#like really wonky proportions or bodies without faces etc
Explore tagged Tumblr posts
Visit Tumblr Blog
Explore Tumblr blogs with no restrictions, modern design and the best experience.
Last Seen Tumblr Blogs


Fun Fact
28.6 is the average number of monthly visits per US mobile user.
Text
Okay I thought I was tripping but I counted and there's about 92 requests in the hoard so this is y'all's semi consistent reminder that I love you so much and I'm excited about literally all the requests and I will do my best to fulfill them at a reasonable balance of speed and quality <3
due to the number of them I will likely be choosing with preference towards the oldest, my personal favorites, and random selected ones!
Thank you for being so patient and understanding! 🫶✨
#i also try to make sure to sprinkle in andy and joe every now and then#even tho yall kno im obsessed with Patrick#and i try to sprinkle in personal requests here and there bc i know that those r very vulnerable and special#but yeaj i just wanted to put into context why i havent been able to respond to these as quickly as id like#i want to keep them lighthearted doodles for the most part but i dont want them to lack quality#like really wonky proportions or bodies without faces etc#and some really warrant a few sketches per request#should i set up a patreon? idk if theres enough of us that like a dollar a month could add up to something#but also an idea ive had is i could do a couple dollars for a vote and we could do a full painting once a month!#trying to keep this fun and accessible but still figure out how to do it without life stuff interrupting#never putting the art behind a paywall but also if i had more time to give to these ahh#imagine daily livestreams of full illustrations for requests!! the dream#okay ive typed enough#not art#general psa#request
16 notes
·
View notes
Text
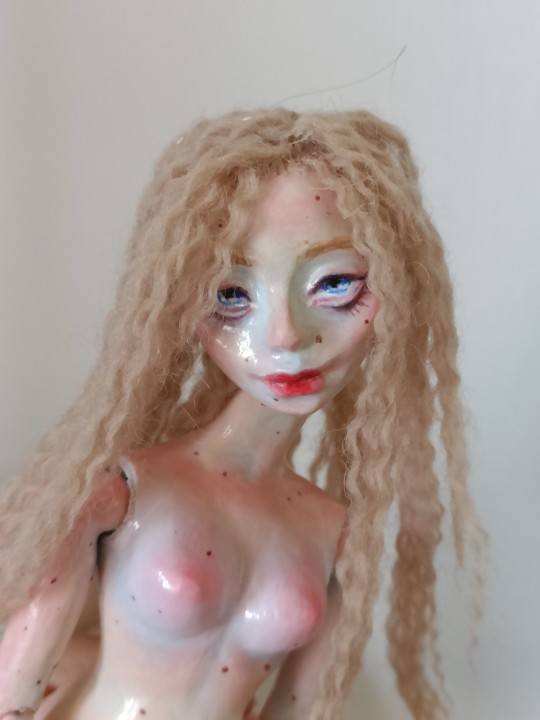
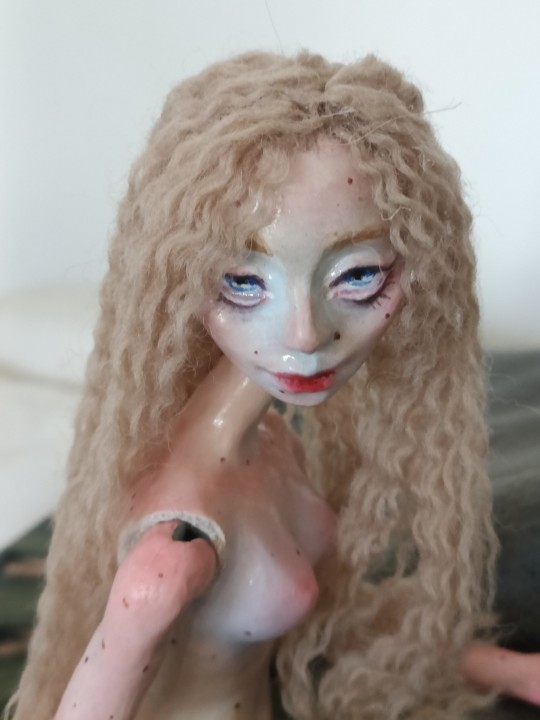
I made a doll
After making historical doll clothing, I got this idea that what if I made a doll myself. I was coveting a doll I could sew clothes for and then pose them for the clothing, but I don't really like that much of any of the design of commercial posable dolls and I'm broke so I can't in good conscience buy an artisan ball jointed doll (and I anyway don't like how thin most of them are). So I did the reasonable thing - I bought very cheep air dry clay (I do have "normal" clay but I don't have access to ceramic oven and it takes much longer to dry it and burn it etc, and I was literally just trying this out) and just started making it myself. I didn't plan ahead because it felt very overwhelming since I have never customized dolls beyond making them clothing and repainting their faces nor have I ever even owned a ball jointed doll. I went with the learning through mistakes rather than theory. The route I most often take. So just bear with me (real doll makers I'm sorry for the cringe).
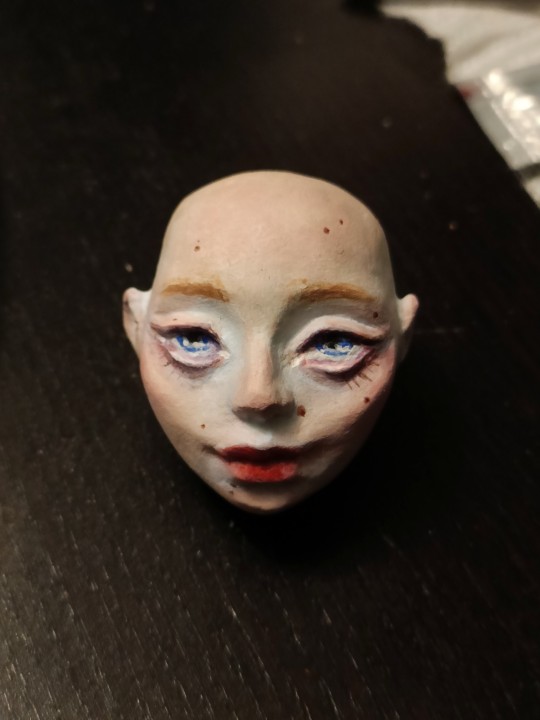
Without further ado, here's Aune, my vampire OC (from my wip Be All My Sins).
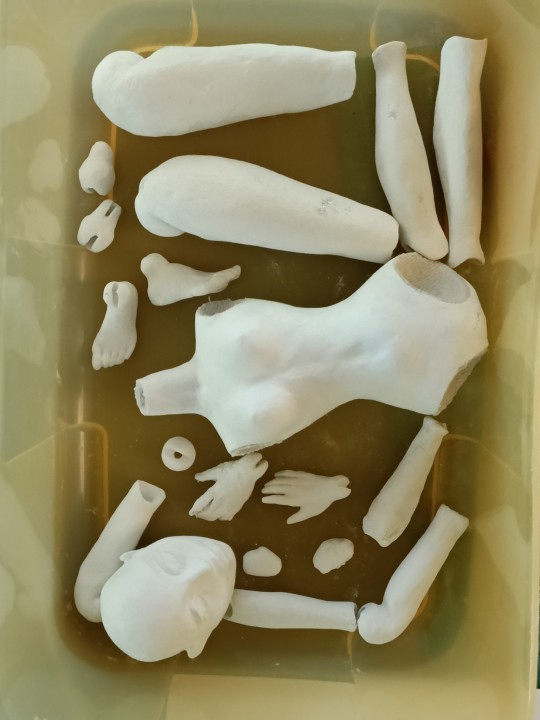
I wanted to make her look like a porcelain doll, because I love their aesthetics. I did lean towards more realism than they were historically like though. Here's all her body parts before painting. (Some of the pieces in the picture are not actually fully smoothed and sanded, but it is right before I started painting the face. My brain just works in a way, where I jump around between the working stages. I'm very much incapable of doing anything organized and straight forwardly.) I have been wanting to do clay sculpting for a long time (it was so fun, when I was a kid in afternoon art school), and this was small scale enough to be manageable so it was so much fun. I will be definitely making more.
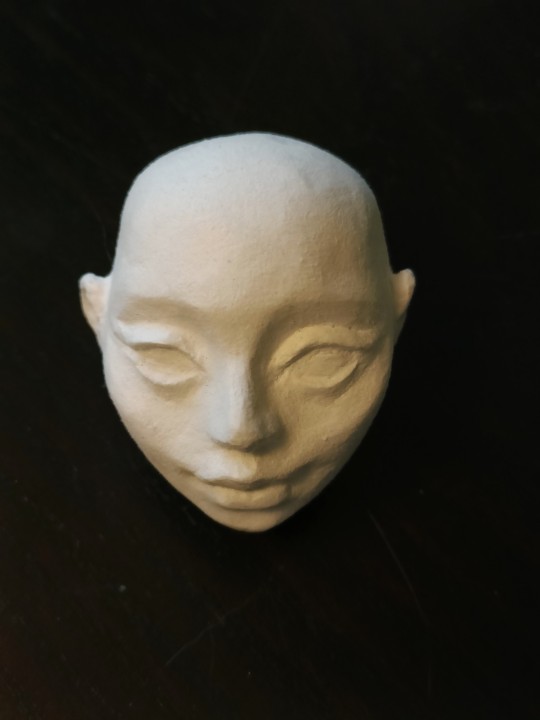
Here's her face before and after the paint. I'm quite happy on how the face sculpt turned out, but the paint job was a bit messy. As I mentioned I have done couple of repaints of doll faces, but I'm still not very good at it. When I paint traditionally I'm not often this detail oriented and painting on a 3D surface feels very different.
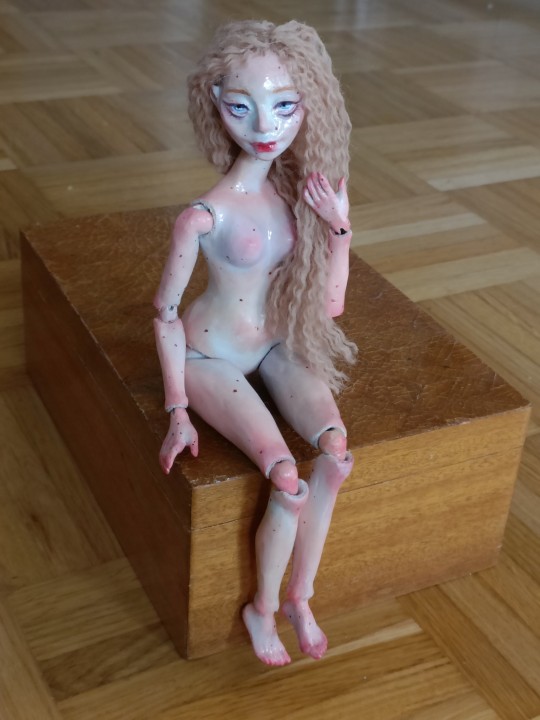
Here she is before and after getting her hair. I made her hair from wool yarn just by unraveling the yarn. It's the first time I made doll hair and I didn't want to buy proper doll hair for this or learn to curl it (I don't even have any curling irons or literally any other hair shaping appliances than a hair dryer, which I don't even use for my hair but for painting with water colors). It doesn't fall down nicely, but it has roughly the look I was going for.
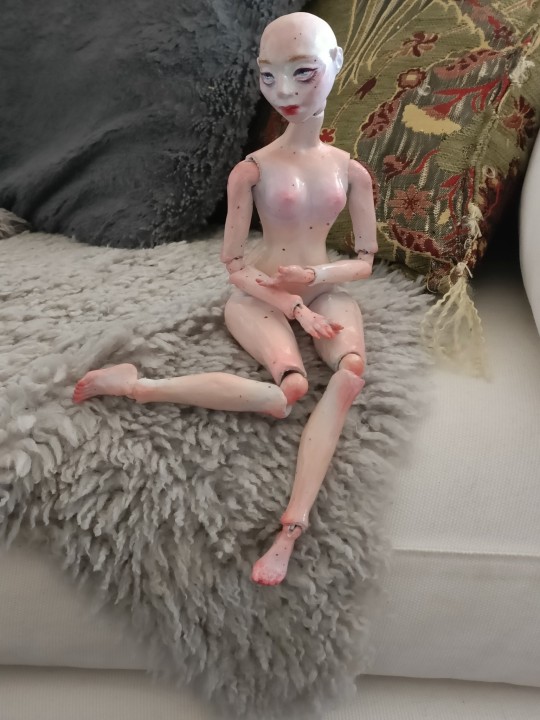
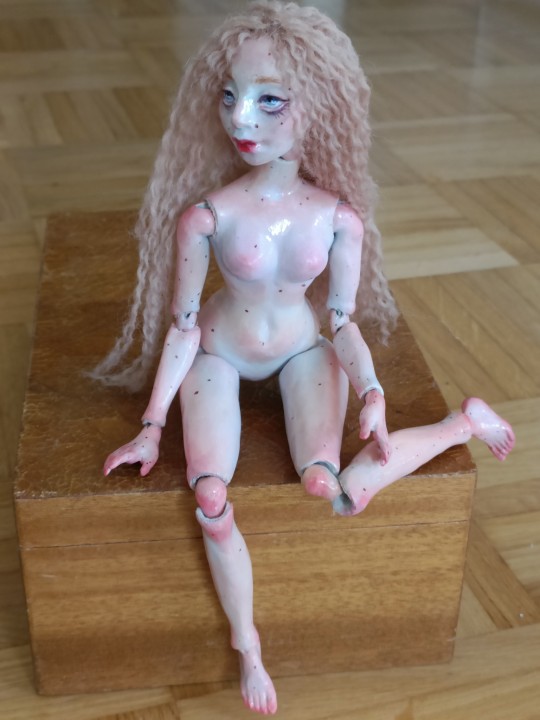
Because I didn't plan at all ahead, the proportions are a little wonky (her arms especially are too thin imo and he legs could have a little more shape too) and the joints are not great. Worst of the joints was the hips, which attach to the torso in a weird way. The biggest issue that I had was not taking into account how much the varnish would add to the size. It's not a visible amount, but enough to make fit of the joints very poor and basically making it very hard for her to stand. (Her index fingers already broke of when she fell from my desk after I had made her stand there djfkjds. I was able to glue them back.)
Here's couple more picture of her!
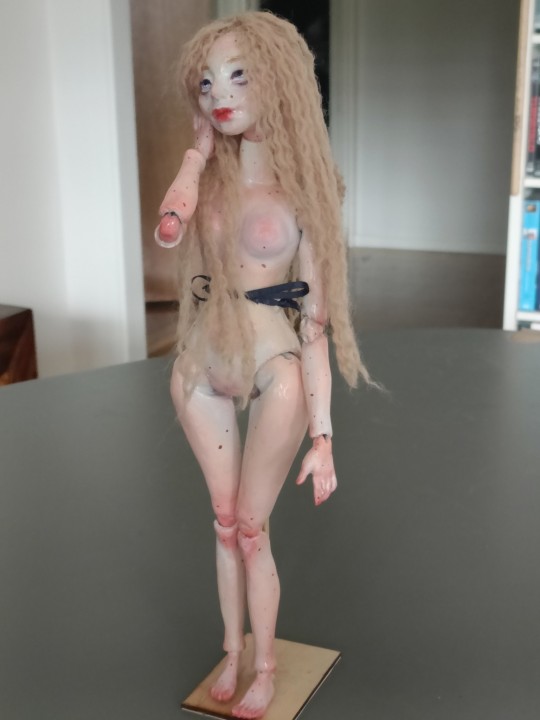
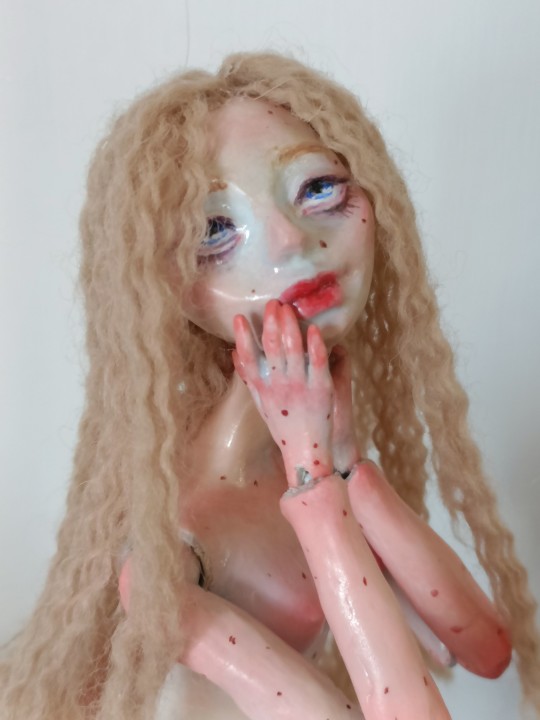
It's not perfect at all, but I do still love her if only because it's such a cool feeling to be able to just have a lump of clay and two weeks later have a posable doll. It somehow feels magical to be just able to make a real physical thing from scratch.
#my art#crafts#ooak doll#dollblr#original character#my ocs#custom doll#ball jointed doll#bjd#bjddoll#clay sculpting#bams#doll nudity#art doll
208 notes
·
View notes
Note
Do you have any advice for understanding hands better? I’ve been practicing them for years but feel like compared to other aspects of anatomy it’s the one thing I haven’t seen much improvement in. I draw both from life and images and draw nearly everyday but nothing I’m doing seems to help
I personally get by mostly from remembering poses that I’ve already practiced a ton, like I figure out how to draw it once and am able to file that away in my brain and use it again later, and tweak bits of the pose or the level of simplification to suit what I’m drawing.
I’ve paid special attention to drawing hands for like.... most of my life so I have a LOT of poses I’m easy comfy with now, but when I need to figure out something complicated or new, I can usually work it out by breaking a hand down into shapes, remembering a few key points/”rules” from what I’ve learned about hands in order to help me break it down in a way that makes sense. And if that’s not enough either, then I take photo refs.
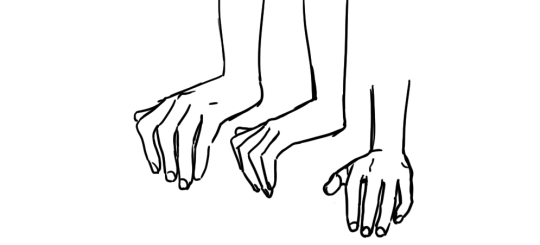
^^^ here is a pose I use a ton. I have a quick way of drawing it from various angles. the first time I had to draw a pose like this, I had to think and figure it out, but in drawing it a bunch of times and having to use various angles like this, I’ve eventually come up with a quick, reliable way to draw it from a few of the most common angles that fits the style I like to draw in. I’m blessed with a good memory for observations, so when I see a beautifully posed hand, I can usually really quickly analyze what I like about that pose and why, and that helps me absorb it so I can recreate my saved impression later. But I know not everyone thinks the same way. it might benefit you to quickly scribble down a study in a sketchbook when you see a pose you find beautiful and want to learn from for later.
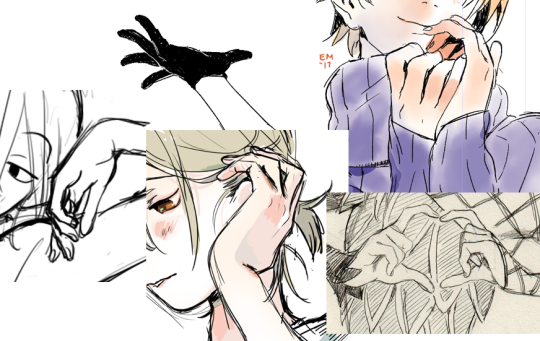
^^^ here are some poses I had to stop and spend time figuring out, calling up the “rules” for how hands are built to kind of logic-out how they should look from angles I’m less familiar with. results can be mixed, but... if I end up with something expressive that fits the style of the rest of the drawing, I’m usually really forgiving of fudged anatomy or slightly wonky proportions. as long as the thumb is on the right side and there aren’t too many fingers, that’s a great start lol.
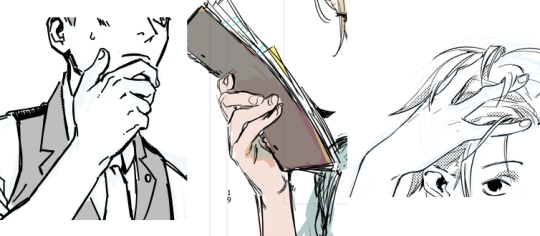
^^^ and here are ones I had to take reference-selfies for. I try to use this as a last resort because 1) it’s a lot of trouble 2) interrupts my drawing and 3) if I’m not careful I stick too close to the reference, and the drawing ends up with the hand looking referenced and the rest of the pose not, which is jarring to me. not to mention I have tiny manlet wrists that without fail, look horrific and emaciated in photos, and the lens distortion makes my fingers look scary too... ugh, photo reference has definite flaws. I actually don’t like the look of drawings for which I can Really Tell the artist drew from photo reference, because most often that means they’re taking the ref too much at face value and incorporating ugly lens distortions into their drawing. so I have to think extra hard not only about interpreting the ref, but also might have to make multiple passes just to get the hand to look normal, AND match the style of the rest of the drawing.
Anyway, here are some of the ““rules””” I mentioned earlier that I fall back on to help me figure out more complicated poses:
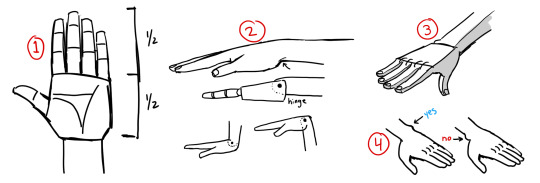
1. probably seen this before, but basic proportions. the palm is usually half the total height of the hand. obviously you can mess with this purposefully.
2. I think of joints as like, ball joints or hinges. I find that easier than trying to remember bones & muscles. here’s a drawing of the wrist as a hinge. note that when you’re thinking of it this way, it’s a shortcut, but a shortcut is only good if you use it with precision. notice the pin for the wrist hinge is not just halfway, it’s closer to the top of the hand. being precise about that is what allows this shortcut to work. the heel of the palm juts out, while the top of the hand transitions into the wrist quite smoothly.
3. simplified planes. planes are important yo. in super simple terms: top is flat, bottom is round. this works on the fingers too, actually. the tops are bony and tendony, and the bottom is where the fat is, so it’s rounder and soft
thinking of the hand as abstract shapes REALLY helps simplify the task of drawing hands, and is just as helpful even if you are drawing from reference. I can say “the palm is a box” and obviously the palm is not really as simple as a box, but if I think of the palm, wrist, and each finger joint as various shapes of box, then all of a sudden, psychologically, my task is SO much easier. I’m not drawing a Hand, which is hard, I’m drawing boxes, which is easy.
4. that prominent knob some people have on their wrist? that’s on the pinky side.
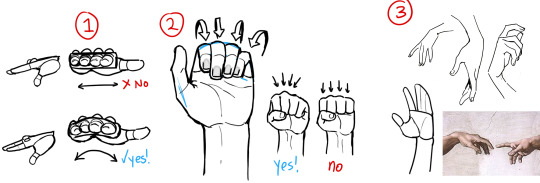
1. the knuckles aren’t really a flat row on top. the hand is like a cup right, so your palm can hold water and things. so we can think of the hand as a box to make figuring out the pose easier, but when it comes down to it, you’ll want to make it more of a curve. this curve is why you can see multiple fingers in a side view
2. when curled up, the fingers nestle together. the fingernails also turn slightly toward the center. even if I’m simplifying the hands significantly, I usually still draw the fingernails because they are SO useful for communicating the pose of the hand effectively.
3. lots of people suggest to think of the hand as a mitten, grouping the pinky/ring/middle fingers and singling out the index finger. this works great, the index finger is more independent from the other three. on the flip side, those three are really stuck together; if you’re drawing the pinky curled up all the way, then you better not draw the ring finger sticking straight up, cause that would HURT. anyway, singling out the index finger leads to more interesting poses in my experience.
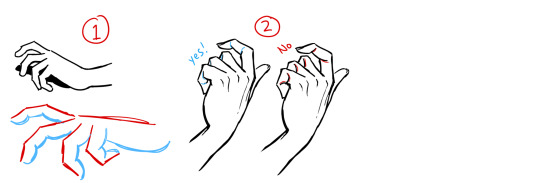
1. this is another illustration of top = flat and bottom = curved. this is a really easy way to organize your line quality. straight lines and sharper angles where there is bone, and soft gentle lines where there is muscle and fat. your drawing as a whole will read very clearly if you find some guidelines like that to stick to, as it means all your lines are intentional and thoughtful.
2. this one’s about overlaps. when forms overlap, it makes a crease, and when you draw that crease you’re communicating which form is in front of the other. in the second drawing I reversed all the creases, and it looks.... messed up. think about how pieces connect.
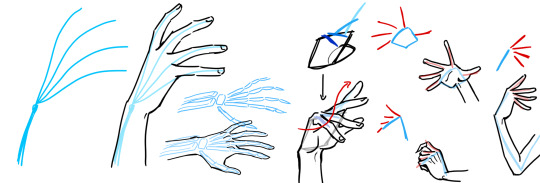
so when you’re trying to make up a pose without using specific reference, I think it’s good to think about the.... flow of energy through the pose. honestly, I know it’s really abstract, but if I have an ability to make interesting poses that communicate weight and movement, the things that make people say your character feels ALIVE, like they really EXIST in a space... it’s because I started to think of poses this way. imagining streams of energy bouncing through the body, flowing down the limbs and out through the fingers. this is why hands are so important to me, cause they’re where the kinetic energy of the pose ultimately ends up. I talk about it when drawing the torso and arms and legs, but an interesting drawing has a bounce back and forth between opposites: for every curve, an opposing straight line, alternating back and forth down the entire body. if you’re sensitive to the energy of the pose, then even very simple poses will be interesting to look at.
anyway, with regards to hands, I imagine the energy getting sort of cinched in as it passes through the wrist, and then emanating out through the fingertips. I hope my drawing at least SORT of communicates this imagery. it makes sense because that’s BASically how the bones in the hand are anyway. and then the right side of the image above is just demonstrating some highly simplified gestures. see how the fingers fan out and curl in, rarely parallel to eachother. when you’re figuring out the pose, using a line to stand in for the row of knuckles is super valuable.
aaand finally, here’s two hands where I intentionally neglected correct anatomy and proportion because I felt it worked better for the style of the whole drawing. Left side: since this is a really simple and cartoonish style, I was thinking back to kids’ and shoujo manga I have read where the style was very solid and distinctive, but definitely NOT overly concerned with correct anatomy, or even really drawing hands, uh, “well” at all. to me, that sort of approach has a Look that I like to invoke sometimes, since for years I felt like I learned a bunch of anatomy and proportion and drawing from life actually in detriment to the liveliness and appealness of my drawings. this hand is mushy and makes very little sense, but it turned out as intended. Right side: sometimes I like to pretend fingers only have 2 bones in them, cause i am a Queen and i do what i want
and there you go. I hope that helped, like, at all? Look at real hands and photos of hands and hands in motion, but also look at drawn hands as well. find what you like, and work towards expressing that yourself. and remember the hand is part of the whole drawing. not only in the art style like I’d been talking about, but because the angle and placement of the hand is reflected in the angles of the arm, which in turn reflects on the angles of the shoulder, which affects the whole torso, etc etc etc. and the techniques you can use to understand and draw the rest of the body, works on hands too. as you improve everything else, your hands will improve as well.
DISCLAIMER: I whipped up these diagrams quickly, they’re not meant to be good drawings or accurate refs, just diagrams to illustrate my thought process lol
3K notes
·
View notes
Note
How long did I take you to get as good as you are? And do you have any tips?? I could really use some to improve on anatomy, expressions detail etc
OH NOOO I’m too flattered!! ; ; thank you so much!! ❤
I always see people saying they started drawing since they could hold up a pencil and while I did doodles for a lot of my childhood I don’t think I started taking drawing seriously ‘til 6 years ago (I was 16!) and I don’t think I’m to a stage where I’m pleased yet, but there’s always time to learn more as long as you want to improve! here’s some stuff that have worked for me and I try to keep in this mindset!!- don’t worry about trying to have “a style”, stuff like that comes normally the more you practice. Look at all the art you like and don’t be afraid to adopt traits from your favourite artists cuz eventually it’ll all blend into your own thing and you won’t even notice, what matters is that you keep on trying new things, that’s how you’ll discover what suits you best!- A good tip for anatomy is always drawing from life, but if you have too much trouble with proportions what I do is open a photograph on your nearest drawing program and break down the proportions in a different layer. That way it’s like you translate it to a sketch and get more used to seeing it as such; you’ll know vital parts of the process so it won’t feel like there’s such a big divide between the model in front of you and the wonky line you just did. PLUS it helps ya break down how body parts are connected!- EXPRESSIONS nobody does expressions in the same way. I pay attention to friends and family and try to appreciate little details they do: something as simple as a smile can vary a lot. Some hide the lips and are wider, some are small smiles that show more in the eyes, it’s all so fascinating when you try and think of “how i’d do a cartoon of this person”!! what to emphasize and all, the more you think of it and analyse, the more expressions become more a matter of “how does this person express this and that”- talking about expressions, having projects and acting on them does wonders!! When I doodle idly sometimes I’ll find myself avoiding certain angles or poses because “it’s been a while since I drew x, I wanna show his face dammit”. I wanna make it showy and good! But when you have a project that requires specific situations in mind, say, like an animatic or a comic, you’ll find yourself letting go of that fear because you’ll have many prompts and situations to show different aspects of this character. You wont be afraid of showin this character from the back cuz you’ll already draw him from the front a lot, so it’ll naturally push you to adapt to a prompt and stick to it because you’ll be drawing a lot. It’s not only the best way I know of letting go of that “this pic needs to be good” feeling that doesn’t let you try weird or new stuff, but also it pushes you to practice without even noticing! It’s motivating!
- and super importantly, when you feel like you’re not good enough or you’re going thru art block, try new things to keep your mind always exercising that aesthetic muscle! I do a redraw of an old thing every once in a while, or draw a character I like that I haven’t done before, or even do studies from life since they don’t require you to come up with a creative idea but keep you learning. Art block goes away if you don’t let it get comfy in your mind, you gotta fight it with productivity even if you’re not fully pleased. Art challenges are there to help ya out!
That’s all I can think for now but let me know if I can be more specific on anything, I hope these help you out as much as they’ve helped me!
6 notes
·
View notes
Note
Why have I not discovered you sooner, seriously I love the art style with the bionicles? Any suggestions for a fan trying to draw bionicle?
It’s been a while since I’ve poked my head into the fandom like I used to, but I do have a few art tips that worked well for me. This is somewhat of a rough/vague/basic guide starting from when I was the greenest beginner.
Under a read more because it’s kinda long.
Practice drawing straight lines, curves, circles, and ovals because there will be A LOT of that going on. For circles and ovals, try to make the ends touch (as you can see it takes a few tries lmao but it’s a good warm-up). I usually do these whenever I don’t have time to draw, like on a scrap piece of paper.
Use one single stroke rather than a bunch of small ones. Not only is it a good habit to make your lines nice and clean, but it also makes the drawing process so much faster in the long run.

Use geometrical shapes like cylinders and cubes to block in poses and armor and to visualize proportions and how they interact in space. It’s also a good opportunity to practice some perspective and foreshortening. (this is where those art mannequins come in handy if you want, I personally never used them but I probably should’ve lmao). There’s quite a lot of art books and online tutorials out there that go into much further detail, so I highly recommend reading through some.

USE REFERENCE (such as the actual sets, screenshots, concept art, etc.) This one here is very important for drawing anything in general.
Breaking things down into shapes makes it so much easier to mentally visualize how things would look at a different angle. You can even trace the pics for study purposes to see how things fit together and to get the shapes and proportions down.

Search up pictures and videos of how different mechanisms work, like different types of joints and pistons and hinges (there’s quite a lot of ball joints in particular).
Although what I like the most about the movie designs is that quite a few areas are filled with organics like muscle sinews for the Toa Metru or that brain-looking stuff for the Toa Nuva.

I kinda jumped into drawing biomechs straight away instead of learning to get a grasp on human anatomy first (which in hindsight was a mistake because even now I struggle with humans lmao) but it would be incredibly useful to learn because there’s quite a lot of connections between the structures of biomechs and the human body. Bonkles are just a lot more skewed, and this goes for more than just the movie version I’m using as an example. Posing will also be a lot more easier to deal with.

When it comes to posing, nothing’s better than stick figures amirite guys

Personally I’ve found Kanohi and non-Kanohi faces to be especially difficult to draw because it’s so easy to make them look wonky. Tracing references to study them helps a lot to get the proportions down, and then you can break them down into blocks. Try out different angles, the shapes change drastically sometimes.


But once you’ve gotten Kanohi/faces down, the fun part comes where you can squash and stretch them! Play around a bit and learn how the facial features interact with each other. Making silly expressions in a mirror helps a lot (even without the mirror you’ll probably end up involuntarily making faces anyway). Watching any of the Bionicle movies will give you plenty of examples since you get to see animated expression changes. I use the Piraka as an example here because of their giant teeth. \o/
If squash-and-stretch masks aren’t your thing, then body language and eye expressions will help compensate.


All this stuff may sound daunting, but all it really takes is practice! The earlier you start, the better you will be later, and you’ll save a lot of time and work in the long run. Take inspiration from the works of other Bionicle fanartists and note what you particularly like, such as lineart or color choice or armor design.
Of course, the most important thing is to have fun!

Being able to draw whatever you want is the most empowering thing.
66 notes
·
View notes
Note
Hi PM! So I'm starting out in digital art and I was wondering, do you think in term of learning, it's good to trace your reference picture or does it just makes you 'lazy'? I don't know if I make sense but I feel like tracing is the easy way and won't help, and at the same time feel like it can really help with understanding proportions and whatnot
(cont) PS: for the tracing question, I’ve seen a lot of artist getting yelled at for even just expressing their opinion on the subject so if it’s not something you feel comfortable talking about I 100% understand it
Hi anon ^^
Ok, good question! A bit more complicated than it seems.
at the same time feel like it can really help with understanding proportions and whatnot
Not really. Ok I’m gonna try to explain you in my amazing Frenglish why it’s not a good method, I hope it’s gonna be clear. :)
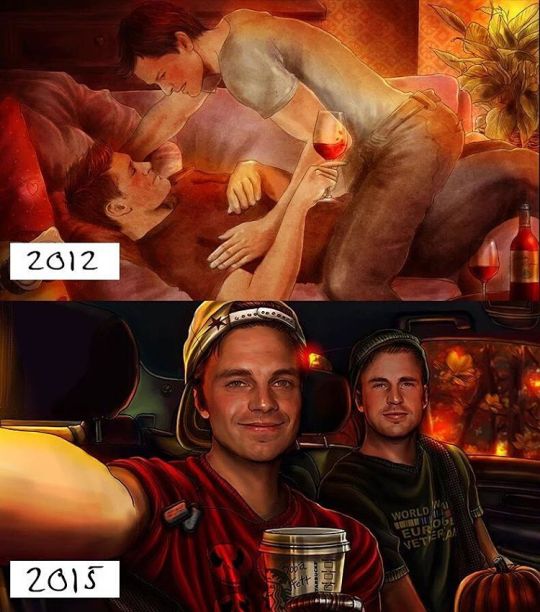
From what you are saying, tracing could be useful to understand proportions. If we start on that principle, it would mean that all the photos you are gonna trace have models with proper anatomical proportions. I mean, how could it be otherwise? It’s a picture! It’s reality! Well….Nope! It’s not exactly reality. It’s the reality of the camera. The camera itself and even the way the pic was taken can deform the human body and the proportions on the photo you choose to trace can be completely fucked up. Two examples: selfies and sport pictures.
- Selfies: When you take a selfie in front of a mirror, the hand holding the phone is closer to the lens of the camera. That’s why it looks so big. If you render the same proportions on a pic by just tracing without any knowledge of anatomy or proportions, it’s gonna look ridiculous and just give you a “small body - big hand” effect. Someone with a better understanding of anatomy would either draw the hand smaller to correct the deformation of the camera either foreshorten the arm to really enhance the play on perspective and give a cool effect like for instance in this artwork.
- Sport pics: When you take a pic of, let’s say, a baseball player. The body is so much in tension, in action, in MOTION that when you look at the pic, the body seems completely deformed. Does the body look this way in reality? No, it’s the reality of the camera lens. Don’t get me wrong, these pics are cool but if you trace them, for instance, to work on your baseball AU, the characters are gonna look ridiculous. Not stylized. Not cool. Ridiculous. Short legs, arms curved like a bow. They are not reality, they are just an impression of reality.
That’s why tracing will lead you nowhere in terms of learning. If you don’t know anything about anatomy, drawing techniques, proportions, you won’t be able to identify anatomy mistake (or perspective mistake, or whatever mistake). Tracing is mindless,you think you know what you are tracing but in fact, you aren’t.
It’s far better if you learn from the start, whether you are into CG art or not, to abstract your subject. Try to think it as bigger elements, and then study the proportions and composition of the elements. Basic elements used to draw a body, a car, a chair, whatever, include standard shapes such as boxes, cones, cylinders and spheres. Once you grasp the subject using such primitives, it isn’t that hard anymore to draw whatever you want and then add detail. A good part of learning to draw is learning to observe so you can translate what you see into two dimensional line or forms. (I did a post about deconstructing the body into shapes HERE). Tracing does absolutely nothing to help with that.Don’t get me wrong, when I was about 10-11 and that I started to learn to draw, I started to trace (with tracing paper, because…there was no CG art at the time xD) but it achieved nothing. I thought it did but I when I look at the drawings I did at the time, they are all deformed and the faces are wonky (the funniest thing is when you look at the original pics, you don’t see these deformations). In other words, Linda Evangelista, I’m sorry for all the wonky traced drawings I did of your face, where your jaw was super big and your eyes not on the same level. xD
When an artist use a reference picture they don’t just copy it exactly. They correct the deformation of the camera lens to render proper body proportion. Reference pictures are a GREAT help, I use them all the time and I will never shut up about how useful they are because it’s stupid to try to recreate a whole face, car, landscape, guitar, etc.. from memory but if you know about technique, you will correct the mistakes by yourself. The pic will just give you basic depth, proportion and curve perception to build your final work.
Also, tracing won’t train your hand to be better at doing a clean line work either for instance.It’s better to draw again and again and again to train your hand. Your line work will be wonky at first, then cleaner and cleaner.
However, there’s nothing wrong with tracing your own stuff if you are working on a complex picture. Some artists sketch all their characters on a different piece of paper and use a light table to put them all in the same pic (a lot of mangaka do this). They also use this method to do a clean line work (they sketch the character, use a light table and trace their sketch with ink). As you were asking about CG art, it’s different, of course. But there’s nothing wrong with doing all your characters on different layers, even different documents and then grouping them all in one pics. Whatever works. I do it when it’s a complex pic like this one.
I’ve seen a lot of artist getting yelled at for even just expressing their opinion on the subject so if it’s not something you feel comfortable talking about I 100% understand it
As if I cared.

If it were a good method, I would tell you, it’s a good method. I will never shut up about the virtues of referencing in spite of what a part of Tumblr thinks, so, you know, as I said, I don’t care.
Voilà! I hope it helped :) Good luck on learning about CG art. You’ll get there like I got there. Slowly but surely.
84 notes
·
View notes