#like it's like. it's not plastic it's like a rubber kind of? and it's flat and encases the hoodie string completely
Explore tagged Tumblr posts
Visit Tumblr Blog
Explore Tumblr blogs with no restrictions, modern design and the best experience.
Last Seen Tumblr Blogs


Fun Fact
Tumblr.com is the 103rd most visited website in the world.
Text
wearing my new dca hoodie is such a Comfort Thing now
#THE MATERIAL IS SO. IT'S SO GOOD. it's not a normal hoodie material it's like. a very soft t-shirt-like material.#and the sleeves are just a Bit too long. so they're good for Flapping <3#this hoodie is like a hug to me i love it sm#PLUS my bois are So Fucking Cute this is my favourite canon image of them Ever GAH#MOON HUGGING THE GLAM F.REDDY PLUSH?? AUGH. I LOVE.#AND SUNNY LOOKS SO HAPPY AND EXCITED. BABY BOI BABY.#obsessed with this hoodie i Love it#OH ALSO. the aglets on the end of the hoodie strings are Flat and the end of the string doesn't come through it#so it's rlly rlly good to chew on#like it's like. it's not plastic it's like a rubber kind of? and it's flat and encases the hoodie string completely#it's Top Tier#talking.txt
5 notes
·
View notes
Text

ok here’s my hammer tier list. my thoughts under the read more
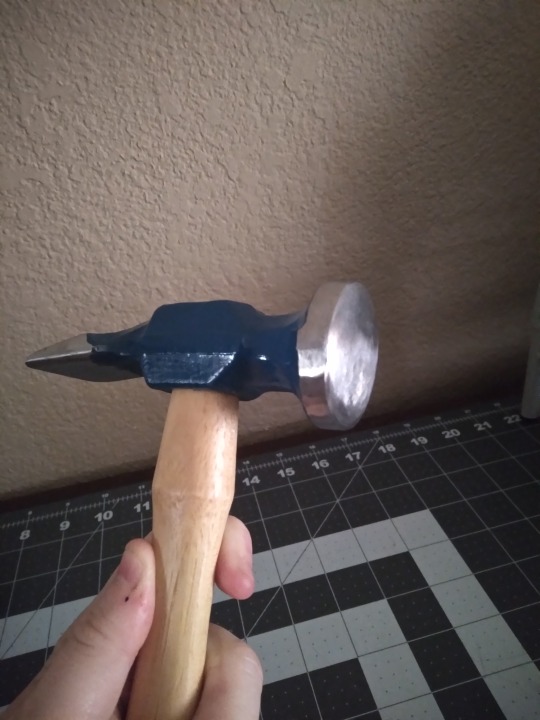
ball peen: s tier. funny name. made me laugh really hard. what more do you need. ok actual description its used for metal working in the peening (hehe) process (surface hardening through impact). its got a rounded head on one side and the other side has a flat side thats sometimes used for chiseling or striking punches (making a hole through a hard thing). but it is in s tier bc of the name.
___ hammer or as i dub it maraca hammer: s tier. maraca hammer. not all of them have the loose steel shot inside tho some are just made of a different material (rubber or durable plastic) that helps like. dampen the force of a hit so it doesn’t bounce back as much. its good for working in tight spaces + preventing accidental damage. would be a tier but the fact theres the maraca version with the beads inside (that serve the purpose of like spreading out the energy of the force of the hit) that you can hear gives it s tier to me
framing hammer: b tier. fine hammer. a type of claw hammer its got like a little bumpy grid on the head that helps it keep a grip while its hitting but it also leaves a mark on the wood it hits. the woods is usually a part of the frame of the structure (as said in the name)and theres a different type (a finishing hammer) to make wood that goes on the outside look nicer so it doesn’t really matter. gets the job done solid hammer
claw hammer: a tier. like the most basic hammer. the kind of hammer you think of when you think of a hammer (unless you think of a mallet). used for wood working mostly bc its not suited for metal stuff, but its got other general uses. a classic. where would we be without you claw hammer
( ‼️ animal death mention ‼️) cow hammer: e tier. can’t find a picture. used for animal slaughter. fallen out of use bc of animal welfare objections. probably kind of cruel way to do that. also just seems really inefficient. makes me sad.
drilling hammer/lump hammer: b tier. a smaller kind of sledgehammer. more light weight with a smaller handle. useful in light demolition work or like cutting stuff with a chisel. also used in scouts stuff!! for like tent stakes and similar things.
gavel: s tier. i think we all know what a gavel is. judges use in it court its the little hammer they bang for stuff. s tier bc i’d have a lot of fun with it if i had it
geologist’s hammer: a tier. its in the name, geologists used it to open up specimens and shit.finds pretty rocks so thats why its a tier. wooo
warrington hammer: s tier. its a kind of cross peen hammer. giggling. fun name unlike the ball peen tho its used for wood working. thin side sets a nail flat side drives it in. can be used for other stuff like fixing a bent nail. more precise than a claw hammer
mallet: b tier. rubber roundish head. bunch of different kinds. didn’t feel like reading every single time since i’m already doing that for the hammers so. b tier
rock climbing hammer: a tier. the wiki page for this is very barren but not much explanation needed i think. its for rock climbing, specifically aid climbing, for putting in and taking out pitons and the like. useful for Not Falling and Dying. but also it looks like a plague doctor mask and its silly and i like it
sledgehammer: a tier. BIG HAMMER!!! also distributes force over a bigger area. but BIG HAMMER!!!!
soft faced hammer: b tier. like dead hammer its for not causing as much damage as normal hammers. but no maraca. no fun colors like it either.
spiking hammer/spiking maul: b tier. used for striking nails into the railroads. cool! idk i dont have a lot of feelings on it and i dont know how much more i can fit in a tier lmao
splitting maul: c tier. more of an ax than a hammer tbh. used for splitting wood.
stone mason’s hammer: b tier. one side has a little thinish part part and the other part is flat. can be used to cut bricks and stones and stuff and chisel without an actual chisel. also used by geologists!
upholstery hammer: b tier. its in the name. used for upholstery. often has a magnetic side for picking up tacks. has kinda been replaced by the staple gun though
hammer drill: c tier. more of a drill but behaves enough like a hammer for me to allow it i guess. im less interested in the mechanically powered ones ngl
jackhammer: a tier. very cool actually. combines a hammer and a chisel. not fun if its nearby bc its loud and annoying but cool if i’m just passing by. used to break up rock and concret and shit. brrrrrrrrrrrr
steam hammer: a tier. now that is a solid mechanical hammer i think. actually hammery. used for shaping forgings and driving piles.
trip hammer: S TIER. I LIED THIS ONE IS A GOOD MECHANICAL HAMMER. variety of uses like for processing grain in agriculture crushing metal ores in mining and in forges formaking iron into workable iron bars. old as fuck too. unfortunately replaced by the power hammer.
power hammer: a tier. extremely similar to the steam hammer. replaced the trip hammer which makes me sad. but its still cool
nail gun: d tier. that is a gun.
staple gun: d tier. that is also a gun.
44 notes
·
View notes
Text
I had a message the other day asking (among other things) what kind of tools and equipment I use in making books, and as it's something I like to go into detail on, I realized I couldn't fit everything I had to say in a message so it's getting its own post. With photos!
Disclaimer that I'm not a professional bookbinder, I'm entirely self-taught and probably have habits and practices that would drive a pro nuts. I'm no authority, but these are the things that have worked for me, and maybe you can adapt them to work for you too.
This post will not cover: storage options, materials like board and glue, or equipment specific to one narrower aspect of the hobby like embossing or gilding. It is also not a tutorial on how to make a book, though I am covering things in more-or-less the order I use them in during the book-making process.
This post will cover: What I've found useful, what I've regretted buying, and some things you can co-opt from other, more common hobbies. A lot of it you may already have in your house. Some of it is for beginners, some is nicer equipment you might want as you get further into making books. They are not separated, it's just a list and some description.
Keep reading below the cut; this is gonna be a very long one and there are a lot of photos of everything.
If you want to make books you will need access to a printer. I'm not going to go into detail on this part and I didn't take a photo of my HP (not the best brand, but that's a long discussion in and of itself). Once you've got your pages printed and it's time to fold it into signatures, it helps to have a folding tool like these:
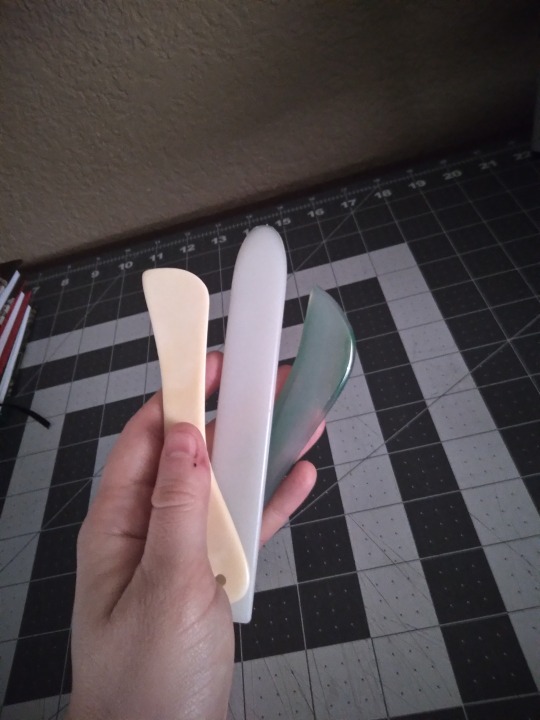
Folding tools can be anything as long as they're smooth and flat. The one on the left here is an actual bone folder from an art supply shop, but the center one is a plastic leatherworking tool that I got at Hobby Lobby, and the one on the right is an agate burnisher that I got from Amazon. None of these cost more than $10, and you can also use the edge of a pen (as long as it has no rubber grip or cap/clip) or the back of a spoon. Or your fingers, but the tools make it faster and the folds are more precise. I once worked a job where I had to fold maps, and all my coworkers were wondering how I did them so much faster and why mine were flatter than everyone else's, and it was because I'd grabbed a sharpie and started using the back end like a bone folder.
Once it's folded, you'll need to poke holes for sewing. I use one of these:
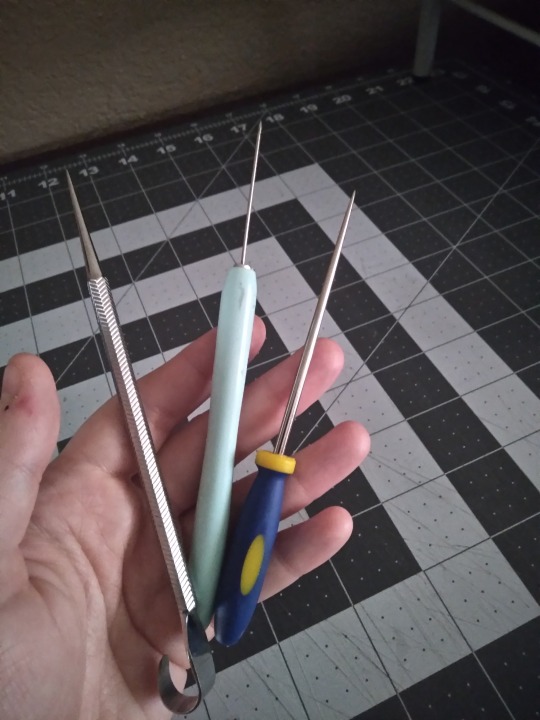
Left is, again, an actual bookbinding awl from an art supply store, while the center one is a paper quilling tool and the right one is a beadwork awl, both of which came from a big chain craft store. The bead one is my favorite; it's a good size and very stable. The quilling thing has too long and thin of a blade and it's wobbly, and I don't like the tapering on the bookbinding awl. It tends to make the holes in the middle page too big, and the outer ones too small. Again, these were cheap, about $10 each, but you can also use a sewing needle stuck in a cork, or a thumbtack or pushpin. If it's pointy and rigid, it'll work.

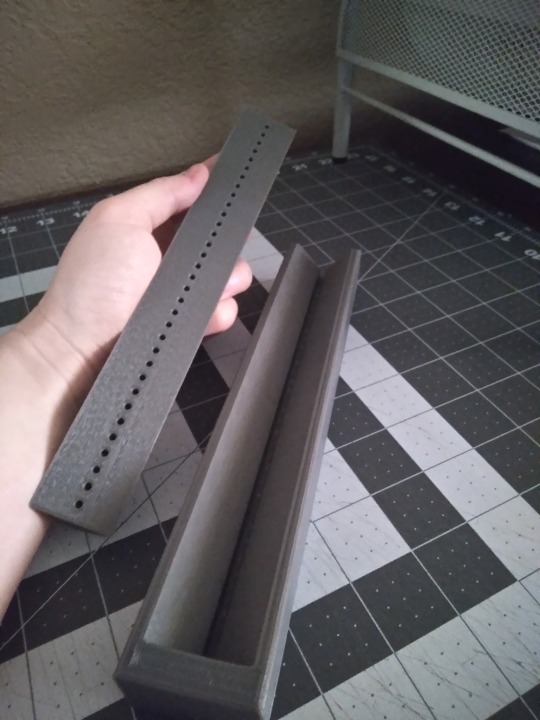
This isn't a requirement by any means, but I've found I like having a punching cradle for the hole-poking step. I got this 3d printed one from a fellow bookbinder, who was designing their own and made this one as a prototype. There are a lot of tutorials on how to make a punching cradle, or you can buy them online from several different vendors. They don's all look like this, and you can make them from wood or cardboard (though those don't usually have guide holes). If you're just starting out or this doesn't appeal, you can just use a paper template like the one on the far right. The cradle helps get the holes lined up and evenly spaced, and I've never liked this step so anything that makes it faster and less fussy is a win. If you use this kind, check that your hole-poking tool fits in the guide holes--the binding awl pictured above doesn't, but the other two do.
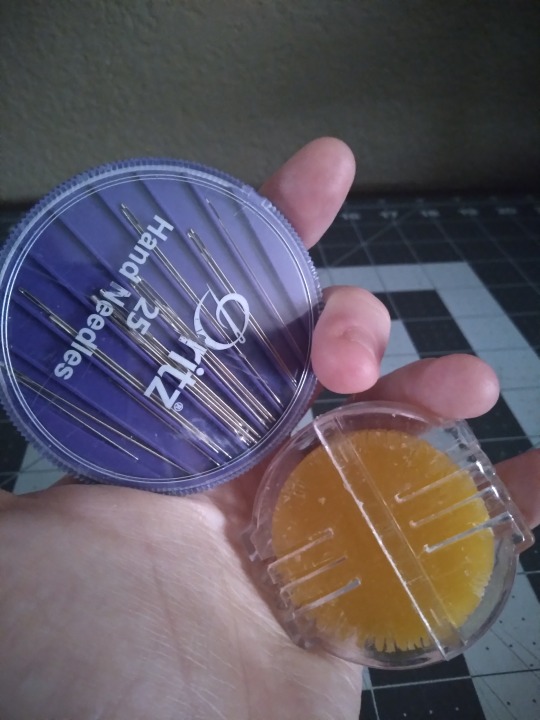
We've made holes, so let's stitch them up. These are just regular sewing needles and beeswax, to make your thread less prone to tangling. You can get both of them in any store that has a sewing department. There are dedicated bookbinding needles, like curved needles, and some binders like them, but I've never gotten the hang of the curved ones and they aren't necessary, especially when you're just starting out. If it fits through the holes you made, it will work.
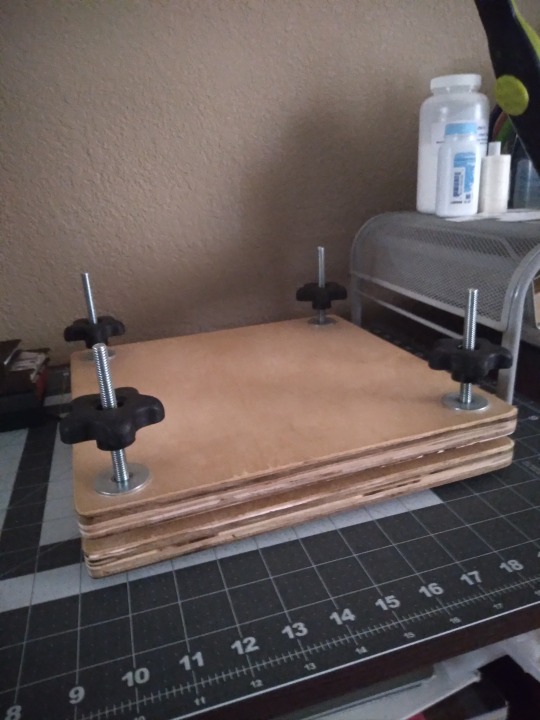

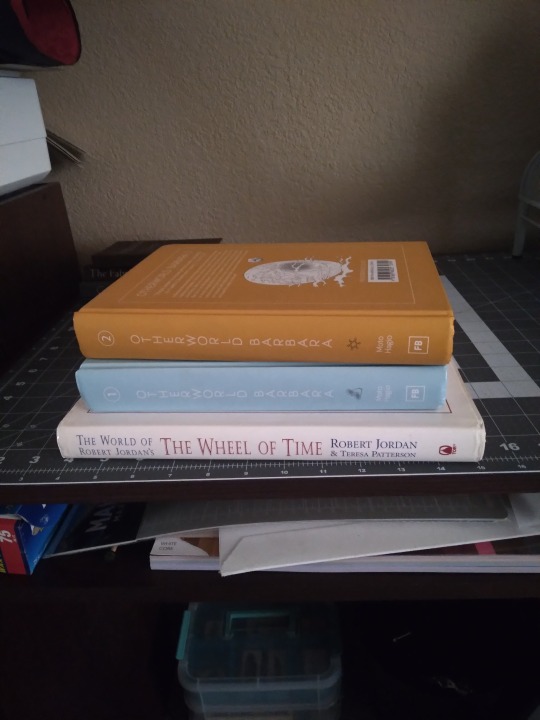
Once it's sewn, you probably want to squish your new text block so it's flat. I've got a laying press that I bought a couple of years ago when I was first getting started. It was marketed as a book and flower press, and it's honestly not the best. I would probably not have bought it if I had known that it wasn't essential to the process, and I mainly use it now when I'm squishing a text block and still want to use my work space, because once it's tight I can move it somewhere else. You can really use almost anything for squishing as long as it's heavy and flat and rigid on one side, like the stack of books in the right-hand photo. Textbooks, encyclopedias, art and photo books, and comic book omnibuses are all great. I've seen people use all kinds of things, like paper-wrapped bricks and doorstops, and there are tutorials out there to make your own press out of cutting boards if you do want one.
If you like your books to have smooth, flat page edges you're going to have to trim them. This is a book plow from Affordable Binding Equipment, and it was the first piece of actual expensive equipment that I bought. Not all plows look like this; I think the design is unique to ABE, but I've never used the traditional kind. In the interest of full disclosure, you can also trim edges with a sharpened chisel, which is much cheaper and can be bought at any hardware store, and some binders love this method. I do not love this method and have had zero regrets about caving and getting the plow. Very easy to use but does require some grip strength. Not pictured: the setup for sharpening the blade, which isn't hard but requires a bit of space and a small sheet of plate glass that you have to source yourself. Even with that, I still prefer it to the chisel. That said, this is not an essential step and you can leave your books with a "sawtooth" or deckled edge. Most of my early books have them, and some people just like them better than the flat ones and never learn to trim them. As another side note, some tutorials will say that you can trim your edges flat with a knife. You can't. Maybe on a pamphlet you can, but if it's more than 10 or 20 pages you just can't. It will look terrible.
If you're going to use a plow, you've got to have the right kind of press. The one I talked about further up the thread is the wrong kind (full disclosure: I did use it with that press turned on its side, before I bought this one. But it's harder, more time-consuming, less comfortable, and less safe. Don't be like me). So here's a photo of my finishing press (also from Affordable Binding Equipment). I bought it so I could make backed books, but I use it for trimming too. The top part here has a narrow tapered section for backing, but if you flip it over it's totally flat, which is what you need for trimming. Not pictured: the stand that it came with for backing, or the c-clamps that I use to attach it to the desk for trimming. Again, though--this isn't a requirement for bookbinding. This is a later stage that's entirely optional. On the subject of backing, though:
You don't need special equipment to round the spines of your books, but you do for backing. Left image is the set of backing boards I got from, once again, Affordable Binding Equipment, and on the right is a backing hammer from Hollander's. Neither of these are essential. Even if you get the boards (which have to be used in a press with a tapered edge, like the one directly above) you can actually use a regular hammer as long as the front part has no scratches or gouges. This one is a backing hammer, the primary difference being that it has a wider, convex head than a regular household hammer, to make the kind of glancing blows needed for backing a little easier. Honestly, I'm still learning how to use these and I'm not very good with them yet. Comes of being self-taught, probably. I don't think youtube is the best vehicle for learning this part, but it's what I have and I'm making do. Not every book is going to benefit from backing, either; it's primarily for helping mitigate spine swell.
Okay, time for my favorite repurposed equipment hack.
It's bookends. Regular bookends that I've had for ages and that probably came from Ross or some other place that doesn't even sell craft supplies.


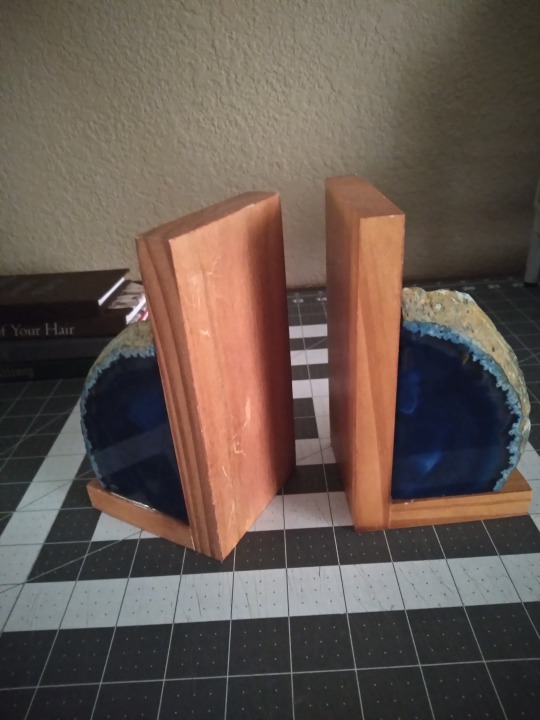
Want to keep the text block upright while you glue it? Bookends. Want to sew some custom end bands but your text block keeps falling over? Bookends. They won't provide pressure for squishing, but if you just need to hold something upright while you work on it, bookends are the answer. They hold up books, it's right there in the name. Having said that, you want some with a little weight to them, like these agate slices, so they won't slide around. And you want something with a smooth finished edge like these, so they won't scratch up your text block or leave dents. I have other sets but these are the only ones I use for this purpose, and they're better for it than anything else I've got.
Moving on from making the text block, let's look at what I use to make covers.

It's appeared in the background of most of the other photos, but here's a photo of just the desk surface covered in cutting mats. I really recommend a mat to protect the surface of your furniture and keep your knives from going immediately dull. I've got a big one that covers almost the full surface, and a small one for when I want to be more mobile. I started with just the small one and it was good until I started working with larger sheets of paper. The big one was bought largely for convenience but I have no regrets about it. They're self-healing, non-slip, and you can get them in the sewing section of any big craft store.
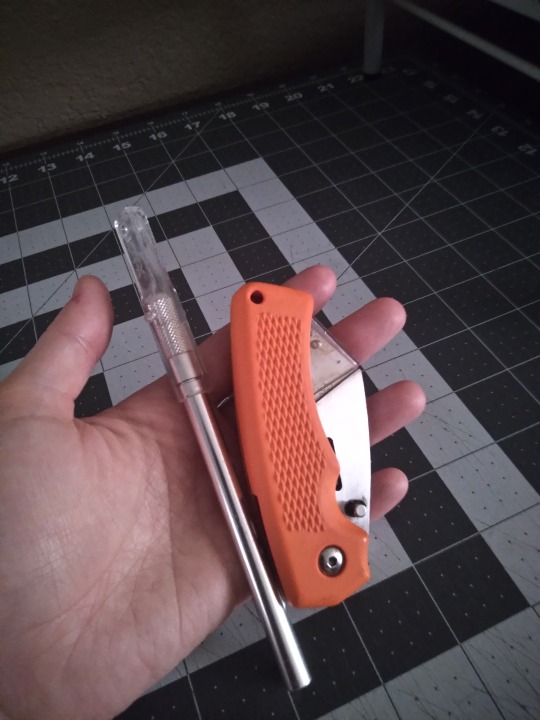
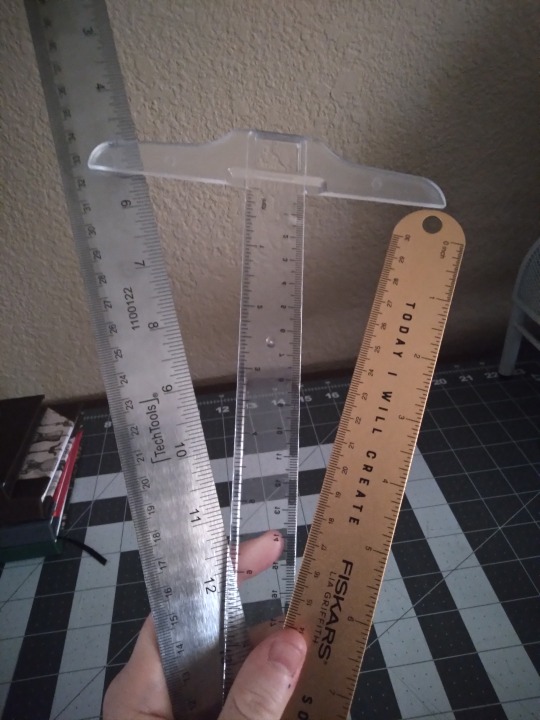
I'll be honest, I am not big on knives. I've got a regular box cutter for trimming board, and a razor knife for paper and cloth, and that's it. There are a lot of kinds and really all you need is one sharp blade for board. Paper and cloth can be cut with scissors if you want, though I find I get more consistently straight lines with the knives. Also pictured: Metal rulers and a T-square. You want a metal ruler for this. Plastic will flex and wood won't lay flat. Ideally you want one without a cork backing (my 18" one has this problem) and with the tick marks etched in rather than printed (my 12" one has this problem). For larger sheets of paper and cloth, the 18" one is great, but you can get by with the smaller one. The T-square is for making right angles; mine is plastic and only 12", and I really wish I had a longer one that was metal. These are drafting tools and you'll find them in the section of the craft store that has easels and sketch pads and they're usually pretty cheap.
This is an adjustable compass. You can probably get these at craft stores but I got mine on Amazon. It's for measuring hinge gaps and the width of spines, both essential for making sure your cover fits your text block and your hinges open the way they should. Both of those are incredibly frustrating situations, and this thing makes it so much easier to avoid them.
Things to spread glue with! Any old paintbrush will do, though I like to have a few different sizes and textures on hand to choose from. I like the big one for cover boards and casing in, the mid-size ones for doing turn-ins, and the little fellow for details and touch-ups. I don't care for foam brushes because I find them hard to clean when glue is involved, but if you like you can use those. The metal thing on the left is a micro-spatula, and I did have to special order it from an art supply place but it was cheap and it's very helpful to have on hand for when the brushes are too thick, for doing turn-ins on rounded spines, and for separating pages if you decide to learn edge foiling. Not essential, but recommended.
One thing I neglected to take a photo of is my crepe eraser. Despite the best intentions, no matter how careful you are, you will at some point get glue where you don't want it, where it will be visible on the finished book. This is where the crepe eraser comes in; you can use it to remove dried glue from cloth or (to a lesser extent) paper. Very annoyingly, none of the craft or art supply places I went to had even heard of these and I had to get mine from Amazon. It was cheap (under $10) and I strongly recommend getting one.
Once your cover is made, you have some options. You can leave it blank, hand-letter or draw an image, stamp it with ink or embossing powder, use a stencil, or do what I usually do these days and make a cover graphic from HTV. I've got a cricut for this (though they're not the only kind of cutting machine; it pays to research other brands) and a mini heat press (I want a bigger one, but I got this one cheap because the box is messed up). A lot of libraries have cricuts you can use, and you can use a regular iron to apply the HTV. Getting it to stick is a bit tricky, but that's true no matter which tools you use. Not pictured: a cutting mat, different than the kind shown above, necessary with most materials you can cut (mine came with one, they're about $20 at most craft stores, and they're lightly sticky to keep your materials in place while it's being cut). I don't know if other brands require them, but cricut does unless you're using their Smart Materials (I have never used these). If your library has a cutting machine, they will also have the appropriate cutting mats. Also not pictured: weeding tools. Weeding is when you remove the bits of HTV that you don't want in the final image, usually the spaces between letters and such. The negative space, if you want to get artsy. The special tools cricut sells aren't necessary, you can use an awl or needle and the dull edge of your knife blade, but I have a set of theirs and I like mine.
I didn't take a photo of it, but sometimes I use embossing inks and powder to make cover designs and text. You only need a heat gun for embossing powder, it takes up way less space than the cricut does, and it's cheaper. I got mine free from a family member so I don't know what it cost initially, but cutting machines are a really big expense; the cricut is my third most expensive piece of equipment, after the finishing press and the plow.
Good god I think that's everything. It sounds intimidating, I know. And it sounds like it takes up tons of space in your home, and to be honest it can, but it doesn't have to. The first dozen or so books I made, I made completely to my satisfaction with tools and materials that fit in one 12x16" moving box. If you love the hobby and can make the space, the bulkier items might be worth it down the line, but especially when you're first getting started it's smart to keep things low-cost and compact. Most of the basics are simple and your fellow bookbinders are delighted to share their shortcuts and substitutions if you ask.
The end! I hope it was helpful, @cardassianexpats! I did warn you it would be wordy, lol.
#bookbinding#fanbinding#long post#like ridiculously long post omg#my own verbosity will be my downfall#if anything is unclear please tell me#i can't always tell when i'm over-explaining#or when i think i've given enough info but my audience thinks i haven't#snek makes books#but sometimes she just talks about them
23 notes
·
View notes
Note
Can you do headcanons for Jason Todd/Red Hood as a caregiver?
Of course!
Contrary to what you might assume, Jason's best with baby/toddler regressors. Babies are easy, babies make sense. They want cuddles and attention, they want food, they want you to shake a rattle at them or give them a piggyback ride, and they want a nap. Kids want to play pretend, they like to run around and play and cause havoc and Jason is too awkward to play pretend and frets too much about them getting lost.
He's a big strong man and absolutely flexes it by picking up any little like it's nothing. Carrying, piggyback rides, even letting them ride on his shoulders are a major part of his caregiving style.
You will finish your vegetables before you have any dessert and he will not waver on that. It's important to eat healthy.
Immune to puppy-eyes. Just chuckles and says "Nice try." while patting you on the head.
Babyproofs things. Little rubber stoppers on sharp corners, those little plastic cupboard locks, flat covers over outlets, etc. etc. Even Tim made fun of him for going overboard and that's an achievement.
King of bedtime stories, goes all-in. Voices for each character, big hand gestures, real emotions, gets really into it. He's so good that it's more entertaining than it is soothing and the kid will end up more awake than then they started.
I feel like the first time he ever came across age regression was rescuing a civilian and he noticed that they were behaving strangely, and then when he turned them over to the hospital a nurse explained it to him. After that he couldn't help but notice some familiar signs in his siblings... Hmm...
Keeps a keen eye on all the stuffed animals so he can catch any wear and tear and then sneak it away during nap time to stitch it back up or wash it, good as new.
Could brush your hair if you asked and would try to be gentle but he'd be just a little bad at it. His hands are too big for his own good and he'd be constantly using detangling spray so he didn't catch knots. Even with short hair, he just needs to be sure.
A little bit awkward with tantrums. If they're angry tantrums then he'll try to let them tire themselves out and then talk to them, and if they're sad tantrums then he just holds onto them and like... pets their head. "They're there..?" kinda vibes.
Likes baking with Tim or Steph when they're regressed. Tim is very helpful and Steph just lights up and is excited about the whole process.
Looks after Tim and Steph most frequently. Dick is on the older side and kind of self-sufficient but he'll hang out with him or read to him sometimes.
Firm but gentle parent.
#batfamily#jason todd#dc agere#fandom agere#agere headcanons#caregiver Jason Todd#sfw age regression#sfw agere
18 notes
·
View notes
Text
Sweetapple Slices - Slice 3
Sweetapple | Dear Mr Tracy | Along the way | Slice 1 | Slice 2 | Slice 3
@idontknowreallywhy asked:
What is a childhood meal your character cherishes?
...and this happened.
Many thanks to both @onereyofstarlight and @katblu42 for both the inspiration and for editing help :D
This one is based before @womble1 's Extra Sweetapple and leads up to a small mention made in that fic. Thanks for the staring point :D This also means this is based before these two knuckleheads became a couple. It's also a little bit crack.
I hope you enjoy.
-o-o-o-
Virgil reached around Alex’s back and nabbed himself a chocolate.
He’d held off as long as possible as really he needed a full meal, planned to have one, and snacking, while a staple in the field, was something he had a tendency to control when it wasn’t needed.
But he’d dropped in on Alex today, straight off a rescue with an idea. It wasn’t a major one, just a little one that might help fix the issue Alex had been having with the micro-plastic contamination.
That had been an hour and a half ago and several eureka moments since. Now it was the middle of the afternoon, after a far too early morning - thank god for the coffee kit on Two - and really, his blood needed sugar, after all.
Alex himself was well into his creative zone and Virgil couldn’t help but smile.
But then he had been engrossed himself not thirty seconds ago and it was only his lunch deprived stomach that was distracting him.
Alex usually had something lying about somewhere. The engineer had offered him some of the chocolates earlier, but Virgil thought he would be okay.
Apparently not.
So he nabbed one and threw it into his mouth in the hope it would shut his stomach up long enough to finish the calculations that might, just might lead them both to a solution.
The chocolate melted in his mouth and his shoulders relaxed just a little.
But then whatever was inside the chocolate touched his taste buds.
It was a chemical. That was all he could think of to describe it. Rubber? Some kind of soft plastic? In any case, whatever it was, it was revolting.
“You okay?”
Virgil nodded while trying not to choke on whatever the hell was in his mouth.
Alex frowned at him even more.
Okay, whatever it was, it needed removal. He shot to his feet glanced around the room until he found a box of tissues, grabbed one, and turning his back to Alex, spat it into the tissue.
Wiping his mouth and running his tongue over his teeth, he chucked the wad of tissue into the bin and grabbed the remains of his cold coffee, shoving it down his throat.
Alex by this time was on his feet, worry in every movement. “Virgil?”
“I’m fine.” He needed more coffee. He could still feel that weird texture in his mouth. “Want some coffee?”
Alex opened his mouth-
“I’ll go get some. Back in a minute.” He didn’t flee the room. No, he walked calmly to the door and exited quietly, in no way indicating he wanted to scrub his mouth out with a wire brush.
A short trip out to Thunderbird Two and a quick mug of coffee while he waited for a couple more to brew, and he was back in the lab with some steaming liquid of the gods in no time.
Unfortunately, Alex was still staring at him.
“What was that?”
“What was what?” He hid behind his coffee cup.
“That?” Alex waved at the door.
“I got you some coffee.”
Alex was still staring at him.
“What?”
Alex’s eyebrows dropped into enough of a flat-eyed ‘I’m not an idiot’ glare, that yes, Virgil had to own up.
“Your chocolates, what are they?”
“Huh? Oh.” Alex reached over and grabbed them, offering the bowl to Virgil. “Pineapple lumps. Want one?”
Virgil held up his hand. “No. Thank you for asking.”
Alex shrugged, grabbed one and threw it into his mouth.
Virgil didn’t wince. No, he didn’t.
“You don’t like chocolate?”
“I love chocolate.”
The bowl was offered to him again. Now he was smelling whatever they were made of.
His stomach twisted.
“You don’t like pineapple lumps?”
He forced a casual shrug. “Not my thing, I guess.”
“So you’ve tried them?”
“Yeah.”
To his dismay, Alex threw another one into his mouth. “They were my dad’s favourites. Bit of a tradition, particularly now he is no longer with us.” Alex shifted where he sat.
Virgil looked down at nothing in particular. “Yeah, traditions are important.”
There was silence a moment while Virgil thought of things that had kept his family afloat while Dad had been missing.
He looked up at Alex. “Are they your favourites?”
Alex looked down at the third pineapple lump in his hand. Virgil tried not to shudder.
“Yeah, I like them.”
Note to self: buy some pineapple lumps for Alex.
“But honestly, I prefer real pineapple.”
Note to self: buy pineapples for Alex.
“And the ultimate is really pineapple ice cream. Now that, that’s my favourite.”
Note to self: find and buy pineapple ice cream for Alex.
“So you’re a pineapple on the pizza kind of guy?”
Alex’s expression shifted to one of horror. “Pineapple on a pizza? You speak blasphemy!” But then Alex was smiling. “No, not my thing. You?”
Note to self: never put pineapple on pizza ever again.
“Of course not.”
“You’re sure? I’m sensing a little Hawaiian vibe here. No shame if you’re on the other side of the debate. You can still be my friend.” Alex was grinning.
Virgil liked the idea of being Alex’s friend. “No pineapple on the pizzas. Got it.” He returned the grin. “Just don’t tell Gordon.”
“Uh oh. You mean-“
“Yes, he’s pineapple all the way.”
“Weirdo.”
Virgil smiled. “Definitely.”
-o-o-o-
#thunderbirds are go#thunderbirds#thunderbirds fanfiction#virgil tracy#alexander sweetapple#nuttyfic#virgil tracy/alexander sweetapple#romance
30 notes
·
View notes
Text
plinth
a quick end-of-S3 thing that came to me and would not leave because I can't get the image of Robin and Max sitting on the same stretcher post-starcourt out of my head. —polished version now up on ao3 | 1k
Monsters are real, there are were Russians hiding beneath the (now smoldering remains of) her summer job, and Robin is sitting on a stretcher next to a teenager who just watched her step brother get torn to shreds by a spider-creature made of human flesh.
Robin doesn't know where to slot any of these facts into her understanding of the universe.
Other currently-uncategorized facts of the universe (in no particular order):
Robin will throw herself into danger if a child's life is at risk
This is a helpful fact to know, considering she will also throw a kid into danger provided she is A) bored and B) does not have an accurate sense of the relative stakes of a situation
A bunch of kids have been fighting the previously mentioned monsters for nearly 3 years now
Chief Hopper knows that there are monsters in Hawkins
The smell of burning human flesh is a scent so incomparable as to defy description in any of the four languages she knows
Steve Harrington is a genuinely good person who doesn't care if she is a lesbian likes girls
That last one in particular has been tripping her up for a while. She thinks there's a part of her still stuck on the bathroom floor. Held in stasis in that perfect moment of pure fear.
(Yet another part is still stuck underground, tied to the man she will later face with dread of him seeing all of who she is.)
Whichever part of her is sitting on the stretcher next to the child who just watched her brother die thinks she should say something.
"You get used to it."
Apparently the child has beaten her to the punch.
"Get used to what?” Her voice hurts. She's spent too much of the last 24 (36? 48?) hours screaming; swallowed down so much smoke and ash that her throat is thick with sludge, and her tongue heavy in her mouth.
"Monsters." The kid's voice is flat, no nonsense.
"Do you?" Robin's not sure she believes this kid. Robin should probably learn her name.
The kid shrugs. "No. But it's a nice platitude, right?"
"What's your name?"
The kid's face scrunches up for a moment, but Robin doesn't know what it's supposed to mean. "Max."
"Hey, Max. I'm Robin." She just manages to hold herself back from sticking out a hand like they're at the start of a job interview.
Still, Max stares at her for what Robin thinks is probably a couple beats too long. "I know," she says. And there's some kind of inflection there, but Robin can't pin it down. "You've still got your name badge on." Max reaches over to flick the small plastic rectangle affixed to her chest. "Plus, Steve talks about you all the time."
Robin folds her legs up onto the stretcher, so that her knees are tucked under her chin and she's turtling beneath the shock blanket. "He does?” What does he say? (Did he say?) Does he complain about her? Talk about how annoying she is? "What does he say?"
Max shrugs. "He says you're a dork, but he means that he loves spending time with you."
How can she know that? "How can you know that?"
Max rolls her eyes. "Because all of us are dorks—okay, well, I'm not—” Robin thinks that probably people who feel the need to specify that they themselves are not dorks are probably pretty dorky. "—and he loves all of us. I think he has a type."
"Is Nancy Wheeler a dork?"
Max blinks. "I don't think I've seen him talk to Nancy for longer than 5 seconds."
Robin squints, and adds that to her list of uncategorized facts.
"Are you okay?" That's something Robin should ask right now, right? Except, fuck, that was probably a dumb thing to ask. "Fuck, that was a dumb thing to ask."
"Yeah," Max says, looking down at her shoes. "This was all new to me too, last year. Like, the rest of the group, they'd already gone through it once before and then I just got thrown in and I had…no idea what was happening."
Robin picks at the rubber of her shoes.
"It's…really scary," Max says, trailing off with a frown into the middle distance.
Robin nods. She wants to say something. She wants to try to comfort Max in the way that she's pretty sure Max is trying to comfort her, but she's scared to say something that will make it worse.
"Do you like hugs?” Robin is ambivalent about them most of the time, but that's a good nonverbal option for providing comfort, right?
"No."
So Robin doesn't move.
But a moment later, she glances down in surprise when a soft weight lands on her shoulder. Max is leaning her weight into Robin's side, and rests her head on Robin's shoulder.
"Oh."
"Shut up."
Robin wraps an arm around the kid, and her heart lurches in her chest. She thinks maybe she understands the bright smile on Steve's face from whenever any of the children walked into Scoops. (She saw it, even though he tried to hide it. For some reason Steve Harrington has always been the one person she could read—when she cared to really look at what she was seeing, at least.)
The lights from the emergency vehicles continue flickering red, blue and purple around them. Men rush from one point to another, constantly moving, ceaselessly fixing. Robin feels like a large stone in a river—the rapids rushing all around her as she sits steadfast in place. If she holds still enough she can be stable enough for two. Robin darts her eyes around the lot and catches sight of Steve. She remembers Dustin and Erica up on Weathertop.
Maybe she can be sturdy enough for four.
Her eyes dart around and catch on each of the kids huddled into the back of transport vehicles. She doesn't really know anyone else's name yet, but as she lets her gaze linger on each one, she finds that number expanding.
For now though, she can sit in the eye of the storm with Max.
#stranger things fanfiction#robin buckley#max mayfield#fic#read writes#background stobin#semiotics 'verse
20 notes
·
View notes
Text
Collars Dot Com Ch 2: The Hammer of Thor
(Back to Chapter One) I shut the lid on the washer, started the cycle, then leaned against it as it filled. To the left the dryer thumped steadily, sounding like a particularly monotonous wedding night.
I'd changed the sheets on the bed, stuffed my bachelor-smelling comforter in the washer, gathered up the long-neglected laundry pile, dragged the comforter back out of the washer in favor of washing the clothes first, scrubbed the bathroom, sanitized the kitchen, vacuumed the living room, collected six thousand sticky coffee mugs and empty soda cans from my desk, wiped down every flat surface, and nearly thrown up twice.
I sat down on the arm of the couch, putting a hand over my eyes to try and keep them from falling out of my skull. I smelled like bleach wipes and hangover sweat and the coffee I'd spilled down the front of my shirt two hours ago and all I really wanted was to lay facedown in bed and sleep until rigor mortis set in.
Some time between changing the pillow cases and gagging on bile, I'd opened the DoorDash app on my phone and ordered two bottles of Gatorade, two containers of fruit salad, and two more bottles of Gatorade in case the first two and the vitamin C from the fruit weren't enough to purge the tequila and idiocy from my body.
I did stupid things when I was drunk. That's what had ended my last relationship, hadn't it? I'd gone out for drinks with some of the guys from work, ended up doing jello shots with a bunch of college girls, and sent a picture of my dick to everyone on my contact list-- including my sister-- with the caption 'THE HAMMER OF THOR!'
I'd woken up the next morning with a variety of responses waiting for me. From my boss, 'you're lucky you're the only one I can rely on to turn in scripts on time,' and from Alyssa: 'I'm tired of your immature bullshit.'
My sister had sent a thumbs-up emoji.
It wasn't the first time Alyssa and me had gotten in an argument over how I spent my free time, and I thought an apology and giving her some space to cool off would keep things rattling along. Instead she dropped her copy of my apartment key in my mailbox, changed her relationship status on Facebook, and posted several memes about finding her flame and not letting anyone hold her back anymore.
Then lockdown had started, my entire department had been sent home to work remotely, all of my meals came from no-contact DoorDash deliveries, and if I wanted to hang out and drink with the guys from work, I had to do it over Zoom. I hadn't realized how much I'd relied on visits from Alyssa to motivate me to give a shit about what my apartment looked like until...
Well, until about 2pm today.
This was going to be the kick in the ass that I needed, I decided. I wasn't gonna keep the Pet I'd ordered, but I wasn't going to mix alcohol and online shopping again, either, and I was gonna clean up after myself and have people over again. Or better yet, go out. See people. Meet people. Shave every day.
Someone hit the buzzer in the downstairs lobby. I got up to hit the unlock button by the front door, got another whiff of stale coffee, and jogged into my bedroom to try to find a clean shirt so I didn't look like a complete slob for the DoorDash guy. I tossed the dirty shirt into the laundry corner, stopped, picked it up and put it into the hamper, and pulled on an ancient band tee, the screen printing long since faded away into nothing. By the time I emerged from the bedroom, DoorDash was already knocking.
Usually I only knew my order had arrived by the swish of a plastic bag being dumped on my mat and the driver's footsteps as he walked off. But I had to sign something, I guess. They'd used to make you sign for stuff, before. I turned the deadbolt and opened the door.
There was a boy standing there.
Blond hair, big eyes, freckles and a pretty mouth that was currently occupied by some kind of black rubber gag. Behind him was a man with a moving dolly stacked high with boxes labeled 'COLLARS.COM.' Behind him was pretty much every single one of my neighbors, all out to grab their mail and pick up their newspapers and check the hallway for werewolves at once.
Fuck.
"Delivery," the man said, looking supremely bored. "For--"
"Yeah, uh, yeah, come in," I said quickly, backing out of the doorway and holding the door wide. The boy stepped through first, then his chaperone with the dolly, and I thought about how I was going to have to either find a new apartment or somehow keep living in this one without ever making eye contact with any of my neighbors ever again.
The man set the dolly upright and plucked a chunky black device from his belt, shoving it at me. "Just use the pen to sign," he said, indicating a thin plastic stylus swinging from the device by a tether.
"Right, uh, so, there was kind of a--" I began weakly, trying to give the device back.
"Hit 'enter,'" the man said. The boy had been wearing a sort of black smock, tied at the back, and his chaperone was taking it off. The black pants came off too, and the boy was very much wearing absolutely nothing underneath them.
"This was-- I can't--" I tried again.
"Arms out," the man said to the boy, holding up his phone to take a picture. "Alright, turn." He glanced at me. "Press the pen down harder if it isn't doing it," he said.
"There has been," I said slowly and firmly, "a mistake."
The man looked at me. I looked back at him.
"Are you Brian Stink?" he asked.
"It's 'Stynch,'" I said automatically. "Listen, I bought all this by accident, I didn't really mean to--"
"The return policy is on the website," the man interrupted. "Can you sign the thing? I've got other deliveries."
"But I can't." A misshapen silence popped between us; I'd been expecting him to cut me off again. "I can't, uh, take him, really."
"I can't put him back in the van," the man said. "I've already sent Proof of Delivery to the dispatcher, and I can't just stick him back there while I finish all my other deliveries. By the time I got him back to the hub, all the handlers'd be gone for the day. Sign," he enunciated, "the thing."
"Alright, fine, fuck," I sighed, scribbling something approximate to my signature on the heavy device and watching it struggle to accept my name with technology from 1992. I slapped it back into the man's hand, trying to show my severe annoyance with him. He wasn't phased. "I'll see you again tomorrow when you come to pick him up," I told him.
"I'm off tomorrow." He yanked the dolly out from underneath the tower of shipping boxes and turned to let himself out. "Enjoy your purchase and have a nice day."
I glared at the closed door for a while, entertaining all my fantasies of letting his employers know I was Very Offended and that they had better do something to make up for it, and receiving an email from the CEO begging for my forgiveness.
Maybe even a phone call. We're so sorry. We're so sorry. The mean delivery driver has been reprimanded and fired-- no, that was too cruel, not with the economy the way it was. He probably had a family to feed. We have sat him down and told him he has been a Very Bad Boy. Yeah.
I locked the deadbolt. And the horse you rode in on, I thought viciously, turned around, and remembered there was an extremely undressed Pet standing next to my shoe rack. The room congealed around me a little, going from the hot soup of righteous anger to the greasy leftovers of what the fuck am I going to do now in an instant.
God, he looked good.
I had been expecting him to be a little plainer than the profile picture I'd glimpsed in a drunken haze the night before. Nobody was supposed to look as perfect as their headshots, that's what Photoshop was for. But there he was, smooth and blemishless, the same buttery curls, the sprinkling of freckles like cinnamon on a macchiato. The mouth, which was still stoppered by the rubber gag whose straps were beginning to leave red marks in his cheeks. He swallowed awkwardly around it and looked at me.
I stepped forward, reaching behind his head and feeling for a clasp. The strap was stiff and new, the price tag still stuck across the cheap plastic. "This thing smells like a used tire shop," I muttered, picking the tag off and undoing the buckle. "Probably tastes like one too."
I pulled the gag out of his mouth. It was a couple inches long, wet and slick where it'd been pressing against his tongue. I wrinkled my nose at it and set it on top of the boxes. They could take that back, too. "How long have you had that thing in your mouth? Do you want a glass of water?"
The boy's mouth puckered; he wiped saliva off his chin with the back of his hand. "Yes, please."
I went to the kitchen, took down a glass, turned on the tap and let in run until it was cold. My coffee mugs were still piled in the sink, looking at me accusingly with sticky eyes. I ignored them and returned to the living room to find the boy standing just where I'd left him.
"Here." I put the glass in his hands. "Come on and sit on the couch."
I discovered, then, that it was possible for someone to sensually drink a glass of plain tap water. The movement of his throat and the sound of his swallowing was almost obscene. Maybe it was just because he was naked, or because I knew what he was for, but the lovely pink mouth was definitely in the lead for 'reasons I was about to make decisions with my dick.' I knew, when I reached out, that just touching his mouth wouldn't be enough. I promised myself I just wanted to feel the shape of it, his lips against the ball of my thumb, but I had wanted that mouth since I saw it on the website, had clicked yes and yes and yes because I hadn't cared what I'd have to pay to get it. I cupped my palm against his cheek and he leaned into it, looking at me, and I was pushing forward without looking at the price.
I kissed him because I wanted to feel the softness of his lips, the texture of them against my tongue, the sweet sound as we parted. There was a little hesitation when he opened his mouth to mine, as if he wasn't quite sure of it, like the sensation of my tongue against his was new for him. I held him still with a hand against the nape of his neck, where the finest curls of his hair tickled against my fingers, and let him get used to what it felt like to be kissed by me.
By the time I let him go, his breath had gone a little short and there was color in his cheeks and down his neck to his collarbone. His lips were still slightly parted, and I slid my thumb into his mouth. He made a soft sound as I pressed down on his tongue and bottom lip. He made that sound again when I pulled him forward for another kiss, and he slipped off the couch and down to his knees in front of me before I could even form an image of what I wanted.
Now he was looking up at me through his eyelashes and wetting his upper lip with his tongue. I took his chin in my hand because-- I don't know, I wanted to look at him, wanted to stay in the moment of anticipation forever, but with my other hand I took out my stiffening cock for him because I wanted it in his mouth.
He took the head between his lips, delicately, like kissing the first bite of a ripe peach, tongueing the flesh. He took the shaft in his hand and drew upward and I felt a throb of pleasure, my cock bobbing when he pulled away. He looked up at me again and I watched him take me into his mouth in one long, delicious slide, lips and tongue working as he sucked. He lifted his head, taking in a breath, then down again and I could feel myself in the back of his throat. Another shudder of pleasure, releasing in a groan.
I leaned my head back, listening to the sound of his mouth on my cock and riding each rise in tension, each a little bit stronger, a little bit longer than the last. I held my breath to make the pleasure hit deeper, letting it out when I was coming close to the edge. My back and thighs were tensing, wanting to thrust upwards; it began as a soft rhythm, then grew more and more insistent until I braced a hand against the back of his head to fuck his mouth.
I twisted my fingers into his hair, fucking into the friction I wanted, faster and harder, trying to come up short before I climaxed but tumbling over the edge anyway, coming hard with a hoarse, cracked groan.
I felt him swallow twice, then wrap his fingers around my aching cock and pull slowly upwards. I sucked in a breath, wincing, and put out a hand to stop him before he yanked my organs out of my body. "Enough," I panted. "Enough. I'm done, I'm good." He let me go. I took a few more steadying breaths, blinking up at the ceiling, and alternated saying "god" and "fuck" a half dozen times until I was able to think clearly again. It might have been several hours. I don't know. When I finally pulled myself together, I looked down at him still kneeling there.
"So," I said. "What's your name?"
He smiled, tucking a strand of hair behind his ear. "My name is Ren." Kofi - Donate - AO3
6 notes
·
View notes
Text
bracelet tour
in no particular order, except it's in somewhat of a particular order. kind of a long one, don't click the read more if you don't want to read more
preamble
structured by name, picture, description, story/extra information, and standard location. you don't have to read anything just look at the pictures <3 piling them on one arm is just for the pic i don't actually wear them in that specific configuration
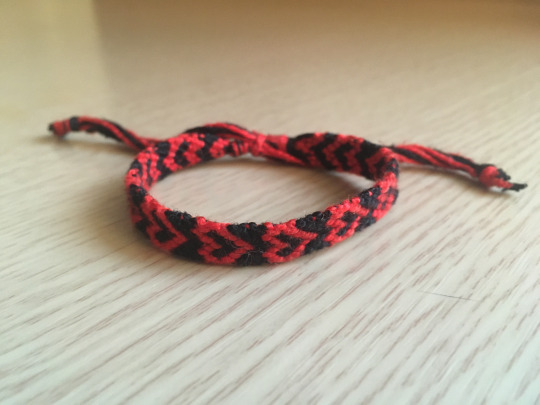
1. "rave bracelet"

made of somewhat malleable plastic, translucent in the middle with glitter that's slowly become more and more unevenly dispersed, outlined with pink on the edges.
i don't really know why i call it my rave bracelet, i'm not going to any raves, it might've said something on the packaging? it was 50 cents at the dollar store and my friend bought it for me on their birthday. i'm such a good friend. it featured in two of my high school art projects because it's such a powerful symbol of friendship. sometimes i'll squeeze it when i'm feeling anxious
standard location: base of left arm, at the very bottom. it can go up to like half my bicep because i'm a scrawny bitch
2. mori from ouran high school host club

a blue rubber bracelet with blue roses and mori ohshc printed on it
i had to google his name. i've never seen ohshc. purchased at hot topic in a pack with the other characters on a group mall outing, i was assigned this guy for lack of a more fitting character. i think it's pretty funny, maybe i should watch the show at some point? who knows, i'm pretty bad at watching long form media
standard location: base of left arm, second in command, above the rave bracelet.
3. pompompurin
a fishtail rainbow loom bracelet made from alternating white and yellow bands. in the middle is attached a charm of pompompurin
made the same day as my corvo's slut bracelet. my best friend assembled this and a matching cinnamoroll one for herself. i'm going to be honest i like cinnamoroll more, but i have accepted pompompurin into my life.
standard location: left arm. he hangs above mori, flat and facing me. if my arms are down, he's upside down.
4. black and red fishtail rainbow loom

what the title says.
also made by my best friend, but earlier. i don't really wear this one anymore because i had one in the same colour that said "vampir" (as in. the character from dick fight island. we read dick fight island and then she made bracelets for a couple of us with the names of the characters on them) but it broke </3 rip vampir i don't remember what you did at all besides being in the dick fight on the island
standard location: retired
5. black and red hearts
a heart friendship bracelet made from craft string. the hearts are red and the background is black.
i've made like 14 of these things in different colours. i'm not sure on the exact number, but most of them were for my friends. we all get one in our own colour scheme :) of course, mine is black and red, because of the my chemical romance poisoning. this whole thing started when my mom gave me a big pack of thread intended for friendship bracelet making, and i said, ok sure why not. they're all size adjustable, so you don't need to tie anything.
standard location: left arm, 3rd from the top, always has to be facing the way it is in the above picture (with the top of the hearts facing my left)
6. green and purple hearts
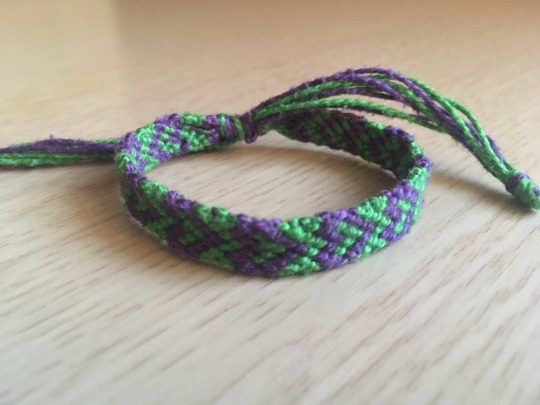
a heart friendship bracelet made from craft string. the hearts are purple and the background is green.
the latest of these specific heart ones that i made, alongside one that's inversed (purple with green hearts). me and the bestie are going joker mode 👍 also funny because i was called the joker (specifically jared leto joker) once by a fourteen year old trying to bully me
standard location: left arm, above the black and red hearts, also always has to be oriented with the top of the hearts facing left.
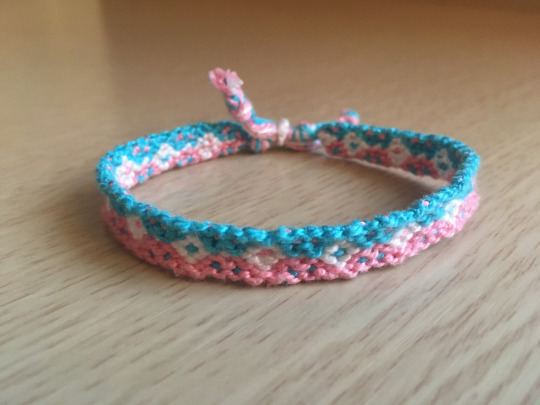
7. red flowers (friendship-bracelets.net pattern #9173)

red flowers on a black vine-like stem on a white background. kind of reminds me of the rose health bar in alice: madness returns
second non-heart bracelet i made if my friendship-bracelets.net account is to be believed, made this one just cause i like how it looks. the edges curl up on themselves but it's fine if you just flatten them out.
standard location: i don't wear this one that much, but it sometimes appears on the left arm. sometimes on the right. just, somewhere in the middle, wherever i think it looks right. flowers face left when on the left arm, right when on the right.
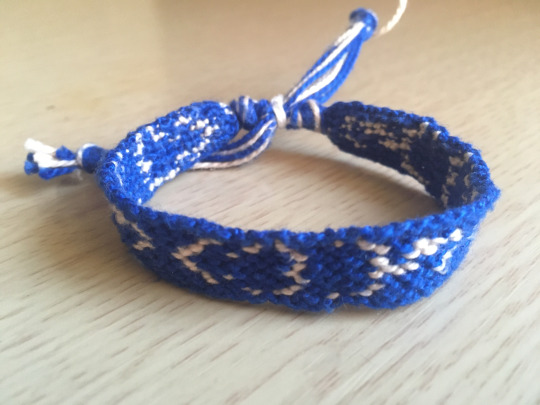
8. this bracelet is transgender (pattern #106540)
half blue and half pink, with white diamonds with alternating blue and pink interiors.
i just made this one because of the colour scheme it came in. the pattern's also nice i guess
standard location: same as the previous one, not always worn and location not set. i don't even have a preference for which side is up, though i think the blue side usually is.
9. emoticon mice (pattern #3228)
white emoticon mice on a blue background
<:3)~ mice. or maybe they're rats. who knows, they've been abstracted to smiley face levels. i wanted rat friends like i summoned them with devouring swarm. i don't like this one that much because it's so goddamn uneven, idk if you can see it that clearly but it's super obvious when it's flat. i am so ashamed of how wiggly this is that i didn't upload a picture onto friendship-bracelets.net when i finished it.
standard location: not always worn and location not set. the mice face my left when on the left arm, and right when on the right arm.
10. papa's games new years decoration lookin-ass (pattern #110541)

rainbow x's and infinity symbols on a black background.
i'm pretty sure i'm autistic. me and the boys out here experiencing patterns symptoms and behaviours. anyways that's why i made this one
standard location: not always worn and location not set, but i think i prefer it on the right arm.
11. corvo's slut

a black and pink fishtail rainbow loom bracelets that says "corvo's slut" in blue, purple, and pink cube letter beads
you've already seen this one but you can see it again! it's kinda hard to stretch it out so all of the words can be seen since the letters take up more than half of the whole bracelet. very funny. i love this thing, my friend was a genius when she suggested this one. turned the pic sideways so it matches the others.
standard location: top of the left arm, above everything else. this is cause it was pretty tight but i stretched it out, it's still kinda tight tho.
12. misfits fiend skull (pattern #2902)

white fiend skull on black background
a little convex??? my string tension is garbage. it's also pretty thick at 25 strings so i got creative with how i tied the ends. this one makes me think of leyendecker because i was watching a video about him when finishing it.
standard location: don't always wear this one but i wear it more often than some of the others. can go on either arm but mostly the left, above pompompurin and below the hearts. top of skull faces left when on left arm faces right when on right arm you get the pattern right.
13. woodstock (pattern #5082)

woodstock from peanuts on a black background
i just finished this one today so i'd have it for this post. matching with a snoopy i made for my friend months ago. finally, snoopy is no longer alone. we also have snoopy and woodstock plushies (i'm woodstock she's snoopy) with magnets in their heads so they can stick together
standard location: i literally just made this like 2 hours ago. i'll put it on my left arm tho, between pompompurin and the hearts. he has to be oriented exactly like he is in the picture etc. you know.
postamble
ok that took longer than i expected bye have fun the end. one time one of my friends said that i should sew them all together to make one big arm warmer and i told him i already thought about that and he said "oh no am i becoming as crazy as you are"
4 notes
·
View notes
Note
that stained glass process sounds so inchresting omg.. 👁 (open invitation to tell me abt it)
Hi. This took forever for me to answer.
Now, I don't have a bunch of time to write this up so you get The Abridged Version [aka just stained glass, not the other glass products I can make too]
So starting up, materials.
There's lots of kinds of glass out there and you can use most of them for stained glass, but they tend to vary in thickness. Picture frame glass is VERY thin compared to the glass I use in my class. The glass can get funky too, there's transparent glass, translucent, and [mostly] opaque glasses and sometimes the colors are marbled or have texture or are holographic. I've found a few that are pearlescent.
There's also the other materials and tools you use, like foil tape, soldering iron, solder, flux, and patina. Foil tape is. Foil tape. It's thin and is wrapped around the edge of your individual pieces of glass before they are soldered together. You use a soldering iron to move lead or tin solder onto the foil and bind them together. Flux helps it stay where jts supposed to and patina is for coloring the solder. The natural color of the line in between glass in stained glass is actually bright silver! You have to make it black or copper with patina.
The process for actually making a piece differs between artists, but this is the way I was taught. It starts with a pattern. Each shape has to have its own piece of paper/plastic and a label. When making a pattern, it's really hard to do anything hollow or internally curved without special tools [which I don't have] so you avoid those shapes.
Once your pattern is made and cut out, you glue it onto the glass with rubber cement [for easy removal later] or trace it with a sharpie. You take your glass pieces and take em to a Waffle Grid, which is used for safety. Which!!! Safety glasses are very, very necessary!! Do Not Get Glass In Your Eyes!!! Anyways, from there you use a scorer to trace the shape of your pattern. It's got this little tiny diamond disc thing that cuts a thin groove into the glass. From there, you break the glass along the score line with pliers. If further adjustment is needed, you can use nippers. They have 2 large versions of those discs and are used sorta like scissors, except super tough and also dangerous. Nippers are the #1 source of flying glass. But! They're very good for precision!
Once you've got your peice cut to the pattern [or as close as you can get with the tools u got] you head to the grinders. Grinders are like little sanders but for glass. They have small cylindrical diamond plated bits that spin in a circle really fast that you place your piece against. They use water to keep glass dust away from lungs and such, but also you have to wear safety glasses and a mask for this part. Once the edges of your pieces are smooth, you clean them off.
Once the pieces are clean, you foil them! You place the beginning of the foil tape on a corner, parallel to an edge, and start wrapping the edge. You gotta try and keep your foiling neat and centered because it affects the soldering process. Once that's applied, you burnish the foil to make sure it stays flat and connected.
Then soldering! You place your pieces where they belong and pin em in place. A soldering i4on is like a little pen thing with a flat-ish metal tip that gets super super hot and melts the solder. Solder is a soft metal with a low melting temperature [typically lead or tin] and it binds to copper, but not glass. You apply Flux to keep the solder in line [I have no clue how it works but it does] and then you just apply it everywhere there's copper!
Once you've soldered everything, you are technically done. There's stuff you can do to polish it, but the piece is assembled completely at this point. To polish it, you either start with patina [and I do an extra step before, where I sand down any pointy bits on the solder because it can get funky] or just go straitht into cleaning it with flux cleaner . Then you use polish [it's some specific kind idk the name] and just polish it. Then you're done!
The kind of stained glass I do is very small scale, and if you were to do a window, you'd have to use a different method other than solder because it's not strong enough.
Anyways. Hope u enjoyed it! Now u know how to do stained glass :>
#and yes#this is the shorter rant#i could go more into detail about glass cutting techniques#and the other 2 glass arts you can do [fusion and mosaic] could have their own posts#plus i could go into the science of some of the stuff and give tips and all sorts of things#but thats for another day#angel asks#bestiE
2 notes
·
View notes
Note
2, 7, 29…….. 24? <3
ooh! OOH!! holi mi cosita!! fancy seeing you here~♡
2. lighter or matches?
hm.. lighters are more convenient, sleeker too.. i try to carry one on me when i remember to do so.. but matches have such an Aesthetic to them- and theyre not made primarily of plastic
...i think lighters, though
7. hair-ties or scrunchies?
SCRUNCHIES ABSOLUTELY. but i dont own any. i just have hair ties--- well, had hairties. theyve all vanished- last time i put my hair up i used rubber bands from work... um.
29. how do you like your shower water?
answered this one over here ♡♡♡♡♡
but ill add onto it.. i like hard water pressure! and i know a shower isnt a bath, but, i usually put epsom salt and bubble bath whenever i indulge in taking a bath ♡♡♡
24. if we were together on a rooftop, what would we be doing?
oh, we would be chatting up a storm, i just know it!!

we would definitely be holding hands, people watching- you know when you watch people interact but you cant hear them, so you make up what theyre talking about? we would be doing that heh

we would listen to music together! we could really talk about the songs we love, why we love them, why we want to share them..

and of course we would have to hug!! how could i see you in person and not give you a hug??

y, i dont know what kind of roof it is. if its something flat, though.. something with rails. we could end up dancing ♡

4 notes
·
View notes
Text
How to Remove Door Handles on VW Beetles: 1998 to 2010

Learn how to remove door handles on VW Beetles from 1998 to 2010. Do you need to remove your exterior door handle on your 6th Generation VW Beetle? This is a quick article to help anyone who is looking how to accomplish this project. You will find images and a video included in this article.

In many ways, the way exterior door handles on cars today, are easier to get off than they used to be. Many of the cars up to around the late 90’s, required removing the door panel to remove the door handle. Even though this article is about how to remove door handles on VW Beetles. The method is very similar with other makes and model cars today.
Reasons For Removing VW Beetle Door Handles
You probably already have your reason for needing to remove your door handle. It could be to replace it because it is broke, or you may need to improve its operation. I just wanted to go over a few things first. If you are looking to improve the operation by lubrication, there is very little to lube. With the door handle end out, which will be covered later. You can see some of the mechanics of that make the handle work. You can spray some white lithium grease on these parts but let me ask you this. Is the handle stiff or hard to pull out or does the door act like it is stuck a little? If it feels like it is sticking, look for the latch area. Spray white lithium grease up inside the latch area and see if that solves the issue. This is kind of a common issue with this generation VW Beetle. The key-lock cylinder can also need lubrication. I would recommend a graphite lubricant down inside where the key goes.

You may be replacing the door handle due to damage or repainting. If you are repainting, be sure not to spray any areas that are the mechanics of the handle. For replacement handles, shop here on Amazon. If you need to paint a new handle or the old one, get matched paint from Automotive Touchup Paints.
How to Remove Door Handles on VE Beetles
This isn’t a really long process and the images and video below will probably serve you best. You do not have to pull the door panel off. Everything is accessible from the outside edge of the door. You will mainly need three tools. A flashlight, a small flat blade screwdriver and a T-20 Torx head socket. The Torx bit will require a ratchet and an extension, so that is five tools in all. Door Handle Removal Procedure 1. Open the door and look at the end of the door 2. Remove the rubber plug at the end of the door

3. Unscrew the T-20 Torx bolt about half way out – about 2 turns out. You do not have to remove the bolt. 4. Pull the “Handle End” straight out of the door

5. Look for a plastic catch that is hooked to the actual handle, this needs to be disconnected 6. Using a small flat blade screw driver, pop the cable catch out of the door handle
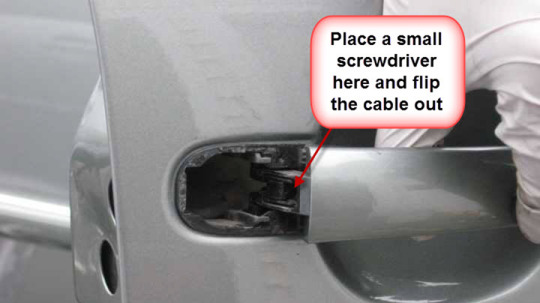
7. Once the cable catch is disconnected, slide the handle towards the rear and the handle will come off from the door
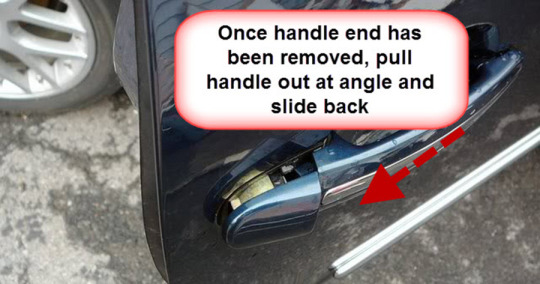

As you can see, you have to pull the handle to the rear of the door and pull out at the same time. The front of the handle is a cradle hook. There is nothing it attaches to; it just sticks into the hole in the door. To reinstall, just reverse the removal process. I recommend watching the video as well to fully understand the removal and reinstall process.
How To Video
Conclusion
Your biggest obstacle to remove door handles on VW Beetles will be the cable catch. Both on popping it free and hooking it back up. To me, it isn’t that obvious, especially if you have never done one before. On installation, after putting the handle back in. You will need needle nose pliers to pull the catch cable into place. All it takes to hooking it back up, is to snap it back to the handle with your finger. You will find that the removal process is much like a KIA and Hyundai Door Handle Removal. If you have any questions, be sure to reach out and contact me and I will help you the best I can. Be sure to watch the video as well. Read the full article
0 notes
Photo
[Image description: A black square with white text at the bottom that says, ‘There’s a plant called the “TomTato” which is a cherry tomato plant with potatoes as roots. It yields large quantities of both tomatoes and spuds.’ Above this is a photo of a person holding one of these plants, which is tall with several red cherry tomatoes visible in the leaves and several potatoes growing in the roots. Text above this says, ‘source is mentioned in our blog: www.UnbelievableFactsBlog.com / Image source: hompson & Morgan TV/youtube.’ \End description]
[Reblog comment plain text: Ok but you left out that they call it “ketchup n’ fries in marketing. \End PT]
[Video description: A video titled ‘Tomato Potato Graft’ that starts with a shot of a potato plant with white text that says ‘Grafting 101: Tomato onto Potato.’ The narrator says, ‘This summer, I’m going to conduct an experiment. I’m going to graft a tomato plant onto this potato plant. This is my potato plant.’ The next shot shows a cut tomato plant with its stem resting in a glass of water. The narrator says, ‘This is my tomato plant, a sucker.’ The next shot is from the POV of someone holding the tomato plant in their left hand and a razor blade in their right. The narration says, ‘What you want to do first is cut a V into the stem of the tomato plant. You want to expose as much cambium as possible. Something like a 45-degree angle is good. You want to make it kinda like an arrowhead, but flat at the base.’ The hands rotate the stem to show it from all sides. The narrator says, ‘Here’s a closeup,’ and the next shot shows the stem up close. The next shot shows the cut stem in the glass of water. The narrator says, ‘Toss that in some water while you prep the potato plants.’ The next shot is of the potted potato plant. The nattor says, ‘Here’s the potato plant, and I’m just removing some of the branches. You want to find the closest diameter to the tomato stalk that you just cut.’ The narrator pulls branches off a stalk as they speak and then cuts an end off one of the stalks. The next shot shows them cutting the potato stalk with their razor. They say, ‘Here, you want to cut a vertical incision into the potato plant, about the same as the length of the tomato plant. Here, you’ll slide the tomato plant into the potato plant, forming the union. This is where the graft is. It should be nice and snug. And yup, just like that.’ They take their hand away, showing that the groove in the potato plant is able to support the grafted tomato plant. The narrator says, ‘The next thing you want to do is wrap it in some plastic. You can use Saran wrap or cut up a piece of grocery bag like I’ve done here, and you want to secure it with a rubber band or some tape.’ They demonstrate using a rubber band to hold the plastic wrapping in place. They say, ‘Now, because the stalk is kind of thick, I wanna fasten it with a piece of plastic like this half of a plastic knife, and I just tape it up so it’s nice and snug and secure.’ They use blue tape to hold the knife piece to the graft and say, ‘There you have it. The first one. Bottom will be potatoes and the top will be tomatoes.’ The camera pans down the plant to show the pot. The narrator says, ‘They’ll pull double duty.’ The camera pans back up to the top, where the tomato part is slightly wilted. The narrator says, ‘It’ll spring back to life, the tomato. We’ll do it again.’ The next shot shows them cutting another tomato plant and grafting it to the potato. They say, ‘Cut the tomato plant in a V shape, slide it into the potato plant. I’ve done this about four times to the potato plant. And then we’ll track its progress.’ The camera pans around the entire plant, with four grafts. ‘The top and bottom support each other, so it pulls double duty. Double the fruit, or vegetable.’ \End description]
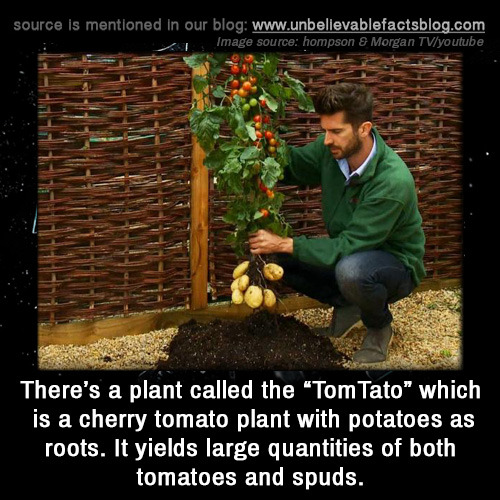
There’s a plant called the “TomTato” which is a cherry tomato plant with potatoes as roots. It yields large quantities of both tomatoes and spuds.
31K notes
·
View notes
Text
Adventures in boot customizing.
I have these knee high Airwalks. I really only wore them a few times, despite having them for many years, and the reason for that is because they had white laces and white edges. They look a lot like Converse. And like, that's cool and all, but I'm really much more into the all black all black look, not black with white accents. So I decided to change them to suit me better.
First I decided to throw them in with some other things I was dying. The insides of the shoes were white. And while they'd really be largely not visible while being worn, idk, I felt like sometimes it might peek through, and in particular the edges where the outside black canvas met the inside white canvas was visible enough that it would bother me, even if no one else really noticed it much. So yeah, I tossed 'em in to dye the insides black, and I threw in the shoelaces too.
The dye job worked great on the shoes* (*mostly, I'll get back to that). It also worked on the laces except for the ends that were covered in the plastic ends. I was hoping the dye might seep in a bit better, like creep their way down into those, but it didn't really do that much so eh. I painted the ends and that would have been fine except that they weren't really long enough, so I had to get some new laces that were longer anyway. On that note, my calves aren't even like, that wide, but this isn't the first time I've found laces on knee highs being not long enough. Thicker legged folks are being done dirty out here in the shoe world 😔 *Back to the bit about the dye though. The canvas took the dye well - they're a nice, uniform deep black. But it did cause the glue of the edges to come up in a couple of spots. First I tried my E6000 to glue them back together but it didn't stick all that well. I can almost never seem to get my E6000 to stick as well as it seems to for other people. I wonder if it's just a temperature thing or...? Not sure. In any case, it didn't work like I'd hoped, so instead I got out my Aquaseal (glue for shoe soles) out of the freezer and used that. It had a decent sized dried plug that I had to use my Xacto to cut out first though lol. This time I tried to scrape the glue off the opening some so there wouldn't be a flat skin of glue to dry there hopefully. The Aquaseal worked great, sides glued back on - though there's a couple of shiny spots where glue got up onto the canvas. I'll just color that over with a Sharpie or something at some point.
I sewed some chains on the front! I like how those came out :)
I painted the toe caps and sides with black leather paint. Now these parts are rubber, and the paint company doesn't recommend you paint rubber because it won't bond well, but that's not really been the case for me. It seems to stick just as well to that as the leather or faux leathers I've ever painted over so 🤷
I decided this was a tad shinier than I wanted though, so I got some matte finisher. Well. That didn't work so great lol. I thought because it would sit on top of the paint it was made to work with it would be fine, but it wasn't. Probably because of the rubber base...? It didn't exactly like... bead up I'd say, but it didn't... not bead up? I'm not sure how best to describe it. Like it sort of pooled in some areas and not others, and when it dried it was very streaky, like rain lines on something.
The next step is removing all the previous paint and finisher as best I can using 91% rubbing alcohol. This works like a charm, by the way, but it is a lot of work because the edge bit in the front that has a lot of texture to it. The non-textured parts come off pretty quickly with just a little bit of work - if only all of the edge was smooth lol. I've done one shoe already but will save the other for tomorrow. I've kind of had enough of the smell of the rubbing alcohol for tonight. I've heard acetone can also work for this kind of paint removal, but I've also heard mixed results about acetone, and that rubbing alcohol works better. Since I have more rubbing alcohol on hand than I do acetone, I went with that.
Once I finish removal, I can paint the edges and toe cap again. I've gotten a flat black paint which is meant to dry much less shiny. Won't be using a top coat this time, so it may not be as durable as it would have been if the finisher had worked, but ah well. I don't mind if I have to do touch ups now and then if it means I'll actually wear these shoes instead of them sitting around collecting dust.
#not that anyone's really interested lol#just rambling to myself about what i've been up to#i'll post a picture when i finish probably
1 note
·
View note
Text
Storm Collectibles Samurai Shodown: Nakoruru (Review)
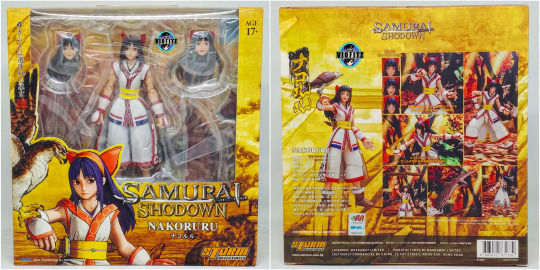
Introduction:
Storm Collectibles is a Hong Kong based designer and manufacturer of action figures. Known for making officially licensed, collectible action figures, most notably from fighting game series and iconic figures. Aside The King Of Fighters series, they also aquired the license to make Samurai Spirits/Samurai Shodown action figures. The figures were made into 1/12 scale with feature numerous points of articulation, interchangeable head sculpts and pairs of hands, and special fighting effect parts. Today, the review is going to focus on Nakoruru, she was given with a standard boxart like Blue Mary and Jin Kazama. With a visible large window plastic, we can almost see the whole contents. The front part was printed with "Samurai Shodown" logo with Nakoruru name in both japanese and romaji, her Samsho render artwork portrait, age 17+ print which means the figure is for 17 years old or above. And SNK corporation logo prints. While the back part is mostly shown the figure's promotional photos showing how the figure works.
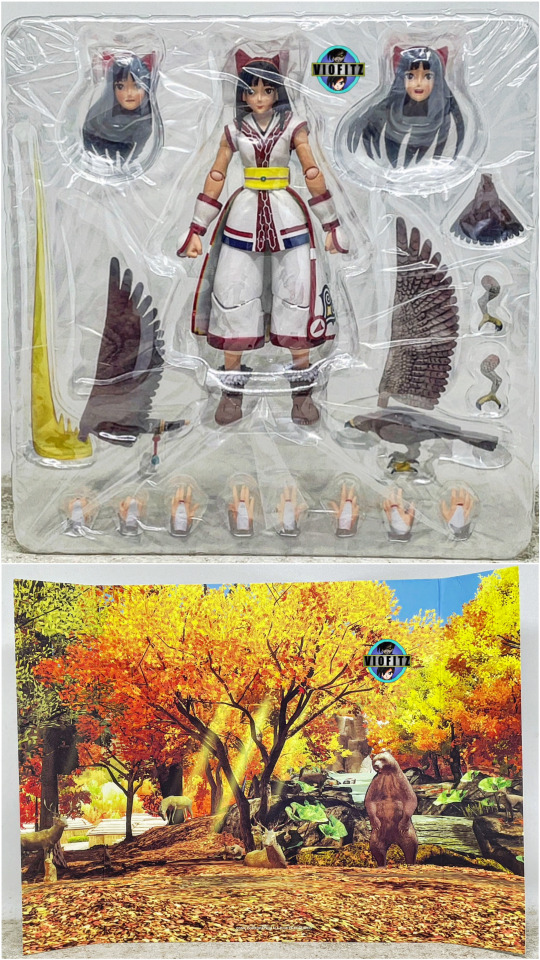
Contents:
Nakoruru comes with her main figure, she's included with 3 interchangeable head sculpts in total, 5 pair of hands in total, Mamahaha figure along with his option body parts, Chichiushi dagger with the sheath and dagger's slash effect for her certain dagger scenes. Her background paper inside the box is a diorama stage of Kamui Kotan's forest in Autumn weather.
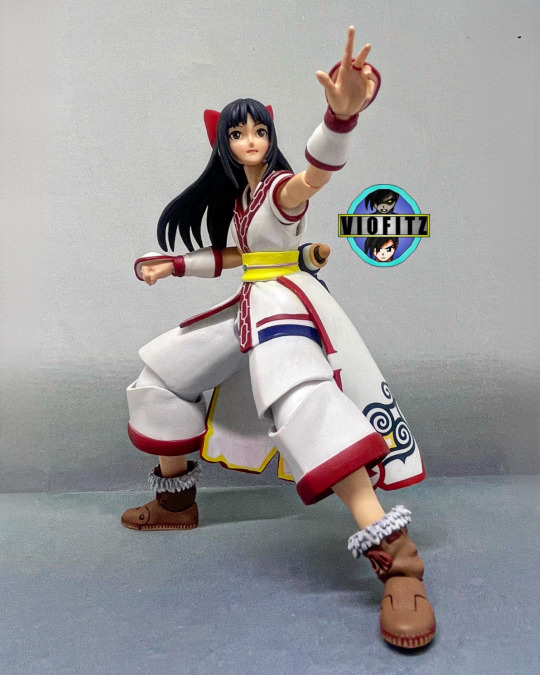
Nakoruru is a Japanese Ainu teenager girl with small and slender figure, she has long hime cut black hair with blue shades. Her getup was based on Ainu clothing consisting white dress with red trim and some part has navy blue trim & motives. Red bow tie headband, her headband has some yellow lines. And brown boots. She was depicted to be a petite girl with a lovely appearance and personality with an "innovative" character.
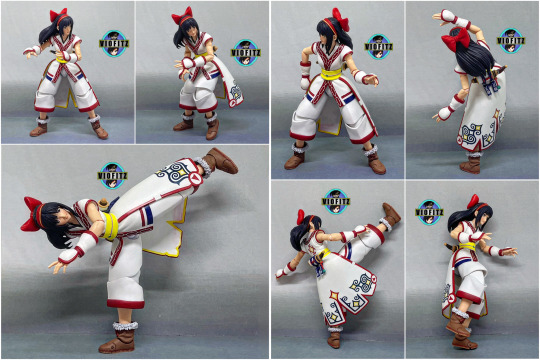
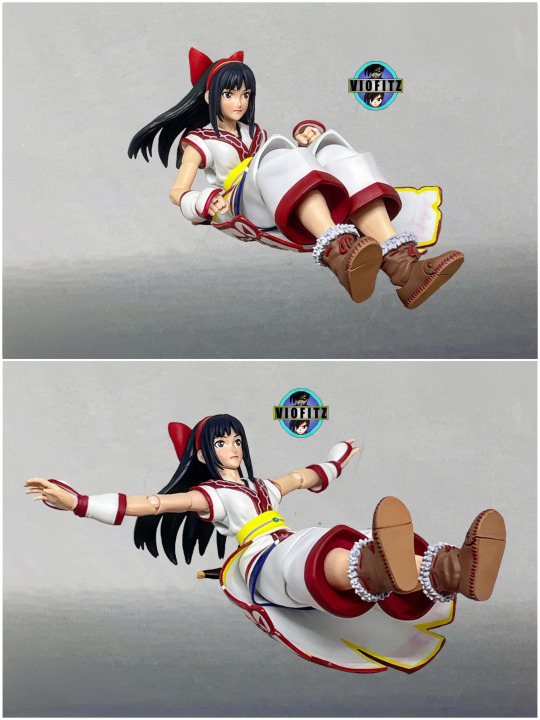
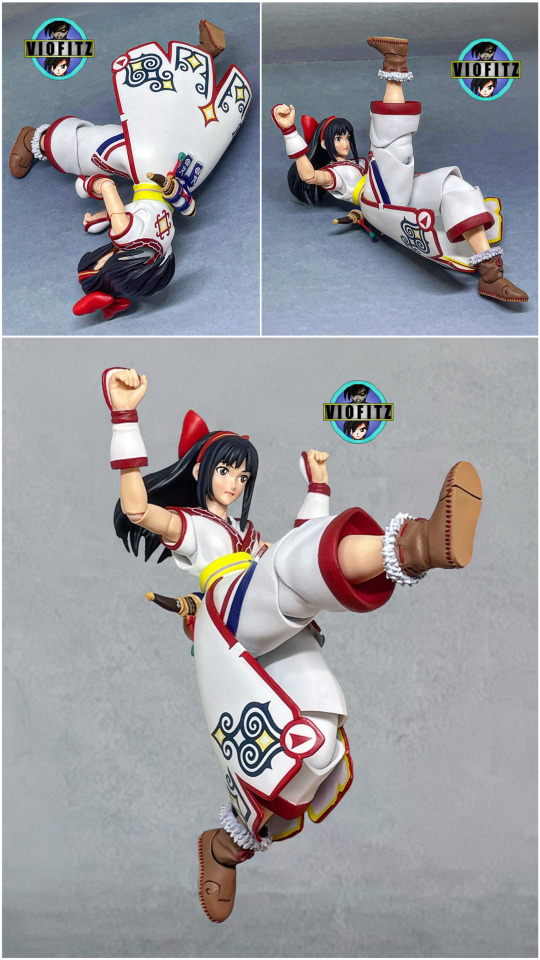

Her articulation points consisted movable head, torso which is hidden underneath her clothing, arms with bicep cut, single jointed elbow, wrists, legs with thigh, single jointed knee, leg cut, ankles and tiptoe part. Like Jin, her gauntlets are movable and also removable since it's separate pieces so, we can see her bare lower arms but, her back hands wears knuckles. Her knuckles may look funny as there's no wrist band but, all depends your point of view on posing her. What I really hate from her is that single jointed are very inconvenients since I couldn't make a dynamic pose, especially when it comes to folding her elbows and knees.
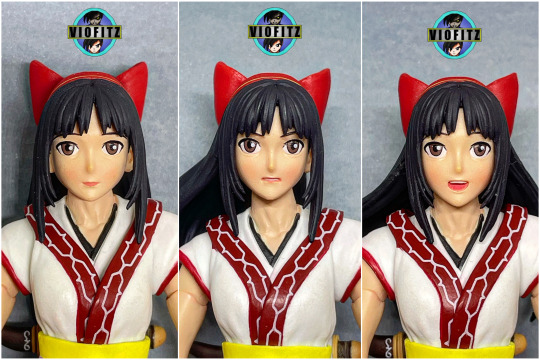
Nakoruru was included with 3 head sculpts (HS) in total, first would be her standard flat expression. Second HS is her serious expression with a grit and third is her cheerful smile with open mouth. Well, her face and expressions are looking rather gentle like how she was depicted but, like Mary she felt kinda bland and empty. Her head consisted removable bow tie, back hair and head band. Yes, it's swappable but, I don't understand on having removable 3 headbands and bow tie since all headbands are identical and swappable to every hair parts. Her HS, back hairs as well as her bow tie head bands are mostly made from hard materials but, her fringes were made from a soft rubber... Sadly, some of her eyes paintapp are rather sloppy, although they surprisingly didn't really bother me.
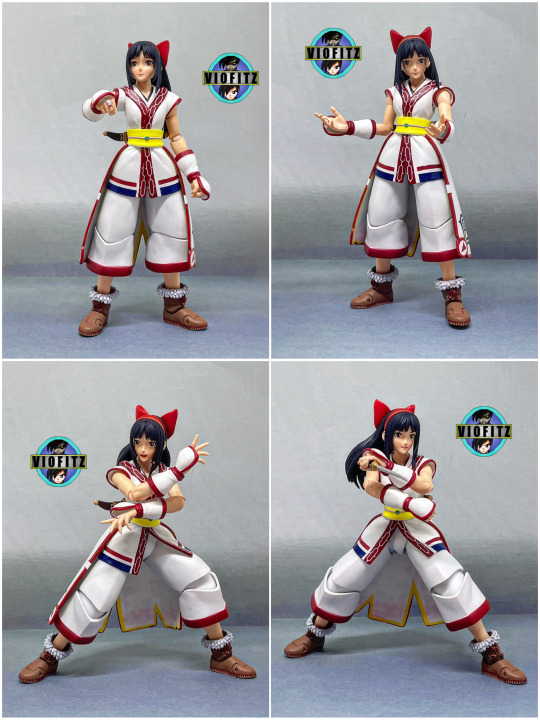
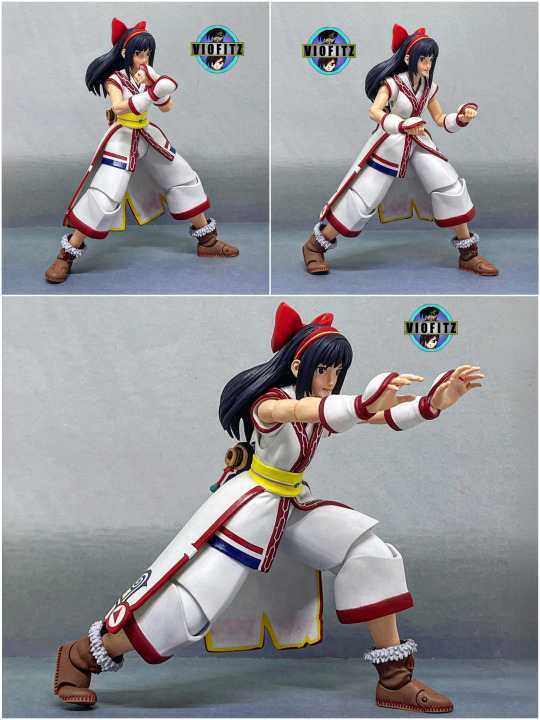
Nakoruru comes with 5 pair of hands in total, that would be: fisted hands which was already attached to her main figure, 3 kinds of unique open splayed and gripping hands for her necessary battle poses. Her hands were also made from soft rubber materials.
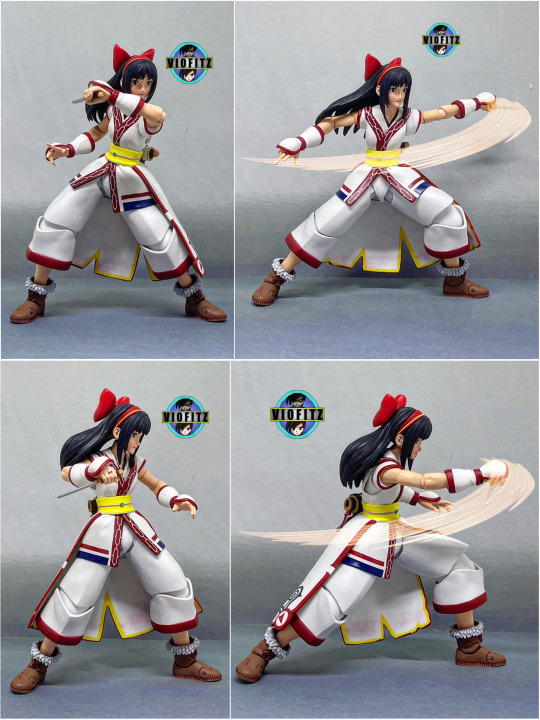
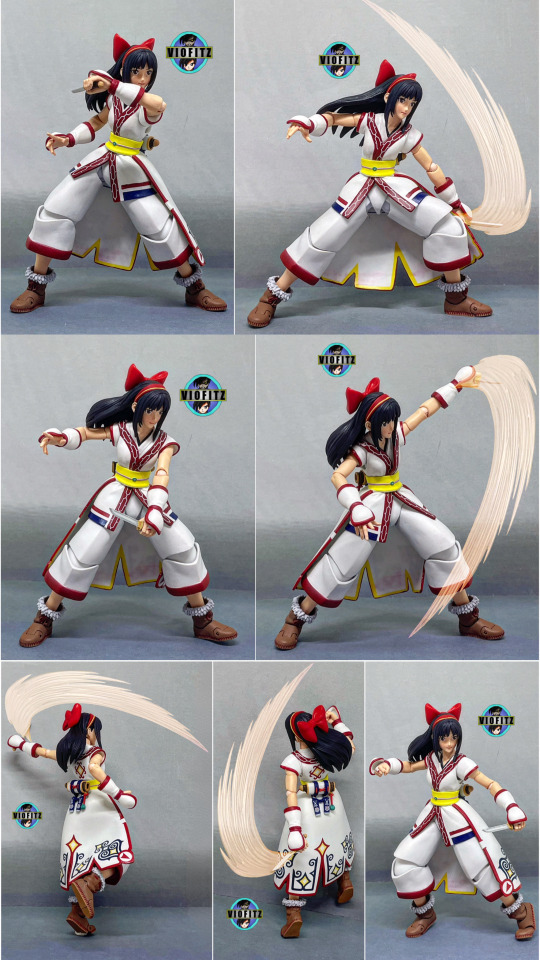
Nakoruru's weapon is none other than her Chichiushi dagger. They came with dagger and sheath and the sheath usually stored on her rear holsters. However, instead of having a separated sheath, I'd rather prefer they'd just make a single dagger and the sheath remains glued or just one mold to the rear holsters. When you take off the sheath from the holsters, it leaves a paint transfers. To be honest, her dagger is way too small.
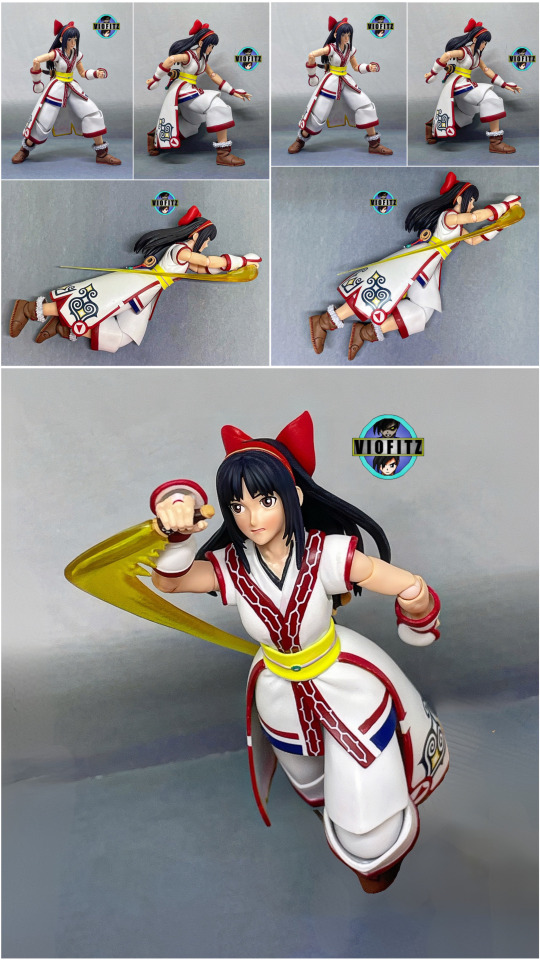
Chichiushi Dagger's slash effect. Of course, the dagger won't be good without this especially on how small they're made. The effect was made from a soft rubber material and you can simply inserts the hole into the dagger's blade. The effect was made from a semi transparent materials that is mainly translucent yellow.
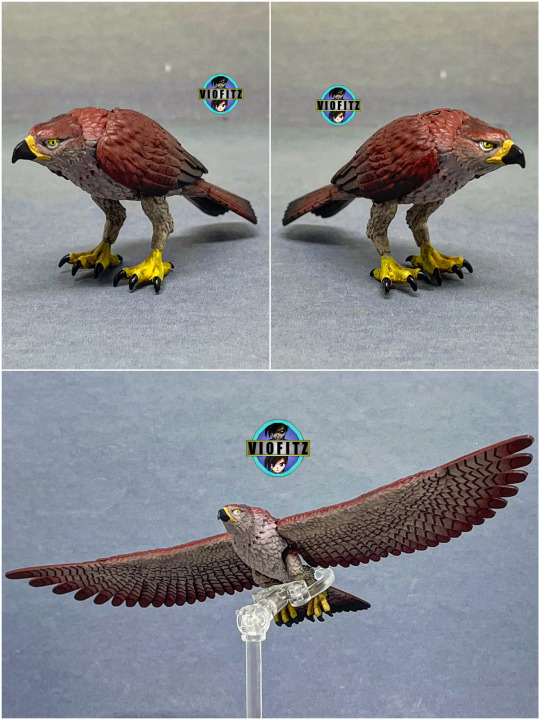
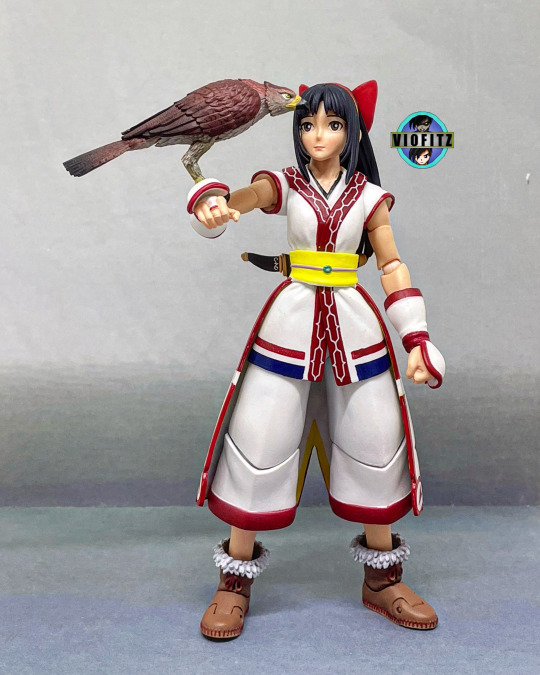

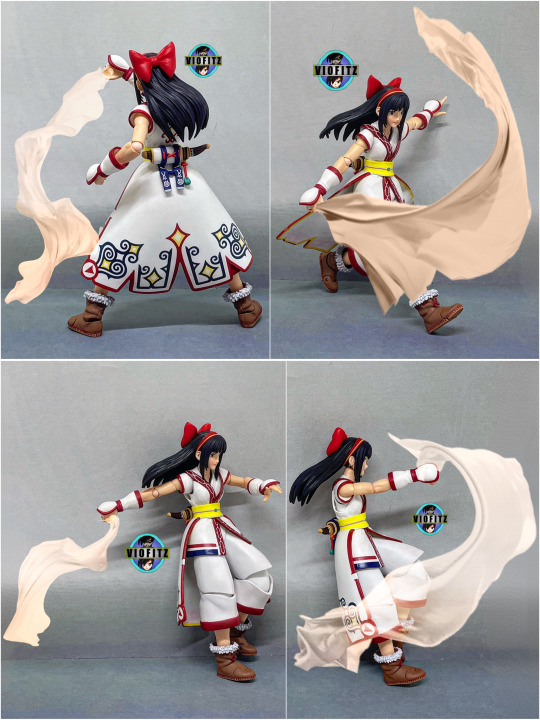
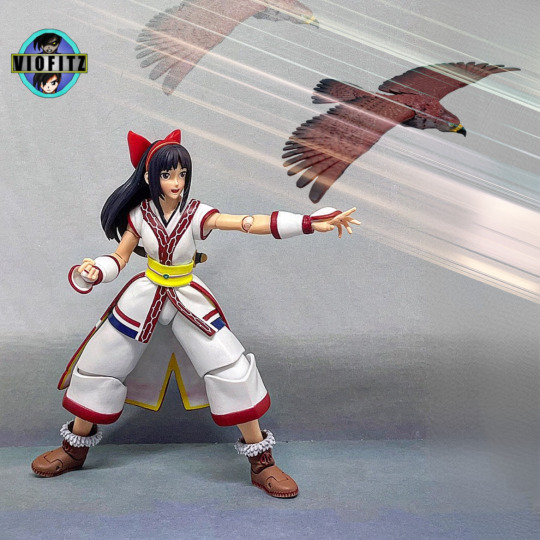
Her Mamahaha accessory were also included for her companion during her fight, I gotta say, they did good on the sculpt although it's not something special since he's quite similar to many animal figures that was sold by many toy companies. Except, Mamahaha was included with option parts of wings and legs, his head is movable but, not quite much. With his alternate legs you can hang his claws on Nakoruru's gauntlets. And with his spreading wings part you can either make his flying pose or you can even make Nakoruru hanging her hands on his claws by using Nakoruru's grasping hands.
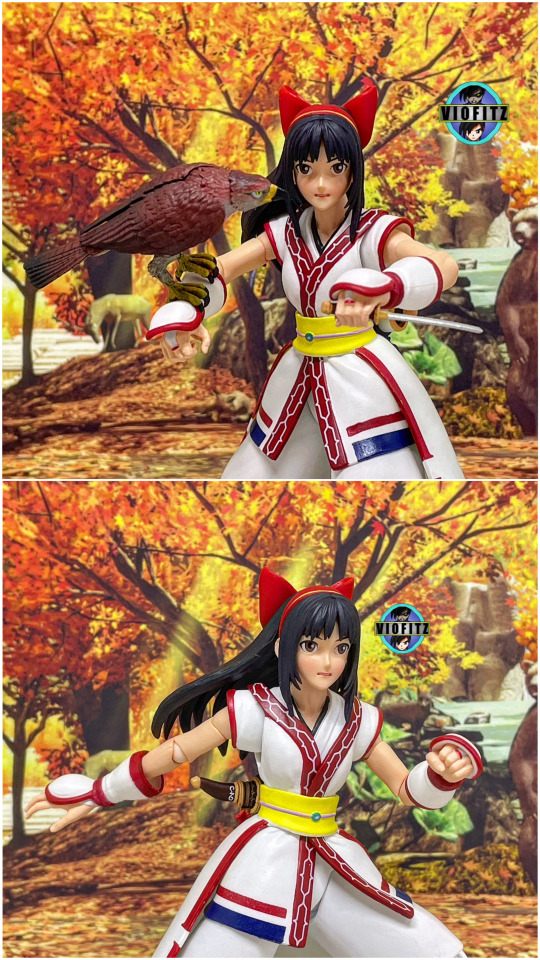
Lastly, her diorama stage was a printed of the Kamui Kotan's forest in Autumn weather background which is really fitting for Nakoruru who loves nature.
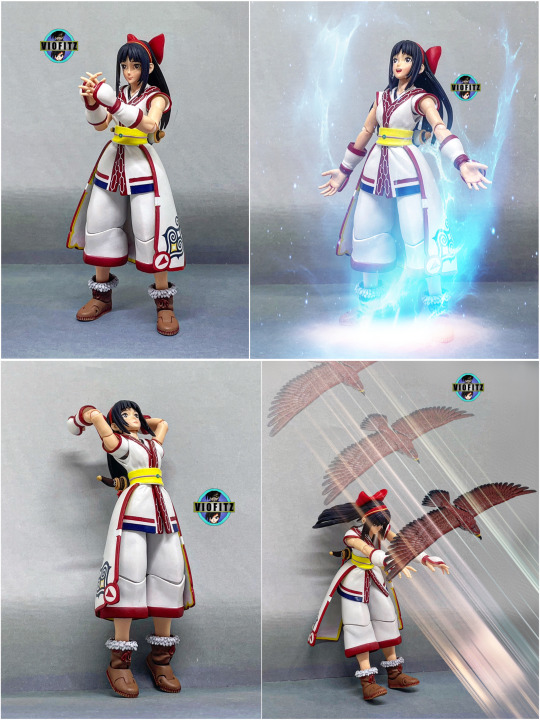
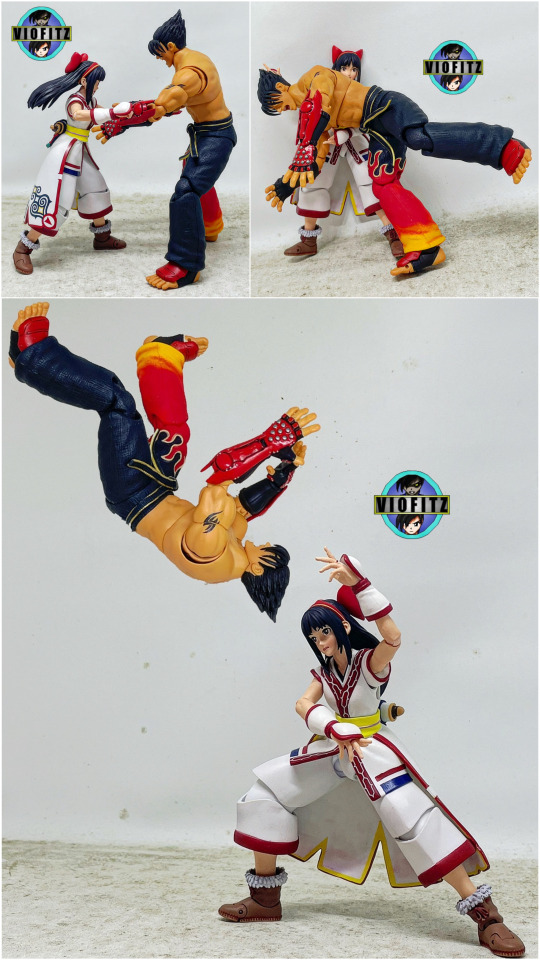
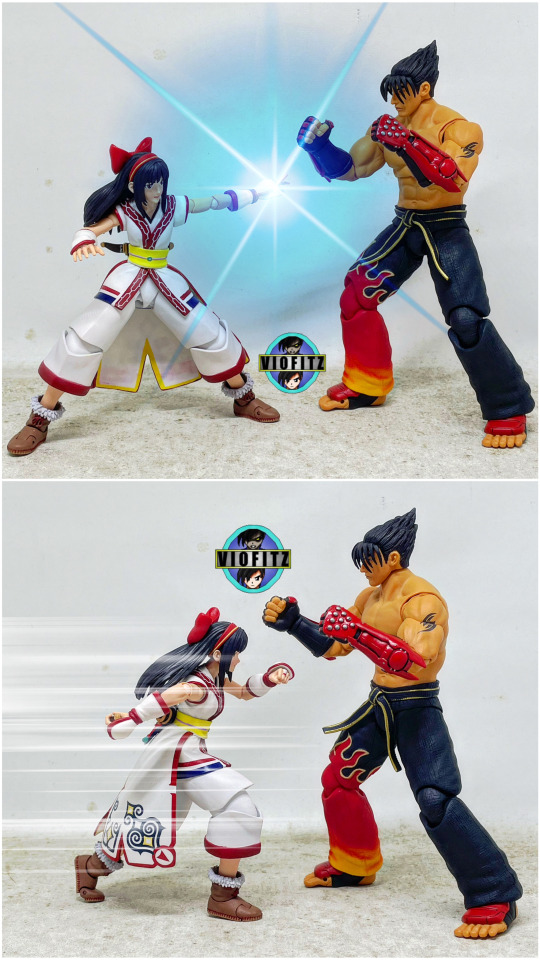
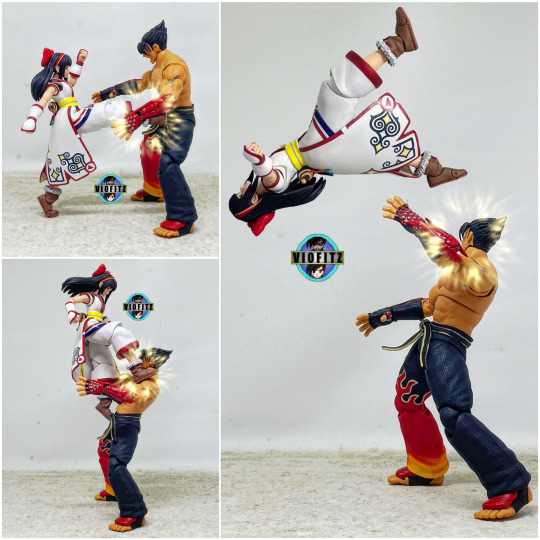
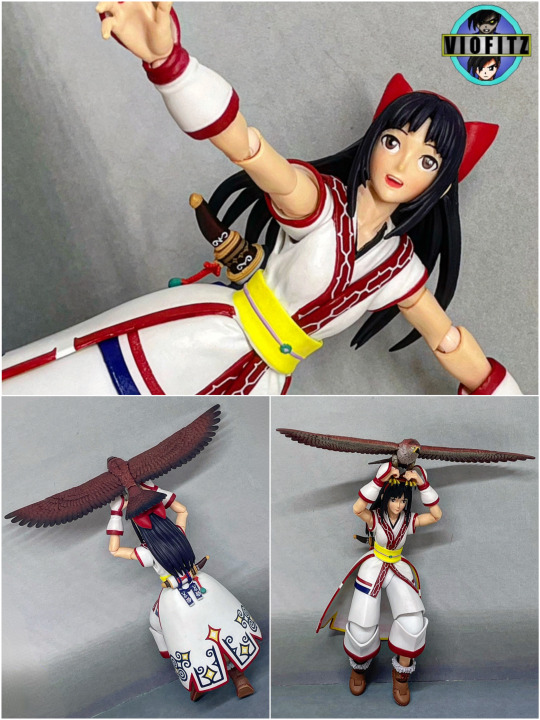
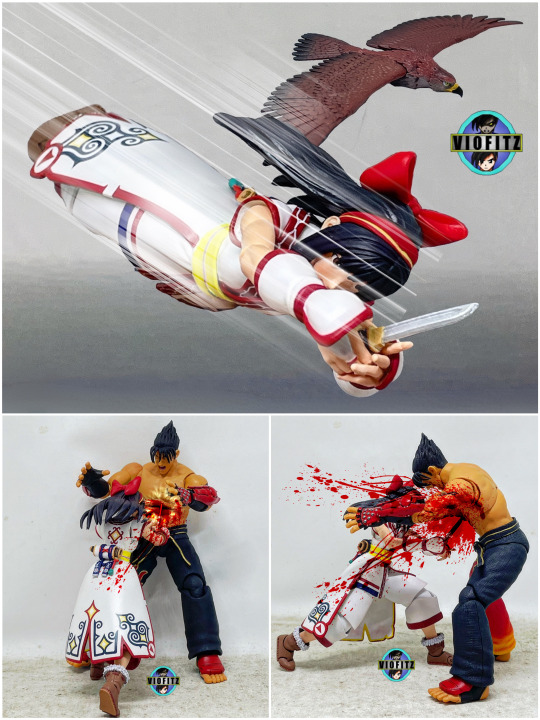
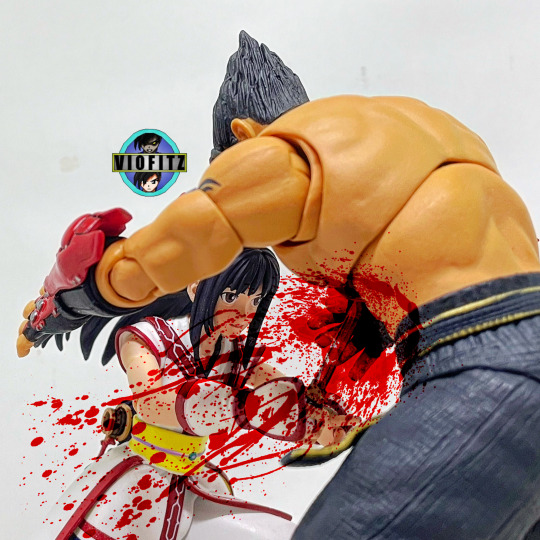
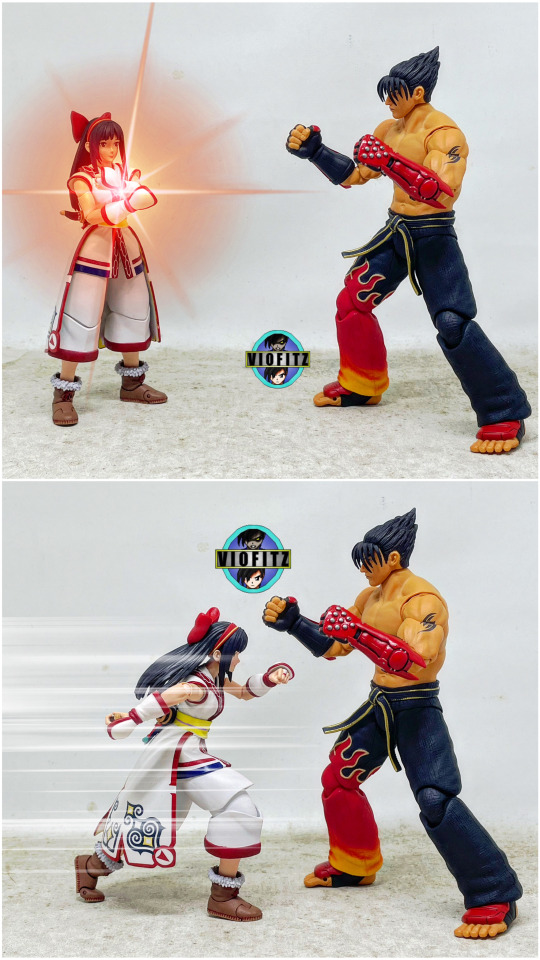
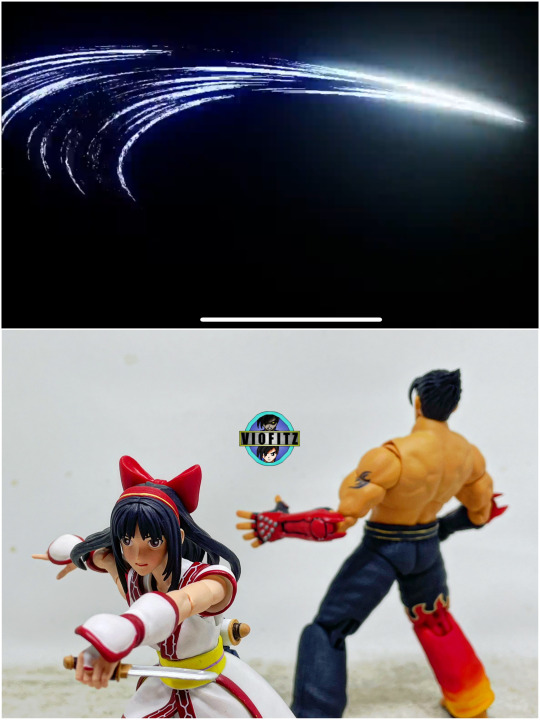
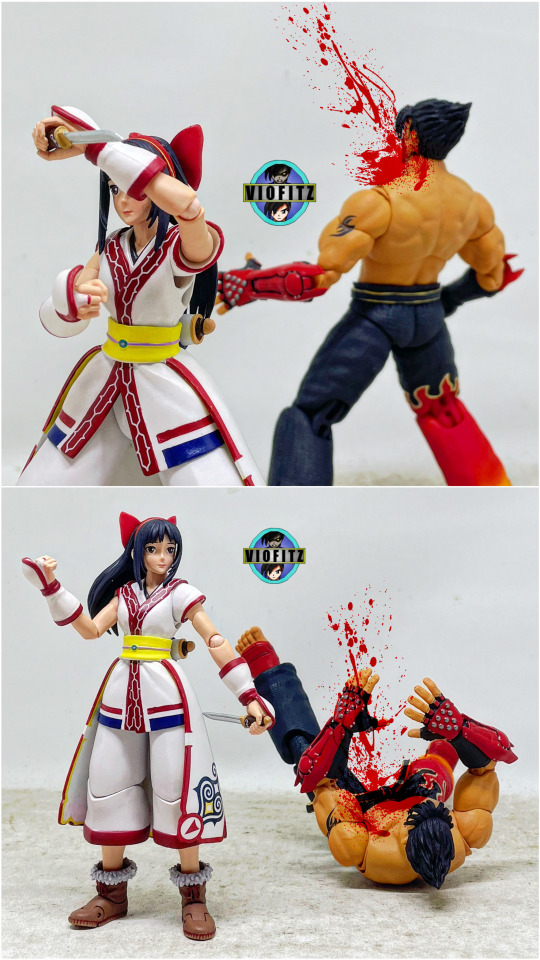
Thoughts:
Nakoruru is my third Storm figure collection but, contrast to my previous reviews... Nakoruru appeared to be very disappointing in quality, she got so many sloppy paintapp and paint transfers due to her folding fabric and her single jointed articulations are very-very inconvenients. Mamahaha doesn't come with his flapping wings which is important for his battle stance. She's also lacking her Kamui Rimuse clothing part which was actually one of Nakoruru's iconic moves. A pointy finger hand would be needed for recreating Nakoruru commanding Mamahaha. I gotta admit, I had a terrible time handling the figure, although I could still make tons of her other move lists from the game.
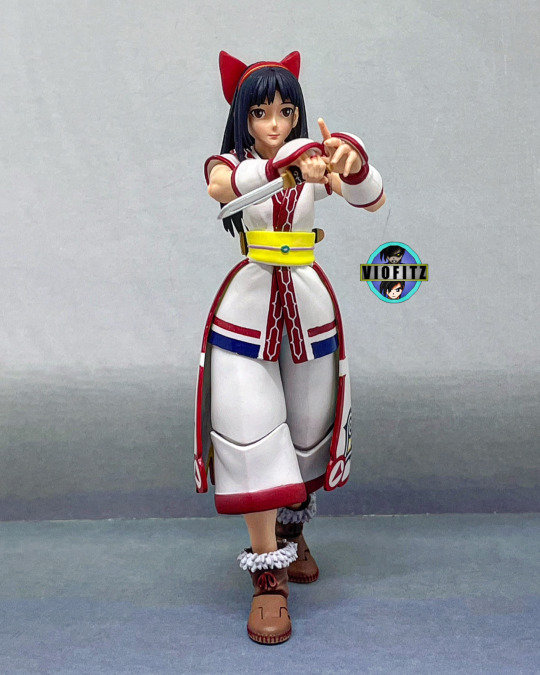
Thank youu for reading😁🙏🏻
#action figures#toys#collectibles#storm#storm collectibles#snk#snk playmore#samurai shodown#samurai spirits#nakoruru#tekken#tekken 7#jin kazama#bandai#bandai namco#toy review
1 note
·
View note
Text
What Makes Smok Nord Coils A Good Choice? Let’s Find Out Here
The younger generation of today vapes more frequently because they like to try new things. Electric vaporizers are one of them. A more recent trend is using electronics while smoking. A few manufacturers provide a limited number of disposable vape items. In the past, people utilized hookahs with different coil configurations, but that was a little risky. Smok Nord Coils offer 5 coils in a single pack with various possible ohms.

One of SMOK's most recent products, the SMOK Nord is a special pod vape. Instead of using single-use pods, the SMOK Nord uses changeable coils with a variety of coil configurations. There are three coils available as of right now.
What are the amazing features of Nord Coils?
The Nord Coils are a fantastic device with simple controls. This has replaceable coils with different ohms instead of utilizing a single-use pod. The Nord Coil from Smok is one of their best-selling items. Smok Nord coils distinguish from the competition. The resistance twist and SMOK pull-out features of the latest pod vape. In this article, we'll cover every detail about Smok Nord Coils.
What distinguishes Smok's Nord Coils structurally from others?
The construction of Nord coils is exceptional. The new coil for the Smok Nord was developed for use with the Smoketch Nord Pod System Set. One o-ring is on the underside of the coils, and two are on top. The rings are utilized for a straightforward plug-and-play method. Strong, delectable, and pleasurable smoke is what Smok Nord coils are designed to produce. The transportable Nord Ultra device is already available.
What traits do Nord Coils possess?
The three different kinds of Smok Nord coils are Mesh, Ceramic, and Standard.
Each helix exhibits a unique range of resistance:
0.06 ohm for the mesh
Standard: -1.4 ohm
Plastic: 1.4 ohm
These coils are designed to be swappable.
Each strip contains 50 milligrams of nicotine salt.
Mesh coils are suggested for twin coil structures with 20W.
0.8-ohm At 16W, mesh Nord-MTL coil operates.
Regular Nord coils are optimized for MTL.
Ceramic coils can withstand high temperatures.
Do you want to learn more about the Wattage Setting for the SMOK Nord Coils?
The Smok Nord Coils have three various wattage levels, making it a great choice for those just starting out. They include low, medium, and maximum levels. A different degree of taste strength and vapour production will be available in each arrangement. If you want to get the most out of your vaping experience, it is suggested that you commence on the maximum level and work your way down. You can be sure that your device will create the most taste and vapour by doing this.
What is the use of Smok Nord coils?
According to vapers, replacing the coil only needs to be done once every one to two weeks and is fast. To complement the e-liquid, some vaporizer users change their coil. Here are some easy steps that you can take to change the coil. Remove the capsule from the device. Remove the rubber stopper from the capsule and throw it away if there is any e-liquid inside. Use Kleenex to scoop the liquid out of the pod.
Try to remove any Nord Coils from the capsule by turning it up and down. Skip this procedure if the container doesn't contain a coil. Utilizing your new coil, apply the juice to the cotton wick material and ladle some juice down the pipe of the coil. Observe the directions provided:
Apply the liquid to the cloth until it is damp.
E-juice must be added because it enhances the flavour of smoking.
In between 4 and 9 minutes, the device will consume the e-liquid.
You can then attach the inductor once that is complete.
Find the hole in the pot, then set the flat sides nearest to the entryway on the flat side of the coil.
It is necessary to force the filament inside.
Now it can be filled.
Wrapping It Up
Every smoking product provides amazing exposure and enjoyment. The best taste is produced by the 0.6-ohm mesh coil, and you can use 50/50 nic salt vape liquid. Given that this object is electrical, use it only after thoroughly reading all instruction manuals and adhering to all safety precautions. Smok is not liable for incorrect or misused battery use. If you don't manage these sensitive gadgets correctly, they could burn you. Smok Nord coils include all required directions with their goods, but how you use them is up to you. Purchase the 1-pack of 5 new coils at the Smok Nord Coils store.
Additionally, they offer free shipping. Smoke Nore coils also offer good value for your money. Take enjoyment and safety in your vaping.
0 notes
Photo
If they're anything like the parks in Ontario by the border, then they're small, flat areas with a giant monstrosity of plastic and steel in the middle for children to play on, and no actual trees.
They are covered in nothing but turf grass and are mowed everytime something slightly grows.
Not a flower, tree, nor stone may exist there.
If there are trees, then it is only one kind and they are trimmed at the bottom so that no child may climb on them.
A polished prison cell of rubber and inedible decorative plants.
Life does not grow there.
It only visits.
It comes on holiday when the middle-class inconvenience of having no actual garden hits the children.
It is a single vestige of hell on earth.
They cannot exist without the vice and immorality of foolish bureaucrats who care not for the sanity of their people, but instead creating the perfect image of joy without diversity.
It is not a park.
It is not art.
It is not life.
It is not the innocence of childhood nor the enjoyment of peace in adulthood.
It is a fragile display of wealth.
It is a stamping out of creativity.
It is inanimate.
It is a distraction from the daily grind of capitalist hell, made to birth generation after generation of complacent and unquestioning workers, giving us a small taste of what they think freedom is.

122K notes
·
View notes