#let it sit for 30 secs and it’s the PERFECT texture
Text
it’s a cereal and ice cream for dinner kind of day tbh
#I had other stuff too but if it was up to me I’d just eat more cereal tbh#peanut butter and chocolate cereal balls my beloved <3#so tasty especially when slightly wet#I pour water into them and then immediately drain it out again#let it sit for 30 secs and it’s the PERFECT texture#literally one of my favorite foods#spoon talks
2 notes
·
View notes
Note
🌻sumflober
MOCHI RECIPIE:
Mochi is my favorite thing to make!!! Ever!!! I use the microwave for convenience, but I want to try steaming it one day. Here’s like. My rough recipie for it Idk it gets it to the PERFECT texture for me (I like mine chewy and firmer) so yeh eheh all of my tips, coming from someone who is only measuring for the first time (I eyeball everything normally). Makes a decent serving??
Ingredients:
- Glutinous Rice Flour (I use Koda Farms Mochiko) / 75g (I need more flour that’s why I’m not using too much)
- wator / 145g
- any kind of condensed flavoring (extract, syrups idk) / idk to taste
- any kind of granulated sweetener / again to taste, add more water if too dry.
- cornstarch for dusting
tools:
- spatula
- choptsticks when making batter(?) but spoon/fork also works just not my pref
- GLASS bowl/Contianer
-
combine water and flour until like. It’s got the viscosity of. Cum (YES I USE THIS AS A METRIC BECAUSE IT WORKS I DID IT AS A JOKE UNTIL I REALIZED IT’S EFFECTIVE IN GETTING THE RIGHT RATIO OF WATER/FLOUR DONT COME AT ME)
add in yir flavors!!! In drops, I did 2 vanilla, 1 peach, 3 coconut bc I’m putting this in peach cream chia pudding as a topping 😋 + sweetener I did 1/2 tbsp of truvia
I added food color too for fun, but keep it light (it will get darker trust) v light pink for peach color!!
COOKING:
cover the container first! And make sure it’s got a bit of an air hole. I use these silicone crofton bowl cover things
My microwave is 1000w! Adjust for power. cook in 30 sec intervals and stir between each one. This is VERY important becuase it will burn/overcook and die because this is a microwave. Also switch to a spatula NOW if you haven’t, it will be hell if you don’t. Also get out yir cornstarch.
just. Do it until it has a soft, but rubbery texture that bounces back. It might stick, but it can’t be creamy or anything. Mixing well helps.
when ready to transfer from container, get an airtight container and put come cornstarch in it. Then close it and shake it a ton this will make life easier.
let the hot mochi sit a bit, a few minutes (stirring helps) before transfering it to your container. Shake it again, like an insane person.
then let it cool in the container or store it for up to like 3 days and then YUMMY CRATULARUONS /REF YOU MADE IT
4 notes
·
View notes
Text
Will Cain's Margarita Recipe: A Refreshing Beverage Guide

Hi there, it's me again! I'm here to share with you my favorite margarita recipe - the Will Cain Margarita. This delicious and fruity cocktail is perfect for any occasion. It has a unique flavor that'll keep your taste buds happy all night long!
In this article, I'll be giving you step-by-step instructions on how to make this margarita so you can enjoy it at home. I've included some of my own tips and tricks so you can get the most out of each sip. So grab your shaker, let's get mixing!
Gather Your Ingredients
I'm excited to share with you my go-to margarita recipe! It's simple, delicious and packs the perfect punch. Before we get started, let's make sure you have all your ingredients on hand. The most important thing is getting the mixing proportions right so that you can enjoy a balanced drink without too much alcohol content.
You'll need tequila, triple sec, lime juice and some ice cubes. For every two parts of tequila - I recommend using a good quality silver or reposado tequila - add one part of triple sec and one part fresh lime juice. If you want it sweet enough to mask any lower grade tequilas, just up the triple sec by half an ounce or more depending on how potent you like it. And lastly, don't forget plenty of ice for those great margaritas in summertime!
Once everything is ready, fill your shaker with ice then pour in all the ingredients before giving it a good shake to mix them together properly. When done correctly your margarita should be perfectly balanced between tartness from the limes and sweetness from the triple sec – not overly boozy yet still packing enough of a kick to keep things interesting!
Prepare The Tequila Mixture
I'm going to show you how to make a delicious Will Cain Margarita! First, I'll walk you through the tequila mixture. Utilizing tequila, mix together 1/2 cup of lime juice and 1/4 cup of triple sec. If desired, substitute in orange or pineapple juice for an extra fruity flavor. Next, add 2 tablespoons of simple syrup (or agave nectar) and stir until all ingredients are combined.
For those who don't want alcohol in their drink, try substituting club soda with some fruit flavoring instead of the tequila-lime combination. You can also replace the triple sec with any other type of liqueur that is available. Finally, add ice cubes to your glass and pour over your prepared margarita blend. Enjoy!
Combine The Ingredients
Now that the tequila mixture is prepared, it's time to combine all of the ingredients and create a perfect margarita. To make sure your drink has the right amount of alcohol content I recommend using measuring spoons or a jigger. Start by pouring two ounces of your prepared tequila mixture into an old-fashioned glass filled with ice cubes. Then add one ounce each of triple sec and fresh lime juice. Mix together all the ingredients in the glass for about 30 seconds until everything is combined well.
When mixing drinks, you should always use certain techniques to ensure great flavor and texture. Make sure you are stirring continuously while adding each ingredient so they blend properly. Also be careful not to overmix as this will affect both the taste and consistency. You want to achieve a smooth yet slightly thick consistency which can only be achieved if done correctly. Lastly, don't forget to garnish your masterpiece with some salt on the rim like a true professional!
As soon as you've added all the necessary ingredients and have finished stirring, you'll have yourself a classic margarita cocktail ready for sipping! Now just sit back and enjoy every sip without worrying about having too strong or weak an alcoholic kick - because you followed my advice on getting the measurements precisely right earlier!
Add Garnish
I love adding a unique garnish to my margaritas. It's the perfect way to finish off any drink with flair and style. A great pairing idea is to place colorful fruit slices around the rim of the glass, like oranges or limes. This not only looks beautiful in presentation but also adds an extra hint of flavor that compliments the tequila-lime mixture inside.
For something more creative, I suggest infusing herbs into your margarita for a truly special taste experience. Basil, rosemary, mint and thyme work especially well when combined with citrus juices and tequila - plus they look amazing! You can either muddle the herbs before mixing them in or use fresh sprigs as a garnish on top of the finished product.
Serving suggestions are always important too – it's all about creating an eye-catching display that will impress any guests you may have over. Margaritas make excellent centerpiece drinks for social gatherings since their vibrant colors stand out amongst other beverages. Place some glasses filled with ice cubes and colorful fruits around them to really complete the look!
Enjoy Your Will Cain Margarita!
Now it's time to add the finishing touches! Start by garnishing your Will Cain Margarita with a lime wedge and some salt around the rim of the glass. This will give your drink an extra kick of flavor, making it even more delicious. You can also experiment with different cocktail variations if you'd like - try adding muddled fruit or flavored syrups for a twist on this classic margarita recipe.
Once you've added all your desired ingredients, be sure to give your Will Cain Margarita a taste test before serving. If you're satisfied with how it tastes, pour yourself (or someone else) a glass and enjoy! Keep in mind that this is just one take on the traditional margarita recipe, so don't hesitate to make adjustments as needed until you get it just right.
Cheers! With the perfect balance of tartness and sweetness, there's no doubt that this delicious concoction will be a hit at any gathering. So go ahead - grab another glass and share the goodness with friends and family alike. Let's raise our glasses to a lovely evening filled with good company, great drinks, and lots of laughter!
Frequently Asked Questions
What Type Of Tequila Is Best For This Recipe?
When it comes to mixing up a margarita, you want to make sure that you are using the best tequila for your recipe. Blending techniques and tips will help make this drink even tastier!
Generally speaking, silver or blanco tequilas work best in margaritas as they are lighter and less expensive than other varieties. Silver tequila has more of an agave flavor profile compared to gold or reposado which can be too sweet for some drinkers.
If you have access to high-end tequilas like Anejo, then opt for those since they tend to yield a smoother taste when mixed with citrus juices.
What Other Ingredients Can Be Added To The Margarita?
When making a margarita, there are many ingredients that you can add to personalize the flavor. If you want something more than just tequila and lime juice, consider adding other fruit flavors like orange or mango for some sweetness.
You could also give your glass a salt rim for extra texture and savory taste. The possibilities are endless when it comes to making a margarita - have fun with it!
Is It Possible To Make A Virgin Version Of This Margarita?
Yes, it is possible to make a delicious virgin version of the classic margarita. All you need are non alcoholic substitutes like limeade or orange juice in place of tequila and other alcohol.
You can also use blender techniques such as muddling fresh fruits like strawberries and limes for extra flavor. With some creativity, you can still have all the fun of this traditional drink without any of the alcohol!
What Type Of Glass Should The Margarita Be Served In?
A classic margarita should be served in a traditional rocks glass. This is typically a short tumbler with straight sides, and it's the perfect size for serving up one of these delicious cocktails.
The size of the glass can vary depending on how much you're making; just make sure that whatever size you choose fits enough ice to keep your drink cold without becoming diluted. To finish off your cocktail presentation, add garnishes like lime wedges or salt rimming around the edge of the glass.
How Many Servings Does This Recipe Make?
When it comes to portion sizes and alcohol content, this margarita recipe typically yields four servings.
Whether you're hosting a party or just looking for something refreshing to make for yourself, Will Cain's Margarita Recipe is sure to satisfy your craving. It also makes enough for you to share with friends!
Conclusion
Making a margarita is easy, fun and delicious! With the right ingredients, you can make an amazing will cain margarita. Start with quality tequila as it's the base of this cocktail.
Add some fresh citrus juice to bring out the flavor, then sweeten up your drink with simple syrup or agave nectar. You can also get creative by adding other flavors like muddled fruit or herbs for unique twists on classic recipes.
Finally, serve in a salt-rimmed glass over ice and enjoy your homemade Will Cain Margarita! If you're looking for something nonalcoholic, consider making a virgin version of this recipe using club soda instead of tequila. Whatever variation you choose to make, I'm sure it'll be tasty - cheers!
Read the full article
0 notes
Text
How to Cook the Best Rice You`ve Ever Had

Rice is the grain that fuels the world.
It's low-cost, easy to expand, and also nutritious, which is why it's a staple food for nearly fifty percent of the world, consisting of greater than one-fifth of the overall calories that us people consume.
What it's not, though, is interesting. I don't think my pet dogs would even liven up for a pot of rice for dinner.
What they-and most people-don' t understand, though, is simply exactly how delicious rice could be when it's prepared to perfection.
They likewise don't understand that obtaining it ideal takes some ability as well as technique, too.
Add too much water, boil for as well long, or utilize too much warmth, and you'll wind up with something ranging from blah to burnt.
Use the proper rice to water ratio, simmer it appropriately, as well as utilize your heat well, however, and also it's entirely various dish.
And that's exactly what this post is going show you: the basic science of making superb rice.
By completion of it, you'll understand just how to turn this humble little grain right into something special and also whip up exceptional rice with ease.
So, if you're all set to prepare the very best rice you have actually ever had, keep reading.
How to Choose the Right Rice

The first step to food preparation impressive rice is choosing the type of rice you wish to cook.
For the purpose of this article, we're mosting likely to concentrate on the rice most typically consumed: long-grain white rice. The techniques you're mosting likely to discover use equally to all kinds of rice, though, so feel complimentary to attempt your hand at the various selections to discover just what you like most.
The initial point you should recognize is rice comes in three grain sizes-long, tool, and short-and your option must depend upon the texture you such as and the meal you're making.
For example, long-grain rice is best for a pilaf or stir-fry meal whereas medium-grain makes better sushi as well as meals where you want a little bit a lot more eat. And also if you want something velvety like risotto or dessert, after that you'll need short-grain to obtain that rich texture.
Now, there are several selections are long-grain rice, including white, brown, jasmine (Thai), and basmati (Indian/Pakistani).
These rices are the fluffiest and also most flexible due to the fact that they don't clump as well as stick like their medium- as well as short-grain counterparts.
Medium-grain rices consist of Japanese-style rice (made use of making sushi) as well as Bomba (utilized making Spanish paella).
These rices are slightly sticky and also have a stronger, chewier texture once cooked.
The short-grain family of rice has one of the most starch, making it the stickiest and plumpest when cooked.
For example, Arborio is the popular short-grain rice made use of to earn risotto and rice pudding.
Should You Consume Wild rice or White Rice?
This inquiry warrants a post of its very own, truly, however I'll offer the Cliffs Notes here.
The long story brief is brown rice is reduced on the glycemic index and even more nourishing compared to white rice, yet that does not always mean you shouldn't consume white rice.
If you have a healthy and balanced body fat percentage, generally consume a healthy and balanced (healthy) diet, as well as exercise consistently, there's no reason to avoid white rice. Consume the kind of rice that you like most.
How to Store Uncooked Rice
Store your rice in the sealed bag or container it came in, as well as maintain it in an awesome, completely dry place.
Once you open the bag or container, reseal the extra section or move it to a container with a closed lid. Make sure to label your container with the expiry day if you're using wild rice (it does not last as long as white rice).
You could also keep rice in the refrigerator or fridge freezer to further shield it from dust and also pests.
How to Cook the Best Rice

The very first action to cooking excellent rice is thoroughly rinsing it to get rid of excess starch (and also make the rice less sticky).
This exemption right here is when you're making a velvety recipe like risotto. In that instance, don't wash the rice initially due to the fact that the starch is exactly what provides the meal its texture.
Most individuals simply utilize a filter for washing, yet if you want to truly ensure your rice prepares to prepare, do this:
Add the rice to the pan you're going to prepare it in with adequate water to cover it. Swish the rice around delicately with your fingers up until the water is gloomy, drain pipes the pan and also replenish, and repeat this procedure until the water remains clear after swishing (3 to 5 rinses, generally).
Make sure to fully drain pipes the water out after your last rinse, too-excess fluid will certainly toss off your rice-to-water proportion and food preparation time.
And that brings me to the cornerstone of cooking good rice: the appropriate rice-to-water ratio.
Getting this ideal makes all the difference and also needs just three points: rice, water, as well as a medium pan with a tight-fitting lid.
For every (dry) mug of rice that you intend to prepare, you require to consist of 1 3/4 mugs of water (you could throw in a rub of butter and also pinch of salt too, if you like).
Leave the pan uncovered and also bring the rice to a boil over high warmth, and also as soon as the water is rolling, transform the warmth to low and also cover the pot.
You want to bring it down to a simmer so the rice could absorb the water and begin steaming, which is going to cook the rice ( not boiling water). Hence, if you hear the rice still boiling away in the frying pan as soon as you have actually reduced the warmth, you have to reject the volume even more.
Next, established a timer for 12 minutes and also do not lift the cover or stir the rice. You require to maintain the vapor in the pan.
Once the timer is up, lift the lid quickly to see where points are at.
If you still see water simmering, allow it to cook for a couple much more mins, but maintain a close eye on it. As soon as the liquid is absorbed (no water visibly glittering) and also the rice looks plumped, get rid of the pan from the heat.
Don' t take the rice out of the frying pan simply yet, though. To ensure your rice has that flawlessly even, fluffy structure, you have to mix it as well as then let it rest in the pan with the lid on for at the very least 5 minutes (you could try out different remainder times, as well, as much as 30 mins even!).
Finally remove the lid as well as fluff the rice with a fork. Currently it's ready to serve!
How to Store Cooked Rice
If you have leftover rice or are meal prepping, allow the rice to cool down before storing it. Then location it in an airtight container and refrigerate.
Cooked rice will keep in this manner for 4 to 6 days.
You can likewise freeze it for as much as 6 months.
How to Reheat Rice

This is just one of the beauties of rice. It's extremely simple to reheat as well as, when done correctly, preferences great every time.
The most fail-safe means to reheat your rice is in the microwave.
Place the rice in a microwave-safe meal and also include a sprinkle of water per offering fist-sized serving.
Then, cover the meal and also cook above for 30 secs, enable the rice to sit for about 15 seconds, and also fluff it with a fork. Repeat home heating and fluffing in 15-second intervals if you 'd such as the rice to be hotter.
If you 'd rather reheat on the stovetop, include the rice to a pan with a splash of water each serving, cover, and heat for 5 mins over reduced heat.
Another yummy method to reheat leftover rice is to pan-fry it. Below's an easy way to do this:
Heat some veggie or peanut oil in a wok or saute frying pan and afterwards add the rice.
Break up any kind of clumps as well as stir it making certain it's equally coated with oil. Continue stirring up until the rice is heated up through and also golden.
Throw in an egg as well as some leftover veggies, maintain stirring, and voila, you've obtained tasty, revamped leftovers!
3 Delicious Rice Recipes to obtain You Started
Once you can make a killer pot of rice, you prepare to go past the basic.
Give these very easy and also tasty recipes a try and I assume you'll be happily stunned how tasty 'healthy and balanced' food such as this can be!
Cilantro Lime Rice
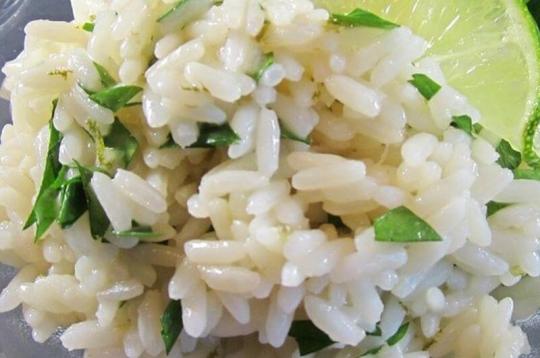
Serves 4
Ingredients
2 cups water
1 Tbsp. butter
1 cup long-grain white rice
1 tsp. lime zest
2 Tbsp. fresh lime juice
1/2 cup chopped cilantro
Nutrition Facts (Per Serving)
Calories: 84
Protein: 2 grams
Carbs: 13 grams
Fat: 3 grams
GET THE RECIPE
One Pot Mushroom Rice

Serves 6
Ingredients
1 Tbsp. olive oil
2 cloves garlic, minced
1 onion, diced
1 lb. cremini mushrooms, very finely sliced
2 tsp. Worcestershire sauce
1/2 tsp. dried thyme
kosher salt and fresh ground black pepper, to taste
3/4 cup brown rice
1 1/2 cups vegetable broth
2 Tbsp.unsalted butter
2 Tbsp. chopped fresh chives
Nutrition Facts (Per Serving)
Calories: 180
Protein: 5 grams
Carbs: 25 grams
Fat: 7 grams
GET THE RECIPE
Spiced Coconut Rice

Serves 30 / Makes 15 cups
Ingredients
1 Tbsp. dried turmeric
½ cup water
Zest of one lemon
1 Tbsp. minced ginger
4 dried bay leaves
2 tsp. kosher salt
2 cans (27 oz.) coconut milk
2 canisters (27 oz.) lite coconut milk
2 lbs. (5 mugs) brownish basmati rice
Fresh cut cilantro (optional garnish)
Nutrition Facts (Per Serving)
Calories: 184
Protein: 3 grams
Carbs: 26 grams
Fat: 8 grams
GET THE RECIPE
The Base Line on Food preparation the very best Rice
Everyone understands that rice is a simple resource of carbs, yet not everyone understands just how great it can be when it's well prepared.
Here's just what makes all the distinction in food preparation rice:
Choose the best kind of rice for the recipe you're making.
Store it correctly so it stays fresh.
Thoroughly rinse long-grain rice prior to cooking.
Use the appropriate ratio of water to rice.
Bring it to a boil then let it simmer.
Don' t stir or reveal the rice while it's cooking.
Let it rest before serving.
Do all that and also I assure that your love for rice will certainly understand no bounds!
Enjoy!
9 notes
·
View notes
Text
How to choose the right Wobbel board
Keen to get Wobbel boarding but not sure which Wobbel board is best for your family? We’ve made choosing the right Wobbel board easy, with this comprehensive guide.
What is a Wobbel board?
Wobbel boards, as the name suggests, are boards for wobbling on! They comprise a single wooden arch, that can be used to balance and rock back and forth on. You can do this standing on the board, sitting on it or even lying down (how you use it will change depending on how big you are, and how big your board is. More on this in a sec.)
But actually Wobbel boards are good for so much more than wobbling. When they’re not being used in this kind of movement-based play, Wobbel boards can also become props in imaginative play, steps for reaching high-up places, nooks for quiet time, and pretty much anything else you want them to be. There are a number of different sizes, styles and materials to choose from, according to your home and the children (and adults) who’ll be using it. Keep reading to find out which Wobbel board is best for you.

What’s so great about Wobbel boards?
Where do we start? These seemingly simple curves might look pretty minimal but they come with maximum play benefits for the whole family. In this sense a Wobbel board is not really a toy at all but an invitation: to move, to imagine, to create. Here are just some of the benefits of playing with a Wobbel board:
Promotes balance, nimbleness and core strength, leading to physical confidence and motor control
Inspires creativity in imaginative play (what can this board be? How can I use it?)-
Creates an instant child-size ‘space’ in any room or setting for quiet-time and contemplation
Challenges your child to move and play physically indoors and on rainy days
Provides a natural scene or stage for small-world play
Invites children of all ages, and adults, to play together
Are all Wobbel boards the same?
Knowing how to choose a Wobbel board is easy with a few simple guidelines. First up, it’s worth knowing that every basic Wobbel board is made in the same way, from several layers of high quality European FSC beech or bamboo wood, and finished in a translucent, water-based lacquer (purists can also opt for an unlacquered Original.) There are then a number of different options you can choose from when it comes to the look, feel and overall functionality, of your Wobbel board. In the next section you can read about each specific board and choose which one is right for you, but first here’s a heads-up on some of the key features you’ll want to consider when choosing the best Wobbel board.
Felt
A felt backing on one side is recommended for Wobbel boards being used in homes with wood or tiled flooring. It brings a layer of protection to your board and dampens the sound of the wood against hard floors. It also provides a splash of colour and a soft surface for dolls and figures when you are in small-world mode.
Choose between traditional wool felt and pressed felt. Wool felt is softest, pressed felt is more durable being made from recycled plastic bottles and is best for intensive use and older children. It’s also easier to clean so a good option for people with pets, and of course being wool-free, it’s 100% vegan.
Tip: You can still use a board with a felt backing in homes with carpets and rugs. You just get an extra layer of padding!
Cork
Slightly tougher than felt, a cork backing is a good option for use on indoor hard floors as it provides a natural grip. It’s also particularly recommended for children aged three and above, as its natural strength adds to the weight bearing potential of the board. Cork also looks and feels super natural. However because of its texture you’ll find you can’t slide things down a cork backing so easily and occasionally small pieces can break away. .
Colour
Felts come in a range of colours from light pastels to darker shades, all of them muted and natural, to work with the wooden board. Wobbel boards tend very quickly to become part of the furniture at home, so you’ll want to think about which colours work best for you and your space. You can also choose between the paler beech wood and richer bamboo boards. Decisions, decisions!
Starter or Original: which Wobbel board should you choose?
So which Wobbel boards do 100 Toys stock? Because we specialise in play for children under five we have the Wobbel Starter and Original boards. These two boards are the best Wobbel boards for babies and toddlers, and provide plenty of room for play and growth beyond the early years. Let’s take a closer look.

Wobbel Starter
The Wobbel Starter is the smallest board and as the name suggests, the ideal first Wobbel. It’s light so the smallest children can carry and manoeuvre it, and thanks to the way the Starter is put together it is flexible and responsive to all the bouncing and bashing you can throw at it. There are no age limits for Wobbel boards but we think this is the best board for babies and your youngest children. The curve is extremely gentle so it has exceptional balance, and a subtle waist with accentuated corners gives it stability when flipped over. A sheepskin or a favourite blanket can transform this into a lovely rocker for storytime (never leave a baby unsupervised on a Wobbel board) and it makes a great bridge, space ship, car ramp or boat in your imaginative games and small-world play. Choose plain lacquered or with a recycled felt backing in the colour of your choice.
Dimensions: 70 x 27.5 cm
Weight: 2 kg
Use weight: up to 100 kilos
Best for: babies and smaller children (up to 5 years)

Wobbel Original
The Wobbel Original is the most universal Wobbel board. It’s slightly larger and heavier than the Starter but still super-light, flexible and strong - the perfect partner for your growing family. It comes in either a plain beech or bamboo, lacquered or unlacquered finish, and you can have either an eco-felt backing or cork (suitable from 3 years up.) Like all Wobbel boards, the possibilities for play are endless: use it as step when you’re cooking, a ramp for skating, a stage for your shows, a roof for your den and even a sledge when the snow comes. Throw a cosy sheepskin over and you have a lovely rocker or even a footstool.
Dimensions: 90 x 30 cm
Weight: 4.5 kg
Use weight up to 200 kilos
Best for: children up to 7 years

Wobbel board play ideas
How do you play with a Wobbel board? is a question we get asked a lot. Because they are open-ended toys, we can’t really tell you how to use your Wobbel boards, that would spoil the fun! But here are some of our top suggestions for playing with a Wobbel board:
Wobble on it! Simply standing on a wobbling the board around is a surprisingly absorbing activity and a great workout for gross motor skills. See if you can move it in circles or travel across the room on it. If you have a willing pet or a sibling who wants to hop on board even better.
Make a den. The board provides an excellent roof for a den or a door to a bunker.
Use it as a shield. It is a well known fact that Roman soldiers and knights of the Round Table all used Wobbel boards to protect them in battle. Combine with silks for authenticity.
Use it as a table for your tea parties with teddies and dolls. Or as a desk at the doctor’s or a counter in a shop - any surface in imaginative play.
Use it as a ramp or bridge in your vehicle play
Use it provide a stage or a backdrop in your small-world games. Draped with orange silks it’s a desert, or green and it’s a mountain.
Pile it with cushions and use it for quiet time and reading.
from One Hundred Toys - The Blog https://ift.tt/3ocZXBM
0 notes
Text
Julia Busuttil Nishimura’s Boozy Pear And Polenta Tart
Julia Busuttil Nishimura’s Boozy Pear And Polenta Tart
Food
Julia Busuttil Nishimura

Bosc pears ready to be soaked. Photo – Julia Busuttil Nishimura.

Pressing down the polenta pastry after arranging the pears. Photo – Julia Busuttil Nishimura.

Julia advises to press the pastry lid gently around the shape of the pears. Photo – Julia Busuttil Nishimura.

Discard any excess pastry from the rim. Photo – Nori Nishimura.
This has become one of my favourite desserts to make since eating it in a tiny restaurant in Turin many years ago – I can still remember how soft the pears were in contrast to the crisp yet tender pastry. It is incredibly simple and comforting, and elegant at the same time. It also happens to be one of the first things I made for my husband Nori when we started dating. I always do feel a little sentimental come Autumn when pears are at their best and I can make this tart. While late autumn and winter doesn’t have the exciting arrivals of things like berries and stone fruit, sturdy and dependable pears made into this beautiful tart is a welcome treat in the colder months.
Traditionally this tart is made with Italian Martine or Martin Sec pears, but Beurre Bosc pears are the next best thing, as they are also a firm dry pear which keeps its shape when cooked. Perfect for this dessert where they are first poached in red wine and spices and then of course baked in the torte in the oven. I’ve chosen a Dolcetto to poach the pears in – I wanted something from the region of Piemonte in Italy, like the torte itself, and of course delicious to drink aswell – since it doesn’t use a whole bottle. If you don’t have any wine on hand, you can also simply poach the pears in a light sugar syrup with the spices, it won’t be the same but it will still work and be delicious.
I poached the pears the night before and let them sit in the liquid in the pot to soak up some more flavour, but this is of course optional. I also made the pastry in advance and let it chill in the fridge overnight. It’s a great dessert to make in stages if you don’t have big block of time, and it can also sit intact in the fridge overnight in its entirety ready to be baked. Usually the red wine poaching liquid is reduced til it’s thick and syrupy and then is poured over the torte. However, I really love a homemade crème anglaise with pears – but either is great. The creaminess is a really lovely contrast to the tender pastry, which has a pleasing sandy texture thanks to the polenta.

Top the tart with a dusting of icing sugar. Photo – Julia Busuttil Nishimura.

Best enjoyed with a cup of tea and a dollop of crème anglaise! Photo – Julia Busuttil Nishimura.
JULIA’S Pear + Polenta tart (serves 8)
Ingredients
400ml medium-bodied Italian red wine such as Dolcetto, Nero d’Avola, Amarone or Nebbiolo
180g caster sugar
1 cinnamon stick
3 cloves
2 strips of lemon peel
5-6 firm beurre Bosc pears
Polenta pastry
180g plain flour, plus extra for dusting
150g fine polenta
80g caster sugar
zest of a lemon
pinch of sea salt
200g cold unsalted butter, cubed
3 egg yolks, lightly whisked
3-4tbsp iced water
1 egg, for the egg wash
icing sugar, to dust
Method
Begin by making the poaching liquid for the pears. Combine the wine, sugar, cinnamon, lemon and 600ml of water into a large pot. Bring to a simmer over a medium heat then reduce to low, stirring occasionally to ensure the sugar has dissolved. Simmer for 8-10 minutes to reduce the liquid slightly.
Meanwhile prepare the pears by removing the stems, peeling, halving and coring them. Add them into the poaching liquid. Cut a piece of baking paper to the size of the pot and then cut a hole in the middle. Press the paper onto the surface of the pears. This stops the liquid evaporating too much and also keeps the pears submerged. Simmer the pears until tender. Insert a knife into a thick part of the pear and turn them over halfway if not fully submerged. This should take around 20 minutes but will depend on the pears you are using and how firm they are. Allow to cool in the poaching liquid then transfer to a plate lined with paper towel to dry. They need to be cool and completely dry before using them.
For the pastry, mix the flour, polenta, sugar, lemon and sea salt in a large bowl or on a bench until combined. Add the butter and toss it through the flour to coat. Use your finger tips to rub the butter into the flour until you have mostly pea sized lumps, some butter more rubbed in is fine too. Pour in egg yolks and begin to gently press the flour into the egg to begin to create the pastry. Add the iced water, 1tbsp at a time until you can press the pastry dough together and there is no dry bits of flour left. Shape into a disc, wrap and refrigerate for at least 30 minutes.
Preheat the oven to 180C.
Allow the pastry dough to sit at room temperature to make it easier to roll. Take two thirds of the pastry dough and roll out on a dusted work bench to approximately 4mm in thickness. Drape into a 25cm fluted pan with a loose base. Arrange the pears onto the pastry. Now roll out the remaining pastry and lay over the pears, using your hands to shape it over the pear halves. Trim any excess overhanging pastry and press gently to secure the pastry edges together.
Whisk the egg with 1tsp of water and brush the tart with the egg wash. Pierce two holes into the pastry to allow for steam to escape and bake in the preheated oven for 30-35 minutes or until the pastry is a sunny golden colour. Allow to cool then transfer to a serving plate and dust generously with icing sugar and serve slices at room temperature with crème anglaise. Any left over tart can be kept at room temperature in an airtight container for 2-3 days.
What else I’m cooking with…
Persimmons, chestnuts and pumpkin. The latter in everything – risotto, pies, tarts and curries.
What I’m eating…
The Basque cheesecake from Marion.
You can follow along with Julia on Instagram and find more fab recipes via her website!

Click here to download printable recipe!
0 notes
Text
common korean food that are vegan
all 떡 (korean mochi, pronounced thuk) are made with vegan ingredients.
make sure to eat it the day you bought it, or else store in fridge and microwave before consumption! the texture completely changes when stored in fridge, gets thick and rubbery, doesn’t stay sticky / stretchy.
my favorite 떡 are:
기정떡 pronounced ghee jung thuk
very unique because batter is fermented prior to steaming. spongey in texture, tastes like 막걸리 (korean rice wine, pronounced maak gull lee) usually topped with dried dates and black sesame seeds. the ones from my favorite shop have good alcohol fragrance. all the other shops i’ve tried don’t do it well and end up having little to no alcohol
photo credit 기정떡 is the only kind of 떡 that is shaped like a muffin

photo credit many places also sell it shaped like a typical 떡, rectangular.

쑥떡 pronounced sook thuk
mugwork rice cake. texture is not like 기증떡. 쑥떡 texture is like japanese mochi and has no bubbles or sponginess. should taste like mugwort but some shops do a shabby job and tastes plain. if done right, should taste herby! go for the deep dark green ones, more likely to have enough mugwort.
photo credit

인절미 pronounced in jul mee (like injure me, not in jool mee)
covered in soybean powder. texture is like softer 쑥떡. if you microwave it too long it will “melt” then harden!
photo credit usually cut into cubes or rectangles, half the height of thumb

photo credit variant: this one is green from the mugwort. this would be called 쑥 인절미 (pronounced sook in jul mee)

시루떡 pronounced shi roo thuk
like 인절미 except covered in red bean. texture is like 쑥떡
photo credit

photo credit variant: yellow/orange from pumpkin. this would be called 호박 시루떡 pronounced ho baak shi roo thuk

all the 떡 shops i’ve been to also sell 약과 and 약밥 which are also vegan.
약과 pronounced yaak gwa
fried cookie. texture is sticky. the 떡s i listed are savory but 약과 is sweet. they are usually sweetened with rice syrup. after i saw a shop sell 꿀약과 (꿀 means honey) i started asking other shops whether they use honey, they said no. honey is expensive in korea, affordable ones are runny which is unsuitable for 약과.
photo credit

약밥 pronounced yaak baap
glutinous rice with rice syrup, sesame oil, dates, chestnuts, pine nuts. texture is like the rice from mango sticky rice. sweeter than 떡 but not as sweet as 약과.
photo credit

i almost forgot to mention 찹쌀떡. this one’s funny because i’ve only seen it at convenience store and bakeries, never at a 떡 shop.
찹쌀떡 pronounced chaap saal thuk
mochi filled with red bean paste. dusted with glutinous rice flour which will get all over your clothes if you eat it while walking. all the ones i’ve had were too sweet except for the one at an’s bakery in songdo.
photo credit

when i was in singapore, potato chips were always vegan. oreo was also vegan. that’s not the case in korea.
oreo sold in korea is usually manufactured by a korean company, and those oreos are not vegan. also, most potato chips made by korean companies are not vegan.
but the following potato chips are vegan! keep in mind these are not general items but specific products. other product with same name made by different company may not be vegan.
참기름 감자칩 pronounced chaam ghi reum gaam ja chip
potato chips dotted with seaweed bits and sesame oil. really yummy!! just slightly sweet, not enough to annoy me, but would prefer it to not be there!
photo credit

무뚝뚝 감자칩 pronounced moo thook thook gaam ja chip
not paper thin, these have visible width. fun to eat! have a crunchy bite to them. seasoned and taste savory, have zero sweetness.
photo credit

the following are more korean junk food that is vegan.
조청유과 pronounced jo chung yoo gwa
rice crackers sweetened with rice syrup. perfect ratio, just the right amount of sweetness!
photo credit

땅콩강정 pronounced thaang kong ghaang jung
popped grains with powdered peanut and sugar! airy, crunchy, sweet, and nutty :D
photo credit

the following are healthy snacks
감말랭이 pronounced ghaam maal leng E
persimmon cut and half dried. no added sugar!
photo credit

고구마 말랭이 pronounce goguma maal leng E
cooked sweet potatoes cut and half dried! if done well should be moist and chewy. the No Brand 무농약 반건조 군고구마 (pictured below) is my favorite! cut into thick pieces, very very very moist <3 ah... they only sell this at emart, a popular korean retail.
photo credit

these two 고구마 말랭이 products are the most common! even the smallest 711 will have them.
photo credits left right

매일두유 pronounced meh ill doo you (like mail do you)
photo credit

they are all soooo yummy omg... i use the 설탕 0% with coffee concentrate to make latte! the 식이섬유 tastes like cereals. its a good mix of savory and sweet. the chocolate one is VERY impressive!!! considering this is grocery product, omg. tastes like legit chocolate! the berry mix is reeeeally yummy too! i usually hate berry flavored things because they are way too sweet and fake, but this one is like legit berry and has just the RIGHT amount of sweetness!
from left to right: 설탕 0% (pronounced sul tang yung percent), 식이섬유 (pronounced sigi sum yoo), 초콜릿 (chocolate), 배리믹스 (berry mix)
keep in mind that not all soy milk in korea are vegan. i’ve seem some that contain milk.
the following are ready made products. keep in mind these are not general items but specific products. other product with same name made by different company may not be vegan.
삼립 팥호빵 pronounce saam lip paat ho bbang
steamed buns with red bean paste inside! these can be microwaved, but make sure to cover otherwise it will be super dry! cover well and microwave 30 sec and you’re good to go. this item is sold in most grocery stores, like emart, lottemart, etc. at room temperature
photo credit


햇반 pronounced het baan
instant rice! peel to dotted line and microwave 90sec. the two circular products in the picture is white rice, but in the shelf below is also brown rice, multigrain, black rice, etc... if you’re in korea and a shop sells packaged food, they definitely sell 햇반. sold at room temperature
photo credit

this brand also produces several kinds of rice based microwavable meals, and one of them is vegan!
햇반 컵반 고추장 나물 비빔밥 pronounced het baan cup baan goh choo jaang nah mool bee beam bap
rice with spicy sauce, sesame oil, and real veggies! vegetables include 고사리 (pronounced go sah ree, it’s a type of fern), carrots, bean sprouts, mushrooms
photo credits

not included in picture is the 햇반. the 햇반 sits on the edge of the bowl/cup, covering the vegetable packet, sauce packet, and spoon. all you need to do is microwave the 햇반 (open till dotted line, microwave 90sec) and then mix with the packet contents! really yummy :D sometimes i buy two, eat one with just the sauce packet, and save the veggie packet for later to double the veggies hehe
this item is sold in all grocery stores and convenience stores at room temperature.
photo credit bawn ah pee teit

CJ 밀당의 고수 김말이 pronounced CJ mill daang eu gosu gimal E
CONTAINS OYSTER SAUCE (im one of those vegans who are ok with eating oysters) glass noodles with veg, wrapped in seaweed, battered, and deep fried! found in the frozen food section in most grocery stores. instructions say to fry it in a pan.
photo credit

피코크 건 곤드레 밥 pronounced peacock gun gondreh baap
in the frozen food section at a popular korean retail called emart. microwave for four minutes and you have a yummy fried rice with thistle! skip the sauce, it seriously ruins the already so flavorful and suuuuper yummy fried rice.
photo credit the final product looks exactly like the packaging picture! one package (left) has four servings (1 serving pictured on right)

피코크 건 표고 시래기 밥 pronounced peacock gun pyogo shiregi baap
4 min microwave fried rice (and skip the sauce) in the emart frozen section like the previous product, but has shiitake and different kind of leafy veggie! they’re both really yummy in their own way. im so impressed with these two! when in frozen state the rice grains are all separate from each other, it’s really easy to pour. and when its done in the microwave the rice stick to each other like fresh rice, and have just the right amount of oil! savory, hearty, flavorful, and not too heavy :D so sad this 표고 시래기 one only comes with 3 servings :(
photo credit

피코크 생깻잎무침 pronounced peacock seng kyet nip moo chim
perilla kimchi!!!!! this is a pleasant surprise!!! all kimchi in korea have pickled shrimp but wow!!! this one doesnt?!??! perilla kimchi is really yummy! i am so gonna try this out!! like all peacock products, this is available at emart. it is sold in the refrigerated section.
photo credit

피코크 아몬드 고구마 맛탕 pronounced peacock almond goguma matang
cubed sweet potatoes deep friend and coated with rice syrup and almond slivers! 맛탕 in general should be vegan unless they are sweetened with honey, which is unusual and would be mentioned in the dish name. this item can be found in the frozen section of emart. all you need to do is either microwave 30 sec or let it defrost at room temperature for 20 mins.
photo credits left right

피코크 계피호떡 pronounced peacock gye pee ho thuk
fried 떡 filled with cinnamon sugar! one box has four. most 호떡 (chewy 떡 pancake) contain egg. however, this product is not only vegan, but also assembled already! you can find it in the frozen section at emart. however, it is not pre-cooked. you have to cook it yourself with oil and frying pan.
photo credit


be careful when you eat it, the inside is melted sugar and it is super super hot and runny! so careful not to burn yourself and careful not to get the syrup on the carpet / clothes / etc.
피코크 호떡 pronounced peacock ho thuk
like the previous item but without cinnamon, and has nuts!
photo credit

피코크 팥호떡 pronounced peacock paat ho thuk
like the previous item but not runny, has red bean paste and sesame seeds inside!
photo credit

beverages. wherever you go the following will always be vegan (unless it has honey, which is highly unlikely)
수정과 pronounced soo jung gwa
spicy and sweet cinnamon drink, topped with a few pine nuts and slices of dried date
photo credit

식혜 pronounced sheek hye
sweet malt drink with soft papery rice grains
photo credit

4 notes
·
View notes
Link
Gateau Chocolat (Bittersweet Chocolate Cake) ☆Recipe Video☆.

You can cook Gateau Chocolat (Bittersweet Chocolate Cake) ☆Recipe Video☆ using 14 ingredients and 25 steps. Here is how you achieve that.
Ingredients of Gateau Chocolat (Bittersweet Chocolate Cake) ☆Recipe Video☆
You need of Gateau Chocolat.
It's 135 g (4.8 oz) of couverture chocolate, cacao 56%.
Prepare 75 g (2.6 oz) of unsalted butter.
You need 60 g of (2.1 oz, 1/4 us cup) heavy cream.
You need 42 g of (1.5 oz, 4.7 Tbsp) cake flour.
It's 55 g of (1.9 oz, 9 Tbsp) cocoa powder, sugar-free.
You need 4 of egg yolks.
Prepare 50 g of (1.8 oz, 1/4 us cup) granulated sugar, for egg yolk.
Prepare 5 of egg whites.
Prepare 100 g of (3.5 oz, 1/2 us cup) granulated sugar, for egg white.
Prepare of powdered sugar for dusting.
Prepare of Topping.
It's of whipped heavy cream (no sugar added).
You need of mint.
Gateau Chocolat (Bittersweet Chocolate Cake) ☆Recipe Video☆ instructions
★Recipe video★ (my You Tube channel)→youtu.be/DeSZPAIVjL4.
Grease the pan with unsalted butter. Line the pan with parchment paper. Set aside..
Cut the unsalted butter into thin or small pieces, and put them in a bowl. Add chocolate (small pieces) into the bowl with the butter..
Put the cake flour and cocoa powder into a bowl. Mix well while crushing lumps; set aside. Preheat an oven to 200℃ / 392F..
Separate egg yolks from egg whites. (4 egg yolks, 5 egg whites) Put the egg white in a large bowl. Let the egg white sit in a fridge..
Add granulated sugar to the egg yolks. Mix it for 2 mins until whitish and heavy. Set aside..
Pour water into a small pot. Bring the water to a boil and then turn off the heat. Place the bowl with chocolate and butter on the top of the pot. Place the bowl so as not to touch the hot water directly (to prevent separating). Wait for 30 sec..
Melt the chocolate and butter until smooth. Warm the heavy cream until it comes out steam lightly. (until around 50℃ / 122F), microwave it at 500W for 40-60 sec..
Add the warmed heavy cream to the chocolate in 4-5 parts. Mix well until combined each time. If the cream is too hot, the chocolate may separate, so be careful. Takedown the bowl. Takedown the pot too, and set aside the pot for later use..
Mix the egg yolk mixture lightly. Add half of the melted chocolate. Mix it with a whisk until combined..
Add the other half. Mix it until glossy for around 1 min. Place it on the pot to prevent it from getting cold..
Take the egg white out from the fridge. Beat it lightly until watery. Whip it with a hand mixer on high speed until whitish and fluffy..
Add half of the granulated sugar. Whip it on high speed until heavy. Add the remaining sugar. Whip it on high speed until the peak hangs down deeply..
Whip slowly on low speed for a min to smooth it..
Mix the chocolate mixture lightly. Add the meringue in 4 parts. Stir well with a whisk until combined at 1st addition..
And then sift half of the dry ingredients over. Stir well until smooth..
Meringue; 2nd addition, stir roughly until marble-ish..
Sift the remaining dry ingredients over. Stir well until smooth..
Meringue; 3rd addition, mix the top lightly, and scoop the batter up and let it slip through your whisk; repeat scooping. Continue to scoop until almost combined..
Meringue; 4th addition, mix in the same way as the 3rd addition until combined. And then use a spatula to scrape the batter on the inner side of the bowl, and fold it..
Pour the batter into the pan. Drop the pan lightly to remove big bubbles. Bake it at 180℃ / 356 F for 40-45 mins until the top of your cake crack..
Drop the freshly baked cake lightly about 2 times. Let it cool as it is for about 4 hours. It'll slowly go down..
Remove the cake from the pan. Peel the paper gently. Use plastic wrap to wrap it double. Let it sit in a fridge for 1-2 days..
Dust the cake with powdered sugar. Top with whipped heavy cream and mint. Done!! This cake has a strong bitter taste on the first day. You should sit in a fridge for 1-2 days to get a nice mild flavor. The second day is my favorite..
(The best-by date is about 4 days. When storing, wrap it with plastic wrap and put it in the fridge. If you want to get a soft texture, let it sit at room temperature, or warm a little with a microwave.).
0 notes
Text
Will Cain's Margarita Recipe: A Refreshing Beverage Guide

Hi there, it's me again! I'm here to share with you my favorite margarita recipe - the Will Cain Margarita. This delicious and fruity cocktail is perfect for any occasion. It has a unique flavor that'll keep your taste buds happy all night long!
In this article, I'll be giving you step-by-step instructions on how to make this margarita so you can enjoy it at home. I've included some of my own tips and tricks so you can get the most out of each sip. So grab your shaker, let's get mixing!
Gather Your Ingredients
I'm excited to share with you my go-to margarita recipe! It's simple, delicious and packs the perfect punch. Before we get started, let's make sure you have all your ingredients on hand. The most important thing is getting the mixing proportions right so that you can enjoy a balanced drink without too much alcohol content.
You'll need tequila, triple sec, lime juice and some ice cubes. For every two parts of tequila - I recommend using a good quality silver or reposado tequila - add one part of triple sec and one part fresh lime juice. If you want it sweet enough to mask any lower grade tequilas, just up the triple sec by half an ounce or more depending on how potent you like it. And lastly, don't forget plenty of ice for those great margaritas in summertime!
Once everything is ready, fill your shaker with ice then pour in all the ingredients before giving it a good shake to mix them together properly. When done correctly your margarita should be perfectly balanced between tartness from the limes and sweetness from the triple sec – not overly boozy yet still packing enough of a kick to keep things interesting!
Prepare The Tequila Mixture
I'm going to show you how to make a delicious Will Cain Margarita! First, I'll walk you through the tequila mixture. Utilizing tequila, mix together 1/2 cup of lime juice and 1/4 cup of triple sec. If desired, substitute in orange or pineapple juice for an extra fruity flavor. Next, add 2 tablespoons of simple syrup (or agave nectar) and stir until all ingredients are combined.
For those who don't want alcohol in their drink, try substituting club soda with some fruit flavoring instead of the tequila-lime combination. You can also replace the triple sec with any other type of liqueur that is available. Finally, add ice cubes to your glass and pour over your prepared margarita blend. Enjoy!
Combine The Ingredients
Now that the tequila mixture is prepared, it's time to combine all of the ingredients and create a perfect margarita. To make sure your drink has the right amount of alcohol content I recommend using measuring spoons or a jigger. Start by pouring two ounces of your prepared tequila mixture into an old-fashioned glass filled with ice cubes. Then add one ounce each of triple sec and fresh lime juice. Mix together all the ingredients in the glass for about 30 seconds until everything is combined well.
When mixing drinks, you should always use certain techniques to ensure great flavor and texture. Make sure you are stirring continuously while adding each ingredient so they blend properly. Also be careful not to overmix as this will affect both the taste and consistency. You want to achieve a smooth yet slightly thick consistency which can only be achieved if done correctly. Lastly, don't forget to garnish your masterpiece with some salt on the rim like a true professional!
As soon as you've added all the necessary ingredients and have finished stirring, you'll have yourself a classic margarita cocktail ready for sipping! Now just sit back and enjoy every sip without worrying about having too strong or weak an alcoholic kick - because you followed my advice on getting the measurements precisely right earlier!
Add Garnish
I love adding a unique garnish to my margaritas. It's the perfect way to finish off any drink with flair and style. A great pairing idea is to place colorful fruit slices around the rim of the glass, like oranges or limes. This not only looks beautiful in presentation but also adds an extra hint of flavor that compliments the tequila-lime mixture inside.
For something more creative, I suggest infusing herbs into your margarita for a truly special taste experience. Basil, rosemary, mint and thyme work especially well when combined with citrus juices and tequila - plus they look amazing! You can either muddle the herbs before mixing them in or use fresh sprigs as a garnish on top of the finished product.
Serving suggestions are always important too – it's all about creating an eye-catching display that will impress any guests you may have over. Margaritas make excellent centerpiece drinks for social gatherings since their vibrant colors stand out amongst other beverages. Place some glasses filled with ice cubes and colorful fruits around them to really complete the look!
Enjoy Your Will Cain Margarita!
Now it's time to add the finishing touches! Start by garnishing your Will Cain Margarita with a lime wedge and some salt around the rim of the glass. This will give your drink an extra kick of flavor, making it even more delicious. You can also experiment with different cocktail variations if you'd like - try adding muddled fruit or flavored syrups for a twist on this classic margarita recipe.
Once you've added all your desired ingredients, be sure to give your Will Cain Margarita a taste test before serving. If you're satisfied with how it tastes, pour yourself (or someone else) a glass and enjoy! Keep in mind that this is just one take on the traditional margarita recipe, so don't hesitate to make adjustments as needed until you get it just right.
Cheers! With the perfect balance of tartness and sweetness, there's no doubt that this delicious concoction will be a hit at any gathering. So go ahead - grab another glass and share the goodness with friends and family alike. Let's raise our glasses to a lovely evening filled with good company, great drinks, and lots of laughter!
Frequently Asked Questions
What Type Of Tequila Is Best For This Recipe?
When it comes to mixing up a margarita, you want to make sure that you are using the best tequila for your recipe. Blending techniques and tips will help make this drink even tastier!
Generally speaking, silver or blanco tequilas work best in margaritas as they are lighter and less expensive than other varieties. Silver tequila has more of an agave flavor profile compared to gold or reposado which can be too sweet for some drinkers.
If you have access to high-end tequilas like Anejo, then opt for those since they tend to yield a smoother taste when mixed with citrus juices.
What Other Ingredients Can Be Added To The Margarita?
When making a margarita, there are many ingredients that you can add to personalize the flavor. If you want something more than just tequila and lime juice, consider adding other fruit flavors like orange or mango for some sweetness.
You could also give your glass a salt rim for extra texture and savory taste. The possibilities are endless when it comes to making a margarita - have fun with it!
Is It Possible To Make A Virgin Version Of This Margarita?
Yes, it is possible to make a delicious virgin version of the classic margarita. All you need are non alcoholic substitutes like limeade or orange juice in place of tequila and other alcohol.
You can also use blender techniques such as muddling fresh fruits like strawberries and limes for extra flavor. With some creativity, you can still have all the fun of this traditional drink without any of the alcohol!
What Type Of Glass Should The Margarita Be Served In?
A classic margarita should be served in a traditional rocks glass. This is typically a short tumbler with straight sides, and it's the perfect size for serving up one of these delicious cocktails.
The size of the glass can vary depending on how much you're making; just make sure that whatever size you choose fits enough ice to keep your drink cold without becoming diluted. To finish off your cocktail presentation, add garnishes like lime wedges or salt rimming around the edge of the glass.
How Many Servings Does This Recipe Make?
When it comes to portion sizes and alcohol content, this margarita recipe typically yields four servings.
Whether you're hosting a party or just looking for something refreshing to make for yourself, Will Cain's Margarita Recipe is sure to satisfy your craving. It also makes enough for you to share with friends!
Conclusion
Making a margarita is easy, fun and delicious! With the right ingredients, you can make an amazing will cain margarita. Start with quality tequila as it's the base of this cocktail.
Add some fresh citrus juice to bring out the flavor, then sweeten up your drink with simple syrup or agave nectar. You can also get creative by adding other flavors like muddled fruit or herbs for unique twists on classic recipes.
Finally, serve in a salt-rimmed glass over ice and enjoy your homemade Will Cain Margarita! If you're looking for something nonalcoholic, consider making a virgin version of this recipe using club soda instead of tequila. Whatever variation you choose to make, I'm sure it'll be tasty - cheers!
Read the full article
0 notes
Last Seen Blogs

theorgasmcontroller
G'day

pink-goguma
snsd is bae.

goldenoswaldgorgeos
oswald

tomboystylin
Tomboy Stylin

ossielv
Ossiel V