#leites culinaria
Explore tagged Tumblr posts
Visit Tumblr Blog
Explore Tumblr blogs with no restrictions, modern design and the best experience.
Last Seen Tumblr Blogs


Fun Fact
The Tumblr app for Google Glass was released on May 16, 2013.
Text

Clementine Cake by Leite's Culinaria
28 notes
·
View notes

Text
pie
today i remade the leites culinaria test recipe for pumpkin pecan pie. they have made a couple of tweaks to the recipe and ask if would wouldd make it / test it. the results; a most delicious pie indeed!
0 notes
Text
Leite's Culinaria Chicken Meatballs

Indulge in the mouthwatering goodness of Chicken Meatballs from Leite's Culinaria the ultimate comfort food treat.
0 notes
Text

Roasted Cod with Lemon and Potatoes (via Leite's Culinaria)
0 notes
Video
Neste vídeo, vou falar sobre 5 alimentos que não podem faltar na dieta de uma mulher que busca uma vida saudável e equilibrada. Você vai descobrir os benefícios nutricionais de cada um deles e como eles podem ajudar no bom funcionamento do corpo e da mente. Além disso, vou te ensinar receitas práticas e deliciosas que vão te ajudar a incluir esses alimentos na sua rotina alimentar de forma fácil e saborosa. Não perca as dicas valiosas que preparei para você e comece já a transformar sua alimentação para uma vida mais saudável e feliz! Lembre-se: Uma alimentação saudável é essencial para a pele, cabelos, unhas e mente. Quer aprender a cozinhar receitas extremamente saborosas do zero, mas não tem ideia por onde começar ? São 400 receitas fit low carb, corre e aproveita 2 bônus incríveis totalmente gratuitos: 🔥 https://hotm.art/400-receitasfit-prom... -155 Receitas Fit -155 Low Carb -Cardápio Low Carb -Marmita Fit Congelada -25 Sucos Detox -35 Sobremesas Fit e Low Carb -10 Leite Low Carb -10 Farinhas Low Carb -Chá Seca Barriga -40 Exercícios para queimar calorias -10 Aplicativos para queimar calorias BÔNUS #1 MARMITAS FIT CONGELADAS BÔNUS #2 CARDÁPIO LOW CARB 30 DIAS #alimentaçaosaudavel #comidadeverdade #saudedamulher #saudemental Capítulos do vídeo: -00:00 Sobre o que vou falar -00:17 Primeira dica -00:36 Segunda dica -00:50 Terceira dica -01:15 Quarta dica -01:31 Quinta dica Receita simples de salmão assado com legumes: Ingredientes: -2 filés de salmão -2 cenouras -1 abobrinha -1 cebola -1 pimentão vermelho -Azeite -Sal e pimenta a gosto Modo de preparo: -Preaqueça o forno a 200°C. -Corte as cenouras em rodelas, a abobrinha em cubos, a cebola em fatias e o pimentão em tiras. -Coloque os legumes em uma assadeira, tempere com sal, pimenta e regue com um fio de azeite. -Leve ao forno por cerca de 15 minutos ou até que estejam macios. -Tempere os filés de salmão com sal e pimenta. -Retire a assadeira do forno e faça espaço para os filés de salmão. -Coloque os filés de salmão na assadeira e regue com um pouco de azeite. -Leve ao forno por mais 10-12 minutos ou até que o salmão esteja cozido. -Sirva o salmão com os legumes assados. Essa receita é fácil de fazer e muito saudável, pois o salmão é rico em ômega-3 e os legumes são fontes de vitaminas e minerais importantes para a saúde. Bom apetite! #bemestar #saude #nutricao #alimentosnutritivos #receitasaudavel #salmão #legumes #vidasaudavel Não perca nenhum conteúdo! Se inscreva no canal: / @hqsreview #culinaria #cozinha #comidasaudavel #receitasaudavel #alimentacaosaudavel #alimentacaonatural #comidafitness #comidafit #vidasaudavel #dicasdesaude #bemestar #nutricao #vidafit
0 notes
Photo

No-Knead 5-Minute Artisan Bread
Ingredients
3 cups lukewarm water (100°F or 38°C) (24 oz), + more for the broiler tray
1 TBSP granulated yeast (active dry, instant, quick rise or bread machine)
1 to 1 1/2 tablespoons kosher or another coarse salt, to taste
6 1/2 cups unbleached all-purpose flour, scoop-and-sweep method
Cornmeal, for dusting (optional)
Preparation
1. Warm the 3 cups water just a little so that it feels just slightly warmer than body temperature. That should put it at about 100°F (40°C). In the large bowl of a standing mixer or a 6-quart container with a lid, mix the yeast, warm water, and salt. Don’t worry about getting the yeast to dissolve. Add the flour all at once, then use a spoon or stand mixer to mix until the flour is completely incorporated and you have a blobby dough. (If you’re hand-mixing the dough and it becomes too difficult to incorporate all the flour with the spoon, just use very wet hands to press the mixture together.) Don’t knead the dough! It’s not necessary. You just want the dough to be uniformly wet and loose enough to conform to the shape of its container. All you need to do is be certain that there are no dry patches of flour.
2. Loosely cover the container and let the dough hang out at room temperature until it begins to rise and collapse or at least flatten a little on the top, about 2 hours. (Relax. It’s bread dough, not a newborn. You don’t need to monitor it constantly. And don’t worry about the dough being precisely double or triple its original volume as you would with a traditional bread recipe. Just walk away, go about your business, and come back in 2 hours. Seriously.)
3. After 2 hours, stash the container of dough in the fridge. That’s it. (If your container isn’t vented, you want to ensure the gases can escape by leaving the cover open a crack for the first couple days in the fridge; after that, you can seal it.) You can use the dough anytime after the initial 2-hour rise, although the refrigerated wet dough is less sticky and easier to work with than dough at room temperature, so it’s best to refrigerate the dough overnight before handling it. Once refrigerated, the dough will seem to have shrunk back upon itself as though it will never rise again—that’s normal. Whatever you do, do not punch down this dough. You’re trying to retain as much gas in the dough as possible, and punching it down knocks gas out and results in denser loaves. Just be certain to use the dough at some point within 14 days.
4. When you want to bake a loaf of artisan bread, dust a pizza peel or a baking sheet turned upside down with cornmeal or line it with parchment paper. Grab a hunk of the dough and use a serrated knife or scissors to cut off a 1-pound piece of dough. Hold the dough in your hands and, if necessary, add just enough flour so the dough doesn’t stick to your hands. (What you’re trying to do is surround the surface of the dough with flour so that it can be handled. You are not trying to incorporate more flour into the dough, so for the love of all things good, resist the temptation to get rid of all the dough’s inherent and lovely stickiness by working the flour into the dough.) Gently stretch the surface of the dough, tucking the ends underneath the ball and rotating it a quarter turn as you go. Most of the dusting flour will fall off, and that’s okay, because as we just said, it’s not intended to be incorporated into the dough. The bottom of the ball of dough may appear to be a collection of bunched ends, but it will flatten out and adhere during resting and baking. Your round loaf of bread should be smooth and cohesive, and the entire shaping process should take no more than 20 to 40 seconds—don’t work the dough any longer or your loaves may be dense. Place the shaped ball of dough on the prepared pizza peel and let it rest for about 40 minutes. It doesn’t need to be covered. You may not see much rise during this period, but don’t fret. It will rise much more during baking.
5. Preheat the oven to 450°F (230°C) for at least 20 to 30 minutes. Preheat a baking stone on a middle rack for at least 20 to 30 minutes. Place an empty metal broiler tray on any rack that won’t interfere with the rising bread. (Do not use a glass pan as it could shatter.)
6. Dust the top of the raised loaf generously with flour and, using a serrated bread knife, slash a 1/2-inch-deep cross or tic-tac-toe pattern in the top. There’s no need to dust the flour off the loaf.
7. Place the far edge of the peel or the upside-down baking sheet in the oven on the baking stone a few inches beyond where you want the bread to land. Give the peel or baking sheet a couple quick back-and-forth jiggles and then abruptly pull it out from under the loaf. The loaf should land on the baking stone with very little drama. Quickly but carefully pour about 1 cup hot water into the broiler tray and immediately shut the oven door to trap the steam. Bake the bread for a total of 20 to 35 minutes, until the crust is richly browned and firm to the touch. (Don’t worry. Because the dough is so wet, there’s very little risk of it becoming dry despite how dark the crust may become.) And crazily enough, a perfectly baked loaf will audibly crackle, or “sing,” when initially exposed to room temperature. Let the loaf cool completely, preferably on a wire rack for the best flavor, texture, and slicing. The crust may initially soften but will firm when cooled.
79 notes
·
View notes
Text
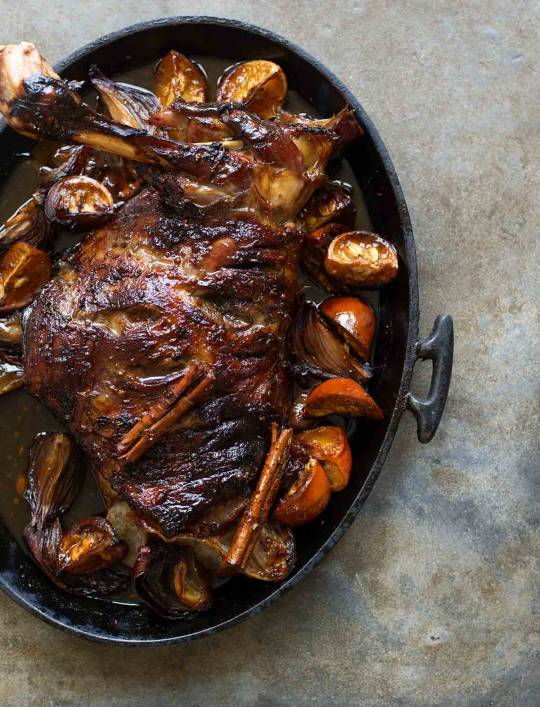
Slow Roasted Lamb by Leite's Culinaria
12 notes
·
View notes
Text

6 notes
·
View notes
Link
Receita de pudim de leite com maizena
1 note
·
View note
Photo

Aprenda hoje a fazer esta receita de rigatoni com lagostim e farofa crocante de azeitona que pode render até 6 porções.
1 note
·
View note
Text
Pipoca de Leite Ninho
Esta receita de pipoca de leite ninho é uma deliciosa para festa junina e todos os outros dia do ano! Sim, não é porque o mês de junho está acabando que as comidas de festa junina devem acabar também! Experimente! #saborperfeito #receitasaborperfeito
Esta receita de pipoca de leite ninho é uma deliciosa para festa junina e todos os outros dia do ano! Sim, não é porque o mês de junho está acabando que as comidas de festa junina devem acabar também!
É uma receita muito fácil de fazer e vai deixar seu dia ainda mais saboroso! Uma dica desta receita, se você não é muito fã de leite ninho, troque por achocolatado!

Pipoca de Leite Ninho
View On WordPress
#cozinhando na quarentena#cozinhar#cozinhar com amor#cozinhar faz bem#culinária#culinaria#gastronomia#ingredientes#na cozinha#pipoca de leite ninho#receita#receita facil#receita fácil#receita sabor perfeito#receita simples#receitas#receitas caseiras#sabor perfeito#tudo de gostoso
1 note
·
View note
Photo

Basic Crêpes (Makes 15-18 Crêpes)
Ingredients
1 3/4 to 2 1/4 cups whole milk
4 large eggs
1/2 teaspoon kosher salt
1 1/2 cups all-purpose flour
6 tablespoons unsalted butter (3 oz), melted, plus more for the pan
Preparation
Place 1 3/4 cups milk, the eggs, and salt into a blender. Whiz for a few seconds to blend everything together. Remove the lid, add the flour, cover, and blend again until very smooth, about 20 seconds. Remove the lid, pour in the melted butter, cover, and whiz until combined, about 10 seconds more. (Alternately, you can simply whisk everything together.)
Pour the batter into a large glass measuring cup with a spout or a bowl that’s large enough to easily fit a 1/4-cup measuring cup. Let the batter rest for at least 5 minutes and up to 24 hours. (If resting for more than 30 minutes, cover and stash the batter in the fridge.)
When you’re ready to make crêpes, test the batter’s consistency; it should be as thick as heavy cream but not as thick as pancake batter. If it feels too thick, whisk in a little more milk at a time, using up to a 1/2 cup more.
Heat an 8-inch crêpe pan or nonstick skillet over medium-high heat until it’s hot enough to make a drop of water sizzle upon contact. Using a folded paper towel, spread about 1/2 teaspoon butter around the interior of the pan. You want the pan to be sufficiently hot so that the butter sizzles upon contact, but not so hot that it instantly burns and turns brown.
Pour about 1/4 cup crêpe batter into the center of the pan and at the same time (or very shortly thereafter) lift the pan from the heat, tilting and turning it in all directions so the batter spreads evenly across the bottom of the pan into a thin circle.
☞ TESTER TIP: If your crêpe has any holes, quickly add a few drops of batter to fill them. Or if you’ve ladled in too much batter and the crêpe looks too thick, immediately pour the excess back into the measuring cup or bowl of the batter; if there’s a “tail” that’s left behind in the pan, no worries, you can trim that later.
Cook the crêpe until the edges begin to dry and lift from the sides of the pan and the bottom is nicely browned about 1 minute. (To check for color, use a table knife, slim off-set spatula, or your fingers to lift up an edge of the crêpe and peek underneath.)
When the first side is ready, use the knife, spatula, or your fingers to lift the crêpe and quickly flip it over. Smooth out any folded edges or pleats and then cook until the center is firm and the second side is browned, about 20 seconds more. The first side is almost always much prettier and more evenly browned (we’ll call it the presentation side), while the second side tends to be more spotty.
Slide the crêpe from the pan onto a large plate or cooling rack. Repeat with the remaining batter, adjusting the heat and wiping the pan with more butter as you cook. You can stack the crêpes on the plate as they’re done.
☞ TESTER TIP: If you’re new to crêpe-making, prepare to mess up the first crêpe (or even more) as you get the hang of swirling the batter into the pan, having your pan at the right temperature, and the timing.
Serve the crêpes individually, in short stacks or, if desired, fold the crêpes in half to create half-moon shapes or fold again into quarters.
To stash the crêpes in the freezer, place pieces of waxed or parchment paper between the crêpes so they don’t stick to one another. Then wrap the stack in plastic wrap, slide it into a large resealable freezer bag, and keep in the freezer for 2 to 3 months. Let the stack sit at room temperature until the crêpes are pliable, about an hour, and then peel them apart and proceed with your recipe.
To stash the crêpes in the fridge, just stack them neatly; no need for the paper separators. (Keep the stacks small if you usually cook for just a few people, or make the stack larger if you find yourself cooking for a crowd most nights.) Slide the crêpes into a large resealable plastic bag and toss them in the fridge. The crêpes will keep like this for up to 3 days. Let the stack sit at room temperature until the crêpes are pliable, about an hour, and then peel them apart and proceed with your recipe.
3 notes
·
View notes
Link
[ad_1] [ad_2] 🌷 INSCREVA-SE!! É DE GRAÇA!! 🌷 0:00 Chantilly Tradicional 2:07 Chantilly de Emergência 4:30 Chantilly de Leite Condensado 🌺 Creme de Leite Fresco Caseiro: https://www.youtube.com/watch?v=vmY1l2x9xbk 🌸 Como Fazer LEITE CONDENSADO: https://www.youtube.com/watch?v=9U7-9-ycK0s 🌷 Meu grupo do Facebook: https://www.facebook.com/groups/MarileneSarah/ 🌷 Meu perfil do Facebook: https://www.facebook.com/marilenesarah.fialho.77/ ----------- 🌻 MEUS PRODUTOS 🌻 ----------- 💝 Ervas, Temperos e Especiarias: https://amzn.to/3qPhQa6 🔥 Queima de Gordura Abdominal https://go.hotmart.com/G10780707D 🔥 Plantas Medicinais - Sabedoria Milenar: https://go.hotmart.com/B9890325O 🔥 400 Receitas Fit com Cardápios (+ebook bônus): https://go.hotmart.com/J9890382T 🔥 Plantas Medicinais e Fitoterapia na Vida: https://go.hotmart.com/J58734555L 🔥 Receitas para Secar em 30 Dias (2.0): https://go.hotmart.com/F18848650N ⭐ Eletrônicos com o Melhor Preço do Mercado: https://amzn.to/2MlbuQQ -------------------------- 💝 -------------------------- 🌺 PARA MIMOS E PRESENTES 🌺 BRASIL BANCO ITAÚ AGÊNCIA: 0409 CONTA CORRENTE: 04706-5 MARILENE FIALHO Desde já, muito obrigada pelo apoio e pelo carinho 💝😍😘😘 -------------------------- 💙 -------------------------- 💐 E-mail para Parceria: [email protected] 🌹 Canal oficial (Marilene Sarah Fialho) https://www.youtube.com/channel/UCkuIv7PrBEr4mAV5SkgS3Bw 🌹 Canal só de remédios caseiros: https://www.youtube.com/channel/UC5N-__7PCqgU3MPJHUTGqcA 🌹 Canal de culinária: https://www.youtube.com/channel/UCRR3LPmkrArEonbffTVTfuw 🌹 Canal de queijos: https://www.youtube.com/channel/UCI2orutgHvezeR_ztMyMMNA 🌹 Canal de viagens: https://www.youtube.com/channel/UCJIV5ARV8uMJF8vXvtAEOFw 🌹 Canal de oração: https://www.youtube.com/channel/UCw2gNlARK-XOza-2oJw9O9g DEIXEM NOS COMENTÁRIOS DICAS E SUGESTÕES!! Bjss 💖💖🌺🌺 [ad_2] Link da fonte https://receitas.blogdosergiocoach.com.br/receitas/chantilly-tradicional-de-emergencia-e-de-leite-condensado-simples-e-facil-%f0%9f%8c%b9-marilene-sarah-fialho-3/?feed_id=11976&_unique_id=62ee6379707c3
#3receitas#chantili#Chantilly#ChantillyCaseiro#ChantillydeÁgua#chantillydecremedeleite#ChantillydeLeiteCondensado#chantillynatural#chantillytradicional#comofazerchantili#ComoFazerChantilly#Compilação#Condensado#culinaria#CulináriaCaseira#CulináriaemCasa#Emergência#fácil#FIALHO#Leite#MARILENE#MarileneSarahFialho#ReceitaCaseira#ReceitadeChantilly#receitascaseiras#ReceitinhasdaRoça#SARAH#simples#TRADICIONAL#Brazilian
0 notes
Text
Barley Thumbprint Cookies Recipe | Leite's Culinaria
Barley Thumbprint Cookies Recipe | Leite’s Culinaria
These barley thumb-shaped cookies are chewy, infused with the right amount of sweetness, and have a pleasant nutty taste. The magic? Barley flour. Set them up with your favorite jam. (Warning: Be sure to keep some for yourself. These are going fast.) Adapted from Abra Berens | Grist | Chronicle Books, 2021 I never really got into thumbs up cookies until my former co-worker, Lauren Bushnell, left…

View On WordPress
0 notes
Text

Me gusta cocinar, me encanta curiosear con sabores y texturas.
0 notes