#learning to use Grid Adjuster for literally 1 single thing I might not even try again
Explore tagged Tumblr posts
Visit Tumblr Blog
Explore Tumblr blogs with no restrictions, modern design and the best experience.
Last Seen Tumblr Blogs


Fun Fact
Post activity is at the highest at 4:00 pm EDT; notes peak at 10:00 pm EDT.
Note
Hello! May I ask how you draw? I'm currently learning how to myself and would be highly interested into a step to step process by you! Like from sketch to the done thing (no color necessary)
Hello there!
I dunno how I feel about showing how I work/giving advice to someone who’s learning (and I say it as a pro artist who went through years of traditional art education) because when I do the illustrations you see here on my tumblr I BREAK THE RULES you’d learn though life drawing routine, and give in to bad habits, and my methods are rather unplanned and chaotic which makes it difficult to pinpoint significant stages. But I used my portable potato to take some photos during working on my last piece, so I’ll throw it here with a bit of an explanation of what’s going on.
Before I begin - and because you’re about to look at a mess of a WIP - I’d like to give you some general advice that generally makes life easier when you draw (again, things that I learned in traditional arts education - another artist might advise you the complete opposite, dunno!)
Work holistically. Forget them satisfying-to-look-at clips on instagram showing someone produce a hyperrealistic portrait starting from an eye, with each and every element emerging being finished before they proceed to another part. It takes a lot of talent, yes, but these are ppl redrawing a photo in a kind of a mechanical manner. Most artists don’t work this way. Especially if you’re working without a reference, or if you’re doing a life drawing - your process will be layering and changing and finding what works best to give an impression of what you’re drawing rather than reproduce the exact image, and your artwork is likely to look messy most of the time.That said: don’t start with the details. Don’t spend too much time on a particular part while neglecting others. Your goal is to keep the whole piece at the same level of ‘finished’ (even though it’s unfinished - do I make sense?) before you’re confident that everything is where it should be and proceed to the details. So sketch out the composition first. See how things fit, what’s the dynamics. You’ll save yourself from limbs sticking out from the frame, odd proportions etc etc.
Because it’s a game of relationships between different parts of the picture/scene. I ask you not to worry about finishing a single element before laying out the rest because you’ll find that said element will look different once the other part appears! For instance - you might think that the colour you picked for a character’s hair is already very dark. But once you’re done with the night sky background, you’ll find that it’s in fact too light, and doesn’t work well with the cold palette. You’ll have to revisit different parts of the image as you go to balance these relationships and make the picture work as a whole.
Give an impression of something being there without actually drawing it ‘properly’- because details are hard, mate. You’ll see that my lineart usually has hardly any, and my colouring is large unrefined stains, but the finished thing looks convincing. Like, fuck, I can never focus on how Crowley’s eyes are really shaped. So I just turn them into large glowing yellow ellipses crossed by a line, and heard no protests so far.
Don’t panic if you messed up (you probably didn’t anyway). It might turn out to be a completely unnoticeable mistake - because, remember, things work together to balance each other, so another finished off prominent element will probably drown that badly placed line that looked so visible and out of place a second ago.
It might not look good before it’s finished. I’m mostly immune to it after years of drawing, and my recent illustrations all follow a specific method (ykno, my sunset glow effects and all that) so I can kinda predict the next stage. But I do my linearts on a specially picked crap paper, I don’t bother erasing the smudged graphite, and it looks messy af until I make the background white in Photoshop. Conclusion: you might have a moment of doubt as you work through a piece, but try to break through it - I often suddenly start to like what I cursed a minute before! - and try to finish it even if it’s meant to be bad. This way, looking through your past pieces, you’ll see the progress. And trust me, I can’t even look at my art from literally three months ago. It’s normal.
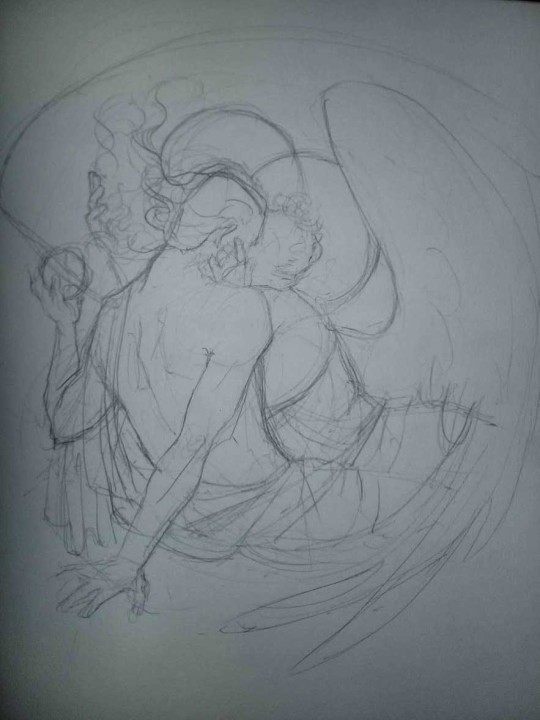
Now, pics! The sketches are paler in real life, but I increased the contrast a little so you can see something.
1. Laying out the composition!
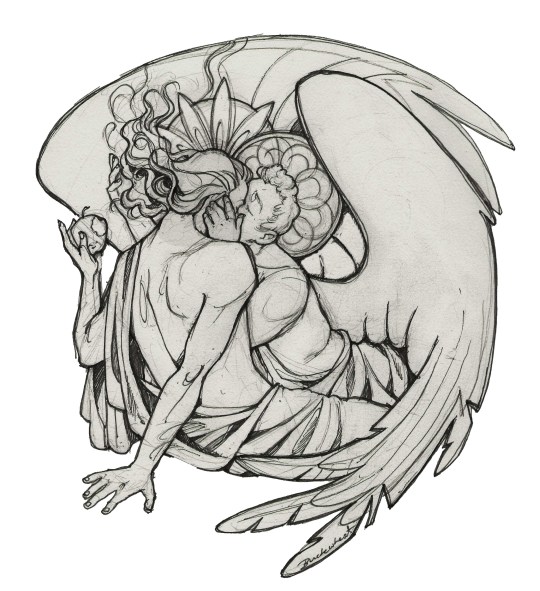
I wanted to just show them kissing, but I got carried away due to some Art Nouveau inspiration. As you might have noticed, most of my illustrations are quite self-contained (ykno - they look like a sticker on a plain background). So I wanted a tight swirl bordered by Aziraphale’s wings creating a sort of rounded, yin-yang like bubble around them. Consequently I made the whole composition revolve around their heads.

2. Adding more details to the sketch. It’s messy af. It will be messy until I’m done. It’s fine.
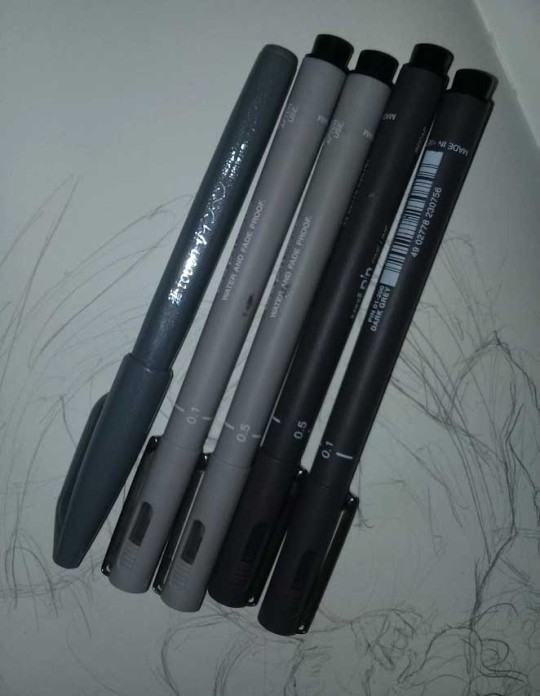
3. These are the fineliners I use for the linearts! They are made by Uni-ball and come in light and dark grey. I also sometimes use the guy on the left - ‘Touch’ sign pen by Pentel, when I want more brush-like, wider strokes. I work in grey because when I scan it and do my usual boring trick with sunlight highlights - which is an Overlay mode layer in Photoshop - the highlights ‘burn out’ the lines too and make them vanish a little, and the lighting effect gets more striking. I also like to use the light grey ones to make something look pencil-y without actually using pencil, because pencil fucking smudges.
4. It smudges! So because I am right handed, I start inking from the right hand side, no matter how tempted I am to do their faces first.
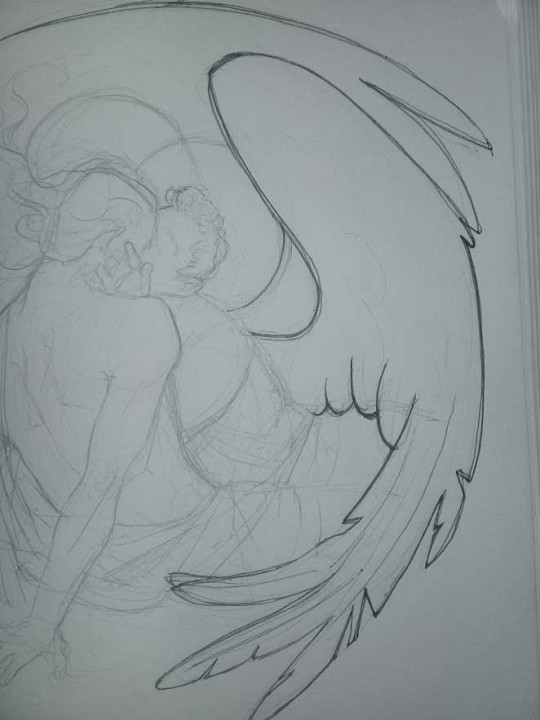
5. You can see the composition directions here. I made it intuitively, but ofc some ppl actually use grids etc to lay out their drawings.

6. See how pale ans thin the lineart was at first? I kept adjusting it as new inked parts were appearing. It starts to look nice and consistent now!

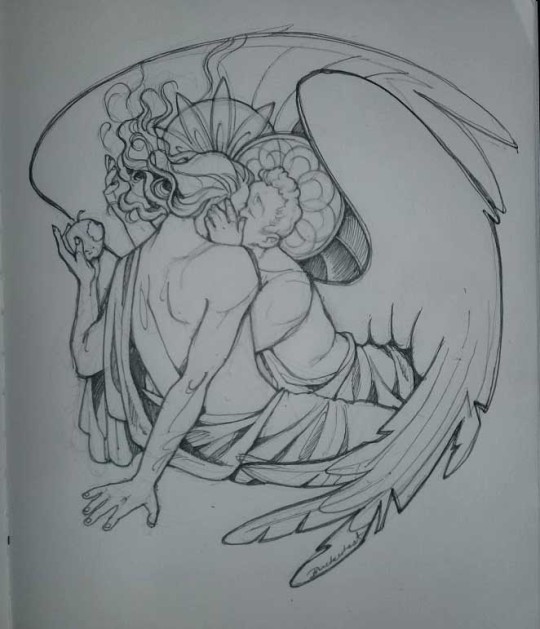
7. Finished lineart? There are some mistakes which I later corrected in PS. Notice that Aziraphale’s face has hardly any details on it - I tried to make the drawing suggest his expression rather than risk overdoing it.
8. Photoshop time!! You can totally do what I did here even if you don’t have a graphic tablet. I used Curves tool to enhance the lineart, then Quick Selection Tool to select the background around around my sticker-like piece and filled it white (on a new layer ofc). I keep this white layer on top of the layer order so it works as a mask as I colour. I decided I did not like the hatching shading underneath Aziraphale’s halo, so I erased it with a Stamp tool (because I wanna keep the textured grey fill my crap paper naturally gives me!). It’s done roughly but won’t be visible once the thing is coloured.
9. And the reason why I keep the grey shade instead of easily getting rid of it by using Curves/Levels is because when I set this layer to Multiply mode and colour underneath, it gives me this nice desaturated look like from an old cheap paper comic page. It works as a natural filter! But of course I can’t do bright colours this way, so all my glowing highlights happen ABOVE the lineart layer - on a separate layer in Overlay mode!
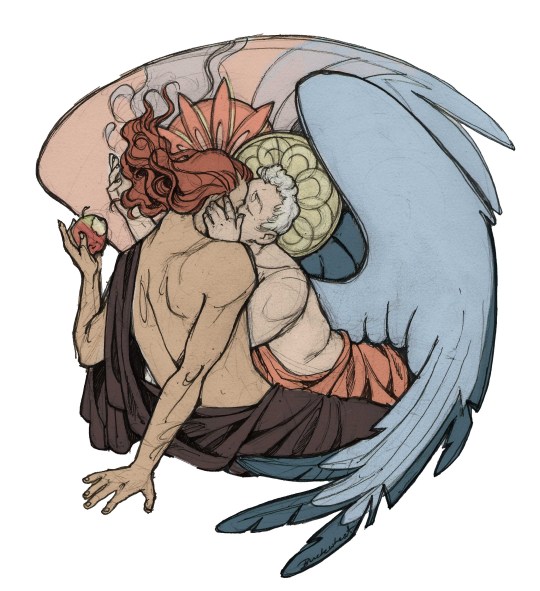
Finished thing here!
_____
Commission infoBuy Me a Coffee - help me with my transitioning expenses!Prints and stickers and things on my Redbubble!
#ask the buckwheat#long post#tutorial#drawing advice#drawing tutorial#good omens#ineffable husbands#good omens fanart#good omens art#my illustrations#doodles#toastedbuckwheat
1K notes
·
View notes
Text
My Favorite Writing Stuff
One of the best things about writing is that all you need is a pen and paper! But we all have our favorite tools and luxuries, and I thought it might be fun to talk about mine below the cut. Lotsa pics, long post.
Word Processors
Scrivener
The single writing item I use most is my word processor, Scrivener, by Literature and Latte. At some point waaaaaay back in 2012, I found myself writing Growing Up with You in Microsoft Word... And having to wait ten seconds for the screen to adjust and load new text as I scrolled. It was just too danged long for the program to handle. Just reading my manuscript was a nightmare, let alone copying and pasting to move text, shuffle paragraphs, etc. Making a new doc for each chapter quickly became a clunky chore.
THEN I FOUND SCRIVENER, AND IT’S THE BEST.
Scrivener is... not very user friendly; there’s definitely a learning curve. But it was immediately so much better for writing long fiction than Word that I bought a book on the program and read it from cover to cover, which... I don’t think I’ve ever done before. That’s how much of a game changer this was.
The feature I rely on most is the binder.

This is the binder for Four Years, which currently has... Forty-eight chapters. I corralled the chapters into two folders, one for the first year of college (1), and one for the second (2).

If I click folder 1, all of the chapters appear, each snug in their own folder. Once the Scrivener file loads, there is no further loading time. Each folder can be moved by clicking and dragging, as can each text file inside each folder. FREEDOM!
This feature alone was worth the price of the program. They offer a free trial, so please check it out if you’re interested!
Portable Word Processors
I’ve mentioned these before, but I have two portable gadgets that allow me to write on the go, distraction free.
Alpha Smart Neo 2
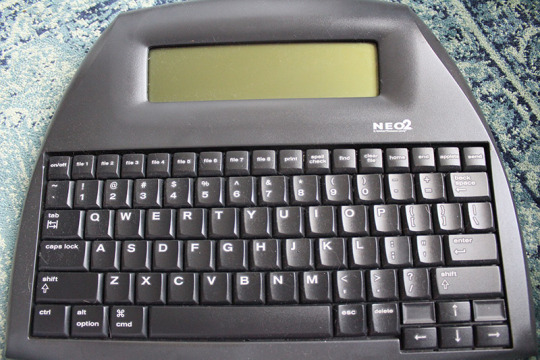
This might look like the baby of a toddler’s toy computer and a keyboard, but it’s actually my baby.
Just kidding! Sort of! The Alpha Smart Neo 2 is a portable word processor that boots up in a second, is powered by three AA batteries for eons, and weighs about 2 pounds. They are no longer in production (which is a crime), but there are oodles available on Ebay for about $20-30.
(I used to own and talk about my Alpha Smart 3000. The Alpha Smart Neo 2 is the latest model before the company shut down, and the keyboard is nicer; it’s quieter and easier on the fingers).
I honestly can’t say enough about this device. I rarely draft on a computer anymore; it’s just too easy to find yourself surfing the web, falling down a research vortex, or even reading your manuscript instead of writing. Alpha Smarts can remember what you wrote until you delete it. That’s it. That’s all they do. It’s beautiful.
I write about 800 words/hr on a computer. I write about 1,500 words/hr on an Alpha Smart. Distractions are so, so real.
When you’re ready to port your writing from your Alpha Smart to your word processor, all you have to do is connect a printer cable to your Alpha Smart, then plug the usb end into your computer. Open your word processor, turn on your Alpha Smart, select the file you want to transfer, and hit send. If you forget any of this, it’s written on the back of the Alpha Smart.
I know that no one should blame their success or failure on their tools, but... I wouldn’t be able to write nearly as much without my Alpha Smart. And if you ever do writing meet ups, you’ll be the only person who isn’t fighting for a power outlet! It also fits easily into a tote bag or backpack.
Oh, Alpha Smart Neo 2. My partner and friend!
Freewrite
The Freewrite by Astrohaus is... um. Well, it’s a lot like the Alpha Smart Neo 2, except that it’s waaaay more expensive, much harder to use, and has terrible firmware.
There are cool things about it, for sure! For one, it has this weird... Pseudo typewriter feel. It’s much larger and heavier than an Alpha Smart, and I’m not sure that I actually consider it portable... But the thick, angled base practically functions as a lap desk. It’s comfortable to use and has a nice mechanical keyboard.
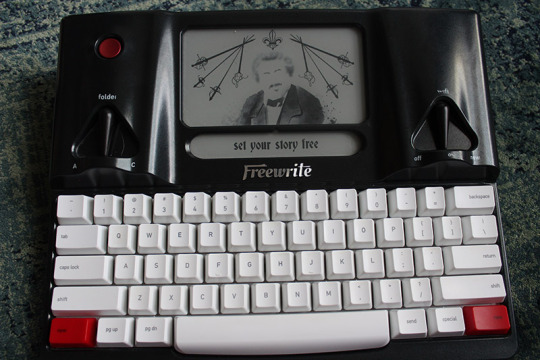
It has wifi capability, so you can send drafts directly to your dropbox/cloud/email, no cords or transfers needed. The screen is an e-ink scree, like a Kindle Paperwhite, easy on the eyes and readable in the sun. It’s also backlit, which is the one major win over the Alpha Smart.
I bought mine used off ebay for a fraction of the list price (this thing is NOT worth $600 on any planet, goodness gracious mercy dang! I paid about $180), and, um... I still don’t know if it was worth it, not when I can buy an Alpha Smart Neo 2 for $30 tops. I mean, I like the e-ink and the backlit screen, but... There’s a lag between typing and the words populating on the screen. There are no arrows to fix a typo. I had to send 10 emails back and forth to tech support to get it updated and working. It was not broken, and I understood all the directions... It’s just god awful firmware. I also lost a draft because it wipes your device if you open their Sprinter program while using your Freewrite.
I still use it, though! The tactile sensation is really nice, the keys make a satisfying clickety clackety, the E-ink screen is lovely, I adore the option to write in a not-that-well-lit room, and the wifi transfer is faster than my Alpha Smart’s wired method. But I still can’t recommend it as long as Alpha Smart Neo 2s are available, not unless you’re some combination of the following: a writing nut who writes so gosh dang much that these toys are worth it, someone who is big on tactile sensation, someone who likes hipster stuff, or someone who would love an Alpha Smart but can’t read the electronic screen well. If this is you, make sure you also have a strong grasp on how to talk to and understand tech support, because you will need them.
Just never ever EVER open Sprinter...
Notebooks
Leuchtturm1917, hard cover, A5, dotted
MAY I INTRODUCE YOU TO MY LOVE, THE LEUCHTTURM NOTEBOOK.

WHERE DO I EVEN START.
The Leuchtturm is... Just the best. The hard cover takes abuse well, stickers hold onto it nicely, it has two ribbon bookmarks and an elastic closure, there’s a folder attached to the back inside cover... The dot version is unobtrusive and encourages smaller writing, which helps the notebook last. And it is available in a rainbow of colors!
The paper is lovely, the pages are numbered, and IT HAS AN INDEX.
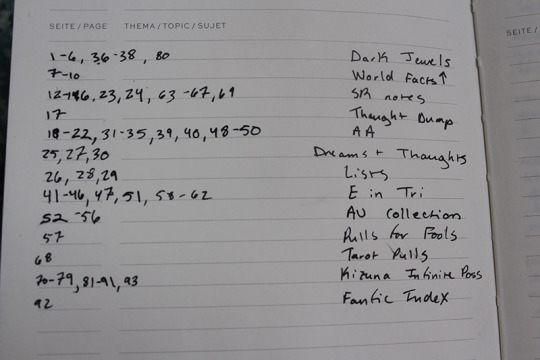
I’m a scientist, and working in a Leuchtturm is just like working in a fancy, expensive lab notebook. The set up is done already, man. You just gotta jot down what pages contain what. IT’S SO ORGANIZED, with almost zero effort! Mi amor.
Sure, I could make an index page and number all of my pages manually... But I’ve met myself. I won’t do it. When you combine all of these lovely features, you have one unbeatable notebook.
Plus, they’re easy to obtain in the states! I order them off Amazon or buy them at my local Barnes & Nobles.
Midori MD Notebook, A5, grid
The Midori has even nicer quality paper than the Leuchtturm, but the cover can’t take abuse, and it lacks the nice features. I truly appreciate the paper quality, but the other features bring me back to my Leuchtturms every time.
It’s a Japanese item and is more difficult to import to the states. You can get them off Amazon, though!
Pens
I use Uni-ball Signo 207 gel pens. They write comfortably, and using them feels satisfying. They should be available in most Walmart/Target type stores, at least in the states!
It should be noted that I’m just not a pen buff. I tried fountain pens, and it was more trouble than it was worth for me.
Folios/Traveler’s Notebooks
Okay, so you found the perfect notebook! Wanna make it SUPER DUPER FANCY PANTS?! Well, you could try a traveler’s notebook.
I only learned what a traveler’s notebook is about a year ago, so if you’re also in the dark... It’s a leather cover that holds notebooks inside with elastic. I own these chic sparrows, one for my Midori notebook (or whatever notebook I’m using at the time), and one for my journal.

My full name is etched into them, so please pardon my censorship XD
The chic sparrow traveler’s notebooks are so elegant and decadent and... I won’t lie, I literally move one or both around the house with me, just so I can look at them.
The one on the left is a Mr. Darcy deluxe, size A5, in the Wickham color. The one on the right is an Enchanted Woods deluxe, size A5, in the Elderwood color.

They have lots of pockets on the inside, a pen loop, and elastics to hold multiple notebooks. This one is strung with a Midori notebook. I also have a smaller B6 one that I use as a wallet! It holds a small notebook, so I can write down those ideas that always happen when I’m out and don’t have paper. The pockets hold IDs, credit cards, and cash.
It’s just this... magical, opulent item. While it’s likely the least practical thing on this list, it’s very special to me.
Lap Desks
I HAVE A HARRY POTTER RAVENCLAW STORAGE DESK FROM POTTERY BARN AND I FEEL LIKE A WITCH WHEN I USE IT.
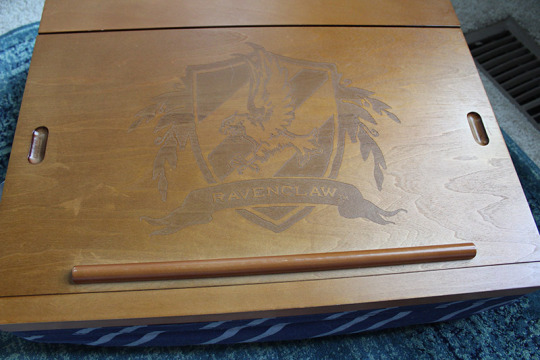
Oh dear, I took a terrible picture, it looks so lovely in person.
The top can slide in both directions, revealing enough storage for several A5 notebooks, pens, and more. It’s a great way to cart your stuff into your favorite cozy nook for a writing session. Plus, you’ll feel like a Hogwarts student! It’s available in all four house designs, plus a Hogwarts crest version.
Pottery Barn puts these on sale occasionally. I’d aim for 25% off before buying.
My Writing Bag

I decked out a tote bag in writing pins to carry my Alpha Smart, thesaurus, a notebook, and pens. You can use any bag, as long as it accommodates what you need! Here are my fave sources for writing-related pins:
Literary Emporium, who makes my favorite pin, “Still I Rise,” a Maya Angelou quote. They have the most gorgeous pins.
When life gives you lemons, read them, advice for the ages
And fandom:
Digivice pin
My beloved Sailor Moon pin, the loveliest pin I’ve ever seen (not shown because it lives on my Sailor Moon jacket!). All of the inner senshi are available!
THAT’S ALL, THAT WAS SO MUCH. Please let me know if you try any of these out!
3 notes
·
View notes
Text
Lightwork, Theurgy & Chakra activation - How I did it

Hello beatiful lightworkers and starseeds <3
In today’s post I will tell you the story of a pretty big lightwork project of mine and how you can perform it yourself if you feel like it. I will walk you through the steps and what I had to do to make it happen.
Disclaimer: I don’t hold the ultimate truth, everyone as it’s own way of doing stuff, I’m not saying I did this perfectly but I followed my own guidance and trusted my higher self. If you want to do this yourself please adjust the process with your own guides if need be.
________________________________________
It all started some months ago. I planned on going on several events where a lot of people would be gathered. I won’t go into details to where and what it was but I can tell you that they were going to be a least 360′000 people and that the purpose of the event was very uplifting in nature, the mood about love and communion and overall really positive energy.
So this idea came to me: why shall I not try to send those people some light to give them a heart chakra activation ?
Let me explain.
At this event, everything was set out for people to feel love and oneness already. Everything was set out for some kind of upgrade for people to reach. I don’t really know how to explain it felt like a build up that led us to it and deep down I simply knew the timing was perfect. So I thought, why not give them a little extra “push” and activate their heart chakra while we’re at it? Why not using this opportunity to help them ? I didn’t really know how the heart activation would work, in which extent individually the energy would be felt, I just knew I had to do it.
As we know, this is a time of shifting, and the heart helps with integration as well. I had never done anything like this before, especially in such a large scale, but to me it’s clear that’s now it’s ok to think big, it’s ok to be bold, and as lightworker we should be able try whatever we wanna do. Times of limitations are over.
Of course, I knew people would chose with free will to take the activation or not, I knew not everyone would take it or be able to take it.
Now after I finished with everything and debriefed with my guides I can confidently say about 74′000 people received the activation.
Maybe not so bad for a first time after all. So that’s why I’m sharing, if I did it anybody can do it! It takes determination but it’s a lot of fun to do and I believe doing lightwork on large scales really is something we should do more often.
To do it I used meditation, visualization, a huge crystal grid, theurgy, and a lot of trust. I did it once at a distance, and once on site (there were several events of the same nature). Both ways used different techniques. So here’s the process and how you can do it yourself.

1. Start of the meditation
I started 2 weeks before the event (the one I would physically go to) took place, twice a day. I usually meditate, but not this much and never focused on the same theme, so it was a real challenge to meditate for hours on one single thing, you have to get really creative.
First, I put myself in my merkaba. I imagine the two tetrahedrons spinning fast in opposite directions. If you don’t know what it is I invite you do read this article: https://bit.ly/2IwxXVj
Then, I call in my pillar of light (it’s very important), it’s better to always put it up while meditating. You can imagine the divine light, the light of source coming down on you from above, going through all of your chakras and going straight to the center of the earth, then imagine the earth sending back it’s energy to you, through your chakras from the base to the crown, and going back down again directly to your heart, so you can stay grounded while doing work. You can even say the process in your head while you’re visualizing it in and say “I am in my pillar of light and grounded to earth, now”.
2. Theurgy
I learned this word while researching on what I was actually doing, so it’s a form of magic, where you call in higher beings, you work through the divine to manifest your desire. There are various types apparently with all sorts of ways to perform rituals. But personally I really kept it light, I only did a really simple one that I’m going to explain later.
At the beginning when I had this idea I thought I could do this on my own (which was a tad too optimistic of me I admit) but as I began really thinking it through...I had no idea how to do it, how to move energy, how to share it with so many people...so I needed to ask for some help.
That’s when I decided to ask for support to the angel realm and miracle! the dream team of angels came down to help me make it happen. How sweet of them <3
So basically I knew nothing about angels before doing this, so I had to ask my guides which ones I should call and they gave me a list. In total, ten different angels helped me performing this pretty big task. I won’t tell you which ones, I think it’s better if you ask yourself which ones you need for your specific purpose.
I read a lot of things while researching Theurgy, that it was dangerous, this and that, a lot of things coming from fear.
Honestly you have nothing to worry about. Angels are happy to help, they always only want your highest good. Their presence while meditating can be a bit intense (especially with so many of them) but it’s all good. If you feel overwhelmed just take a deep breath and trust, talk to them, focus on your goal.
The most important thing as you probably well know is your intent.
It’s clear that if you call them to help you for selfish reasons you probably won’t have the best experience, but if you intentions are pure and loving, in service to others, then angels are really here for you. It doesn’t mean you can’t call them for personal things as people usually do but here it’s a bit different than asking them to help you heal from some pain or have some guidance, it’s literally asking them to move a huge amount of energy from higher dimensions to fulfil your desire. (Which is a nice one, but still, a pretty big one)
So I really humbly asked them if they wanted to do this together with me, I explained my idea and asked for some support if they thought the idea was good. I tried to make clear how pure my intentions were, I opened my heart and tried to show how much I wanted to help and be of service. I had to persist a bit and really prove my determination. And they said yes! I was super excited.
So once you have your merkaba, your pillar, you can call in your guides, then the selected angels that you need to perform the task and you can really start.

3. Visualization
Once the “mandatory phase” of the meditation was done (all of the above) I could really start setting out my intent and visualizing what I wanted to do. So I called in the divine light, the pure white light to come down on me. I had a feeling the light coming from higher dimensions needed some filtering before getting spread into 3D matrix and it’s people, so I believed it would be best if it was filtered through my own body. To make it simple: I visualized the light coming into my body from above, and then being spread out all around me through my meridians. I would be the channel for the light.
I used several steps of visualization.
First, I imagined the white light coming into my field, and as I was in the middle of the crowd, being spread out onto everyone softly, like a big wave. I tried to picture the light reaching everyone, coming into their field, making it’s way into their hearts. I used this image several times in different ways, I pictured the higher dimension the light would be coming from. I picture the crowd filled with light, but also the light at a particule level. And I put some thoughts into it, saying with words my intent for what the light was supposed to do, how it was supposed to come. I also imagined the angels pouring it down on me from when it’s coming from. So it was a multi layered scene: the higher dimension, the angels, the light going through me, then reaching all of them in different ways.
I believe you can use the light for pretty much anything. It’s a bit of a neutral thing, it’s energy. But an energy without intent is no much use. Simply wanting it isn’t enough, I had to fill the light with all the effect I wanted it to have. And for that I needed to look into my heart.
So in second, I had to actually put in some emotions to “charge” the light. This part was the trickiest for me.
I focused on 3 things:
- Unconditional love
- Oneness
- Bliss
For unconditional love, I tried to picture every single person, their personality, their body, their desires, them laughing, smiling, living. As I mostly operate from oneness and love these days it wasn’t so difficult to find the love inside of me most times.
I visualized myself hugging them one by one, saying that they are loved, safe, that everything was going to be alright, that they were the perfect version of themselves in every now moment. I pictured myself holding their hand and placing my other one onto their heart for it to be illuminated with light and love.
I tried to do it very softly, very gently, like a would do with a child. It wasn’t difficult because it’s true: I really love everyone, all the time. But some days especially in the morning when I had to do it, I might have seen it really clearly, nothing would come physically I don’t really know why (probably you need to be in a certain mood and in the morning well you’re still sleepy so it’s not so easy to concentrate, anyway)
For properly “charging” the light I believe I had to feel the emotions physically. So to help I sometimes pictured people I know that I loved, or loving memories, pretty much anything that would help me getting it out and then I focused it on those people. For oneness, I visualized them existing from the same energy, the same light, the same source. I picture source splitting into those beautiful reflections, going into different dimensions, and then at this event, I pictured them all here, being stripped down from their body as light beings, in the same space and time, being separate but the same, and I was in the middle, looking at them saying “look around, you are me and I am you” and showing them our similar hands filled with light. Then they would be back into their body, but we would look at each other with a knowingness and smile and everyone would embrace each other in a big giant hug.
Yes it’s incredibly cheesy lmao.
I don’t really know how to explain how to physically put out the feeling of oneness, it’s like being at several place at the same time, like being aware of each other and knowing we are one, so it brings a feeling of piece. We are whole and everything is alright. We are one experiencing each other, experiencing our creations, and it’s a beautiful journey. You’re pain is my pain, your happiness is my happiness, we’re in this together like a family. It’s the vibe I tried to bring forward through thoughts. Each time you can do it differently. You can use images, you can use memories of moments when you felt whole, you can use words inside your head like you are talking to them. Anything, really.
For bliss it was a bit trickier. To me bliss is a bit of a “higher” emotion and a combination of several feelings.
So I worked with it in stages, I did the unconditional love, then the oneness so I actually felt both, and afterwards while feeling both at the same time I tried to add piece to it? happiness? and bam! bliss. Bliss is really when you are in perfect harmony when everything is beautiful and perfect, filled with light. So if you feel unconditionally loved and whole, it makes you happy and bliss kind of naturally comes in when you mix both of it.
Honestly this was difficult, to go deep into myself and feel blissed twice a day...
so I had to picture myself in their shoes, in this moment of communion, kind of outside of this world, a moment where everything that might have bothered them in their lives was vanishing into thin air to be replaced by a single moment of unconditional love and oneness. Visually, I imagined the moment being suspended in time, like everybody moving in slow motion and the light coming from the sky shining on them really bright. They would look up and feel it, I pictured the air buzzing and them closing their eyes and be filled with happiness and piece and love and wholeness.
Hard. Very hard. So sometimes when I couldn’t bring it in physically I asked my guides to help and they did and that was nice, you can probably ask them too.
So basically it’s those 3 types of visualization/feelings I used after calling the light. As I needed to do it twice a day, I had to get really creative so my mind wouldn’t wander off too much. Feel free to brainstorm with yourself even before starting your meditation on which visualization you could use.
But overall doing all of that took time, so to me you will at least need 25 minutes per meditation, minimum twice a day for it to work but honestly I did really longer ones. In the morning I would do a 25 one and in the evening sometimes an hour or more. Do it as you please but the longer you do it the most effective it is. Simply do it in the best of your capability!
____________________________________________

Complementary tips to help the process
Those two weeks of intense meditation wasn’t the only thing I needed to do. I knew that to keep it really pure, I had to keep myself at a high vibration at preferably all times. I'm already switched into 4th dimension, so I process consciousness much easier than before but still, I needed to be careful. Which means:
- No doubts allowed. Honestly I didn’t know it would work but I knew that if a truly wanted it to work I just couldn’t doubt it or it simply wouldn’t. So I told myself, do it until the end, give everything you have and you’ll see, you have nothing to lose, do what you think is best, trust, and do it. That’s it.
- No negative thoughts. Yes, getting negative thoughts is sometimes inevitable, I have them really less than before but a side of myself loves creating them for no reason at all. So when it happens, acknowledge them, stay neutral and let it move through you. You can “counter it” with positive thoughts afterwards if you like.
- Stay grounded. Go in nature. Drink a lot of water because your energy field must be adjusted to let the light move through it, so help it. Listen to your body and what it needs to stay in high vibration, ask for guidance, sleep if you can.
Another thing, before you go to sleep and when you wake up, you can just visualize it happen one more time really quickly. I do some affirmation before sleeping and I usually review everything that I want in life to manifest so I included it.
Sometimes when affirmation didn’t really feel good I switched to “What if?” questions. What if it worked? What would they feel if it worked? What would I feel? Will I be happy? Will it help them in the future? ect.. to activate your imagination part of the brain which is also good for manifestation.
_______________________
During certain meditations, I couldn’t do the usual steps. Why ? Because the angels started working on my field and on my consciousness to help make it happen. When an angel is working on you, your mind can get “fuzzy” like filled with candy floss so it’s harder to concentrate. Before it happened I always asked which angel it was so I could kind of identify what upgrade they might be doing, but most of the time to be honest I didn’t know what they were doing and in fact I didn’t really care, I trusted them entirely. They were always very sweet and made me feel quite safe and loved which was nice.
When it happened as I couldn’t focus I just kind of enjoyed the moment, tried to open myself up so they could work better, tried to feel their (intense) energy, get to know them. Sometimes in those meditations my guides made the most of it and sent me some guidance about other topics while they could (I wasn’t meditating on anything else at all during those two weeks so they used those times to reach out to me). It can be a bit intimidating at first, but as I said before you can focus on your breath, calm down and stay neutral so your mind won’t go into panic mode as these energies can be quite unusual.
The angels and my guides during those ones sent me guidance about the steps to make everything work out in the best possible way. That’s how I learned I actually had to make a crystal grid to make it work.

5. Crystal grid & Sacred geometry
So it was my very first crystal grid and guys what a grid lol. I actually had to set it up all around the location of the event. Which was...hell? complicated? Because it was highly secured and I had to set up 15 stones discreetly all around it without getting arrested for being shady. Anyways.
First I had to actually invent it, because no crystal grids exists on the internet that is meant for this kind of thing. I created it with sacred geometry. You can find the meanings of the symbols in any sacred geometry book. I had to use 3 different symbols to make my grid, and also use 3 different set of stones. All of it was created with my guides and the angels, I would either receive downloads of simply get the answers during meditation.
First of all when I received the stones I had to purify them and consecrate them. Then, the night before the event I had to fill them with my intentions.
I had 3 sets of stones with different shapes, each set corresponding to a sacred geometry pattern. I used only clear quartz crystals except for the central stone which was an emerald (related to the heart chakra). So I had the central stone on myself to activate the whole grid at the right time (in a way in fact I was the central stone.)
So to fill it with my intention I had to do a meditation the night before. I was confused on how to do it so my guides told me to put a different emotion for each set of stones. So each set had 1 emotion to focus on (unconditional love, oneness, bliss)
I had to do it very separately, take one set into my hands and focus on the same visualization I usually did and really pull in the emotion, then do the next one ect..
So the plan was to place them on site, pray to the angels to keep them safe (some of them were quite big and could easily be seen) and wait for the proper timing to activate them with my emerald central stone.
____________________
To move this kind of energy you have to put things in motion in every plan of existence. So you have to, besides meditations, do something physically to make it work. That’s why a crystal grid was needed amongst other reasons. But when I was on site, I couldn’t put the crystals at the exact right spots of my sacred geometry grid, the crystals would be seen too easily so it wasn’t 100% accurate. However, as I walked near the exact spots, the angels/guides sent energy through my field, I believe they still anchored energy at the right spot. It worked perfectly. Afterwards I simply asked the grid to deactivate, collected the stones and that was done.
6. The day of the activation
Everything went according to plan, I was on site with everybody, ready to do the activation at the right time (I picked a moment where I knew the heart of people would be the most open). A few minutes before I was supposed to start, the air around me was already starting to feel different, kind of buzzing, my chakras all activated. I was ready. It was go time.

So I closed my eyes, palms upwards facing the sky. I first pictured my merkaba, and invoked my pillar (I programmed them to be instantaneous), then I called in the angels, my guides, and asked for protection. At this moment it was already insane, like a bubble was ready to pop. I put my central stone in my hands and activated it, visualizing each stone turning bright. Then I called in the light, did the visualization of the light coming down into me and being spread to everybody, just as I did in meditation. And...it did. I felt a huge continuous stream of energy going through me, through my chakras. I gave my everything to pull out some emotions, to focus on the effect I wanted, to picture their heart chakra opening. My energy was spinning, the flow of energy going through me felt so big, honestly it was the most intense and insane thing I’ve ever done. Then after a couple of minutes the stream slowed down, I opened my eyes and it came to an end. I had to sit down immediately I was all shaky but I was so happy, I knew we succeeded! My friend that was beside me also felt it strongly. Afterwards my body was really weird, like hungover. I had to eat and drink a lot but I truly felt better after sleeping.
I collected the stones and left. We did it! We sent out the activation! :D
When I came home, we drank a glass of champaign to celebrate, and to thank the angels I poured one glass to each of them (and I actually felt their energy near the drink, no idea how it works but they must have tasted it in some way lmao) and I thanked them individually for everything.
They all helped me so much. I never felt more supported than during those two weeks. Teamwork makes the dream work and I’m the happiest.
Doing the same thing at a distance
One week before the main event, I knew there was another one in another city. My higher self actually told me to go months ago and unfortunately I didn’t listen but I was also supposed to do the activation there. Nonetheless when I figured it out, I asked if we could still do it at a distance from my home. And yes we could.
The process is a bit different, there is no crystal grid involved. As I wasn’t on site disturbed by the surroundings and the noise, the plan was to meditate during the whole time of the event to send out energy. As we know, space and time doesn’t really matter, even if I think it’s more effective if you can be physically there.
So what I had to do came to me in meditation: I had to light some candles, and prepare a little gift for the angels (lots of chocolate, I’m not surprised they like it, and I bought good stuff lol)
I started the meditation the same way I did before and all, merkaba, pillar, calling everyone, visualization. And bim! it worked but this first time was way more intense than the second time. (It’s normal, when I was physically at the event I still had to be able to like...stand up as the energy came through me, but since the first time I was at home they kind of could go all in)
The energy as I said was VERY intense, my feet that were brushing my table near my couch could feel the table buzzing, it was a very rapid flow of light, very light but heavy because there were a lot. I kept it on for about an hour and then it became too intense and I kind of...passed out. Not really passed out but I fell asleep. I think it was better for me to be unconscious so there wouldn’t be too much interference from my ego and thoughts. The second the flow stopped I suddenly woke up about an hour after so in total the transfer took 2 hours.
And that’s it. They liked the chocolate, everything worked out and it was possible in only one week of work. (The main event was one week after this one)

Conclusion
This experience made me learn quite a bit. First of all: that anything is possible if you put your mind to it. It also helped me be more rigorous, as I wasn’t used to meditate twice a day every day, I proved myself I could do it. I learned that there are always beings ready to help you in ways you may not always understand. I feel more confident and blessed that I was able to help so many people within my capacity. It was a lot of fun!
Anybody can do it. I alone (with the team of course) was able to activate the heart chakra of 74′000 people! It’s huge! What can’t we do if we try similar things as a group then? Honestly I think it goes beyond our imagination.
And I invite all the lightworkers to use it. Be creative! Have fun! You have a great idea to share? You have a project you want to build? Do it! Ask for help if need be but do it.
As I said, I knew nothing about any of this before, but I persisted and I received every information I needed as I went on, it was very natural and effortless.
You can do anything, and it’s time to think big. I hope this story inspired you in a way. Don’t hesitate to send me DMs and asks if you have any specific questions!
I love you all a lot, may your light shine always <3
0 notes