#just making a giant square then adding smaller ones to the top n bottom
Explore tagged Tumblr posts
Text
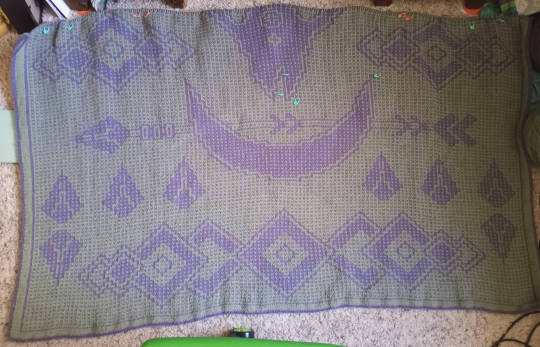
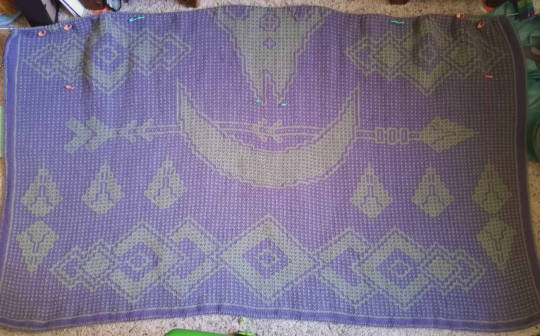
we are at the end of september so heres a blanket update :p
#other#t talks#knitting#once i finish the sweater im gonna start doing 3 rows a day every few days so i can hopefully finish this in november instead of december#cause my goal this year was to 1 finish as many of my wips as possible#and 2 use all the yarn for this blanket#cause it takes up so much space#well. turns out i actually bought like. double the amount of yarn i would need#so i want to make a second Basic granny square blanket#just making a giant square then adding smaller ones to the top n bottom#took me like 9 days to make one last time but i want to take my time with it after i finish this beast#so want to try to have a whole month to just chill and not worry about making progress every single day#o ya ignore the stitch markers#ive been too lazy to remove the ones i dont need anymore :/
8 notes
·
View notes
Text
Galactic crossing program pt 1
The Vicarious empire had been expanding for a large portion of their recent history, the collective government of their race founded a company made specifically to terraform and colonize planets with multiple colonies for the use of population dispersal and to expand horizons. Space agencies were almost exclusively mobile agencies, giant university ships, dragging trawler ship factories, and even the occasional asteroid miner and ship fabricator docks spaced through out the massive reach of space. And today, Galactic standard date 12/39/13098, I am setting out to explore the uncharted space!
———
“Welcome abound captain Freyith, it is an honour to make your aquaitance.”
The ship greeted its captain in Retah tongue, as Freyith came abourd.
Freyith: “Salutations to you aswell wing, would you please start up the FTL drive?”
W-I-N-G: “Of course, shall we make haste to the edge of mapped space?”
Freyith: “Yes please. Oh this is so exciting, imagine all the new species we could incounter.”
W-I-N-G: “Unlikly, the nearest area of unmapped space contains mostly rouge or unstable systems at the fringes of the galaxy.”
Freyith: “ohh...”
The young Retah slumped down in her helm nest with disappointment, was this really all her space days would be? Jumping from system to system to scout out uninhabitable planet after planet.
W-I-N-G: “Do not fret captain, it is much more safe to see unique planetiod formations rather then potentially hostile and savage life forms. And what’s more if something did truely survive in this area of space, it would be the closest thing to a walking crieyutt.”
Freyith shuddered at that blatantly poor attempt at humour, the walkers of crieyutt were nothing but an old story told to fledglings to make them grow a sense of danger. No creature would actually survive if they were so violent, the laws of the galaxy themselves say so.
Freyith: “Sure sure wing, I ain’t got this reachers license for nothing. Let’s go have some ventures, shall we?”
W-I-N-G: “Commencing space jump in three, two, one.”
Freyith was thrown back in her nest, she laughed with amazement as the lights of stars glimered past in lines of bright white, blue, yellow, reds, greens, and a rare few purple dashes just before the Feathered festival ship dropped out of FTL space.
Freyith giggled and laughed until her sense returned and she was able to sit up once more.
Freyith: “Wing, system report.”
W-I-N-G: “It would appear that we have dropped approximately sixteen yip lengths from a large red dwarf star, celestial body count of 7 comprised of 4 asteroid bodies. Shall we move towards the furthest planetoid?”
Freyith: “Affirmative, let’s see what this system has in the ways of inhabitability.”
The small ship flew into orbit of the third planet.
W-I-N-G: “Readings indicate small surface pockets, of electrolized metal. Likely caused by the exceedingly dense atmospheric conditions, as well as atmospheric friction. Surprisingly this planets core is very hot, suggesting that there is some form of mineral gas in the atmosphere preventing the planet from cooling down. There also appears to be a record 78 orbiting bodies of natural origin, scans suggest that most of them are solid state hydrogen oxide.”
Freyith: “This planet has perfect conditions for terraformation, with all that electrolized metal it would be more than easy to make this into an active food world. And all those hydrogen oxide asteroids could serve as water for millennia!”
W-I-N-G: “Deep scans suggest that there is some sort of... burrowing lifeform on the planet.”
Freyith gasped with excitement, then paused, and began to feel curiousity.
Freyith: “Wait, if the deep scans picked it up, how large would it be?”
W-I-N-G: “Deep scans say it is around, 60-90 Vep (15-20 meters squared) in size.”
Freyith: “Search for possible locations for new life, if something that big is here, surely there is something habitable here.”
W-I-N-G: “Negitive, the life form was very close to the surface. It may be a rapid magmetic convulsion pressure. We should scout the rest of the system, before setting foot with such a thing on the planet.”
Freyith: “ugh fine, but as soon as we are done we are going back to see it.”
The ship cruised along
W-I-N-G: “Planet 2 contains heavy amounts of solid state nitrogen deposits. No atmosphere, scans suggest a strong abundance of sodium meteors in the asteroid rings around the planet.”
Freyith: “Fun, next.”
W-I-N-G: “please refrain from not documenting these planets captain.”
Freyith: “Right sorry, it’s just like the orbital bodies back home. It’s nothing interesting.”
The ship moved along, as the captain had a fight with the ship ai.
W-I-N-G: “Planet number 1 seems to have dense- captain, we have an impact warning in 6 wop. Get up, we need to document this!”
Freyith: “Who in the burning blunder is out here?”
W-I-N-G quickly moved the ship out of the way, then further out of the way as another impact warning played out.
Freyith sat with baited breath in front of the vid screens, as the odd six sided object came hurdling through space. It flew by the ship with a multitude of other objects of the same shape, as all of the swarm of them ignited a bright yellow fire at their bottoms and flung towards the third planet.
Freyith: “Wing follow them to the planet, and I won’t say I told you so.”
W-I-N-G hurled the ship back to the third planet, as they watched the odd ships rain down into the dense atmosphere and crash straight into the under ground tunnels the life form had made.
Freyith: “Wing What is happening?”
W-I-N-G: “It does not compute, there doesn’t seem to be a obvious reason as to why this is happening.”
With astonishment Freyith watched as the planets atmosphere began to clear and thin out, as the odd ships flew through it. The odd shapes having been switched out for the megnitised surface deposits, as the metal was pulled out of the atmosphere and placed in a visible pile.
Freyith: “Wing, land us planet side. As close to that massive deposit as you can.”
The ship did as commanded and flew down to the surface, putting on a atmosuit Freyith hopped out the airlock to look around. The pile of metal was amazing, the small grains of black dust stuck to the magnetic deposits was absurd as more of the odd ships flew over head.
A loud howl like noise suddenly erupted behind her, before she turned rapidly to face the new foe. A small adorable creature stood just a little ways away, it wore no pressure suit, it wore no atmosuit, all it wore was a small patch of fur atop its head and synthetic garments.
The sense of fear and sense adoration were so much, she had no idea what to do. Run back to the ship, or stand her ground to meet the small cute creature.
It began to walk towards her, its clumsy looking bipedal stride mixed with the frail looking limbs made her want to help it towards her as if it was helpless living on a world that was in the dooms day of all doomsday not a few moments ago.
It stood next to her, and outstretched its stumpy grasping appendage towards her. She didn’t quite know what to do, so she reciprocated the gesture. The small creature took her grasping in its and shook them up and down before letting go, and gesturing back to where it came.
Freyith was shocked with how calm the creature was, and the virtually no aggression seemed to be good indicator. Ignoring wing yelling in her ear she followed the small clumsy creature over the flat land, past large metal structures taking atmosphere in and changing it before releasing it out the top. The small creature lead her towards what Wing had thought was the large life form diggin close to the surface, but in actuality it seemed to be a surface miner. What it was mining for was unknown, the small creature gestured that she went inside the living quarters inside the large miner.
She peered inside for any form of threat, all that was inside was a small rectangular nest. On one side a surface with various food items was spread out, and on the other was some sort of sleeping set up. And down a set of platforms was the pilots helm. The small creature followed behind her and went over to the food surface, it opened a compartment from the supporting wall and removed what looked like... meat! The creature was preparing food for her and it!
Just as she was enveloped with curiosity over the small creatures actions, it suddenly placed a metallic bowl with a special handle over top a circle built into the food item surface. It placed the dehydrated meat onto it before adding liquid water, it sizzled as the new smell of cooked meat wafted through the small nest.
The creature paused to looked back at her, and she noticed the two small forward facing eyes. So it was some sort of predator, hmm, yet it appeared completely docilen if not friendly. She looked around the nest a saw photographs embedded in viewing compartments, placed throughout the nest. One had a picture of the creature with another of its kind, and a small predator of a different species sitting in front of them. It looked rather shaggy the smaller thing, big dopey golden coloured ears with a small red live stock collar around its neck. As she puzzled over the picture, the creature grabbed back her attention. It had cut the meat with a sharp metallic utensil, and had placed the two portions on small platters. Only on its platter was some form of stalky green plant matter, and on hers a small bowl of seeds. So they were omnivores, that’s new. Most species they encountered only ate one form of food, and left the other in peace or to be used some other way. This creature seemed to eat both, and likely based off the act of peperation she was showed they ate a multitude of different foods.
The creature was using a different set of metallic utensils to eat as it sat down on one of two circular soft platforms around a surface. She sat down on the empty soft platform, and was handed her own set of utensils. Not wanting to be rude she tried them, it wasn’t a bad way to eat if not a bit safer then the regular. This way she didn’t have anything stuck in her beak, and she didn’t have to wait between bites for her food to properly settle.
The meat was delicious, some how this creatures people had a way of preparing food that made it taste better and more easily digestible. Once she finished she looked at the stalky green plant matter the creature had taken, it picked up one with its stumpy graspers and chewed it between its back jaw bones.
It was finishing the last one before it looked at the small bowl of seeds it had set out for her, it looked concerned. She wasn’t an omnivore, so she had left them alone. She pushed her finished platter towards the creature, hoping it would understand. To her surprise the creature picked up the bowl and simple swallowed all the seeds in one go, so they had multiple ways of eating, interesting.
The creature put the dirtied platters and bowl in a different compartment then they had come, maybe that was a to be cleaned compartment. The creature led her to one of the embedded viewing compartment. She recognized it as some sort of map, as the creature set it on the eating surface. It gestures to her, then to itself before gesturing at the end of a line segment on the map.
So that’s where they were, she gestured to the large circle on the map. The creature brought up a data pad and after tapping on it a few times, it showed her a collection of photos. First was a picture of the large metallic deposits landing on the surface and attracting the black dust, next was the odd shaped ships picking them up and flying them around and clearing up the atmosphere, next was a picture of the creature coming out from a buried shealter and taking down the shell of it to reveal the miner, next was a picture of the map with a swath of multiple line segments leading to the large circle she had originally gestured to.
So this was some sort of terraforming process, so this creatures race had come from an as of yet undiscovered species! And they were capable of terraforming like this? Unbelievable. She held her breath as she examined all the started lines and the few lines on the map that had come to the circle, there were hundreds of these creatures on this planet. Only hundreds, that’s so little for this massive task.
She paused and held her hand up hoping to pause the creature ramblings
Freyith: “Wing are you seeing this?”
W-I-N-G: “Yes!!! We found a deathworlder species and you are in its den, and you are vastly unprepared to face a deathworlder!!!”
Freyith: “I think I’m going to travel with them until they get to the redevue point them have shown me on their map.”
W-I-N-G: “Are you crazy!?! Have you gone savage!?! What if they eat you? What if it takes a few hepta?”
Freyith: “Thats fine, at least I can learn about them. Fly the ship over here so I can load up supplies and other sorts.”
W-I-N-G: “Does the deathworlder know you are doing this?”
Freyith paused as she looked back to the deathworlder, with its adorable patch of fur and its stumpy and clumsy looking limbs. She gesture to what she thought was a resting around, then to herself. The creature tapped on the data pad again as another surface folded out above the first one, the soft material there aswell. The creature then gestured to her and the top sleeping pad.
Freyith: “they seem happy to take me.”
Authors note:
Hey everyone, I know I still have a series on the bench but I’m going to start this one while I work on the final piece. As always thanks to my fellow authors, prompters, and commenters for the inspiration for this piece. Hope you enjoyed, have a good one.
#humans are space australians#humans are space orcs#humans are weird#humans are adorable#humans are space oddities#galactic crossing program
319 notes
·
View notes
Text
Cropping & Editing Icons in GIMP

Hello everyone!
This is Bubbles-mod here with your second tutorial! Like Jerry-mod, I’ll also be going from start to finish on how I crop and edit icons on the wonderful program known as GIMP. GIMP is a lovely alternative for anyone that’s seeking Photoshop and cannot afford it because -- guess what? It’s free! It’s also able to run on Windows, Mac OS, and Linux which makes it very versatile. Whether you’re an old timer with GIMP like myself, or a newbie, I’ll guide you through the many steps on how to complete this. And if you don’t have GIMP and wish to learn with this tutorial you can grab it from here!
That being said there is a few things you might need while working with this tutorial.
Important things to have
Of course having a method of downloading your video is a must. So there’s many sources you can get videos from, youtubemp4s converters and also Kissanime/Kisscartoon (the latter once they get the site back up and running).
Next you’ll need your trusty GIMP program.
Then we’ll need my favorite plugin: BIMP -- the Batch Image Manipulation Plugin which you can also get from here. Now if you’re not familiar installing Plugins, I recommend following the instructions they have there as this won’t be the main focus of my tutorial.
Finally, you’ll want a frame ripper. The one I tend to use DVDVideoSoft’s Video to JPG
One other script that can be added is the ExportAll script. This just allows you save all the images you have opened at one time to a location. This comes in handy if you don’t want to save images one by one later on while cropping. It is not necessary needed. Remember to add it to GIMP like you would any other script/plugin.
Now, this is going to get a bit image heavy so I’m going to be putting everything under a cut from this point on. Good luck and happy iconing everyone!
Step 1: Making your Frames

So upon opening DVDVideoSoft’s convertor, you’ll receive a screen very similar to this:
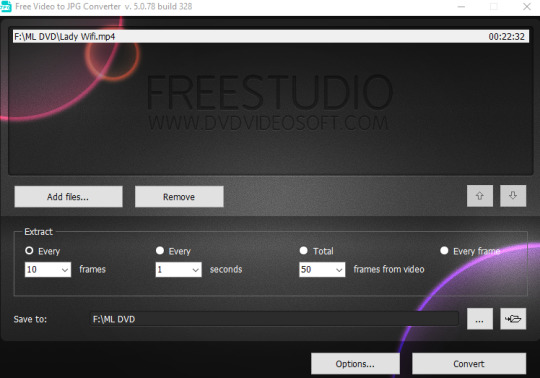
Most of the buttons are pretty self explanatory with adding your video file and the output location. The one thing I want you to pay attention to is that the setting I have at the far left for frames. I always go with every 10 frames no matter what project I’m working on. It does offer other options, but this gives me the most frames to work with -- minus the option for every second but that’s a bit too much. Once you have everything in order, go ahead and click that convert button and let it do its thing!
I will forewarn, depending on how long the video is and how fast your computer is, the time can vary. If you don’t believe your video is powerful enough then play around with some of the setting until you find one that works for you!
Step 2: Pick your Frames

There isn’t much to add for this section here. Like Jerry-mod mentioned, I too can agree this the worst part. You’ll have to scroll through the frames you have to select the ones you wish to keep for iconing. I recommend either deleting the frames you don’t want as you go OR set up a folder to stash the frames you wish to keep and then delete the folder containing the miscellaneous once you’re done. I tend to flip back and forth, usually going with the latter if I plan on cropping more than one character from a video.
So let’s move onto the next step once you’re finished!
Step 3: Loading & Cropping

Okie dokie! Now that we’ve selected all the screencaps we wish to use, let’s go ahead and open up GIMP. Once it’s open, make sure that you have it in Single Window mode. You can check this by going to Windows and clicking Single Window -- or if it has a check by it then you’re good! Next, let’s go back to the folder that contains all the lovely caps you’re going to be using today.
Since I’m using a windows computer, I’m afraid I only know this command, but what we’re going to do is select the very first image in your folder. Once that’s done, press the Shift key on your keyboard. Then, if you have arrow keys, move down until you’ve selected 25 images. If you don’t have arrow keys, your mouse can suffice. You’re more than welcome to do more or less than 25 images, but I like working with this multiple.
Now that they’ve all be selected, we’re going to drag them over to our GIMP window where GIMP will now help us out and load all 25 images into separate tabs.

Pretty handy eh?
Now it’s time to set up a few things before we start cropping. If you’re unfamiliar with the GIMP tools it’s this guy:

And these are the settings we’ll wish to make for it in the dialog box:

That way while cropping, your images will keep to the size of a square. You can navigate to the different images just by clicking them and the arrows on the left and right side so you can pan through more tabs if your screen resolution isn’t big enough to have them all on one line. Once that’s completed, it’s time to save these bad boys.
Step 4: Saving the images

If you didn’t bother saving my ExportAll script, then you can save/export these images as you normally would in GIMP under the File > Overwrite [filename]. However, if you did use my script, then I’ll show you how to use it real quick. Like you would with saving a regular image, you’d click File but now you’ll go to a new option I’ve given you called Save All:
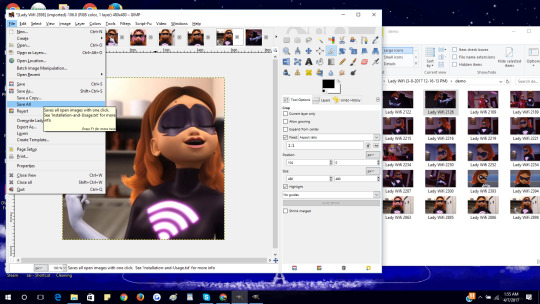
Selecting it will give us a new dialog box that we’ll have to work with. In it you’ll select the folder that your screencaps are located and you can leave the rest of the information alone.

Now go ahead and click okay and let the script run so we can move onto your next set. Just don’t forget to close all these lovely images as you move through each set. Close All can also be found under File as well. Once you’ve completed all of your cropping it’s time to move onto the next phase.
Step 5: Make the Border

I know what you’re thinking. Bubbles-mod, why would I make my border now when my images are still so gigantic? Don’t worry there silly, we’ll worry about that in a few. The reason I like to create a border if I want to use them on an icon is because batching allows us to color them, resize, reshape and add a border all at the same time! It’s pretty snazzy. But if you already have a border in mind, then go ahead and skip this step.
So before we move onto that, likes go ahead and make an image the size that you’re going to make your icons. For simplicity, I’m going to make a canvas of 100 x 100. You can do this from File > New
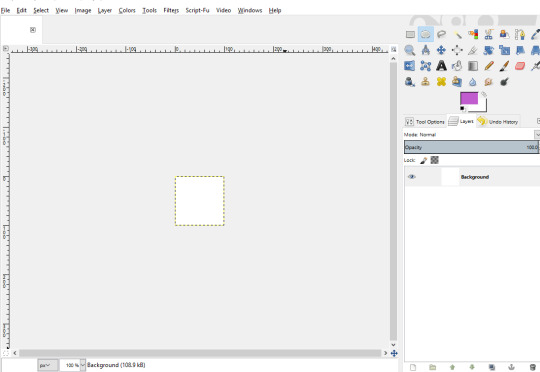
Now if we’re sticking to square icons then this will be a piece of cake! Let’s go ahead and select the color we want our border to be. As you can see from above I’m going with a dashing fluorescent purple to meet Lady Wifi’s needs. Next, we’re just going to fill the box with the paint bucket tool. Then, select the Square Select tool from your tool box. It sort of looks like a rectangle:

Fix up it’s settings like we did before with cropping so it can have an aspect ratio before we start our selection on the square. Now how much you select is up to you. Keep in mind, we will be deleting the content of the square we’re selecting so if you want a really big border then make it a smaller selection. Otherwise, making a very huge selection if you want a thin one. Once it’s done hit the delete key.
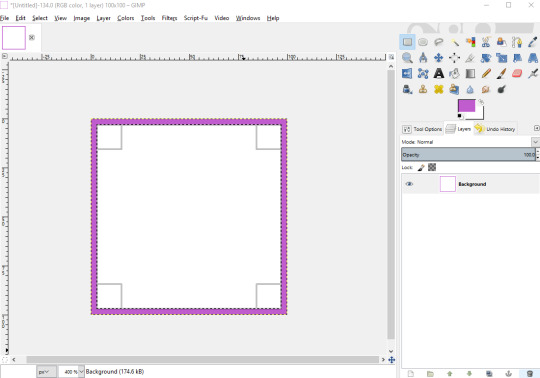
Now you’re probably wondering if this happens so to you, what to do about this white background? Not to worry! Just go and right click on your background layer so we can add an Alpha Channel:
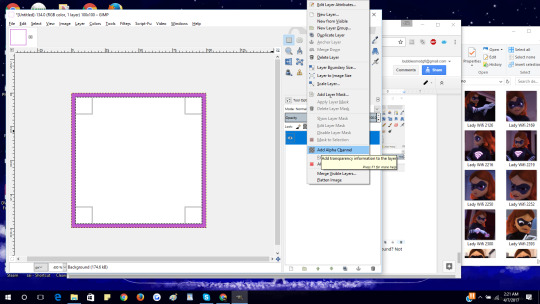
And then we’ll happily hit the delete key again and now we have our square border!
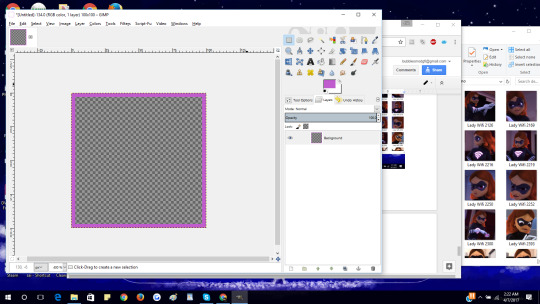
Now if you’re going for a circle icon border, the steps are pretty much similar. Just instead of the Square/Rectangle select tool, you’re going to want to use the circle one:

Like before fill in your canvas, select the tool, change the aspect ratio and create your circle size. Now with Circle, you’re going to want to do something instead of deleting your selection. I want you to copy it. You can do this with Ctrll+C and then make a new layer with Shift+Ctrl+N or selecting Layers > New from the top bar. Now paste that circle you copied into the new layer.
At first you may not see anything different, but that’s because we have to delete our bottom layer. So we’ll need to right click and select Delete Layer:
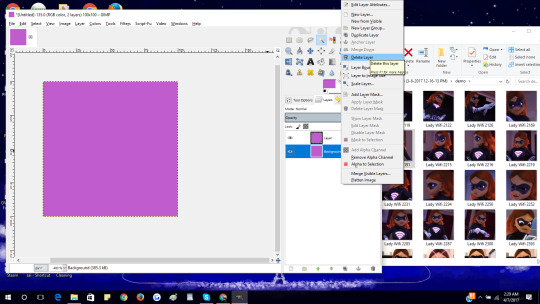
Now you should see the circle you were looking for! Now we’re back to our old steps with the rectangle, we just need to select the Circle tool again to make the selection of the Circle that we’ll be deleting this time. Like before this is also your call for the size border that you want.
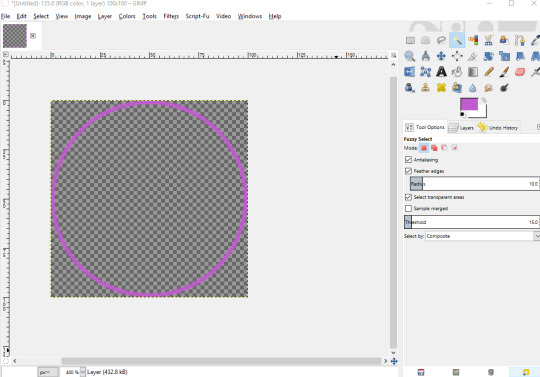
Once you’re done remember to save the border so we can move onto our next phase: Batching!
Step 6: Batch to Resize Images

Now we’re at one of my favorite parts in the entire tutorial. Batching!! Now I hope you already downloaded the Batch Pluggin before starting and set it up, otherwise you’ll have to close GIMP out first so it can reload with it properly added. Great! So we’re going to open up the Batch by selecting it from the File Menu and you should see its entire name:
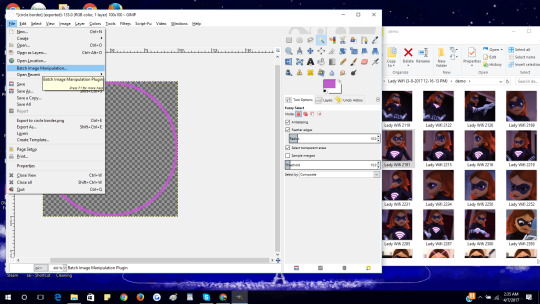
Go ahead and selection and you’ll get Batch Manipulation to open!
Since we finally have it open, let’s do the easy stuff like add in the images we’re going to use and also select their output folder. I suggest making a new folder so you don’t accidentally overwrite your old ones. Once you’ve completed that I want you to click on the giant plus sign with add below it.
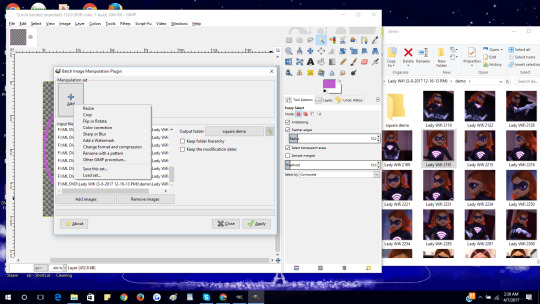
These options will allow you to complete different services for your icons! Most of them are pretty self explanatory but the one I want you to focus on first is change format. I love my icons always in the .png file so if you like that as well, go ahead and select it so that will be the first task it will complete. After you’ve made the option, you will notice the BIMP is allowing you to add another option. This is when we’ll do our resizing by clicking Resize.
In Resizing, I always select the radio button for “Set Exact size in pixel” so we can set the complete size of our image. The width and height boxes is where you can finally select to make our icons go to the size of 100 x 100.
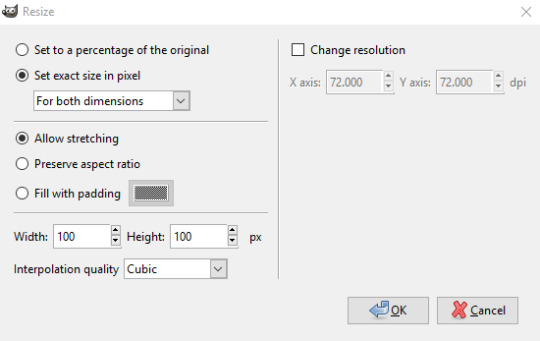
Go ahead and click okay so we can add our next step.
********** (only for circle icons): **********
Now if you want to make circle icons, we have to resize all of our icons to this perfect shape. BIMP can allow us to do that as well. So when clicking the plus/add button, select “Other GIMP Procedure”. A search box will appear along with many other options that GIMP can complete. In the search box the term we’re going to look for is “round” and you’ll see a few return results. The one we wish to go with is the “script-fu-round-corners” so click it.
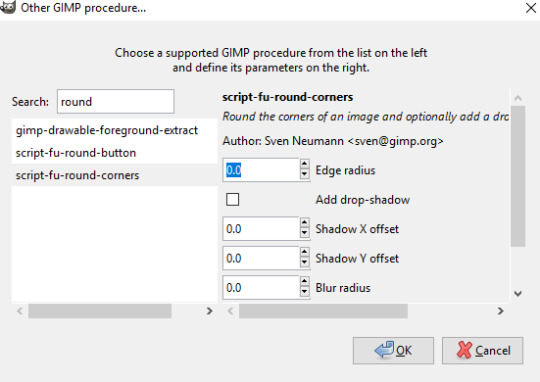
On the right side you’ll see a few other options appear on the right side of the box like above. The only thing we’re worried about here for now is the Edge Radius. Change the value to 50 so you can get a complete circle. I’ll leave it to you to play around with this later to find out what other values and the drop-shadow can do. After changing the 0.0 to 50.0 let’s click OK so we can move onto our next step: our border.
********** (end of only for circle icons): **********
In the add options, you want to select “Add a Watermark”. This allows you to make watermarks in a text or image, we want to go with the image option. From the dropdown, navigate to your border image and open it. You don’t have to mess with any of the other settings of the box there so yours should look like this:
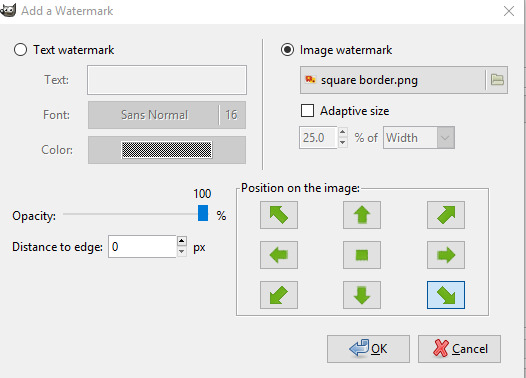
You’re free to hit OK from here. The final step is renaming the images. That’s because DVDVideoSoft gives files really long names. If you have no problem with this, you can skip this last add on. Otherwise, hit the plus add again and pick “Rename with a pattern”. It has a few options to pick from but for simplicity, go with the option to rename them increasing numbers or the ## as they suggest:
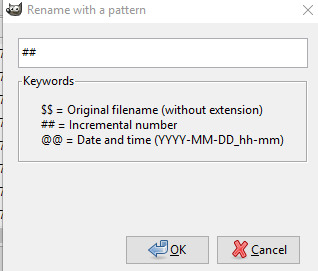
Now you can hit okay once again so it can return you to the BIMP main console. We’ve finished making all of our selections so the final step is to hit Apply to allow it to run. Depending on how many files it is the time length can vary but once everything is complete you’ll get the solid green bar, notifying you the process has finished and whether or not any errors occurred. If you’ve finished with zero errors, you’re in business! Go ahead and close out BIMP and GIMP and navigate to your output folder to see your final results:

243 notes
·
View notes