#it was hard making the psd for photoshop but i think it turned out good lol
Text


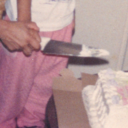
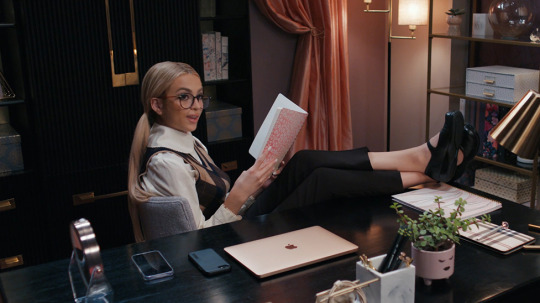
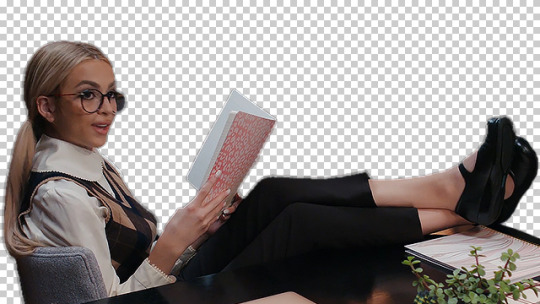
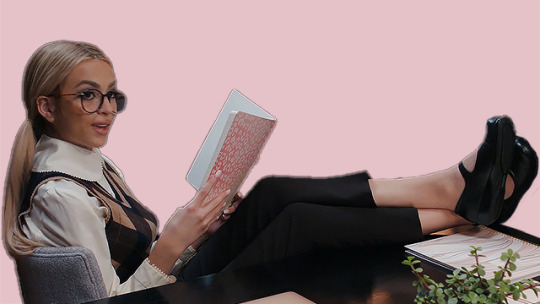
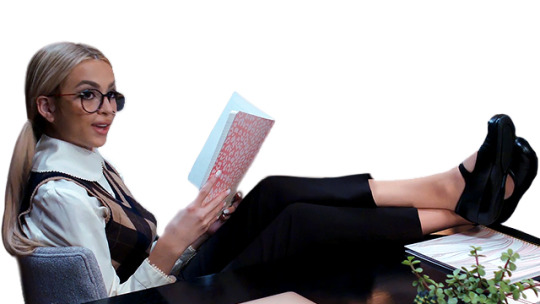
Momma Julie on Cupid's Corner looking for a second chance at love!
// Don't ask how Marcella and I were able to convince our mother to set her up on a dating app just know the matches are coming in HOT.
Cupid's corner main app psd : is my personal edit that I am working on to release for photoshop.
However you can download the awesome matches psd HERE from @cilkey
#i freaking love this#it was hard making the psd for photoshop but i think it turned out good lol#trendingsims#the sims 4#simblr#ts4 roleplay#sims 4 aesthetic#simstory#s4 roleplay#cc finds#my sims#sims 4 gameplay#sims 4 screenshots#sims community#the sims#the sims community#show us your sims#sims 4 edit#cupids corner#sims 4 cas#ts4 gameplay#my gameplay#sim 4 gameplay
9 notes
·
View notes
Note
Can I have some advice on how you make gifs? I want to start making gifs, but I have no idea where to start. What programs to use or how I can even get movies to turn into gifs when there are so many copyright laws trying to stop me.
ah i should clarify that i'm terrible at explaining things, and i'm still a beginner myself but i will do my best to give you some advice/tips that can help you get started!! or at least know where to start looking! i will admit that it does require a lot of patience and some knowledge of photo/video editing. it will seem complicated and overwhelming at first, but take it slow and do your best! (i had to put it under a read more as it got quite long!)
firstly, in terms of what program to use, it's entirely up to you and whichever ones you can get a hold of easily. 'photoshop' is the most popular choice, but i personally use a program called GIMP (GNU image manipulation program), it's free to download and it's basically just a copy of photoshop! the only problem is that a lot of people don't use gimp, so finding tutorials is really hard and photoshop has psds & better quality options. but again, it's entirely your choice! i believe there are a few websites/apps on your phone that can make gifs, but i don't think the quality is always good.
depending on which one you decide to use, just google 'how to make gifs tumblr' and there will be many posts to choose from! i would recommend this one if you're going to use photoshop as it is very detailed & includes other programs you'll need! if you decide to use gimp, unfortunately i can't find the link to the particular tutorial i originally used anymore :( but this tutorial is probably the closest i could find, although there's a few extra steps/plugins that i personally don't use.
secondly, you will need a program/app that lets you take screenshots, i personally use 'kmplayer' but some tutorials will offer you alternatives. i would recommend kmplayer because it also has a built in youtube downloader, and it's pretty safe! this photoshop tutorial shows how to take continuous screenshots for your gifs!
and lastly, getting a hold of footage is the one thing that i really struggle with too. there's different ways to do this but it all depends on your internet security and what you know about t*rrenting/p*rating. you can use a screen recorder to capture scenes though most services won't allow it. perhaps to get you started, i would suggest using download to mp4 websites to get hd clips from youtube, or try your best to find websites that have the movies/shows you want in good quality! i would only recommend using sites like that if you have really good internet security or a vpn. please be extremely careful!!
i hope that you find this helpful in some way!! i'm sorry that i couldn't offer more, but like i said, i am still a beginner myself! i wish you luck if you decide to give it a try! it's a lot of trial and error, but one day you'll figure it out and it'll be a piece of cake :D
#paperbagedhead#answered#i hope its ok to post this publicly!! i thought it could help anyone else who was interested too
12 notes
·
View notes
Text
Yu-Gi-Oh! Duel Monsters GX Episode 84 Subbed (Finalized)
(Previously: Episodes 82-83 Subbed [Finalized])
(Check out my Subbed!GX Stream Masterpost!)
TURN-84: The Curtain Rises on GeneX! Aim for Number One!
Principal Samejima declares the start of a Dueling World Cup*, a large dueling tournament in which Academia Island serves as the stage for the students and Pro Duelists participating. Saiou duels a celebrity from a powerful country in Europe, Prince Ojin, who boasts of victory through a One-Turn Kill, and Saiou himself predicts that the duel will end before his turn arrives. The ATK of the Prince's Satellite Cannon becomes 4000, and it begins an attack aimed at Saiou...
*"Dueling World Cup" is how the GeneX Tournament seems to have been described in the pre-airing episode summary for this episode.
~~~~~~~~~~~~~~~~~~~~~~~~~~~~~~~~~~~~~
Well, then...
After a few unintended hiccups and the resulting recovery--as previously mentioned--episode 84 has finally been finalized! I guess if there's ever a better time for one to experience hard drive issues, it'd be right as we kick off an obligatory tournament arc, haha. Principal Samejima, after his duel with Ryou last time, returns to the Duel Academia to announce the start of the GeneX Tournament--one which he's spent months traveling abroad to organize and bring in some heavy-hitting talent for. As things kick off, Saiou engages one of those heavy hitters, a prince from a small European country, for a duel to win control of the SOLA laser satellite they've launched--one with the power to brainwash wipe out all life on Earth. It's a good transition episode, setting up GeneX's rules and also a key factor in Season 2's endgame through the introduction of Ojin and SOLA, while giving Shou, Kenzan, and newly-White Misawa some dueling time. We'll see that, at some points, it kinda feels like GeneX is on the backburner, but it's a good backdrop for a few things that'll happen in this part of the season.
Part of the delay with this one, the aforementioned hiccups aside (which mostly covered October), was handling a few animation and card fixes for this episode; one in particular was a pretty complex one to work on but still came out well. Details below the cut, as usual, for the curious!
Enjoy, and hope those celebrating enjoyed their time with friends/family this Thanksgiving! Next up, I think I'll be going back to double releases to make up for some lost time, so 85 and 86'll be on the way after a short little break the next couple days, though I did begin some work on them already over the last few weeks. (Doing just 84 and then more doubles works nicely, since there are a few two-parters coming up that I'll be able to get out this way.) Stay tuned!
Fixes/Edits!
For the hardsub: as Napoleon runs to warn Chronos of Samejima's arrival, we see the "Interim Principal" placard on his desk that we see in the 99% OP; I had wanted to translate it by first blanking the placard in Photoshop and then copying the text layer from my edit in the OP, but due to those drive issues, I lost my original PSD files for those edits. As a result, I translated it here by first blanking the placard, then copy/pasting the text from the finished edit and editing it to be transparent by removing the lighter-gray coloring behind it so that I could slap it onto this placard, and then adjusting for perspective. Think it came out well given the circumstances!
One fix I did want to do but was unable to happens near the end of Samejima's GeneX announcement. After he tells the students to work hard so that the eventual winner is one of them, he adjusts his head as he mentions that there's a very special prize that isn't a Mrs. Tome kiss for the winner, but for two of the first three frames as he does so, the front of his face doesn't move with the rest of his head, causing it to jut out a little (you can tell this where there's a duplication of his goatee's beard and a slight gap in the face outline on his left). The third frame has his face set properly, but because there isn't a subsequent frame of his head in that correct position with the same lip/beard-flap before his head moves again, I wouldn't have been able to correctly reposition his face (usually in these cases, there'd be the initial glitched frame or two before things are then normal which I can work with, but his head movement here continues the frame after it fixes), so I scrapped this one.
As we see Prince Ojin in conversation with his assistant Lind, upon being told that GeneX's competitors likely won't pose a threat to him, Ojin says he'll bury them with his One-Turn Kill. He then turns to face a suitcase on a desk nearby, but as he moves his head to face it, the collar of his jacket is effectively duplicated--one is the collar in its initial position earlier in the shot, which is stuck there as the other moves along with Ojin's head. As mentioned here, I removed the initial collar using Photoshop for the four frames involved, then mixed the fixes into the video in Sony Vegas, applying a light feathered mask on the fixes to blend it in consistently.
After seeing Shou and Kenzan win their first GeneX duels, we turn to see newly-White Misawa facing a Blue named Takeda (as JP Wikipedia helpfully noted), but as we do, the Little Chimera that Takeda has out in Defense Mode has the card under it reversed (with the effect box facing us/Takeda's right when it should be the name box facing that way, as we see in the very next shot). This was the more complex fix to make, as I also had the Burning Blood/Molten Destruction card sliding in over it; as this error happens again in a bit, I used that instance of it to help here since it was recycled footage (just positioned slightly differently vertically). I first worked to "blank" the footage in Sony Vegas, using both instances of this error to redo the fade from the sunny White dorm scenery to the Burning Blood-affected field, as then I could redo the Burning Blood card’s semi-opaque slide-in over my eventual fix to Little Chimera, and I masked in parts of the original footage (Takeda and Misawa himself and his field) over the later footage (which had Takeda collapsing as he lost and Eitom on Misawa's field). Once that was done, I threw it into AfterEffects and applied my Little Chimera proxy facing correctly first (while masking in Chimera's little feets), onto one frame which I then repanned in Vegas for the beginning bit of the shot then held in place for the rest of it--once this was done, I went into AE again and this time applied the Burning Blood proxy slide-in, adjusting the opacity to match the original and keyframing its positioning along to the original. All told, came out nicely, but especially the "blanking" part took a bit, lol.
Immediately after #4, we see the Familiar Possessed -- Hiita on Takeda’s field, with an ATK of... 1840? It’s actually supposed to be 1850 (the dub kept this error, too). Fixed it in Sony Vegas by using the later DEF/ 550 counter for Little Chimera; I repositioned it over Hiita’s ATK counter and just masked out the second 5 over the 4 in “1840.″ I did cut away from that just as that “4″ started moving in the counter--the “1840″ digits were increasing while the “550″ ones were going to decrease--so there’s a quick frame or two where that third digit goes 5->4->5, but it’s not too noticeable in motion. (While covering this, Yugipedia also mentions that Hiita’s ATK should only rise by 500 due to Little Chimera’s effect, but when accounting for Burning Blood’s effect, that’s how it gets to 2850.)
After Misawa summons Litmus Death Swordsman, Takeda notes that, though he has more ATK than his Hiita, he still can't defeat her--but as he does, we see that there's a yellow rectangle where Little Chimera would be on his Disk. Fixed in AfterEffects by applying my Little Chimera proxy again; I first put it on one of the later frames in the shot where it's mostly visible as it fades into the zoomed-out shot, then worked backwards to reposition it as the shot pans down the card.
After Misawa's Eitom attacks Takeda directly for game, he collapses as the Solid Vision from their duel fades out--but as mentioned with #4, that error with Little Chimera's Defense-Mode card being reversed also occurs here. It was a sorta similar process to fix: first, I applied the Little Chimera proxy in AfterEffects, then in Sony Vegas, I redid the Solid Vision fade-out so that the proxy faded out properly along with Little Chimera.
Later, as Saiou and Ojin are about to begin their duel, Saiou says on a split-screen that he'd like to assess the Prince's power; one affirmative nod from Ojin later, the split-screen splits as they shout, "Duel!" But in a quick frame during that split-screen's slide-out, Ojin's side is missing a border along its edge. I fixed this in Vegas by just masking out a border from their split-screen and positioning it along the edge.
After Saiou thwarts Ojin's One-Turn Kill, he summons Satellite Base in Defense Mode, but the card on his Disk is laid reversed (as the next shot would show it correctly placed with the name box on his right). I fixed this by first applying a proxy to his Disk in AfterEffects, while also masking his hand in on top as he swings it over the card, then threw that into Vegas, where I redid the zoom-out that happens as Satellite Base is summoned to keep the card looking consistent during it.
#yugioh#GX#yugioh gx#ygo#ygo gx#yu-gi-oh gx#yu-gi-oh! gx#also love Judai being himself after Saiou beats Ojin: 'You were awesome!'#also the new post editor having a shorter text limit with links involved than the legacy one is weird#my subs
11 notes
·
View notes
Text
Hi there! I have never gotten around to make a gif tutorial because there are plenty of good ones out there and I suck at explaining things. Back when I basically use my side blog (@marvelsaos) as my main, I didn’t get that many questions regarding gif making, I presume because many people who followed me there weren’t gif makers. But this year, I finally come back to my real main blog and started posting more gifs over here. This blog is where I mostly follow gif makers and is mostly followed by gif makers. I have gotten a lot more ask on how to achieve certain things in my gifs, most notably my recent Winnie The Pooh set. And this is why I decided to make this post. This is by no means a tutorial, just a post sharing my giffing journey and the things I do in gif making that might be of your interest.
‼️Tons of rambling below. Text, image & gif heavy. Proceed with caution‼️

Table of Contents
Introduction
The Basics
Everything about making a simple gif from start to finish
How to optimize your giffing process
The more advanced stuff?
“Recolouring” & rotoscoping in After Effects
Tutorials mentioned in this post
Acknowledgement
Feel free to jump to any section you find useful. Most of the ramblings are in the introduction.
1. Introduction
i. How I started
You thought that was the intro?! I’m the kind of person who someone would know for a decade without hearing me say a word, and when I finally spoke (usually about stuff that I’m passionate about) I just go on and on and on and it shocks people to no end. I’ve been on tumblr 10 years now as some of you might know I’m doing my 10 year celebration, but I didn’t start giffing until about 7 years ago. And I just realised I have never properly introduced myself. Hi! My name’s Winnie and my username across all social media is Ms_Stanatic. Before I started giffing, my main fangirling platform was IG, and boy I’ve got sooooo many accounts I don’t even remember all of them, the bigger ones were mofy, ouat & aos related, and these days I’m giffing all of my old favs for old time sakes. If you happened to know me back then, drop by and say hi. It probably felt like I drop off the face of the earth when I quit IG. The show that got me started on giffing was, as some of you might know, Agents of SHIELD. @marvelsaos was my “main” blog for the first 6+ years of my giffing journey. Now thinking back it was because I finally got my first laptop when I got into uni and didn’t have to make edits on my android phones anymore. But at the time, all I wanted to do was to capture Melinda May’s eye rolls and actions and static images just weren’t doing it for me anymore. And that’s how I embarked on the journey of gif making.
ii. Tools/ Softwares I used
I had a Macbook air back then, and finding a cracked photoshop for mac was kinda hard, so I had to settle with GIMP. Without the GAP plugin may I add because I do not know how to install it till this day, so it was just pure nightmare. Making gif in the beginning was the most tedious thing I ever did, I’ll explain a bit more later on. The giffing community felt very different back then. I don’t know if it’s because I wasn’t aware or because I wasn’t in it. I felt like there wasn’t as many giffing tutorials on this site, and all I kept seeing was people sharing their psds. It might have been useful if I had photoshop but I didn’t. So the idea was that you can just open up the psd files and drag the adjustment layers onto the image stacks that compose of your gif, and the adjustment layers would affect all the layers beneath it. Not with GIMP though. In GIMP, the adjustment layer(s) only affect the single layer right underneath it. You heard me right. At that time the gif size limit on tumblr was 2mb, a gif I made is usually 20-30 frames/ layers. So I had to duplicate the adjustment layers 20-30 times, them move them right above each image layer. And if I don’t like how it looks, I had to do it all over again. This is slowly turning into a rant but seriously thinking about it gives me headaches. Also, did I mention I didn’t even read up on tutorials and stuff, I basically just googled everything I needed, how to screencap, import it into GIMP, crop & resize, how to use curve, then lastly how to export. No sharpening, no nothing. I didn’t even learn about recolouring like less than 2 years ago (my AoS peeps know which post I’m talking about 😉). This went on for about a year or two, then uni got busy and my life basically went downhill. Somehow, AoS pulled me out of that deep dark hole and get me back on my feet again also because I finally graduated but I’d like to think it’s my love for tv that saved me. I got a bit more time on my hand, I decided to go back to giffing and this time I was determined to get GAP installed on GIMP and have it working. But alas I have failed once again. It was around that time I found out photoshop’s older versions like cs5 was free to download, so I got that instead and finally begin giffing with photoshop.
Moral of the story: Try your best to get photoshop for giffing. It’ll save you so much headache.
And my story didn’t end there. While I was using cs5, I think many people have switch to photoshop cc which has the timeline function for things like smart sharpen (which was a major topic back then) and keyframes (which is what I heard people talking all about these days). Even without timeline, photoshop is definitely a step up from GIMP personally and I managed with a workaround on the smart sharpen function thanks to Julie (@doramilaje). Side note, all the gif makers (beginners & experienced alike) I’ve talked to are all such amazing people. They put so much energy into this craft and are more than happy to talk to you about it when asked. So don’t be afraid, just ask nicely. And maybe go off anon, you might make a friend or two.
2019-20 were probably my most prolific giffing years, I giffed non stop every single day as if it was my full time job. For me, it was something small and easy to complete and it kept my days going. And eventually my Macbook Air that I’ve been using for 5 years was starting to give up on me. And when I upgraded the OS system to Catalina, it no longer supports cs5 and I was devastated. I eventually got my hands on photoshop cc 2020, and in some ways I re-learnt how to make gifs again (like for the third time?).
I knew it was about time to get a new laptop. And now that I know I’m gonna use it for some heavy duty, and I didn’t want to get another macbook because I’m just not that crazy about it and at that time I wanted to use avisynth (more on that later) which was only available on windows (I didn’t know how to install vapoursynth on my macbook ok?). Eventually I got a gaming laptop with a 10th gen i-7 processor and a Wacom Intuos Pro using my sibling’s student discount. I got the Wacom tablet trying to get into digital drawing, but eventually it came in super handy with just day to day editing and especially recolouring.
Moral of the story: Start with whatever you’ve got, then upgrade your equipment when you’re serious about it.
iii. What I’m doing now?
This year has been kinda different for me. In the past, it has always felt like I’m on my own sitting in front of my laptop churning out gifs 24/7. This year, I’ve joined a couple other blogs and gif maker/ ps user networks, learnt a whole lot of new things and diversified my giffing content (I have been giffing AoS 99.9% of the time non stop previously I kid you not). And I’ll be back in school for my part time masters a month or two later, so who knows how often I can gif. I don’t ever wanna stop giffing but I know one day I will, and before that day comes I just wanna share some of my memories with you guys on this hell site. So, basically all that led to this post.
2. The Basics
I’m gonna assume you have a bit of knowledge about gif making. If you’re a complete newbie, I’ve tried my best to link some tutorials to help you understand or get started. And don’t get intimidated by the length of this post. Even though a lot goes into gif making, once you get everything sorted and find your routine, it’ll become second nature. The following is simply my workflow of gif making. It is by no means the right/ better way of gif making. Everyone does things a bit or drastically differently, I’m just here to share my process in hopes that someone might learnt something new or find something interesting. If I got something wrong, feel free to inbox/ message me and address it politely, since I didn’t exactly started out giffing with clear directions, I do get some of the fundaments wrong. And I am no expert in photoshop or any editing software, it’s more of a learning as I go sort of thing. So just take everything with a grain of salt. With all the disclaimers out of the way, here come the things you’re probably here for.
i. Video source
There’s one simple rule, go with the most HQ one, I’m talking 1080p or 4k and make sure it’s the biggest in file size because not all 1080p are created equally. Here’s a post by Taylor (@kylos) explaining all of that and where to download as well. For the most part I just use 1080p because I personally can’t tell the difference but I’m sacrificing a lot of time for a 4k video to load/ process. It’s only instances like these I would use a 4k source.

(gif taken from my set here)
Downloads are gonna take up space but you probably want to keep them if you might gif the show/ movie in the future again since you already spend all that time downloading, so you might need to invest in some hard drives for this. I used to use my uni’s unlimited gdrive plan which was available even after I graduated, but after Google cancelled it I was in huge trouble. I save pretty much all my hd downloads and all my psds & gifs. I’ve recently got a WD Elements 12TB just so I can transfer all 6+TB data on my gdrive to there with space left for the next couple of years.
ii. Screencapping vs Video clipping
So there are a couple of ways to go about this that I’m aware of.
screencapping with mpv (tutorial by Taylor) or other softwares
video clipping with handbrake (here’s an in depth tutorial on gif making including clipping with handbrake by Nums @cillianmurphy), vlc, km player, etc.
video clipping + cropping + resizing with Vapoursynth (download here | tutorial by Em @realstraykids)
I have tried all of the above. I started with screencapping till around late 2020, when I found out about avisynth (now replaced by vapoursynth) and finally got my hands on a pc where I can download it. I was using screencaps for a really long time because older versions of ps don’t have timeline, I would end up having to convert the video back to frames anyways so why don’t I just import screencaps as is. I think it’s the same logic for me now, because I start all of my editing in timeline, so it’s just quicker to import video clips for me (especially when comparing screencapping with mpv vs video clipping with handbrake). From late 2020 till now, I mostly use avisynth/ vapoursynth. There should be less detail lost when resizing using vapoursynth compared to ps. Personally, I think ps does a pretty good job and I wouldn’t say vapoursynth is a must, it just happens to be a video clipping and resizing two in one tool for me. Vapoursynth has additional denoise & sharpening tools, but I just couldn’t quite get the setting right to incorporate them into my giffing routine, so I stick with ps for those purposes.
Here’s a comparison for you if you’re thinking about using it. On the left is how I used to gif without vapoursynth. I did the same thing for both gifs except for sharpening, because the clips from vapoursynth just look slightly sharpened to me so I compensated with more sharpening on the left. Honestly, now looking at it side by side I actually like the one without vapoursynth more 😂 I’ll let you decide for yourself. Also, when I’m doing a huge compilation set where there are a lot of gifs and they are basically tiny and I don’t really have the dimensions in mind yet, I’ll just go with video clipping. It’s faster and I can resize it later.
iii. Resizing
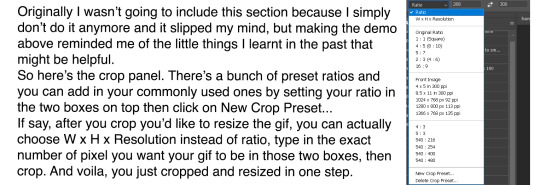
There might be reasons why you don’t want to use the W x H x Resolution crop for your gif, because in the image size panel you can actually choose how you want your resampling setting. Normally I just go with Preserve Details 2.0, and set reduce Noise to 100%.

iv. Sharpening
Once I load my clips into ps, the first thing I do is add smart sharpen to them. For the longest time I only sharpen once. Here’s a sharpening tutorial by Ava (@anya-chalotra). I think those settings are mostly what people use and if you’re new to this you should probably stick with that. But I’ll let you on a secret (not a secret anymore now that’s in the open), I don’t do the whole over sharpen then blur it out thing, I just sharpen to the amount I like. This is coming from someone who spent the first 2? years giffing without sharpening, and when I do realize people sharpen I didn’t even look/ properly follow a tutorial on how to do it. I just knew smart sharpen is a thing. So, I’m sure there’s good reasons why you should sharpen to 500% then add gaussian blur and you probably should do that too. Prior to using vapoursynth, my settings were like radius 0.3, amount 100%-200%. With vapoursynth, I find it slightly sharpens my clips so I go with radius 0.3, amount 50% like 90% of the time.
Then there’s the second sharpen thing if you noticed in my banner gif which I learnt from Sid’s (@sidonidoneeey) tutorial recently. I think it adds more contrast & definition to the objects in the gif.

Here’s a comparison for you to decide for yourself. I tried the max sharpening then add gaussian blur method in the second gif, and I’m still not quite convinced.
v. Colouring
This I would say is pretty much the essence of a gif maker’s style. Again, everybody does it differently, different gif makers swear by different adjustment layers.
Here are some tutorials for getting rid those difficult colour cast:
Kate’s (@dewandawise) channel mixer tutorial
Airam’s (@magnusedom) colouring tutorial
The best/ most experienced gif makers I know all swear by channel mixer so you should definitely check out Kate’s tutorial.
Personally, my routine adjustment layers are like the ones in the banner gif. Levels → (+/- Curves) → Colour Balance and/or Selective Colour and/or Hue/Saturation → (+/-Vibrance). Then repeat any of those if necessary.
Levels:
Personally, I always start my colouring with levels. When I first started giffing, all I heard about is curves and I spent a lot of time fussing around with it not knowing what it actually does. Until I found out about levels. It is way easier to understand than curves and very suitable for beginners in my opinion.
You basically drag the right most arrow to meet the right side of the histogram. What you’re doing is telling ps what value in the gif you want to be the brightest (aka white), and everything beyond that value is going to be white as a result. You do the same thing on the left, and in this case defining the darkest/ black in your gif. I find this to be the simplest way to brighten and add contrast to gifs. The results as you can see is night and day.
Curves:
Curves can basically do what levels do but more. See those two arrows under the histogram in curves (right), they basically do the same thing as what I just showed you in levels (left). And then obviously you can manipulate the curve to get your gif how you want, but honestly I still don’t fully understand what curves is so I’m not gonna try and explain that to you. What I can do is show you some other neat tricks you can do with curves.

You can click on the hand with the pointing finger icon, click and drag up to brighten or down to darken on any area in the gif you’d like to edit.
Another thing I like to do is click on the white (last) or grey (second) eyedropper, then click on an area where you think should be white or grey to get rid of any unwanted colour cast. This video tutorial goes more in depth and is more of a proper way of doing it, but I just don’t bother with doing all of that normally.
So here you can see I click on the grey eyedropper, than I clicked somewhere in the background I think should be grey, ideally further away from that blue light beam behind her because everything near that is just gonna be more bluish. And you can see immediately the ground has less of a cyan tint and there’s more red in her skin. Sometimes, you have to try a couple of different places to get the best results. Sometimes, it just won’t work at all.

You can also Alt+click on the auto button, and a panel shows up. Click on them and see if any of those works for you. But normally I don’t use this because I have already enhanced the brightness and contrast with levels.
Once I get my overall values how I like it, I go into colour correcting. Usually nothing drastic, just trying to get rid of any colour tint and get the gif to look more neutral in colour. My go to are colour balance, selective colour and hue/saturation.
Colour balance:
This is usually my go to to adjust the overall tone of the gif, and the panel gives a good visual of rgb vs cmy.
Selective colour:
This is when I only want to adjust the tone of a particular colour without affecting the rest of the gif. I usually go to red the most to adjust characters’ skin tones. Also, people often ask if they should use relative or absolute mode. I would say for simple adjustment I would go with relative because it’s more subtle, but for major colour change and I want it to really show I’ll go with absolute.
Hue/Saturation:
This I usually go in and click on the hand button then click on wherever in your gif you want to change the colour. Slide the hue or saturation slider around till you’re satisfied.
If you want to, say, change your background to a single colour, check the box colourized. And slide the hue slider to your desire colour. Then paint black over the object in the layer mask to preserve it’s original colours.


Also, that slider you see right there. The center light grey region is where the colours would be affected by the changes you made. And the two darker grey regions flanking it are sort of a buffer so the colour transition isn’t as stark if it makes sense. You can basically slide those sliders closer to each other so the adjustment affects a smaller targeted range of colours. You can always crank the saturation to the max to see what part of the gif you’re changing the colours of.
Photo Filter:
This is a cool one that I learnt about recently. You can basically apply a warming/ cooling filter to quickly change the tone of the gif. Sometimes it helps with getting rid of that last bit of an unwanted colour filter.
vi. Blend modes
Do you know that you can change the blend modes of your adjustment layers to get a different result? I don’t think a lot of people do this, I don’t either most of the time. But there are a couple ones that you might find helpful.
Screen: This will brighten up the gif a lot, could be helpful with really dark scenes.
Colour: When I want my adjustment layer to only affect the colours but not the brightness of the gif.
Luminosity: When I don’t want my adjustment layer to affect the colours.
Here’s a video explaining all the blend modes in photoshop.
vii. Denoise & Clean
It was from the same post that I learnt about avisynth that I found out about Topaz Labs, particularly their denoise plugin & clean plugin. I won’t go in depth into that because I’ve tried it a couple of times and couldn’t get the settings that work for me and it is very time consuming. But if it is something you want to try, here’s a post of the user sharing her topaz settings. What I actually want to talk about is Camera Raw in ps.
I normally add my denoise filter after I coloured the gif, because all the brightening and saturating the gif with colours add more noise to the original clip itself. But if a scene is particularly grainy to begin with, I’ll add a denoise filter right after sharpening, add my adjustment layers, then another denoise filter if necessary. Also, if you want to keep more details in the certain areas like the hair of the characters, just take a soft round brush and paint black in the smart filter layer mask.
Go to Filter → Camera Raw Filter. The denoise function is under the tab Detail. I usually only move the noise reduction and colour noise reduction slider, and keep the detail at 50.
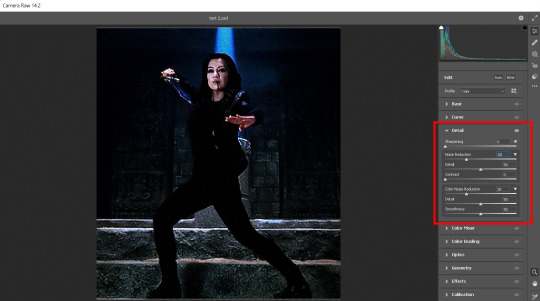
There’s so much more you can do with camera raw. Here’s a tutorial by @michietuts on how to colour your gifs with camera raw. I actually completely forgot about it until I went digging for tutorials for this post. I think the reason why I never got into using camera raw to colour gifs is simply because there’s too many sliders and it’ll take a long time to figure out what works, so I just stick with what worked for me.
viii. Convert to frames & export
After I add all my adjustment layers and denoise filters, I normally convert it back to frames for further editing because I find it takes so long for the video to play in timeline mode. It’s just easier for me to gauge what I want to do with the gif in frame mode, such as whether more adjustment is needed, or how I want to crop my gif. I know a lot of people would just edit everything in timeline mode, and convert back to frames as a last step to change the delay to 0.05s before exporting. You can do it however you want. It’s just spending so much time with cs5, I’ve grown accustomed to editing in frames mode.
Here is my export settings:

For most people, it’s the choice between selective vs adaptive and diffusion vs pattern. Personally I prefer how adaptive pattern looks and I rarely change it across different gifs because I have my export action automated. There’s more explanation and comparison in Ava’s tutorial here.
ix. Subtitles
The majority of gifs I make are what I call “scene edits”. Not that I’m lazy or anything and don’t want to be bothered with making fancier gifs, it’s just what I like to do. Especially when giffing a show I haven’t giffed before I always start with making plenty of scenes, to the point where I can recall just about any scenes from that show when I want to make a fancier gif set. So I’m just gonna share me text settings for the subtitle, show you how I center the text box to the bottom and how to duplicate it to the rest of your files.
Press T for the text tool, and type in whatever subtitle you need. Here are my subtitle settings:

Alt+A to select the whole canvas then press V for the move tool. Then select align horizontal centers and align bottom edges.

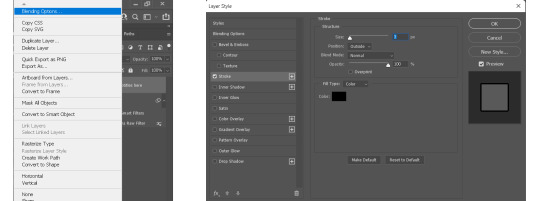
Now that you have your text centered at the bottom, you might want to style it. I usually go for a stroke outside the text, some people op for drop shadow or both. Right click your text layer and select Blending Options... Check the Stroke box, change the size to 3px, position to outside and colour to black.
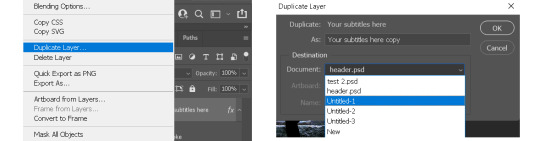
To duplicate text box to the same exact position in another gif, right click your text layer and choose Duplicate Layer... Then choose whichever document you want to duplicate to and press ok.
And of course I have my text duplication automated, so the text would show up in all my gifs in a matter of seconds.
x. Recap

3. How to optimize your giffing process
i. Actions
This one single function in ps is gonna save you sooooo much time & energy my friends. If you’re a chronic giffer like me, you probably spend all your time starring into your computer and just clicking away like a manic, especially those times when new episodes drop and everyone is trying to get their gifs out there as quick as possible. Let me tell you, life before I found out about actions was miserable. Back then, my laptop was even slower, so maybe after I did one thing I had to wait for it to load, then repeat the same process to the rest of the gifs in the set, which is normally 10 in total. I had to grab my laptop with me during meals because I basically couldn’t walk away from it. Actions was a lifesaver, especially for things you’d routinely do when making gifs like sharpening, resizing, denoising, convert to frames, export, etc. You basically use actions to record yourself doing it once, and you can just hit play every time you want ps to do it again. And to take it a step further, you can automate ps to play that action on all the opened files. You then record that automation into an action, then voila you can sharpen/resize/export all your gifs in one click. Now, I can click automate convert to frames, go out and eat dinner and come back to it.

Now here are my actions. I know the naming doesn’t make much sense to you, but basically I have actions to automate sharpening, denoising, converting to frames, setting frame delays, exporting and saving. And yes, I do regularly hit that automate save button so I don’t lose everything when my ps crashes. Then there’s actions for formatting subtitles, duplicating layers, pasting frames after or over frames. I think this covers about everything I use on a daily basis.
Here’s how you record an action and automate said action. (Left gif) First you click on the folder icon to create new set, name it and click ok. Click the + icon to add new action, name it and press record. Then you do whatever you want to record, and when you’re done click to stop button to stop recording. (Right gif) To create an automation of the new action, click the + icon to add new action, name it and press record. (Third gif) Then go to File → Automate → Batch. Choose the set the action you want to automate is in, then choose the action. Click ok then stop recording. Now you have an action to automate the previous action you made.

(gif below) The box on the left of your action is the dialog on/off button. Basically if you check it those dialog boxes will pop up every time after you played the action, which is good if you want to customize every time but not so much when your goal is to click one button and let it run across all gif without interruption. I check most of them off except for the denoise filter which I do want to customize for each gif.
To get the action panel to look like the one I showed in the first picture, click on the little button on the top right corner of the actions panel and choose button mode. And you’ll get to play an action by simply clicking on it.

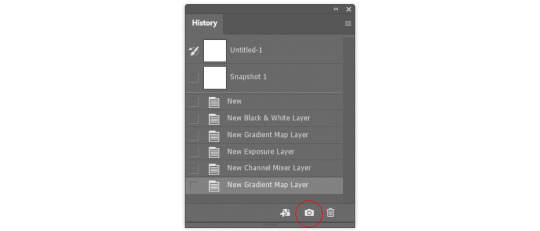
ii. History
There are a couple of things I do in this panel. Have you ever make an adjustment, undo, make a new adjustment, and now no matter how many times you hit revert you just can’t get back that first adjustment you made? There’s a simple fix in the history settings. Click on the little button on the top right corner of the history panel and choose History Options, then check the box “Allow Non-Linear History” and click ok.

I often like to use the history to go back to previous adjustment, because I can see clearly what has been done (sometimes I click on the wrong button without knowing) and I can go further back without keep hitting Crl+Z. You can also click on the camera icon in the bottom right to take a snapshot of the current process/ step of the gif, so in case you don’t like some changes you make, you can always go back to that snapshot. Or you can take snapshots of different adjustments you made to the gifs, then you can quickly compare how they look by toggling between snapshots.
iii. Keyboard Shortcuts
Know/ customize the shortcuts for things you often do, such as Crt+Z for undo, T for add text, V for move, Crl+A for select all, etc. It’ll save time & effort in the long run.
To customize, simply go to Edit → Keyboard Shortcuts.
iv. My Workspace
I’m the least organized person I know but I still want to talk about my ps workspace. It’s been structure to fit my giffing needs. Basically all the panels I need are there, and I maximize my space for the document window and timeline.

If you go to Window → Workspace → New Workspace, you can save your current workspace as a preset. So maybe if you moved things around or accidentally closed some panel that you don’t remember the name for, just click on that preset workspace, or if it says you’re already in that workspace click reset “whatever the name of your workspace” and your workspace will be reset. There’s mainly 2 workspace I toggle between, one for giffing and another for digital painting.

4. The more advanced stuff?
i. “Recolouring”
I’m not gonna spend a lot of time on this part because the next part is actually what I really want to talk about. But Hue/Saturation is going to be your friend if you want some major colour change. Then add a gradient map over it for good measure. I’ll link some tutorials for you if you don’t know what I mean.
Becca’s (@yenvengerberg) mega colouring tutorial
Kate’s tutorial on @usergif (←there’s all sorts of gif tutorials in their resources directory, go check it out)
People would always tell you to find gifs where the character barely moves or the background is of a contrasting colour to make the process easier. Now, with timeline you’ve got keyframes to help with slightly more movement. But what if you want to make something like this gif below? 😨
I made this during my earlier days of recolouring (which was not that long ago), and the only thing I could think of was colour it frame by frame. This gif has 73 frames. There are 8 gifs in this set which I had to all colour frame by frame. It was a long and tedious process I tell you, but the results, in my humble opinion, is stunning!!! But what if I tell you it can be done without colouring it frame by frame and it only takes a fraction of the time I spent?
(gif taken from my set here)
ii. After Effects & Rotoscoping
The reason I started using after effects was for this gif set. I got a gif request and my inspiration was the intro from the youtube channel sortedfood. Here’s how one of the gif looks like.
See the character cut out on the right? Basically the same thing in my recent Winnie the Pooh set. In my first trial, I was trying to do it frame by frame on ps like I always did, but there was no way I could get it looking smooth, it gets very jagged when the background was a completely different scene. And with some googling, that’s how I found out about rotoscoping on after effects.
This is the youtube tutorial I learnt it from and the one I send it to people when they ask me how I do character cut outs like that. I’ll try to quickly show you how I do it below, but please refer to that video if you want more details.
Usually I export my gifs as videos in timeline mode in ps, then import the video into ae. After I’m done, I’ll export the ae file as video, import it back into ps, convert back to frames and do the rest.
Here are my steps to rotoscoping:
Double click the layer you’d like to work on. The layer window should pop up and that is what you want to work with.
Click on the Rotobrush tool and paint across the object you want to include. Always paint across, not outline.
I have my roto brush set to version to 2.0, and I would change the quality from standard to best.
Continue painting until everything is included. Alt+drag to deselect unwanted parts. Hit spacebar when done and let it run.
You can change the properties of the roto brush selection in effect controls.
If you want a more detailed written explanation than this. Go to adobe’s help page on roto brush here.
Once you have the cut out of the object you desire, there are many things you can do with it.
Duplicate the original layer, change the colour of the bottom layer as aforementioned. And now you have a gif with a different coloured background.
Or you can have a different background (either a solid colour or a different video/gif)
You can have text behind the object, etc.

You get the idea. (This is a simple demo, please excuse the quality and choppiness of the gif)
Now you’ll never recolour gifs the same way again. Here’s a Kate & Yelena gif for you guys (even though it’s not the best, could’ve blurred out the edges a bit more but it’s still pretty damn awesome and I wouldn’t have coloured it like that if it wasn’t for ae)
(gif taken from my set here)
Here’s another gif I made with AE from this set. The possibility is endless and I’m barely scratching the surface. I can do a separate AE tutorial if you guys are interested. Let me know in the comments or tags.

5. Tutorials mentioned in this post
i. Text tutorials
@kylos’s film downloading and screencapping tips for making gifs
@kylos’s gif tutorial
@cillianmurphy’s giffing 101- your ultimate guide on how to make gifs
@realstraykids‘s gifmaking with vapoursynth tutorial
@anya-chalotra‘s sharpening & exporting tutorial
@sidonidoneeey‘s sharpening tutorial
@dewandawise‘s the beginner’s guide to channel mixer
@magnusedom’s colouring tutorial
@yenvengerberg’s mega colouring tutorial
@usergif’s how to change the background of any gif tutorial
adobe’s Roto Brush and Refine Matte
ii. Video tutorials
PiXimperfect’s Color Correction with Easy "4-Point" Technique!
PiXimperfect’s The Science of All 27 Blend Modes in Photoshop!
@michietuts‘s How to Color Grade Gifs Using Camera Raw
C.M. de la VEGA ‘s Get the Best Results with Rotobrush 2
6. Acknowledgement
Thank you so much to the authors of all the amazing tutorials, everything was so eloquently written, well explained and easy to follow.
And a huge shoutout to the people at @pscentral & @womenofmcu. Our conversations on gif making have prompted me to write this post.
I’ve learnt so much from the people at psc and thank you Ace & Val for creating this place that I didn’t even know I needed. It is one place I feel truly belong. So If anyone is interested in gif making, come join us at pscentral.
And thank you to the ladies at womenofmcu for being so nice and welcoming, always love chatting with you lot.
Last but not least, I’m patting myself on the back. For someone who’s terrible with words this is one hell of a long text post.
As always, happy giffing!
#completeresources#allresources#ps resources#userdanni#maystag#usergiu#tuserheidi#usershreyu#uservivaldi#userfnuggi#supervalcsi#aphrandt#userdean#userannalise#userrainbow#uservier#userelio#rogerhealey#tusercat#my tutorials#gif tutorial#even though I said this is not a tutorial I still need to tag it in a way I can find it
303 notes
·
View notes
Note
hi i absolutely love your header! do you mind giving a tutorial on how you made it?
yeah ofc!
I did not save the final psd for that gif so this turned out a bit different than the actual header but the process—which assumes some photoshop familiarity, but includes lots of examples—is the same and gets us really close
if anything feels skipped, confusing, or glossed over, pls feel free to ask questions 😊
FOREGROUND
— alright so we’ve got a shot of lexi from saved by the bell
— before cropping, convert to smart object at its full size so it’ll retain its quality in case there’s any need to resize later
— then just crop to mobile header dimensions: 640 x 360. and adjust the shot until it fills that space the way you’d like

— there are a few ways to mask but for a still frame esp, I think the easiest is object selection (W) because you get pretty clean edges. I find rectangle mode misses too much, so set it to lasso mode on ‘add to selection’

I missed the entire desk but bc of add to selection, I can just loop around and add it without losing what’s already selected

you’ll notice you truly do not need a steady hand for this, just get close and the tool will do the heavy lifting
— add a layer mask


— then just brush over the missed parts (like the edge of the desk) and erase the extra (like where it caught some of the bookshelf by her shoes)
— so that’s pretty clean except there’s a noticeable stroke around the layer (much more obvious against a background). if there’s a way to avoid this idk what it is! but it's simple enough to get rid of with the brush. in this case I used 10px at 60% hardness + 100% smoothing

— so now you can make any adjustments on coloring and sharpening. running through it really quickly, I got this
— and that looks fine so the foreground is done!
BACKGROUND
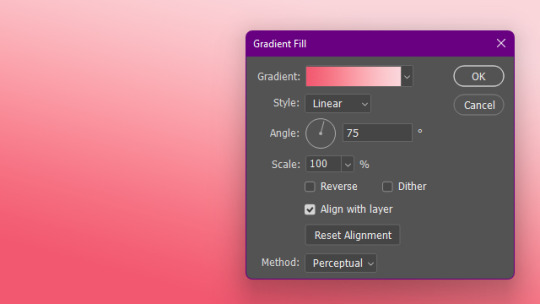
— for the background, just add a gradient layer

OVERLAY
— the overlay is from this pack: https://www.deviantart.com/scottvandyne/art/GIF-OVERLAYS-PACK-by-scottvandyne-796712849
like i mentioned, I do not have a psd for our header but the first overlay in the pack works the same as any of the others, so I’ll be using 'falling sparkles' for this tutorial. but there are like 43 options. lots to have fun with
anyway
— create video timeline if you haven’t already
— open the overlay psd of your choosing. drag (or copy then paste) it into the header file above the gradient
— this overlay is only 500 x 281. you can duplicate it to cover the extra space but it’s honestly not that much smaller so I just resized it
— blending will get rid of the black background and just leave the sparkles
if you want dark or colorful sparkles you could invert and/or use the other modes (really good video on the topic btw: https://www.youtube.com/watch?v=i1D9ijh3_-I), but we’re gonna keep white sparkles over the gradient, so we only want the lightening modes
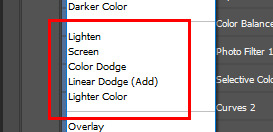
literally any one of them work fine, it’s just a matter of preference. I am always a sucker for linear dodge (add) which gives us this:

BORDER
— you could do what I’m entirely sure I originally did and pull a vector off pixabay if not google tbh and then clip layers to it and use masks and do too much
however pen tool is quicker + less messy
— use the curvature pen tool. as you leave anchor points, it will curve the line for you. it doesn’t matter what color you use (esp since you can alter it later) but stroke will determine how thick the upper line is

tweak the anchor points to clean up curves

— copy the line shape layer, then paste in place (ctrl + shift + v)
— raise one line higher, leaving a gap between them at whatever thickness you like

— rasterize the lower line, use the magic wand to select both the line and the empty space below it
then brush over everything
— when you brush over the selection, you lose smoothness. there’s a trick to smoothing it out but honestly just copy the upper line (which should still be a shape layer), paste in place, and lower until it rests just above the rasterized layer. same effect, no brainpower
just to show the difference:
— and that’s it! just save as a gif and you’re good to go!
ok sike. actually the overlay is a good 200ish frames so whether you export from timeline or flatten to clips/convert to frames, remember to shorten the work area first

— ok that’s it for real this time!

vs. the original. not too far off!

61 notes
·
View notes
Text
Tu... torial? Pt. 5.
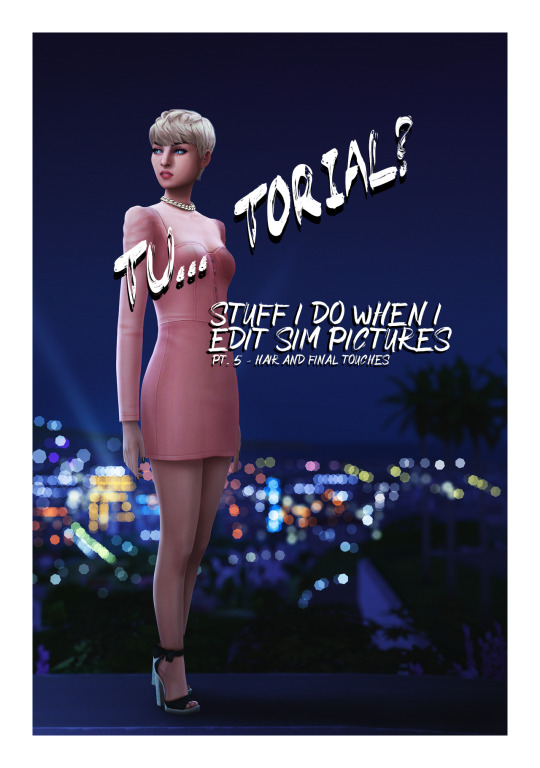
Final part of my tutorial! This is a little all over the place, because that’s how I am in this stage of editing. Also I didn’t proofread this...
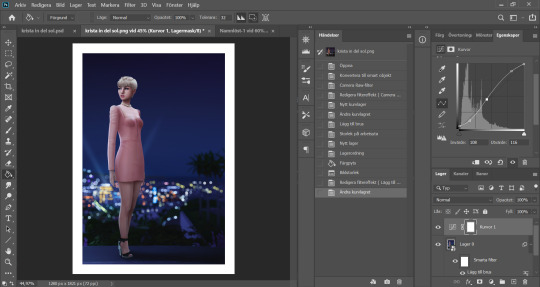
Open this in dashboard for best view of the screenshots.
Disclaimer: I have no formal training for any kind of graphics stuff, I work in an office as a receptionist - I serve coffee for a living. I am absolutely self taught and while I consider myself pretty comfortable with photoshop, that doesn’t mean that there isn’t about a gazillion of other things that can be done that I have no idea about. There are people far superior than me in the Sims community. This is just how I do it, with techniques I have picked up through the years. Some things I go over in these will be pretty basic, some things a little more unorthodox.
Disclaimer 2: My edits take time. This is what I do to relax, one edit takes several hours for me. Sometimes days :)))
Disclaimer 3: My photoshop is in Swedish, which is my first language. I tried my best to find the English translations for every step that I do.
Tools used: The Sims 4, Adobe Photoshop 2020, One by Wacom Pen Tablet (very basic and unfancy).
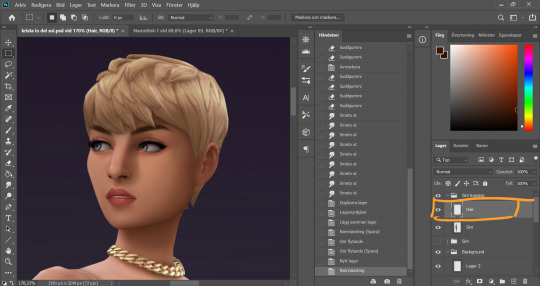
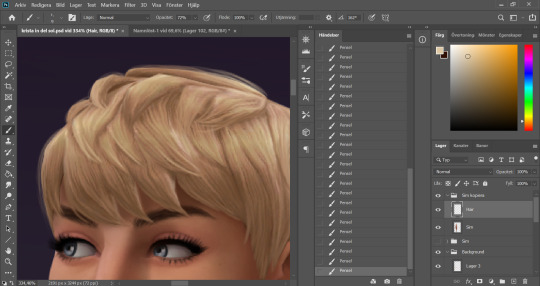
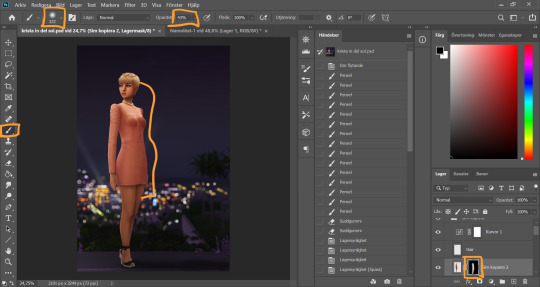
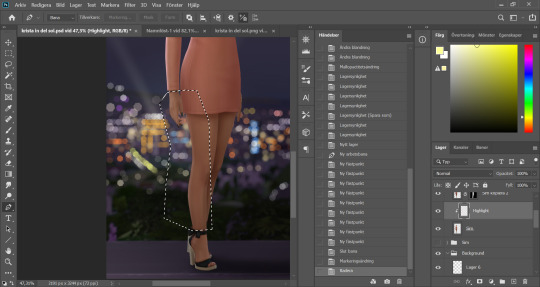
It´s hair time baby! I very much enjoy drawing hair on sims. I make a new empty layer on top of my base Sim layer.
This is where having a drawing tablet makes a huge difference. We need the brush to be sensitive to pressure to get the effect of hair strands. I chose a hard brush, small small size (how small depends on the picture size of course, but I usually land somewhere 6-9 px)

I pick up a color from the hair, I usually starts with a medium light color.
I start by drawing strands around any tips of the hair so they don't look quite so solid. I do this part with both short and long hairs. Hot lazy tip: straight unlayered hairs is the absolute easiest. This is a layered hair so I start with the bottom and work my way up. I pick up different colors from the hair as I go along, to add dept.

Continuing up in the hair and add strands to the pointy bits.
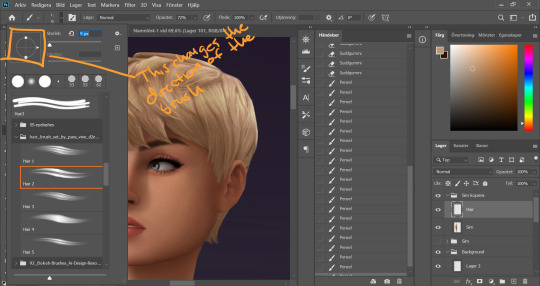
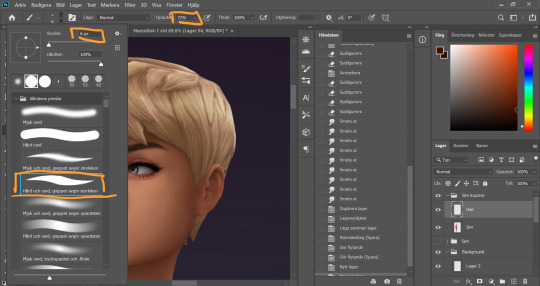
When I feel like the pointy bits have been softened I select one of my hair brushes. I use these ones by Para Vine.
I start painting "around" the hair with one of the lighter colors picked up from the hair, changing the direction of the brush every once in a while for a more natural result.
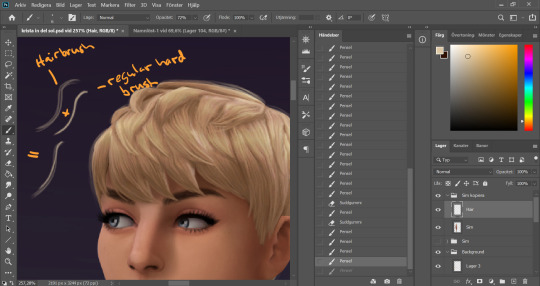
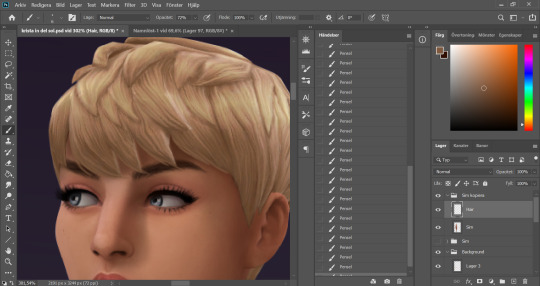
After this the hair is looking a little fuzzy, so I'm going to go back with my small harder brush to fill these parts out.
I don't add a lot of them, just small bits here and there for filling.
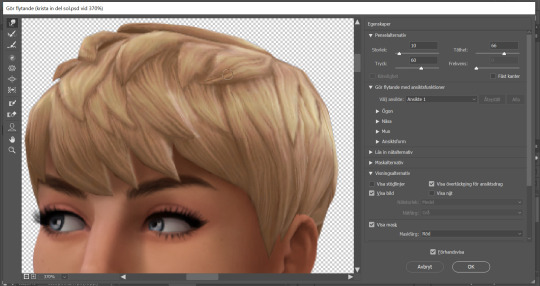
This is a little overkill but... now we have some of that "squary" thing going on in the hair as well that are still showing through our painted layer. Now we could paint over these, but painting can actually be overdone and I wan't to keep the hair recognizeable because the creator put a lot of work into it! So I go into liquify and smooth over any wonky lines still showing, just slightly.
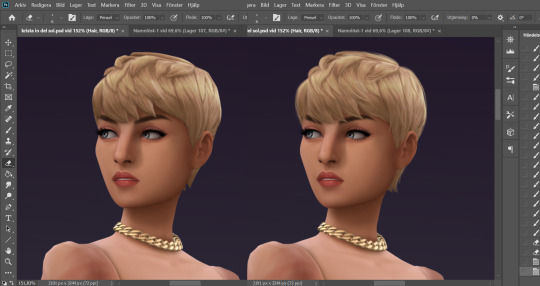
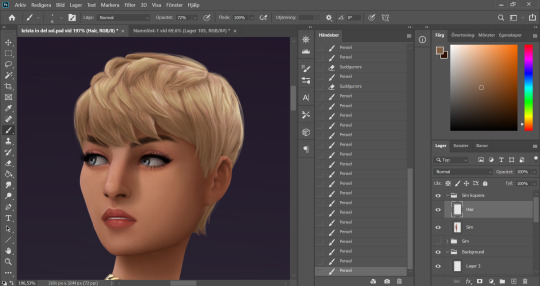
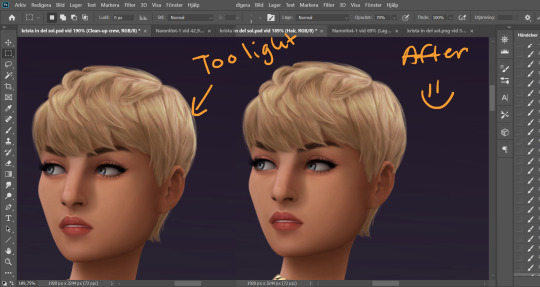
A comparison of before and after hair. Still recognizeable, but softer.
This is our result so far. We've come a long way, but we're not done.
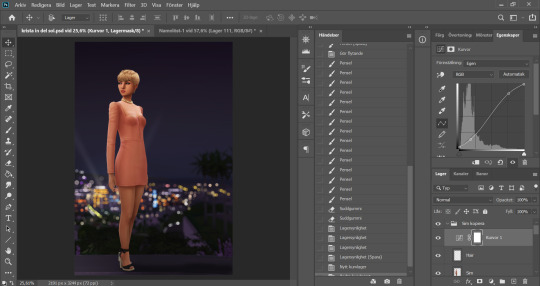
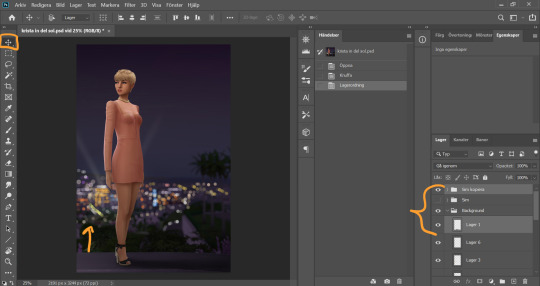
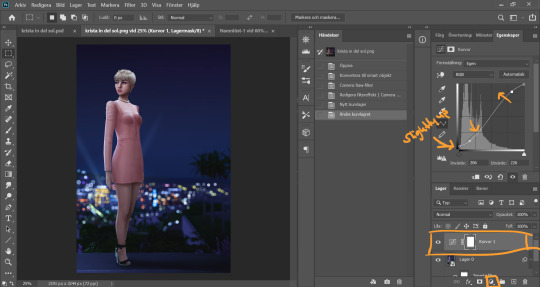
At this point (or actually sometimes sooner) I add an adjustment Curves layer, this will not end up in the finished image, this is just to give me an idea of what the image might look like with more contrast (which we will add later). I keep this at the very top of the layer panel and turn this on and off as I go. Very important to have it turned off if we are going to eyedrop a color and use that to paint, since it would pick up the wrong hue if we have it turned on.
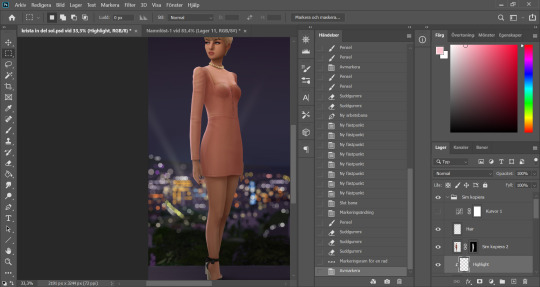
Now I still want the front of my sim to be a little darker to fit my lighting, but I don't want to go over with any more shadow. So I duplicate my Sim layer, and go to Layer -> Adjustments -> Curves. This will only change the active layer, as opposed to creating an adjustment layer down in the Layer panel that will change all layers below it. I drag the curve down a bit to make my new Sim layer darker.

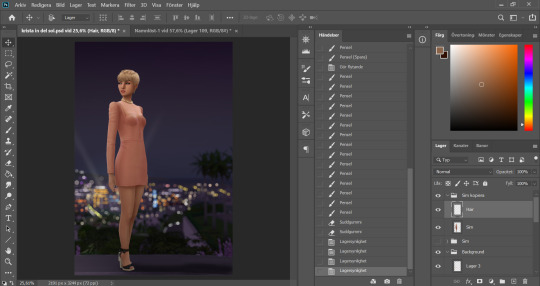
I add a layer mask to my new Sim layer, and bucket fill it with black color so the new layer gets hidden.
I chose an absolutely HUGE soft brush, with medium opacity, and starts painting white on the areas where I want the new darker layer to be showing. And blend by going back with black where the line is to harsh.
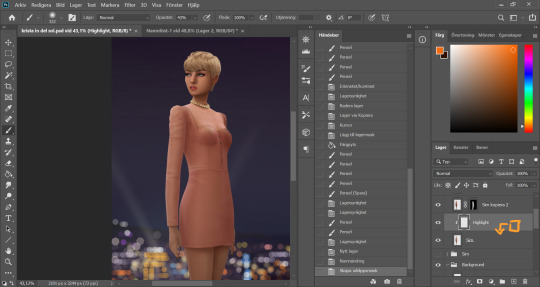
Time to add some highlights. I create a new empty layer between my two Sim layers, and add a clipping mask by holding Alt and hovering on the line between the new layer and my bottom sim layer, until the little square with the arrow symbol comes up and then click. This will make whatever I do on my new highlight layer, only show up on the areas where the layer underneath is filled.
Time to paint. I disable the curve adjustment layer for this. I choose a bright color, in this case a light pink because I didn't want a contrasting color for this picture. I go with a big soft brush around the edges where I want my highlight to hit. In this case, the arm, the hand, the arch of the back and the calf. I didn't add anything to the face in this picture because I didn't like the way it looked, but usually a little highlight to one of the cheeks is just *chef's kiss*
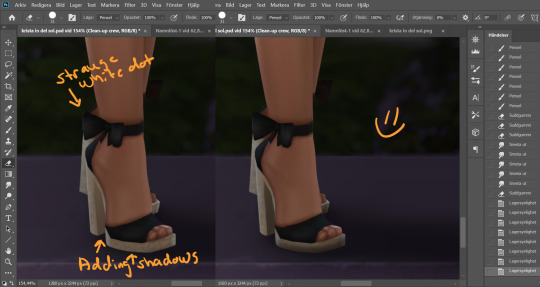
And somewhere around here I got really stuck and really struggled to follow with this tutorial. I felt the picture was lacking something and I tried several different things. I added light rays, tried creating different light sources, there was a moon at some point. But I ended up with just a simple additional gradient shadow down in the right corner (on a new layer down in the Background layer group). Life changing…
And then I didn't like the pink highlight on the skin (sigh, this is how I work, but it’s not recommended to be this indecisive) so I removed that and added a more beige-yellowee highlight instead. And forgot to take a picture after the highlight was added....
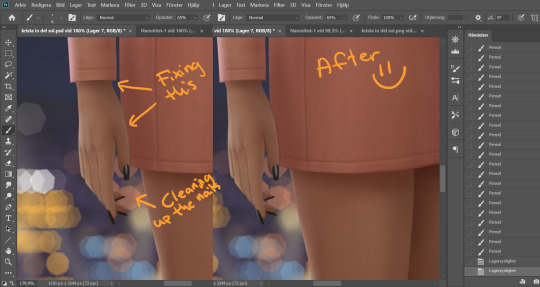
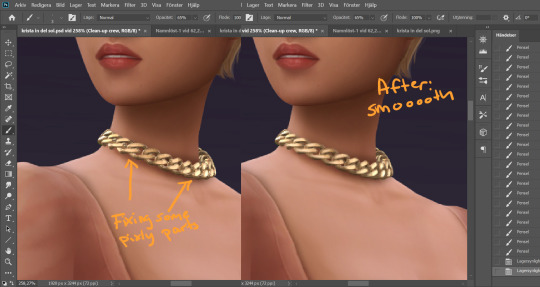
And now I go into nitpicking mode. I add a new empty layer on top of my Sim layer, I add it under the highlight layer so it automatically takes on the clipping mask of the Sim layer, I name it Clean-up Crew and go in to refine anything slightly wonky. Picking up colors with the eyedrop tool and going over flaws with a tiny brush.
When I fixed this little light area on the back of her head I left the Clean-up Crew layer and went to my Hair layer instead, because I still have that separate and it's above all the other layers.
I thought my sim was a little too far down in the picture so I moved her up by selecting my whole Sim layer group and the layer on which I have her ground shadow, chosing the move tool and pushing them up. This will move all the layers in the Sim layer group as well as the ground shadow layer equally.

I'm telling y'all, nitpicking mode could go on forever. Added more strands to the bangs.
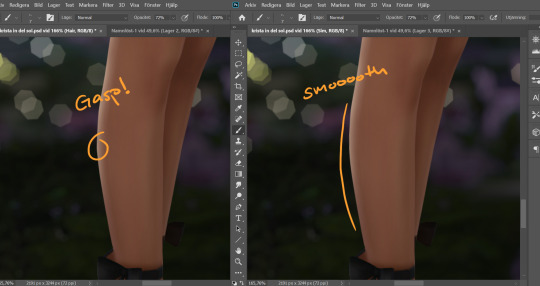
Noticed a little pointy part on the calf, so I wen't into Liquify on the base Sim layer and smoothed that out. Since the highlight layer has a Clipping Mask corresponding to the Sim layer, the highlight stayed in place.
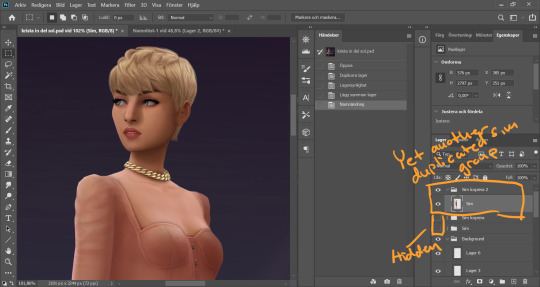
I duplicate my Sim layer group once more, and merge the layers within this group. So now the Hair, Highlight and Clean-up Crew is all merged onto the Sim layer. I hide the previous Sim groups.
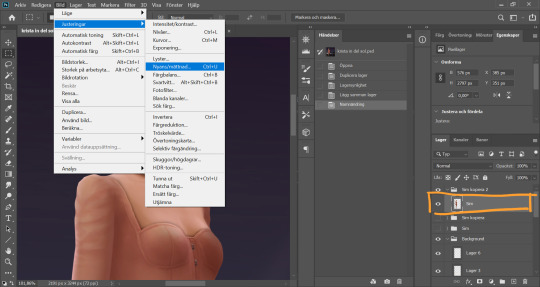
With my new Sim layer selected, I go to Image -> Adjustments -> Hue/Saturation. I want to make my Sim a little less bright so it will match the background a bit better.
I drag down the Saturation and Brightness slider a bit until I like what I see. After this I save my whole image as a PNG-file because from now on I want to edit the whole picture but still want to keep this psd-file as it is for anxiety purposes. Important: I disable my curves layer before saving this as a picture, I don’t want that brought with me into the next steps because I will be adding new curves there.
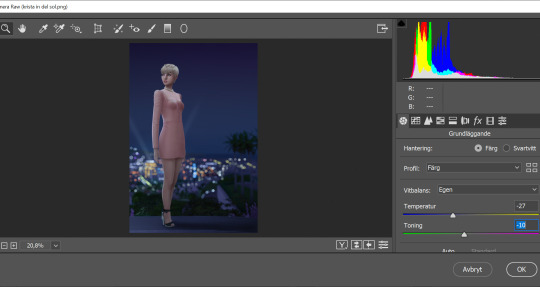
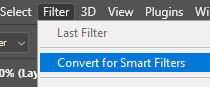
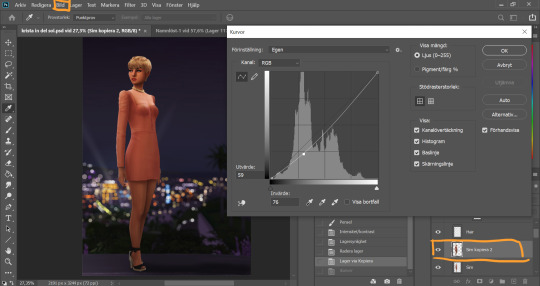
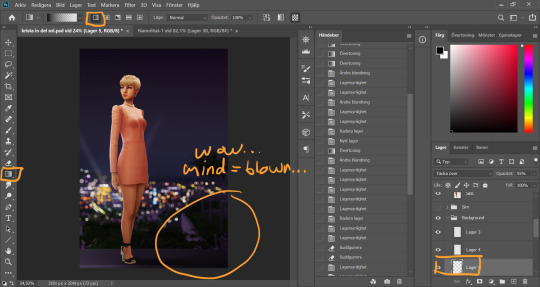
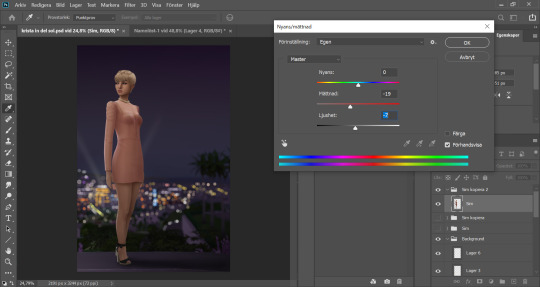
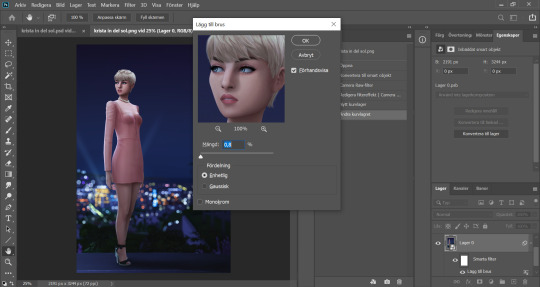
I open my new saved PNG-file. I go to Filter -> Convert for Smart filters. This will allow us to go back and change any filters we add to this layer. I go to Filter -> Camera Raw Filter and for some reason this window opens up humongus. I start by dragging down the temperature. How much depends on the picture, usually more if it's nighttime.
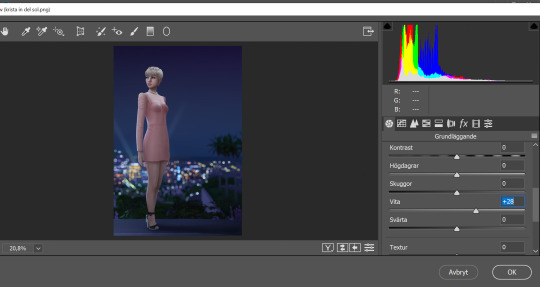
I pull up the Whites a bit for a cleaner look.
Now I add a Curve Adjustment Layer. Now you can add Contrast in the Camera Raw Filter as well, but I prefer the curve layer because I like to control the different levels. This way I can make my darkest parts a little brighter, giving just a little washed out flair to it all.
I select my background layer again and go to Filter -> Noise -> Add Noise and choose a level that I think looks good. This just brings the picture together a bit more. Also vintage vibes :)))
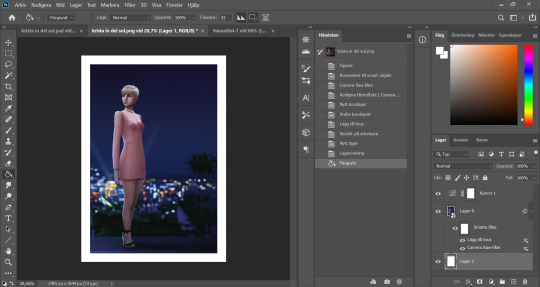
I add my frame (because it´s my aestethic and I think it looks cool on tumblr) by resizing my workspace and adding a filled white layer underneath the background layer.
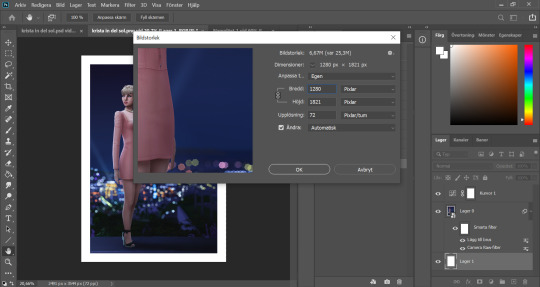
I resize my picture (Image -> Image Size) because we don't need it to be huge.
And they I just fine tune the Filters and Curves until the end of time :’)))
And that is that my friends! That’s the end of the tutorial! I hope you could follow somewheat and that someone found it useful. Thank you for reading and never be afraid of contacting me if you have any questions :) I’m very friendly.
61 notes
·
View notes
Text
#showyourprocess
From planning to posting, share your process for making creative content!
To continue supporting content makers, this tag game is meant to show the entire process of making creative content: this can be for any creation.
RULES: When your work is tagged, show the process of its creation from planning to posting, then tag 5 people with a specific link to one of their creative works you’d like to see the process of. Use the tag #showyourprocess so we can find yours!
Thank you so much to @cloudylotus and @wendashanren for tagging me for this set ❤ (please check out their respective posts here and here as well 🥰) and to the members of mdzsnet who started this!
1. Planning
I try to alternate between gifsets based on quotes and gifsets based on a single scene for the cql edits I create! This is because the ones based on quotes require significantly more thinking for me to come up with scenes to fit, alongside getting all of them to adhere to one colour scheme and then inserting the typography, rather than just me focusing on a single scene 😅 This time it was time for me to pick a quote, which I usually do from my #words tag on my tumblr where I like to collect poetry I resonate with.
“Oh, let my chest split open, let my blood spill over, body be still! I’ve bled for you, and you won’t even show me your face.” - Yi Kwangsu (via skogenflicka)
For the quote used in this set, I had thought that it fit wangxian so I had already tagged it to find later 😄 I also searched it up to read a little more on the background of the story and author and was surprised to find that it was from a short story on gay, unrequited love, which made it somehow more appropriate as I wanted to fit lwj’s perspective during his mourning years.
To select the scenes, I split the quote up into four lines and wrote the summary of the the scenes that demonstrated them quite literally, as in the things lwj did for wwx out of love even when wwx was pushing him away, + ep number and timestamps for easier gif creation. I knew that I wanted to focus on text effects too so the 3rd gif was specially picked for the horizontal movement of lwj across the frame.
2. Creating
- oh, let my chest split open (wen brand at the cold springs)
- let my blood spill over (blood running down his hand as he holds onto wwx)
- body be still! (lwj holding the rods as punishment for visiting burial mounds)
- i’ve bled for you, and you won’t even show me your face. (wwx pushing lwj’s hand off his and turning away)
I use Handbrake to isolate the scenes I want and then Photoshop to import and pare down the number of frames. I favour larger gifs, especially so that there’s room for the typography, so these were the usual 540px ratio across for cropping. For the first gif in this set, I didn’t have the special episodes downloaded so I used a screen recorder to get the needed frames of lwj’s chest brand! I remember not being happy enough with the length/framing of the brand from the regular episodes. I didn’t cut out his nipple and so many tags I see talk about it 😂
Colouring
Okay so! I knew I wanted to try out a darker colouring as the ones I do are more bright, so I went to look for tutorials and I found this psd that had a good effect for what I wanted after I modified/removed many of the layers. I wanted to work with existing colours already within the chosen scenes rather than modifying or emphasising them to go with the muted, anguished mood of the quote. The colour scheme thus became dark, maroon red (wwx) from the blood and wwx’s tassel, as well as turquoise (lwj) from the water and lwj’s robe. I then added a channel mixer layer and selective colouring layers to make the turquoise of the waters that the psd had removed stand out more, and then another vibrance layer and an additional selective colour so that I could match the blues/reds across gifs. Thankfully, I could copy this colouring over to the other gifs with a few alterations of hue/saturation, curves and levels 😊 After colouring, I resize, denoise, and sharpen the gifs.

Typography
I really wanted to work with some text effects and get out of my comfort zone in this one. In line with the three parts of the first line of exclamation in the quote (and the parallel structure for the first two parts which I found hit so hard 😭), I wanted to highlight the alliteration I found in them - the words ‘split’, ‘spill’, and ‘still’. For the first two gifs, I decided on linear gradient overlays at 45 degrees + taupe drop shadows with the colour from the colour scheme other than the colour already in the gif. In the second gif, I used the pen tool to draw a line (in blue below!) that followed the curvature of their hands, then pasted the text in. I realised that I had to draw a separate line for the word ‘spill’, which after a lot of trial and error turned out to be much simpler after turning off the first pen layer visibility (the new line kept connecting to the first 😓)
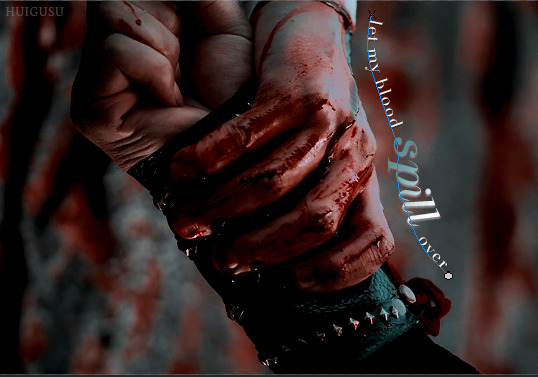
As for the third gif, I initially thought of masking each frame to make the words appear as lwj moved from left to right, then I remembered that using the ‘overlay’ blend mode on the text hides it when it is on top of the colour black! 😄 In this case, lwj’s hair is black so I just had to position the words properly so that the words ‘body be’ would reveal themselves while giving time for the word ‘still’ to also have a nice effect after. (If you look closely you can see them a little in lwj’s hair 😅) The word ‘still’ took a lot longer to figure out, but in the end using ‘difference’ for the overall text layer and ‘pin light’ for the dark maroon colour overlay gave the clearest dark red effect as the camera panned.

Finally, in the last gif, I wanted to have the effect of the word ‘face’ change from a dark maroon gradient to turquoise with wwx’s hand moving lwj’s away to have it be a bit symbolic I guess 😅 of wwx’s leaving lwj? The ‘linear burn’ setting for the overall text layer (solid turquoise) and ‘difference’ for the gradient overlay (maroon) ended up working best to make the red disappear the moment wwx’s hand ran over the word, unlike other settings where the colour looked mixed/too messy.
3. Posting
I usually save the gifs and look at them on tumblr to see if I need to adjust any colours to match better or make them more vibrant (and ask yan what she thinks HAHA). These were fine, so I wrote the caption to summarise the source of the quote, added links to research and the op of the quote on tumblr, and wrote my tags. If it’s a post with translations of what the characters are saying/from the novel I typically take more time to edit the translations/do my own translation. I check if it is loading fine on mobile and edit the saved draft if necessary, then I post! 💕
Tagging but no pressure please!! 💗
@lanwuxiann for this amazing wangxian wedding night edit 🤧🤧🤧 that had me yelling into my pillow
@inessencedevided for this heartbreaking nie brothers set (which included manhua scenes!!)
@lan-xichens for this really lovely wwx + lotus pier edit, the colouring of which i think about from time to time
@mylastbraincql for this gorgeous jyl set with soup set with such pretty blending
@still-snowing for this beautiful piece of wangxian art about lwj holding wwx’s hands through the years that i teared up over multiple times
#showyourprocess#phew thank you for reading the whole way if you did!!#and thank you jasmin and ali for the tag#❤❤❤#tag game#tw blood#tw scars#gifmaking
17 notes
·
View notes
Note
i saw ur tags on that last post and i am a beginner digital artist and i would love to hear ur tips ^-^ tysm!
hello anon! sorry it took me a hot sec to respond to this, i hope you see this aha
here are some tips i have for beginner digital artists! please keep in mind that i am not a professional, and that what is best for me might not be best for you! also i primarily use paint tool SAI and photoshop, for reference. i just have been doing this for a while so i have figured some shit out:
play with brush settings!! having different brushes with different settings to serve different purposes can make your life so much easier. my suggestion would be to have at least 5 different brushes in your wheelhouse set to your own preferences: custom all-purpose brush, eraser brush, pencil brush, airbrush tool, brush for blending (i have a custom paint brush to use for this but a standard water brush also works pretty well for this). turning whatever brush you are using into eraser mode will also be very helpful. for paint tool SAI users, i can share some of the brushes i use + what i use em for
map your undo keys (ctrl + z) to somewhere convenient, and set up your desk/devices to optimize your comfort. i work on my laptop, which i put on a raised surface on my desk so that i can sit straight and look straight ahead at the screen instead of hunching over my desk to work. i’m getting older and my back is so messed up so this important for me LOL. my drawing tablet has buttons, so i map my ctrl + z keys to the buttons so i can use the undo button quickly. this is a really simple thing to do and it helps to streamline your process by a LOT
the magic wand tool is so helpful for filling in outlined spaces and streamlining your coloring process a little. it won’t be perfect but often i think it’s easiest to magic wand things spaces and then go in and fill in the gaps
for ALL stages of your art (lining, coloring, painting, etc) using transparent eraser functions are actually really useful. this one is hard to articulate fully, but instead of just repeatedly drawing a line and undoing it because it looks bad, it’s often a lot easier to get a little sketchy and loose with your lines and then go in and touch them up with an eraser. i use basically all my different brushes on the eraser mode to make things look more natural. if you are curious about this one i can try to explain further with visuals in a separate post
you can window your files so that you can work with your references right next to your art, which i personally find very convenient.
layers can be SO USEFUL!! they are something that really sets digital art apart from traditional art. you can compartmentalize different parts of your drawing into different layers, adjust each layer differently, move and transform layers independently, add different filters/effects to each layer, etc. i can’t really dictate to you how exactly to use your layers, because some people like to use a ton of layers and some people prefer to use very few to only one layer, but it is worth playing around with different methods of using layers to see what works best for you. personally, i am someone who uses like 30+ layers in a piece. if you use a lot of layers, PLEASE keep them organized and label them in a way that makes sense to you
transform tool (ctrl + t ) is your friend! i use this tool so much, it is excellent for resizing things, tweaking shapes, fixing perspectives, and more.
play with the hue/saturation and brightness/contrast sliders. those are really good for adjusting colors, shadows, highlights, etc etc
save often, and save multiple sets of your files in multiple forms. this shouldn’t happen too often, but sometimes your files can just arbitrarily get corrupted beyond repair and you just lose all your work. i’ve gotten into the habit of saving my works at various stages into .sai files, .psd files, and .png files. SAI files are especially vulnerable, i’ve noticed.
these are just some things i could come up with off the top of my head, it’s hard to be comprehensive in one post, but feel free to shoot me some questions! i can try to make some more helpful tutorials if any of you are curious about my process.
52 notes
·
View notes
Note
psst share your outer banks coloring secrets
ah, yes, one of the worst shows to color lmaoooo. i'll try to give some tips but im sure as anyone who has tried to color this show knows each scene is diff and has it's own flavor of awful yellow/green/red shading.
some tips on how to go from this to this......


............under the cut! (warning v long and idk if i'm the best at explaining things lmao)
so firstly, i use this psd i made ages ago for everything (alecbaenes was my url many moons ago i just am too lazy to change and reupload). usually i will go into each individual layer of that psd and see how they work with the scene, and will change the opacity or turn off the layer depending on what looks best. generally for obx, i will lower the opacity on the gradient map layer, as well as certain vibrancy/curves/levels layers, ones that make the gif brighter and more vibrant. i will usually bring back some vibrancy and brightness later but when im first getting the base coloring, some layers just heighten the yellow/red and we need to kinda bring that down before we make adjustments to get aspects like skin color more accurate.
so, just with my psd/adjustments made to the psd layers, the gif may looks something like this: (going to use this gif bc i made it more recently so i remember some of the stuff i did better, and is the most accurate to my current process--plus it sucks to color lmao)
ususally still way to red/yellow for my liking, both for the skin tones and to be able to manipulate the colors for a vibrant coloring! so the next step is to get colors as close to how they are normally. warning, you will have to make 345435354 adjustment layers and just keep tweaking and tweaking... and tweaking. sometimes i will have like 20+ adjustment layers at the end of the process. i usually put all my adjustments under my psd--i also always add a vibrance and brightness layer above. sometimes it helps to do final tweaks above the psd if you just cant get anything right bc of course the psd will change how colors normally look.
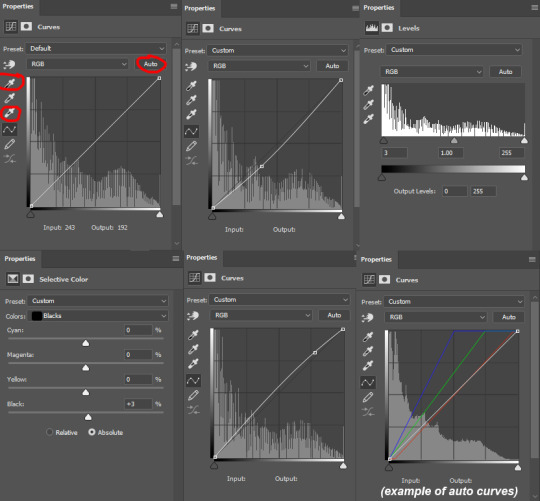
anyways, usually my base fixes will be some sort of combination of curves, levels, color balance, and selective color. so like, if the gif needs more depth/darkness, or is way too bright, i will bring the curve down or up respectively. levels, and also increasing the black selective color layer will also add depth. i will also use auto curve sometimes! the first image i have below i circled some of the extra tools i may use--auto for auto curves, the top black eyedropper you select the darker points in your gif and it will adjust based on that, the bottom one for the lightest--if i use those i will either use the black one only, or the black and then the white. the other three are examples of how my curve layers may look--i already have S curves in my psd, so when i do extra curve adjustments, it's just one single point, and i don't move it that much. same with levels, i dont make a super dramatic change, when it's under the psd it's enough to just move a bit to make a big difference. sometimes i'll also bring these layers to a lower opacity.
generally my first step is color balance though, especially if the gif seems mostly fine lighting wise. for obx, i usually shift it towards cyan and blue to cancel out the red tones. magenta and green depends, if its more green i may move towards magenta and vice versa, but usually i dont shift it that dramatically and often leave it alone. i will usually move the bottom bar towards blue, to soften the yellow tones. color balance helps shift the overall colors of the gif. notice that it's on mid tones in these pictures:
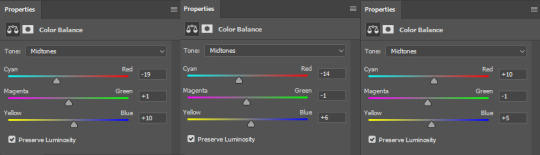
as you can see, i shift the cyan/red one more dramatically than the yellow/blue, and with magenta and green i usually just move it 1-3 points over. in the last one, i actually shifted towards red above my psd layer, because after all my adjustments i lost some of the red/warmth, so i brought back in red.
with color balance/curves, the gif may looks something like this
less of a completely red/yellow filter over everything! but still not great, their skin is too red, and overall still not the best base to try colorings. so next up is selective color, which can really help you fine tune things, but because of that.... SUUUUPER tedious. i will have 3495874 selective color layers and sometimes like 5 of them will be half canceling each other out just to get something okay. but this is a hobby i've chosen so we must suffer LKRGJRG. generally, my realm revolves around red, yellow, and at times magenta or neutral. if you think back to how we fixed some of the colors with color balance, kind of a similar principle, just with the individual colors. and lots of experimenting. so with color balance i would cancel out reds by making them more cyan--on the red selective color, im also gonna turn up the cyan. for yellow, i'm gonna make it more magenta, to make the yellow tones warmer. i will tweak the other tones too, just kinda experiment to see how changing it affects the gif, and then soon you will kind of intuitively know how to change the values based on whats going on in the gif lighting. magenta selective color helps for red values that are more pink, so make them more red or yellow based on what you need--i don't use this as much, hence i didnt have an example in the crop of psds i opened, but it's helpful sometimes. with neutral selective color, it usually affects the whole gif, so again, only minimal changes--usually i will bring the black levels down if it got to bright, or add just a tinge or yellow or cyan or whatever i need. here's some pics to show examples of what mine looked like for this gif:
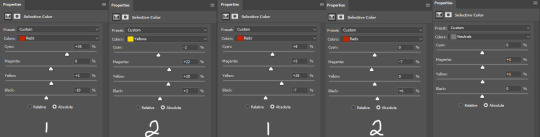
there were many more, but i just chose a few. the '1' and '2' i wrote to demonstrate that these layers were sequential, how they balance each other, and how selective color can be a tedious balancing act-- the second example it's like basically the opposite but it balances it out. also, if you have two characters with different skin tones, or the lighting is different for them, etc, you can use layer masks to erase certain adjustments so it only affects one of the subjects. some of these tweaks will be inbetween me transforming the gif to be colorful, and noticing how the colors interact, etc. so between this i was also making it colorful and it's not exactly the finished product at this stage: but this is kind of what the gif would look like after all the adjustments just to get it looking... normalish:

not totally perfect but MUCH better, and also will look a little different when surrounded by the colors i want to turn it into. i have some stuff about how i color in this tag, i can do a lil other tutorial or smth if needed but bc i have limited photo space on the ask and already wrote so much i wont get super into it here. but for shows like obx, it helps to work with a group of colors that will work with the show--yellows/oranges are easier bc of all the yellow already found in the show. pinks can be harder because there is so much yellow in the show, but doable. greens are good because of all the green in the show, and thus blues are good because its easy to go from green to blue with selective color and stuff. thus, purples are good too because its easy to go from blue to purple! stuff like that makes it easier. some work with selective color, hue and saturation, gradients, and voila!

you can see how maybe some of the issues like it being still a little too yellow/greeny toned balances out with the surrounding colors.
also, a big part of it is just practice! i've been giffing for yeaaaaaars and with media that has just the most god awful lighting so i've gotten good at understanding what to do and sometimes i'm just on auto pilot.
hopefully that helped, i know it was long winded and it can be hard to explain/understand photoshop. if y'all want some more in depth explanation about a part of the process i can try, or with other examples!
9 notes
·
View notes
Photo
but before i go looking in the tags, let’s talk about my latest gifsets!
what a worker bee i was both yesterday and today with prodigal son AND loki <3 never have i created so many gifs in a short amount of time it’s a damn miracle that my photoshop didn’t straight up cough up blood and keel over. alas, us bitches are stronger than that! if this post gets flagged because of the scenes i included....that would just mean that i made the right decision to exclude those scenes ajsdksajkldsa
malcolm stabbing martin
when the episode finally downloaded, i took a peek at the ending before it aired to see how it all ends (just in case it doesn’t get renewed </3). GOSH, was i just in a TIZZY when i saw this happen and i couldn’t tell my dad what i saw because we were straight up watching the show as it aired. anyways, keeping my secret knowledge, i got to work on making this gifset. i missed a huge chunk of the episode bc it took me over TWO hours to make the six gif set. i was really torn on the “artistic” approach aka which scene to gif and which to leave out. because i saw the ending before anything else, i couldn’t play it out loud and i didn’t have my headphones to listen so i was like FREE FORMING THE SUBTITLES. plus the captions weren’t synced up so it was really hard to decipher what was being said :(
i really thought i would be able to create the set before 9 but i was running into unforeseen issues such as the subtitle problem, which on top of that, like i said earlier, my photoshop is c/racked and janky so....you catch my drift. i was actually going to gif the bisexual moment in the cafe which i think would’ve been MUCH easier but i jumped the gun and wanted to make the gifs of the shocking ending. funny part about that is the shocking part wasn’t even included in my set (malcolm driving the knife into martin) because i felt like the scene was too short...anyways, let’s talk about the positives:
i really do like the coloring of this one. i used a psd that i’ve used before and luckily it’s meant for outdoor scenes with greenery so the gif really popped. sharpening, buddy ole pal, love you sm. the caption was kinda last minute but i hoped to save it with the gradient. cropping was a bitch because for some reason, it takes forever when you’ve made multiple gifs beforehand (cache innit) pero we pulled through! i actually started not saving the psd files to try and save time which is very unusual for me pero i was getting frustrated with photoshop so i was like y’know what....so i just gave up entirely and stopped saving. i do save when i’m taking my time but jeez, it’s a bad habit. i like saving the psd file because i never know if there is a mistake i missed in post and when i go to publish it, it’s blatant and it needs to be fixed. please, save your psd files idc if it takes up space u can just delete them later. IT HELPS !! TRUST ME!!
first & “last” appearance
i actually premade gifs for this gifset! unfortunately, i didn’t realize that three of the five gifs were the wrong size (pictured above) because i flipped the ratio. instead of 268 x 250, i made them 250 x 268. i don’t know HOW i managed to fuck that up but luckily i saved the psd files (wink, wink) so the coloring was still intact. i think i had to restart photoshop or it was getting too late so i picked it back up in the morning. sucks that i had to remake the entire gif from scratch but we will take some wins xx
coloring is the same with the previous gifset (listen....it’s a good coloring) and i actually did have an alternative coloring that was very warm pero i didn’t end up using it. almost melted the two with the “last” appearance of gil but ultimately didn’t go through with it. also i was thinking of using baby malcolm as the first appearance because technically, that IS his first appearance in the show but i was like...just use adult malcolm lol. also i know that scene of dani isn’t the “first” but the first scene she has goes really quick and she is planked by gil so there isn’t much of a solo (even though this scene isn’t much of a solo either pero it’s better than the former). the lighting is weird in this episode and my coloring tried their best :/ i know gifmakers make each gif a diff coloring pero i’m lazy okay and looking to be time effiencent. another slight tangent is that i actually queued the post for the morning but since i woke up to a storm, i was like, i’m here so i’ll publish it myself.
other than that...i didn’t run into any other problem. i was actually hesitant to make the caption that because i wasn’t sure how to really describe the team. i have poor memory so if there was ever an official name, i do not remember it. i did a quick google search pero it turned up nothing. i stuck with “dream team” because, well, that’s what they are. plus i didn’t want to tarnish the gifset with any mentions of p/olice (i was thinking about putting sumn along the lines of ‘the nypd team’) so DREAM TEAM IT IS because it’s true! you cannot have the show without these five! also, i should’ve used quotations on “last” because there is a bunch of talk about a renewal pero...just in case... sorry y’all :/
odinson brothers parallels
this was made in the spur of the moment. i saw that the teaser trailer with shirtless loki dropped in hd, i came A-RUNNING! it was posted like 47 minutes after the fact and i was like...somebody probably already made a gifset of the scene so i was like...gosh, to make the gifset or not all the while i was trying to download the video. trying because again, this was in the middle of a storm so my wifi was acting up and wasn’t at its strongest (whatever that may be). so i was getting frustrated because neither cc nor 4kdownloader was downloading this small one minute clip. that’s when i knew i was gonna be too late to make the loki gifset so i was like whatever ig...
then i had an idea.
i love parallels so luckily it hit me that this paralleled with thor and how his hair got chopped off. so, i knew i had ragnarok downloaded and got to work <3 wasn’t sure what dimensions to use so i went with 268 x 268 to make perfect squares. because the loki scene was short, i could only make three so i was like..okay, i can work with this. three for loki, three for thor, they’re brothers and they share! i wasn’t planning to add subtitles but i had written them down for the plain gifset so i was like alright, we’re going all in. i didn’t take that long to make since again, they’re small gifs and i did have a coloring in mind that i always use for ragnarok (it’s my fave for non-marvel edits as well). there was a slight adjustment to the final loki gif because i realized the gif had that dark fade into the scene which i didn’t know if it was an artistic choice for the show itself or was added for the trailer only (it happens when companies cut a bunch of scenes together and it’s not at all how it actually plays out). i didn’t want to take any chances so i cut those parts out. i know the gifs are short on the loki side pero...that’s just how it is in show business.
thank you so much for listening and hearing me out! i like discussing my work and i try to have pride in them even if the numbers don’t reflect what i hope they would. either way, still learning, still growing, still thinking about buying p.s. like deadass this shit is RIDICULOUS -_- imagine opening up ps and like...it opens up in less than two minutes...shivers
#read more is because i typed up a lot hehe#i mean to me it doesn't look like a lot pero i don't want to clog y'all's tl
2 notes
·
View notes
Video
youtube
i was tagged by alice ( @ljuyeon ), dani ( @hyunjoons ), and han ( @hwqll ) for showing my gifmaking process ! there’s a few components missing + some explanations and process details below the cut for those who are curious !
i feel like most of my deobi cc frens have been tagged so i’ll just tag any creators that would like to do this and you can just say i tagged you !
here’s the gif post avisynth w/ no coloring or sharpening: before

after coloring + sharpening:

what you didn’t see in the video:
me running the showcase video through avisynth- i trim and crop in avisynth just bc it feels more convenient for me, in essence i filmed it but it was 4 minutes of me sitting there with frames rendering and the actual avisynth tutorial found here is much more informative
for those who don’t know avisynth (for windows) / vapoursynth (for mac) helps resize and process video files down to tumblr’s gif dimensions without destroying the quality of the video as much as resizing in photoshop does, hence why i use it for every video i gif
after rendering the frames i simply file > import > video frames to layers > ok and load the frames into ps
what you see (and sort of don’t see *sigh*) in the video:
for sharpening i use an action and i only recently switched to coloring after i sharpen (to no really big noticeable difference in my view perhaps) but i do not use topaz to sharpen
coloring is this entire video and you can tell i’m kind of ;;; cr*zy to say the least about it
i use a bunch of adjustments (which i should say is not good bc more adjustments can make your gifs noisier / grainier but i’m used to this process of just jumping around adjustment to adjustment screaming internally until i get something i like)
you might notice i turn up specific colors all the way in hue / saturation this is to help me SEE what colors i’m working with better so i can better adjust them
then afterwards i just flatten frames to clips and convert back to frame animation so i can adjust the frame rate delay but i have an action for it too
concluding notes / comments:
i waste THE MOST TIME either coloring or waiting for frames to render so most of the time i’ll run frames through avisynth while i’m coloring and simply drag the group / psd coloring onto the next gif after it loads if i’m making a set
i by no means think i’m any good at gifmaking but i try my best and this video which is just me moving adjustment dials back and forth in minute almost unnoticeable quantities is the bulk of what i do everyday in ps when i go to gif something
sorry you can’t see me pulling up ? my windows with my sharpening action or for selecting things in menus idk why it’s like that
omg reveal / catching fire playing in the bg so hard for me to pay attention and not just full on jam out / start crying over chanhee’s voice
feel free to ask me any additional questions you may or may not have
usually sets will take me 30 minutes or so depending on how i’m feeling bc if i take the full time and not rush myself for posting i can get a set out that has decent coloring in 20-30 mins but if i’m rushing i can finish within 10-20 mins with really awful coloring !
i do not use psds idk if you noticed that but every video for me is different and just starting from scratch is a lot easier for me than going back through a psd and making tiny adjustments on every single layer
yes i turn the group on and off to check how it looks,,, sometimes if i stare at it for too long i forget what colors are
also my alternative title is see jess struggle with photoshop for about 6 minutes
26 notes
·
View notes
Photo


Tagged by @jimmytfallon for this gif meme. I’m not really sure how the meme started so I may be missing the point, but I think it’s to show overall skill with coloring and whatnot? Also this project presents a minor challenge for me, in that all my .psds and previous gifs are almost all full-width. So it was fun practicing with half-width!
Anyway, I have three different methods I use, depending on the source material, for getting videos to work with.
For YouTube/Instagram videos of 720p or lower, I screencap the video, load files into stack, and use the basic method outlined here. I think it’s the best way to handle smaller gifs.
For YouTube/Vimeo videos of 1080p or higher, I directly load the video file itself into Photoshop and work off of that.
For screen recordings (most of the Pacific, BoRhap, and Robot gifsets I do are like this), I simply don’t have the option of screencapping—my computer records at almost 3000px width and the screencaps fill up my hard drive in a matter of minutes. So I open the screen recording in Photoshop, and after I’ve slowed the clip (in all three cases, it’s usually around 81% speed for it to be somewhat normal speed), I resize to the desired width immediately. This has to be done or my computer will crash and this thing is not exactly bottom of the line.
From there, I do my adjustment layers and then I sharpen. It doesn’t matter what order you sharpen in if you’re doing this as a smart object. You can turn on and off these sharpening effects—and if you’re feeling fancy like I have lately, you can do the same with the artistic effects like oil paint or half-tone.
Adjustment layers in order of preference/use:
Curves. You can literally do everything in curves if you’re really willing to learn how they work. Initially, you might think they effect lighting. The bottom left corner turns up and down blacks. Left of center, you’re changing how light or dark the shadows are. Right of center, you’re changing the highlights, and to the top right, you’re changing the whites and how bright they are. But you can also change colors within the different toggles of Curves. I don’t always do this because to do an effective job, you still have to create multiple curves layers—and why do that when you can just do...
Color balance! This is the absolute most important coloring tool that I’ve found to deal with Mr. Robot’s pallor. It’s so green-yellow that I find myself turning things back to red and magenta and blue to try and give Elliot a little bit of life back. In the gif above, you can see that it was almost a pea green tone over the whole thing, so I gave it back some peachiness (and don’t get me started on how dark all of Mr. Robot is).
Brightness/Contrast. I try to use this sparingly, but sometimes it’s just the simplest tool to get things done.
Selective Color! I didn’t know about this for a long time and once I figured it out, it was a game changer. When you just want a yellow robe to be a warm yellow without green undertones and you want high contrast in the rest of the image but not in the yellow robe—Selective Color is where you need to go. Hue/Saturation can only do so much for you here.
Solid Color. Lately I’ve been trying to vignette some gifs using this. And it can be really helpful to do so because it cuts down on flashing pixels that will add to your overall gif megabyte-age. So I’ll load one up in a dark color (if not completely black) and then use a layer mask to get rid of a lot of the solid color. This is not shown anywhere above, but you can see it in action here. It’s more valuable in extra-big gifs.
And then Smart Object effects
Plain old Sharpen. I always do this before the other. And sometimes I turn it back off after I’ve gotten the next step down. In the yellow robe gif above, I wound up turning off this sharpen layer because it introduced too much edge noise.
Smart Sharpen. Learning how to hone this is absolutely vital. 500, .3, 20, Gaussian is always a good place to start—and if that doesn’t mean anything to you, just try opening the Smart Sharpen tool and putting those four things in. Of course, once you get a handle on Smart Sharpen, you can go wild trying to get things just right. Layering it with other Smart Sharpen layers can sometimes help create a balance, too.
Oil Paint. I’ve been screwing around with this a lot lately and haven’t quite got it nailed down, but I’m having fun with it!
Other Useful Layers
Overlays. I love to layer up two separate video files! So much so that I now have a drop-down menu for them on my full browser layout. The YSL/Rami modeling overlay above is the perfect example. Want to see how I do it? Ask for a tutorial. I don’t want to give everything away in one post!
Layer Masks. For mostly-still scenes, especially in cinematography where the camera doesn’t move a lot (like Mr. Robot, or in an interview), you can take a picture basically of your gif, super-impose it, and then make a layer mask to make it smooth. Works really well in many of my Mr. Robot Rewatch sets, like this one. Again, willing to give a tutorial if you ask.
Captions. All of mine come out looking fuzzy and I’m not good at them so I don’t do them much. If you’re a gif maker reading this and have a method you like, please share because I cannot figure out why I can’t make this look good.
So anyway, as you can see, it’s a lot to work with. So many options! There’s so much that can go into a single gifset, and though I have a system down to where I can make certain gifs really quickly, it’s still usually an hour or two on even the simplest gifs. I like to think it doesn’t take as much brain power as a fic writer, but it does take a certain intuition and know-how that takes years to hone.
I love my fellow gif makers and would love to see how they do. Tagging @gwil-lee, @ewan-mcgrxgor, @ilygwilym, and @warmommy because I want to learn your secrets see your process if you’re willing to share!
49 notes
·
View notes
Text
I saw that ask meme with questions for gif makers going around, but I felt like answering them all on my own lmao
1. What are your top 3 favorite sets you’ve made
This one, this one (if the timing works lmao), and this one (I’m so proud of my AU gifsets... where did all that creativity go??)
2. What is your least favorite set you’ve made
I honestly don’t know... I don’t think I hate anything I’ve posted though. If I don’t like how it’s turning out, I just won’t post it lol
3. Which of your sets has the most notes
The most notes ever is this one I think
4. A set that flopped but deserved better
I don’t know... there’s a bunch, but I’m fine if a gifset flops
5. What is your favorite movie/TV show to gif
DOCTOR WHO
6. What is your least favorite movie/TV show to gif
I really don’t gif anything else lmao...
7. Who are your top 3 gif makers
I’ll just pick 3 people off the top of my head :) @shatner, @melodyspond, @stupidape
8. What gif trend do you hate
The pale/black and white gifs that are so hard to see.......
9. What/who inspired you to start making gifs
I wanted to gif my favourite parts of DW that I didn’t see anyone else doing, so I was like alrighty, time to learn how to do this!! I think the people that inspired me are long gone from tumblr, or I’m no longer following them because they’ve moved blogs (Natasha aka lumos-maxima... wherever you are, I MISS YOU... also Courtney aka needlebug I MISS YOU TOO)
10. What was the first gif you ever posted
THIS ONE! I remember being so happy about posting it, haha. Also, I still love that Confidential episode so much. I miss my space hipsters...
11. What is that one set you made that just won’t die
The Zoboomafoo one
12. What is the most embarrassing thing you’ve ever giffed
Everything I’ve ever posted
13. Where or from whom did you learn how to gif
Various tutorials on here and just by experimenting. I don’t even think I used Photoshop to begin with, since back in my Neopets days I used Paint Shop Pro to make graphics so I think that’s what I used first to try making gifs of videos.
14. How long does it usually take you to make a set
45 minutes to an hour or so?? It’s been taking longer and longer because the screencaps are so huge though and my poor laptop can’t handle it.
15. Have you ever had gifs stolen and reposted
Yes, and don’t think that I can’t tell when those are my gifs, even without a watermark!!
16. How long have you been making gifs
Since 2011...... my god
17. 10 sets, 8 sets, 6 sets? How many gifs to you prefer in a set
As many as it takes!!!!! But usually between 6-8
18. For the aesthetic, for the laughs, or for the feels what your preference
For FUN!
19. What is your gifting process like
Open video, find scene, screencap, load screencaps in Photoshop, resize to gif dimensions, add colouring, curse myself for picking a hard-to-colour scene, continue adjusting colouring and become increasingly frustrated because it’s not turning out the way I want it to, give up, add text, save gif, POST!
20. Mac or PC
PC
21. PSDs or original coloring for each gif
Original colouring. PSD who???
22. What fandom/movie/show/person etc do you gif the most
DOCTOR WHO and more specifically, David Tennant... I think his tag has the most :’)
23. What is the thing you gif when you don’t have anything else you want to gif
Any episode with Ten and Donna, or The Eleventh Hour, or the Day of the Doctor, or Blink
24. 480p 720p 1080p? What is the minimum quality you’ll gif from
I used to be all good with giffing 480p back in the day, but I guess now it’s 720p since the gif limits have gone way up.
25. Old dimensions or new dimensions and why
New dimensions because they look nicer on the dashboard.
26. How many un posted sets are in your drafts right now
ZERO.
27. Have you ever made a set, decided you hated it and deleted it? What was it
Probably at least one or twice, but I don’t remember.
28. Have you ever posted a set, regretted it and immediately deleted it
No, I don’t think so. I’m leaving my mistakes there for all to see!
29. Have you ever posted a set, realized you made a mistake later but it was already too late
Yes, I did this just the other day with that Missy, Bill and Nardole set. I got the dialogue slightly wrong lmao..... shh
30. How frequently do you like to post
I try to do at least one gifset a day if I can!
31. Do you schedule/queue posts or do you post right after you’re done
Right away. These gifsets are fresh off the grill.
32. What is your favorite tool/adjustment layer in Photoshop
Selective Color or Color Balance
33. Do you like to/can you make edits and graphics too or only gifs
Yes, I can do both but gifs are way more fun imo
34. A set that took you a long time/was really hard but you’re really proud of how it came out
I’m gonna say this one again because I was so proud of it when I made it, and I can’t believe I used to put that much effort into my gifs.
35. Do you change your giffing style a lot or do you have a set routine
I have a routine, as described above. My gifs are pretty much all made the same way as I describe in my colouring tutorial too.
36. Do you gif with something specific in mind or do you just wing it
Usually a mixture of both. I like to try to gif a different Doctor each day, so I’ll know who I have in mind but I’m not planning on a specific episode. I’ll just open up one of their series and go from there!
37. What sets if any do you have planned to make in the future
Idk, I was thinking of doing yet another gifset with Donna in it since I just finished her Big Finish series... but maybe I’ll do one with Eleven and the Ponds??? We’ll see.
38. What are you really excited to gif that isn’t out yet
The next Doctor Who holiday special?? :D
39. How often, if ever, do you delete old sets that you don’t like anymore
Never!! I love seeing how my gifs have slowly changed and improved over time.
40. Why do you make gifs
Because it’s fun, and it’s a way for me to relax after a long and busy day at work.
41. What is your least favorite part about your gif making process
When it takes forever for my screencaps to load, and when it takes forever for my gifs to save sometimes
42. How is your gif folder organized? Is it organized at all?
Lol nope.
43. Do you keep videos forever or delete them once you’re done giffing
I keep the episodes forever, but honestly I think I keep everything forever because I forget about getting rid of the other stuff like trailers and interviews... I should go through my downloads folder.
44. Ever had a gif become a meme? Would you like that if you haven't
I’ve had people use my gifs as reaction gifs and it is a weird feeling, especially seeing the gifs being used on websites other than tumblr. I remember seeing one of my gifs used in someone’s book review on Goodreads and I was like “WAIT THAT LOOKS FAMILIAR!!”
45. Ever gotten hate over a set
Not really hate, but I do get a lot people that are like “WHERE IS ______?” in their tags. And sometimes I just want to be like “Make your own gifs if you think they should be there!!!”
46. Ever gotten a really sweet compliment over a set
Yes :’)
47. Any advice for novice gif makers/people who want to start making gifs
Don’t give up!! Make gifs of whatever makes you happy, don’t worry about the notes too much, and use your tags! KEEP PRACTICING!
48. How would you describe your giffing style
I don’t know??? If someone else has a way to describe my style, then please let me know haha
49. How much would you say you’ve improved since you first started giffing
It’s been almost 9 years since I’ve started, so I hope I’ve improved quite a bit! :P
Well, that was fun. Congrats on making it to the end of this post!!! Now I will go make a gifset.
7 notes
·
View notes
Text
Vograce stickers review
I don’t usually make reviews here but I felt it would be opportune since there isn’t any out there and if you are looking for options and you can’t find any soul talking about it, then you would rather avoid that option, right?
When it comes to stickers, I always print them locally. It’s pretty much a hit and miss here, the people who print here are very casual and take little care of their machines. One day the prints can be nice and the other a total mess. Since the designs I was doing required kiss cutting(So you can peel off the sticker out of the sheet) and I don’t have a plotter like a machine like a silhouette or a cricut I decided I wanted this time my stickers to be made by a company.
First I contacted a company in the US which I heard good things about(Mind you, I’m from Peru) But they were taking a while to reply. I don’t want to comment on them much since I never fully tried their service. The thing was, time passed by and the stickers were on a void of no progress.
I recalled then Vograce(Which is a known company based in China for making acrylic charms)was making stickers and sticker sheets(Vinyl/PVC and washi like paper) They replied very fast which make me feel things would be done on time. Here I’m posting my experience with making stickers(I had done charms with them before)
Communication:
Speed: Fast! Yet pay in mind because of timezones the exchange could be delayed.
Language barrier: This must be the massive Vograce downside of them all. As someone who speaks English as a second language, I have a hard time to make myself understandable. Vograce reps are pretty much the same. I think it’s best to keep messages short and simple if you can. If you need things to be fixed, then try to illustrate them so they can understand it better.
Fixing stuff: Another Vograce downside and for a moment I felt like I was talking with two different people. The first two days of exchanges went smoothly and the rep which was attending me was very nice. I sent my files via Google Drive and there were no issues at all. Yet the third day where there was another thing to fix, the rep(Which was supposed to be the same person) approached me in a rather rude manner or at least that was the impression I had. Also, they refused to check my files via Google Drive when the previous days they had any issue? This plus the fact of the timezones, the exchange was becoming really slow and tedious.
Sticker formatting:
There is no way to know how exactly they need their stickers to be formatted unless you ask them, and they are a little vague about it. I’m going to give a bit of advice here:
The way you need to format your sticker sheet is similar to how Zap Creatives request it as far as I know. You have a PSD file with a layer called “background” where the non-cut art goes. and a layer called “art” where your sticker pieces go. I had a big issue here because of the following sticker sheet:
As you can see, the borders are different colored, not just one color.
Vograce then replied to me with a preview of all the sticker sheets that looked like this. The pink line is the cut line:
So I thought “Welp, I fucked it up, it looks like they need a bigger bleed border just in case the cut line moves a little” I requested if it was possible to change the artwork to this one I did according to the thick white bleeding they added:
This is when things got difficult and it’s the change they were refusing to do. They told me because the stickers were very close to each other, they needed that white border. But my issue wasn’t the border but the color of it so I was clueless on why they were so against on changing it? Perhaps I’m ignoring the fact that their plotter program is different from Photoshop when it comes to replacing the artwork, but after a very very tedious exchange, the artwork remained as the preview they sent at first. So pay in mind there is a big big chance your artwork gets a white border instead of the color you requested. If anything, when printing with Vograce, avoid the nuisance and make your borders white. This may save you some headaches when sending and fixing your files.
Price:
Vograce by no means is the cheaper option if you consider shipping. The US sticker company I approached before was 20 cents less for one A6 sheet and had a flat rate of $20 of shipping for a certain amount of stickers. Vograce only ships via express(EMS) or private couriers so the shipping could be as much as the item itself depending on where you live.
Shipping:
Again, since you are paying for express shipping, things are meant to arrive quickly to your place. I knew they had a holiday so I requested if it was possible to ship it before it. Their rep promised they would, and so they did. After the previous headaches, I was relieved they kept their promise and did the effort to have them on time considering how hectic things can be before holidays.
Sticker quality:
After all the struggle I on the process the stickers finally got here. I don’t have a wide reference on how other companies make their stickers, but to me, these are very nice:
I was afraid that white border would show up but it wasn’t the case:
It’s a very precise cut.
The stickers are very thin tho! Yet they are very sticky.
The back of the sticker paper looks like this, which might be a turn off to some people but since I’ve been printing locally, the stickers here look kinda similar with the manufacturer name so I don’t really mind.
The colors are accurate on what I sent them. Maybe they lean a liitle bit to the yellow side but that’s me being super picky because they are very close to what it looked in the screen(In CMYK) You can choose between glossy or matte finish. I knew that glossy makes your colors pop even more but I felt it could be a little jarring to have a sticker that reflective if you pasted it in your laptop or such. I’m glad the matte finish didn't dull the colors up.
How they will stand:
I have no idea yet lol. I stuck some in my most used journal and see how it will go. So far they have stuck to it well considering it’s a fabric cover.
Final thoughts:
While the end result was pleasant, I think I will try and search for another sticker company next time. Perhaps go for Vograce if you are already making a big order of something else with them. I felt the issues with communication and fixing were a turn off to me. Maybe if they had their formatting info in a PSD or in a video they would avoid so many problems with people like me who are clueless which honestly it’s a massive waste of time from both sides.
32 notes
·
View notes
Note
hey! I absolutely adore your gifs and was wondering if you would be willing to give a tutorial or something on how you do them, ive been wanting to start making my own but I’m finding it real difficult. If not that’s fine, have a good day! :)
hi - of course!
shinyunas/nctmark/izonechu made a good tutorial here: https://itzy.cf/post/186759375366/hi-do-you-have-any-tutorials-for-how-to-make
i pretty much do the same thing, but i’ll just list a few things i do differently/would like to mention!
1. i sharpen in photoshop and clean/denoise using topaz (u would need to torrent this and can probably google a tutorial for it from tumblr). it’s honestly just a personal preference thing to not use vapoursynth. i tried it before here but it didn’t really suit me! i also try not to use topaz clean as often as possible because (a) it takes double the time and (b) i realized this also doesn’t suit me! however when a video clip is not hd or i need to zoom in a lot, i use topaz clean to try making up for the pixelation. i also avoid using clean at all costs when it’s not a closeup because it makes faces look weird if they are too small imo. you’ll have to play around with the settings to see what you think looks best. the only ‘right’ way to do it is whatever you like the most c: –> applies to everything here!
2. color and adjustment layers are really what makes ur style and they make gifs stand out. personally i first white balance using levels or curves. then i adjust saturation/vibrance and use selective color and hue/saturation to adjust the levels of each color. careful with the saturation because high saturation can end up highlighting the dither of the gif. at the end, before sharpening and what not, i add solid color layers and play around with them depending on the color scheme im going for. i like using hue/soft light/overlay/multiply/difference or a combination of those and play around with opacity. if u dont know what something does, google and watch some videos on it. don’t use tools without knowing what they are for because you might change other things unknowingly that may affect your gif later. you can also use other people’s psds if you want, but i personally think each gif needs a diff coloring. i’ve only downloaded psds in the past if i really wanted to figure out how someone got a certain vibe off
3. before the color adjustment, i delete unwanted layers, convert to video timeline, and turn all frames into one smart object. after adding adjustments, i apply the sharpen/topaz filters to the smart layer. dont play the gif after u put topaz on… ur computer will glitch out LOL. convert frames > flatten frames into clips to get ur post filter frames. then delete non-visible layers and convert back into frame animation timeline. (i hope i got the names of these right lmao i set shortcuts for everything so i dont click any menu for anything LOL)
if i need to blur out words - after filtering i would convert it into a smart layer again. then use marquee tool to choose the area with the words/logos and 1.3 gaussian blur it (i prefer 1.3 because it’s just enough for me to not notice it but not so much that the blur stands out… once again personal preference!)
4. my export settings

i use different sorting depending on what i need to know e.g. if the gif is too big i can sort by popularity or hue and try to take out colors that don’t affect the gif that much. (for some reason my gifs need to be below 2.85MB to upload on tumblr lol)
5. just keep making gifs and have fun! it’s honestly hard at first, takes a lot of time, and can be a pain in the ass. here’s my first gifset on this acc lol https://joyuls.tumblr.com/post/181169072903/la-vie-en-rose-eunbi-mama-in-hong-kong-2018. definitely not my greatest work, but i guess it reminds me that i worked hard haha. but as long as you enjoy the process instead of the results, it’ll be worth it, and your gifs will start looking a lot better before you know it. hope to see your content around soon, and feel free to ask more questions if you have!!
6 notes
·
View notes
Note
1, 21, 32, 34 :^)
i’ve already answered 1 :(
21. PSDs or original coloring for each gif
i always use psds or make my own coloring but i like the gif to look natural in either ways idk if i explained it well
32. What is your favorite tool/adjustment layer in Photoshop
definitely blur! i’d always used topaz but then i understood that i didn’t need to use it and started to use blur instead bc topaz takes a lot of time :(
34. A set that took you a long time/was really hard but you’re really proud of how it came out
hmm good question, from my recent ones i think this one bc there were a lot of layers to add it took me a good 2 hours but i liked how it turned out in the end!
send me questions about gifs!
1 note
·
View note
Last Seen Blogs