#interesting what a difference a few skin details/shaders & lighting can make
Explore tagged Tumblr posts
Visit Tumblr Blog
Explore Tumblr blogs with no restrictions, modern design and the best experience.
Last Seen Tumblr Blogs


Fun Fact
Kazakhstan’s Minister of Communications and Informatics has blocked the Tumblr site because it contained 60 sites of terrorism, extremism, and pornography in 2015.
Note
ei bebe mostra teu sim ruivinho no cas por favor
hi! i don't know Portuguese, so please forgive me if i've misunderstood what you're asking & feel free to send another ask if that's the case!
anyway! this is what kel looks like in cas (& a bonus blender screenshot for comparison bc... why not)


honestly, i haven't touched my game in a while so the cas screenshot is a couple years old, but it's the only one i could find so it'll have to do lol i never really mess with the boys' in-game models anymore, so he should still look more or less the same
but. yea! thanks for the ask! :-)
#cas kelly..... jump scare!#literally could be two different sims lol#interesting what a difference a few skin details/shaders & lighting can make#really that's all i've changed on him#ALSO i've been avoiding my inbox so if you've sent me a chain ask or a wcif in the last like... all of this year & i didn't answer#i apologize greatly#i have good intentions but if i get more than one ask at a time i get overwhelmed. it's a lil silly#& if i never answer them... just know i still appreciate them!!!#anyway. yea. i know translation websites aren't always accurate so again. if i misunderstood... i'm sorry!#i am too afraid of people to ask someone to help me translate otherwise i would have done that instead#ask#anon
9 notes
·
View notes
Text
“Along For The Ride”, a reasonably complex demo
It's been a while since I've been anticipating people finally seeing one of my demos like I was anticipating people to see "Along For The Ride", not only because it ended up being a very personal project in terms of feel, but also because it was one of those situations where to me it felt like I was genuinely throwing it all the complexity I've ever did in a demo, and somehow keeping the whole thing from falling apart gloriously.
youtube
The final demo.
I'm quite happy with the end result, and I figured it'd be interesting to go through all the technology I threw at it to make it happen in a fairly in-depth manner, so here it goes.
(Note that I don't wanna go too much into the "artistic" side of things; I'd prefer if the demo would speak for itself on that front.)
The starting point
I've started work on what I currently consider my main workhorse for demomaking back in 2012, and have been doing incremental updates on it since. By design the system itself is relatively dumb and feature-bare: its main trick is the ability to load effects, evaluate animation splines, and then render everything - for a while this was more than enough.
Around the summer of 2014, Nagz, IR and myself started working on a demo that eventually became "Háromnegyed Tíz", by our newly formed moniker, "The Adjective". It was for this demo I started experimenting with something that I felt was necessary to be able to follow IR's very post-production heavy artstyle: I began looking into creating a node-based compositing system.
I was heavily influenced by the likes of Blackmagic Fusion: the workflow of being able to visually see where image data is coming and going felt very appealing to me, and since it was just graphs, it didn't feel very complicated to implement either. I had a basic system up and running in a week or two, and the ability to just quickly throw in effects when an idea came around eventually paid off tenfold when it came to the final stage of putting the demo together.

The initial node graph system for Háromnegyed Tíz.
The remainder of the toolset remained relatively consistent over the years: ASSIMP is still the core model loader of the engine, but I've tweaked a few things over time so that every incoming model that arrives gets automatically converted to its own ".assbin" (a name that never stops being funny) format, something that's usually considerably more compact and faster to load than formats like COLLADA or FBX. Features like skinned animation were supported starting with "Signal Lost", but were never spectacularly used - still, it was a good feeling to be able to work with an engine that had it in case we needed it.
Deferred rendering
During the making of "Sosincs Vége" in 2016, IR came up with a bunch of scenes that felt like they needed to have an arbitrary number of lightsources to be effecive; to this end I looked into whether I was able to add deferred rendering to the toolset. This turned out to be a bit fiddly (still is) but ultimately I was able to create a node type called the "G-buffer", which was really just a chunk of textures together, and use that as the basis for two separate nodes: one that renders the scenegraph into the buffer, and another that uses the buffer contents to light the final image.
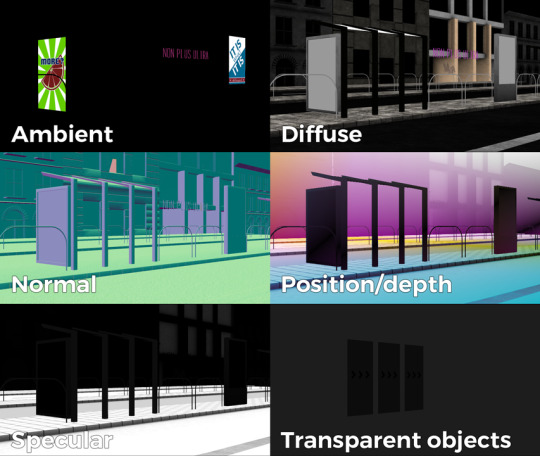
The contents of a G-buffer; there's also additional information in the alpha channels.
Normally, most deferred renderers go with the tile-based approach, where they divide the screen into 16x16 or 32x32 tiles and run the lights only on the tiles they need to run them on. I decided to go with a different approach, inspired by the spotlight rendering in Grand Theft Auto V: Because I was mostly using point- and spot-lights, I was able to control the "extent" of the lights and had a pretty good idea whether each pixel was lit or not based on its position relative to the light source. By this logic, e.g. for pointlights if I rendered a sphere into the light position, with the radius of what I considered to be the farthest extent of the light, the rendered sphere would cover all the pixels on screen covered by that light. This means if I ran a shader on each of those pixels, and used the contents of the G-buffer as input, I would be able to calculate independent lighting on each pixel for each light, since lights are additive anyway. The method needed some trickery (near plane clipping, sphere mesh resolution, camera being near the sphere edge or inside the sphere), but with some magic numbers and some careful technical artistry, none of this was a problem.
The downside of this method was that the 8-bit channel resolution of a normal render target was no longer enough, but this turned out to be a good thing: By using floating point render targets, I was able to adapt to a high-dynamic range, linear-space workflow that ultimately made the lighting much easier to control, with no noticable loss in speed. Notably, however, I skipped a few demos until I was able to add the shadow routines I had to the deferred pipeline - this was mostly just a question of data management inside the graph, and the current solution is still something I'm not very happy with, but for the time being I think it worked nicely; starting with "Elégtelen" I began using variance shadowmaps to get an extra softness to shadows when I need it, and I was able to repurpose that in the deferred renderer as well.
The art pipeline
After doing "The Void Stared Into Me Waiting To Be Paid Its Dues" I've began to re-examine my technical artist approach; it was pretty clear that while I knew how the theoreticals of a specular/glossiness-based rendering engine worked, I wasn't necessarily ready to be able to utilize the technology as an artist. Fortunately for me, times changed and I started working at a more advanced games studio where I was able to quietly pay closer attention to what the tenured, veteran artists were doing for work, what tools they use, how they approach things, and this introduced me to Substance Painter.
I've met Sebastien Deguy, the CEO of Allegorithmic, the company who make Painter, way back both at the FMX film festival and then in 2008 at NVScene, where we talked a bit about procedural textures, since they were working on a similar toolset at the time; at the time I obviously wasn't competent enough to deal with these kind of tools, but when earlier this year I watched a fairly thorough tutorial / walkthrough about Painter, I realized maybe my approach of trying to hand-paint textures was outdated: textures only ever fit correctly to a scene if you can make sure you can hide things like your UV seams, or your UV scaling fits the model - things that don't become apparent until you've saved the texture and it's on the mesh.
Painter, with its non-linear approach, goes ahead of all that and lets you texture meshes procedurally in triplanar space - that way, if you unwrapped your UVs correctly, your textures never really stretch or look off, especially because you can edit them in the tool already. Another upside is that you can tailor Painter to your own workflow - I was fairly quickly able to set up a preset to my engine that was able to produce diffuse, specular, normal and emissive maps with a click of a button (sometimes with AO baked in, if I wanted it!), and even though Painter uses an image-based lighting approach and doesn't allow you to adjust the material settings per-textureset (or I haven't yet found it where), the image in Painter was usually a fairly close representation to what I saw in-engine. Suddenly, texturing became fun again.

An early draft of the bus stop scene in Substance Painter.
Depth of field
DOF is one of those effects that is nowadays incredibly prevalent in modern rendering, and yet it's also something that's massively overused, simply because people who use it use it because it "looks cool" and not because they saw it in action or because they want to communicate something with it. Still, for a demo this style, I figured I should revamp my original approach.
The original DOF I wrote for Signal Lost worked decently well for most cases, but continued to produce artifacts in the near field; inspired by both the aforementioned GTAV writeup as well as Metal Gear Solid V, I decided to rewrite my DOF ground up, and split the rendering between the near and far planes of DOF; blur the far field with a smart mask that keeps the details behind the focal plane, blur the near plane "as is", and then simply alphablend both layers on top of the original image. This gave me a flexible enough effect that it even coaxed me to do a much-dreaded focal plane shift in the headphones scene, simply because it looked so nice I couldn't resist.
The near- and far-fields of the depth of field effect.
Screen-space reflections
Over the summer we did a fairly haphazard Adjective demo again called "Volna", and when IR delivered the visuals for it, it was very heavy on raytraced reflections he pulled out of (I think) 3ds max. Naturally, I had to put an axe to it very quickly, but I also started thinking if we can approximate "scene-wide" reflections in a fairly easy manner. BoyC discovered screen-space reflections a few years ago as a fairly cheap way to prettify scenes, and I figured with the engine being deferred (i.e. all data being at hand), it shouldn't be hard to add - and it wasn't, although for Volna, I considerably misconfigured the effect which resulted in massive framerate loss.
The idea behind SSR is that a lot of the time, reflections in demos or video games are reflecting something that's already on screen and quite visible, so instead of the usual methods (like rendering twice for planar reflections or using a cubemap), we could just take the normal at every pixel, and raymarch our way to the rendered image, and have a rough approximation as to what would reflect there.
The logic is, in essence to use the surface normal and camera position to calculate a reflection vector and then start a raymarch from that point and walk until you decide you've found something that may be reflecting on the object; this decision is mostly depth based, and can be often incorrect, but you can mitigate it by fading off the color depending on a number of factors like whether you are close to the edge of the image or whether the point is way too far from the reflecting surface. This is often still incorrect and glitchy, but since a lot of the time reflections are just "candy", a grainy enough normalmap will hide most of your mistakes quite well.

Screen-space reflections on and off - I opted for mostly just a subtle use, because I felt otherwise it would've been distracting.
One important thing that Smash pointed out to me while I was working on this and was having problems is that you should treat SSR not as a post-effect, but as lighting, and as such render it before the anti-aliasing pass; this will make sure that the reflections themselves get antialiased as well, and don't "pop off" the object.
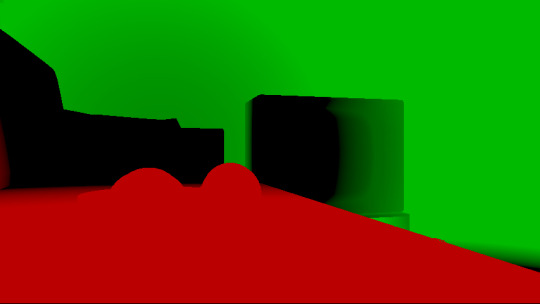
Temporal antialiasing
Over the last 5 years I've been bearing the brunt of complaints that the aliasing in my demos is unbearable - I personally rarely ever minded the jaggy edges, since I got used to them, but I decided since it's a demo where every pixel counts, I'll look into solutions to mitigate this. In some previous work, I tried using FXAA, but it never quite gave me the results I wanted, so remembering a conversation I had with Abductee at one Revision, I decided to read up a bit on temporal antialiasing.
The most useful resource I found was Bart Wroński's post about their use of TAA/TSSAA (I'm still not sure what the difference is) in one of the Assassin's Creed games. At its most basic, the idea behind temporal antialiasing is that instead of scaling up your resolution to, say, twice or four times, you take those sub-pixels, and accumulate them over time: the way to do this would be shake the camera slightly each frame - not too much, less than a quarter-pixel is enough just to have the edges alias slightly differently each frame - and then average these frames together over time. This essentially gives you a supersampled image (since every frame is slightly different when it comes to the jagged edges) but with little to no rendering cost. I've opted to use 5 frames, with the jitter being in a quincunx pattern, with a random quarter-pixel shake added to each frame - this resulted in most edges being beautifully smoothed out, and I had to admit the reasonably little time investment was worth the hassle.
Anti-aliasing on and off.
The problem of course, is that this works fine for images that don't move all that much between frames (not a huge problem in our case since the demo was very stationary), but anything that moves significantly will leave a big motion trail behind it. The way to mitigate would be to do a reprojection and distort your sampling of the previous frame based on the motion vectors of the current one, but I had no capacity or need for this and decided to just not do it for now: the only scene that had any significant motion was the cat, and I simply turned off AA on that, although in hindsight I could've reverted back to FXAA in that particular scenario, I just simply forgot. [Update, January 2019: This has been bugging me so I fixed this in the latest version of the ZIP.]
There were a few other issues: for one, even motion vectors won't be able to notice e.g. an animated texture, and both the TV static and the rain outside the room were such cases. For the TV, the solution was simply to add an additional channel to the GBuffer which I decided to use as a "mask" where the TAA/TSSAA wouldn't be applied - this made the TV texture wiggle but since it was noisy anyway, it was impossible to notice. The rain was considerably harder to deal with and because of the prominent neon signs behind it, the wiggle was very noticable, so instead what I ended up doing is simply render the rain into a separate 2D matte texture but masked by the scene's depth buffer, do the temporal accumulation without it (i.e. have the antialiased scene without rain), and then composite the matte texture into the rendered image; this resulted in a slight aliasing around the edge of the windows, but since the rain was falling fast enough, again, it was easy to get away with it.

The node graph for hacking the rainfall to work with the AA code.
Transparency
Any render coder will tell you that transparency will continue to throw a wrench into any rendering pipeline, simply because it's something that has to respect depth for some things, but not for others, and the distinction where it should or shouldn't is completely arbitrary, especially when depth-effects like the above mentioned screen-space reflections or depth of field are involved.
I decided to, for the time being, sidestep the issue, and simply render the transparent objects as a last forward-rendering pass using a single light into a separate pass (like I did with the rain above) honoring the depth buffer, and then composite them into the frame. It wasn't a perfect solution, but most of the time transparent surfaces rarely pick up lighting anyway, so it worked for me.
Color-grading and image mastering
I was dreading this phase because this is where it started to cross over from programming to artistry; as a first step, I added a gamma ramp to the image to convert it from linear to sRGB. Over the years I've been experimenting with a lot of tonemap filters, but in this particular case a simple 2.2 ramp got me the result that felt had the most material to work with going into color grading.
I've been watching Zoom work with Conspiracy intros for a good 15 years now, and it wasn't really until I had to build the VR version of "Offscreen Colonies" when I realized what he really does to get his richer colors: most of his scenes are simply grayscale with a bit of lighting, and he blends a linear gradient over them to manually add colour to certain parts of the image. Out of curiousity I tried this method (partly out of desperation, I admit), and suddenly most of my scenes began coming vibrantly to life. Moving this method from a bitmap editor to in-engine was trivial and luckily enough my old friend Blackpawn has a collection of well known Photoshop/Krita/etc. blend mode algorithms that I was able to lift.
Once the image was coloured, I stayed in the bitmap editor and applied some basic colour curve / level adjustment to bring out some colours that I felt got lost when using the gradient; I then applied the same filters on a laid out RGB cube, and loaded that cube back into the engine as a colour look-up table for a final colour grade.
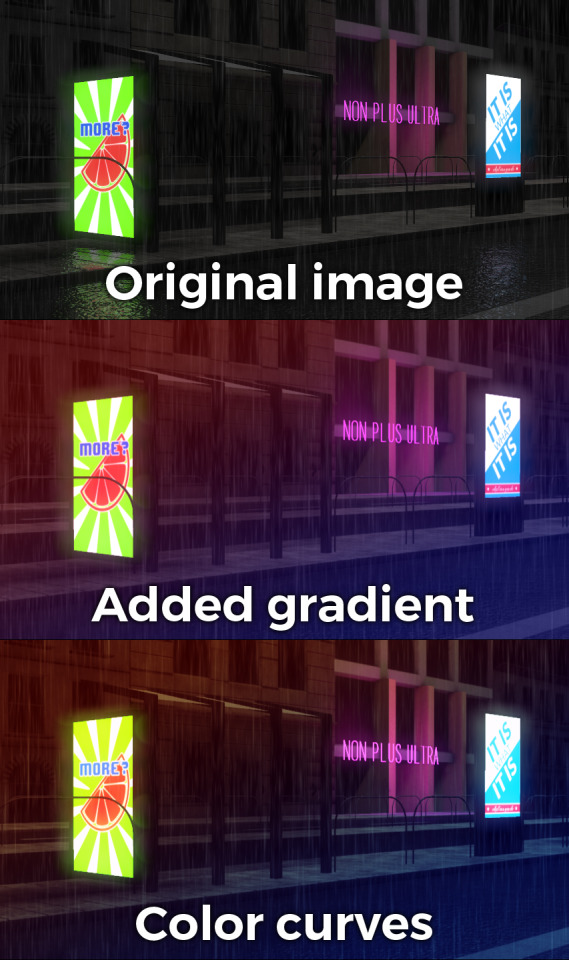
Color grading.
Optimizations
There were two points in the process where I started to notice problems with performance: After the first few scenes added, the demo ran relatively fine in 720p, but began to dramatically lose speed if I switched to 1080p. A quick look with GPU-Z and the tool's internal render target manager showed that the hefty use of GPU memory for render targets quickly exhausted 3GB of VRAM. I wasn't surprised by this: my initial design for render target management for the node graph was always meant to be temporary, as I was using the nodes as "value types" and allocating a target for each. To mitigate this I spent an afternoon designing what I could best describe as a dependency graph, to make sure that render targets that are not needed for a particular render are reused as the render goes on - this got my render target use down to about 6-7 targets in total for about a hundred nodes.

The final node graph for the demo: 355 nodes.
Later, as I was adding more scenes (and as such, more nodes), I realized the more nodes I kept adding, the more sluggish the demo (and the tool) got, regardless of performance - clearly, I had a CPU bottleneck somewhere. As it turned out after a bit of profiling, I added some code to save on CPU traversal time a few demos ago, but after a certain size this code itself became a problem, so I had to re-think a bit, and I ended up simply going for the "dirty node" technique where nodes that explicitly want to do something mark their succeeding nodes to render, and thus entire branches of nodes never get evaluated when they don't need to. This got me back up to the coveted 60 frames per second again.
A final optimization I genuinely wanted to do is crunch the demo down to what I felt to be a decent size, around 60-ish megabytes: The competition limit was raised to 128MB, but I felt my demo wasn't really worth that much size, and I felt I had a chance of going down to 60 without losing much of the quality - this was mostly achieved by just converting most diffuse/specular (and even some normal) textures down to fairly high quality JPG, which was still mostly smaller than PNG; aside from a few converter setting mishaps and a few cases where the conversion revealed some ugly artifacts, I was fairly happy with the final look, and I was under the 60MB limit I wanted to be.
Music
While this post mostly deals with graphics, I'd be remiss to ignore the audio which I also spent a considerable time on: because of the sparse nature of the track, I didn't need to put a lot of effort in to engineering the track, but I also needed to make sure the notes sounded natural enough - I myself don't actually play keyboards and my MIDI keyboard (a Commodore MK-10) is not pressure sensitive, so a lot of the phrases were recorded in parts, and I manually went through each note to humanize the velocities to how I played them. I didn't process the piano much; I lowered the highs a bit, and because the free instrument I was using, Spitfire Audio's Soft Piano, didn't have a lot of release, I also added a considerable amount of reverb to make it blend more into the background.
For ambient sounds, I used both Native Instruments' Absynth, as well as Sound Guru's Mangle, the latter of which I used to essentially take a chunk out of a piano note and just add infinite sustain to it. For the background rain sound, I recorded some sounds myself over the summer (usually at 2AM) using a Tascam DR-40 handheld recorder; on one occasion I stood under the plastic awning in front of our front door to record a more percussive sound of the rain knocking on something, which I then lowpass filtered to make it sound like it's rain on a window - this eventually became the background sound for the mid-section.
I've done almost no mixing and mastering on the song; aside from shaping the piano and synth tones a bit to make them sound the way I wanted, the raw sparse timbres to me felt very pleasing and I didn't feel the sounds were fighting each other in space, so I've done very little EQing; as for mastering, I've used a single, very conservatively configured instance of BuzMaxi just to catch and soft-limit any of the peaks coming from the piano dynamics and to raise the track volume to where all sounds were clearly audible.
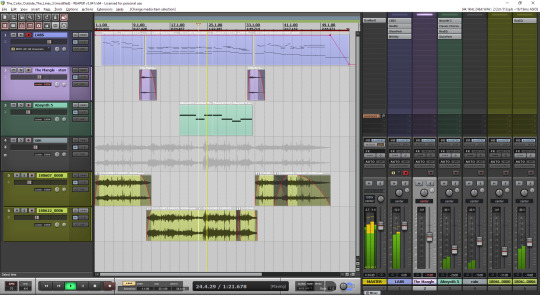
The final arrangement of the music in Reaper.
Minor tricks
Most of the demo was done fairly easily within the constraints of the engine, but there were a few fun things that I decided to hack around manually, mostly for effect.
The headlights in the opening scene are tiny 2D quads that I copied out of a photo and animated to give some motion to the scene.
The clouds in the final scene use a normal map and a hand-painted gradient; the whole scene interpolates between two lighting conditions, and two different color grading chains.
The rain layer - obviously - is just a multilayered 2D effect using a texture I created from a particle field in Fusion.
Stuff that didn't make it or went wrong
I've had a few things I had in mind and ended up having to bin along the way:
I still want to have a version of the temporal AA that properly deghosts animated objects; the robot vacuum cleaner moved slow enough to get away with it, but still.
The cat is obviously not furry; I have already rigged and animated the model by the time I realized that some fur cards would've helped greatly with the aliasing of the model, but by that time I didn't feel like redoing the whole thing all over again, and I was running out of time.
There's considerable amount of detail in the room scene that's not shown because of the lighting - I set the room up first, and then opted for a more dramatic lighting that ultimately hid a lot of the detail that I never bothered to arrange to more visible places.
In the first shot of the room scene, the back wall of the TV has a massive black spot on it that I have no idea where it's coming from, but I got away with it.
I spent an evening debugging why the demo was crashing on NVIDIA when I realized I was running out of the 2GB memory space; toggling the Large Address Aware flag always felt a bit like defeat, but it was easier than compiling a 64-bit version.
A really stupid problem materialized after the party, where both CPDT and Zoom reported that the demo didn't work on their ultrawide (21:9) monitors: this was simply due to the lack of pillarbox support because I genuinely didn't think that would ever be needed (at the time I started the engine I don't think I even had a 1080p monitor) - this was a quick fix and the currently distributed ZIP now features that fix.
Acknowledgements
While I've did the demo entirely myself, I've received some help from other places: The music was heavily inspired by the work of Exist Strategy, while the visuals were inspired by the work of Yaspes, IvoryBoy and the Europolis scenes in Dreamfall Chapters. While I did most of all graphics myself, one of the few things I got from online was a "lens dirt pack" from inScape Digital, and I think the dirt texture in the flowerpot I ended up just googling, because it was late and I didn't feel like going out for more photos. I'd also need to give credit to my audio director at work, Prof. Stephen Baysted, who pointed me at the piano plugin I ended up using for the music, and to Reid who provided me with ample amounts of cat-looking-out-of-window videos for animation reference.
Epilogue
Overall I'm quite happy with how everything worked out (final results and reaction notwithstanding), and I'm also quite happy that I managed to produce myself a toolset that "just works". (For the most part.)
One of the things that I've been talking to people about it is postmortem is how people were not expecting the mix of this particular style, which is generally represented in demos with 2D drawings or still images or photos slowly crossfading, instead using elaborate 3D and rendering. To me, it just felt like one of those interesting juxtapositions where the technology behind a demo can be super complex, but at the same time the demo isn't particularly showy or flashy; where the technology behind the demo does a ton of work but forcefully stays in the background to allow you to immerse in the demo itself. To me that felt very satisfactory both as someone trying to make a work of art that has something to say, but also as an engineer who tries to learn and do interesting things with all the technology around us.
What's next, I'm not sure yet.
3 notes
·
View notes
Text
a few people have asked me how i take my screenshots so i thought i'd share my general like... process
so first things first i do not have the greatest rig. i wouldn't even call my rig good. what i DO have is a decent gpu -- i was lucky enough to get my grubby little goblin mitts on one when cryptocurrency mining was just starting to create a shortage, this was a few months ago when it wasn't as bad as it is now... anyway i have the gtx 1050 ti, i think 4gb?, which is a good card! it lets me run dai at a stable 40-60 fps on mostly ultra/high settings. the rest of my rig is garbage tbh. it's a cheapo dell i grabbed off the rack to replace my dying laptop years ago. a decent gpu will make a huge difference is my point. i chose to spend a little extra money to get something i wouldn’t have to replace for a while.
i have a 1080p monitor and run the game fullscreen to get the biggest screencaps i can. the bigger your resolution, the bigger your screencaps, the more detail you can jam in there. it's always better to have to scale an image down than up.
for purposes of portrait screenarchery in dai you only need to worry about 3 settings really: mesh, texture, and shader. if you want to cap scenery or combat shots etc you will probably need high settings on other options but for just portraits of faces, those 3 are all you need. you can always hide ugly background textures by making everything in the bg really blurred out. don't neglect shader. that's what gives things like hair a higher resolution so it's not this super shiny metallic oilslick look.
now, tools. you'll need the dai cinematic tools and some screencapping software. i use fraps, which i paid for, at the cost of about $37. i think you can still take screencaps with the free trial version, you're just limited to certain filetypes and you can't take video? there's free screencapping software but i thought fraps was the most intuitive and simple that i tried so i bought it. (i think dai has a built in screencap feature on pc...? but i have never used it if so. in-game screencapping usually saves as compressed jpegs which i Do Not Want.)
the cinematic tools are a free third party software you can download above. download the zip and extract it into its own folder somewhere you can easily find again. when i run the cinematic tools, i first boot up the game, then either completely load a save or a new game, then alt-tab out and boot the cinematic tools (RUN AS ADMINISTRATOR). two windows will eventually pop up. don't touch anything until the black box says something like "gui found." then alt-tab back to the game and you can start playing with the tools.
i used this tutorial as a basic how-to guide for flycamming, and this tutorial to start figuring out the settings of the cinematic tools. from there it was just playing around with the settings and trying things out.
for the most part, i usually just change the depth of field to get a nice crisp shot when i zoom in with a blurry background to bring the focus more on the subject of the picture. i also always use the cinematic tools to hide the hud (delete key) and temporarily upscale the resolution. sho talks about that in their tutorial. otherwise, i usually don't make many adjustments. i prefer to post-process my screencaps in photoshop. you can also use a reshade, but those are VERY labour-intensive on the ol' gpu, and i find the drop in framerate is a hassle i'm not willing to deal with.
i have fraps set to save screenshots as png files. this produces absolutely huge filesizes but they retain their quality without jpeg compression which is valuable to me.
there's a few other tricks i do with the cinematic tools, aside from the simple tip of going under 'misc' and setting the resolution to '2' to temporarily upscale the resolution and then returning it to '1' when you're ready to play the game again --
1. when i flycam to take portrait shots, i usually do so during cutscenes. this will give you slightly better detail on the textures and such, but it also lets you get much closer to the character. for whatever reason in the overworld if you zoom in to a certain point your character just vanishes, but in cutscenes you can get so close to them you can literally see the inside of their head and their creepy realistic teeth and eyeball models. also, overworld characters have resting bitch face somethin' fierce. cutscene shots will provide more variety of expression.
2. take several different angles, and take more screencaps than you think you'll need. you can weed them out later.
3. a good Tip to take portrait-oriented... uh, portraits (you know, vertical and not horizontal) is to use the flycam to just rotate the camera 90 degrees, take your screencap, then rotate it in any basic image editing program. this will give you a much higher resolution portrait-oriented screencap than just taking a landscape-oriented screencap and cropping it. it's the exact same thing as physically turning your camera to the side in your hands.
i also use a lot of high-resolution mods in my game. i have a list of recommended mods here, but if you just want a mod experience that's "the vanilla game, but improved," i'd recommend this mod to lessen the shininess of the vanilla skin, this one to enhance the resolution of the eyes, this one for vallasin, this one for hair resolution, this mod that slightly elongates the vanilla eyelashes (elongated lashes v03, and this eyebrow mod that totally overhauls EVERY eyebrow in the game. i can give a tl;dr about what makes some mods (imo) better than others, but basically what i prioritize is 1) realistic, 2) lore-friendly, and 3) high-resolution. in that order.
so that's how i get the quality that i do when i take screencaps -- using a decent gpu to run the game at ultra settings when possible, prioritizing mesh/textures/shader, and using the cinematic tools to take clean screenshots with the hud hidden and flycam to zoom in on faces and frame them better.
when it comes to visual interest that's a little trickier. the biggest thing i'd recommend is studying photography. that's why i got into screenarchery, i have a background in photography which i studied until i had to sell my camera due to unemployment. specifically read up a little bit about photography composition and try to apply that to your screencapping. general art composition will also apply here.
do not be afraid to experiment in terms of composition. if you “break the rules,” take a long look at your composition and think about whether or not you think it works, and why. study other people’s compositions and think about how that contributes to the feeling of a piece. some stuff is obvious common sense stuff -- want to create a feeling of loneliness and isolation? make your subject very small and off to one side so they seem almost drowned out by all the empty space... want them to look powerful and imposing? put them at a high angle so they look large.
really pay attention to your lighting. take a couple screenshots of your character in different lighting situations and try to figure out where they look better and why that is. light will bounce off your character’s face in different ways at different angles and enhance or detract from their appearance. that’s why all the youtube beauty gurus have ring lighting... because it’s SUPER flattering, unnaturally so.
angle will also affect how people see your character’s facial features. you know how when you accidentally turn the front camera on your phone on and you’re like OH GOD I’M A MONSTER? it’s bc that angle from below is ridonkulously unflattering with human facial features. it’ll make everything look bigger and bloated. remember the myspace days, when all the scene girls took selfies from like a foot above their heads pointing down? that’s bc that angle made them look thinner and longer.
i love dutch angles but uh, be careful with that. dutch angles impart a sense of drama into a picture that can be kind of out of place if you're taking just some casual chillin' shots. but you can pry them out of my cold dead hands...
that’s about it, if u have any other q’s send me an ask
3 notes
·
View notes
Text
It’s the first of December and the Christmas countdown starts NOW!! Christmas is my absolute faaavourite time of the year and when I was younger I would start making my wish list months before the big day. As I’ve gotten older though I’ve found it increasingly difficult to think of things that I’d like to receive and that my friends and family would like to receive too. This year I’ve compiled a list of items that the chic and fashionable woman may want for Christmas including clothes, shoes, accessories, beauty, tech and more. I hope this will help build up a quick picture of what a modern city girl may wish for this Christmas for all those confused boyfriends, husbands and friends!
So here are some gifts for her if you’re stumped this festive season:
Fashionista
White Stuff Nene Jacket
Gloriously soft and fluffy, this Nene jacket from White Stuff is my fave of the season! It’s incredibly warm and has actually served me much better than my other winter coats so far. It’s thick enough that it’s pretty much completely wind proof and with all that fluff the heat stays inside! I’ve been wearing this one every day since I got it because it’s perfect for pretty much all occasions. You can very easily dress it up or dress it down making it a great gift this winter.
Available from White Stuff for £120
White Stuff Grey Spot My Heart Jumper
There’s something very Christmassy about this jumper despite the lack of Christmas trees or Christmas hats adorned on it. It’s super cute and cosy and a really great, light option to keep you warm this winter. It’s simple enough that most people will love it but with enough details to make your outfit that little bit more interesting. This one is nearly sold out on the website so grab it quick if it’s on your Christmas list!
Available from White Stuff for £55
Dune Olyvea Red Suede Boots
One of my absolute favourite items on this list are these gorgeous red suede boots from Dune. I’ve only had these for a week but already had so many compliments on them. The red colour is perfect for Christmas and the block heel means these actually make for sensible day shoes and are very comfy. These bad boys were actually out of stock for weeks so if you’ve got your eyes on these then snap them up quickly!
Only downside is that they have coloured a few of my socks red so I will be wearing black socks/tights with them from now on!
Available from Dune for £99
Barts Women’s Jasmin Beanie
I find that if you really don’t know what to give for Christmas, you can never go wrong with a good hat, scarf and gloves! This chunky knit grey beanie from Barts is super cosy and even has an extra fleece layer around the inner edge to keep your head extra snug. What’s more this beanie is hand-knitted so each and every one by Barts is slightly different making it that little bit more unique.
Available from Tiso for £27
Charles Conrad Rose Gold Watch
Minimalist watches are still all the rage right now so this rose gold watch from Charles Conrad makes for the perfect gift that you know will be treasured long after Christmas is over. I love the simple watch face with roman numerals round the edge, which look so elegant. Charles Conrad watches are actually all unisex so the watch face is a bit larger than similar watches out there. Whilst some of their other watches would work well for both sexes, I think the rose gold one is best suited to the ladies!
ALSO, get 30% off full price Charles Conrad watches on Watches2U.com with the code ‘WHATSHOT30��. Valid until 31st December 2017.
Available from watches2u for £169
Rose Gold Pandora Rings
I’ve always been a huge fan of Pandora’s stacking rings and I’ve been eyeing up their new Rose Gold collection ever since it’s release. They have a huge range of rings with some very simple and other more extravagant items. What I love about Pandora’s jewellery is that you can mix and match pretty much all of it and over the years I’ve built up a collection of silver and rose gold jewellery that can be paired with anything. Pandora’s charms and stacking rings make for great Christmas presents if you know that someone’s already a fan of their range because then you can just add to the their collection. I wear four of these Pandora rings daily, with three stacking rings and the radiant elegance ring as the star of the show. The Daisy Band one is really special so I save that for parties and such!
Puzzle Heart Ring £45 // Droplets Ring £55 // Radiant Elegance Ring £55 // Linked Love Ring £45 // Dazzling Daisy Band Ring £75
Beauty Addict
Magnitone BareFaced Shimmer Brush
I have always been skeptical about gadgets like this, wondering if it’s just the beauty industry trying to push another expensive product that I don’t really need. However, ever since I first got my hands on this back in 2015, I’ve been a convert to the Magnitone BareFaced Viba-Sonic Brush! The best thing about this brush is that the results are immediate (yes, immediate!) and you’ll have silky smooth skin from day one. For people who think that their skin is good enough without one of these, I can assure you that it is honestly impossible to get as deep a clean from just using an exfoliator or cleanser. This would be the perfect gift for any lady as it’s great for all skin types and can be used on a daily basis. The shimmer brush is limited edition, which makes it just that little bit more special for the festive season. What’s more, it comes with a 12 month warranty so there’s no need to worry about repairs – I’ve had mine for 2 years already and never had a problem with it!
Read my full review of the Magnitone BareFaced Vibra-Sonic Brush here.
Available for £90 from Magnitone
Magnitone Wipeout! Cleansing Cloth
I’ve seen a couple of reviews of these wipes and I honestly just couldn’t believe that they would be able to remove make up without the help of a cleanser. However, I managed to remove a full face of foundation, mascara and eyeliner with just a few rubs from this uber soft cloth. I couldn’t believe my eyes! I was most impressed that it managed to remove all of my mascara, which is usually quite tricky and I have to use an oil-based make-up remover. This cloth works like m a g i c and it’s now an essential part of my night-time routine! This is an essential for any girl that wears makeup during the day and she’ll thank you eternally (well, for 1000 uses) for bringing this magic cloth into her life.
This pack contains two cleansing cloths and each one is reusable up to 1000 times. Yes, 1000 times. It’s machine washable, super compact and super useful – great for every day use or for travelling! Using one of these also means less disposable wipes in the landfill so it would make the perfect gift for an eco-friendly gal.
Available from Magnitone for £15
7th Heaven Complete Pamper Pack
7th Heaven face masks have always been my go-to when I’m in need of some pampering. At only £1 per pack, they’re super cheap but soo good! The new complete pamper pack that they’ve released for Christmas would make the perfect gift for someone who’s been a bit stressed lately and needs a bit of time to themselves. This pack is complete with 8 different face masks, an exfoliating and bath & shower pom pom, a headband, a mini towel, glove masques, sock masques and finger masques. If you’re wondering what the hell the last three are, the glove and sock masques are ultra moisturising gloves for dry or rough hands and feet, and the finger masques are for strengthening your nails and cuticles. For just £19.99 this is one of the best beauty bargains out there this Christmas should make any girl very happy on Christmas day. Giving someone an excuse to treat themselves is one of the best things you can do this season!
Available for £19.99 from Argos
Iconic London Make Up Brushes
Now I’ll be honest, when I first got my hands on these babies I had no clue what each brush was supposed to do. It’s been a steep learning curve but I’ve realised that having a specific brush for each part of your face really does help create that ultra-flawless look and it makes me feel like a badass makeup pro. These 12 pearl gold brushes are sure to make any makeup fiend very happy and add a bit of luxe to their beauty collection. The best thing about Iconic London is that all their brushes are 100% cruelty free and vegan!
Here’s what’s included:
Large Powder, Tapered Powder
, Foundation Buffer, Contour Buffer (Perfect for sculpting)
, Angled Powder (to sculpt cheeks)
, Concealer blender (to cover imperfections)
, Flat Fan Brush (perfect for dusting)
, Large Shader (apply shadows
), Medium Angled Shader: Gives a soft application of colour. Great to use on brows or to blend the crease
, Tapered Blending Brush (perfect to apply colour)
, Small Angle Brush (perfectly shape and define brows) & Small Point Brush (use with gel or liquid liners).
Available from Iconic London for £75 (+ 10% student discount online!)
Magnitone BlendUp Brush
A new addition to the Magnitone family is the BlendUP Vibra-Sonic Makeup Blending Brush. As I said above, I’ve been a huge fan of Magnitone since 2015 so I was pretty excited to see their new product for applying foundation. There are three different modes: blend, airbrush and clean, and you can use these for light, medium or full coverage. What’s really cool is that you can even use this brush to add the finishing touches such as bronzer, highlighter and blusher! I’m sure this will quickly become a must-have for beauty addicts who’ll accept nothing less than flawless coverage. My only problem with this product is that it takes longer to apply because you’ve got to wait for the vibrations to absorb smoothly into your skin but the result really is so much better than your average make up brush. There is literally zero evidence that you even applied any product to your face!
Available for £70 from Magnitone
Blink Brow Bar Super Natural Brow Gift Set
Did you know that brow exfoliator existed? I certainly didn’t until I opened up this small package of brow essentials. I even created a poll on Twitter and Instagram and it turns out most other people don’t know these exist either! Strong brows are all the rage right now and I don’t know many girls who haven’t been sucked into this trend. This super natural brow gift set is for those that aren’t messing around when it comes to their brow game. Including brow exfoliator, brow day cream and a brow pencil, this will take your brow game to the next level!
Available from Blink Brow Bar for £35
Bobbi Brown Bronze Shimmer Compact
Bobbi Brown’s Shimmer Compact is a favourite amongst beauty lovers. This little compact works as a highlighter, bronzer and eyeshadow making it an essential for all outings. The versatility of this means this is suitable for pretty much any makeup fiend so throw a little bit of glitter their way this Christmas!
Available from Debenhams for £30.15 (RRP £35.50)
Cook Extraordinaire
Cookshop Waffle Maker
Waffle makers are one of those things that everybody wants but no one feels like they can justify buying, which is exactly why they make the perfect Christmas presents!! Everybody loves a good Belgian chocolate waffle at the Christmas market but nobody wants to pay the $$$ price tag that comes with them. Problem solved with this uber cheap waffle maker so you can make them in the comfort of your own (warm) home!
Available from Debenhams for £21 here (RRP £35)
Kilner Spiralizer
A spiralizer is one of those trendy gadgets that insta-foodies love to have in their kitchen. I picked this Kilner one up at random but it is actually so, so good and I was amazed by how quick and easy it is to use. For £15 I thought this was an absolute steal as the vegetable lands right inside the jar creating zero mess and you create your salad to go quickly and easily. The blades at the top are engineered so that your vegetable of choice is firmly stuck vertically on top of the jar and you just need to twist it round to create those beautiful vegetables swirls.
Available from Debenhams for £15 here
Breville Blend-Active Blender
When I went through my fitness crazy phase in my second year of uni, I quickly nabbed one of these Breville Blend-Active Blenders to mix up some tasty protein shakes and smoothies. Three years later, this is still one of the top blenders on the market and I’d say that you definitely get the most value for cost to quality. I love this blender because it blends directly into a bottle, ready for you to take away with you. This blender has so many uses and my mum and I now share it with me using it to make protein shakes and her using it to make soup!
Now available in green, blue and pink with different container sizes.
Available from Debenhams for £20 (RRP £30)
Shop more of Debenhams Christmas range here.
Biscuiteers Nutcracker Biscuit Tin
I have been a huge fan of the Biscuiteers ever since I did work experience with Penguin Random House (read more about that here) and they had a custom box of Willy Wonka inspired biscuits made up. Whoever said food isn’t art clearly hasn’t seen these beautiful biscuits because they are stunning! Almost too stunning to eat. These Nutcracker biscuits make for the perfect Christmas gift and your recipient can always keep the tin to remind them of these exquisite biscuits!
Available from Biscuiteers for £35
Home Goodies
HEMA Instax Accessories
In this digital age it’s nice to see that polaroid cameras have made a solid comeback. I love taking polaroid photos to mark special moments but, the problem is, I’m always losing these little prints since I’m reluctant to risk damaging them by pinning them up. I’m so glad I’ve now got my hands on the Instax accessories range from HEMA so I’ve can put my fave prints in a little album and safely store the rest of them in this handy polaroid sized box. This bundle would make the perfect gift for anyone who already owns an Instax mini, or, if you know someone who’s keen to get one, you can purchase one of those too at HEMA for £70.
Instax mini 8 camera bag £12.50 | Instax photo album £5 | Instax storage container £2 | colour film Instax mini Glossy (2×10/pk) £15
Unicorn Slippers
Unicorns are all the rage right now and I can’t think of a better gift for someone who likes to hibernate at home during the winter months. These amazing slippers will make each step feel magical and add a bit of fun to your home. Plus, the super thick unicorn face at the front means your toes will never go cold!!
Available from Find Me a Gift for £14.99
Leather Goals Journal
Every #girlboss needs a goals journal to get sh*t done, or as it says on the cover “achieve your dream life”. This plain leather journal feels suitably luxe for your biggest, wildest dreams. Over the past few months I’ve become obsessed with writing to-do lists for my day/month/year/LIFE. What’s more, this journal is filled with that thick cut paper that’s really satisfying to write on. Help your gal pal achieve her goals this coming year with a swanky new leather journal.
Available from Find Me a Gift for £36.99
*This post contains some PR samples. All opinions are my own.
Stay up to date with What’s Hot?
Bloglovin’ / Instagram / Facebook / Twitter / Pinterest
[jetpack_subscription_form] // <![CDATA[ (adsbygoogle = window.adsbygoogle || []).push({}); // ]]>
Christmas Gifts For Her: Fashion, Beauty, Kitchen & Home It's the first of December and the Christmas countdown starts NOW!! Christmas is my absolute faaavourite time of the year and when I was younger I would start making my wish list months before the big day.
0 notes