#import tuner model
Explore tagged Tumblr posts
Visit Tumblr Blog
Explore Tumblr blogs with no restrictions, modern design and the best experience.
Last Seen Tumblr Blogs


Fun Fact
130K people were victims of a chain letter scam that affected Tumblr in May 2011.
Text


TOP 10: Obscure Car Makes/Models
1. Hindustan Contessa Sedan
2. Wartburg 353 Sedan
3. 1962 Tatra T603 Sedan
4. Barkas B 1000
5. FSO Polonez
6. 1978 Zaz 968 Coupe
7. ISO Grifo 90
8. 1989 Jiotto Caspita
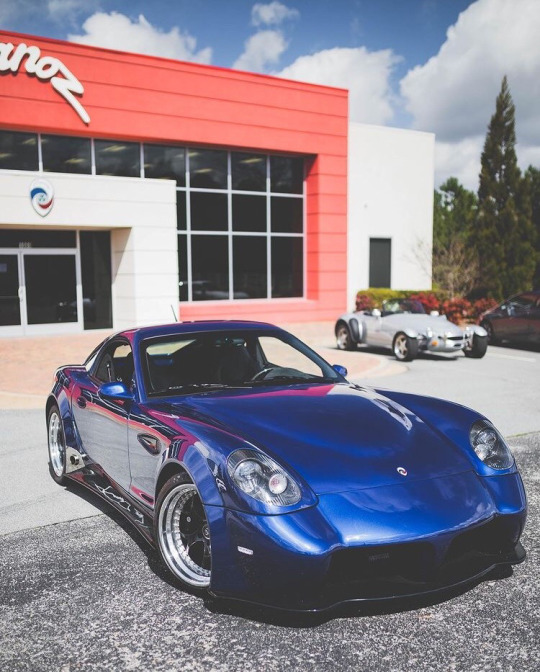
9. Panoz Avezzano
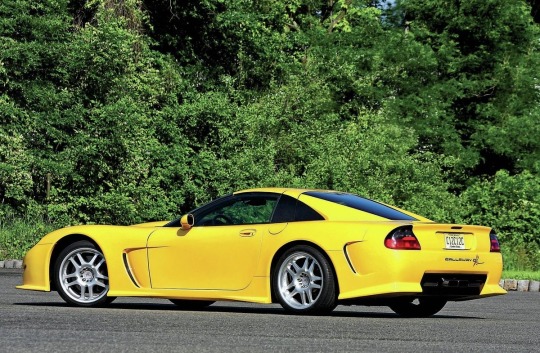
10. 1999 Calaway C12
#TOP 10: Obscure Car Makes/Models#2023#modified#stance#tuning#retro rides#tuner#slammed#street#imports#lowered#fitment#static#uncommon cars#oddballs#unknown car
121 notes
·
View notes
Text

𖤐𖤐𖤐
#jdm#y2k fashion#archive#y2k#fashion#car model#early 2000s#trashy 2000s#2000s#import tuner#car show#early web#webcore#honda
11 notes
·
View notes
Text

#tuner#import tuner#jdm#motortrend#modified car#sports car#model car#model cars#streethunters#superstreet#vertex#vertex s13#vertex silvia#diecast#diecasts#nissan#nissan silvia#s13#s13 silvia#ps13#schassis#nismo#240sx#nissan 240sx#240sx coupe#s13 coupe#red car#red cars#aesthetic#coupe
4 notes
·
View notes
Text


Kaila Yu for Import Tuner
#2000s#2000s aesthetic#2000s nostalgia#import tuner#import model#model#editorial#fashion#2000s fashion#00s#00s nostalgia#I love her outfit and hair so much
4 notes
·
View notes
Text
As I'm halfway through writing an AU, my brain switches focus to the next one right-that's how the X-Men AU was born. So, right now I'm thinking about doing a Street Racing Supercorp AU.
Lena's an undercover detective.
Kara the underground racing top dog (with Alex prob, or perhaps I switch it up and her bestie is Sam and her sister's like...a cop too? Omg the drama).
What can possibly go wrong?
Anyways, of course my first thought is what car they drive because I'm just a big ole stereoptype gay who loves cars.
Lena? Easy, a vintage 70's Porsche 911 model. Tuned up, naturally.

Kara? I wanna go with either one of two cliches. 1) she's an import lover, little tuner action you know. 240SX, Supra, Skyline, whatever. 2) She's all about muscle cars and thinks imports are scrap metal.
Haven't decided yet.
I personally love both, I've had a Camaro and yeah its hard to not fall in love with muscle cars, but MAN, idk.
#supercorp#supercorp au#supercorp fanfic#lena luthor#kara x lena#lena x kara#kara danvers#ao3 fanfic
51 notes
·
View notes
Note
giggled thinking about rome eating ass in his chrome purple convertible
Yeah and he had her posing on it first like an import model, he and Brian used to pass issues of Import Tuner back and forth like porno mags when they were kids. Rome has her posed up on the hood of the Spyder, arched in the back seat, draped over the side, he'd take pictures with his little digital camera if you'd let him. His pretty import model hunny whose ass he eats nasty in the back seat with your cute little outfit still on 'cause that's part of the fantasy.
#i loveeeeee import mags btw love them love them bri and rome would love em too#roman Pearce headcanon#roman pearce smut#fast snd furious
7 notes
·
View notes
Text
I wonder what exactly Snot Rod’s relationship is with the rest of the Tuner Gang because he seems like the odd one out in basically every way. He has a different accent then the rest of the Gang does. He’s an American make and model (based on the Plymouth Barracuda and the Dodge Charger) while the rest of the gang are Japanese imports. The rest of the gang drive in a tight synchronized formation while Snot Rod lags behind and seems to struggle to maintain speed with them.
And my favorite subject - character design!!!! Look at this picture

Snot Rod has a warm color motif (orange) and the rest of the gang have cool color motifs (blue, cyan, purple, and green)
He has much fewer body modifications in general
Only member of the gang without a spoiler
Only member of the gang without any LED’s on his sides
His tailpipe flames are different - DJ, Wingo, and Boost all have thick conical artificially-colored flames that extend behind them, while Snot Rod’s flames sort of fan out to his sides
Even his headlights are different. You can see the rest of the Tuner Gang have harsh white LED’s, but Snot Rod has softer yellow incandescent headlamps (color motif again I imagine)
81 notes
·
View notes
Text
A Night In Tokyo With Mick Schumacher and A Mercedes 190E Evo II
Driving around Tokyo is daunting. With no centre or suburbs, its road network is huge, spiralling, occasionally latticed and sometimes subterranean. At times, even Mr Roboto in the satnav gives up and shrugs directions your way. Which has happened. Meaning I'm lost while leading Mick Schumacher (behind the wheel of a stunning Mercedes 190E 2.5-16 Evolution II) through Japan's neon-lined labyrinth. It's a hot, humid evening and Mercedes F1's reserve driver (and son of iconic seven-time Formula One world champion Michael Schumacher) is cutting the perfect shape of a 90s boyband member. Where I'm perspiring like a burst pipe, he palms back his blonde curls and looks effortlessly cool in his loose-fitting, oversized Tommy Hilfiger contractual clobber. Sartorially, it couldn't be more of a perfect fit for the car he's driving. Born out of German touring cars, the Evo II is a deeply lustworthy, boxy and bewinged sports saloon. With a revvy, induction-tastic 232bhp four-cylinder engine mated to a dog leg close-ratio five-speed manual, rear-wheel drive and aero appendages that get petrolheads salivating, it's a proper tip one's hat 'if you know, you know' car. Mercedes only built 502 of them (as per DTM's homologation rules) out of some 1.9 million W201 models that it's based on, so they're properly rare beasts. The fact we've got a quadruplet of Evos following Mick makes the situation we're in a bit more mind-blowing. But that's the plan. We wanted to give Mick an evening to remember, to take him away from the repetition and rigmarole of modern media junkets. We don't want to know where he keeps his ketchup, or when the last time he thought of the Roman Empire was. We want to indulge his love for cars.

"I went looking for an Evo II to buy but decided against it… for now," Mick says in his soft, geographically hard to place international accent. "It's a beautiful car and has huge sentimental value to me, the main reason being that my dad had one as a company car when he was a Mercedes junior. He spent a lot of time doing lots of laps on the Nordschleife with Heinz-Harald Frentzen. I remember within a month they had to change the brake pads and things with the engine. So it's an emotionally important car to me." Growing up in Gland, Switzerland, Mick struggles to pinpoint exactly when he got bitten by the road car bug. "Honestly, I don't really know where I got into them. Driving them around the property as a child was a big factor. The first time I had a steering wheel in my hand from a road car was maybe four or five years old, on my dad's lap. I got to drive very nice cars, very soon and very early. I guess it just grew naturally. Especially when I turned 18; then it really turned into an obsession." Raised on a healthy diet of racing, the Fast and Furious franchise and gaming, Mick picked up a penchant for JDM cars by proxy. "I just love how raw and simple they are," he says. "I enjoy playing around with them, changing stuff, tuning them and making them more fun to drive." Knowing this, we head out of Tokyo towards Chiba to meet Japan's most inconspicuous bad boy: Kazuhiko 'Smokey' Nagata. Tobacco and turbo enthusiast Smokey is one of Japan's legendary tuners. He and his company Top Secret have modified every generation of Nissan GT-R, including an R33 Skyline GT-R that managed 0–186mph in 17 seconds at Yatabe test track and 204mph in Tokyo's famous Aqualine tunnel. Like Smokey, Mick is also a GT-R fanboy, with some tucked away in a shed at home, including his R34 drift car.

"I've really got into drifting. As an F1 driver, drifting, or oversteer, is the opposite of what you want to do, but if you control it and have the feel for it, it can really help you. So I took the step of saying 'I want to try it' after the 2019 Race of Champions skill race. I was quite good, finishing second against rally drivers and everything, so I thought, 'Okay, maybe I should try this a bit more,' so I got my own car and started enjoying sideways. I love the sensation of connecting turns and being in a difficult situation, because obviously the car is upset, to then be able to control it. I think that's what's so intriguing. It's a good feeling." Mick's curiosity and JDM love resonates as he wanders around Smokey's GT-R littered shop. Not being able to speak Japanese, Mick uses international hand signals for car nuts to explain various car parts, gets out his phone to show Smokey his cars before stumbling upon Smokey's VR32 GT-R (an R32 with all the mechanics and interior of the R35 transplanted) and trying to find a way to import it into Switzerland. But we've got no time for this, as we've got the legendary Bayshore Route to hit and a car meet to get to. For someone so young, 24-year-old Mick is at a rather quiescent point in his career. Having had a triumphant run in his youth coming second in karting in the World, European and German Junior Championships, then switching to Formula 4 in 2015 and finishing second overall in both the German and Italian F4 championships, before becoming European Formula 3 Champion in 2018 and FIA Formula 2 Champion in 2020, Mick made it to the big leagues and bagged himself a seat in F1 with Haas. It wasn't easy. In 2022 Mick lost his seat after a difficult second season that saw him struggle to match teammate Kevin Magnussen for form. He recorded a best finish of sixth in Austria, one of two points finishes during the season, but it was not enough to save his seat. For 2023, Mick dropped his Ferrari junior ties and linked up with Mercedes (the last team his father raced for in F1), picking up the role of reserve driver.

"Being a reserve driver gives you tremendous insight, especially at Mercedes," Mick says. "I miss driving, I'm not going to lie, but the main thing I've learned since moving from Haas to Mercedes is how the team operates, the tools they have, how they use them and the communication. They're big learning points. It has opened my eyes in a lot of ways and has made it clear why Mercedes is as successful as it is. The worst part is sitting in the garage and seeing everybody drive out and do what you love to do." Part of Mick's remit is to join Mercedes trackside at all F1 race. That's how we're able to blat around Tokyo for a night before he heads to Suzuka to support the team. But time in Merc's state-of-the-art sim back in Brackley is also key. Mick was praised by Mercedes' technical director James Allison for a 2 am shift he did during the British GP weekend, turning the car's "woeful" one-lap pace on Friday into a competitive car and set-up for Lewis Hamilton and George Russell to compete with during quali and the race on Sunday. With every mile behind the Evo II's wheel, Mick's smile grows to match the width of its monstrous rear wing, especially when he realizes it shoots flame on the overrun after a 7,600 rpm toll booth roll out. We cross over to Yokohama and swirl down a concrete pillared plughole, arriving in an unsuspecting parking lot that doubles up as the epicentre of cool Japanese car culture in Japan: Daikoku PA. Mick, having never been to a car meet before, has his eyes widened. Even though it's a school night, the place is pumping. Mick walks around curiously, showing his girlfriend, Danish model Laila Hasanovic, Veilside-kitted Mazda RX-7s, how riveted wide arch Liberty Walk bodywork hangs from an R35 GT-R for the ultimate kerbside stance, and the extended provenance from the flood of awesome, rare Mercedes (including the original 190E Evo I, an AMG-clad W124 and a custom Cosworth 2.5 boasting Penta wheels and Brabus brakes) that are all parked honourably in their uniform herringbone bays. As Mick gets under the bonnets and kindly signs carbon airboxes for marginally hysterical owners, I wonder if he's handy with the spanners.

"I wish I was," he says, "but I don't have the time. I'm starting to bring more of my cars over to my place so that I eventually will be able to work on them myself and change things that I want to change. Currently, I am very good at taking things apart… maybe less gifted at putting them back together." But since the meteoric rise of social media and documentaries like Netflix's Drive to Survive, racing drivers' personalities have been mainlined into public consciousness. Nowadays, it appears drivers' human interests need to be put on display like the plastic dishes outside Daikoku's service station restaurant windows. Yet here, tonight, Mick seems completely at home and relaxed. "It's risky because I feel like I'm a very private person. I like my privacy. Sometimes when you get people wanting to know more, they get a bit too snoopy. I feel it should be my choice how much I share, and what I share, not people trying to figure that out for me." In this job you get to sniff out the car nuts from the blaggers, and Mick's passion is palpable. It's refreshing to see, and a welcome break from the headlines and hearsay currently surrounding him given he's caught in a gloopy limbo where F1 politics, money and raw talent are all currently fighting each other to work out where he'll race next.

As I type, Mick's currently linked with an LMDh drive with Alpine in next year's World Endurance Championship, a move Mercedes F1's big boss Toto Wolff is fine with, as Mick is "part of the family" and "will always have a home." Mick's tone becomes more forlorn when talking about the future, obviously having had a tough few years and aching to get back into an F1 car. I wonder if it takes its toll, and how he pushes through in times of uncertainty. "Having the right people around you," he says. "You need to try and be mentally in the right space and try and get the best out of the situation so that you can, whenever it's necessary, be in the position that you can jump in and be ready to go." After an evening with Mick, you can't help but wish him the best of luck. If all else fails, he could always lean into drifting and see where that takes him. Sideways Schuey. Has a good ring to it, doesn't it?
#mick schumacher#f1#formula 1#japanese gp 2023#fic ref#fic ref 2023#japan#japan 2023#japan 2023 thursday#not a race#2023 not a race#between singapore and japan 2023#tw food#cw food#tw smoking#with michael#childhood photos
12 notes
·
View notes
Photo


Subaru Impreza STi Cosworth CS400 (1 of 75).
The Subaru Impreza became popular during the 1990's when the likes of the late Colin Mcrae and Richard Burns flew through the rally stages dominating the WRC. This certainly sparked a huge interest and following for the Subaru Impreza, which led to models such as the type RA and WRX being imported from Japan. After the hugely successful first and second generations, Subaru gave us the third generation.
This was launched in April 2007 at the New York Motor Show, with the WRX STI following close by in October 2007. Available as a 5-door hatchback model, this was something quite different to previous 4-door saloon versions of the Impreza. When the STI was launched it had gained some width, (56mm), and some extra track, (38mm), which improved handling. This was a bonus with the extra power from the flat-four turbocharged Boxer engine producing 303bhp.
This level was stepped up when Cosworth tuners breathed their magic into the Impreza, and the result was the Subaru Impreza WRX STI CS400. This model became the fastest roadgoing model made by Subaru with 0-62 in 3.7 seconds, a standing quarter mile 12.75 seconds and limited to 155mph. The CS400 was limited to Great Britain, all right-hand drive and just 75 made.
47 notes
·
View notes
Text
UNLOCKING THE POWER OF AI WITH EASYLIBPAL 2/2

EXPANDED COMPONENTS AND DETAILS OF EASYLIBPAL:
1. Easylibpal Class: The core component of the library, responsible for handling algorithm selection, model fitting, and prediction generation
2. Algorithm Selection and Support:
Supports classic AI algorithms such as Linear Regression, Logistic Regression, Support Vector Machine (SVM), Naive Bayes, and K-Nearest Neighbors (K-NN).
and
- Decision Trees
- Random Forest
- AdaBoost
- Gradient Boosting
3. Integration with Popular Libraries: Seamless integration with essential Python libraries like NumPy, Pandas, Matplotlib, and Scikit-learn for enhanced functionality.
4. Data Handling:
- DataLoader class for importing and preprocessing data from various formats (CSV, JSON, SQL databases).
- DataTransformer class for feature scaling, normalization, and encoding categorical variables.
- Includes functions for loading and preprocessing datasets to prepare them for training and testing.
- `FeatureSelector` class: Provides methods for feature selection and dimensionality reduction.
5. Model Evaluation:
- Evaluator class to assess model performance using metrics like accuracy, precision, recall, F1-score, and ROC-AUC.
- Methods for generating confusion matrices and classification reports.
6. Model Training: Contains methods for fitting the selected algorithm with the training data.
- `fit` method: Trains the selected algorithm on the provided training data.
7. Prediction Generation: Allows users to make predictions using the trained model on new data.
- `predict` method: Makes predictions using the trained model on new data.
- `predict_proba` method: Returns the predicted probabilities for classification tasks.
8. Model Evaluation:
- `Evaluator` class: Assesses model performance using various metrics (e.g., accuracy, precision, recall, F1-score, ROC-AUC).
- `cross_validate` method: Performs cross-validation to evaluate the model's performance.
- `confusion_matrix` method: Generates a confusion matrix for classification tasks.
- `classification_report` method: Provides a detailed classification report.
9. Hyperparameter Tuning:
- Tuner class that uses techniques likes Grid Search and Random Search for hyperparameter optimization.
10. Visualization:
- Integration with Matplotlib and Seaborn for generating plots to analyze model performance and data characteristics.
- Visualization support: Enables users to visualize data, model performance, and predictions using plotting functionalities.
- `Visualizer` class: Integrates with Matplotlib and Seaborn to generate plots for model performance analysis and data visualization.
- `plot_confusion_matrix` method: Visualizes the confusion matrix.
- `plot_roc_curve` method: Plots the Receiver Operating Characteristic (ROC) curve.
- `plot_feature_importance` method: Visualizes feature importance for applicable algorithms.
11. Utility Functions:
- Functions for saving and loading trained models.
- Logging functionalities to track the model training and prediction processes.
- `save_model` method: Saves the trained model to a file.
- `load_model` method: Loads a previously trained model from a file.
- `set_logger` method: Configures logging functionality for tracking model training and prediction processes.
12. User-Friendly Interface: Provides a simplified and intuitive interface for users to interact with and apply classic AI algorithms without extensive knowledge or configuration.
13.. Error Handling: Incorporates mechanisms to handle invalid inputs, errors during training, and other potential issues during algorithm usage.
- Custom exception classes for handling specific errors and providing informative error messages to users.
14. Documentation: Comprehensive documentation to guide users on how to use Easylibpal effectively and efficiently
- Comprehensive documentation explaining the usage and functionality of each component.
- Example scripts demonstrating how to use Easylibpal for various AI tasks and datasets.
15. Testing Suite:
- Unit tests for each component to ensure code reliability and maintainability.
- Integration tests to verify the smooth interaction between different components.
IMPLEMENTATION EXAMPLE WITH ADDITIONAL FEATURES:
Here is an example of how the expanded Easylibpal library could be structured and used:
```python
import numpy as np
import pandas as pd
from sklearn.model_selection import train_test_split
from sklearn.preprocessing import StandardScaler
from easylibpal import Easylibpal, DataLoader, Evaluator, Tuner
# Example DataLoader
class DataLoader:
def load_data(self, filepath, file_type='csv'):
if file_type == 'csv':
return pd.read_csv(filepath)
else:
raise ValueError("Unsupported file type provided.")
# Example Evaluator
class Evaluator:
def evaluate(self, model, X_test, y_test):
predictions = model.predict(X_test)
accuracy = np.mean(predictions == y_test)
return {'accuracy': accuracy}
# Example usage of Easylibpal with DataLoader and Evaluator
if __name__ == "__main__":
# Load and prepare the data
data_loader = DataLoader()
data = data_loader.load_data('path/to/your/data.csv')
X = data.iloc[:, :-1]
y = data.iloc[:, -1]
X_train, X_test, y_train, y_test = train_test_split(X, y, test_size=0.2, random_state=42)
# Scale features
scaler = StandardScaler()
X_train_scaled = scaler.fit_transform(X_train)
X_test_scaled = scaler.transform(X_test)
# Initialize Easylibpal with the desired algorithm
model = Easylibpal('Random Forest')
model.fit(X_train_scaled, y_train)
# Evaluate the model
evaluator = Evaluator()
results = evaluator.evaluate(model, X_test_scaled, y_test)
print(f"Model Accuracy: {results['accuracy']}")
# Optional: Use Tuner for hyperparameter optimization
tuner = Tuner(model, param_grid={'n_estimators': [100, 200], 'max_depth': [10, 20, 30]})
best_params = tuner.optimize(X_train_scaled, y_train)
print(f"Best Parameters: {best_params}")
```
This example demonstrates the structured approach to using Easylibpal with enhanced data handling, model evaluation, and optional hyperparameter tuning. The library empowers users to handle real-world datasets, apply various machine learning algorithms, and evaluate their performance with ease, making it an invaluable tool for developers and data scientists aiming to implement AI solutions efficiently.
Easylibpal is dedicated to making the latest AI technology accessible to everyone, regardless of their background or expertise. Our platform simplifies the process of selecting and implementing classic AI algorithms, enabling users across various industries to harness the power of artificial intelligence with ease. By democratizing access to AI, we aim to accelerate innovation and empower users to achieve their goals with confidence. Easylibpal's approach involves a democratization framework that reduces entry barriers, lowers the cost of building AI solutions, and speeds up the adoption of AI in both academic and business settings.
Below are examples showcasing how each main component of the Easylibpal library could be implemented and used in practice to provide a user-friendly interface for utilizing classic AI algorithms.
1. Core Components
Easylibpal Class Example:
```python
class Easylibpal:
def __init__(self, algorithm):
self.algorithm = algorithm
self.model = None
def fit(self, X, y):
# Simplified example: Instantiate and train a model based on the selected algorithm
if self.algorithm == 'Linear Regression':
from sklearn.linear_model import LinearRegression
self.model = LinearRegression()
elif self.algorithm == 'Random Forest':
from sklearn.ensemble import RandomForestClassifier
self.model = RandomForestClassifier()
self.model.fit(X, y)
def predict(self, X):
return self.model.predict(X)
```
2. Data Handling
DataLoader Class Example:
```python
class DataLoader:
def load_data(self, filepath, file_type='csv'):
if file_type == 'csv':
import pandas as pd
return pd.read_csv(filepath)
else:
raise ValueError("Unsupported file type provided.")
```
3. Model Evaluation
Evaluator Class Example:
```python
from sklearn.metrics import accuracy_score, classification_report
class Evaluator:
def evaluate(self, model, X_test, y_test):
predictions = model.predict(X_test)
accuracy = accuracy_score(y_test, predictions)
report = classification_report(y_test, predictions)
return {'accuracy': accuracy, 'report': report}
```
4. Hyperparameter Tuning
Tuner Class Example:
```python
from sklearn.model_selection import GridSearchCV
class Tuner:
def __init__(self, model, param_grid):
self.model = model
self.param_grid = param_grid
def optimize(self, X, y):
grid_search = GridSearchCV(self.model, self.param_grid, cv=5)
grid_search.fit(X, y)
return grid_search.best_params_
```
5. Visualization
Visualizer Class Example:
```python
import matplotlib.pyplot as plt
class Visualizer:
def plot_confusion_matrix(self, cm, classes, normalize=False, title='Confusion matrix'):
plt.imshow(cm, interpolation='nearest', cmap=plt.cm.Blues)
plt.title(title)
plt.colorbar()
tick_marks = np.arange(len(classes))
plt.xticks(tick_marks, classes, rotation=45)
plt.yticks(tick_marks, classes)
plt.ylabel('True label')
plt.xlabel('Predicted label')
plt.show()
```
6. Utility Functions
Save and Load Model Example:
```python
import joblib
def save_model(model, filename):
joblib.dump(model, filename)
def load_model(filename):
return joblib.load(filename)
```
7. Example Usage Script
Using Easylibpal in a Script:
```python
# Assuming Easylibpal and other classes have been imported
data_loader = DataLoader()
data = data_loader.load_data('data.csv')
X = data.drop('Target', axis=1)
y = data['Target']
model = Easylibpal('Random Forest')
model.fit(X, y)
evaluator = Evaluator()
results = evaluator.evaluate(model, X, y)
print("Accuracy:", results['accuracy'])
print("Report:", results['report'])
visualizer = Visualizer()
visualizer.plot_confusion_matrix(results['cm'], classes=['Class1', 'Class2'])
save_model(model, 'trained_model.pkl')
loaded_model = load_model('trained_model.pkl')
```
These examples illustrate the practical implementation and use of the Easylibpal library components, aiming to simplify the application of AI algorithms for users with varying levels of expertise in machine learning.
EASYLIBPAL IMPLEMENTATION:
Step 1: Define the Problem
First, we need to define the problem we want to solve. For this POC, let's assume we want to predict house prices based on various features like the number of bedrooms, square footage, and location.
Step 2: Choose an Appropriate Algorithm
Given our problem, a supervised learning algorithm like linear regression would be suitable. We'll use Scikit-learn, a popular library for machine learning in Python, to implement this algorithm.
Step 3: Prepare Your Data
We'll use Pandas to load and prepare our dataset. This involves cleaning the data, handling missing values, and splitting the dataset into training and testing sets.
Step 4: Implement the Algorithm
Now, we'll use Scikit-learn to implement the linear regression algorithm. We'll train the model on our training data and then test its performance on the testing data.
Step 5: Evaluate the Model
Finally, we'll evaluate the performance of our model using metrics like Mean Squared Error (MSE) and R-squared.
Python Code POC
```python
import numpy as np
import pandas as pd
from sklearn.model_selection import train_test_split
from sklearn.linear_model import LinearRegression
from sklearn.metrics import mean_squared_error, r2_score
# Load the dataset
data = pd.read_csv('house_prices.csv')
# Prepare the data
X = data'bedrooms', 'square_footage', 'location'
y = data['price']
# Split the data into training and testing sets
X_train, X_test, y_train, y_test = train_test_split(X, y, test_size=0.2, random_state=42)
# Create and train the model
model = LinearRegression()
model.fit(X_train, y_train)
# Make predictions
predictions = model.predict(X_test)
# Evaluate the model
mse = mean_squared_error(y_test, predictions)
r2 = r2_score(y_test, predictions)
print(f'Mean Squared Error: {mse}')
print(f'R-squared: {r2}')
```
Below is an implementation, Easylibpal provides a simple interface to instantiate and utilize classic AI algorithms such as Linear Regression, Logistic Regression, SVM, Naive Bayes, and K-NN. Users can easily create an instance of Easylibpal with their desired algorithm, fit the model with training data, and make predictions, all with minimal code and hassle. This demonstrates the power of Easylibpal in simplifying the integration of AI algorithms for various tasks.
```python
# Import necessary libraries
import numpy as np
import pandas as pd
import matplotlib.pyplot as plt
from sklearn.linear_model import LinearRegression
from sklearn.linear_model import LogisticRegression
from sklearn.svm import SVC
from sklearn.naive_bayes import GaussianNB
from sklearn.neighbors import KNeighborsClassifier
class Easylibpal:
def __init__(self, algorithm):
self.algorithm = algorithm
def fit(self, X, y):
if self.algorithm == 'Linear Regression':
self.model = LinearRegression()
elif self.algorithm == 'Logistic Regression':
self.model = LogisticRegression()
elif self.algorithm == 'SVM':
self.model = SVC()
elif self.algorithm == 'Naive Bayes':
self.model = GaussianNB()
elif self.algorithm == 'K-NN':
self.model = KNeighborsClassifier()
else:
raise ValueError("Invalid algorithm specified.")
self.model.fit(X, y)
def predict(self, X):
return self.model.predict(X)
# Example usage:
# Initialize Easylibpal with the desired algorithm
easy_algo = Easylibpal('Linear Regression')
# Generate some sample data
X = np.array([[1], [2], [3], [4]])
y = np.array([2, 4, 6, 8])
# Fit the model
easy_algo.fit(X, y)
# Make predictions
predictions = easy_algo.predict(X)
# Plot the results
plt.scatter(X, y)
plt.plot(X, predictions, color='red')
plt.title('Linear Regression with Easylibpal')
plt.xlabel('X')
plt.ylabel('y')
plt.show()
```
Easylibpal is an innovative Python library designed to simplify the integration and use of classic AI algorithms in a user-friendly manner. It aims to bridge the gap between the complexity of AI libraries and the ease of use, making it accessible for developers and data scientists alike. Easylibpal abstracts the underlying complexity of each algorithm, providing a unified interface that allows users to apply these algorithms with minimal configuration and understanding of the underlying mechanisms.
ENHANCED DATASET HANDLING
Easylibpal should be able to handle datasets more efficiently. This includes loading datasets from various sources (e.g., CSV files, databases), preprocessing data (e.g., normalization, handling missing values), and splitting data into training and testing sets.
```python
import os
from sklearn.model_selection import train_test_split
class Easylibpal:
# Existing code...
def load_dataset(self, filepath):
"""Loads a dataset from a CSV file."""
if not os.path.exists(filepath):
raise FileNotFoundError("Dataset file not found.")
return pd.read_csv(filepath)
def preprocess_data(self, dataset):
"""Preprocesses the dataset."""
# Implement data preprocessing steps here
return dataset
def split_data(self, X, y, test_size=0.2):
"""Splits the dataset into training and testing sets."""
return train_test_split(X, y, test_size=test_size)
```
Additional Algorithms
Easylibpal should support a wider range of algorithms. This includes decision trees, random forests, and gradient boosting machines.
```python
from sklearn.tree import DecisionTreeClassifier
from sklearn.ensemble import RandomForestClassifier
from sklearn.ensemble import GradientBoostingClassifier
class Easylibpal:
# Existing code...
def fit(self, X, y):
# Existing code...
elif self.algorithm == 'Decision Tree':
self.model = DecisionTreeClassifier()
elif self.algorithm == 'Random Forest':
self.model = RandomForestClassifier()
elif self.algorithm == 'Gradient Boosting':
self.model = GradientBoostingClassifier()
# Add more algorithms as needed
```
User-Friendly Features
To make Easylibpal even more user-friendly, consider adding features like:
- Automatic hyperparameter tuning: Implementing a simple interface for hyperparameter tuning using GridSearchCV or RandomizedSearchCV.
- Model evaluation metrics: Providing easy access to common evaluation metrics like accuracy, precision, recall, and F1 score.
- Visualization tools: Adding methods for plotting model performance, confusion matrices, and feature importance.
```python
from sklearn.metrics import accuracy_score, classification_report
from sklearn.model_selection import GridSearchCV
class Easylibpal:
# Existing code...
def evaluate_model(self, X_test, y_test):
"""Evaluates the model using accuracy and classification report."""
y_pred = self.predict(X_test)
print("Accuracy:", accuracy_score(y_test, y_pred))
print(classification_report(y_test, y_pred))
def tune_hyperparameters(self, X, y, param_grid):
"""Tunes the model's hyperparameters using GridSearchCV."""
grid_search = GridSearchCV(self.model, param_grid, cv=5)
grid_search.fit(X, y)
self.model = grid_search.best_estimator_
```
Easylibpal leverages the power of Python and its rich ecosystem of AI and machine learning libraries, such as scikit-learn, to implement the classic algorithms. It provides a high-level API that abstracts the specifics of each algorithm, allowing users to focus on the problem at hand rather than the intricacies of the algorithm.
Python Code Snippets for Easylibpal
Below are Python code snippets demonstrating the use of Easylibpal with classic AI algorithms. Each snippet demonstrates how to use Easylibpal to apply a specific algorithm to a dataset.
# Linear Regression
```python
from Easylibpal import Easylibpal
# Initialize Easylibpal with a dataset
Easylibpal = Easylibpal(dataset='your_dataset.csv')
# Apply Linear Regression
result = Easylibpal.apply_algorithm('linear_regression', target_column='target')
# Print the result
print(result)
```
# Logistic Regression
```python
from Easylibpal import Easylibpal
# Initialize Easylibpal with a dataset
Easylibpal = Easylibpal(dataset='your_dataset.csv')
# Apply Logistic Regression
result = Easylibpal.apply_algorithm('logistic_regression', target_column='target')
# Print the result
print(result)
```
# Support Vector Machines (SVM)
```python
from Easylibpal import Easylibpal
# Initialize Easylibpal with a dataset
Easylibpal = Easylibpal(dataset='your_dataset.csv')
# Apply SVM
result = Easylibpal.apply_algorithm('svm', target_column='target')
# Print the result
print(result)
```
# Naive Bayes
```python
from Easylibpal import Easylibpal
# Initialize Easylibpal with a dataset
Easylibpal = Easylibpal(dataset='your_dataset.csv')
# Apply Naive Bayes
result = Easylibpal.apply_algorithm('naive_bayes', target_column='target')
# Print the result
print(result)
```
# K-Nearest Neighbors (K-NN)
```python
from Easylibpal import Easylibpal
# Initialize Easylibpal with a dataset
Easylibpal = Easylibpal(dataset='your_dataset.csv')
# Apply K-NN
result = Easylibpal.apply_algorithm('knn', target_column='target')
# Print the result
print(result)
```
ABSTRACTION AND ESSENTIAL COMPLEXITY
- Essential Complexity: This refers to the inherent complexity of the problem domain, which cannot be reduced regardless of the programming language or framework used. It includes the logic and algorithm needed to solve the problem. For example, the essential complexity of sorting a list remains the same across different programming languages.
- Accidental Complexity: This is the complexity introduced by the choice of programming language, framework, or libraries. It can be reduced or eliminated through abstraction. For instance, using a high-level API in Python can hide the complexity of lower-level operations, making the code more readable and maintainable.
HOW EASYLIBPAL ABSTRACTS COMPLEXITY
Easylibpal aims to reduce accidental complexity by providing a high-level API that encapsulates the details of each classic AI algorithm. This abstraction allows users to apply these algorithms without needing to understand the underlying mechanisms or the specifics of the algorithm's implementation.
- Simplified Interface: Easylibpal offers a unified interface for applying various algorithms, such as Linear Regression, Logistic Regression, SVM, Naive Bayes, and K-NN. This interface abstracts the complexity of each algorithm, making it easier for users to apply them to their datasets.
- Runtime Fusion: By evaluating sub-expressions and sharing them across multiple terms, Easylibpal can optimize the execution of algorithms. This approach, similar to runtime fusion in abstract algorithms, allows for efficient computation without duplicating work, thereby reducing the computational complexity.
- Focus on Essential Complexity: While Easylibpal abstracts away the accidental complexity; it ensures that the essential complexity of the problem domain remains at the forefront. This means that while the implementation details are hidden, the core logic and algorithmic approach are still accessible and understandable to the user.
To implement Easylibpal, one would need to create a Python class that encapsulates the functionality of each classic AI algorithm. This class would provide methods for loading datasets, preprocessing data, and applying the algorithm with minimal configuration required from the user. The implementation would leverage existing libraries like scikit-learn for the actual algorithmic computations, abstracting away the complexity of these libraries.
Here's a conceptual example of how the Easylibpal class might be structured for applying a Linear Regression algorithm:
```python
class Easylibpal:
def __init__(self, dataset):
self.dataset = dataset
# Load and preprocess the dataset
def apply_linear_regression(self, target_column):
# Abstracted implementation of Linear Regression
# This method would internally use scikit-learn or another library
# to perform the actual computation, abstracting the complexity
pass
# Usage
Easylibpal = Easylibpal(dataset='your_dataset.csv')
result = Easylibpal.apply_linear_regression(target_column='target')
```
This example demonstrates the concept of Easylibpal by abstracting the complexity of applying a Linear Regression algorithm. The actual implementation would need to include the specifics of loading the dataset, preprocessing it, and applying the algorithm using an underlying library like scikit-learn.
Easylibpal abstracts the complexity of classic AI algorithms by providing a simplified interface that hides the intricacies of each algorithm's implementation. This abstraction allows users to apply these algorithms with minimal configuration and understanding of the underlying mechanisms. Here are examples of specific algorithms that Easylibpal abstracts:
To implement Easylibpal, one would need to create a Python class that encapsulates the functionality of each classic AI algorithm. This class would provide methods for loading datasets, preprocessing data, and applying the algorithm with minimal configuration required from the user. The implementation would leverage existing libraries like scikit-learn for the actual algorithmic computations, abstracting away the complexity of these libraries.
Here's a conceptual example of how the Easylibpal class might be structured for applying a Linear Regression algorithm:
```python
class Easylibpal:
def __init__(self, dataset):
self.dataset = dataset
# Load and preprocess the dataset
def apply_linear_regression(self, target_column):
# Abstracted implementation of Linear Regression
# This method would internally use scikit-learn or another library
# to perform the actual computation, abstracting the complexity
pass
# Usage
Easylibpal = Easylibpal(dataset='your_dataset.csv')
result = Easylibpal.apply_linear_regression(target_column='target')
```
This example demonstrates the concept of Easylibpal by abstracting the complexity of applying a Linear Regression algorithm. The actual implementation would need to include the specifics of loading the dataset, preprocessing it, and applying the algorithm using an underlying library like scikit-learn.
Easylibpal abstracts the complexity of feature selection for classic AI algorithms by providing a simplified interface that automates the process of selecting the most relevant features for each algorithm. This abstraction is crucial because feature selection is a critical step in machine learning that can significantly impact the performance of a model. Here's how Easylibpal handles feature selection for the mentioned algorithms:
To implement feature selection in Easylibpal, one could use scikit-learn's `SelectKBest` or `RFE` classes for feature selection based on statistical tests or model coefficients. Here's a conceptual example of how feature selection might be integrated into the Easylibpal class for Linear Regression:
```python
from sklearn.feature_selection import SelectKBest, f_regression
from sklearn.linear_model import LinearRegression
class Easylibpal:
def __init__(self, dataset):
self.dataset = dataset
# Load and preprocess the dataset
def apply_linear_regression(self, target_column):
# Feature selection using SelectKBest
selector = SelectKBest(score_func=f_regression, k=10)
X_new = selector.fit_transform(self.dataset.drop(target_column, axis=1), self.dataset[target_column])
# Train Linear Regression model
model = LinearRegression()
model.fit(X_new, self.dataset[target_column])
# Return the trained model
return model
# Usage
Easylibpal = Easylibpal(dataset='your_dataset.csv')
model = Easylibpal.apply_linear_regression(target_column='target')
```
This example demonstrates how Easylibpal abstracts the complexity of feature selection for Linear Regression by using scikit-learn's `SelectKBest` to select the top 10 features based on their statistical significance in predicting the target variable. The actual implementation would need to adapt this approach for each algorithm, considering the specific characteristics and requirements of each algorithm.
To implement feature selection in Easylibpal, one could use scikit-learn's `SelectKBest`, `RFE`, or other feature selection classes based on the algorithm's requirements. Here's a conceptual example of how feature selection might be integrated into the Easylibpal class for Logistic Regression using RFE:
```python
from sklearn.feature_selection import RFE
from sklearn.linear_model import LogisticRegression
class Easylibpal:
def __init__(self, dataset):
self.dataset = dataset
# Load and preprocess the dataset
def apply_logistic_regression(self, target_column):
# Feature selection using RFE
model = LogisticRegression()
rfe = RFE(model, n_features_to_select=10)
rfe.fit(self.dataset.drop(target_column, axis=1), self.dataset[target_column])
# Train Logistic Regression model
model.fit(self.dataset.drop(target_column, axis=1), self.dataset[target_column])
# Return the trained model
return model
# Usage
Easylibpal = Easylibpal(dataset='your_dataset.csv')
model = Easylibpal.apply_logistic_regression(target_column='target')
```
This example demonstrates how Easylibpal abstracts the complexity of feature selection for Logistic Regression by using scikit-learn's `RFE` to select the top 10 features based on their importance in the model. The actual implementation would need to adapt this approach for each algorithm, considering the specific characteristics and requirements of each algorithm.
EASYLIBPAL HANDLES DIFFERENT TYPES OF DATASETS
Easylibpal handles different types of datasets with varying structures by adopting a flexible and adaptable approach to data preprocessing and transformation. This approach is inspired by the principles of tidy data and the need to ensure data is in a consistent, usable format before applying AI algorithms. Here's how Easylibpal addresses the challenges posed by varying dataset structures:
One Type in Multiple Tables
When datasets contain different variables, the same variables with different names, different file formats, or different conventions for missing values, Easylibpal employs a process similar to tidying data. This involves identifying and standardizing the structure of each dataset, ensuring that each variable is consistently named and formatted across datasets. This process might include renaming columns, converting data types, and handling missing values in a uniform manner. For datasets stored in different file formats, Easylibpal would use appropriate libraries (e.g., pandas for CSV, Excel files, and SQL databases) to load and preprocess the data before applying the algorithms.
Multiple Types in One Table
For datasets that involve values collected at multiple levels or on different types of observational units, Easylibpal applies a normalization process. This involves breaking down the dataset into multiple tables, each representing a distinct type of observational unit. For example, if a dataset contains information about songs and their rankings over time, Easylibpal would separate this into two tables: one for song details and another for rankings. This normalization ensures that each fact is expressed in only one place, reducing inconsistencies and making the data more manageable for analysis.
Data Semantics
Easylibpal ensures that the data is organized in a way that aligns with the principles of data semantics, where every value belongs to a variable and an observation. This organization is crucial for the algorithms to interpret the data correctly. Easylibpal might use functions like `pivot_longer` and `pivot_wider` from the tidyverse or equivalent functions in pandas to reshape the data into a long format, where each row represents a single observation and each column represents a single variable. This format is particularly useful for algorithms that require a consistent structure for input data.
Messy Data
Dealing with messy data, which can include inconsistent data types, missing values, and outliers, is a common challenge in data science. Easylibpal addresses this by implementing robust data cleaning and preprocessing steps. This includes handling missing values (e.g., imputation or deletion), converting data types to ensure consistency, and identifying and removing outliers. These steps are crucial for preparing the data in a format that is suitable for the algorithms, ensuring that the algorithms can effectively learn from the data without being hindered by its inconsistencies.
To implement these principles in Python, Easylibpal would leverage libraries like pandas for data manipulation and preprocessing. Here's a conceptual example of how Easylibpal might handle a dataset with multiple types in one table:
```python
import pandas as pd
# Load the dataset
dataset = pd.read_csv('your_dataset.csv')
# Normalize the dataset by separating it into two tables
song_table = dataset'artist', 'track'.drop_duplicates().reset_index(drop=True)
song_table['song_id'] = range(1, len(song_table) + 1)
ranking_table = dataset'artist', 'track', 'week', 'rank'.drop_duplicates().reset_index(drop=True)
# Now, song_table and ranking_table can be used separately for analysis
```
This example demonstrates how Easylibpal might normalize a dataset with multiple types of observational units into separate tables, ensuring that each type of observational unit is stored in its own table. The actual implementation would need to adapt this approach based on the specific structure and requirements of the dataset being processed.
CLEAN DATA
Easylibpal employs a comprehensive set of data cleaning and preprocessing steps to handle messy data, ensuring that the data is in a suitable format for machine learning algorithms. These steps are crucial for improving the accuracy and reliability of the models, as well as preventing misleading results and conclusions. Here's a detailed look at the specific steps Easylibpal might employ:
1. Remove Irrelevant Data
The first step involves identifying and removing data that is not relevant to the analysis or modeling task at hand. This could include columns or rows that do not contribute to the predictive power of the model or are not necessary for the analysis .
2. Deduplicate Data
Deduplication is the process of removing duplicate entries from the dataset. Duplicates can skew the analysis and lead to incorrect conclusions. Easylibpal would use appropriate methods to identify and remove duplicates, ensuring that each entry in the dataset is unique.
3. Fix Structural Errors
Structural errors in the dataset, such as inconsistent data types, incorrect values, or formatting issues, can significantly impact the performance of machine learning algorithms. Easylibpal would employ data cleaning techniques to correct these errors, ensuring that the data is consistent and correctly formatted.
4. Deal with Missing Data
Handling missing data is a common challenge in data preprocessing. Easylibpal might use techniques such as imputation (filling missing values with statistical estimates like mean, median, or mode) or deletion (removing rows or columns with missing values) to address this issue. The choice of method depends on the nature of the data and the specific requirements of the analysis.
5. Filter Out Data Outliers
Outliers can significantly affect the performance of machine learning models. Easylibpal would use statistical methods to identify and filter out outliers, ensuring that the data is more representative of the population being analyzed.
6. Validate Data
The final step involves validating the cleaned and preprocessed data to ensure its quality and accuracy. This could include checking for consistency, verifying the correctness of the data, and ensuring that the data meets the requirements of the machine learning algorithms. Easylibpal would employ validation techniques to confirm that the data is ready for analysis.
To implement these data cleaning and preprocessing steps in Python, Easylibpal would leverage libraries like pandas and scikit-learn. Here's a conceptual example of how these steps might be integrated into the Easylibpal class:
```python
import pandas as pd
from sklearn.impute import SimpleImputer
from sklearn.preprocessing import StandardScaler
class Easylibpal:
def __init__(self, dataset):
self.dataset = dataset
# Load and preprocess the dataset
def clean_and_preprocess(self):
# Remove irrelevant data
self.dataset = self.dataset.drop(['irrelevant_column'], axis=1)
# Deduplicate data
self.dataset = self.dataset.drop_duplicates()
# Fix structural errors (example: correct data type)
self.dataset['correct_data_type_column'] = self.dataset['correct_data_type_column'].astype(float)
# Deal with missing data (example: imputation)
imputer = SimpleImputer(strategy='mean')
self.dataset['missing_data_column'] = imputer.fit_transform(self.dataset'missing_data_column')
# Filter out data outliers (example: using Z-score)
# This step requires a more detailed implementation based on the specific dataset
# Validate data (example: checking for NaN values)
assert not self.dataset.isnull().values.any(), "Data still contains NaN values"
# Return the cleaned and preprocessed dataset
return self.dataset
# Usage
Easylibpal = Easylibpal(dataset=pd.read_csv('your_dataset.csv'))
cleaned_dataset = Easylibpal.clean_and_preprocess()
```
This example demonstrates a simplified approach to data cleaning and preprocessing within Easylibpal. The actual implementation would need to adapt these steps based on the specific characteristics and requirements of the dataset being processed.
VALUE DATA
Easylibpal determines which data is irrelevant and can be removed through a combination of domain knowledge, data analysis, and automated techniques. The process involves identifying data that does not contribute to the analysis, research, or goals of the project, and removing it to improve the quality, efficiency, and clarity of the data. Here's how Easylibpal might approach this:
Domain Knowledge
Easylibpal leverages domain knowledge to identify data that is not relevant to the specific goals of the analysis or modeling task. This could include data that is out of scope, outdated, duplicated, or erroneous. By understanding the context and objectives of the project, Easylibpal can systematically exclude data that does not add value to the analysis.
Data Analysis
Easylibpal employs data analysis techniques to identify irrelevant data. This involves examining the dataset to understand the relationships between variables, the distribution of data, and the presence of outliers or anomalies. Data that does not have a significant impact on the predictive power of the model or the insights derived from the analysis is considered irrelevant.
Automated Techniques
Easylibpal uses automated tools and methods to remove irrelevant data. This includes filtering techniques to select or exclude certain rows or columns based on criteria or conditions, aggregating data to reduce its complexity, and deduplicating to remove duplicate entries. Tools like Excel, Google Sheets, Tableau, Power BI, OpenRefine, Python, R, Data Linter, Data Cleaner, and Data Wrangler can be employed for these purposes .
Examples of Irrelevant Data
- Personal Identifiable Information (PII): Data such as names, addresses, and phone numbers are irrelevant for most analytical purposes and should be removed to protect privacy and comply with data protection regulations .
- URLs and HTML Tags: These are typically not relevant to the analysis and can be removed to clean up the dataset.
- Boilerplate Text: Excessive blank space or boilerplate text (e.g., in emails) adds noise to the data and can be removed.
- Tracking Codes: These are used for tracking user interactions and do not contribute to the analysis.
To implement these steps in Python, Easylibpal might use pandas for data manipulation and filtering. Here's a conceptual example of how to remove irrelevant data:
```python
import pandas as pd
# Load the dataset
dataset = pd.read_csv('your_dataset.csv')
# Remove irrelevant columns (example: email addresses)
dataset = dataset.drop(['email_address'], axis=1)
# Remove rows with missing values (example: if a column is required for analysis)
dataset = dataset.dropna(subset=['required_column'])
# Deduplicate data
dataset = dataset.drop_duplicates()
# Return the cleaned dataset
cleaned_dataset = dataset
```
This example demonstrates how Easylibpal might remove irrelevant data from a dataset using Python and pandas. The actual implementation would need to adapt these steps based on the specific characteristics and requirements of the dataset being processed.
Detecting Inconsistencies
Easylibpal starts by detecting inconsistencies in the data. This involves identifying discrepancies in data types, missing values, duplicates, and formatting errors. By detecting these inconsistencies, Easylibpal can take targeted actions to address them.
Handling Formatting Errors
Formatting errors, such as inconsistent data types for the same feature, can significantly impact the analysis. Easylibpal uses functions like `astype()` in pandas to convert data types, ensuring uniformity and consistency across the dataset. This step is crucial for preparing the data for analysis, as it ensures that each feature is in the correct format expected by the algorithms.
Handling Missing Values
Missing values are a common issue in datasets. Easylibpal addresses this by consulting with subject matter experts to understand why data might be missing. If the missing data is missing completely at random, Easylibpal might choose to drop it. However, for other cases, Easylibpal might employ imputation techniques to fill in missing values, ensuring that the dataset is complete and ready for analysis.
Handling Duplicates
Duplicate entries can skew the analysis and lead to incorrect conclusions. Easylibpal uses pandas to identify and remove duplicates, ensuring that each entry in the dataset is unique. This step is crucial for maintaining the integrity of the data and ensuring that the analysis is based on distinct observations.
Handling Inconsistent Values
Inconsistent values, such as different representations of the same concept (e.g., "yes" vs. "y" for a binary variable), can also pose challenges. Easylibpal employs data cleaning techniques to standardize these values, ensuring that the data is consistent and can be accurately analyzed.
To implement these steps in Python, Easylibpal would leverage pandas for data manipulation and preprocessing. Here's a conceptual example of how these steps might be integrated into the Easylibpal class:
```python
import pandas as pd
class Easylibpal:
def __init__(self, dataset):
self.dataset = dataset
# Load and preprocess the dataset
def clean_and_preprocess(self):
# Detect inconsistencies (example: check data types)
print(self.dataset.dtypes)
# Handle formatting errors (example: convert data types)
self.dataset['date_column'] = pd.to_datetime(self.dataset['date_column'])
# Handle missing values (example: drop rows with missing values)
self.dataset = self.dataset.dropna(subset=['required_column'])
# Handle duplicates (example: drop duplicates)
self.dataset = self.dataset.drop_duplicates()
# Handle inconsistent values (example: standardize values)
self.dataset['binary_column'] = self.dataset['binary_column'].map({'yes': 1, 'no': 0})
# Return the cleaned and preprocessed dataset
return self.dataset
# Usage
Easylibpal = Easylibpal(dataset=pd.read_csv('your_dataset.csv'))
cleaned_dataset = Easylibpal.clean_and_preprocess()
```
This example demonstrates a simplified approach to handling inconsistent or messy data within Easylibpal. The actual implementation would need to adapt these steps based on the specific characteristics and requirements of the dataset being processed.
Statistical Imputation
Statistical imputation involves replacing missing values with statistical estimates such as the mean, median, or mode of the available data. This method is straightforward and can be effective for numerical data. For categorical data, mode imputation is commonly used. The choice of imputation method depends on the distribution of the data and the nature of the missing values.
Model-Based Imputation
Model-based imputation uses machine learning models to predict missing values. This approach can be more sophisticated and potentially more accurate than statistical imputation, especially for complex datasets. Techniques like K-Nearest Neighbors (KNN) imputation can be used, where the missing values are replaced with the values of the K nearest neighbors in the feature space.
Using SimpleImputer in scikit-learn
The scikit-learn library provides the `SimpleImputer` class, which supports both statistical and model-based imputation. `SimpleImputer` can be used to replace missing values with the mean, median, or most frequent value (mode) of the column. It also supports more advanced imputation methods like KNN imputation.
To implement these imputation techniques in Python, Easylibpal might use the `SimpleImputer` class from scikit-learn. Here's an example of how to use `SimpleImputer` for statistical imputation:
```python
from sklearn.impute import SimpleImputer
import pandas as pd
# Load the dataset
dataset = pd.read_csv('your_dataset.csv')
# Initialize SimpleImputer for numerical columns
num_imputer = SimpleImputer(strategy='mean')
# Fit and transform the numerical columns
dataset'numerical_column1', 'numerical_column2' = num_imputer.fit_transform(dataset'numerical_column1', 'numerical_column2')
# Initialize SimpleImputer for categorical columns
cat_imputer = SimpleImputer(strategy='most_frequent')
# Fit and transform the categorical columns
dataset'categorical_column1', 'categorical_column2' = cat_imputer.fit_transform(dataset'categorical_column1', 'categorical_column2')
# The dataset now has missing values imputed
```
This example demonstrates how to use `SimpleImputer` to fill in missing values in both numerical and categorical columns of a dataset. The actual implementation would need to adapt these steps based on the specific characteristics and requirements of the dataset being processed.
Model-based imputation techniques, such as Multiple Imputation by Chained Equations (MICE), offer powerful ways to handle missing data by using statistical models to predict missing values. However, these techniques come with their own set of limitations and potential drawbacks:
1. Complexity and Computational Cost
Model-based imputation methods can be computationally intensive, especially for large datasets or complex models. This can lead to longer processing times and increased computational resources required for imputation.
2. Overfitting and Convergence Issues
These methods are prone to overfitting, where the imputation model captures noise in the data rather than the underlying pattern. Overfitting can lead to imputed values that are too closely aligned with the observed data, potentially introducing bias into the analysis. Additionally, convergence issues may arise, where the imputation process does not settle on a stable solution.
3. Assumptions About Missing Data
Model-based imputation techniques often assume that the data is missing at random (MAR), which means that the probability of a value being missing is not related to the values of other variables. However, this assumption may not hold true in all cases, leading to biased imputations if the data is missing not at random (MNAR).
4. Need for Suitable Regression Models
For each variable with missing values, a suitable regression model must be chosen. Selecting the wrong model can lead to inaccurate imputations. The choice of model depends on the nature of the data and the relationship between the variable with missing values and other variables.
5. Combining Imputed Datasets
After imputing missing values, there is a challenge in combining the multiple imputed datasets to produce a single, final dataset. This requires careful consideration of how to aggregate the imputed values and can introduce additional complexity and uncertainty into the analysis.
6. Lack of Transparency
The process of model-based imputation can be less transparent than simpler imputation methods, such as mean or median imputation. This can make it harder to justify the imputation process, especially in contexts where the reasons for missing data are important, such as in healthcare research.
Despite these limitations, model-based imputation techniques can be highly effective for handling missing data in datasets where a amusingness is MAR and where the relationships between variables are complex. Careful consideration of the assumptions, the choice of models, and the methods for combining imputed datasets are crucial to mitigate these drawbacks and ensure the validity of the imputation process.
USING EASYLIBPAL FOR AI ALGORITHM INTEGRATION OFFERS SEVERAL SIGNIFICANT BENEFITS, PARTICULARLY IN ENHANCING EVERYDAY LIFE AND REVOLUTIONIZING VARIOUS SECTORS. HERE'S A DETAILED LOOK AT THE ADVANTAGES:
1. Enhanced Communication: AI, through Easylibpal, can significantly improve communication by categorizing messages, prioritizing inboxes, and providing instant customer support through chatbots. This ensures that critical information is not missed and that customer queries are resolved promptly.
2. Creative Endeavors: Beyond mundane tasks, AI can also contribute to creative endeavors. For instance, photo editing applications can use AI algorithms to enhance images, suggesting edits that align with aesthetic preferences. Music composition tools can generate melodies based on user input, inspiring musicians and amateurs alike to explore new artistic horizons. These innovations empower individuals to express themselves creatively with AI as a collaborative partner.
3. Daily Life Enhancement: AI, integrated through Easylibpal, has the potential to enhance daily life exponentially. Smart homes equipped with AI-driven systems can adjust lighting, temperature, and security settings according to user preferences. Autonomous vehicles promise safer and more efficient commuting experiences. Predictive analytics can optimize supply chains, reducing waste and ensuring goods reach users when needed.
4. Paradigm Shift in Technology Interaction: The integration of AI into our daily lives is not just a trend; it's a paradigm shift that's redefining how we interact with technology. By streamlining routine tasks, personalizing experiences, revolutionizing healthcare, enhancing communication, and fueling creativity, AI is opening doors to a more convenient, efficient, and tailored existence.
5. Responsible Benefit Harnessing: As we embrace AI's transformational power, it's essential to approach its integration with a sense of responsibility, ensuring that its benefits are harnessed for the betterment of society as a whole. This approach aligns with the ethical considerations of using AI, emphasizing the importance of using AI in a way that benefits all stakeholders.
In summary, Easylibpal facilitates the integration and use of AI algorithms in a manner that is accessible and beneficial across various domains, from enhancing communication and creative endeavors to revolutionizing daily life and promoting a paradigm shift in technology interaction. This integration not only streamlines the application of AI but also ensures that its benefits are harnessed responsibly for the betterment of society.
USING EASYLIBPAL OVER TRADITIONAL AI LIBRARIES OFFERS SEVERAL BENEFITS, PARTICULARLY IN TERMS OF EASE OF USE, EFFICIENCY, AND THE ABILITY TO APPLY AI ALGORITHMS WITH MINIMAL CONFIGURATION. HERE ARE THE KEY ADVANTAGES:
- Simplified Integration: Easylibpal abstracts the complexity of traditional AI libraries, making it easier for users to integrate classic AI algorithms into their projects. This simplification reduces the learning curve and allows developers and data scientists to focus on their core tasks without getting bogged down by the intricacies of AI implementation.
- User-Friendly Interface: By providing a unified platform for various AI algorithms, Easylibpal offers a user-friendly interface that streamlines the process of selecting and applying algorithms. This interface is designed to be intuitive and accessible, enabling users to experiment with different algorithms with minimal effort.
- Enhanced Productivity: The ability to effortlessly instantiate algorithms, fit models with training data, and make predictions with minimal configuration significantly enhances productivity. This efficiency allows for rapid prototyping and deployment of AI solutions, enabling users to bring their ideas to life more quickly.
- Democratization of AI: Easylibpal democratizes access to classic AI algorithms, making them accessible to a wider range of users, including those with limited programming experience. This democratization empowers users to leverage AI in various domains, fostering innovation and creativity.
- Automation of Repetitive Tasks: By automating the process of applying AI algorithms, Easylibpal helps users save time on repetitive tasks, allowing them to focus on more complex and creative aspects of their projects. This automation is particularly beneficial for users who may not have extensive experience with AI but still wish to incorporate AI capabilities into their work.
- Personalized Learning and Discovery: Easylibpal can be used to enhance personalized learning experiences and discovery mechanisms, similar to the benefits seen in academic libraries. By analyzing user behaviors and preferences, Easylibpal can tailor recommendations and resource suggestions to individual needs, fostering a more engaging and relevant learning journey.
- Data Management and Analysis: Easylibpal aids in managing large datasets efficiently and deriving meaningful insights from data. This capability is crucial in today's data-driven world, where the ability to analyze and interpret large volumes of data can significantly impact research outcomes and decision-making processes.
In summary, Easylibpal offers a simplified, user-friendly approach to applying classic AI algorithms, enhancing productivity, democratizing access to AI, and automating repetitive tasks. These benefits make Easylibpal a valuable tool for developers, data scientists, and users looking to leverage AI in their projects without the complexities associated with traditional AI libraries.
2 notes
·
View notes
Text
Preparing for Your First Music Lesson: What to Expect
Starting Music Lesson in Tampines is an exciting adventure, whether you’re a novice or returning to track after some time.
Choosing the Right Instrument
Before your first lesson, verify the instrument you’ll be getting to know and remember any recommendations your instructor can also have for beginners. Many song shops, which offer leases or starter applications for popular gadgets just like the piano, guitar, and violin, allow you to get commenced without a first-rate in advance funding.
Instrument Quality Matters: Even novices take advantage of quality instruments. If you’re uncertain which to pick out, your teacher can guide you on locating a properly-suited model or emblem.

Getting to Know Your Instructor
Your teacher plays a significant position on your studying adventure. In the primary lesson, they’ll take time to understand your musical history, pursuits, and desires. This will help them tailor Voice Lessons in Singapore for your unique wishes, whether you’re interested in classical, jazz, or pop tunes, or in case you intend to play for fun or attain a professional stage.
Set Goals Together: Communicate any precise dreams you have got, which include mastering a favorite tune or constructing general musical knowledge. This can assist your teacher create a custom designed gaining knowledge of plan.
Basic Materials You’ll Need
Bring any substances your instructor has advocated, such as an ebook or notebook, to write down notes, suggestions, and homework. For instruments like the guitar or violin, convey your own tool and any vital add-ons like a tuner or music stand.
Essential Tools: Instruments regularly require accessories like picks for guitars or rosin for violins. Ask your trainer for a tick list of objects to have reachable, making sure you’re properly-organized for each lesson.
What to Expect in Your First Lesson
The first Music Lesson in Pasir Ris is frequently an advent to the fundamentals, presenting a foundation you’ll build on with exercise and subsequent lessons.
Instrument Basics: You’ll begin via gaining knowledge of the elements of your tool, the way to keep or function it, and primary care suggestions.
Fundamental Techniques: Your instructor will train you foundational strategies like finger placement, posture, or breathing techniques (for vocal classes) to set you up for a hit practice.
Simple Exercises: Expect to try a few simple exercises or play basic notes. Even if you’re a whole amateur, this can come up with a sense for the instrument and an experience of feat.
The Importance of Practice
Practice is fundamental to progress, so your trainer will probably talk about how frequently and how long you must exercise between lessons. It’s ordinary to feel clumsy in the beginning, but constant practice is the quickest way to enhance and sense confidence.
Setting Up a Practice Routine: Consider putting aside a specific time each day for exercise, even supposing it’s just 15-30 minutes before everything. Routine practice allows constructing muscle memory and accelerates learning.
Creating a Positive Practice Space: Set up a quiet, comfortable area at home in which you could be aware without interruptions. Having a committed exercise vicinity enables you stay organized and encouraged.

Being Open to Feedback
Constructive comments are an important part of mastering any talent, such as track. Don’t be discouraged if your teacher gives corrections; those are supposed to help you enhance and reach your dreams faster.
Embrace a Growth Mindset: Music is a skill that improves over the years with staying power and practice. Embrace feedback as a manner to examine, and also you’ll begin to observe development.
Ask Questions: If something isn’t clear or you’re suffering with a specific technique, don’t hesitate to invite for explanation. Instructors respect curiosity and engagement and are there to assist.
Building Confidence as You Learn
It’s ordinary to experience uncertainty in the beginning, however don't forget that every musician became an amateur. Each small development will construct your self belief, and through the years, your competencies will grow.
Celebrate Small Wins: Learning an instrument is a journey, and celebrating milestones, along with mastering a brand new chord or gambling a short melody, can hold you inspired.
Set Realistic Goals: Instead of aiming for perfection, awareness on steady development. Setting viable goals will hold you inspired and encourage constant progress.
Your first tune lesson is just the beginning of a thrilling, profitable adventure. By preparing with the proper materials, setting practical expectancies, and embracing the getting to know procedure, you’ll be prepared to make the maximum of each Singing Lesson in Singapore. We’re here to help you every step of the way with excellent units, dedicated instructors, and a community of tune fans. Remember, each remarkable musician commenced in which you are now—with an ardour to research and the courage to take that first step. Enjoy the technique, and glad playing!
0 notes
Text


Car Girls #1
#Car Girls 1#modified#stance#tuning#retro rides#tuner#slammed#street#imports#lowered#jdm#girl#hot car model
63 notes
·
View notes
Text
How to Train and Use Hunyuan Video LoRA Models
New Post has been published on https://thedigitalinsider.com/how-to-train-and-use-hunyuan-video-lora-models/
How to Train and Use Hunyuan Video LoRA Models
This article will show you how to install and use Windows-based software that can train Hunyuan video LoRA models, allowing the user to generate custom personalities in the Hunyuan Video foundation model:
Click to play. Examples from the recent explosion of celebrity Hunyuan LoRAs from the civit.ai community.
At the moment the two most popular ways of generating Hunyuan LoRA models locally are:
1) The diffusion-pipe-ui Docker-based framework, which relies on Windows Subsystem for Linux (WSL) to handle some of the processes.
2) Musubi Tuner, a new addition to the popular Kohya ss diffusion training architecture. Musubi Tuner does not require Docker and does not depend on WSL or other Linux-based proxies – but it can be difficult to get running on Windows.
Therefore this run-through will focus on Musubi Tuner, and on providing a completely local solution for Hunyuan LoRA training and generation, without the use of API-driven websites or commercial GPU-renting processes such as Runpod.
Click to play. Samples from LoRA training on Musubi Tuner for this article. All permissions granted by the person depicted, for the purposes of illustrating this article.
REQUIREMENTS
The installation will require at minimum a Windows 10 PC with a 30+/40+ series NVIDIA card that has at least 12GB of VRAM (though 16GB is recommended). The installation used for this article was tested on a machine with 64GB of system RAM and a NVIDIA 3090 graphics cards with 24GB of VRAM. It was tested on a dedicated test-bed system using a fresh install of Windows 10 Professional, on a partition with 600+GB of spare disk space.
WARNING
Installing Musubi Tuner and its prerequisites also entails the installation of developer-focused software and packages directly onto the main Windows installation of a PC. Taking the installation of ComfyUI into account, for the end stages, this project will require around 400-500 gigabytes of disk space. Though I have tested the procedure without incident several times in newly-installed test bed Windows 10 environments, neither I nor unite.ai are liable for any damage to systems from following these instructions. I advise you to back up any important data before attempting this kind of installation procedure.
Considerations
Is This Method Still Valid?
The generative AI scene is moving very fast, and we can expect better and more streamlined methods of Hunyuan Video LoRA frameworks this year.
…or even this week! While I was writing this article, the developer of Kohya/Musubi produced musubi-tuner-gui, a sophisticated Gradio GUI for Musubi Tuner:
Obviously a user-friendly GUI is preferable to the BAT files that I use in this feature – once musubi-tuner-gui is working. As I write, it only went online five days ago, and I can find no account of anyone successfully using it.
According to posts in the repository, the new GUI is intended to be rolled directly into the Musubi Tuner project as soon as possible, which will end its current existence as a standalone GitHub repository.
Based on the present installation instructions, the new GUI gets cloned directly into the existing Musubi virtual environment; and, despite many efforts, I cannot get it to associate with the existing Musubi installation. This means that when it runs, it will find that it has no engine!
Once the GUI is integrated into Musubi Tuner, issues of this kind will surely be resolved. Though the author concedes that the new project is ‘really rough’, he is optimistic for its development and integration directly into Musubi Tuner.
Given these issues (also concerning default paths at install-time, and the use of the UV Python package, which complicates certain procedures in the new release), we will probably have to wait a little for a smoother Hunyuan Video LoRA training experience. That said, it looks very promising!
But if you can’t wait, and are willing to roll your sleeves up a bit, you can get Hunyuan video LoRA training running locally right now.
Let’s get started.
Why Install Anything on Bare Metal?
(Skip this paragraph if you’re not an advanced user) Advanced users will wonder why I have chosen to install so much of the software on the bare metal Windows 10 installation instead of in a virtual environment. The reason is that the essential Windows port of the Linux-based Triton package is far more difficult to get working in a virtual environment. All the other bare-metal installations in the tutorial could not be installed in a virtual environment, as they must interface directly with local hardware.
Installing Prerequisite Packages and Programs
For the programs and packages that must be initially installed, the order of installation matters. Let’s get started.
1: Download Microsoft Redistributable
Download and install the Microsoft Redistributable package from https://aka.ms/vs/17/release/vc_redist.x64.exe.
This is a straightforward and rapid installation.
2: Install Visual Studio 2022
Download the Microsoft Visual Studio 2022 Community edition from https://visualstudio.microsoft.com/downloads/?cid=learn-onpage-download-install-visual-studio-page-cta
Start the downloaded installer:
We don’t need every available package, which would be a heavy and lengthy install. At the initial Workloads page that opens, tick Desktop Development with C++ (see image below).
Now click the Individual Components tab at the top-left of the interface and use the search box to find ‘Windows SDK’.
By default, only the Windows 11 SDK is ticked. If you are on Windows 10 (this installation procedure has not been tested by me on Windows 11), tick the latest Windows 10 version, indicated in the image above.
Search for ‘C++ CMake’ and check that C++ CMake tools for Windows is checked.
This installation will take at least 13 GB of space.
Once Visual Studio has installed, it will attempt to run on your computer. Let it open fully. When the Visual Studio’s full-screen interface is finally visible, close the program.
3: Install Visual Studio 2019
Some of the subsequent packages for Musubi are expecting an older version of Microsoft Visual Studio, while others need a more recent one.
Therefore also download the free Community edition of Visual Studio 19 either from Microsoft (https://visualstudio.microsoft.com/vs/older-downloads/ – account required) or Techspot (https://www.techspot.com/downloads/7241-visual-studio-2019.html).
Install it with the same options as for Visual Studio 2022 (see procedure above, except that Windows SDK is already ticked in the Visual Studio 2019 installer).
You’ll see that the Visual Studio 2019 installer is already aware of the newer version as it installs:
When installation is complete, and you have opened and closed the installed Visual Studio 2019 application, open a Windows command prompt (Type CMD in Start Search) and type in and enter:
where cl
The result should be the known locations of the two installed Visual Studio editions.
If you instead get INFO: Could not find files for the given pattern(s), see the Check Path section of this article below, and use those instructions to add the relevant Visual Studio paths to Windows environment.
Save any changes made according to the Check Paths section below, and then try the where cl command again.
4: Install CUDA 11 + 12 Toolkits
The various packages installed in Musubi need different versions of NVIDIA CUDA, which accelerates and optimizes training on NVIDIA graphics cards.
The reason we installed the Visual Studio versions first is that the NVIDIA CUDA installers search for and integrate with any existing Visual Studio installations.
Download an 11+ series CUDA installation package from:
https://developer.nvidia.com/cuda-11-8-0-download-archive?target_os=Windows&target_arch=x86_64&target_version=11&target_type=exe_local (download ‘exe (local’) )
Download a 12+ series CUDA Toolkit installation package from:
https://developer.nvidia.com/cuda-downloads?target_os=Windows&target_arch=x86_64
The installation process is identical for both installers. Ignore any warnings about the existence or non-existence of installation paths in Windows Environment variables – we are going to attend to this manually later.
Install NVIDIA CUDA Toolkit V11+
Start the installer for the 11+ series CUDA Toolkit.
At Installation Options, choose Custom (Advanced) and proceed.
Uncheck the NVIDIA GeForce Experience option and click Next.
Leave Select Installation Location at defaults (this is important):
Click Next and let the installation conclude.
Ignore any warning or notes that the installer gives about Nsight Visual Studio integration, which is not needed for our use case.
Install NVIDIA CUDA Toolkit V12+
Repeat the entire process for the separate 12+ NVIDIA Toolkit installer that you downloaded:
The install process for this version is identical to the one listed above (the 11+ version), except for one warning about environment paths, which you can ignore:
When the 12+ CUDA version installation is completed, open a command prompt in Windows and type and enter:
nvcc --version
This should confirm information about the installed driver version:
To check that your card is recognized, type and enter:
nvidia-smi
5: Install GIT
GIT will be handling the installation of the Musubi repository on your local machine. Download the GIT installer at:
https://git-scm.com/downloads/win (’64-bit Git for Windows Setup’)
Run the installer:
Use default settings for Select Components:
Leave the default editor at Vim:
Let GIT decide about branch names:
Use recommended settings for the Path Environment:
Use recommended settings for SSH:
Use recommended settings for HTTPS Transport backend:
Use recommended settings for line-ending conversions:
Choose Windows default console as the Terminal Emulator:
Use default settings (Fast-forward or merge) for Git Pull:
Use Git-Credential Manager (the default setting) for Credential Helper:
In Configuring extra options, leave Enable file system caching ticked, and Enable symbolic links unticked (unless you are an advanced user who is using hard links for a centralized model repository).
Conclude the installation and test that Git is installed properly by opening a CMD window and typing and entering:
git --version
GitHub Login
Later, when you attempt to clone GitHub repositories, you may be challenged for your GitHub credentials. To anticipate this, log into your GitHub account (create one, if necessary) on any browsers installed on your Windows system. In this way, the 0Auth authentication method (a pop-up window) should take as little time as possible.
After that initial challenge, you should stay authenticated automatically.
6: Install CMake
CMake 3.21 or newer is required for parts of the Musubi installation process. CMake is a cross-platform development architecture capable of orchestrating diverse compilers, and of compiling software from source code.
Download it at:
https://cmake.org/download/ (‘Windows x64 Installer’)
Launch the installer:
Ensure Add Cmake to the PATH environment variable is checked.
Press Next.
Type and enter this command in a Windows Command prompt:
cmake --version
If CMake installed successfully, it will display something like:
cmake version 3.31.4 CMake suite maintained and supported by Kitware (kitware.com/cmake).
7: Install Python 3.10
The Python interpreter is central to this project. Download the 3.10 version (the best compromise between the different demands of Musubi packages) at:
https://www.python.org/downloads/release/python-3100/ (‘Windows installer (64-bit)’)
Run the download installer, and leave at default settings:
At the end of the installation process, click Disable path length limit (requires UAC admin confirmation):
In a Windows Command prompt type and enter:
python --version
This should result in Python 3.10.0
Check Paths
The cloning and installation of the Musubi frameworks, as well as its normal operation after installation, requires that its components know the path to several important external components in Windows, particularly CUDA.
So we need to open the path environment and check that all the requisites are in there.
A quick way to get to the controls for Windows Environment is to type Edit the system environment variables into the Windows search bar.
Clicking this will open the System Properties control panel. In the lower right of System Properties, click the Environment Variables button, and a window called Environment Variables opens up. In the System Variables panel in the bottom half of this window, scroll down to Path and double-click it. This opens a window called Edit environment variables. Drag the width of this window wider so you can see the full path of the variables:
Here the important entries are:
C:Program FilesNVIDIA GPU Computing ToolkitCUDAv12.6bin C:Program FilesNVIDIA GPU Computing ToolkitCUDAv12.6libnvvp C:Program FilesNVIDIA GPU Computing ToolkitCUDAv11.8bin C:Program FilesNVIDIA GPU Computing ToolkitCUDAv11.8libnvvp C:Program Files (x86)Microsoft Visual Studio2019CommunityVCToolsMSVC14.29.30133binHostx64x64 C:Program FilesMicrosoft Visual Studio2022CommunityVCToolsMSVC14.42.34433binHostx64x64 C:Program FilesGitcmd C:Program FilesCMakebin
In most cases, the correct path variables should already be present.
Add any paths that are missing by clicking New on the left of the Edit environment variable window and pasting in the correct path:
Do NOT just copy and paste from the paths listed above; check that each equivalent path exists in your own Windows installation.
If there are minor path variations (particularly with Visual Studio installations), use the paths listed above to find the correct target folders (i.e., x64 in Host64 in your own installation. Then paste those paths into the Edit environment variable window.
After this, restart the computer.
Installing Musubi
Upgrade PIP
Using the latest version of the PIP installer can smooth some of the installation stages. In a Windows Command prompt with administrator privileges (see Elevation, below), type and enter:
pip install --upgrade pip
Elevation
Some commands may require elevated privileges (i.e., to be run as an administrator). If you receive error messages about permissions in the following stages, close the command prompt window and reopen it in administrator mode by typing CMD into Windows search box, right-clicking on Command Prompt and selecting Run as administrator:
For the next stages, we are going to use Windows Powershell instead of the Windows Command prompt. You can find this by entering Powershell into the Windows search box, and (as necessary) right-clicking on it to Run as administrator:
Install Torch
In Powershell, type and enter:
pip install torch torchvision torchaudio --index-url https://download.pytorch.org/whl/cu118
Be patient while the many packages install.
When completed, you can verify a GPU-enabled PyTorch installation by typing and entering:
python -c "import torch; print(torch.cuda.is_available())"
This should result in:
C:WINDOWSsystem32>python -c "import torch; print(torch.cuda.is_available())" True
Install Triton for Windows
Next, the installation of the Triton for Windows component. In elevated Powershell, enter (on a single line):
pip install https://github.com/woct0rdho/triton-windows/releases/download/v3.1.0-windows.post8/triton-3.1.0-cp310-cp310-win_amd64.whl
(The installer triton-3.1.0-cp310-cp310-win_amd64.whl works for both Intel and AMD CPUs as long as the architecture is 64-bit and the environment matches the Python version)
After running, this should result in:
Successfully installed triton-3.1.0
We can check if Triton is working by importing it in Python. Enter this command:
python -c "import triton; print('Triton is working')"
This should output:
Triton is working
To check that Triton is GPU-enabled, enter:
python -c "import torch; print(torch.cuda.is_available())"
This should result in True:
Create the Virtual Environment for Musubi
From now on, we will install any further software into a Python virtual environment (or venv). This means that all you will need to do to uninstall all the following software is to drag the venv’s installation folder to the trash.
Let’s create that installation folder: make a folder called Musubi on your desktop. The following examples assume that this folder exists: C:Users[Your Profile Name]DesktopMusubi.
In Powershell, navigate to that folder by entering:
cd C:Users[Your Profile Name]DesktopMusubi
We want the virtual environment to have access to what we have installed already (especially Triton), so we will use the --system-site-packages flag. Enter this:
python -m venv --system-site-packages musubi
Wait for the environment to be created, and then activate it by entering:
.musubiScriptsactivate
From this point on, you can tell that you are in the activated virtual environment by the fact that (musubi) appears at the beginning of all your prompts.
Clone the Repository
Navigate to the newly-created musubi folder (which is inside the Musubi folder on your desktop):
cd musubi
Now that we are in the right place, enter the following command:
git clone https://github.com/kohya-ss/musubi-tuner.git
Wait for the cloning to complete (it will not take long).
Installing Requirements
Navigate to the installation folder:
cd musubi-tuner
Enter:
pip install -r requirements.txt
Wait for the many installations to finish (this will take longer).
Automating Access to the Hunyuan Video Venv
To easily activate and access the new venv for future sessions, paste the following into Notepad and save it with the name activate.bat, saving it with All files option (see image below).
@echo off
call C:Users[Your Profile Name]DesktopMusubimusubiScriptsactivate
cd C:Users[Your Profile Name]DesktopMusubimusubimusubi-tuner
cmd
(Replace [Your Profile Name]with the real name of your Windows user profile)
It does not matter into which location you save this file.
From now on you can double-click activate.bat and start work immediately.
Using Musubi Tuner
Downloading the Models
The Hunyuan Video LoRA training process requires the downloading of at least seven models in order to support all the possible optimization options for pre-caching and training a Hunyuan video LoRA. Together, these models weigh more than 60GB.
Current instructions for downloading them can be found at https://github.com/kohya-ss/musubi-tuner?tab=readme-ov-file#model-download
However, these are the download instructions at the time of writing:
clip_l.safetensors llava_llama3_fp16.safetensors and llava_llama3_fp8_scaled.safetensors can be downloaded at: https://huggingface.co/Comfy-Org/HunyuanVideo_repackaged/tree/main/split_files/text_encoders
mp_rank_00_model_states.pt mp_rank_00_model_states_fp8.pt and mp_rank_00_model_states_fp8_map.pt can be downloaded at: https://huggingface.co/tencent/HunyuanVideo/tree/main/hunyuan-video-t2v-720p/transformers
pytorch_model.pt can be downloaded at: https://huggingface.co/tencent/HunyuanVideo/tree/main/hunyuan-video-t2v-720p/vae
Though you can place these in any directory you choose, for consistency with later scripting, let’s put them in:
C:Users[Your Profile Name]DesktopMusubimusubimusubi-tunermodels
This is consistent with the directory arrangement prior to this point. Any commands or instructions hereafter will assume that this is where the models are situated; and don’t forget to replace [Your Profile Name] with your real Windows profile folder name.
Dataset Preparation
Ignoring community controversy on the point, it’s fair to say that you will need somewhere between 10-100 photos for a training dataset for your Hunyuan LoRA. Very good results can be obtained even with 15 images, so long as the images are well-balanced and of good quality.
A Hunyuan LoRA can be trained both on images or very short and low-res video clips, or even a mixture of each – although using video clips as training data is challenging, even for a 24GB card.
However, video clips are only really useful if your character moves in such an unusual way that the Hunyuan Video foundation model might not know about it, or be able to guess.
Examples would include Roger Rabbit, a xenomorph, The Mask, Spider-Man, or other personalities that possess unique characteristic movement.
Since Hunyuan Video already knows how ordinary men and women move, video clips are not necessary to obtain a convincing Hunyuan Video LoRA human-type character. So we’ll use static images.
Image Preparation
The Bucket List
The TLDR version:
It’s best to either use images that are all the same size for your dataset, or use a 50/50 split between two different sizes, i.e., 10 images that are 512x768px and 10 that are 768x512px.
The training might go well even if you don’t do this – Hunyuan Video LoRAs can be surprisingly forgiving.
The Longer Version
As with Kohya-ss LoRAs for static generative systems such as Stable Diffusion, bucketing is used to distribute the workload across differently-sized images, allowing larger images to be used without causing out-of-memory errors at training time (i.e., bucketing ‘cuts up’ the images into chunks that the GPU can handle, while maintaining the semantic integrity of the whole image).
For each size of image you include in your training dataset (i.e., 512x768px), a bucket, or ‘sub-task’ will be created for that size. So if you have the following distribution of images, this is how the bucket attention becomes unbalanced, and risks that some photos will be given greater consideration in training than others:
2x 512x768px images 7x 768x512px images 1x 1000x600px image 3x 400x800px images
We can see that bucket attention is divided unequally among these images:
Therefore either stick to one format size, or try and keep the distribution of different sizes relatively equal.
In either case, avoid very large images, as this is likely to slow down training, to negligible benefit.
For simplicity, I have used 512x768px for all the photos in my dataset.
Disclaimer: The model (person) used in the dataset gave me full permission to use these pictures for this purpose, and exercised approval of all AI-based output depicting her likeness featured in this article.
My dataset consists of 40 images, in PNG format (though JPG is fine too). My images were stored at C:UsersMartinDesktopDATASETS_HUNYUANexamplewoman
You should create a cache folder inside the training image folder:
Now let’s create a special file that will configure the training.
TOML Files
The training and pre-caching processes of Hunyuan Video LoRAs obtains the file paths from a flat text file with the .toml extension.
For my test, the TOML is located at C:UsersMartinDesktopDATASETS_HUNYUANtraining.toml
The contents of my training TOML look like this:
[general]
resolution = [512, 768]
caption_extension = ".txt"
batch_size = 1
enable_bucket = true
bucket_no_upscale = false
[[datasets]]
image_directory = "C:UsersMartinDesktopDATASETS_HUNYUANexamplewoman"
cache_directory = "C:UsersMartinDesktopDATASETS_HUNYUANexamplewomancache"
num_repeats = 1
(The double back-slashes for image and cache directories are not always necessary, but they can help to avoid errors in cases where there is a space in the path. I have trained models with .toml files that used single-forward and single-backward slashes)
We can see in the resolution section that two resolutions will be considered – 512px and 768px. You can also leave this at 512, and still obtain good results.
Captions
Hunyuan Video is a text+vision foundation model, so we need descriptive captions for these images, which will be considered during training. The training process will fail without captions.
There are a multitude of open source captioning systems we could use for this task, but let’s keep it simple and use the taggui system. Though it is stored at GitHub, and though it does download some very heavy deep learning models on first run, it comes in the form of a simple Windows executable that loads Python libraries and a straightforward GUI.
After starting Taggui, use File > Load Directory to navigate to your image dataset, and optionally put a token identifier (in this case, examplewoman) that will be added to all the captions:
(Be sure to turn off Load in 4-bit when Taggui first opens – it will throw errors during captioning if this is left on)
Select an image in the left-hand preview column and press CTRL+A to select all the images. Then press the Start Auto-Captioning button on the right:
You will see Taggui downloading models in the small CLI in the right-hand column, but only if this is the first time you have run the captioner. Otherwise you will see a preview of the captions.
Now, each photo has a corresponding .txt caption with a description of its image contents:
You can click Advanced Options in Taggui to increase the length and style of captions, but that is beyond the scope of this run-through.
Quit Taggui and let’s move on to…
Latent Pre-Caching
To avoid excessive GPU load at training time, it is necessary to create two types of pre-cached files – one to represent the latent image derived from the images themselves, and another to evaluate a text encoding relating to caption content.
To simplify all three processes (2x cache + training), you can use interactive .BAT files that will ask you questions and undertake the processes when you have given the necessary information.
For the latent pre-caching, copy the following text into Notepad and save it as a .BAT file (i.e., name it something like latent-precache.bat), as earlier, ensuring that the file type in the drop down menu in the Save As dialogue is All Files (see image below):
@echo off
REM Activate the virtual environment
call C:Users[Your Profile Name]DesktopMusubimusubiScriptsactivate.bat
REM Get user input
set /p IMAGE_PATH=Enter the path to the image directory:
set /p CACHE_PATH=Enter the path to the cache directory:
set /p TOML_PATH=Enter the path to the TOML file:
echo You entered:
echo Image path: %IMAGE_PATH%
echo Cache path: %CACHE_PATH%
echo TOML file path: %TOML_PATH%
set /p CONFIRM=Do you want to proceed with latent pre-caching (y/n)?
if /i "%CONFIRM%"=="y" (
REM Run the latent pre-caching script
python C:Users[Your Profile Name]DesktopMusubimusubimusubi-tunercache_latents.py --dataset_config %TOML_PATH% --vae C:Users[Your Profile Name]DesktopMusubimusubimusubi-tunermodelspytorch_model.pt --vae_chunk_size 32 --vae_tiling
) else (
echo Operation canceled.
)
REM Keep the window open
pause
(Make sure that you replace [Your Profile Name] with your real Windows profile folder name)
Now you can run the .BAT file for automatic latent caching:
When prompted to by the various questions from the BAT file, paste or type in the path to your dataset, cache folders and TOML file.
Text Pre-Caching
We’ll create a second BAT file, this time for the text pre-caching.
@echo off
REM Activate the virtual environment
call C:Users[Your Profile Name]DesktopMusubimusubiScriptsactivate.bat
REM Get user input
set /p IMAGE_PATH=Enter the path to the image directory:
set /p CACHE_PATH=Enter the path to the cache directory:
set /p TOML_PATH=Enter the path to the TOML file:
echo You entered:
echo Image path: %IMAGE_PATH%
echo Cache path: %CACHE_PATH%
echo TOML file path: %TOML_PATH%
set /p CONFIRM=Do you want to proceed with text encoder output pre-caching (y/n)?
if /i "%CONFIRM%"=="y" (
REM Use the python executable from the virtual environment
python C:Users[Your Profile Name]DesktopMusubimusubimusubi-tunercache_text_encoder_outputs.py --dataset_config %TOML_PATH% --text_encoder1 C:Users[Your Profile Name]DesktopMusubimusubimusubi-tunermodelsllava_llama3_fp16.safetensors --text_encoder2 C:Users[Your Profile Name]DesktopMusubimusubimusubi-tunermodelsclip_l.safetensors --batch_size 16
) else (
echo Operation canceled.
)
REM Keep the window open
pause
Replace your Windows profile name and save this as text-cache.bat (or any other name you like), in any convenient location, as per the procedure for the previous BAT file.
Run this new BAT file, follow the instructions, and the necessary text-encoded files will appear in the cache folder:
Training the Hunyuan Video Lora
Training the actual LoRA will take considerably longer than these two preparatory processes.
Though there are also multiple variables that we could worry about (such as batch size, repeats, epochs, and whether to use full or quantized models, among others), we’ll save these considerations for another day, and a deeper look at the intricacies of LoRA creation.
For now, let’s minimize the choices a little and train a LoRA on ‘median’ settings.
We’ll create a third BAT file, this time to initiate training. Paste this into Notepad and save it as a BAT file, like before, as training.bat (or any name you please):
@echo off
REM Activate the virtual environment
call C:Users[Your Profile Name]DesktopMusubimusubiScriptsactivate.bat
REM Get user input
set /p DATASET_CONFIG=Enter the path to the dataset configuration file:
set /p EPOCHS=Enter the number of epochs to train:
set /p OUTPUT_NAME=Enter the output model name (e.g., example0001):
set /p LEARNING_RATE=Choose learning rate (1 for 1e-3, 2 for 5e-3, default 1e-3):
if "%LEARNING_RATE%"=="1" set LR=1e-3
if "%LEARNING_RATE%"=="2" set LR=5e-3
if "%LEARNING_RATE%"=="" set LR=1e-3
set /p SAVE_STEPS=How often (in steps) to save preview images:
set /p SAMPLE_PROMPTS=What is the location of the text-prompt file for training previews?
echo You entered:
echo Dataset configuration file: %DATASET_CONFIG%
echo Number of epochs: %EPOCHS%
echo Output name: %OUTPUT_NAME%
echo Learning rate: %LR%
echo Save preview images every %SAVE_STEPS% steps.
echo Text-prompt file: %SAMPLE_PROMPTS%
REM Prepare the command
set CMD=accelerate launch --num_cpu_threads_per_process 1 --mixed_precision bf16 ^
C:Users[Your Profile Name]DesktopMusubimusubimusubi-tunerhv_train_network.py ^
--dit C:Users[Your Profile Name]DesktopMusubimusubimusubi-tunermodelsmp_rank_00_model_states.pt ^
--dataset_config %DATASET_CONFIG% ^
--sdpa ^
--mixed_precision bf16 ^
--fp8_base ^
--optimizer_type adamw8bit ^
--learning_rate %LR% ^
--gradient_checkpointing ^
--max_data_loader_n_workers 2 ^
--persistent_data_loader_workers ^
--network_module=networks.lora ^
--network_dim=32 ^
--timestep_sampling sigmoid ^
--discrete_flow_shift 1.0 ^
--max_train_epochs %EPOCHS% ^
--save_every_n_epochs=1 ^
--seed 42 ^
--output_dir "C:Users[Your Profile Name]DesktopMusubiOutput Models" ^
--output_name %OUTPUT_NAME% ^
--vae C:/Users/[Your Profile Name]/Desktop/Musubi/musubi/musubi-tuner/models/pytorch_model.pt ^
--vae_chunk_size 32 ^
--vae_spatial_tile_sample_min_size 128 ^
--text_encoder1 C:/Users/[Your Profile Name]/Desktop/Musubi/musubi/musubi-tuner/models/llava_llama3_fp16.safetensors ^
--text_encoder2 C:/Users/[Your Profile Name]/Desktop/Musubi/musubi/musubi-tuner/models/clip_l.safetensors ^
--sample_prompts %SAMPLE_PROMPTS% ^
--sample_every_n_steps %SAVE_STEPS% ^
--sample_at_first
echo The following command will be executed:
echo %CMD%
set /p CONFIRM=Do you want to proceed with training (y/n)?
if /i "%CONFIRM%"=="y" (
%CMD%
) else (
echo Operation canceled.
)
REM Keep the window open
cmd /k
As usual, be sure to replace all instances of [Your Profile Name] with your correct Windows profile name.
Ensure that the directory C:Users[Your Profile Name]DesktopMusubiOutput Models exists, and create it at that location if not.
Training Previews
There is a very basic training preview feature recently enabled for Musubi trainer, which allows you to force the training model to pause and generate images based on prompts you have saved. These are saved in an automatically created folder called Sample, in the same directory that the trained models are saved.
To enable this, you will need to save at last one prompt in a text file. The training BAT we created will ask you to input the location of this file; therefore you can name the prompt file to be anything you like, and save it anywhere.
Here are some prompt examples for a file that will output three different images when requested by the training routine:
As you can see in the example above, you can put flags at the end of the prompt that will affect the images:
–w is width (defaults to 256px if not set, according to the docs) –h is height (defaults to 256px if not set) –f is the number of frames. If set to 1, an image is produced; more than one, a video. –d is the seed. If not set, it is random; but you should set it to see one prompt evolving. –s is the number of steps in generation, defaulting to 20.
See the official documentation for additional flags.
Though training previews can quickly reveal some issues that might cause you to cancel the training and reconsider the data or the setup, thus saving time, do remember that every extra prompt slows down the training a little more.
Also, the bigger the training preview image’s width and height (as set in the flags listed above), the more it will slow training down.
Launch your training BAT file.
Question #1 is ‘Enter the path to the dataset configuration. Paste or type in the correct path to your TOML file.
Question #2 is ‘Enter the number of epochs to train’. This is a trial-and-error variable, since it’s affected by the amount and quality of images, as well as the captions, and other factors. In general, it’s best to set it too high than too low, since you can always stop the training with Ctrl+C in the training window if you feel the model has advanced enough. Set it to 100 in the first instance, and see how it goes.
Question #3 is ‘Enter the output model name’. Name your model! May be best to keep the name reasonably short and simple.
Question #4 is ‘Choose learning rate’, which defaults to 1e-3 (option 1). This is a good place to start, pending further experience.
Question #5 is ‘How often (in steps) to save preview images. If you set this too low, you will see little progress between preview image saves, and this will slow down the training.
Question #6 is ‘What is the location of the text-prompt file for training previews?’. Paste or type in the path to your prompts text file.
The BAT then shows you the command it will send to the Hunyuan Model, and asks you if you want to proceed, y/n.
Go ahead and begin training:
During this time, if you check the GPU section of the Performance tab of Windows Task Manager, you’ll see the process is taking around 16GB of VRAM.
This may not be an arbitrary figure, as this is the amount of VRAM available on quite a few NVIDIA graphics cards, and the upstream code may have been optimized to fit the tasks into 16GB for the benefit of those who own such cards.
That said, it is very easy to raise this usage, by sending more exorbitant flags to the training command.
During training, you’ll see in the lower-right side of the CMD window a figure for how much time has passed since training began, and an estimate of total training time (which will vary heavily depending on flags set, number of training images, number of training preview images, and several other factors).
A typical training time is around 3-4 hours on median settings, depending on the available hardware, number of images, flag settings, and other factors.
Using Your Trained LoRA Models in Hunyuan Video
Choosing Checkpoints
When training is concluded, you will have a model checkpoint for each epoch of training.
This saving frequency can be changed by the user to save more or less frequently, as desired, by amending the --save_every_n_epochs [N] number in the training BAT file. If you added a low figure for saves-per-steps when setting up training with the BAT, there will be a high number of saved checkpoint files.
Which Checkpoint to Choose?
As mentioned earlier, the earliest-trained models will be most flexible, while the later checkpoints may offer the most detail. The only way to test for these factors is to run some of the LoRAs and generate a few videos. In this way you can get to know which checkpoints are most productive, and represent the best balance between flexibility and fidelity.
ComfyUI
The most popular (though not the only) environment for using Hunyuan Video LoRAs, at the moment, is ComfyUI, a node-based editor with an elaborate Gradio interface that runs in your web browser.
Source: https://github.com/comfyanonymous/ComfyUI
Installation instructions are straightforward and available at the official GitHub repository (additional models will have to be downloaded).
Converting Models for ComfyUI
Your trained models are saved in a (diffusers) format that is not compatible with most implementations of ComfyUI. Musubi is able to convert a model to a ComfyUI-compatible format. Let’s set up a BAT file to implement this.
Before running this BAT, create the C:Users[Your Profile Name]DesktopMusubiCONVERTED folder that the script is expecting.
@echo off
REM Activate the virtual environment
call C:Users[Your Profile Name]DesktopMusubimusubiScriptsactivate.bat
:START
REM Get user input
set /p INPUT_PATH=Enter the path to the input Musubi safetensors file (or type "exit" to quit):
REM Exit if the user types "exit"
if /i "%INPUT_PATH%"=="exit" goto END
REM Extract the file name from the input path and append 'converted' to it
for %%F in ("%INPUT_PATH%") do set FILENAME=%%~nF
set OUTPUT_PATH=C:Users[Your Profile Name]DesktopMusubiOutput ModelsCONVERTED%FILENAME%_converted.safetensors
set TARGET=other
echo You entered:
echo Input file: %INPUT_PATH%
echo Output file: %OUTPUT_PATH%
echo Target format: %TARGET%
set /p CONFIRM=Do you want to proceed with the conversion (y/n)?
if /i "%CONFIRM%"=="y" (
REM Run the conversion script with correctly quoted paths
python C:Users[Your Profile Name]DesktopMusubimusubimusubi-tunerconvert_lora.py --input "%INPUT_PATH%" --output "%OUTPUT_PATH%" --target %TARGET%
echo Conversion complete.
) else (
echo Operation canceled.
)
REM Return to start for another file
goto START
:END
REM Keep the window open
echo Exiting the script.
pause
As with the previous BAT files, save the script as ‘All files’ from Notepad, naming it convert.bat (or whatever you like).
Once saved, double-click the new BAT file, which will ask for the location of a file to convert.
Paste in or type the path to the trained file you want to convert, click y, and press enter.
After saving the converted LoRA to the CONVERTED folder, the script will ask if you would like to convert another file. If you want to test multiple checkpoints in ComfyUI, convert a selection of the models.
When you have converted enough checkpoints, close the BAT command window.
You can now copy your converted models into the modelsloras folder in your ComfyUI installation.
Typically the correct location is something like:
C:Users[Your Profile Name]DesktopComfyUImodelsloras
Creating Hunyuan Video LoRAs in ComfyUI
Though the node-based workflows of ComfyUI seem complex initially, the settings of other more expert users can be loaded by dragging an image (made with the other user’s ComfyUI) directly into the ComfyUI window. Workflows can also be exported as JSON files, which can be imported manually, or dragged into a ComfyUI window.
Some imported workflows will have dependencies that may not exist in your installation. Therefore install ComfyUI-Manager, which can fetch missing modules automatically.
Source: https://github.com/ltdrdata/ComfyUI-Manager
To load one of the workflows used to generate videos from the models in this tutorial, download this JSON file and drag it into your ComfyUI window (though there are far better workflow examples available at the various Reddit and Discord communities that have adopted Hunyuan Video, and my own is adapted from one of these).
This is not the place for an extended tutorial in the use of ComfyUI, but it is worth mentioning a few of the crucial parameters that will affect your output if you download and use the JSON layout that I linked to above.
1) Width and Height
The larger your image, the longer the generation will take, and the higher the risk of an out-of-memory (OOM) error.
2) Length
This is the numerical value for the number of frames. How many seconds it adds up to depend on the frame rate (set to 30fps in this layout). You can convert seconds>frames based on fps at Omnicalculator.
3) Batch size
The higher you set the batch size, the quicker the result may come, but the greater the burden of VRAM. Set this too high and you may get an OOM.
4) Control After Generate
This controls the random seed. The options for this sub-node are fixed, increment, decrement and randomize. If you leave it at fixed and do not change the text prompt, you will get the same image every time. If you amend the text prompt, the image will change to a limited extent. The increment and decrement settings allow you to explore nearby seed values, while randomize gives you a totally new interpretation of the prompt.
5) Lora Name
You will need to select your own installed model here, before attempting to generate.
6) Token
If you have trained your model to trigger the concept with a token, (such as ‘example-person’), put that trigger word in your prompt.
7) Steps
This represents how many steps the system will apply to the diffusion process. Higher steps may obtain better detail, but there is a ceiling on how effective this approach is, and that threshold can be hard to find. The common range of steps is around 20-30.
8) Tile Size
This defines how much information is handled at one time during generation. It’s set to 256 by default. Raising it can speed up generation, but raising it too high can lead to a particularly frustrating OOM experience, since it comes at the very end of a long process.
9) Temporal Overlap
Hunyuan Video generation of people can lead to ‘ghosting’, or unconvincing movement if this is set too low. In general, the current wisdom is that this should be set to a higher value than the number of frames, to produce better movement.
Conclusion
Though further exploration of ComfyUI usage is beyond the scope of this article, community experience at Reddit and Discords can ease the learning curve, and there are several online guides that introduce the basics.
First published Thursday, January 23, 2025
#:where#2022#2025#ADD#admin#ai#AI video#AI video creation#amd#amp#API#approach#architecture#arrangement#Article#Artificial Intelligence#attention#authentication#author#back up#bat#box#browser#cache#challenge#change#clone#code#command#command prompt
0 notes
Text

#tuner#import tuner#jdm#motortrend#superstreet#diecast#diecasts#model car#model cars#honda#civic#type r#civic type r#fk8#fk8 type r#ek#ek hatch#ek civic#eg#eg hatch#eg civic#hatch#hot hatch#eg6#ek9#ek4#hobby japan#tarmac works#streethunters#hondatuning
3 notes
·
View notes
Text
Price: [price_with_discount] (as of [price_update_date] - Details) [ad_1] Product Description KEEP IN TUNE LASER F HOLES The size and position of the sound hole affect the sound and pitch of the violin; the laser F hole of the violin has a small cutting surface and a moderate air volume in the sound cavity to ensure high-quality sound VIOLIN FEATURES Four professional grade built-in fine tuners on a composite tailpiece.Naturally dried maple and tight-grained Himalayan spruce.Handmade construction with inlaid purfling. Full Size Student Model Violin Unique Craftsmanship The hand-made violin is accurate and has a long and pleasant sound. It is suitable for every student who is beginner to violin. Package include: 1*Hard shelf Case 1*4/4 Bow 1*Replacement string 1*Rosin 1* Chinrest 1* Bridge Imported violin, bow, and rosin It comes with case Easy to carry [ad_2]
0 notes
Text
Modify Your Vehicle with Performance Car Parts UK
Driving is an essential skill. Driving a vehicle can help you travel along with your family and friends. The driving hobby has grown to such an extent that people are not satisfied with just the basic model of the car and want customization options. For example, some people buy an M140i Air Intake for their BMW B58. Using this air intake, the vehicle gets significant upgrades in power gain, improved induction noise, etc.
Many car enthusiasts are not satisfied with the stock parts of their vehicles. They buy performance car parts to improve the speed, performance, suspension, etc., of their vehicle. However there are many suppliers of custom car parts and components all over the UK, and choosing where to buy from gets difficult.
Also, these parts should be reliable, as the quality must not be compromised while replacing stock parts with custom parts. But you need not worry about that, as you can buy performance car parts at Performance Car Parts UK.
Performance Car Parts UK
Performance Car Parts UK supplies quality car parts and components to enhance the performance of vehicles all over the UK. They are committed to supplying top-tier products. To provide exceptional service, they cater to all the major models, so the car enthusiast can easily find what they need to enhance the specific part’s performance on their vehicle. Some of these parts are
Fiesta Parts
No matter the old or new model of the Ford Fiesta, you can get any custom product for your Ford Fiesta. They have got replacement filters. If you have been relying on your old Ford Fiesta for a long time, then it's high time to switch your old filter. There are many more such Fiesta parts available at Performance Car Parts UK.
BC Racing BR Coilovers
Suspensions are an important part of every vehicle. They ensure a smooth ride on bumpy or irregular roads. Some people also look for more than simple suspensions. They want customizable suspensions so they can adjust the ride height of the vehicle and fine-tune it on their own. Such people can buy BC Racing BR Coilovers from Performance Car Parts UK. They also improve the BC performance.
GR Yaris Parts
The GR Yaris is known for providing a thrilling experience whenever you ride it. If you want to improve the riding experience and add additional thrill to your GR Yaris, then you should modify it with the GR Yaris parts at Performance Car Parts UK. You can buy the products, like coilovers specific to the GR Yaris, allowing you to adjust ride height, which comes with a warranty as well.
Radium Engineering Parts
Radium Engineering parts are popular among serious tuners. These parts are known for their precision in making and durability. A range of Radium Engineering Parts are available at Performance Car Parts UK. You can buy a new exhaust system for a sporty sound. You can also replace your old plastic coolant with the new radium coolant tank kit.
These were just some of the parts available at Performance Car Parts UK, which shows how large their inventory is.
Why choose Performance Car Parts UK?
They follow the same-day dispatch policy for the in-stock items. This policy has helped various customers receive their orders at or before the delivery date.
Performance Car Parts UK can ship any car parts all over the UK. Their excellent network can deliver the product on the scheduled date, no matter your location.
They have also developed multiple payment options that also ensure security.
Performance Car Parts UK has established itself as a trusted name in the automotive industry. This reputation was built because of the reliable services they offered.
So, you can trust Performance Car Parts UK to give your vehicle a new look and upgrade its performance. Buy performance car parts today at performancecarsparts.co.uk.
0 notes