#icons without osd
Explore tagged Tumblr posts
Text


#oaey ponchanok icons#oaey ponchanok#icons#mate the series#mate the series icons#gl icons#girls love icons#thai gl icons#wlw#wlw icons#lesbian#lesbian icons#icons without osd
24 notes
·
View notes
Text
Emby For LG 1.0.37 Released With Many New Features
Emby for LG 1.0.37 features Intro Skip, Lyrics & RTL Support Embedded Lyrics Support for Music Files Emby now supports display of musical lyrics you provide. This doesn't require modifying your actual music tracks but is done using a text file residing next to the track! You can quickly and easily use a tool such as MediaHumon Lyrics Finder that makes quick work of adding Lyrics to your existing content. Rescan your music library and have this: This is a great new feature that's easy to implement, uses hardly any storage space (text files) and gives you great results! (first icon bottom left) Audio now playing screen The above picture shows one view of our new audio Now Playing Screens. Here's another version of the same screen without the lyrics showing your current queue: Save Time with Emby's Intro Skip New to LG 1.0.37 is the ability to skip TV Show Episode Introductions segments. This allows you to jump right to the start of the action, saving a great deal of time allowing you to quickly get to the good stuff! Combine Into Skip with Automatic Play Next Episode for a superior binge-watching experience! Please see our blog post on Intro Skip setup and use on the server side: Configure Emby Client for Automatic or Manual Intro Skip Each client can be set to ignore TV Show Intros, automatically use Intros, or to prompt use showing a button. You can set this option in the client option's Playback Menu. Using Intro Skip With the Skip Intro button selected you can clearly see the button on the OSD immediately at the start of playback. The timeline is still at 0:00 before the show has started to play and we can already skip the introduction of the show. Clicking the Skip Intro button immediately jumps right to the start of the Episode. With the client option set to Automatically skip intros our TV show intros have been put on auto pilot. Right at the start of playback it jumps to the end of the intro right at the point of the fade in. Right to Left languages: Emby for LG 1.0.37 takes advantage of Emby Server's (4.7.6) support for right to left languages. The above two examples come from the 4.7.6 Server blog where you can read more about this. Emby for LG 1.0.37 has many fixes including: * Various subtitle improvements * Various video playback improvements http://dlvr.it/Sj9sr6
0 notes
Photo


just like please!!
#demi lovato icons#icons demi lovato#demi icons#icons demi#demi sem psd#demi without psd#icons#icons sem psd#icons without osd#demi#demi lovato#demi lovato edits#edits demi lovato#nath#random
43 notes
·
View notes
Photo


just like
15 notes
·
View notes
Text


• if you’re saving/using please like this post ♡
• FOLLOW ME FOR MORE
#girl#icons#girls#pretty girl#uptown girls#Indie#grunge#alternative#icon#boy#smoke#headers#sem psd#no psd#without osd#instagram#instagram girls#cigarette#cigz
58 notes
·
View notes
Photo


like if u save
#sem psd#no psd#without osd#ucons#icons sem psd#bands#little mix#personal pictures#icons little mix#little mix icons#leigh anne icons#icons leigh anne#leigh anne pinnock#leigh anne pinnock icons#icons leigh anne pinnock#kaio
9 notes
·
View notes
Text
Aida64 extreme edition 5.95.4500

#AIDA64 EXTREME EDITION 5.95.4500 SOFTWARE#
#AIDA64 EXTREME EDITION 5.95.4500 WINDOWS 7#
The hardware detection module is strengthened by an exhaustive hardware database holding over 120,000 entries. AIDA64 can also alarm the user when it detects overheating, over-voltage, or cooling fan failure.ĪIDA64 has the most accurate hardware detection capabilities in its class, to provide detailed information on the computer internals without the need to open it up. The values can also be logged to file or exported to external applications such as RivaTuner or Samurai. Measured values can be displayed on System Tray icons, OSD panel, Sidebar Gadget, and Logitech G15/G19 Gaming Keyboard LCD. Temperature, voltage and cooling fan monitoringĪIDA64 supports over 150 various sensor devices to measure temperatures, voltages, fan speeds, and power draw. AIDA64 Disk Benchmark determines the data transfer speed of hard disk drives, solid-state drives, optical drives, and flash memory based devices. For legacy processors all benchmarks are available in 32-bit version as well. Processor benchmarks utilize MMX, 3DNow!, SSE, XOP, FMA, and AVX instructions, and scale up to 32 processor cores. Memory and cache benchmarks are available to analyze system RAM bandwidth and latency.
#AIDA64 EXTREME EDITION 5.95.4500 WINDOWS 7#
AIDA64 is compatible with all current 32-bit and 64-bit Microsoft Windows operating systems, including Windows 7 and Windows Server 2008 R2.ĪIDA64 implements a set of 64-bit benchmarks to measure how fast the computer performs various data processing tasks and mathematical calculations. It has unique capabilities to assess the performance of the processor, system memory, and disk drives. AIDA64 Extreme Edition provides a wide range of features to assist in overclocking, hardware error diagnosis, stress testing, and sensor monitoring.
#AIDA64 EXTREME EDITION 5.95.4500 SOFTWARE#
I have also Corsair HX1000i PSU installed and conected to my mobo thru USB, and Crosair Link support enabled in "Preferences", but disconecting PSU from USB bus doesn't gives any advantage.AIDA64 Extreme Edition is a streamlined Windows diagnostic and benchmarking software for home users.ĪIDA64 Extreme Edition is a streamlined Windows diagnostic and benchmarking software for home users. I've also tryed to connect AIDA64 to Remote Panel app on my Tab thru WifI (with USB detached) - lags are remaining. If i'm disconnecting my tab from USB with Odospace support enable lags are remaining. If i'm disabling Odospace support in AIDA64 everything is ok, and game is going normally. This lag's are happening simultaneously with data renewal on my tab's "Remote Panel" app. The oher thing, that is "Update frequnecy" for "LCD" is set to "1000 ms", but the data on my Tab is renewed each 3-4 seconds, not in 1 second. Windows 10 was clearly reinstalled.Īfter enabling "Odospace" support in "LCD" tab, i'm having some strange single lag every 3-4 second in-game, and it repeats in next 3-4 second, and once more, and so on. Hi, i've just moved to my new mobo from Rampage V Extreme to Rampage V Edition 10, and some strange in-ghame (Battlefield 4) single laging appeared.

0 notes
Text
Aida64 extreme edition v4

#AIDA64 EXTREME EDITION V4 LICENSE KEY#
#AIDA64 EXTREME EDITION V4 DRIVERS#
#AIDA64 EXTREME EDITION V4 SOFTWARE#
#AIDA64 EXTREME EDITION V4 WINDOWS 8.1#
#AIDA64 EXTREME EDITION V4 PC#
Measured values can be displayed on System Tray icons, OSD panel, Desktop Gadget, Logitech G15/G19 Gaming Keyboard LCD, and Razer SwitchBlade LCD. The latest AIDA64 release supports over 50 LCD and VFD screens, and introduces wireless remote monitoring of sensor values on smartphones and tablets.ĪIDA64 supports over 250 various sensor devices to measure temperatures, voltages, fan speeds, and power draw. List of started processes, services, DLL files, startup programs, and visited web pages is also available.ĪIDA64 can display vital system data on a variety of LCD/VFD devices connected to the computer.
#AIDA64 EXTREME EDITION V4 SOFTWARE#
The hardware detection module is strengthened by an exhaustive hardware database holding over 176,000 entries.ĪIDA64 provides over 50 pages of information on installed programs, software licenses, security applications, and Windows settings. Hard disk, SSD and OpenCL GPGPU video adapter stress testing is also available.ĪIDA64 has the most accurate hardware detection capabilities in its class, to provide detailed information on the computer internals without the need to open it up. Versão já crakeada, basta instalar Links Direto:DOWNLOAD.
#AIDA64 EXTREME EDITION V4 WINDOWS 8.1#
It is compatible with all 32-bit and 64-bit Windows editions, including Windows 8.1 and Windows Server 2012 R2.ĪIDA64 provides over 50 pages of information on hardware configuration and over 50 pages of installed programs, software licenses, security applications, and Windows settings.ĪIDA64 System Stability Test uses a 64-bit multi-threaded stress testing module to drive the computer to its absolute limits. SE INSCREVA - LIKEVeja nesse rápido vídeo como fazer o download e instalar o AIDA64 EXTREME. It also offers a couple of benchmarks for measuring either the performance of individual hardware components or the whole system. As it is monitoring sensors in real time, it can gather accurate voltage, temperature and fan speed readings, while its diagnostic functions help detect and prevent hardware issues. It provides detailed information about installed software and offers diagnostic functions and support for overclocking.
#AIDA64 EXTREME EDITION V4 PC#
Detection of feasible misconfiguration and compatibility issues of hardware and software.AIDA64 Extreme is an industry-leading system information tool, loved by PC enthusiasts around the world, which not only provides extremely detailed information about both hardware and installed software, but also helps users diagnose issues and offers benchmarks to measure the performance of the computer.ĪIDA64 Extreme has a hardware detection engine unrivaled in its class.A list of firewalls, anti-spyware and anti.Statistics about running gadget protection.Distinct facts about mounted programs, scheduled responsibilities and startup applications.Targeting business customers, AIDA64 Business is a comprehensive IT asset management solution, which offers hardware diagnostic, network audit, change management and remote capabilities to corporate customers. A termk minden 32 s 64 bites Windows opercis rendszerrel kompatibilis, belertve a Windows 10-et s a Windows Server 2016-ot is. Big amount of records approximately networking fame, faraway get entry to, network resources and internet settings. All AIDA64 v4.50 editions are globally available today. Szmos benchmarkmodult is tartalmaz, melyekkel mrhet a szmtgp egyes rszegysgeinek s a rendszer egsznek a teljestmnye.Information about network stocks, users and organizations list, and plenty more.
#AIDA64 EXTREME EDITION V4 LICENSE KEY#
Info of home windows, which include the date of set up, the license key and more.
Records approximately other glands (pci, pnp, pcmcia, usb).
Exhaustive records approximately community adapters, multimedia and input gadgets.
#AIDA64 EXTREME EDITION V4 DRIVERS#
Information of the video drivers and screen.
Stage records about motherboard and cpu.
Furthermore, whole software program, operating gadget and safety product aida64 translates into complete machine diagnostics tool that gives over one hundred pages of statistics about your laptop. Benchmarks cpu module floating factor and memory to degree the real machine overall performance and compare it to previous states or different structures. AIDA64 Engineer For the duration of machine optimizations and tweaking it gives vital device and overclock knowledge famous hardware monitoring and diagnostics to evaluate the impact of using the ones or different settings.

0 notes
Text


22 notes
·
View notes
Text

Hope Mikaelson Icons. Made by jennifermusingisms
Must like/reblog this post (Or the post for the set that you are using but this is linking you to a page so might be easier just to do it here)
Personal blogs do not like, reblog or use these icons on your blog! These are for roleplaying only or reaction icons for ooc posts only
Danielle is 18 years old but she was a minor when she filmed the Originals (At least some of the episodes since her birthday is in October) so do not use these for smutting and in general, she is playing a minor in the originals.
Credit me if you want (Not really needed unless someone asks you where you got the icons or you want to credit me somewhere on your blog).
Do not repost these and claim as your own. When I say repost I mean share to another site, put these in other icon hunts or fc packs without my permission.
Do not edit this (This includes adding textures, osds, a different border, etc to these)
I screencapped to make these icons. I used my own psd (Hope.psd on jennifermusingisms).
This will be updated at least once or twice more so that I have all of her moments in the originals for the final season.
This page is long since there is well over 1,000 (No doubt more since my latest upload was close to 1,000 icons so there is way more than that) so the page might take a few minutes to load depending on your wifi connection
{ 𝙸𝙲𝙾𝙽 ��𝙰𝙶𝙴 ⭳ }
11 notes
·
View notes
Text
FA Cup betting tips / odds and predictions
Fa cup odds paddy power - Premier League: Today's best odds boosts for Liverpool, Chelsea and Man City
Following the draw for the FA Cup 4th and 5th Rounds fa cup odds paddy power Monday night, fa cup odds paddy power bookmakers have been very busy. Knowing the draw for the next two rounds rather than just the one has allowed bookmakers to make an even more informed prediction as to this year's winners of the oldest club competition in world football.
We're going to take a look at the draws for the 4th and 5th Rounds of the FA Cup and provide you with the very latest odds available for the potential winners of the competition.
The only other all Premier League affair will be between Southampton and Arsenal, fa cup odds paddy power the Saints get through their postponed 3rd Round tie at home to Shrewsbury, and Fulham vs Burnley.
There are a few other possible all Premier League ties on offer, Wolves could play Southampton or Arsenal, Everton might get the home advantage against Spurs and Leicester could play host to Brighton in the 5th Round. City are away at League Two side Cheltenham and if they get through that tie as expected they would be away at Swansea or Notts Forest on the 5th round. Two lots of Championship opposition would Lampard and his players down to the ground, as the fa cup odds paddy power is more than familiar with that division.
Mourinho's men put in a thoroughly professional performance against Marine in the last round and are still in with a chance of securing both cup competitions and maybe even the Premier League title. Spurs are away at Championship strugglers Wycombe Wanderers in the 4th round and could face a trip to Goodison Park in the following round. New players only. Should the Citizens be able to tame Erling Braut Haaland and reach the semi-final stage of the European Published here, they are guaranteed to be facing tough opponents considering that Paris Saint-Germain or Bayern Munich lie in wait.
However, the entrance of League One read more here League Two outfits adds a new level of competition to the 36 teams from the lower leagues. Skelmersdale United are the lowest ranked team competing in this round. Some of the standout fixtures are:.
This is an all-League One affair but there is a huge gap between Oxford and Peterborough in the league standings. The two are at the opposite ends of the table with Peterborough flying high after 18 points from eight games. League One Sunderland are at home to Mansfield and they hope find here preserve their excellent first-round record. Mansfield are struggling in the League Two while Sunderland are aiming for a promotion spot but such circumstances end up bringing a great fight from the lower ranked outfits.
This is an iconic David vs Goliath contest with two divisions separating Wigan and Chorley. The Latics also have home advantage, but their form has been dreadful as seen by FA Cup tips.
Wigan are without a win in the last five games and their last success came against Doncaster at the start of October. The FA Cup predictions once again have to deal with a match that pits a top ranking team fa cup odds paddy power a lower league opposition. Since the FA Cup consists of so many rounds, you will not be short on options for this form of wagering.
Fa cup odds paddy power the subject of the number of games being played, a lot of punters like to make an accumulator bet for one single round. Here you can combine as many games as you wish, and since the FA Cup is a bit of a graveyard event for big teams, you could shoot for some upsets in the hope of decent returns. The Foxes have reached the quarter-finals in two of the last three seasons, being beaten by Chelsea both times, but are the underdogs to book a trip to Wembley after being drawn against Man Utd in the quarter-finals.
FA Cup betting tips: Sunday March 21 best bets
Sheffield United, which is going to be relegated, was no match for Leicester City in defeat. The Foxes won the expected-goals xG battle by a 4. Against Manchester United, Leicester City will likely continue to play osds three center backs and fullbacks Fa cup odds paddy power Pereira and Timothy Castagne bursting down the wings.
However, their last four games have featured some impressive results.
Best FA Cup Odds for 2021 inc. Outright Winner
According to FBref. The win over Milan was inspired by the halftime introduction of Paul Pogba and a lackluster attack from the Italian side. We are committed fa cup odds paddy power our support of responsible gambling. Recommended bets are advised to overs and we strongly encourage readers to wager only what they can afford to lose. If you are concerned about your gambling, please call the National Gambling Helpline onor visit begambleaware.
0 notes
Text
VIEW Rockdale, Sydney Apartments
VIEW Rockdale, New South Wales Apartments, Sydney Real Estate Building, NSW Interior Photos, Australian Architecture
VIEW Rockdale in Sydney
9 Apr 2021
VIEW Rockdale Apartments
Design: Fuse Architecture
Location: Sydney, New South Wales, Australia
VIEW was conceived through a design excellence competition for a mixed use tower within the Sydney suburbian town centre of Rockdale. It aimed to encapsulate and extend the vibrant character of the existing lowscale stock and present in an iconic form, the ambitions of its future character.
As a studio, Fuse Architecture sought to explore the latent potential for innovation in multiple dwelling housing, to provide homes that were economically, environmentally, and socially sustainable and provide an appropriate gateway building into an aspirational town centre.
On a compromised site, sandwiched between a busy arterial road, a railway line, and directly under a flight path, the technical considerations though complex, were skilfully curated, transforming inherent constraints into poetic design solutions that helped deliver a sophisticated, confident and beautiful scheme without artistic compromise.
The requirement for design excellence was used as an opportunity to challenge from first principles the projects ambitions, planning controls, technical considerations and tectonics, to ultimately maximise its impact. The scheme distilled into a contextual framework the delivery of what is Rockdale’s first design excellence building.
The outcome is an architecture that exceeds the standards set within market housing in Sydney’s outer ring suburbs, an elegant building in form, appropriate for its time, purpose and context.
The design is an elegant two tower form that provides 91 high quality residential apartments, and 615sqm of active ground floor retail. At heart of the development is an open breezeway, which compositionally unites the towers whilst practically allowing residents to turn their backs away from the compromised environment. This planning strategy maximises the quantum of north facing apartments for optimum orientation and amenity, allowing the building to breathe whilst also capturing distant city views for maximum commercial appeal.
The breezeway is veiled with a metallic golden screen derived from the organic lines of neighbouring Botany Bay. This formal gesture is reinforced with an important overlay for social interaction. Bridges and voids weave through the space and connect vertically dispersed communal courtyards. These green spaces are raised for protection from the harshness of the ground plane and act both as an environmental filter and a quiet space in which to retreat.
View is an architecture that encourages active use and focuses on resident wellbeing. It elevates the ritual of arriving and leaving home into the ceremonial.
The form was studied extensively to ensure technical input from acoustics, mechanical, landscape and wind engineers to maximise the breezeway benefits to future occupants.
Successful urban design aspects of the existing Princes Highway retail strip were implemented and improved into the immediate public domain. Footpaths were widened and layered with continuous retail activation, and an awning for maximum public amenity and commercial viability.
With ambitions for inclusion and access, View was designed with housing options for people with a disability, as afforded under the National Disability Insurance Scheme (NDIS).
VIEW Rockdale in Sydney, NSW – Building Information
Architects: Fuse Architecture
Project size: 15637 sqm Site size: 1696 sqm Project Budget: $27000000 Completion date: 2020 Building levels: 11
Photography © Tom Ferguson
VIEW Rockdale, Sydney Apartments images / information received 090421
Location: Sydney, New South Wales, Australia
Architecture in Sydney
Sydney Houses
Sydney Architecture
Sydney Central Station Development, Henry Deane Plaza, Central Business District Design: SOM and Fender Katsalidis image © SOM | Fender Katsalidis Sydney Central Station Development
Pitt Street OSD and metro station, corner of Park & Pitt streets Design: Foster + Partners image © Foster + Partners Pitt Street Over Station Development
NSW Properties
Tennyson Point House Architects: CplusC Architectural Workshop photograph : Murray Fredericks Tennyson Point House
YrdPods Architects: Kreis Grennan Architecture photo : Douglas Frost YrdPod Garden House
Sydney Architect Studios
Australian Architecture
Australian Houses
Comments / photos for the VIEW Rockdale, Sydney property design by Ian Moore Architects page welcome
Sydney, NSW
The post VIEW Rockdale, Sydney Apartments appeared first on e-architect.
0 notes
Photo
New Post has been published on https://magzoso.com/tech/philips-bdm4350uc-43-inch-4k-ultra-hd-monitor-review/
Philips BDM4350UC 43-Inch 4K Ultra HD Monitor Review

Laptops may account for the bulk of computer sales, but it’s hard to argue against the advantages of a big screen, especially when you have to juggle multiple apps at the same time. A big, high-resolution display opens up possibilities that even the biggest laptops cannot aim to match.
And they don’t come much bigger than the monitor we’ll be reviewing today. We’ve had the chance to spend a few weeks using the Philips BDM4350UC, a 43-inch 4K LCD monitor, to see whether a really big screen can turbocharge your productivity. Could this be the monitor of your dreams? It’s time to find out.
Philips BDM4350UC design and specifications
Given its size, it’s no surprise that the Philips BDM4350UC resembles a television more than a traditional monitor. In most cases, monitors — except ones with atypical aspect ratios — look like smaller televisions, save for the fact that most of them have stands that let you adjust their position in ways that televisions aren’t designed for.
But the Philips BDM4350UC looks just like any television of its size. In fact, installing this monitor involves fixing two legs stick out quite a bit on either side of the monitor, just like we’ve seen with large-screen televisions by the likes of Xiaomi and others. We didn’t have a table large enough to accommodate this monitor fixed to its legs, so we decided to leave them in the box.
Thankfully, the monitor is still stable enough to stand on its own without any problems, and that’s how we used it for the entire duration of our test period. Though there’s a slight tilt to the back when it’s in this position, it’s definitely not as stable as it would be with the legs, and we don’t advise using it like this out in the real world. With or without the legs, there’s no way to adjust the height of the monitor, nor do you have the option to tilt or swivel the display in any way, which is a bit of a change from many popular standard-sized monitors.
The sheer size of this monitor is something you’ll need to keep in mind before purchasing it, as physically, it may not just be a plug-and-play replacement for, say, the 24-inch monitor you’re currently using. It does have a standard 200x200mm VESA mount for wall-mounting, or for a third-party VESA stand that could enable tilt and swivel adjustment that the monitor lacks by itself.
The bezels aren’t particularly large, but this is no edge-to-edge monitor, and one could argue that it doesn’t need to be because of its sheer size. We never really noticed the bezels, probably because there was so much screen real estate occupying our field of view. The overall design looks and feels premium, and this monitor is nothing like most of the budget televisions that we’ve seen recently.
A small plasticky piece jets out from the centre at the bottom. This piece features a Philips logo and a small LED that stays on without attracting any attention when the device is powered on, and strobes gently when it is in standby mode.
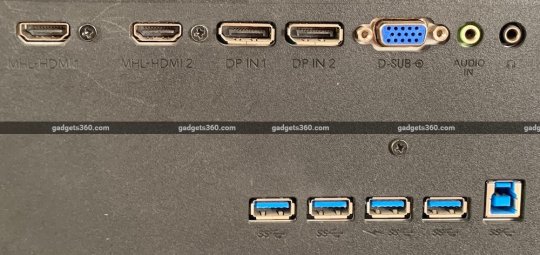
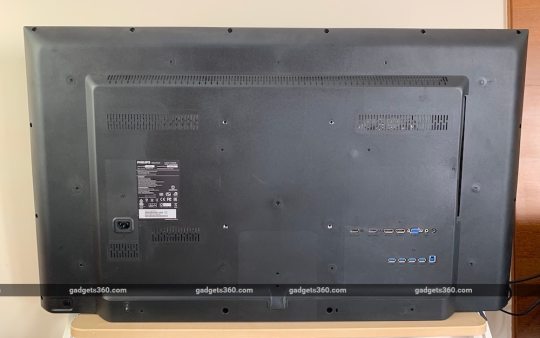
All the ports are at the back, on the left-hand side (as you reach backwards from the front) near the bottom, except for the power inlet which is on the right. You get two HDMI 2.0 ports (with MHL), two DisplayPort 1.2 ports, and a VGA port for input. Additionally, you get four USB 3.0 ports, one of which is listed to support “fast charging”, and a USB-in port to connect the monitor’s USB ports to your computer. Audio-in and audio-out (3.5mm) ports are also thrown in for good measure. As we noted, all these ports face outwards, which did not prove to be a problem for us, but it might be a concern if you wish to wall mount this monitor.

The Philips BDM4350UC offers plenty of ports
The panel measures 42.51 inches (108cm) diagonally, which allows Philips to market this as a 43-inch monitor. The native resolution of 3840×2160 pixels is supported at up to 60Hz, with a claimed typical response time of 5ms. The peak brightness is said to be 300 nits, with a typical contrast ratio of 1200:1. The panel does not support HDR. There are two built-in speakers of 7W each, which sounds like a good idea in theory, and we’ll soon find out how they perform in the real world.
The monitor also supports picture-in-picture (PIP) and picture-by-picture (PBP) modes that let it display input from more than one device at the same time. There are no buttons at the front — there’s only one joystick-style button at the back near the bottom right that’s used to control all settings. It takes some getting used to the positioning and functioning of this button, but after a couple of days with the monitor we were reaching out for it and adjusting settings blind without any problems. A power button that can be flicked to turn the monitor on or off is also located at the back, though it’s not as easy to reach.
Philips BDM4350UC performance
In this section, we’ll focus on two main areas — the first, how it is to use a monitor of this size on a day-to-day basis, and the impact it can have on your productivity. The second is the performance of this panel itself, in which we will look at some benchmarks and other formal tests.
We connected the monitor to a Mac mini, and macOS defaulted to the native 4K resolution. We had no problems reading text and most other on-screen elements, so we didn’t bother scaling down to a lower resolution, though your mileage may vary. The only UI elements that seemed a bit too tiny for our comfort were the menu bar near the top right corner of the screen. Switching to 3200×1800 resolution resulted in a better experience.
With that said, we loved the extra pixels that the native resolution offers and switched back to it in no time, deciding to live with the slight discomfort of smaller menu bar icons. As you would expect, the 4K panel at its native resolution gives you an enormous amount of real estate, and as someone who’s constantly juggling multiple windows, we decided to make the most of it.
We dedicated one part of the screen to our email client, another to the browser, one to Slack (our chat application), and another to Google Analytics, which we love keeping an eye on in real time. We still had plenty of real estate leftover for other windows. While it was great being able to keep tabs on so many applications at the same time, we did notice some patterns in our usage.
Despite having all the additional pixels, we tended to position the “main application” — i.e. whatever we were focussing on at the time — near the bottom-left of the screen. So, while the mail client’s message list window stayed on the top-left of the screen, we composed emails near the bottom-left (thankfully the macOS Mail app remembers the winndow’s position after you’ve dragged it once). We found that the top half of the display was largely useless for anything other than monitoring apps that require an occasional glance.
While the ability to have large documents display on the screen in a tall window sounds good in theory, we found that looking at the top one-third (at least, if not the top half) of the screen for long requires too much effort, and it almost feels like watching a movie from the front row. We think that everyone will end up having “sweet spots” where most of the action takes place, with everything else in the periphery.
There are some other problems that arose due to the quirks of macOS combined with our usage habits. Notifications from Mac apps show up in the upper-right corner of the screen, and this is a behaviour that cannot be changed (other than disabling notifications altogether, of course). This means that if you’re focused on the bottom-left of the screen like us, it is all too easy to miss notifications due to the sheer size of this display. Even when we did manage to catch them, at times it seemed like too much effort to shift our attention to the top right corner and then back again to what we were working on.
We also booted into Windows on our Mac mini to see what the experience was like. By default, Windows resorted to 300 percent scaling, but we switched to 100 percent, and the experience was pretty similar to what we noted with macOS above. Text was sharp — even at 8-point size — and the overall experience was nothing like what you’d remember from hooking up your old, large-screen, non-4K TV to your computer a few years ago.
Of course to make the most of such a monitor, some people might need to change some habits. Many users who grew up using Windows are used to maximising their current window and using Alt-Tab to switch between apps. If you are someone who’s married to that working style, unless you are using apps like Photoshop or other pro-grade apps, you are unlikely to get much benefit out of a monitor of this size, and will likely see huge white (or black) bands on either side of your content.
Some of you might be worried about eye strain associated with using such a large display at relatively short distances. We didn’t experience any physical discomfort while using this monitor, but we’ve spent nearly every waking moment for the best part of the last 30 years in front of one screen or another, so we are probably not best suited to comment on the subject of eye strain and we recommend getting an opinion from a licensed medical professional instead.
As we mentioned earlier, diving into the monitor’s settings requires you to reach around for the joystick-style button, but we got used to it and the menu layout pretty quickly. The settings let you control basic stuff like the current input source, the picture format (widescreen, 4:3, or 1:1, though the latter seemed to have no effect and mimicked widescreen), colour temperature, gamma correction, brightness, contrast, and pretty much everything else you might expect (see images below).
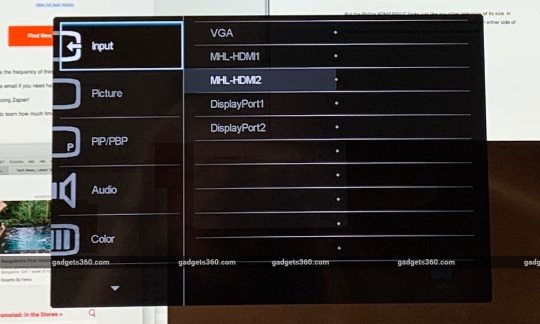
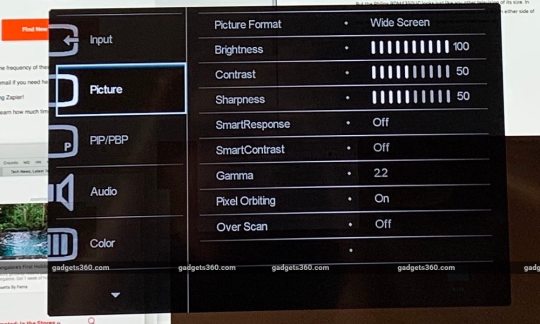
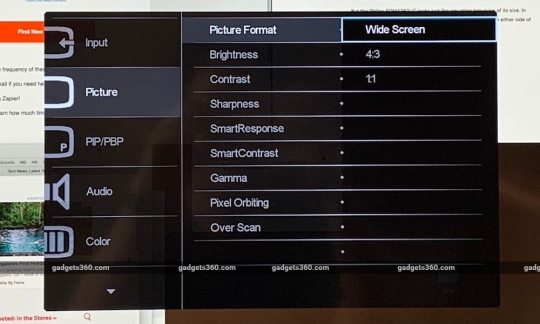
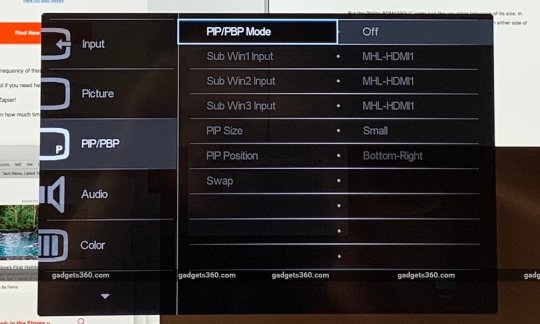
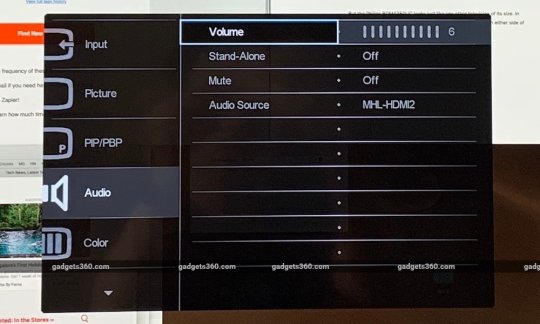
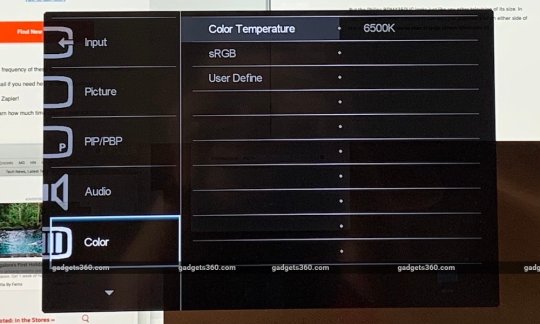
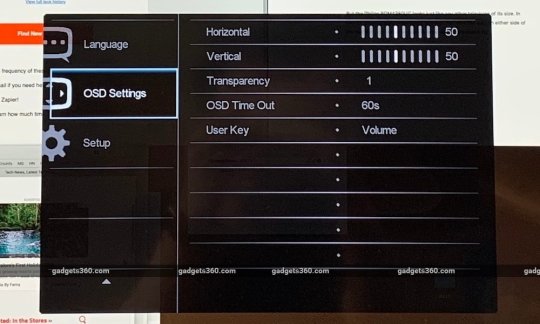
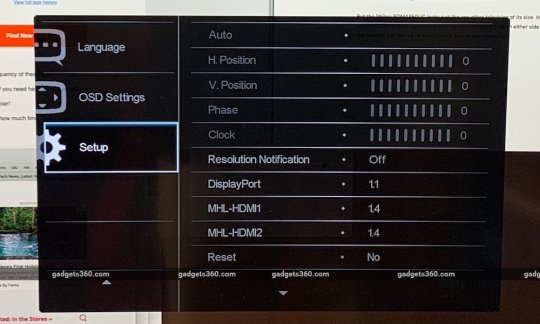
Philips BDM4350UC OSD settings
There are a bunch of standard features under Philips’ marketing names, such as SmartImage presets that are supposedly optimised for Movie, Game, and Office scenarios, and SmartResponse which is designed to optimise response time and reduce lag while gaming. We were fairly happy with the settings out of the box, but it’s good to know that the options exist for those who want a bit more control.
Our favourite part of the settings panel was the one related to PIP and PBP. The former gives you an inset that takes over a part of the screen. You can select which source gets to be the main input, and which gets to be the inset. You can customise its position(top-left, bottom-left, bottom-right, top-right) as well as size (small, medium, large), with the inset taking over a little less than a quarter of the screen at its largest size.
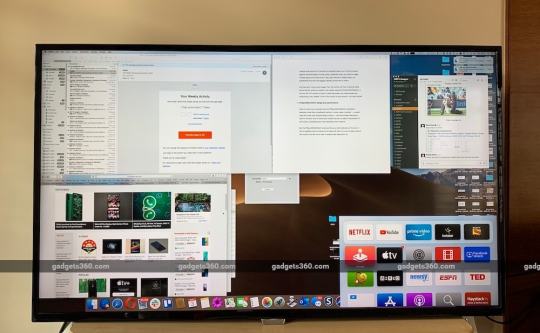
PIP on the Philips BDM4350UC with an Apple TV in the inset
We found this to be useful while, say, working on the main screen while having an Apple TV connected so we could follow a cricket match while continuing to work. Yes, you can easily do this by having Hotstar open in a browser window on your machine, and both ways have their advantages and disadvantages.
We appreciated the ability to use the Apple TV remote to control the video we were watching without interrupting what we were working on, though the disadvantage is that we couldn’t control the exact positioning of the inset, the way you would a window on your computer. which means it can end up covering important on-screen elements. We wish there was a way to use the joystick to position the inset exactly where one wants.
PBP lets you position two, three, or four sources side by side, without any overlap. This didn’t appeal to us a lot, but your mileage may vary. It’s a nice way to have, say, the same computer and Apple TV running side by side so one doesn’t get in the way of the other. To get the most out of this mode, it’s best to have the resolution of your computer set to 1080p, as each input in PBP mode is being rendered in full-HD resolution.
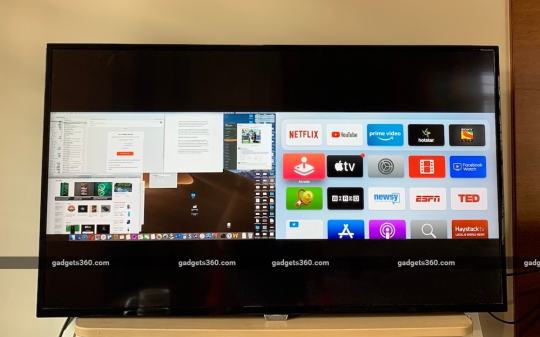
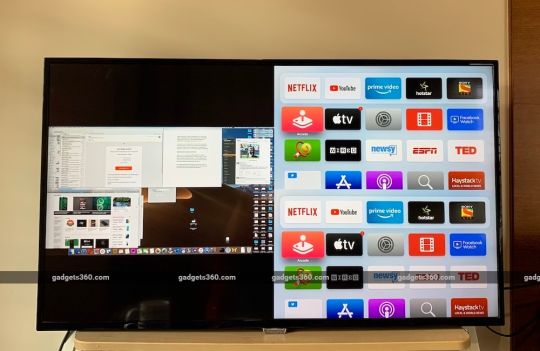
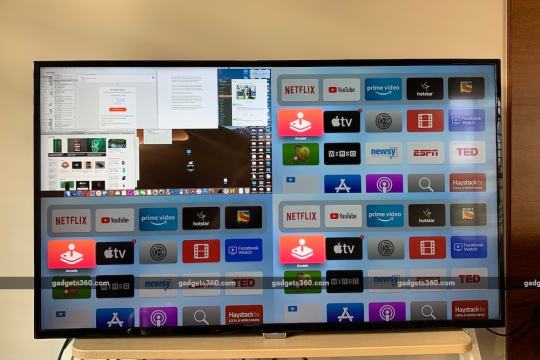
PBP with two, three, and four sources. We had only two devices connected, hence the repition.
In the PassMark MonitorTest Master Screen, running at native 4K resolution in the 16:9 ratio, the top left grille with a pixel spacing of one pixel appeared as a uniform grey colour instead of individual black pixel lines. We switched to 4:3 and could then see the individual lines. However, the centre circle which is expected to be a circle at 4:3 was more of an oval, while it appeared to be a perfect circle at 16:9. The opposite happened with the four smaller circles in the corners. We didn’t notice any blurring or smearing in the six coloured squares near the centre. Everything else on the screen was as expected as well.
The solid colour screens of the benchmark appeared fine, as did the Scale Black-Red and Black-Blue screens, though the Scale Black-Green appeared as a series of distinct vertical green lines of different shades, instead of one smooth gradient like in the other screens. In the Gamma Red, Green, and Blue tests, we noticed that the rectangular bar faded into the background at Gamma level 1.16. In the Fonts Test, the 6-point text was just about readable, with individual characters as distinct as we could expect them to be.
In the browser-based Eizo test, we noticed issues similar to PassMark on the opening screen, with the squares appearing as individual black and white lines in 4:3 resolution, but as a grey square at 16:9. We didn’t notice any defective pixels in any of the colours. In the uniformity test, we noticed that at 25 percent grey, the right half of the screen was brighter than the left, especially closer to the edge.
The monitor fared really well in the colour distances test, which means it can sufficiently differentiate between colours that are similar. Our colour gradients tests reported similar results to PassMark, with green being the only one that stood out as a little bit odd.
The Philips BDM4350UC excelled in the text sharpness test, with both White on Black and Black on White scenarios. However, the viewing angles test didn’t go as well, with noticeable changes in the sizes of the circles on screen as viewing angles increased. With that said, we didn’t notice significant degradation in quality when viewing content from odd angles in day-to-day usage. Eizo’s Gamma test indicated a value of 2.4.
We also spent a considerable amount of time using the monitor as a television, with a 4K Apple TV and an ACT Stream TV 4K media player connected to it. The monitor fared surprisingly well in this setup. Powering off the media player puts the monitor in standby mode, so we didn’t need to fiddle with the power switch. Power on a media player, and the monitor automatically switches the source to that input. The ACT Stream TV 4K media player has volume controls of its own, so we didn’t miss having a TV remote at all when using this as our video source.
The built-in speakers on the Philips BDM4350UC get loud enough to fill a large bedroom, and in all the time we spent with this monitor, we recall just one occasion when we wished they could’ve been louder, which could just be down to a poorly mixed show. Sound quality is good, and while there’s no real bass to speak of, the speakers are good enough to let you use this monitor as a standalone TV. You won’t need dedicated external speakers, though the audio-out port means you can do just that if necessary.
As far as picture quality is concerned, watching both HD and 4K content was pretty enjoyable, and while we didn’t have any complaints about the brightness of the panel, we did wish at times that the contrast ratio was a little bit better. In completely dark scenes, we also noticed a bit of “IPS Glow, especially near the right edge, though it wasn’t particularly bad. During the day, we found the glossy panel to be a bit too reflective at times, specifically when using the device as a television from a distance, though this wasn’t really an issue when we were sitting up close and using this it a monitor connected to our PC.
With a claimed response time of 5ms — and due to the fact that most PC graphics cards can’t drive 4K panels at their native resolution while offering consistent 60fps — this monitor isn’t targeted at gamers, so we didn’t run any formal gaming benchmarks. With that said, we did connect our Xbox to the monitor for a bit of gaming, and we were satisfied with the experience.
Verdict
There’s a lot to like about the Philips BDM4350UC. A 4K panel has the potential to greatly enhance your productivity, and this monitor delivers on pretty much everything it promises. Despite a few minor quirks, we didn’t find any major performance issues, and were more than satisfied with the overall experience. Creative professionals and others who can put the extra real estate to use will love what this monitor has to offer. We can also see this monitor being put to use in conference rooms as a high-resolution, all-purpose replacement for a projector, or on an office wall where the PIP/ PBP features can be used to display multiple sources at once.
However, as our time with the device showed, not everyone will be able to make the most of the extra pixels, and it’s easy to see in hindsight why many prefer using multiple regular-sized monitors next to each other instead of one giant 43-inch panel. Using such a large display as a monitor isn’t very practical and it’s easier to develop blind — or at least “non-preferred” — spots than when using a multi-monitor setup, as was the case in our usage.
With that said, if you are looking for a giant monitor that also doubles up as a television, the Philips BDM4350UC is a great bet. As much as we loved the PIP feature, even without that this monitor does a great job of being a television substitute, thanks to the good built-in speakers. All in all, we think this monitor will be a great addition to any home office where this kind of versatility could be particularly useful.
Price: Rs. 45,000 Warranty: 3 years
Pros
Decent overall performance
Plenty of inputs
4 USB 3.0 ports
Built-in speakers are good
Useful PIP and PBP features
Doubles up as a nice TV
Cons
Big panels aren’t great for all use cases
Contrast ratio could be better
Can be a bit too reflective at times
Ratings (out of 5)
Design: 4
Features: 4
Performance: 4
Value for Money: 3.5
Overall: 4
0 notes
Text
Asus ROG Strix XG17AHPE 240Hz Portable Monitor Review: Expensive Innovation
Having a portable monitor is a lifesaver. Whether your laptop’s screen just doesn't give you enough space or you’re looking for something to connect to a smartphone or tablet, having an extra screen can instantly boost your productivity. But what if that lightweight screen wasn’t all business? What if it had a fun side too?
The Asus ROG Strix XG17AHPE is just that, bringing a pro-level 240 Hz refresh rate to a portable screen for the first time. The 17.3-inch monitor (DisplayPort Alt Mode over USB Type-C or HDMI) delivered most of what I wanted and needed for both work and gaming and made its mark as a one-of-a-kind product. But that innovation comes at a $500 price tag that leaves us wondering if you’re better off just buying one of the best gaming monitors instead.
Design of Asus ROG Strix XG17AHPE
With speedy specs, there’s no doubt that the Asus ROG Strix XG17AHPE is for gamers, but with portable monitors offering little space to work with, gamer aesthetics are only embodied by a pair of watchful eyes that are the Asus ROG logo. With black the dominating color, the overall look here is pretty mute, but Asus found subtle ways to include premium touches.
With its subtle placement, smooth feel and silver look, the Asus ROG logo actually looks good in a bottom bezel that also manages to fit in two 1W front-firing speakers without taking up too much room. The back of the Asus ROG Strix XG17AHPE is its fanciest looking part. A diagonal line starkly divides two contrasting brushed finishes that makes one half look darker than the other. Here lies another ROG eye that glows when the monitor’s on. I’m not usually a fan of massive branding, but when the logo looks this good and gives out a vibe this creepy, I can’t help but appreciate it.
The 17.3-inch Asus ROG Strix XG17AHPE will naturally take up more desk space than the 15.6-inch MSI Optix MAG161V (15.7 x 9.9 x 0.4 inches for the Asus versus 14.05 x 8.94 x 0.43 inches with the MSI), but it’s still comparably thin and even thinner than the Lenovo ThinkVision M14 (12.7 x 8.2-8.7 x 3.8 inches). However, with its larger size, the Asus is also heavier than those non-gaming portable displays (2.3 pounds versus the MSI’s 2 pounds and the Lenovo’s 1.3 pounds). But if you want larger screen size, which is handy for immersing yourself in the game as much as possible, the extra screen real estate will be worth the extra pound, and pixel density is still fantastic at 127.3 pixels per inch.
A small way the Asus ROG Strix XG17AHPE starts earning its price tag is through versatile connectivity options. If you have a laptop or desktop with a USB-C port that supports DisplayPort Alt Mode, you can connect to the monitor that way. If your computer's USB-C port can charge other devices, you can even use the ROG Strix XG17AHPE without ever having to worry about it running out of battery. Through USB-C, the monitor can receive up to 12V at 2A (with USB Power Delivery 3.0). With my laptop’s Thunderbolt port, I was able to use the ROG Strix XG17AHPE with a single (included) USB-C to USB-C cable for hours without its battery life ever dropping. USB-C also serves to connect tablets and smartphones, including a Samsung Galaxy S10 I connected to it effortlessly.
Either of the two USB-C ports can power the monitor, so if none of your system’s ports can’t do that, you can use one to connect to your device and the other to supply it power. The Asus ROG Strix XG17AHPE comes with a USB-C to USB-A adapter, which plugs into an included power brick. That adapter also means the monitor can connect to your system’s USB-A port and receive power.
In addition to USB-C or USB-A, you also have the option to connect to a device’s HDMI port via a MicroHDMI to HDMI cable. This opens up possibilities in the world of Raspberry Pi, gaming consoles and even cameras. If you use HDMI, it’ll either run on battery (see the Battery Life section) or you could simultaneously give the monitor power through a USB-C cable. There’s also a 3.5mm headphone jack for plugging in your best gaming headset.
The panel’s left side holds all the ports and controls. Controls come in the form of a power button located higher than the rest of the inputs and lights up when on or charging, plus three additional buttons. They’re all pretty shallow but worked on the first try.
Origami Stand on Asus ROG Strix XG17AHPE
Like with many portable monitors, the Asus ROG Strix XG17AHPE uses an origami-style stand that you must fold a certain way to prop up the monitor. It felt a little more intuitive to fold than the one found on the Optix MAG161V, and the Asus has a magnetic hard bit that secures under the bottom bezel for added stability. But the stand was still a pain in the butt.
The origami stand does allow for different levels of back tilt, but I sometimes wished I could get the monitor closer to 90 degrees to better line it up with a connected laptop. If my table started shaking due to aggressive typing, I’d notice the XG17AHPE wobbling too. But the monitor never came crashing down, even if I slid it across my desk (putting pressure on the top bezel was a different story though).
In portrait mode, the stand never failed me, but I felt nervous the whole time. The stand just doesn’t provide enough of a foundation for me to feel safe using it that way long-term or with a wobbly table. But I have to admit that having this much vertical screen space is fantastic for reading and something missed with the vast majority of laptops.
We wish more monitors would employ a reliable and sturdy kickstand like Lenovo does with the ThinkVision M14, which has not one, but two built-in stands. Portable monitors are just too delicate and, in the XG17AHPE’s case, expensive to bet it all on thin, bendy stand-sleeves. The monitor will eventually be available as a different SKU (XG17AHP) with a tripod stand, (plus the same sleeve and a bag), but that ups the monitor’s price to $600.
As bad as this thing is as a stand, it’s even worse as a protective case. While the cover makes a debatably safe stand, it’s an undeniably flawed protector that leaves the sides and back of the monitor exposed. Since this monitor’s meant for traveling, we expected Asus to provide a sleeve that covered all bases without easily sliding off.
Gaming Performance of Asus ROG Strix XG17AHPE
A 240 Hz monitor opens up a world of potential for first-person shooters and other eSports. While even the best graphics cards for gamers can’t always push AAA titles at a frame rate of 240 frames per second (fps) and high settings, eSports games look extra smooth at 240 fps with low latency and the elimination of disastrous distractions, like ghosting. The Asus ROG Strix XG17AHPE's FreeSync fights off screen tearing, which happens when your GPU’s frame rate doesn’t match up with the display’s refresh rate, but that only works with AMD graphics cards.
Unfortunately, with New York City in lockdown we couldn’t use our lag tester on the Asus ROG Strix XG17AHPE; however, I put it through its Overwatch paces, paired to a gaming laptop running an Nvidia GeForce GTX 1060 mobile GPU. I used the monitor’s out-of-the box settings, so overdrive was set to Level 3.
As I played Overwatch for a few hours, I didn’t notice any input delay with the monitor with the game set to run at 1920 x 1080 at 240 Hz, but with a GTX 1060 GPU, I was only able to hit a frame rate of about 63-85 fps. To maximize the screen’s potential, I’d need a more-powerful GPU that can push out 240 fps with this game.
Still, images on the ROG Strix XG17AHPE appeared smooth, even during Sigma’s most intense and fastest moments of battles or when enemies filled the screen. Trotting around felt very smooth and realistic. Ocean waves in the distance moved smoothly without stuttering. I’m used to gaming on a 17.3-inch 144 Hz screen, so I didn’t notice a grand improvement in quality when graduating to a 17.3-inch 240 Hz display. But if you’re moving from a standard 60 Hz screen, your experience may differ.
On-Screen Display, Calibration on Asus ROG Strix XG17AHPE
The Asus ROG Strix XG17AHPE's on-screen display (OSD) is surprisingly navigable for a portable monitor settings menu. Pressing the menu button on the side brings up icons on the display that align with the corresponding buttons for activating. This makes it easy to know where the buttons for scrolling, selecting and back are. It’s no joystick, but the pop-ups are large and proved helpful in navigation.
Asus also surprised me with a large number of calibration options on the ROG Strix XG17AHPE. The Gaming menu features overdrive (five levels of overdrive, plus off), an option for toggling FreeSync and the GamePlus menu, which has a crosshair, timer, FPS counter and display alignment. In the GameVisual section, you can pick from eight image modes. Racing is the default, but there’s also Scenery, Cinema, RTS/RPG, FPS, sRGB, MOBA and User. The Gaming section also has Shadow Boost, which, according to Asus, “clarifies dark areas of the game without overexposing brighter areas” with three levels, including 0, the default.
The Image section of the ROG Strix XG17AHPE's OSD provides control over things like brightness, contrast and the blue light filter, depending on the mode selected. Meanwhile, the Color menu has options for Color Temp (cool, normal, warm, or user with red, green and blue sliders from 0-100%), Gamma (2.2, the logic default, or 1.8 or 2.5) and Saturation.
Other menu sections include Power, Input Select (HDMI or USB Type-C), My Favorite, for shortcuts and customized settings and System Setup, with standards like language, volume, key lock, OSD setup and reset. There’s also an Auto Rotation feature, but to use it you must download Asus’ DisplayWidget software.
Image Quality on Asus ROG Strix XG17AHPE
We did our testing with out-of-the box image settings, so the Asus ROG Strix XG17AHPE was in Racing Mode with contrast set to 80 and the blue light filter and Shadow Boost off.
The ROG Strix XG17AHPE worked great as my general second display with plenty of brightness. Even when I was facing a sunny window, the screen was bright enough for productivity use at 50% max brightness, and games were playable at this setting, albeit more dull.
Word documents were luminous enough to edit while looking at the monitor head on, and when I turned it perpendicular from me, I could still view documents and games, but with just a touch of reflection in the further third of the screen. When I boosted brightness up to 100%, that reflection was barely noticeable. Additionally, with the screen completely flat, I could comfortably view documents and movies, only sacrificing a small amount of brightness. Credit is due to Asus’ use of IPS, a panel tech known for strong viewing angles.
Overwatch, a particularly colorful game, looked properly saturated on the Asus ROG Strix XG17AHPE, and dark colors were distinct. Different shades of dark green topiaries and a yellow sunflower were apparent in shadowed corners. Colors on the movie Mission: Impossible Fallout were also strong, from green poplars that looked exuberant and vivid as Ethan and Ilsa walked past them, to differing shades of gold and rust in a club scene. Even the secretly olive green in Ilsa’s jacket was discernible on the ROG Strix XG17AHPE.
The ROG Strix XG17AHPE proved pleasantly bright in our testing but fell short of Asus’ 300-nit max brightness claim. Still, 285.6 nits is plenty and still brighter than the next runner up by 117.2 nits, as well as the average of the comparison group by 81.6 nits.
Asus claims that the ROG Strix XG17AHPE covers 100% of the sRGB color space, but our review unit actually surpassed that slightly. Colors on the Asus should look more saturated than those on the MAG161V or the 15.6-inch Asus ZenScreen MB16AC. The Lenovo fell behind the XG17AHPE by 11.5%. When it came to the wider DCI-P3 space, the XG17AHPE hit an impressive 77.5% coverage, significantly better than what MSI’s MAG161V or Asus’ MB16AC can do here.
Battery Life on Asus ROG Strix XG17AHPE
The Asus ROG Strix XG17AHPE runs on a 7,800mAh battery. If you have a USB-C or USB-A port with Power Delivery 3.0 support, it can provide the monitor enough power to save you from having to get a charger. When I used it with a Thunderbolt port, battery life never fell below 100%, and when I used it with a supporting USB-A port for 7 hours at max brightness, the battery life only dropped to 97%.
But if your device doesn’t have a Power Delivery port, the monitor will be running off battery power. With the Asus ROG Strix XG17AHPE running at 240 Hz and using the speakers at max volume, it lasted about 2 hours at 80% brightness. At 100% brightness and without using the speakers, it lasted about 3 hours and 30 minutes.
At 60 Hz, the display uses less battery power. With brightness maxed out, but rarely using the speakers, the Asus ROG Strix XG17AHPE lasted 3 hours. When I used the XG17AHPE at 50% brightness at this refresh rate, the portable monitor lasted about 4.5 hours.
Asus claims that the ROG Strix XG17AHPE can get enough juice to game for 2 hours at the max 240 Hz refresh rate with an hour of charging.
Audio on Asus ROG Strix XG17AHPE
It’s not the primary reason people buy portable monitors, but the Asus ROG Strix XG17AHPE's two 1W stereo speakers are shockingly loud and might outblast a connected phone, tablet or disappointing laptop speakers. The ROG Strix XG17AHPE’s speakers were especially handy when I played emulated N64 games off a Raspberry Pi, which, of course, doesn’t include speakers, as would also be the case if you connected the XG17AHPE to a gaming console.
Because the speakers on my laptop are particularly bad, the Asus ROG Strix XG17AHPE's speakers were actually an upgrade when I played Overwatch. With front-firing speakers, audio from the monitor never sounded muffled. During battle, I could make out the differences in sound effects from various weapons and still clearly hear characters' voices and even that of my teammate, who wished something bad would happen to me in real life (I hope you live a long life, pal!). Overall, the Asus ROG Strix XG17AHPE provided fuller sound, even allowing me to hear wind blowing in the background during a quiet training session that I couldn’t hear when I toggled audio back to my lackluster laptop speakers.
Hearing Mission: Impossible Fallout was also easy, even with the windows in my Brooklyn apartment open. Ethan and Ilsa’s whisperings were hard to make out, but gunshots were booming, and I could even follow the echo of Luther’s pained voice traveling down a tunnel.
You can also plug a pair of cans into the display’s 3.5mm headphone jack, which uses an integrated ESS ES9118 digital-to-analogue (DAC) converter. For audiophiles, the SoC drives 24-bit, 192 kHz lossless playback that Asus promises delivers “unprecedented dynamic range and ultra-low distortion.”
Bottom Line
The Asus ROG Strix XG17AHPE is an amazing portable monitor for gamers with the need for it. Nothing can compete for pairing with a good graphics card or gaming console or just packing up for a LAN party, thanks to its thin build and 2.3-pound weight. And with great viewing angles, it’s also a great second screen for work.
But $500 is a steep price to pay for a portable monitor considering that some of the best full-sized PC gaming monitors are available for less. 240 Hz monitors are so speedy that they’re in their own category, but our favorite 240 Hz desktop monitor right now is the Samsung 27-inch CRG5, which as of this writing is a mere $400. Looking around online, I also found a 27-inch LG 240 Hz monitor for pre-order at $279 and a 240 Hz Acer 25-inch available now for $300. At $500, then, the XG17AHPE isn’t for gamers seeking an inexpensive way to add a 240 Hz display to their setup.
Therefore, this monitor’s best audience is those who need a monitor they can easily pick up. If you travel a lot, the Asus ROG Strix XG17AHPE will make sure you’re never stuck gaming on a lackluster screen or, even worse, not gaming at all.
If you’re just looking for a quality portable display, the Lenovo Thinkvision M14 isn’t fit for gaming, but is half the price ($250) and has a built-in kickstand rather than an annoying origami stand. That said, you can’t get this level of color saturation from Lenovo’s monitor. And the ROG Strix XG17AHPE's port selection brings valuable versatility, including console gaming, connecting to a Raspberry Pi and getting power and data from one cable.
If you need a gaming monitor that can move with you while delivering very high refresh rates, the Asus ROG Strix XG17AHPE is a premium option, but it’s also the only option we know of.
0 notes
Text
When it comes to the best gaming set up, everyone has their own opinions and preferences. Some like gaming on a triple monitor set up, while others prefer a single, high refresh rate screen. I say a 34″ ultra-wide is the best of both worlds. So, when we were asked to take a look at the AOC CU34G2X 34″ ultra-wide, I couldn’t wait to get my hands on it. The CU34G2X from AOC is a 34″ ultra-wide with a 21:9 aspect ratio. With a refresh rate of 144 Hz, a 1 MS response time, and a beautiful 3440 x 1440 resolution, the CU34G2X is designed with gaming in mind. However, there are several other benefits to having an ultra-wide monitor that goes beyond just gaming. So, we put the CU34G2X to the test to see the benefits out way the cost of on paper, what looks to be a great option for anyone looking for an ultra-wide monitor. But specs aside, how does the CU34G2X perform, let’s find out.
We would like to thank AOC for providing us a sample of the CU34G2X to check out!
Specifications
Monitor color
Black Red
Monitor size
34 inch
Resolution
3440×1440
Refresh rate
144Hz
Response time
1 ms
Panel type
VA
Backlight
WLED
Aspect ratio
21:9
Brightness
300
Contrast (dynamic)
80M:1
Pixel pitch
0.23175
Active Screen Area
797.22 x 333.72
Viewing Angle
178/178 º
Colors
16.7 Million
Bezel type
Frameless
OSD languages
EN, FR, ES, PT, DE, IT, NL, SE, FI, PL, CZ, RU, KR, CN (T), CN (S), JP
Connections
Signal input
HDMI 2.0 x 2
DisplayPort 1.4 x 2
Display Port version
1.4
USB Input
USB 3.2 (Gen1) x 4
Audio output
Headphone out (3.5 mm)
Features
Curved screen Curved
What’s in the box
HDMI Cable 1.8 m
Displayport Cable 1.8 m
Power shuko c5 Cable 1.8 m
Sustainability
RoHS
Ergonomics
Swivel -30°±2°~+30±2° °
Tilt -5±2°~+23±2° °
Ergonomic height amount 130mm
Base removal
VESA 100×100
Power
Power supply
Internal
Power Consumption On
37W watt
Power Consumption Standby
<0.5W watt
Dimensions
Carton dimensions mm x mm x mm
903x548x280
Net weight excluding packaging
8 kg
Gross weight including packaging
9.47 kg
Warranty
Warranty period 3 Years
A Closer Look at the AOC CU34G2X
Being an ultra-wide, the CU34G2X takes up a fair amount of desk space measuring 903 mm x 548 mm x 280 mm. However it also gives you a fair amount of screen space without having to deal with annoying bezels like on multi-screen set-ups. The CU34G2X is also a curved monitor. We all know the benefits of a curved screen. A curved screen offers wider viewing angles. The shape also gives you the illusion of panoramic viewing. But overall, a curved ultra-wide screen offers an all-around more immersive experience than even a flat ultra-wide can.
The CU34G2X from AOC is a 34″ ultra-wide with an aspect ratio of 21:9, a resolution of 3440 x 1440, a 1 ms response time, and a refresh rate of 144 Hz. The CU32G2X has a vertical alignment or VA panel that is back-lit by white light-emitting diodes, or WLEDs. The VA panel on the CU32G2X has a dynamic contrast ratio of 80M:1. The CU32G2X has a viewing angle of 178/178° and sports 16.7 million colors. The stand on the CU34G2X does both swivel and tilt. The swivel range is between -30°±2°~+30±2° and the tilt range is between -5±2°~+23±2°.
#gallery-0-34 { margin: auto; } #gallery-0-34 .gallery-item { float: left; margin-top: 10px; text-align: center; width: 33%; } #gallery-0-34 img { border: 2px solid #cfcfcf; } #gallery-0-34 .gallery-caption { margin-left: 0; } /* see gallery_shortcode() in wp-includes/media.php */
In addition to both tilt and swivel, the height of the CU34G2X can also be adjusted. At its highest point, the bottom edge of the CU34G2X sits 6.25″ or 158.75 mm from the top of the desk. At its lowest point, the bottom edge of the monitor sits only 1.25″ or 31.75 mm from the top of the desk.
#gallery-0-35 { margin: auto; } #gallery-0-35 .gallery-item { float: left; margin-top: 10px; text-align: center; width: 50%; } #gallery-0-35 img { border: 2px solid #cfcfcf; } #gallery-0-35 .gallery-caption { margin-left: 0; } /* see gallery_shortcode() in wp-includes/media.php */
The CU34G2X has the standard 100 mm x 100 mm VESA mount. It even comes equipped with VESA mount screws already attached to the back of the monitor. The included stand does not require screws to install. It simply slides into place at the top of the VESA mount cutout and clicks into place at the bottom. There is a release switch on the mounting plate on the stand. Pushing this switch up releases the stand from the monitor.
#gallery-0-36 { margin: auto; } #gallery-0-36 .gallery-item { float: left; margin-top: 10px; text-align: center; width: 50%; } #gallery-0-36 img { border: 2px solid #cfcfcf; } #gallery-0-36 .gallery-caption { margin-left: 0; } /* see gallery_shortcode() in wp-includes/media.php */
The Stand for the CU34G2X is made prominently out of plastic, aside from the part that attaches to the actual monitor. But more on that later. As we mentioned earlier, the stand on the CU34G2X both swivels, as well as raises and lowers. Also, there is a cutout in the actual stand made for cable management. This is a small but welcomed feature. Especially when you have as many cables running through your office as I do.
#gallery-0-37 { margin: auto; } #gallery-0-37 .gallery-item { float: left; margin-top: 10px; text-align: center; width: 33%; } #gallery-0-37 img { border: 2px solid #cfcfcf; } #gallery-0-37 .gallery-caption { margin-left: 0; } /* see gallery_shortcode() in wp-includes/media.php */
On the back panel, there are four USB 3.2 (Gen 1) ports and one USB B port. Using a USB A to B cable, you can power the other USB ports on your monitor. The Yellow USB 3.2 (Gen 1) port is an always-on port. So, as long as the USB A to B cable is connected to your PC, even when the PC is off, this port will have power. I keep my phone charger plugged into the always-on port so I can always charge my phone. For video, there are two HDMI 2.0 ports and two Display Port 1.4 ports. Last, there is a single 3.5 mm audio out port for headphones, speakers, or a soundbar.
#gallery-0-38 { margin: auto; } #gallery-0-38 .gallery-item { float: left; margin-top: 10px; text-align: center; width: 33%; } #gallery-0-38 img { border: 2px solid #cfcfcf; } #gallery-0-38 .gallery-caption { margin-left: 0; } /* see gallery_shortcode() in wp-includes/media.php */
The CU34G2X has an internal power supply. This means, no external power brick. When on, the CU34G2X consumers about 37 watts per hour. When on stand by, the CU34G2X uses less than 0.5 watts per hour. The CU34G2X uses a standard computer power cord (NEMA 5-15P to IEC 320 C13). The port for the power cable is located left of the monitor when looking at it from the front. Just below the port for the power cord is a Kensington Security Slot for a Kensington Lock. For those who may not know what a Kensington Lock is, more on that here: https://en.wikipedia.org/wiki/Kensington_Security_Slot
AOC describes the CU34G2X as having a frame-less bezel. Unlike traditional monitors that have a bezel around the screen, the panel on the CU34G2X goes directly to the edge. So, if you were to pair two or more of these monitors together, there wouldn’t be a large gap between monitors. But, there is only so much to say about the outside of a monitor. So, let’s get into the initial assembly.
Assembly
This section will consist of assembling the actual monitor. The assembly of the CU34G2X is rather straight forward. The base has four feet. Two small feet on the back and two large feet on the front. In the center of the base, there are two metal nipples, for lack of a better word. In the center, you can see the tip of a bolt that will attach the stand to the arm.
#gallery-0-39 { margin: auto; } #gallery-0-39 .gallery-item { float: left; margin-top: 10px; text-align: center; width: 50%; } #gallery-0-39 img { border: 2px solid #cfcfcf; } #gallery-0-39 .gallery-caption { margin-left: 0; } /* see gallery_shortcode() in wp-includes/media.php */
The center of the base has a red ring around the part that swivels. There is a cutout in the middle of this red ring for the stand arm to sit in, as well as slots for the stand base to sit in on the arm. There is a screw with a wing nut on the bottom of the base of the stand. This screw tightens down to secure the arm to the base.
#gallery-0-40 { margin: auto; } #gallery-0-40 .gallery-item { float: left; margin-top: 10px; text-align: center; width: 33%; } #gallery-0-40 img { border: 2px solid #cfcfcf; } #gallery-0-40 .gallery-caption { margin-left: 0; } /* see gallery_shortcode() in wp-includes/media.php */
As we mentioned earlier, the CU34G2X has a standard 100 x 100 VESA mount. The Stand is made up of mostly plastic. However, there is a metal VESA mounting plate on the arm. This is the part that attaches to the actual monitor. there are two metal clips at the top of the plate, and two plastic clips at the bottom. The plastic clips are what snaps the monitor on to the stand. On the back of the mounting plate, there is a release switch for the monitor stand.
#gallery-0-41 { margin: auto; } #gallery-0-41 .gallery-item { float: left; margin-top: 10px; text-align: center; width: 33%; } #gallery-0-41 img { border: 2px solid #cfcfcf; } #gallery-0-41 .gallery-caption { margin-left: 0; } /* see gallery_shortcode() in wp-includes/media.php */
Now that our CU34G2X is assembled, its time to get into the OSD, or on-screen display.
On-Screen Display
I’ll admit, I never, ever go into the OSD, or on-screen display for any monitor I buy. I generally find them annoying and tedious to use. I am still holding out hope that someone will put out a monitor with a remote. That being said, the OSD for the CU34G2X from AOC wasn’t difficult to navigate at all. My one complaint on the OSD is I have a hard time seeing the icons on the bezel. But, that is due to my poor eyesight. However, my camera can see them. So, going from right to left, there is first a light that indicates power. If the monitor is on, the light will be in. Next, there is a power button. For the actual OSD controls, there is the Menu button, that brings up the OSD, the scroll right and scroll left buttons, and the Go Back, or return button.
#gallery-0-42 { margin: auto; } #gallery-0-42 .gallery-item { float: left; margin-top: 10px; text-align: center; width: 33%; } #gallery-0-42 img { border: 2px solid #cfcfcf; } #gallery-0-42 .gallery-caption { margin-left: 0; } /* see gallery_shortcode() in wp-includes/media.php */
Before we get into the OSD, there are a couple of quick menus that can be brought up with the touch of a button. Pressing the “Go Back” button for the OSD will bring up the input selection menu. Pressing the left arrow button will bring up gaming mode. Pressing it again when the Game Mode box is on the screen, it will allow you to scroll through the different game modes. Pressing the right arrow will put a crosshair on the center of the screen. Now, on to the menu.
When using the OSD for the CU34G2X, the fist section the menu will open to is Luminance. In this section, you can adjust settings such as contrast, brightness, and Gamma. Here is where you can also enable modes such as ECO Mode, DCR, and HDR mode.
The next section on the OSD is the Color Set-Up section. Here, you can set the color temperature. You can also enable DCR, or Dynamic Contrast Ratio mode, as well as enable the DCR demo. Enabling the DCR demo will initiate a split-screen mode. One side with DCR enabled and the other with it disabled. This is more meant for when the monitor is on display at say a retailer like Best Buy or Microcenter. Also in color setup, you and adjust the RGB levels. By this I mean the red, green, and blue levels on the display. Not RGB lighting, The RGB levels can only be adjusted when the color temp is in User Mode.
The picture boost section has an option called Bright Frame. This allows you to create a picture frame of sorts in any position on the monitor, at any size. Inside the picture frame you create, you can control the brightness and contrast of that section of the screen, separately from the rest of the screen.
The OSD settings allow you to adjust the settings of the On-Screen Display. you can adjust everything from position to transparency. You can also switch between several different languages including English, French, and Spanish just to name a few. a full list is in the Specifications section of this review. There is also an option to adjust the volume of the audio output, as well as the timeout of the OSD. I wish I had played with that one before trying to take pictures of the OSD.
The PIP, or Picture in Picture menu allows you to set up just that, the picture in picture feature. It allows you to select from the four inputs, what one you want as the main display, and what one you want as the secondary display. You can select from three different sizes, small, medium, and large. You can enable or disable the audio as well and select the position you want the secondary display.
#gallery-0-43 { margin: auto; } #gallery-0-43 .gallery-item { float: left; margin-top: 10px; text-align: center; width: 50%; } #gallery-0-43 img { border: 2px solid #cfcfcf; } #gallery-0-43 .gallery-caption { margin-left: 0; } /* see gallery_shortcode() in wp-includes/media.php */
The Gaming section is where you can customize your CU34G2X for gaming. Here you can enable game mode. Game mode will lower your response time, but usually at the cost of image quality. But not that much. The gaming settings also have shadow control, game color, and MBR, or Motion Blur Reduction sliders. You can also enable Adaptive Sync, Pixel Overdrive, and LowBlue modes in the Gaming section. But, my favorite feature in the Gaming Settings has to be the FPS counter that can be enabled.
The final section of the OSD is the Extras section. here you can select the different inputs, reset all settings, and set an off timer. Now, let’s get into my personal experience with the CU34G2X from AOC.
Testing and Benchmarks
Test System
Processor
Intel Core I7 9700K (Confidential Processor)
Motherboard
Aorus Z390 Pro
Graphics Card
AORUS RTX 2080 Waterforce
Memory
Aorus RGB Memory 3200 MHz Cas 16
Storage
512 GB Crucial P1 NVM3 M.2 SSD
Power Supply
850 Watt EVGA SuperNova P2 80+ Platinum
Cooler
Custom Cooled
XSPC D5 pump
XSPC Photon 270 ml Reservoir
360 mm x 60 mm Radiator
3 Fractal Design Prisma Fans
3 EK Vardar Fans
EK Vector RGB Waterblock
Case
Thermaltake Core P5
Games
Assassin’s Creed Odyssey
Deus Ex: Mankind Divided
Far Cry New Dawn
Far Cry 5
Strange Brigade (DX12)
Strange Brigade (Vulcan)
Red Dead Redemption 2 (DX12)
Red Dead Redemption 2 (Vulcan)
Shadow of the Tomb Raider
Wolfenstein Young Blood
Testing a monitor is unlike testing say a graphics card. It isn’t much different I’d do from my day to day uses as most of the experience is very subjective. However, there is a process for everything. So, the first step once the monitor was set up and ready was to calibrate the screen using the Spider5 calibration tool and the Spider5 Express software as that’s what came with the actual tool. Once Spider 5 Express was installed, we placed the sensor on the screen, and it took about 4 or 5 minutes to calibrate as the screen changed to several different colors.
#gallery-0-44 { margin: auto; } #gallery-0-44 .gallery-item { float: left; margin-top: 10px; text-align: center; width: 33%; } #gallery-0-44 img { border: 2px solid #cfcfcf; } #gallery-0-44 .gallery-caption { margin-left: 0; } /* see gallery_shortcode() in wp-includes/media.php */
Once the CU34G2X from AOC was calibrated, it was time to get to the real-world testing. Now, I’ve been using the CU34G2X for about a month and a half. I previously had a 34″ ultra-wide that I sent an umbrella stand through. When it came time to replace it, I ended up with a 32″ 144 Hz screen in its place. I have felt empty ever since. Until the CU34G2X hit my desk. Now, for gaming, an ultra-wide is a great option. However, the benefits of an ultra-wide go far beyond just gaming. Originally, I had a 3 27″ 1080p monitors and I used to game in surround. When I first started writing reviews, I opted for an ultra-wide simply so I could include 3440 x 1440 resolution in my gaming results. Then, I started getting into editing in Photoshop and Premiere Pro. No, it wasn’t Photoshop that made me fall in love with this monitor as I have a 10-Bit 4k monitor for editing pictures and the CU34G2X is only an 8-bit panel. It wasn’t even gaming, but Premiere Pro. I forgot how great it is to have all that extra screen space dedicated to my timeline.
With a 1 ms response time and 144 Hz refresh rate, the CU34G2X was designed with gaming in mind. and it does an excellent job in-game. The 144 Hz refresh rate gives you buttery-smooth game play. But, depending on the game, there are random dips here and there. So, I enabled adaptive sync as well as the on-screen frame counter. Adaptive sync dynamically adjusts the refresh rate to match the refresh rate of the GPU. The CU34G23X is the first monitor I’ve ever tested that has adaptive sync. I have Freesync monitor sure, but I’ve never had a GPU that supports FreeSync. So, I had never really used adaptive sync before, until testing the CU34G2X. I was so impressed with how well adaptive sync works. It kept even RDR2 running at 144 Hz and it looked amazing. We decided to add in some gaming benchmarks for the RTX 2080 Waterforce in amazing 3440 x 1440 resolution, at 144 Hz and adaptive sync off.
All games were tested at their highest preset. in 3440 x 1440 resolution. The system we used consisted of an i7-9700k, AORUS RTX 2080 Waterforce, and 16 GB of AORUS RGB memory running at 3600 MHz. The two best performing games were Strange Brigade in Vulcan and Wolfenstein Young Blood. Strange Brigade in Vulcan averaged 104 frames per second on the RTX 2080 Waterforce in 3440 x 1440 resolution. Wolfenstein Young Blood was second with an average of 102 frames per second. Strange Brigade in DX12 was next with an average of 88 frames per second. Far Cry New Dawn and Far Cry 5 were both close in averages. Far Cry New Dawn averaged 76 frames per second and Far Cry 5 averaged 74. Shadow of the Tomb Raider was next on our list with an average of 57 frames per second followed by Deus Ex with an average of 51 frames per second. Red Dead Redemption 2 in Vulcan averaged 49 frames per second. In DX12, Red Dead Redemption 2 tied with Assassin’s Creed Odyssey with an average of 46 Frames Per Second. Now with all that being said, enabling adaptive sync the built-in frame counter was always at 144 Hz in any game I played. Except for one. My absolute favorite experience with the CU34G2X from AOC had to be playing modded Skyrim in 3440 x 1440 resolution. Although the game doesn’t support a 21:9 aspect ratio, it can be tweaked in the INI files of the game to support 3440 x 1440 resolution. and it looks great. But this was the one game that the frame counter was locked at 100. Without adaptive sync, Skyrim usually stays locked at 60 frames per second, or at least won’t go higher than 60 frames per second.
Final Thoughts and Conclusion
Overall, I can’t say enough good about the CU34G2X from AOC. I’ve owned other ultra-wide monitors before. However, this is the first time I’ve had a 34″ ultra-wide with a 144 Hz refresh rate in my office. I remember now why I originally switched from a triple screen set up to a single ultra-wide. The CU34G2X offers an amazing and immersive gaming experience. The curved screen offers better viewing angles than a flat version would and it just looks better than any flat screen I own. For an 8-it panel, the CU34G2X offers very vivid and bright colors, as well as deep, dark blacks. This makes the CU34G2X a great option for gamers who also do some editing on the side. For a YouTuber who is just uploading twitch streams or talking head videos, the colors on the CU34G2X are more than good enough for editing both video and even stills. Now, if you edit on a more professional level and get into color grading, then this probably isn’t the monitor for you. But again, this is a gaming monitor, not a professional one.
Games ran great on the CU34G2X. The gaming features on this monitor are plenty. One feature I never expected to use was the picture in picture feature. This was a very useful feature, especially when bench-marking. When running benchmarks, I won’t run anything else on that system in case it messes up the benchmark. So, having a picture in picture was great. I had two computers hooked up to the CU34G2X and when I was running benchmarks, I could still watch YouTube or and my benchmark on the same screen. It’s the little things in life. This was my first experience with adaptive sync and I fell in love with it. It is one of those features that you can’t go back to not using once you experience it. When my previous ultra-wide broke, I just couldn’t afford to drop another $1000 on a 34″ ultra-wide. So, I’ve put it off for a very long time. Generally, the features I am personally looking for in an ultra-wide would run between $700 and $1000. But, the MSRP of the CU34G2X from AOC when it officially launches on May 12, 2020, is only USD 449.99. That is an amazing price for the number of features AOC crammed into this 34″ ultra-wide. The CU34G2X is the ultra-wide monitor I have been waiting for for a very long time. Try it out, you won’t be disappointed!
[sc name=”award-editors-choice” ]
AOC CU34G2X 34″ Curved Ultra Wide Monitor Review When it comes to the best gaming set up, everyone has their own opinions and preferences. Some like gaming on a triple monitor set up, while others prefer a single, high refresh rate screen.
#2k monitors#2K Ultrawide#3440 x 1440 monitors#AOC#AOC Monitors#PCTB Monitor reviews#QHD#ultrawide monitors#UWS
0 notes