#i'm going to have to sew the individual pieces together and i'm trying Not to think about it
Explore tagged Tumblr posts
Text
I'm almost done with the first set of ribbing on this project, and my poor, poor skein has gone through hell 💀😭

#art#crochet#my first project tag#described images#image description in alt#i'm so close to being done with the ribbing so i can start the rest of the fabriccc#this is only for either the front/back of the hoodie so i'll have to do this again later#i'm going to have to sew the individual pieces together and i'm trying Not to think about it#my method has been to play skyrim then get bored then do some rows then repeat
26 notes
·
View notes
Note
I really like your idea of "scrap management" and I'm thinking of trying it myself. So I'm just wondering, do you try to put scraps together that have similar/coordinating colors or patterns, or do you literally just put anything together? I have some "christmas" themed scraps, but not really enough for a quilt or anything, and I think they might look ugly/out of place with my other scraps. Just curious how you go about it.
Thank you for the great idea! You're always sharing neat stuff. :)
I kind of do both? I have my initial box of scraps, which is a little plastic shoebox thing where I stick any quilting scraps smaller than like half a fat quarter but larger than 1/2" as I finish projects. Then I kind of have two separate systems. For my original scrap quilt idea, before I learned crumb quilting, I'd take those scraps, iron them, and cut out 3.5" squares, 6.5" squares, and 2.5" wide strips. My finished scrap quilt will alternate between patchwork squares made of two 6" squares and two sets of four 3" squares, and 12" blocks made of six rows of strips. When I have a bunch of the 2.5" strips, I cut up the long pieces so no individual piece is longer than 12.5", sew short ends together at random until I have a long roll of 2.5" wide fabric, then cut it into 12.5" lengths. I mix them up and sew them together pretty much at random (I do try to make sure no identical fabrics end up touching). Once I've cut out the more uniform sizes, I sort the smaller scraps that are left by color into smaller boxes. When I feel like crumb quilting, I either pick a few colors I want to work with or decide I want to work at random. If I've picked a color palette, I'll pull a bunch of pieces out in that color spread and iron them, then start sewing. If I decide to make it at random, I'll iron a bunch of scraps I like the look of together, then start sewing them together in pairs and go from there. Oh wait I forgot one scrap thing: I have some very cartoony halloween fabric from a scrap pack I got, and I treat that a little differently. I use that for kennel quilts I make for donation to animal shelters. I don't really like the fabric, and it doesn't match or even clash interestingly with the rest of my fabrics, so it is in its own box and when I have scraps of batting too small for a quilt and scraps of backing fabric leftover from a quilt in a color or pattern I don't really want to use and/or have too much of, I make some kennel quilts. If I had christmas scrap fabric it'd probably be kennel quilt fabric for me
#ask away!#scrap management#the important thing about scrap management is to think of it as an ongoing task#that you do a little at a time like maintenance#otherwise it can seem overwhelming and never-ending#I'm not against either halloween or christmas fabrics#I have a lot of halloween fabrics I love! I made a whole halloween baby quilt!#but some halloween things are just not my vibe you know?#I don't think I have any christmas fabric at the moment but that's because I mostly make quilts for friends and family#and I don't know any of my friends or family that would use a christmas quilt year-round#but I know SEVERAL that would ABSOLUTELY use a halloween quilt#I've got a big awesome corvid panel I'm going to make a chaos halloween quilt around for a friend of mine
2 notes
·
View notes
Note
Good evening, Liz! For monikers, I've been thinking between pirate or dragon. Pirate fits the person-archetype theme, but I would be remiss to ignore your URL. Perhaps you can choose between the two, or even pick both?
I've had cornbread muffins, which might count, but no good plain bread freshly homemade. Comes with living poor and disabled in a city, I suppose. The custard is frozen, yes, the ice cream type. I find I prefer custard ice creams over the regular kind, for some reason. There's little discernible difference, but the places I get my frozen custard must have better options, I suppose. I enjoy sorbets quite a bit as well.
Thank you for the hoorahs in return! I'll save them for a rainy day, perhaps once I've gotten some sewing done, or if I need motivation to get started on it.
Eclectic fashion is my favorite, honestly. Though, less eclectic where nothing fits together, and more the kind where you get one really loud piece and build something around it. I've a few choice items I've found at thrift shops that are just delightfully horrid, and I love the challenge of making them presentable. I especially enjoy "owning" the tackiness and being proud in it.
For scents... Perhaps a compromise between your two poles of options? A fresh apple, perhaps. Food-based but light, and it brings to mind images of late spring to early autumn, where everything's green and loud. Makes me think, also, of noisy, shameless laughs with your close friends. It seems to fit you quite well.
My favorite baked good... I'm quite partial to danishes, usually with cream cheese. I've been meaning to try the varieties with fruit topping, though. You also can't go wrong with cake, though.
For your question: if you could have any animal as a magical familiar, which animal would it be?
- With love, the Knight
Jereliz the pirate-dragon certainly has an air of whimsy about it, and let it never be said that I don't appreciate a good portmanteau (even if neither of those is technically a portmanteau. shhhh)
Cornbread muffins are good! But yeah, a nice loaf of fresh baked bread with chewy and soft insides and a crispy crust, still steaming from the oven, is irreplaceable. I hope you get to experience it someday!
Custard ice creams are often a bit richer than their egg-free counterparts, as they're made with egg yolks (which have a fair amount of fat) along with the usual cream/milk mixture. You might be detecting that difference without realizing, or it might just be a matter of flavor choices like you'd said. Maybe it's the subtle egginess! In which case I imagine you would really like eclairs, souffles, and popovers.
here's a few more for you to stockpile: Hooray! Yippee! Wahoo!
That's an excellent way to go about fashion, I think. I tend to not invest a lot of energy in my outfits, so I go more for pieces that bring me joy individually and that aren't super off the wall, so I can mix and match fairly easily.
I like that! Or maybe some ripe strawberries, fitting the same categories (i have had strawberry based nicknames in the past because of how much i like them <3) I'm honored to be compared to the boisterous laughter of friends, that's one of my favorite things to both hear and do.
Danishes of all sorts are lovely. In specific, are you referring to the breadier/cakier type, like you usually find in stores, or the flakier, almost croissant-like type? I've made both, and they're both delicious, but notably different.
Oooh, that's a tricky one. Believe it or not, I'm not going to immediately go for an owl (though it's tempting). Though I love them dearly and admire them aesthetically, they're maybe not the best match for my personal vibe. they're also dumb as rocks
Maybe a prairie dog. They're unassuming at first sight, relatively small, and very cute. I definitely wouldn't want to go for an extremely large predator-type animal, as I'd be a cottage-core type of magic user. Prairie dogs are also quite social (and though i do appreciate my quiet time irl, I also very much enjoy talking with friends, both irl and digitally)
also, they love to hug and kiss, and i'd love to snuggle them

If you don't mind, I'd like to borrow the same question for you! What would your magical familiar be?
2 notes
·
View notes
Note
Oh I swear, these wee fucklings.
I'm a bit young for Compuserve, but AOL, LiveJournal, fanfiction.net in its heyday, WWOMB... babycakes I know fandom spaces you've never even heard of, many of which no longer exist. Hell, I created my FB account when you still needed a .edu email to sign up because it was originally designed for college students.
I was there when fanfiction was not a thing you admitted to writing, online or off. Community was a listserv, invites passed by email, hoping you hadn't just given your whole creative world to a lawyer or a studio stooge or someone who would go tattling to Anne Rice. If you wrote something REALLY cool and you had the audacity to think it was good enough, you formatted it for screenplay and then mailed it off to the producing studio in hopes they might use it for real. Knowing that by doing so, you gave up the overwhelming majority of your intellectual property rights over that creation and IF they decided to use it, you might get a "based on a story by ____" credit, you might get a call requesting more work, you might get a job... or you might get nothing at all and you didn't have the money to prove in court that the studio stole your idea.
This world you live in, where the writers and actors of your favorite shows/books/manga are X-ers and Millennials and older Gen-Zs who lurk in social media groups and deepdive AO3 to see what you're saying about their work and writing with their characters and consider fanworks transformative and valid even if they don't like your individual piece? This world where actors of shows you loved when you were ten have Cameo accounts and will actually read your fanscript and if they like it enough, get together and put it out on youtube just for the fun of it? That's all new, darlin'. And unimaginable even twenty years ago.
Look at the fics from the early aughts... they're all prefaced with legalese boilerplate disclaimers declaring which characters and bits of plot are owned by which company/studio/author and which are their own creation. That's because back then, fair use laws had not expanded to encompass fanfiction, fanart, etc and people were still getting sued left right & center. Imagine that. Sued. Over shipping people the director didn't ship. Telling stories the studio didn't approve. Making characters gay when the creator said otherwise. (*cough*ANNE RICE CAN EAT MY METAPHORICAL LEFT NUT AND I HOPE HELL IS TOASTY *cough*) Just ... try to imagine a world where the characters and worlds that bring you joy and make your life feel a little less like a trap you'll never escape are closed to any interpretation but the original. Where you are not allowed to envision yourself in that world, or at least not legally permitted to write that vision down, draw it, sculpt it, for others to see and enjoy as you did.
That's where us "grannies" lived, kiddo. It was honestly a pretty weird time, and the world has changed SO much, so very quickly. I am so pleased that you never lived in that world, truly I am.
Yes, there are proper Old Folx on "your" tumblr and social media and fandom spaces. And we're not going away. Because it was ours first. We built it. We plastered our harmless fanworks in boilerplate in hopes of avoiding Cease & Desist letters from multinational companies and authors our parents' age. We fought when those letters came anyway because for fuck's sake, we're none of us making money here, we just want to play in the sandbox too. We got the fair use laws expanded to cover your "inspired by" art and sewing patterns and mugs and screen-accurate custom-fitted cosplay shops. We grew up and became the writers, producers, directors, actors in the shows you love today, who see a really cool idea in a fic and contact the author to find out if they mind it becoming canon... because any of us is ever gonna say no. Also if your work is really good you might be offered a job, you'd be surprised how often that's happened!
I love that you feel so free and comfortable and entitled to take up space in today's world of fandom, precious child. That was in fact our goal and I am thrilled beyond measure to see it so fully realized.
But we came first. We built these spaces where your imagination can run free, and we're hardly going to pack up and shuffle off to some digital old folx home just because your fragile butt is "embarrassed" to be seen in the same spaces as our wrinkles and gray hair.
You're not embarrassed being an old woman and being in tumblr? I would rather die that my grannies have an actual account on tumblr for celebrities rho
Why would I be embarrassed for having interests I enjoy? My guess is that you’re really, really young. And that maybe you don’t actually have solid relationships with adults who have lives outside of parenting or work. But I hope for you that when you’re my age you have hobbies that bring you happiness. And that by that point you realize that trying to shame someone for being an adult only makes you look too immature to be in adult spaces, which Tumblr is.
When I was 20, I loved music, making art, writing and reading good stories, fashion, talking about popular culture, making friends, going to concerts… You’d be surprised how little changes when you’re my age. I just have way more money and time to enjoy those things now. I’m only 55. I’m not dead. I’m also not a “granny”, but even if I was, I’d probably still like all of those things.
Ageism isn’t cute, love. And I sure don’t ever see people telling men they shouldn’t go to football games or have their little “fantasy football leagues” or wear their favorite player’s merch. For every comment you guys like to say is misogynistic (but isn’t), this is one that really reeks of it.
38K notes
·
View notes
Text
Halloween Plans
Eddie Munson x platonic!Reader
Reader has no plans for Halloween and Eddie helps them to figure out what to do.
Notes: contains some swearing, M*A*S*H is mentioned
"Eddie, I have a problem", you stared into your wide open wardrobe, staring at the sweaters. "I'm going to be honest with you, I don't see it. But maybe if you point it out to me, we can freak out about it together", Eddie stared at your clothes in confusion.
"You see my M*A*S*H sweater, right?". "Yeah, I've known and loved it since approximately 1982", you had worn that sweatshirt every Halloween, without fail, for the past four years but now the streak would break. "I don't have any pants to wear with it, my green corduroys ripped the other day and I'm not about to go into one of these fucked up stores to get army style pants", you thought back at all the adventures you had gone through with these corduroys. They must have been the most resistant piece of clothing your mom had ever sewn.
"Does that mean you'll go as something else this year?", he looked like he was already thinking of other possibilities. "Unfortunately. But I have no idea what to wear, it's only one more week, I have work to take care of and my mom said my corduroys can't be fixed. The fabric has gotten so thin it would just rip apart more if she'd try to sew it back together". "You could be a cat again, or a mouse", suggested Eddie, "it's an easy to make costume". "Ed, last time I went as an animal was in first grade. If I start again I'll never hear the end of it", you were thinking harder. Meanwhile Eddie started suggesting your favourite movies, maybe you'd find a character there. "Escape from New York?" "I don't wear a mullet anymore". "Once upon a time in the west?". "I could but I'm not really in the mood for that". "James Bond?" "Probably. I think I need a whole chart to decide what to dress like for Halloween. I just wanted to wear my M*A*S*H outfit", Eddie had seen you wear the corduroys and the sweatshirt individually on many occasions, but both together were reserved for Halloween. It had always brought across the message, with your self made dog tags and that green hat you'd wear on cold enough nights.
"You'll find something else, I'm sure", but there was something other than your inability to choose an outfit, another question plagued Eddie. "I sure hope I will", you shrugged. "Are you coming to hellfire on Halloween?", he watched your reaction. "Are you sure I'm invited? I don't really play that much anymore ever since I graduated", you'd love to go though. "You're a founding member, I bet everyone would be excited to get to know you", Eddie was sure about this one. "Are you sure the new kids would accept me? I must be ancient to them", you had graduated a year prior to the year Eddie should've graduated. Both of you had started the Hellfire Club in your sophomore year and to you that time had long passed. You have started college, gotten a job and D&D has unfortunately been left behind. "Of course they will. They've seen our old club photos and they'll all look up to you, so why don't you join us for a final round of D&D on Halloween", Eddie looked at you with his best puppy dog eyes, "and if you're up for it you could stay after the session and we'll listen to that new Billy Idol album you haven't showed me yet". "Oh right, I got so worked up about my costume that I forgot about that", you made your decision at that moment, "alright, I'll be there for the Hellfire party".
#reader insert fanfiction#gender neutral reader#eddie munson#eddie munson x reader platonic#eddie munson x reader#stranger things
9 notes
·
View notes
Text
@kawaiiipandaa said,
Hello! I was wondering if I could request a matchup? This is my first time doing this, so please let me know if I'm doing something wrong! ^^; For starters, I'm a Cancer and I'm 157 cm [ 5'2 ]. I suppose you can say my most distinct physical features are my short hair and glasses. Some of my hobbies consist of reading/writing stories, sewing [ just learned last year but I'm pretty proud of the pillows I've crafted ], and occasionally sketching.
I dislike large crowds, most seafood and speaking out loud. Personality-wise, I can be pretty standoffish and aloof upon first meetings. As I grow more comfortable with an individual, I'm known to be easily-embarrassed, somewhat clingy but still very much awkward. I laugh at jokes even when they aren't funny and tend to space out at times. I have a hard time opening up about my feelings, so most say that it's hard to understand me.
I prefer for things to go how I've planned for them to and when they don't, I get anxious.

✧ Thank you so much for requesting a matchup. I literally have no idea when you send this and I’m genuinely sorry for the very long wait. Please look after yourself. I wish you good health and all the best! 💓
I’d match you with: . . .
➜ HOW YOU TWO FIRST MET ; The first time you met Kazunari was via a mutual friend of yours. It really wasn’t that surprising, considering the fact that he is someone who can talk to anyone without any discrimination. And when you guys did meet, there wasn't anything special between you two― you were just his friend’s friend which was also in the same year as him, and he was just your friend’s friend. He would smile at you whenever you were near each other, maybe strike up a conversation and out of politeness, you would give him a small smile back, weirdly enough, that was all and your friend was totally depressed about it. They wanted you guys to be friends too, or maybe more than friends but you don’t know that😌. Sometimes your friend group and his would have lunches together, which wasn't rare but also wasn't common either. And you would occasionally share a laugh and coversation with the others along with Kazunari, but you were always closer with your side of friends. But one day, you've gotten sick but you didn't want to burden and worry your friends because their classes were still ongoing so you had no choice but to try and walk home before you fainted but that day was said to have a rainy weather, and when you were about to leave to the school gates, not caring if you’d get soaked or not, a familiar voice called out for you, running up to you. You were confused, nevertheless stopped yourself as you saw Kazunari’s figure coming closer to you. “Oh, Kazunari.” your hoarse voice was evident, but you tried to clear your throat anyways. “I heard you were sick and you had to go home.” he started off, “Here,” he handed you an umbrella you didn't notice he held on his right hand. “I heard that it was going to rain today and saw that you didn't have an umbrella.” Not going to lie, you wasn’t expecting that. “No i could't i―” "What? Could it be that you are falling for me? I just made your heart flutter, didn’t I?” He asked excitedly, only to receive a blank look from you, the unfamiliar thumping on your chest, butterflies in your stomache being unknown to him. “Sorry, sorry. I just couldn’t pass the opportunity to tease ya you know?” He said with a smile and continued. “Your friends wouldn't be happy since you're already sick, and I still some classes and a spare umbrella. Get well soon ♪.” As you accepted his umbrella, you walked home with nothing but Kazunari wondering in the deepest cevices of your mind that you didn't know existed. After that day, something kinda changed between you guys. Don’t get me wrong, smiling at each other in the hallways were still a thing; but there were a bit newer accompanies, the peach on your cheeks, and the nervousness on both of your nerves. The two of you would have a small chit-chats with each other even if it's just the two of you inside a classroom, occasionally laughing at a joke one of you had up your sleeves. You and Kazunari would hold unusual, and long gazes at each other― the one would also look at the other when they aren't looking, and vice versa. You get the point. It was some time after that kdrama kinda thing that Kazunari invited you to watch him perform at Mankai.
➜ PERSONALITY COMPATIBILITY ; You two compliment each other perfectly! If I had to describe your relationship it would be introverted found its extroverted and I think it’s really cute skdhskdhkdhd. He loves how easily-embarrassed and clingy you are because hello??? he literally finds you the cutest thing ever. I headcanon him as the type of boyfriend who hugs you from behind as soon as he sees you or just closes your eyes with his hands and asks “Guess who, cutie~?”. I wouldn’t worry too much about having hard time opening up about your feelings or being hard to understand. He may not look like it but this boy is perspective. Very perspective. I feel like Kazunari is naturally observant of others' behavior due to being overly concerned about what other people think of him. This helps him notice the tiniest details of others, including their habits and personality. He’s not the type of person who would force you to spill everything inside your head. Instead, he would let you know that no matter what, he’s here to talk. That he’s here for you. After all, he knows how it feel like to not voice the things inside your head because you feel like it would only cause unnecessary trouble for the receiver. Kazunari teaches you that love should be fun and full of joy. There’s no reason that loving someone should be completely serious and perfect; imperfections make love real, they make love unique. His impulsive way of loving you is uniquely him; he loves you deeply, and diving into that pool of bottomless love he has for you from the highest diving board with no lifeguard near sparks more joy in him than should be humanly possible. He falls in love with how fun it is to love— with how fun it is to be in love with you.
➜ SHARED ACTIVITIES ; Since you have a harder time with big crowds than him, who doesn't mind showy spectacles, he usually spends time inside for you because he doesn’t want you to become uncomfortable. But be sure to offer going on outside dates to him from time to time. Both of you are into crafting, so I can imagine you two making masks, drawing together or making collages. You just get together to hang out and decorate your masks. You can both do your own thing or have them based on a theme. Whatever works for both of you. Don’t worry if they turn out horrible, that’s part of the fun. Oh, and Kazunari will make sure to get some photos together after you finish and post them on his social media accounts. Also, you two have a fun drawing game, where one person draws one part, and then the other does the next part. Or if you want a really interesting picture, one person draws until a timer runs out and then the next person goes. Depending on how serious you are taking the game, the finished piece is usually either a masterpiece or something that neither of you can describe. Needless to say, you two get a good laugh on the later. Oh, also I hope you don’t mind PDA because Kazunari likes to show the world your good times. The conversation would never cease as you lay wrapped in his arms. One arm would be slung around your waist, and the other resting beneath your head. Usually cuddling with Kazunari would be playful, more tickling than actually laying around, but sometimes, like a lull in the storm, he would stop talking, choosing instead to bury his nose deep in the crook of your neck. The room would be cast in silence. As you laid beside him though his mind reeled. You were real. You were beside him, a goddess in a mortal world, and you were with him out of every person in this world. Of course you had faults, but they were what made you, you. “I love you.” He would say, breaking the silence of the room, and causing you to startle. He had to tell you though. For all he knew, you would disappear like the dream you seemed to be, when he opened his eyes again.
➜ ZODIAC COMPATIBILITY ; Kazunari’s birthday is on August 1, which makes him a Leo. Cancer and Leo both have a playful attitude and a desire for an epic, enduring romance. These two are neighbors on the zodiac wheel, and depending on the degree of their sun, they share many of the same cosmic energies. They are fun-loving and creative. Leo likes romantic gestures, and Cancer knows how and when to show sincere affection. Both are strongly loyal, even to the point of possessiveness, Cancer for safety’s sake, Leo for the sake of their self-confidence. They are also both committed to a enduring, rewarding connection. Since their desires are similar, a Cancer and a Leo may fill very important voids in each other’s lives. What’s the best aspect of the Cancer-Leo relationship? Their mutual commitment to a sincere relationship. Together this pair can share a supportive, positive and healthy vibe. People see them as a winning combination, and their mutual desire for a secure, loving relationship makes them strive for harmony.
8 notes
·
View notes
Note
I'm trying to put together a Jiangshi Mei and I'm having a hard time of where to begin.. Any tips or suggestions for me? //Thank you so much for this blog!
Hello there!
This is going to be a generic response to “how do I begin on a cosplay” type questions. Normally I don’t answer these, but this allows for a guide that other cosplayers can follow.
The first thing I would do is take a look at the slides for my Planning Your Cosplay panel, which was developed to answer this exact question. It should, at the very least, give you a starting point.
The next step is to start researching! This can be time-intensive even if you generally know what you are looking for, but even more so if you don’t, so here’s a few pointers. Often, research and costume breakdowns (as described both in the panel linked above and in the section below) go hand-in-hand, since you may need to research what something is before you can come up with any sort of plan for it.
- Get your references in order. If the costume is from a live-action property, you may get lucky and find information from the costumers or from other fans who have seen the costumes in person (or spent the hours watching the series or movie so you don’t have to). If the costume is from a video game, see if models of the character have been released or ripped. Some game companies also put out cosplay guides these days with breakdowns in them! If the costume is from a 2D animated property, see if character reference sheets have been released. These should show all angles of the character in order to keep the artists on model as they draw.
- Look for tutorials or WIPs posted by other cosplayers of the same outfit. This doesn’t always exist, but you may get lucky and see someone else’s breakdown of the outfit, how they made specific pieces, or if you get extra lucky, you might find a tutorial or other instruction on how to make specific pieces. Don’t count on finding this, but it’s a good thing to just see if it exists.
- Use other cosplayers as a guide. This doesn’t mean that you should copy everything they did, but rather to look and see what others cosplayers did and whether it works for you or not. What fabrics did they use? What other materials? How does it appear to wear? How did they interpret tricky bits of the design? Seeing how others turned something from an image into real life may spark some inspiration, and can give you ideas on what works (and doesn’t) in real life.
- Determine who this character is. What culture are they from? Era? If their garments are inspired by historical and cultural garments, looking up information about how to make garments of that culture and era can help you gain pattern and tutorials for those garments. It helps to first find out the name of the garment if it is something you are unfamiliar with, and then look for how-tos from there. You may not end up making something entirely culturally accurate, since it’s a cosplay, but it can get you much closer to modify the types of garments that the costume design is based on. If the setting is purely fictional, is it based on any particular culture and era? For example, many fantasy series are loosely based on medieval Europe, and looking at clothing from that culture can help you figure out what you are looking at and how to make it, even if it will almost certainly require modifications.
- Once you have determined who the character is, you can use that for more editorial decisions about the costume as well. What fabrics would this character wear? Would it be mostly natural or synthetic fibers, or does it not matter? Is the outfit more formal or casual? What textures would make the most sense? How can you make the colors and textures cohesive in real life? What kind of weathering and other details would this costume have? Much of this will be determined by the nature of the costume itself (such as requiring a stretch fabric for a bodysuit), but you will always have at least some leeway to make these decisions.
- Once you have your breakdown done, how are you going to make each piece? Are you doing sewing with fabrics? Armor? How are you going to attach pieces together? What is the order of the layers of the costume? How are you going to finish items on the surface (such as painting vs. using vinyl on armor pieces)? Even if you have some ideas, I would recommend combing through as many tutorials as you can get your hands on for more ideas on construction methods, especially on specialty sewing techniques you may not find in commercial patterns or sewing books and on cosplay-specific crafting methods like armor.
- Combing through the sections for what you are making on our master tutorial list, as well as doing research on your own on the google, can give you many ideas on how to go about construction. Choose a method that fits your skill level, time budget, money budget, and the effect you want for the costume. You can place any level of importance you want on those individual categories, and even take into consideration other things, such as comfort. Even if you don’t know the specifics of what you want to do and are just looking through, say, the armor section or the horns section generally, you can apply the principles of those tutorials to the specific costume you are making, and even combine techniques if you find something that seems like it would work.
- If you find a tutorial or advice on a technique but it’s not for the specific outfit you are doing, keep in mind that shapes and colors can always be changed to adapt to what you need.
While you are doing your research, it helps to also be simultaneously working on a breakdown. This is a listing of everything in the costume that you will need, and can range from very basic to very complex. This will help you to know what you are looking at when you are looking at a complex costume, will help break down the costume into manageable pieces, and will give you a starting place to work from.
- Get your references in order. Clear images that show are angles are best, but not always possible to find, depending on the design (I’ve personally done a lot of weird old JRPG cosplay where there is only one image of the outfit…). If there are multiple conflicting references, combine them for the effect you like best, or choose one and stick with it. If you are to be competing with the costume, be sure to include all references and explain your rationale for choosing from one ref or another.
- Start labeling each part of the costume. It can help to print out a physical copy of a full body shot or character reference sheet so that you can label each piece of the costume and sketch out parts that may be unclear or that you want to fully understand how they work. You can also sketch out things like the layering of parts of how pieces attach to each other, or any modifications you are making or parts you have to make up (such as if there is no back shot of the outfit).
- I like to make an Excel spreadsheet that lists each material I need, how much I need, and the estimated cost, since it helps to see each material clearly laid out and helps with budgeting. Some people prefer to use an app like Cosplanner. Do your breakdowns however fit you best.
- Start with the most general and move into more specific. For example, first label “skirt” and “blouse,” and then go into more specific things such as “circle skirt” or “knife pleated skirt,” and then even more specific, such as listing out potential materials, tutorials you might use, patterns you might use, etc. This is why a lot of your research and breakdown work will happen simultaneously!
- Figure out material choices, as discussed above. If you are stuck on materials, look at the backs of pattern envelopes for similar garment types and see what they suggest. I also recommend simply going to a fabric store and looking at and touching fabrics (and taking flash photos) in order to find materials that have the properties you need. Does the material on the reference look thick or thin? Does it drape stiffly or fluidly? Does it have any particular shine to it, and if so, what is the quality of that shine? Does the fabric need to stretch in order to encapsulate the body?
- While choosing materials, also keep in mind things like who the character is/the the world they come from, your skill level, your budget, and your personal comfort. If you are going to be wearing something covering in a warm climate, for example, be sure to choose natural fibers so the costume breathes.
- Start gathering things like tutorials and patterns. If you don’t know where to start on sewing something, look at the shapes of the garment compared to real-life garments, including what other cosplayers have done. Look at sewing patterns and see what types of garments are similar to the garments you are trying to make, and start thinking about how to modify the shapes into what you need. If you are doing historical costuming, do the same, only with historical or culturally-specific garments. If doing armor, see how others have patterned armor in similar shapes.
- Start figuring out how to make things! Once you know what everything is in the costume and you have some ideas of techniques, you can start deciding on techniques to use. You may find it helpful to create a document that you write out your breakdown in (so listing out each piece) and then creating a written description of the item, adding reference images, and compiling links to tutorials. This way, you can always go back and reference this document later when you are working on the costume, ensuring that you don’t lose any of your important references or tutorials. If you are competing, you have the added bonus of being able to adapt this document into one where you record what you ended up doing to present to the judges.
This may seem like a lot of steps, and it is, but once you gain experience with cosplay, a lot of this becomes quick decisions that you can make based on your experience. It can be very helpful to look at something as overwhelming as an entire character design and break it down into smaller, manageable components, especially if you are just starting out on your cosplay crafting journey and don’t know where to begin. By following a step-by-step road map such as this, you can get over that initial hurdle and start making!
I hope that helps! Good luck :]
—Fabrickind / Q&A Staff / Twitter
#sheepysol#cosplay 101#beginner's guide#beginner cosplay#cosplay planning#cosplay help#getting started#planning#cosplay#asks#fabrickindfridays
598 notes
·
View notes
Note
Hello, Vincent! I'm a huge fan of your work & your blog. I know this is a bit of a silly question, but how in the world do you do those plackets on your fall front breeches? I'm trying to construct my own pair and am having a fair amount of difficulty with them. Thank you so much!
Edit: I’ve posted a somewhat better version of this up on my blogspot blog.
Thank you! And this is absolutely not a silly question. It took me several tries to get it right the first time, and I’ve never seen any instructions anywhere for doing them. (Not that I’ve actually looked for any, I just took modern sleeve placket instructions and modified them to include the gap flappy thing.) It is never a silly question to ask how to sew a thing, and I love sharing sewing knowledge!
Fall front plackets are something I’ve done quite a few of and I still have to stop and really think about what I’m doing, it’s very easy to get all mixed up & confused with them. As with many things, it’s best to do a sample with scrap fabric first!
Alright, so to demonstrate it best I’ve sewn up a little muslin sample with contrasting thread. This turned into quite a long answer so I’ll put it under a readmore. (Though sometimes those decide to not work, so if that happens then I’m sorry for putting so many sewing steps on your dashes. I recently learned you can press j on the computer keyboard to go directly to the bottom of a post though, so that’s nice.)Edit: Goddammit the readmore didn’t work! And I tried to put it back and it still isn’t working, sorry folks!
(Also, if my hands in these photos get this post flagged I will be so annoyed. Maybe I’d better tag it “sfw”? I’ve heard that works?)
Ok, here we go. First I’d better mention the lining, if there is one. I usually fully line my breeches because it makes the knee opening easier to finish, but they can be made unlined too.You want the top edge of the fall to be finished before you even start the placket. I find it’s best to sew the crotch seam first, on the front pieces only. I know that modern pants instructions will tell you to sew each leg individually and then sew them together, but fall fronts require a different approach.
Here is a shitty diagram to show what I mean:

So, front lining sewn to front outer fabric first on the top of the fall only. There is also the option of just lining the fall with a little upside-down-house shaped bit of fabric. Or, if you really don’t want any lining, just hemming the top.
Ok, so now we have a nice finished top edge, and can get onto the placket! If you do have a lining then after sewing it on there you should make sure it’s nicely lined up and then baste it in place around the placket areas. Don’t want it shifting.
Your pieces will look something like this: (except twice as many, and the crotch seam will be sewn) I’ve labelled the inside and outside of the pants, and the side seam and centre front, to help make things clearer.
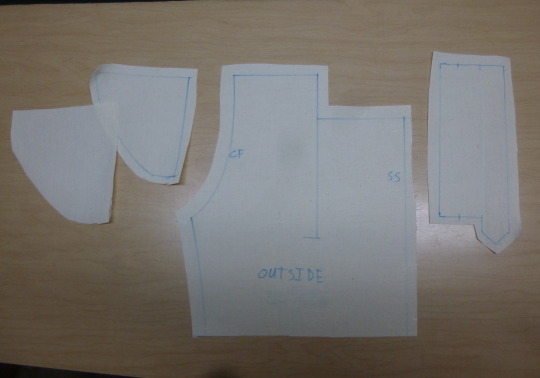
First, take your front gap filling flappy thingy pieces, sew them together on the curved edge only, trim, turn & press. After this I like to put the pattern piece back over them and trace on the lines again so I can see where exactly it goes.
I have also pressed down the seam allowance on the top of the fall in this sample, so we can pretend it’s a finished lined edge.
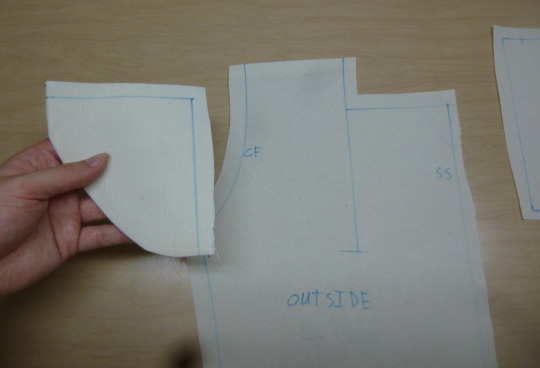
The line for your placket should be clearly marked on the inside. If it’s lined this means you’ll have to transfer the marking for the dot at the bottom onto the right side of the lining and draw it on with a ruler. (do this after cutting it out, before sewing)Line up the appropriate line on the flappy thing with this line. The bottom of the flappy thing should be about 1cm above the bottom of the line, so as to avoid bulky terribleness there. The flap must be on the inside and pointing towards the side seam! Pin it on & sew it about 1/2 cm away from the line - away in a towards the side seam direction. Like so:
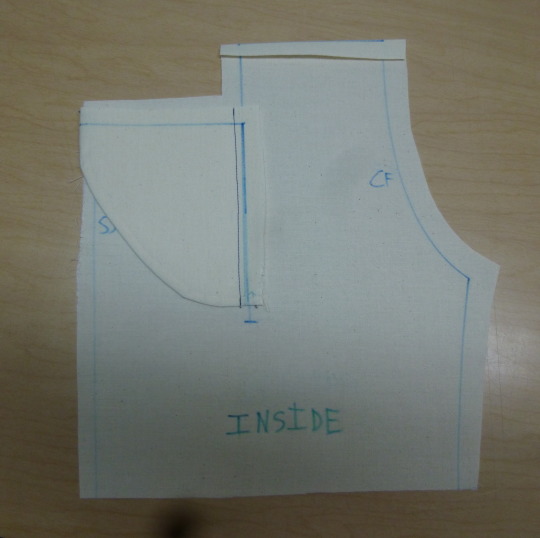
Next you carefully trim the seam allowance off the flappy thing, on the edge you just sewed. Don’t cut down the line yet, just trim the edge of the flappy! The seam allowance should be about 1/2 cm, or maybe a tiny bit less. Not trimmed close enough that it’s in danger of fraying & coming out, but still narrow enough to not get in the way of sewing this slit.Here you can see that the seam allowance is trimmed and the placket piece is waiting to be added:

I drew a couple of lines on the placket, about 1cm apart, to show where to sew.
The placket piece has a longer bit that sticks down, a middle section almost as wide, and then another section that’s somewhat narrower. The longer bit that sticks down must be pointing towards the Centre Front. Line it up exactly with the line, pin it, and sew it on in a very long U shape. When you’re near the bottom of the slit it’s a good idea to make your stitch length smaller. Trim down the middle, and clip with a little inverted Y at the bottom, like so:

(Hm, I should have put a bit more seam allowance on the bottom of that placket, but it’s ok!)
Now if all has gone well you’ll have the seam allowance from the flappy thing only in one half of your slit seam allowance.
Next, turn it to the outside and press it, like so:

See that narrow little bit on the left? You must turn it under and stitch it down, like so: (You can also trim off the protruding bit on the top, as I’ve done here)
This bit should be as narrow as you can reasonably get it. I like mine to be 1cm or a bit less. The important thing is that it’s covered up by the other part of the placket. (Which is one reason it’s good to do a sample first, you can check if your dimensions are good!) If the fabric is bulky and the stack of seam allowances from the flappy are making the foot misbehave then I use a zipper foot for this step.

Next, you press this bit towards the side:

Press the little slit seam allowance towards the side too, and then press these 3 sides in, as shown. (You should also press down the allowance on the top of the placket at this step, but I apparently didn’t make this sample placket quite long enough, oops.)
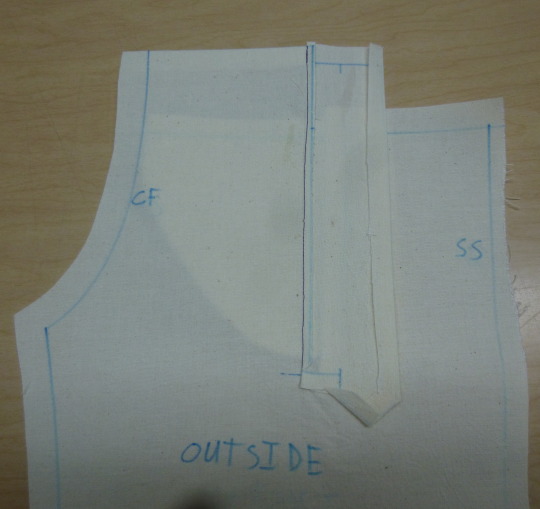
Next, press the longer bit of the placket back towards the front, as shown. You want it to be covering the narrow little bit on the other side, and also the seam from the slit. The little downward pointy bit may look uneven at this point, but you can simply shift those folds a little and press it again.

You want to make sure that the seam allowance at the bottom of the slit is totally enclosed by the downward pointy, so I like to draw a little line showing just where the best place to sew it. (I used marker on the sample, but chalk is usually better when making the actual garment.)

Now pin the placket down flat, taking care to not pin through the flappy, and begin to sew it on on the line I marked in the above photo:

Once you’ve sewn this line, go around the downward pointy bit and then back over that line again. (it’s good to have the extra stitching there, it need the reinforcement.) I try to stay about 1-2 mm away from the edge, like a very close topstitch:

Now, after the downward pointy is sewn, it’s very important that you move the flappy out of the way so as not to sew the whole thing closed! Sew down the long bit of the placket, again staying 1-2 mm away from the edge.

Then sew along the top bit, (which would have had more seam allowance to fold under if I’d remembered to make the sample placket long enough):
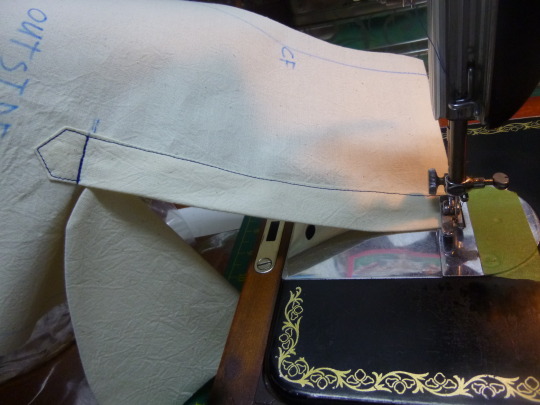
Voila! A placket!
Now you need only to do the reverse on the other side, and it’s ready to put the waistband on!


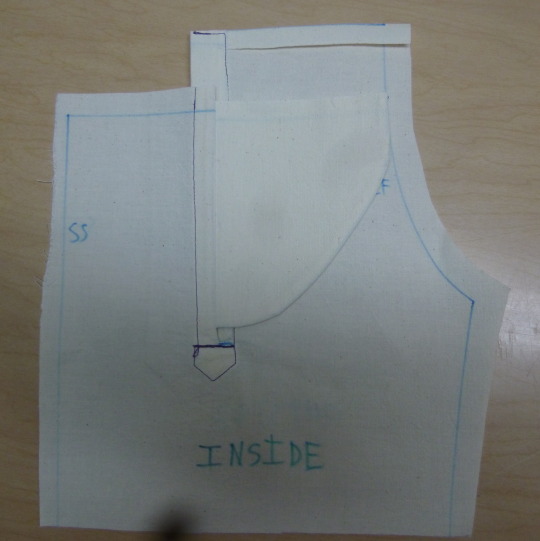
For the sake of thoroughness here’s one of my finished pairs of breeches, with the waistband buttoned and the fall unbuttoned:

And with the fall buttoned up:

And of course there’s also the option of a broadfall, like I did on my jeeches, where there are no plackets because the entire front is the fall:

I can’t specifically remember what I did here, but it took some awkward fussing with the side seam, so I’m sure I’ll do it differently next time. I do know I left a little gap for the middle buttonhole on both the lining and the outside of the fall, and then just whipstitched the edges together there.
I hope this helps! Best of luck with your breeches, and I’d love to see a picture when they’re done!
#sewing#ask#gridbugged#how to#breeches#fall front#pants#sfw#clothing#tutorial#I have the day off work today and had time to answer properly!#I like doing sewing instructions it's nice
151 notes
·
View notes
Text
there’s glitter on the floor after the party...
Taylor,
*About 9 days ago, on May 22nd, 2018, I had just arrived home from your Seattle show at CenturyLink Field. It was 4am and I couldn’t sleep. I had so much on my mind and was still on a high from your show. So, in the early hours of the morning, after my friends had long gone to bed, I began to write. I’ve revised my original note quite a bit since then. I’ve also had the opportunity to do some additional reflecting since tour, and I have some thoughts. So, I guess this is the end-result of a mash-up of 4AM overly-emotional rambling, combined with well thought-out, fully coherent, mature writing. I feel like I really over-explained this. I could have been a lot less-awkward in setting this up. Let's just get into it:
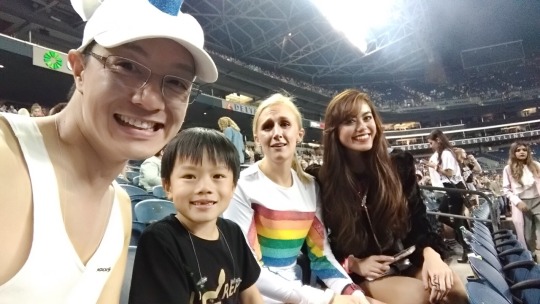
[SO. I just got home from your Seattle show. It's 4 am and I can't sleep. This was my 6th tour, and I made what seems like an infinite amount of unforgettable memories with a group of incredible people I call my ‘Swiftie Fam” (the name needs work...). There's Cecil (my long-time, Canadian Swiftie friend, you’ll see him in earlier posts), Wanda (Cecil’s wife), Kaeden (7. Cecil & Wanda’s son. Major Swiftie. His first concert!), and finally the beautiful Maile (a recent addition to the fam, and now a life-long friend!). It’s hard to explain in words, but we all have developed a connection that’s special and unique because of what we experienced together. I couldn’t have asked for a better group of people to stand by my side tonight. We danced, laughed, and cried together… I don’t think I’ve ever felt more understood. These people ‘get’ me.
Not surprisingly, I screamed every single lyric at the top of my lungs and subsequently lost my voice almost IMMEDATIELY. With that in mind, I suppose a more accurate description would be: I wasn’t so much singing, as I was gasping for the remainder of the show. I literally danced with until I was out of breath. I cried (ok, SOBBED) all of my make-up off (a Long Live/NYD mash-up… are you kidding me?! I FEEL ATTACKED).
By the end of the night, I resembled a pathetic, overly-emotional, glittery, drowned rat.
and I was living my absolute best life.
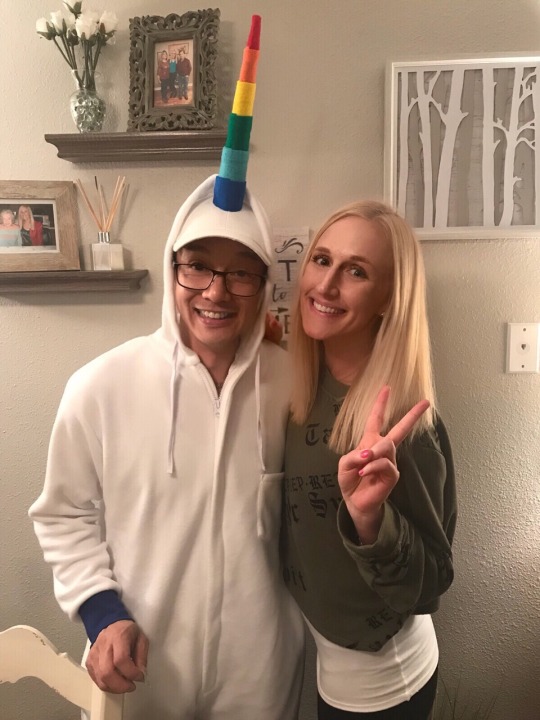
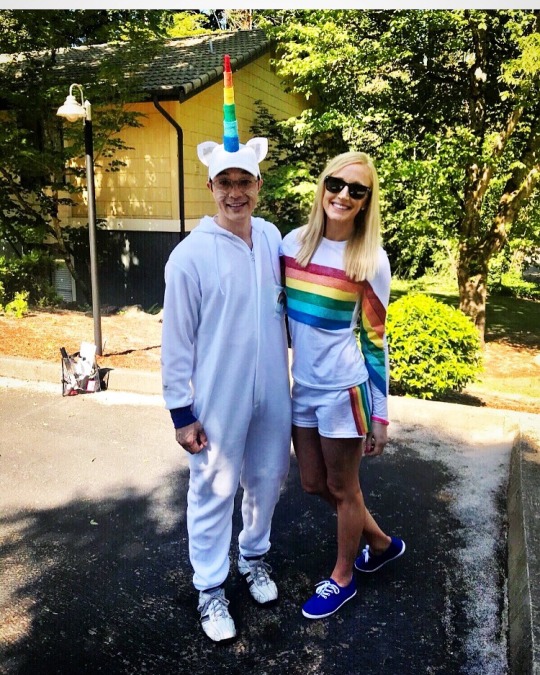
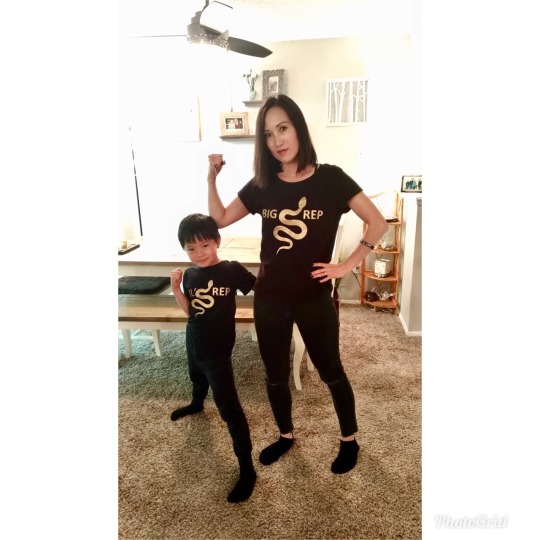
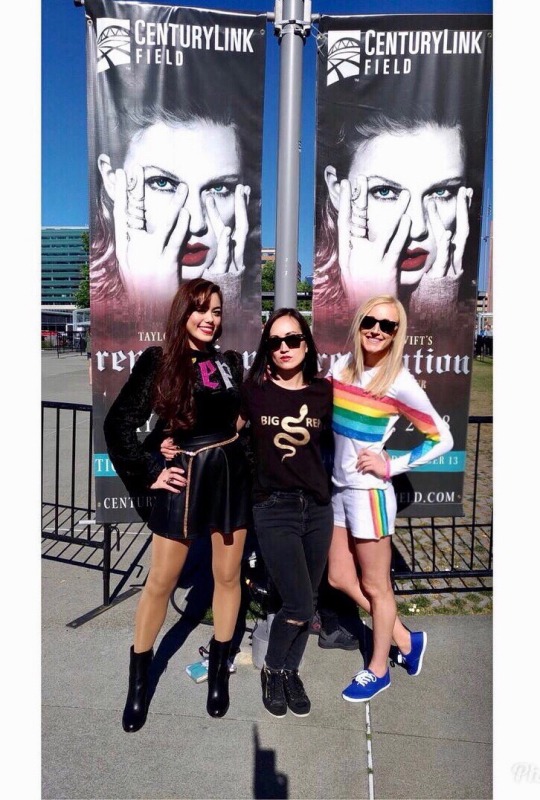
Also, I was REALLY proud of our outfits this time around! I think we did a decent job of recreating your Direct TV commercial, with my rainbow two-piece, and Cecil’s interpretation of Olivia Benson dressed as a Caticorn (I can’t say I ever thought I’d use that in a sentence). It consisted of around 8-10 hours total of gluing, painting, and hand-sewing, leading up to the show. Everything turned out awesome, way better than expected. Totally worth the man hours! Wanda hand-made matching these adorable matching t-shirts for her and little Kaden (Big Rep & Little Rep), and Maile constructed a beautiful MASTERPIECE from the mountain LYWMMD outfit- it was freakin’ incredible and HOT!
There was something a bit different about this tour for a couple of reasons:
[The production.] I don’t think I’ve experienced such sensory-overload in my LIFE. The whole time it was like a constant stream of frantic, internal dialogue with a lot of run-on sentences, like, “WHAT IS HAPPENING SHE’S GIVING US CHOREO OMG YAAASSS WERK HONEY IF A MAN TALKS SHIT WE DON'T OWE HIM A DAMN THING OH MY GOD ITS RAINING CONFETTI I MUST COLLECT IT I HOPE THESE MULTI-COLORED FLASHING LIGHTS DON’T GIVE ME AN EPILEPTIC ATTACK WHERE THE F-CK DID THESE GIGANTIC SNAKES COME FROM THERE ARE LITERALLY STAGES EVERYWHERE I’M OVERWHELMED OH SHIT SHES PULLING A SPEAK NOW BY WALKING THROUGH THE CROWD WHAT'S GOING ON OH GOD F-CKING FIREWORKS THESE VOCALS ARE LIT THO I'M SWEATING I’M DEFINITELY GONNA NEED THERAPY AFTER THIS NEW YEARS DAY/LONG LIVE MASH UP IS THAT A FOUNTAIN WHATS HAPPENING OH GOD IT’S REAL WATER AND SHE’S IN THE FOUNTAIN I’M HAVING A 2008 SHOULD’VE SAID NO ACM AWARDS FLASHBACK MOMENT HOLY SH-T MORE F-CKING FIREWORKS SO MUCH PYRO IS THIS EVEN LEGAL” I’ve gotta say, you have BEST band (Paul, Amos and Mike..OGS), vocalists (Eliott and Kamilah…the TALENT), and all the dancers. Every single person on that stage was on FIRE, and their talent, passion, and individual personalities made the night sparkle.
[The fans.] I freaking adore this fan culture. I’ve never met a Swiftie who wasn’t ridiculously friendly, welcoming, and super relatable. The vibe was so positive. I’ve never smiled, waved and taken pictures with so many random strangers in my life. It felt as if we were literally in a different world that day. It felt like home.
[YOU!.] We need to talk about this major GLO UP you’ve got going on, honey. You exude SO much confidence and you're just pure sunshine. When I think about the way you’ve carried yourself these past couple of years through all of the BS drama, I can’t help but feel damn proud. You’ve successfully converted pain into art, into music. Real music, that’s poignant, raw, and just BAD ASS. Your lyrics continue to foster a special connection you maintain with the audience...a connection that often times breathes life into brokenness.
I felt like the luckiest girl in the entire world tonight.
This may have been my best concert experience ever, which is actually pretty ironic because:
Unlike Red, I wasn’t in the Pit
I didn’t have VIP seating, like 1989
You weren’t close enough for any potential high fives, waves, or eye contact like I experienced at Speak Now at B-Stage
We were not chosen for Rep Room (or T-Party, Club Red, or Loft 89)
…But, it was OK. It was way more than OK. It was truly a dream.
Listen: Something I've always deeply admired about you is that you make it a priority to maintain a personal relationship with the fans. It’s clear you want to meet as many of us as possible, and you make a conscious effort to do so. You get to know us as individuals and you CARE, and that means everything us and makes such an impact. I mean, you invite us into your HOME for crying out loud, you walk through massive crowds and give high-fives, you lurk our Instagrams and Tumblrs and interact on social media, and you always make a notable effort to meet as many of us as possible at tour.
However, this can sometimes turn into a bit of a "Catch 22" situation for people. The downside, is that it’s honestly SUPER easy to fall into the “trap” of being consumed with the possibility of meeting you after your shows. Due to the fact that the “selection” process is both intentional, yet also random. To be transparent, it's quite difficult to not obsess with the idea of ‘trying’ to get chosen. I witness this behavior so often, in others and in myself just as much, if not more. Selfishly, I often feel not only jealous, but UPSET when I see photos/read experiences of other fans meeting you. I sometimes feel like the only one who hasn’t yet gotten the opportunity. It can quickly turn into a mind-game if you're not careful, which has the potential to become toxic if we allow the idea of meeting you to rule supreme over what it's actually about...which is the MUSIC. And, this amazing show you put on for us night after night. And somewhat understandably so, I've witnessed the obsession with being chosen to meet you become a main focus point for a lot of us (including myself a bit!). It's pretty stressful, and can easily dampen or cheapen the concert experience, if you're not careful. As dramatic as this probably sounds, Tumblr (and social media) can be brutal within this fandom, and dare I say ‘cut-throat’ at times. It's easy to get upset watching (what seems like) literally EVERYONE get that opportunity, except you.
That said, I had a wake-up call/mini-epiphany recently, which manifested while driving home from your show at Midnight on May 22nd with my friends, feeling so amazing and so grateful for what I just experienced…but also a little guilty because I feel like I’ve spent way too much time worrying about the possibility of meeting at you when you come to Seattle, how to get the attention of Taylor Nation, where to find Mama Swift, getting that guitar pick from Papa Swift, and this time was no different. Granted, my intentions are 100% pure and it’s only because you’ve meant so freakin much to me for so many years, and it's almost as if my life won’t be complete until I finally get to tell you in person. That said, there is certainty a valuable lesson to be learned here. I am confident that you and I will come face-to-face one day (hopefully with my Swifie fam!). The stars will align at the exactly the right time, and I will have my moment with you, and it will be SO worth the wait. You can't "force" stuff like this, you know? The privilege of meeting you is almost ‘sacred’ in a sense. At least in my opinion. Anyway, my point is: I refuse to a continue to attempt to “create fate” by attempting to "earn" my worthiness in fandom. It’s not productive, it's not healthy, and it’s not cute.
Alright, this is getting out of hand. I need to wrap this up. 🤣 I’m not sure whether or not you’ve seen any of my throwback photo-posts I posted the week leading up to the show. They definitely explain a lot more about me, and my history being a fan. Either way, I must reiterate how grateful I am to have you in my life, and that support you 100% and will always be here. The amount of hope, joy and comfort you've given me over the past 10+ years is insurmountable, and I'll never be able to repay you for that. And I mean that in the most sincere way. Not a lot of things make me as happy as you make me (especially lately). This experience was the ‘boost’ I needed, I think. And like I said, the relationship I have with my friends/Swiftie Fam is invaluable, and I look forward to making memories with them at your shows in the future. You’ve brought the most random group of people together and created a bond that’s unique, unconditional and unbreakable, and I think that’s so cool.
This was A LOT longer than I originally intended it to be. This escalated quickly. Haha. Thanks for listening. 💗
Don’t read the last page…]
Love you, T
Crystal
@taylorswift
@taylornation
@ceunit
@maileswiftie
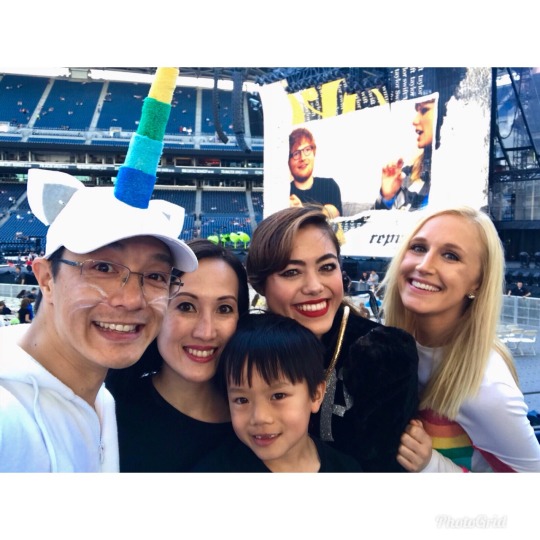
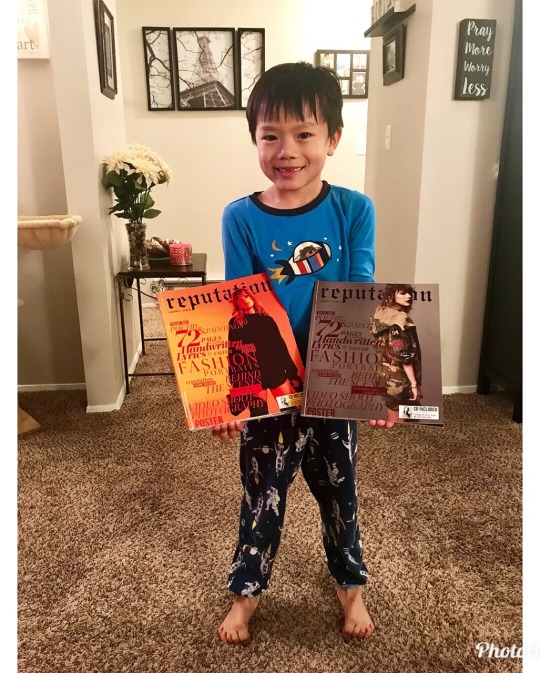
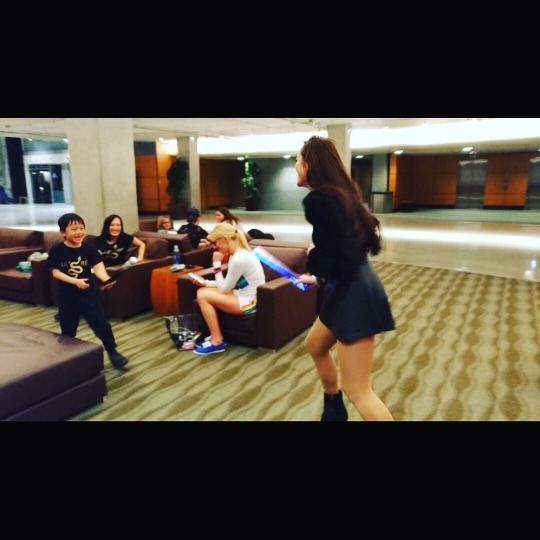
[photos]: 1) The whole crew: Cecil, Wanda, Kaeden, Maile and myself at our seats. 2) Kaeden the night before the show. SO EXCITED!! 3) Testing out the Caticorn onesie w/ Cecil 4) Cecil and myself FULLY DECKED and ready to go. 5) Wanda and Kaeden: Big Rep & Lil’ Rep! 6) the girls! Maile, Wanda and Me pre-show 7) Us at the end of the show! And yes, that’s me in the middle..in disbelief, exhausted, sweaty, and a physical and emotional wreck (see also: ‘drowned rat’ description above). 8) All of us after the show literally in a hotel lobby (and glitter on the floor after the party!), waiting for traffic to die down before we headed home.
#reptourseattle#rep tour seattle#reputationstadiumtourseattle#reputation stadium tour seattle#reputationseattle#reputation seattle#reputationtourseattle#reputation tour seattle#reptour#reputation#reputationtour#reputaylurking#taylurking#reptaylurking#taylorswift#taylornation#taylor swift#taylor nation#may22nd#may 22nd#centurylink field#reputation tour#reputation stadium tour#swift squad#swiftsquad
4 notes
·
View notes
Note
hi!! i know you guys typically make your cosplays, but I was wondering if you have any tips for buying ones? (I saw the nozomi one on your store) I'm currently unable to make my own due to lack of resources but i still really wanna cosplay!! thank you for your time and have a nice day!!!
We don’t buy very often –– in fact, I think the only ones we’ve bought in the past ten years are a couple Love Live school uniforms (the Constellation ones), an official Cospa K-on! uniform, wedding Kotori and a Green Lantern zentai. We have no personal experience with Taobao or anything; all of ours have just been through direct retailers (i.e. Cospa) or wholesale sites.
As such, the advice we can offer is slim, but here we go!
Take sizing seriously. If you’re buying wholesale or from Asian sellers, sizing runs very small. Shirts that fit around the chest might still have very narrow arms or other quirks typical to Asian clothing. When in doubt, size up. If you’re providing your own measurements for a custom piece, double-check your measurements; sometimes an issue with a final costume isn’t because the seamstress did anything wrong –– it’s because the measurements provided were inaccurate. Along the same lines, when taking measurements make sure you’re wearing the same undergarments that you intend to wear with the costume. If you are wearing a push-up bra or corset or shaper with the finished costume but measured without, the fit will change.
Do your research. Look at reviews and gather as much peripheral information as you can from others who have ordered or left reviews. Much heartache can be avoided by knowing not to order from a company or individual with a poor track record for product delivery, known quality issues, or history of scamming.
Take pricing with a grain of salt. Sometimes you get surprisingly decent quality for a cheap price. Other times you get something below your expectations for a fair bit more. Remember that if you’re buying wholesale, odds are someone was paid mere dollars to put that costume together, and if you’re commissioning an individual, they’re likely vastly undercharging themselves. (I’ve rarely met commissioners who charge enough to be making even minimum wage.) Be graceful if an item you didn’t pay much for isn’t stellar quality.
Keep in mind that many individual commissioners these days are young and inexperienced, or haven’t decided to pursue it as a serious profession. Sewing (or prop making!) professionally is a job, and many people open commissions as an extension of their hobby (or a need for quick cash) rather than any intent to make a career out of it. I have commissioned props from probably about a dozen people; the difference between the work of professionals and the work of students making ends meet or adults trying to make a buck off a side hobby is a vast chasm. That isn’t to say their work isn’t worthwhile –– I love a lot of those pieces! –– but I am never surprised when they blast past deadlines, have rough edges, or too-hastily-shipped paint jobs, never send progress updates, or take weeks to respond to inquiries after long silences. In my mind, as long as I get a passable piece in the end, these are the costs of going with hobbyists, but I think it’s an important thing for anyone to keep in mind.
- Jenn
24 notes
·
View notes
Note
Hi! So I'm going to try and put together a New 52 Poison Ivy cosplay for early November this year. Any tips?
Hello there!

Is that the correct version?
For this, you have a few options.
If you are comfortable sewing a bodysuit, you can make the suit. It appears to be a shiny material, so I would recommend a wet-look spandex or a black/black mystique dot spandex. PVC would look good, but it wouldn’t hold up to the amount and type of sewing you’ll need to do for the leaves. If you are comfortable and able to do latex, that would be another option, though less durable and more expensive (you’d have the advantage of being able to glue on latex leaves though).
If you aren’t comfortable making a bodysuit, you can do this with a purchased one. Be sure to check the sizing carefully so it isn’t too short in the torso. I’d recommend one with an invisible zipper up the back.
For the leaves, you also have a few options, depending on how you are interpreting this and what route you want to go. I would buy or make cloth fake leaves and sew them on individually. If you do this, be sure to sew them on while the bodysuit is stretched so that there’s enough room between them that the bodysuit can still stretch to fit your body. You can also applique them on, either individually as flat leaf-shaped pieces, or as a larger green splotch, and then add leaf texture to that (either by buying leaf-patterned spandex or by adding individual leaves to create dimension to the larger green splotch). Properly-done stretch applique would preserve the stretch of the suit with no worries and be a LOT faster, but would be a little less realistic in effect, so it would be up to you and your personal preferences and skills.
The wig seems to have minimal styling, so purchasing a long lacefront wig (since it has an exposed hairline) should be enough there. You can attach leaves to clips or pins and pin them in, or you can sew or glue them directly to the wig if you don’t mind them not being removeable.
I hope that helps! Good luck :]
—Fabrickind / Q&A Staff
50 notes
·
View notes
Note
Hello! I'm planning to make yurio's agape costume from YOI and was wondering on what you would recommend to make the shoulder/wrist things from? I'm an intermediate sewer, but a very beginner crafter and I wasn't sure what material would be best. I'm planning on making them detachable using snap clip things, so it doesn't need to be made from fabric. Thanks so much for your help!
Hello there!

There’s two major ways to go about this project: using fabric, or using real feathers.
If you went with fabric, you would either find something that wouldn’t fray when cut or something that is easy to seal the edges of (by doing a rolled hem or by melting the edges with heat – you would need a 100% synthetic to melt the edges). I would recommend a chiffon or similar material for this, as it would get the floaty, ethereal look. You would make a bunch of long feather-shaped pieces and seal the edges, then sew them all overlapping and generally in a line, so that they hang down all in one direction. I would use a more stable fabric as a backing and sew them all into a long strip, perhaps with an edge bound in bias tape or similar binding to keep the raw edges contained. Take this long strip and loop it into a U shape, with the bend of the U at the outer edge of the shoulder. Overlap a few layers of this material if you want a fluffier look. Sew this all in place and put the decoration (cut out of finished-edge fabric) and a few individual “feathers” on top to hide the center. These can be attached in place with snaps. For the hand pieces, you’ll need to stiffen pieces. I’d use starch, but you can also try adding a bit of stabilizer behind it.
The other method would be to use real feathers. This is what I did when I did a femme version of this costume. I bought goose feather trim, which consists of feathers glued and sewn into a piece of satin binding, and hand sewed the pieces into shape. For each shoulder piece, I used three pieces of the trim: two pieces as long as my shoulder, arranged so that one pointed towards my front and the other towards my back, and one piece about as long as my shoulder is wide (so a few inches in length), placed all the way up at the neck end of my shoulder and sewn so that the feathers were pointing outward, towards the tip of my shoulder (I would recommend doing these first and then doing the fabric applique on top, though the applique would just need to be tacked down in a few spots to keep it in place). This hid the satin binding tape holding the other feathers together. This whole assembly is hand sewn together and attaches with snaps to the shoulder of my leotard. The hand piece are again feathers, this time consisting of two pieces (each, four pieces total) of just enough length of trim to contain two feathers. The two pieces were arranged so that the satin binding is at a 90° angle, forming a square, and sewn together. These attach with two sets of snaps per piece, with the second snap there to prevent it from spinning around on a single snap. I opted to not have the two-tone feathers (time constraints mostly), though an extra feather can be added on top for the grey middle section. This can be purchased, or you can dye one of your feathers with acid dye or alcohol ink (I’d just carefully color one with a grey alcohol-based marker honestly).
Feather trim can be difficult to sew through, since it is thick and has glue. I’d keep something to wipe your needle on handy, and use a thick needle to be able to pierce the material if you go the feather route.
When shopping for feathers, look for ones that have the same type of look as the piece in the show. Marabou is probably the wrong choice, but the trim that I used or ostrich feathers or similar would be fine.
I suppose these can also be glued together if using feathers, but sewing by hand will be more stable.
I hope that helps! Good luck :]
—Fabrickind / Q&A Staff
#yuri on ice#yuri plisetsky#yuri on ice cosplay#yurio#yurio agape#feathers#cosplay#asks#fabrickindfriday#anon
92 notes
·
View notes