#i wanted to upload the video of this performance but the ts file size was over 100mb
Explore tagged Tumblr posts
Visit Tumblr Blog
Explore Tumblr blogs with no restrictions, modern design and the best experience.
Last Seen Tumblr Blogs


Fun Fact
The KCSC sent more than 20K requests to delete posts related to prostitution and porn to Tumblr from January to June 2017.
Photo


DAY6 x DAYS GONE BY (singing room)
#day6#young k#jae#sungjin#dowoon#wonpil#i wanted to upload the video of this performance but the ts file size was over 100mb#and theres no online software that allows me to convert it to mp4 without the limit of only 100mb :/#anyways this performance was beautiful! yall should wait for the reupload and watch it#(my allergy is killing me i feel like my nose is going to drop off soon flgklsdks)#*#1k
1K notes
·
View notes
Text
HELLO & WELCOME ♡ to an all inclusive giffing guide, which includes: - vapousynth installation on windows / mac - how to source giffable material - resizing / deinterlacing / denoising / sharpening on VS - step by step breakdown of how to use VS - giffing after you've used VS - giffing using only photoshop - simple colouring guide - watermaking and blurring captions
( a better and updated version of the previous one )
GIFFING USING VS + PS
1. VAPOURSYNTH & ITS INSTALLATION
VS is free to download and use. it is truly an amazing tool which allows you to resize, denoise, sharpen your gifs all at once and save the output in gifs, frames , mp4 and mov.
You can install vapoursyth from here. The site has download software and installation guide for both MacOs and Windows. Please watch and read the installation guide thoroughly, it is a very well written one and if you follow along, installation will be done easily.
It is best to use a video with minimum resolution of 1080p but a good 720p would work sometimes. This is how gifs look after sharpening a normal 1080p video:
2. SOURCING GIFABLE MATERIAL
➞ You can start with downloading a 4K Video downloader. It will allow you to download clean and best available resolution videos from youtube. ➞ If you don't want to download a software, you can use screenrecording. - Windows : windows key + alt +R - MacOs: shift + cmnd + 5 ➞ .TS files - for seventeen .ts files, you can go to rosebay
3. TUMBLR SIZING
Tumblr has it own resizing rules so that your gifs aren't blurry after you've uploaded them. Keep this in mind when you're using VS resizing tool.
4. USING VAPORSYTNH
After you've installed the VS properly. You'll have a VS script shortcut on which you'll drop your video file for giffing. Once you drop your video file on the VS shortcut, a window like this will pop up:

After you've put your timestamps and gif duration, a resizer will open up in chrome ( or your default web) along with a VS Script Window (sometimes it’ll take a min to open).
GIF Size: WIDTH (left space) and HEIGHT (right space). Use the bottom left triangle to adjust you clip. Make sure 'Preprocessor' is set to 'None' and "debilinear'.
Use KNLM for denoising and FineSharp for sharpening by selecting them and ticking the small check box beside them. DONOT mess with the denoise and sharpening cursor on the resizer tab, we'll adjust setting on the VS Script.
There are CCs who use BM3D for denoising but it never worked for me. Always gave me an error. KNLM has worked without an error for years for me.
NOW, there are CCs who like to set frame per second ( qtgmc) on the resizer itself but qtgmc is designed to work with interlaced video. Don’t waste your time with fancams, it won’t do shit.
[ Interlaced content: live performances, variety shows. Typical formats: .ts/.tp/.m2ts Progressive content: fancams, vlive/instagram videos, some variety shows (basically 1080p/720p/480p/…, anything with a p. Typical formats: .mp4/.avi ]
Copy whatever code that comes on the top right.
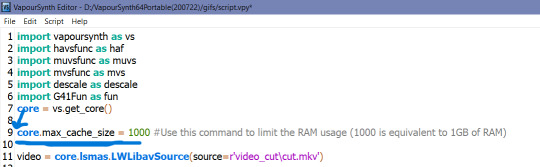
YOUR VS SCRIPT:
First, remove the # on line 9 to increase your cache size so that your VS doesn't slow down or crash. It is already removed in mine, but you'll have to remove the # on the start of line 9.
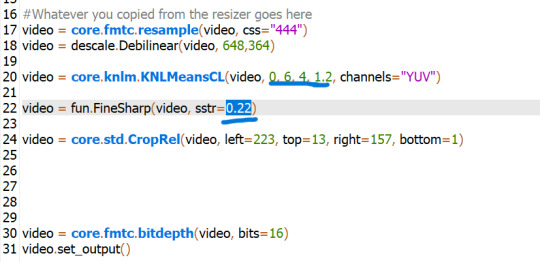
Remove everything from line 17 till before "video = core.fmtc.bitdepth(video, bits =16)" and paste the code you copied from the resizer on line 17.

After you've pasted the code, we put in our denoise and sharpen settings by changing these things. denoise: 2, 6, 4 , 2 finesharp: 2
Now, Encoding aka Saving the output. Script > Encode Video and another window will pop up which allows you to select in which way you want to save your ouput.
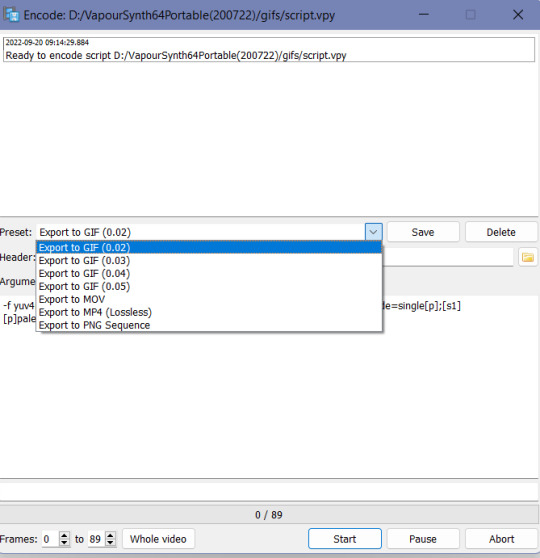
I would highly suggest using the PNG sequence because it is easily editable and is saved in hd from. GIF output can often be dithered.
Ensure that header in in Y4M mode
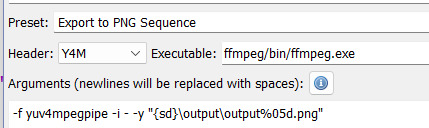
Click on Start to start your encoding process. Don't close any of the window tabs before the encoding is completed.
Your output will be saved under "D:\VapourSynth64Portable(200722)\gifs\output".
Before you start encoding another batch of frames or a gif, please cut and paste the previous output in another folder because each new batch of output gets saved in the same folder with the same name, thus, automatically replacing the files.
after you’re done with accessing your output PNGs, close all the windows and repeat the same for a new set of PNGs for another gif.
TRIMMING GIFS
If your saving as PNG sequence, you can simply trim your gif by removing the unwanted frames!
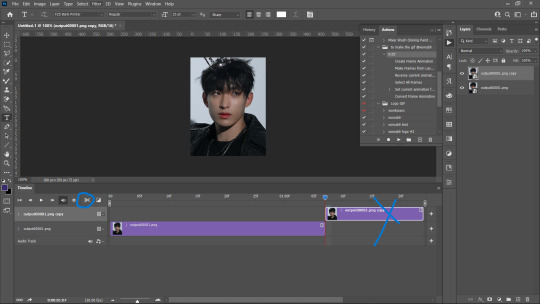
If you're saving as a GIF output, after loading your gif and converting it into a smart object, you can cut it using the 'scissors' button on the timeline. Place the cursor thing from where you want to cut the gif from and press the scissors button. It will split the gif in two. Select the unwanted one and press delete.
REMOVING FLASES FROM GIFS
To remove flashes in gifs in a simple and easy way is to save them as a PNG sequence. With that you can clearly see which frame has a flash and simply delete that before loading in photoshop as stack.

5. LOADING THE GIFS IN PHOTOSHOP
Firstly, turn on your timeline mode. WIndow > Timeline
To LOAD GIF FILE IN PS FOR COLOURING File > Open > Select GIF > Enter ( a normal gif output will have a 0.02 FPS delay )
(if you want to sharpen or add any effects to the gif then:) - Click the small button on the left bottom of the timeline to convert into into video timeline.

Select all frames on your right and convert them into a Smart Object (select all > right click > covert to smart object)
Add whatever filters you want.
Add your colouring and save.
TO SAVE AKA EXPORT GIF
File > Export > Save to WEB
6. LOADING PNG SEQUENCE FRAMES FOR GIFFING
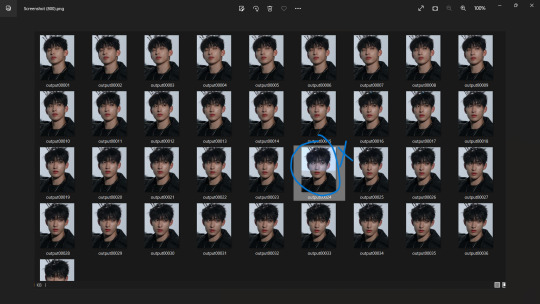
File > Scripts > Load into Stack > Browse Browse will open your File Manager. Select the frames you want to be loaded as a stack. Let them load and click OK.
After PS is done loading your frames, Follow these steps:
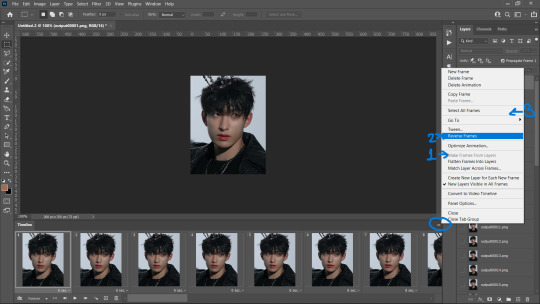
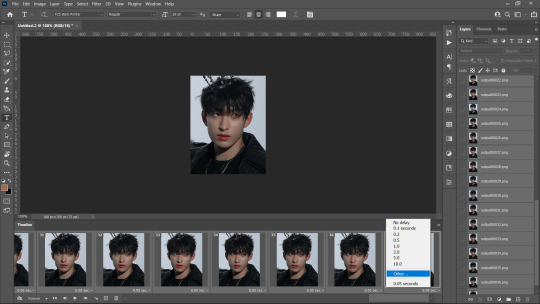
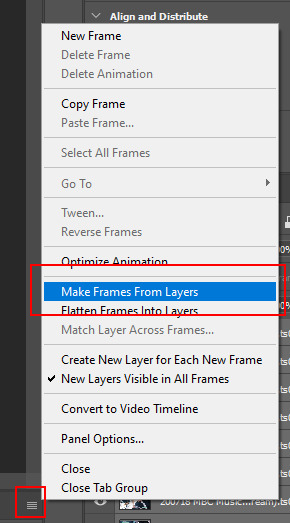
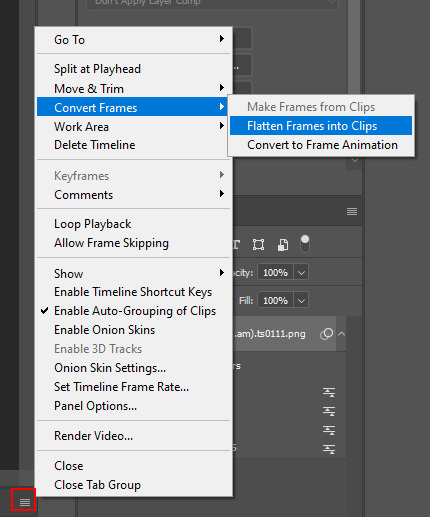
Click create frame animation. It’s show only one frame so you have to click this ≡ symbol on the top right of the timeline.
Then click Create Frames from layers and it’ll make all frames.
Then click ≡ again and click “reverse frames” because ps loads stacked frames in reverse so you have to un-reverse it.
4. Most importantly, we need to set frames per second because we didn't set anything on the resizer. Frames per second can make a huge difference in how fast or slow you want your gif to be. 0.05 FPS is just my preferred setting.
To input your desired FPS settings, select all frame from the timeline, right click on any frame > Other > Input your desired setting. ( anything above 0.08 will make the gif too slow )
5. Click on 'Create Video Timeline' to turn this into a video timeline. (bottom left of timeline)
i made an action that does all steps from 1 to 5. Download it here <3
6. Then select all your layers from the side panel and convert it into a smart object so that you can sharpen it and add other filters.
7. Add your adjustment layers for colouring and save it!! Saving process as same as before. (File > Export > Save to WEB)
GIFFING USING ONLY PHOTOSHOP
If you don't want to go through hassle of installing and using vapoursynth, you can use this photoshop only method. You can simply cut the video and load them as frames.
File > Import > Video Frames to Layers
A window like this will pop up:
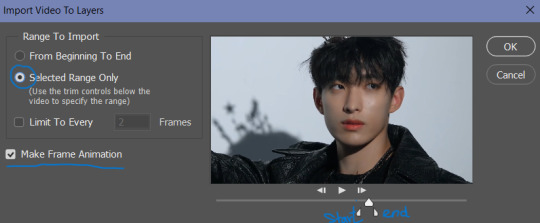
Use the triangle cursors to set the start and end of your clip. Make sure Make frame Animation is check. Press OK.
IMP: After you frames have loaded, you'll see the frames have loaded at a 0.04FPS. You can change it according to your preference but the speed is different (slower) for these gifs even if they're both at 0.05fps, that is because the number of frames is different than number of frames from a VS png sequence for the same clip.
You can adjust the fps the same way mentioned above.
You can see the difference even with the same FPS settings. The frames in the second gif are VS generated whereas the first one is PS generated.

After setting you desired FPS, click on the Make Video frame animation button at the bottom left on the Timeline tab,, Select all frames/ layers on the right and convert them into a SmartObject.
Now comes the main part, Resizing the gif according to tumblr. For this, Image > Canvas Size. Input your desired dimentions and press OK.
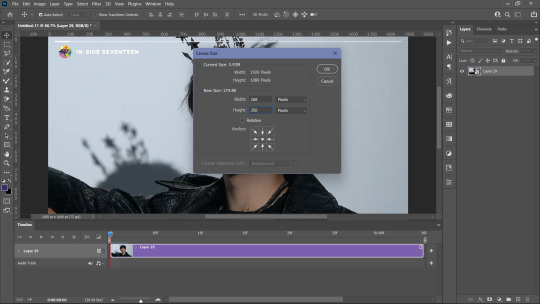
Then, Click of CTRL + T (Free Transform) and adjust the gif along the canvas. like this:

Press Enter. You gif is set. all you need to do is, add your sharpening (filters > smart sharpen).
You can also refer to this amazing tutorial by @jeonwonwoo for photoshop giffing.
BLURRING CAPTIONS IN GIFS
For this you only need a gif in a Smart Object, Marquee Tool and Gaussian Blur.
Marquee Tool is the small dotted rectangle tool. Click on it and then make your selection around the caption by clicking and dragging your cursor.

normal selection
Add to selection (to the normal selection) ( best for multiple captions, it lets you select in multiple places at once) Example:
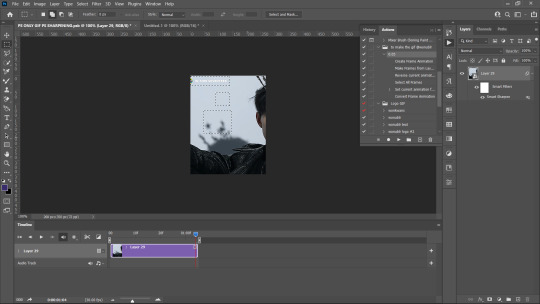
after selection, go to Filters > Blur > Gaussian Blue > 3.0
IMP: If you want to add Blur using marquee tool on a smart object that already has a smart sharpen filter (or any filter) on then you need to convert that smart object into a smart object again.
after you've added your colouring adjustment layers, save your gif. File > Export > Save for Web
WATERMARK
To make you custom watermark shape, you can follow this wonderful tutorial by @yunaevis
How to set the custom watermark or any watermark, you can follow this tutorial by me. ( bonus: it'll also teach you how to use actions for watermarking)
BASIC COLOURING
Start off Curves. Click and drag the curves from the middle to upwards. This will increase the brightness .
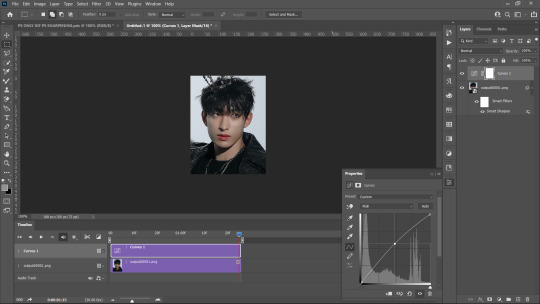
For skin, we begin with Selective colours. Messing with Reds and Yellows, give the skin more even saturation. You can accentuate blacks and increase brightness + contrast too.
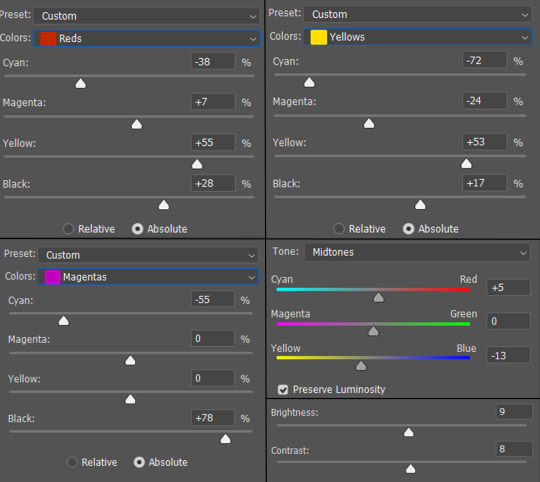
BEFORE AND AFTER:
for a detailed basic colouring tutorial, you can follow this tutorial!
DONE AND DUSTED,,,, THANKYOU <333 I hope this was somewhat helpful <3 if anyone has a doubt, they can always contact me!
#photoshop tutorial#vapoursynth tutorial#all in one gif guide#gif tutorial#kpopccc#lee.guide#ps tutorial#watermark#giffing#blurring captions#resources#guides#allresources#vs#vapoursynth#photoshop#gif making#300
593 notes
·
View notes
Text
emily’s gif tutorial!
hi there! here is how i make a gif from start to finish!
1. Find and HD video
2. Download video
3. Vapoursynth
4. Photoshop
1. Find an HD video to gif: I ususally do not gif something thats not 1080p or above, and preferably it is a video in 4k. For stage performances, I use .ts files from various sources. You kind of have to do some digging for these high quality videos, and sometimes this is the hardest part of giffing! But imo, it is not worth it to gif something low quality, as the gifs wont turn out as sharp or nice no matter what you do to them. For this tutorial, I am using this 1080p youtube video
2. Download the video: I use a variety of sites and even other people’s google drives to download HD videos, but be careful and make sure you know the source you’re downloading from is reliable! You can download a video from youtube, vlive or twitter even! I recommend finding a .ts file for performance videos, however, which cannot be found on youtube (try sites like 4sashi, or if someone uploaded something on twitter)
3. Use Vapoursynth: I’m not even going to try to attempt to explain how to download vapoursynth (for mac, or avisynth for PC users) because it is a very in depth process. Please check here for all you need to know about downloading vapoursynth!
a. Drag the video file into the vapoursynth editor. You will be asked to select a time stamp in 00:00:00 annotation. Start with the time on the video that your gif starts, so for our example that is at 16 minutes and 13 seconds into the video.

Next, you need to enter the duration of the video you want Vapoursynth to capture, starting at the previously selected timestamp ^. I want about 3 seconds of video, (we will trim it better later, in photoshop). I want three seconds of video so here is what I enter.... (tip; I would not go more than 4 seconds, 2-3 is the sweet spot for gif duration)

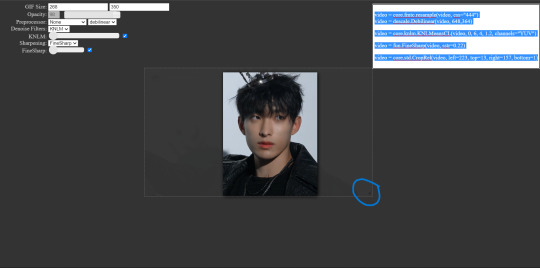
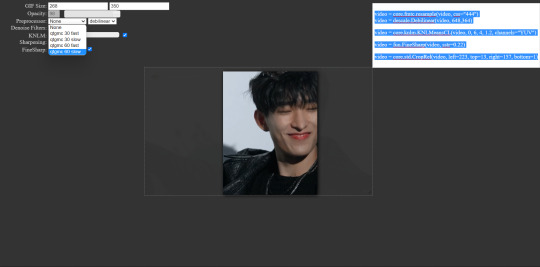
b. In your browser, a window will pop up like this;

Select your desired sharpening settings on the left side (my preferred settings are already input in the photo). You can adjust the gif dimensions up at the top of the left side (reminder; tumblr only accepts gifs formatted in 540, 268 or 177 for width). You can pull and drag the box around the video loop to zoom in/out/up/down while keeping your dimensions as well. Copy the box of text on the right once you’re satisfied.
c. Paste the box of text into Vapoursynth Editor (this application window should have popped up along with the browser window earlier) where indicated under #resizer content goes here. Then, go up to the top and select Script > Encode Video.

d. A new box should pop up that looks like this...

MAKE SURE you select Y4M up at the header box, and then click start! Wait for the video to finish processing. After it is finished, you can upload the video (found in Finder as output.mov in the Output folder) into photoshop.
4. Photoshop:
a. upload your video into photoshop (File > Import > Video Frames to Layers). The first thing I do is trim the layers.
b. Next I set the timing of the layers to either 0.05 or 0.04 depending on the gif.
c. Then, click the Convert Video to Timeline button. Select all the frames on the right hand side, and click Filter > Convert for Smart Filters. Now you can sharpen the gif, I like to use smart sharpen, I adjust these levels based on the gif but here are my settings...

d. Now is the fun part! You can color your gif however you want. Using psd’s is fine, but if you’re a new giffer I encourage you to experiment and play around with the Adjustments tab yourself to really understand the basics and what you like! You can find psd files anywhere, my favorite sources are tumblr and deviantart. I never just upload a psd onto a gif and call it good though, you’re almost always going to make a few coloring adjustments and tweaks to fit your gif! This is where those basic skills come in handy. I can go further into coloring in another tutorial as well...
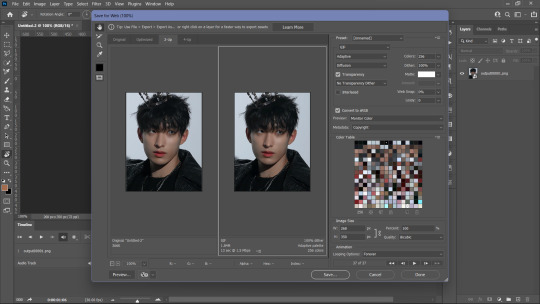
e. Now the gif should be done! When you go to save it for posting, you need to click File > Export > Save for Web Legacy. Make sure your gif is less than or equal to 3.00M in size (this is indicated in the bottom lefthand corner of the picture below, where you can see my gif here is at 2.826). Tumblr wont support a larger file. You can shorten your gif to make the file smaller.

Now you’re done! Repeat these steps with your other gifs. You can copy all your coloring from the first gif onto the next ones, so the process goes fast after you figure out your coloring on that first gif! Depending on lighting or scene changes, however, you might have to make a few tweaks to the coloring on a new gif. Experiment and have fun with this! Sometimes I make a few different coloring versions of a gif, save them into my drafts on tumblr and view them on my phone to decide which I like better!
Here is the finished product of this tutorial :) I hope this helped you!
#tutorial#faq#i kept this super basic and high level#but i can do some things more in depth too like coloring etc
21 notes
·
View notes
Text
how I make my gifs: a tutorial
Hi everyone! Just in case someone asks in the future + for those curious, I'm here with a tutorial on how I make gifs! If you have any questions whatsoever, please do send me an ask! I’ll be glad to help! The gif I made with this tutorial is the one right here!
So... let’s start this tutorial with the programs I use.
Adobe Photoshop 2020 - To make the gifs, majority of the work is done in this program.
TopazLabs (Topaz DeNoise 6 and Topaz Clean 3) - To "denoise" and "clean" the gifs, as the names would suggest. Links for download: Topaz DeNoise 6 & Topaz Clean 3
KMPlayer (an alternative would be PotPlayer, or any other video playing program that allows you to capture the frames) - To capture the frames. - I use an older version of KMPlayer, though I don't know which exact version that is.
Now let’s continue onto how I use these programs to create gifs!
Step 1: After you’ve downloaded the necessary programs, download your video. The way to get the best gifs? Quality videos. That’s the first step. For K-pop performances, I recommend this website (the hq files are in .ts form, KMPlayer should be able to open these). Bookmark it! It’s really handy :) Get the video you want to make a gif from and open it in KMPlayer (or PotPlayer or any other program, but for this tutorial I’ll use KMPlayer). Open your video in said program and look for the part you want to make a gif of. Then press CTRL+G (I apologize because I cannot for the life of me remember if this was a standard shortcut or not)
Step 2: After pressing CTRL+G, you’ll be met with this screen:

I’ll briefly explain the numbered parts, but before that, these are my standard settings and just make sure you have them all the same and it should be good!
1: This is where your captured frames will be extracted to. I have them extracted to the standard folder, but you can change this if you want to. You’ll need this folder later when opening the frames!
2: Like it says, this is the image format. I use PNG in the highest quality, as the name would suggest, for the quality.
3: These are the amount of frames the program captures. Say you put in every 2 or 4 frames, you’ll get more choppy gifs. To get the smoothest gifs, put “every frame” (this in turn will increase the gif size as the amount of frames will obviously be bigger).
Once you’ve put in the correct settings and you’ve put the slider where you want the capturing process to start, press “start” (now, before you do this I recommend putting the video on mute as the audio will start to get kinda demon-y the longer you record lol save your ears pls). Then, when you’ve captured all the frames you need, pause the video, press CTRL+G again and click “stop” and close the pop-up/program.
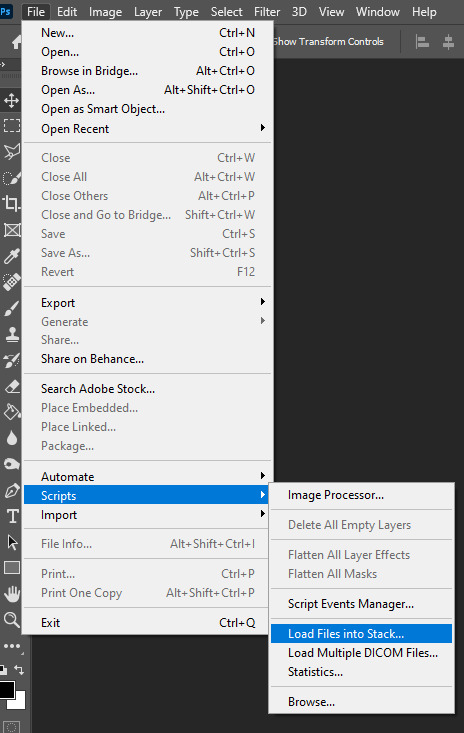
Step 3: It’s time to open up Photoshop! Then go to File > Scripts > Load Files into Stack... (for older versions/another version I used in the past this one didn’t work and I had to use the “Load Multiple DICOM Files...” instead. It should work similarly though, if I remember correctly).
You then get a little pop-up that looks like this:
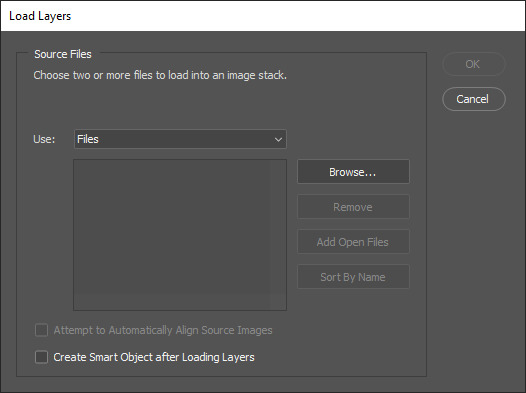
All you have to do here is click “browse” and navigate to the folder where your captured frames have been saved in. Select all the frames you need, wait for them to load in and then click “OK”!
Step 4: Depending on the amount of frames you’ve selected to load in, as well as the beefiness of your PC/laptop, the frames loading part might take a little while. Photoshop is importing every frame as a separate layer into one file, so just... grab a drink or something and wait a bit! When you’re done waiting, if you haven’t already, go to Window > Timeline. This will show you the animation timeline. For older Photoshop versions this is slightly different (I believe it’s called animation). Then click “Create Video Timeline” and click the 3 squares on the left bottom side (in older versions it’s on the right bottom side, not sure).
Step 5: After you’ve done all that, you’ll want to select all your layers. You can do this by pressing ALT+CTRL+A or going to Select > All Layers. With all the layers selected, you have to go to Layer > Arrange > Reverse. You only have to do this if you used the “Load Files into Stack” option!
Step 6: After reversing all your layers, you’ll want to go to the three lines you see in the following screenshot, and click “Make Frames From Layers”.
As the name suggests, this turns all the layers into frames. I don’t know why but the first frame will always be 5 seconds long, so to make it easy on yourself when you want to check your gif while editing, just put that on 0 for now. You can do that by clicking the seconds under the frame and clicking “No delay”. After this, check to see if you have the right frames and if you need to delete some (you can do this at any point in the process but I didn’t know where to put it in the tutorial oops).
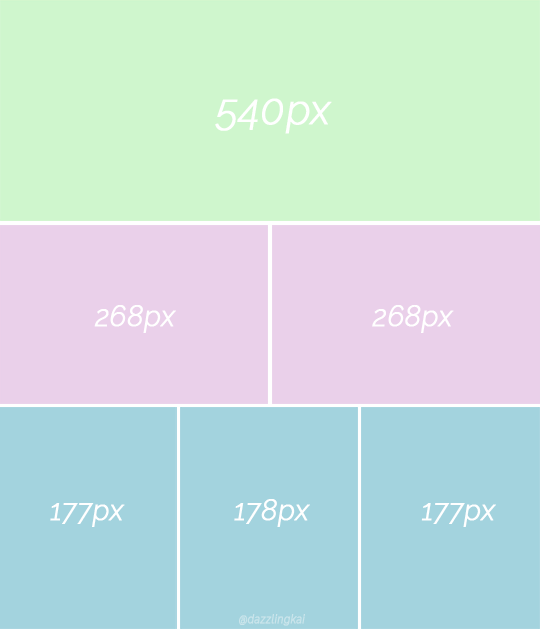
Step 7: Time to crop the gif to the correct size! For this gif I’m using as an example, I’m making it specifically for Twitter, so the sizes aren’t that obvious (for Twitter I usually use a width of 850 px to keep it sharp, for long size gifs (more height than width for example), I add a background so that it eventually still becomes 850x850 pixels). There’s many posts on Tumblr about the correct sizes for gif/photosets, but a brief rundown of my most used sizes: one gif spanning the entire width of the post has to be 540 px in width. Two gifs next to one another need to have a width of 268 px. I use these dimensions the most! For others, you can Google!
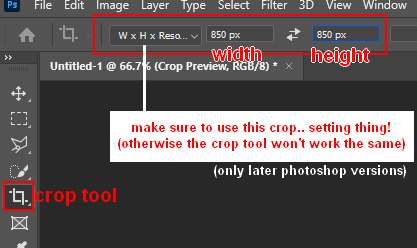
Step 8: After you’ve cropped the gif, you can do either of two things: either you first add the coloring of your choice and then sharpen the gif OR you do it the other way around. I usually switch these two around depending on how sharp the gif already looks before sharpening because I can’t stand looking at 2 pixels while coloring (lmao). For this one I’ll do the sharpening first.
The whole sharpening process is actually quite simple but you need to make sure that you do the following little steps in the right order or else it won’t work! Select all the layers (CTRL+ALT+A or Select > All Layers) and then click this little thingy:
Then you’re going to Filter > Convert for Smart Filters
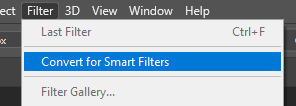
If you don’t do it in this order, your gif will end up... well, not being a gif and not moving. If that happens, track back in your history to see if you did it in the correct order! :)
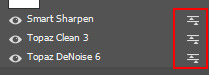
Step 9: The actual sharpening process! After clicking the “Convert for Smart Filters”, you’ll want to go to Filter again and find the Topaz Labs tabs. Personally, I usually do it in the order of DeNoise first and then Clean, but this is a personal thing, really.
I recommend playing around with the settings to see what fits the gif but here are my go-to DeNoise settings (tip: save these as a preset so you only have to click that for faster giffing!):
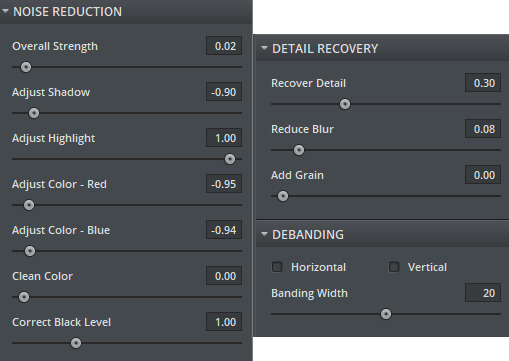
And my Clean settings:
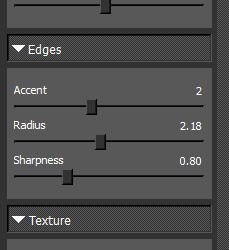
Press OK when you’re done with these and then go to Filter > Sharpen > Smart Sharpen. These are my SS settings (just copy these, and again, save as a preset!):

Depending on how sharp you want the gif to be, you can input the same settings or go to this in the layers and change the percentage.
Now that we’re done with these... it’s time to flatten it! Just follow these little steps:
And then you wait. Again. I know.
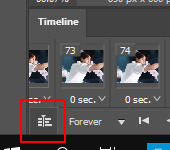
Step 10: After playing the waiting game, you’ll click the three little squares again and do the same thing you did earlier: “Make Frames Into Layers”. Delete the first frame. Add a coloring of your choice (can be a PSD, can be your own coloring, etc. this is honestly just... playing around with things and see what it can do). After you’ve done coloring, select all your frames (same lines as previous screenshot except now you’ll see a “Select All Frames” option, click it!) and change the time to whatever you like (I usually go for 0.05, 0.06, or 0.07. Again, just play around with this!! Try different things!)
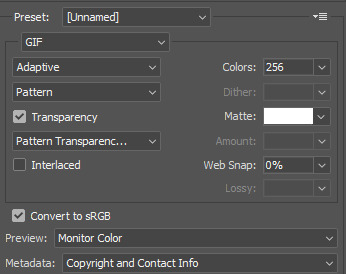
Step 11: Final step! Saving :) I use shortcuts a lot to make things faster so either press ALT+SHIFT+CTRL+S or go to File > Export > Save For Web. Not much to do here, just copy the following settings and save the file!
!!! NOTE: After making a new gif today I realized there’s a weird dotted border on the top of my gifs, it’s a bit difficult to explain but I had no idea what it was. Turns out that the reason why this showed up was because, as shown in the screenshot below, I had “Transparency” selected. If you’re experiencing this too, UNSELECT the transparency and it should be all good!
Also make sure that the “Looping Options” is set to Forever, or else your gif will play only once and then stop!
Tip: While making gifs for Twitter I at one point noticed that if I added in a white background, no matter what I’d do, it’d show up as yellow-y in the preview box. After googling I found that going to the options (1 in the screenshot) and then clicking “Sort by Luminance”, then double-clicking the lightest color (not the transparent one, 2 in the screenshot) and selecting white (or FFF) will get rid of this! This likely won’t be that useful for Tumblr gifs but just in case you ever want to have a white background...!

Then just... save, and upload to Tumblr! :)
Final note: Tumblr has a mix gif size of 3MB. If you have a gifset of 4 gifs you want to upload, all 4 gifs can be max 3MB each. Keep this in mind! If you’re over 3MB, delete a few frames and try again, or resize/crop your gif!
As it turns out, Tumblr has increased their gif size to 8MB, however, the quality tends to get compressed with larger gifs like that so per recommendation: keep them below 5MB! (thank you @yeoli for letting me know!)
I hope this helped! If you have any questions, feel free to send me a message and I’ll try my best to answer them.
75 notes
·
View notes
Note
I really wouldn't mind you aiding me with some tutorials love
giffing tutorial/resources
hi anon! sorry it took me so long to answer. i figured this might be helpful for others out there who have asked me similar questions, so i’ve compiled a pretty comprehensive list of tutorials/resources. idk about others but when i was new to giffing, it took me a lot of painful effort to go around and look for resources, so i’m putting it all here to make it a little easier!
i download videos using 4k video downloader. it will download very good quality 1080p videos in .mp4 format. if you’re downloading a 4k video, make sure to change the setting option to .mkv so that you get 4k and not 1080p—for obvious reasons since you want the highest quality.
i rely on kpopexciting to get .ts files — which are basically raw, very high quality video files for live performances. they are much less grainy than .mp4 versions of live performances—which are the ones you’ll see uploaded to youtube. i’ve found that 4k videos (in .mkv) are just as good quality as .ts, but obviously you will rarely see live performances in 4k, so get .ts when you can!! you can also try to find .ts files on twitter, but you may have to do a lot of digging. i wish i could recommend you twitter accounts, but the ones i used to go to have been very inactive/taken down all their drives :( but this website is really nice and updated frequently so i would recommend it!
vapoursynth links + download. the reason you would use vapoursynth is to resize your gif, while maintaining the optimal quality of the gif. if you gif without vapoursynth (.ie only using photoshop), it will still be fine, but the image quality may be grainier. also, you will definitely need vapoursynth to gif .ts files —more will be explained in the tutorial i’ve linked below. i would recommend that you have a high processing/lots of ram/newer desktop or laptop to use vapoursynth so that 1, your computer isn’t fried and 2, your vapoursynth process will go a lot faster. i am using a 2017 macbook pro for all my work, and it runs pretty well, but my laptop still gets pretty hot so just make sure you’re not running a million things in the background while using adobe products and vapoursynth lol. i used a pretty old and beat up 2011 model macbook air back then, and i will say that yes vapoursynth worked and ran on it, but it took much longer, and basically fried the laptop’s battery (aka i had to get the battery changed twice and the laptop would die randomly) but issok it was a school borrowed laptop so i didn’t feel too bad lol. im just saying this as a precaution, to preserve the health of your electronic devices!! but don’t be afraid to use vapoursynth! you should still try it at least once.
thank you to @realstraykids for this super detailed, really nice tutorial! it includes how and where to download videos, how to gif using vapoursynth, using photoshop, comparisons, coloring, and pretty much all you need to know. 10/10 would recommend
thank you to @dreamcolouring for this lifesaver!!! the best and easiest way to blur out unwanted captions/objects in your gifs. i recommend doing this step after converting your frames to video timeline and before you do sharpening and coloring. another tip i’ll add is to feather the selection you’ve made right before you click on “add vector mask” —this will make sense once you’ve read through the tutorial. feathering it will make the blurred spot less noticeable and more subtle.
i use this generator to create gradient colored captions! copy and paste your text, then select the colors you want. generate the code, and copy it. change the settings of the text editor on your post to HTML. paste the code, preview, and voila! add elements <blockquote>,<b>,<i>, etc as needed. see more on colored captions in this tutorial by @kylos --i believe op mentioned a different and better color generator but for some reason it won’t work for me :( hopefully it works for u! basically same idea as the previous generator i mentioned.
my own mini tutorial/workflow process of making gifs. this includes working with a .ts file, vapoursynth, photoshop, coloring, watermarking, etc. and a few of my own tips below:
if you are working with an .mp4, you do not have to make any changes to the preprocessor/denoise filters/sharpening in the resizing part of vapoursynth—it doesn’t make that big of a difference if you do. but if you are working with a .ts file, definitely do make those changes,, that’s the whole reason you have vapoursynth. with an .mp4, i like to use vapoursynth to just resize, but i don’t add any additional settings. i use smart sharpen in photoshop to sharpen it, which is pretty good on it’s own (at least in photoshop 2020!).
my rule of thumb is to do add .02 seconds when i am setting frame delay. so if when you first import the frames, they are at 0.04 seconds, i usually change them to 0.06. of course, this is my personal taste—you can make all your gifs faster or slower depending on how you want em to look.
if you are on a mac, you can screen record by pressing Command+Shift+5 (it’s a shortcut to quicktime screen recording). I only screen record for things like the beyond live concert or other live streamed events. the image quality of the screen recording, in my experience, is actually pretty good. when you gif the screen recording however, you may notice that it adds extra frames that you don’t need. by that i mean duplicate frames. you could keep the duplicate frames but that just means the size of your gif is going to be much bigger (keep in mind the limit is 8mb). in order to remove those duplicates, my only solution has been to remove them manually (by holding Command while selecting), or when you are importing the video to frames, select the option to “limit to every 2 frames”—but this method will be less precise and still not as good as manually removing frames. if you remove the duplicate frames, this means you will need to set the frame delay even slower, to make up for lost frames. in my experience, fps(frames per second) and frame delay work in conjunction. so for example, if i delete every other frame because they are duplicates, but the starting frame delay is 0.02, i am now going to change it to something like 0.05 (so i added 0.03 seconds rather than my usual 0.02). if the duration length and the image dimensions of the gif are short/small, feel free to keep the duplicate frames in—i only delete duplicate frames in order to keep my gif under the 8mb limit. then, if you keep the duplicate frames in, continue with your standard frame delay preferences. now that i’m writing this im realizing this might not make a lot of sense lol.. but don’t worry about it for now and if you run into trouble w screen recorded gifs then you can come back to this for reference. again, this is only my experience recording on a mac—it may be a lot different if you use a screen recording program or are on a pc.
i don’t really use .psd templates because i like to give every gif/gifset it’s own unique coloring—so i remake the coloring every time, but if you get into a rhythm it’s pretty easy. there are a lot of nice coloring tutorials out there, too! my personal coloring adjustments in order: levels, exposure, color balance, selective color (if needed), vibrance, photo filter (if needed), color lookup (i use 2strip most often and i put it on ‘color’ blending mode). don’t forget to adjust the opacities and fills of the ‘color lookup’ adjustment layer in case it’s too strong. go back to correct each adjustment layer as needed. then, when you’re done and satisfied, group all those layers, copy the group (you can do an easy command+c), and paste it onto the next gif you’re working on for easy workflow.
if for some reason you can’t see the frames when you import your layers/video, it’s likely because your ‘timeline’ window isn’t showing up. just go to the window menu on photoshop, go to the bottom and you’ll see ‘timeline.’ make sure it has a check next to it.
i recommend watermarking your gifs because a lot of people like to repost tings these days 😠 - so make sure u got your brand on it! i keep my watermark saved to my ‘libraries’ in photoshop so it’s ready when i need it. i use the blending mode ‘overlay’ and adjust the opacity, but if you don’t want to do that you can also add a stroke/shadow to your watermark/do all sorts.
tag #nctinc for your nct creations and #jenonet for your jeno creations!!
here’s my own mini tutorial (well not much of a tutorial ig more like a work process vid?): took about ten minutes including the time to search and download the video (but i didn’t record that part i trust yall know how to do that), vapoursynth, and exporting. i hope this helps somewhat! feel free to ask more questions whenever :)
youtube
keep in mind that giffing takes a lot of patience, energy, and experience—so don’t worry if it takes you a bit to figure things out or if your gifs don’t turn out the way you want them to the first time around. we all start at the same place and all run into problems. i know giffing can sound intimidating and seem like a lot of work, but i promise, once you get into a routine, giffing is going to happen in minutes—and you’ll get beautiful gifs. have fun! 😊
#anon#answered#tut#tuts#giffing tutorial#should i make a tut/resources post on gfx? not rly sure if gfx can be taught.. it's like a lottt about personal style imo lol#hope this helps!#not just for anon but for anyone
118 notes
·
View notes
Note
love your gifs are so pretty how do you make them 🥺
I’ve never gotten an ask like this in three years 😭 Thank you 💖
I think the key to hq gifs are hd videos. You don’t get good quality videos you’re pretty screwed. A lot of people also use Vapoursynth to improve on video quality but I think my gifs look better without it lol. For downloading videos it depends on where you’re getting it.
For youtube videos I use 4k Downloader
I get TS files for performances from kpop24hrs, you can’t download from there without a login tho. But they upload all performances of each day. Unlike Kpop Exciting which only uploads from more popular artists.
For other videos from like vlive for instance i use Savieo
To get my frames I use Gomplayer. In there you use burst capture ( ctrl + g) and I do it at a rate of 0.06, 0.04 or all frames, depends on how short the clip is and I’m sure you can figure out which rate works best for you
I currently use Photoshop CC 2018, I for some reason have 2019 and 2020 as well tho. I do pay for it, surprisingly.
Gonna grab some screenshots of the process of making this gif:

so i’ll put a “read more” here
I get the frames into PS like this Files > Script > Load Files Into Stack
Make sure you have the timeline window up at the bottom and click Create Frame Animation and then Make Frames From Layers.

If you load your frames in the way that I mentioned above it will be backwards so remember to Reverse it! Select All Frames and set your frame delay. I usually go for 0.1 but if it’s really long i’ll go for 0.08.
Resize | ctrl + alt + i 540 for a full size, 268 for 2 in a row and 178 for 3 in a row. Height doesn’t matter that much.
Add your PSD or manually colour whichever you want, I have a psd I use on literally everything lol. I got an ask for that on my gg sideblog so I’ll link to that here once I’ve answered it.
Now to sharpen. Convert to Video Timeline > ctrl + alt + a (mark all frames) > right click the frames Convert to Smart Object > use sharpening action
or if you don’t have a sharpening action on the ready. Filter > Sharpen > Smart Sharpen

To save your gif you need to go into “Save For Web” File > Export > Save For Web (the keyboard shortcut is: shift + ctrl + alt + s)
These are my save settings

And that’s that I’ve made a gif.
No editing

Edited
I’m sorry if this makes no sense I haven’t written a thing like this in 3 years, In the end my process is very simple and fast. I know a lot of people use Vapoursynth and Topaz but I don’t tend to. I use topaz occasionally.
6 notes
·
View notes
Text
Free APE To MP3 Converter 1.zero
Boxoft APE to MP3 Converter Freeware is an easy-to-use program to remodel Free Lossless Audio Codec (APE) into MP3 format. Convert your entire WMA files to MP3 easily with Free WMA to MP3, the software program designed solely for this goal. You may get by means of a large batch of those recordsdata quickly and with little getting in the best way. Media > Open Seize System > Select Desktop because the Seize Mode > Set your body rate > Click the drop-down menu on the underside of the screen and select Stream > A brand new window will open where you possibly can select the output file format and location. A-PDF All to MP3 Converter is an easy, lightning-quick and powerful audio conversion and MP3 Rip software that means that you can to batch convert Audio (wav, flac, ogg, wma, ape, tta) to high quality MP3 audio codecs. Audio Converter is extremely quick due to full-scale computation squeezing probably probably the most out of your CPU - however many cores it has. You may configure this habits in Preferences.
Select MP3 because the the format you need to convert your APE file to. APE to MP3 Converter helps prevalent operation techniques. The Cellular Media Converter is a free video and audio converter for converting between fashionable desktop media codecs. The System is ready to cut the music from any video. So it's attainable to soundtracks from motion pictures and various videos on-line. It is very handy for when you need to get the music whose name you do not know. Pavtube Video Converter Ultimate is a suitable alternative for MP3 to OGG conversion. It's simple to use and options fast conversion pace. Plus, for space-saving consideration, you can too compress your mp3 to small dimension with this tool. Click on convert" button to transform APE to MP3 with quick conversion tempo and high output top quality. This method Free APE to MP3 Converter is accompanied by a particular model of the FFmpeg encoder, tailored to the needs of the program. Probably not helpful to make use of totally different versions of FFmpeg. Convert HD and AVCHD to widespread codecs. Extract audio from m4a, wma, wav, mp3, aac, ac3, ape, mka, ogg, and many others. video recordsdata Crop video to create the correct image for numerous display display screen sizes. All2MP3 is devoted specifically to MP3 conversions and makes use of AppleScript to perform quick and environment friendly conversions. It is easy to use because of a simple drag and drop interface and all you need to do is click on the All2MP3 button to begin converting. Convert APE to more audio codecs, like changing APE to FLAC, to AAC, AC3, AIFF, WAV, M4B, M4A, OGG, WMA, MP2, and so on. Helps numerous codecs. MP3 Toolkit is committed to being inclusive of users who've various preferences relating to the formats they need to convert. Thus, the program affords greater than 20 enter formats and more than 10 output formats. You possibly can obtain the MP3 Toolkit software program and check out it instantly. Though there are numerous APE Converters obtainable on-line, solely few of them do help changing APE recordsdata. Even, most of them only enables to convert APE to 1 or two audio formats like APE to MP3 or APE to WAV, reasonably than virtually all popular audio formats. And what's worse, these APE Converters are shot of the function of splitting and converting CUE related APE into particular person MP3, WAV, FLAC, ALAC, and so forth information. Step 2: Start this system. Select APE files. The free trial version of AudioConverter Studio can convert up to 10 recordsdata directly. You can repeat the process as many time as you would like. For those who like the program, you possibly can register it and remove all limitations. Turns out to be useful. I hate having WMA, they're just extra restrictive than most different recordsdata and its higher to have all of your library in MP3. Energy Mp3 seems to have solved the problem. This can open a dialog field where you may browse file on your pc and select the specific info you want to convert. Various online converters embody Zamzar, and Online Convert. Video Converter Free is among the finest free FLAC to MP3 converter obtainable. Simple methods to Convert MP3 to WAV. This program helps multiple audio formats, together with wav, mp3, vox, gsm, precise audio, au, aif, flac, ogg, and many additional. Free APE To MP3 Converter 4dots is a software product developed by 4dots Software program and it is listed in Audio category beneath Audio Convertors. Free APE To MP3 Converter 4dots is a free software program product and it is totally purposeful for a vast time although there may be different versions of this software program product. You possibly can run Free APE To MP3 Converter 4dots on all fashionable Windows OS operating systems. Free APE To MP3 Converter 4dots was last time updated on 09.09.2014 and it has 1,990 downloads on portal. Download and set up Free APE To MP3 Converter 4dots safely and without issues. Profile: Choose the profile with the encoding that you'd like your new file to be. As an example, if you happen to selected aMP4 file for converting toMP3, you'd use the "Audio - MP3" profile. Download and run HD Video Converter Manufacturing unit Pro, click on on Add Recordsdata" button or you can simply drag and drop your APE information into this program. Not like traditional methods akin to mp3, ogg, or lqt that completely discard quality to avoid wasting house, Monkey's Audio doesn't loose information through the encoding course of, and encoded audio recordsdata are usually decreased to about half of their authentic size. Remodel videos to MP3, M4A or www.Audio-transcoder.com different media format. This system supports over 500 in style and rare video codecs: MP4, AVI, FLV, MKV, DVD, WMV, HD, H.264, MOV, VOB, SWF, TS, WebM, free mp3 ape converter youtube Xvid, and many others. Save soundtracks and extract music from a video in seconds. Unique audio high quality is preserved. Outline Title, Artist, Album, Genre, Track or 12 months for output MP3 recordsdata. Convert APE To MP3 Format And Break up It To Explicit individual Tracks Using CUE File. Step three: Provoke FLAC to MP3 Conversion. Click on "Upload", select music files of the following formats: AAC, FLAC, M4A, MP3, OGG, WAV, WMA. The most important downside to this program is which have to buy the Infinite Pack to convert audio information which can be longer than three minutes. Super is a very fashionable and free audio converter. You can be stunned on the lengthy checklist of audio codecs it supports. If in case you have an audio file recorded in a rare format and also you need it converted to a more common format, it's best to try out the Tremendous audio converter. Enter formats include MP3, MP2, WMA, WAV, WV, TTA, free mp3 ape converter youtube RM, RAM, OGG, MPP, M4A, FLAC, MMF, APE, AAC, AMR, and AC3.
1 note
·
View note
Text
Audio File Size Calculator
Now that you know how to export your GarageBand songs to iTunes and learn how to use your customized music with the opposite iLife functions, let's take a look at tips on how to convert your AIFF files to MP3 in iTunes. Step 2: Click Import Settings to set MP3 format in the "Import Utilizing" drop-down menu to pick MP3 Encoder. And you can too set bitrate on the "Setting" drop-down menu. Sony Vegas and older versions will support all three audio formats supplied by Free Inventory Music with out having to render or compress them until you export your venture. Rework videos to MP3, M4A or other media format. This system supports over 500 standard and rare video codecs: MP4, AVI, FLV, MKV, DVD, WMV, audio-transcoder.com HD, H.264, MOV, VOB, SWF, TS, WebM, Xvid, and so forth. Save soundtracks and extract music from a video in seconds. Original audio quality is preserved. Online converter is one other wonderful on-line media converter, which is ready to convert different media files on-line fast for free. Simply use the web program to get the specified files with ease. Once your file have been uploaded, you'll be able to see them within the window. Drag the handles to pick the half you wish to get as a new audio file. Present a brand new filename and format for the output audio, then click on "Lower and Convert" to complete the process. Click on on Convert" button to start the conversion from AIFF to MP3. If the sound of your AIFF information is so lower or larger, you should utilize the software to amplify or scale back the sound. Using native codecs is always encouraged and you can keep away from lots of hassle in modifying production music just by selecting the best format to obtain. This free on-line AIFF converter lets you easily convert audio information from numerous codecs to AIFF audio information. You only have to upload your file or provide a hyperlink the place we can download your audio file. After clicking on "Convert file", your file will likely be transformed to AIFF and you'll download it instantly. You'll be able to convert audio recordsdata AIFF to MP3 as well as to variety of other formats with free on-line converter. Step four. Click Convert button to start out the AIFF to MP3 conversion on Mac. Changing multiple video and audio recordsdata in batch to MP3 Audio, OGG Vorbis Audio, WAVE Audio, AAC Audio, MPEG-four Audio, and WMA Audio is supported. There's no doubt that MP3 is king relating to all things audio on COMPUTER or Mac. In case your music or audio isn't in MP3 format you then need a simple solution to convert it which is what All2MP3 does. MP3 file format is a popular audio coding format which was designed by the Moving Picture Experts Group (MPEG). It is a lossy format which makes use of a type of lossy knowledge compression. A MP3 file has a comparatively smaller dimension and generally used to steam or retailer audio. It may be transferred and performed on most digital audio players. Whether or not to bounce as mp3 vs aiff depends on what you're using them for. Aiff files are an uncompressed format while mp3 files are. Consequently aiff recordsdata are a lot greater, but are of upper quality. I'm not exactly certain why you might be getting an upgrade message as a result of you are able to bounce to mp3 in 7 ans nicely as 7.1 as long as you will have bought the add on software program. You may just need to re-set up the mp3 Possibility and reauthorize it.
For those who kind the letter "a" in a "paint" type program, here's what you see on display screen, again magnified many occasions. Your file will probably be a BMP, PICT, PSD, TIFF or related type of file. This is much like an MP3, WAV and different types of audio recordsdata. In this case, we'd have only one intrument playing one be aware, nothing extra. If we had a phrase, it might be like having as many notes as there are letters. gives a simple different to convert your audio information into numerous codecs with the intention to use them in other units and sound applications. I just need to congratulate you for the MediaHuman Audio Converter. Variety of choices for audio high quality, file extension type and multiple cpu core alternative. And checkbox for adding to iTunes whereas converting. Genius. You saved me from hours of waiting. Effectively achieved. Inform Zamzar the place you wish to receive your converted MP3 file. Step 1 - Launch this AIFF converter, click "Add Information" button to import AIFF recordsdata or a easy drag-and-drop. Click the "Convert" button and this Bigasoft Audio Converter will immediately begin all video conversion duties. After completed, click on "Open Folder" icon. You'll get the transformed audio and proceed whatever you want with it.Click "Burn" to start burning your AIFF files to disc. Once burning is completed, your AIFF information will now be on an audio CD, when you insert this CD into a computer it can show thecda recordsdata in My Pc. When you have a bunch of music information unsupported by your MP3 participant, Freemake Audio Converter is an easy technique to clear up that drawback once and for all".
1 note
·
View note
Note
WHAT DO YOU MEAN YOU USE INSTAGIFFER??? I USE IT AS WELL AND I CAN NEVER MAKE GIFS AS BEAUTIFUL AS YOURS??? pls tell me your secrets senpai!!! 🙇🙇
djghfbghf senpai I am most certainly not!
I’ll put this under the keep reading so as not to annoy anyone!
As for what I systematically do (depending on each video I’m working with things do alter):
HQ videos only! I refuse to work with any lower than 720p, preferably 1080p. With music shows I download .ts files from kpopexciting or kpop24hrs (they also upload other performances occasionally and music videos at 1080p)
In the FX & effects panel I turn my enhance up to 100. It CAN make it look grainy, but if I can, I utterly want my gifs to be as sharp as possible.
Try to get the gif up to the highest fps: size ratio it will go (under 3mb)
Quality obviously up to 100
I find brightening the gif by 1 tends to allow for more highlight opportunities
in the FX & effects, go to colouring. Use an orange, red or pink hue and then decrease it from 100 to increase shadows. (it’s easier if when you start you use the faded, lighter hues)
Recently I have gotten into the habit of messing around with drastic colour changes with colouring and then using the colour fade option to balance as gifs look sharper
(basically I spend ages messing around with the brightness, colouring colour fade and occasionally! the nashville options)
This is my basic editing for each individual gif with instagiffer. Depending on what A. the desired effect I’m going for and B. video I’m working with it can change.
Hope this helps !!
19 notes
·
View notes
Text
Can I Convert MP3 To Flac? Solved
Begin APE2FLAC Converter. Click the "Profile" drop-down list to pick MP3-MPEG Layer-3 (.mp3) from the "Basic Audio" class. And in the following passage, audio-transcoder.com we are going to cover largely in the right way to convert APE audio recordsdata to MP3 or other formats, which can be performed in some transportable and widespread media players. Some must be downloaded onto your computer or Mac, whilst you can obtain with some online converters. Just examine the desired solutions from the article now. Different codecs supported by Libsndfile are additionally decodable. XLD makes use of not decoder frontend however library to decode, so no intermediate information are generated. All of the supported formats might be straight cut up with the cue sheet. XLD additionally helps so-known as 'embedded' or ‘internal' cue sheet. Complete Audio Converter takes care of the job. This software supplies you with a clear, straightforward-to-use interface where you can select the information you want to convert and the goal format, after which merely let this system do the remaining. The free trial version of AudioConverter Studio can convert as much as 10 files directly. You can repeat the method as many time as you wish. Should you like this system, you can register it and take away all limitations. WonderFox HD Video Converter Manufacturing unit Pro is a professional APE to FLAC converter. It supports flawless conversion at fast speed and offers the optimized output audio parameters. Only three steps, you can convert APE file to FLAC, WAV, ALAC, MP3 and extra different audio format at one go. To play APE on extra devices and players, changing APE to FLAC is the widest selection. In this way, you'll be able to keep the quality and compression of the source file. Convert APE to lossless audio format like convert APE to WAV, convert APE to FLAC , convert APE to Apple Lossless ALAC M4A. Convert APE to lossy audio format like convert APE to MP3, MP2, WMA, AAC, AC3, AIFF, AU, RA, DTS, OGG and etc. Since wav data do not include any tags, all wav to flac conversions will require some kind of after conversion tagging of the flac recordsdata. mp3tag may be very simple to make use of and, with barely effort and experience, may also be very powerful. APE is a loseless audio format (aka Monkey's Audio) which is pretty common because of the excessive compression ratio that it provides. The principle disadvantage of the format is that its use is mostly restricted to Home windows OS. Thus, if you want to playback a track withape extension in your MAC or ape to flac audio converter online free iPhone, you'll require to convert it. FLAC is the chief competitor of APE and is way more appropriate for listening functions as it's supported by a wider range of units and players. To describe the conversion course of I can be using Free Audio Converter. This is likely one of the packages from the Free Studio bundle and, to my mind, it's the best solution if you happen to simply need to change the format of a file with out toying with quite a few conversion choices. A good friend and I've simply downloaded version 2.2.0, and examined each the 32bit version and the 64bit version, and we've discovered a standard downside. When using the profile choice of MP3 and leaving the defaults alone, it really works and saves the audio in an MP3 format, and the listed container is indicating Containers (.mp3). The second we change the bitrate to a better stage, either 160 or in my case 192, the output container now signifies Containers (.ts), and the resulting created file is garbled, mainly destroyed. Even if I power the extension to MP3 by altering the container choice to All recordsdata (.)", and the file identify and extension accordingly, it doesn't help. I've not examined additional with other input file formats, however we're at present tryingmp4 andmp4a information, video recordings from our cell phones, and making an attempt to extract the audio solely. Freemake Audio Converter helps several frequent audio codecs and is extremely simple to use. Nevertheless, it solely helps audio recordsdata which might be shorter than three minutes. Freemake is a function-wealthy and very simple to make use of audio converter that supports multiple input and output audio file codecs. With Freemake, you may mix a number of information into one massive audio file. This software program additionally allows you to adjust the output quality earlier than file conversion begins. Enter codecs supported embody MP3, WMA, WAV, OGG, M4R, M4A, FLAC, AC3, AMR, and AAC. Output codecs supported embody MP3, WMA, WAV, OGG, M4A, FLAC, and AAC. Monkey's Audio a.k.a APE successfully unites lossless compression approaches that are traditional (linear prediction and route coupling) and a simple Neural network. To save lots of the output values of its prediction measure Vary coding, which is altered to function very nicely with constant values which might be kind of is used by it. The drive letter for my exterior drive (holds all the lossless information) had changed once I reconfigured my stuff. I accepted the default path supplied by the music converter (last time used) without pondering. The trail was to a non-existent location, hence the error message. As soon as corrected worked tremendous.
Well-liked ape flac player of Good Quality and at Reasonably priced Prices You'll be able to Buy on AliExpress. I at all times really feel like I ought to have something good so as to add to this discussion, however the main lossless codecs are all good decisions. Zamzar is a web based audio converter service that supports most common music and audio formats. Simply upload FLAC file out of your computer or enter a URL to an online file, after converting, it may well output WAV, MP3 information etc. We did not find results for: Convert APE To FLAC (On-line. Try the suggestions beneath or sort a model new question above. Yahoo gives you a wide range of products and services for little or no worth. We're prepared to do this on account of our promoting income. This also makes it attainable to supply positive corporations and content material which may in any other case be unavailable to you thru Yahoo firms. Step 3: Look forward to a while to finish converting APE to MP3. Then, download the output recordsdata onto your computer. Added assist of format APE (Monkey's Audio). Moreover, this APE to FLAC converter is provided with some enhancing operate like trim, merge or break up audio file, change audio channel, alter audio birate, compress audio to a smaller measurement, and many others. A: The APE to FLAC Converter download for COMPUTER works on most current Home windows operating programs. In contrast to traditional strategies such as mp3, ogg, or lqt that completely discard quality to save space, Monkey's Audio does not free information through the encoding course of, and encoded audio information are usually diminished to about half of their authentic measurement.
To take pleasure in music saved in exotic codecs that you media player doesn't assist, you may need to install an audio converter software that promises to transform the audio tracks to a supported format. Numerous audio codecs exist, and each has its own unique features. Some preserve wonderful sound high quality, some will be performed solely on specific devices, some provides compact size, and others are so rare that you don't have any concept which packages can open them.
0 notes
Note
can you teach me how to make gifs like you? ^^
i can definitely try! i’ll give a few general basics in this response as i don’t know how familiar you are with the process already. if you think a full tutorial of how it do it would be useful, feel free to message me again! or if you’re having specific problems, come off anon and i can troubleshoot with you :)
the most important thing is video quality. your gif can never be better than the basic quality of the video you download. i try to use .ts files whenever possible (here or here are good sites to find .ts files, mainly of performances)
i use avisynth to trim videos to manageable size for the gif. there’s a good tutorial on installing and using it here. it’s definitely a little overwhelming at first, so let me know if you have any questions or want a full tutorial of how i use it!
once i have a short clip, i use photoshop cc to actually make the gif.
first “import video frames to layers” of the clip made in avisynth
then delete frames that i don’t want
crop and resize
clean and sharpen (my method for this is a little overkill, so i’ll make a separate post about it if you’re interested)
then coloring. this varies dramatically by gifset (i generally dont use psds), so again, i can make a separate post about that if you think it’d be helpful :)
finally, save for web!
some tips on my settings for making/saving gifs
the speed of the frames i usually have at .04 seconds
saving settings are 256 colors, perceptual, pattern, no lossy
tips for uploading to tumblr
gifs have to be less than 3mb! i prefer not to compromise quality (by using less colors, having lossy, etc) and instead delete frames to get under the limit
sizes for posts are 540px wide, 268px for two images side to side, and 177px for three in a row
i hope this was at least a little useful, and not too confusing. please feel free to ask more questions/request a full tutorial/etc. and i’m happy you like my gifs!!!
#replies#Anonymous#i feel like i just rambled and this isnt actually useful#idk let me know#also sorry i took like a year to respond to this
1 note
·
View note