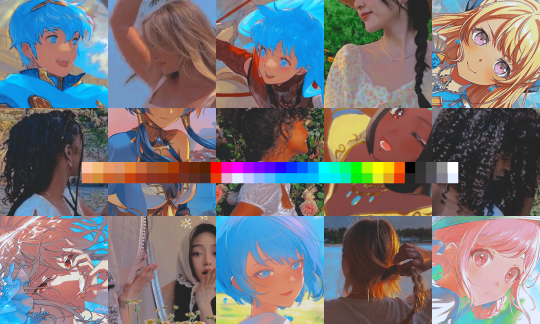
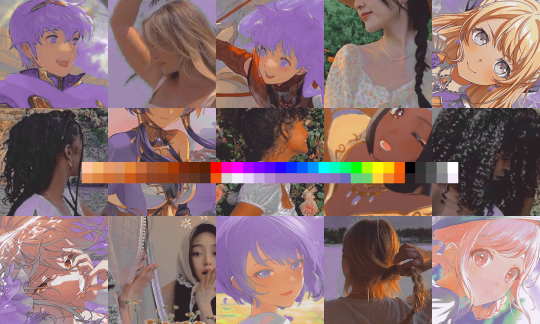
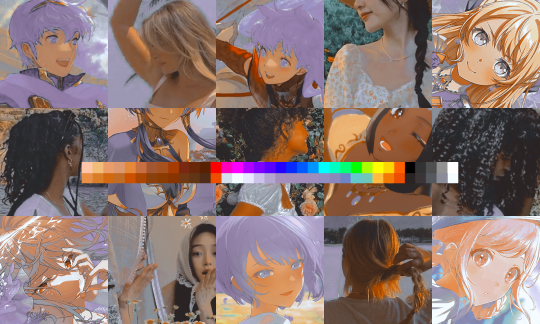
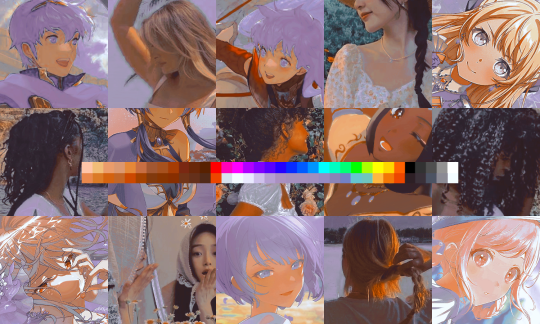
#i used the same psds and colorings for all of them but it's not a coincidence that one of these graphics does not look like the other
Text


the prettiest smile on earth. | 🍊 | for → @sopekooks
↳ suchwita episodes #1 and #2
#btshoneyhive#dailybts#purplearmynet#boongietrack#annietrack#userjeonjcngkook#trackofthesoul#heyryen#shirleytothesea#usersky#tusermanny#yoonkookclub#dailydaegu#cyphernet#tusercait#tusercelia#flytomyroom#myg#suchwita#my+gifs#i am not a fan of the colorings i used here tbh T_T esp the ones of the 2nd episode#and it's the same psd too lol#(and i just now realized this but the watermarks of each episode are in different positions oh my god#well it's nearly midnight here and i need to sleep lmao)#anyway crystal hi! i tried to find all of the moments of yoongi smiling and laughing in the 2 episodes of suchwita#and compile them for you <3#i hope it makes you happy! ^^#and also late happy new years! i'm praying that 2023 treats you well!
2K notes
·
View notes
Text


#elena of avalor#beauty and the beast#batbedit#disneyedit#eoa edit#belle x beast#estebalena#kinda but also not kinda#I think a lot about the fact that it's been confirmed that this is an intentional homage#like EoA series supervising director Elliot M. Bour was just like casually bringing BATB into things as an Easter egg#since it was his first job in animation#and like don't get me wrong; I LOVE that he did this. I just don't know how he expected anyone (i.e. me) to be normal about it afterwards#once you've introduced BATB; it ceases to be a fun and casual reference and just makes the literature major girlies go feral#i thought this was gonna be a quick and easy little project but it wasn't#the parallels are all there but they're in slightly different order in EoA than the original and the pacing for each reference is differen#so i had to determine which ones I needed to skip frames for and which ones to use all the frames#and then try to figure out the speed from there#the coronation day scenes were very hard to color because the grey skies and muted filter kind of whitewash the characters#like you don't even understand i added so MUCH vibrance and saturation to the 4th and 5th gifs but elena's skin still is just gray#and the coloring is still just a very very mixed bag#also i've realized that while I don't think it was an intentional reference in the same way BATB was#anna's sacrifice and resurrection from frozen is perhaps just as --if not more-- a clear parallel to the coronation day scene than BATB#so maybe I will do that one someday too?#once i psych myself up again to try coloring coronation day again#which i imagine will be awhile#these do not look like the same scene and pretty much the same scene at all even if i tried to use the same psd when i could#and edit them to make the coloring as close as i could
122 notes
·
View notes
Text
WTW CHARACTER EVENTS | TROPES

SILK HIDING STEEL
↳ "They are beautiful things, kind and pure, clothed in fine dresses and soft gloves who hold silk fans... made of sharpened blades. In short, beware the proper ones." -- TV Tropes
While there are many at the imperial court who dress their treachery up with smiles, throughout the story, Fenice strives to turn 'delicate and unassuming' into a weapon of it's own. Fragile and doll-like in appearance, Fenice has spent most of her life being viewed as weak and helpless. Putting her pride aside, she isn't adverse to using these conceptions to her own advantage, biding her time for the right opportunity to strike. The unlucky ones who manage to see behind the veil find out far too late that her smile as filled with wolf's teeth.

PRINCELING RIVALRY
↳ "It's good to be the Prince. Born to power, destined to inherit rule of the Kingdom from your parents when their time comes. Bless their souls. Until you realize that kind of privilege only goes to the first son. If you're unlucky enough to be the second born, or if you just hate the heir, you really gotta hope big brother doesn't have any kids or is unable to perform his duties." -- TV Tropes
Not exactly adhering to the trope as Aetier doesn't practice primogeniture, but the entire crux of the plot of WCTD and the history of Aetier is filled with the vi Aetier heirs competing with each other for a chance at the crown. There is family and there are enemies. For the vi Aetiers, these two are one and the same.

SINS OF THE FATHER
↳ "The act of exacting revenge upon the descendants of the one who originally did the wrong. [...] The trope name comes from the ancient saying: "The sins of the fathers shall be visited upon their children." -- TV Tropes
The Vasilier Dantalion vi Aetier will go down in history with many epithets, among them "The Great," "Areia-Blessed," "The Butcher of Heira," and most notably "Kinslayer." His reign brought a new era of glory and prosperity to his empire. But that golden age comes at a price-- one that his children will have to bear.
Taglist | (ask to be +/-)
GENERAL → @charlesjosephwrites | @bearunicorn154 I @seasteading| @writting-in-blood | @trapped-inadystopianovel | @inky-duchess | @thats-my-type-writer | @serpentarii | @myhusbandsasemni | @aphaimaniis | @writinglyra | @belialwrites | @amoranza | @pseudepigraphic | @mel-writes-with-her-dragons | @uppoffringar | @fantasydisease | @sourrcandy
WCTD → @zmlorenz | @andiwriteunderthemoon | @ryns-ramblings | @marchdove | @cielnocturnes | @wren-is-writing | @lord-fallen
#wtwevent#wtwcommunity#collection.events#series.wctd#i used the same psds and colorings for all of them but it's not a coincidence that one of these graphics does not look like the other#aka i didn't realize that 2 of the 3 were gonna be predominantly red but i'm too lazy to make everything match so let's chalk it up to#symbolism then haha#collection.my projects
27 notes
·
View notes
Text

hi! someone requested me to do a tutorial based on this gifset!
this tutorial requires an intermediate knowledge of gifmaking. i won’t teach you how to do gifs from scratch, there are other tutorials for that out there.
[tutorial under the cut]
THE BASICS
AN INTRODUCTION
first off, the gifset in question is based on this gifset by @/eddiediaaz and i got permission from them to explain the process. i won’t be sharing the template because it’s a near replica of theirs (that isn’t shared to the public) and i don’t feel comfortable doing so, but you can recreate it by yourself just like i did!
also, ESL, so please pardon any mistakes.
THE FONT
Circular ST (Medium & Black). download it here & here.
CLIPPING MASKS
clipping masks are the way i put images and gifs inside of shapes. i used that method in the first and second gif of the Spotify gifset as you can see here.
what does a clipping mask do? basically, it links two or more layers together in a way it follows the “shape” of your base layer. ie, everything that is shown follows the “shape” of your main layer and nothing more. your base layer can be anything: a shape, an image, a gif, a text, an adjustment layer, really everything. let’s see an example:
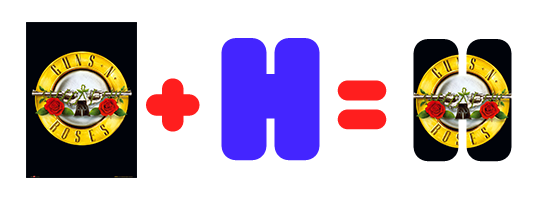
CLIPPING MASKS & SHAPES

the original image (Gun 'n' Roses logo) is intact, as in, it’s not cut like a circle, something that cannot be undone. instead, everything outside the limits of the blue circle is just hidden. if i delete the base layer (the circle layer), the original image will appear as it originally is, as an rectangle.
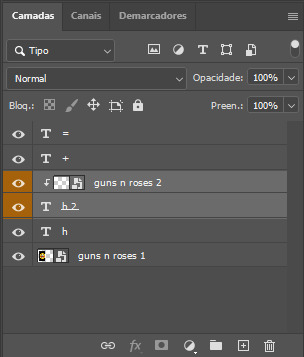
talking about layers, let’s see my layers panel (some things are in Portuguese, but i think you can understand):
notice the little arrow pointing downwards to the “circle” layer. that is the clipping mask symbol. the base layer always needs to be below what is being clipped. if the base layer is deleted, the chain is broken and every layer clipped will now act independently and have its original shape. you can have as many clipped layers as you want. you can also have multiple chains going on in a .psd, each one with its own base layer.
to clip a layer, you just need to press ctrl+alt+G or cmd+option+G while having the layer you want to clip selected (NOT your base layer). or, you can go to LAYER > CREATE CLIPPING MASK.
CLIPPING MASKS & TEXT
let’s see the same example, but with text instead:
A TIP
because adjustment layers are clippable, you can completely gif by using clipping masks. this is very useful when you have more than one gif inside a canvas and don’t want an adjustment layer to affect everything besides a certain layer/element.
let’s take my first gif of the Spotify gifset as an example.
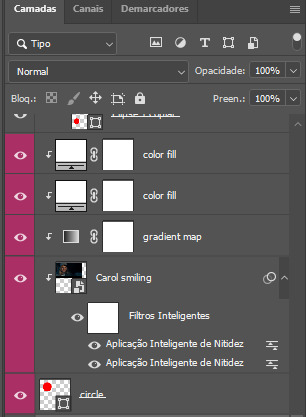
the circle is the base layer. the “Carol smiling” layer is my gif converted to a smart filter. above that “Carol smiling” layer, there is a black and white gradient map and two color fills of white so i can achieve the coloring you see. all those layers are clipping onto the circle layer, making my now b&w gif have the shape of a small circle as well.
those layers are in a folder in the .psd of my first gif, so i don’t have multiple files sitting on my PC to assemble just one gif. i could have giffed that small gif separately and pasted it onto my canvas as well, but i like to do this way so i can adjust everything i want in real time instead of redoing a gif over and over every time i want to change something.
HOW TO MAKE EACH GIF
all gifs are 540x540px.
THE FIRST GIF
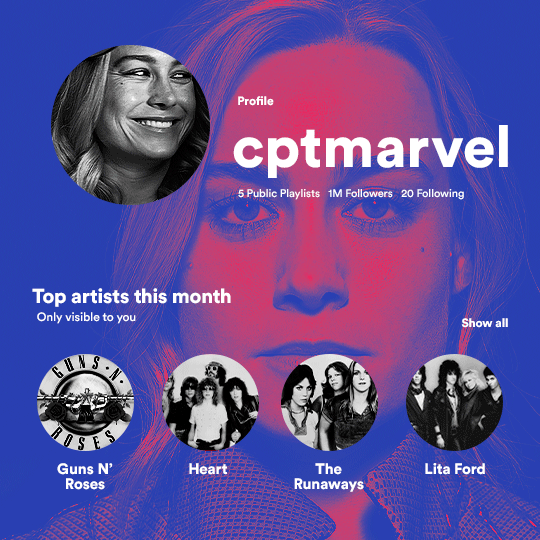
the first gif has 6 elements. the elements are: a big gif serving as a background (a close-up of Carol), a smaller gif inside a circle (a b&w gif of Carol smiling) as a profile picture and four static images for the featured artists.
i giffed as i normally do (loaded screencaps, resized the gif, sharpened the gif, etc) for my background gif. to achieve the coloring, i’ve added a gradient map (layer > new adjustment layer > gradient map) purple to pink.
to the profile picture, i made a 160x160px circle in the top left corner. the color of it doesn’t matter. the next step is a matter of taste: i giffed the smaller gif in the same .psd thanks to clipping masks that i explained earlier, but you can do it in a separate canvas too.
for the featured artists, i made four circles with 98x98px each. for the images, i had to check Spotify for their selected PFPs. after that, i googled “[band/artist] spotify” to find the images.
the PFP of bands and artists in the Spotify app are displayed in black and white, so you might have to make them b&w if you happen to find them only in color.
to make the artists PFPs pop a bit more, i transformed them into smart filters and added a bit of sharpening to them (intensity 10 x radius 10). you can adjust the colors and the brightness if you want, too.
the sizes of the texts in the gif are: 58px (username), 20px (top artists of the month), 15px (name of the artists), 12px (only visible to you + show all + profile) and 11px (following and follower numbers).
SECOND GIF
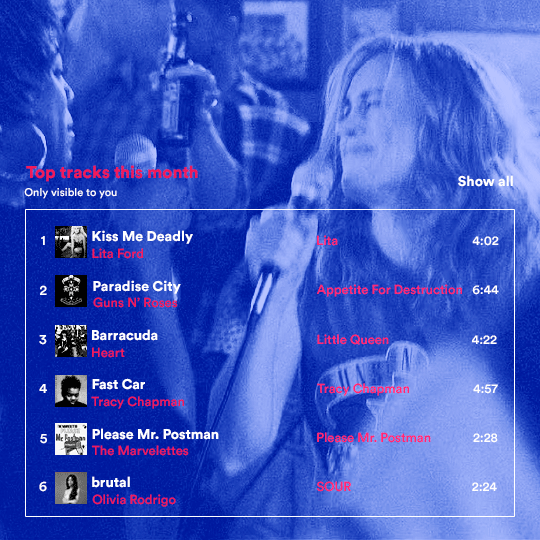
for the chart, i created a black rectangle (490x308px) that i set its blending mode to lighten (thus making it transparent) and i added an internal white stroke. i added the text and the little squares next to the top 6 numbers.
the font sizes are: 17px (top tracks this month), 11px (only visible to you), 14px (song title, show all, top 6 numbers), 13px (artist/band, album title, length of the song).
i added the album covers — that i made b&w — by clipping images onto 32x32px squares.
for the coloring, i added a gradient map (dark purple > light purple).
THIRD GIF
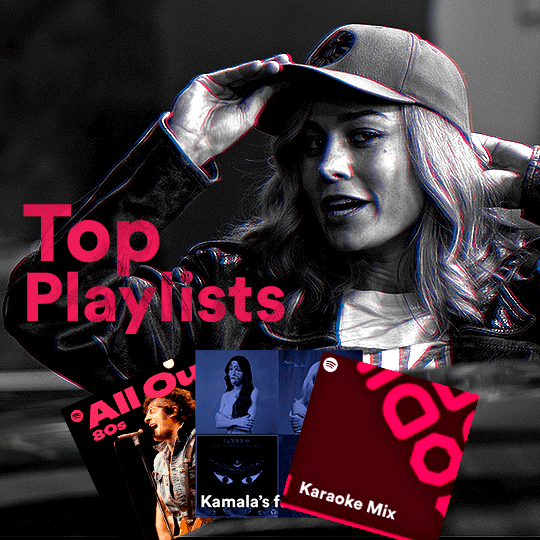
there are three types of playlists in this gif: a Spotify original playlist, a playlist made by a user and a Mix. you don’t have to follow this formula if you don’t want to, but in the case you do, here’s how i did it:
browse Spotify for an original playlist of theirs. chances are, if you google the playlist’s name, you can find its cover on Google Images. at least, i found the “All Out 80s” cover that i used in my gifset. you can also create your own.
for the user playlist, just pick four songs and find their (album) covers, also on Google. create a square canvas on Photoshop and make four squares, each in one quadrant of the canvas. paste your images onto your canvas and clip the images to each square. then, add a gradient map (black + whatever color you want) to all those images and title your playlist (font size: ). save that collage as a PNG and load to your gif canvas or merge all the layers+transform into a smart filter and drag the smart filter layer onto your gif canvas.
now, the trickiest one. while you can invent your own Mix, i wanted to use a real one, but i had no idea on how to find them. thanks to reddit, i discovered that, if you search “made for you” on Spotify, you will find their Mixes! some of them are very whacky and specific! i just picked the Mix that made the most sense for Carol from that (gigantic) list.
before doing the next step, i would advise you to google the name of the Mix you picked to see if you are able to find the cover of it with good quality. i wasn’t able to find mine (Karaoke Mix), so i just screenshotted my Spotify app, pasted that screenshot into Photoshop and cut the Mix cover and pasted that onto my canvas.
the quality wasn’t great, so i transformed the cover into a smart filter, added a bit of gaussian blur and then sharpened it (intensity 10 x radius 10). the color wasn’t what i wanted either, so i used Hue/Saturation to change the hue.
because the original image for the Mix was smaller than i wanted and i stretched it to make it bigger, the quality of the text and the Spotify logo was botched. i painted over the Mix cover and created a text with the font i linked earlier to replace its now pixelated title. i also painted over the little Spotify logo, found a logo in the internet and pasted over the Mix cover about the same size of the original logo.
to achieve the “3D effect” of the gif, i made my b&w gif, the base. then, i duplicated all layers and added a gradient map (black > pink) and merged all the layers of that duplicate. i made a second replica of my gif, now with a different gradient map (black > blue). i set both replicas to the ligthen blending mode. you will notice that the replicas will "disappear" and only the original b&w gif will remain. if you move the replicas a bit, that colored border will appear. this doesn't work much in very bright gifs without a lot of dark areas, btw.
FOURTH GIF
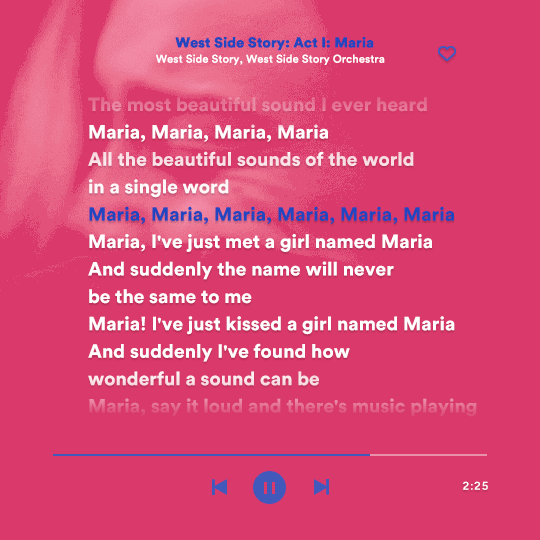
this gif used an altered (by me) version of this template. (i changed the fonts to match the rest of the gifset, too.)
for the color text effect, you will have to gif with the timeline bar. take your gif’s length and do the math to find how many frames are ⅓ of it. take your lyrics’ layer and cut it into three equal parts or close to it by using the scissors icon in the timeline panel. in each third, change the color of just one line, line by line.
when you play your gif, the colors of the lyrics will change like in Karaoke.
you can do the same thing with frames iirc, though. i explained the timeline method because that’s the one i used in this gifset and use in general gif making.
for the coloring, i added a gradient map. to make the colors pop a bit more, i add two gradient maps: the first one is in black and white, the other is in color. that adds depth to the blacks and darker colors of the gif.
FIFTH GIF
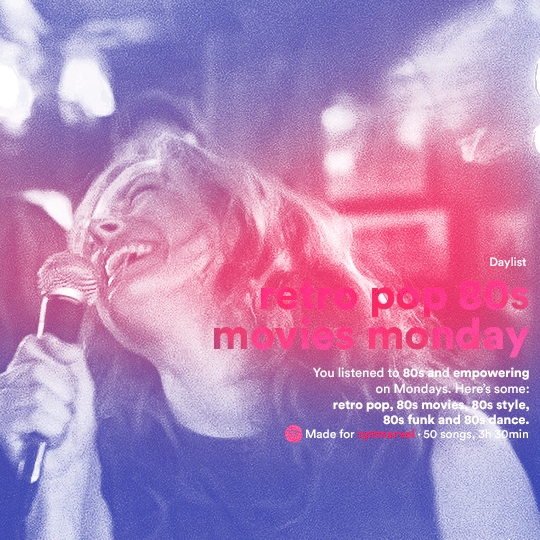
like in the Top Playlists gif, i wanted for my Daylist to be real as well. to achieve that, i listened to my Carol Danvers companion playlist (that you can listen here) for a long time until my Daylist refreshed itself. (Daylists refresh in certain times of the day — don't worry, Spotify will tell you when.)
then, i just copied what it told me — the title and the genres i listened to generate such a Daylist, plus the genres i should check it out. you can invent your own Daylist if you want, but because it is generated by AI, i find very difficult to mimic its crazy titles, but you can try!
you can also search in the web for other people’s Daylists if you want, but usually people don’t tell you what they listened to to get those playlists and nor what was recommended for them to listen to and i, at least, find that information important for the gifset.
be aware that Daylists aren't available for every country yet (like in mine), but i found a way to work around that. the browser Opera GX offers a free "VPN" — not exactly a VPN, but it works close enough — so you can set your location to the US and listen to in-browser Spotify. i recommend not log into Tumblr while using Opera's VPN as there is a myth (that could easily be true!) that Tumblr terminates people's accounts that use a VPN.
font sizes: 43px (daylist title), 13px (text), 12px ("daylist" & "made for").
for the flare effect, i searched for flare overlays on YouTube and downloaded one of those videos with 4K Video Downloader, a free software. i loaded the overlay into Photoshop and added a gradient map (purple > pink) over it, thus changing its color. i pasted the overlay onto my b&w gif and set its blending mode to screen. voila!
that's it! i hope you liked it and that i was able to express myself well. if you have any questions, feel free to contact me, i love helping people about their gifmaking questions! 💖
#*#*tutorials#gifmaker tag#dailyresources#usergif#completeresources#alielook#userairi#userhallie#userbess#userrobin#usershreyu#userzaynab#tuserju#tusermalina#tuserheidi#usertina#userabs#userbuckleys#usermagic#userjoeys#antlerqueen#userarrow#flashing gif tw
284 notes
·
View notes
Text
Thoughts on ai and Art
What has Ai really changed for me is the perception of my own art. Years back, I was extremely concerned of my work being imperfect: everything had to look "right", the anatomy had to be flawless, the lines - clean and refined. The pipe-line had to be flawless too: minimal amount of layers, one - for lines, one - for colors, and a few for lighting/shading.
Meanwhile I was yearning for chaos and the standard pipe-line felt too strict, too limiting. I finished the drawing and cried over the imperfections, but I could not let myself create a new layer and just paint it all over as I wanted to - that would "mess up my perfect psd". This was even harder because I started as a traditional artist and traditional art is basically the same as drawing on one layer or stacking the layers on top of each other whenever you wish to change anything.
I was so obsessed with the anatomy/perspective looking right that my works started looking boring and stiff. If I was not sure that I would be able to draw a certain body part at a certain angle ANATOMICALLY PERFECT - I just refused to draw it at all.
Drawing back then was HARD. I forced too much limitations upon myself, I was so scared of making any mistakes and thus did everything I could to avoid the risk to fail. It felts like an entire world would see me failing and everyone - literally everyone - will disapprove.
And don't get me wrong - the art community in my country has always been astonishingly toxic. We had, like, a group of 20 THOUSANDS individuals hunting down children online and bullying them into oblivion for drawing anime and furry characters in their school textbooks. And pretty much everyone except a small group of people (which I was a part of) thought that it's absolutely fine and this is how the things should be. Even the industry professionals were absolutely sure that young artists have to suffer and be ashamed of everything they do unless it is absolutely flawless at an any aspect.
I was ashamed of everything I did back then. I was ashamed of drawing and posting sketches because I felt like they are not good enough to be shown to anyone.
And then the Ai-boom started. And I had mixed feelings because I was not THAT scared, but I was somewhat disappointed of people? General public praised the generated slop ignoring the mistakes far worse than what real artists got bullied for for DECADES.
The synthetic artworks are shiny. They are overrendered. They are liveless, boring, they lack fundamentals and yet somehow people viewed them as some kind of a miracle. I decided to learn how does those little machines generated their slop out of morbid curiosity, just to make sure that I got it right and it is spitting out cadavers created from mutilated, dismembered works of real artists. Used by people who did not care enough to pick up a bloody pencils.
And I thought: why would I care enough to look at something that no one bothered to create?
And then I started seeing everything I do completely different.
I suddenly stopped caring of being perfect.
Every piece I have ever done, every work I was crying over for it being ugly, every messy sketch and unfinished doodle suddenly started to matter a lot. Not that I stopped caring of doing my best, no. I stopped wishing to disown my own mistakes. They are my own. I cared enough to try and fail and to try again, and fail so badly that I wanted to cry, scream and throw up. And I repeated the cycle for long enough that I started to enjoy my silly doodles and started loving every tiny imperfection because this is what made my art so human.
I still suck at drawing hands and feet. My line-art is messy and I started doing it right on top of my colored sketch. My pipe-line is in chaos and my PSDs look like a total mess of three hundreds of layers. I draw sketches with huge-ass round brush only adding the details that really matters. My works are better than they could ever be because they feel alive and chaotic as we human had always been. This is a love letter to my art and write it while flipping off my middle finger to the cadavers generated by the machine.
I will not be stopped by glorified autocomplete and I refuse to be outdone by people who confuse googling an image with the act of creation.
My worst drawing is better than any of the generative imagery out there, because I cared drawing it.
209 notes
·
View notes
Note
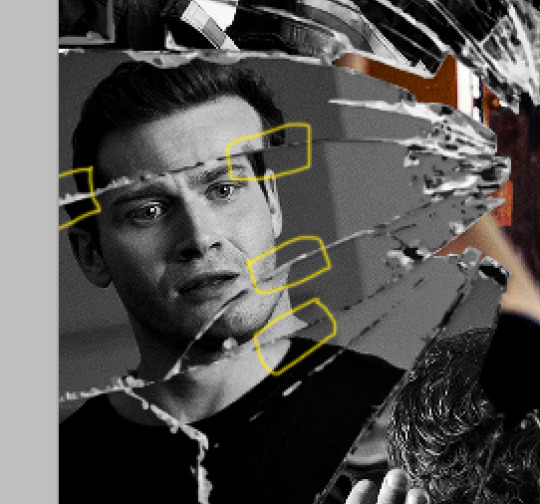
alie! I absolutely adore this mirrorball x buck set that you made last year! (/post/701462848238403584/) (also I can't believe it's been a year, like seriously what is time?) I was wondering how you did the shattered glass effect in the first gif? in particular how you made the black and white gifs appear distorted within the glass if that makes sense? thank you!!!
ahhh thank you so much renee! literally what is time lol, this gifset is still one of my faves that i made. the shattered glass effect is mostly just a lot of layer masks to be honest hahaha. i'm so glad i still have the psd, so here's how i did it under the cut~

(this tutorial assumes you know how to put multiple gifs in the same canvas and are familiar with layer groups and masks)
I. PREPARATION
first things first, create an empty canvas of your desired size. mine was 540x540 px.
then, you need to find a cracked glass texture. if i remember correctly i simply googled something like "broken glass png", "cracked glass png", because i wanted something already transparent.
(a texture that's something like black lines over a white background definitely works too, you'll just have to put that layer's blending mode to darken or multiply.)
here's the png i used (and a download link for best quality):
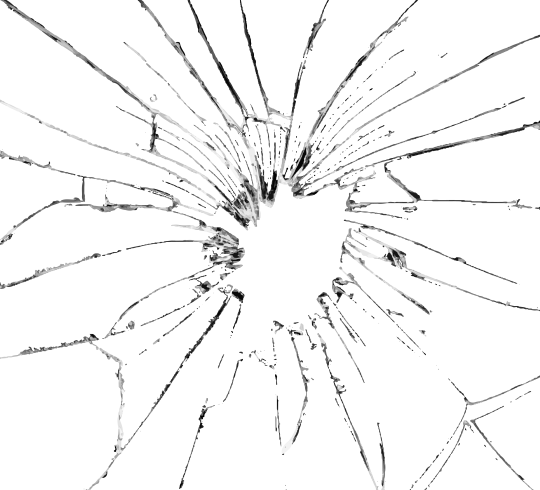
and after positioning it into my canvas.

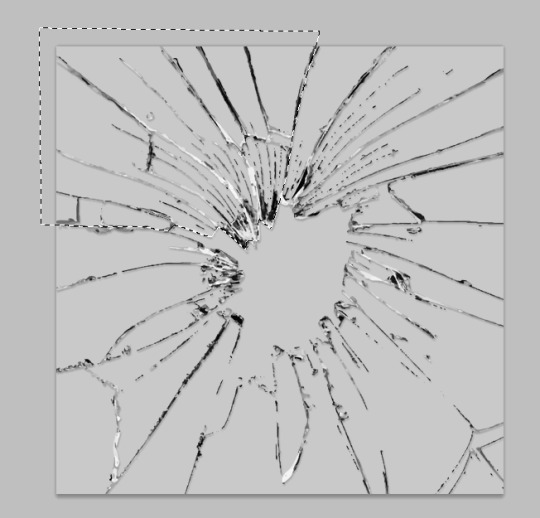
II. CREATING MAIN SECTIONS FOR GIFS
so basically when i did is i sectioned parts of the texture for each gif that i wanted to put. following the texture's lines, i zoomed in and carefuly drew a first shape along the lines with the polygon tool. you can also put a color fill layer behind the cracked glass layer so it's easier to see, like i did.
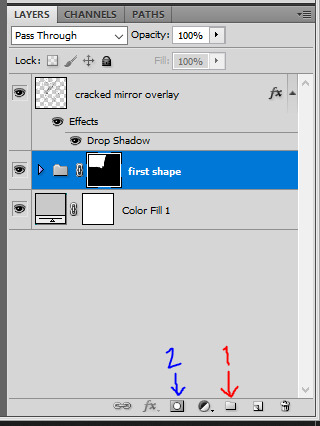
once you have your shape selected, click on the folder icon (1), then on the layer mask icon (2). it should give you a nice masked group to put gifs in hehe
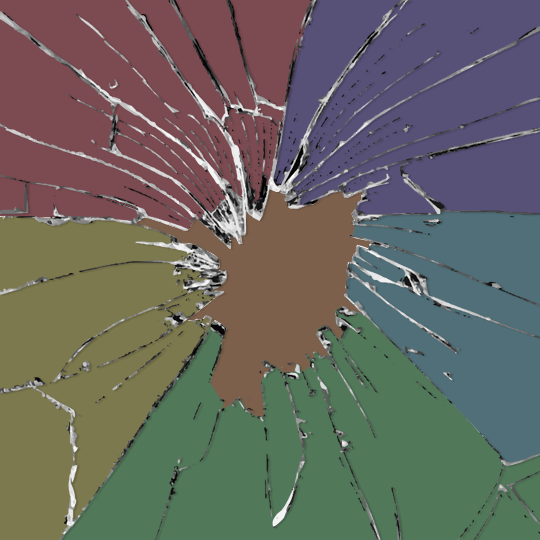
then i repeated the process until i had all of my desired shapes. i've put some color layers so it's easier to see, but here are my 6 main shapes and how my layer groups look like so far:
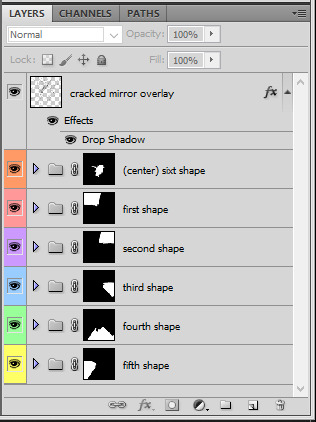
III. GIFFING TIME
after screencaping and making all 6 gifs required for each section, you need to put all of them in the same canvas. i simply put one smart object gif layer in each group created earlier. then, i resized and rotated each gif to fit its group (by hitting ctrl + T while selecting the gif layer), as you can see with the gif labeled 6x02 in the layers preview. for the coloring, i went simple with black and white for most of them.
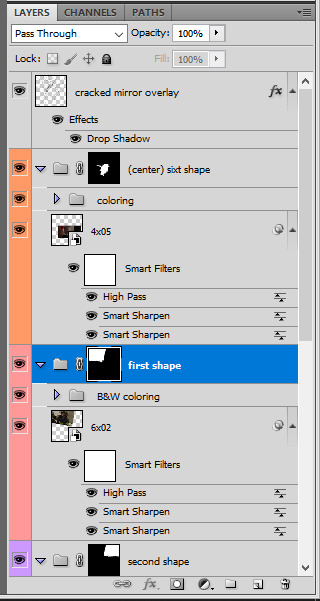
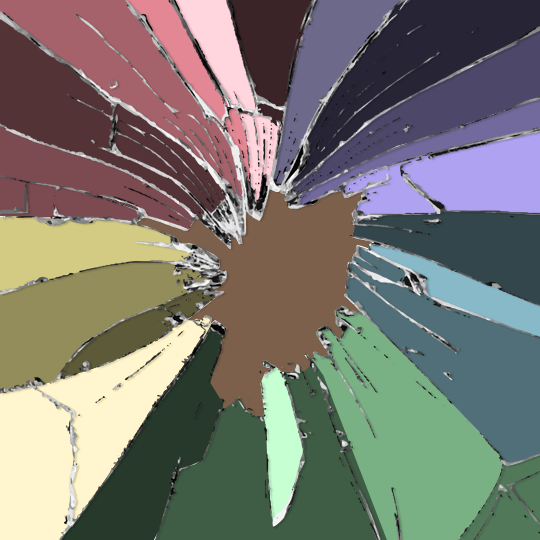
once i have all six gifs sharpened, colored, and placed in each shape group, the gif looks like this. the broken glass texture does most of the work to be honest:


obviously the center gif doesn't have any kind of effect, it's just colored as usual, so i'm not gonna go over it. it's just one gif layer in a masked group.
IV. SUBSECTIONS FOR DISRTORTED EFFECT
okay so for the distorted effect it's even more layer masks! basically i created more smaller sections within each main shapes already, still following the cracked glass texture's lines with the polygon tool and put them in individual masked groups like i did in the second step. here's how i ended up dividing each main sections:
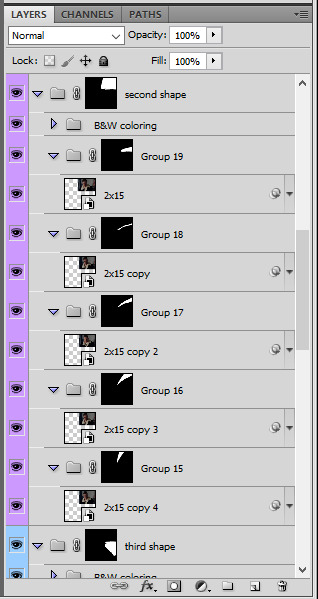
yep, each color here is a different masked group, for example the 2nd and 3rd shape sections:

for each main shape section, you want to duplicate your gif layer the same amount of times as you have subsections within that shape. so if the main shape has 5 smaller subsections, i want 5 layers of that same gif. just make sure to not change its duration or position yet, and make sure the coloring layers/group stays on top of the groups in its shape section. then, simply put one gif layer duplicate in each group. example of my layers for the second shape so far:
then just repeat this until all subsections have its own gif layer.
V. DISTORTED EFFECT
this is the best part! and it's really easy. basically you want to slightly move each subsection by a few pixels, so they're in a slightly different position than the ones next to it.
to do so, select one of the gif layers and with the arrows on your keyboard, move it left or right, and even up or down if it looks good. i do this for all duplicated gif layers, making sure it looks like they're all slightly offset. focus on the cracked glass overlay's lines while nudging the gif layers, it's easy to see how the shapes break when you move them. for example here:
this is really just all trial and error, you just need to move each subsection gif layer by a few pixels with the keyboard arrows until it looks good to you.
here's my result once i've done this for all (23!!) subsections:
VI. FINAL TOUCHES
i don't think i did much else to this before typography besides adding a bit of contrast overall and a thin drop shadow to the cracked layer texture on top of everything. if you have a transparent png this definitely helps to give a bit more dimension to the effect. so here's the final result:
i hope that was clear enough hehe :D
#alie replies#tutorial#photoshop#resource#*ps help#completeresrouces#allresources#userhella#userabs#userkarolina#userdena#tuserheidi#usercats#userrainbow#userbunneis#usersmia#tuserabbie#usertreena#usernik#swearphil
432 notes
·
View notes
Text

yes, that's us
Pin: info and FAQ
Hey! We're MLARTY, Meka and Grisha — a duo of co-author artists and soulmate friends who mostly draw art based on personal projects with original characters. We're monster lovers, horror fans, and just obsessed with the color red. Our main brainchild is a dark, predatory world called UTROBA, but right now we’re focused on BG3 content, especially about our Dark Urge Marrow. So here you will find a lot of illustrations and concepts with her, some memes... and fan comics!
Posts and art may contain spoilers and a lot of blood, so you're warned
× Other links and galleries: linktr.ee/mlarty
× Patreon with exclusive content: patreon.com/mlarty
FAQ
You both run this account? How do you split the work? How do you draw together?
— Yeah, exactly. Just imagine a small art studio of two people drawing in the same style and working on the same work. Share tasks, collaborate on steps like sketching for example, but also create individual pieces. Sometimes it feels like we share one brain... One big elder brain
What brushes you use? Where can I find more about your work process? What program do you use for drawing?
— Brushes, materials about our drawing process, tutorials and other similar content are available on our Patreon! We also regularly upload step by step materials and PSD files
We’re drawing in both SAI and Photoshop!
Do you do commissions? Can I get one?
— Yes, we draw commissions, but currently they are closed. We'll drop a post about the slots as soon as we free up time for new work. You can find all the details about working with us in the links
Can I draw your ocs or make any other content with them or interactions with my ocs?
— OH YES OF COURSE, ABSOLUTELY YES! Don't stop yourself! We're totally happy with the fanarts with our babes. The only thing we're not okay with is NSFW and disrespecting the original. Some topics are just too personal to us. But aside from that... you're more than welcome!
Feel free to ask other questions, especially if it's about our ocs or artwork! We're trying to create a special open space here and just chill with you~
258 notes
·
View notes
Text
My GIF Making process: Screen capturing using MPV player, Organizing files, 3 Sharpening settings, Basic Coloring PSD + Actions set

This is a very long post so heads up.
I’ll try to be as thorough and true as much as possible to the way I make my gifs (I already use Photoshop Actions which I’ve long since set up but now for this tutorial I’m reviewing them to show you the exact steps I’ve learned to create my gifs 😃) and present them to you in a semi-coherent way. Also, please bear with me since English is my second language.
First things first. Below are the things and tools we need to do this:
Downloaded 4K or 1080p quality videos (let’s all assume we know where to get these—especially for high definition movies and tv series—so this post doesn’t get removed, okay? 😛)
Adobe Photoshop CC or the CS versions can work as well, but full disclosure I haven’t created gifs using the CS versions since 2020. I’m currently using Adobe Photoshop 2024.
mpv player. Use mpv player to get those frames/screenshots or any other video player that has a screen grabber feature. I’ve used adapter for the longest time but I’ve switched to mpv because the press to screenshot feature while the video is playing has been a game changer not to mention ultimate time saver for me. For adapter you need to play it in another video player (like VLC player), to get the start and end timestamps of the scene you want to gif which takes me ages before I can even open Photoshop.
Anyway! Please stop reading this post for a moment and head over to this amazing tutorial by kylos. She perfectly tells you how to install and use mpv player, both for Mac and Windows users.
One thing I have to share though, I had a tough time when I updated my MacOS to Sonoma since MPV is suddenly either duplicating frames or when I delete the duplicates the player seems to be skipping frames :/ I searched and found a solution here, though it didn’t work for me lol. My workaround for this in the meantime is decreasing the speed down to 0.70 then start screenshotting—it’s not the same pre Sonoma update but it works so I’ll have to accept it rather than have jumpy looking gifs.
Now, after this part of kylos’ tutorial:

you can continue reading the following sections of my gif tutorial below.
I want to share this little tip (sorry, this will only cater to Mac users) that I hope will be helpful for organizing the screenshots that MPV saved to the folder you have selected. Because believe me you don’t want to go through 1k+ of screenshots to select just 42-50 frames for your gif.
The Control + Command + N shortcut
This shortcut allows you to create a new folder from files you have pre-selected. As you can see below I have already created a couple of folders, and inside each folder I have selected screenshots that I want to include in one single gif. It's up to you how you want to divide yours, assuming you intend to create and post a Tumblr gifset rather than just one gif.

Another tip is making use of tags. Most of, if not all the time, I make supercorp gifs so I tag blue for Kara and red (or green) for Lena—just being ridiculously on brand and all that.
Before we finally open Photoshop, there's one more thing I want to say—I know, please bear with me for the third? fourth? time 😅
It's helpful to organize everything into their respective folders so you know the total number of items/frames you have. This way, you can add or delete excess or unnecessary shots before uploading them in Photoshop.
For example below there are 80 screenshots of Kara inside this folder and for a 1:1 (540 x 540 px) Tumblr gif, Photoshop can just work around with 42-50 max number of frames with color adjustments applied before it exceeds the 10 MB file size limit of Tumblr.

Sometimes I skip this step because it can be exhausting (haha) and include everything so I can decide visually which frames to keep later on. You'll understand what I mean later on. But it's important to keep the Tumblr 10 MB file size limit in mind. Fewer frames, or just the right amount of frames, is better.
So, with the screenshot organization out of the way, let's finally head over to Photoshop.
Giffing in Photoshop, yay!
Let’s begin by navigating to File > Scripts > Load Files into Stack…

The Load Layers window will appear. Click the Browse button next.
Find your chosen screenshots folder, press Command + A to select all files from that folder then click Open. Then click OK.
After importing and stacking your files, Photoshop should display the following view:

By the way, I'll be providing the clip I've used in this tutorial so if want to use them to follow along be my guest :)
If you haven't already opened your Timeline panel, navigate to Windows > Timeline.
Now, let's focus on the Timeline panel for the next couple of steps.
Click Create Video Timeline, then you’ll have this:

Now click the menu icon on the top right corner then go to Convert Frames > Make Frames from Clips

Still working on the Timeline panel, click the bottom left icon this time—the icon with the three tiny boxes—to Convert to Frame Animation
Select Make Frames From Layers from the top right corner menu button.
So now you have this:

Go and click the top right menu icon again to Select All Frames
Then click the small dropdown icon to set another value for Frame Delay. Select Other…

The best for me and for most is 0.05 but you can always play around and see what you think works for you.
Click the top right menu icon again to Reverse Frames.
I think Photoshop has long since fixed this issue but usually the first animation frame is empty so I just delete it but now going through all these steps there seems to be none of that but anyways, the delete icon is the last one among the line of feature buttons at the bottom part of the Timeline panel.
Yay, now we can have our first proper GIF preview of a thirsty Lena 😜

Press spacebar to watch your gif play for the very first time! After an hour and half of selecting and cutting off screenshots! 😛 Play it some more. No really, I’m serious. I do this so even as early (lol) as this part in the gif making process, I can see which frames I can/should delete to be within the 10 MB file size limit. You can also do it at the end of course 🙂
Now, let’s go to the next important steps of this tutorial post which I’ve numbered below.
Crop and resize to meet Tumblr's required dimensions. The width value should be either 540px, 268px, or 177px.
Convert the gif to a Smart Object for sharpening.
Apply lighting and basic color adjustments before the heavy coloring. I will be sharing the base adjustments layers I use for my gifs 😃.
1. Crop and Resize
Click on the Crop tool (shortcut: the C key)

I like my GIFs big so I always set this to 1:1 ratio if the scene allows it. Press the Enter key after selecting the area of the frame that you want to keep.
Side note: If you find that after cropping, you want to adjust the image to the left or another direction, simply unselect the Delete Cropped Pixels option. This way, you will still have the whole frame area available to crop again as needed and as you prefer.
Now we need to resize our gif and the shortcut for that is Command + Opt + I. Type in 540 as the width measurement, then the height will automatically change to follow the ratio you’ve set while cropping.
540 x 540 px for 1:1
540 x 405 px for 4:3
540 x 304 px for 16:9
For the Resample value I prefer Bilinear—but you can always select the other options to see what you like best.
Click OK. Then Command + 0 and Command + - to properly view the those 540 pixels.

Now we get to the exciting part :) the sharpen settings!
2. Sharpen
First we need to have all these layers “compressed” intro a single smart object from which we can apply filters to.
Select this little button on the the bottom left corner of the Timeline panel.


Select > All Layers
Then go to Filter > Convert for Smart Filters
Just click OK when a pop-up shows up.
Now you should have this view on the Layers panel:

Now I have 3 sharpen settings to share but I’ll have download links to the Action packs at the end of this long ass tutorial so if you want to skip ahead, feel free to do so.
Sharpen v1
Go to Filter > Sharpen > Smart Sharpen…
Below are my settings. I don’t adjust anything under Shadows/Highlights.
Amount: 500
Radius: 0.4
Click OK then do another Smart Sharpen but this time with the below adjustments.
Amount: 12
Radius: 10.0

As you can see Lena’s beautiful eyes are “popping out” now with these filters applied. Click OK.
Now we need to Convert to Frame Animation. Follow the steps below.
Click on the menu icon at the top right corner of the Timeline panel, then click Convert Frames > Flatten Frames into Clips
Then Convert Frames > Convert to Frame Animation
One more click to Make Frames From Layers
Delete the first frame then Select All then Set Frame Delay to 0.05

and there you have it! Play your GIF and make sure it’s just around 42-50 frames. This is the time to select and delete.
To preview and save your GIF go to File > Export > Save for Web (Legacy)…
Below are my Export settings. Make sure to have the file size around 9.2 MB to 9.4 MB max and not exactly 10 MB.

This time I got away with 55 frames but this is because I haven’t applied lighting and color adjustments yet and not to mention the smart sharpen settings aren't to heavy so let’s take that into consideration.
Sharpen v1 preview:

Sharpen v2
Go back to this part of the tutorial and apply the v2 settings.
Smart Sharpen 1:
Amount: 500
Radius: 0.3
Smart Sharpen 2:
Amount: 20
Radius: 0.5
We’re adding a new type of Filter which is Reduce Noise (Filter > Noise > Reduce Noise...) with the below settings.

Then one last Smart Sharpen:
Amount: 500
Radius: 0.3
Your Layers panel should look like this:

Then do the Convert to Frames Animation section again and see below preview.
Sharpen v2 preview:

Sharpen v3:
Smart Sharpen 1:
Amount: 500
Radius: 0.4
Smart Sharpen 2:
Amount: 12
Radius: 10.0
Reduce Noise:
Strength: 5
Preserve Details: 50%
Reduce Color Noise: 0%
Sharpen Details: 50%
Sharpen v3 preview:

And here they are next to each other with coloring applied:
v1

v2

v3

Congratulations, you've made it to the end of the post 😂
As promised, here is the download link to all the files I used in this tutorial which include:
supercorp 2.05 Crossfire clip
3 PSD files with sharpen settings and basic coloring PSD
Actions set
As always, if you're feeling generous here's my Ko-fi link :) Thank you guys and I hope this tutorial will help you and make you love gif making.
P.S. In the next post I'll be sharing more references I found helpful especially with coloring. I just have to search and gather them all.
-Jill
#tutorial#gif tutorial#photoshop tutorial#gif making#sharpening#sharpening tutorial#photoshop#photoshop resources#psd#psd coloring#gif coloring#supercorp#supercorpedit#lena luthor#supergirl#my tutorial#this has been a long time coming#guys. i'm BEGGING you. use the actions set - it was a pain doing all this manually again ngl LMAO#i've been so used to just playing the actions#so this has been a wild refresher course for me too 😆
103 notes
·
View notes
Text


psd pack #1 by perotovar
i saw @heroeddiemunson show the difference between their gifs edited vs unedited and it made me wanna do the same! i have a few psds that i cycle through depending on the scene and figured i'd share them with anyone that was interested!
if enough people are interested, i might do a second batch of some fancier/more experimental coloring 👀
they're pretty basic for this first batch, but they can be decently customized for a lot of things. i obviously can't make a universal psd but i can certainly try to cover the basics lol
psd links under the cut! please like or reblog if you use!
you can have all of them in a pack -> here <-
or individually:
base
blue scenes (there's 3 versions within the psd)
foggy scenes
dark scenes
yellow scenes
day scenes
ezra
#pscentral#completeresources#psd#photoshop#coloring#psds#resources#pedropascaledit#ppascaledit#pedro pascal#usermaguire#useriselin#userallisyn#xuserannie#userallii#userfanni#userkam#idk if y'all want to be tagged in this kind of thing#but i figure it's at least useful? lol#feel free to ignore this if you want!#oaks#psd*
583 notes
·
View notes
Note
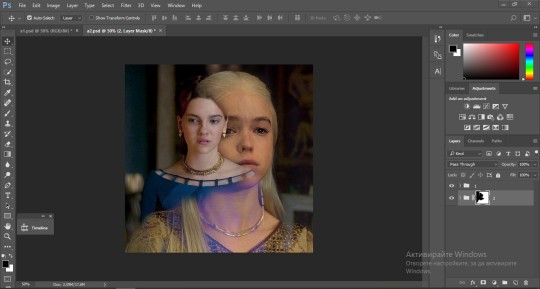
could you please do a tutorial of your game of thrones 'so much for stardust' gifs where it has the ripped paper textures? it's so pretty, and i'd like to learn how to do one with just the texture in the middle and two gifs on either side, like half and half and just having a rip in the middle. it's so cool how you did a gif in the middle though so i wanted to ask as well! all of them are so cool looking. you are extremely talented. if you don't want to though i understand :) thank you
TORN PAPER EFFECT + BLENDING TUTORIAL
thank you so much for your sweet words, dearest anon and i'm sorry it took so long to answer but it's here now so i'll try my best to explain <3
disclamer: this is the first tutorial i ever made, it's very screenshot heavy and it assumes the basic knowledge of ps and gifmaking. if there's something you don't understand, don't hesitate to ask <3 so, let's get to it!
1. PREPARING THE BASE
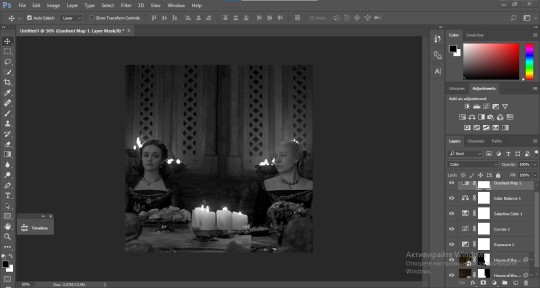
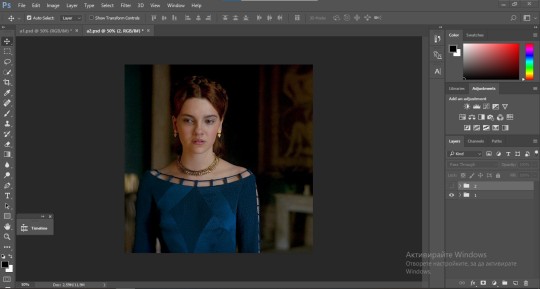
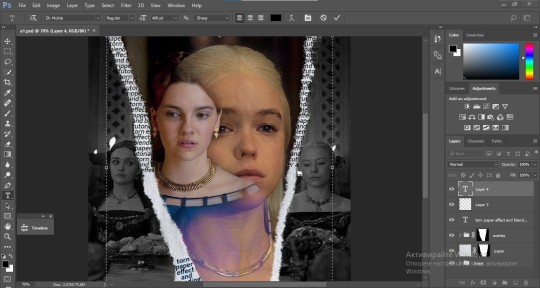
As you can see in this shot there's a lot of space between Rhaenyra and Alicent and that makes it perfect for the ripped paper overlay without hiding much of the base gif. So the first thing i did was to crop it like this:
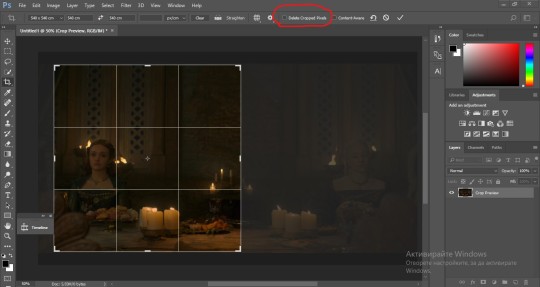
Also you want to make sure that the highlighted box (delete cropped pixels) is unchecked! After taking the usual steps for the animation (creating frames from layers, reversing the frames, setting frame delay) you continue with the video timeline and convert your frames into a smart object.
psa: if you don't have the motivation or the time to play around with coloring here are some psds i recommend: 1, 2; as for the sharpening i think this one is the best.
now that you have your smart object sharpened and colored what you want to do next is drag it to the end of the canvas and duplicate it. after that you move the copy on the other end like the original and make sure it's under the coloring layers, like this:
After that you have to create layer masks (the highlighted icon above) for both smart object and the copy and change the blending option of the copy to screen or lighten (whatever looks best!). So this is how it looks now:
pls ignore that there are no layer masks on the smart objects i just added them after changing the blending rip </3
Now, as you see both gifs are like fighting eachother for their rightful place on the canvas. (fgfgfdf) To fix that you have to use a soft round brush to delete the parts you don't want. (feel free to play around with the brush however you want to get the result you want!) Here's my result:
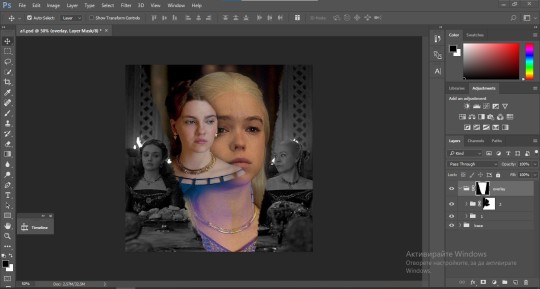
2. THE OVERLAY
Now for the both gifs you want to use for the ripped paper effect you pretty much apply the same steps as the ones you did with the gifs for the base. Here are the two gifs i chose:

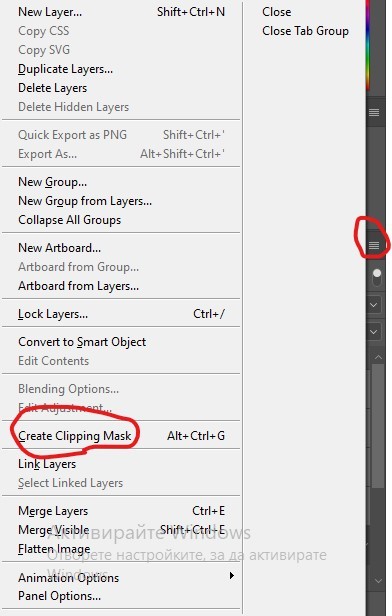
Before blending both gifs however you want to create a clipping mask for each of the smart objects coloring layers, like this:
And now you're ready to blend both gifs together! You choose the group with one of the gifs and change the blending again to screen or lighten and place the said group on top of the other. So this is how it looks now:
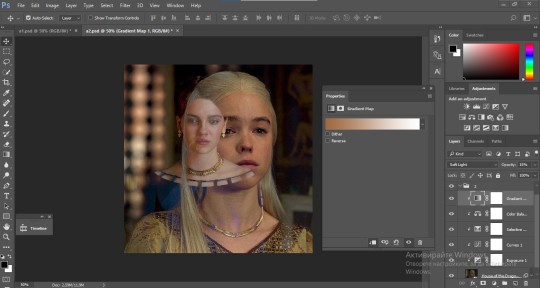
optional: if you feel like the base gif doesn't pop out enough you can always add a gradient map on one of both gifs and play around with the opacity and the color you think fits best.
Then you add a layer mask on the overlay gif group and again play around with the brush to delete what you don't want. So this is the final result:
ps - don't repeat my mistake by placing the group with the layer mask under the other group. it should be on top and the blending option should be lighten or screen.
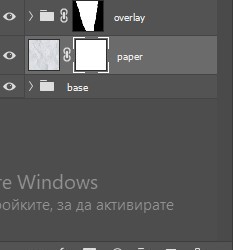
After blending both gifs together, you're ready to place them on the base. So first thing you want to do first is place both groups of each gif in one single group together. Then you duplicate the said group in the psd of the base gif and create a layer mask. This is how it should looks:

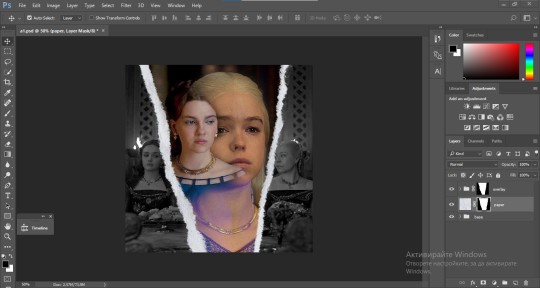
Now, in order to create the ripped paper effect, you'll have to download a ripped paper brush pack. This is the one i use. After loading the brushes in ps (if you don't know how here is explained) you're ready to begin! Change the size and angle however you'd like to make it look how you want. And if you want you can move the overlay gif by choosing both groups in case you aren't happy with the adjustment. This is how it looks like so far:
We're almost done! Now you have to find a paper texture, (i got mine from google) place it between both groups of your gifs and create a layer mask, like so:
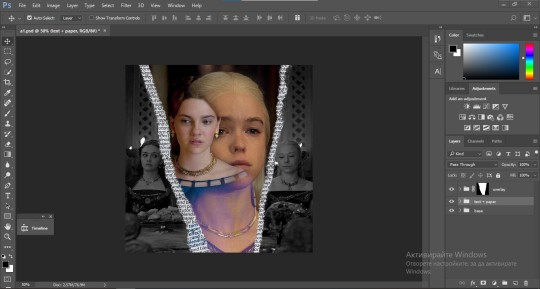
What you have to do here is pretty much the same thing you did with the overlay gifs. Still, make sure there's enough space for the text you want to write in. However, if you think that the space isn't enough you can just delete a bit more of the overlay gifs. Here's mine:
3. THE TEXT
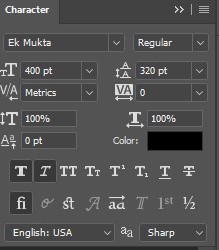
You're finally ready to type out the text you want! If you're having troubles with choosing the right font and size, here are my text settings:
You can always play around with the angle and if your text is too small, zoom in so you can place it just how you like it. And since i'm a bit lazy to deal with it later, i choose to add the highlight color while it's still zoomed. You just have to add an layer above the text and use a soft round brush with opacity from 70-75% and flow from 15-18%.
For the repeated text you want to make sure you create a big space for writing so it can contain the whole space of the torn paper. Also, write where the text will be seen only and use the tab button to skip the space where the gif is. This is how it looks:
Once you're done with writing the repeated text, you want to select all the character layers and the highlight layer and move them under the overlay gif and on top of the paper, like this:
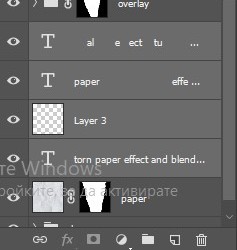
With the layers still selected and in order to contain the text within the paper the last thing you want to do is create a clipping mask. And that's It. You're done! This is the final result:
#allresources#dailyresources#usergif#chaoticresources#gifmakerresource#hisources#onlyresources#alielook#usermaguire#userrobin#usernik#userpat#userbells#gif tutorial#ps help
151 notes
·
View notes
Text
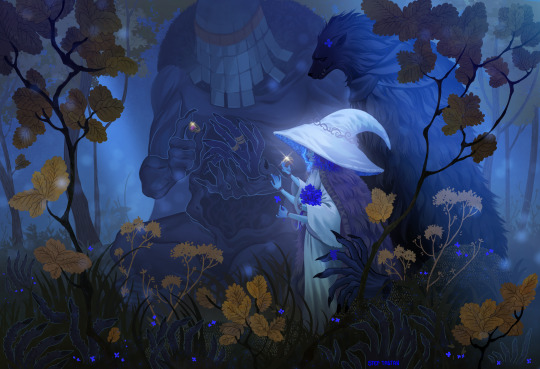
Carian Stroll
“Tell Blaidd, and Iji…I love them.”
Before this piece, I had been wanting for a long time to create my own piece of Elden Ring fanart featuring Ranni. I had tried several sketches unsuccessfully, just wasn’t particularly feeling the ideas I had sketched up until that point.
One day of usual internet scrolling, I stumbled upon this gorgeous piece of art by Shimomura Kanzan.
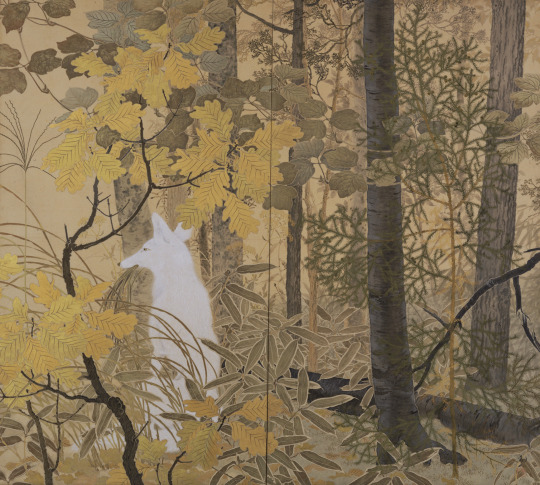
I knew immediately I wanted to do something like this for my Elden Ring fanart. In fact, if you look at this piece, there is tons of inspiration that I drew from the original artwork, such as the style of the yellow leaves and the main subject matter being a prominent silhouette of the brightest value, placed at approximately the bottom third of the image.
The main character is cleverly shrouded amidst various layers of trees and foliage, giving us the impression that we're peeking into candid moment of their life. In the case of the fox, we caught it during a mid-day snack. In the case of Ranni and her party, we caught them in a leisurely stroll, while Iji outfits the dreaded Fingercreepers with their iconic rings.
I wasn't sure if I wanted to capture a happy moment, but Ranni goes as far as to ask us to deliver to Iji and Blaidd the message that she loves them dearly as her quest draws near its end. I would imagine they all must have had fun moments together as a family. Hey, maybe even the hands liked to be around them?
The process
youtube
I started this on my iPad using the procreate app. Sadly the full process is not captured on video, as I switched to Photoshop for the rendering phase of the illustration. This video is a fun window into my chaotic process and how I iterate on the fly on the same canvas. I probably wouldn't do that in a professional setting where you often need to have color keys and iterations to be reviewed and analyzed. I like to I cut myself some slack when doing personal art to keep things fun.
Trying and failing some more
This illustration was not a straightforward path. I haven’t been very diligent about personal art, and at some point I started deviating too much from my reference by adding too many levels of depth to the background and suffocating the piece. I got into a weird loop where I would randomly open the PSD, play around with the values, pushing Iji to the back, then bringing him back, cranking all the levers on Ranni, etc., decide it would look horrible, then begrudgingly determine I’d never complete this image and go on with my life.
As artists we likely have unfinished work sitting everywhere, be it in our sketchbooks, canvases, or hard drives. But it’s a different kind of sting when you feel like you can’t even nail the fundamentals.
Anyway, so a couple weeks ago, I decided to give it another go, but this time I would get rid of all the unnecessary stuff, even stuff that I had been trying to render for ages. I would not hold on to anything, I would try and recapture what drew me to Kanzan's beautiful painting to begin with.

After it became a matter of pushing and pulling pixels until the image was finished!
That’s about it. I didn’t go crazy in depth but lately I’ve been enjoying reading into artists’ processes and I’d be remiss to not share my own thought process also.
Thank you for viewing!
#elden ring#lunar princess ranni#blaidd the half wolf#war counselor iji#illustration#artists on tumblr#fromsoftware#digital art#video game#fanart#Youtube
620 notes
·
View notes
Text

The silent art of gif making
The gif above has 32 layers plus 6 that aren't shown because this is part of a larger edit. I wanted to share it to give everyone a glimpse of the art of gif making and how long it usually takes for me to make something like this. This one took me about an hour and a half but only because I couldn't get the shade of blue right.
I use Adobe Photoshop 2021 and my computer doesn't have a large memory space (I don't know what to call it) so usually most of psds get deleted because I'm too lazy to get a hard drive. It doesn't really bother me that much because I like the art so when it's done, it's done. Off to somewhere else it goes.
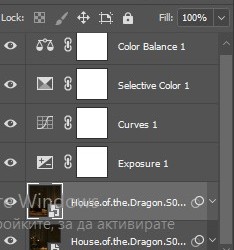
Here are the layers:

Everything is neat and organized in folders because I like it that way. I prefer to edit it in timeline but others edit each frame. There's a layer not shown (Layer 4 is not visible) and it's the vector art. Here it is:

Now it is visible. I don't plan to make this a tutorial, but if you're interested I'd love to share a few tricks about it. I'm pretty new to the colors in gifmaking but the rest is simple to understand. Here, I just want to show how much work it takes to make it.

I opened Group 2 and here's the base gif. I already sharpened and sized it correctly but that's about it. Let's open the base coloring next.

Yay! Now it looks pretty! The edits are in Portuguese but it doesn't matter. There's a silent art of adding layers depending on how you want the gif to look but you get used to it. The order matters and you can add multiple layers of the same thing (for eg. multiple layers of levels or curves or exposure).

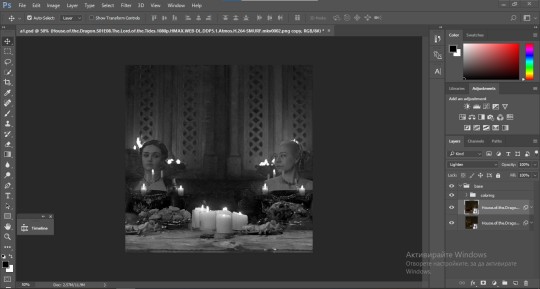
This was pretty much my first experiment with coloring so I don't know what I'm doing (this happens a lot with any art form but gifmaking exceeds in DIYing your way to the finished product) but I didn't want to mess up his hair, that's why the blue color is like that. Blue is easy to work with because there's little on the skin (different from red and yellow but that's color theory). I painted the layers like that and put it on screen, now let's correct how the rest looks.

I was stuck trying to get the right teal shade of blue so yes, those are 10 layers of selective color mostly on cyan blue. We fixed his hair (yay!) we could've probably fixed the blue on his neck too but I was lazy. This is close to what I wanted so let's roll with that.

BUT I wanted his freckles to show, so let's edit a little bit more. Now his hair is more vibrant and his skin has red tones, which accentuates the blues and his eyes (exactly what I wanted!). That lost Layer 2 was me trying to fix some shadows in the background but in the end, it didn't make such a difference.

This was part of an edit, so let's add the graphics and also edit them so they're the right shade of blue and the correct size. A few gradient maps and a dozen font tests later, it appears to be done! Here it is:

Please reblog gifsets on tumblr. We gifmakers really enjoy doing what we do (otherwise we wouldn't be here) but it takes so long, you wouldn't imagine. Tumblr is the main website used for gif making and honestly, we have nowhere to go but share our art here. This was only to show how long it takes but if you're new and want to get into the art of gif making, there are a lot of really cool resource blogs in here. And my ask box is always open! Sending gifmakers all my love.
#gif making#gif tutorial#resources#completeresources#y'know what that post yesterday got me into this#i love creativity so i send all my love to gifmakers#this is HARD#my tutorials#tutorials
385 notes
·
View notes
Text

frequently asked questions masterpost!
hey you! welcome to my faq masterpost! i see a lot of the same questions being asked over and over again so, heres somethin somethin to help everyone out. sorted below the cut! will likely be updated as i see necessary.
psds/photopea
q: "what is a psd?"
a: a photoshop document. theyre basically files that save your layers so you can share them. people typically use psds to share colorings, but theres also different psd templates that people make and upload
q: "how do i make psds?"
a: photopea for dummies by canarysage explains adjustment layers pretty well! really psd making is all about messing around with what you know and figuring out what you like. theres no right or wrong way to really do it
q: "how do i use psds in photopea?"
a: open the psd file, then drag and drop the folder into the canvas youre working on
q: "can i use psds in [program that isnt photoshop/photopea]?"
a: no
q: "how do i import photos on photopea?"
a: file -> open and place -> pick and place your image
q: "how do i move images on photopea?"
a: edit -> free transform
q: "how do i insert gifs into photopea?"
a: gifs in photopea are imported as layers into folders, all you do is open it in a new canvas and then drag and drop it into the canvas youre working on. then transform and move/resize as necessary.
general editing
q: "what are some good editing programs?"
a: some good free ones id recommend would be photopea and ibispaint. for making gifs, ezgif is a good pick. i personally use dubious photoshop, but not everyone knows how to get that
q: "whats the tumblr banner size?"
a: i personally use 711 x 400, but any variation of that works really
q: "how do i recolor gifs?"
a: (for photopea) pretty similarly to how you insert gifs into other sorts of graphics. once you have the gif in your canvas, drag the psd folder on top of the rest of your edit (or just the gif folder if youre only recoloring a gif) like you would any other edit
q: "how do you clip gifs onto masks?"
a: im not retyping this. heres a tutorial!
q: "how do i make graphics/edits?"
a: okay so really theres no real correct way to do it. but advice id personally give a beginner is to pace yourself. dont try and jump in and do a million new things at once. start simple and work your way up
tumblr stuff
q: "how do i add read mores?"
a: when you create a paragraph break (press the enter button) there should be a few buttons on the left side. a read more is the squiggly one

q: "how do i add more than 10 images in a post?"
a: its a desktop only feature, so you have to use desktop tumblr
q: "how do i make gradient text?"
a: heres lilay explaining it
54 notes
·
View notes
Text
…make a psd?
this is a question i get pretty routinely, and i’m going to tell you upfront: there is no one way to make a psd. there’s no ‘better’ way, no ‘easier’ method, you just have to figure it out yourself.
with that said, this post is going to be how i, personally, make my psds, just for the sake of reference. my way isn’t better or worse than anyone else’s—it’s just the way i do things ¯\_(ツ)_/¯
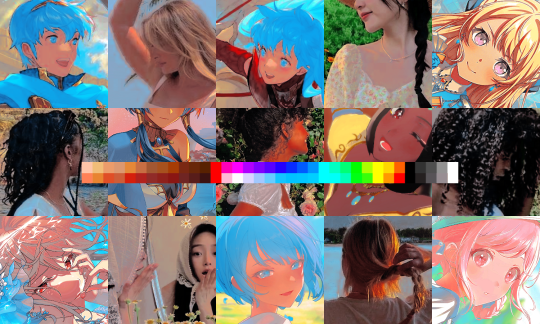
i. making a showcase/moodboard
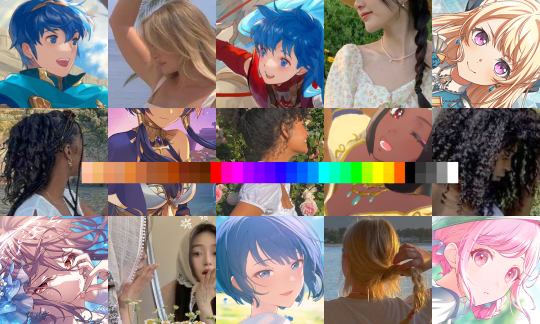
depending on the psd you want to achieve, your moodboard will probably look different—if you’re making a blue psd it will be mostly blue, if you’re making a psd based on a certain character or card set it will be based around that, etc. i made myself a general showcase that i test my psds on that includes both irl images and darker skin characters, because i like for my psds to work for those purposes most of the time. my showcase is below if you’d like to use it!
it’s best to include sources you edit frequently so you know what works on them and what doesn’t but how the moodboard looks exactly is up to you ¯\_(ツ)_/¯ i also recommend using swatchies (original by zeroresources on d*viantart) as long as you bear in mind that swatchies is not a great guideline for actual dark skin
ii. creating the base
actual step two is creating a folder but that takes like two seconds. do make a folder though or you will be sad.
after making a folder, start making the base of your psd; whatever the foundation is going to be. depending on how you want your psd to look, this will look very different. i personally always start off with a gradient map, just to get things going
my settings for this are the default black and white gradient map set to reverse, and it’s set to blending mode soft light at 35% opacity. i typically do something in the range of 20-45% opacity depending on how i want it to look
i’m honestly not sure where i picked up this habit but it does make it a little easier to get things going for me personally. it’s a simple change but it’s a good start. if you want higher contrast you can do the same thing but without reversing the gradient map
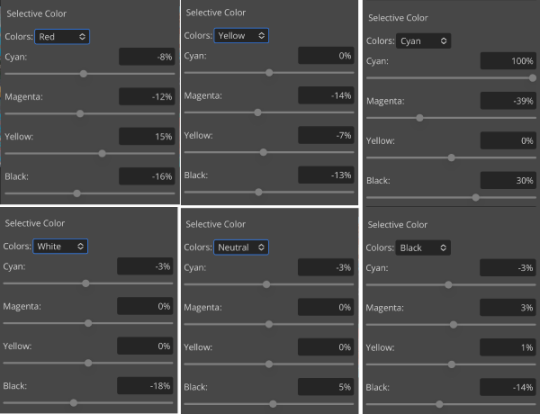
next thing i do when creating a base is add a selective color layer, which helps things pick up the pace. i’m too lazy to write it all down but these are my settings:
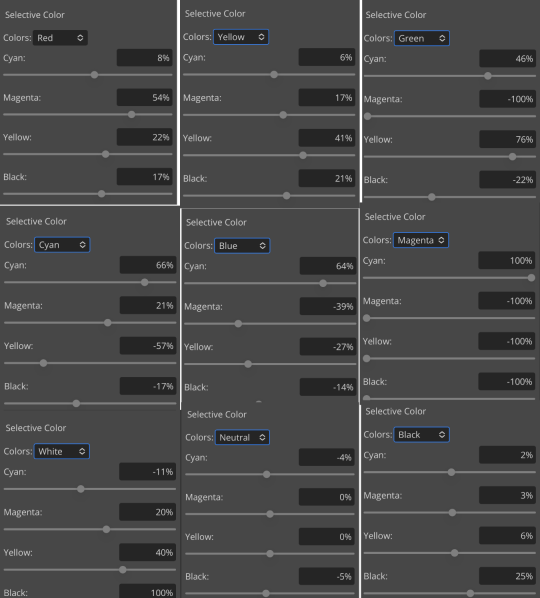
worlds ugliest collage so i don’t max out my images LMFAO apologies. obviously depending on what colors you want to focus on this will look different. for this one i completely axed magenta and emphasized blue and red/yellow. i also maxed out the black in white, which is extremely typical in my psds. this is what our psd looks like now:
pretty different already, right? nice!
next thing i typically do is another selective color layer. it’s typically pretty similar to the first, but once again that depends on the psd! the worlds worst collage again:

pretty much the same but a little different. and our results:
as you can see, this is pretty saturated and a little all over the place. not to worry—let’s move onto the next step!
iii. let’s get serious
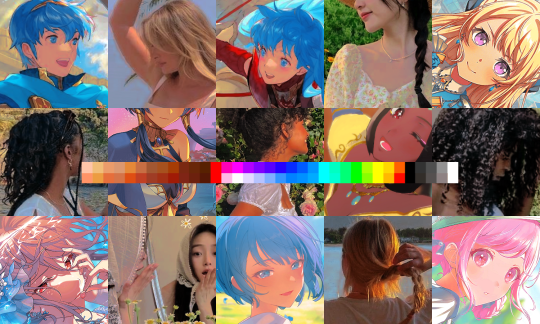
this step varies a lot depending on what my psd needs, but because this one is pretty sayurated right now and that seems to be my main problem, i’m going to add a photo filter in a light grayish-blue to help desaturate and cool it down
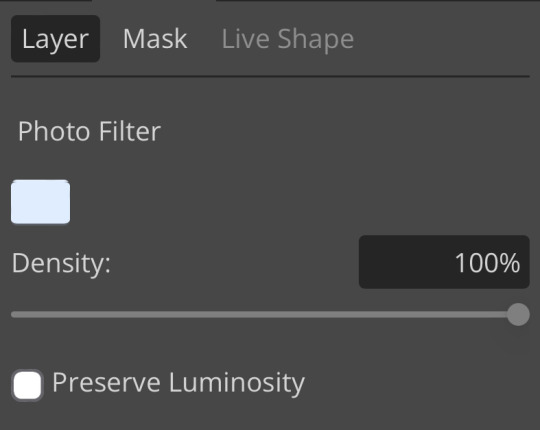
(i unchecked preserve luminosity here because i think it looks neat. i don’t recommend doing that if you’re using a darker color bc it gets hard to see, but you can do whatever forever)
obviously this isn’t the only way to desaturate but i find it fun. observe:
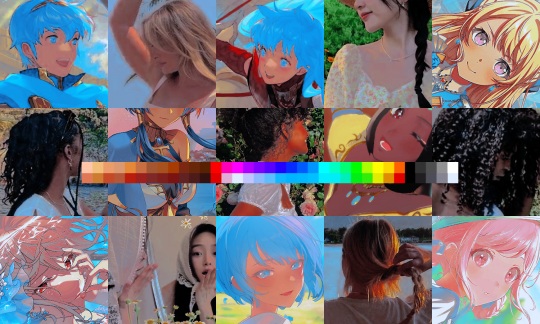
definitely better, at least to me, but still not great. we’re going to add another selective color layer bc the skintones look kinda wack. welcome back world’s worst collage:
i only adjusted some of the colors in this one because i wanted to fix specific problems; namely that the darker skin tones were too dark and ashy.
mission accomplished
with that done, it’s time for hue/saturation! for funsies ദ്ദി(˵ •̀ ᴗ - ˵ ) ✧ this part i just had some fun with. a new collage:
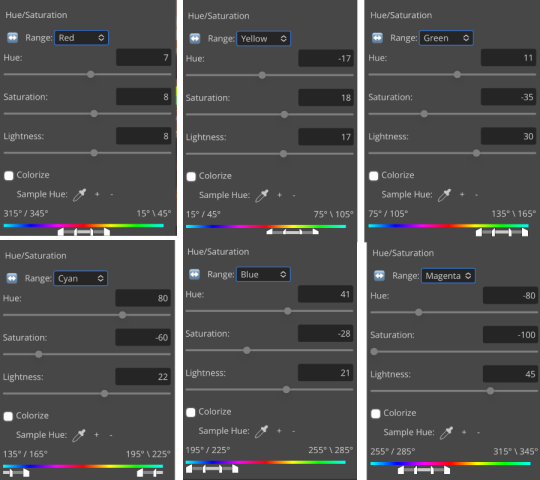
and the results:
purple! this wasn’t what i originally had in mind but it was much more fun to do tbh LMAO i decided to turn the cyan/blue into purple because it looked better in my head
iv. okay now get silly again
now that the main meat—so to speak—of our psd is done, we can add some fun layers. if you want ideas for this, i have a post about it, but what i’m gonna add as my first silly layer is channel mixer, which is one of my personal favorite layers
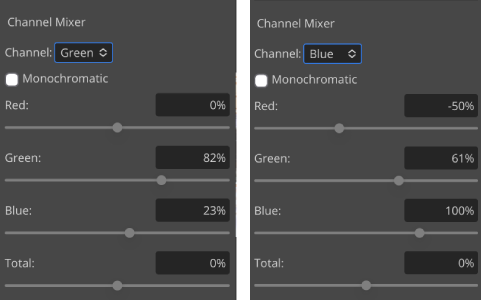
pretty simple adjustments for channel mixer honestly ¯\_(ツ)_/¯ but i thought this would look fun. as a general rule of thumb i don’t mess with the red channel so much because it tends to screw over my skintones, but, as with anything, you’re free to do whatever forever
next fun layer i’m gonna add is a noise gradient map, also just for funsies
i randomized until i got a nice pink-ish kinda one. i was hoping for blue but all the blue ones were too green and i got impatient LOL
a little fucked but for sure fun. i set the gradient map to soft light at about 15% opacity. it gave the psd a fun texture and a bit of extra warmth
v. finishing touches
sometimes i add a couple more layers, sometimes i add less, but this psd feels about done so imma wrap it up. i typically don’t save my psds as the showcase for my storage’s sake, so i’m gonna grab something to use as an icon. i typically go ahead and size it at about 300x300
hello, haruka! once i have my icon set i duplicate the folder into the new project and name both the project and the folder. how you name it is up to you, i usually either use a random word generator or just whatever comes to mind. in this case, i’m just naming it ‘tutorial psd’ lol
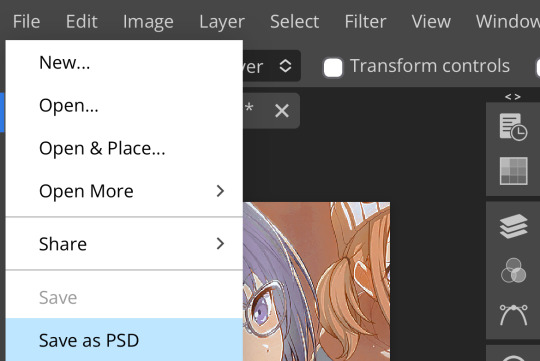
then go to file and save as psd, bada bing bada boom you’ve got a psd ☆〜(ゝ。∂)
as i said at the beginning, there’s no one way to make a psd. this isn’t the only process or even the best one, it’s just how i personally work. the best way to make a psd on your own is fuck around and find out <3 canarysage out
…so that’s how you do it.
P.S. the psd i made here will be posted under the tag #tutorial psd. you’re free to poke around in it and use it as per usual. if you want to copy it, feel free, but don’t claim it’s your own or repost it as your work. thanks!
P.P.S. wondering about adjustment layers? see photopea for dummies. wondering about something i haven’t covered yet? shoot me an ask ദ്ദി(˵ •̀ ᴗ - ˵ ) ✧
36 notes
·
View notes
Note
Hey!! I just wanted to say that your recent speak now gif set is sooo stunning. I was wondering how you managed to create that cassette tape effect if it isn’t any trouble? It’s really so pretty.
Have a great day! ✨
ahhh thank you so so much! first of all, i cannot take any credit for this effect, as it was greatly inspired by this amazing yellowjacket gifset by @thewintersoldier!!
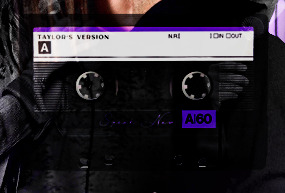
but here's how i recreated the effect, from a cassette png (found on pngwing here), to this animated cassette effect (as seen in my speak now set):
psst: i usually always create in photoshop cs5, but for this effect you need a recent version of photoshop because it's using transform keyframes (i think cs5 doesn't let you do that, or i just don't know how to lol). i used cc 2019 for this.
sorry if this is lengthy or has too much or too little details haha, but i hope it's comprehensible! english is not my first language so i also apologize in advance for any mistakes!
I. PREPARING THE CASSETTE
so, starting with the png here:

i removing everything i didn't want on the cassette png with the brush tool by just drawing the right color over the unwanted text. for the color, i then went to image > adjustments > hue/saturation and in the red tab, i played with the hue slider to get that purple color. finally, i added some text to my liking, and this is what i ended up with:
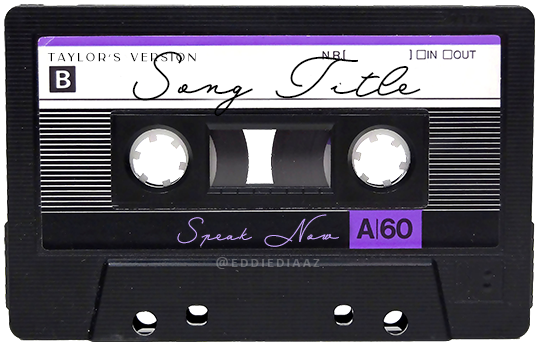
(not necessary but: i also selected the white lines on each side with the magic wand tool because i wanted these lines to be transparent. once your selection is done, go right click > layer via cut. it will create a new layer of the cutout you just made. you just need to disable or delete the layer to make the selection (lines) transparent.)
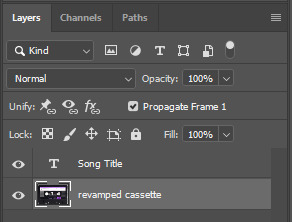
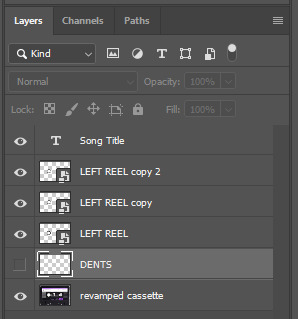
at this point you want to have only 2 layers: the revamped cassette and the text layer. you can remove the text layer actually, and just add the title back at the end, as it is not necessary for this effect. i just like to have the visual.
if you have multiple layers, you need to select all of them (except the song title layer), right click on the png layer and click on merge layers. this will create one layer with all the editing you made on the cassette. if you think you will need to edit this later though, i would save the file as a psd before merging the layers.
II. THE EFFECT
okay, so now that you have your cassette, make sure your video timeline is activated, not frame animation, and you are ready to go.
first, you want to create a perfect circle shape around one of the reel with the elliptical marquee tool (hold shift while dragging the circle). make sure it covers the entire area that will later be rotated. make sure this circle is perfectly centered around the reel or otherwise the animation will be a bit lopsided.
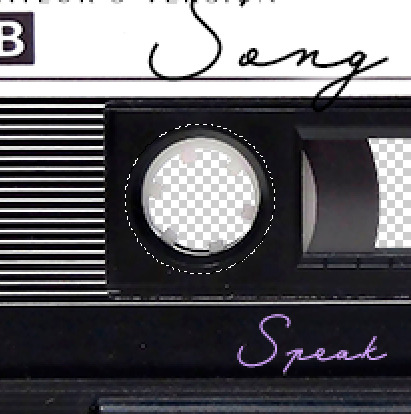
then right click on this selection and go "layer via copy". this will create a layer of only that circle selection. important step: right click on that new layer and go "convert to smart object". the layer should look like that, i've renamed mine:
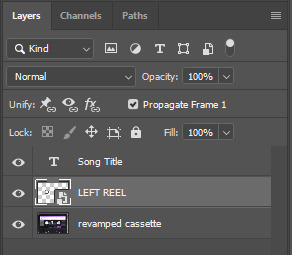
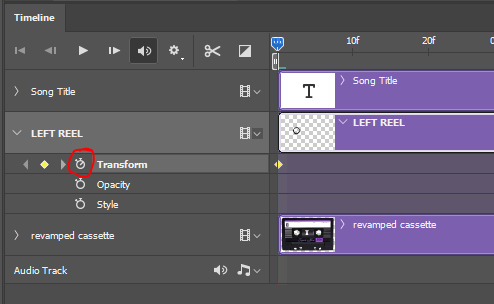
now if you go to your timeline and open that new smart object layer, you will see that you have 3 keyframe options. we only need the transform one.
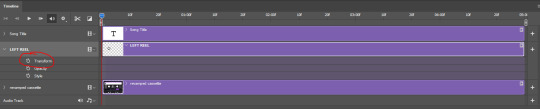
go to the start of the timeline and activate the transform animation by clicking on the stopwatch button. a keyframe will be created automatically.
to create the actual animation, move the position of the cursor on the timeline further, i put mine at the 01:00f mark so it's easier to create the right timing.
then what you want to do is select the reel smart object layer and hit ctrl + T. a box will appear and this is how you will make the reel rotate.
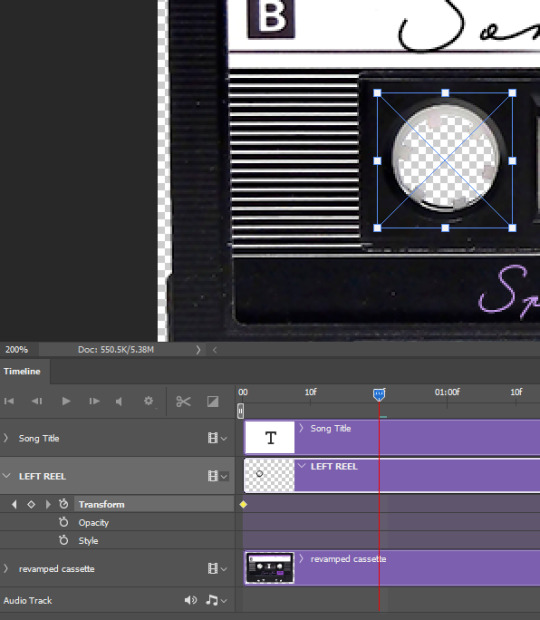
to rotate the reel shape, move your cursor near the blue box on your canvas and drag it until you have rotated the shape halfway through and hit enter. another keyframe will be created and if you play your animation, the reel should rotate on itself for half a turn

move your position on the timeline to 02:00f and do the same thing: select the left reel smart object, hit ctrl + T, rotate for another half turn, and hit enter. this third keyframe should be the last one needed for the animation and you should have a full animated rotation of the reel.
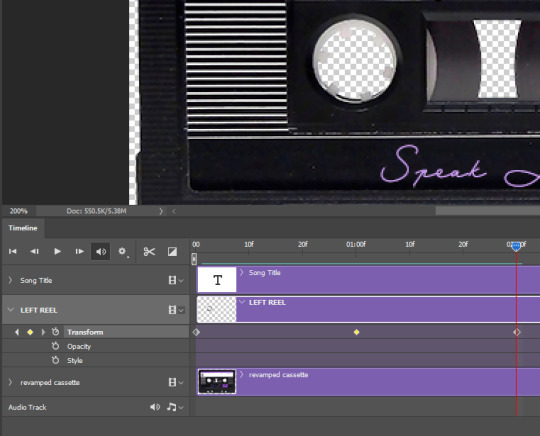
play your animation, and adjust the speed to your liking by dragging the keyframes on the timeline (but make sure they stay within the same distance from each other). the closer the keyframes are, the faster the animation are, and the further they are, the slower it'll be.
then you can just trim the smart object to your animation's length, and duplicate (right click the smart object > duplicate layer) this layer the amount of times needed (i find this less finicky than duplicating keyframes), and placing them one after the other. three full turns should be enough. this is what my timeline looks like right now:
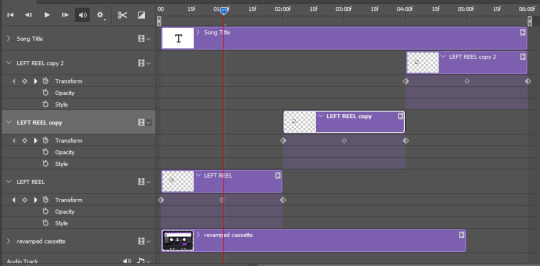
and my animation for the left side looks like this:
as you can see, we can see the little "dents" peeking through behind the animation. we don't want that! to remove it, select the revamped cassette layer (that should be under the reel smart object), and create another perfect circle around it with the marquee tool. this time make sure it's smaller than the previous one, it just needs to cover these dents.
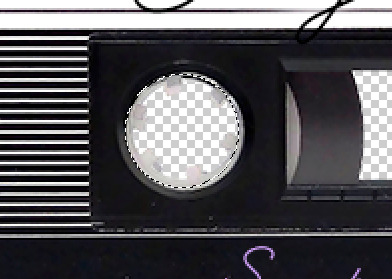
then right click on this selection on your canvas and go "layer via cut". this will create a new layer with that selection, and all you need to do is to disable it. this is removing the information in that circle.
once you are happy and the animation works, you can just delete that cut layer. now the animation is done and looks like this:

III. SECOND ANIMATION
one you have done it on the left side, you just gotta do the same thing on the right side. you can also try duplicating it, but i found it finicky for some reason (or maybe i'm just not used to the controls of this 2019 photoshop version?).
this is what i have once i've done the same thing on the right reel:
once i am happy with the speed and everything, i want to have only one layer so it's easier to use on gifs. first, i will save this animation as a psd file, in case i want to reuse it. then i am removing the song title layer and will be flattening everything and creating frames from this animation. to do so i am using the "save" action from here.
i'm not sure why it does that, but it's creating a couple of frames where the reels are a bit offset from their position everytime there's a full circle done, so i just delete these 5-6 frames. you can also change the speed here, but by default it should be 0.05.
once you are happy with it, just turn these frames into a smart object with the video timeline again (convert frame animation to video timeline and select all the frame layers > right click > convert to smart object)
now you have a smart object that is ready to be used anywhere!
IV. FINAL TOUCHES
for my particular speak now gifset, i have multiple layers of the animated cassette on each gif:
1, bottom one - cassette layer set to the blending mode "hard light" and set to opacity 86%:
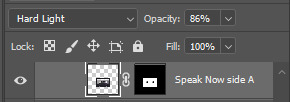

2, middle - this same cassette layer set to hard light, but with the opacity at 100%, AND with a layer mask so it's only applied to the animated reels (i wanted them to show up more):

3, top one - and finally a third layer with another layer mask because i wanted the white label and speak now area to be less see through. it's set to the normal blending mode and the opacity is at 75%


and then i just added the song title on top at 100% opacity and normal blending mode, and added some drop shadows, and tada!
there we have it, i hope this was helpful <3
#alie replies#Anonymous#photoshop#tutorial#*ps help#completeresources#allresources#resourcemarket#userrobin#userraffa#userpjo#usertreena#tuservaleria#tuserheidi#userdean#userrainbow#usersalty#userzaynab#usernik#swearphil
380 notes
·
View notes
Photo
PHOTOPEA BLENDING TUTORIAL by kai @heroeddiemunson
howdy! i’m back with another tutorial for photopea :) nobody asked for this one, but i have noticed people who have reblogged my gifsets commenting on my blending, and i thought it’d be cool to have a tutorial on how i do it!
what you need:
photopea (basically photoshop in your browser, completely free!)
basic giffing knowledge, because i won’t cover it in this tutorial (other tutorials: tutorial by @benoitblanc, tutorial by @ashleysolsen)
decide what scenes you’re going to be blending; i don’t recommend blending more than three gifs together, just for the sake of being able to see what all your gifs are. for this tutorial, i will blending three gifs together. also make sure that all of your gifs are the same amount of frames as well, otherwise this blending tutorial won’t work!
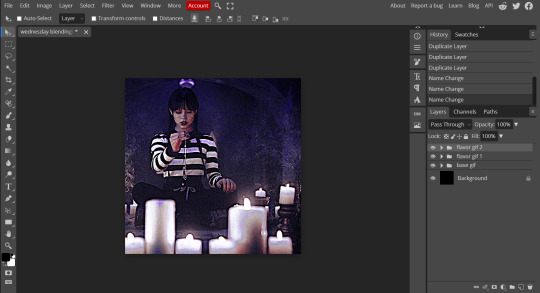
step one: making your individual gifs
first thing’s first: you need to make the individual gifs you’re going to be blending. make sure when you’re cropping these gifs, you have a sort of understanding of what they will look like together; you can check this by right clicking on one gif, selecting duplicate to, and choosing the gif you’re going to be blending it with. on the other gif, you should have the duplicated version of the first gif on top. here’s what my work station looks like after i’ve duplicated two of my three gifs onto the third gif’s canvas:

now you can change the opacity of the gif(s) you have layered. here’s an example of what my three gifs may look like when they’re blended together (the middle gif is at 50% opacity, and the top gif is at 30% opacity):

since none of these gifs have been colored yet, it may be a little hard to see, so feel free to play around with the opacities of your gifs to make sure that you cropped them how you want them to be blended. i like my crops, so now i can color each of these gifs individually!
when i’m blending gifs, i like to think of them as my “base” and “flavor” gifs. “base” gifs i tend to keep simple, usually with some sort of color overlay on top of them to make the “flavor” gifs pop out more. below is what my “base” and “flavor” gifs look like individually before i’ve sharpened/blended them:

for my “base” gif, i colored it as normal, and then went to layer > new adjustment layer > gradient map; from here, i clicked the black to white gradient in the pop up, and then chose the white color and changed it to the color that i wanted (in this case, the hex code #b7a6ff). my “flavor” gifs are colored as i would color any other gif i’d make that isn’t blended.
save your psds of these gifs, sharpen, and go to file > export as > GIF. now you have the gifs you’re going to blend! great job! :)
step two: making your blended gifs’ canvas
now that we have our gifs we’re going to blend, we have to have a “canvas” to put them on. to do this, go to file > new… and make a new canvas. make sure the canvas is the same size as your crops, and your background is set to black! below is what i did for the gifs i’m going to be blending:
now to put our gifs that we made onto this canvas! unfortunately, photopea doesn’t allow you to use the open & place feature for gifs, so we’ll have to go to file > open and open our gifs individually. similarly to what we did in step one, right click your gifs and select duplicate to and duplicate the gifs you will be blending into your new canvas.
now your canvas will look something like this:
and we can move on to the fun part, which is actually blending the gifs together!
step three: blending!
so, when blending gifs, there’s a lot of ways to do it. i’ve found that blending gifs is a lot of experimentation, since you’ll probably never find yourself blending two gifs the same way every time.
for now, let’s change the blending modes (drop down menu above the layers panel; it should say “pass through” right now) for each of the gifs, that we can actually see them as we blend them.
for my “base” gif, i always set the blending mode to “lighten” no matter what. but the fun thing about your flavor gifs is you actually have a fun choice of choosing either “lighten” or “screen”, depending on what you want the gif to look like. below i show the difference of what “lighten” or “screen” look like for each of my flavor gifs:

i personally really like what it looks like with my first “flavor” gif with the “screen” blending mode and the second “flavor” gif with the “lighten” blending mode, so that’s what i’ll be doing; but it always depends on your gifs that you’re blending and what you want it to look like, so do what works best for you!
so as you could probably see from my screenshots or your own gifs, sometimes it gets a little hard to see your gifs. to fix this (and probably my favorite part of the blending process), select one of your gifs, and then look below your layer panel to click the “add raster mask” button (it looks like a little rectangle with a circle in the middle of it). do this same step for each of the gifs you will be blending, and your layers panel should look something like this (i’ve also highlighted the “add raster mask” button):

the raster masks are white, which means anything white is something you can see. using black with the brush tool gets rid of parts of the gif that may be visible. for example, this is what my gif looks like after playing around with getting rid of some of the stuff that was covering the parts of other gifs i wanted visible:
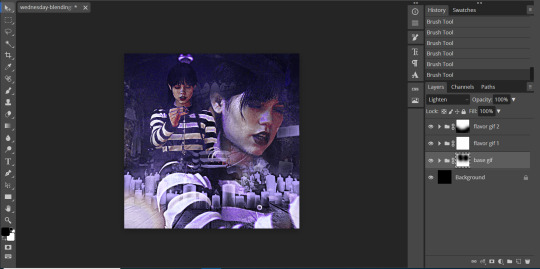
but to me, the black is a little too intense, as it gets rid of a lot of the gifs. but we’re in luck: the best thing about raster masks is that you can use various shades of grey to really blend your gifs together in unique ways by changing the colors in the bottom left corner. below i have a couple screenshots of what my blending for these gifs look like, as well as what my layers look like with the different shades of grey i used:
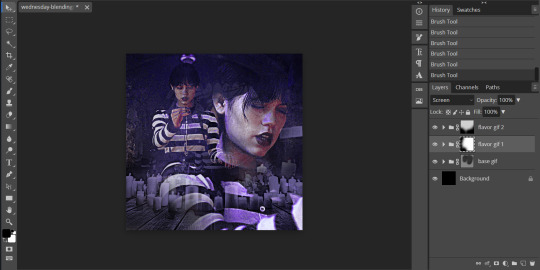
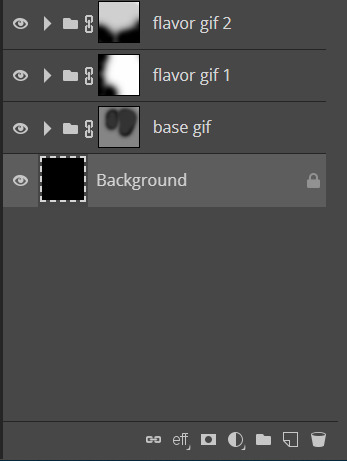
and now, our gif is almost finished! make sure to save your canvas as a psd, just so you don’t lose any of the work you’ve done.
step four: finishing touches
before we save this gif as a gif, i want to do some finishing touches. as we all know about me, i love myself some very colorful gifs, and i want the purple to stand out more in this gif. to do this, go to layer > add adjustment layer > gradient map and do like what we did for the “base” gif to make the same black to purple gradient we did before.
on the gradient map layer’s raster mask, use your brush tool like you used for erasing parts of your gif in order to erase part of this layer. i personally make my brush 1000px large and with 0% hardness into what i like to call my “big fluffy brush” (which makes no sense, because it isn’t fluffy, but it’s what i call it anyway). doing your best to center your brush in the middle of your gif and left clicking once should get rid of most of the gradient map’s color, but feel free to click again if you’d like. here’s what my gif looks like after two clicks of my big fluffy brush:

that doesn’t add much more color, but that’s okay, because it does add more contrast for us. go to layer > add fill layer > color fill and put in the color you have been using (in my case, that purple color). like the last layer, do your best to center your big fluffy brush and left click until you’re satisfied. here’s what my gif looks like after two clicks:

from here, i change the blending mode to “color”, and set the opacity at 50%. i then right click and choose duplicate layer, and with this new layer, change the blending mode again to “soft light” and set the opacity at 25%. now my gif looks like this:

now my gif is much more colorful! from here, i’ll add some typography and whatever else to my finishing touches before i once again save this psd so i don’t lose my progress. and now we can move to the final step!
step five: exporting
before we can export our gif, we have to combine our gifs together so they act as one singular blended gif rather than multiple separate gifs on one canvas. go to layer > animation > merge, and your individual gifs should be combined into one gif on your layers panel something like this:

and now, you can go to file > export as > GIF. make sure your gifs move together as you want them to, as well as that it’s until 10MB, and viola! congrats, you’ve just blended together a gif! :)
#photopea tutorial#photopea gif tutorial#completeresources#allresources#userars#userzesty#tusersai#dailyresources#gif tutorial#photopea#mystuff#mytutorials#hopefully i explained this good enough#feel free to send me asks if i said something confusing sjdhldsf
396 notes
·
View notes
Last Seen Blogs

emerald-island-jamaica-blog
Emerald Island Jamaica
paper-cloud
awake for ever in a sweet unrest
stars-of-interpol-blog
Starbound's Dumbest Secret Organization

craftswebstore
Crafts Store

glamrbeautytips
GLAMR BEAUTY TIPS