#i tried doing backups in the past and they never completed the exporting process
Explore tagged Tumblr posts
Visit Tumblr Blog
Explore Tumblr blogs with no restrictions, modern design and the best experience.
Last Seen Tumblr Blogs


Fun Fact
Tumblr is available in 18 languages.
Text
I exported my likes blog and the backup file is 20gb...................................
#i tried doing backups in the past and they never completed the exporting process#so i'm really just delighted to have the backup#i didnt realize how much of a treasure trove i have collected over the years until looking for art resources again#and its actually incredible to have a curated hoard of exactly what i'm looking for#its like ten years of me giving myself gifts#Thank you past me. Tumblr is kind of awful in some ways but in other ways it is truly valuable to me
1 note
·
View note
Video
youtube
transparent render tutorial/process vid, v2: beginners’ edition! (written walkthrough under the cut)
yeah okay the last video was really only helpful if you already know the basics of making caps, so here’s another manga panel rendering tutorial for anyone who’s never made a cap in their life, complete with drop-down menus instead of keyboard shortcuts! I tried to be pretty explicit, keeping in mind what things I had to figure out myself when I was learning... still, steps are under the cut!
oh, and bonus: watch me do this at 1500% speed
final product:

Note: i’ve changed a few of my keyboard shortcuts, so yours might not be identical; as such, I tried to avoid them as much as possible!
first of all, useful GIMP navigation shortcuts:
ctrl+R = reset view
scroll wheel = scroll up/down
shift+scroll wheel = scroll left/right
ctrl+scroll wheel = zoom in/out
and tools we’re gonna use:

and finally, the how to:
1. open the page with your panel in GIMP or copy-paste it in, and save your project
2. use the crop tool (shift+C or yellow above) to select the area around what you want to render, then click on that area to crop it
3. click your foreground color (in blue above) and change it to any color you like
4. create a new layer (either by going to Layer>New Layer or Ctrl+Shift+L), and make sure “foreground color” is selected, then click OK
5. drag your new layer below the manga panel layer on the right, then select your manga panel layer again so that it’s highlighted in blue
6. click the little squares (indicated in purple above) to reset your fg/bg colors, then the arrows (in green above) to switch them so that white is your foreground color
7. Layer>Transparency>Color to Alpha, make sure it’s set to pure white (it should be by default) and hit OK
8. Layer>Mask>Add Layer Mask, make sure “White (full opacity)” is selected and click OK! This creates a “layer mask”, which basically lets you erase without permanently erasing
(you should probably save here)
9. Click the lasso tool (in red above) and start carefully clicking points to outline the spot you want to render. You don’t have to be as precise as I am (I’m really anal about it), but notice what spots i’m cutting out:
you also might need to cut out certain spots, but I’m a complete idiot and used keyboard shortcuts for this in the video so here’s how you do it:

I made a note of it in the video itself, too! Also, I don’t know if Feather Edges is on by default, but if it is, TURN IT OFF IMMEDIATELY. it’s the absolute worst just trust me
(you might wanna save again)
10. Select>Invert (Ctrl+I) and hit the DEL key, then Select>None (Ctrl+Shift+A)
11. Right click on your layer>Duplicate Layer, right click>Apply Layer mask, right click>duplicate layer (again), & hide the bottom version (the one that still has the layer mask) by clicking the eyeball- it’s just there to be a backup
12. select the top layer and then go to Layer>Transparency>Threshold Alpha, i usually set it to about 123-127 but you may want to go lower; a higher number means it’ll be sharper, but you may have holes in the outline you’ll need to fill in
13. click this little icon to lock the layer:
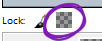
then Ctrl+F to fill with white, then that little icon again to unlock the layer
14. use the magic wand tool on the area that’s going to be transparent, using Add to Selection if needed, invert the selection, and Ctrl+F to fill with white (NOTE: if there are gaps you’ll need to either fill them or go back and do it again but with a lower threshold for threshold alpha. You can see me do the former in this one)
15. drag the white layer below your other visible copy, crop how you like, and you’re done! I recommend exporting two versions: one with the colored background visible, and one without it. make sure they’re .png files too!
congrats friend u just made a transparent render like a pro
that got a bit wordy but don’t worry, it’s really not that complicated! It took me longer to write this than it did to make the render pffft
feel free to ask if you have any questions!
#world trigger#wtgraphics#mangacap tutorial#graphic tutorial#gimp tutorial#this time ft izuchika#theyre rly easy!! seriously#i made this like 3 days ago and forgot to post it#cookie's edits#//emerges from the dumpster
54 notes
·
View notes