#i seem to have branded myself the Beta Editor Gal at the moment so. leaning into it. here ya go
Explore tagged Tumblr posts
Text
Beta Editor Overview
This post was originally made on January 7, 2023, and was last updated on January 14, 2023.
After seeing quite a few posts expressing confusion/frustration over the beta editor, trying to understand new features and find where old options have moved to, I thought I'd write up an overview of the new editor, showing the various changes it has from legacy.
My main goal is to show people that the new editor not nearly as bad as they may have heard. You'll have a few days of weirdness and confusion, and then you'll be used to it. The beta editor does have some bugs... but so does the legacy editor. We've all just gotten used to legacy and know how to work around its quirks. After a couple weeks with beta, you'll be familiar with it and know how to do the same.
FAQ
I'm putting this part above the read more to quickly answer the questions I see asked most often.
How do I cut posts with the new editor? — You need to get an extension called XKit Rewritten and use Trim Reblogs. Once you have that installed, save the post to your drafts and click the scissors icon along the bottom of the post. This will open a window that allows you to remove earlier reblogs. If you run into funky issues, see my ginormous post here.
Where is blockquote? — Blockquote is now called indented. There are two ways to reach it. Option 1: select your text, open the dropdown menu, and choose indented. Option 2: type / on an empty line, select indented, and type your text.
Where is small text? — Select your text and click the small S in brackets. I recommend doing this at the end of writing your post, as it can be finicky otherwise. The old keyboard shortcut for small text does not work anymore; the new shortcut is CTRL/CMD + COMMA.
Where are bullets? — Select your text, open the dropdown menu, and choose bulleted list. You can also type / on an empty line and select/type bulleted list. Additionally, you can type * and a space on an empty line to autoformat to bullets, or use the keyboard shortcut CTRL/CMD + SHIFT + 8.
How do I disable reblogs on a post? — Click the settings icon in the top right, click the dropdown next to "Who can reblog?" and select "no one." (Please note that while it says those mentioned in a post can always reblog, I've found this to be broken. At the moment you should only disable reblogs if you don't want anyone reblogging it.)
Why does adding a gif to a post include the URL? — Inserting an image via link will automatically include that URL underneath the image in the final post (though it won't display in the editor). You can remove this by hovering over the image and clicking the chain link icon in the bottom left. Select the URL in the field there, delete it, and click Done.
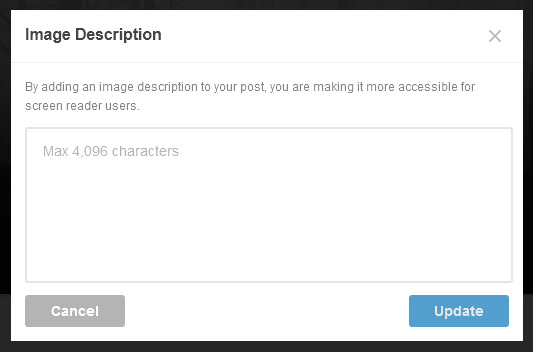
How do I add alt text to an image? — Add your image, hover over it, click the three dots in the bottom right corner, and click "update image description."
Adding Elements
When you click on an empty line, options for things to add to your post will appear on the right, similar to legacy.

In order, these are:
Image
Gif search
Link
Audio
Video
Read more
All of these work almost exactly as they have previously, except for adding an image. Clicking that will give you this, which resembles a standalone photo post of the old format.

You can then upload directly from your computer, or paste a URL, as before. If you insert an image via URL, that link will be visible just below the image in your final post, though it won't show up like that in the editor. It'll look like this.

If you don't want this, make sure to click the link icon at the bottom left of the image and delete the URL there.
Back to the image you added in the text editor! Hovering over the image will give these options.

The squares icon in the top left lets you click and drag the image, and you can drag images next to each other to stack them horizontally. The X in the top right will remove the image from your post. The link icon in the bottom left shows the image URL, and will only appear if you inserted the image via link. And the dots in the bottom right allow you to add alt text to your image -- click the dots, then click Update image description.

Formatting Text
Now! If you type up some text and then select it, formatting options will pop up. This is similar to legacy, but now there's a dropdown menu.

Here's what's in the dropdown.

Here's what they all look like in a post.

Regular is plain text. Bigger is the equivalent of the headline option on the legacy editor. Biggest is the equivalent of the main title, but you can have more than one in a single post now.
Quote turns text into a serif font and increases the font size. If you type up a long quote, the font size will shrink.
Chat switches to a more computer-looking font.
Lucille increases the font size and is a cursive font.
Indented is blockquote. It looks a tiny bit different on the dash now, with some more spacing on the top and bottom, but it's functionally the same.
Bulleted and numbered lists are self-explanatory. You can also start a bulleted list by starting an empty line of regular text with * and a space, and a numbered line by starting an empty line with 1 and a space. Additionally, the keyboard shortcuts CTRL/CMD + SHIFT + 7 for numbered list and CTRL/CMD + SHIFT + 8 for bulleted list still work.
You can also access these same options (and some others) by typing a slash onto the start of an empty line. A menu will pop up, allowing you to either click the one you want or simply type the one you want and hit enter.
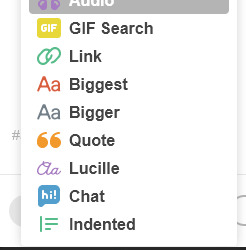
If you want to quickly add a title, an indented blockquote, or anything like that, this is the fastest way to do it.
Hopping back to the rest of these options now!

To the right of the drop down, these options are:
Strikethrough
Bold
Italics
Small
Link
Color
Most of these are self-explanatory. Keyboard shortcuts for bold and italics work as before. The old keyboard shortcut for small text no longer works, but CTRL/CMD + COMMA does.
Link works the same as it always has, and the keyboard shortcut of CTRL/CMD + K works as well. Additionally, if you have text selected and just paste in a URL, it will insert as a hyperlink from that selected text.
Color lets you change the color of your text to a few presets. Just click the paint bucket, and pick the color you want.

Post Settings
Back out to the main editor now, here's what under the settings icon in the top right.
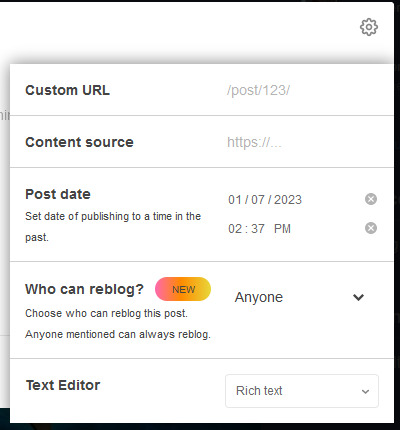
Custom URL lets you set a custom URL for your post, if you want it to be something other than a string of numbers.
Content source is the source link and works similarly to how it did in legacy.
Post date is not the scheduler! That's under the post button dropdown and is fairly straightforward. But this option lets you backdate a post, setting the date to sometime earlier than you actually made. Gonna be completely honest, I haven't used this at all and don't entirely see the point, but if you want to play around with it, there it is.
Who can reblog? Is one of my favorite features. Opening that dropdown lets you disable reblogs on your post. The reblog button will be grayed out on the dash. (After you've made the post, you can edit to turn reblogs back on if you need to.)
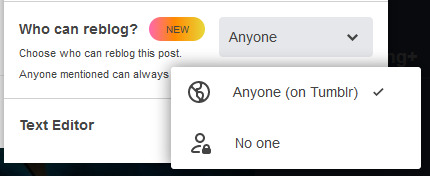
While this does say that anyone mentioned can always reblog, I've found this to be broken in my testing -- I have submitted a ticket to staff, so hopefully they're working on it. It would be a godsend for roleplayers, since it would restrict reblogs to only the partner that you @-mentioned in your starter and keep randos from reblogging your threads.
Lastly, the text editor lets you switch to HTML or Markdown for your post, if you prefer one of those. They are similar to how they worked in legacy.
Community Labels
Along the bottom of the editor, you'll see the close button, the post button with the same dropdown as in legacy, and another dropdown that reads Everyone by default. Here's what that one looks like.

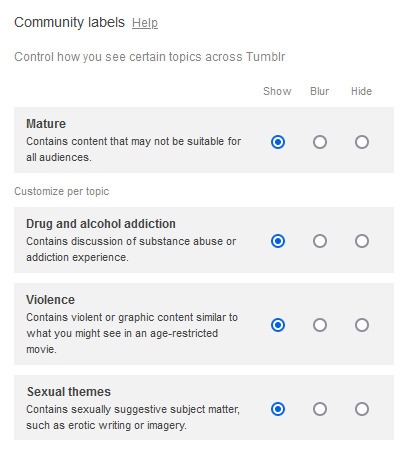
This is where you can manage your community labels, which is a fairly new feature from Tumblr. By default, your post will be marked as being for everyone. However, if your post contains any of the content listed, you should click to toggle that one on. This will hide your post from anyone who has that label switched off in their settings.
To check what you have on or off in your settings, look for this underneath your filtered tags:
Tags
Tags work the same as before. The only notable difference is that you can now edit inside tags without having to completely delete them. Just click on the text where you want your cursor to be.


You can rearrange tags with click and drag as before. Just be sure to click on the blue space around the text, rather than on the text itself.
Autosaving
The beta editor will automatically save your posts! It's autosaving whenever you see this pop up at the bottom of your screen, every minute or so.

If the editor gets closed unexpectedly, the last autosave of your post will go into your drafts. As someone who's lost many replies to unexpected tab closures, this is a godsend.
Just know that this only works if something external closes the editor. If you click the close button yourself, the post will disappear.
Miscellaneous Differences
You can now have more than one main title (Biggest) in your post.
You can no longer have multiple levels of bullet points.
You can no longer have paragraph breaks within your blockquote/indented text (though it's been that way for a while). To get a similar look in your blockquote, hold down shift and press enter twice (or use <br><br> in your HTML).
Previewing a post on your blog is still possible, but in a different location. Go to a post in your drafts, click the three dots in the top right, and click preview.
The editor will still remember your tags, but capitalization will be removed, which might be an aesthetic annoyance.
The editor will only suggest tags that start with your search. For example, if your ask memes tag is send me stuff ( ask memes ) — typing "send me stuff" in the tags box will suggest this tag for you, while typing "ask memes" will not.
When making or reblogging a post, your most recently used sideblog will be up by default; this is different from the legacy editor, which would always open your primary blog. Be mindful of things going onto the correct blogs!
More items may be added here as I spot them. Feel free to send any observations of your own if you have them.
Known Glitches
Because the beta editor is still known to be buggy, I thought I'd document the glitches I am aware of. I have reported these to staff using their feedback option and highly recommend that you politely do the same if these annoy you.
I've heard from several people that using CTRL/CMD + Z to undo caused their entire post to be erased. This has not personally happened to me, but I've heard it enough times that I feel I should share it here.
Using CTRL/CMD + A to select your entire post can be finicky. Clicking and dragging across the entire post is more reliable.
Typing with small text can be finicky and won't always apply correctly. I highly recommend applying the small text after everything is written, just to save some headache.
Generally, text formatting and paragraph blocks can behave oddly, especially when trying to select more than one. This is also a problem I've had with the legacy editor, but my experiences are not universal, so it may be a hindrance to you.
Customizing Beta/NPF Elements on your Theme
This is only for those of you who want to know how to change the way certain new beta elements look on their blog theme. If that's not you, you can stop reading here!
These are the elements and classes you want to customize in your CSS:
BIGGER - h2
BIGGEST - h1
QUOTE - .npf_quote
CHAT - .npf_chat
LUCILLE - .npf_quirky
RED TEXT - .npf_color_joey
ORANGE TEXT - .npf_color_monica
PURPLE TEXT - .npf_color_chandler
YELLOW TEXT - .npf_color_phoebe
BLUE TEXT - .npf_color_ross
PINK TEXT - .npf_color_niles
Colored text that isn't one of the default colors from Tumblr will just use <span> to assign a custom hex code, and can usually be targeted that way. You may need to use the !important property to override some of these default styles.
#beta editor#beta text editor#rpc#rpt#rph#*my stuff#*my tutorials#i seem to have branded myself the Beta Editor Gal at the moment so. leaning into it. here ya go
470 notes
·
View notes