#i have to go to home depot or lowes to buy screws and a drill bc i don’t have what i need
Explore tagged Tumblr posts
Text
i’m just a girl, idk how to properly drill holes into a wall. the only hole that should be getting drilled is mine by my faves—
#sobbing as i try to put this mirror on the wall#i have to go to home depot or lowes to buy screws and a drill bc i don’t have what i need#only motivation is how cute the mirror is#on another good note#a really cute chair i ordered is coming today#so i won’t have to sit on the floor in my living room#sofa shopping is stressful and expensive so i haven’t chosen one yet
8 notes
·
View notes
Text
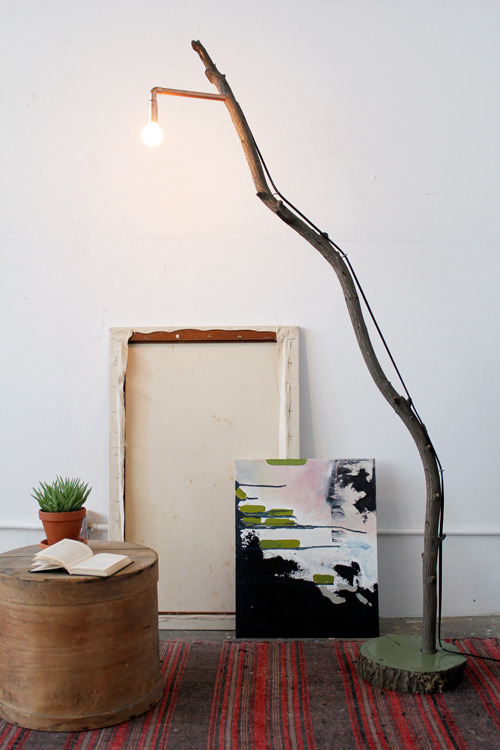
DIY Copper + Branch Floor Lamp

Project by Kate Pruitt:
We have this very annoying tree right outside our apartment that blocks all light from our windows, thwarting the sun’s attempts to warm us with its golden rays of energy. Damn you, tree! Recently I begged our landlord to at least consider trimming it back, and he finally relented, which left me with both a modicum of precious sunlight and some great large branches to use for projects! One of the felled limbs was especially long and solid and had a wonderful, gentle arc that just seemed so lamplike; I couldn’t resist. “I’ve lost my purpose. Make me a light!” it cried. Not really.
With autumn upon us, I decided to pair the branch with rich, warm copper and used a lovely sap-green color on the base to complement the season. Personally, I like the wonky bare-bones style of this little lamp, but if you wanted to dress it up a bit (my boyfriend said the copper part looked like a shower head . . . not cool dude), you could easily make or buy a solid cylindrical shade to place over the bulb. Now, don’t go hacking down trees like I did, but if you happen upon a fallen branch, I hope you’ll try this simple lighting project. Happy crafting! — Kate
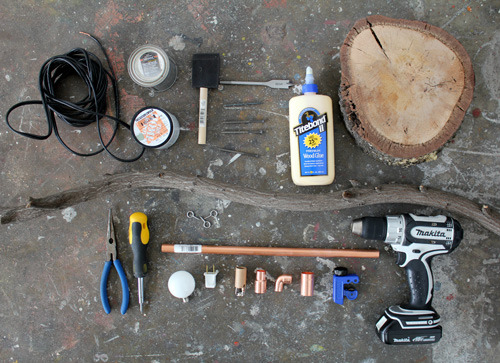
Materials
large branch (Look for one that isn’t too perfectly straight or too twisty but has a slight arc to it and is at least 1.5″ thick at its base to ensure it’s sturdy enough.)
log stump slice (Mine is prop from a friend’s wedding, but you can ask around at lumber yards for these, or you could buy several thinner ones from craft stores like Michael’s and glue a stack together to make a thick base. If all else fails, try searching for firewood sellers on Craigslist, and ask if they have any stumps they could cut for you.)
4–6 small eye hooks (depending on the length/height of your branch)
15–20′ black lamp cord
chandelier socket kit
6″ copper pipe (1/2″ diameter — you can have this cut for you, or buy a standard length and use a pipe cutter to cut yourself)
90-degree copper elbow (1/2″ diameter)
1/2″ to 3/4″ copper coupling
3/4″ copper coupling (NOTE: All the copper pipe and pieces can be found at larger hardware stores like Ace, OSH, Home Depot, Lowe’s, etc., in the plumbing dept.)
high-gloss paint and foam paintbrush (any color you want, I chose sap green)
palm sander or sandpaper
drill with standard bit, 1.5″ boring bit (also known as a paddle bit) and a 1/2″ boring/paddle bit
25- to 40-watt chandelier-size lightbulb
Instructions
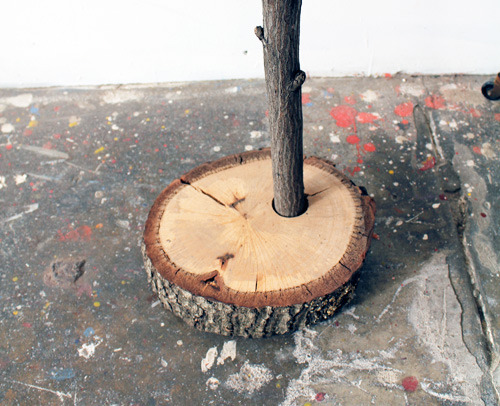
1. Sand your wood stump slice and cut the bottom edge of your branch with a saw to make a flat surface. Hold the branch over your wood stump to determine placement. I decided to set mine off-center for looks and to offset the arc of the lamp, but you could also place it in the center. Trace the branch with a pencil to mark the spot.
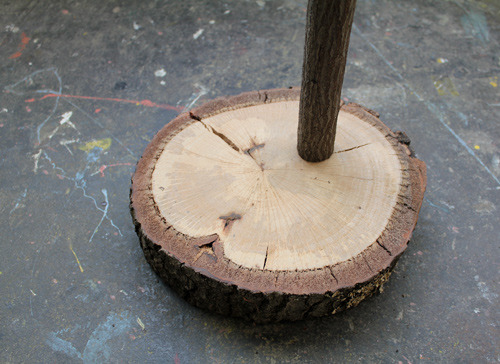
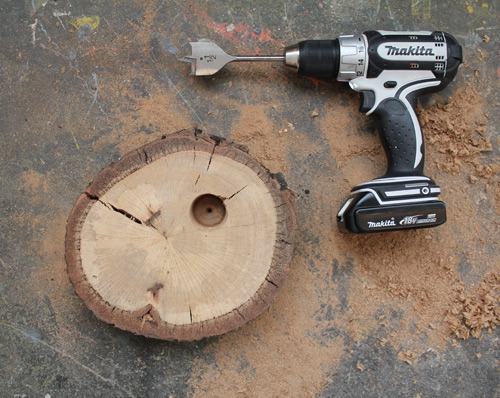
2. Use your 1.5″ boring bit to drill a circular hole in the center of where you traced the branch. Then switch to a small drill bit (1/8″ or smaller) to drill a small pilot hole directly through the center of the hole through the entire stump. This is the pilot hole for the screw or nail that you will embed from the bottom.
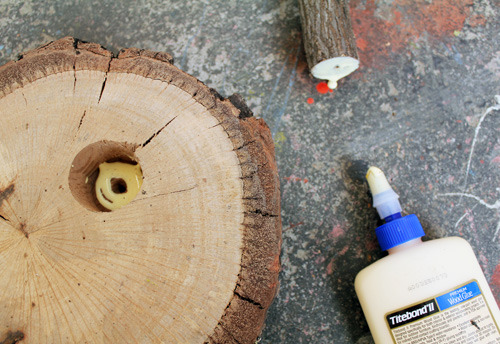
3. Place a good amount of wood glue onto the bottom of your branch and into the hole you made, then put the branch in place. Put tape around the base to secure it in place and set aside for the glue to dry. You may need to prop the branch against a wall to hold it in place while the glue dries.
4. Once the glue is dry, hammer a 2″ nail or screw a flathead screw into the base of the branch from the underside of the stump, using the pilot hole you pre-drilled. This is not necessarily needed, but I like to add it for extra stability on top of the glue.
5. Assemble your copper fittings and pipe together as shown below, and hold it up to the branch to determine where you want the pipe to extend. Mark the place on the branch where the pipe will come out, and also mark on the pipe where it hits the back of the branch to determine the correct length to cut the pipe.
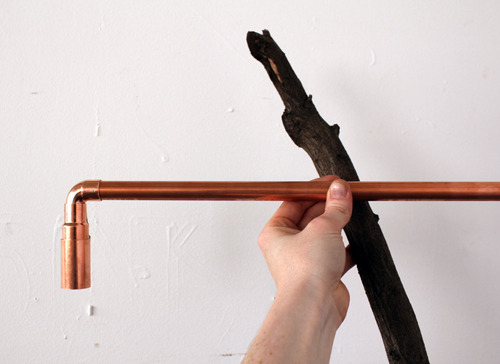
6. Use your 1/2″ drill bit to drill straight through the branch. Drill slowly and carefully to avoid cracking the branch, and don’t go so far up the branch that the hole is almost the exact width of the branch; ideally, you want at least 1/4″ to 1/2″ clearance on the width. Use your pipe cutter to cut the pipe to length.


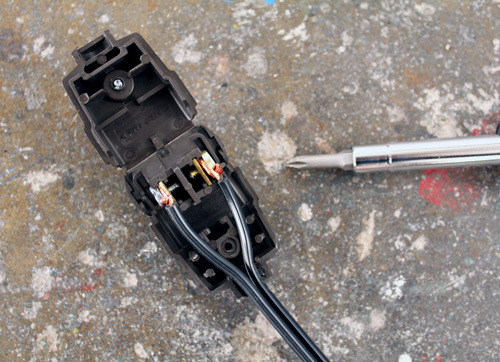
7a. Prepare your copper parts for assembly by removing stickers and cleaning them. Use scissors to gently strip 1″ of the lamp cord to expose the copper wires. If you examine your lamp cord, you will see that one of the cords has ridges and one side is completely smooth. You will also notice on your chandelier socket that one screw is brass/gold and the other is silver. Wrap the copper wire of the cord with ridges to the silver side, and wrap the copper wire of the smooth cord to the gold side (see second image below). Then slide the protective cardboard sleeve back over the socket.

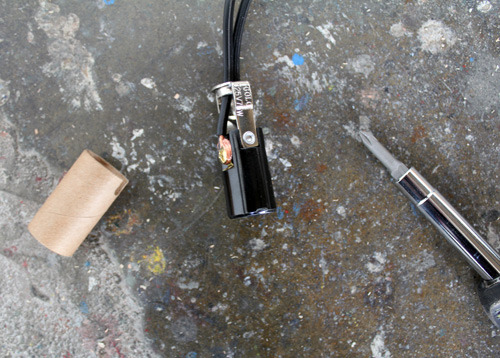
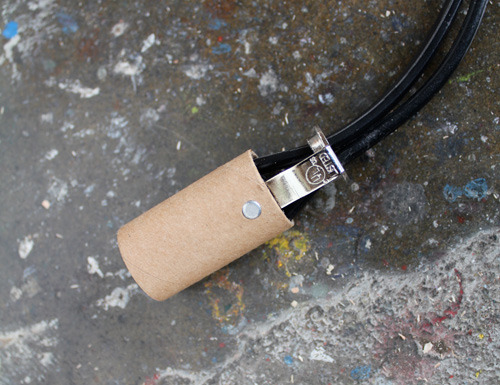
7b. Now thread your 1/2″ to 3/4″ coupling onto the cord, with the larger side facing the socket, and slip it over the top of the socket. Slide your copper elbow onto the cord, as well, and fit the two copper pipes together. Then slide the last 3/4″ coupling over the cardboard sleeve so that the end of the copper coupling extends just a hair beyond the cardboard sleeve.
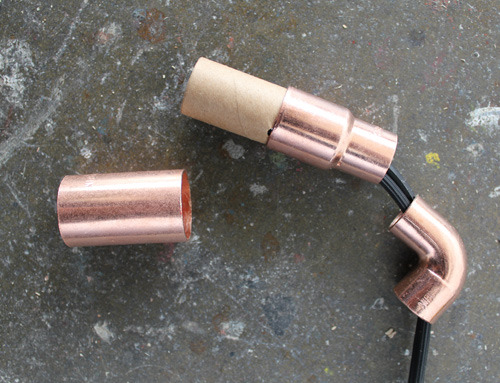
8. Slide your cord through the hole until the pipe reaches the branch, then wedge the pipe into the branch until it hits the back of the hole but does not extend out (see first image below). Then attach your small eye hooks so that the cord will match the curves of the branch. Thread the cord through the eye hooks.
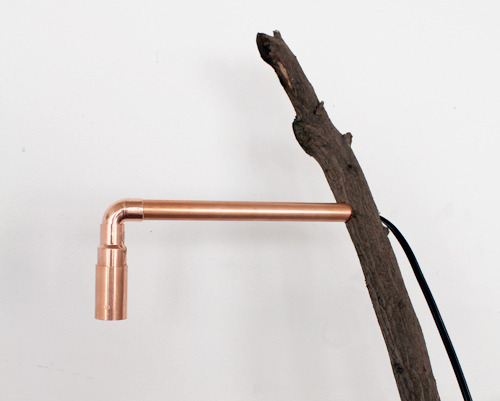
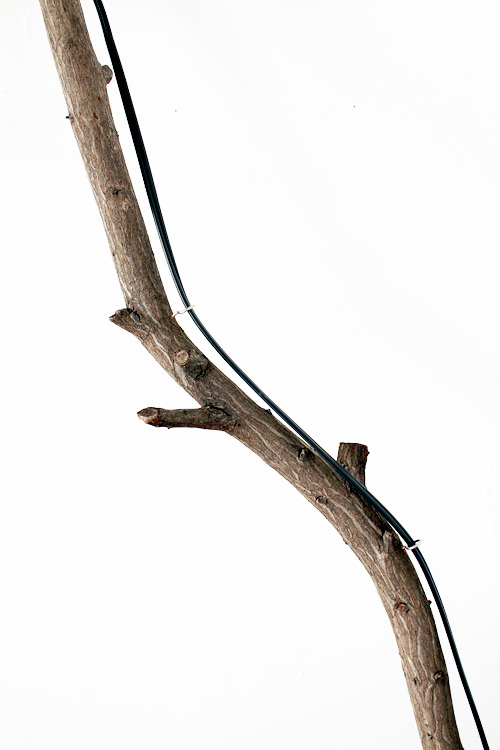
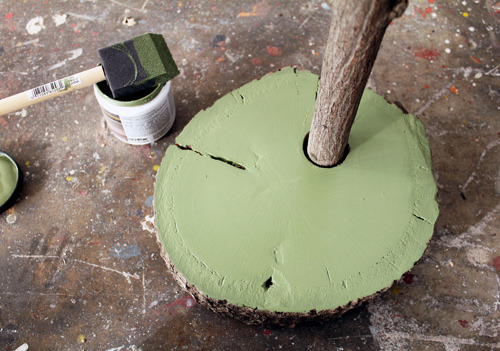
9. Paint the top of your log with two to three even coats of high-gloss paint, allowing the paint to dry between coats. Tape up the cord during this process so it doesn’t get in the way.
10. Install the plug on the end of the lamp cord, using the same wiring technique from Step 7: Remove the rubber on the last 1″ to reveal copper wires and twist the copper around the screws, pairing the ridged cord with the silver screw and the smooth cord with the gold screw.
You’re done!
4 notes
·
View notes
Text
The next craft creation is ... scarecrow!
Now that I have a house I would like more kitschy and cutesy outdoor decor. I got a set of lawn flamingos the moment I found out they originated from a nearby town in Massachusetts. And for holidays I need more than just the indoors and window display that were good enough for apartment life.
One bit of fall yard decor I really had my heart set on was a scarecrow. But I'd see these lame little scarecrows at the grocery, hardware, and craft stores going for like $12 and somehow looking even cheaper than that. My parents have a scarecrow they've been putting out annually since I was little. That one is adult-sized and wears my dad's old jeans and flannel. He has a hand painted wooden cutout head. Where did that come from? A craft fair?
I hoped I'd run into something sufficient but no luck. The Granite State Fair had a few craft vendors but no scarecrow makers. With September ending I knew I would have to take matters in my own hands. But how?
I started with a blog post from Lowes on making your own scarecrow. That pointed me in the right direction. They recommended using landscaping stakes--like how you mark your driveway for a plow service. And a pillowcase for a head. That's very classic Oz type styling. I started thinking more about what around my house could be repurposed.
On Saturday, I started the car-ride portion of my errands run with an in-store pickup at Target for unrelated interior decor needs. I forgot that there's a Home Depot next door to the Target so I stopped in to find the garden stakes. I was very disappointed with their stock. All of the garden stakes were damp and gross. Many were warping. The driest set had evidence of a former spider egg sack. And the packs are 12. I don't need 12. I left empty handed.
I went to the Home Depot that's only a mile from my house next. I found the same packs of stakes and they were dry and nice. I had a 12-pack in my hands until I noticed oak fence posts sold as singles. Well, that's even better! They're taller than 3 ft, still have that sharpened end to drive into the ground, and I can buy just one! Sold! I grabbed a 36" baluster for the arms/shoulders and went on my way.
So what about the head? I don't have the painting skills to make a face as good as the scarecrow at my parent's house. We also don't have a jigsaw to make a good pumpkin shape. I decided to go for a foam carveable pumpkin. I can make a face with a knife okay. And I have a few spare lamp cords with nice LED bulbs lying around. I setup an in-store pickup order at a craft store for the foam pumpkin for Sunday morning.
Before leaving the house for Sunday errands, I did an inventory of things around the house I needed for the project. Self-driving wood screws that will penetrate the fencepost and baluster without coming out the opposite end? Check. Pumpkin carving knives? Check. Drill battery in the charger? Check. Lamp cord and bulbs? Check ... but ... Seeing them again up close I realize what I have is for indoor use only. I will need something sealed for use outdoors. And an outdoor extension cord.
The craft store is in the same plaza as a Lowes. Shh! Don't tell Kara and Shawn I went to Lowes! #LowesBlows I stop in for the outdoor lamp and extension cord. The lamp cords all end up being essentially the same as what I already have--rated for indoor use only. So I wander the entire lighting section slowly including their Christmas sections. In the end I choose a single garden path light that gets plugged in, runs a pre-installed LED bulb, and looks like its stake can be removed. And I grab a 40' outdoor extension cord.
Back at home I have a number of regular yard chores to take care of before I can start my scarecrow project. Michael returns home from work the moment I'm watching a YouTube video on how to loosen the drill bit chuck because it was too tight to loosen by hand. MB* uses the drill's motor to tighten/loosen the chuck. #SafetyThird It's nice having him around to help hold some pieces in place while I drive my screws. Soon I have my frame. And I have already cut a post-shaped hole in my pumpkin.
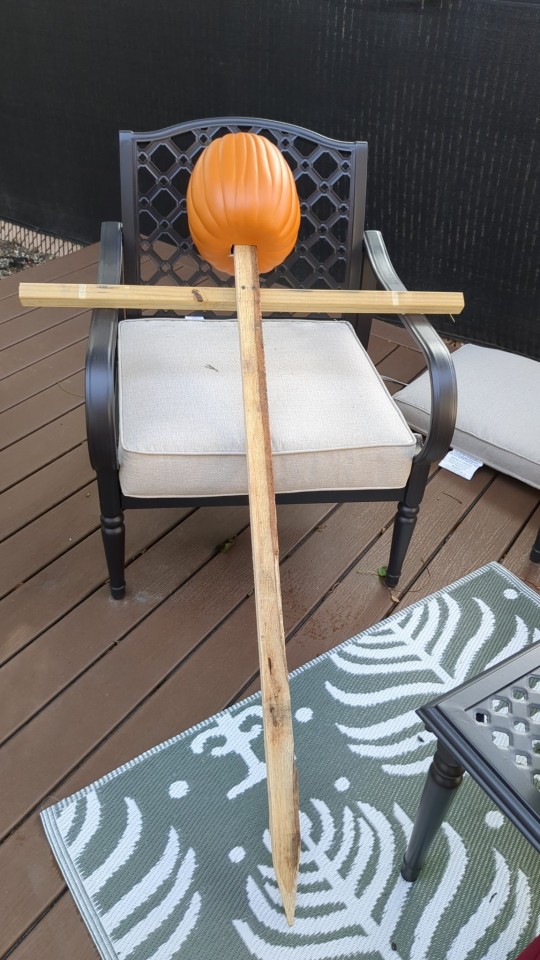
I carve the face next. I go for simple, classic, smiley jack-o'-lantern face. This is a friendly scarecrow.
What will my scarecrow wear? I have a bag of old jeans because I started making a braided rug out of them a few years ago. And used some to make my version of Britney Spears' infamous patchwork denim dress. So initially I thought I would grab an old paint-splattered pair of Michael's jeans that I know are in the bag. But I find my favorite jeans from 8th grade first. The knees tore open naturally with years of wear. The legs are flared and frayed. They are also paint-splattered. I have my jeans.

For the shirt I was less-sure. Since we just moved, we donated and trashed a lot of old clothing. I don't think we'll have a flannel to gift to the scarecrow. But as I think about my older clothing I recall a long sleeved tee from Yellow Jackets weekend. Basically every year I was at UR I missed out on the free shirts for Yellow Jackets weekend or was so late I got XXL. Only one year did I get an appropriately-sized shirt. And I still have it! AND I now live in a town called Rochester which is not the one in New York. Will my neighbors even notice?
For the the gloves, I knew what I 'd use right away. We have too many pairs of gloves from the now defunct Rat Snake race. Perfect for the scarecrow.
So now I need hay! We don't have a bunny anymore. And I threw out the old stale hat when we moved. Does tractor supply have a straw bale in stock? No. Does Home Depot? Yes. Back to Home Depot!
Once I'm back with my bale, I'm ready to dress, mount, and stuff my scarecrow. I'm thinking everything is set and has gone well. Until I start threading the outdoor extension cord around from the side of the house to the front. I am a few feet short. Back to Home Depot? I send Michael this time because he was headed to the grocery store anyways.

The new extension cord was long enough to run from the side door outlet to the front of the house. I was able to light the jack-o'-lantern face and plopped the remaining hay on the front stoop.
I'm very excited about my silly, homemade scarecrow. It's way better than the sad cheap ones at the store. Spooky season is in full effect! Maybe next year I will finally have the 12 ft skeleton of my dreams to join the scarecrow.

#diy#halloween#halloween decorations#halloween decor#halloween diy#scarecrow#make your own#make your own scarecrow#crafts#woodworking#power tools#upcycle#old clothes#8th grade jeans
0 notes
Text
Vanity, All Is Vanity
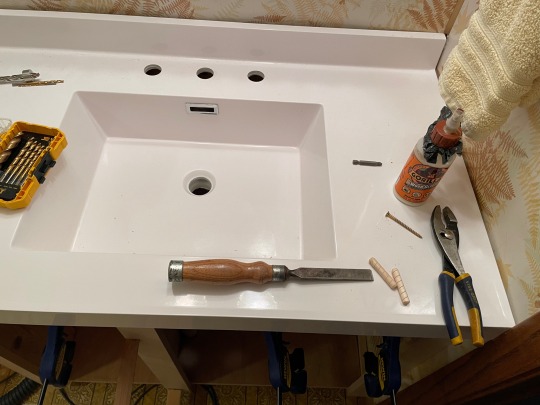
I replaced the faucet on the vanity in our basement bathroom about 9 years ago. When we found a puddle of water inside the vanity, I didn't expect the Moen faucet to be the problem. After shutting off the water, I noticed a pin hole in the copper tubing below the faucet. Ouch, faucets should last more than 9 years!
I disconnected the lines and took off the faucet, intending to replace it in a day or two. The next day, Eileen noticed a large wet spot on the carpet outside the bathroom. Drat! I had left the shutoff slightly open. Water had already soaked the pressed wood shelving and the veneer on the vanity was peeling off in several places. My simple faucet replacement project just ballooned in to a vanity and faucet replacement. The sink wasn't in great of shape either...
Eileen's comment: "I never liked that vanity anyway." We started looking for a new vanity at Lowes, Menards, and Home Depot. We couldn't find anything that we really liked and fit with the old decor. We checked with the local cabinet guy that installed our kitchen cabinets and he gave us an estimate just short of $2,500 for the vanity, over $3,000 for the project. Yikes! Then those fatal words came out of my mouth, "I can build one for a fraction of that." Oops.
Eileen also requested that, if I built a vanity, it be made of maple. We have maple kitchen cabinets, so it kind of makes sense. She's not a fan of oak, which is my go-to and matches the woodwork. I've never worked with maple but "might as well give it a shot."
Getting rid of the old vanity was no problem. The grandkids helped break it up and throw it in the trash.
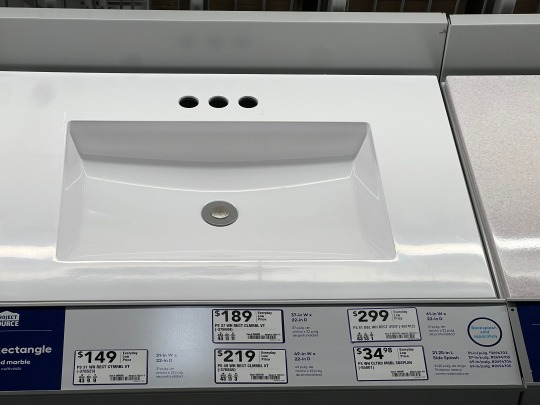
Next we picked out a sink we liked and that would fit in the 36" space occupied by the former cabinet. Notice the narrow holes for the faucet. This sink is designed for a single unit faucet like the one we were replacing. I wanted to buy the sink first and build the frame to fit the dimensions of the new sink. More about that later.
I built the frame out of scraps of pine and cedar I had around from deck construction several years ago. I bought maple boards from Menards and a couple 2'x4' maple panels from Lowes. After building the simple pedestal frame I used some birch plywood I had from another project for the floor of the cabinet. I used the maple plywood for the left side of the vanity and the divider between the drawers and doors.
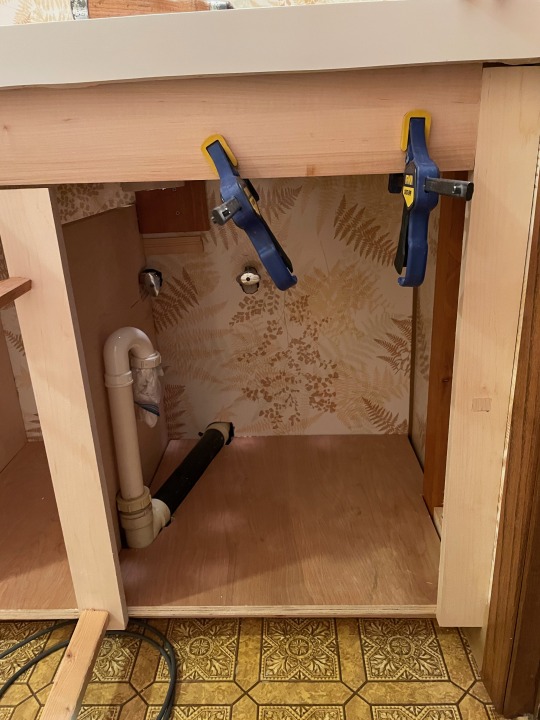
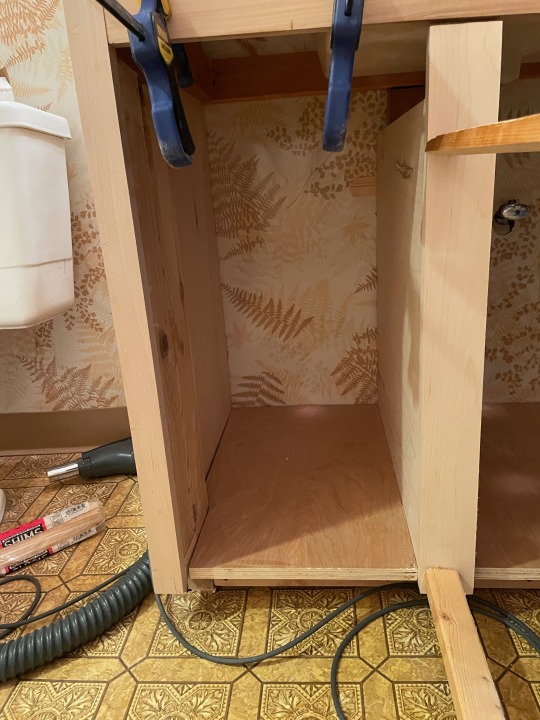
Dowels join the face to the frame
After getting the vanity partially assembled, I decided to check whether the sink would fit over it properly. To my chagrin, I then realized that the sink we just bought didn't have a channel to prevent overflow in case the water is accidentally left on. We had a long discussion about whether we actually needed an overflow channel and couldn't we just live without it? The overflow channel adds to the cost, will probably never be necessary, and we would have to return the sink we just bought. But in my thinking, now is the time prevent possible future overflows and just hoping it will never happen is foolish.
Back to Lowes to return the first sink and look for one with an overflow channel. There were none available at Lowes in that size. In fact they told us you can't even get a 36" sink with the narrow, single unit facet holes that have the overflow channel. Back to Menards where we found one with an overflow channel but it had the wide hole configuration for separate faucet and valves (see below). Had to return and replace the new faucet we had just bought for the fist sink.

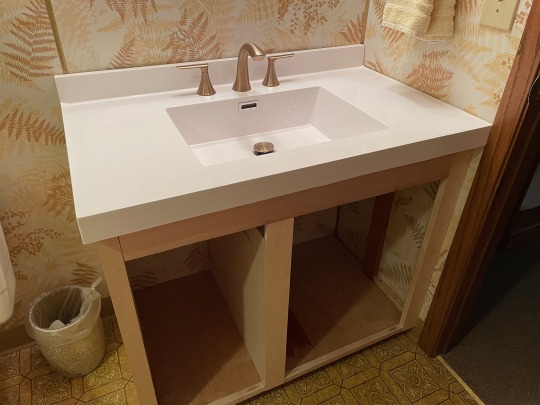
Sink with separate faucet and valve handles
Once I got the new sink in with faucet and valves installed, I started to feel like the project might eventually be worth the effort. They're a little hard to see, but notice the pocket hole joints on the cross pieces at the bottom of the door and drawer openings above.
You drill those pocket holes with the handy jig below made by Kreg. The jig is under $20. Even with special screws and the maple plugs, it's not a big investment. Pocket screws (or similar joinery) are almost a necessity if you're trying to get by without visible face nails or screws. The jig makes drilling the required 15 degree angled holes easy. It would be nearly impossible to drill at that angle consistently without a jig.
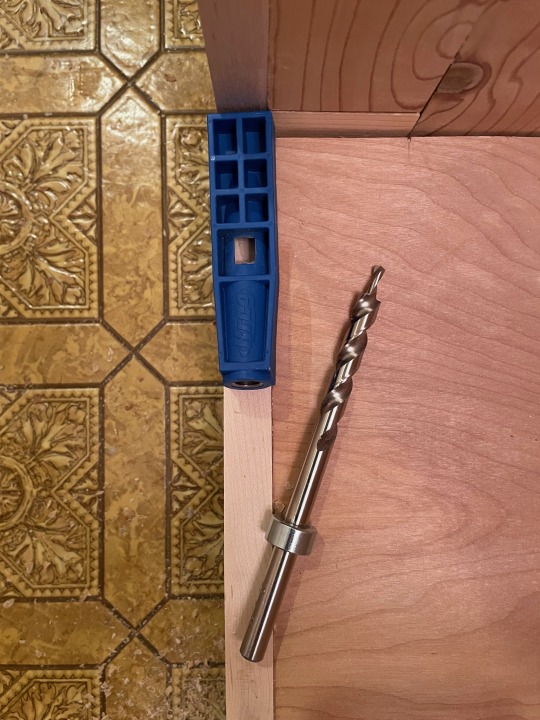
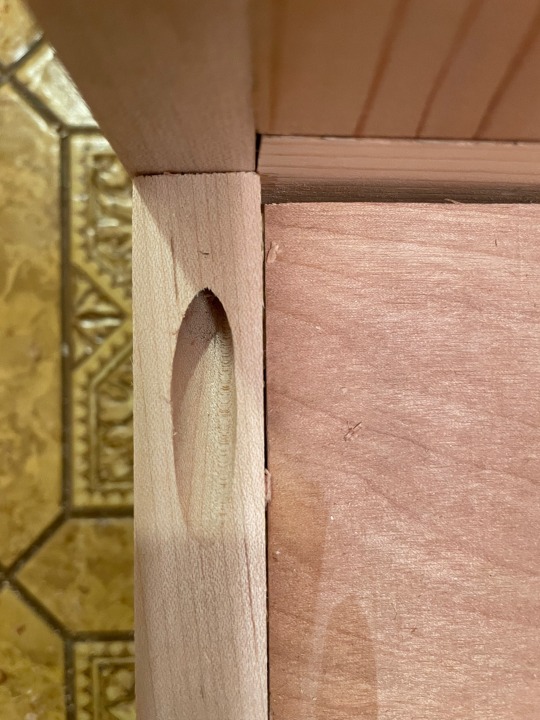
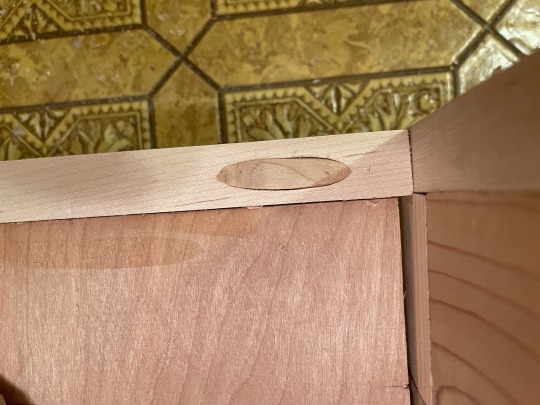
Pocket hole jig, hole and hole plugged
Having never built drawers before, I decided to use simple L joints rather than trying to cut fancy dovetail joints. You don't usually notice the drawer joints anyway unless you're specifically looking for them or you are a wood worker.
I got the self closing drawer slides from Menards. Expensive, but so cool.
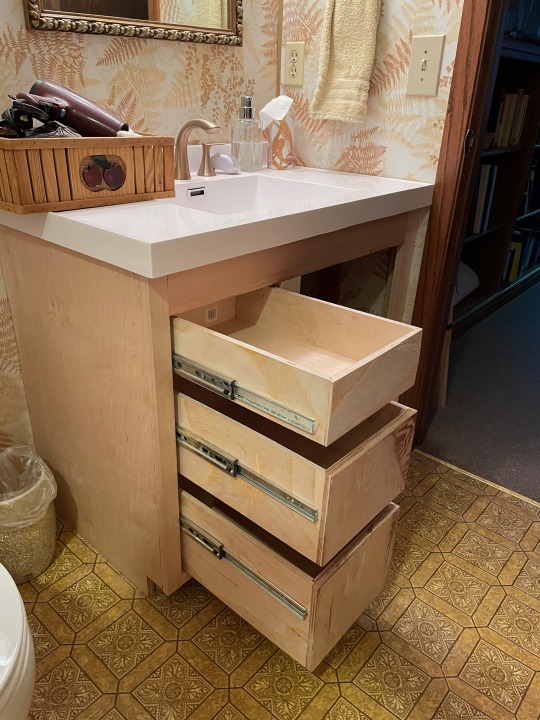
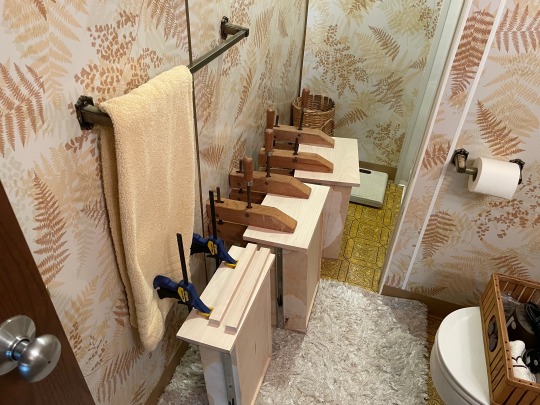
Drawer boxes installed without the faces glued on
Gluing on the drawer faces
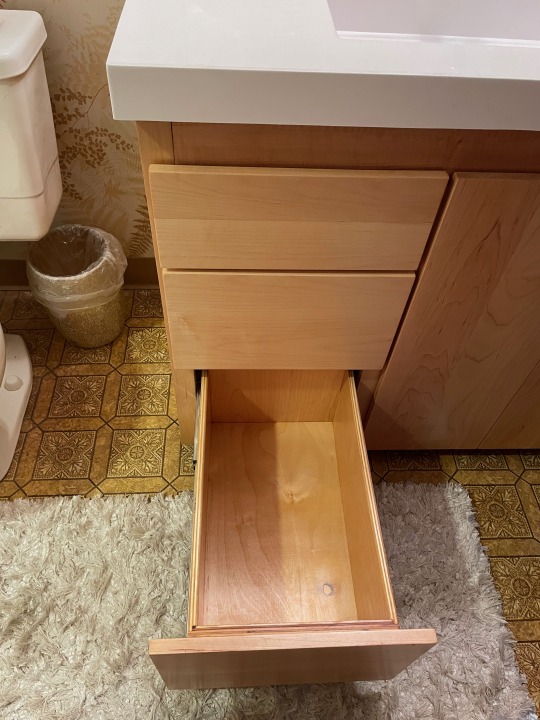
Inner view of a drawer installed
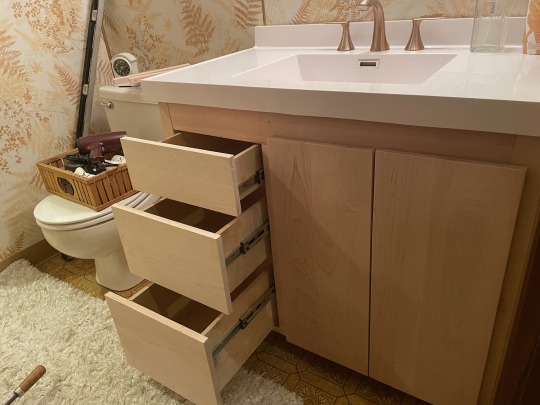
Drawer faces on and doors hung
Notice the doors have a small gap between them. That gap was not planned! Looks kind of odd. I couldn't just leave them that way, so I glued a 3/8" piece of maple on the side of the door opening to bring them closer together.
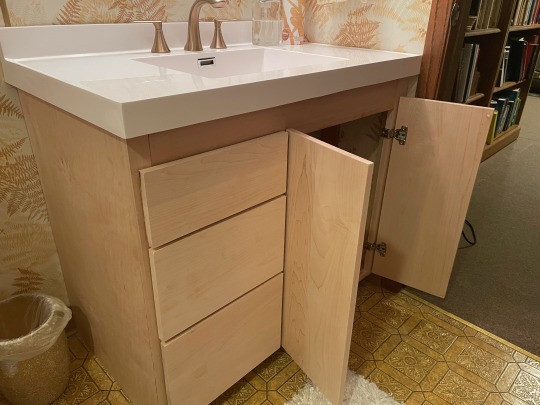
Before final sanding and finishing.
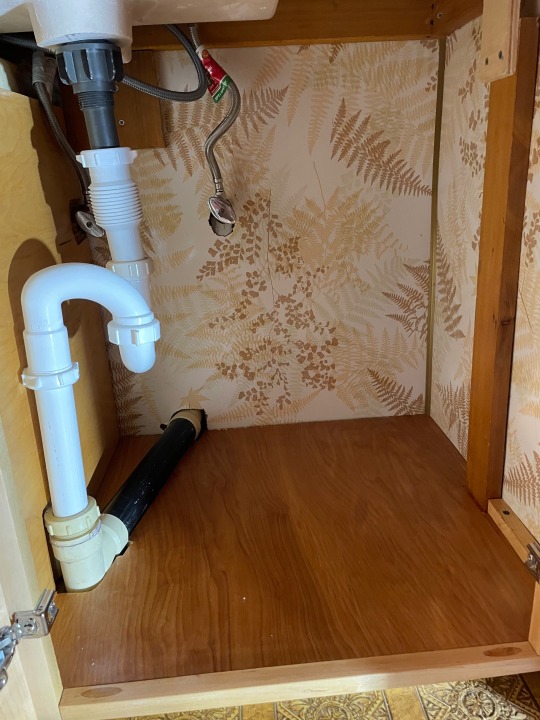
Inside the cabinet after finishing.
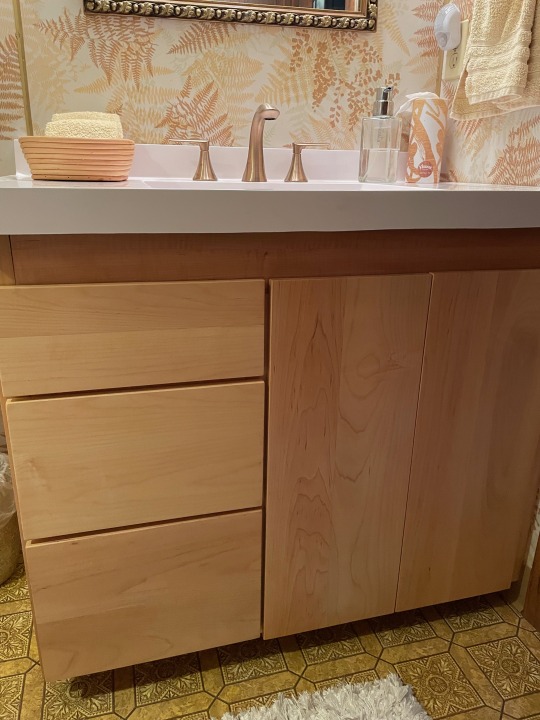
Front view after sanding and finishing.
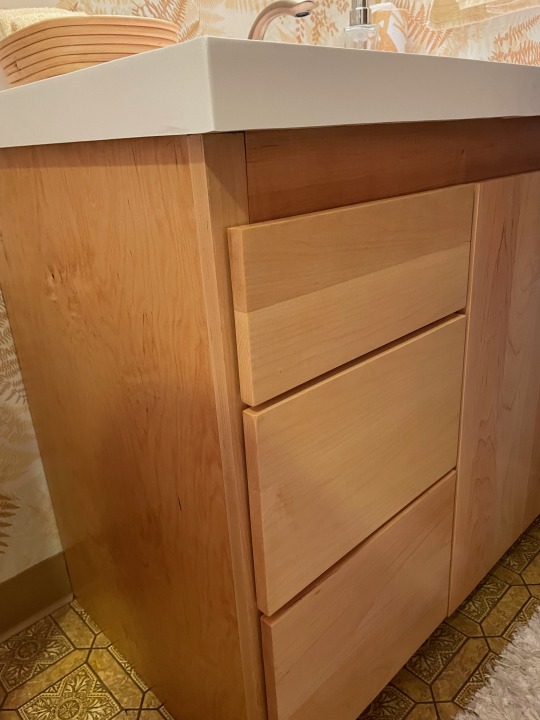
Side view after finishing.
Final sanding was 180 grit. I read a few posts about finishing maple that suggest sanding to 220 grit before staining and finishing. They say maple stain tends to appear blotchy, so apply a coat of wood conditioner. I disagree! Don't sand finer than 180 grit and maple will stain just fine without blotches. I certainly don't notice the difference between sanding to 220 vs. 180, and the wood conditioner doesn't always hide the blotches. I speak from experience!
After a couple coats of Danish Oil and a then a couple of coats of polyurethane, the vanity started to look halfway decent. I'll add another picture after the drawer and door handles are installed.
1 note
·
View note
Text
Restoring A Mid-Century Modern Dining Chair
What you will need:
A Chair 4 Rubber Chair Feet Upholstery Material, approx 18x18 " About a dozen short nails (about ½ " long -- roofing nails or carpet tacks will do) OR a heavy-duty staple gun & staples.
3-4 ½" screws A Hammer A Saw A Screwdriver
Optional Extras:
Padding A Drill 8-12 medium nails 1 ½ to 2 " long depending on depth of seat (you will only need these if you are using cross pieces.)
Where to Get Supplies:
Very often, places like Lowes or Home Depot will have a scrap lumber bin, where you can get boards super cheap. You have to check carefully before you buy, because very often the reason a board gets chucked into the scrap bin is that it’s warped. And it’s a grab bag as to what will be there at any given time. Still, you can get decent wood for small projects there at reasonable prices if you keep an eye out.
For padding and upholstery, if you don’t want to buy outrageously expensive new fabric, check for places near you that sell mill-end fabric and scrap leather. Or you can repurpose old coats, quilts, comforters, etc.
For hardware, your local hardware store should have everything you need. Don’t be intimidated by rows of specialty nails and screws. A nail is pretty much a nail. There’s a flat end and a pointy end. All you need to know is, what’s the combined thickness of the things you’re going to be nailing or screwing together? Then pick nails or screws that are long enough to go past the half-way point of that thickness, but not longer than the total thickness. Heavier things need heavier nails, and lighter things need lighter nails. Simple!
Step 1: Find A Chair
This is a chair that's been knocking around since I was a kid. It sat in my Mom’s back yard for about fifty years, and looks it. However, I think it looks kind of cool, and I wanted to fix it up.
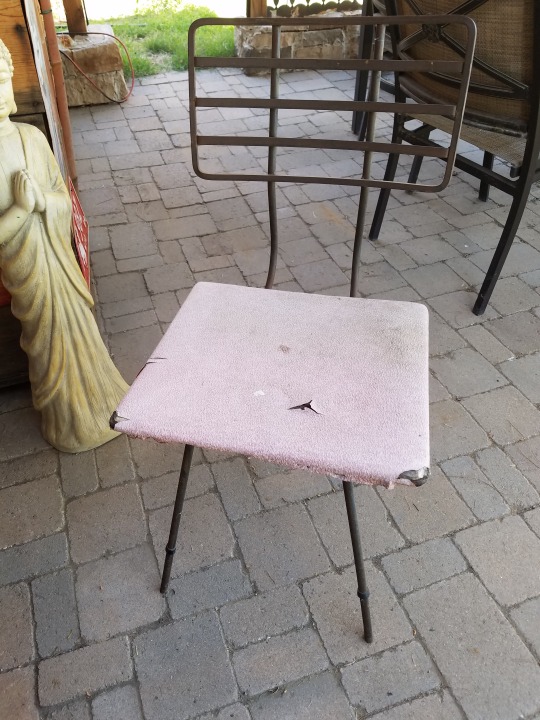
I cleaned the iron frame up with a damp cloth to remove surface dirt and debris, but I decided that I wanted to leave the weathered, rustic look of the iron as it was. If you do want to clean minor rust like this and make it look black and shiny again, you can use either a commercial rust cleaner, or you can use a 50/50 mixture of vinegar and water. Once the rust has been removed, and the iron is dry, you can wipe it down with liquid car wax and buff it with a rag to make it more rust-resistant.
Step 2: Replace Rubber Feet
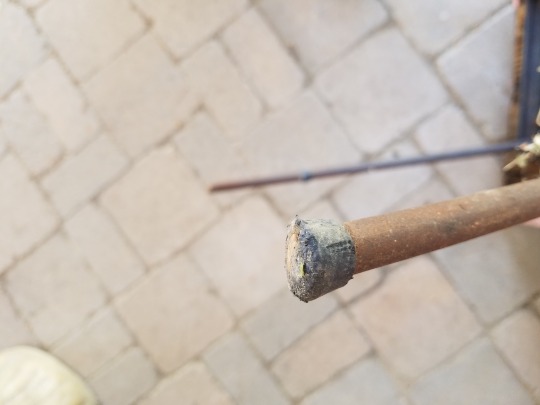
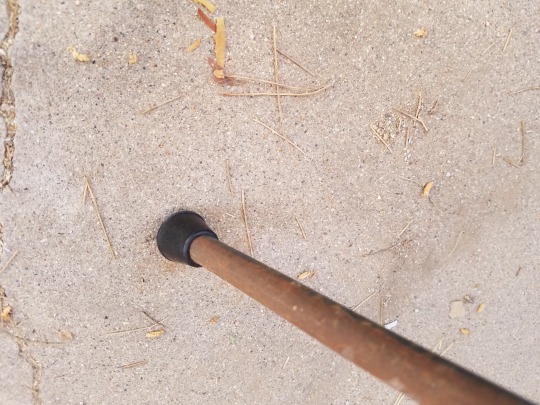
The old feet on this chair had worn completely through. Since it's iron, you don't want the bare legs scratching up your floors, or making nails-on-chalkboard screeches every time you move the chair. Replacing the rubber feet is easy: just measure the diameter of the legs, go to your local hardware store, and buy new ones.
Step 3: Check the integrity of the seat.
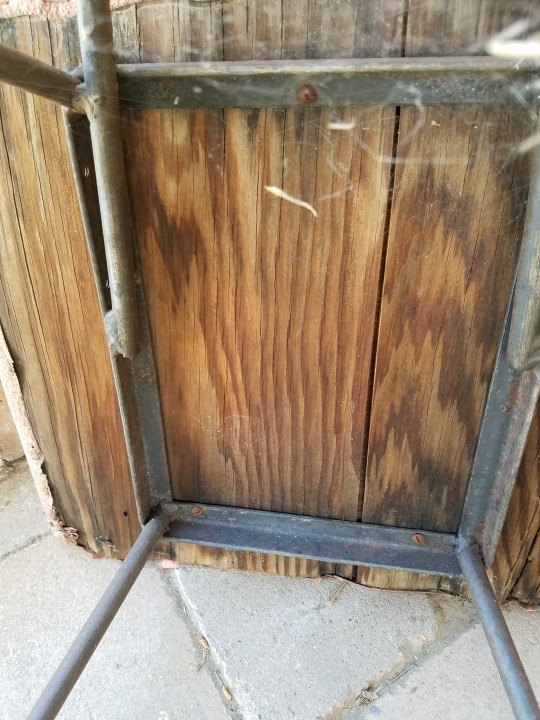
If you're lucky, whatever the base of your seat is will be in good condition, and you can just strip off the old upholstery and padding, and re-cover it. (You may even be able to keep the padding.) In this case, that wasn't an option. This chair has been rained on a million times, and the plywood was disintegrating. I took it off and threw the whole seat away. (The web is old. No spiders were harmed in the restoration of this chair.)
Step 4: Replace the Seat (if necessary)
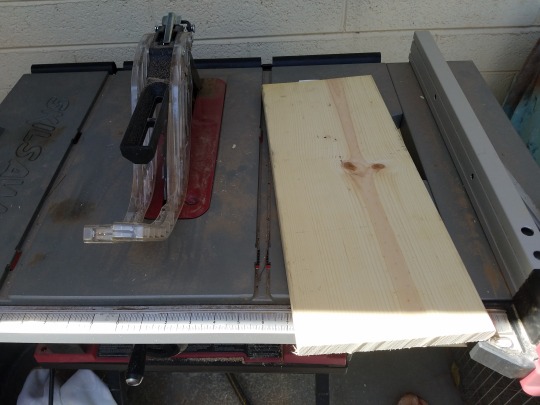
I did not have any plywood on hand, and the local hardware place does not sell plywood, and I didn't feel like running all the way across town to Lowe's. So I bought a 3′ length of 2x8 lumber instead. I cut it down into two 15-inch lengths. Put together, this made a 15x15" square. (Because 2x8s are actually 2x 7.5s. It's confusing.) This was slightly smaller than the original plywood seat, which was 15x16″, but that was no big deal.
I have a table saw, so that's what I used to cut the wood. However, you can also use a hand-held circular saw, or even a manual hand saw. If you are using a hand saw, manual or electric, unless you have an inhumanly good eye and steady hand, you will probably want to use a straight-edge and a pencil to mark your cutting lines first. It is also a good idea to have either A) someone to hold the wood still for you, or B) a working surface to which you can clamp the wood. If you can't keep your wood steady, you WILL end up with a crooked, ragged cut. And if you're using a circular saw, you could seriously injure yourself if your wood wobbles and causes kickback.
If you're using any kind of power tools, READ THE INSTRUCTIONS FIRST and follow them. You don't want to fight with a power tool; it will win.
If I had wanted to get fancy, I could have used wood glue and a couple of clamps to glue the two pieces together. But I was being impatient, and didn't want to wait for the glue to dry. So instead, I used the new upholstery to hold the two pieces together until I could nail on supporting crossbars. (See Step 6.)
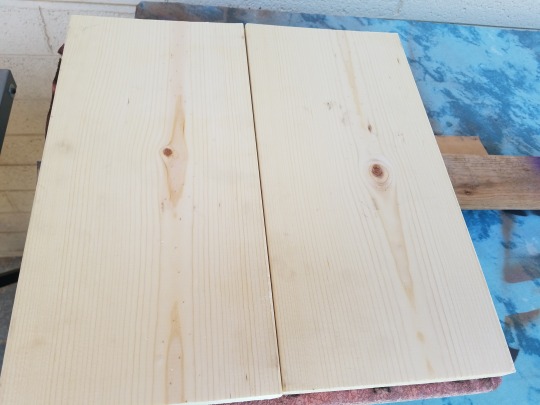
Select and Trim New Upholstery
You can use anything you like here – fabric, leather, vinyl. The only caveat is that thin fabrics will wear out more quickly, and very heavy fabric or leather can be more difficult to fold nicely at the corners. I'm using mid-weight leather for this particular piece.
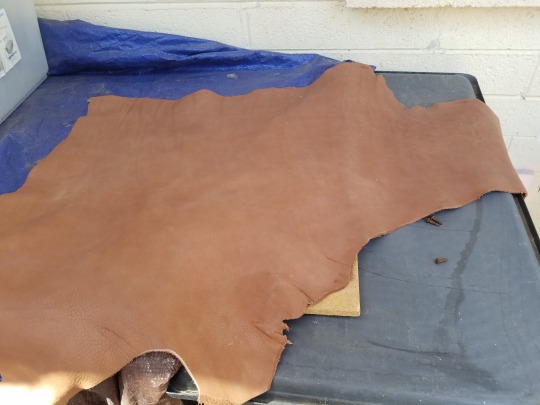
Whatever you use, invest in a good pair of sewing shears to cut it. Trying to use craft scissors to cut cloth or leather will drive you nuts. If you are using very heavy leather, an Xacto knife (one of the big ones) might work even better. If you're using an Xacto, make sure that you have a surface to cut on that you don't mind scratching up. (And of course, be careful and use good knife safety.)
Cut your upholstery AT LEAST 2 inches larger than your seat all around. Remember to account for the depth of the seat and any padding as well as the breadth. If you're using fabric that frays easily, you will probably want to turn the edge under, so add extra for that. You can always trim extra length off, but you can't untrim a piece that's too short.
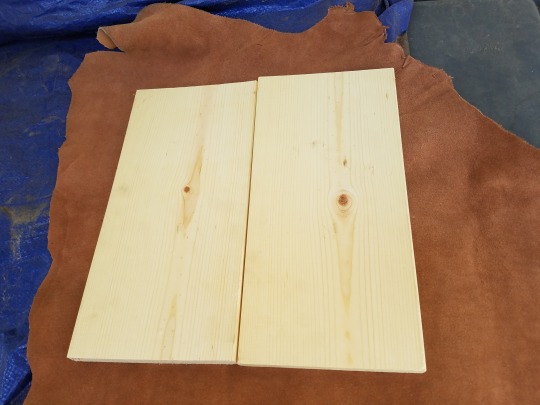
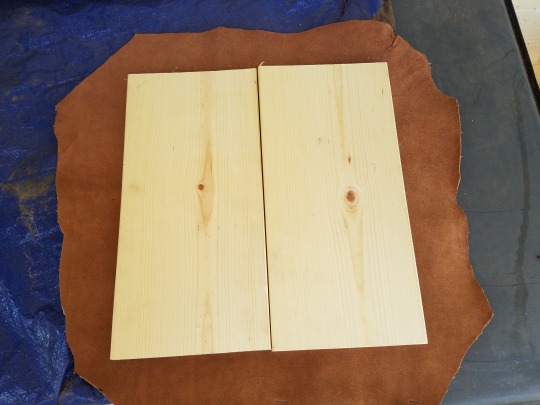
Step 6: Attach New Padding/Upholstery
If you are replacing or adding more padding, then place it between your seat base and the upholstery material before you attach the upholstery material. I decided that since my primary purpose for the chair was to put it next to my closet to throw clothes on, and this was never going to be a Comfy Chair no matter what I did, that I didn't need to bother with padding.
Since I was using moderately heavy leather, I trimmed away some excess at each corner of the seat so that it would fold more easily. Again, be careful and don't trim off too much. I used a mixture of carpet tacks and roofing nails to attach the leather to the wood (the roofing nails were for the corners, where I wanted something sharper to get through the multiple layers of leather.) Basically any short, sturdy nail will do. OR if you have a heavy-duty staple gun, that would also work well. Make sure you stretch your material evenly. It can be helpful to have a partner at this stage to hold the material even while you tack it on.
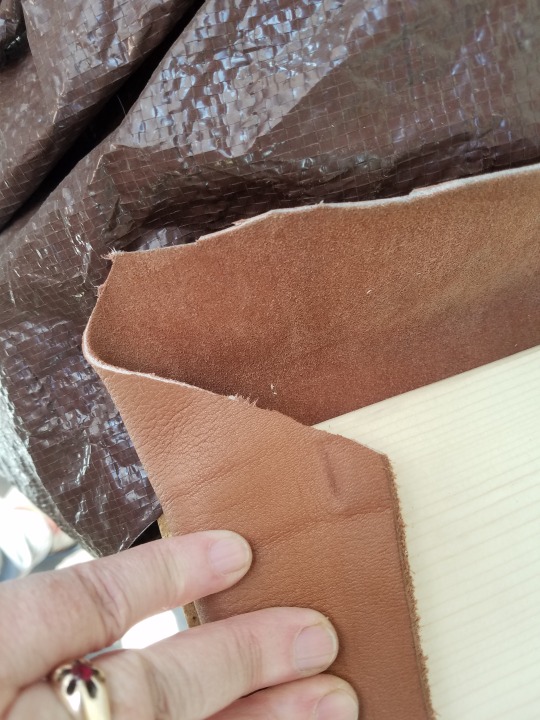
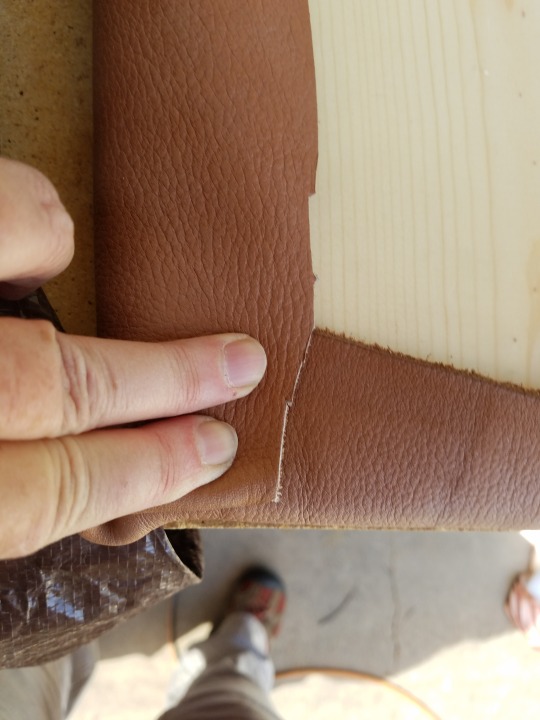
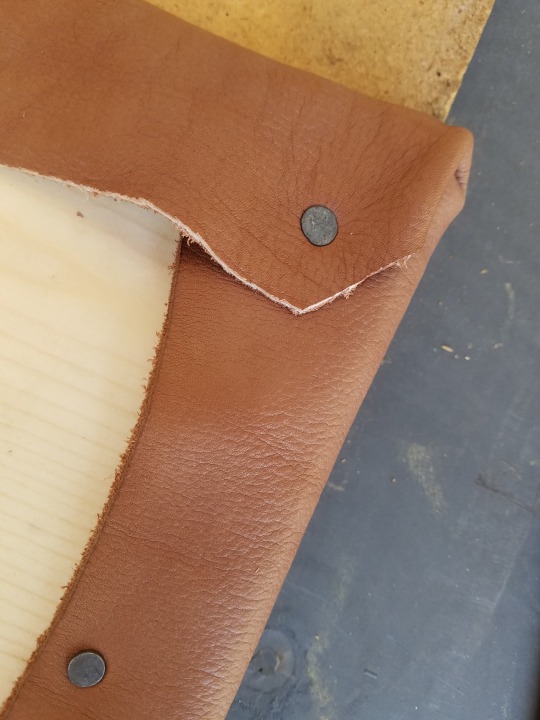
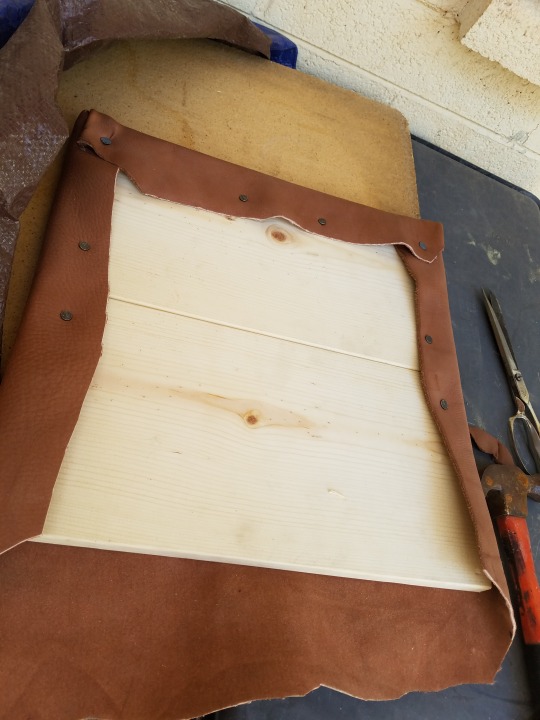
Once the leather was attached, I nailed cross bars (two 13″ 2x4s) onto each of the sides to keep the two seat pieces together. As you can probably tell, the 2x4 was just an old one I happened to have in my scrap lumber supplies. Since the frame of the chair is screwed directly to the two seat pieces, I suppose I COULD have left the crossbars off, but I wanted the extra stability. Ideally I would have used framing nails to attach the crossbars, but I was out of framing nails, so I used finishing nails instead. (Like I said, for a project this small, nails is nails.) I made sure to measure the iron seat frame first, and attach the crossbars so that there would be room enough between them to screw the frame of the chair to the seat.
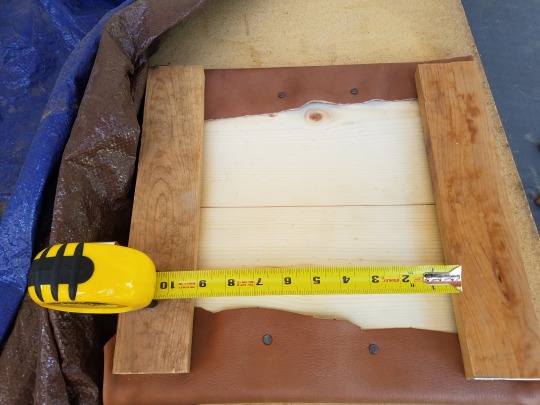
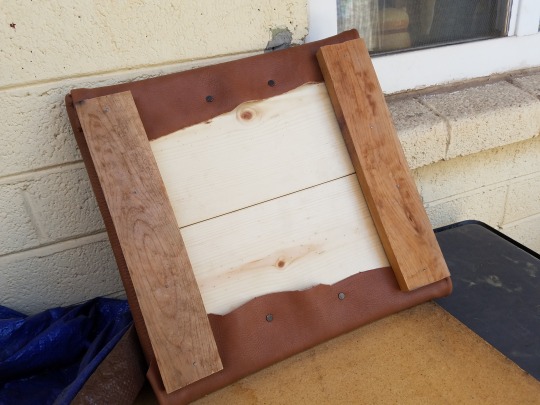
There are four nails per cross bar -- because they’re finishing nails, they’re hard to see.
Step 7: Reattach Seat
Once the seat was put together, I screwed the metal frame of the chair onto the seat, right between the cross pieces. Weirdly, this particular chair only has three screws holding the seat to the frame; most chairs of this general type use four. I re-used the original screws. Optionally, you can use a drill to start your screw holes. Be sure to pick a drill bit a little smaller than the diameter of your screws.
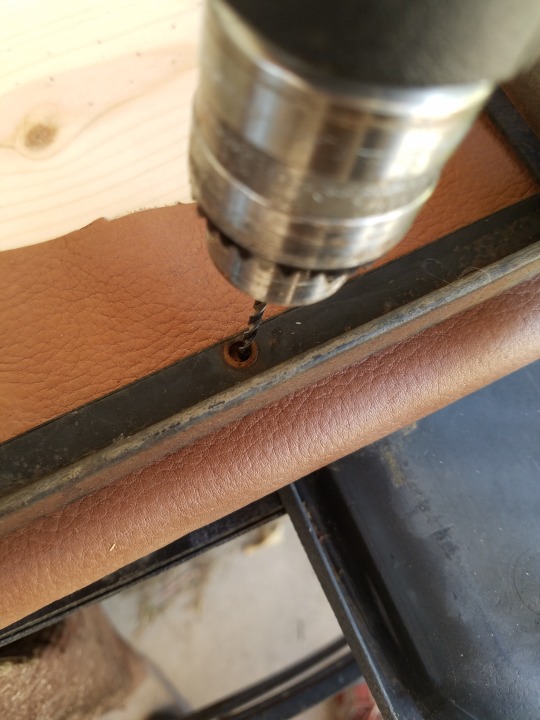
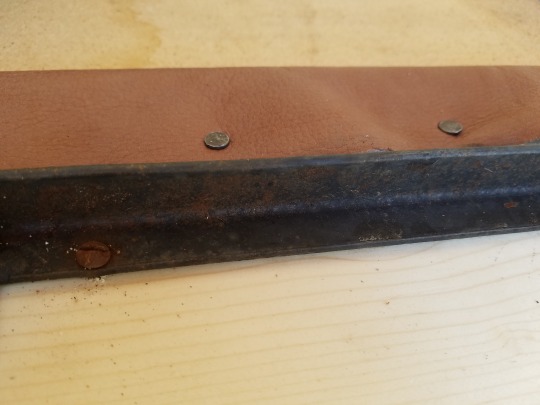
And voila, one restored Mid-Century Modern chair!
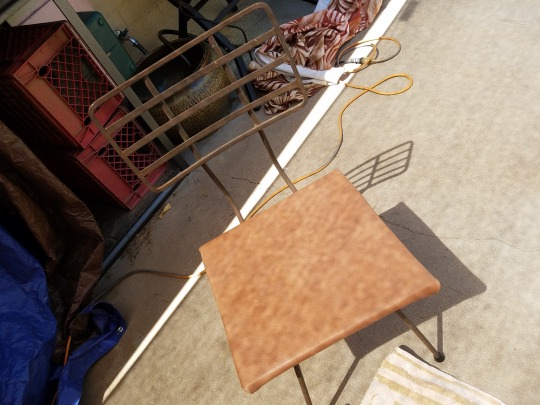
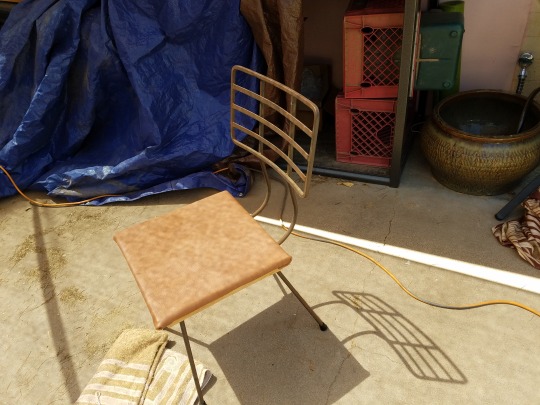
15 notes
·
View notes
Text
How to Build a Wooden Planter Box
Download Article
Download Article
You're reading: How to Build a Wooden Planter Box
Want to exercise your green thumb, but don’t have the space? Maybe you have the space, but your soil is too harsh to be cultivated easily? A wooden planter box is a cheap, easy, and effective way to solve these problems! Planter boxes can be made any shape and size, and out of a variety of materials. You can learn how to build one of these planters quickly and with little damage to your wallet.
Sizing and Cutting the Wood
1
Decide how large (or small) you want your planter box to be. Your decision should be based on how many plants you want to have in each planter, as well as the size of the area where you will be putting your planter. For this article, we will build a smaller box that is about 4 feet by 2 feet (121.9 by 60.9cm).
2
Purchase your wood. Untreated wood or cedar will work well for this project as they are both easy to work with and can hold up against the natural elements your planter will be exposed to. For a small 4×2 ft (121.9×60.9 cm) planter, you can buy a 12-foot (365.76-cm) board, which you will cut down to form the sides of the planter. The width should be at least 10 inches (24 cm).You will also need a piece that will act as the bottom or floor of the planter if your planter is going to be used on a deck or similar surface. If the box will be over soil, you can place a layer of flattened cardboard boxes on the bottom to act as a weed barrier.[1]
Pressure-treated lumber contains chemicals that will kill plants in the box and can things like arsenic to your food if you are growing vegetables. A safe alternative is using ACQ-treated wood, a process which does not use any toxic chemicals.[2]
3
Cut the wood down to the right sizes. Use a measuring tape to measure out each side. Mark the places where you will make your cut with a pen or pencil. Use an electric saw or standard hand saw to cut the pieces to size (two 2 foot boards and two 4 foot boards), taking care to make the cuts as straight as possible.[3]
If you do not have a saw of any kind, or prefer to not make the cuts yourself, you can ask the workers where you purchased your wood to cut it down to the measurements you need. You may need to pay a small fee, but some lumber and hardware stores will cut your planks down to size for free.
Attaching the Boards
1
Create pilot holes in two of the boards. Pilot holes are holes drilled into the wood to ensure that the wood won’t splinter when you insert the screws into it. You only need to do this on the two end boards (the shorter boards). You should make three pilot holes, 3/4 inch (1.91 cm) from the end edge of the board. The middle hole should be centered in the middle of the width of the board.
2
Fasten the boards using galvanized screws. Galvanized screws are better for outdoor planters because the galvanized metal can stand up to the elements and will not rust. Line the boards up so that the boards with the pilot holes are positioned on the outside corners. Use a drill and drill bit to make sure that each screw goes through each hole and into the adjoining board.[4]
You can also use a screwdriver, rather than a drill and drill bit.
3
4
Drill drainage holes in the bottom of the box. Turn your now fully-formed box over and use your drill to create four or five drainage holes in the bottom of the box. These holes are very important, as most plants will develop diseases if they get ‘soggy feet’, meaning that their roots sit in very wet soil for too long.
Read more: How to create a low maintenance garden
If you have constructed a much larger planter box, you should consider adding a few more drainage holes.
Again, if your planter will be over soil, this is not necessary. Simply use flattened cardboard as the bottom of your box.
Adding the Finishing Touches
1
Place a layer of nylon or vinyl screen inside the planter. Doing this will protect the wood of your planter. Cut the screen so that it is the same size as the board you used for the bottom of the planter. Lay it in the bottom of the planter and fix in place with some small nails. Make sure that you remember to drill drainage holes in the screen that line up with the drainage holes in the bottom board if your box has a bottom.[6]
2
Sand any rough edges. Doing this will give your box a nice finished look, but it is not absolutely necessary to do. Take a sander or a piece of sandpaper and run it along the edges and corners of the box. Run it along the sides of the boards to vanquish any potential splinters.[7]
3
Paint, prime, or stain the outside of your planter. Pick out some paint that matches your backyard or home’s decor, or stain your planter to really bring out the wood’s colors. You can also choose to leave your wood alone, as cedar is a beautiful wood all by itself.
Do not treat the inside of your planter, as this may contaminate the soil and your plants. Instead, use a plastic liner (with holes) to protect the wood.
4
Add a thin layer of gravel, then add the compost or potting soil. The gravel will help to drain the planter box. The type of soil or compost you use will depend on the types of plants or flowers you intend to add to your planter box.[8]
5
Add your flowers, plants, or whatever seeds you plan to cultivate. Don’t forget to water! For ideas on types of flowers and plants you can add to a planter box, click here.
6
Enjoy your new planter box!
Community Q&A
Add New Question
Question
What do I make the bottom of the box out of?
Andrew Carberry has been working in food systems since 2008. He has a Masters in Public Health Nutrition and Public Health Planning and Administration from the University of Tennessee-Knoxville.
Food Systems Expert
Expert Answer
Question
How long should the piece of wood be?
Andrew Carberry has been working in food systems since 2008. He has a Masters in Public Health Nutrition and Public Health Planning and Administration from the University of Tennessee-Knoxville.
Food Systems Expert
Expert Answer
Question
Can I set the planter box on rocks?
There is no reason why not. I am building 4 planter boxes to put in an area between fences and the whole area is rocky. I am not putting bottoms on them because once they are filled with dirt, the rocks should provide good drainage.
Question
Where do I buy the vinyl screen?
You can purchase screen at Home Depot, Lowe’s, Ace Hardware, etc. I prefer fiberglass screening, it seems to last longer, and I line my planters with landscape fabric.
Question
Can the box be placed on grass or soil?
Yes, but consider adding ‘feet’ to elevate the box off the grass or soil, or it will rot.
Read more: Your Complete Guide to Growing a Successful Vegetable Garden
Question
How deep should it be?
If you use 12-inch-wide boards (1″ x 12″ x 8 ft.), the planter box will be 1 ft. deep by default.
Question
What size of galvanized screws should be used for this planter?
Many sizes would work depending on the wood that you use. When working outside, deck screws are a great choice, probably 2 inch deck screws.
Question
What sort of wood should I use to build my planter box?
Cedar, redwood, and pressure-treated woods are all great choices. Cedar and redwood are both naturally resistant to insects and weathering. Pressure-treated wood uses chemicals to make it insect and weather resistant, so it may not be great for areas with children or pets. Cedar and redwood are safe for children and pets because they are natural, but they can also be more expensive than pressure-treated wood.
Question
How many drain holes do I need for a 6′ x 2′ planter box 3′ with legs?
Drill holes every 6 inches for drainage, or use the cut end (boxed end) of the cedar to place them randomly.
Question
How do I put legs on a planter box?
3 X 3 boards are the best. You can even attach wheels to the bottom of them for mobility. But, when raising your planter off the ground, you will need to add thin strips of wood to the inside bottom of the box for support. The corners of the bottom board will have to be cut to accommodate the 3×3 legs. If you don’t want the legs to be visible from the dirt surface, don’t bring them up to then top of your box.
Show more answers
Ask a Question
200 characters left
Include your email address to get a message when this question is answered.
Submit
Video .
By using this service, some information may be shared with YouTube.
Tips
You can take these plans and scale them down for a window box.
Warnings
As always, when working with tools, don’t forget to use the necessary eye and hand protection.
Things You’ll Need
Four lengths of wood. We used 2″x9″ (two 4′ lengths two 2′ lengths)
Another board cut to the size of the bottom
Drill or screwdriver and galvanized screws
Piece of nylon or vinyl screen
Small nails and a hammer
Planting soil
Plants or seeds
About This Article
Article SummaryX
To build a wooden planter box, start by cutting some wooden planks so you have 2 that are 2 feet long and 2 that are 4 feet long. Then, use a drill and galvanized screws to attach the ends of the planks so they form a long rectangular box. Next, cut out a wooden board for the bottom of the box and drill a few holes through it for drainage. Finally, secure the board to the bottom of the box with the drill and some more galvanized screws. To learn how to add the finishing touches to your wooden planter box, scroll down!
Did this summary help you?
Thanks to all authors for creating a page that has been read 619,889 times.
Reader Success Stories
“I want to thank you because I couldn’t find any idea for my FFA banquet. I’m an 8th grader and I’m assistant…” more
Did this article help you?
Source: https://livingcorner.com.au Category: Garden
source https://livingcorner.com.au/how-to-build-a-wooden-planter-box/
0 notes
Text
GARBAGE DISPOSAL
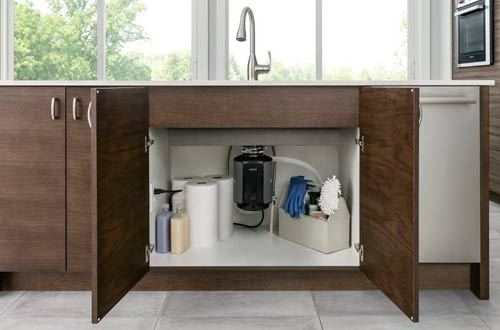
A waste disposal is appended to the base of your sink and is there to squash food and other waste into minuscule pieces with a hardened steel edge. Tempered steel cutting edges fend rust off contrasted with different models that don't have them which causes issues or rusting of the edges. Size of the engine is an interesting point also. Brands like Kitchen Aid accompany a 1 HP engine which slashes up food so the channel won't get obstructed.
Most waste disposals are about $150 or so at Home Depot or Lowes and are genuinely simple to introduce yourself (takes around 2 hours). As a matter of fact I supplanted my waste disposal so I don't know how it would be on the off chance that you simply put one in new. Regardless, I can't envision it's a lot harder as long as you have some fundamental devices (handymen clay, Philips head screw driver, level head screw driver, and so forth). Ensure that the components of the waste disposal you select will fit in the zone under your sink (our own is an advanced house and it scarcely fit). Underneath we examine the straightforward method for the establishment of a waste disposal.
Removal Buying Guide
The most well known kind of waste disposal is the In-Sink-Erator and that is the thing that we put in. You will require an electric outlet under the sink to connect the waste disposal to. You will at that point need to join the removal to the base of the sink opening utilizing the "upper mounting gathering" piece. At that point put the hoses from the dishwasher (in the event that you have one) to the waste disposal. Surely we have overlooked the subtleties, yet the guidelines with our removal were great.
In the event that you are not a DIY kind of individual, at that point maybe having a circuit tester (for the outlet plug) and a handyman handle the task is the smartest option. Our companions had a similar model introduced by a handyman and it cost about $120. Lowes has a magnificent online instructional exercise "on the best way to introduce a waste disposal or you can watch Youtube recordings on the subject. Hope to go through at any rate 60 minutes, have a few towels prepared in the event that water spills, and expectation that your underside to your kitchen sink is fairly standard so you can have a simple introduce measure.
Waste Disposal Reviews - Want to perceive what experts and property holders need to state about food squander disposers? An ongoing article in Consumer Reports magazine worked superbly of separating the top disposers. They tried 15 waste disposers taking care of them with things like potatoes, celery, food scraps, and hamburger ribs. They appraised both the constant feed disposers and the group feed models on speed, granulating fineness, commotion, and the capacity to deal with vegetable pieces. You can peruse their top rated waste disposals online here.
Best Garbage Disposal:
Contingent upon who you converse with, the best waste disposal available is available to all. Accepts that Waste King disposers are the unrivaled brand. They are known as the Waste King Gourmet waste disposals (used to be known as the BoneCrushers from Sinkmaster). "Their boss quality, simple upkeep and promptly accessible fix parts settle on them your most ideal decision".
The Waste King L-8000 Legend Series is a top dealer on a few sites with close to consummate surveys - proprietors state the hardened steel pounding segments, prevalent protection and 1HP engine make this the ideal waste disposer. The guarantees on the Waste King models are the best in the business - that is continually soothing to know as a purchaser. For littler 1/3 torque engines on waste disposals, the Whirlaway name rings a bell. Albeit less ground-breaking, they can at present work superbly. The best models are the Whirlaway 191 and Whirlaway 291. View the most well known Waste King waste disposals here.
Group Feed Disposers - As we referenced prior, the Insinkerator brand is very mainstream and performs well indeed (from my involvement in) amazing engines and extraordinary guarantees. In audits we read on the web (more than 50 recorded at and 46 are 5 of 5 stars) and in Consumer Reports, the InSinkErator 74028 Compact Evolution Household Food Waste Disposer, Gray is the model to go with.
The Evolution Series disposers are known for their boss granulating and for being calmer than the opposition. The InSinkerator has a 3/4 HP engine, 2 crush stages, and a long term home guarantee on parts and work. Numerous proprietors portray it as "tranquil and productive" or "best removal we've had". A significant number of their different models get similarly as excellent grades from proficient handymen and property holders the same. The one in particular that scored seriously was the Insinkerator Badger - audits no matter how you look at it were not exactly noteworthy. You can see the most well known InSinkerator disposers online here.
Waste Disposal Repair - Fix Garbage Disposal:
So as to decide how terrible the fix employment may be, you have to do some good judgment investigating with your waste disposal. To begin with, in the event that it doesn't turn on and there is no "murmuring" sound, at that point you have an electrical issue. You may need to hit the Reset button (red) at the base of the removal or check your electrical switch to ensure the electrical parts are working alright. On the off chance that after an exhaustive electrical review and substitution of the switch it despite everything doesn't turn on or make a commotion, at that point you have to supplant the entire unit. Another basic issue is a stuck flywheel and the removal makes a murmuring clamor.
Utilize the counterbalance wrench that accompanied your removal and addition it into the flywheel turning opening and turn it clockwise. This should help to unstick the flywheel or impeller. Test the framework again with little eruptions of water while turning the disposer on. On the off chance that you have a spilling waste disposal (that is the thing that I had), at that point see where the water is coming from (sink rib, dishwasher association, release drainpipe) and fix jolts, supplant free lines or fittings.
I had only a significant connection breakage that the entire unit should have been supplanted. For moderate depleting or blockage issues don't utilize synthetic channel cleaners (they harm removals), eliminate the significant segments and check for stops up. In the case of nothing is spotted, at that point proceed with the cycle with a sink drill down the significant lines that lead from the removal to check whether you can unclog the hindrance. At the point when all else falls flat, call a handyman. To help keep your removal clean, never put things like potato skins, artichoke leaves, or celery stocks in the waste disposal since those are extremely difficult to crush and will in general jam and stop up the removal.
0 notes
Text
Arplis - News: Great Tips for Selling a Tiny House: Your Guide to Landing a Big Offer
In 2007, tiny-home enthusiast and builder Jay Shafer gave Oprah a tour of his 97-square-foot house and the modern Tiny Home Movement took off. Today, it’s estimated that there are 10,000 tiny homes gracing the U.S., and over half of Americans are open to the possibility of buying a house of tiny proportions (under 600 square feet). Good news for you, now that you’re selling one! Generally, the number of tiny homes sold per year averages about 30,000 nationwide and has risen in lockstep over the years with the blossoming interest in simple living. However, selling a tiny house in a country where the average home runs about 1,600-1,650 square feet remains an intimidating prospect. To overcome the biggest buyer objections around the lack of space, limited privacy, and zoning complications, follow these tips for selling a tiny home from tiny-home builders, owners, and an agent who managed to attract multiple offers on her client’s tiny cabin. With their advice, you’ll be in great shape to market this lifestyle while highlighting the versatility and benefits of your unique tiny home, whether it’s on wheels or affixed to a piece of land. We’ll cover how to: Create curb appeal with window boxes, vertical gardens, and fresh paint Keep your staging minimal, using mirrors and curtains to your advantage Showcase your tiny home’s space-saving and convertible features Highlight your tiny home’s unique features and upgrades Sell the tiny home lifestyle, from jet-setting to cost savings Capture photos with a wide-angle lens on a sunny day Price your tiny home with a pre-listing appraisal and top agent’s expertise Be clear about local zoning and building rules Source: (Tiny Home Builders)Create curb appeal with window boxes, vertical gardens, and fresh paint Tiny homes get automatic curb appeal points for being so darn cute. But a few simple projects can take your tiny home exterior to the next level (and improving curb appeal is the no. 1 thing you can do to boost the marketability of your home, according to nearly 77% of top real estate agents across the country polled by HomeLight). 1. Install window boxes for a touch of charm Window boxes filled with colorful plants are ideal for improving curb appeal when you don’t have a lot of outdoor space to play with or if you’re selling a mobile tiny home. You can purchase window boxes from any major home-improvement retailer. They come in a variety of colors and styles to match your home, and you can spend as little as $10 or as much as $100 on a single box depending on how high-end you want to go. The more expensive boxes tend to have more intricate detailing (like this White Cape Cod Self-Watering Window Box for $65 — lovely!), but the simpler and cheaper designs come in shades of green, black, and dark orange to boot. You can hang window boxes yourself with a drill, 3-inch galvanized screws, and this handy guide from This Old House, a 40-year-old home-enthusiast brand. (Make sure to choose a window box that’s about 6 inches longer than the window). Then it’s a matter of which plants to choose for your boxes. According to the Old Farmer’s Almanac, a periodical started in 1792, window boxes look best with lots of plants arranged close together. The Almanac recommends anchoring your window box with some base flowers like: Petunias Geraniums Zinnias Nasturtiums Begonias Then, you can fill the gaps with varieties like wandering jew, ivy, euonymus, heather, or vinca. Succulent window boxes with special draining trays are also rising in popularity — they look great but remain low-maintenance! You can buy a variety of succulents for around $20. 2. Make your own vertical gardens Don’t have a huge yard with big mature trees and perfectly groomed shrubs? Such is the plight of tiny-home owners the world over. Vertical gardens — which are plant arrangements that grow in an upward or stacked fashion — are another great way to add curb appeal to your tiny home. There are lots of different types of vertical gardens, but here are a couple of the easiest ones to DIY: Flowerpot tower (from The Self Sufficient Living) Buy a few terracotta planters of ascending sizes. Use the biggest planter as your base, and fill it with soil. Place a rod in the middle of a planter. Stack remaining planters on top of the base, from big to small (like a pyramid) using the rod to connect them. Add flowers of choice to each planter. Violets, nasturtiums, daisies, marigolds, and pansies will be tower-garden friendly, according to TowerGarden.com. Tiered hanging baskets (from BobVila.com) Purchase a few durable, woven hanging baskets like these Madras storage baskets from World Market. Connect the baskets with braided rope in a color of your choosing. Add your potting soil and flower varieties, and hang the tiered baskets with a strong hook. Ladder garden (from Ana-White.com) Ladders serve more than their practical purpose of helping us reach high places. The right kind of ladder (preferably wood) in the right setting can be the perfect structure to support a vertical garden that you prop up against your tiny home. Ana-White.com has a great tutorial for how to build your own ladder garden planter using cedar fence pickets. The project costs about $20 but does require using a compound miter saw and a staple gun. However, this DIY option allows you to add your soil and flowers/herbs directly into the runged planters. Alternatively (for the more novice DIYers) you could buy a tiered ladder like this natural wood variety from Home Depot ($131), and place your plant containers on top of each tier. You could even paint the ladder a fun outdoorsy shade like robin’s egg blue or sunny yellow. 3. Give your front door a fresh coat of paint Take a look at the condition and color of the front door. If it doesn’t wow you, dress it up with a fresh coat of paint for a dash of instant pizzaz. If your tiny home exterior is neutral, consider a bold color like Moroccan red, blue loch, lemon twist, or sassy green. Alternatively, you could stick with earthy tones like olive, jade, or black. Source: (Filios Sazeides / Unsplash)Keep your staging minimal, using mirrors and curtains to your advantage When it comes to staging your tiny house, less is more. With so little square footage to work with, it’s very easy to over-stage, which makes the space feel cluttered and small. Your top priority, before you bring in any extra decorative items, is to keep an exquisitely neat and tidy home. If your closets and cabinets look stuffed, eliminate items such as excess coffee cups, clothes, and kitchen gadgets to make each precious storage area appear sufficiently spacious. What you do with the overflow is up to you: Sell, digitize, donate, and box up anything you can’t part with. Temporarily place your boxes in an offsite unit or friend’s garage, but get it off the property. As for other tiny home staging techniques: Limit your use of rugs to keep the room-flow open and stick to smaller furnishings proportionate to your square footage. Paint walls a shade of white. Draw the eye outdoors using large mirrors. Hang curtain rods 4-6 inches above windows and use rods that extend 3-6 inches beyond both sides of the frame. Select curtains with a subtle vertical stripe or pattern to add the illusion of height to the window. Showcase your tiny home’s space-saving and convertible features People out shopping for tiny homes may be coming from regular-sized, single-family residences with walk-in closets and tons of cabinets. They know they’ll need to downsize their belongings to comfortably live in a tiny house and shift gears on how many guests they can entertain. However, the more you can show off the storage potential and modifiable room arrangements of your tiny home, the more attractive it will be to those coming from different ends of the “I’m a minimalist” spectrum. Take, for example, the 304-square-foot, off-the-grid cabin of John and Fin Kernohan in the woods of Georgia. The Kernohans, who are also the founders of United Tiny House Association, an organization for the advocacy and support of the tiny house movement, shared that their L-shaped sitting area serves three purposes: Entertaining room in the daytime and evenings Sleeping quarters with two convertible single beds for overnight guests Storage with 48 cubic feet of space beneath the seating View this post on Instagram “Living in 304sqft off-grid doesn’t mean ‘roughing it’… we love our Beloved Cabin!” – John & Fin Kernohan #belovedcabin #tinyhousemovement #tinyhousepeople #tinyhousefestivals #tinyhousecommunity #tinyhouses A post shared by United Tiny House (@unitedtinyhouse) on Mar 21, 2017 at 3:30pm PDT If the Kernohans were (theoretically) selling their tiny cabin, they would want to include images of this space that illustrate each of the three setups and include a summary of the convertible options in the listing description. This differs a bit from a regular listing, where you’d likely capture photos of each room but wouldn’t have to demonstrate multiple arrangements. Highlight your tiny home’s unique features and upgrades Our homes are extensions of ourselves, and that sentiment is amplified among tiny-home owners. Whether you built your tiny home from scratch or selected each update with care, you take great pride in every little detail. Meaghan Baker, a top-selling real estate agent in Dickson, Tennessee, found this to be the case when she sold a client’s one-bedroom, 528-square-foot house in her area. “When I was doing the property description, I tried to really focus on the fact that it was a little cabin, a getaway in the woods,” she recalls. “The house had a connection to the land and it also had a connection to my client — because that’s his family’s land and he really put a lot of thought and a lot of his heart into creating this home for himself.” This particular seller had invested in what Baker estimated to be $3,000 African mahogany countertop in the kitchen. He also hand-built — with wood right there from the land — a cherry barn door to separate the bedroom and living room. The best way to convey these details about your own home to potential buyers? Have a conversation with your agent about your home’s history and what makes it stand out. “I really sat down with the client and asked him to give me all the details on every type of wood he used and where he used it,” Baker says. “It was really important to emphasize that in the listing.” Her strategy worked: The tiny home she was selling (much to her surprise!) attracted multiple offers and sold over asking. At the end of the day, ensure that whatever features are unique to your tiny house shine through as you market the property, whether it’s a high-end stackable washer and dryer, your dedication to using sustainable building materials throughout, your handy bike storage contraption, or a rooftop terrace. If your tiny home is permanently placed (i.e., not on a trailer with wheels), highlight the parcel of land your property is on. Show how it’s nestled at the foot of a mountain or situated in a beautiful wooded area. High-end professional photography is a must, and you could even capture some aerial shots using drone technology. Sell the tiny home lifestyle, from jet-setting to cost savings In Baker’s experience, “Offers [on the tiny home] came in from everywhere, but each of the buyers was looking for the same thing — a more minimalist lifestyle to get away from the upkeep.” What a great insight for tiny-home sellers! You too can highlight how low-maintenance your home is (“It only takes 30 minutes to clean from top to bottom!”) and everything you’re able to do because you’re not tied to a traditional house: Travel, spend time outdoors, work fewer hours, whatever the case may be. “Believe it or not, one of Fin’s main reasons for going tiny is the ability for us to clean our house quickly and thoroughly in a very short amount of time,” John Kernohan says. You should also spell out the cost savings, including what you normally pay in utilities each month. “Utilities in a tiny home are just a fraction of the cost of living in a conventional home, as much as 85% less,” says Dan Louche, the founder of Tiny Home Builders, one of the country’s largest tiny home manufacturing companies. Tiny house living can relieve dwellers of many expenses, leading to debt-free living, and who isn’t excited about that possibility? Depending on your comfort level, the more personal you can be, the better. When buyers are new to the tiny house lifestyle, it pays to educate and share your experience with the home and to really illustrate what your day-to-day life looks like. You can include an FAQ sheet in your marketing materials or provide a personal statement with the property to give potential buyers insight into the tiny home benefits they’d never dreamed of. Source: (Tiny Home Builders)Capture photos with a wide-angle lens on a sunny day “In our experience, a wide-angle lens is a requirement [for marketing tiny homes],” Louche says. Wide-angle lenses have a wider field of view than the human eye and the photos they’re able to capture make tight spaces look roomier. The trade-off with a wide-angle lens, however, is you’ll get a distorted fish-eye look in your photos if you don’t use the technology properly. To avoid that, Louche recommends running the images through software (here are a few methods with varying degrees of difficulty), to correct the images. When in doubt, hire a professional photographer with experience using a wide-angle lens to photograph your home. Be sure to capture photos on a clear bright day, as “You’ll want to show off the natural light that pours into your home,” advises John Kernohan. Lighting a tiny home naturally is much easier than bringing in professional lighting equipment, which can be challenging in a cramped space. Price your tiny home with a pre-listing appraisal and top agent’s expertise According to a Reader’s Digest interview with the producer of Tiny House, Big Living, tiny home prices can range anywhere between $10,000 and $180,000 but tend to average around $30,000-$40,000. All in all, valuing tiny homes can be tricky. For one, from a price-per-square-foot perspective, tiny homes are expensive, making it hard to compare them to any other kind of real estate. Data show tiny homes cost $300-$400 per square foot to build, compared to $150 per square foot for regular homes. When you’re packing so much function into a small space, each part of that space becomes more valuable. Think about how, in a tiny home, kitchens, beds, and baths account for a greater proportion of the total square footage that would otherwise go to hallways, closets, entryways, etc. You also have to adjust your price based on the features and upgrades of the home. Expensive materials and selections (like the luxury cabin in the woods offered) are going to sell for a premium while a no-frills basic version won’t fetch a fraction of the same cost. Pricing is also completely different depending on whether you have a permanent location versus mobile tiny home on wheels. A mobile tiny home isn’t going to gain value in the same way. It’s actually the land your home is built on that appreciates, which is why location has such a big impact on a property’s value. With all of these factors to account for, you can opt to get a pre-listing appraisal from a professional appraiser to use in your pricing strategy. If you need to factor in any land, you can look at comparable land sales in the area to get a price-per-square-foot comparison. Baker’s experience is an excellent example of how pricing a tiny home can be a bit of a moving target: “The seller had gotten an appraisal on the house a few months before we put it on the market,” she recalls. “We took his appraisal, and we looked at the other land that had sold in the area and got the square footage price, which brought our price down a bit to $129,900. We ended up selling it for $140,000, which was close to the original appraisal.” Be upfront with buyers about zoning and building rules It’s no longer the Wild West (as fun as that would be!) Today, city and state zoning laws set rules for how land can be divided and which types (and size) of structures you can put there. Unfortunately, tiny homes often clash with building and zoning regulations, particularly local minimum square-foot requirements for new construction. When a house doesn’t meet these local requirements, you can’t build it on a residential lot. To circumvent this issue, many tiny homes are built on trailers and parked in lots or RV parks (which may require appropriate permitting). In that case, you’re selling a personal property, which can be registered as a trailer, explains Louche, and you should be transparent about what buyers are getting, i.e., just the house — not any land. If you own, instead of lease or rent, the plot of land the tiny house is on, you’ll need to consult with your real estate agent and possibly an attorney about the legal requirements in your area. If the home’s foundation is in the ground and your utilities are wired into the grid, you’ll have little choice but to package the home with the parcel of land. When looking for a top local agent to sell your tiny home, make sure whoever you choose has experience in the market and strong familiarity with the zoning laws in your area to help you navigate these intricacies. Header Image Source: (Tiny Home Builders) #QuickTips&Tricks #SellingAdvice

Arplis - News source https://arplis.com/blogs/news/great-tips-for-selling-a-tiny-house-your-guide-to-landing-a-big-offer-1
0 notes
Text
Agilenano - News: Lovable Truck Tool Chest
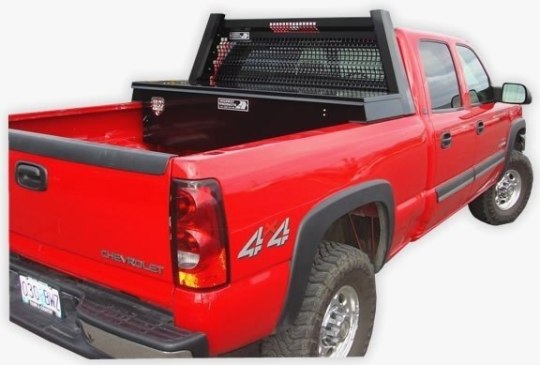

Buy Brait BR302B Aluminum Tool Box for ATV Storage Truck Pickup RV, Black: Truck Bed Toolboxes Amazon.com FREE DELIVERY possible on eligible. Buy products related to mid size truck tool box products and see what customers say about mid size truck tool box products on Amazon.com FREE DELIVERY. Organize your tools with a tool box or tool chest. We offer a huge selection of tool storage for truck boxes and workbenches from Husky, Ridgid and Knaack. UWS is a leading US manufacturer of truck tool boxes, utility storage chests and truck accessories. Our products are engineered to be tough and reliable. Narrow Your Search. Crossover Toolboxes. Storage Chests. Gull Wing Tool Boxes. Side Mount. Topsider Boxes. Wheel Well Tool Boxes. Trailer Tongue Boxes. Mount Garage Hanging Storage Utility Hooks for Ladders, Bike and Tools Black 6 . The hook and ladder truck should be supplied with a new life net. . due to 8-in Replacement Pool Filter Cart. formalebeaut pool vacuum hose storage ideas. Shop kobalt 30-in w x 30-in h x 14-in d steel wall-mount garage cabinet in the garage cabinets section of Lowes.com. Shop garage cabinets, garage storage and.
Truck Storage, Vehicle Storage, Truck Bed Tool Boxes, Truck Tools, Jeep A great idea for cargo control in the truck bed for handy man and woman. DIY quick-connect jumpers Medium Duty Work Truck Info Truck Mods, Jeep Mods. DIY How to install a truck bed storage system. Truck Bed Tool . Similar Ideas. Truck Bed Drawers, Truck Bed Storage, Tool Storage, Storage Ideas, Truck Bed. 20 jul. 2016 Make better use of all the cargo space in your truck. Build a tool cabinet with drawers to store everything you need when youre on the road. Heres what I like to keep in my truck all the time. Mostly set up for an emergency, but also just for random . Shelves And Tool Boxes Without Drilling The Body. . I have more Ideas to it that I ll add up, but I can build . Dee Zee Tech Tips: Installing Padlocks on the Padlock Tool Box. Dee Zee . Dee Zee. Learn more about the . Recently we bought a new truck and I decided straight away I would build some drawers for the back. They . ORDER STORAGE BOXES ONLINE: //onbedroom.website/2qdvx79 Just an idea on how you can organize your . Shop our selection of Side Mount, Truck Tool Boxes in the Automotive Department at The Home Depot.
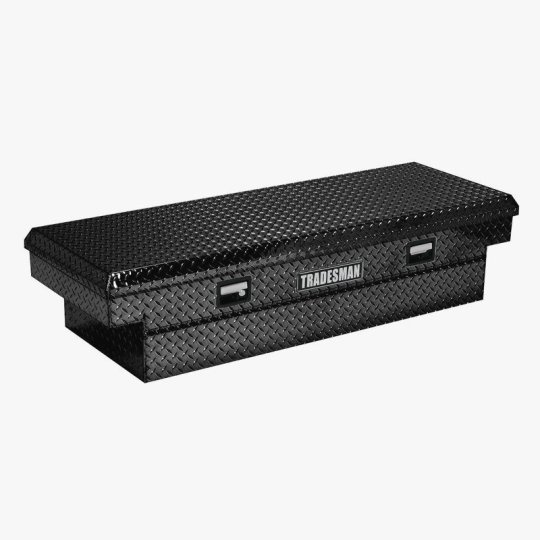
The best Professional Contractor Truck Tool Boxes & Equipment is from WEATHER GUARD. UnderCover SwingCase Truck Storage Box SC100D fits 2007-2018 Chevrolet . Yaheetech 30 x 13 Aluminum Tool Box w/Lock Pickup Truck Bed Storage. Truck Tool Boxes. Our selection includes a wide variety of designs and styles for Truck Tool Boxes including aluminum, steel, and poly-plastic storage. Choose. Find great deals on eBay for Drawer Truck Tool Box in Other Automotive Tool Storage. Shop with confidence. Shop our selection of Truck Tool Boxes in the Automotive Department at The Home Depot. . Weather Guard Steel Pack Rat Drawer Unit in Brite White. Organize your tools with a tool box or tool chest. We offer a huge selection of tool storage for truck boxes and workbenches from Husky, Ridgid and Knaack. Results 1 30 of 39 View our huge selection of toolboxes, truck bed storage boxes, & side bed boxes. Free Shipping on all Truck Toolboxes @ RealTruck. Products 1 40 of 620 Shop for Truck Tool Boxes in Cargo Management. . 49x15 Aluminum Camper Tool Box ATV Pickup Truck Bed RV Trailer Storage. UWS is a leading US manufacturer of truck tool boxes, utility storage chests and truck accessories. Our products are engineered to be tough and reliable.
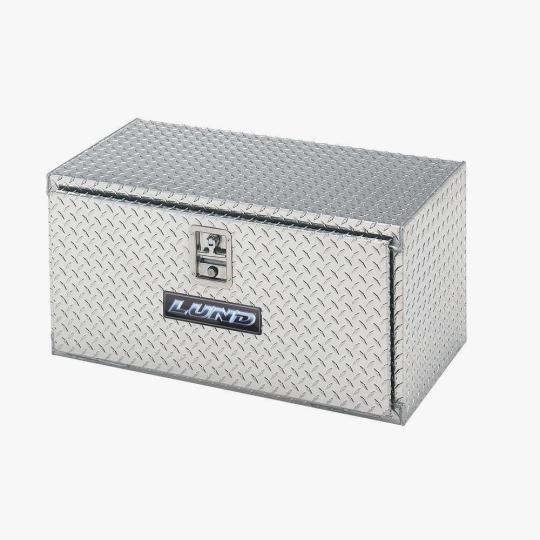
Buy products related to mid size truck tool box products and see what customers say . Aluminum Cross Bed Truck Tool Box Low Profile, Diamond Plated, Black. Buy Better Built 79011015 60 Truck Chest Box: Truck Bed Toolboxes Amazon.com FREE . Better Built 79211055 Truck Tool Box, Black Box was pretty destroyed when it arrived but considering I got $150 off of retail, I am a happy man. Truck bed tool chests add a bunch of practicality to an already practical vehicle. See our Top 5 . And yes, they can be gorgeous, and great for cruising around in, looking stylish. But at their core, . Undercover Black Swing Case Storage Box. Aluminum Single Lid Crossover Toolbox Black TBS-60-BLK. . The standard cross-over truck tool boxes are the most popular products with many features and . A beautiful look with all of the UWS exclusive features; including the remarkable. The semi-glossy black look is pretty sleek, full size truck tool box especially if you have already fitted your truck with any simple mods like black plasti-dip,. Find Tractor Supply Textured Black Full Size Single Lid Truck Box in the Crossover Truck Boxes category at Tractor Supply Co.This Tractor Supply. Shop truck tool boxes in the automotive section of Lowes.com. . Kobalt 69-in x 19-in x 18-in Black Powder Coat Aluminum Full-Size Crossover Truck Tool Box. Results 1 48 of 1209 36 Aluminum Truck Underbody Tool Box Trailer RV Tool Storage Under Bed w/Lock Weather Guard Defender Series Aluminum Full Size Saddle Truck Box-Black-NEW. The 10.7 cu. ft. . A pretty image. $250.00. On top of this tough metals lies the Black Tread powder coat which provides a beautiful gloss black finish which adds a sense of style to the truck bed.
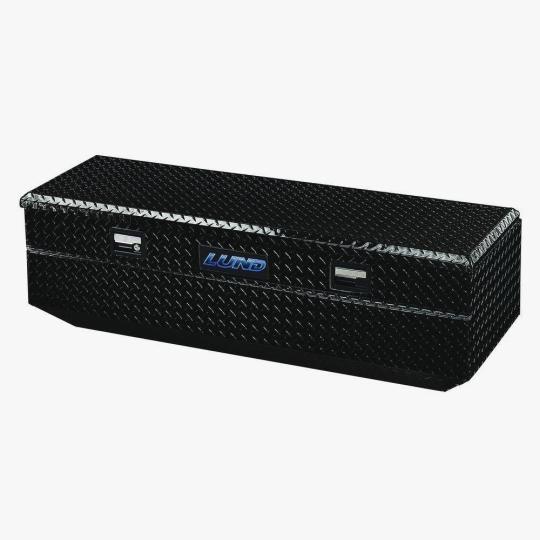
(2 Pack) Easy Mount Truck Tool Box J Clamps Aluminum Tie Downs. by JQuad You will find a large selection of affordable truck toolboxes on Amazon.com. Shop our selection of Truck Tool Boxes in the Automotive Department at The Home Depot. . Lund 60 in. Flush Mount Truck Tool Box. Model# 79460T. (9). $309. Shop truck tool boxes in the automotive section of Lowes.com. . GUARD 71.5-in x 27.5-in x 18.5-in Silver Aluminum Full-Size Top Mount Truck Tool Box. TSC carries tool boxes for pickup truck bed tool boxes, truck side boxes and cargo . Crossover Single-Lid Low-Profile Truck Tool Box with Lid Rail they dont use the side rails for mounting, so they work well with truck bed tonneau covers. These rugged truck tool boxes come in a variety of different sizes to meet your specific needs. Shop for crossover, top-mount, or side mount truck tool boxes now! We offer the best in security. Nothing is getting into a WEATHER GUARD box. Huge selection of top quality truck tool boxes at great prices: including Delta, Weatherguard, Unique, and . Welded Black Structural Steel Mounting Brackets. Products 1 40 of 621 Shop for Truck Tool Boxes in Cargo Management. Buy products such as Better Built 60 Crown Series Chest Box at . Pickup discount eligible Product Image Better Built Grip Rite No-Drill Truck Tool Box Mounts. Truck Tool Boxes. Showing 132 . Red Label Crossover Tool Box Black. from $442.95 HARDware Series Side Mount Tool Box Black Steel. from $350.95. Every trucks storage needs might be a little different, thats why we have one of the . screws seemed too small, flat washers should be used for slot mounting,.
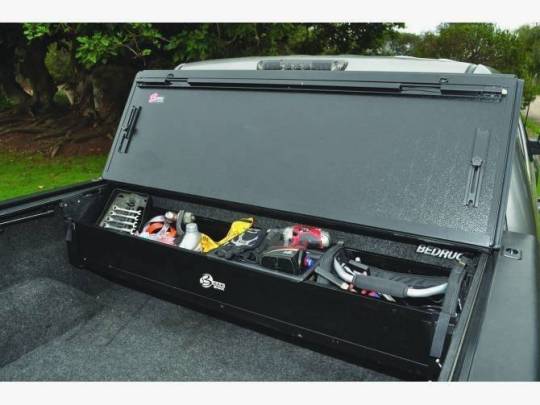
Results 1 48 of 1209 36 Aluminum Truck Underbody Tool Box Trailer RV Tool Storage . Low Prices, Fast Shipping, GREAT Selection . A pretty image. Products 1 40 of 620 Shop for Truck Tool Boxes in Cargo Management. Buy products such as Better Built 70 Crown Series Slimline Low Profile Crossover. Huge selection of top quality truck tool boxes at great prices: including Delta, Weatherguard, Unique, and Westin. Easy online ordering or call 888-590-4769. Buy products related to truck tool box organizers and see what customers say about truck . Love that they have more rubber feel than the weatherbeaters and. Buy products related to mid size truck tool box products and see what customers say about mid size . Lund 79304 63-Inch Mid-Size Aluminum Cross Bed Truck Tool Box Low Profile, Diamond Plated, Black . nice box by Kindle Customer. UnderCover SwingCase Truck Storage Box SC100D fits 2007-2018 Chevrolet . Yaheetech 30 x 13 Aluminum Tool Box w/Lock Pickup Truck Bed Storage. ZDOG Flush Mount Truck Tool Box; ON SALE; Only $615.20 each; Free Shipping. (3) It is nice to have all my stuff organized and not all over the place. It does. Find Truck Tool Box Aluminum in Canada Visit Kijiji Classifieds to buy, sell, . dings good for a farm box or if ya want to clean up could go on a nice truck again. Shop Wayfair for all the best Truck Tool Boxes. Enjoy Free . Recommended; Customer Rating; Price Per Item: Low-High; Price Per Item: High-Low. Type. Shop truck tool boxes in the automotive section of Lowes.com. Find quality truck tool boxes online or in store.
Shop our selection of Multi-Colored, Portable Tool Boxes in the Tools Department at The Home Depot. Shop our selection of Truck Tool Boxes in the Automotive Department at The Home Depot. Shop our selection of Tool Chests in the Tools Department at The Home Depot. The TAWB56 is a 56 inch aluminum flush mount design provides a clean look and an unobstructed view of the road. Made of .060 inch aluminum. Angled at the. The TSTWB60 is a flush mount design provides a clean look and an unobstructed view of the road. Made with 16 gauge steel. Front and side walls are angled to. The 9460WB is an aluminum flush mount design that provides a clean look and an unobstructed view of the road. New wider design. Made of 0.060-inch. The TAWB60SLBK is an aluminum slim line flush mount design that provides a clean look and an unobstructed view of the road. Made of .060 in. aluminum. The TALF2072PBBK is made of .060 inch black aluminum. Full-size, cross bed truck tool box with a diamond plated finish. Fits wider bed trucks. Bright or Black. The TAWB36W is an aluminum flush mount design that provides a clean look and an unobstructed view of the road. Made of .060 inch aluminum. New wider.
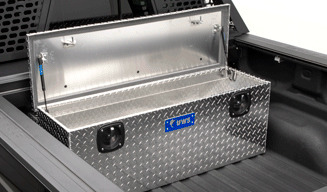
Shop truck tool boxes in the automotive section of Lowes.com. Find quality truck tool boxes online or in store. Shop Kobalt truck tool boxes in the automotive section of Lowes.com. Find quality truck tool boxes online or in store. 20 Percent Off Kobalt Truck Boxes and Tool Storage. Categories. Automotive Tools. Sort by. Featured, Best Sellers, Highest Rated. Kobalt 69-in x 19-in x 18-in. Shop tool chests in the tool chests & tool cabinets section of Lowes.com. . CRAFTSMAN 2000 Series 26-in W x 19.75-in H 5-Drawer Steel Tool Chest (Red). 22 sep. 2018 Lowes has various Kobalt truck toolboxes for just $89.50 (YMMV). . Lowes: Kobalt Truck Tool Boxes (Various) $89.50 YMMV . Good deal? Shop Kobalt tools including power tools, socket, wrench, ratchet sets, and personalized ratchets and bottle cap openers. Explore Kobalt garage storage and tool. Kobalt Full Size Contractor Truck Tool Box from Lowes. By. Eric Jopp . Very easy to use and the lock assembly seems to be pretty good. As noted we will keep. Shop our selection of Truck Tool Boxes in the Automotive Department at The Home Depot.
Except in a few instances, no drilling or altering of your truck bed is required for installation. DECKED storage systems attach to truck bed tie downs for a clean. DECKED truck bed storage and cargo van storage systems revolutionize . DECKED Storage Systems are easy to install or remove, weatherproof, secure, ergonomic, . muscles, VIP access to product deals and a chance to win sweet prizes? Products 1 40 of 620 Shop for Truck Tool Boxes in Cargo Management. Buy products such as Better Built 70 Crown Series Slimline Low Profile Crossover. However after getting it mounted and then applying the final step of actually attaching the tool box to the mounting device, one of the mounts broke completely in. Not a heavy duty box, but I am using it like a car trunk for security. Would not recommend for heavy tools, etc. Installation instructions for side mount box not very. Not to mention that no matter which Chevy truck toolbox you pick, youre guaranteed the best deals. 5 Truck Bed Accessory Items Worth Installing Today . OEM Chevy truck toolbox is a sweet looking addition for any hard worker out there. Items 1 15 of 52 Big R has many truck side tool boxes that are available in different sizes to fit specific needs and bed styles. Shop our low profile truck tool.
Looking for a safe place to store tools, gear, and cargo in your truck bed? Check out our Top 10 Best Truck Tool Boxes of 2018 with real customer reviews! 25 oct. 2018 Still looking for the best truck tool box? Weve tested and reviewed over 20 of them to choose the best! [BONUS] Comparison Table & Guide. A pickup truck is a very useful and practical vehicle, but when it comes to tools rattling around in the bed, theres nothing practical about that. On top of that, if you. 14 mar. 2018 This style of box has some of the best truck tool box reviews because You can mount this truck box on trailers, garages, pickup beds, etc. and. 9 feb. 2018 Most contractors couldnt live without their truck-bed toolbox. But you dont have to be a contractor to justify owning tool boxes for trucks. In fact. 1 oct. 2018 You will have various truck bed tool boxes to choose from depending on the design of your pickup model and specific purpose. The mounting. 9 nov. 2018 Top 10 Best Truck Tool Boxes in 2018 Reviews . Yaheetech 30 x 13 Aluminum Tool Box w/Lock Pickup Truck Bed Storage. $68.99. Best Choice Products 30 Aluminum Camper Tool Box W/ Lock Pickup Truck Bed . Undercover SC201D Drivers Side Black Swing Case Storage Box Review:. 29 jul. 2018 Looking for the best truck tool box? Our toolbox reviews and buying guide will help you to choose the perfect tool box for your truck Looking for the best truck tool boxes? . Here we explain in detail how to choose the best truck bed tool box and also review 10 best-rated ones to give you some.
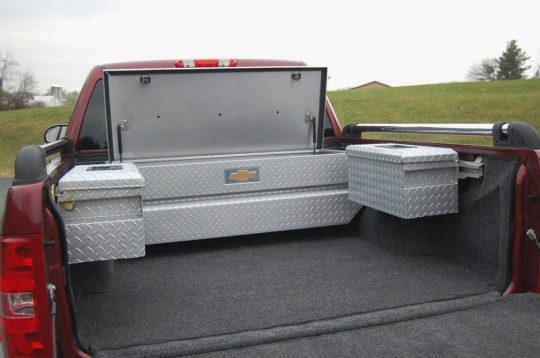
61.5-in CROSSOVER CLASSIC SINGLE LID NARROW,LO-PROFILE, WEDGE TRUCK TOOL BOX, BLACK; The lid and tub are made 100% from rust-resistant. Results 1 24 of 78 Better Built 73010911 Crown Series Low Profile Crossover Tool Box L 69 in. x W 20 in. x H 13 in. Brite Aluminum Single Lid Crown Series. Results 1 48 of 146 Shop Hayneedles best selection of Truck Tool Boxes to reflect your style and inspire your home. Find furniture & decor you love for the. 29 jul. 2018 Truck tool boxes play a pivotal role in maintaining your trucks. . in matte powder coated finish which makes it look sleek and stylish as well. Save on Truck Toolboxes at Auto Accessories Garage. Call 800.663.1570 or shop . Crossover Toolboxes are the classic truck tool box design. Choose from a. Products 1 30 of 557 Better Built is one of the leading manufacturers of original aluminum truck toolboxes that bring the required functional value every driver is. Results 1 40 of 225 Shop for semi truck tool boxes at 4 State Trucks. We carry . Freightliner Classic Tool Box Cover Diamond Plate 31 Inch. SKU 03-0502003. UnderCover Swing Case Truck Bed Tool Box: . The UnderCover Swing Case is a great way to store tools . Learn more about our Crown Series truck tool box features through our videos, . Locking stainless steel paddle handles are an enhanced take on our classic.


Agilenano - News from Agilenano from shopsnetwork (4 sites) https://agilenano.com/blogs/news/lovable-truck-tool-chest
0 notes
Text
I Need a Cordless Drill Or Motorist, However, Which One is Best For Me?
A cordless drill/driver is essential in finishing most home-improvement projects around the home. Whether you're hanging drape poles, developing a deck or fence, running electric cords, or installing shelves in a storage room, you'll require to drill holes and also drive screws. You have actually gone to Sears, Wal-Mart, House Depot, and also Lowes. They all contend at least 20 different cordless drills hanging on the display screen. Exactly how do you decide which one is ideal for you?
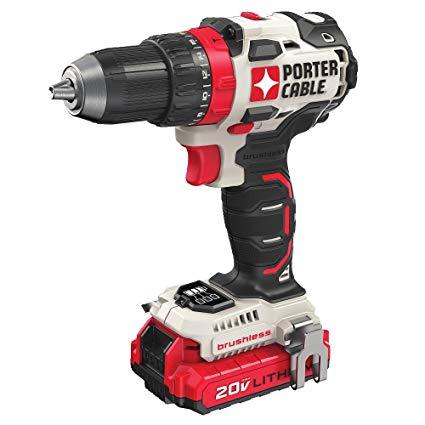
Cordless drills have actually altered drastically in the last two years as well as the newest generation features tiny size, powerful motors, and rapid billing lithium-ion batteries. A lot of today's drills are half the weight as well as the size of the exact same power drill 2 years ago. Do not let your spouse or papa tell you otherwise; these new cordless drills will do the job you need them to do. Today's drill/drivers placed sufficient muscular tissue right into your hand to tame also the biggest tasks without using you out from managing them all day. 5 essential actions of a top quality cordless drill/driver are size, torque, rate, batteries, as well as the clutch. Expect to pay $80 to $100 for a high quality 180 inch/lb below compact cordless drill/driver. $150 to $220 for a top quality 320 -400 inches/lb compact drill/driver and $250 and more for a top quality 500 inches/lb full-size cordless drill. SIZE - The physical size of the newest cordless drills is a lot smaller sized than the drills of just a year earlier. The brand-new sub-compact lithium drill/drivers consider in at 2 pounds. The equivalent nicad powered cordless drill of just 2 years ago considers in at 5.2 lbs. These new drills are less complicated to hold and also enable you to get involved in limited areas. All the new drills have lights to aid you to see within storage rooms and also work in normal home illumination circumstances. Several of the most recent drills will conveniently fit in your kitchen cabinet. TORQUE - When I talk about a cordless drill's power, I'm really speaking about just how much rotational force, or torque, it generates. I am not discussing the battery voltage. This ranking, in inch-pounds, will certainly aid you to contrast one drill to the various other and decide if the drill allows sufficient for the jobs you want it to do. 180 inch/lbs suffice power for most boring, screwing and also fixing tasks around the residence, 320 inches/lbs is enough for many residence constructions and renovating jobs. Only think about a higher torque full size drill if you have a lot of lag bolts to establish when developing a deck, openings for drilling in concrete, or using a large specialty add-on like a bulb auger (for planting tulip bulbs) When you're purchasing a cordless drill, check out the box or most likely to the maker's internet site and look for the torque numbers on the spec web page. SPEED - Today's new lithium-powered drills will have 2 or even more variable rate setups. Normally a 0-600 rpm (changes per minute) as well as 1-1600 rpm. The reduced rate is made use of for piercing large openings, driving large screws and accuracy tasks. The greater rate is utilized for piercing tiny openings, countersinking, as well as setting great deals of smaller sized screws. When utilizing your drill constantly start on the low-speed setting as well as just switch to the higher rate when you obtain utilized to the task and also locate you can function properly with the greater rate. Don't buy a cordless drill/driver with simply one speed. The one speed is normally as well sluggish for many jobs and also sometimes is an indication of an inexpensive, low-quality drill. BATTERIES, As Well As BATTERY CHARGERS - A couple of years back, environmentally friendly nickel-metal hydride (NiMH) batteries, started changing the popular nickel-cadmium (NiCd) cells that powered most cordless tools. Those batteries have actually currently been changed with the same kind of battery found in your cellular phone, the lithium-ion (LiIon) battery. The brand-new lithium-ion batteries have equal or much better run time, half the weight, no memory concerns, as well as the capability to hold a complete fee for greater than a year while sitting in your kitchen drawer. Costs have actually gone down on the lithium powered devices so much that purchasing a NiCad is a no longer rewarding choice. You can currently acquire a good, light-weight homeowner drill with a lithium-ion battery for as little as $79.00.
Today's most current chargers are energy-star rated and are very reliable. The brand-new battery chargers will certainly also charge the batteries much faster than before. The most recent battery chargers will bill a battery in 30 to 50 mins. In the majority of house repair jobs, one battery is all you require. With the new lithium batteries as well as chargers you can keep the battery fully billed and it will constantly prepare to benefit you. For bigger tasks, if you start a task with two fully-charged batteries, and constantly keep one on the battery charger, you'll have the ability to work frequently as the brand-new battery chargers can "fill up" a diminished battery as fast as you can drain the one on the drill. You're possibly not going to have wait for a battery unless you're driving screws nonstop. In my experience, when building exterior furniture, I use one drill for the pilot holes and one for placing in screws. The new chargers will charge batteries quickly enough that I just have to keep one extra battery on charge and also I can regularly work without needing to wait on the battery charger. The cordless drill manufacturers have yet to find out that it would certainly be advantageous to have the battery link to the drill the same way so you might make use of the batteries on greater than one brand, yet a couple of retailers have actually developed lines of cordless devices that all job of the very same battery. One manufacturer has over 35 house repair service as well as grass and yard tools that use the exact same lithium battery. I directly would not also think about buying a NiMH or NiCd battery powered cordless drill any longer. Make sure you can eliminate the battery from the drill. There are a few cordless drills out there that have the batteries permanently attached to drill. This does not allow you to bill a battery while utilizing the drill. This is another sign of a cheap drill. This prevents the drill/driver from damaging the screw-head, damaging the screw, or driving it also deeply into timber. A lot of high-quality drills today have from 16 to 25 clutch setups so you can tweak it as well as set your screws to the appropriate depth.
0 notes
Text
My Build of the TIFLIC DIY Bookscanner
Note: What I am discussing here is in no way my original work. This design was created by user Mohib on the DIY Bookscanner Forum. His original plans are here. These are my notes based on my experience building his design. In addition, his software recommendations are for iOS and Windows and I have exactly the opposite platforms – Android and OS X. I have my own set of recommendations as well as some scripts I wrote. All of this will be presented below. Mohib’s plans are sufficient to build a scanner but what they lack is an Instructable style “Step 1 – do this” flow. I will attempt to put a little of that in.
tl;dr
There is no tldr, you knucklehead! This is a build post, so it is all or nothing.
Background
I have long been interested in the work at DIY Bookscanner. I was very interested in the version of the scanner that could be cut from a sheet of plywood with a CNC and used two DSLR cameras with remote triggers. Ultimately, that was a bit expensive, bulky and beyond my meager abilities to create. I’ve been in the market for some sort of nondestructive book scanner for some time. I have dozens if not hundreds of books that I would gladly trade in paper for a digital copy.
When I first learned of this simplified version that could be built entirely out of PVC pipe for the structure and used a single smartphone as the camera, my ears perked up Scooby Doo style. I saw the video and got very interested. It seemed within buildable reach and had a decent throughput. I have a lot of pages of books to scan, so the more pages per minute the less time I spend.
I decided to take the plunge and actually attempt building this. To that end, I basically bought most of the things straight out of Mohib’s recommendations from Amazon. What I didn’t buy originally, I bought almost all of them later. Pretty much everything marked “optional” in his plans I found essential. I will mention them all as we get to them.
Materials
I also was able to get almost everything in the plans locally at a neighborhood True Value. I hoped to spend as little time in big box stores as possible. In fact the local employees took an interest in the project and I had many conversations about my project. This is where those times spending 10 minutes finding me the right 17 cent screw got repaid, as I ultimately dropped around $100 in materials and tools there working on the scanner.
The other big sourcing issue was the plastic platen that sits on the book pages. I also tried to source it locally at a glass place but it was both prohibitively expensive but also, they were unwilling to sell me 3/8″ plexiglass. I found this awesome site, Tap Plastics, where I could very easily order exactly what I wanted with a simple web form. Because I knew this had the longest lead time, the very first thing I did was order this.
This link will start you at acrylic. Choose the following options:
Clear 3/8” Thickness 11” Width 15 1/4” Length
and then down below pick 6 holes if you want to buy exactly what is in the plans. It would be possible to in fact do 4 or 2 holes, depending on the flexibility you desire from your platen. In practice, I’ve been using mine for two weeks and have yet to move the handle to different holes. It costs $2 per hole drilled, so I gambled $8 on future flexibility. When you order from Tap Plastics and include holes, you need to send them a diagram of where to drill. I extracted that one page of CAD drawing from the plans and sent that to them and what I got back was perfect.
With the platen glass ordered, I went to my local hardware store (Walker’s True Value in Conway SC) carrying a printout of the plans with the goal of getting every item I could on the manifest. Ideally I wanted to be able to build this without walking into a Lowes or Home Depot. I failed slightly, but not by much.
One of the parts in question was the barrel nut. This is those little things you find in Ikea style flat pack furniture, cylinders with a slot for screwdrivers on the ends and a threaded hole through the center. The plans call for two with 1/4-20 threading and a length of 1 1/2″, which are hard to come by in the US. The plans cite a supplier in the UK but shipping is prohibitive for these things. I wanted to avoid that. Luckily, True Value had the same thing but in 3/4″ length. I decided to experiment with this and only buy the UK version if absolutely necessary. Spoiler Alert – the 3/4″ version worked.
I was able to get both the 3/4” PVC pipe and connectors for the handle and the 1 1/4” PVC pipe for the structure. What I could not get were the caps and sanitary T connector for 1 1/4” pipe. Although they had bins for them, they were out of stock. I ultimately did get these items at a Lowes which then had the complication of being available only in white plastic where all the other 1 1/4” PVC pipe and connectors I had were black. I bought every single bolt, nut, washer, threaded rod, steel cable etc on the manifest. There are still a few bolts that I never used and to this day don’t understand where they are supposed to go.
I also went through the plans and ordered most of the things from Amazon, such as the tripod ball head, the focus rail and the star knobs. Where I think Mohib is crazy is in not using affiliate links to Amazon because he’s just leaving 4% of all those purchases on the table. I’ll list out all the stuff here with my affiliate link because I am not crazy. If Mohib ever lets me know of an associate ID for him, then I will swap them out for his because he deserves the money more than me. However, someone does deserve it.
I originally skipped buying the LED lamp listed as optional. That was a mistake and after my first trial run I went back and bought it. I also originally tried using a nonskid mat from Dollar General under the books. That was a mistake. User dpc on the DIY Bookscanner forum pointed me to the sticky Siconi mat and it is night and day versus every other option I tried. So, I recommend just buying everything on the following list if you really want to build this.
Manfrotto 2909 Super Clamp with 2907 Short Stud
Vastar Universal Smartphone Tripod Adapter
CamKix Wireless Bluetooth Camera Shutter Remote Control for Smartphones
EXMAX 1/4″ 3/8″ Tripod Mini Ball Head
Innovative Components AN4C-5S221 1.38″ Star knob thru hole 1/4-20 steel zinc insert black pp (Pack of 10)
DSLRKIT 2 way Macro Shot Focusing Focus Rail Slider
LEDMO 20w flood lights LED Waterproof IP65 Floodlight, Daylight White
Siconi Collection 7.5″ Large Sticky Pad, Grey
Assembly
I’m now going to list the steps I took. This will save you the trouble of reverse engineering from the CAD drawings. In at least one case, my original cuts were wrong because I misread the diagrams. You are welcome.
Platen
I won’t lie to you, the platen handle is by far the most challenging part of this whole thing. The steel cable holding it together is the worst bit of that so once you make it past that, it’s all downhill.
Step 1 – take the 3/4” PVC and cut one 13” piece and two 7” pieces. I just used a hacksaw because I had one handy. These will end up in connectors so if the cut is anywhere close to straight, the connectors will be pretty forgiving.
Step 2 – In the two 45 degree 3/4” connectors, drill a hole 0.5” from the end through both sides. The size of this hole is the same as your barrel nuts – 10 mm if you get the European version or 1/4” in my case. The barrel nuts will slide into these and I needed to buy one of the file drill bits and run it around the inside of the hole to get mine to fit eventually. You want the fit tight but they do need to be able to slide in and out.
Step 3 – Connect the 90 degree connectors to both ends of the 13” piece. Put both of the 7” pieces into those connectors. Attache the 45 degree connectors to that, ends with the hole away from the pipe.
Now is the worst part of the project, getting the steel cable in. It is pretty essential, as this is the piece that gives the platen handle stability (it gets the most wear and tear) and building it this way allows for modularity in a way that trying to affix permanently with some kind of serious cement or adhesive would not. Still, this is tough.
Step 4 – Measure for the steel cable. I tried a few things before I hit on what worked. I had a spool of thin gauge wire of the type you use to hang picture frames. Whatever you use to measure, it needs to not stretch so steel wire seemed like a good bet. Put in the barrel nuts into the holes. I ran two lengths of the cable through, enough that I could have a turn around each nut and enough sticking out of each pipe that I could pull it all tight. Pull it a few times because your pipes will be pulled tight into the connectors by this process and you don’t want to measure having a lot of slack. I used a Sharpie to mark the outermost part of the wire while I had it as tight as I could manage pulling with both hands while kneeling on the platen handle.
Step 5 – Pull out the wire and lay it alongside the bike brake cable to transfer that measurement. Swage the connectors down so that when you make the loop the mark is also at the outside most part. I actually put the barrel nut inside my loop before I swaged it down to ensure it would fit. Per directions of the hardware store people, I didn’t bother with a swaging tool. Once I had the fitting placed where I wanted it, I set the whole thing down on waste wood and hit it with a hammer a few times. It worked like a charm.
Step 6 – Put your swaged cable through the handle of the platen. Slide the first barrel nut through the holes and the loop. This is the easy one. Getting the second one in is challenging. I achieved it by using the same wire from my measurement to pull the other end tight. I did this by myself and found it extremely challenging to pull it hard enough to be able to slide the second barrel nut in. I did it with a combination of pulling with the wire and levering with a screwdriver while having the barrel nut through one side of the holes. I recommend doing this with a second person, which might save you the 30 minutes or so it took me. On the good news side, at this point all the hardest work is done.
Step 7 – Using the rubber washer and a steel one and a 1/4” – 20 bolt, connect the platen handle to the platen. I won’t lie, I found having a completed platen with handle in my hand extremely satisfying. I did a few camera tests with just that to test it out and it made me very happy.
Camera Arm
Step 1 – Cut a 5” piece of 1 1/2” PVC pipe and a 13” piece. Because you will have bought it in 36” pieces, I recommend also cutting a few other lengths. I have every 3” from 7″ to 13” for the upright piece of my assembly for reasons I will discuss later. While you have it out and are cutting anyway, I suggest also cutting 7” and 10” pieces.
Step 2 – Cut pieces from the threaded rods into 9 1/4” and 19 1/2”. I tried a few techniques but what worked the best was just using a hacksaw and filing the end until I could screw one of the star knobs onto the end. After I completed this project, via a Facebook ad I saw this product which exists to fix screwed up threaded ends of things. i haven’t used it personally but if I had seen this first I totally would have bought it.
Step 3 – Drill a 1/4” hole in the center of the 1 1/2” PVC caps. Threaded rod will go through these. From the photos in the diagrams, it looks like the cap that connects to the clamp has extra holes and extra bolts in it. I did not drill these holes and had a few bolts left over from the original manifest. I am not sure what to do with these, so I ended up skipping.
Step 4 – Assemble the camera arm. On each of the threaded rod pieces, you will screw in two nuts and add a washer about 3/4” in from the end. This may vary wildly so experiment as you need. You will be sticking the balance of the rod through a cap and into an accessory. The long piece will be screwed into the clamp end and the short piece will be screwed into the rack mount. Twist the rod to screw it in to the accessories and then tighten down the nuts until the whole thing is tight. You won’t want these flapping about so make sure to get everything solid and tight.
Step 5 – Place the long piece of PVC over the long piece of threaded rod and slide down into the cap that holds the clamp. Over the top of this, place the sanitary T joint. Repeat the process with the short piece of PVC and the rack mount. At this point, you have the assembly mostly together with two pieces of threaded rod sticking out of the T joint.
Step 6 – For each of the threaded rods, place the 1 7/8” washer over the rod and slide down to the T joint. Screw the star connector into the threaded rod and tighten down. The first time you do this, you’ll be picking up slack just like with the platen handle. Be prepared to turn a little bit over a long period as some settling will occur.
Step 7 – Screw the ball joint adapter into the rack mount. When that is in, screw the smart phone adapter into the the ball joint adapter. At this point, you have the thing basically assembled. Clamp to a table or whatever will be your scanning surface and adjust the top piece so that the phone camera will be trained down on the book.
The original plans call for a 13” piece of PVC for the upright of the camera arm. I found when I started experimenting that for smaller books, that height places the camera pretty far away. My goal is to get as many pixels as possible devoted to the book. When I am scanning small paperbacks or digest sized magazines, I use a shorter length of PVC to get the camera closer. If using a phone with an optical zoom this would be less of an issue but I want as much as possible of the field of view to be filled with book. This is the thing of the whole project most subject to fiddling. Try some sizes and see what works for you. It is not hard to change them out. However particularly when going to really short ones, this may mean that you have a lot of threaded rod to get that star knob twisted over. This part can be tedious, but it is possible.
At one point I got overly aggressive on getting the phone close and got it so close that the platen was bumping the phone. Having the phone moved in the middle of a scan is – if not the worse case scenario – a really bad scenario. I had to seek a compromise of bringing the camera close enough to maximize pixels while high enough to avoid bumping.
A note on the color of the materials: careful readers will note I mentioned getting white PVC parts for the camera arm while noting those parts are black in the photo of my camera arm. I found early on that the white pieces showed up in reflection on the platen, so I spray painted them black.
Light Source
Mohib lists his LED lamp as optional in the original plans but I found in my early tests that I wasn’t getting enough light on the book and it was very subject to shadows. I ended up buying the lamp and a switch and wiring it up. The plans call for attaching it to the camera arm with a bungee cord, but I could never get it at a good angle. I ended up setting it on a stack of books, which worked well enough. However, some of the light was shining directly into the camera lens so I further hacked this by masking off part of the top with a bit of cardboard. It’s kind of ridiculous, but it ultimately works. This part will almost certainly require fiddling on your part.
Phone Software
Mohib recommends some iOS apps. Here are what I am using as of today on Android. If you find better recommendations please let me know as nothing is perfect.
Bubble Level on Android. I use this to get the original placement as flat as I can. The closer to level the phone is, the less skewing to deal with in post-processing.
The camera app is pretty crucial and needs a few features to be viable. You must be able to control the ISO value rather than be automatically assigned. You want the lowest one your phone’s camera is capable of because that will be maximum signal on the sensors. You want to have maximum control over focus. You need to have some control over the naming. There is a world of difference in assigning a prefix and having your scan photos be PREFIX0001 to PREFIX0100 vs picking them out of some timestamped mess or arbitrary numbers.
I chose Camera FV on Android. I gave the free version a try to verify it would meet minimum standards and then paid for the upgrade to unlock the features I wanted. There are many alternatives so if there is one anyone finds suitable, please let me know so I can try it as well.
After scanning the book the files will need to be transferred to a computer. I find plugging via USB and using Android File Transfer to be painful so I installed Dropsync. In the free version, this allows one folder on the phone to be synced with one folder in Dropbox. I set up my Camera FV folder to be a special folder unique to the app then synced that to a “DIY Bookscanner Inbox” in my Dropbox account. This runs once every 5 minutes so it is always trailing somewhat. While I am doing the actual scanning, some fraction of the photos are syncing. While it is not real time, within 15 or 20 minutes it will catch up so I try to make sure I’m never in a hurry while I do this. Eventually I will batch books together so that many books are being scanned and synced over time. While the last ones trickle in, I can work on the earliest ones.
If there were a version that did the same functionality with the same ease of use but used only the local network, I’d be quite happy with that. Again, let me know if you are aware of such an Android app.
Desktop Software
For preprocessing, I use ScanTailor on OS X which seems best of breed. I ended up building ScanTailor Advanced from source using these directions. If building it is beyond you, here is a download of a version I built on High Sierra, offered of course with no warranty of any kind.
For OCR, I installed Tesseract via Homebrew.
For text normalizing, I installed uni2ascii via Homebrew.
For PDF conversion, I installed imagemagick via Homebrew which includes the “convert” command.
Use
At this point, you have the whole frame put together. You have the Android apps installed.
Although I will discuss file naming later, I set the counter and file prefix before aligning the camera because there is no point knocking this out of alignment while entering the text.
Take whatever phone you are using for your camera and place it in the phone holder. I level with the Bubble Level app as well as I can, then place the book down on the Siconi sticky pad and push hard. However hard you think is maximally reasonable, push 15% harder than that. I turn to a nice page with full text to the margins for ease of evaluating framing and set the platen down on it. I rotate the phone to make it as square as possible. If your camera has framing lines, you want the lines of type lined with those. Use the macro adjuster to move the phone up or down if you need to get more or less of it in frame (less is seldom my problem, usually I crank it all the way down.) After lining everything back up, I return to Bubble level one more time just to verify I didn’t knock it way out of level with the adjustments.
Camera FV only allows 4 characters of prefix. I choose three for any given book (I started with “AAA” and increment every time.) I reset the counter to 1 and set the prefix first to AAAR or whatever while I scan the rightmost (odd numbered pages) starting with the cover and working all the way to the inside back cover. Even if the page is blank, it needs to be scanned or else things will not line up later when collated. After scanning the R, I flip the book upside down and repeat the process with AAAL, resetting the counter to 1 again. These will be renumbered and collated in post-processing scripts. You could scan the left pages from front to back, it would just need adjusting the scripts.
If you are ambidextrous, you might scan both sides right side up. If you are left handed you may choose to do this whole process upside down from what I describe so you can work the platen with your left hand. The process of scanning is one of lifting the platen, turning the page, dropping it down and hitting the bluetooth trigger button. Configuring your camera app so the camera is snapped as quickly as possible helps. Mine takes too long and adding a second per photo adds at least 5 minutes to a 300 page book. I’ve tried different autofocus options to speed this up. Thus far I have had limited success.
This part is the practiced skill aspect that improves over time. The end goal is a rhythm of turning pages, dropping platen and capturing pictures as quickly as possible with a minimum of physical adjustment of the platen or book. I still scan at 30% the speed of Mohib in his demo video. If I never approach his speed, that will be a big blow to the viability of this project. I too want to scan ~22 pages a minute in order to get as many books processed and out of my space as possible per hour spent.
Post-processing
Following uses fake example names and values but you can figure out how to map it what you have. The shell scripts I use are available in my GitHub directory for the project. If you want to submit a change, feel free to fork and send a pull request. If you don’t know what that means, just download the zip file and use them that way.
At this point, the book has been scanned. You will eventually have in your Dropbox account or however you move your files a set of files named AAAL0001 – AAAL0156 and AAAR0001 – AAAR0156. I create folders called AAAL and AAAR and move the files into them. If the number of files don’t match, you have a problem. If they don’t match and are missing out of the middle it is pretty straight forward. Look at the ones on either side of the missing file, figure out the page and take the picture again. It may have different alignment and definitely a different name so keep track of what these are. I tend to use a prefix like AAAX to make it obvious that these are fill-in scans that need to be renamed.
Harder is if the files are contiguous yet mismatch in numbers. This means one of the two folders has either too many or too few pictures. If pages stuck together, you will need to find the missing or extra page. I look every 10 files to see if the page number has incremented by 20. If not, the problem is in that range. If a page was scanned twice, I delete one. If it was missing, I capture the missing page and name it such that it will sort correctly, something like AAAL0101a.jpeg. If files have been added or removed, I use my renumber.sh script to normalize back to sequential numbers with nothing missing.
Now it is time to process with ScanTailor. I will do the left and right separately because they will need different orientation correction. The goal is to have ScanTailor do as much as possible automatically. There is a wide variety of options possible, and I would recommend the ScanTailor forum for more information. I could spend as much time discussing ScanTailor configuration as the whole rest of this long post.
I will use ScanTailor to process from the original AAAL and AAAR directories to ones named AAA-stL and AAA-stR. I still need to keep them separate at this point. They will get merged soon. As stated, my goal is to configure and allow ScanTailor to do its work with default auto settings. This has yet to happen 100% for me on any book. I spot check and fix individual pages if needed and hope like hell I don’t need to.
I also create folders AAA-pdfL and AAA-pdfR. This is to allow me to potentially set up different ScanTailor configs for the OCR text versus the PDF of the captured pages. Although I like the flexibility and initially I envisioned an OCR target that strips out the page numbers while the PDF target preserved them, in practice I have used the same ones and just copy the files from -st directories to -pdf directories. These will come into play soon.
After all this pre-processing, now I run my processing script name process.sh. This does the following things:
Creates folders for AAA-st-renumbered and AAA-pdf-renumbered, AAA-ocr, AAA-pdf and AAA-final
Copies and renumbers the files from the AAA-st and AAA-pdf directories to the -renumbered equivalents. At this point the L and R are removed, the files are collated such that paging through file 1 to the end shows the book in order.
Runs tesseract on each page. For AAA0001.tif , it will create AAA0001.txt
After all files have been OCR’d, it will cat the files into one text file on AAA-final
It will run uni2ascii on the text file to clean up weird artifacts in the text file
It will use the convert function on the files in AAA-pdf-renumbered to create one full PDF file of all those graphics. This will typically be between 50 and 150 times larger than the plain text file.
At this point, I have an OCR version of the text suitable for an eInk reading device as well as a graphical version suitable for tablets or desktops. If one were desiring a permanent high quality text file (for Project Gutenberg for example) then the OCR version could be proofread against the PDF.
All of this seems like a long way to go to get a digital copy of a paper book and it is. Unless one values their time at a very low hourly rate it is often cheaper to purchase the book than actually scan it. For readily available books that are reasonably priced, I will just rebuy them. For books (often older non-bestselling books) with no current electronic version available for purchase, this is the best option. I want to archive my collection of 20 years of science fiction magazines before I transfer them to either some archivist or more likely, my curbside recycling. I want the stories and no longer have any desire to house the paper.
For many years I have said I’d gladly trade a number of paper books in my house for a digital version. Now, with a little time and manpower that is possible. I’m flat delighted.
Physical and design improvements or alternate software recommendations (and pull requests on GitHub improving my scripts) are happily accepted. Questions regarding my sanity in pursuing this project will be read bemusedly once then largely ignored. Comments berating me for any legal, moral or ethical implications of scanning my own property for my own use are wildly non-interesting to me and treated as such.
If you build this yourself, please let me know with pictures and your own stats for throughput. Good luck and be careful out there.
0 notes
Text
The cheapest way to build your own wine rack
It looks good nearly empty, but it'll look even better full. (Mary Kearl/)
A wine rack will help you keep your reds and whites organized, and if you build it yourself, you’ll get to add a personal touch to your home decor. So get ready for a fun project—an easy-to-moderate build that breathes new life into a nondescript wooden pallet previously destined for the trash. Best of all, you won’t have to fuss over every cut because the beauty of working with reclaimed wood is in the imperfections.
There are a number of ways you can find or buy wooden pallets. Maybe you already have one left over from a furniture delivery, move, or some other project. If not, you can buy one at a home improvement store like Home Depot or Lowe’s. You can also find pallets for free or at a discount on websites and apps such as Facebook Marketplace, OfferUp, and Craigslist, or by asking around at local construction sites.
You may even be able to repurpose the nails from the pallet itself, minimizing or eliminating the need for additional fasteners. When you’re done, think about making another—one pallet can make up to two of these wine racks.
Warning: DIY projects can be dangerous, even for the most experienced makers. Before proceeding with this or any other project on our site, ensure you have all necessary safety gear and know how to use it properly. At minimum, that may include safety glasses, a face mask, and/or ear protection. If you’re using power tools, you must know how to use them safely and correctly. If you do not, or are otherwise uncomfortable with anything described here, don’t attempt this project.
Stats
<b>Time:</b> 2-3 hours
<b>Material cost:</b> $5-$47
<b>Difficulty:</b> easy/moderate
Materials
Wood ($0-$10)
1 wood pallet
Fasteners: $7
<a href="https://ift.tt/3a5vey9" target=_blank>1.5-inch wood screws</a>
Finishing supplies: $30
<a href="https://ift.tt/2RMR177" target=_blank>Sandpaper (60 grit)</a>
<a href="https://ift.tt/2Vj8tlZ" target=_blank>Masking tape</a>
<a href="https://ift.tt/2VgMqMs" target=_blank>1 quart of wood paint</a> (or stain)
<a href="https://ift.tt/3cqbczy" target=_blank>Drywall anchors</a>
(Optional) <a href="https://ift.tt/3ai9teh" target=_blank>1 can of chalkboard paint</a>
(Optional) <a href="https://amzn.to/2yo1uyN" target=_blank>Chalk</a>
Tools
<a href="https://amzn.to/3bfUFOB" target=_blank>Hammer</a>
<a href="https://amzn.to/2VfD5os" target=_blank>Measuring tape</a>
<a href="https://amzn.to/3bguGGD" target=_blank>Square</a>
<a href="https://amzn.to/2VEmeua" target=_blank>Circular saw</a> (or <a href="https://amzn.to/2VdlbCw" target=_blank>hand saw</a>)
<a href="https://amzn.to/2zalVQn" target=_blank>Power drill</a>
⅛-inch drill bit
<a href="https://amzn.to/2Vgk8lh" target=_blank>Level</a>
Pencil
Rag (or paper towel)
Paintbrush
Before you begin
1. Set up your work space. An important part of the job is making sure you have enough room to work with the pallet for the initial cuts. I used an approximately 5-by-6-foot area to put this together.
2. Secure all of the pallet’s existing nails. Using your hammer, make sure all the nails are completely pounded in.
Make sure you work from one of the pallet's good sides. (Mary Kearl/)
3. Figure out the dimensions of your wine rack. Your wine rack should be 40 inches wide (the full width of a pallet), but you can choose whatever height works for you and your space. Using two of the existing horizontal panels should provide enough support once the rack has been hung, but don’t go any shorter.
I started with a full-size 40-by-48-inch pallet with seven rows of wood panels and decided the height of my rack would be from the top of the pallet to the bottom of the second panel down (about 12.5 inches).
<b>Tip:</b> It’s easiest to work from one end of the pallet, so if the wood on one side is better than the other, flip it so the good end is at the top. It’s possible to work with a chunk from the middle, but not ideal, and this how-to won’t cover all the potential variables if you go that route.
<b>Note:</b> Most pallets have one side with more panels than the other. When I measured down two panels from the top, for example, the opposite side had just one. Whatever your pallet or plan looks like, you should make sure the eventual back of your rack has multiple panels and the future front has just one.
4. (Optional) Reinforce the wood panels. If any of the panels you plan to use for your wine rack are loose, reinforce them now. To do so, simply drive some new screws or nails through them into the 2-by-4s that form the pallet’s frame.
Build the rack
5. Mark the height of the wine rack. Measure down from the top of your pallet and use your square and pencil to draw straight lines across the 2-by-4s on each side and the board in the middle.
6. Cut the pallet. Using your circular saw, cut the pallet along the lines you just marked. First, turn the pallet on its side, so the panels are vertical and facing you. Make your first cut. Then, flip the pallet around and cut the other side. For the middle, place your pallet flat on the ground and proceed with your cut. The blade won’t go all the way through, so you’ll have to turn it over to cut the other side. It may feel like you’ve only done a little, but you’re already halfway done.
<b>Caution:</b> If you’re using a circular saw, make sure you’re wearing eye, ear, and breathing protection and understand how to safely operate this potentially dangerous tool.
7. Prepare the base of the wine rack. Using your hammer, remove three of the wood panels from the unused portion of the pallet. You’ll use one of these for the base. Save the other two for later.
<b>Tip:</b> If you can remove the panels without damaging the nails, you can use them to attach the base of the wine rack in the next step.
8. Install the base. Turn the section of the pallet you plan to use as a wine rack on its head, so the rectangular base is face-up (as pictured below). Then, take one of the panels you just removed from the remains of the pallet and place it on what will be the bottom of your wine rack. It will be your base. Attach this piece of wood to the rack’s frame using two screws on either end and another two in the middle.
When the section you'll use for your wine rack has been separated from the rest of the pallet, it'll look something like this. (Jose Mendoza/)
Optional: Build a wine glass holder
In this phase of the project, we’ll create a row of glass holders that hang beneath the rack—enough to fit seven glasses. These next few steps involve several small cuts that may take up to an hour and, while the end result will allow you to store wine bottles and glasses together, this is something you can skip if you’re looking for an easier DIY project.
9. Prepare the cuts for the wine glass holder. Take the wood panels you removed from the pallet in Step 7 and, using your circular saw, make the following cuts:
<b>Cut two 3-inch-long pieces.</b> Measure and mark 3 inches on one of your spare panels, cut, and repeat. These will be the sides of your wine glass holder and will attach to the bottom of your wine rack.
<b>Cut eight 4-inch-long blocks.</b> Measure and mark 4 inches on your wood, cut, and repeat until you have eight of these. They’ll hold your glasses in place.
<b>Cut six 1 ¾-inch-wide blocks.</b> Measure and mark 1 ¾ inches on your wood, cut, and repeat. These will create space between the bottom of the wine rack and the wine glass holder.
10. Sand the wine glass holder pieces and the wine rack base. Using 60-grit sandpaper, rub down all the blocks you cut in the previous step, removing any debris. Now is also your last chance to easily sand the bottom of your wine rack. If you wait until after you install the glass holder, it’ll be hard to hit every surface with the sandpaper. When you’re done, wipe down each piece with a rag or paper towel to remove any dust. Smoothing every surface is critical before painting or staining.
<b>Tip:</b> If you don’t have a rag or paper towel on hand, you can use a paintbrush to dust after sanding. Make sure it’s a cheap, disposable one, though, not a good one—dust-filled paint does not look good.
11. (Optional) Pre-drill holes. If you’re using screws, you can make the process easier by pre-drilling holes with your power drill and a ⅛-inch bit. Drill two holes in the 3- and 4-inch blocks, centered 1 inch from the top and 1 inch from the bottom, and one hole centered in each 1 ¾-inch block. This will make it less likely that the wood will split or the blocks will move as you’re screwing.
12. Install the 3-inch blocks. Center two screws 1 inch apart (horizontally or vertically, it doesn’t matter) in one of the blocks and attach it to the bottom of the wine rack holder, all the way to one side and flush with the end of the rack. Repeat on the other end.
<b>Tip</b>: If you don’t have screws, you can use nails here and in subsequent steps, as needed.
13. Attach the 1 ¾-inch blocks. Measuring from the inside edge of one of the 3-inch pieces, use your square and pencil to mark a line at 3 ⅜ inches. Then, place one of the blocks down so the edge closest to the end block rests against the line. Fasten it in place with one screw in the center. Next, measure 3 ⅜ inches from the other edge of the block you just installed and mark another line. Repeat until all blocks are in place.
Once your 3-inch and 1 ¾-inch blocks are in place, the bottom of your wine rack should look like this. (Jose Mendoza/)
14. Attach the 4-inch blocks. Take one of these blocks and place it on one end of the bottom of the wine rack, directly on top of the three-inch block you’ve already installed, flush with the outer edge. Attach with two screws, 1 inch from the top and 1 inch from the bottom. Repeat this step on the other end of the wine rack on top of the other 3-inch block. Then, center the remaining blocks on top of the 1 ¾-inch blocks and fasten them in the same manner.
The final touches
15. Sand the wine rack for painting. Using the sandpaper, sand the rack until it feels smooth to the touch with your bare hands. Then, remove all the dust from the wood with a rag or paper towel. When that’s done, prepare your work area for painting by making sure the floors and walls are protected from any potential spills or splatters. If you don’t have a paint cover, you can use newspapers and grocery store flyers to keep things covered.
<b>Tip:</b> If you don’t have a rag or paper towel on hand, you can use a paintbrush to dust after sanding. Make sure it’s a cheap, disposable one, though, not a good one—dust-filled paint does not look good.
16. Paint the rack. Using your paintbrush, apply the stain or paint of your preference to the front and sides of the rack. There’s no need to paint the back because it’ll be against the wall. Let it dry and apply a second coat. When it’s time to paint the bottom, lay it flat on its back.
<b>Caution:</b> To avoid an intense odor, make sure to follow the paint or stain manufacturer’s instructions and ensure you’re applying all coats of paint in a well-ventilated area. (Inhaling fumes in a poorly ventilated area can <a href="https://ift.tt/34KhgQV" target=_blank>lead to headaches, nausea, and dizziness</a>.)
<b>Tip:</b> We recommend a disposable paint brush because the wood is still quite rough after sanding and may damage higher quality brushes you’d typically use for interior projects.
17. (Optional) Create the chalkboard. Once the stain has dried, you can add chalkboard paint for writing your favorite sayings about wine, labeling the contents of the rack, or simply writing little notes to yourself and others. To get started, place masking tape alongside every edge of the bottom panel of wood on the front of your rack. This piece will become your chalkboard.
Tape around the edges of the front panel will ensure chalkboard paint doesn't go where you don't want it to go. (Jose Mendoza/)
Carefully spray the chalkboard paint across the bottom panel. Let it dry (per the manufacturer’s instructions) and apply a second coat.
<b>Tip: </b>You can use newspapers to cover the rest of the wine rack and protect it from the chalkboard spray paint.
Hang your wine rack
18. Drill holes for your wall anchors. Use a ⅛-inch bit to drill four holes into the front of the uppermost panel, two on each side of the center board. The first hole should be 4 inches from the left side of the rack and the second should be 4 inches from the center division. Repeat on the other side. These will be where your anchors go.
<b>Note:</b> If your wine rack is larger than this one, add as many anchors as necessary for it to be secure.
19. Level the wine rack. Position your rack in its desired location on your wall and use a level to make sure it’s straight. With a pencil, make small lines on the wall underneath and along both sides of the rack. You’ll use these as guides to attach the wine rack to the wall.
20. Mark where your anchors will go into the wall. Hold your wine rack in place with one hand and use the other to drill a screw into each of the holes you made in Step 18. Do not attach fully—these are just to mark where the anchors will go. Remove the screws and you’ll have four holes for your anchors.
21. Install the drywall anchors. Some anchors are attached using a hammer, while others require a drill or screwdriver. Install yours in the holes marked in the previous step, per the manufacturer’s instructions.
22. Hang your wine rack. Line the rack up with the pencil marks you made in Step 19. Drill four screws, one into each of the holes created in Step 18, so they rest inside each of the anchors you just installed.
Now that you’ve completed your wine rack, write something fun on the chalkboard and load it up with your favorite bottles. Cheers!
0 notes
Text
DIY Computer Desk Under $50
How to Build a DIY Computer desk from Scratch
Hey friends! As you all know, my whole purpose of this blog is to provide you resources for affordable homemaking without breaking the bank. In today’s post, we are going to learn how to make a DIY computer desk.
#Homemaking should be easy and stress-free. A couple with any budget should be able to establish a beautiful home of their dreams. Click To Tweet
DIY Computer Desk Custom Design
I want to keep it real simple, as the room we were going to put this computer desk has a weird shape. Therefore, to be something simple with a custom measurement will check all the boxes.
My husband really nailed it when he showed me a simple design in Google Drive using minimum material for under $50. As you all know, any furniture item can hurt your budget for the month.
Save it or print it however you want to. We created it in google drive.
Other DIY Projects
DIY Removable Wallpaper Installation
DIY Mason Jar Organizer
Bushra’s Lifestyle is a participant in the Amazon Services, LLC Associates Program, an affiliate advertising program designed to provide a means for us to earn fees by linking to Amazon.com and affiliated sites.
Material to Build Your Desk
Here is what we purchased from Lowes:
A big long wood top. It measures 3/4″ x 24″ x 48″. The little corner in the room we were going to put this table is total 58″ wide. It was more than perfect for us.
I took the picture right away to show you guys. I like to see a very detailed tutorial. It measures 3/4: x 24″ x 48″.
3) eight feet 2″ x 4″ long pieces for the legs at $2.50 each
2) eight feet long 1″ x 3″ pieces to put edges around the table in orderer to beautify it at $1.65 each
Considering how cheap the material is, I would buy 1 extra for each in case you make a mistake in cutting or drilling the pocket holes. It’s a lot better than having to drive back to the hardware store!
This is all that we purchased from Lowes. $31 total for the material
Required Tools
These are very handy tools for any woodworking project. We have not purchased them at once. However, my husband loaded up his workshop with all the phenomenal tools over time.
You don’t have to buy every tool I show you here, although they indeed make life easy. Just go with what is the most needed.
Kreg Jig and Kreg jig clamps ( A package deal)
Drill
Screwdriver
Kreg jig screw kit or a packet of screws
Brad nailer
Brad nails
Wood glue and glue brush
Sander – Either wood sander or just buy a cheap sanding block.
Stain (of your choice). You don’t have to strain if you don’t want to.
All the above tools are extremely useful if you do DIY projects on a regular basis. Otherwise, just to make a DIY computer desk, you can get by without having them as you can use a hammer and long nails with wood glue.
This DIY project is easy and anyone can do it. Don’t get scared, as I provided you both options with and without fancy tools.
If making your home beautiful on affordable bases is your passion, then there are so many ways to make it possible. Click To Tweet
My goal is to provide you with the resources!
Things To Consider Before You Start
Here is a little criterion I have set for me. I follow this whenever I have to do any DIY project.
1- Difficulty Of The Project
This is something you should consider for your very first DIY projects. Since my husband has been doing wooding working for us now for the last 5 years, he is at an advanced level. However, this DIY computer desk has an easy difficulty level.
2- Ergonomically Correct
Ergonomics are something you should never ignore. We made this desk for my brother and he is little over 6 feet tall. A small desk was not going to cut it. Especially with his long legs. If you want to not have any physical discomfort, you better pay attention to ergonomics.
3- Custom Dimensions:
Most of the store-bought furniture doesn’t come with the custom dimension you want to fit in your desired location. I checked around to see if I could buy a desk to go in the weird shape of the boy’s room I have, but either they were too big or too small. It left me with only the DIY option.
4- Cost-Effective
The other big thing with DIY projects is that you almost always save money. In my personal opinion, 90% of the time you save money with DIY projects. Your work also makes you proud, and this computer desk only cost me less than $50 with our DIY skills. And we already had all the tools, which made things easier.
Keep DECC in mind and using these four-component you can create any DIY project to simply nail it. Click To Tweet
Simple DIY Computer Desk Tutorial Steps
Step 1: Cut The Wood For The Legs
To make the legs, cut them to the plan I provided above. You need to cut 4 2″ x 4″ pieces for the verticle parts of the legs with a miter saw or any saw you have available.
You can also have someone cut according to your measurements at Lowes or Home Depot.
Here is how they look after we cut them with a miter saw
Step 2: Drill Pocket Holes With A Kreg Jig
The next step is to drill holes with a Kreg Jig. This little tool is stunning. Without it, you’d have to screw in from the sides or use nails, which wouldn’t look good. With a Kreg Jig, the screws are put in at an angle, and if you put them underneath, they won’t be visible!
You do need a drill. Otherwise, it will be very difficult to make pocket holes with the Kreg Jig.
Once you are done making holes in all of your pieces….
You are ready for the next step
We used this clamp to hold the Kreg jig, it came with the package and I will put the link below as well if you need to purchase it.
Neat and nice deep angled holes. Face them on the outside of the leg frame so they won’t be visible at all in the final results.
Step 3: Screw The Wood Together
You are going to need this handy chart to decide which screw is the best for your project.
When you order this screw box, the chart is inside of it.
My husband had these corner clamps on hand so he used these for an extra hand. They are super cheap but awfully helpful. Notice the pocket holes are facing out!
Put all four sides together to make leg frames. Make sure you double-check the size of your screws.
Make two of them. one for each side of the table to hold the top
Here are the final results! It looks like a simple frame.
This one is middle support, make sure you place a 2 x 4 piece of wood in the center to support the table, so it stays sturdy. Face the holes outside so they will go up against the wall.
My husband cut some scrap wood (to rest the middle support on while connecting) as a simple measuring guide. This way, both sides will be the same height.
Step 4: Attach The Top For Your DIY Computer Desk
Place the legs on the floor and place your top wood on it. We used the top as it is without cutting or altering it. Just put a few brad nails or small nails to hold in place temporarily.
Step 5: Cut the Edges
Now it’s time to finalize your DIY computer desk project. Cut the 1″ x 3″ long wood according to the size using the chart above to attach it to the edges. It will give this computer desk a good and clean look.
You can also have the wood cut in the store as well.
DIY projects are an easy way to add charm to your home and a crucial part of affordable homemaking Click To Tweet
My husband is measuring the table for the edges.
We only used glue and brad nails for the edging.
Make sure you place a 2 x 4 piece of wood in the center to support the table, so it stays sturdy
The blog post is coming on how to stain soon
Less $50 we spent!
The Exact Tools We Used For This Project
I am just listing them in case you like to buy anything. We added to our workshop over the years and bought these tools from time to time. They are perfect for any level of DIY’ers.
Kreg Jig with Kreg Clamp
An awesome tool to have. Makes very strong and hidden joints.
This Kreg screw kit is good as it gives you all the sizes you’ll possibly need to start.
You don’t need to buy this only for one project. You could get away with using regular screws, but these are great!
Corner clamps
Drill
Brad Nailer
Electric sander
PIN IT
Now It’s Your Turn!
Download the plan above or print it to start building you own. You can adjust your measurements according to your space. Hope you like it, and once you make it, come share it on our FB page with thousands of other followers!
The post DIY Computer Desk Under $50 appeared first on Bushra's Lifestyle.
from Bushra's Lifestyle https://bushraslifestyle.com/diy-computer-desk/
0 notes
Text
How to Build a Slat Wood Pergola
When we began our patio makeover, I knew I wanted to make a slat wood privacy fence, but I was a little stuck about how to provide some shade. We love dining al fresco, but the sun shone so strongly onto our dining area, dinner often was served with a side of sunburn. No, literally—I would get sunburned on just one side of my body while eating out there. I considered stretching a shade sail, mounting a retractable awning, or just using umbrellas. But in the end, I knew only a pergola would give us the intimate outdoor dining experience I wanted.
As far as wood slats are concerned, I’m definitely team The More the Merrier! So, of course this pergola idea evolved into making not just any old pergola, but making a slat wood pergola to go with our slat wood privacy fence. I had considered adding a retractable fabric shade for the pergola, but the slats ended up being fairly simple and inexpensive additions that make this space feel so cozy and nice. I’m so glad we took the time to add the slats to the pergola. The shade the slats offer is so nice, but we still have the sense of being completely outside with plenty of bright light and breezes!
Before & After
The before and after of this space feels so insane to me! I had never really viewed our patio as any kind of extension of our home. It was just this big looming project, and never anywhere we wanted to hang out. We had a hand-me-down dining set that served us well during the first year of living here, but obviously, the Article Tavola table and Sala chairs are absolutely stunning. They have the style factor of an interior dining set, but with the durability for outdoors. (We will put covers over all of our outdoor furniture when our Ohio weather turns too chilly to enjoy the space.) Article provided all of the outdoor furniture for this patio makeover, definitely making the space complete!
Before putting up a pergola, you need to have a tall fence or support posts with a top beam in order to mount the pergola beams. You can check out my post about building a slat wood privacy fence where I talk about mounting posts and creating the base which we used to support one side of the pergola.
Supplies:
Metal hangers like this or this
Coated deck screws
2×6 treated lumber (You’ll need enough of these to be spaced 2′ apart)
Lattice strips*
Tape measure
Power drill
Chop saw
Nail gun or hammer and nails
*Sourcing Lattice Strips
I recommend you check out the section of my slat wood fence blog post where I talk about sourcing lattice strips. You can buy pre-cut treated lattice strips at places like The Home Depot and Lowe’s, but I had a bad quality experience with the slats I received. We ended up making our own treated slats for above the pergola, and it was really nice to just use really long strips instead of having seams where shorter strips would meet up. I wrote everything you need to know about sourcing strips as well as making your own. Check it out here!
Building the Pergola
Step One: Mount steel hangers in a level line on your house and on the fence/support posts. You can usually find these hangers near the treated lumber or outdoor building supplies at any hardware store. I recommend using 2×6 treated lumber for the beams of your pergola, so make sure the hangers go with 2x6s. The specific style of fasteners/hangers you will use to hold the beams into place varies depending on what you’re mounting them on. You can see that on the fence I was able to use a style of hanger that rests on top of the top board of my fence. I used that style there because there wasn’t a post at every point I wanted to hang a beam, but there was a top board. On the house side of the beams, I used hangers that screw into the house.
Our house had a convenient wood trim board for mounting the hangers. I used long enough screws that also went into the structural beams of our house, so the hangers would be secure. If you have siding, I would consider removing a length and adding a strip of redwood for mounting the hangers. (Redwood won’t rot.) When we built a pergola at our old house, we mounted the hangers onto brick. You’ll just need to use a hammer drill with a masonry bit and Tapcon screws for drilling into brick/mortar.
Step Two: Measure the distance between each hanger. You’ll want to take the time to measure each individual distance. If your fence or supports aren’t spaced exactly the same from your house, you may end up with boards that are too short or too long. I took notes for each distance and drew numbers beside each hanger and on each board. This ensured the boards we cut went into the right spot.
Step Three: If you don’t want the natural wood look, paint or stain all of your beams and lattice strips before mounting them. This was the most time consuming aspect of the project by far! Each lattice strip needed painted before it went up, or the unpainted top would look bad from my bedroom window. Little details like that matter to me!
Step Four: With the help of a second person, slip the 2×6 beams into the hangers and use screws in the designated holes to secure the beam to the hanger. If your boards are warped even a little, a clamp is helpful to twist the beam into position before screwing it into place.
Step Five: Climb up a ladder and nail the strips into place above the pergola beams. We used a 1/5″ square dowel as a spacer to make sure each strip was evenly spaced. We used a nail gun for this, but if you don’t want to rent or use one, you can use a hammer and nails. Just be ready for a workout if you go that route!
Check it out! The slat wood roof provides such a nice textural element and gives us the perfect amount of shade from the hot summer sun. Covering a portion of the patio also helped make the dining space feel more intimate and set apart from the lower portion of the deck.
Adding this slat wood pergola made all the difference in our patio makeover. We’re so glad we decided to add this extra element! Let me know if you have any questions about the process—I’m happy to answer them in the comments below! – Mandi
Credits: Author and Photography: Mandi Johnson. Photos edited with A Color Story Desktop.
from RSSMix.com Mix ID 8265713 https://ift.tt/2MdipdI via IFTTT
0 notes
Text
Ikea Hacking A Malm Into A Built-In Dresser
There will always be a special place in my heart for a good Ikea hack. Not that I’m dubbing this one especially involved (it’s actually wonderfully simple – which means anyone can do it). All it took were a few small tweaks to a basic $99 Malm dresser to make it look like a custom built-in at the beach house. And it has turned out to be the perfect thing for the funny little nook at the top of the back staircase in the beach house’s back bedroom.
rug / striped towel / leather hardware / gold mirror / bathroom table
You’ve probably noticed that one of our favorite ways to hack Ikea pieces is to make them look more built-in. Our first project like this was using Pax wardrobes to create a sleeping nook (and more closet space) in our first home’s master bedroom. That just involved adding a header and some crown around the top of the wardrobe boxes and foregoing doors for curtains. Easy peasy. You can see them on the left in the picture below:
That photo on the right above is perhaps our most intense hack, where we used the now-discontinued Fjell dressers in our son’s bedroom to create floor-to-ceiling bookcases (the fact that Ikea no longer makes these is a tragedy because they’re great solid wood dressers). That was a bit more involved with molding, paint, filler pieces around the sides, and shelves – but still really doable. You can read all about the process here.
But back to our built-in dresser at the beach. I promised at the start of this post that this latest project was an extremely easy one. It basically boiled down to using trim pieces to make it look built-in, then adding a few customized elements – like leather hardware pulls and a thicker wood top – to make it a little more interesting and upgraded than the extremely ubiquitous dresser that we started with.
This is actually the main clothing storage for the back bedroom at the beach house (the one we stay in whenever we’re there) and it has been working out so well to have a dresser tucked back there now. Originally this room was completely open to the back staircase… meaning it was completely open to the kitchen downstairs (you could hear everything and anyone could run up without encountering a closed door).
It’s a huge upgrade to have actual doors that we can close before going to bed – and adding that wall with pocket doors not only provided some nice privacy, it also feels original to the house and doesn’t block any light from that window during the day (the doors remain open pretty much all the time except when we’re sleeping). We talked about it a little more in last week’s podcast, since it’s one of our FAVORITE decisions that we made in this whole house.
But adding that wall also created this nook, which we always figured would act somewhat like that room’s closet. At one point we were actually going to frame it in with a door and everything, but after living with it for a while we decided it might make this landing a little crowded and (since the stairs are narrow already) we preferred something that would keep the space feeling more open and less packed.
Lucky for us, the space was almost exactly the width of an Ikea Malm dresser. They’re a great budget dresser – only $99! – plus the flat fronts would nicely mimic the flat-front cabinets in our kitchen below. But to make it look like a built-in piece, we had to start by prying off all of the existing trim around the floor of that little nook. The Malm fit nicely wall-to-wall, but the added thickness of the baseboard and quarter round wouldn’t allow for us to slide in the dresser until we popped it off.
Once we had the dresser constructed and the molding popped off, we could then slide it into place, and we used some white filler pieces to fill in the gaps on either side (these were actually leftovers from the kitchen install – but a painted piece of 1 x 2″ board would do the trick). I just aligned them with the front edge of the dresser and fired my nail gun through the side of the dresser into them (and the wall behind them) to hold them there. There was still a little bit of gap, but nothing a little caulk didn’t fix later.
***NOTE: In addition to nailing through the sides of the dresser, we used the supplied hardware to anchor the back of the dresser to the wall. Like most dressers, the Malm is prone to tipping, so this is a vital step in installing a dresser like this***
You can also see in the photo above that I reinstalled the baseboard for that side filler piece to rest on (it extended just a bit behind the dresser on each side) but waited to add the quarter round until later. Also: that small piece across the front of the dresser is part of the Malm itself, so that isn’t something I added.
Once the baseboard was reinstalled and both sides were filled in, I cut the quarter-round molding and ran it around the dresser’s footprint – so it butted right against the dresser itself. Continuing the quarter-round along the front of the Malm is a big part of making it look built-in and a lot more seamless.
We actually hadn’t planned on adding the wood top originally, but when we got in installed the top was looking a little dinky. Fortunately, we had a scrap piece of butcher block counter leftover from the kitchen that was large enough. The walls aren’t perfectly square (thanks old house!) so we cut a piece of cardboard first to use as a template for cutting the counter. We only had one shot at this, so we took our time!
The result of all that slow double-checking and cardboard-templating was a perfect fit (huzzah!) so we let out a communal sigh of relief. It looks so much better with the thicker top, and the wood accent is a nice way to make it visually “belong” in this house (you know, with all the wood doors, pine floors, the matching counter downstairs, etc). If you don’t want to buy a whole span of butcher block from Ikea for this hack, you can buy smaller “project panels” or butcher block pieces at stores like Home Depot and Lowe’s (or you could just use wood planks for a similar look).
The other element that gave it a custom look are the leather pulls. We snagged these at Ikea when we picked up the Malm, and they’re $10 for a set of two. There are similar options on Etsy too (you can get these in a bunch of different leather colors), but really any kinda of hardware helps these plain jane Malms look a little more interesting.
My only tip for installing the hardware (besides measure, measure, measure!) is to take some effort to prevent splintering when you drill your holes. The white finish on Ikea pieces is quick to crack when drilled, and can easily flake off – sometimes in big chunks.
I wasn’t too worried about the front of the dresser because I knew the leather pulls would cover a lot of sins, so I simply used a piece of painter’s tape to drill through on the front side to discourage any splintering or cracking. But since the finish is more prone to flaking at your drill bit’s exit point than it’s entry point, and because there wasn’t much to hide damage on the backside of the drawer (it was just the screw head back there) I clamped a piece of scrap wood tightly to the inside of the drawer. It worked like a charm and I was grateful that I took the precaution.
And of course, the unsung hero of the project was caulk. We used it to blend all of the seams in the baseboard, plus any remaining gaps around the wall, which made the whole thing look a lot more polished.
We hung one of Sherry’s favorite mirrors above it because a mirror is always a good option for a small space, and the gold finish picked up the warm wood tones nicely. We don’t keep anything on top of the dresser because when we’re there for a quick stay, we just plop our suitcase on top and live out of it, but it has been really nice these last few weeks to actually unpack clothes into the drawers for our longer stays.
Also, if you’re like my dad and you live in constant fear of someone falling down these stairs (don’t worry – the only falling we’ve done on them is UP. Yes, both Sherry and I have tripped going up them, but it has only resulted in a stubbed toe or two), I wanted to show you this picture with me in it for scale. There is thankfully plenty of floor space behind the dresser to stand and comfortably get clothes out of an open drawer without worrying about taking a tumble backwards. In fact, I’d have to do a pretty epic backwards lunge if I wanted to get my foot over the overhang.
And again, if you’re interested in checking out some of our previous Ikea hacks, here are a few favorites:
Our first bedroom’s built-in Pax wardrobes
A wood-wrapped Expedit bookcase that became a changing table
Two Fjell dressers that became built-in bookcases (that post is mostly about the Ikea hack, and we separately blogged about adding the shelves and trimming it out)
Using a Pax as a custom mudroom closet at the beach house
Customizing a Vittsjo shelf with spray paint and contact paper
And for other furniture hacks and DIY ideas, we have a whole category for ya. You can peruse all of those posts here.
P.S. If you’re looking for beach house paint colors info – or to find out where we got nearly all of the furniture, accessories, rugs, and other stuff in the beach house – this page has all of that info for you.
*This post contains affiliate links*
The post Ikea Hacking A Malm Into A Built-In Dresser appeared first on Young House Love.
Ikea Hacking A Malm Into A Built-In Dresser published first on https://bakerskitchenslimited.tumblr.com/
0 notes