#i got here by clicking the new post option in the three bar drop-down menu on the top left
Explore tagged Tumblr posts
Visit Tumblr Blog
Explore Tumblr blogs with no restrictions, modern design and the best experience.
Last Seen Tumblr Blogs


Fun Fact
The KCSC sent more than 20K requests to delete posts related to prostitution and porn to Tumblr from January to June 2017.
Text
Make google my homepage in safari
Make Google My Homepage in Any Browser How to Make Google My Homepage in Chrome, Mozilla, Safari and Microsoft Edge?How to Make Google My Homepage iPhone, Android and Windows Phone?Make Google my homepage on Android Make Google my homepage on iOS/ iPhoneMake Google my homepage on Windows Phone
The World of Internet is increasing rapidly and it has changed the entire world by many important discoveries and helping humans in many ways in the technology race. But there are still many people who are not able to get Perfect Knowledge due to the fact that there are many search engines which don’t have a good Database of Perfect and Updated Knowledge as Google. Many Browsers don’t even set Google as the homepage. Here in this post, I will tell you how I found the best way to make Google my homepage in any browser and got the access to the Database of more than 5 million pages which are regularly updated.
Despite being a very good search engine yet, Google is not set as default homepage in may of the popular browsers which are used commonly by all people. This is the reason people are not able to get the preferred result of their problem. The best way to get rid of this major problem is to make google my homepage and enjoy surfing the internet.
Are you getting tired of turning your browser away from whatever your homepage is to visit the Google homepage? Would you like to automatically open Google’s homepage every time you used your browser?
There are many ways to Make google my homepage in safari depending on the browser we are using. Here in this guide, I have tried to help you in the way how I am able to Make Google my homepage in almost all the popular browsers that are used in real-time.
How to Make Google My Homepage in Chrome
Google Chrome is the most commonly used web browsers across the world as it gives the best results and is very fast and handy to use browsers till now. Google Chrome is available for almost all devices like Windows, Mac, Android, and iPhone.
So here in this guide, I will tell how I make Google my Homepage in my Chrome browser. Read the Guide carefully and follow all the steps so that you can make Google as your Homepage in your browser.
1. Click the More button, a.k.a. the three dots you can find at the upper right of the screen. Then select Settings.
2. Scroll until you find the Appearance. Here, look for an option that says Show Home button. Make sure that this is checked. It should automatically bring up the www.google.com/ address, but if it doesn’t you can click Change and type it in.
You can also sign into Chrome and sync your settings to make sure the change is fully applied to all devices and Google is set as the homepage for all your devices.
Note: This option may not work if you are using Chrome on a tablet or phone, where settings options are a little more limited.
How to Make Google My Homepage in Mozilla
If you are using Firefox and struggling to make google your Homepage then no need to worry as Mozilla offers the easiest method to You just have to follow some simple steps given below,
1. Open up Firefox, and go to the Google home website with the search bar you know and love.
2. Click/Select the tab itself (the bumper where the title of the page usually is) and hold down. Then drag that tab right, over to the homepage button that Firefox uses in the taskbar – it looks like a little house and you can easily see that.
3. This will bring up a quick notification asking you if you really want to set this on your homepage. Select Yes, and you’re done.
Note: If you want to delete and replace current homepage options more directly, click the three-line menu button and go to Preferences. From here, select the General tab and look for the Startup under Home Page, choose to Restore to Default, which will clear any past choices.
How to Make Google My Homepage in Microsoft Edge
Well, Edge is not very Popular Browser but yet it is used by many of the people so it’s also very necessary to know how to make google my homepage in Edge.
Just follow the steps below and know how to set Google as your Homepage in Microsoft Edge.
1. First, open an Edge Window and select More actions (the dots in the upper right of the screen) and then Settings.
2. Then select View advanced settings from the list. This will provide a number of options to toggle – look for the one that says, “Show the home button” and make sure that it is toggled on. Then set it to “A specific page” in the drop-down menu. In the space below, enter google.com and Save your choice. Now, whenever you click on the Home button you will be able to see that now Google is your Homepage.
If your idea of a home setting is more along of the lines of, “Whatever page that opens when I start Edge,” ( set Google your Homepage for all new Pages) then you can do that too. Under the Settings options, look for a choice that says “Open Microsoft Edge With.” Here you can enter google.com for the effect you want.
How to Make Google My Homepage in Safari/Mac
Last but not the least of Browsers but I am sure Last in popular browsers used by Lakhs of People. Safari is inbuild browser of Mac Computers.
So this guide will not be only for how to make google my homepage in safari but also How to make google your homepage on mac.
Follow the Simple Steps below and Make Google your homepage on Mac having Safari Browser.
Safari allows many different ways to make Google your homepage depending on the way to prefer to browse content on Safari.
1. First open up Safari, select Safari in the upper left corner of the screen, and then select Preferences. From here, select General.
2. Look for the heading that says Homepage with space next to it. You can either type in google.com, or if you’re already on the Google site you can choose the button below, which says Set to Current page.
3. Next, choose set to current page for making use of that webpage.
4. Open some more windows and a pop-up menu will appear, choose homepage option.
5. Close the browser and restart it. After that, you will be able to browse the internet via Google search engine. and Google will be available as your homepage.
Whenever we buy a new phone we usually search for a good browser so that we can surf the internet easily and take the most out of our device.
Not all but many People prefer Google Chrome as the best browser and almost every user wants Google as the Homepage or Startpage of the browser.
Here in this Guide, I will tell you how you can easily in your Phone browser.
Open the browser app and select Menu > Settings > General > Set Home Page and type in www.google.com.
While you can’t set mobile Safari to a home page, you can create a shortcut. Type www.google.com in the text bar of the browser and then at the bottom of the screen select the icon with an arrow coming out of a page. Choose Add to Home Screen and you’ll get a shortcut on your Home screen that will open up to Google every time.
On a Windows Phone, you can create a tile for Google by downloading the Google search app from the Store and pinning it to the start screen.
1 note
·
View note
Note
Your gifs are beautiful and so clear! Have you ever done a tutorial on how you get them so flawless and well lit? Like esp DS9 and TNG gifsets! I love your work so much!
@maylovelies
Wow! Okay, for starters: Thank you so much! I really, REALLY appreciate the kind words and the time you took to send this! I really enjoy making gif sets and I’m always so glad to hear that people like how I edit mine.
To answer your question, yes, I have made a tutorial post in the past, but the method I used back then I’ve strayed from a bit, recently. Some of it I still use, but in reference to lighting and getting them to look a little more high quality, there are some other techniques I’ve been working with lately and really enjoying the results…
I can walk you through with a new example.
Here’s a quick gif from a scene of DS9:

and I’ll do a rundown on how I got it to look like this:

Going to put the rest of this below the cut, though, because it’s significantly longer than my last tutorial-based answer…
So! One trick is to not be afraid to stack up a few adjustment layers of the same variety, sometimes even duplicates of the exact same layer, on top of each other. The reason I do this is because wild adjustments on a single adjustment layer are a lot less controlled and will often effect the wrong parts of the scene’s lighting (by that I mostly mean shadows v highlights).
I edit for light first, personally. Here’s where I am after doing those corrections

Already looking a lot better and clearer. This was done using three adjustment layers.

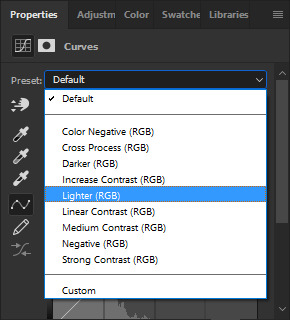
The curves layer is just a basic “lighter” preset that you can find from the drop down menu once you open a new curves layer
The levels layer I start by using the preset “lighten shadows”

at that point the image looks very washed out and grainy

(still image)
so from there i just messed with the layer a bit until I liked it a little more, added some contrast and adjusted the distribution of light, etc.

which got the image looking like this

(still image)
But I still thought that looked kind of washed out and flat, so, lastly, I added a completely custom exposure adjustment layer where I pushed up the gamma correction and exposure settings (you can also push the offset into the negative to get a secondary effect similar to gamma correction, but it’s very harsh and temperamental, at times. I wouldn’t recommend it for first-time use)

that gets us back to this lightness corrected gifset, which I’ll post again now

You can actually get a similar look by using just curves adjustments and their presets. Here’s what happens if you take three (3) layers with the same curves “lighter” preset (see above) and then one (1) curves layer with the “medium contrast” preset.


and the results are pretty similar

Each technique lends itself better to different scenes. And obviously with either method (or a combination of both as tends to be the case on super dark scenes - cough, mirror-universe episodes, cough) you can customize a lot from these presets to get the desired effect. They just give you a good jumping-off point…
Now the first thing I always notice about adding brightness to these scenes is that the tones get very warm and muddy, so from there I usually like to color correct next.
I like to bump my vibrance and saturation sliders up before color correcting, but I know a lot of people do it after. That’s really just a matter of personal preference.
There are a handful of ways to color correct, and, just like with the lighting methods above, I tend to mix and match the various adjustment layers. I’ll use Color Balance (as illustrated in my previous tutorial) and I’ll also now use Hue/Saturation layers and Selective Colors layers.
Honestly, color correcting / color grading alone could be its own tutorial so I won’t go very in-depth on that here. But just play around with the settings and find a method that works for you. (If you feel like you’d want a specific run through on that, just shoot me an ask and I can cover it some other time in more detail.)
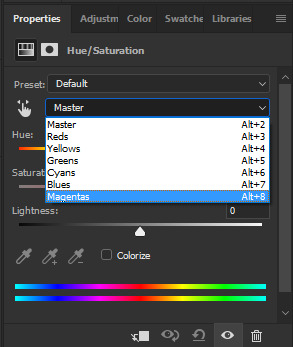
My one recommendation to help you avoid the big rookie mistake I made when I first started doing this is that with the hue/saturation layers, never use the Master slider option; instead, click the drop down menu and work on each color individually.
So here’s where we’re at once I bumped up the saturation and then did my color corrected.

You may notice how sometimes color correction darkens an image and undoes some of the work you did earlier (in my experience, this usually happens when you have to add a lot of blue in the color balance layer) You’ve got two options here. Either go back in to the previous brightness adjustment layers and lighten up some of the contrasts, or put a new layer over top of latest color edits to add brightness back in over top. Again, this comes down to personal preference. Experiment with either version and do whichever works best for you.
Here’s after I brightened it back up a little again.

Subtle difference, but it’s how I prefer it for this scene. Plenty of times scenes don’t end up needing it at all.
So the gif is looking pretty solid from there. In some cases, I’d actually stop right here and just add the quote text to the bottom and call it a day. But if you really want to make it look HQ, there’s a few additional steps…
Firstly, it helps to keep the images smaller (a retread of something I said in that other tutorial too, I believe) but after that, there’s a way to sharpen all the layers and frames at once while also reducing “noise,” both of which improve the quality of a gif.
To do that, take your frames timeline at the bottom of photoshop and click the little icon that looks sort of like a funnel going through a bar graph…

If you have history window open, it’ll say “Convert to Timeline” after you’ve done this, and instead of frames you’ll see a bunch of short purple lines instead of the gif’s individual frames. Don’t panic! That’s supposed to happen.
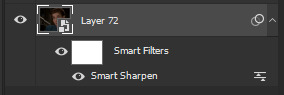
From this point, go to your layers window and select all of the layers that are frames of your gifs, which you can do by clicking the first layer - holding shift - then scrolling up to click the final layer - then releasing shift. They should all have the little eyeball icon on next to them, indicating that they’re all active. Then, right click the top layer and from the pop-up menu click “convert to smart object”

When you do this, all of the layers compress into one Smart Object with the name of the top layer.

Again, don’t panic!, you didn’t lose the other layers they’re just now all going to be affected by the sharpen filter instead of having to be edited one at a time.
Now, go to the top ribbon in Photoshop and in the drop down menus, go “Filter” > “Sharpen” > “Smart Sharpen…” and click that.

A little window will pop up that gives you a preview of how this filter will impact your image.
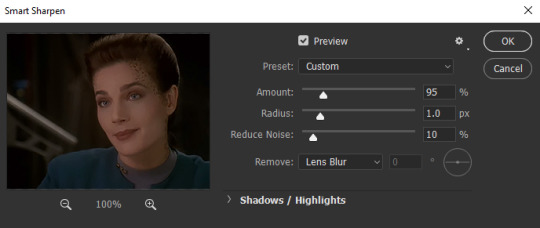
**notice that the smart sharpen preview does not show color and lighting corrections; that’s fine & because we are not applying this smart filter to any of our adjustment layers.
And what you do from here is again a matter of personal preference. Raise the sharpening amount too much and the image starts to look crinkly, have the noise reduction too high and all the detail gets smudged away.
Here’s an example of what happens if youwere to crank both the sharpness and the noise reduction all the way up:

(still image)
And I guess there’s maybe a place and time where something with this aesthetic would work for a particular scene or edit, but generally, I like to keep the settings pretty low. Sometimes, less really is more…
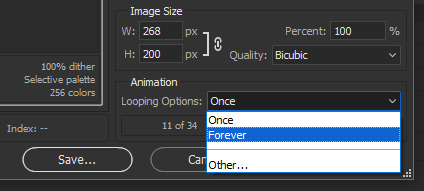
For a 268x200px gif of an 80′s or 90′s Trek show, I keep Reduce Noise at 10% and have the sharpening anywhere from like 85-150, depending on how much I’ve cropped in on the original camera crop. But for this gif, where I didn’t zoom in very much at all and pretty much kept it how the original videography framed her, keeping it around 95-115 works nicely.
When you’re done, click OK.
Now that Smart Object looks like this
And that’s pretty much it! Now, when you export your gif from Photoshop, it’ll look something like this:

The one thing you have to remember about this technique (and this is something that still trips me up from time to time, myself) is that when you export, it doesn’t automatically set the gif to loop forever. Instead, it’s set to “Once.” To fix that, when you click through “Export” > “Save to Web (Legacy)” and the Web window pops up, go to the bottom right corner and above the “Save” button there’s a drop down menu in the “Animation” section. Click there and switch from Once to Forever.
And there you have it! Start to finish, that’s how I make my HQ gif sets!
I know it seems like a ton of work for one lousy gif and super overwhelming at first and hard to remember, but once you get into the swing of things it all becomes very second nature.
So thanks for asking and thanks for reading. Hopefully this was helpful, please let me know if you got anything out of it.
And, of course, feel free to reach out with any other questions or requests. I’ll always try to do the best I can and answer. ♥
#gif tutorial#gif making#photoshop#photoshop tutorial#ds9#tutorial#answer#gif making tutorial#hq gifs tutorial#maylovelies
93 notes
·
View notes
Text
Split Screen App For Mac Yosemite

Mosaic for windows management
Split Screen Mac Yosemite
Split Screen App For Mac Yosemite Windows 10
Split Screen Mac Laptop
Split Screen App For Mac Yosemite
Using Split Screen On Mac
Swipe three fingers up to see the screen with all your apps spread out and at the top there will be windows with all your full screen apps. Go all the way to the right of that with your mouse at the top and a window with a + sign will stick out from the side of the screen. Click it and it will create a second desktop. Split-screen is there to carry on the operations, twice. Better control on mailing features. Photo-Editing is been made easy. Up to 2x faster app switching. Mac OS X El Capitan 10.11.6: Important Product Details.
Swiftly organize active windows with drag and drop.
What tricks do you have in your bag to stay productive for extended periods of time? Some will say: single focus, no distractions, away from computers — and right into the Bronze Age. Because, let’s admit it, shutting everything down is simply not a viable solution for the modern workplace.
Today, our multifaceted responsibilities require us to have multiple windows open on our Macs at all times, fending off never-ending Slack messages while writing emails and managing our calendars. Looking from the sidelines, it might seem that what we do all day is just switching between full-screen app windows.
Split screen app + 170 goodies for Mac
Download Setapp to get access to Mosaic and a whole lot of Mac apps that will help you solve everyday tasks.
Split Screen Mac Yosemite
For years, our natural desire was to get more screen real estate by adding a second, third, and even fourth monitor. Numerous guides on how to do dual screen on Mac properly suggested a variety of ways in which screens could add to our working lives.
In the end, portability and convenience won when most of us switched to predominantly working on our laptops. But accomplishing the same amount of work with a smaller screen got even more challenging. That all changed as Apple released its OS X El Capitan in 2015.
How To Do Split Screen On Mac
Starting El Capitan, all versions of macOS have included a MacBook split screen feature called Split View, which lets you easily open two apps to fill the whole screen and adjust them as needed.
To activate Mac split screen:
Open two apps of your choice
Hold the green “full-screen” button at the top left of the screen
Drag the app to fill either the left or right side of the screen
Click on the other app for it to fill the rest
Note: some older, not frequently updated apps might not support Split View.
Feel free to experiment with various app combinations that would fit your work the best. If you need to see more than two apps, you can easily create another Split View on a new Desktop. To do that, just launch the Mission Control utility and click on the plus icon in the top-right corner of the screen. If you’re wondering how to switch screens on Mac in Split View, you can either go through the Mission Control or swipe left or right with four fingers as a shortcut.
To change the portion of the screen used by each app, simply drag the divider in the center to either side. To quit Split View, either press Escape, the same green “full-screen” button, or use a shortcut Ctrl + ⌘ + F.
Use better Mac split screen alternatives
The Split View Mac provides by default is arguably twice as good as using just one app at a time. But it doesn’t go beyond that. What about four, six, or eight times the productivity? Alas, the Split View can’t give us that — it’s only up to third-party utilities to fix.

Best app for splitting screen on Mac
Get Mosaic, the most robust split view tool. Tons of layout arrangements and ease of use while managing windows on Mac.
Mosaic is a Split View Mac alternative and most likely the last window manager you’ll ever need. Unlike Split View, Mosaic supports any kind of layout arrangement, whether you want to divide your screen in rows, squares, columns, or a completely custom grid.
To split screen on Mac with Mosaic:
Make sure Mosaic is launched in your menu bar
Simply drag your app windows onto the preferred setup
You can also create new Mac split screen configurations by clicking on the Mosaic menu bar icon and then Preferences ➙ Quick Layout.
Split Screen App For Mac Yosemite Windows 10
With Mosaic you can customize your screen to fit your needs precisely and thus considerably increase your productivity. As a bonus, when you find the original Mac split screen not working or being unresponsive, Mosaic can be the answer, as it’s based on a third-party technology and is compatible with all apps.
Create and save custom workspaces
While using Mosaic as a better Split View Mac alternative will help you keep all the app windows in place, reopening every app and file you need for your work can take lots of time.
Workspaces is an automated solution that lets you create custom workspaces for all major activities. It allows you to bring apps, websites, files, emails, and whatever relates to a project or task into handy spots. For example, if you’re about to code something, you can get Workspaces to open your text editor, FTP transfer app, Terminal, your framework of choice documentation in Chrome, and anything else you regularly use.
With Workspaces, you can curate as many project toolkits as you like and switch between them with ease. Every workspace is available from the menu bar. Best of all, you can set up automatic activation for those workspaces that are always associated with a specific type of task.
To create a new workspace in Workspaces, click on the app menu bar icon and select Edit. Then simply add any app or file via the plus button — you can drag and drop the items that are stored on your Mac and paste or type websites. That’s it.
Just like that you can compartmentalize all your work into categories and open all the materials you need in one click.
Do more with Mac split screen and workspaces
The Split View Mac supplies by default is a definite boost to your productivity in the today’s work environment. However, if you need more flexibility in how precisely you configure the app window arrangement, look no further than Mosaic.
In addition, combine everything you need into detailed packages and call on them at any time using Workspaces. This way you can easily divide responsibilities or separate work from personal life. Most importantly, you stop wasting time on opening all the right documents and turn on the always “ready to go” state.
Split Screen Mac Laptop
Best of all, both Mosaic and Workspaces are available for a free trial through Setapp, a platform of more than 180+ Mac apps that cover productivity, task management, creativity, and more. Arm yourself with the utilities you need to go through your day in the productive state of flow.
Setapp uses cookies to personalize your experience on our website. By continuing to use this site, you agree to our cookie policy.
Split view is a new feature in Mac OS X El Capitan which allows you to put two full-screen apps together, dividing them side by side. Just like, for example, you can put a Safari window in full screen mode and share the entire screen with another application, such as Pages. When you enter Mission Control, all windows are now separate, which is a small change from Yosemite, where Windows for the same application was cascading behind each other. The easiest way to start the split view is to click the green button in the expansion window until you see the Split view option. Today, we are here with a trick by which you can easily resize Windows Split View on Mac OS X El Capitan.
Yes, this is possible in this way, as discussed in the article below How to rscale the Split view windows on Mac OS X El Capitan following the steps below.
Step 1. First, hover your cursor between the two windows.
Also read: How to enable split view on Mac OS X El Capitan
Split Screen App For Mac Yosemite
Step 2. Now you need to look at the dividing line between them, which is to resize Windows.
Using Split Screen On Mac
Step 3. Now click and hold the dividing line and drag it to the left or right, as needed.
Step 4. That’s it! You are now ready.
So above, it all comes down How to rscale the Split view windows on Mac OS X El Capitan. I hope you enjoy it, so don’t forget to share this post with others.
Originally posted 2020-04-07 20:50:24.
The Techgadgetguides is a participant in the Amazon Services LLC Associates Program, an affiliate advertising program designed to provide a means for sites to earn advertising fees by advertising and linking to Amazon.com Inc.
0 notes
Text
How to Import Google Docs to WordPress in 2021

Google docs is the word Processing tool which is ready to use for user and teams. It gives high-level editing and collaboration tools at no cost with no limitations. In this informative guide we will discuss on how to import Google Docs to WordPress. However in relation to transferring the document out of Google Docs for a WordPress site, it won’t play well. You’ll lose all of the formatting and images in the procedure. Well, maybe not anymore. Automattic has just published a Google Docs add-on, enabling you to instantly save Google Docs documents being a draft onto your WordPress site. Within this informative article, I’ll also reveal how it is possible to use this add-in to save documents on your wordpress.com or your own self-hosted wordpress.org site. If your post in not ranking so please read our detailed guide. This guide will help to increase rank your post in Google search.
Prerequisites for import Google Docs to WordPress
Listed here are a few of what’s needed for your add-on to get the job done.
For wordpress.com
->websites A Google account to make files and combine it with all the wordpress.com website. ->Any type of browser. ->A wordpress.com website with administrator rights(i.e., wordpress.com account).
For self-hosted wordpress.org websites
->A Google accounts to create the documents and connect them with the wordpress.com site. ->Any type of browser. ->A wordpress.com website with administrator rights(i.e., wordpress.com account). ->Jetpack plugin has to be installed and active on the wordpress.org site. It’s compulsory to really make the add-on working on self-hosted websites.
Process of Import Google Docs to WoredPress
Before following the instructions below, make sure that you meet all of the above requirements depending on the type of your website.
Install the add-on Plugin
Before implementing the add-on, you will need to install it and connect it to your WordPress website. To begin with, start the WordPress.com to Google Docs add-on page and click “FREE” to setup the add-on.

A Google Docs document will begin to a new window, and you are going to be requested to exhibit the needed permissions. Click here “Continue,” after which “Allow” provides the permissions and install in the add-on. If possess administrator access into the self-hosted wordpress.org site (i.e., simply the owner could join the add-on).
Link your WordPress Website
After installing the add-on plugin, you’ve got to link your desired site. To achieve this, then click the”add-ons” menu in Google Docs and select “Open” from the menu “WordPress.com for Google Docs” add-on.

This will begin the add- on the right side bar. This will start the add- on in the right sidebar. Click the “Authorize” button here to begin the authorization procedure.

A brand new tab will start, at which you’ll have to log in with your wordpress.com accounts (or even logged in). You’re going to be asked to pick your site by a drop down menu list of all the sites, which can be attached to a wordpress.com account. Simply pick the necessary site and click the “Approve” button to authorize it.

The window will automatically close, and also you’re likely to see or watch that the authorized site in the Google Docs side bar.

In case you enjoy to authorize more sites, then click to the “Add WordPress Website” button at the end of the side bar which authorize it. It’s likely to replicate the task to add as much sites as you want. The authorization process is also the same for a self-hosted website. Just be certain that the jetpack plugin is setup and installed, then authorize it with the directions above.
Save Google Docs documents in WordPress
It is pretty simple to store your valuable documents into WordPress like a draft. Whenever you are finished editing your document, then click the”Save Draft” in the side bar adjacent to website name. The file will probably be transferred into a WordPress website and also stored as a”Draft”. In the event you update the draft, then simply alter the Google Docs Document and click the”Update Draft” button in the side bar.

The add-on will ensure the majority of the formatting and graphics are all since it’s transferred in the WordPress web site editor; thus, you might well not have to develop any changes. Obviously, the add-on is still not perfect and could bypass some of those complex formatting (such as design). But the majority of the frequent formatting remains complete. For testing purposes, I generated a Google Docs document with dummy text and a few images. Additionally, I implemented the majority of the frequent formatting to view how they pass on, such as headlines, bullet points, bold, italic and underline, etc. Once I opened up the draft in the WordPress editor, then the majority of the formatting was absolutely united. The images had been perfectly aligned also.

I also check the html code of the article, and it had been excellent with no undesired entries. You may view it in the screenshot below.

Basic Troubleshooting
WordPress.com sites should not have any issue becoming authorized. But lots of users have confronted difficulties while attempting to connect their self-hosted wordpress.org site with jetpack installed. The add-on is new, and it has many bugs; it depends upon the”jetpack” plugin for the time being. Many users can face problems based within their site installation, jetpack plugin installation and along with other factors. Here I am giving several of the standard solutions which have been effective for some users to resolve the authorization issue. It will be likely to consult with them if you face a comparable matter. ->Be sure that the website you are analyzing on at least three or more days old. Jetpack plugin faces difficulty in authorizing domain names which are recently enrolled. ->Confirm the latest variant of this jetpack plugin is already installed. ->Disable the rest of the plugins except jetpack and attempt. It’s possible to re-enable them whether it works. ->Disable Cloudflare security if you’re deploying it. It is possible to enable it afterward. ->Change the theme into the WordPress default option (when possible) and then see whether it fixes. It may be a concern with this subject. ->Security solutions have been recognized to cause authorization issues. Try temporarily disabling and authorizing your security solutions. ->Here’s a listing of mistakes that are related to the jetpack plugin. If you encounter any, follow the instructions given to fix it. ->If you remain not able to eliminate the issue, contact jetpack Support. ->You might need to speak to your hosting service to be certain that there isn’t any trouble in their own end. However, I would advise you first to contact Jetpack Support and seek their advice. If you want to read more please click below https://askjitendrakumar.com/google-docs-to-wordpress/ Read the full article
0 notes
Link
Facebook is one of the most well-known social networking sites today. It is undeniably one of the most highly used sites. Although it is a great networking site to not only reconnect with your friends but also gain knowledge and news about various topics, Facebook can also be quite time-consuming. Facebook is one of the most luxurious gifts of technology if you know how to use it the right way. It is honestly brilliant how one can make use of Facebook to video call, and text people.
If you’re anything like most people, I’m pretty sure that you spend a lot of time texting or browsing through your Facebook feed due to which you not only end up procrastinating your work but also end up wasting quite a lot of time. Moreover, Social media can also get quite overwhelming sometimes. In the platform where somebody posts pictures for the sake of others validation makes you want to do the same.
With that said, you must be wondering how you can deactivate your account. Well, if you’re looking to get away from social media for some time to become productive and finish all the goals that you’ve wanted to, there are ways that you can use to delete Facebook permanently or deactivate it temporarily.
Recently many Facebook users started deleting their Facebook account due to Facebook addiction. Here in this post, I have given steps on How to deactivate and delete your Facebook account immediately without waiting for 14 days, You can also follow my previous post to delete Facebook messages or delete Facebook Photos.
FB Delete vs Deactivate:
You may have this question when I say you can deactivate or Delete your account, so here are some difference between Deleting and Deactivating your Fb account.
Deactivating your account won’t delete all your Facebook data, instead, it hides your timeline from your friends, But when you choose Delete Facebook account, your whole FB data will get deleted.
In a Deactivated account your friends can invite you to an event.
A Deactivated account can be Reactivated by you at any time, where you can’t reactivate when you delete your account.
It is best to deactivate Facebook if you’re not able to keep track of your time or end up wasting hours together, texting somebody or just stalking people. You can take a temporary break, get your mind straight and then come back. If you aren’t willing to use Facebook at all in the future, then you can deactivate the account permanently.
Also read: How to Hack Your Friends Facebook Account
How to Delete your Facebook Account:
Permanently deleting your account can be quite a task. It can also affect the other profiles that are linked to your Facebook account. Facebook is one of the most highly evolved sites, and since it is used by many, it can be one of the components that can cost you your friendships. Not only this, but you will be missing out on a lot of news and entertaining memes. Social media is an excellent platform for gaining knowledge on current affairs and even the entertainment industry. Most people have awareness about what’s going on in the world due to social media. However, deleting your account is entirely on you. If you’re willing to go off social media permanently, here is how you can do it
So follow the below steps when you are asking “How do I delete my facebook account” in your mind, these steps will clearly guide you step by step to delete a Facebook account.
1. Step 1:
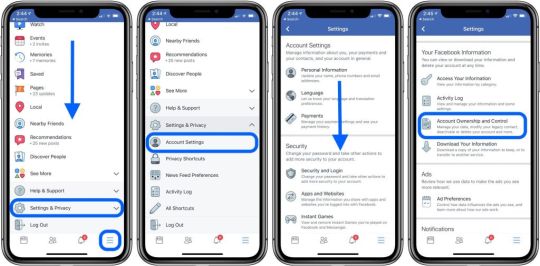
Tap on the account menu from the menu bar, which is located at the top right corner of all the Facebook timelines and other pages.
2. Step 2:
After Selecting the account option, there is an option which lets you download all of the data that Facebook has stored. This option is there in the general settings.
3. STEP 3:
Now go to the ‘deactivation and deletion’ option that you will find in the menu bar under “Your Facebook Information”. After going to the page, you’ll find an option that says ‘delete account’. Click on it; follow the steps thoroughly.
4. STEP 4:
You will have to reenter your password now. After entering it, you will be asked a few questions. Finish answering them, and your account will be deleted permanently.
Or follow these steps
Take Backup of your Facebook data (In case if you have any idea on your mind of coming back to Facebook, anyway this will be a safety precaution, no need to regret after deleting your Facebook account when you have a backup)
Follow this link “Delete my Account“ (link to Official Facebook site to delete Facebook account)
Click Delete My Account. (Clicking this will permanently delete your Facebook account.)
After clicking Delete My Account, A pop-up appears saying “Your account has been deactivated from the site and will be permanently deleted within 14 days. If you login to our account within the next 14 days.” Don’t Login for 14 days after clicking Delete my account.
Once your Facebook account is deleted, you can’t retrieve your data (unless you have a backup before deleting your FB account), but still, your friends could see your older messages that you have sent.
How to Deactivate Facebook account:
Deactivating Facebook has its own set of benefits and setbacks. Most of us end up signing up into a lot of websites through Facebook because we’re lazy to type our email and other details. So what happens to these accounts/websites when you deactivate? Here is a brief list of things that tell us about deactivating Facebook.
You will be able to reactivate your Facebook account at any time.
Your profile won’t be seen on the timelines of other profiles due to which no one will be able to find you.
Your direct messages will still be available to the user after you finish deactivation.
Facebook will save your entire profile’s data due to which all your information will be available just as it was on your timeline after you decide to deactivate your account.
After deactivation, if you immediately decide to reactive, you won’t be able to deactivate your Facebook account for another week due to the rules and regulations of Facebook. Hence, it is best to deactivate your account and not delete it permanently because this way, you can still have access to the reports and subscriptions linked to your Facebook account.
Deactivating your Facebook account is quite easy. With just a few steps, you’ll be able to deactivate your account instantly. If you want to deactivate your Facebook account, here is how you can do it.
Click the down arrow at Top Right in Facebook page.
From the Drop down, Click Settings.
Click Security in the left column, below General.
Click Deactivate your account, the bottom-most option.
Find the picture explanation below to deactivate Facebook:
1. STEP 1: Tap on the menu bar and go to click on the account icon.
Your Facebook timeline or any other Facebook feed, has a menu bar in the right corner at the top. Click on this bar after which a bar you will be able to see plentiful icons.
2. STEP 2: Go to the settings option.
After the above step, all you have to do is go to the settings from this menu bar. When you click the account icon, you will see multiple options from which you are required to select the settings option.
3. STEP 3: Click on ‘Your Facebook Information’.
Now, once you go to settings, you need to click on the option, namely ‘Your Facebook Information’. This option will mainly be in the left corner.
4. STEP 4: Tap on the manage account option.
Once you click on the “Your Facebook Information” icon, select ‘delete or Deactivate my account’, and a link will be open.
5. STEP 5: Deactivate your account.
You will now be able to see the option that lets you deactivate your account. You will have to reenter your password, and other details asked to deactivate your account. You can choose only to deactivate your account and not messenger if you want to text your loved ones.
If you got any issue in closing your Facebook account permanently, kindly let us know in comments.
Also Read: How to Delete Instagram Account.
How to Delete Facebook account using Android and iPhone App:
You can also close your FB account using your Android mobile or iPhone Facebook App, follow the below steps-
Open Facebook for Android App
Go to settings by clicking the three lines at the top right.
Tap Account Ownership and control.
Click Deactivation and Deletion.
Tap Delete account
Tap Continue to Account Deletion
Tap Delete Account
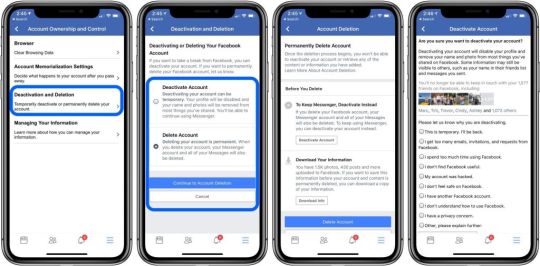
Image source: 9to5mac.com
If you don’t have a phone and you want to delete your FB account from your phone using Browser, just follow the first method using your mobile phone browser.
Also Read: How to Delete Snapchat Account
Note– You can’t reactivate your account after the permanent deletion of it. This is why you should make a deliberate decision and delete the account only if you’re sure about it. Moreover, You won’t have access to the other website accounts that are linked to your Facebook.
Some Frequently Asked Questions:
What is Deactivation and Deletion on Facebook?
Deactivation is a temporary deletion to your Facebook account, your account will be invisible until you log back in. but when you delete your Facebook account your account will be invisible for just 14 days and all your data will be erased.
How to delete facebook account without waiting 14 days?
You can’t do the immediate deletion, but when you click delete account, your account will go invisible for 14 days (actually like deleting the account), don’t log in for 14 days and your account will be deleted.
How to recover my FB account after deleting?
If it is before 14 days after deleting your account, then your account will be recovered just by login back. If you crossed 14 days after clicking delete the account, sorry your account is deleted and can’t be recovered back.
The post How To Delete Facebook Account Permanently (PC/App) appeared first on Waftr.com.
0 notes
Text
FluentU Review 2019: Learning Korean with Videos
Back in 2015, I first discovered FluentU and used it to support my early Japanese studies. Another language FluentU supports is Korean, and when they reached out again recently and invited me to test the app and all its updates in the past few years on a free trial, I thought this was a great chance to update my review and learn Korean with videos. So, here’s my updated FluentU Review.
What is FluentU?
I made a quick 3 Minute Review to explain what it’s all about. Click play on the video below to watch that, or read on if you can’t watch video right now.
youtube
FluentU uses genuine video content from the internet to create their video based learning. There’s a website and an app available on Apple and Android.
Typically for each video there’s optional subtitles added below and a quiz for the new vocab you learn in that video. These words and phrases are then saved as flashcards on an SRS system (spaced repetition.)
There’s a good range of languages too – Spanish, Chinese, French, English, Japanese, German, Italian, Korean, Russian.
So what’s it all about?
Here’s how it works. You browse the videos available for the language you’re learning by level, once you’ve spotted one that takes your fancy, pick it and watch. The subtitles appear below in both languages. You can also tap any word throughout for a direct translation.
What I noticed and really liked is that the videos are ordered in a logical order too for your ability.
I’ve been working through some really fun Hangeul songs that I would have never found otherwise.
When the video is done, you have the choice to play with a quiz to start learning the words featured in the video. This is done by multiple sample sentences, some from the video and others not, ensuring that you can identify and understand your new vocabulary in different contexts. Smart idea, huh?
This is what’s normally missing for me when I learn vocab. I learn a word and then I remember it (or not) but I have no context. So for me, having different sentence examples is a big advantage.
In a nutshell then, FluentU is a fun and natural way to learn languages without feeling like you’re studying too hard. Pretty nifty.
How much is it?
FluentU isn’t free. But stuff this good rarely is. However, the pricing is nice and simple.
You can join for 14 days for free to try it out. After that, you have just one simple payment option. Either you join and pay the monthly subscription or you can also save if you join via an Annual Plan. In fact, that gets you 4 months free, which is a really good deal. So if you’re looking for something new to use regularly, then it’s a worthwhile investment.
Click here to visit their site and sign up to the free trial to have a little look around before buying. (That’s my affiliate link, which means FluentU give commission to me when you join via my link, so it’s also a great way to support Lindsay Does Languages!)
How to Make the Most of FluentU
Ok, so now you know more about what FluentU is about and the basics of how it works, let’s take a look at how you can make the most of FluentU. Because when you’re paying for a subscription, that’s exactly what you want to do.
1. Download for Offline Use
FluentU naturally works better on a tablet or a computer. That’s not to say that it doesn’t work on a phone – it does. But it’s much nicer to use with a bigger screen.
And the great thing in particular about using FluentU on a tablet is that you can download for offline use. So wherever you are, you can be using FluentU to help you learn languages on the go.
To do this, simply click the cloud with a little down arrow next to a video from the main feed. To access your downloads, click the top three lines in the top left corner of the app to open the menu bar, click ‘My Content’, which will open up a drop down menu. Now click ‘Downloaded’.
2. Make Playlists
Much like when you log onto YouTube, when you open FluentU, you’re presented with an array of videos.
These are adjusted to the level that you’ve listed for that language, but to really make the most of FluentU, create playlists of videos you want to watch.
You could group these playlists around particular topics, specific grammar points, or something else.
To do this, simply click a video from the main feed and click the very top ‘+’ that appears in a circle. You’ll then see a page asking you which playlist you want to add this video to. You can select an existing playlist or click ‘New Playlist +’ to create a new playlist.
To view your playlists, simply click the top three lines in the top left corner of the app to open the menu bar, click ‘My Content’, which will open up a drop down menu. Now click ‘My Playlists’.
3. Review Your Flashcards
Whatever you learn from the videos and the quizzes is saved in your flashcards. These work on an SRS (Spaced Repetition System) basis, which means you can trusts FluentU will only show you something when you need to practise so you won’t be wasting your time.
The flashcards work like the quizzes after the videos, so you get to see most words in various contexts too, sometimes with additional video clips instead of images to help you remember.
If you click ‘Flashcards’ on the main Browse bar (All, Video, Audio, Flashcards), you’ll see a range of flashcard decks available for download. But, to view your own, you’ll need to access it from somewhere else.
To do this, simply click the top three lines in the top left corner of the app to open the menu bar, click ‘My Content’, which will open up a drop down menu. Now click ‘My Flashcards’. Here you’ll see ‘My Vocab’ and ‘Already Known’ at the top.
4. Filter content
The content you see in your main feed when you log on will be adjusted to your level already depending on what you said your level was for that language when you first signed up.
If you feel like a challenge however, you can adjust this to filter content to show only specific levels. Perhaps this would be a good chance to create a playlist or two of interesting videos you want to catch up on in the future.
Alternatively, you could also filter content by the topic. For example, if you’re really interested in art, you’ll have much more success using content that’s interesting to you.
Finally, you also have the option to filter via format. Are you looking for clips, music videos, commercials, movie trailers, news or something else? The format of the video you watch might vary the style of language used so this can be a useful feature to help make the most of FluentU so you’re only seeing the best content for your level.
To do this, simply click ‘Filter’ in the top right on the main page when you open the app. Then select your filter options – you can select multiple options here – and click ‘Done’ to see your updated video feed.
5. Set a Daily Goal
Goals work. You probably know already if you’ve read anything on the blog before that I love me some good solid language goals!
FluentU allows you to set a daily goal right within the app. It’s even possible to set a daily notification reminder for your device so you’ll always remember to study.
To do this, simply click the top three lines in the top left corner of the app to open the menu bar, click the Settings cog at the bottom, and scroll to click ‘Daily Goal’. And if you want to set a Notification, tap that too to pick when you want your daily goal reminder. You’ll also need to allow notifications for the FluentU app in the main settings on your device for this bit to work.
6. Multiple Languages
What’s great about FluentU is that for the subscription price, you get access to all the languages they offer. Currently that includes Chinese, Spanish, English, French, German, Japanese, Italian, Russian and Korean.
Already got years of experience learning French back in school but feel like gentle practise and a refresher alongside your new language? You can do that. And you totally should seeing as it’s included in the same subscription.
To do this, simply click the top three lines in the top left corner of the app to open the menu bar, click the Settings cog at the bottom, and scroll to click ‘Language’.
Join FluentU
Ready to join FluentU?
Click here to sign up now and enjoy your free 14 day trial to see if it’s right for you.
Your Free Ultimate List of Language Learning Resources!
Looking for more language learning resources? I’ve put together an ever-growing Google Sheets file with language resources for over 30 different languages. It’s totally free and you can get a copy when you join my email list by clicking the image below.

Have you tried FluentU? What do you think? Share your thoughts in the comments!
The post FluentU Review 2019: Learning Korean with Videos appeared first on Lindsay Does Languages.
from WordPress https://ift.tt/2Ybuyko via IFTTT
0 notes
Text
CS Oneshot: So Much For My Happy Ending
A Secret Santa gift for @jenswans. It was lovely getting to know you and you have been ridiculously patient with me! I hope this domestic modern AU with multiple meet-cutes exceeds expectations! You absolutely deserve it and much more!
5k | T | FF.net | AO3
The morning wind held a hint of spring as Emma yanked on the door to the coffee shop. She had been living in Boston for three months but had yet to find a regular coffee place. The place closest to her house was too pretentious, the one down the street had good coffee but was always crowded with college students, the one on the corner was decent but the blonde barista kept hitting on her. Emma didn’t think she was picky she just wanted a place that served simple, no frills, quality coffee, without ridiculous lines or having to endure awkward flirting.
Emma had high hopes that Cafe Hollow, despite its strange name, could be her place. It was painted in rich neutrals and littered with no-nonsense tables, the music was at a reasonable volume, the line was short, and the menu was a simple black signboard with white letters posted above the register offering simply coffee, espresso, Americano, and cappuccino and no option for sizes. Emma smiled–this was her kind of place.
“I don’t understand. You have milk, you have coffee why can’t you just make me a latte?” The raven haired woman at the front complained in an over-loud voice. Emma rolled her eyes. Why was it so hard to just order what was on the menu?
“This isn’t Starbucks.” Emma heard a male voice mutter lowly behind her and she nodded
“How can you even call yourself a cafe if you don’t serve latte’s?” The irate customer’s pitch rose.
“Seriously?” Emma murmured.
“Someone should tell her there are four other coffee shops on this block that would happily accept her patronage.” The voice added in a rich English accent. Emma gave a chuckle and glanced back to say hello to her fellow annoyed customer but stopped short.
He was a taller man with dark brown hair, a strong jaw covered in scruff, and a mouth quirked into a smirk that Emma found both endearing and dangerous. She gave him a small smile back as her heart did a strange leap and she turned back around to see the woman leaving in a huff. Emma pretended to be interested in the menu as she tried to center herself. It had been a long time since she had felt such an instant attraction–not since Neal– and the thought disturbed her, set all her personal alarms ringing. She ordered her coffee to-go and was striding out the door before the guy had a chance to try talking to her again.
Emma didn’t go back to Cafe Hollow. She told herself it was because their coffee was weak but deep down she knew it was because she didn’t want to run into “coffee guy” again. She knew it was ridiculous but after Neal, after being abandoned and betrayed, she just couldn’t trust herself or her gut when it came to men. Especially not drop-dead gorgeous men with accents and hair that looked softer than a puppy’s fur. She threw herself into her work that week taking on more skips than usual to make sure she was distracted.
That’s how she ended up at a bar called Neverland in a skin-tight red dress and heels that were killing her as she waited for her skip to show his face. She was busy watching the door when someone slid next to her.
“What a charming coincidence.”
Emma’s breath caught. Seriously? What were the odds? She turned from the door to face “coffee guy”. This time she noticed that he apparently didn’t like to do up the buttons on his shirt and he had a generous amount of chest hair. Despite the warming of her blood, she kept her face neutral.
“Is it?”
He chuckled. “You probably don’t remember but we were in line at a coffee shop not too long ago.”
“Sorry. Doesn’t ring a bell.”
He kept his smile but Emma saw a flash of disappointment behind his eyes and it made her want to come clean. Instead, she walked away and out of the bar. She was halfway home before she remembered that she had been there to do a job. She caught the guy two days later coming out of his girlfriend’s house.
Four days after that Boston was hit by a late Spring storm and Emma found herself trudging down the street trying to avoid the patches of ice as she ran down a lead on an embezzler. Her head was bowed against the cold when someone slammed into her and she went sprawling to the ground with them on top. When she finally registered who it was she cursed.
“Damn it.”
It was “coffee guy” and this time he was so close that she noticed a strange gold halo in his blue-green eyes.
“Apologies. I slipped and–“ He cut off as his eyes widened in recognition. “It’s you!”
He looked so utterly delighted with the turn of events that Emma felt herself flush. Was it possible he thought of her as often as she thought of him? Because she did think of him and found herself wondering just who he was and if he was as interesting as his accent and face suggested. But thinking about him was far different from having him on top of her and she felt her need to run rising up inside her. She pushed at his chest and he rolled off of her. Emma got to her feet awkwardly.
“At least tell me your name?” He asked from the ground. But she ignored him and took off as fast as possible, half-worried he would chase her even as she was sure he wouldn’t.
Despite her desire to not see him again, Emma found herself looking for him and she told herself it was only to be able to avoid another meeting. A week past with no sign of him and then two and Emma began to relax, the universe had given up on throwing them together. In the middle of the third week they found asbestos in her apartment and she was told she needed to be out by Friday.
It seemed almost impossible to find a temporary, furnished, place on such short notice. Everything she looked at was either far outside her budget or not available for weeks. She had lived out of her car before and could do it again but she thought she had put those days behind her. Desperate she refreshed the web page and a new listing appeared. With low expectations, she clicked on the link and was pleasantly surprised by the photos of a spacious apartment even better located than her place. The rent was reasonable, it was furnished, and available on a month-by-month basis. Worried she would miss her chance she pulled out her phone and sent a text.
Is your room still available to rent?
I posted it ten minutes ago…
So that’s a yes?
Emma knew she probably wasn’t making the best first impression but she was too anxious to care.
Yes. It’s available.
I’ll take it.
You don’t want to look at it first?
No. Pictures look great and it’s only temporary.
Emma’s stomach rolled as she waited for a reply. She needed that place.
I’ll pay you three months in advance.
Welcome aboard. I will take down the listing. I get home around 6 come by anytime after that.
K. See you then.
She gave a little fist pump and knocked her hand into the roof of the bug; ignoring the pain she smiled. It was the victory she desperately needed this week. She wasn’t worried about living with a stranger; she had spent her whole life living with strangers in foster homes and was pretty sure that whoever her roommate was she could handle it.
That evening just before seven Emma parked her bug outside the apartment building and sent a text to let them know she was on her way up. Then she climbed the three flights to the door with a shiny “J” on it. She knocked and waited with only mild apprehension. The door swung open and Emma’s jaw dropped.
“Seriously?”
Standing before her was coffee guy in a black v-neck sweater, jeans, and a smile on his face that was both shocked and pleased.
“Well, lass, this is serendipitous.”
And she knew it wasn’t his fault, that it was the universe punishing her by throwing him in her path over and over when she had decided to never see him again, but she couldn’t help being angry. “That’s one word for it.”
He chuckled, his voice deep and rich. “Now is that any way to treat your new roommate?”
As she looked at his smug grin she thought about turning and walking away but that would mean sleeping in the bug or spending a fortune on a hotel room and tomorrow she would be right back to apartment hunting.
She sighed and stuck out her hand. “Emma Swan”
“Killian Jones” He shook her hand slowly his thumb rubbing against the back of it. She pulled away. His forehead crinkled and she wondered if he felt it too that weird jolt of electricity–the feeling of deja vu when they touched. But if he did he didn’t say anything he just turned aside and swept his arm out. “After you, milady.”
And it was a ridiculous thing to say but he somehow made it sound almost normal. When she walked by she noticed that his left hand wasn’t a hand at all but a prosthetic. She didn’t call attention to it but wondered again just what his story was.
The apartment looked even better than the pictures which annoyed Emma. As he gave her a quick tour she was careful not to look at him and focused on her surroundings instead. When they got to the bedroom that would be hers and he asked if she had any questions she finally turned to him.
He was leaning against the door frame smiling as he watched her and the only question she could think of was if he always looked so damn attractive. She frowned.
“It’s an apartment, not rocket science,” she replied.
He smirked. “Ms. Swan I think this is the start of something beautiful.” She gave him a sarcastic smile. He pushed himself off the doorframe as he dug into the pocket of his jeans. “Here is your key.”
Emma held out her hand and he dropped the key into her palm.
“I made enough dinner for two if you are interested in fish and chips.”
“Not hungry.”
He paused giving her a searching look before nodding and leaving the room.
Emma sank down on the bed–it was soft and she was pretty sure the sheets and duvet were new–and rubbed the key absently. She thought briefly again of just walking away but then chided herself. She was an adult and while Killian Jones was handsome and attractive there was no reason they needed to become involved just because they lived together. Plus she had a sneaking suspicion that if she walked away they would just end up meeting again. She gritted her teeth and then dug into her wallet for the rent money.
She set the cash on the table next to his food. “Three months as promised.”
He didn’t even glance at the money, just fixed her with a wide grin.
“I’m going to get my stuff.”
He half-rose. “Do you need a hand?”
“Is that a joke?” She said flatly and then felt cruel when she saw the way his smile tightened. “It’s just a few boxes.”
He shrugged. “If you insist.”
Emma appreciated him not pressing the issue or making a big deal about her lack of stuff. When she came back up with her boxes he was gone and she breathed a sigh of relief.
She didn’t see him the rest of the evening–probably because she didn’t leave her room until she was sure he was asleep in his–and the next morning she got up early so she could avoid him again. When she got home late that night there was a note and a plate of food in the microwave but no sign of her roommate and Emma didn’t check to see if he was in his room. She managed to almost entirely avoid him for a week before the early mornings and late nights caught up with her and she woke up with a headache and lungs full of congestion. She still tried to work but her brain was too foggy and halfway through the day she went back to the apartment. She ended up on the couch heavily medicated and watching The Office. Somewhere between Jim returning and the beach party she fell asleep.
When she awoke it was to the sound of someone in the kitchen. She laid there wondering if she could wait for him to leave and then slink off into her room but then she got a whiff of what he was cooking and her stomach grumbled. She let out a groan and sat up.
“Good morning, beautiful,” Killian said in a far too chipper tone.
She glared at him; with matted hair, runny nose, and couch cushion creases on her face she was anything but beautiful. He grinned back as he moved toward her with a steaming bowl.
“Is that?”
“Soup,” he finished as he offered the bowl. “I also made grilled cheese if you are interested.”
Emma felt her mouth water and she must have made a face because Killian’s smile grew as she took the bowl and wordlessly he went back to the kitchen for the sandwiches.
They ate in silence. Emma too hungry to be polite and Killian too polite to try and make small talk. She did keep darting glances to him and occasionally caught him studying her as if she was a math book and he was trying to work out her equations. When she finished she put her bowl on the table and looked at him. She felt suddenly awkward.
“Thank you. For the food.” And she hoped he understood that she meant not just the soup but all the meals she had found waiting for her each night.
He hummed and gave her a look that was familiar though she was positive she had never seen it before. It was mischievous as if he wanted to tease her but was holding back. And her sickness had definitely lowered her barriers because she found herself half-smiling at him.
“What?”
“Oh, I was just thinking about the many ways a person can show gratitude.” And his tongue darted to his lips in a way that spelled trouble. She rolled her eyes.
“Okay, buddy. While you do that I am going to bed.” She stood up and immediately regretted it. Her vision swam with black and she felt herself sway. Killian was suddenly before her his hand and prosthetic at her shoulders. She blinked and waited for the dizziness to clear and when it did she was confronted with Killian’s concerned blue-green eyes.
“I’m fine,” she muttered.
“You sure, love?”
She nodded and he moved back but when Emma took a step the dizziness rushed up and she swayed again. Strong arms came around her and before she could protest she was being lifted up. She was too disoriented to even protest as he carried her toward her room.
“Don’t worry, Swan. I tend to have this effect on women.” And despite feeling like a rung out dishtowel Emma smiled into his chest. He laid her gently down on her unmade bed and then disappeared only to return with a water bottle and some pills. “Now take these and get some sleep,” he said in a no-nonsense tone.
“Aye, aye Captain.”
He looked surprised for a moment and then nodded. “Right. I’ll be outside just call if you need anything.”
He walked out and closed the door quietly. Emma took her medicine and turned over in her bed, her heart swelling with something foreign. It felt nice to have someone take care of her. To be sick and but not alone was a new experience for her and instead of giving herself a lecture she gave a little smile and then drifted back to sleep.
The next morning there were eggs waiting for her and a note in a flowy script encouraging her to get better. That night Emma made dinner for the both of them and when Killian came home she didn’t run into her room but stayed and ate with him. The only indication that he noticed a change was the occasional arching of his eyebrow and the twitching of his lips from a suppressed smile. They talked and Emma was relieved to discover that Killian was both interesting and funny.
It turned out that he worked on a sailboat taking rich tourists out on the water or doing private cruises and had a wealth of stories to share. When Emma told him about her job he grinned.
“I knew you were a tough lass.”
She tried hard not to preen at his compliment. It was a nice change to have a guy impressed by her profession. After they finished eating he insisted on doing dishes and though Emma slipped back into her room immediately she didn’t set her alarm for an early wake-up.
After that Emma no longer tried to avoid Killian. They would get ready in the mornings on top of each other. Trading off shower time and brushing their teeth together became a habit. There were a few awkward moments– like when she forgot her robe and had to run to her room in nothing but a towel or when he came out of his room with his dress shirt unbuttoned and Emma spilled her milk in her distraction– but none of it made her want to go back to avoiding him. If they were both home at night, which happened more often than not, they would have dinner together and watch something on the TV. It became easy and familiar in a way Emma hadn’t thought possible and she wondered why she had resisted getting to know him in the first place.
Killian never asked questions about her past and it took Emma awhile to realize it was because he didn’t want to answer questions about his. And that was something they shared in addition to their sense of humor and taste in food. Killian continued to make the occasional innuendo but he never tried to push their relationship beyond a friendship and Emma was grateful that he wasn’t interested in over-complicating things. But there were times when she caught an expression or look in his eyes and she knew that if she gave him proper encouragement he would be very eager for some complications. But being friends was as far as Emma would allow herself to go and most days she was bewildered at her letting him in even that far. After two weeks she started to feel an impending sense of doom. There was no way her life could ever be this good.
Weeks went by and nothing happened. Killian didn’t get on her nerves or suddenly reveal himself to be an ax murderer. He was sensitive, funny and kind, and she found herself wanting to be around him and texting him during the day. Work was profitable and her skips easy to find. Life was practically perfect and Emma continued to distrust it. When would the other shoe drop?
She started to pick fights with Killian. She gave him a hard time about the volume of the television or leaving dishes out but he didn’t rise to the bait; just gave her a searching look or a sarcastic comment. She wanted him to push her away, to prove what she knew deep down was going to happen eventually, he would get bored with her, he would leave her. And when he didn’t she just got angrier. So she decided to leave instead.
She was in the middle of packing her clothes when he got home and started calling for her.
“Swan? I’m too tired to cook. I was thinking of ordering take–“ He paused in the doorway. “What’s going on?”
She refused to look at him. “I am moving to New York.” He didn’t respond. Her declaration hung between them as she continued to throw things in her box. His steps were heavy on the carpet as he moved behind her. He placed a hand on her arm but she shook it off.
“You can keep the rent money I won’t need it.” She ignored his proximity. There was another loaded pause.
“Don’t run away from me.” His voice was thick with emotion and she couldn’t stop herself from turning to look at him.
His eyes pierced her and struck at her already aching heart. “Emma, please stay. I know you are scared but give me a chance.”
Her heart hammered in her chest as she swayed toward him. “I can’t take the chance that I am wrong about you.”
“I would never hurt you, Emma.”
She looked into his eyes, so open and honest, and knew he was telling the truth. In that moment she knew he wouldn’t leave her or let her down like so many others had. On instinct, she closed the distance between them.
The kiss was intense, their lips sliding and tongues tangling, but also achingly familiar; as if she had kissed him before and somehow forgotten it. When she broke the kiss, Killian chased her lips and she smiled as he drew her back in. It was a perfect moment but in the back of her mind she felt a twinge of disquiet. She pulled away.
“This is wrong,” she murmured. Killian’s mouth twisted into a frown. “Not you,” she shook her head and stroked his cheek “It’s something else, something just not right. We aren’t supposed to be…” she trailed off.
“Emma I have no desire to pressure you. If you still want to go–“
“No.” She surprised herself with her vehemence. “It’s not that, not anymore. It’s just everything. My life is too good, it’s too easy. Does that, does that make any sense?” Emma was sure she sounded like a lunatic but then Killian’s forehead creased and he nodded.
“Aye.”
“Really?”
He scratched behind his ear. “It’s strange because I feel happy but I also feel as if I don’t deserve to be happy. As if I am not worthy of such a life.”
“Exactly! It’s like a happy ending in a fairytale but fairytales aren’t real.” Killian smirked. “What?”
“Oh nothing, love, but I do believe you just called me your happy ending.”
She rolled her eyes. “That’s not what I said.”
He hummed looking unconvinced and so she punched him which earned her another knee-weakening kiss.
This time when they broke apart she licked her lips and caught her breath before speaking.
“I’m serious Killian this just doesn’t seem real.”
And the moment she said it she felt a thrill of truth run up her spine. Startled she looked around the bedroom and suddenly felt that she was looking at a painting–an approximation of a room, not a real place.
“Well, you just had to go and ruin it.”
Emma jerked from Killian’s arms to turn and see a smug-faced, blonde, teenage, boy leaning against her doorframe.
“Bloody hell.”
“Who–“ Emma started to ask but before she could finish she knew the answer. “Pan”
The magic fell from her mind and she remembered. After they rescued Neal she had gotten separated from the group and wandered until she had run into Hook. Then Pan had shown up spouting nonsense about giving the Savior a happy ending.
“You know this magic has kept men occupied for years. Remember Starkey Hook? How he loved getting lost in my little paradise?”
“Starkey,” Killian said like it was a revelation.
Pan nodded. “But you Emma, you can’t even be distracted for one night with your happy ending even with your pirate along for the ride. Magic gave you a perfect little life and you still had to find fault in it. Guess you really are a little lost girl who can never believe that she will be happy even in her fantasy land.”
Something in Emma snapped and she rushed at Pan but as she did the room melted away and she found herself surrounded by a thicket of bushes.
“Damn it.” She kicked at the air wanting badly to hit something. She spun around to see Killian, back in his pirate clothes and lost in thought. She knew they should probably talk about the weird spell they had been under but she needed to get back to her parents and to save Henry. How long had they been under the spell? It had felt like months but Pan had said it had only been a night.
“Do you know how to get back to camp,” she asked abruptly.
Killian snapped from his thoughts and looked around. What he saw in the never-ending green Emma didn’t know but he nodded and began to move.
They walked in silence and while Emma was worried about her family she couldn’t help thinking about what had just happened and what Pan had said. Had the magic truly given her a happy ending or just a twisted version that Pan thought she would enjoy? It wasn’t that she hadn’t been happy it just hadn’t felt like true happiness. Maybe because real happiness needed to be earned? Killian was just ahead of her and she wanted to ask him what he thought but he didn’t seem interested in conversation. It was probably for the best since she was still trying to reconcile Captain Hook with the roommate she had been living with for months.
When they emerged into the camp everyone came running. Her mother and father asked where she had been while Regina’s eyes darted between her and Hook as if that was all the explanation she needed.
“Pan caught us in some magical trap,” Emma explained. “But…uh…we escaped.”
“How?” Regina asked infusing the word with more skepticism than Emma had thought possible for a single syllable.
“The demon underestimated Miss Swan. A failure in judgment I believe you share with him.”
Emma felt a swell a pride at Killian’s words.
Regina rolled her eyes. “Whatever.” And mercilessly the subject was dropped. Emma darted a glance at Hook intending to thank him but he was moving away and her mother was drawing her close.
“Neal went looking for you.” Mary-Margaret gave her a look that Emma pointedly ignored. She really didn’t have room in her head to deal with Neal or her mother’s not-so-subtle hints about him.
“Yeah well, looks like I didn’t need his help.” Emma winced at the bitterness of her tone. “Sorry. I’m just tired. It’s been a long day.”
Her parents nodded sympathetically.
“Of course Emma we understand,” Mary-Margaret said.
“Actually we should go get Regina to call Neal back with that magic walkie-talkie thing,” David said. He planted a kiss on her forehead and then pulled his wife away with him.
Emma sighed. Having parents was harder than she imagined as a kid. Maybe that’s why they weren’t part of her little fake reality? Too much complication? Or maybe Pan was right, maybe she was too broken to ever even consider loving parents or family a possibility in her life.
Lost in her thoughts she wandered over to the fire where Killian sat staring into the flames with his flask in hand. She stood looking at him for a long moment but he didn’t acknowledge her presence. The Killian she had shared an apartment with had been all smiles and innuendoes but Emma realized that had been part of the unreality–Killian wasn’t Killian without his brooding.
She sat down beside him but not close enough to touch.
“Killian, about what happened–“
“You needn’t worry, Swan. I won’t divulge your secret.”
“No. I’m not worried about that.” He turned to her with a raised eyebrow. “I want to understand how the magic worked. Did Pan create it or did I create it or was it a little of both of us?”
He gave a harsh chuckle. “Oh, I think it’s rather obvious it was Pan’s creation.”
“Why? Because Henry wasn’t there?”
“That and the addition of a certain devilishly handsome suitor are pretty big clues.” He gave her a mocking smile. “Pan overestimated my charms when it came to you, love. And in doing so gave his game away.” He tipped his flask toward her before taking a long pull.
Emma opened her mouth to contradict him and then closed it. The happy fantasy version of Emma had taken months and lots of serendipitous events–probably intervention by Pan now that she thought of it– before she had been able to let Killian in, what chance did regular, lost girl, Emma have? And yet she couldn’t let Killian think that she felt nothing for him, that the reason the fantasy had fallen apart was because she couldn’t, even under influence of magic, imagine being with him.
“I think it was a bit of me and a bit of Pan.”
Killian snorted and Emma could see he was determined to believe that she didn’t care. Stubbornly she continued.
“You and me that’s not what gave the magic away.”
“No?” He tossed her a carefully bored look. But she wasn’t fooled she could see the spark of hope behind his mask.
“Naw. It was the apartment. A place that size in central Boston, for that price? That’s the real fantasy.”
His laugh was short but genuine and the smile that lingered after told Emma that he understood, that he was willing to wait for her to figure herself out, just like he had in Boston. And as she stood and moved to her bedroll she wondered if maybe her and Killian being together wasn’t so much of a fantasy after all.
I told you I would somehow make it in Neverland! Hope you liked it!
#cs ff#cs fanfic#captain swan ff#csss#captainswannet#cs au ff#mryddinwilt wrote something#listen this is the latest gift ever#but I think I should get points because it is ridiculously long#I thought this was going to be so easy#and then it took forever!!#but hopefully it made you smile and that's really all that matters in the end#so much for my happy ending#I think the title makes sense by the end#but I had a hard time with the title#if you have a better one come at me and let me know
137 notes
·
View notes
Text
Apress, Premium WordPress Multipurpose Page Builder Theme | Templified
New Post has been published on https://templified.com/apress-premium-wordpress-multipurpose-page-builder-theme/
Apress, Premium WordPress Multipurpose Page Builder Theme
ATTENTION: It may be too late by the time you read this, but Apress is selling for just $19 for a limited time. Nineteen bucks? That’s ridiculous for this much theme. Considering it’s sold over 20 times the first *day* of it’s release, that price isn’t going to last. Hurry!
Already, Apress has over 60 demo sites. Wow. That’s a bunch. I’m going to highlight just a handful of these amazing theme designs. This thing does it all, I’m telling you. It’s got so many demos to prove just that. With highly functional drag and drop design, great coding and more, this one is going to be a massive hit, I guarantee it.
Here’s a general purpose business theme look.
How about a creative agency fullscreen theme?
A general purpose business or creative company theme?
Here’s one for construction companies and other industrial companies.
I need a haircut. You need a website. Fair deal, right?
I love these kinds of super colorful creative agency templates.
Probably best for an architecture company.
Clearly a medical or dental office design.
Another creative, full-screen layout.
Another architecture company.
Simple, minimal portfolio site. Nice one at that.
The Apress Theme is the result of more than 20 months of tireless work by Apress’ designers and developers. This theme does it all. Its equipped with the latest technologies and designed with user in mind to ensure endless freedom to create and customize your site like a pro and without any coding.
Apress Features
Header Builder: Apress Header builder is unique and intuitive. Its the easiest drag n drop header builder for designing any kind of website. The header builder allows you to design your site header to give your site a unique twist and stand above from the crowd. You can design the following headers-
Horizontal Headers, Vertical Expanding header, Horizontal Expanding Header, Vertical Headers
It has lots of elements with extensive customization options to design your header into a truly unique masterpiece. Menu Designer: This header builder comes ready with 17 different menu hover designs for both horizontal and vertical headers. The menu hover can be full customized for colors, gradient and custom CSS properties. Apress Themes have built the menu hover styles into presets , so no need to change any settings and every design is unique and fully responsive. Sticky Header Styles: There are 3 different types of sticky header design options to choose from –
Fixed, Slide Down, Shrink
You can also disable sticky header. The Sticky Header can be fully customized for color, height, transparency etc. Gradient Support: APRESS Theme comes with gradient support for all those who want to spice up their site with beautiful breathtaking combination. You can also design your WordPress default buttons like comment button, contact form submit buttons and various default buttons from a single place in Theme options. Mobile Header styles: There are 2 different types to mobile header for you to take control of your site in mobile view.
With or Without Menu Bar
Translation ready: APRESS Theme is fully translation read and fully compatible with WPML Plugin and Loco translate One page and Multipage ready: With APRESS Theme you can create both one page and multipage with just one click. You can also select the slider position to be above header or below header. Apress Gallery Insta Designs : 250+ Insta designs are available in APRESS Gallery for you to create your site from predesigned layouts. It simply reduces the effort and minimizes time needed to create new sites in minutes. Layouts: There are three different types of site layouts available to design your perfect site.
Wide, Framed, Boxed
Mega menu: The Mega menu is built in to WordPress menu for easy designing in the native style. Simple click any menu and make it mega menu with full control to select number of rows. Search Styles- There are three different styles of Search for match your site. You can choose from
Default ( Basic design ), Full screen, Expanded Search
Vertical Navigation: You can have vertical header in a click for your site with boxed slider or full screen slider with full control on the elements placing using drag n drop header builder. Parallax Effect: You can easily add parallax effects to any row or column using the visual composer. Image Sliders: APRESS Theme gives you 5 different types of image slider to style your pages, posts, portfolio and any other page. Unlimited Portfolio: There are no limits to number of portfolio that can be added to your site. You can also choose from available hover styles to stylize your portfolios .The portfolios can be displayed in the following layouts.
Portfolio Slider/Carousels, Grid, Masonry and Packery
You can also design your own single portfolio page completely using Visual Composer Elements or also design using our Case Studies Insta designs from APRESS Galley. Blog Designs: There are 15 different blog layout are readily available in Visual Composer Elements to display on any of the pages using Visual Composer with full customization options. There is also option to show filter in all available blog styles. The Blog layouts currently available are:
Grid, Zig Zag, Full Screen, List, Cards, Fixed Height, Masonry
Unlimited Colors with gradient support – APRESS Theme comes with unlimited color options. You can easily set the color for the entire site globally or directly inside the elements. Blog Single Post Designs: There are 6 different single post layouts to choose from to present your blog posts in style. These layouts are available as global settings or you can also select different layouts in different posts depending on your preferences. Unlimited Sidebars: You can have unlimited sidebars with APRESS. It comes with sidebar generator and sidebar design options to fully customize your sidebar widgets. Sidebar Designs: You can completely customize your sidebar inside the theme options. You can design the sidebar title, link color link hover color etc. Blog Post Sliders: 7 Different slider layouts are available for showcasing your blog posts in featured sliders. These sliders can be added into any of the pages using Visual Composer Elements. Woocommerce Ready: APRESS Theme is fully compatible with WooCommerce. There are loads of options to customize your Shop page on your WordPress website. You can select the number of rows in your shop page. Retina Ready: The theme is fully equipped with retina ready features. You can select retina ready images for your logos, icons etc Unlimited Sidebars: You can have unlimited sidebars with APRESS. It comes with sidebar generator and sidebar design options to fully customize your sidebar widgets. Sidebar Designs: You can completely customize your sidebar inside the theme options. You can design the sidebar title, link color link hover color etc. Unlimited Colors with gradient support – APRESS Theme comes with unlimited color options. You can easily set the color for the entire site globally or directly inside the elements. Footer Designer: There are 3 different footer areas to add all types of widgets. You can easily set the footer width , colors, design and various CSS properties. Powerful Page Options: APRESS Theme is loaded with a light and very powerful Theme option. Its built with Redux framework and has options for all areas of the website. Contact Form Designs: 10 different designs are available to style your contact form layout with full control on the colors of your contact form. Lightbox gallery: There are 2 different lightbox gallery available in the theme to present your images in classy way. Lifetime updates, gradient support, tons of HD video tutorials and a ton more…whew…I’d say that’s a multipurpose WordPress theme for sure!
Demo More Information Get Hosting
0 notes
Text
Google’s Chrome browser got a big facelift, and new features, for its 10th birthday
New Post has been published on https://nexcraft.co/googles-chrome-browser-got-a-big-facelift-and-new-features-for-its-10th-birthday/
Google’s Chrome browser got a big facelift, and new features, for its 10th birthday
We live in our browsers, clicking between tabs as we work (or “work”). But just like you can choose what computer to buy, or email service to use, so too can you pick your browser—Chrome, Safari, Firefox, Microsoft Edge or Internet Explorer, to name the major ones. It’s a big commitment.
Worldwide, one browser is king, according to a service called StatCounter: Google’s Chrome. By that site’s estimate, Chrome’s market share is nearly 60 percent, while Apple’s native browser, Safari, is currently around 14 percent. Those percentages change if you focus just on the United States, but Chrome is dominant there, too.
It’s been a decade since Google released Chrome to the hungry internet-browsing masses, and to mark that ten-year milestone, the Mountain View-based company is releasing a major update (they usually update it every six weeks, but this one is more significant than usual). Here are some new features it’s rolling out, plus other useful tricks you may not have known about.
It looks different!
In the old version of Chrome, the tabs had pointy corners. The new tabs have a totally new shape that rounds off those pointy edges, and the tabs you’re not using are now separated by simple little vertical lines. Icons, the color scheme, and the user interface in general has been updated. “These updates have a simpler look and will (hopefully) boost your productivity,” Google said in a blog post announcing the anniversary and the rationalle behind the changes. It’s worth updating for the new, cleaner look alone.
Google has also improved the password manager; the company says it will now focus on spurring people to make their password choices stronger by suggesting a more robust string of characters. (Safari already did this.) The way Chrome automatically fills in content on a webpage—like your address, credit card, or passwords—is more accurate now too, according to Google.
Google is boosting the capabilities of that central bar at the top of the browser, which they call the Omnibox. Among the changes: in the near future, you’ll be able to search your Google Drive files by typing into that Omnibox instead of just punching in URLs or searching the web, as it does now. It’ll also provide information answering some of your search queries right there, too.
There’s a secret game!
Chrome already had a hidden game: it’s a cute jumping dinosaur. A little T-rex pops up on the browser’s “no internet” page when you try to load a site but don’t have an internet connection. Even if you do have a connection, you can manually go there by typing this into the search bar: chrome://dino. Start playing by hitting the spacebar, and then make the dino jump over cacti by hitting the same button. Or, if you’re on a mobile device, just tap the dinosaur to start playing, then touch the screen to make him jump like you’re a dinosaur puppeteer. Fun times!
Now Google has given that poor dinosaur a blue hat to celebrate the birthday. It’s the same game, the T-rex just has a hat now, which he dons after running into a birthday cake. (A factual note: birthday cakes and hats didn’t exist during the age of the dinosaurs.)
Tab life
Chances are, you have more tabs open on your browser than you know what to do with. Before today’s update, Chrome already offered tools for managing them: You could hit “ctrl” plus the tab key to cycle between them (on a Mac, that’s control plus tab); you could also drag one out so it becomes its own window, or you could pin it to the left for future reference. (You pin tabs by right-clicking on them. Right-clicking them also gives you other options, like muting the audio playing from a tab, or even opening one you just closed by accident.)
Another trick that could save you some time: you can press ctrl then a number on your keyboard to jump to that specific tab. For example, ctrl + 3 will bring you to the third tab from the left (on Mac, use your command key to do this). You can also hold down ctrl and then select multiple tabs to drag off into their own window.
Access to translation
Loading a website in a foreign language frequently gives you the chance to translate it—in Chrome, a box will pop up and ask if you want it to be translated. But if you don’t see that box, a good shortcut is to force the issue by right-clicking on the page that’s in the foreign tongue. You’ll see the option there to translate it from that drop-down menu.
So when do I get to try it?
Beginning today and throughout the week, the update will start rolling out to users. You’ll know when it’s there for you to grab when you see a green arrow at the top of your browser.
If you’re excited and want to manually check for an update, click on the three dots stacked vertically on the right side of the browser bar, then Help, then “About Google Chrome.” That will prompt your browser to check for an update. If you haven’t updated to the newest version yet, you’re probably running version 68.0. The new one is 69.0.
For mobile devices, updating to the latest version on your iOS (where Chrome’s toolbar will now be at the bottom) or Android gadget will happen through the App Store of Google Play, respectively.
Written By Rob Verger
0 notes
Text
Sony a9 shooting experience: Here's why I'm impressed
Introduction
Sony's looking to storm the sports photography market with its new a9 mirrorless camera.
When I started shooting sports for college publications, I was stuck working with 3 fps. Then I graduated to a new camera offering 5 fps, and gravitated towards weddings and events. Now that I've been with DPReview for a year and a half, I've gotten used to 12, 14, 18 and 24 frames per second for shooting just about everything.
To be blunt, past a certain threshold, burst shooting speeds don't net me appreciably more keepers in my usual style of photography. But that won't be the case with everyone, and honestly, it doesn't hinder my enthusiasm with regards to the new Sony a9, even though that's one of its headline features. Even setting burst speeds aside, this camera is among the best I've ever used, bar none. Here's why.
Background
During my time at DPReview, Sony's always left me feeling a little conflicted.
On one hand, the technology and features crammed into the company's cameras are always impressive; during my interview for this job, our own Rishi Sanyal showed me Eye AF on an a7R II, and I accidentally blurted out an expletive as my jaw dropped – it was something I'd never seen before. On the other hand, I've consistently found the usability of Sony's cameras to be a primary concern for me. The interface and general operation were laggy enough to be irksome, I got lost in the menus all the time (movie options should never be nonsensically shuffled among stills options), and there were times that I felt I was fighting the camera to get it to just do what I wanted.
Sony's RX100 V is an incredibly capable pocket camera, but the series hasn't seen any ergonomic or UI improvements in two generations. Photo by Samuel Spencer
The list of qualms I have with the a7-series in particular is full of items that, on their own, are quite insignificant; but as the list grows, they all combine to make for cameras that I almost never choose for personal work or play. But the sheer volume of improvements and refinements in the a9 are having me singing a different tune.
So, what exactly has changed with the a9?
Despite similarities to the a7-series at first glance, a lot.
The buttons and dials all come with better haptic feedback. The AF joystick replaces an eternity of clicks when moving the AF point. When you flip the screen out, the eye sensor is disabled, which resulted in fewer missed shots when working at odd angles. Boot-up time is shorter. Battery life is way better. The interface is more responsive. I don't get lost in the menus at all anymore. All of these changes add up to a camera that is more transparent, in the sense that it just 'gets out of the way' more than any previous Sony camera I've used, and lets me get on with taking pictures.
The controls, the feel and the operation of the new a9 have all been improved relative to Sony's a7-series of full frame mirrorless cameras.
Even if you don't use the full 20 fps (electronic shutter) burst speed, shooting anything you could want without any intrusive shutter noise (important for delicate moments during, say a wedding reception) without any blackout whatsoever is a revelation. Sure, the RX100 V and Olympus E-M1 II both also offer fully electronic shutters and silent operation, but neither has a full-frame image sensor, neither can show you a live view during bursts (only slideshows of images being taken), and the a9 suppresses rolling shutter so ably that it's one more thing that I almost never have to worry about.
I had a big hand in the reviews of Nikon's D5 and Canon's EOS-1D X Mark II, and while the optical viewfinder blackout on both of those cameras is incredibly short, I have to stress that the Sony a9 goes one step further in that it shows no blackout whatsoever. None. This camera makes it easier than ever to simply follow the action, and catch exactly the moment you want.
An additional plus - this camera has taken the preliminary crown (review units are forthcoming) for the best mirrorless autofocus system I've ever used. We were given the opportunity to photograph hockey, figure skating and a full-on track meet, and the a9 rarely let me down. Watch our site next week, when we'll be able to post actual photos and videos from these events for you to examine for yourself.
What's the catch?
Okay, there's a few catches here.
First of all, do you need 20 fps? I don't. There are, of course, those that will. But that feature, that incredibly fast readout speed of that new 24MP sensor, is something you're paying for if you shell out $4,500 for this new camera, even if you're only interested in the other (not insignificant) improvements outlined above.
I shot over 2,800 images during our shooting experience with Sony in New York. That caused me worries about card space (even with a 128GB card), cost me hard drive space, and cost me time during downloading and editing. I'm no pro sports shooter, so take this with a grain of salt, but I'm having a hard time convincing myself that I got an appreciably greater number of keepers because of the a9's burst rate than I would have with a slower-shooting camera. Heck, I even switched to 10fps halfway through to save card space, and I still came away with images I was pleased with. And it's worth noting that the absence of any blackout whatsoever is still incredibly awesome, even at 10fps.
This image is from the first occasion where I really soaked a camera in the name of a shoot; photographing the King County Search and Rescue team during a training exercise as part of my job for Puget Sound Energy. That D800 and 24-70mm F2.8 are still in good working order, though the rubber zoom ring on the lens had started to come a little loose. ISO 1600 | F4 | 1/100 sec Photo copyright Puget Sound Energy, image via Flickr
Also, Sony's made claims that the a9 is weather resistant, but after handling the camera and flipping out the port doors, battery door and memory card doors, I just don't have the same faith that it would survive a downpour that a D5, 1D X II or E-M1 II could shrug off. That said, this isn't necessarily a common requirement, but it's something to keep in mind. Were I to take a personal a9 into a rainstorm, I'd gaff tape the heck out of it.
And lastly, where are the XQD card slots? Yes, the a9 has an amazing buffer that I never once hit, but that buffer takes a good amount of time to clear. Incorporating XQD cards would also have meant my download times would be closer to three minutes instead of thirty at the end of the day, plus they're simply more durable for demanding situations. After having used them extensively on Nikon's D500 and D5, I'm sold: for sports cameras, faster media is the way to go.
The wrap
Looking forward - does the a9 have what it takes to steal the hearts of sports shooters around the globe? Only time will tell. Okay, time, durability and quality of professional service and support.
Professional sports and action photographers have demanding jobs, and it goes without saying that learning a new camera system is not usually something they're looking to add to their workload. But the a9 might just be worth it.
Sony says it's rolling out more robust professional support, with one-day turnaround for loaner units when a camera needs repair, and walk-in service centers in New York and Los Angeles (with more coming soon), and better support throughout Canada. That's promising, for sure, but in a chicken-and-egg dilemma, do you want to be among the first to adopt the Sony system and test the validity of those claims for yourself, or wait to see what other professionals who switch have to say?
For a professional wedding and event photographer who isn't spending hours in inclement weather, I'd say the Sony a9 is worth a look if you're used to Dx-series cameras from Nikon, and 1D-series models from Canon. With the a9, you'll save a ton of weight, have a higher frame rate (again, only relevant if you need it), and likely have an easier time following the action than with even the best DSLRs.
But it must be said, the cost of switching systems isn't something to be sneezed at – and it's something we'll be looking at in detail in a forthcoming article, so stay tuned.
from DIYS http://ift.tt/2p53TWM
0 notes
Text
Soledad, Multi Concept WordPress Magazine, Blog and News Theme | Templified
New Post has been published on https://templified.com/soledad-multi-concept-wordpress-magazine-blog-and-news-theme/
Soledad, Multi Concept WordPress Magazine, Blog and News Theme
Soledad WordPress theme was voted the best selling blog/magazine theme of the year and I can really see why that’s the case. This stunning multi-concept theme has been the platform for leading tech and travel blogs like mynextgizmo.com and outandabout.be. The possibilities of customizing this theme are simply amazing. With powerful customization tools like WP Bakery Visual Composer, as well as full Gutenberg support, building your websites will be a breeze, even if you’re new to WordPress or you don’t have a lot of coding skills. This versatile Soledad theme can be used in niches in other fields like beauty, food, gaming, craft and DIY sites. We’ll get to that in a minute, but there’s a lot to get to in the meantime.
Powerful customization
Soledad allows 250+ options in customizing headers, footers, sidebars and so on. That’s just to get you started. It also features 200+ slider, portfolio and blog layouts. You can use the native WordPress customizer or Visual Composer. You will see real time changes in the preview page without having to refresh anything to see what changes you’ve made. You have more options in customizing sidebar and article layouts, as well as choose from 6 portfolio styles. It is one of the few themes that allow easy setup of a video background.
More functionality
Soledad feminine WordPress theme is fully responsive and 100% ready for tablet and mobile devices. It also fully integrates with WooCommerce to improve the shopping functionality of your site. The theme offers 2 mega menu styles such that your website visitors will easily find what they are looking for. The theme will allow for monetization as it is AdSense optimized such that inserting your ads is simple straightforward process. It is SEO friendly to enable pulling more traffic.
Your website visitors’ feedback could be captured using Contact form 7 or MailChimp which you can easily set up. The theme comes with 404 and under construction pages which are ideal when you are working on the site or have broken links.
Soledad has recently been updated to version 6.3.1, it has included quite a number of features that were previously unavailable. This theme is out buddypress and bbpress ready, as well as continuing to support WooCommerce as it always has. The developer is really included everything needed to make your website a real success.
Tons of features
There are tens of features that will make building your website with Soledad an enjoyable hassle-free experience.
Woocommerce Compatibility
Real Awesome Gallery with a lot of styles; justified, single, masonry and Grid
Infinitely Loading posts
Flexible Images and video
Four Body Styles
Top bar Menu
Five Header Styles
Three Sidebar Styles for all pages, posts; right, left, none
Six slider styles
750+ Google font and Typekit font
Five Beautiful Article Styles; default, left, full and thumbnail
Lightbox image in single posts
Various Post formats; standard, video, gallery, audio, quote and link
Unlimited Colors
8 Custom Widgets; About me, Pinterest, Facebook, Recent posts, Popular posts, Social media, Tweets slide bar, quote, Instagram slider.
Search Engines Optimized for better traffic
Ready for translation ( .po file include )
One click Import 250+ Demo pages
Build mail lists with Contact form 7 and MailChimp for WordPress support
Quick dedicated support
The Soledad WordPress theme offers up-to-the-minute code compliance and styling that work together to present one of the most innovative website solutions currently available online. One thing I really love about Soledad, the feminine style it offers. People always ask me, what’s the best WordPress theme for women? I always included Soledad in that list. Its flexibility and nimbleness allow even the newest webmasters to build and customize anything from a simple blog to a multi-concept authority site or internet-based magazine conglomerate. Every design element included with the Soledad theme answers a problem or desire of the modern website builder and owner. Experienced developers will appreciate the accessible and organized code while business owners and freelance professionals without any development knowledge will have no problem diving in and creating their solution for an effective online presence.
Start your page building process with one of the over 250 comprehensive and unique demo homepages. Combine your choice with one of the over 100 blog layouts and graphic slider elements to create a truly unrepeatable design. The choices you make are not only simple but important if you want to create a recognizable and user-friendly experience for visitors and admins alike. The Live Customizer backend helps explore the possibilities as you drag and drop blocks and various elements and features into place on every page. There are more than 250 different options on the SEO-friendly Soledad WordPress theme. If any questions arise during installation or design, check the extensive documentation or contact the comprehensive customer support service.
This is a lively and glistening WordPress blog template, among the best we have seen this past year. Carefully crafted, powerfully featured, well coded and readily altered up if something does not work for you out of the box. The attention to detail is fantastic, a pixel ideal theme if ever there was one. Hey, this is even the very best selling Video Blog and Magazine theme of 2016, so it is likely to be around for a short time. Video wallpapers, video articles and much more are why we advise this theme for people who are searching for a superb solution for displaying a movie portfolio or perhaps embedding video clips from blog articles.
Lets take a look at some of the crazy amounts of demo styles, just to give you a taste of what Soledad can bring to the table.
This is, at least to me, the basic, vanilla design. This could be a solid choice for any type of magazine. It’s clean, sharp and well organized. Just like all of the demo styles in this list, it’s very simple to adjust and adapt to fit your needs.
Here’s one called ‘Hipster’. Now, considering the fact that I’m from Portland, Oregon, one of the classic haunts of hipsters, I should know a little bit about this theme. I’d say it’s a really solid look, but I’m not 100% certain it’s a ‘hipster’ theme. I’d call it a fairly neutral, minimal and clean design that’s solid for all kinds of blog websites.
This theme style is called Simple blog, it is one of soledad’s many lifestyle blogging templates, a particularly clean and self-assured design that places real emphasis on all of your content.
This is the first of several different dark-skinned two versions. This one uses a dark background to set your content off in a little bit different way than some of the other designs in this run-down. Basically, any of the light-skinned versions can have a dark background to go with it, it’s a matter of choice that is up to you. But, I thought that I would include one just to show you exactly how it might look for one of them or basic designs. I think that it is a really neat look to any blog or magazine site.
If your website is all about World Travel, Soledad has you covered. There are quite a number of different travel blog designs, this is one of my favorites. They call it travel guide and as you can see, you can select a high-quality image for the background and still have plenty of room to display your most important post right on the front page, calling attention to the things that matter most. And if you don’t want to use sticky, trending or popular posts, you can simply show the most recent posts in the ‘above-the-fold’ area.
Soledad has a number of different Video magazine or video blog layouts, this is a particularly clean when using a left-sided navigation menu. This Soledad version keeps things clean and fresh, making your video clips the star of the show. Could be great for any video blogger who likes to share World travels. But don’t limit yourself to just to travel blocks. Anything is possible with this theme.
The Soledad Times, now I’ve never heard of that newspaper, but here it is. It’s got a well-designed, clean and old school look. Navigation is key, social media is prominently placed and this theme is highly readable. Folks will certainly know where to look for new content, it’s incredibly simple to navigate this particular design. I rate this high for classic newspapers of all shapes and sizes.
This is a completely minimalist style, accurately called Minimalism. This particular design does not show excerpts on the front page, meaning that there is very little text on your front page. If you have a site that is dominated by imagery, if you are creating a portfolio and you want a Sleek, modern look, this demo style could be a good option. Just like all the rest, it installs with one click and it is highly adaptable. If you’d like to see some more minimal themes, we have a giant collection of templates to choose from.
Okay, here is a fashion blog style. It has prominent placement for the Instagram widget, which is the ribbon of images that you see up at the top of the blog. Heading down a little bit, you got a really nice layout with bold images, or right-handed sidebar and simple, clean-cut navigation. This really is a nice looking lifestyle blog.
No rundown of what Soledad offers would be complete without one of the many different food blog Styles they have. Of course, anything that is this visual, it would work for just about any type of blog. Lifestyle, travel, fashion, mommy blogs, I think that they all work just as well. But, it’s always good to show a number of different options and since food blogs are so important these days, it’s great to give you a concept of what your side could look like. Delicious.
I already showed another video layout, here is a second one. This is more of a classic blog look than the first one, I think that breaking or viral content Works particularly well with this design. It has prominent advertising placement, your social media is all well organized and right there for people to take advantage of and it presents videos in a really interesting and fun way. For more WordPress video themes, take a look at our collection of premium WordPress themes for video.
Ideal for Creative agencies who want a clean, well-organized layout, design mag shows what is possible Right Out of the Box, you will not have to struggle to achieve this look. It is one of the hundreds of different pre-made designs but you can choose from. Of course, with this many options, it might be a bit daunting, but this theme is overhauled incredibly simple to use, even for beginners. This one installs with one click, making it a great starting point for beginners to get a website up and running quickly and without tearing your hair out.
Sure, why not, here is yet another video blog or Video magazine theme. This has a left side of navigation bar and three columns over to the right, with the prominent placement of a slider. This land is a little different, I haven’t seen too many layouts that possess all of these different attributes.
Here’s another fashion blog theme, great for lifestyle blogs as well. I told you there were a lot of different options. We’ve got more fashion blog themes to check out in our full collection where we’ve condensed the thousands of options out there into a few dozen of the absolute best.
And another lifestyle blog. This one uses a slider of three images up top followed by a single column to present your most recent or most important content. It’s also has and about me widget on the right hand side, I think this crucial for modern personal or lifestyle blogs. If you’d like to look at more options for WordPress personal blog themes, we have crafted quite a collection. Nothing but the best.
The game blog WordPress style is, just that. It’s all about games. They have selected a slightly different font for the headline text, it’s got sort of an old-school 8-bit look to it, it’s not something that I would personally choose, but I think that it does work okay for gaming magazines. We’re really starting to see some of the differences between designs, but it’s the little things. The layouts are all still will organized and well-defined oh, it’s just the colors, the button Styles and the text, among other things, that really set these designs apart from one another.
Cryptocurrency is incredibly trendy and here is a look at what one variety of crypto News website might look like.
For offering SEO Services, a clean and flat design like this one could be a good place to start. Of course, half of the battle is what types of images you choose. Frankly, this could be a layout that works for just about anything. The developer simply wants you to see as many different options as possible and that’s why I’ve chosen about 20 images to highlight in this run-down. But, this clean and crisp layout could work for just about any kind of site.
Here is yet another gaming magazine theme style. This has text over image, meaning that things can get a bit crowded if you have long titles, but assuming that you keep the titles to the recommended length, that shouldn’t be too much of an issue.
Similar to Lifestyle blogs and fashion blogs, travel blogs often use prominent placement for the Instagram widget. A Travel Girl is no exception. That is what the ribbon of images of the top is all about, prominent placement of Instagram pictures. You can select from the most recent or most popular images to show in that Rhythm and you get to select the number that you want to display. After that, your content is well organized and elegantly placed, showcasing your most important work or your most popular posts. The layout is completely up to you.
Whew, that’s a lot of stuff!
I could go on and on with showing you different demo Styles, but I won’t. There are demos for wedding websites, for education and health sites, you can install bbpress to create an online Forum, there are viral video and viral content sites, multiple different lifestyle blog, personal blog, portfolio and business sites, Adventure blogs and so many artists portfolios, it sort of makes your head spin. Coffee to Cosmetics, technology to gardening, interior design to Healthy Living, transportation to motorcycles, just about everything has been included in this high-quality, multi-concept and wide-ranging tablet.
All in all, Soledad offers a staggering 5000 home page demos, hundreds of different customization choices and hundreds of slider and layout combos, so there is no limitation to what sort of appearance you may produce on this theme. The page load rates are incredible, since it is so nicely coded and not bogged down with crap you do not need. This assists in the SERPs for certain. HTML5 and CSS3 are a part of the reason behind it. It is easy enough for starting webmasters to perform a great deal of custom work for it too, the visually engaging design actually sets off those strong capabilities.
Okay, that does it for our review of Soledad. Please let us know if you use the Soledad theme, maybe we can give you a little attention to your site, letting folks see how people are using this wonderful blog and magazine theme. We’ll be back shortly with more amazing WordPress themes.
Demo More Information Get Hosting
0 notes
Text
Sony a9 shooting experience: Here's why I'm impressed
Introduction
Sony's looking to storm the sports photography market with its new a9 mirrorless camera.
When I started shooting sports for college publications, I was stuck working with 3 fps. Then I graduated to a new camera offering 5 fps, and gravitated towards weddings and events. Now that I've been with DPReview for a year and a half, I've gotten used to 12, 14, 18 and 24 frames per second for shooting just about everything.
To be blunt, past a certain threshold, burst shooting speeds don't net me appreciably more keepers in my usual style of photography. But that won't be the case with everyone, and honestly, it doesn't hinder my enthusiasm with regards to the new Sony a9, even though that's one of its headline features. Even setting burst speeds aside, this camera is among the best I've ever used, bar none. Here's why.
Background
During my time at DPReview, Sony's always left me feeling a little conflicted.
On one hand, the technology and features crammed into the company's cameras are always impressive; during my interview for this job, our own Rishi Sanyal showed me Eye AF on an a7R II, and I accidentally blurted out an expletive as my jaw dropped – it was something I'd never seen before. On the other hand, I've consistently found the usability of Sony's cameras to be a primary concern for me. The interface and general operation were laggy enough to be irksome, I got lost in the menus all the time (movie options should never be nonsensically shuffled among stills options), and there were times that I felt I was fighting the camera to get it to just do what I wanted.
Sony's RX100 V is an incredibly capable pocket camera, but the series hasn't seen any ergonomic or UI improvements in two generations. Photo by Samuel Spencer
The list of qualms I have with the a7-series in particular is full of items that, on their own, are quite insignificant; but as the list grows, they all combine to make for cameras that I almost never choose for personal work or play. But the sheer volume of improvements and refinements in the a9 are having me singing a different tune.
So, what exactly has changed with the a9?
Despite similarities to the a7-series at first glance, a lot.
The buttons and dials all come with better haptic feedback. The AF joystick replaces an eternity of clicks when moving the AF point. When you flip the screen out, the eye sensor is disabled, which resulted in fewer missed shots when working at odd angles. Boot-up time is shorter. Battery life is way better. The interface is more responsive. I don't get lost in the menus at all anymore. All of these changes add up to a camera that is more transparent, in the sense that it just 'gets out of the way' more than any previous Sony camera I've used, and lets me get on with taking pictures.
The controls, the feel and the operation of the new a9 have all been improved relative to Sony's a7-series of full frame mirrorless cameras.
Even if you don't use the full 20 fps (electronic shutter) burst speed, shooting anything you could want without any intrusive shutter noise (important for delicate moments during, say a wedding reception) without any blackout whatsoever is a revelation. Sure, the RX100 V and Olympus E-M1 II both also offer fully electronic shutters and silent operation, but neither has a full-frame image sensor, neither can show you a live view during bursts (only slideshows of images being taken), and the a9 suppresses rolling shutter so ably that it's one more thing that I almost never have to worry about.
I had a big hand in the reviews of Nikon's D5 and Canon's EOS-1D X Mark II, and while the optical viewfinder blackout on both of those cameras is incredibly short, I have to stress that the Sony a9 goes one step further in that it shows no blackout whatsoever. None. This camera makes it easier than ever to simply follow the action, and catch exactly the moment you want.
An additional plus - this camera has taken the preliminary crown (review units are forthcoming) for the best mirrorless autofocus system I've ever used. We were given the opportunity to photograph hockey, figure skating and a full-on track meet, and the a9 rarely let me down. Watch our site next week, when we'll be able to post actual photos and videos from these events for you to examine for yourself.
What's the catch?
Okay, there's a few catches here.
First of all, do you need 20 fps? I don't. There are, of course, those that will. But that feature, that incredibly fast readout speed of that new 24MP sensor, is something you're paying for if you shell out $4,500 for this new camera, even if you're only interested in the other (not insignificant) improvements outlined above.
I shot over 2,800 images during our shooting experience with Sony in New York. That caused me worries about card space (even with a 128GB card), cost me hard drive space, and cost me time during downloading and editing. I'm no pro sports shooter, so take this with a grain of salt, but I'm having a hard time convincing myself that I got an appreciably greater number of keepers because of the a9's burst rate than I would have with a slower-shooting camera. Heck, I even switched to 10fps halfway through to save card space, and I still came away with images I was pleased with. And it's worth noting that the absence of any blackout whatsoever is still incredibly awesome, even at 10fps.
This image is from the first occasion where I really soaked a camera in the name of a shoot; photographing the King County Search and Rescue team during a training exercise as part of my job for Puget Sound Energy. That D800 and 24-70mm F2.8 are still in good working order, though the rubber zoom ring on the lens had started to come a little loose. ISO 1600 | F4 | 1/100 sec Photo copyright Puget Sound Energy, image via Flickr
Also, Sony's made claims that the a9 is weather resistant, but after handling the camera and flipping out the port doors, battery door and memory card doors, I just don't have the same faith that it would survive a downpour that a D5, 1D X II or E-M1 II could shrug off. That said, this isn't necessarily a common requirement, but it's something to keep in mind. Were I to take a personal a9 into a rainstorm, I'd gaff tape the heck out of it.
And lastly, where are the XQD card slots? Yes, the a9 has an amazing buffer that I never once hit, but that buffer takes a good amount of time to clear. Incorporating XQD cards would also have meant my download times would be closer to three minutes instead of thirty at the end of the day, plus they're simply more durable for demanding situations. After having used them extensively on Nikon's D500 and D5, I'm sold: for sports cameras, faster media is the way to go.
The wrap
Looking forward - does the a9 have what it takes to steal the hearts of sports shooters around the globe? Only time will tell. Okay, time, durability and quality of professional service and support.
Professional sports and action photographers have demanding jobs, and it goes without saying that learning a new camera system is not usually something they're looking to add to their workload. But the a9 might just be worth it.
Sony says it's rolling out more robust professional support, with one-day turnaround for loaner units when a camera needs repair, and walk-in service centers in New York and Los Angeles (with more coming soon), and better support throughout Canada. That's promising, for sure, but in a chicken-and-egg dilemma, do you want to be among the first to adopt the Sony system and test the validity of those claims for yourself, or wait to see what other professionals who switch have to say?
For a professional wedding and event photographer who isn't spending hours in inclement weather, I'd say the Sony a9 is worth a look if you're used to Dx-series cameras from Nikon, and 1D-series models from Canon. With the a9, you'll save a ton of weight, have a higher frame rate (again, only relevant if you need it), and likely have an easier time following the action than with even the best DSLRs.
But it must be said, the cost of switching systems isn't something to be sneezed at – and it's something we'll be looking at in detail in a forthcoming article, so stay tuned.
from DIYS http://ift.tt/2p53TWM
0 notes
Text
Sony a9 shooting experience: Here's why I'm impressed
Introduction
Sony's looking to storm the sports photography market with its new a9 mirrorless camera.
When I started shooting sports for college publications, I was stuck working with 3 fps. Then I graduated to a new camera offering 5 fps, and gravitated towards weddings and events. Now that I've been with DPReview for a year and a half, I've gotten used to 12, 14, 18 and 24 frames per second for shooting just about everything.
To be blunt, past a certain threshold, burst shooting speeds don't net me appreciably more keepers in my usual style of photography. But that won't be the case with everyone, and honestly, it doesn't hinder my enthusiasm with regards to the new Sony a9, even though that's one of its headline features. Even setting burst speeds aside, this camera is among the best I've ever used, bar none. Here's why.
Background
During my time at DPReview, Sony's always left me feeling a little conflicted.
On one hand, the technology and features crammed into the company's cameras are always impressive; during my interview for this job, our own Rishi Sanyal showed me Eye AF on an a7R II, and I accidentally blurted out an expletive as my jaw dropped – it was something I'd never seen before. On the other hand, I've consistently found the usability of Sony's cameras to be a primary concern for me. The interface and general operation were laggy enough to be irksome, I got lost in the menus all the time (movie options should never be nonsensically shuffled among stills options), and there were times that I felt I was fighting the camera to get it to just do what I wanted.
Sony's RX100 V is an incredibly capable pocket camera, but the series hasn't seen any ergonomic or UI improvements in two generations. Photo by Samuel Spencer
The list of qualms I have with the a7-series in particular is full of items that, on their own, are quite insignificant; but as the list grows, they all combine to make for cameras that I almost never choose for personal work or play. But the sheer volume of improvements and refinements in the a9 are having me singing a different tune.
So, what exactly has changed with the a9?
Despite similarities to the a7-series at first glance, a lot.
The buttons and dials all come with better haptic feedback. The AF joystick replaces an eternity of clicks when moving the AF point. When you flip the screen out, the eye sensor is disabled, which resulted in fewer missed shots when working at odd angles. Boot-up time is shorter. Battery life is way better. The interface is more responsive. I don't get lost in the menus at all anymore. All of these changes add up to a camera that is more transparent, in the sense that it just 'gets out of the way' more than any previous Sony camera I've used, and lets me get on with taking pictures.
The controls, the feel and the operation of the new a9 have all been improved relative to Sony's a7-series of full frame mirrorless cameras.
Even if you don't use the full 20 fps (electronic shutter) burst speed, shooting anything you could want without any intrusive shutter noise (important for delicate moments during, say a wedding reception) without any blackout whatsoever is a revelation. Sure, the RX100 V and Olympus E-M1 II both also offer fully electronic shutters and silent operation, but neither has a full-frame image sensor, neither can show you a live view during bursts (only slideshows of images being taken), and the a9 suppresses rolling shutter so ably that it's one more thing that I almost never have to worry about.
I had a big hand in the reviews of Nikon's D5 and Canon's EOS-1D X Mark II, and while the optical viewfinder blackout on both of those cameras is incredibly short, I have to stress that the Sony a9 goes one step further in that it shows no blackout whatsoever. None. This camera makes it easier than ever to simply follow the action, and catch exactly the moment you want.
An additional plus - this camera has taken the preliminary crown (review units are forthcoming) for the best mirrorless autofocus system I've ever used. We were given the opportunity to photograph hockey, figure skating and a full-on track meet, and the a9 rarely let me down. Watch our site next week, when we'll be able to post actual photos and videos from these events for you to examine for yourself.
What's the catch?
Okay, there's a few catches here.
First of all, do you need 20 fps? I don't. There are, of course, those that will. But that feature, that incredibly fast readout speed of that new 24MP sensor, is something you're paying for if you shell out $4,500 for this new camera, even if you're only interested in the other (not insignificant) improvements outlined above.
I shot over 2,800 images during our shooting experience with Sony in New York. That caused me worries about card space (even with a 128GB card), cost me hard drive space, and cost me time during downloading and editing. I'm no pro sports shooter, so take this with a grain of salt, but I'm having a hard time convincing myself that I got an appreciably greater number of keepers because of the a9's burst rate than I would have with a slower-shooting camera. Heck, I even switched to 10fps halfway through to save card space, and I still came away with images I was pleased with. And it's worth noting that the absence of any blackout whatsoever is still incredibly awesome, even at 10fps.
This image is from the first occasion where I really soaked a camera in the name of a shoot; photographing the King County Search and Rescue team during a training exercise as part of my job for Puget Sound Energy. That D800 and 24-70mm F2.8 are still in good working order, though the rubber zoom ring on the lens had started to come a little loose. ISO 1600 | F4 | 1/100 sec Photo copyright Puget Sound Energy, image via Flickr
Also, Sony's made claims that the a9 is weather resistant, but after handling the camera and flipping out the port doors, battery door and memory card doors, I just don't have the same faith that it would survive a downpour that a D5, 1D X II or E-M1 II could shrug off. That said, this isn't necessarily a common requirement, but it's something to keep in mind. Were I to take a personal a9 into a rainstorm, I'd gaff tape the heck out of it.
And lastly, where are the XQD card slots? Yes, the a9 has an amazing buffer that I never once hit, but that buffer takes a good amount of time to clear. Incorporating XQD cards would also have meant my download times would be closer to three minutes instead of thirty at the end of the day, plus they're simply more durable for demanding situations. After having used them extensively on Nikon's D500 and D5, I'm sold: for sports cameras, faster media is the way to go.
The wrap
Looking forward - does the a9 have what it takes to steal the hearts of sports shooters around the globe? Only time will tell. Okay, time, durability and quality of professional service and support.
Professional sports and action photographers have demanding jobs, and it goes without saying that learning a new camera system is not usually something they're looking to add to their workload. But the a9 might just be worth it.
Sony says it's rolling out more robust professional support, with one-day turnaround for loaner units when a camera needs repair, and walk-in service centers in New York and Los Angeles (with more coming soon), and better support throughout Canada. That's promising, for sure, but in a chicken-and-egg dilemma, do you want to be among the first to adopt the Sony system and test the validity of those claims for yourself, or wait to see what other professionals who switch have to say?
For a professional wedding and event photographer who isn't spending hours in inclement weather, I'd say the Sony a9 is worth a look if you're used to Dx-series cameras from Nikon, and 1D-series models from Canon. With the a9, you'll save a ton of weight, have a higher frame rate (again, only relevant if you need it), and likely have an easier time following the action than with even the best DSLRs.
But it must be said, the cost of switching systems isn't something to be sneezed at – and it's something we'll be looking at in detail in a forthcoming article, so stay tuned.
from DIYS http://ift.tt/2p53TWM
0 notes