#i finally built my new PC / set up my new workstation and am moving all my stuff over
Explore tagged Tumblr posts
Visit Tumblr Blog
Explore Tumblr blogs with no restrictions, modern design and the best experience.
Last Seen Tumblr Blogs


Fun Fact
Tumblr is available in 18 languages.
Text

did you have a good NotN ? ♥
#i've enjoyed seeing everyone's hauls and hatches -v-#flight rising#mem draws#nocturne#i finally built my new PC / set up my new workstation and am moving all my stuff over#i'll need some time to adjust . my new screen gave me a migraine for most of today so this sketch is all i've really done lol
250 notes
·
View notes
Text
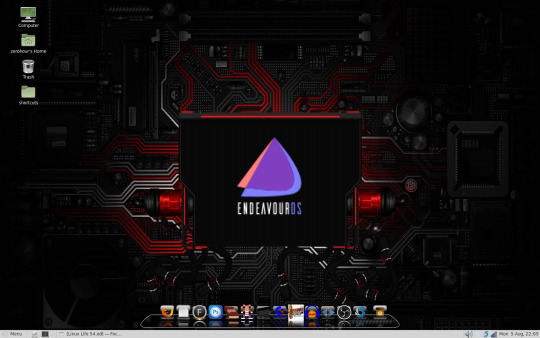
Linux Life Episode 54
Hello people and welcome back to another episode of Linux Life. My seemingly never ending quest of messing about with Linux. Its funny you know as when I originally started this blog. It was regarding my transition from windows to Linux but over time I now very rarely ever use Windows. In fact there is now only one machine I own that still has Windows 10 on it.
In fact its the recent acquisition which is HP Z400 workstation which contains a Intel Xeon W3550 with 12Gb of ECC memory. The reason I even mention this machine is it has been the subject of my most recent Linux adventure.
Now the machine has sat under my desk gathering dust for a few months but I decided it was time to do something with the thing, so I finally dusted it off and set it up in another room.
First I had to find a video converter as the card in the Xeon is a AMD Radeon R9 370X with 4Gb of memory. Th issue was not with the card itself but the spare monitor I had was a VGA only monitor and the two connectors on the R9 are DVI-D and DVI-I. I did order a converter but I had to rake around to find it. Luckily I found it in the end so now video is working fine.
However there is a rather large blue dongle-like converter sticking out the back of the machine so it won’t sit flush against the wall so it is sitting at an angle to work. Not the most inconvenient thing in the world but I don’t have another DVI monitor spare so we make do with what we have.
However it is happily running at 1680x1050 32-bit colour through it so I am not complaining.
OK so I tried to install Namib Linux which I have been running on my i7 desktop for quite some time. Sure enough set up the USB stick using Rufus on the Windows 10 partition and prepared to install.
Sure enough on boot a few failed things and when we get to MATE it can see the Ethernet port but can’t see the Wi-Fi card. Now I admit even Windows 10 did not have a pre-installed driver for the card in question so I had to download the driver to the i7 and transfer it using aforementioned USB stick.
Now the Wi-Fi card in question is a TP-Link Archer 9E PCI Express card. It’s a A/b/g/n/ac card with three aerial connections. However because it can’t see the card Namib will not install as it needs an online connection to install.
Most Arch installers do this so it was not a huge surprise. OK well luckily for me as I mentioned last episode EndeavourOS (the new team who took over the Antergos system) at the moment have a version that uses an offline installer.
So I went back into Windows 10 downloaded the EndeavourOS ISO and managed to transfer it to the USB using Rufus just like I did Namib.
Sure enough I managed to install EndeavourOS on the Xeon but it also could not see the Wi-Fi card.however as it was an offline installer it did successfully install an Arch system with XFCE.
Everything else worked including sound it was just the Wi-Fi card so I decide to trawl the net and find out if Linux can use the Archer 9E card. Sure enough on the AUR there is a set of drivers called broadcom-wl-ck as the Archer 9E uses a Broadcom chipset.
OK so I boot back into Windows and pull down the snapshot from the AUR onto the USB stick and then go back in to EndeavourOS and transfer it to my Downloads directory.
After unarchiving it as I did try using pacman to install it locally but it wasn’t having it. I run makepkg which will build the package using the given manifest sure enough it immediately informs me I am missing the Linux-ck headers.
Can’t build it. OK so I look up Linux-ck. Now I admit I had no idea what it was but given Linux-ck had headers I assume it some form of kernel. It is indeed. Apparently it’s a custom LTS based kernel made by a user known as Con Kolivas.
I will spare you the details of exact files I needed but every time I tried to build Linux-ck I needed another file. So every time I needed to go back into Windows download the appropriate file and then move it back to EndeavourOS.
Lets just say I ended up doing that about six times so it was a bit tedious to say the least. Eventually I managed to get all the files required and started the makepkg command.
All good but it refuses to acknowledge the PGP key and after about a minute it throws it out. OK not happy so I ultimately decide to set he makepkg flag of --ignorepgpsignature. Probably not the best method in the world but after a minor warning it seems to start to compile the kernel.
The whole compilation took 5 hours to complete on the Xeon. Now the W3550 has 4 cores and 8 threads so I didn’t think it would take that long but it definitely took forever.
Eventually it did build and using pacman -U I was able to install the Linux-ck kernel from the local directory it was in. It obviously installed the Linux-ck kernel and the headers so finally I could now build the broadcom-wl-ck drivers. Yay!
It built the drivers in about five seconds flat. So 5 hours for kernel, five seconds for the driver. Oh the irony. OK so now installed I restart the machine and sure enough the Wi-Fi card is now working.
EndeqvourOS now tells me there is about 200+ updates to download which is about what I expect so I set it off working. Sure enough it installs the updates all fine. Having waited for 5 hours for the kernel it was now getting late so I closed the machine down for the night.
Wi-Fi is working the system is updated. All good.
Day Two of EndeavourOS on the Xeon. I boot up and everything is just fine as the Wi-Fi connects without issue. Now I am not a huge fan of XFCE, don’t get me wrong its functional I just don’t like the way it does certain things like updates.
However I know that EndeavourOS had MATE on its servers. So I try pacman to get MATE. First problem hit. Apparently the MATE system is in the AUR not the main repo of EndeavourOS. OK try and install pacaur but for some reason it doesn’t seem to want to do that. Why I don’t know. OK then I will try and install Yaourt. Nope I can’t seem to find that either.
I’m starting to get desperate at this point and the Arch guys seem to recommend YAY as apparently Yaourt is a bit older now and not quite as good as it once was. Sure enough I manage to get pacman to install YAY. Progress...
So it seems to use the same flags as pacman but can access the AUR. So I manage to install MATE and get it running. However now as I am using that I don’t seem to have a way of installing software via GUI. sure i can use Yay but that’s a command line tool.
So I decide using Yay to install pamac-aur which will give me a nice frontend. Sure enough it installs and after a reboot seems to be installed fine.
Then the fun begins as the first thing Pamac notices is the broadcom-wl-ck driver and the Linux-ck stuff has been updated. OK I think well surely now it has the Linux-ck kernel it will just patch it and then the rest can be done from there.
Nope apparently it has to totally rebuild the kernel and the headers so I have another 5 hour wait upon my hands. The good thing is this time it does sort out the PGP keys so at least this time I don’t have to ignore them.
OK so many hours later the update finally finishes and I restart the PC to check that everything is running fine. Sure enough it seems to have upgraded without any issues. A few minor updates later I am ready to go.
Or so I thought. As I go to run the minor updates from Pamac it seems to keep dropping out and not picking up the network. Hanging many times while trying to download the actual update files.
However if I run Yay -Syu from the command line. It works no problem. Strange. Also every time I build something from the AUR in Pamac I have to keep clearing out the cache or it stops working.
I eventually get everything I want to work installed mainly using Yay instead of Pamac. Which kind of defeats the point of even having Pamac installed.
I still have not solved this issue and I have no idea why it is happening. If anyone has any insight into why this is happening please let me know as it is a bit of a pain in the arse.
Sure I can update using Yay but its annoying having to see Pamac tell me there is updates, refuses to download them and then yay does it first time without problems. I’m sure its something pretty simple but I can’t seem to get it to work.
The ironic factor is sometimes after a bit of searching Pamac can install sometimes but nine times out of ten it just times out the connection of the repo servers. Its probably a setting in one of the config files I need to correct but i have no idea.
Help me out if you know what i need to do. So I now have the Xeon w3550 running EndeavourOS running MATE. Thanks to Yay everything is up to date and I have managed to install all of my usual applications.
It took two days of messing about and lots of time. I hope that the Linux-ck kernel is not hugely updated regularly as having to wait 5 hours for it to compile is not the most fun time in the world.
Luckily after the second time it seems to have managed to remain OK for the time being. However I will not doubt updates will eventually come in time, after all this is Arch and it will no doubt inform me of such an update.
So now the Xeon is a dual boot machine running Windows 10 and EndeavourOS. The Wi-Fi works on both and its working reasonably well with the exception of Pamac. I have tested it with a few other programs and all seem to work fine.
If I have any further issues or manage to find out why Pamac is being like it is, I will no doubt update you on the Xeon’s progress.
As for now I think that is enough waffle for this episode so until next time...Take care.
#linux life#intel xeon w3550#linux endeavourOS#linux namib#pamac-aur#yay installer#Tp-Link archer 9e#nightmares#dualboot#waiting times from hell
0 notes
Text
Review: iRig Mic HD 2 handheld digital microphone
Back in 2014, I reviewed the original <US$130 iRig Mic HD handheld digital microphone, which IK Multimedia released at that time. With the included cables, it worked directly with iOS devices via Lightning, and with another included cable via USB-A with Chromebook, Mac and Windows computers. The same Italian company later released a different bundle of the same handheld digital microphone that came with cables for Android phones with OTG-Micro USB connections, plus the same USB-A for the same other computers. Now, I am finally reviewing the second generation of this handheld digital microphone, the iRig Mic HD 2, which is available today. Ahead you’ll learn the improvements and new features in the <US$130 iRig Mic HD 2, see photos and a test recording.
Prior reviews of the two predecessors
Initial review: iRig Mic HD from IK Multimedia (2014)
Review: iRig Mic HD-A for Android from IK Multimedia (2015)
What do we mean by a digital microphone?
When we say a digital microphone, we mean that it has a built-in preamplifier, A-to-D (analog-to-digital) converter, and a digital output. We don’t mean that the actual microphone element is digital (which it is not), just as when we talk about a digital speaker, we don’t mean that the cone is digital… or when we talk about a USB printer, we don’t mean that the actual print head is USB. In the case of the iRig Mic HD 2, there is also a D-to-A (digital-to-analog) converter for monitoring from the host device.
By having a built-in preamplifier and A-to-D converter, a digital microphone can bypass the often inferior ones built into the device you are using, delivering a pure digital signal. Many modern mobile phones no longer offer any inboard analog audio input anyway, including the:
Android Pixel 2 and Pixel 2 XL
iPhone 7 and iPhone 7 Plus
iPhone 8 and iPhone 8 Plus
iPhone X
Now there is even more benefit for having a microphone that delivers an already digital signal, especially when there will be a single microphone, not several connected into a mixer.
Gain adjustment and measurement
Like its predecessor, the iRig Mic HD 2 has a built-in gain control adjustment. Fortunately, it is stiff, and therefore unlikely to be moved by mistake. On the opposite side of the iRig Mic HD 2 there is a multicolor LED that you’ll use to set a proper level.
Slightly different physical shape/colors
While the original iRig Mic HD (and the iRig Mic HD-A, the silver one in the above picture) have a cylindrical shape, the new iRig Mic HD 2 (the black one in the above photo) is slightly longer has a slightly squarish shape which facilitates the grip and prevents it from rolling when placed on a table.
While the original iRig Mic HD are (or were) available either in black or silver color, the new iRig Mic HD 2 is only available in black to my knowledge.
Expanded sampling frequencies and monitor output
Expanded sampling frequency up to 96 kHz and “direct” monitoring seem to be the main focus of the second generation model, since the original iRig Mic HD models stopped at 48 kHz/24-bit and offered no inboard monitoring capability. You may enjoy my related articles All audio production & distribution should go 48 kHz. Learn why. and Understanding 24-bit vs 16-bit audio production & distribution. In order to set the sampling frequency and resolution of the iRig Mic HD 2 on Android or iOS, simply make the adjustment in the recording app (if it offers such an adjustment). In the case of Mac or Windows, you must first set the sampling frequency in the operating system and then in the application. In the case of macOS, that setting is done in the Audio MIDI Setup application first and later in the recording application.
I am very glad to know that iRig Mic HD 2 now has an inboard headphone output, although sadly it is not latency-free. Instead, as in the case of the iRig Mic Studio (reviewed in 2013) it is software-dependent and delayed. The amount of latency depends upon the hardware host. When I say “software-dependent”, I mean that the application you use to record must offer a live monitor option, for example:
Auphonic for iOS
FiLMiC Pro for Android or iOS
IK Multimedia’s own iRig Recorder 3 for Android or iOS
MoviePro for iOS
Please note that although Auphonic for Android doesn’t currently offer live audio monitoring, it can indeed record from the iRig Mic HD 2 and offers excellent visual confidence. Then it can play back recorded clips through the iRig Mic HD 2.
The headphone output on the iRig Mic HD 2 also works to play back clips already recorded on your device, and to hear the other person if you use the iRig Mic HD 2 live with a software like Allo, FaceTime, Hangouts or Skype. In the case of Android or iOS, it should simply work, except in those apps where it offers selecting among different microphones. In those cases, select the iRig Mic HD 2 as your desired microphone. In the case of using the iRig Mic HD 2 with a Chromebook, Mac or Windows, you need to adjust the operating system to monitor through the iRig Mic HD 2.
So far, IK Multimedia has only announced a single iRig Mic HD 2 model, without any separate bundle with different cabling. IK Multimedia has also mentioned its own optional USB-OTG cable, which is great for use with an OTG-compatible Android device with Micro USB port, but not appropriate if your Android uses the newer USB-C. In that case, you can go with a third-party solution to USB-C, as I have done, since so far, I find no USB-C cables or adapters of any type in IK Multimedia’s store.
Test recording
I made the below recording by connecting the iRig Mic HD 2 to my Google Pixel XL microphone. I recorded at 48 kHz using the Auphonic app in WAV mono. I later normalized to -16 LUFS before uploading the WAV file.
https://www.provideocoalition.com/app/uploads/iRig-Mic-HD-2-test_-16-LUFS.wav
About the cardioid pickup pattern in the iRig Mic HD 2
Having a cardioid pickup pattern on a microphone has the advantage of reducing much of the background sound, making the voice(s) more intelligible. However, when doing an interactive news interview with a single handheld cardioid microphone, no matter how experienced or agile the reporter is in toggling the mic’s position between the two people, there is almost always an unexpected interruption by either side which causes one of the two parties to sound “off mic” (much quieter) or sometimes almost inaudible. As a result, some ENG (Electronic News Gathering) crews prefer to use an omnidirectional pattern, since neither party will sound “off mic”. However, this is not an issue with documentaries (or news done in the documentary style), where the interviewer is not expected to be heard, and questions are asked in such a way that responses are given in complete sentences. This is also not an issue if two separate microphones are used.
Use a branded windscreen with the iRig Mic HD 2, not a mic flag
Because of the iRig Mic HD2’s now two potentiometer knobs (one for mic gain, one for monitoring) and its sensitivity to plosives when close to the subject, I continue to recommend the use of a branded windscreen. That’s how you’ll see it in the photo above, with the branded windscreen showing my CapicúaFM show. Unlike a mic flag, a branded windscreen won’t interfere with the adjustment of the potentiometers or impede seeing the LED level.
See my 2016 article Branded windscreen vs mic flag: let’s compare (illustrated above).
More bundled software than before
iRig Mic HD 2 comes with downloadable versions of Mac and PC software including Ableton Live Lite, a DAW (Digital Audio Workstation) application; T-RackS Classiccollection of audio processing plug-ins; and Mic Room, with what IK Multimedia describes as: “incredibly realistic virtual models of some of the most desirable microphones of all time”. Also included are iOS apps such as the Mic Pack for VocalLive, that adds a collection of virtual microphone models to the real-time vocal effects processing and multitrack recorder app; Pro Bundle for iRig Recorder, which adds processing like equalization and compression to the pro-audio recording and editing app with video; and Mic Room, the microphone modeling app.
What comes in the box?
IK Multimedia iRig Mic HD 2 digital condenser microphone
Lightning iOS cable
USB-A cable
Table tripod
Mic clip (stand adapter)
5/8 to 3/8″ thread adapter
Carrying pouch
Limited 1-Year warranty for parts
Limited 90-Day warranty for labor
Availability
iRig Mic HD 2 is available now for US$/€129.99 (Amazon • B&H).
Conclusions
If you are looking for a single handheld microphone to connect to a mobile device like an Android or iOS (iPhone/iPad/iPod Touch) digitally, the new iRig Mic HD 2 (Amazon • B&H) is likely to be one of your best and simplest choice, especially if you like the cardioid pattern for its advantages. The new iRig Mic HD 2 is also a very good choice if you are looking for one to connect directly to a Chromebook, Mac or Windows computer, especially if you plan to connect only one. I only hope that IK Multimedia will eventually make a version with true latency-free monitoring. In the future, I would also like to see the alternative of one with an omnidirectional pickup pattern for interviews, or one with a switchable pattern, for the reasons indicated earlier.
Upcoming articles, reviews, radio shows, books and seminars/webinars
Stand by for upcoming articles, reviews, and books. Sign up to my free mailing list by clicking here. Most of my current books are at books.AllanTepper.com, and my personal website is AllanTepper.com.
Si deseas suscribirte a mi lista en castellano, visita aquí. Si prefieres, puedes suscribirte a ambas listas (castellano e inglés).
Listen to his CapicúaFM show at CapicúaFM.com or subscribe via Apple Podcasts, Radio Public or Stitcher.
Save US$20 on Project Fi, Google’s mobile telephony and data
Click here to save US$20 on Project Fi, Google’s mobile telephone and data service which I have covered in these articles.
Learn to speak Castilian, the most widely used Spanish language
SpeakCastilian.com
FTC disclosure
No manufacturer is specifically paying Allan Tépper or TecnoTur LLC to write this article or the mentioned books. Some of the other manufacturers listed above have contracted Tépper and/or TecnoTur LLC to carry out consulting and/or translations/localizations/transcreations. Many of the manufacturers listed above have sent Allan Tépper review units, including IK Multimedia. So far, none of the manufacturers listed above is/are sponsors of the TecnoTur programs, although they are welcome to do so, and some are, may be (or may have been) sponsors of ProVideo Coalition magazine. Some links to third parties listed in this article and/or on this web page may indirectly benefit TecnoTur LLC via affiliate programs. Allan Tépper’s opinions are his own.
Copyright and use of this article
The articles contained in the TecnoTur channel in ProVideo Coalition magazine are copyright Allan Tépper/TecnoTur LLC, except where otherwise attributed. Unauthorized use is prohibited without prior approval, except for short quotes which link back to this page, which are encouraged!
The post Review: iRig Mic HD 2 handheld digital microphone appeared first on ProVideo Coalition.
First Found At: Review: iRig Mic HD 2 handheld digital microphone
0 notes