#i do not fold evenly and I do not cut straight and my crafts are always in shambles
Explore tagged Tumblr posts
Text
biggest pop-up book hater on earth rn
#beef trimmings#were doing it for class.#im not even in class yet im watching a tutorial video we were instructed to watch b4 class and ugh#obviously its just. its just folding paper and glueing it down it cannot be that bad but#Im the worst at handcrafts!! hand dexterity is not my thing!#i do not fold evenly and I do not cut straight and my crafts are always in shambles#this man has SO many paper pop ups on his desk rn#oh my god hes showing advanced pop up techniques now this is too much for me OH my god oh my god
2 notes
·
View notes
Text
Restoring A Mid-Century Modern Dining Chair
What you will need:
A Chair 4 Rubber Chair Feet Upholstery Material, approx 18x18 " About a dozen short nails (about ½ " long -- roofing nails or carpet tacks will do) OR a heavy-duty staple gun & staples.
3-4 ½" screws A Hammer A Saw A Screwdriver
Optional Extras:
Padding A Drill 8-12 medium nails 1 ½ to 2 " long depending on depth of seat (you will only need these if you are using cross pieces.)
Where to Get Supplies:
Very often, places like Lowes or Home Depot will have a scrap lumber bin, where you can get boards super cheap. You have to check carefully before you buy, because very often the reason a board gets chucked into the scrap bin is that it’s warped. And it’s a grab bag as to what will be there at any given time. Still, you can get decent wood for small projects there at reasonable prices if you keep an eye out.
For padding and upholstery, if you don’t want to buy outrageously expensive new fabric, check for places near you that sell mill-end fabric and scrap leather. Or you can repurpose old coats, quilts, comforters, etc.
For hardware, your local hardware store should have everything you need. Don’t be intimidated by rows of specialty nails and screws. A nail is pretty much a nail. There’s a flat end and a pointy end. All you need to know is, what’s the combined thickness of the things you’re going to be nailing or screwing together? Then pick nails or screws that are long enough to go past the half-way point of that thickness, but not longer than the total thickness. Heavier things need heavier nails, and lighter things need lighter nails. Simple!
Step 1: Find A Chair
This is a chair that's been knocking around since I was a kid. It sat in my Mom’s back yard for about fifty years, and looks it. However, I think it looks kind of cool, and I wanted to fix it up.
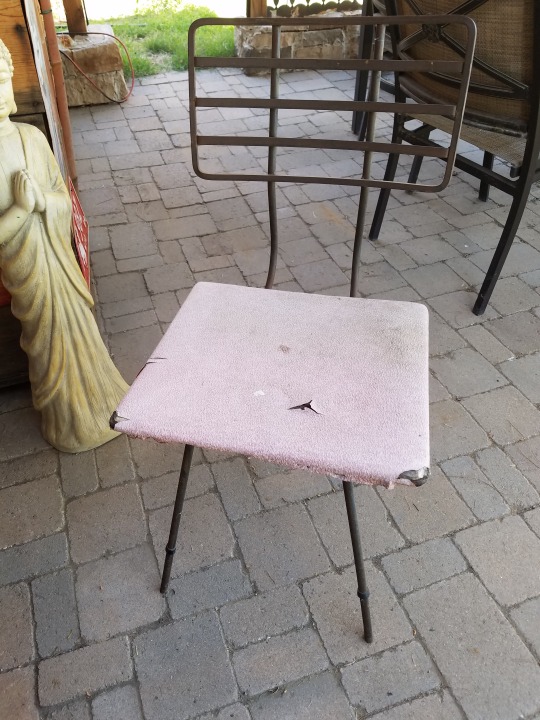
I cleaned the iron frame up with a damp cloth to remove surface dirt and debris, but I decided that I wanted to leave the weathered, rustic look of the iron as it was. If you do want to clean minor rust like this and make it look black and shiny again, you can use either a commercial rust cleaner, or you can use a 50/50 mixture of vinegar and water. Once the rust has been removed, and the iron is dry, you can wipe it down with liquid car wax and buff it with a rag to make it more rust-resistant.
Step 2: Replace Rubber Feet
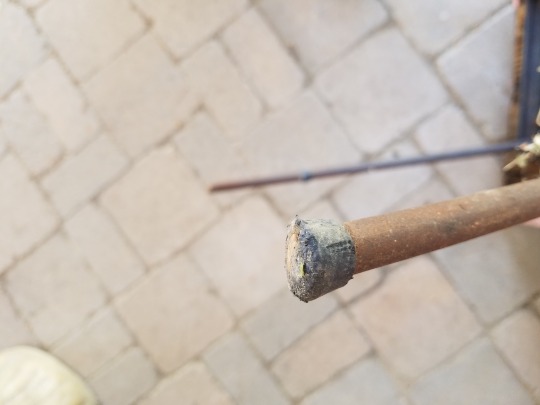
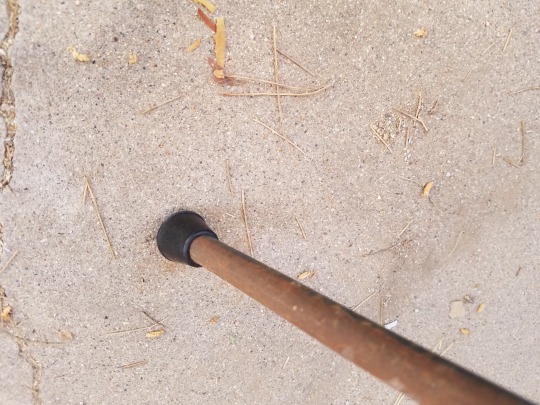
The old feet on this chair had worn completely through. Since it's iron, you don't want the bare legs scratching up your floors, or making nails-on-chalkboard screeches every time you move the chair. Replacing the rubber feet is easy: just measure the diameter of the legs, go to your local hardware store, and buy new ones.
Step 3: Check the integrity of the seat.
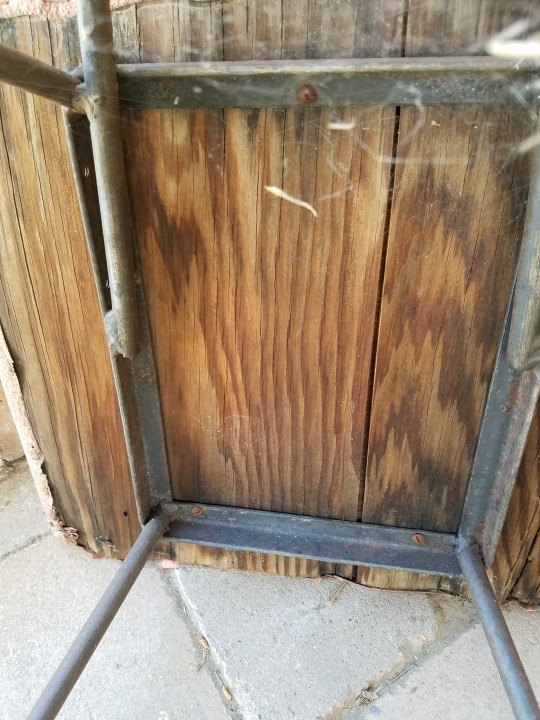
If you're lucky, whatever the base of your seat is will be in good condition, and you can just strip off the old upholstery and padding, and re-cover it. (You may even be able to keep the padding.) In this case, that wasn't an option. This chair has been rained on a million times, and the plywood was disintegrating. I took it off and threw the whole seat away. (The web is old. No spiders were harmed in the restoration of this chair.)
Step 4: Replace the Seat (if necessary)
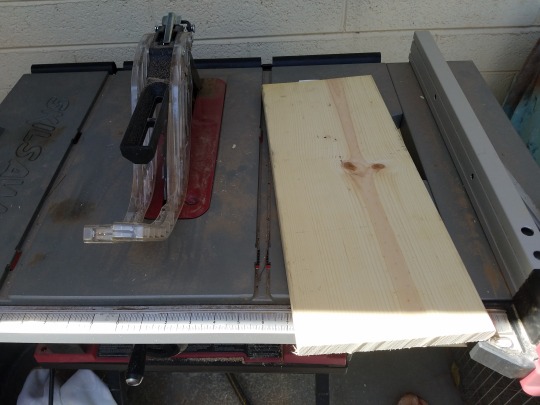
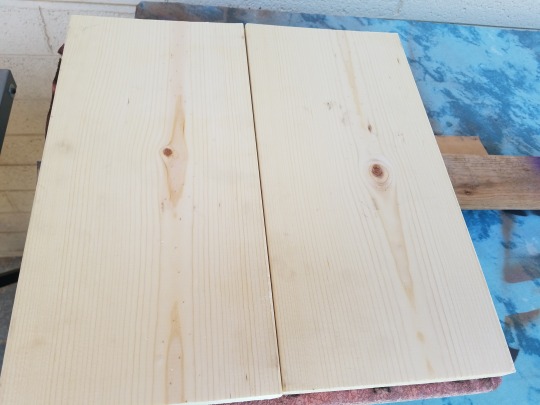
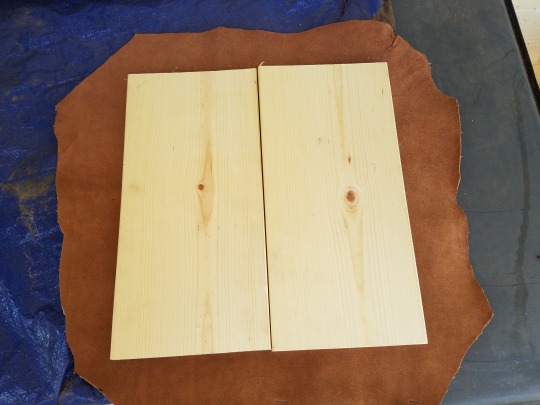
I did not have any plywood on hand, and the local hardware place does not sell plywood, and I didn't feel like running all the way across town to Lowe's. So I bought a 3′ length of 2x8 lumber instead. I cut it down into two 15-inch lengths. Put together, this made a 15x15" square. (Because 2x8s are actually 2x 7.5s. It's confusing.) This was slightly smaller than the original plywood seat, which was 15x16″, but that was no big deal.
I have a table saw, so that's what I used to cut the wood. However, you can also use a hand-held circular saw, or even a manual hand saw. If you are using a hand saw, manual or electric, unless you have an inhumanly good eye and steady hand, you will probably want to use a straight-edge and a pencil to mark your cutting lines first. It is also a good idea to have either A) someone to hold the wood still for you, or B) a working surface to which you can clamp the wood. If you can't keep your wood steady, you WILL end up with a crooked, ragged cut. And if you're using a circular saw, you could seriously injure yourself if your wood wobbles and causes kickback.
If you're using any kind of power tools, READ THE INSTRUCTIONS FIRST and follow them. You don't want to fight with a power tool; it will win.
If I had wanted to get fancy, I could have used wood glue and a couple of clamps to glue the two pieces together. But I was being impatient, and didn't want to wait for the glue to dry. So instead, I used the new upholstery to hold the two pieces together until I could nail on supporting crossbars. (See Step 6.)
Select and Trim New Upholstery
You can use anything you like here – fabric, leather, vinyl. The only caveat is that thin fabrics will wear out more quickly, and very heavy fabric or leather can be more difficult to fold nicely at the corners. I'm using mid-weight leather for this particular piece.
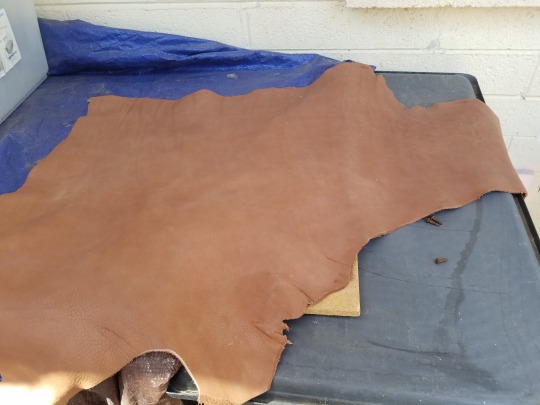
Whatever you use, invest in a good pair of sewing shears to cut it. Trying to use craft scissors to cut cloth or leather will drive you nuts. If you are using very heavy leather, an Xacto knife (one of the big ones) might work even better. If you're using an Xacto, make sure that you have a surface to cut on that you don't mind scratching up. (And of course, be careful and use good knife safety.)
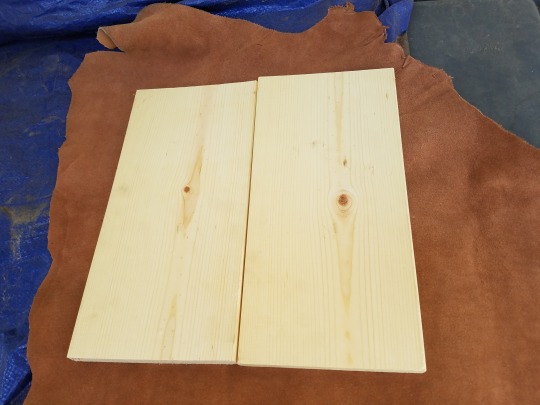
Cut your upholstery AT LEAST 2 inches larger than your seat all around. Remember to account for the depth of the seat and any padding as well as the breadth. If you're using fabric that frays easily, you will probably want to turn the edge under, so add extra for that. You can always trim extra length off, but you can't untrim a piece that's too short.
Step 6: Attach New Padding/Upholstery
If you are replacing or adding more padding, then place it between your seat base and the upholstery material before you attach the upholstery material. I decided that since my primary purpose for the chair was to put it next to my closet to throw clothes on, and this was never going to be a Comfy Chair no matter what I did, that I didn't need to bother with padding.
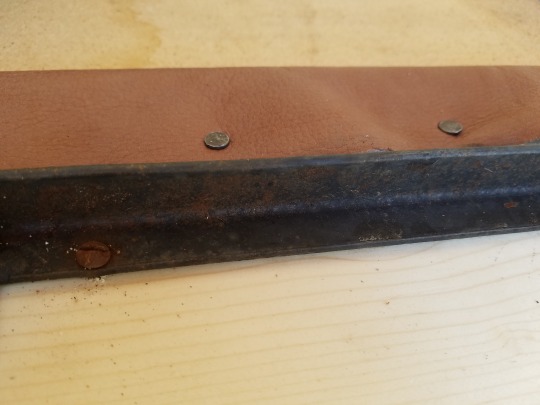
Since I was using moderately heavy leather, I trimmed away some excess at each corner of the seat so that it would fold more easily. Again, be careful and don't trim off too much. I used a mixture of carpet tacks and roofing nails to attach the leather to the wood (the roofing nails were for the corners, where I wanted something sharper to get through the multiple layers of leather.) Basically any short, sturdy nail will do. OR if you have a heavy-duty staple gun, that would also work well. Make sure you stretch your material evenly. It can be helpful to have a partner at this stage to hold the material even while you tack it on.
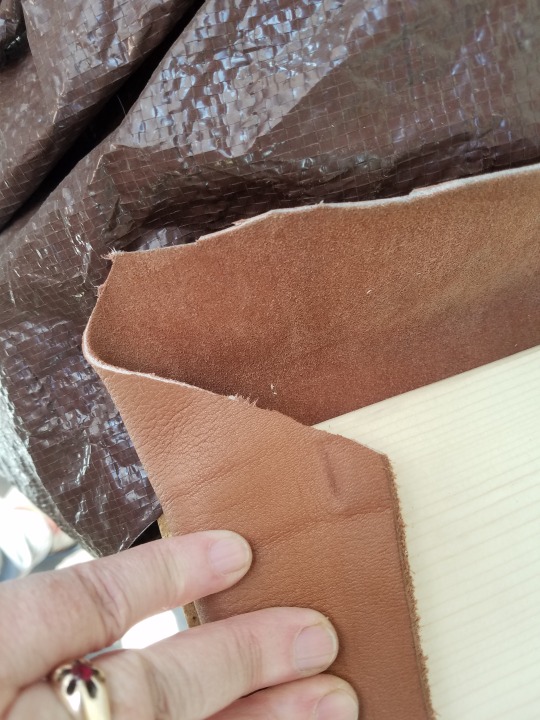
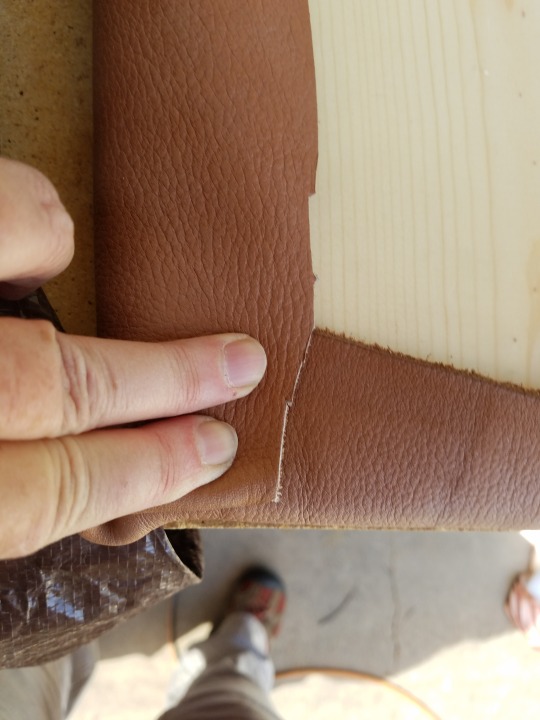
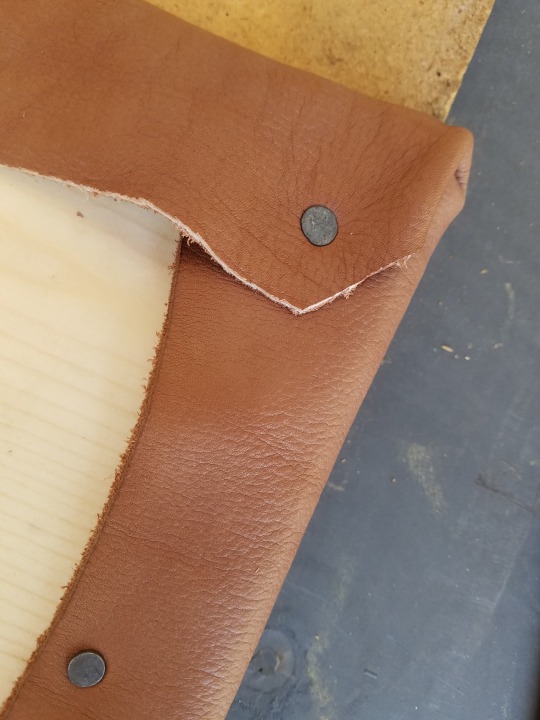
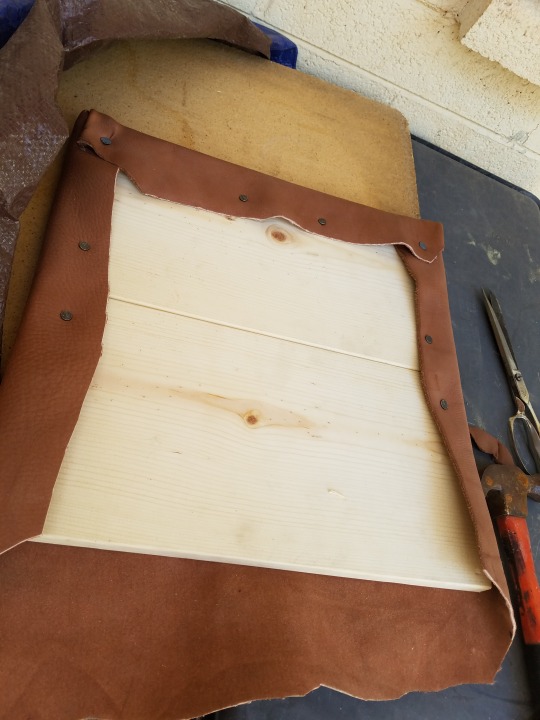
Once the leather was attached, I nailed cross bars (two 13″ 2x4s) onto each of the sides to keep the two seat pieces together. As you can probably tell, the 2x4 was just an old one I happened to have in my scrap lumber supplies. Since the frame of the chair is screwed directly to the two seat pieces, I suppose I COULD have left the crossbars off, but I wanted the extra stability. Ideally I would have used framing nails to attach the crossbars, but I was out of framing nails, so I used finishing nails instead. (Like I said, for a project this small, nails is nails.) I made sure to measure the iron seat frame first, and attach the crossbars so that there would be room enough between them to screw the frame of the chair to the seat.
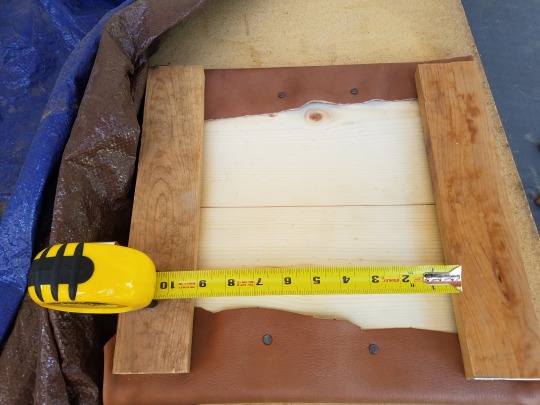
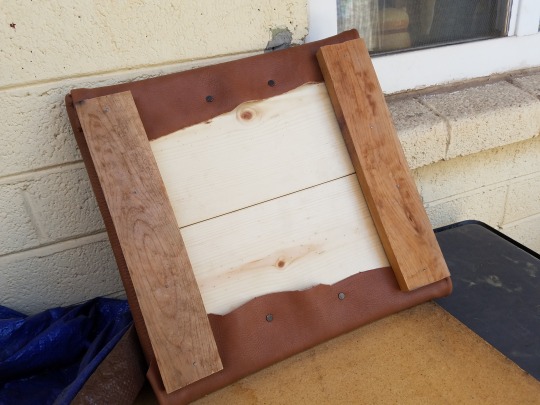
There are four nails per cross bar -- because they’re finishing nails, they’re hard to see.
Step 7: Reattach Seat
Once the seat was put together, I screwed the metal frame of the chair onto the seat, right between the cross pieces. Weirdly, this particular chair only has three screws holding the seat to the frame; most chairs of this general type use four. I re-used the original screws. Optionally, you can use a drill to start your screw holes. Be sure to pick a drill bit a little smaller than the diameter of your screws.
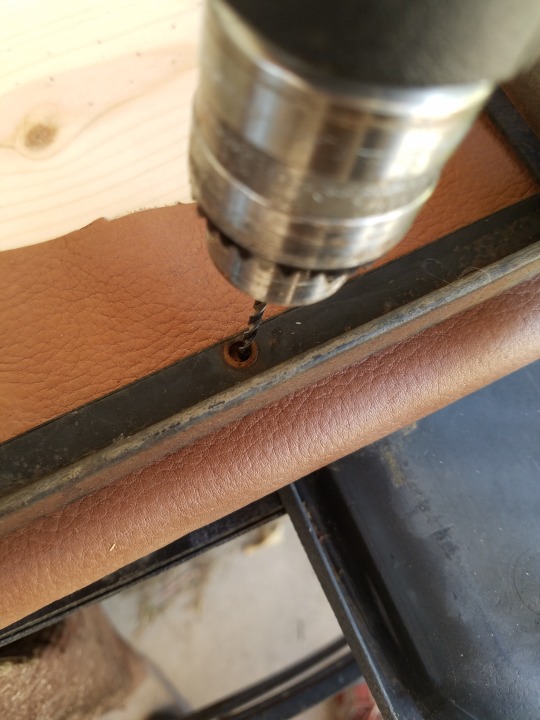
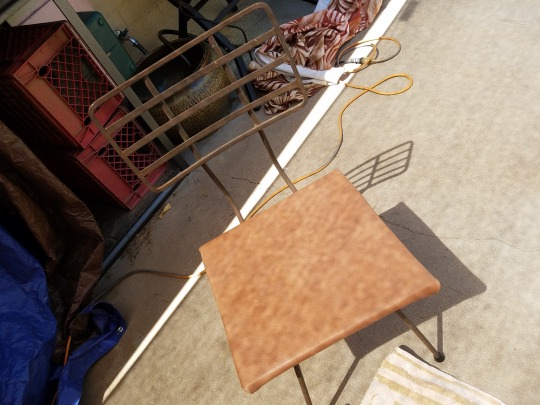
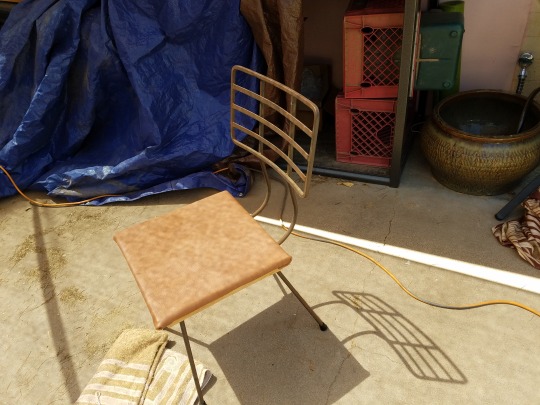
And voila, one restored Mid-Century Modern chair!
15 notes
·
View notes
Text
Prepping fabric for a project
Happy Tuesday, my garb-minded friends! Today, we’re going to talk about a topic that doesn’t get a whole lot of discussion except in criticism–how to prep your fabric before you even get sewing, including washing and ironing. Caring for fabric (and even garb) is a little different from caring for your regular clothes, but following a few simple steps before you get started on a sewing project can really save you a lot of headache during your project and enhance the quality of your finished product.
1. Know your fabric.
Step 1 takes place before you even take your fabric home. When you’re purchasing your fabric at the fabric store, read the end of the bolt to get a bunch of info about the fabric, including fiber content, width, washing instructions, and more. Until you get more familiar with fabric or if you purchase a type of fabric you haven’t used before, I highly recommend taking a picture of the end of the bolt.

I forgot to get a photo, so this is one from my friend Rai Wolfborne. Thanks!
2. Hem your fabric.
I wash all of my fabric I will use for garb before I sew with it, but before I wash it, I hem the edges!
Fabrics do all kinds of things when they’re washed, but one of the worst things that can happen is the edges of your carefully measured fabric fraying and unraveling in the washer and dryer. You can plan for this by purchasing extra fabric yardage, or you can finish the edges before you wash the fabric.
There are a few different ways you can finish your edges, but I recommend zigzag stitching or serging your edges. Serging requires a special machine.
Zigzag:
Set your machine to a zigzag stitch. I do this on my machine by turning the stitch selector knob to the zigzag setting and turning my stitch width knob up to 3 or 5. It’s okay for the stitch length to remain long–we just want a zigzaggy line, not a solid wide line like when we’re appliquéing.
Stitch about ¼ to ½ inch in from the edge on both cut edges. You don’t need to zigzag stitch the selvages.

Fabric with zigzag stitch hem to prevent fraying
Serge:
Line up the cut edge of your fabric with the cutting blade of the serger.
Stitch the length of the cut edges. You don’t need to serge the selvages.
3. Wash your fabric.
I’m gonna be honest, “to wash or not to wash” is a huge question among those in the sewing community. I am firmly in the “wash it, dangit” camp because I am terrified of fabric shrink and bleed. It’s gonna get washed eventually anyway, so you might as well wash the fabric beforehand to be aware of any of these issues.
You have two options when washing your fabric:
Wash it according to the instructions on the bolt, OR
Wash it how you realistically will wash it when it’s garb. Be honest with yourself.
A few tips:
Completely unfold the fabric and gently, loosely loop it around the agitator (if you’re using a top-loading washer).

Don’t overload your washer or throw the fabric in all wadded up!
Use a color catcher! Color catchers are pretty much the universe’s gift to garbers. You might want to use two for the first wash for especially bold colors or reds.

I -love- these things.
Wash different colors separately (especially vastly different colors, and ESPECIALLY reds).
Don’t overload your washer.
Be aware of your temperature settings. Hot water causes fabric fibers to expand, which can cause the dye to release from the fabric, which can cause bleed. Cold, cool, or warm are best for washing fabrics, with cold being best if you’re not sure if the fabric is color-safe. Cold water also helps set dyes.
4. Dry your fabric.
Dry your fabric following one of the two schools of thought above–either according to instructions or how you expect to dry it when it’s garb.
A few tips:
Clean out your lint trap beforehand because it will likely fill up (especially with linen and fleece).
Use dryer sheets to help deal with static.
Use heat if the fabric allows it (it helps release the wrinkles because of the steam).
Untwist your fabric gently when transferring from the washer to the dryer. Any twists in the fabric can result in deep creases, damp patches, or even stretching or distortion of the fabric. You can also snip or very gently tear any frayed strings that might keep the fabric twisted or compressed.
Take the dried fabric out of the dryer promptly and fold, hang, or iron it immediately.
5. Fold your fabric neatly.
If you aren’t going to iron your fabric immediately, it’s best to fold it neatly and put it away. Get someone to help you fold your long cuts of fabric evenly so it doesn’t warp or wrinkle too horribly!
6. Hang your fabric.
If you can’t really fold your fabric, you can hang it instead (for example, over the shower rod).
7. Iron your fabric before marking cutting designs.
If you’re like me, you probably rarely iron, so you might not be sure of the proper way to do it! Here are some pointers.
Set your iron to the hottest setting that won’t damage your fabric. For 100% cotton and 100% linen, that’s full blast, baby.
Make sure your ironing board is clean! You have to replace your ironing board cover once in a while so it doesn’t leave gunk on your fabric.
Make sure your iron is clean! Things like interfacing, synthetic fabrics, and starch (and ironed-over pins…) can gunk up your iron. There are commercial iron cleaners available in stores. There are also cleaning methods on the internet. Check your steam vents for chalky buildup, too–this is probably mineral deposits left by your tap water. You may want to use distilled water for steam if this is an issue, or you can use a separate spray bottle and forgo your steam feature on your iron entirely. From the voice of experience: dirty irons can ruin fabric.
Steam is not usually necessary if you iron straight out of the hot dryer; however, it’s great if the fabric has little gentle wrinkles all over. 100% cotton and 100% linen can be steamed, but not all fabric types can be! Double check!
As for ironing board types–there are several! I personally prefer one that is at least 60 inches wide because the widest fabric I regularly use is 60 inches wide. I also recommend a large freestanding ironing board. However, I currently use an over-the-door flip-down ironing board that is about 45 inches long. This type of ironing board is good for me because it stays in the room where I do most of my sewing and it’s easy to set up and put away, which helps eliminate the excuses I try to make about ironing. (Side note: small apartment/dorm ironing boards are best for small things like sleeves and collars, but they totally work if that’s what you have to work with!)
Let your iron heat up. The iron should have an indicator light that shuts off when the iron has heated up completely.
Place your fabric with the cut edge parallel to the long edge of the board and your selvages parallel to the end of the board.

I use relatively inexpensive irons because I have a habit of dropping and breaking them, and because I abuse them with interfacing and such. This one (it’s a Hamilton Beach) has been pretty sturdy, though.
Press the iron firmly down against the fabric and move it around in a kind of sweepy, squiggly motion, from the inside of the fabric out or from one side to the other, until all of the wrinkles are straightened.
Never leave your iron hot-side down on a piece of fabric–many fabrics burn, distort, or melt very quickly. As a general rule, if the iron is face down, it should be in motion.
If you are using steam, turn that on before ironing. If you are using a spray bottle, spray the fabric on the ironing board before ironing.
If your fabric is longer than the distance from the board to the floor, you probably want to gently roll the fabric as it pools at your feet to help prevent creases (which are especially possible while the fabric is still warm).
There’s a lot of detail here, but I promise, following these steps makes a clear difference in your end product! Happy crafting! <3 Lisael
#garb#garbing#larp#larping#costume#costuming#larp costume#amtgard#sewing#sewist#a&s#arts and sciences
1 note
·
View note
Text
The green grasses, trimmed to an exact cut evenly throughout the field; ever-lovingly tended to be groundskeepers glory. A nice, blue sky, a deep azure hanging just overhead. Seventy... Three degrees? Yes, just a nice warm day.
Years; time untold; this would have been wonderful weather for a picnic, would it not? Not a cloud nor a concern within the sky to mar the mood, ever prevalent and wonderful. Evenly, each single image carved into notion. Ever perfect, anything more would be unforgivable.
All the headstones lined in rows, chipped, sounded down through years of weather eroding at their surfaces. Perhaps the families of those were uninterested in the upkeep of stones? Perhaps no one was left to cater to them?
Shame. All any of these people were completely gone, nothing more than taking up land better suited for anything else. These honored dead a sham, waste of time and resources. Remove them from their tombs, their graves, and burn them down. A parking lot would serve more use than anything here.
“Nathaniel? Are you home? Nathan?...”
All but one. All but a single, wonderful difference. There, beyond the decaying memories and poorly kept stones; beyond a simple plot of land for some miserable miser or useless mistress, sat a fully polished and wonderfully kept headstone.
Up to His chest, shaped in vibrant reds and blacks, shaped like their favorite suite, a headstone admired yearly, no matter the existence that He would find Himself in. Carved perfectly, never a scratch or mark, maintained daily, at no point abandoned.
“Are you listening to me? Nathaniel?!”
It was not often something as simple as a folding chair would need to be with Him, poorly crafted. But yet, the day was just being started, and He would be here the duration. Others were left to tend to themselves, they would be fine. He was busy with the most important thing on today.
“Hello, my dear. I have missed you.”
REBECCA ESSEX December 15th 1585 - May 8th 1616
It was not the specific day that mattered. It was what that day would become. The second Sunday of May. Mothering Day. “I brought you some flowers, Rebecca, hopefully these will be good enough,” placing them gently at the base, His hand returned to His lap, giving some thought to His being, “had them picked specifically for this event, thought they would be special.”
No no no, she can’t be home now, no I’m too close! Quickly, his frame turned about face, staring to the door. It was locked, thankfully, giving him some time to hide what was going on. Silence. Be silent and figure your next need.
“Thomas is too close, so close to being cured and I can’t have her down here yet. I must finish this process...” Hands rushed about the lab, body nearly floating in place to make amends to his actions. Were she to come down here, it would be over. Everything he’d spent months planning would be for naught and their family ruined.
“Come on, hurry up your ignorant machinery. I hate this damned technology...” No matter how advances the machines got, these Celestial computers, they were still machines. Computing nonsense.
“Nathan?” Short breathes, attempts at the locked door knob just at the foot of the stairs. No! He’d lost focus, no longer shielding her eyes from the door. He’d have to hurry...
“I found a wonderful few prospects, have I told you yet? Oh, my, they are a mess. One of them has physical needs, a very... Touchy person. My, he cannot go without contact. Yes, why yes he is a member of homo mutare. Oh, do not give me that, they are not everything. I have moved on from that, Rebecca, please.”
It was not uncommon to find men and women speaking to deceased loved ones at their graves, though it was odd to see them speaking to one so old. The diamond shaped marble a stark contrast to the ivory stones reaching to the sky. And the Man sitting their, speaking His heart out, pale and colorless skin radiant off the sunlight.
“The other one? Dear Me, Rebecca, the child is a mess. She needs better vocal training, badly. And such panic and simplicity. While the other one needs broke from their desires, this one needs broke from their dependency. And yes, I shall break them.
In time, My dear, things do not just get rushed about. I need time. I still must return the alien and the strigoi as well, as useless as they were, I have need for their skills I bestow them. Yes, I am working on that too.”
“Nathaniel Alexander Essex you open this door NOW!” Forceful woman, you don’t understand. None of them would. Tubes and wires pumped into their toddler son, chemicals rushing through his veins. Any moment now the process would be done and he’d...
“What is that beeping sound?” THUMP! “No, no no no!” THUMP!
Gingerly, Essex leaned back in His chair and reflected at her stone, remembering she was gone. “Hours, you and I would stay up just... Blabbering about nothing. Nothing in the world. You would ask Me about work, I would make a terrible joke, and you would laugh. Bless your soul, you would laugh to save my ego.
My pride. It was always that, was it not? My fragile ego getting in the way of us, Thomas, everything. I was a fool then, Rebecca. A foolish, terrible man...”
The door busted open, clothes torn from Rebecca’s shoulder as smooth blood stained her outfit. Bleeding from the shoulder, trickling down her arm, the woman examined the equipment around her in awe.
Machines- foreign and alien- clung to the wall in fantastic lights and colors. Sounds inhuman echoed all over the room, blaring a terrible sound. In the center stood a man, if she could dare say it, bleached white with terrible red eyes.
And on the table lay her son. Her baby boy hooked with wires and machines. Machines beeping a terribly monotonous sound. What was going on, what was... “Nathan what are you doing?” What happened to him?
“It’s not, it’s not...”
“What are you doing to my son?!” Down the stairs she rushed, never faster in her life did she move like now. Greased lightening, poised and readied to scoop up her son from this freak, this monster, but he was faster, catching her within his grasp and letting her see him for what he was-
-but all she could see was the hideous and illuminated diamond on his forehead.
“I am... I am going to make this right, Rebecca. Not like I had done prior, no, Lord En Sabah Nur is long taken care of. I mean make it well. Fix this, all of this; what I should have done from the start! I am a fool, a blind and arrogant man, unable to see the wealth I had before me.
Too much, I let things get out of control, every out of hand. I will change that My dear, I will make the proper amends.”
“Let me go what did you DO TO HIM!”
“Rebecca calm down, I’m fixing him!”
Eyes widened, the words searing into her brain, “You strapped him into whatever these machines are and turned yourself into some demon creature of the night to FIX HIM?! Let me go Nathan, LET ME GO!”
They struggled, gaining and losing ground. As forceful as she was, he was stronger. Nathan always had been. Her footing slipped, forcing him forward and throwing her behind. It was quick, it was final.
Behind her jutted out a large metal rod, jagged, a useless piece he’d yet disposed of. Her eyes flickered, they wavered back and forth looking for hope. She only found him. Warmth filled his torso, bleeding downward as they’d been impaled straight through and out.
“No, no Rebecca I...”
Blood trickled gently down her mouth, lips staining red. With her cheeks puffed up, she took a pull and released, spitting her blood across his face. “I.. I can’t believe this. I find you, utterly... Contemptibly sinister.”
Day passed Him by, the Sun slowly edging to the horizon to once more sink into the ground; disappearing for another night. All day He joked, teased and colluded with, longing.
Longing was the feeling He use to describe this day. Memories and terrors, once a distant past now full and living. “One day, I shall meet you again, hm?, I shall meet you and give you what you deserve proper- not a burial or apology. I shall give you a reason to take back your words.”
2 notes
·
View notes
Text
Make A Dress From Any T-Shirt!
If you haven’t gotten into the T-shirt dress game yet, let me tell you, you’re missing out! They are a great way to wear something comfortable but cute and be dressed up or down pretty easily with accessories. It’s actually really easy to turn your favorite T-shirt into a dress to create a unique piece that’s all your own style! I’ll show you how: Supplies: -T-shirt of choice (I used our Oui Fresh Brunch Club tee!)* -2 yards of wide bolt jersey cloth in corresponding color/pattern for the skirt (I used this fabric) -straight pins and fabric scissors -craft paper –fabric measuring tape or yardstick ruler –cutting mat and rotary cutter (optional) –sewing machine *You’ll want to use the classic jersey or cotton T-shirt-type material for this project since we are leaving some edges with a raw cut rather than a knit material that will unravel easily when cut. Wash both your shirt and fabric before use to initiate any shrinking that may occur before you sew them together. Try on your T-shirt and mark with a straight pin about where you want your skirt to start. I did a few inches below the bustline to make a shorter empire waist dress. Lay your T-shirt flat and measure across the T-shirt where you want your skirt to start.
You’ll also want to measure how long you want your skirt to be from that meeting point so you know how long to cut your skirt piece. Depending on how big a skirt your fabric width can make, you may need to make the skirt start lower if the amount of fabric you have won’t give you a long enough hemline.Use fabric scissors or a ruler and rotary cutter (with a cutting mat underneath) to cut across your shirt 1/2″ down from where you want your skirt to connect.OK, so here’s where you have to do a little math to get your skirt cut out correctly so the skirt waist hole is the same size as your T-shirt hem. Take the T-shirt width number that you got in step one and double it to give you the measurement of your shirt all the way around (remember, measuring a flat T-shirt is actually measuring a flat circle). Since that’s the circumference of your flat circle, just divide that number by 3.14 to get the diameter that your circle would be if it was a perfect circle instead of a flat one. You’ll cut out a paper circle that is that diameter and that’s how big your waist hole should be in your fabric. So, for example, if your shirt measured 20″ across, your equation would be: 20″ x 2 = 40″ and 40″ ÷ 3.14 = 12.73″. So in that equation you would need to cut out a paper circle that is 12.73″ wide (just guess the best you can if your number isn’t an easy number to measure like 12.5″ or 12″—close is good enough). When unsure, it’s best to cut your hole a little smaller and you can always widen it if needed.
Now that you have your waist measured and your circle template cut out, pin the template in the middle of the largest part of your fabric and measure outwards from the circle edge the length you want your skirt to be plus 1/2″ for the seam allowance where the top and skirt come together. You can either measure that exact number from the edge of the circle all the way around (marking every few inches) or you can add half of your circle width onto that number and measure out from the middle of the circle all the way around (which I think is a lot easier to do actually). So, if you wanted an 18″ skirt, you would do: 18″ + .5″ (that’s your 1/2″ seam allowance) + 6.36″ (that’s half your circle width from the example above) = 24.86″. So you’d mark 24.86″ out from the middle of your paper circle to end up with an 18″ long skirt.
Once you’ve made your skirt edge marks all the way around, you can cut out the inside and outside edge of your circle skirt. If your skirt is a pattern like mine is, make sure you note which part of the pattern you want to be the front so it’s falling in the direction you want it to when you look at the dress straight on. Also, keep in mind when choosing a fabric that if you have a pattern that has an obvious “up” and “down” direction, the back of the skirt will show the print upside down. So your cute kitty face pattern may be facing the correct way on the front but be upside down or sideways on parts of the skirt. Choose a more geometric pattern if you aren’t fine with that happening.
Next, we are going to pin your skirt to your skirt, but here’s a little trick to make sure you are pinning it evenly all the way around: Fold your circle template to divide it into 4 even quarters, put the template back into the hole of the skirt (lining up one of the marks with the part you designated to be the front side of your skirt), and mark with 4 pins where each quarter mark is. Find the corresponding marks on your T-shirt by laying it flat and folding in half (so bring the sleeves towards each other) so you can put a pin at each of the 4 folds and have those quarters evenly divided too.Pin the right sides of your skirt and T-shirt together by pinning them at the 4 matching quarter marks first and then continuing to pin all the way around.
You can also skip the step of marking off the quarters if you want to and just start pinning them together, but it does help to make sure it’s evenly pinned so you don’t get bunched up in one spot and have to redo it to even it all out. Sew the skirt to the shirt with a 1/2″ seam allowance and use whatever stitch your sewing machine designates for T-shirt/jersey/knit fabrics so that your seam can stretch a bit without breaking when taking the dress on and off (check your machine guide or ask the company if you don’t know what stitch that is).Press your seam flat with an iron at the appropriate temperature for your fabric (use a damp dish towel on top if needed to protect a printed design). Since we are using material that doesn’t have to be hemmed, I left the bottom of my skirt raw, but you could fold and hem yours if you want to. Sometimes a jersey lays flat and sometimes it rolls a bit when cut, and I was fine with either happening. If you are lucky enough to have a sewing machine like this, you could always serge the skirt and top together and around the hem as well.OK, now that’s just plain cute, right??! I love the graphic saying on the Brunch Club tee with the simple pattern below on the skirt. And since we added a circle skirt onto the bottom, you can guess what’s really fun to do in this dress—twirl! This method would also be great to make dresses for kids with this tee too once a shirt becomes too short for them to wear. Have fun giving your tees a second life! xo. Laura
Credits // Author and Photography: Laura Gummerman. Photos edited with A Color Story Desktop.
from RSSMix.com Mix ID 8265713 https://ift.tt/2ECXMiB via IFTTT
0 notes