#i do love embroidery and appliques....
Explore tagged Tumblr posts
Text
the first jsk i made for myself was maybe back in 2016/2017 with the m2035 cosplay pattern and some blue quilters cotton with a tiny cherry print. i dont even have any cherry prints in my closet now i much prefer strawberry. but idk maybe i should try designing a more flattering pattern (tube bodices always look bad on me even when i was *** just bc my genetic curse) and making a cherry coord from scratch over the christmas break. i need an excuse to make myself a blouse tbh and doing a cute cherry embroidery motif would rly make it more fun than another solid color blouse. and if i have a cherry blouse i need a cherry jsk. depending on how much fabric i might even make a cherry skirt. maybe i can even design a cherry bag. and of course i will need a cherry headdress. i could even try my hand at knitting some cherry socks- *gunshots* ow im dead
#ive sized out of half of the brand blouses i own. i need to make more#shut up luci#no prommies but uahhh uni has tortured me enough. i need to be back on my seamstress grind#if im not designing and sewing im actively suicidal. not even a joke just a real fact ab me i have learned the hard way#the real question is do i custom print fabric or try to shop around for smth off the bolt or do i find a solid and add embroidery/appliques#i do love embroidery and appliques....
0 notes
Text
daydreaming about embroidery
#never embroidered before and was only vaguely interested in it#but now im thinking about ways i can detail a quilt block without super fucking complex patchwork or applique blocks#anime and screencap things lend themselves much better to embroidery#so i could embroider a cotton square that i then just like. sew into my quilt#UGH I LOVE IT#im getting an embroider hoop soon for quilting purposes too#i don't know ANYTHING abt the type of thread used for embroidery though. i have a lot of quilting thread but that seems a little thin almost#i love crafts...#i will still be doing my poorly executed anime applique quilt BUT in the future i want to make a runner with studio ghibli scenes on it#and those HAVE to be detailed because i love them too much to allow otherwise. also it would be a display piece so id want it to look okay#for now though: bad applique <3
1 note
·
View note
Text
Dragon Age Fans!!!
Read below the poll for details regarding this.
PLEASE REBLOG!
Especially if you choose the first option. It makes no sense to choose it if you don't reblog. Where are you gonna tell me what character you want most if you don't reblog and include that info in the tags?
Now, for details...
I create character interpretations in my work, and I'm a hard-core Dragon Age fan. The game saved my life when my mental health got really dark.
Because of a bad fall, and stuff related to it, I'm unable to draw anymore. Now I make quilts. The interpretations are colors, prints, and symbols. At least, until I learn applique.
Here are examples of interpretations. Several were commissioned pieces, and the clients are very happy about the results.
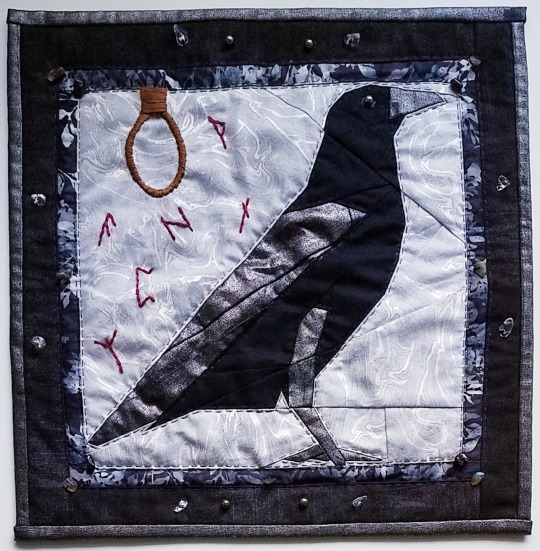
The first is Odin/The Hanged Man. This was a commissioned piece, and one of few where I applied embroidery.
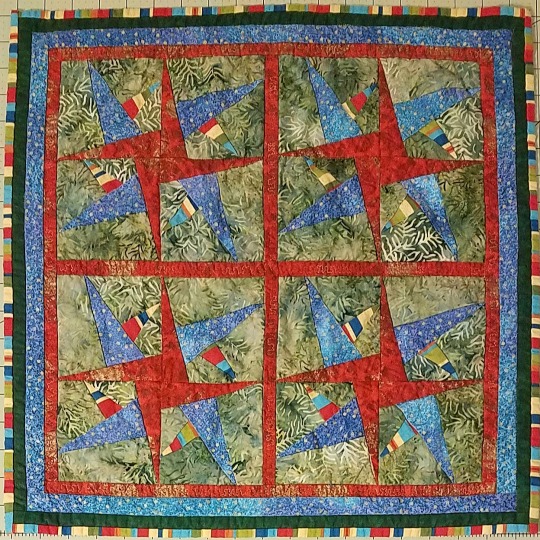
This one is an altar piece representing Brigid, a goddess.
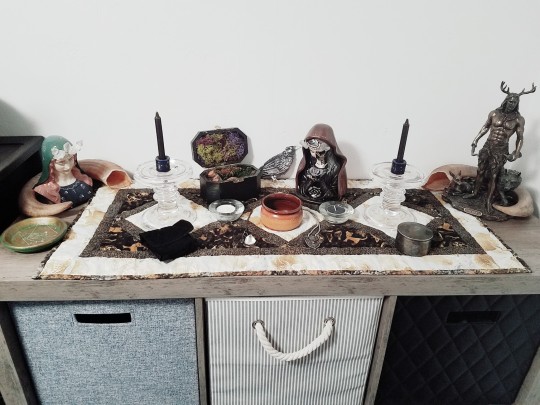
This is a personal piece, a table runner serving as an altar mat for Halloween and the goddess call Hel or Hela. The light print has metallic gold skulls all over it.
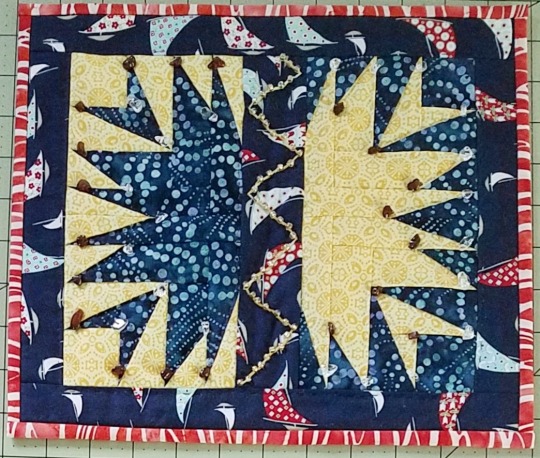
This is a tarot interpretation of the tarot card called The Sun, and was part of a trade. Like the Odin piece, it has semiprecious gems and stones handsewn onto it.
This is a transgender tarot mat, also a commission.
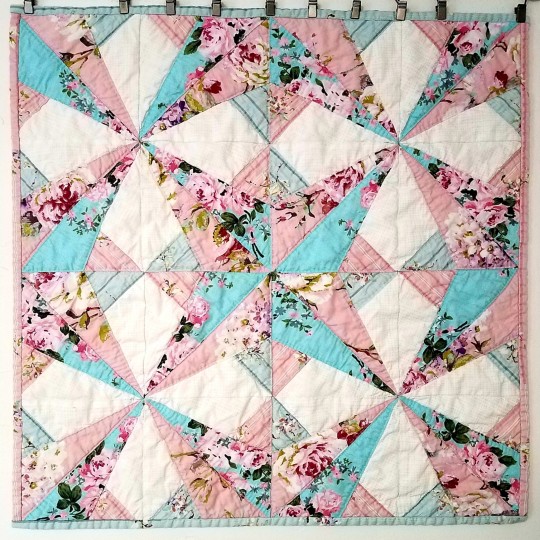
This is an interpretation of my grandpa, made shortly after he passed away. My grandmother wouldn't accept it because it was too accurate and made her cry too much. Instead, I made it a prize for a giveaway.
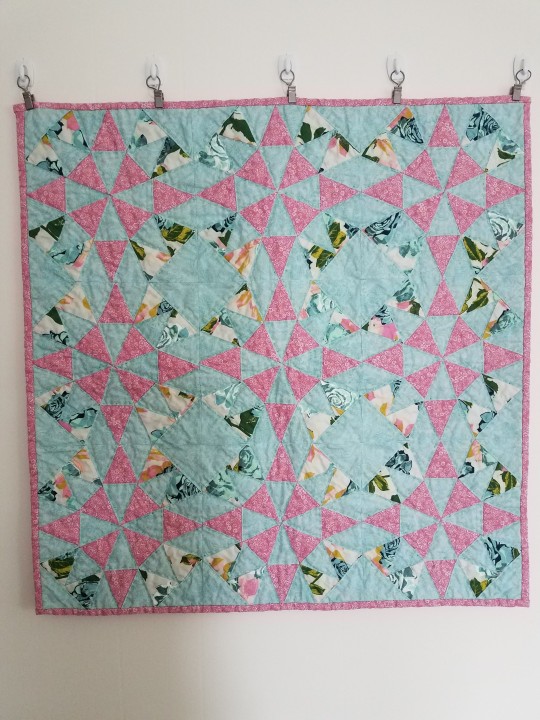
This is a memorial piece, also a commission. I have semiprecious stones and gems handsewn to it as well.
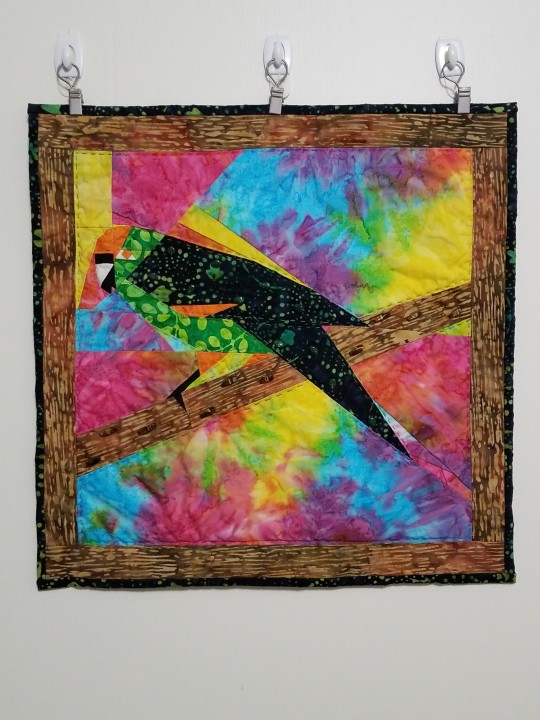
This is Lady of Guadalupe, an interpretation. I can't remember if it was a commissioned piece or trade.
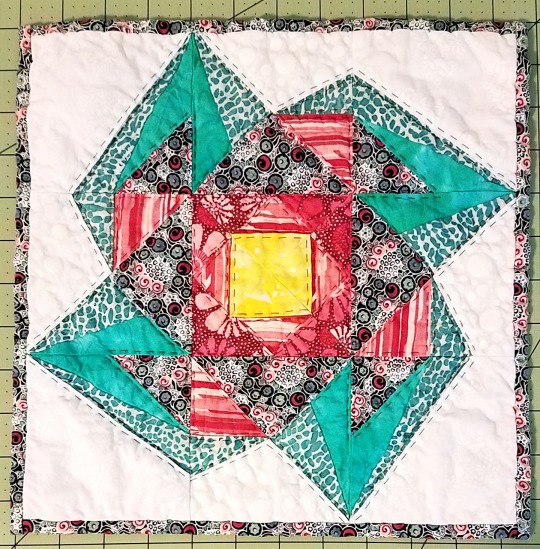
This last one represents the synesthesia I experience after tonic-clonic seizures. My synesthesia is normally my brain interpreting sound as texture, but it switches to seeing sounds. This is a song, but I can no longer recall the song
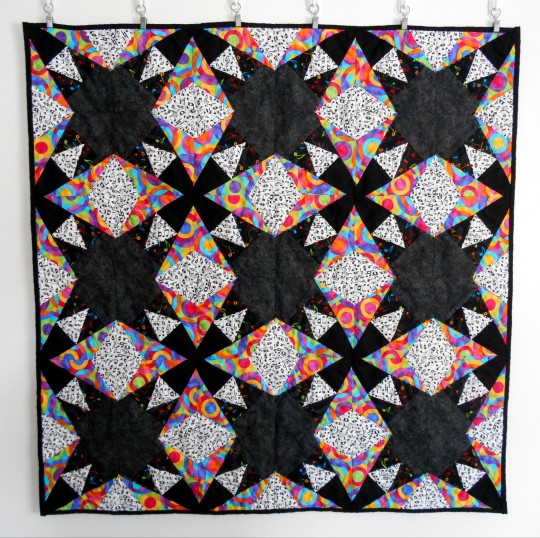
This should give you an idea of what I can do. Interpretation is a challenge I love to no end. As of making this, I've made a wallhanging representing Lucanis Dellamorte (the direct translation is Wolf of Death btw). I has a purple crow made with sparkly cotton, on a field of black shiny like polished leather, framed with a purple soft floral border. He's a Crow, a romantic according to devs, and his colors are purple and black. This will be listed in my shop, and soon I'll be working on another with reversed colors.
Emmerich is my next target, and it'll be skulls, blue, green, and possibly brown or off-white. Neve will likely have serpents, Taash will have wealth and/or dragons, Lace will have a bow and flowers, and I need to figure out the rest.
Feel free to include suggestions!l in the tags for the character you're most interested in!!!
Prices will vary by a lot. Size, design, materials, time, all of these will contribute to the final price. The work is worth the money though, that I can guarantee. There's a reason I gave repeat buyers and clients.
27 notes
·
View notes
Text
Cultural Fashion: Kahola Pt. 2 - Clothing
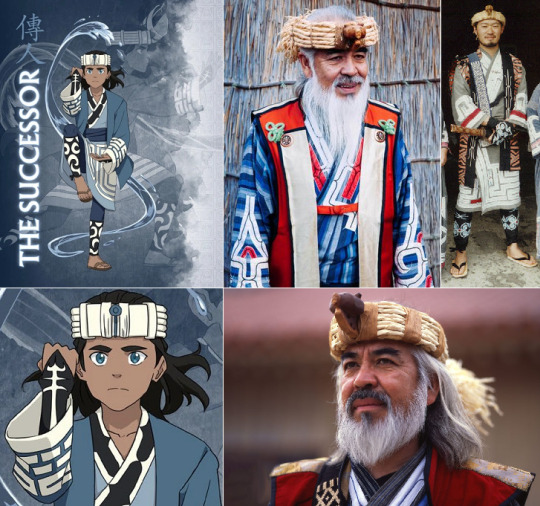
Kahola is a character from Avatar Legends: The Roleplaying Game Core Book. He is the child of Southern Water Tribe pirates. His design is inspired by Ainu culture.
As this is not the first time I’ve written about Ainu clothing, expect a lot of quotes from my previous posts. I think one of the reasons Ainu clothing was chosen for Kahola’s design is the preponderance of blue in traditional Ainu clothing, just like in the Water Tribe. There’s actually a practical reasons for this:
The color blue is actually closely associated with the Ainu people, due to natural indigo (aizome/藍染め) being one of the most common and resilient traditional dyes in Japan.
So if you ever wondered how the Water Tribe gets enough blue to dye all of their clothing that trademark color, they likely get it through trade with ATLA’s Japan-equivalent, Kyoshi Island.
Regarding the patterns and designs all throughout Kahola’s design...
Traditional Ainu decorations favor bold, geometric shapes along the openings of the clothing. These decorations were seen as charms that warded off evil spirits and protected the wearer, hence why the the patterns appeared on areas of the clothing considered vulnerable: Collars, cuffs, hems and backs... From a practical standpoint, adding embroidery and applique to the areas most vulnerable to wear and tear extends the life of a garment, in addition to adding aesthetic appeal.
Unlike the designs of the Kyoshi Islanders--- which had to be simplified for animation purposes--- Kahola’s Ainu-inspired clothing gets to be as beautifully elaborate as its real-life inspiration. The embroidery and appliques (kaparamip / カパラミプ) added to the robes are said to be imbued with the love and soul of the embroiderer. The designs of these appliques are inspired by aspects of nature that Ainu people view as embodying strength and protection.
For example, the swirls on Kahola’s leggings are called moreu (モレウ), meaning spirals. These spirals are stylized representations of whirlpools, symbols of power in Ainu culture. Considering Kahola is both a waterbender and a pirate, he likely shares a similar reverence for them. The designs on his lapels are called ayusi (アイウシ), meaning thorns. This design is meant to ward off evil spirits from the wearer, just as thorns ward off predators from plants. Finally, the boxy patterns on the coat are called utasa (ウタサ), meaning intersecting shapes. They do not seem to represent any specific element of nature, but appear to act as general protection charms.
Finally, underneath their distinct robes, Ainu wear form-fitting undershirts and leggings. It’s worth noting that the patterns on Kahola’s sleeves loosely resemble Ainu hand tattoos, which also acted as protective charms. He also wears sandals, which are quintessentially Ainu (and Japanese) footwear.
Overall, I like Kahola’s design almost as much as I like Tsemo’s; I just wish it was for a Kyoshi Island character instead of a Water Tribe person. Both of his parents are Southern Water Tribe pirates so his choice of clothing doesn’t really make sense for the arctic seas. And Ainu aren’t any more known for being pirates than any other Asian ethnicity. I believe he was primarily given this design to distinguish him from the other waterbenders in the game. Personally, I would’ve put Kahola in a parka, put his guardian (Honu) into a Yakut-inspired dress, and have Honu come from the Northern Water Tribe. That way you’d have a SWT, NWT, and Swampbender character.
Like what I’m doing? Tips always appreciated, never expected. ^_^
https://ko-fi.com/atlaculture
#avatar#atla#Avatar The Last Airbender#water tribe#Kahola looks exactly how I imagine Sokka and Suki's child would look#Can I just pretend he's Sokka's kid?#Cultural fashion#avatar legends
354 notes
·
View notes
Text

Sheriff Ginny vest... complete! (...for now)
this was made from a pair of jeans & the off cuts from shortening the skirt for this costume! i really love how it came out, its fun and cute, and i enjoyed considering how to be as efficient as possible with my fabric
the waves on the front are done with applique- its my first time doing it in many years so i might have to touch up some areas, but i like the rustic look where its slightly uneven and fraying, it fits the vibe.
because i was working with off cuts, my binding is heavily pieced- each section is only around 19cm- theres 12 round the outside and 3 more for each armhole! i paired the worn ends of denim with each other, & the same with the cut edge, so the piecing blended better & looked intentional.
i did end up removing the embroidery i did on the back panel, i just wasnt quite vibing with it for this piece- the stitch was a little messy in places & it didnt quite fit with where i set my hem line to (though id decided to remove it by that point anyway) i think i will go back in and add something on there eventually, but thats going to be a more long term project i think
(↓ a closer look at the details! ↓)

#for my friends: yeah i hand sewed all the binding down in the end and you know what? no regrets it looks way better#no 1 stitch in the ditch hater#< its not that i cant do it i just think it looks bad#sewing#cosplay#upcycling#sorta?#mysims#sheriff ginny#ill take worn pictures of it soon! its just too cold today so youll have to deal with this lame ass hanger picture#with god awful lighting. such is life#i also cross posted this to instagram so call me an INFLUENCER baybeee
14 notes
·
View notes
Text


This is Zero the Cccat! Made for X3NO42 on Twitter back around the end of 2023. :)
This plush is made entirely with custom dyed minky. Details on this plush were machine embroidered and appliqued. Unfortunately I do not recall the total length of the plush, but the base body was at least 24 inches long, including the tail was probably about 40+ inches. gradient on the body was hand dyed and touched up with dry brushing.
I will say it how it was-- this absolutely beautiful character and design broke me (and literally broke my sewing machine! Like, very literally knocked it off my work table and needed to buy a new one the next morning.🤣😭 ) I have so many mixed feelings about this little one, aggressively revolving around how proud I am of completing them and trying new techniques all the way to seeing that I don't feel like I did justice to them with some intense disappointment. I will let those be the only negative words on this gorgeous project and lay them to rest. ❤
The WHOLE body was custom dyed, save for the main pink color of the head and belly to chest ( creamy yellow). I split the body into a few pieces since different gradients were applied-- Tail, Back Legs, Torso/Trunk, Chest, and Arms and head(that didn't require dyeing). The underside of the tail was dyed as a long strip like the top side.
Just about every piece of this plush was embroidered or had embroidery details! I used some lovely pearlescent thread for the sparkles!
Nothing much else to add without rambling, but the two little orbs were refreshing to make after this sweetheart was completed! <3
Ko-fi: https://ko-fi.com/appledew
Trello queue: https://trello.com/b/FZKSnMo7/plushie-commission-to-do-list
Twitter: https://twitter.com/AppleDew_
Instagram: https://www.instagram.com/apple.dew
Tumblr: http://appledew.tumblr.com/
Furaffinity: http://www.furaffinity.net/user/appledew
deviantArt: https://www.deviantart.com/appledew
14 notes
·
View notes
Text
Let's Make Cute Sweaters!!!
Listen up Tumblr, your local goth is going to teach you how to make an applique and sew it onto a sweater or sweatshirt.
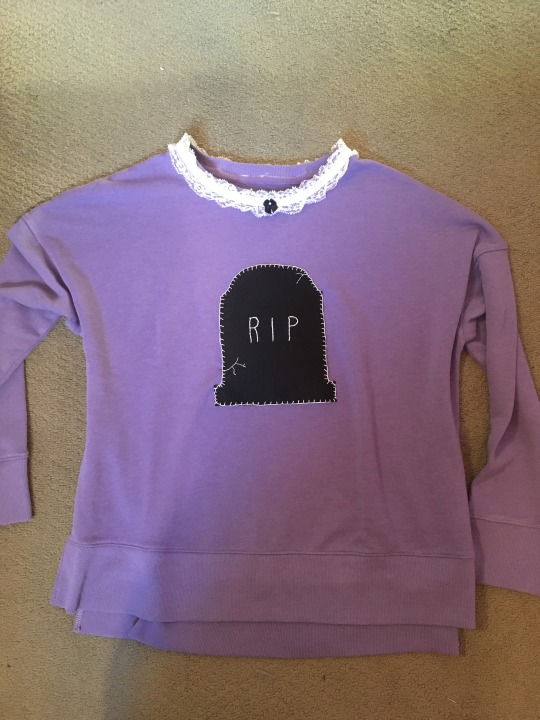

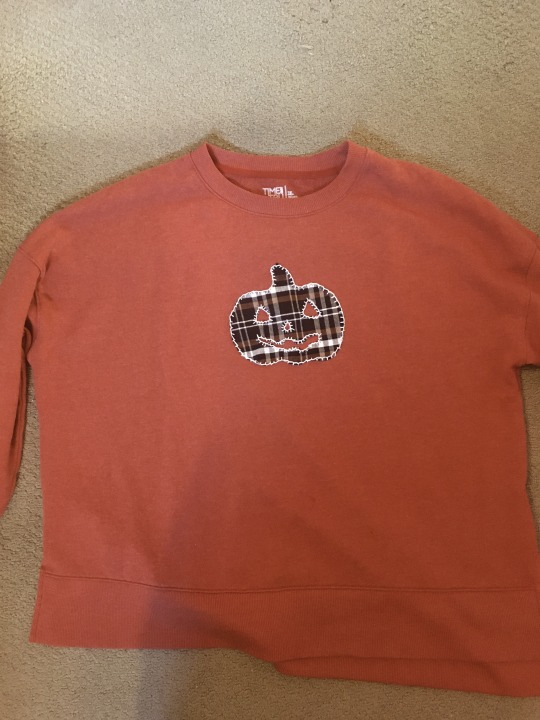
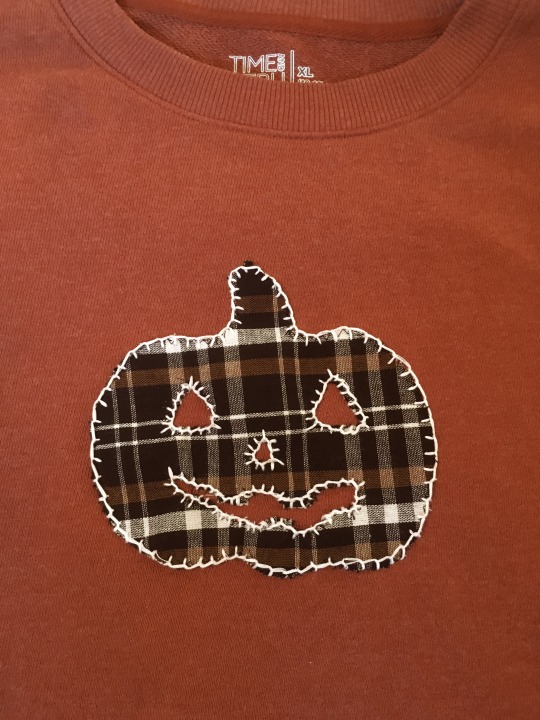
Yeah, my pumpkin's wonky, but he's my Special Little Guy, and I love him.
I used plain, Time And Tru sweatshirts from Walmart that only cost about $10, but you can easily thrift a sweater or use one you already have that needs a little spice. The tombstone is made with felt, and the pumpkin is made from a plaid fat quarter--I will explain both methods, as they differ slightly.
Felt (the easiest): Find or draw a template (I searched tombstone templates for mine), cut it out, then use it to cut out the same shape from your felt of choice. If you want to embroider any details on your applique, like I did with the RIP and cracks, do that before sewing it onto the sweater. Put the sweater on and pin the applique where you want it to sit (doesn't have to be on the center--you could easily do elbow patches or a little patch off to the side), then do a blanket stitch by hand around the border for a decorative, clean way to attach it. I used 4 strands of embroidery floss in a contrasting color on the tombstone and six strands on the pumpkin--I think four works perfectly fine and is a little less bulky. Embroidery floss comes in every color imaginable and is pretty cheap, so you can experiment with color combos or even use multiple colored threads. You're welcome to play around with stitches and find something that works for you if you don't like the look of the blanket stitch, you can use a sewing machine instead, or you can safety-pin or fabric-glue the applique on if sewing isn't for you.
Optional: I sewed lace trim around the neckline and added a tiny bow for extra cuteness. If you're going to add lace trim, keep in mind that unless you're using stretchy lace, it'll hinder the stretch of the sweater. To mitigate this, I stretched the neckline a bit as I sewed and used a zig-zag stitch with my machine (you can sew it on by hand, too, just using wider stitches). I also must mention that the neckline on this sweater was decently wide without stretching, so even though it can't stretch as far anymore, it's no trouble getting it over my head. If you're using something with a tighter neckline, or tight cuffs on the sleeves, that really needs to stretch, then use stretchy lace or none at all. Bows are still something you can add that won't affect the stretch, so go wild with bows, buttons, safety pins, and all manner of little trinkets!
Cotton: The attachment process is still the same as the felt method, but making the applique is a little different. Since cotton isn't as sturdy as felt, and it frays, you need to prepare it differently. Before you cut out your shape, iron on lightweight fusible interfacing (sold at Walmart--make sure it's compatible with woven fabric if your fabric isn't stretchy and knit fabric if it is). I've made appliques without interfacing before, but they'll hold their shape much better and be sturdier if you do use it, so I recommend taking the couple extra minutes to iron it on. On the wrong side of your fabric, iron on a patch of interfacing large enough to fit your shape, let it cool, and then cut out your shape. I used an X-acto knife to cut out the face of the jack-o-lantern, which did pretty well, but did cause a bit of fraying that I cleaned up with my fabric scissors. To seal the edges, you can sew a zig-zag stitch around them, use an overlocker/serger, or use Fray-Check or fabric glue. I chose to do a zig-zag stitch so it'd be less noticeable under my blanket stitch, but I've used my serger in the past, and it looks nice, too--especially if you use a contrasting color. Now the process is exactly the same as the felt one.
Remember, it's perfectly okay if it has that "homemade look," and it doesn't need to look perfect or symmetrical, by any means! This is about having a fun little project to do while watching a show or some YouTube videos and sipping on some hot cocoa, knowing that you'll get a cute new sweater out of it that'll be unique and your own. And it's also okay to use it as stay-at-home lounge wear if it looks as wonky as Mr. Crooked Smile the pumpkin over there. Have fun, learn new techniques, and make happy little accidents!
Happy crafting!
#diy advice from your local goth#goth#goth subculture#gothgoth#goth diy#goth fashion#diy#diy fashion#crafting#sewing#sewing tutorial#diy tutorial#mine
38 notes
·
View notes
Text
Blue Lock Boys × Fem! Native! Reader: You Bead Something For Them
Disclaimer: ANOTHER POST FOR ALL MY FELLOW NATIVES, NON-NATIVES ARE ALLOWED TO INTERACT WITH THIS POST AS LONG AS YOU ARE RESPECTFUL OF OUR CULTURE. Again, all Indegenious/Native Tribes are different so I sadly won't be able to represent all of our people but I am gonna try and keep this as general as possible!
Cultural Context: My favorite part of our culture has always been beading and there are two types of beading: looming (where you use a loom essentially) and applique embroidery, where you just bead on designs with a sewing needle and thread! I will be talking about the embroidery one in this post since its one I've seen my tribe do a lot so I hope you all enjoy!♡
Reo Mikage:

- Your beading has always been so impressive to him. Not only is it the patience you have when you do it but also, the way your hand is so steady, and how creative you have to be with the beads in order to get the picture and design you want.
- HE WILL BUY YOU SUPPLIES, TOO. What fabric do you need to put your beads on? What specific brand of beads do you want? Do you want him to have people make you your own custom glass beads??? Just, like, stuff like that.
- He loves it when you walk around, a pair of shoes flashing an old design you did a while ago. Some beads had broken off and went missing a few times so some of the design was gone but he still liked how it looked on you!
- He also loves the texture of your beadwork, looking at a work in progress design you had laying around from a year ago and asking if it was if he could touch it, admiring the craftsmanship even tho you tell him that it still looks a bit sloppy, he loves it all the same and doesn't understand how you can see any flaws in it.
- You have made designs based off of him, too. Using beads colored purple that are his exact eye and hair color. Whether you made it into an earring or necklace for yourself, he doesn't really care, he just LOVES seeing you wear it honestly.
- So one day you decide that you want to bead something for him. Maybe his shoes? Obviously not his soccer ones but shoes that he wears on his days out or something. Maybe a bracelet that he can always wear whenever you aren't allowed in Blue Lock! Or perhaps just do something on his bag?
- Either way, whatever you decide to give him, HE LOVES IT. He is careful with it however, even if you assured him that you sewed the thread and beads together as best as you could to make the design more hardy but he's still very careful with it.
- HE TRIES TO PAY FOR IT AT FIRST. LIKE, HE KNOWS HOW MUCH TIME IT TAKES FOR YOU TO DO THESE THINGS AND HE'D FEEL SO BAD, but you assure him that you don't really want his money (especially after he already got you such expensive and high grade supplies) and that you just wanted to gift this to him because he means so much to you and that you really appreciate him respecting your culture and being so supportive of you that you just want to give him something in return.
- AND HE LOVES IT BECAUSE THERE IS NOTHING ELSE LIKE IT. The design you did was personalized for HIM. The time and attention you spent on this was for HIM. MONEY WILL NEVER BUY HIM ANYTHING THIS SPECIAL. So he will cherish the ABSOLUTE HELL out of your gift.
- He's fiercely protective of it and when he misses you, he just lays and admires it and your handiwork.
Rensuke Kunigami (Pre-Shidou):

- Rensuke is so interested in it, honestly. Like, he'll ask you all the time what designs you're thinking of doing, how you arranged the beads to get them to look like that. Just a whole bunch of questions but he knows you won't get annoyed and will answer all of his questions.
- Doesn't mind sitting in silence as you bead and he's practicing kicking goals into the net. He likes the comfortable silence and sometimes, he'll just smile at you lovingly as you furrow your brows and carefully place different colored beads that join together to create a beautiful pattern.
- He does make sure to check for needles when he's over at your place because last time when he sat on a couch, he accidentally sat on a needle that you placed there so it wouldn't fall or go missing. It didn't hurt that much but, you know, it's a needle. At least you let him know where you place your needles.
- If you ever spill your beads, he will help you pick them up and idk why but its just really cute to imagine him crouching down and helping you pick them and just being REALLY attentive about it. Especially if it was his fault, like he knocked over your plate of beads with a soccer ball or something but POINT IS, HE IS THOROUGH.
- He likes seeing all the bags, shoes, if you have a blue lock id that came with a lanyard (for when you are permitted to visit) then yeah, you're totally beading that too.
- Gets defensive if someone says anything that puts you, your art, or your culture down. Like, you're doing some beadwork and one of the guys just asks why you do something so pointless and Kunigami immediately jumping to your defense.
- "Just because you don't understand it doesn't mean it's pointless. You don't know how much work and time it takes them." and then he proceeds to just casually beat them in the next match he has with them.
- If you ever give him something you beaded as a gift, he will cherish it. I personally think he'd look cool with beaded necklace with a soccerball on it. You're embarrassed because you think it's really generic but he is absolutely stoked about it!
- Obviously he can't wear it in Blue Lock but anywhere else? He'll proudly wear it with you, making sure the bright patterns are visible for everyone to see and running his fingers against it and feeling the texture and smiling to himself about all the long hours you put into making this for him.
- He also knows sometimes you stay up late to make things though or finish up a few things on your beading but he will definetly urge you to go to bed and when you resist, he just carefully takes the needle from you and wraps an arm around you and you're about to protest but you let out a yawn and sigh and begrudgingly admit that he might be right.
Ryusei Shidou:

- Homie has BEEN asking for something from you ever since he learned that you do that. To be honest, he definetly thinks there are some parts of your culture that are cool as fuck but some of them are stereotypes that you might need to correct him about and he's willing to listen.
- But back to the beading thing, he saw how some of your things had various different tribal patterns or just some designs you thought looked cool and he asked where you keep getting that stuff and is fairly impressed when you tell him you made it yourself.
- "YOU SHOULD MAKE SOMETHING FOR ME. Like, a super badass design on my jersey!"/ "Ryu, that design would probably break. I could do a leash though, that'd be more useful."/ "I could work with that~"
- However when you start working on his gift, he soon realizes that the beading process takes A LOT your time. Aka, time that you could've spent with HIM. So he'll whine and ask you to pay attention to him and you have to be there like: "Shidou, YOU ASKED FOR THIS." and he's all: "I KNOW, BUT I'M DYING OVER HERE, BABY!"
- He has knocked over your plate of beads before, let's be honest. He doesn't mean to do it, he's just so easily excited and energetic and a huge fucking menace that its sadly the price the you pay for being in love with him. He'll help you pick them up but he's so fucking annoyed with them too because THEY'RE SO STUPID SMALL, HOW DO YOU DO ANYTHING WITH THEM!?
- Also if he ever hears you go: "Fuck!" and hiss in pain, he knows for a fact you probably poked yourself and he walks over to you and PUTS THE TIP OF YOUR FINGER WHERE YOU POKED YOURSELF IN HIS MOUTH.
- You pulled your hand away the first time and said: "RYU, WHAT THE HELL-" to his excuse was "What? Just kissing it better for you.~" So he just does that and you're going to have to accept that. Might teasingly bite your finger when you remind him you still have to work on his gift.
- When you finally finish with it, HE IS SO OBNOXIOUS IN SHOWING IT OFF. Like, he's talking about how great and talented his s/o is and how they're so cool and if anyone makes fun of it, he is gonna need to be locked up again. IF ANYONE TRIES TO TOUCH IT, HE WILL BE IN PRISON FOR LIFE.
- Tbh he might break it during like a fight or he just was too rough so you do have to make some repairs to it and while you're semi-annoyed, you think its really cute how he gets so upset about it until he starts talking about how he's gonna murder the guy he was scrapping with. If he has to wait because you don't have the right color beads, he will be moody with everyone (except you♡) and he'll be patient for when its ready.
- Ryusei loves seeing you wear the jewlery that you made tho, there's something so mesmerizing about you casually representing your culture that just makes him feel some kind of way. Idk why but he'd def like the dangly beaded earrings you wear, they're just super pretty on you. He can't explain it.
#Native! Reader#x native american reader#native american reader#native american#blue lock x reader#bllk x reader#bllk x you#poc reader#reo mikage x reader#reo mikage x you#rensuke kunigami x reader#kunigami x reader#kunigami x you#reo x reader#shidou x reader bllk#ryusei shidou x reader#shidou x reader#I KINDA WANNA DO AN ANGSTY ONE SHOT WHERE AFTER KUNIGAMI'S MAFCH W SHIDOU THAT THE NATIVE! READER#TAKES BACK HER GIFT FROM HIM OR SHE JUST LETS HIM KEEP IT BUT BREAKS UP WITH HIM.
114 notes
·
View notes
Note

idk that I agree per se, (or disagree, I kinda just think it's fine) but I *am* v curious what type of wedding dress you would have put Maddie in!
So, I don't really have a great answer for this, because my reaction was really based on my own aesthetic sensibilities rather than anything to do with Maddie. Frankly, the part I hate most is the mesh sleeves with the appliques along the forearms because that sort of "illusion mesh" style just always reminds me of ice skater costumes, where it's intended to create a certain effect from far away but it's not really meant to be viewed close up. I happen to think it's very ugly, but that's my personal taste.
But now that I am thinking about it, I think a big part of it is that the dress they chose is such a quintessential "traditional" bridal gown with an over-the-top amount of tulle, beading, and embroidery that all just kind of run together in a way that makes details that could look quite lovely on their own blend into an overall effect that is sort of cluttered and muddy. It's an effort to be fancy, but without discernment or taste. This is the kind of gown you wear to a Big Wedding that's geared toward impressing people, which is... just absolutely not Madney's vibe as a couple. It brings to mind the sort of wedding I would have imagined Maddie might have had with Doug, where the wedding is less about the couple's love for one another and more about Appearances.
As for the kind of wedding outfit I would LIKE to see Maddie in for her wedding with Chimney? Something a lot simpler, for a start. I could totally see Madney as that couple that's so committed to a casual wedding vibe that they get married in jeans (though Maddie would still probably wear a pretty white blouse or something), but if they did get dressed up I think seeing Maddie in something that was less of a Wedding Gown and more of a nice dress that happens to be white (or maybe it's not white! maybe it has white on it, but also has some good colors that signify growth and happiness. IDK, I'm not @stagefoureddiediaz, I can't speak to costume design on that level).
But yeah. It's very out of touch with the "living room ceremony followed by backyard reception" plan Chim and Maddie were talking about at the end of season 6, but there's also a huge disaster... so I sort of feel like everything about the planned wedding is supposed to be a little bit wrong, and then in the wake of whatever the fuck happens to Chimney, they're able to have a small, quiet, beautiful ceremony back at their house at the end of the episode.
6 notes
·
View notes
Text
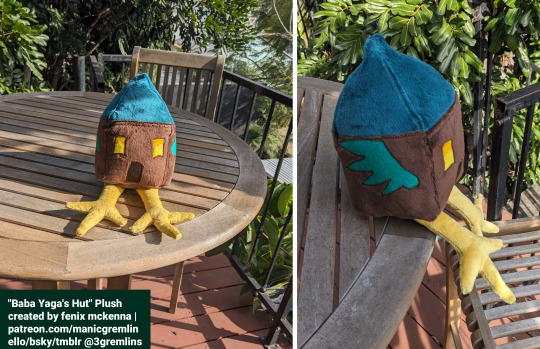
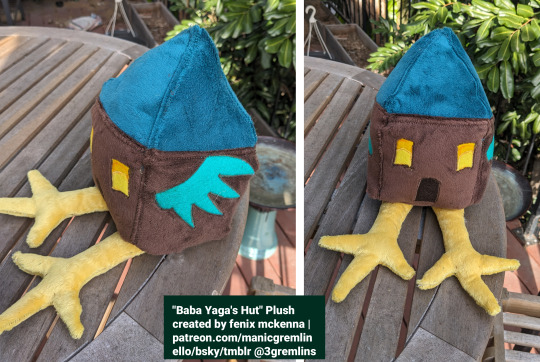
So as I've mentioned previously, my nibling loves baba yaga/her hut, so I wanted to make him some baba yaga stuff! I did the paintings but I wanted to do something more tangible, so I decided to make him a plush version!
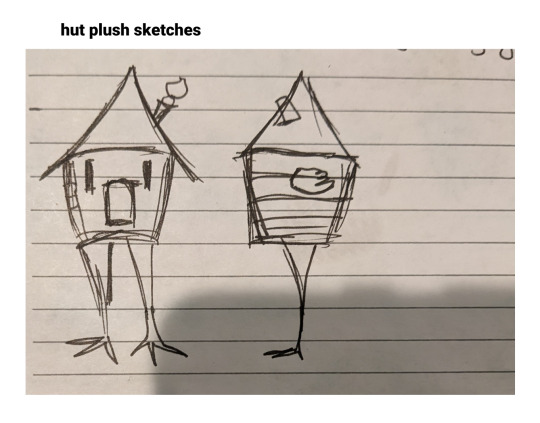
this is my original sketch to compare (it initially had a few more features but i nixed them for this version. currently working on a slightly more complex version too)
I used choly knight's square sheba plush pattern as a base to just figure out the cube (and having something already measured/sized as a base was really helpful/time saving) and did the rest of the patterning myself. I wanted it to be pretty simple since it was for a younger kid (i also made it out of baby safe and hypoallergenic materials).
The legs/feet took the most time to pattern, i went through a bunch of different iterations before i came up with a version that was both simple and "chicken-y" enough. I decided on floppy legs b/c you can't put anything hard like wire in kids toys, plus engineering for standing stuff is a lot more annoying lol. The bottom of the house is reinforced with canvas to support the legs a little better (all the seams are reinforced a bit in case of heavy playing)
The legs are floppy and can either dangle or sit straight out and all the applique is wool felt (i get my wool felt from this shop and can't rec them enough). I don't have an embroidery machine, so i used a satin stitch with my regular sewing machine to applique the eye pieces together for the highlights (and then to attach it to the minky).
any way this was a super fun project to do! as mentioned, i think i'm going to make a slightly more complex version (maybe with a chimney/3d wings) but i honestly also really like the simple version so i might make another just to have lol (maybe experiment with different colors or eye/window shapes idk)
i still have a ton of materials left over, so i could def make a few more (tho i once again have the "make plushes" bug i get every few years and might work on something else for a bit). if you're interested in more in depth wips, you can see them over on my patreon
#my art#plushes#plushies#plush toy#baba yaga#baba yaga's hut#russian folklore#q#folklore#the hut with chicken legs
3 notes
·
View notes
Note
Howdy! Hope you're doing alright, all things considered.
I was wondering, I've got a 4x4 Babylock Sofia 2 A-line - do you know if I'd be able to use the spring action hoops on it? I'm having a lot of trouble finding them to begin with (and not just standard machine hoops and spring-loaded hand sewing hoops), let alone what's compatible with my ol' gal 😮💨
I appreciate your help either way!
PS. Do you think a tutorial for the execution of larger files with smaller hoops may ever happen? I've tried to read up on it but it hasn't quite clicked enough to try it and I'd love to see how you would do it (not to be a kiss ass but your tutorials have made so much more sense and helped me more than 99% of other media consumed on the same subjects).
For repositionable hoops for the Sofia (and this also goes for people who own the Baby Lock Verve and Aurora, as well as most Brother 4x4 machines), I recommend the DIME Snap Hoop Monster. It's a magnetic hoop.
There's three kinds of Brother/Baby Lock hoop attachments, so make sure you're buying the right kind. There's the slide-in one that you see on most machines 6x10 or larger, there's the one where the pins are on the hoop, and the ones where the pins are on the embroidery arm. Nothing like getting your shiny new hoop home and finding that it doesn't fit your machine.
If you have software, the first thing that I'd do is check to see if it has design splitting built in.
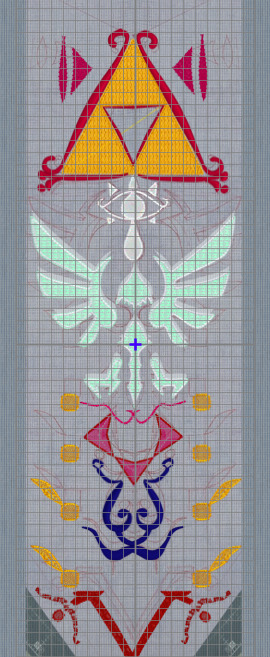
When I'm making something bigger than my biggest hoop, I make a custom hoop that's the size of my finished product, and I split it after.
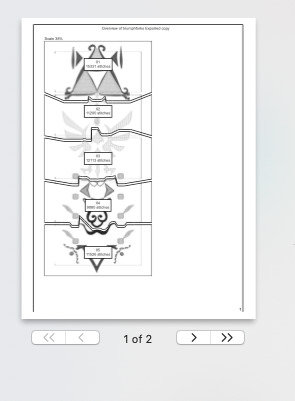
This automatically tries to find the best place to split, calculates how much overlap I need between hoopings, and places alignment stitches at the start and end of each block. Sometimes it makes decisions that it doesn't handle very well, like how it deletes stop commands if it has to split an applique. However, it's pretty okay for things like this, where it's able to split between motifs most of the time.
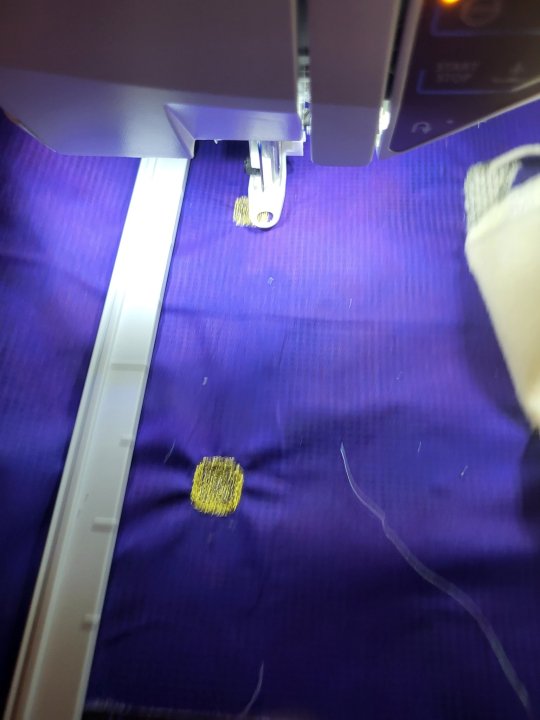
I'm using the Mega Endless Hoop here, which has its own problems. Notably, it doesn't grip particularly tightly, which can lead to puckering and other problems. It requires fusible or sticky stabilizer applied to the entire piece before you hoop, and all I had was Power Mesh, which is intended for much lower stitch counts. I might get some small and powerful magnets and use them to increase clamping power on the hoop, but I haven't tried it yet.
Having a way of telling the machine where it's sewing in reality (viking calls it Design Positioning, Pfaff calls it Precise Positioning, Bernina calls it Perfect Placement, and I can't for the life of me remember what Brother and Baby Lock call it) really helps. It means that my alignment markers have to be in roughly the correct position, but that I have some wiggle room to adjust to get my needle to be right on my marker.
If your machine doesn't have the ability to tilt the design (mine doesn't) then you need to get the piece in the hoop as straight as possible. What I do for that is to get one marker lined up, and then sink the needle. With the needle down, you can pivot the fabric without losing your placement. This is also the only time that I find those clear plastic hoop alignment guides to be any use at all. If you've lost yours, like I have, you can stretch a rubber band across the hoop and make sure that it's even, and then line up with the rubber band. On a long project like this, I will also iron in a crease across the length of the design, to be a marker. You can also use a pen or chalk to mark that. My hoop has center marks molded into it, so if I can line my center line up with my center marks, then I know my piece is straight enough, and I just have to match the corner marks.
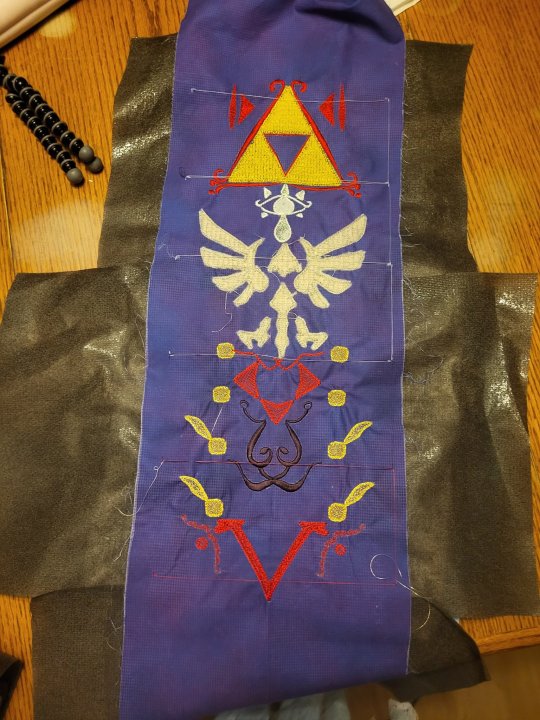
I definitely recommend doing a test run, which will let you spot trouble areas and make some overall design adjustments. It'll also give you experience with how the multiple hoopings work. Especially if you're just using a 4x4 hoop, there's a learnign curve to doing this. Doing a test run means that you won't be in a situation where the first hoopings are bad and the last hoopings are really good. You'll be more even across the board.
This piece here has taught me a lot of things. When I have a chance, I'm going to go through all of it in my software and fix things. Most of that fixing is just adjusting the size of things or how close they are to each other, but there's some some changes to fills and lines and density as well. I need to change how the gold squares are built to try to cut down on the puckering. Because I was watching as this stitched out, I noticed that the piece was much flatter before the line was stitched out. I think that changing that line will reduce puckering. Being able to sit with the physical copy in my hand while I go through the project on the computer is very helpful.
I'll also probably be layering some stabilizer in this. If I do fusible cut-away instead of fusible mesh, the designs will be better supported, but the piece will hang differently. It's all about balancing the pieces with each other.
The corner markers can be easily removed, or incorporated into the seam allowance and hidden.
If you have very detailed pieces to build, you can also do what a lot of Kimberbell pieces do, and just stitch out the whole piece with overlapping edges. You'll build a seam allowance that has part of the design, and then you can sew the finished pieces together and perfectly match the seams. This is probably a long easier, but does mean that you'll have seams all over your piece.
But I'd definitely start with either a piece that's pre-split by the maker, or one that's split by a machine and that adds the markers for you, before you try to yolo one on your own.
And, for what it's worth, if you have an applique that has to stretch over two hoopings, it's a really good idea to pre-cut that if at all possible. You can do it where you just hold the fabric off to the side on each side, or where you cut the fabric and splice it together, but pre-cut is the way to go. On the final one, I'm probably going to export the applique shapes on my Cricut, because having the fabric fused to the piece will make re-hooping a lot easier.
9 notes
·
View notes
Note
oh my goodness thank you for answering that so quickly wow! that’s exactly i was looking for honestly, i go to fabric stores all the time and i’ve worked with different fabrics for embroidery projects and the like so i feel pretty good when it comes to fabric it’s the patterns and just where to begin that was stumping me. i know this is super ambitious but i was looking to do the character momoo from one piece. he’s in like 4 episodes and never shows up again but i love him so much and i need a small version of him to hold gentle like burger. obviously trying to make him from scratch would be super ambitious which is why i was looking for basics to work up my confidence, understanding, and skill. the resource you’ve provided seem like an excellent place to start, i’m going to look at it a little closer in the morning when i’m not so sleepy but this is already making me super exciting to start learning a new skill! thank you so much again!!!!
You're so welcome! Sewdesune's free patterns and tutorials are so great, and I am always happy to share them with people (honestly her paid patterns are also great, but I learned to sew from her free patterns so I'm a bit biased lol) I had to look up momoo but from what I'm seeing, there are four patterns I'd use as the starting point to making a momoo pattern, and luckily enough all four are free! And all four are sewdesune patterns, which is a big plus for anyone new to sewing - For the head, I'd use her free cow pattern, and just size it up or down to match the rest of the pattern (I did that when I used the cow head for the baby minotaur, and there's a great tutorial on how to scale patterns up or down here) - For the body, I'd take a look at the other three patterns and decide how stylized I want the end product to be. On the simpler end of the scale, there are the narwhal and seal patterns. If you leave off the face applique (and narwhal horn) and sew a cow head (that's been sized to fit) it's a pretty decent simplified pattern for momoo. On the slightly more complex end of the scale, there's the free koi fish pattern. I'd do a similar "leave off the appliques and add a cow head" method, maybe grab the flippers from the seal pattern, and topstitch the flippers and the tail fins for those ridges. I'd probably also lengthen the dorsal fin pattern and do some topstitching there as well Oh one more note for you and anyone else getting into sewing plushies: air soluble fabric markers are great. You can trace pattern pieces onto fabric, you don't have to worry about pinning the patterns in place and the pinning distorting the stretchy fabric, and if you have tricky seams to sew you can draw the seam on the fabric before you sew it so you can follow it easier. And they are air soluble, so you don't have to try to erase it or worry about it showing through! The only downside I've found is that they seem to only come in purple, which is not visible against dark fabrics. For dark fabrics I use silver sharpies. Have fun sewing, and let me know if you have any more questions! I'm happy to help. Also, more generally, if anyone would want a momoo plushie next time I do a fundraising raffle let me know, because I am extremely tempted to make one
#ask away!#long post#I don't think this is overly ambitious as a first project nonny#well. my first plushie was a cube#but my second was a llama#made with faux sherpa and minky#so like...if it interests you and makes you want to sew#go for it! have fun!#you absolutely do not have to use the patterns I suggested but I do think the koi and cow patterns would work well together to make momoo#I have both a full-size cow plushie head (on a cow plushie) and a 90% scale cow plushie head (on baby minotaur) at the moment#if you want any measurements of the finished cow heads to help determine what scale you'd need the head to be to match the body pattern#or how much to scale the body up to match the head#scaling the body up might honestly be easier?#depends how big you want the finished product to be
9 notes
·
View notes
Text
I received a small sample of threads by Aurifil when I renewed a subscription to a quilt magazine last year. The first time I used the thread was for a friend's quilt (finished the top) and this stuff is phenomenal. Zero lint, strong stitches, sharp seams, no tangling, and fell in love with it. Buuuut this stuff isn't cheap. At all. I dream of having their entire collection of thread, but that's a long way down the road. This here? $160 Each spool has 1422 yards/1300 meters, which is nearly twice more than the spools of Gutterman I use (Gutterman is the best affordable thread Joann Fabrics offers IMHO).
For piecing, you want to use 50 wt thread with an 80/12 size needle. The larger the number for piecing thread, the more fine it is. 28 wt is really thick, 80 wt is very fine. The thread needs to fit the needle, or you'll end up with torn threads, tangling, and skipped stitches. For 50 wt, 80/12 is best.
For quilting, it depends on what kind of quilting you're doing and the look you want. Pearl Cotton is very thick and adds serious boldness, but you need an embroidery needle because the threads are too thick for a standard handsewing or quilting needle. The standard thread weight is 28 wt, which makes for a more visible bolder look than finer threads. I prefer variegated threads done with my machine because the tension never breaks the thread, whereas I end up breaking the thread when handquilting. Thread made for handquilting also tends to be stiff, and only tangles if cut too long (18 inches is recommended, but I tend to cut 24 inches). Using a thread wax, like Thread Magic, prevents tangling and bearding (batting coming through the sewing stitches), and it also makes the thread pass through the layers very smoothly.
My dream is to have Aurifil's enter 50 wt solid spools collection, and their entire 28 wt collection (which includes variegated) buuuut that's really expensive. I'm talking over $2k worth of thread. I'll be happy with just a collection of Aurifil's neutral colors 50 wt collection.
Here are the link to their full 28 wt threads. It's $1800 USD aka waaaaaay outta my price range.
Here's the link to their 50 wt collection of neutral colors. It's $160 USD, which is outta my price right as well.
My favorite, more affordable, brand for piecing and handquilting is Gutterman. 100% cotton, low lint, good color selection (when Joann Fabrics has it in stock), and 800 meters per spool. The dream, however, is Aurifil.
Here's a link to Aurifil's info website. You'll learn a lot about thread that way.
As for needles, this is what I use. I have enough needles to last several years. They're sharper the more well known brand Shmetz, and I absolutely love these.
16 notes
·
View notes
Text
i have been doing needlework (x-stitch, embroidery, applique, etc) and knitting for years like almost my whole life. but the ONE thing i cannot figure out is crochet and i feel so stupid for that!! does anyone have any really good idiot-proof crochet blogs/patterns/tips?
i have a visual disability (monocular) that i think is my entire issue with crochet because it's really hard to see the correct stitches due to my depth perception. so if anyone has literally anything i'd love to try it i really want to figure out crochet!! also my asks are always open please send me links ToT
3 notes
·
View notes
Text
Level 10 Jester Cosplay (Day 3)
I did think I was being vastly optimistic with my timings and what do you know, I was right :')
As I mentioned in the previous post, I had to make an emergency fabric shop trip...and of course I was served by the same lady who served me yesterday. I had to be like...."hi...I ran out of fabric". However I did (hopefully) get all the notions that I needed, and she was lovely about it.
I bought ribbon for the contrast panel sections, as I thought that would be the easiest way of minimising seam bulk and honestly I think it's worked really well. I seamed a narrow red ribbon to two wider white ones to get the center section, and a massively wide black ribbon for the backing. (I draped out the angle on the dress form, which helped massively)
Next I marked out roughly where I wanted the butterfly? shapes to go:
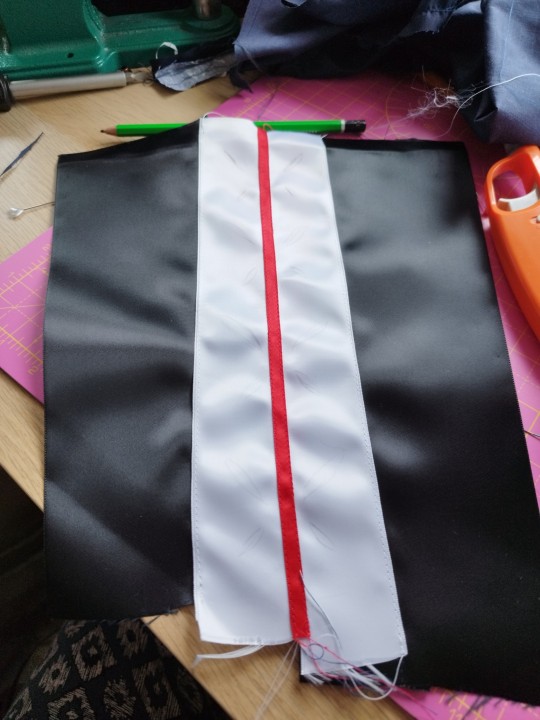
I was hoping the fabric shop would have applique flowers I could just iron/sew on, but nothing that was the right style or shape, so I went with option B, which was hand embroidery.
I would just like to clarify that while I can hand embroider, I dislike it intensely, especially without an embroidery hoop, which, unsurprisingly has vanished into the ether of the house.)
So! Split stitch, my beloathed, which I hate because it's fiddly and takes ages. I genuinely think I watched most of a season of Bridgerton just to do the butterfly section. (Don't judge me, Regé Jean Page is a very attractive man XD).
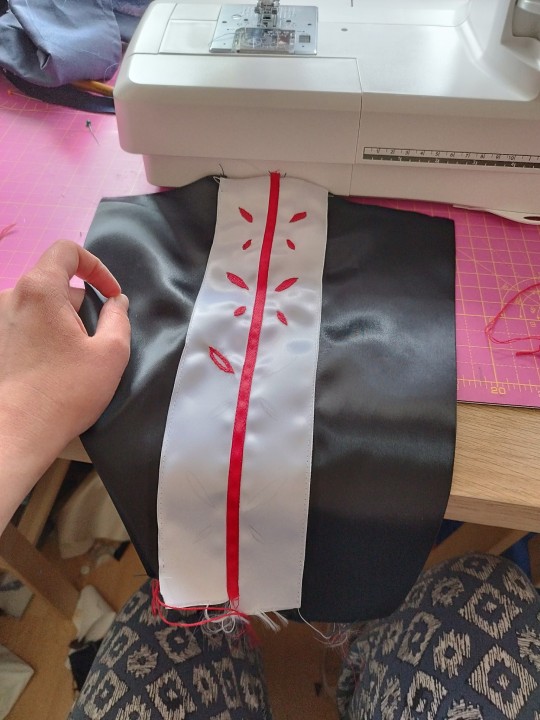
This is maybe 2 hours work? Maybe an hour and a half.
The crosses were a lot quicker, but because my other half had the audacity to make food and get me to eat it, I lost about an hour of sewing time as well as some of my momentum The bastard/j
This is what I finished today with, a combination of fatigue and a general loss of the will to live meant I figured this was a good stopping point.

However, because I wanted to give myself a false sense of accomplishment, I quickly pinned everything I had so far together to see how it will look.

The bustle side definitely needs taking up, as even hemmed at the moment I think it would be longer than the underdress, while I think the other side wants reshaping slightly. I don't think I remembered to mention yesterday, but the reason I figured out my overskirt pattern was demonstrating to @naia10101 how to wear a cloak a specific way and then realised that was exactly the shape I needed.
I'm going to take the little panel with me to work tomorrow, and I'm hoping I'll maybe be able to sneak a couple of hours in if it's quiet. (Knowing my luck it'll be rammed, but oh well.)
3 notes
·
View notes
Text


This is Finn! Made for Orange_Parade on Instagram back at the end of 2023!
This plush is made with minky and mochi minky for the paw pads. Details on this plush were machine embroidered and appliqued. The fish net accessory around the neck is embroidered using the freestanding lace embroidery technique! This little one has magnets on each paw to help hold their little starfish accessory.
Fun facts!:
I recall this project being a breeze, even with the extensive embroidery-- minus the hair! I struggle a bit to get it to look like the reference and I do remember liking the final project A LOT after photos were done! Loved working on this chunky little fella! ^u ^
Ko-fi: https://ko-fi.com/appledew
Trello queue: https://trello.com/b/FZKSnMo7/plushie-commission-to-do-list
Twitter: https://twitter.com/AppleDew_
Instagram: https://www.instagram.com/apple.dew
Tumblr: http://appledew.tumblr.com/
Furaffinity: http://www.furaffinity.net/user/appledew
deviantArt: https://www.deviantart.com/appledew
10 notes
·
View notes