#i cant make big projects with expensive yarn
Explore tagged Tumblr posts
Text
the massive dilemma of wanting to boycott all plastic yarns vs wanting to be cost-effective vs I Want Blanket Yarn vs michaels carrying 95% plastic yarns vs actually plant and animal fibers arent necessarily super ecofriendly depending on supplier and fiber type vs I Just Want Soft Cool Yarn etcetc etc
#buying yarn is the worst part of fiber crafting akchually and not primarily bc of cost...#like i know for now my best option would be to buy locally sourced fibers / made yarns#but theyre kinda really pricey imo#i cant make big projects with expensive yarn#and i wanna transition to making clothing and blankets etc.#imagine 100% organic locally raised and processed alpaca wool or whatever for double sized blanket hah.
1 note
·
View note
Text
Temperature Blanket Progress & Thoughts
I've been working on a temperature blanket for 2024 over the past few weeks and I wanted to share some of my thoughts so far for anyone else considering it:
It definitely felt intimidating at first- I bought a lot of yarn at once which wasn't cheap, and a year is a long time to work on one thing- but it's been really rewarding. Seeing the blanket grow over time makes me feel accomplished, and the color pattern is turning out to be pretty cool.
I get to chose how much work I do each day. If I only want to do one row, fine. If I get behind and want to do five to catch up, great. And I know that I will end the year with something big and impressive. I typically spend a few minutes a day on the blanket, often while also watching TV because the stitches are not complicated and don't need my full attention.
I love projects that feel monumental like this one. Sometimes life gets really hard and everything feels dark and dreary and disappointing, but having this big colorful masterpiece means that I can turn all of those depressing days into something great. Plus I'm doing rows of single crochet stitches for most days, but half-double crochet stitches for birthdays and anniversaries. I genuinely cant wait to look back on a whole year and see these special days that meant something important to me standing out.
I get to make this project totally my own. I won't pretend that this is something unique and one of a kind, I know that temperature blankets are super popular. But even still, there is a lot of creative freedom with these. I will be posting soon about some of the choices I made to customize mine, and other options you could chose too-- so feel free to check that out if you're starting your own project.
So if you're thinking about taking this project on I definitely recommend it. Yes, it will take at least a full year before you have the finished project. And yes, buying so much yarn can be expensive. But I love taking this out every day (or every few days...) to add to it and I can't wait until it's done.
#crochet#temperature blanket#craftblr#yarn crafts#crocheting#home decor#creative process#creative inspiration#create#mental health
3 notes
·
View notes
Note
top five books u want to read but havent yet, and top five tips for beginner knitter/crafter type people!
aaaa. ok
i have 1.5 books left of the Realm of the Elderling series. and i am SO looking forward to the last one as much as i am sure it is going to D E S T R O Y me holy shit. cannot emphasise how much i know it is going to ruin me. i know 2 death spoilers (both of which aren't surprising. cant follow a whole life without...following a whole life. and the other one is Old lol) but i dont know specifics and im fully going to be a sobbing mess when i get there and i cannot wait
legends and lattes is...12th on my TBR but im rly looking forward to it! constantly seeing it at the top of cosy fantasy recommendations and there is a lady orc on the cover, im gonna love it
really looking forward to when i get around to the 3rd Bone Ships book! its a very cool series about giant sea beasts and ships made of bone and just. exceptional wordbuilding. loved the first 2 books a lot. bumping this up my tbr as i type this
have decided 2023 is the year i will get around to starting Wheel of Time. it's one of the Big Fantasy series i havent touched yet and i wanna (i think the only others are Dark Tower which im ehhh about starting and Mazlan which i think i will love if i go into at the right time, and hate if it is the wrong time lol)
hmmmm. god there are so many books im excited to read, this is difficult. i have 3 full amazon wishlists of books lol. just gonna put the next fantasy book Jen Williams puts out. i love her and i love how....maximalist her fantasy worlds are. she doesnt just go "ok this is a world with dragons" she goes "ok this place has mushroom forests and a giant tree that births mythological beasts and sexy vampire elves and life magic and WEIRD BUG ALIEN INVADERS and lesbians and gruff axe weilding gay men and so much more" (go read the winnowing flame series, people!!!!!!!!!!!!) and i will buy her next book without a milisecond of hesitation
ok. *breathes* im ok. promise.
CRAFTING.
[every craft] everyone tells you to start with something simple. fuck that. start with something COOL. you will be 10000% more motivated to work on something if its gonna look rad. garter stitch scarf is gonna be boring even if it is simple. i believe in u, u can google and learn and make that weird project
[knit/crochet] skip the cheapo acrylic yarn if you can. it is cheap but yr gonna stick a WHOLE BUNCH of hours into this, i promise it will be more fun if it feels NICE while yr doing it!! there are some really pleasant feeling yarns that aren't much more expensive, and it will just be a much nicer experience.
[every craft] ignore everyone telling you you need a billion accessories. most of them are completely unnecessary. you dont need the fanciest needles or fancy stitch markers or expensive whatevers. dont sink a bunch of money into something yr just trying out
[all] try out different methods!! i spent ages trying to learn continental knitting when i was starting, bc people said it was Better but. i tried and i didnt enjoy it. but i know more for trying it!
[all] if it works, it works. if u are making fabric and you like it, s'all good!! maybe yr doing it in a weird way but if it is comfy for you fuck what the internet says. things Do Not need to be perfect!!!!!!
[knitting] bonus one: google twisted stitches. this is a common mistake and itll fuck you over if you get used to making them when youre not meant to lmao
thank u for letting me ramble about 2 of my favourite topics lol. and if u want some fun beginner friendly knit projects lmk 💚
6 notes
·
View notes
Text
so you want to knit
knitting is so great y’all.
- if you have like add or adhd or something, or you need to fidget in class or something - it’s something you can do mindlessly (and if you get good you don’t even have to look at it) and, unlike Cool Fidget Toys, you get fun knitted garments!!!
- don’t wanna buy presents last second? make everyone hats. everyone loves a good homemade hat. they wont even know that u used super cheap clearance red heart super saver yarn. i make everyone special hats and they love me. it works
- conversation starter “wow i love ur scarf whered u get it” “i made it!” “wow haha so talented” - thats how u impress chicks it works 100% i got a gf with my knitting and baking skills
- so, so therapeutic. stress knitting is nice because you’re stressed, you need to do something with your hands and, again, you get a knitted garment out of it. stress can be good! big yarn and needles are especially nice. and soft stuff. like caron super soft.
Important stuff:
• you don't actually need exactly what the pattern calls for. as long as the weight is the same ur good dude.
beginner materials id recommend:
red heart super saver yarn. that shit is bulletproof strong, washable, and dirt cheap. its awesome.
size 8 knitting needles. get the fun colored aluminum ones for like five bucks at michaels first, and when you get more into it you can experiment with other kinds like bamboo or laminated birch if u wanna be super fancy. size 8 is good to start with because TONS of patterns require it. you can branch out whenever, it usually happens when u find the BEST PATTERN and it calls for needles u don’t have. now i have fifty thousand needles. i just find them laying in my house. dont be like me. organize ur needles
GAUGE CHECKER. one of the most important things in knitting is gauge. you have to know how many stitches and how many rows fit into a certain amount of inches. super important for knowing the size of ur project. i am an idiot who doesnt ever check gauge and it made me accidentally create fuckin huge hats and hats that could be baby hats by accident. always check your damn gauge. i actually sent that hat to a baby and it fit perfectly. the best kind? the CLASSIC metal Susan Bates knit-chek. nothing else competes. plus, it comes with holes in it so if u forget what size ur needles are u can just shove em through the holes till one fits about right. it looks like this

Types of yarn:
• red heart yarn is cheap as shit and durable as shit and especially good for charity knitting. it looks like this

• merino yarn is expensive but SUPER SOFT???? made from a specific kind of sheep I think v special but don't buy unless it's a gift to a knitter bc honestly you will blow every dollar you have on this without some restraint
• aran: basically worsted. idk much bout it tbh
• sock yarn: usually pretty thin, so you'll need smaller needles. usually for socks, obvi.
• bulky yarn: god I live for this shit. You can knit hats in like half the time. Some big ass needles are required.
Needles!
• straight needles. basically what you think of when you hear grandma. They have one point and some kind of thingie at the other end to keep the stitches from falling off. you need a pair of them for like scarves n shit
• round needles. these are connected on the non-pointed end so you can knit stuff in a circle like hats or gloves or mug cozies - but you don't have to knit stuff in a circle, pour they're connected so you can't lose just one. these are my personal favorite - buy them!!! you can make anything. scarves? yep! hats? yep! socks? just use the magic loop method! so useful
• double pointed needles. they come in packs of four or five. these are only for round things, like hats or socks or mittens or whatever. a lot of knitters will switch to these when they’re at the top of a hat, cause there are less stitches and double pointed needles are t h e s h i t for small amounts of stitches. also called dpns. they look like this in action

Other stuff:
• ravelry.com . TONS of free or paid patterns and its super easy to filter so you only get the free ones in search results. it makes finding a pattern so. easy. so many boxes, like if u only have size eight needles and u wanna make something small, you check the box for the yardage of your desired project, the box for size eight needles, maybe the box for level one difficulty. so comprehensive. i cant use words to describe how awesome this free site is.
• youtube!!! thats where u LEARN. just search for like learn to knit or something, there are so many helpful videos. id go for learning the knitted cast on and the classic knit and purl stitches and mastering those before you move on to Crazy Stuff.
Abbreviations!
• in knitting were all about short versions of words so knitting patterns look like crazy jumbled gobbledygook to a regular, non-knitting loser. some typical ones (some you may not need)
st - stitch
k - knit
p - purl
yo - yarn over. you bring the yarn over the right needle from FRONT to BACK, as if it’s a stitch so u just have a loosey goosey loop on ur right needle.
k2tog - knit 2 together. its like ur doing a regular knit but you shove ur right needle through two stitches instead of one and you end up with one stitch out of two. it’s a right-leaning decrease thats p common in hats n pretty much everything
p2tog - purl 2 together. same concept as k2tog, but with purling.
sl - slip. instead of knitting a stitch, you just slide it from your left needle to your right needle without doing anything to it.
psso - pass slip stitch over. this happens after you slip a stitch, then do something with the next stitch, so the slipped stitch is the second closest to the point of the right needle. you use the left needle to grab the slipped stitch, and you pass it over the one to its left so its no longer on the needle.
thanks for reading!!!! please learn to knit
#knitting#mine#god this took me ages please love me#original#took so much effort i shoulda used to study
20 notes
·
View notes
Text
rosenmarille’s embroidery tutorial

hey anon you made my entire week and i love you
Let me preface this by saying that I’m in no way an expert and I’ve literally only been doing this for less than a month, so most of what I do is making it up as I go along. hopefully you find my tips helpful though!! <3
I wasnt sure which part you wanted to know about so i made a rundown of everything from start to end
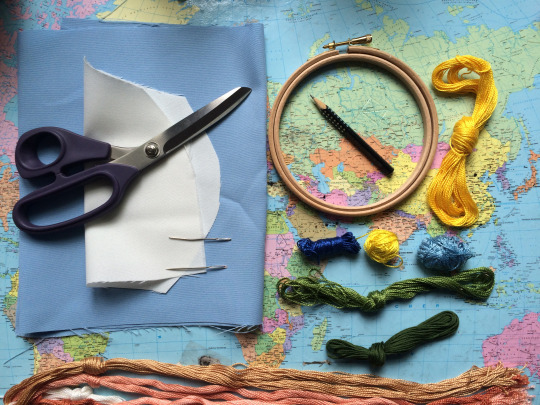
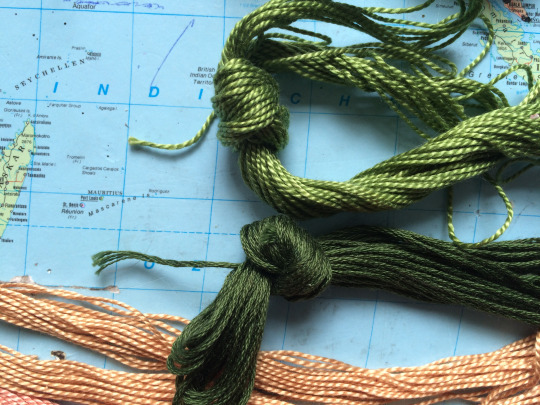
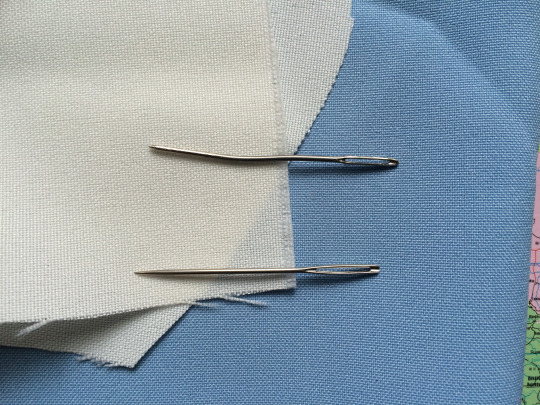
1) List of things you’ll need:
Embroidery frame (I just went to the nearest crafts store and got them in two sizes. Theyre quite cheap and sometimes also come in plastic or different shapes)
Fabric (the less stretchy the better, though if youre planning to decorate clothing I think it really depends on how determined you are. what ive got here is some leftover polyester fabric from cosplay and other sewing projects. you can even sew different pieces together if one isnt big enough for the frame but in that case you need to iron the sewed piece flat or else it will be very difficult to keep straight and neat)
Embroidery yarn (see pic) (theres two types, and ive only used pearl yarn (top) so far but the other one allows for more precision since you can pick how many strands of yarn you need)
Needle (see pic) (properly pointy, not like the crappy one above. I mainly use that for crochet things because it actually bends and that’s NOT what you want here)
Scissors and a pencil
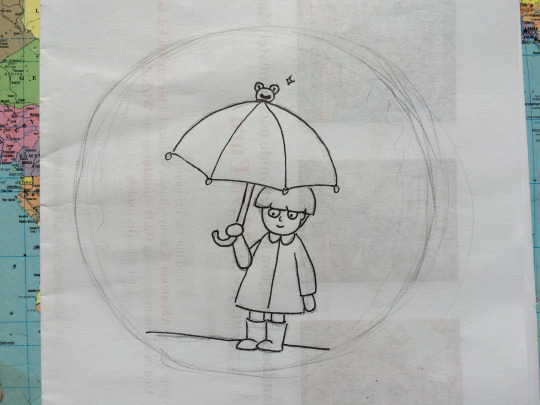
2) Sketch: Pick an image of what you want to do. I’ve found that at first, practicing with basic shapes and colours is a lot easier to get used to the whole thing, it helps give you a feel of how the yarn ends up looking stitched to the fabric. So far I almost only did screenshots, and I didn’t have to draw something up myself. In mobs case, I based it off a doodle I did in class and added a little colour to it
3) Pick fabric and yarn: That’s mainly up to you, depends on what youre going for, but as a fair warning, very light fabric colours will show the stitches and leftover yarn from behind, so you need to tuck them behind the main body of your embroidery later on
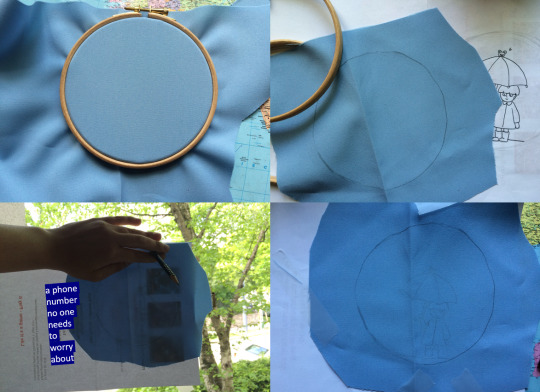
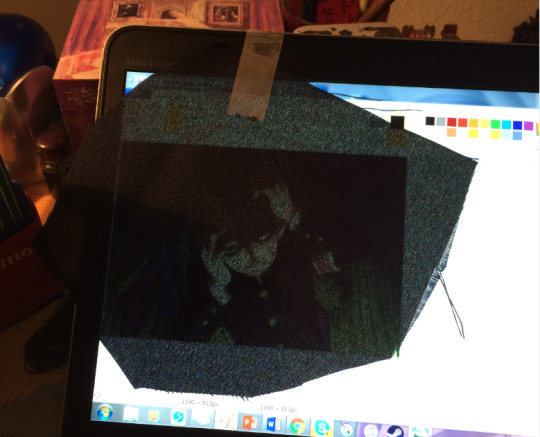
4) Apply to fabric: 2 ways, both pretty much self explanatory, only heres where the stretchiness of the fabric comes into play. As you can see ive developed a fool proof technique, ive had tape stuck to the top of my laptop for weeks now, im not about to waste it? (use more than one tape, this is an old pic i took because the concept was hilarious in the moment) Pro tip: don’t draw your sketch on paper advertising dnd game sets because youre gonna have a hard time seeing the pattern through everything and youll curse yourself for doing that instead of paying attention in class Pro tip 2: dark fabrics demand a white colour pencil, you literally wont be able to see anything else
5) Stitches: heres a LINK to the page I use to find all the different stitches I could possibly use. Practice makes perfect, i spent about two hours trying each of these out on an irrelevant piece of fabric to see how theyd work and how difficult they are, and still use that bit as ref to consider how a stitch would look on my current piece. Of these, ive only used about three in my finished broids, since theyre mostly for decorative things I think. Don’t let that stop you though, get creative and use the things im too lazy to incorporate!! (ill be using these terms for the rest of the tutorial, so if you dont know a word its probably in there)
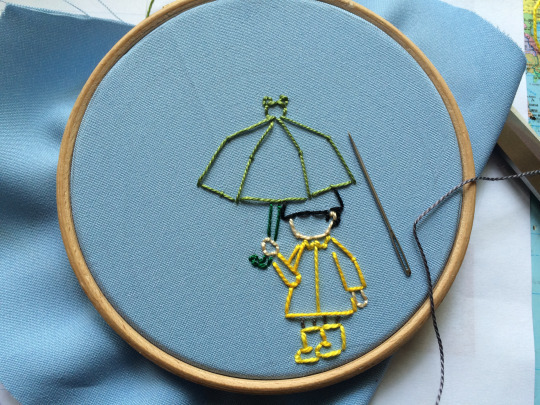
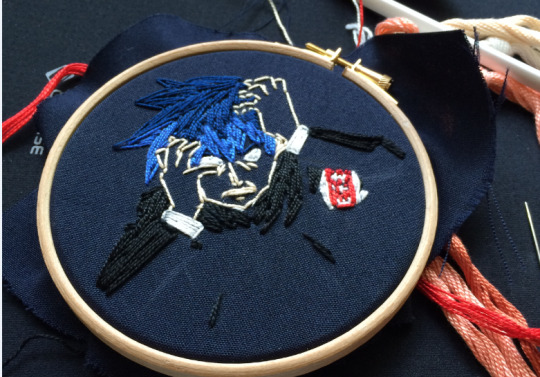
6) Outlines/shading: Start by outlining your sketch with a few backstitches to get a feel for where everything needs to be. If theres shading then itd be useful to do those lines in the other colour already, or youre going to have to fix all that later and itll be a huge pain and make you want to stop altogether. It happens
Im not sure if that’s how its supposed to work but I fill in the shades first, it gives me a good sense of what direction the main colour stitches need to go to make it look dynamic.
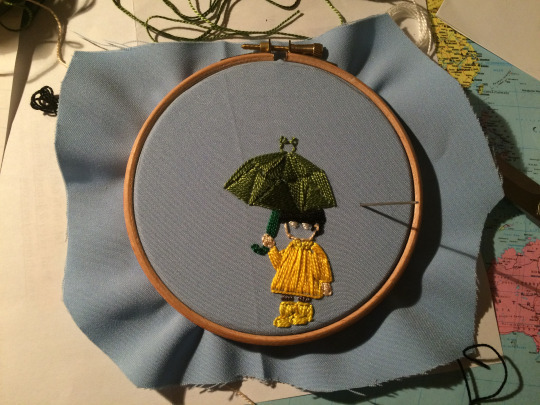
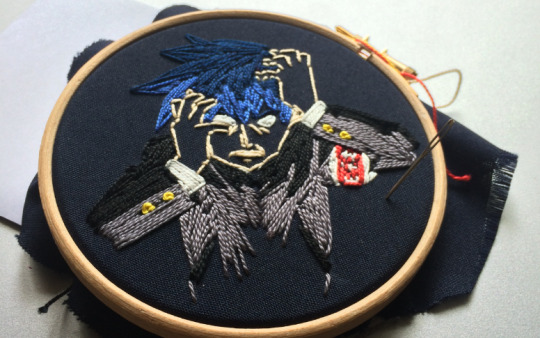
7) Fill in mains: This is where all those handy dandy stitches from that library probably wont help you too much if you want to do something relatively simple. Ive only used normal satin stitches to fill in colour so far, though what the link doesn’t mention is that it wastes a shitton of yarn. Yarn is expensive, so what you can do is come up for point 3 not back next to 1 but instead next to 2. Warning: that does warp the way the yarn lies though, so use that one accordingly (for example: I do Not use it when doing small delicate places, or things that need to be detailed in general)
Mob was fairly simple as far as that went since i didnt add a lot of pattern, but ritsu is a little more complicated. Like i said earlier, adding shade before the main colour helps because now i know where the folds in his clothes are and how the fabric would bend to accommodate it.
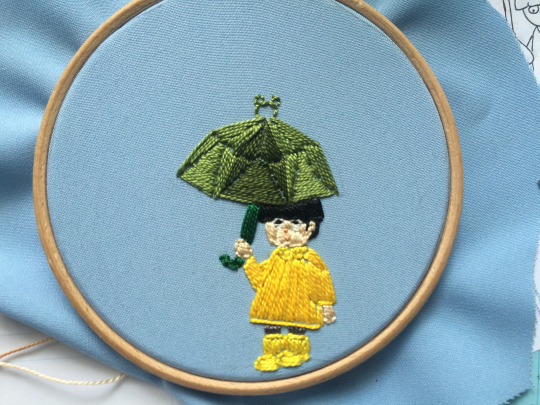
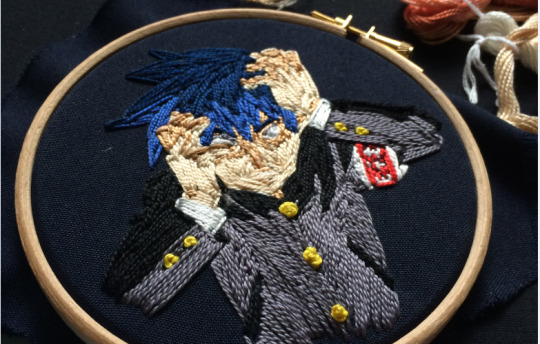
8) Add details (like faces!):
Again, here I cant tell you exactly how you need to stitch to get everything looking good, just try to follow the way a face has its dynamics. Is it a long face, make lots of long vertical stitches, is it a round one, try to stick to the edges (but don’t spiral)
Facial features are a little more difficult because its hard to make a round nub or dots for pupils on something very small but its better to try 5 times and get it right the 6th instead of leaving the 1st try (i took ritsus entire face apart at least 3 times and t b q h i still think it doesnt look good but ¯\_(ツ)_/¯)
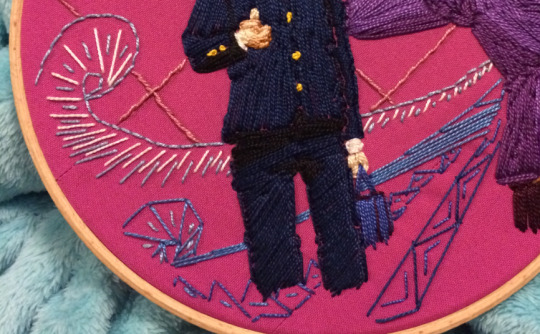
9) Background: Get real fancy on that shit, heres where you can try out those cool rose shaped stitches from up there in the link, go wild lol
10) Lastly: PATIENCE
I cant stress this enough, this WILL take a loooot of time, the first ritsu I did took me a literal week, while the second one took me roughly four hours in total (and that was a rather simple design).
Accept the fact that it wont look as good as you imagined it. That may sound harsh but for me that’s been my main issue, imagining how a string would lie exactly and then looking on in disgust when that doesn’t work out. You’re not drawing, the medium doesn’t exactly translate, but that doesn’t have to be a bad thing! Try to figure out what methods work best for embroidery exclusively.
Don’t be afraid to undo, be careful about it though. I use those big scissors and it’s a bad idea, don’t do that. Unpicking from the back to save the yarn also works but it gets difficult (and at some point impossible) once the strands start getting woven together on their own
And there you have it, a finished piece of embroidery!!
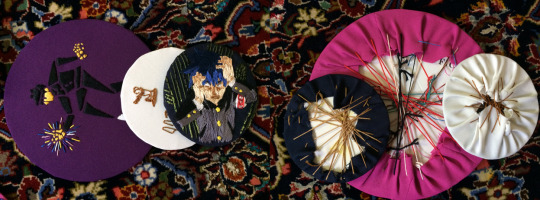
You can now either hang it up in its frame and cut away the excess fabric at the sides or tie it around a piece of cardboard like so. it’s a little hard to get right at first but practice amiright
I hope i could be of help!! if you have any more questions feel free to come to my ask anytime!! ^^ <33
#embroidery#pari stickt#tutorial#i still cant believe someone actually asked me to do this#anon who are you i want to hug you omg#also i hope you see this??? id have tagged you :0
37 notes
·
View notes