#i apoloogize in advanced for any mistake or bad explanation
Explore tagged Tumblr posts
Visit Tumblr Blog
Explore Tumblr blogs with no restrictions, modern design and the best experience.
Last Seen Tumblr Blogs


Fun Fact
Tumblr was attacked by a cross-site scripting worm deployed by the Internet troll group GNAA on Dec 3, 2012.
Text
GIF Tutorial
Someone asked me how I made my gifs so HD so I decided to write a full step-by-step uuuh babyyy 🎶 tutorial + useful tips on every part of the process.
It is explained in detail, so people with 0% experience can try it for the first time, and the more experienced gif makers can focus on the parts they are interested in 👍 (click on the images to see them bigger)
Disclaimers: I am not a professional, I have learned by trial and error and by watching other amazing creators. I use photoshop CC 2019 in Spanish so some of the names may vary but I tried to use the more accurate English names and used colors as references so even in other languages you can still follow this tutorial.
GIF TUTORIAL STEP BY STEP:
1.- Open photoshop and create a new project. Then go to “files” 🠲 “import” 🠲 “convert video to frames” 🠲 this will send you to your video folder, and from there select the one you want. TIP 1: try always to download it in the best quality possible (1080p or 720p) so you will end up with “cleaner” HD gifs.

2.- When you select your video, then you will have to choose the specific moment or scene you want (you do this by selecting and moving the arrows at the bottom of the image) TIP 2: I usually limit every 2 frames, but if your scene is too short (less than 20 - 25 frames) then I suggest not clicking the limit and leaving it at 0, likewise if your scene has too many frames (over 70) then limit every 3 frames 👍 to make it smaller.

3.- Sometimes when you select your scene, a few extra frames will show up in your timeline, it’s ok, you can delete them by selecting the frames and clicking the trashcan icon at the bottom. Next, don’t forget to change the speed, you do this by selecting all the frames (click the first one then press SHIFT and click the last one, this will select everything), and then click one of the numbers below the image and select “Other”. TIP 3: Usually I use between 0,07 - 0,08 (my fav) - 0,09 from faster to slower. The speed will depend on the gif you are making. TIP 4: If you have PSDs colorings, now it’s time to add them, just click and drag your PSD on top of the image, and remember to make sure it is on top of all the frames and layers ( the ones on the side). Personally, I do it now, because when I do it later in the process there is always a few frames that won't color.

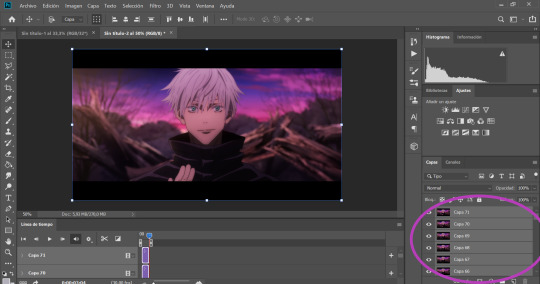
4.- Now that we have our desired frames, speed, and PSD coloring (optional), we need to make it easier to keep editing. So we need to click on the little icon with stripes at the top right corner on top of the timeline (the orange square) 🠲 “Convert timeline into video” 🠲 and now you should have one long frame instead of many single ones.

Now let’s do the same with the layers that are on the right (purple circle), once again click the first layer then shift-click on the last one to select everything 🠲 right click on one of the layers 🠲 “convert into a smart object” 🠲 and now all the layers also become one.
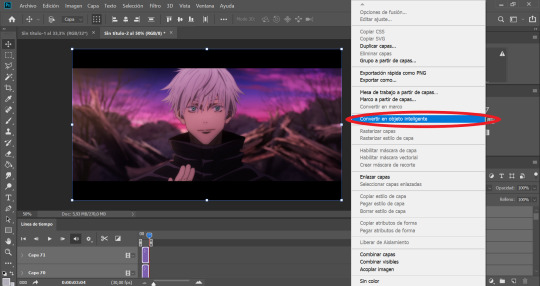
5.- What I like to do next is to cut and then resize (you can do it the other way around if you’d like) select the cutting tool on the left side (light blue circle) and then it is up to you to choose which shape do you want (in the purple circle) there are some basic proportions but you can also make your own.
6.- Now is where all the fun begins. Let’s resize our image so we won’t end up with a giant gif. to do this go to the “Image” tab on top of the screen 🠲 “image size”
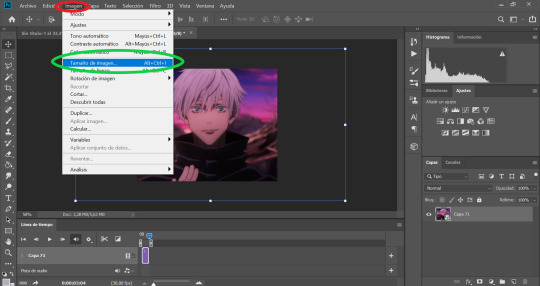
TIP 5: To choose a good size, please keep in mind the standard sizes on Tumblr or other social media. If you are using one gif per row then the size should range between 540px - 560px - or 580px / If you are using 2 gifs per row then the size should be around 268px / and if you have 3 per row then the size should be around 177px. Once you select the appropriate size… this is where it gets tricky. Depending on the gif you are making you will have to select a different option ex: if your gif is too blurry or has lots of movement or grains if they are too dark or too light if the colors are too different, all these factors will determine what you need to use. TIP 6: I usually use only 3: bilineal - bicubic reduction or keep details 2.0 (the names may change in English but look for something along those lines or in the same place as the ones in the image with the green ticks)

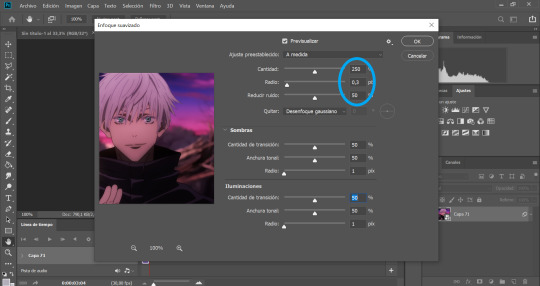
7.- SHARPENING TIME!: go to “Filter” 🠲 “sharpen” 🠲 “smart sharpen”

As I have mentioned before, the amount will depend on the gif you are making, there is no perfect formula for all the gifs, so you need to play around a bit to find the perfect setting for your specific gif. TIP 7: This is what I normally use: amount: between 250 and 300 / Radius: 0,3px - 0,4px or 0,5 (but never over 0,5) / noise: anything between 0 and 50, now if you have a very blurry scene you can go up to 100 👍 and finally select the option “Grussian blur”.
Tbh I never change the “shadows” and “lighting” settings (they are always 50 -50 -1) If you know how to use them or want to play around, then go for it…. I have no idea how to 🤣 oops.
8.- BLUR: sometimes the gifs look TOO sharp so we need to add a blur filter. so go to “filter” 🠲 “blur” 🠲 “surface blur”

then once again, depending on your needs, you can play around with the settings. TIP 8: I normally use 10-6 / 9-4 / 7-4 or 3 / etc. but I never go over 10.
Also if you are noticing that your gif is still looking a bit blurry or with imperfections, due to the quality of the video, the scene is too complicated, etc. then I recommend adding noise on purpose 🤣 hey! if you can’t fight against the noise then put it on purpose and make the gif with a bit of texture and colors, it will look nice too 👍 go to “filter” 🠲 “noise” and then add the amount you want.

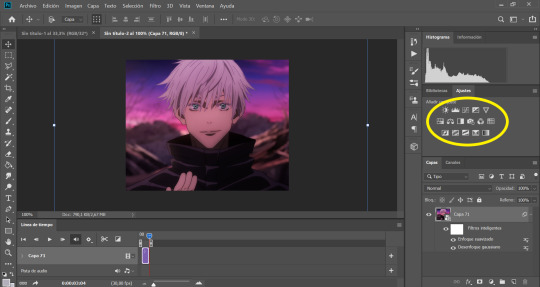
9.- Now we are almost done, you can leave it like that if you want or you can add some extra steps and play around with the brightness, exposure, color balance, gradients, filters, etc. you can find everything on your right (the yellow circle). Here is up to you to explore and experiment, I never use the same, it changes every gifset I make.
10.- You can add your watermark, images, texts, paint with the brushes, or do anything else with your gif. but this time I will skip these steps, but if you need extra information about something, please feel free to ask, and I will gladly help you 😊.
TIP 9: Before you save your gif, please make sure all the things you added are in line with your gif “video frame” 🠲 move the little arrow so it will end perfectly with your gif, if the others are longer, it doesn’t matter, you can move them or you can leave them there, the important thing is that the line is perfectly in line with your gif.

11.- Now there is nothing left to do, it’s finally time to save it for the web. Go to “files” 🠲 “export” 🠲 “save for the web”
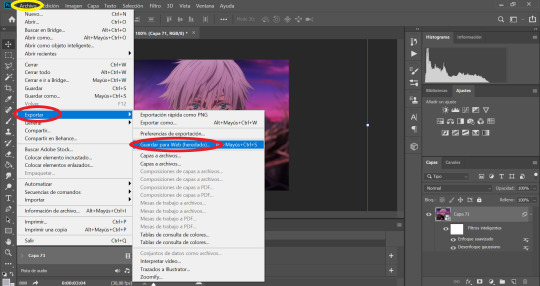
TIP 10: Now you have two options: you can view your gif in the “optimized version” tab where it will show you one option that you can edit. If you select this option then these are the settings I always use, the only option that changes is: using pattern (the gif will have a small invisible “net” that will make the gifs look more uniform, use this especially when the lights or shadows and colors look grainy) or you can use Diffusion (to make it smoother and move flowy) you can try both and see which one suits your gif best 👍

and then the easier second option is to click the “4 copies” tab on top of the gif, and it will show you 4 different options, then you just select the one you like the best and it’s ready!

12 .- THE LAST STEP!!! TIP 11: make sure your final gif is smaller than 10MB (Tumblr's limit) and hit SAVE! and you are ready!! ヾ(≧▽≦*)o
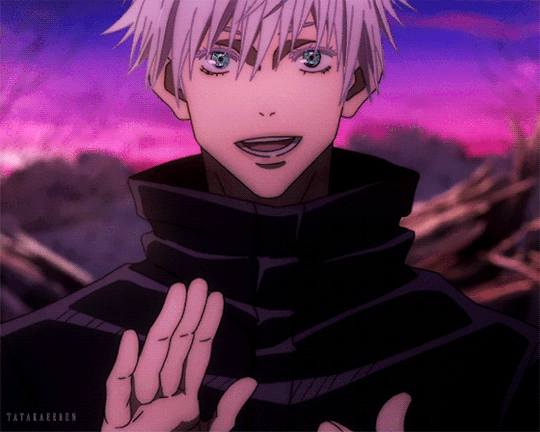
This is our final result: A sexy Gojo 💙
Thank you for reading, I hope this helped you, and I can wait to see all of your creations! ✨
Feel free to tag me in your gifsets or to ask me any other question in case you need extra information or need me to explain something better 💖
Also, if you are an expert and would like to comment, change or suggest better steps and/or settings, please let me know! so we can all learn and grow 👍
#gif tutorial#tutorial#mygiftutorial#i apoloogize in advanced for any mistake or bad explanation#I really hope this help you to learn how to make gifs or to learn new steps or settings 💖#allresources#completeresources#rresources#please let me know if im doing something wrong#or if you would like to recommend me better settings or steps#i would gladly accept them! 🥰🥰🥰
166 notes
·
View notes