#how to use sims 4 tray importer
Explore tagged Tumblr posts
Text
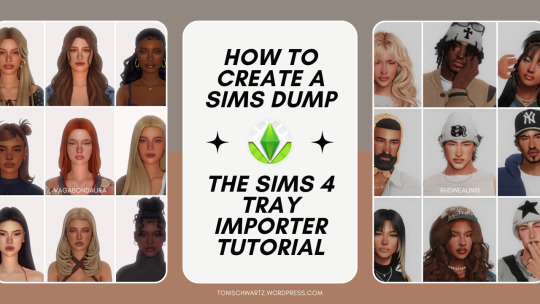
How To Create And Upload A Sims Dump Using The Sims 4 Tray Importer
If you’re a PC player and a Custom Content lover like me, you probably know your way around Tumblr and Patreon. Have you ever seen Sim dumps?
Sim dumps are when a player creates a Sim (or several Sims) and upload them to either Patreon, SimFileShare, Google Drive or another file upload platform, and it’s always a .zip file that contains the files necessary for the Sim and their respective CC to show up in your game.
Here are some examples:
If you want to create your own Sims dumps but you don't know how the tray importer works or where to start - I wrote a tutorial on how to do exactly that!
Read it here: https://tonischwartz.wordpress.com/2024/05/08/how-to-create-and-upload-a-sims-dump-using-the-sims-4-tray-importer/
Photos used in the banner are Sims made by vagabondaura and rhdweauni0
#the sims 4#the sims#simstumblr#the sims 4 cc#sims 4 custom content#sims 4 mods#ts4cc#cas cc#tray importer#tutorial#ts4#blog#sim dump#how to#how to use sims 4 tray importer
57 notes
·
View notes
Text
about to empty out my sims 3 cc folder...again...
#this time i'm gonna organize the living shit out of it#find CC i'll actually use and not bother to download the stuff i won't#label everything categorize it properly so i can find it later#sims 4 is goated for the tray importer i wish so bad that sims 3 had that#i can never figure out how to work ccmagic#also i'm a 🏴☠️ so i don't think it quite works right unless you have legit copies of the game#i have a legit base game and university life and that's IT#sims 3
1 note
·
View note
Text
The Pleasant Family
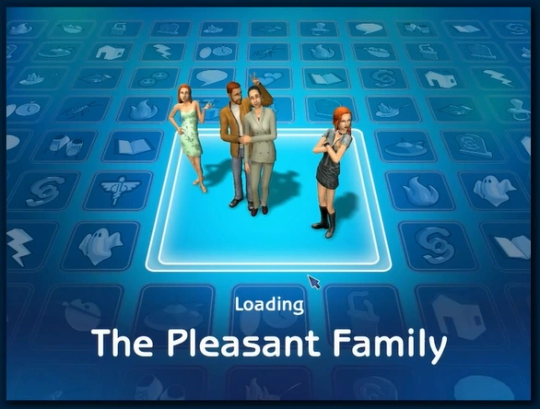
I recreated the Pleasant Family from The Sims 2 in The Sims 4! This household was one of my favorites to play with back in the day and I love the way they've turned out!! 🖤 I especially love Lillith; I've always had a soft spot for her.
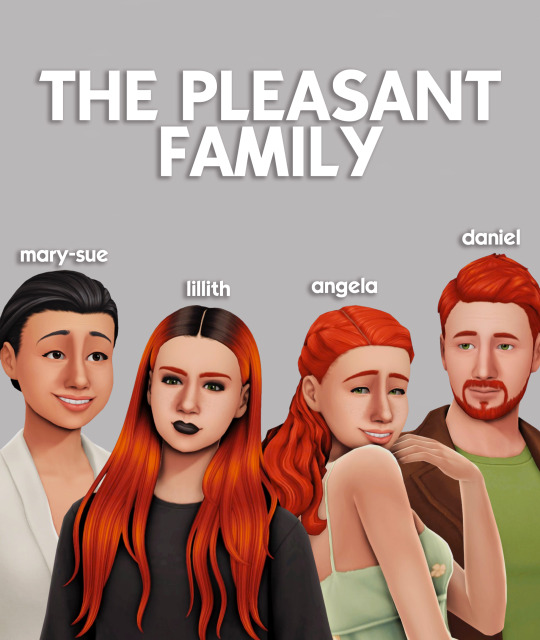
Download and more info below the cut 🖤
Within the download zip file you'll find the following: ➕ Required CC packages (it's a very short list!) ➕ Tray Files for the Pleasant household ➕ A text file with a list of required packs for the Pleasant household (only available for reference; doesn't need to be added anywhere!!)
For the most part, I tried to keep the pack usage to a minimum. If you don't have a few of the packs needed, there are easy swaps in Base Game that you could make without completely changing the sims looks! That was very important to me.
Also the CC I used could be easily swapped with in-game options. Primarily, I use some skin details that won't significantly impact the sims looks if they were not included or added to your game. The most significant piece of CC is likely Lillith's hair!
**If you have the Growing Together and Lovestruck Expansion Packs, all sims will have assigned familial and romantic dynamics. Preferences, turn-ons, and turn-offs were not designated. These sims will not come with skills, jobs, or degrees. I'll leave these things up to you to decide and play them how you'd like 😉
Check out the TS2 to TS4 comparison over on my YouTube channel as well: https://youtu.be/-Q2iaS4HO7w 🖤
DOWNLOAD 🔗: Pleasant Family (TS2 x TS4 MissSimReno)
Thank you to all the CC creators: @daylifesims @miikocc @missrubybird @simcelebrity00 @rustys-cc @crypticsim @simandy 🖤🖤🖤
77 notes
·
View notes
Text

my personal create-a-sim resource list
as promised, i've made a resource list to accompany my newest video after a 3 year long youtube hiatus! This video is about how I make my sims in cas! please note that these are my *personal* favorite cc creators, not every single creator. So if someone is not mentioned, charge it to my mind and not my heart cause WHEW I got 280+ gb in my CAS folder ALONE, so forgive me if I've left someone out. Although, I will continue to update this over time. I've been procrastinating on making this for over a year now. I've conjured up 100 creators for you to check out, since there are so many I didn't link them all bc it would become so tedious that I'll get overwhelmed and scrap it like I always do. Sorry about the inconvenience. I can lead y'all to water, but I can't make y'all drink it! y'all welcome!!!
Also, please be aware that some of these creators are perma-paywallers. Like I said, I can lead yall to water...
gshade presets
a little sweet life - wakawakaongong
pearl - amelie
glow comic preset - simgirlz
nightraven - 7cupsbobatae
favorite cas mods
reflection cas background - vyxated
skip cas stories - mizoreyukii
more traits in cas - thepancake1 and mizoreyukii
more columns in cas - weerbesu
colour sliders - thepancake1 and mizoreyukii
chalk'd up ui dark mode mod - vyxated
gentle cas lighting - northernsiberiawinds
cdd fresh start styled look - celaena
styled look hider - mizoreyukii
tidy cas organizers - your queen of night sims
controlled position - northernsiberiawinds
sliders
dumbaby
obscurus
magicbot (they have just as many body sliders on their page too)
luumia (also have a height slider, I don't use those personally)
redheadsims (another height slider, I don't use them so I don't know how they will work for you!)
vibrantpixels
skins, presets, masks & skin details creators (by creator)
okruee
ddarkstonee
northernsiberiawinds
obscurus
angissi
poyopoyo
sims3melancholic
jaysims
trillqueen
skinccreator/eyeedentity
claikimsim
thisisthem
mmsims
twistedcat
leahlillith
blahberrypancake
badddiesims
dumbaby
fashionsimsta
hoodlem
khadijah551
pralinesims
nonvmestudios
remussirion
afrosimtricsims
hokusai (nsfw)
boataom
agapesims
clothing, hair & accessories
slayclassy
busra-tr
joancampbellbeauty
turksimmer
plumbobs n fries
offline/pox/klubb/bergdorf/brior/pare n all them (lmaooo)
babyetears
whimp1337
san333*
1-800-cuupid
dogangje
seoulseoul
tinasims
b0tchedsimz
3dmuhari
archivefaction
b0t0xbrat
sentate
backtrack
belaloallure
charonlee
complexsims
cecesimsxo
overkillsimmer
fka crybby
bodybyvasquez
glacierbrand
gawdlygames
savagesims
brazilianforeversims
cocogames
kikovanity
kiegross
brandysims
ddarkpinkr0sa_
badddiesims
camuflaje
chih
kollections
cleptobycleo
darte77
cybersimscapes
idsims
outfitopia & shoestopia
decayed
coolcontentstar
mssims
euno
jius
noir angelz
wonder-bitter
xxblacksims
ebonix
anto
wingssims
s-club
delicious things
elliesimple
gorillagorillagorilla
kk's creation
greenteahoney
gramsims
hardswae
rimings
sunberry
siik
eh_sims
simstefani
valenttina muniz
simtographies
urban imports
tomiochan
pinkpusay
nitropanic
november
madlen
lynxsimz
vittleruniverse
simlocker
astya96
clumsytrait
korkassims
mermalade
tbzsimz
pyx
redheadsims
sheabuttyr
frxsk0sims
trapstyleree
plasticsimz
diversedking
lifelikesims
dorific
rona_sims
poppin
mablystore
dallasgirl
bradford
simtury
billsims
makeup
peachyfaerie
slephora
ddarkpinkr0sa_
bunzbunzsims
goppolsme
lean
cosimetic
bydiv
northernsiberiawinds
angissi
obscurus
twistedcat
cosimetic
misc
my cc finds - @thasimplug
sims 4 mod manager - gametimedev
sims 4 tray importer - luniverse sims
clean up your mod folder tool - snoopy911 (shoutout @blacksimlish for putting me on! love u girl. check her out.)

socials: sisisims | Twitter, Instagram, TikTok | Linktree
98 notes
·
View notes
Text
[DOWNLOAD] Teen Pascal Curious for TS4!
Hi!!! ^_^ This is my first time sharing a sim and I don't know exactly how to do it correctly, but I want to thank @hell-is-coming-for-you for suggesting me Sims 4 tray importer so I can share Pascal <3


[LINK] (MediaFire)
This sim includes EP content: Seasons and Life and Death
...
!!!: This sim includes CC (which does not belong to me) so I will leave the links to said cc that I used! All credits to the respective creators ↓
- Hair: Bernard hair v2 by johnnysims
- Skin details: Acne skin details by breezytrait
- Shirts and shorts: Hoodie short sleeves and Polo short sleeves by its-adrienpastel
- Bottom (2): Byeong Chan set by miro-sims
- Shoes: Birkenstock Arizona EVA socks by ceeproductions
30 notes
·
View notes
Text
well hi :3 welcome to deja’s skinblending guide. this is my first full written tutorial so excuse me if its not very good LAWL before we get started, here's the tools i'll be using
sims4studio
tray importer
photoshop 2022 (theres cracked version everywhere on tumblr)
blender 4.1
sims 4 ripper
blender + the ripper aren't required to make skins, plenty of people don't go that extra step, but i love using it for placement help
okay lets fuckin go gamers heres my very in depth process for making my ocs skins
miss dolly is gonna be our model today. she already has a skin but im gonna add some little details for the sake of example + some tats cause ive been meaning to anyway.
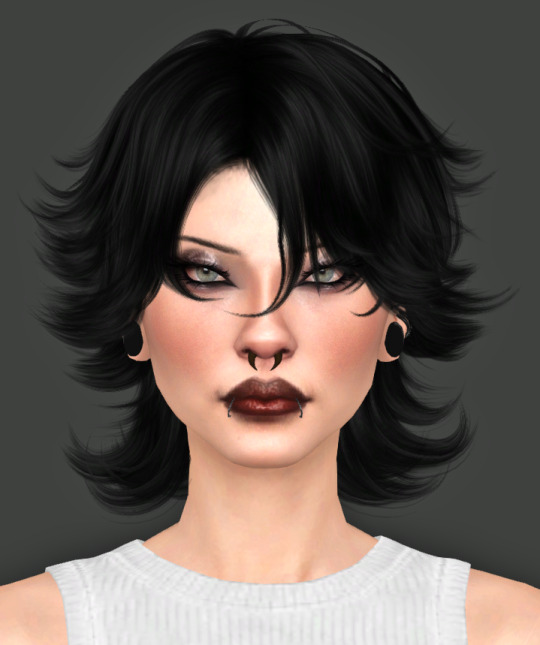
so when i first get started on making someone a skin, ill find a good base to use and then add details from other categories like nosemasks, eyebags, contours, etc.
my fav skin creators are @sims3melancholic and @thisisthem. my bases are usually thisisthem, and then i'll pick through a couple s3m skins and make notes on my phone about what parts i wanna take off of them (like, say, i like how a certain s3m skin's nose looks. i'll use that instead of a nosemask)
my goal when im gathering things i wanna add is to free up as many slots as i can. id rather add cheshire's freckles onto her skin than use up the freckle slot in skin details that i could use for something else, yknow?
ill repeat this process for makeup next. obviously im not giving my ocs permanent full glam, but some lipsticks can add better texture, you can get highlights/blush from........the blush section LOL and i love using this obscurus eyeliner at a low-ish opacity

just adds an extra level of detail i love. i think what keeps my sims looking consistent next to each other is that i tend to use some of the same details all across the board
make sure for all makeup/skin detail/tattoo category swatches you use, you make note of what swatch it exactly is. when you go into s4s to export the file, you're gonna have to manually select it and if u cant remember what skintone u chose out it can be annoying :/
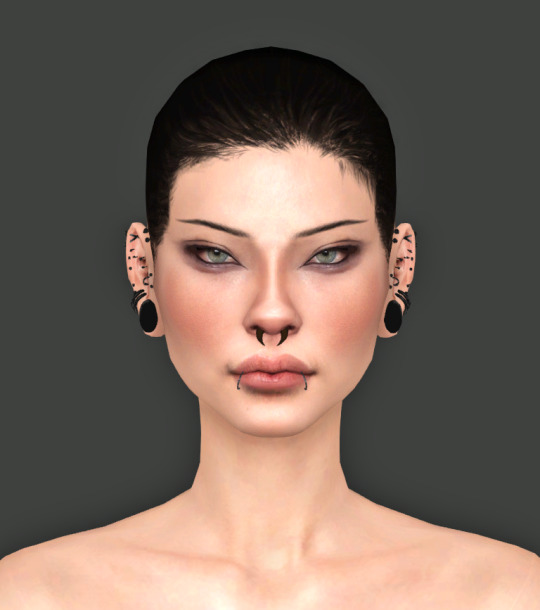
note that she is completely nakey aside from her piercings while i pick what im gonna use for her skin! no clothing but u can keep on their hair. this is so we have a clear view of everything (and i mean EVERYTHING) for blender.
after you make sure u save the sim/household to ur gallery, you can close out of cas and save ur game! i forgot to do this bc im a fucking idiot but its okay bc you will not. its not REALLY necessary to do this as long as you know exactly what packages you need to locate for texture exporting
step one is done!!!! close out ur game
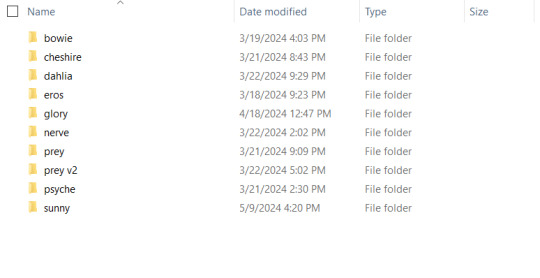
i have a million fucking characters so i made a deja senti skinblending folder to keep it all organized :-)
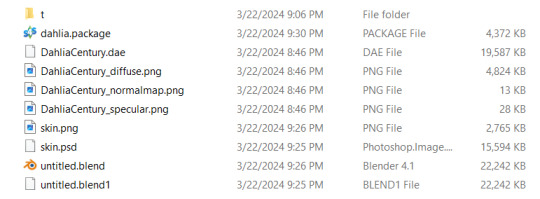
this is what it looks like inside. gives u a pretty good overview of what ur gonna be doing tbh. the 't' folder is all the textures we're about to export
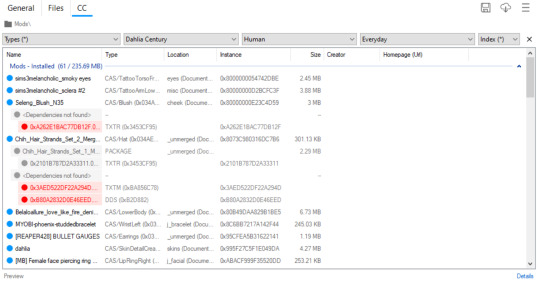
thankfully i do have a version of dahlia saved in my gallery so even tho i didnt go it before i closed my game i can still show u what to do in tray importer lol. i have multiple sims in one household, so i narrowed it down by going up top and selecting dahlia / human / and her everyday outfit.
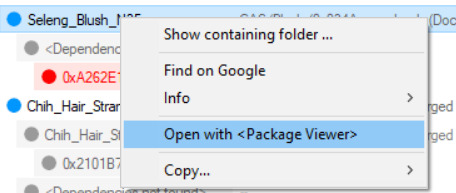
since im gonna give her this blush, i right click and hit open w package viewer so itll find it and open s4s for me
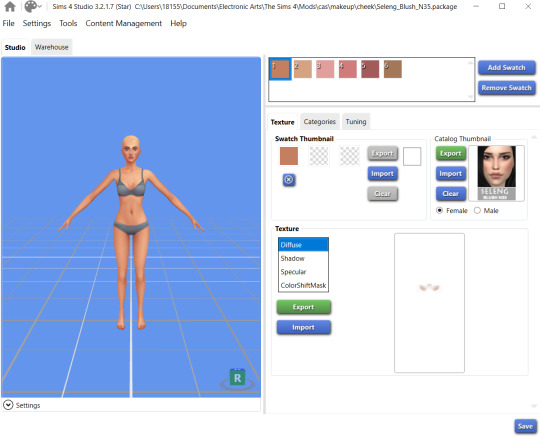
anime wow sound. im gonna change the color manually in photoshop so it doesnt matter to me what swatch i export. hit that green export button under the list of diffuse/shadow/etc (u dont need to worry about all those options, just diffuse) and save it to ur folder!
once ur done gathering ur textures ur good to close out of tray importer and s4s(we'll come back to s4s later tho)
thats step two! the quickest step lawl
this is where i start being a little extra. u dont have to rip ur sim and use blender if u dont want to, but i think it can rly help bc the default sim in s4s doesn't have ur sims facial features and can make ur skins look wonky/wont give an accurate representation of how itll look in game. this cuts out having to go in game/out of game over and over to check
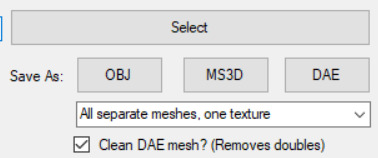
so in simripper once u load up ur sim, the important part is to make sure u have it set to export the dae with separate meshes. once thats done u can import it into blender and there's plenty of other tutorials out there how to use simripper n all that.
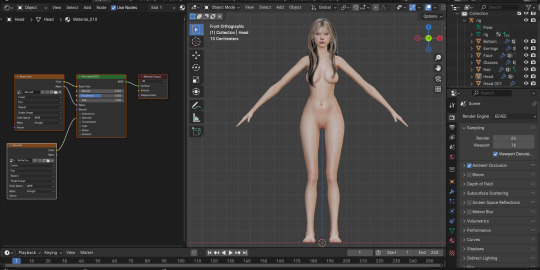
so once u get the dae loaded into blender im gonna send u on a little side quest over to this ask i answered where i explain how i separate eyes from the head mesh. next thing ur gonna open is photoshop! or whatever u have thats similar
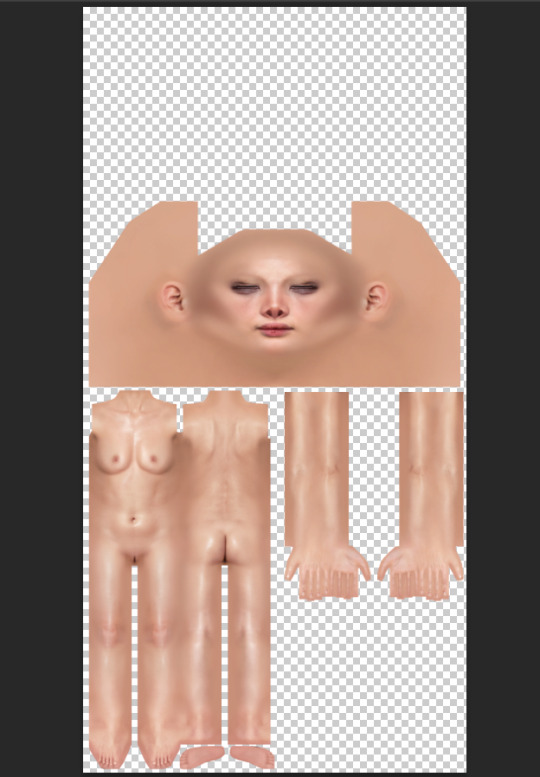
say hi to flat dahlia. u should have ur own guy but flat open now too :-) along with everything else ur gonna combine. in my case its blush and a titty mask. im gonna start w the blush so i zoomed into her face in blender. i went into the blush file and copied, then back into my base skin file and pasted into place with crtl+shift+v
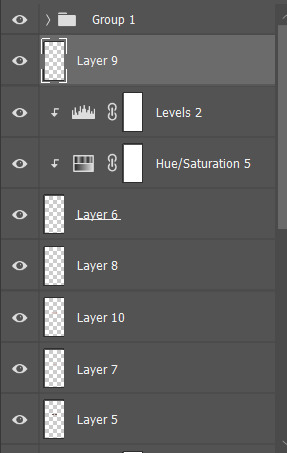
please do not be like me. make sure u rename ur layers as you copy and paste them into the main skin file. do this because it DOES matter what order ur layers are in. u dont want to put ur highlight under ur nose mask cause the nose mask will just cover the highlight etc etc. i already lost what layer the new blush i added is. what is wrong w me
so when u have ur first detail pasted on and in place, ur gonna save the base skin file as a psd. then go into blender, and in the little textures window ur gonna replace the diffuse file ur dae came loaded with with ur new psd file
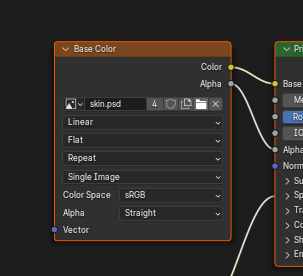
u should see the change u made but mine was super subtle so im gonna show it to u when i put on the cleavage overlay
when it comes to stuff like this, ur obviously gonna want to pick the closest to ur skintone swatch as u can. i did not do this, because again, im an idiot

mine is way too pale LAWL whoops. we can fix this tho
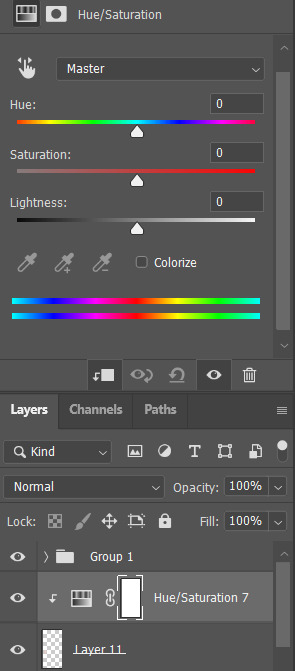
i add a hue/saturation adjustment and make it a clipping mask using that square w the arrow so the adjustment will ONLY affect the mask
from there i just make little adjustments until the color match up is as perfect as i can make it. for example for this, ik that it needs to be a little warmer and a little more saturated, so im gonna bump the hue and saturation sliders to the right and it was pretty much perfect
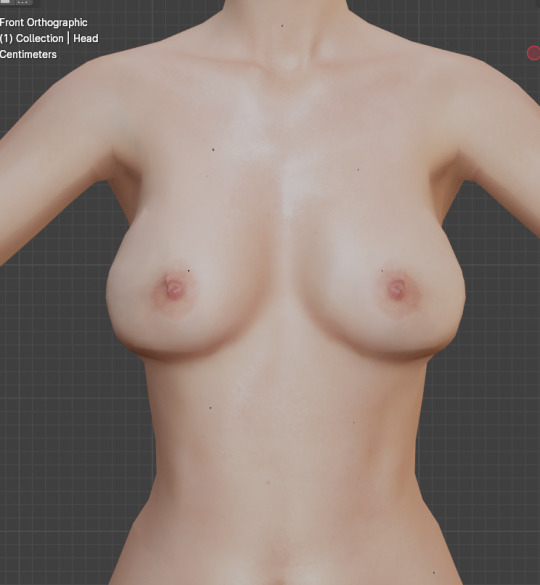
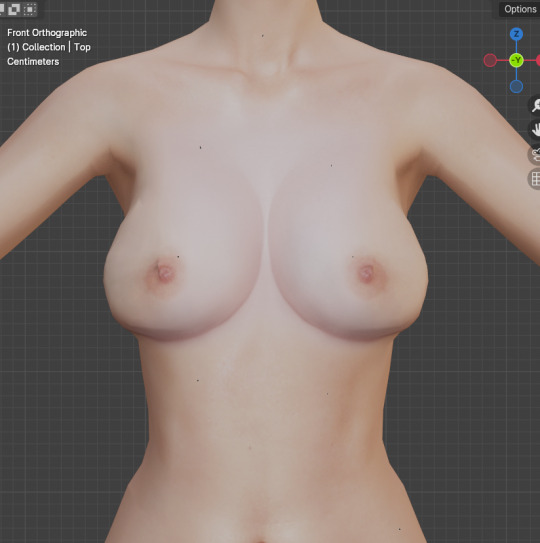
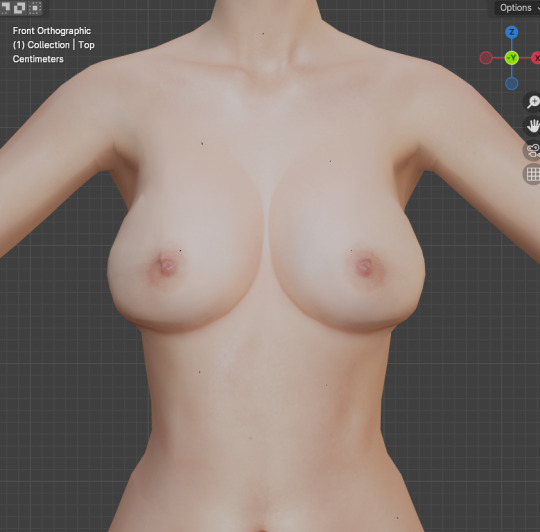
tiddies with no mask > with mask no adjustments > with mask and adjustments
and ur gonna go ahead and repeat that process with every single thing u wanna add to ur skin.
so as for tattoos! this is another thing ur gonna wanna rename the layers for because depending on how heavily ur sims can be tatted it can get A LOT
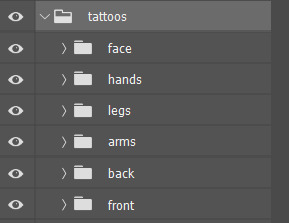
here's psyche's neat little tattoo folder. its separated into where the tattoo is and then
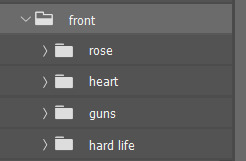
what it is
i find all my tattoo inspo on pinterest using flash sheets/keywords in the search. my ocs usually have sub-boards that i hoard inspo in for them specifically. dahlia doesnt have one bc ive never seen her as the most tattooed person, but i think she'd have some at least
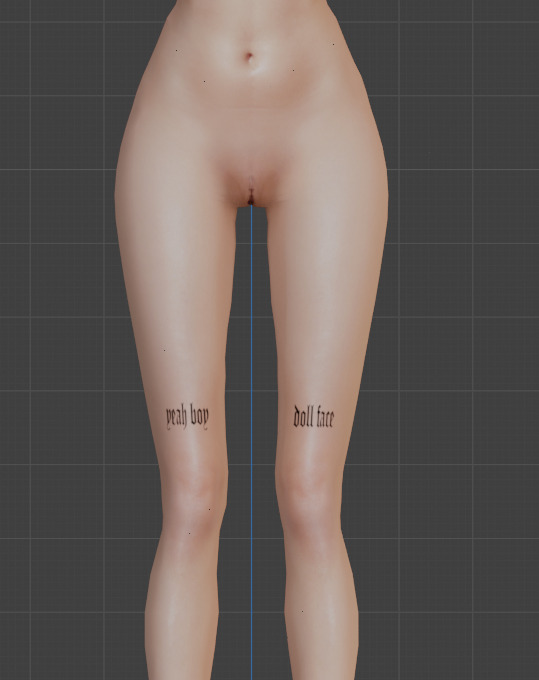
this process is pretty much the same as putting on skin details! its all about adjusting to what u like. for example, i like when my sims tattoos are a little faded and a bit blurred at the edges cause it looks a little more real
when it comes to images i find on pinterest, ill save the image and first try to make it as clean as i can
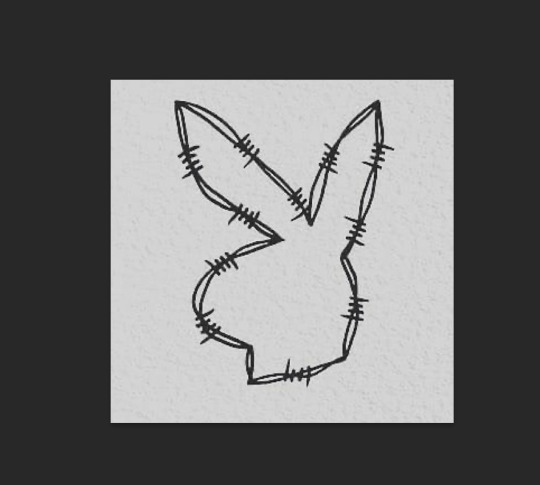
for example, this lil guy
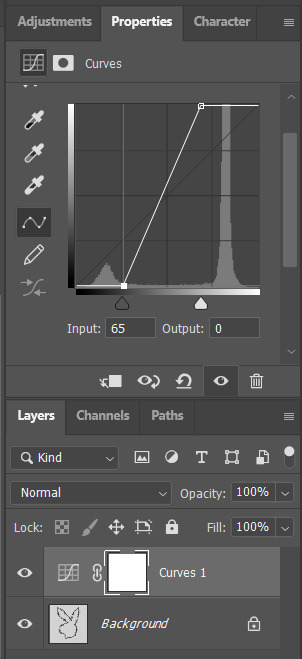
a curve mask made the whites brighter and the blacks darker as u can see. then ill go into filter > reduce noise to soften the harsh edges
then i flatten it, copy and paste to the skin file, n place it wherever i want it to go :-)
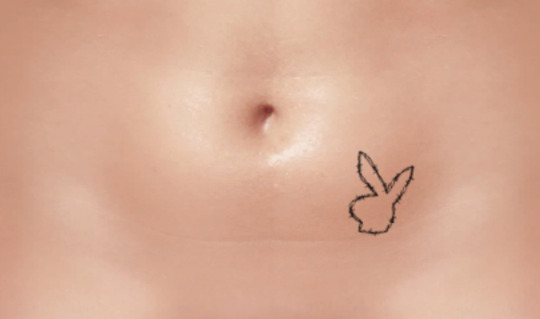
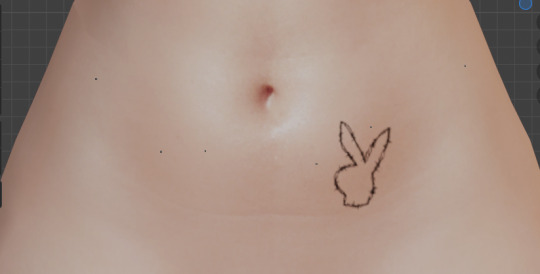
louder anime wow!!!
okay so now ur gonna want to make sure u .psd file is saved (it should be bc we've been checking our progress w blender) and then merge the visible layers (NOT flatten, merge visible. we need the transparency around the skin to be in tact)
ur done in photoshop and blender!!! good job :-)
step whatever number we're on. back into s4s!
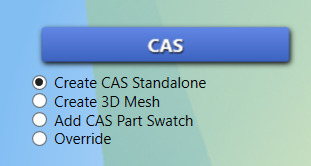
ur focus is over here. make sure the option filled is the top one, and then hit the cas button
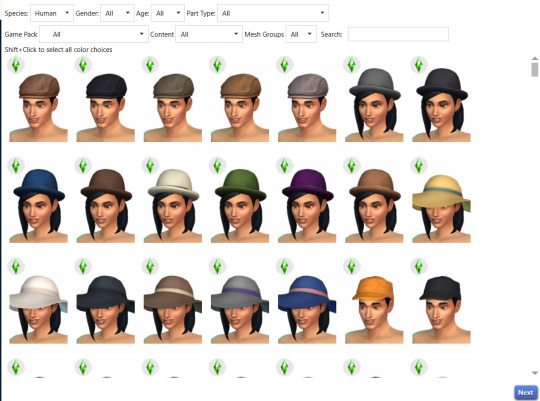
this menu will open, ur gonna go up to part type and find the option skin details, forehead. pick the first forehead wrinkle option that appears and hit 'next.' itll prompt you to save ur new file n give it a name, i usually just make it my sim's name cause i have a folder in my mods folder for specifically my cc
remember wayyyy back when we were exporting the skin details? ur gonna go back to that same section and hit 'import' instead of export. select ur skin's .png file, and poof !
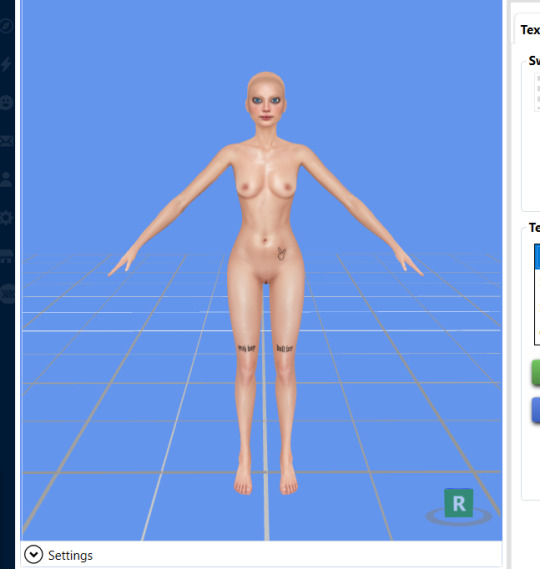
ur skin :DD it looks great man good job
this part is EXTREMELY important. go up to the warehouse tab

in the 'data' section ur gonna see a box at the top labeled 'filter.' thats where i typed in 'compos' just so it would show me JUST the compositionmethod section since theres a lot of shit in there lawl. yours is initially gonna say '3,' but we're gonna change it to '0' mind you, this is because MY skins are all alpha. maxis match overlays do not show up on my skins because my comp method is set to 0, meaning it has top priority essentially.
after you do that, you can hit save and place that .package file you created into your mods folder!!! and GUESS WHAT BESTIE UR DONE!!!!! U DID IT :DDDD
of course, as always, you can always dm me if youre stuck on anything or need any more clarification. i am always open to help as much as i can. i rly hope this helped :-)
59 notes
·
View notes
Text
The Earth is McFlatt - CC Free Single Sim Household
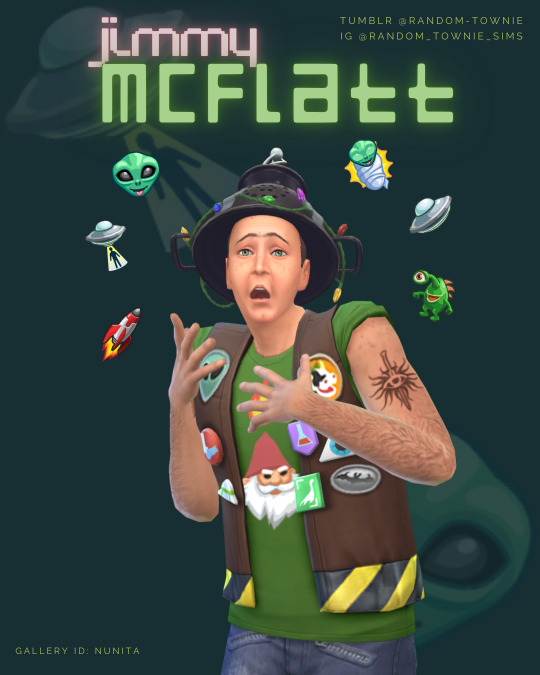
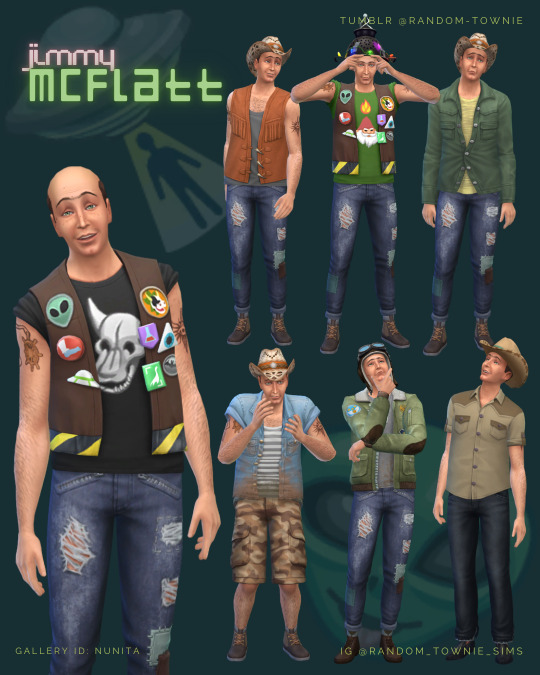
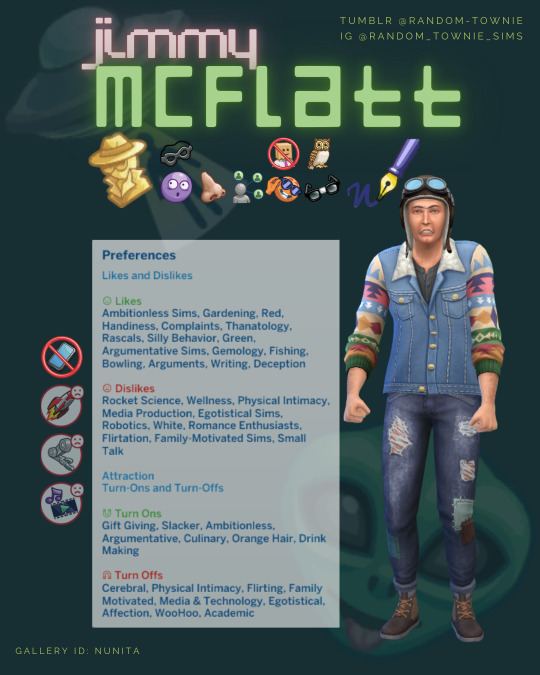
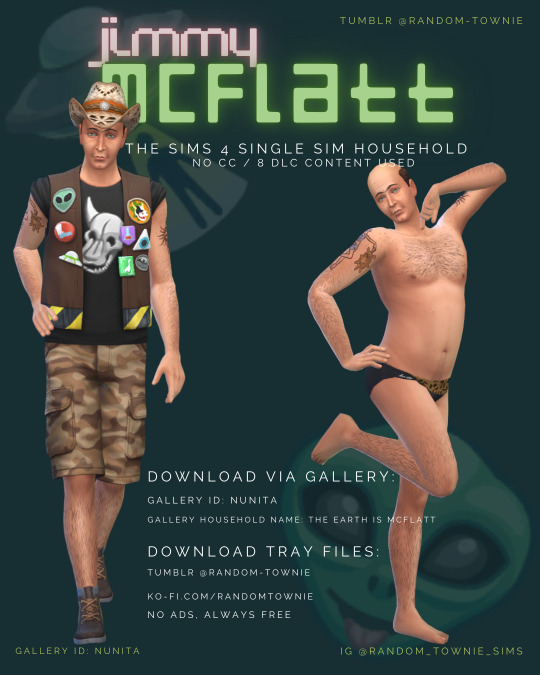

CC free / 8 packs used
You can always download any Sim. Some items will be missing if you don't have particular pack/kit. Simply restyle them in CAS with EA packs/CC you own.
Download: Google Drive - Ko-Fi *free*
Unpack all the files to your ...\Documents\Electronic Arts\The Sims 4\Tray
EA Gallery ID: nunita
Gallery household name: The Earth is McFlatt
Keep in mind MCCC imports only the Sims basic appearance. Age, traits, skills, jobs - all will be randomized/gone. Move them to an empty lot, evict and move to Other Households for them to stay as intended.
❤️If you download my files, please cheer me up and leave a comment or like ❤️ Edit and reupload if you wish, but don't claim as yours - be kind and tag me instead, I'd love to see them ❤️
🛸
👽 Jimmy's home and Sandtrap bar finished lots will follow in the next couple of days 👽
Jimmy is... something. That's for sure. Everybody in Oasis Springs knows Jimmy or at least heard of him. Or about his blog "The Earth is McFlatt".
Jimmy lives a peculiar lifestyle. His cabin in Bedrock Strait looks like he handcrafted it himself - which he obviously did. Can't trust nobody - he says. He prefers to stay off the grid, but neighbors swear they can see the computer screen shining through the window of his wooden bungalow. And there is also that satellite dish he tried to hide in the bushes... It's better to stay away from his place, really, not that Jimmy likes any visitors.
Before becoming a writer Jimmy lived from nectar making, a little source of income and happiness. His juice was good, but oh boy, the stories he had to tell - they were even better. That's how he suddenly got his first real job with a paycheck. His boss accidentally overheard him talking to himself about the mind controlling aliens, Sixam planet and abductions by flying saucers. Jimmy's stories were so awesome that he offered him a position of a blogger to write all of that down, share with people and make money off of it!
Reluctant at first, Jimmy agreed to the offer and that's how "The Earth is McFlatt" began. Sims all over the SIMNation just LOVED it.
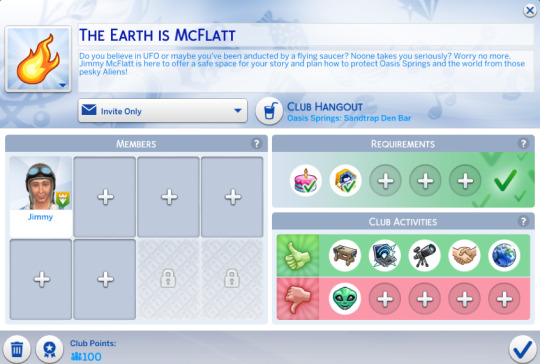
Sudden popularity didn't change Jimmy much. He still lives in his old cabin, making nectar in the basement, researching and writing at nights. He didn't regret it for a single moment though and was inspired by his readers to open a club of like-minded Sims and together expose the alien conspiration. Now that even the Oasis Spring's Daily wrote an article about it the candidates for Jimmy's newest endeavor will for sure be queuing at the Sandtrap Den bar.
👽
Jimmy is ready to add some spice and drama to your game. You can play with him and explore his story further or make him a new, interesting Not-So Random Townie for your Sims to meet.
He has multiple outfits, job, likes and dislikes, extra traits and skills etc. related to his lifestyle to give him some deeper personality.
Unfortunately, the Clubs settings doesn't get saved together with a Sim who is a club leader, so Jimmy will be clubless in your game. You can ignore it, create one based on the picture below or follow your own idea.
Jimmy is the first official resident of Bedrock Strait, OS, in my save file, but you can have him in your game too.

#the sims 4#sims 4#ts4#simblr#ts4 simblr#random save file#sims dump#ts4 cas#sims 4 cas#sims 4 nocc#ts4 vanilla#ts4 sims#ts4 ideas#ts4 download#ts4 gameplay#random townie sims#the sims 4 cas#ts4 nocc#no cc sims#lore dump#character creation#sims community#ts4 story
14 notes
·
View notes
Text
Honeydew Houses (furnished)
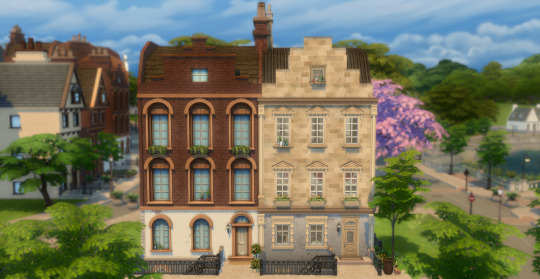




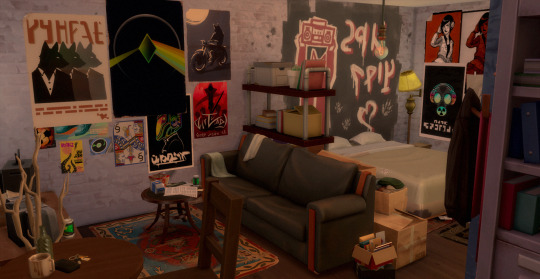
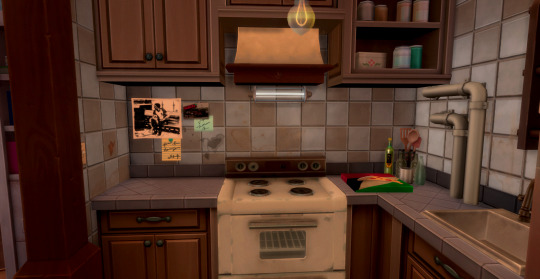

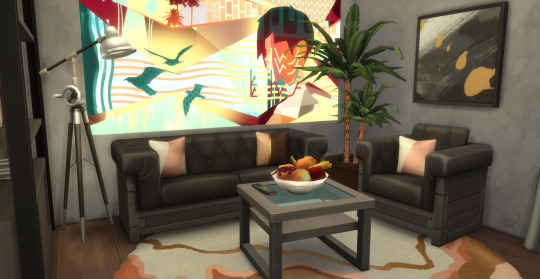

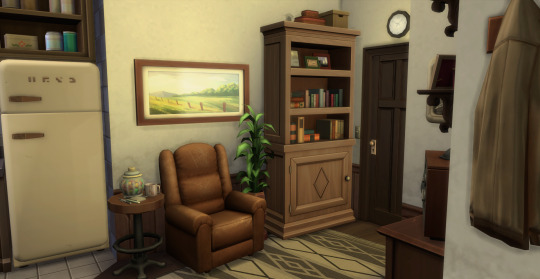

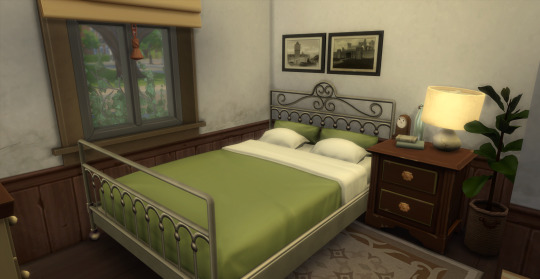

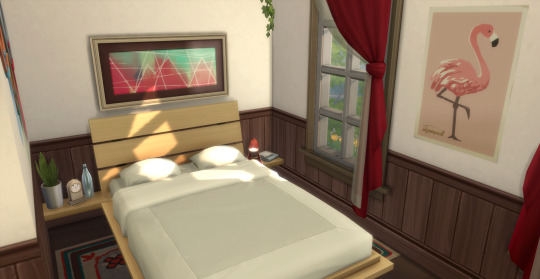

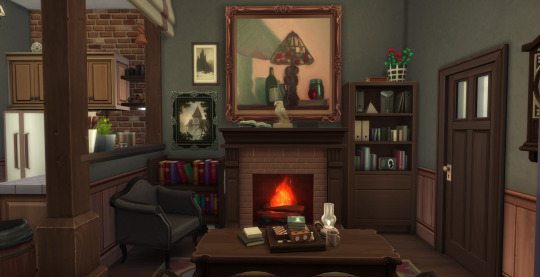


It's been 84 years, but I finally finished furnishing my Britechester apartment building(s). Yes, I can hardly believe it myself.
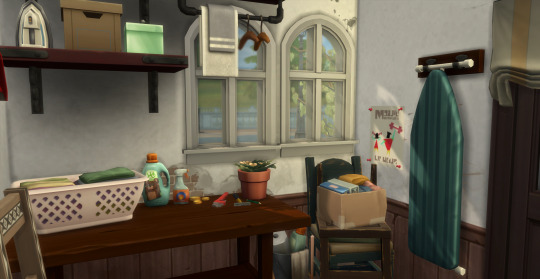
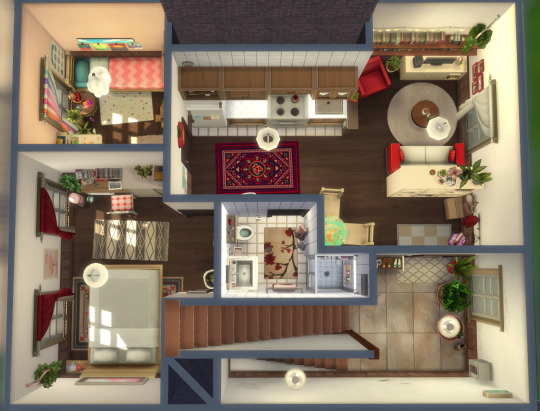
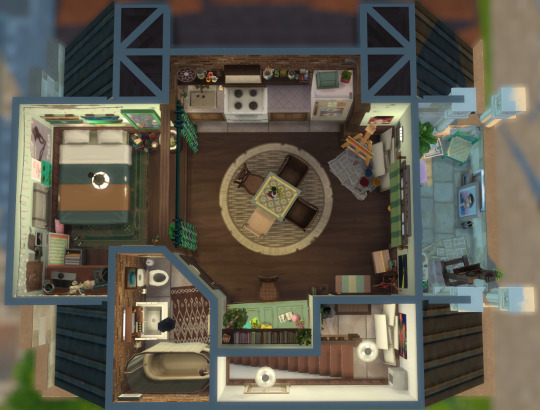
Honeydew Houses, in the heart of the old town, offer six units with different layouts, decorated in different styles. There's a small shared laundry room on the groundfloor, and the apts. include:
Seven Bedrooms - Six Bathrooms in total (so one bedroom - one bathroom per apartment, only the one on the first floor has two bedrooms)
Basement, left: Grungy Apt.
Basement, right: Musician's Apt.
Groundfloor: Caretaker's Apt.
First Floor: Single Mom's Apt.
Second Floor: Dark Academia Apt.
Third Floor/Attic: Painter's Mansard
If you prefer to furnish them yourself, you can download an (almost) empty version of this build from the gallery as well.
Lot Type: Residential
Lot: Honeydew Fields, 20x15, Gibbs Hill, Britechester
Lot Traits: (honestly I forgot to add them to the finished build, but considering the lore, I would have probably gone for) Homey, Study Spot, Great Acoustics
Price: § 294,594
Packs: CottageLiving | EcoLifestyle | DiscoverUniversity | GetFamous | CatsAndDogs | CityLiving | GetTogether | GetToWork | Werewolves | Parenthood | Vampires | Paranormal | LaundryDay | ModernLuxe | BasementTreasures | Everyday Clutter
noCC
MoveObjectsOn cheat required
Playtested (I found two minor issues which I decided to ignore for the sake of the backstory and/or aesthetics, and a bigger one that drives me insane but I don't know how to fix; more info under the cut)
Available on the Sims 4 gallery!
Tray Files: Google Drive
Heads-up: this build might be a little bit heavy on older pcs as it's very cluttered and detailed. The file size is ca. 503 KB, so pretty high for a 20x15 lot, and my laptop was taking ages to load when I placed the build in a new save for some last playtesting, so please keep that in mind and make sure to save your game before adding it (and bulldoze the lot before you do), just in case. Sorry for the inconvenience!
And I also made some sims for this build...
Gallery ID: LaTalpaVolante
You can find a playlist with the speed builds for all the six apartments on my Youtube channel:
More info and floorplans under the cut!
As you can tell from the list of packs, I haven't used For Rent for this as I don't have this expansion yet, so the apartments technically aren't separate units. I just added all the tenants as one household and assigned them their apts. by locking the other doors; or you could of course play around with the roommate system as well, or turn the apts. into proper rental units if you own For Rent.
Known Issues (I'm sorry, I know these explanations shouldn't be that long...)
In the grungy basement apt., the access to the right side of the bed is blocked by the punchbag. Sims can still get into the bed from the left side without problems. Because I had intended the apt. to be for one single sim anyway and it was more important for me to keep the punchbag, considering the hobbies and backstory of this sim, I decided to just go with it. But if you want to move two sims in, you'll either have to make one of them scoot over in the bed or delete the punchbag.
In the caretaker's apt. on the groundfloor, sims can't remove dirty dishes from the dining table. Otherwise sims can interact with that table perfectly fine (they can sit down and eat, do homework, read etc.), they just can't take dirty dishes from the table. This is apparently caused by the decorative shelf in the corner because its footprint slightly overlaps the one of the table. Easiest fix would be to either completely delete the shelf or just move the table away from it. However, because moving the table away from the wall looked a bit weird, and in my gameplay, I tend to just manually drag the dirty dishes into the sink anyway, I decided to ignore it.
The Interrupted Cooking Interaction in Basements Desaster Yeah. I basically made a whole post about this, but to sum it up, there seems to be a general issue where sims refuse to autonomously complete a cooking interaction in the basement when there are other cooking opportunities (=stoves, counters) available on the lot. If you play this build with the locked doors method, like me, and you want your sim to cook in one of the basement apts., they will take out the ingredients from the fridge, then behave as if the stove/counters were blocked (although I made sure they're accessible) and put the ingredients down. If you then click on the ingredients and choose to continue cooking, sims will however complete the interaction as if nothing happened. (If you don't lock the doors to the other apts., sims from the basement will automatically go upstairs to cook and ignore the basement kitchen.) I spent a ridiculous amount of time playtesting it over and over again and trying to figure out what exactly causes the problem, but I really couldn't find a solution and I'm extremely sorry for this. Maybe if you've got For Rent, turning the apts. into proper rental units might fix this issue? Please let me know in case you encounter any other problems (or if you know a way to fix the last one...)!
Floorplans



#sims 4#ts4#20x15#britechester#no cc#residential lot#sims 4 residential#apartment building#sims 4 apartments#sims 4 no cc#sims 4 townhouses#sims 4 britechester#latalpavolante
17 notes
·
View notes
Text


Above: before-and-after pictures of this process. Thank you to @cloudywithachanceofsims, @silverthornestudfarm, and @blueridgeequines for giving me permission to use their coats as examples!
CK's Guide to Fixing Pixelated Horse Coats
As we all know, every time you paint a horse (or any pet or werewolf, really) in Create-a-Pet, it inevitably gets pixelated. This is due to the TS4 engine's compression of Sims textures, which it does to theoretically save on file space and load time. The more you paint on your horse (and the more you save it over and over again), the greater the artifact damage becomes, until you're left with a pixelated mess.
Luckily, I've figured out a way to fix it. Yay!
This method uses a program called chaiNNER, which is an incredibly versatile node-based graphics UI that (among many other things) uses AI models to upscale and process images. After a month and a half of experimenting on multiple different types of coats with about a dozen different models, I've identified two AI models that work best at repairing the artifacting damage done by TS4: RealESRGAN_x2plus and 2xAniscale. I extract the painted coats from the tray files using Cmar's Coat Converter, process them using chaiNNER, use Photoshop to make any touch ups (softening hard edges, fixing seams, adding in the appropriate hoof texture), and then create a new hoof swatch to put the newly fixed coat back into the game.
Fair warning: chaiNNER is a bit of a hefty program that requires significant RAM and VRAM to run. If you have a beefy gaming computer, you should have no issues running this (as long as no other major programs - games, graphics programs, etc. - are running as well). If you've got a lower end computer, though, your computer might not be able to handle it and this method might not be for you. Make sure to read all the documentation on chaiNNer's github before proceeding.
Before we begin, we're going to need to gather some resources. We will need:
A graphics program. I use Photoshop, but GIMP or any other program that can work in layers will work too.
chaiNNER
AI Models; these are the ones I use are RealESRGAN_x2plus and 2xAniscale
Cmar's Coat Converter to extract the coat textures from your tray files
Tray Importer (Optionally) to isolate your household tray files and save you the trouble of searching the Tray Folder
The TS4 Horse UV as a helpful guide to make sure all our textures are lined up properly
Sims 4 Studio to create your new package.
I recommend using S4S to export hoof swatch textures from the game or from existing hoof swatch cc. Some popular hoof swatch CC include @walnuthillfarm's Striped Hooves and @pure-winter-cc's Glorious Striped Hooves
This tutorial assumes you are familiar with the basics in how to use Sims 4 Studio, such as how to clone a base-game item & how to import and export textures, and the basic functions of your graphics program, such as adding multiple different image files together as layers. I'll try to keep my explanations as straight-forward as possible.
STEP ONE: Extract the Coats
Install Cmar's Coat Converter and run it. Cmar's Coat Converter works by looking through your tray files for specific texture files (ie. The coats of cats, dogs, horses, and werewolves) and converting them to png files. You can go through the households of your Tray folder one by one, but I typically just use Tray Importer to separate the household containing the horses I want to fix.
Save the extracted coats in a project folder. These are your OG coats.
STEP TWO: Extract the hoof textures
Open up S4S. To extract the hoof swatches from the base game, create a new package by clicking CAS -> New Package, filter everything by species (ie. Horse) and then part type (Hoof color). Highlight all the basegame swatches and then save your new package.
Open up that package and then extract the texture for each swatch. Save them in your project folder (In a 'basegame hooves' folder to keep things organized).
To extract the textures from Hoof Swatch CC files, simply open them up in S4S and repeat the above.
STEP THREE: Download the AI Models
Right as it says on the tin. These are the models I use currently & some notes about them:
RealESRGAN_x2plus - this model is THE workhorse. It repairs artifact damaging with minimal loss to texture quality and results in a very smooth coat. It may sometimes darken the texture a little bit, but it's not noticeable in-game. That being said, it has a harder time with finer details such as spots, individual ticking for roans, dapples etc. I run this one first on all the coats because it usually does the job.
These models are trained to find and repair any incidence of artifacting/jpeg damage and approximate what the image is supposed to look like. The reason RealESRGAN_x2plus has an especially hard time with spots/dapples/tiny repetitive details etc. because it registers those areas as particularly damaged and works extra hard to smooth it out… which can sometimes result in a bit of an iffy coat repair. When things don't turn out the way I want, I turn to...
2xAniscale - I use this model for any appaloosas, roans, sabinos etc. that have very fine detail and came out mangled by RealESRGAN_2xPlus. It's also good for light-duty repairing (in cases where people have only 'saved' the coat once, as opposed to working on it on and off). While not strong enough on its own to tackle the more heavily damaged coats, it still does a decent job while keeping the fine details intact.
Go make a folder somewhere and name it 'AI Models' or something similar, and drop these guys in there.
STEP FOUR: Setting up chaiNNER
Obviously, go ahead and download chaiNNER, and then (through chaiNNER itself) download & install the dependencies. You really only need PyTorch for this, so if you'd like, you can skip NCNN, ONNX, and Stable Diffusion.
At first glance, chaiNNER is a bit overwhelming. It is unlike any other graphics ui I've seen before, but the basic premise is pretty straightforward: you 'chain' together specific functions ('nodes') in order to get your result.
We're going to start by setting up a chain for single coat conversions.
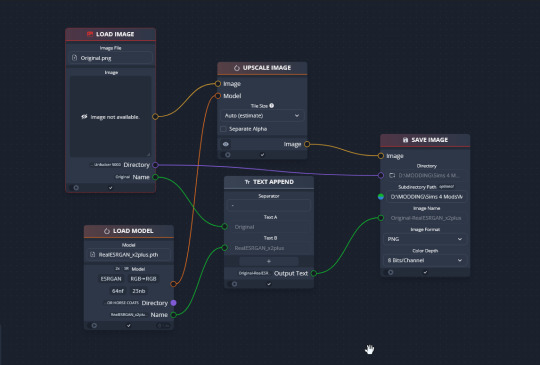
Drag & drop these nodes into your workspace:
Load Image
Save Image
Upscale Image
Load Model (From the PyTorch tab only!)
Text append
Next, connect the nodes just as I have connected them in the image.
Load Image, obviously, loads your image. We then tell the program we want to upscale that image by linking to the Upscale Image node. Upscaling can't happen without a model, so we then want to link Upscale Image with Load Model.
Text Append takes the original name of the image and combines it with the model name. This is super helpful, because if you're playing with many models at a time, you need to tell your result images apart. Link the output text to the Save Image Model.
Finally, Save Image obviously saves the image. We link the directory from Load Image to save it in the same place as the OG image, or, optionally, add in a file path link to another folder (in my case, I load images from a folder called 'Unprocessed' and save them into a folder called 'Processed'. Link the image from Upscale Image to Save Image to complete this chain.
Go in and select your image, model, and save locations.
Ta dah! You made your first chain.
To create an Iterator to batch process coats, we follow the same general idea, only we use 'Load Images'.
STEP FIVE: Run chaiNNER
Go ahead and run chaiNNER. Repeat using 2xAniscale if your spotty/dappled coat comes out funky.
Optionally, you can also add 'Resize' between 'Upscale' and 'Save Image' so the output texture is the same size as the OG. I like keeping mine big, as it makes it easier to fix any fine details in Photoshop.
STEP SIX: Combine in Photoshop
Go ahead and open up the horse UV, your coat texture & hoof swatches in Photoshop. This is a fairly straightforward process: layer the hooves overtop the texture, and then hide all hoof layers except the one you want. Make sure everything is lined up properly using the horse UV.
This is also where you would go in and fix any sharp, jagged edges you might spot. I often notice jagged edges on white face markings. Since the head is often one of the worst areas for artifacting, the AI models don't really have much to work with, resulting in jagged edges as they try to extrapolate what had been there 'before'. Either paint over it or use blur to smooth it out.
I personally would also remove any stray color that isn't the horse texture (body + ears). It won't hurt to leave it there, but I personally like things neat and tidy. Use the horse UV as a guide.
I also add in any little details using extracted stencils & layer masks.
Save your new coat as a png. Optionally, downsize it by 50% back to the original size. I don't do this because I'm very forgetful, but this would definitely help in keeping your package size smaller.
STEP SEVEN (Optional): Make a thumbnail
I make thumbnails for all the coats I do because it makes it much easier to identify them under the Hoof Swatch category. TS4 thumbnails are 144 x 148. You can label it with your horse's name, or stick a headshot in there etc. whatever works for you that will help it stand out from the other hoof swatches.
STEP EIGHT: Put it all Together
Finally, we've come to the end.
Using S4S, create a new package cloned from a hoof swatch. Import your new coat into 'Texture', and your thumbnail into 'Thumbnail'. Make sure you import the thumbnail for both Male and Female!
Check to make sure there aren't major seams, and that your texture is properly projected onto the S4S horse model. If there are seams, go back to check that your texture is lined up properly with the Horse UV. If there are minor seams (legs, chest, underbelly etc.) you can carefully paint (using the same color as on either side of the seam) just beyond the UV mesh boundaries to close the seam.
Then, go into Categories, scroll down, and uncheck Random. This will prevent random townie horses from wearing the coat.
Save your package.
Congratulations! You're done!
#ts4 tutorial#ts4 resource#ts4 guide#Ts4 horse cc#ts4 equestrian cc#sims 4 horse cc#sims 4 equestrian cc#ts4 equestrian#sims 4 equestrian#ts4 horses#sims 4 horses#ts4 horse ranch#sims 4 horse ranch#sims horses
77 notes
·
View notes
Text

TS4: High School Lunch Override - Korean Menu
Sul sul ^^
Last year I created a Korean high school set, and also an override for the school lunch.
I wanted to add more food options, but at that time I didn't know how to create recipes for the game.
But now, here it is! :D
Read down below to know what's in this download, and what version you prefer :)

RECIPES
* There are 15 new recipes: 10 food trays (4 being vegetarian), and 5 drinks.
* Check this image to see all of them :)
* I also changed how the "order food" list appears (image), so it becomes easier for you to read and choose what you want :)
*All of them are cost 0 simoleon (free) :)
* When your Sim is eating, there will be a piece of food in their hand, or they'll use a custom spoon or chopstic :)
* If you notice, when you Sim finish eating, the food tray will be empty and "dirty". Each recipe has a different "dirty" empty tray to look more realistic :)

DOWNLOAD OPTIONS:
There are two download options:
* "channel4sims - high school lunch override korean menu": in this version, you'll only have the 15 new recipes when ordering food from the school cafeteria.
*"channel4sims - high school lunch override korean menu - EA included": in this version, when ordering food from the cafeteria, there will be the 15 new recipes + the standard (EA) recipes from the school cafeteria.
🚨 IMPORTANT: download just 1 version.

EXPANSIONS NEEDED:
* You need High Schools Years expansion for it to work.
* It's not necessary, but if you have City Living expansion the chopstick effects will be better :)

NOTE:
If you choose to download the recipes with the EA included, and you use the Korean high school lunch override, it's better for you to delete it, or you'll end up having duplicate lunch options :)
FILES THAT WILL BE MODIFIED:
- cafeteriaStation_Highschool_PushOrder
- cafeteriaStation_Highschool_Active_PushOrder_Autonomous

Any questions or problems, feel free to talk to me :)
I hope you'll enjoy it a lot! :D
Happy Simming ^^
*-* DOWNLOAD (free on July 31st, 2023) *-*
#sims4cc#ts4cc#s4cc#cc#ts4#custom content#the sims 4#download#sims4#mod#mods#ts4 mods#ts4foodmod#ts4customfood#ts4food#ts4korea#channel4sims
176 notes
·
View notes
Text


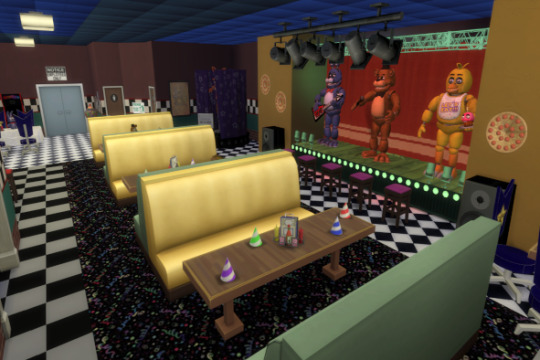

[Sims 4 Lot Tray File] - FNAF: Freddy Fazbear's Pizza Place (v4.0)
Heard a few times that the last update file wasn't working for people, here's a newly made Tray File for the latest Sims 4 update. I have also completely replaced the interior to better fit FNAF and pizzeria vibes. If the tray file is still not working I'll post a Gallery version soon ID: Cryptiam
Important:
This lot uses various cc, download them below to use this build in-game.

CC USED ("~" is for cc used but you could probably go without it):
1) FNAF Custom content by BeaJoinsTheGame
2) FNAF Floors by Tyran-the-tyranical
3) FNAF Walls by Tyran-the-tyranical
4) Ultimate FNAF Posters by Tyran-the-tyranical
5) FNAF Plushies Collection
6) FNAF Pizzaplex Walls, Floors, and basically all files on the page here:
~7) Restaurant/Store Sign Decals
8) Freddy Fazbear's Pizza Place Sign (FNAF Movie Sign)
9) FNAF Animatronics + Pirate Cove + Fan (Deco)
10) FNAF Stage, Paper Pals, coin machine:
11) FNAF Movie posters:
~12) FNAF Mr. Gumball deco:
~13) FNAF Pizza boxes:
~14) Functional Wall Phone by awingedllama:

Features:
Base Game Compatible
30x20 lot size
Community Lounge Lot
Watch me speedbuilding the exterior:
youtube

▼Download the Tray File on my Patreon here:
How to install/use:
1) Have all the important CC installed
2) Unzip the file below and place tray files into your Sims 4 documents>Tray folder
3) Find a community lot and open/place from your saved Gallery
#sims 4#fnaf#five nights at freddy's#fnaf movie#ts4#ts4 lot#s4 lot#s4 builds#tray file#lot build#s4cc#cryptiam#download#freddy fazbear's pizza#freddy fazbear#five nights at freddys#Youtube
24 notes
·
View notes
Text

Ask for help and you shall receive!!
In light of some FAQ in @changingplumbob's upcoming Bachelorette Challenge, I decided to write this guide as an intro in sim sharing for my little bubble in simblr. I hope you find it useful!!
Topics to be discussed:
1. What you should get: Gallery OR Tray Importer + SFS? 2. About Tray Importer by TeameeVo on L'universims: 2.1. Download and Installation 2.2. How to export a sim? 3. On SimFileShare: codes for an account and sharing your sim.
Keep in mind, this is a very basic tutorial, but you'll need knowlegde on how to navigate through folders and files in your pc!

• You technically can upload sims with cc to the Gallery, and they will be flagged accordingly by your game and the receiver's game as made with cc. However, the sim downloaded wouldn't carry any of the cc characteristics you gave it (aka. they would be bald, ugly and butt-naked).
• To fix that issue, an alternative would be making a tumblr post linking to the cc you used. But depending on the quantity, that might be troublesome, if not incredibly tedious.

Sims 4 Tray Importer: [LINK]


(Pathetic woman [me] has an average of 0 downloads lol)
Codes for y'all, lovelies <3
rx3TpRbdb9No7eJsC1rJA79Ghtl30f1Q
NPiom2GPWgLY8VT61bQSAJ7VogUpFwTf
DNNuWiHXQEgbzjPNUsebTOMorCZcK1Ts
WWS3RmSh5WGoTULvIh7kcWjYisJcy1Z2
qdcVuARNP49E4HNS5D6yVtx1h5z7d3To
LAAMh9dhQ4UFPja1ASno6cbIN7riENb7
gsrtB6ZZYzOB6I6YFvYGjtZo6n19gopk
iGW96FTlI7HBu57P3a4BbvbUXFOzGZ3H
QmvnjSzJbbJIEvniRTlgv9WSZ1aH5LE1
4RZcuE4Y7C7WHjePsUMjVv3beKYTFYN0
13 notes
·
View notes
Note
can I ask what ur method is for cleaning out your mods folder i want to do it but i dont know how
I clean it out in parts because doing my entire mods folder in one go is too overwhelming for me 😅. I always try to keep my mods organized in sub-folders when I download CC, so for instance I have a sub-folder in my mods folder called Accessories which in turn also has sub-folders called glasses, earrings, necklaces, etc. When I want to clean out my mods I pick only a couple of those sub-folders at a time to put into my game and then open the save file I specifically use for testing and removing cc and put all the items that I don't want anymore on a new sim (or on a lot when you want to clean out build & buy items). When I'm done, I save that household (or lot) to my library, close the game, and then use Sims 4 Tray Importer by Luniversims to see what CC I want to remove on the saved sim or lot and then remove it from there. I do this with every sub-folder I have in my mods until I'm done.
#it always feels so good when I've cleaned out my mods folder#the downside is that it can be such a long process if you want to do it thoroughly#because how often you have to open and close the game can take up a lot of time depending on the amount of cc you have#I was cleaning out my mods last night and gave up after an hour because I didn't want to do it anymore 😂🙈#ask#anon
9 notes
·
View notes
Text
The Broke Family
I recreated the Broke Family from The Sims 2 in The Sims 4! Skip Broke's mysterious ladder pool accident has left Brandi to be a single mom, raising her two sons Dustin and Beau. Little does she know she is expecting another baby as well! 😭
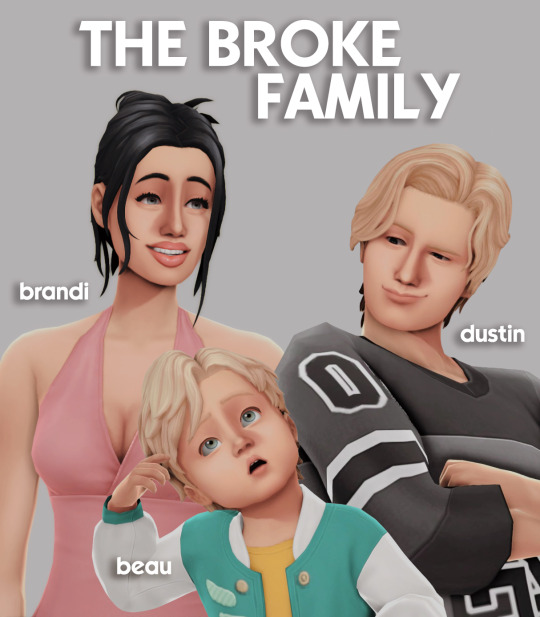
Download and more info below the cut 🖤
Within the download zip file you'll find the following: ➕ Required CC packages (it's a very short list!) ➕ Tray Files for the Broke household ➕ A text file with a list of required packs for the Broke household (only available for reference; doesn't need to be added anywhere!!)
For the most part, I tried to keep the pack usage to a minimum. If you don't have a few of the packs needed, there are easy swaps in Base Game that you could make without completely changing the sims looks! That was very important to me.
Also the CC I used could be easily swapped with in-game options. Primarily, I use some skin details that won't significantly impact the sims looks if they were not included or added to your game.
**If you have the Growing Together Expansion Pack, all sims will have assigned familial dynamics. Preferences were not designated. These sims will not come with skills, jobs, or degrees. I'll leave these things up to you to decide and play them how you'd like 😉
Check out the TS2 to TS4 comparison over on my YouTube channel as well: https://youtu.be/O_pLbPYwyd0 🖤
DOWNLOAD 🔗: Broke Family (TS2 x TS4 MissSimReno)
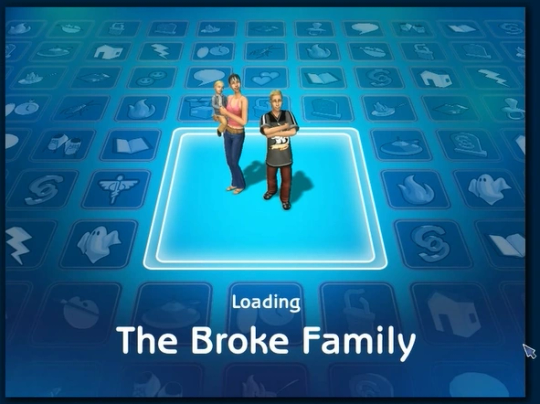
Thank you to all the CC creators: @missrubybird, @oakiyo, @golyhawhaw, @miikocc, @crypticsim, @simandy, @pralinesims, @kumikya, & @qrqr19 🤍
29 notes
·
View notes
Note
how do you make the houses you build downloadable?
hello! so first i save the lot to my gallery, then i use the sims 4 tray importer to track down the files from my tray folders! after that, i use either google drive or sfs to upload the zip folder :)
plumbie made a great video on how to use ts4 tray importer which can be found here <3
if you have any further questions, feel free to send me another ask and i’ll try my best to help!
8 notes
·
View notes
Text
Valicer In The Dark: "A Murder Shared Is A Murder Thirded" Outline!
Hello everyone -- I recently started work on the second Valicer In The Dark story, "A Murder Shared Is A Murder Thirded" (aka the one where they kill Bumby), and I thought it might be neat to share with you guys the outline I prepared for the story! Especially since I don't have any Sims 4 stuff to share on Wednesdays at the moment, thanks to the Chill Valicer Save file no longer functioning. :( I have plans for a successor, but it's going to take a little bit to get off the ground, so...
*shakes head* Anyway -- outline! My planning process for this story involved approaching it like it was an actual Blades In The Dark score -- complete with deciding on the type of plan the gang was going to use (and the detail they needed to provide), the loads they were going to have (and thus how much stuff they could actually carry), and doing actual rolls to figure out how the story would progress as they encountered various obstacles! (I, uh, may have purchased actual BITD-themed dice and a dice tray explicitly for this purpose. ^^;) However, I also took a moment to note down any "must-happen" moments in the fic first -- basically, any particularly important or cool bits that were going to occur no matter WHAT the dice said. Reason being, I've done some "rolling for something on the spot" fic-writing in the past with a friend, and I know how fucking frustrated I get whenever a dice roll ruins the cool thing that was supposed to happen in my head. Noting down the things I was DETERMINED to have happen and doing all the rolls BEFORE I actually started writing meant that I couldn't get angry at a good moment being ruined. Though actually, as you'll see, the dice were pretty kind to the trio in this score! I guess they wanted to make sure they succeeded in their task as much as I did. :) So, without further ado, here's the outline/score summary for "A Murder Shared Is A Murder Thirded!" Naturally, there will be spoilers for what happens in the fic, but I'll put most of it behind a cut, and you guys already know I have no care for spoiling my own stuff on here. XD
---
Score: Infiltrate the Houndsditch Home For Wayward Youth in Charhollow, find proof of Bumby’s activities, and preferably kill the bastard
Plan Type: Stealth (I mean, there’s going to be an element of Assault, but first they have to get in)
Detail: Point of Infiltration – the back door into the basement kitchen of the house
Loads: Alice – Light; Victor – Light; Smiler – Light (each have three load slots)
Have To Happen Moments:
The gang successfully make it to Alice’s room so she can get her stuff; possible heartfelt moment when they see the picture of her family on her wall
The gang successfully finds Bumby’s ledger in his office (inside a safe stowed away in a hidden drawer of his desk; it’s generally opened via Lizzie’s key but can be picked)
Bumby shows up, and Alice reclaims Lizzie’s room key and blows him up
Gang successfully escapes with the ledger, and run into Smiler’s parents Matt and Carol as they head out of town; they’re taken back to the Ministry Of Joy for the Names (aka night)
Engagement Roll:
+1 d for sheer luck
+1 d for being bold or daring (they’re trying to expose a known philanthropist as a child pimp)
+1 d for exposing a vulnerability of the target (Dr. Bumby has written off Alice as lost in the city and hired a new dogsbody, AND he doesn’t think she’d ever get anyone to help her if she did tell anyone about his activities)
3d total
Result: 1, 2, 4 – Mixed result, risky position – they get in the back door without incident, but Alice’s replacement June comes into the kitchen as they’re preparing to head up the stairs
Score Rolls:
As per the above, trio encounters June coming into the kitchen shortly after their successful infiltration and have to get past her – Smiler immediately introduces themselves and explains that they were hoping to meet with Dr. Bumby to see if they could form a partnership, as they believe their alchemical prowess would help the man in his work (they are indeed cringing on the inside as they say this) – Sway, 2d – 6! June believes them and sends them up to see Dr. Bumby with the other two
Safely inside the house, Victor gets the idea for Alice to get her stuff from her room before they proceed further (having already suggested they grab it before they went); Alice agrees with this and they grab her things (1 load for Victor, who I picture as carrying the bag)
Head up the stairs to Bumby’s office, encounter one of the children (Abigail? Charlie?) in the upstairs hallway, who naturally recognizes Alice and wants to tell Dr. Bumby she’s back – Alice tries to tell them no, with Smiler backing her up by claiming they want to surprise him – Command, 3d (+1 for Smiler’s help, 1 stress for Smiler; +1 for pushing herself, 2 stress for Alice) – 5. The kid agrees not to go tell Dr. Bumby right now, but it’s clear that they will tell him the next time they see him… Start a “Bumby Shows Up” clock as a result, four pieces, none ticked so far
Into the office before Dr. Bumby shows up! Time to find that ledger… The trio split up – Alice examines the bookshelf, Victor checks Dr. Bumby’s desk, Smiler looks around for anything that might give them a clue as to where the ledger might be
Alice – Study, 2d (+1 for pushing herself, stress up to 4) – 6! She doesn’t find the ledger in the bookshelf, but she does find a book safe with some money in it – +1 Coin for the gang to take with them!
Victor: Study, 2d (+1 for pushing himself, 2 stress for Victor) – 5. Victor finds a secret drawer with a safe in it – but, well, unsurprisingly, it’s locked, and opening it will take a bit (+1 to the “Bumby Shows Up” clock, 3 segments left)
Smiler: Survey, 2d (+1 for pushing themselves, stress up to 3) – 6! While Victor finds the safe, Smiler notes the windows on the side of the office and determines that it would be safe for the group to exit via one of them if they had the appropriate means to do so – cue them going “good thing I brought some rope!” and setting it up for them to climb down (one load ticked for Smiler)
That safe looks like it’s important – shame it’s locked! Smiler offers to try and pick it (flashback to them finding some lockpicks in Elder Gutknecht’s library – as they have, or will have, the “Pack Rats” special ability as Shadows, I will let them squeak by with no stress for this – probably does count as load for them, so that’s a second slot ticked) as Alice and Victor keep watch for Bumby or other suspicious children – Tinker, 2d – 5. Smiler gets the safe open, but Alice hears what sounds like someone coming up the steps… (+1 to the “Bumby Shows Up” clock, 2 segments left)
However – safe is open, and there is indeed a ledger inside! A ledger that is very clearly about selling off children to pedos, and in fact contains some notes from Bumby about the work that he does...and how much Alice reminds him of Lizzie. Everyone is notably disgusted, and Alice angrily wishes that she could get that room key off him, but agrees that it’s better to try and escape. The ledger is thus shoved in the bag, and Victor closes up the safe and stores it back in the secret drawer, before the trio try to stealthily head down the rope leading outside –
Alice – Prowl, 1d – 6! Alice is shockingly stealthy and gets down like a fucking ghost
Victor – Prowl, 1d – 4. Victor is not so stealthy and hits the wall once – he doesn’t make THAT much noise, but it’s definitely noticeable… (+1 to the “Bumby Shows Up” clock, 1 segment left)
Smiler – Prowl, 1d (+1 for pushing themselves, stress up to 5) – 4. And Smiler is also not particularly stealthy, losing their balance as they get off the rope and falling over – just loud enough for someone to notice! (+1 to the “Bumby Shows Up” clock – full!)
And that someone is Bumby, who entered his office at just that moment, saw the rope hanging out of his window, and stuck his head outside to see Alice and two other people, one of whom is carrying a bag. He naturally assumes that she’s stolen SOMETHING from him (even if he doesn’t yet suspect it is his ledger) and starts yelling at her – Alice blasts him as an abomination and reveals that she knows exactly what he’s been doing. Bumby is first like “oh come on, who would believe–” And THEN it registers “wait, she’s here with two other people, SHIT SOMEONE BELIEVES HER” and scrambles out of the office himself on the rope. Fortune roll for how gracefully he gets down, 2d because I imagine he has decent Prowl to get kids to customers – 4. He gets down, but like Smiler he lands badly and is off-balance for a bit –
And Alice, seeing an opportunity, darts in and grabs his watch-chain, ripping Lizzie’s room key off it, while shoving the electroplasm bomb (tick one load for Alice) into his hands. As this is a must-win scene for the fanfic, this Skirmish, 2d roll is only to determine the consequences to her – 4. She gets the bomb in his hands before he can retaliate, and he goes up a treat...but unfortunately, poor June has come out of the kitchen, attracted by the noise, and promptly starts screaming as Bumby goes up, forcing the trio to flee VERY FAST (Smiler yelling “sorry!” behind them) – they are not a crew yet, but they will start being one with 1 Heat on their tracker as a result!
However, score is officially a SUCCESS! :D The trio run until they’re sure they’re not being pursued, then take a moment to celebrate their victory, with Alice being very happy that she was indeed able to kill the bastard (even if she accidentally traumatized her replacement – she’ll want to make up for that later if she can). Talk then turns to getting the ledger to someone who will be able to publicize Bumby’s misdeeds – And then someone says “Smiler?” nearby, and Smiler recognizes their parents! They run over for hugs and introduce Matt and Carol Alton to their new friends. Matt and Carol are very nice and warmly greet Victor and Alice – Alice, feeling a little guilty, apologizes for getting Smiler into some trouble and preventing them from coming home sooner. Matt and Carol are confused, so the trio explain the Barkis situation and the whole “turns out he was a Spirit Warden and the Bluecoats think we murdered him” thing – And Matt and Carol go, “Oh! No, the actual Spirit Wardens confirmed he was an imposter who killed one of their own and stole their kit, and that his corpse showed signs of being very recently possessed before it burned, so you’re in the clear!” Victor, Alice, and Smiler are a bit “…” over this, as you might imagine. Carol jokes that, “oh come on, it’s not like you killed anyone else, right?” [significant silence] “...right?” Fortunately, this is when Victor hands over the ledger, with Alice and Smiler explaining a bit more about what just happened – after a look inside, Matt and Carol are like, “Oh, yeah, that murder was TOTALLY justified, good job.” They tell them that they can send it onto a reporter of their acquaintance, the lady who runs Publick Occurrences, and that Victor and Alice can stay the night in the Ministry of Joy if they want. As the trio have spent two days since the end of “Start At The Beginning...Sort Of” living in a house with no running water or heat, in one set of clothes, they are more than amendable to this suggestion, and the story probably ends with them on the way to the MOJ.
Post-Score Summary And XP:
Alice:
Stress level before downtime actions – 4
+1 Coin
XP:
2 for addressing a challenge with violence or coercion (commanding the kid, killing Bumby)
2 for expressing her beliefs (protecting the children) and background (she was the former dogsbody at Houndsditch!)
1 for – less struggling with and more indulging her vice (Obligation to the children of Houndsditch!)
Total: 5 – put 3 in the Insight XP tracker, 2 in the Prowess XP tracker (Alice wants Hunt and Finesse)
Victor:
Stress level before downtime actions – 2
XP:
1 for expressing his background (trade, he was the one to know to look for a ledger in the first place)
Total: 1 – put it in the Playbook XP tracker
Smiler:
Stress level before downtime actions – 5
XP:
2 for addressing challenges both with deception (talking their way past June) and technical skill (picking the lock on the safe)
1 for expressing their beliefs (taking Bumby down makes the world a little bit happier)
Total: 3 – put 2 in the Insight XP tracker, 1 in the Prowess XP tracker (Smiler wants Study and Finesse)
Downtime Activities:
Alice:
House Rule – if a score serves as indulging a vice for a character, that character automatically gets 1 stress knocked off the tracker at the end – stress down to 3
Train Insight, +1 XP in that tracker (Alice is working toward Hunt – maybe she gets pulled into a game of tag with some of the younger members of the cult XD)
Train Prowess, +1 XP in that tracker (Alice is also working toward Finesse – does some drawing)
Victor:
Train Playbook, +1 XP (Victor talks to some of the Whispers in the cult, starts getting excited about being one despite himself)
Train Resolve, +1 XP (Victor might as well work toward another Attune dot)
Smiler:
Indulge Pleasure Vice – 4, stress down to 1 (entertains themselves and their new friends with some songs on their guitar)
Train Prowess, +1 XP in that tracker (Smiler is working toward Finesse, and playing the guitar works with THAT too)
#valicer in the dark au#storybuilding#blades in the dark#corpse bride#alice madness returns#the smiler#valicer#this was actually INCREDIBLY fun#I had a blast coming up with obstacles for them and making the rolls#admittedly this MIGHT be because the dice were kind XD#we'll have to see how I handle straight-up failed rolls in future scores#and I admit there was a little light fudging in spots#like not having anyone push themselves on the Prowl roll because I WANTED partial successes/failures#to fill up the 'Bumby Shows Up' clock#because I wasn't going to end the fic without him dead#but it all worked out!#even if poor June ended up traumatized#sorry about that!#she will be less traumatized once she learns what her employer was like#and Alice will probably find a way to apologize for that because damn#she did not mean to give June nightmares#as you can see though the XP totals were NOT kind to Victor#the problem is that you have specific XP triggers in BITD#and him 'expressing his trade background' by going for the ledger was the only one I could justify#sorry Victor but this WAS a very Alice-focused score#you will get more chances to earn more XP later!#queued
7 notes
·
View notes