#how to recover deleted photos from sd card
Explore tagged Tumblr posts
Visit Tumblr Blog
Explore Tumblr blogs with no restrictions, modern design and the best experience.
Last Seen Tumblr Blogs


Fun Fact
US Tumblr user growth rate is estimated to slow down to 4.1%.
Photo
Ever deleted a crucial WhatsApp chat by accident? Maybe it was that important contact detail, a silly inside joke with your best friend, or even confirmation for a train ticket just minutes before your departure? The sinking feeling that hits when you realize those messages are gone… we’ve all been there. Finding yourself desperately searching for a way to recover deleted WhatsApp chat without backup can feel like trying to find a needle in a haystack. This guide dives deep into how to recover those deleted chats, focusing especially on situations where you don’t have a backup. We’ll explore various methods, discuss their limitations, and guide you through the process step by step. Let’s reclaim those lost WhatsApp whispers!
Exploring Methods to Recover Deleted WhatsApp Chats (Without Backup)
Losing WhatsApp chats can be stressful, and if a back-up isn’t available the thought of permanent loss might pop into mind. It’s essential to manage exceptions right at the start, as, unfortunately, the chances reduce dramatically and the solution become more complex for permanent deletion from a device internal storage or from an SD card that subsequently gets deleted before retrieving or recovery. First and foremost, recovering deleted chats without a backup is difficult – not impossible, but definitely a challenge. The success rate, and possibility significantly depend on things like the frequency of using your phone, the deletion process implemented by WhatsApp and the device model you specifically use . Your Android vs. iOS Operating Systems and devices will often involve various specific methods too
The Power of Phone Storage Quick Checks
One of most important initial steps is to immediately check your “Recently Deleted” option, it can be on different aspects of phone and data recovery depends on phone type! Every Android and iOS Phone contains built in apps and some type of data or recent activity recover. Sometimes within application setting we can also recover or recently remove items too by setting of ‘Recover deleted Items’. Immediately put your phone mode offline and away and start examining these.
* Check your phone’s recycle bin or recently deleted files: On some newer, especially some devices Android devices might have “Recently Deleted” features similar in some methods to Google’s recycle bin. * Examine your Files Application: check your device-specific application manager under different files and sections on its storage if recoverable elements available are recovered by that technique with simple interface.
It´s important to ensure an extra step to check if recently deleted folder is empty: even those are not always working properly ! They will not always be an option but trying quickly is not going to take you long
Before anything else start immediately stopping data/ activity processing including backing up device before anything.
Android Methods for Reclaiming Deleted WhatsApp Messages Without a Backup
Android, often known for some openness, offering greater flexibility to third-party apps – compared to the usually more closed environment of iOS – when dealing with access management systems from Android Operating Systems, that’s where you notice such differences. These third party apps allow certain access for storage, photos albums, text apps, calendars e.tc however they often also request greater levels of app permissions within application menus themselves, as each company works under its application rules: Therefore, exercising caution when selecting is crucial for security or avoiding malware downloads or viruses. Always download only from dependable sources similar trusted Apps stores (usually Google Plays Store )
There usually can be various additional steps:
* Third-Party Data Recovery Tools: Many data recovery apps are specific designed to deal various deleted files: They’re commonly available for downloads in the Android Play Store These Apps (Note the disclaimer below!!) often claim their abilities to restore files similar deleted WhatsApp chats: They scan the device , search in phone’s storage from a range aspects including partition tables, identifying items , that often even not appear at app or visual level anymore – and allows their subsequent recover: But also take into account, these not always working. Various features can interfere with apps like cache’s, SD cards and other internal storage: therefore, remember always to back up your information properly. Results may vary
Note again : Disclaimer: While certain app third party developers promote restoration of data. and promise restoring even delete data some are completely fake or have limited success rate. Always, exercise careful when choosing them downloading and use carefully. Avoid paying for applications initially not fully known. Many reviews & online information helps significantly to decide accordingly too to the correct choice*
iOS Approaches: Fetching Lost WhatsApp Conversations
iOS , a very popular globally, has historically often presented numerous issues and complexity for many recovering file data recovery, due to its tightly-controlled environment. Options may be are sometimes significantly more limited
* iCloud Recently Deleted: Though iCloud doesn’t provide file retrieval specifically deleted from certain apps like WhataaApp messages -but it contains folders on several kinds of data managed & recoverable within them(Photos , etc) – however: checking items on last deleted features (folders are specific on device and app use cases ) on devices is recommended.This not always guarantees perfect success – chances vary on its usage.
* Professional Data Recovery Services: If nothing else works then may choose using professional data recovery services companies and may succeed that way ; they are typically paid services often offer specialized hardware & software but comes at obvious price tag. For that is suggested searching online to find companies , or even some individual experts available, near your residence( city, etc ) for any questions that arise
* Note : Use services with cautions, only those verified / reputable companies and never proceed payment, share personal details before thorough research! There are several scams online too !
Understanding Key Factors Affecting Recoverability
Several factors influencing your odds of recovering those deleted WhatsApp messages successfully. Let’s explore them to create a picture and be realistic. In simple terms , we´ll summarize the probability considerations involved in successful result.. Remember the faster you act, chances increase:
Timing—Your Biggest Ally and Enemy in Data Recovery
The longer you wait is after deletions from the primary internal storage in you cell, it chances to recover gradually decreases. The action that your particular whatsapp deleting application takes often impacts your recovery. Various deleting operations do not automatically “empty” a content permanently and they involve numerous intermediate hidden folders. Overwritten the very space is where your WhatsApp Chats occupied after phone operations: the same happens with Whatsapp backup processes ! There chances decreases to restore it by application methods unless this space already not used anywhere
The Role of the Full BackUps on the Process Efficiency Overall For Better Outcomes in This Processes:
A full backed-up data will increase considerably the rate of data restored successfully & correctly even deleted some type of from various kind of partitions. The process speeds up a lot in cases where you successfully recovered before deleting other types of partition folders on all device, external SD storage or any type storage memory card
A previous back-up does help enormously when a deleted partition space gets formatted or wiped even entirely because any of its copies is elsewhere ! We need to have an important warning here in next sentence: it´s extremely important to back up at regular steps to avoid various problems from both cell data files.
Device and Operating System Type : A key difference in successful outputs. As mentioned many times!
Several details are involved : the kind of your phone manufacturer and overall brand will greatly impact these techniques: If your memory management on the devices manages in entirely a specific style is possible a very efficient recovery be applied immediately.. Some phones perform data deletes/recover processes quite efficiently using similar recovery techniques compared overall to android devices or windows base computer data backups
FAQs: Frequently Asked Questions About WhatsApp Chat Recovery
Q: Can I recover completely all deleted WhatsApp messages if only the chat hasn’t the messages within that particular chat fully deleted as such a single action entirely deleting the messages too permanently? How do I even determine if is an easy- recoverable item with certain type deleted messages within a process completely successful ??(This question helps cover different scenarios!)
A: Not completely, depending on where has the message been placed. The device can still sometimes recover fragments and not everything entirely! If you acted quickly maybe just that you still see them somewhere but without necessarily entirely restoring in correct and order
Q: Why doesn’t using third-party apps on most android versions help sometimes ?
A: Even certain apps often can fail too from many factors that greatly influence rate of successful restored of messages; issues ranging from incorrect detection systems internally into device( software, errors inside the operating device , memory management details of file system ) including incorrect internal algorithms processes. Third parties can sometimes succeed sometimes especially if only if several small items or pieces from the recent deletes items
Q: I have a Samsung phone, Are there specialized ways, perhaps some techniques or steps specific better adjusted ?
A: Samsung itself developed various mechanisms to support its data & files recoveries. The official procedures that you must strictly follow in that cases are detailed on its support’s sections including its phones manual , websites including their various specific applications for restoring/recover data/files too for its devices; be sure to see more data from each phone manufacturers, many specific features are unique on a brand
Q:What about WhatsApp’s built-in backup option ? Will simply backing data frequently restore always successfully delete items/recover ?
A: Backup is the safest and usually the simpler method, however in situations such is more complex , however there also might additional considerations. Certain phone brands have more specific functions, etc some times other details regarding types backedup data and which exact settings might come into play also in the recovery result
Q: what techniques exist other besides using specific phones or android phone systems methods
A: Many methods exist already. Professional recovery services are other possibility. Certain advanced tools that specifically recover data sometimes only accessible for specialised personnel on those domains. Certain more complex aspects involving also detailed processes for that many methods exists! Methods in low data recovery rates including: even certain possibilities to find older message-versions exist at least partly restoring information too from a particular chat or more depending mostly of many circumstances. Success heavily depend on too many reasons even then too involving also a wide variety of possible situations , time past deletions many others.
Reclaiming those vital WhatsApp chats without a backup is a challenge, but it’s not impossible. Though direct restoration approaches frequently fall short, acting quickly, checking recent deletions, and using tailored Android and iOS means available increases probabilities of finding relevant parts . Remember exercising suitable data-protection approaches is good idea , backing up using iCloud, Google Drive often improve chances a lot in future instances in some scenarios: Always stay realistic at these hopes for outcome though at various scenarios too though ! Remember before to always weigh all pros and cons well on different recovery methods ; never hesitate seek for help and suggestions too. You’ll be amazed with several possibilities exist!
What about your experiences? Share your own successful recovery tactics below —perhaps someone could learn something from it!. Leave even any experiences even of completely failed recover items. It will surely to others learning process ! Let’s empower fellow WhatsApp users throughout and together too always share experiences .
0 notes
Text
Complete Guide to Recovering Data from SD Cards
SD cards are widely used in devices like cameras, smartphones, and tablets to store photos, videos, and other data. However, data loss from SD cards is a common issue caused by accidental deletion, formatting, corruption, or physical damage. Fortunately, in many cases, the lost data can be recovered with the right tools and techniques. This comprehensive guide will walk you through the steps to successfully recover data from SD cards.
1. Understand the Causes of Data Loss
Identifying the cause of data loss is the first step in the recovery process. Common causes include:
Accidental Deletion: Files deleted manually by mistake.
Formatting: Unintentional formatting of the SD card or device.
File System Corruption: Errors caused by improper ejection or malware.
Physical Damage: Damage from water, heat, or bending of the SD card.
Bad Sectors: Portions of the SD card’s memory that become unreadable over time.
Knowing the root cause can help determine the best approach to recovery.
2. Stop Using the SD Card Immediately
When data loss occurs, stop using the SD card immediately to avoid overwriting the lost files. New data written to the card can overwrite the space previously occupied by deleted files, making recovery much harder or even impossible.
Key Tips:
Avoid saving new files to the card.
Do not attempt to reformat the card.
Eject the card safely and store it in a secure location.
3. Check for Backups
Before starting the recovery process, check if the lost files were backed up.
Cloud Storage: Services like Google Photos, iCloud, or Dropbox may have automatically backed up your data.
Device Backups: Some smartphones or cameras offer built-in backup options.
Local Backups: If you regularly back up your SD card to a computer or external drive, your files might still be accessible.
4. Use Built-In Repair Tools
Both Windows and macOS include utilities to repair minor issues with SD cards. These tools can fix file system errors and make your data accessible again.
For Windows Users:
Connect the SD card to your computer using a card reader.
Open File Explorer, right-click the SD card, and select Properties.
Navigate to the Tools tab and click Check under the Error-checking section.
Follow the prompts to scan and repair the card.
For macOS Users:
Open Disk Utility from the Applications folder.
Select the SD card in the left-hand menu.
Click First Aid and follow the prompts to repair the card.
If the issue persists, move on to recovery software.
5. Recover Data Using SD Card Recovery Software
Specialized recovery software can scan SD cards for recoverable files, even if they’ve been deleted or the card has been formatted.
Popular SD Card Recovery Tools:
EaseUS Data Recovery Wizard: User-friendly with deep scan options for photos, videos, and other files.
Disk Drill: Comprehensive tool for Windows and macOS that supports a wide range of file formats.
Recuva: Free recovery tool for Windows users, ideal for basic recovery tasks.
Stellar Data Recovery: Known for its ability to recover data from corrupted or formatted SD cards.
PhotoRec: Open-source software focused on recovering photos and videos.
Steps to Use Recovery Software:
Connect the SD card to your computer using a card reader.
Install and open the recovery software.
Select the SD card as the target drive for scanning.
Run a deep scan to locate recoverable files.
Preview the recovered files and save them to a different storage location.
6. Create a Disk Image Before Recovery
If the SD card is severely corrupted or physically compromised, creating a disk image is essential. A disk image is a complete copy of the card’s data, preserving its current state.
How to Create a Disk Image:
Use tools like dd (Linux), Clonezilla, or Macrium Reflect.
Save the disk image to a reliable storage device.
Perform recovery attempts on the disk image rather than the original SD card to prevent further damage.
7. Address Physical Damage
Recovering data from a physically damaged SD card requires special care.
What to Do:
Avoid DIY Repairs: Opening or tampering with the SD card can worsen the damage.
Seek Professional Help: Professional data recovery services, such as DriveSavers or Ontrack, have the expertise and tools to recover data from physically damaged SD cards.
Tip: If the card was exposed to water, place it in a sealed bag of rice or silica gel packets to absorb moisture before seeking help.
8. Recover Data from Formatted SD Cards
Accidental formatting doesn’t always erase data entirely. Recovery software can often retrieve files from formatted SD cards.
Steps to Recover Formatted SD Cards:
Use advanced recovery software like Stellar Data Recovery or Disk Drill.
Select the “Formatted Recovery” or similar option in the software.
Scan the SD card for recoverable files.
Save the recovered files to a separate device.
9. Backup Recovered Data Immediately
Once you’ve successfully recovered your data, back it up to multiple locations to ensure it’s safe from future losses.
Backup Strategies:
Use external drives or NAS (Network Attached Storage) for local backups.
Enable cloud backup services like Google Drive or OneDrive.
Regularly update backups to include new data.
10. Prevent Future Data Loss
Taking preventive measures can reduce the risk of losing data from SD cards in the future.
Tips to Protect SD Cards:
Eject Properly: Always eject SD cards safely to avoid corruption.
Store in a Secure Place: Protect SD cards from water, heat, and physical damage.
Monitor Health: Use tools like H2testw to test SD card integrity and detect bad sectors.
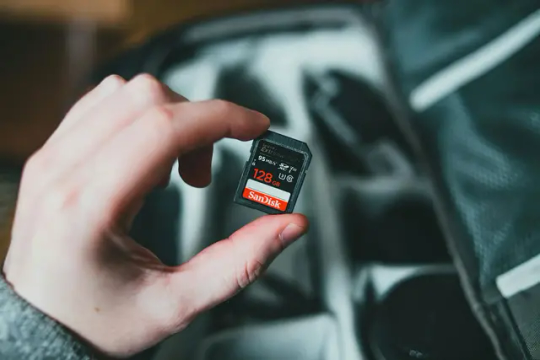
Use High-Quality Cards: Invest in SD cards from reputable brands like SanDisk, Samsung, or Kingston.
Recovering data from SD cards is often possible with the right tools and techniques. Start by diagnosing the issue, use built-in repair tools, and turn to recovery software if needed. For severe damage or corruption, professional recovery services can help. Once your data is recovered, focus on implementing a robust backup strategy and handling your SD cards with care. By following these steps, you can minimize the risk of future data loss and safeguard your valuable information.
#data recovery Calgary#Apple data recovery#hard drive recovery#SSD recovery Calgary#deleted file recovery#Data Recovery#Data Recovery Services#Data Recovery Software#Data Recovery Perth#Data Recovery Company
0 notes
Text
Download iMyFone AnyRecover 5.3.1.15 Full Free Activated
May 17, 2024
iMyFone AnyRecover Crack + License Key {Latest}
iMyFone AnyRecover data recovery software Full Version helps you to recover emails, videos, documents, images and a variety of other data with its clever and superficial features.it is a best and easy Software developed to help users to recover lost or deleted files from a variety of storage systems. It supports recovery from hard drives, memory cards, USB flash drives, and other digital storage mediums. AnyRecover can be particularly useful in situations where data has been lost due to accidental deletion, formatting, device corruption, or computer virus attacks.
Additionally, iMyFone AnyRecover Activation Key can recover your valuable data from Windows, Mac (M1, M2 supported), SSD, external drive, camera, drone, dashcam, camcorder, video, music player, hard drive, USB, SD cards, etc. Overall, iMyFone AnyRecover 4.5.0 cracked is aims to provide a reliable solution for data recovery needs across various operating systems, including Windows and macOS. the software supports recovery from different file systems such as FAT, exFAT, NTFS, and more.
You Can Also Download: Undelete 360
Key Features iMyFone AnyRecover:
iMyFone AnyRecover data recovery Free Download software recover delete or lost data from iOS device, iTunes, iCloud.
this software Recover any iOS data like photos, contacts, WhatsApp, call history, videos, app data, etc.
You can Save iOS data lost by accidental deletion, factory resetting etc.
Preview detailed iOS files (both deleted and existing files) before recovery.
It Support all iOS devices and iOS versions including iOS 17, iPhone 14 and iPhone 15.
Your best data recovery specialist for Windows, Mac, iOS and Android.
This software Restore deleted files from Recycle Bin, HDD, SSD, USB, SD card, etc.
Also, Recover deleted document, pictures, videos, emails and other files in 1 click.
In addition, It Can recover files from popular cloud storage services like Dropbox and Google Drive.
Allows pause, save, and resume of recovery sessions for flexible data restoration.
Recovers data from BitLocker-encrypted drives with decryption.
What’s New in Version iMyFone AnyRecover 8.5.5?
This release Comes with Optimizes the recovery quality, especially the data recovery of FAT/FAT32/NTFS
file systems, so more data can be recovered.
This new version Optimizes the scanning process and shortens the recovery time.
iMyFone AnyRecover Registration Code Supports to scan the partitioned disks.
Additionally, it now Support to recover data from BitLocker encrypted disks.
It now Support devices with APFS and HFS+ file systems.
This supports Window 12 and macOS 11.0.
iMyFone AnyRecover Supports the Following File Types:
Documents: PPT/PPTX, PDF, DOC/DOCX, XLS/XLSX, and more.
Graphics: JPG, PNG, GIF, TIFF, BMP, PSD, and various camera raw formats like CRW, CR2, NEF, ORF.
Videos: AVI, MOV, MP4, MKV, WMV, and other popular video formats.
Audio Files: MP3, WAV, WMA, AAC, M4A, and other common audio formats.
Emails: File types from various email clients, including PST, EMLX.
Archives: ZIP, RAR, ISO,
System Requirements:
For Windows:
Operating System: Windows 11,10, 8.1, 8, 7, XP
CPU/Processor: 1GHz (32 bit or 64 bit) or higher
RAM: 256 MB or more of RAM (1024MB Recommended)
Hard Disk Space: At least 200 MB of free space
For macOS:
Operating System: macOS 10.10 and later (up to the latest macOS)
CPU/Processor: 1GHz Intel or higher
RAM: 512 MB or more
Hard Disk Space: At least 200 MB of free space
How to Install iMyFone AnyRecover Crack Free Download?
Click the link below to begin the iMyFone AnyRecover Data recovery Crack Free Download. This is a complete offline installer standalone setup for the Windows Operating System. This would be compatible with both 32 and 64-bit Windows.
0 notes
Text
Get Your Deleted Photos Back with Restore Images - File Recovery App!
Have you ever accidentally deleted important photos from your phone and wished you could get them back? With Restore Images - File Recovery, you can easily recover deleted photos and images in just a few simple steps.
Key Features of Restore Images - File Recovery:
Photo Recovery: Restore deleted photos from your phone's internal storage or SD card.
User-Friendly Interface: The app is designed to be easy to use for everyone.
Quick Scan: Scan your device quickly to find and recover deleted photos.
Preview Before Recovery: Preview deleted photos before recovering them to ensure you're restoring the right ones.
Secure: Your recovered photos are saved securely to prevent any further data loss.
How to Use Restore Images - File Recovery:
Download and install the app from the Play Store.
Open the app and grant the necessary permissions.
Select the types of files you want to recover (in this case, photos).
Scan your device for deleted photos.
Preview the recovered photos and select the ones you want to restore.
Click on the "Restore" button to recover the selected photos to your device.
Don't let accidental deletions ruin your day. Download Restore Images - File Recovery today and recover your deleted photos with ease!
Download Restore Images - File Recovery and never lose a precious photo again!
0 notes
Text
How to Retrieve Lost Videos from SD Card Easily
It is understandable to fear losing priceless videos, whether they got accidentally deleted from the gallery or misplaced when you moved to a different device! However, only some of the apps you come across will genuinely assist you in recovering your erased videos. With the help of the video recovery app, you may quickly recover files that got inadvertently erased, lost because of system failures, or damaged by hardware problems. This video restore software solution supports documents, images, movies, and other file types. With the help of a video recovery tool, you may quickly recover various data types.
Part 1: Can You Recover Deleted Videos from SD Card on Your Own?
Videos you remove from your computer's SD card or any other device, such as a camera or smartphone, are outside the trash or recycle bin. That's why you cannot simply restore them using your recycle bin. Then, you might wonder if recovering a deleted video on your SD card is possible.
Yes, you can get back deleted videos from your SD card using reputable video restore software, even though it might appear hard initially. Rapid technological advancement has given us many recovery possibilities while resolving our problems. As a result, you can proceed with your memory card video recovery without expert support. Contact a data recovery agency in certain situations to find out if you can retrieve your priceless data. For instance, you might need assistance recovering them if your SD card is seriously damaged.
But as soon as you notice the video loss, stop using the SD card to ensure data recovery.
Please note that recovery is possible only when the data isn't overwritten.
Part 2: How To Recover Lost Videos from SD Cards Without Software
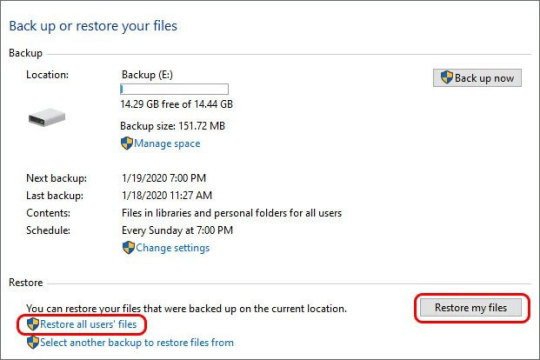
Recover deleted videos from SD card for free via Backup and Restore
One of the most effective ways to recover data from an SD card without using a third-party software recovery tool is through backups. If you've backed up your deleted video files, you're in luck, as restoring them becomes straightforward, helping you avoid data loss entirely.
Here are the steps to restore deleted videos from an SD card using backups:
Step 1: Connect the external SD card to a computer and press the Win + I keys to open Settings.
Step 2: Click "Update & Security" and then access the "Backup" option.
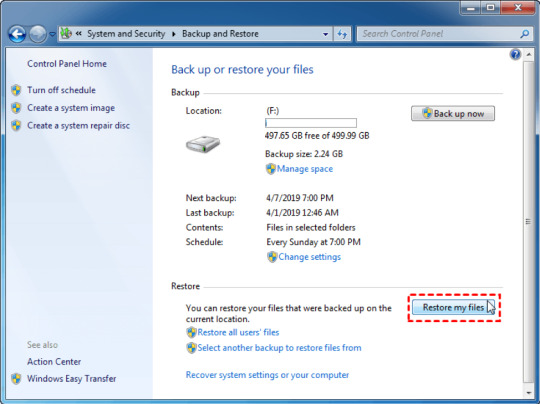
Step 3: Within the Backup & Restore tab, select "Restore My Files."
2. Easily get back permanently deleted or lost videos from SD card for free with Wondershare Recoverit Enhanced Video Recovery.
Wondershare Recoverit stands out as a comprehensive video recovery solution. Its Enhanced Video Recovery feature takes file retrieval to a new level. With support for over 2000 storage devices and 1000 file formats, it boasts an impressive success rate in handling 500+ real-life data loss scenarios, including formatting, system crashes, and virus attacks.
Key Features:
All-in-One Data Recovery: It offers a broad spectrum of file format compatibility. Its success extends to various data loss scenarios, ensuring a comprehensive recovery experience.
Enhanced Photo & Video Recovery: Specialized in rescuing lost or hidden videos and photos, Recoverit can restore Ultra HD, 4K, and 8K content while maintaining their integrity. It supports multiple formats and works seamlessly with popular camera brands.
Video Scenario Expansion: It supports retrieving surveillance and car camera videos, addressing a more comprehensive range of user needs.
Corrupted Video Repair: Offering both quick and advanced repair modes, Recoverit mends corrupted, truncated, and broken videos, enhancing the quality of the repair process.
System Crashed Computer Recovery: It creates a bootable USB drive to access data on a crashed computer. This feature prioritizes user convenience, speed, and security.
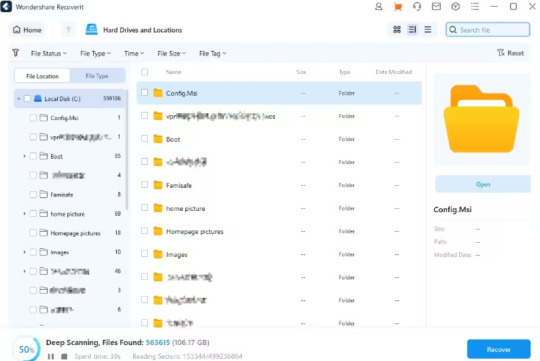
Here's a step-by-step guide on recovering removed files from your SD card using Wondershare Recoverit Data Recovery Software on a Windows computer:

Step 1: Download the Wondershare Recoverit Data Recovery Software.
Select Your SD card to ensure it is connected to your computer. Select your SD memory card from the disk list displayed in the software and click the "Start" button to initiate the process.

Step 2: Scan the SD Memory Card on Recoverit.
SD Card Recovery Software will commence scanning your SD card. The scanning process might take several minutes to complete.

Step 3: Preview and Recover Deleted Data
Once the scan is over, you can review all the recovered data and files. Preview the recovered files, such as images, videos, etc. Pick the files you want to retrieve and click the "Recover" button to restore them.

Tips: Avoid saving recovered files onto the same SD card where you previously stored the lost data. Doing so could result in data loss or overwrite the existing data. A safe external storage device is advisable to keep the recovered files securely.
Part 3: Tips for Preventing Video Loss on SD Cards
While SD cards are reliable for file storage, they are not immune to potential problems like physical damage or corruption. Thus, you must take proactive measures to safeguard your files and be prepared in case of any unexpected data loss. Here are some tips:
Back-Up Important Media Files: Instead of relying solely on your SD card, create copies of your media files and store them on alternative mediums like an external hard drive or cloud-based services such as Google Drive or Dropbox.
Appropriate Storage for SD Cards: If you own multiple SD cards, consider investing in a case to organize and protect them. Ensure your SD cards are stored safely, without excessive heat or moisture.
Safely Eject from Your Computer: Always use the proper procedure to eject your SD card from your computer. Removing it without proper ejection can disrupt the read/write process, potentially leading to file corruption.
Stop Using the Card if Errors Appear: If you encounter errors or issues with your SD card, cease using it immediately. Retrieve any essential files from the card promptly. Errors signal potential card failure, and continued use may result in significant data loss.
Conclusion
So, we saw, losing valuable videos can be distressing, but with the right approach, recovery is possible. Utilizing backups or advanced tools like Wondershare Recoverit can effectively retrieve deleted videos from SD cards. Its Enhanced Video Recovery feature and comprehensive data retrieval capabilities make it a standout choice. Also, safeguarding your files by implementing preventive measures, such as regular backups and safe storage practices, is crucial. For a reliable and hassle-free recovery tool, consider using Wondershare Recoverit—a powerful solution worth recommending.
0 notes
Text
How to Retrieve Lost Videos from SD Card Easily
It is understandable to fear losing priceless videos, whether they got accidentally deleted from the gallery or misplaced when you moved to a different device! However, only some of the apps you come across will genuinely assist you in recovering your erased videos. With the help of the video recovery app, you may quickly recover files that got inadvertently erased, lost because of system failures, or damaged by hardware problems. This video restore softwaresolution supports documents, images, movies, and other file types. With the help of a video recovery tool, you may quickly recover various data types.
Part 1: Can You Recover Deleted Videos from SD Card on Your Own?
Videos you remove from your computer's SD card or any other device, such as a camera or smartphone, are outside the trash or recycle bin. That's why you cannot simply restore them using your recycle bin. Then, you might wonder if recovering a deleted video on your SD card is possible.
Yes, you can get back deleted videos from your SD card using reputable video restore software, even though it might appear hard initially. Rapid technological advancement has given us many recovery possibilities while resolving our problems. As a result, you can proceed with your memory card video recovery without expert support. Contact a data recovery agency in certain situations to find out if you can retrieve your priceless data. For instance, you might need assistance recovering them if your SD card is seriously damaged.
But as soon as you notice the video loss, stop using the SD card to ensure data recovery.
Please note that recovery is possible only when the data isn't overwritten.
Part 2: How To Recover Lost Videos from SD Cards Without Software
Recover deleted videos from SD card for free via Backup and Restore
One of the most effective ways to recover data from an SD card without using a third-party software recovery tool is through backups. If you've backed up your deleted video files, you're in luck, as restoring them becomes straightforward, helping you avoid data loss entirely.
Here are the steps to restore deleted videos from an SD card using backups:
Step 1: Connect the external SD card to a computer and press the Win + I keys to open Settings.
Step 2: Click "Update & Security" and then access the "Backup" option.
Step 3: Within the Backup & Restore tab, select "Restore My Files."

Easily get back permanently deleted or lost videos from SD card for free with Wondershare Recoverit Enhanced Video Recovery.
Wondershare Recoverit stands out as a comprehensive video recovery solution. Its Enhanced Video Recovery feature takes file retrieval to a new level. With support for over 2000 storage devices and 1000 file formats, it boasts an impressive success rate in handling 500+ real-life data loss scenarios, including formatting, system crashes, and virus attacks.
Key Features:
All-in-One Data Recovery: It offers a broad spectrum of file format compatibility. Its success extends to various data loss scenarios, ensuring a comprehensive recovery experience.
Enhanced Photo & Video Recovery: Specialized in rescuing lost or hidden videos and photos, Recoverit can restore Ultra HD, 4K, and 8K content while maintaining their integrity. It supports multiple formats and works seamlessly with popular camera brands.
Video Scenario Expansion: It supports retrieving surveillance and car camera videos, addressing a more comprehensive range of user needs.
Corrupted Video Repair: Offering both quick and advanced repair modes, Recoverit mends corrupted, truncated, and broken videos, enhancing the quality of the repair process.
System Crashed Computer Recovery: It creates a bootable USB drive to access data on a crashed computer. This feature prioritizes user convenience, speed, and security.
Here's a step-by-step guide on recovering removed files from your SD card using Wondershare Recoverit Data Recovery Software on a Windows computer:

Step 1: Download the Wondershare Recoverit Data Recovery Software.
Select Your SD card to ensure it is connected to your computer. Select your SD memory card from the disk list displayed in the software and click the "Start" button to initiate the process.

Step 2: Scan the SD Memory Card on Recoverit.
SD Card Recovery Software will commence scanning your SD card. The scanning process might take several minutes to complete.
Step 3: Preview and Recover Deleted Data
Once the scan is over, you can review all the recovered data and files. Preview the recovered files, such as images, videos, etc. Pick the files you want to retrieve and click the "Recover" button to restore them.

Tips: Avoid saving recovered files onto the same SD card where you previously stored the lost data. Doing so could result in data loss or overwrite the existing data. A safe external storage device is advisable to keep the recovered files securely.
Part 3: Tips for Preventing Video Loss on SD Cards
While SD cards are reliable for file storage, they are not immune to potential problems like physical damage or corruption. Thus, you must take proactive measures to safeguard your files and be prepared in case of any unexpected data loss. Here are some tips:
Back-Up Important Media Files: Instead of relying solely on your SD card, create copies of your media files and store them on alternative mediums like an external hard drive or cloud-based services such as Google Drive or Dropbox.
Appropriate Storage for SD Cards: If you own multiple SD cards, consider investing in a case to organize and protect them. Ensure your SD cards are stored safely, without excessive heat or moisture.
Safely Eject from Your Computer: Always use the proper procedure to eject your SD card from your computer. Removing it without proper ejection can disrupt the read/write process, potentially leading to file corruption.
Stop Using the Card if Errors Appear: If you encounter errors or issues with your SD card, cease using it immediately. Retrieve any essential files from the card promptly. Errors signal potential card failure, and continued use may result in significant data loss.
Conclusion
So, we saw, losing valuable videos can be distressing, but with the right approach, recovery is possible. Utilizing backups or advanced tools like Wondershare Recoverit can effectively retrieve deleted videos from SD cards. Its Enhanced Video Recovery feature and comprehensive data retrieval capabilities make it a standout choice. Also, safeguarding your files by implementing preventive measures, such as regular backups and safe storage practices, is crucial. For a reliable and hassle-free recovery tool, consider using Wondershare Recoverit—a powerful solution worth recommending.
0 notes
Text
Photo Recovery from SD Cards: A Photographer's Guide
Drawing from my own experiences, this guide offers insights into photo recovery. If you're seeking assistance in recovering photos or videos from corrupted SD cards, this article could provide valuable guidance. Experiencing the frustration of encountering corrupted photos on an SD card is an unfortunate challenge that many photographers may encounter. Photographers invest significant time and effort in capturing moments that hold immense value, both personally and professionally.The core of a photographer's craft resides in the images they create, rendering the loss or corruption of photo files a profoundly distressing experience. Various factors, including hardware malfunctions, software issues, or human errors, can lead to corrupted photo files. Confronted with this challenge, photographers must possess strategies to prevent and address such occurrences. This comprehensive guide not only delves into preventive measures for safeguarding their work but also provides practical solutions for photo recovery and repairing corrupted files.Whether you're a seasoned professional or an aspiring enthusiast, understanding these photo recovery methods can be crucial in preserving the visual narratives that photographers strive to capture and share with the world.
What Not To Do With The Corrupted SD Card
After inserting the memory card into the card reader, if you receive an error message saying 'Drive is not accessible', 'The volume does not contain a recognized file system', or are prompted to format the SD card, it is bad news for you. But don't panic yet. When confronted with a corrupted SD card, it is crucial to exercise caution and avoid immediate formatting. Formatting the SD card can result in the irreversible erasure of all data, complicating the recovery process.
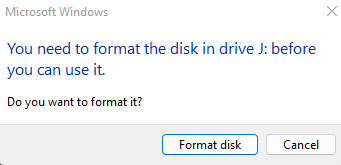
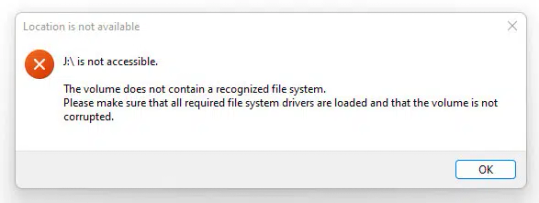
It is advisable to explore photo recovery options before taking any drastic steps. Additionally, refrain from using the corrupted SD card for further data storage or photo capture to prevent the risk of overwriting existing data, which could hinder the recovery efforts. Similarly, resist the temptation to save new files or data onto the compromised card, as this can overwrite and replace potentially recoverable files. By following these precautions, you enhance the chances of successful data recovery and mitigate the risk of further data loss.
How To Restore With MiniTool Partition Wizard
MiniTool Partition Wizard is a versatile partition management software that provides users with a range of tools for disk and partition operations. It allows users to create, resize, move, merge, and split partitions on their hard drives. Additionally, MiniTool Partition Wizard enables the recovery of lost or deleted partitions and the restoration of data from damaged or corrupted partitions.The software supports various file systems and offers features like disk cloning, disk benchmarking, and the ability to convert disk types. Overall, it is the best SD card recovery software that works and a comprehensive solution for users to manage and optimize their disk space and partitions effectively.If you are looking to successfully restore your photos, then you have come to the right page. Restoring data with MiniTool Partition Wizard with its photo recovery features is a straightforward process. Follow these steps to recover lost or corrupted photos & videos using the MiniTool Partition Wizard software:
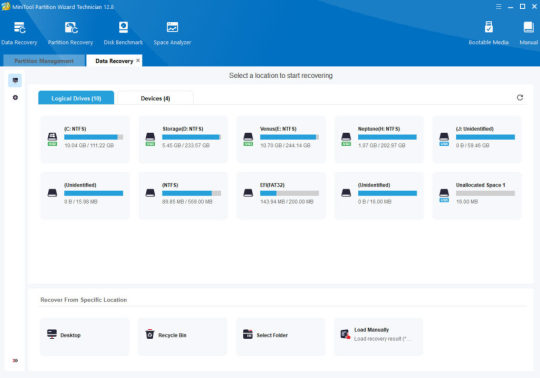
Select Recovery Feature - In the main interface, locate and select the "Partition Recovery" feature. This option allows you to recover lost or deleted partitions, including data stored within them.Choose the Target Drive - The software will display a list of available drives. Choose the drive or partition where you want to perform the data recovery. Click on the drive and then click "Next."Select Scan Method - MiniTool Partition Wizard provides two scan methods: "Quick Scan" and "Full Scan." Quick Scan is faster and suitable for recently deleted or lost data, while Full Scan is more thorough and effective for deeper recovery. Choose the appropriate option based on your needs.
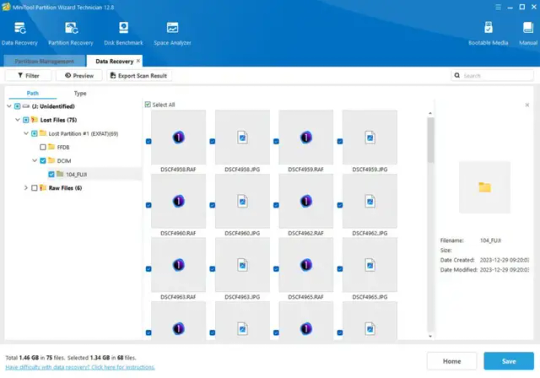
Preview and Select Files - Once the scan is complete, MiniTool Partition Wizard will display a list of recoverable files and folders. You can preview these files to confirm their integrity. Select the files you wish to recover.Choose Recovery Destination - After selecting the files, choose a destination where you want to save the recovered data. It is advisable not to save the recovered files to the same drive to avoid overwriting existing data.Initiate the Recovery Process - Click on the "Next" button to begin the actual recovery process. MiniTool Partition Wizard will restore the selected files to the specified destination.Complete the Process - Once the recovery process is complete, the software will display a confirmation message. You can now access your recovered files from the designated recovery destination.
How To Handle & Prevent Your SD Cards From File Corruption
1. Quality Memory Cards - Ensure you research and choose SD cards from reputable brands. Pay attention to speed ratings, as these can impact data transfer and write speeds, especially for high-resolution photos or video recording. - Select SD cards that are compatible with your camera model. Some cameras may have specific requirements, and using the right type of card can prevent compatibility issues and potential corruption. - Be cautious about purchasing SD cards from unverified sources to avoid counterfeit products. Counterfeit cards may not meet quality standards, increasing the risk of corruption. 2. Format in the Camera - Formatting the SD card in the camera itself ensures that the file system aligns with your camera's specifications. This helps prevent potential incompatibility issues that could lead to corruption. - In-camera formatting also helps minimize file fragmentation on the SD card. This can enhance performance and reduce the likelihood of data corruption during read and write operations. - Develop a routine for formatting your SD card after each use or when switching between different cameras. Regular formatting maintains the integrity of the file structure and reduces the risk of corruption over time. 3. Eject Properly - Ensure that the camera has completed all writing processes before ejecting the SD card. Abruptly removing the card during an active write operation can lead to incomplete or corrupted files. - Always use the designated eject option on your camera or computer when removing the SD card. This ensures that all data transfer processes are safely concluded before physically disconnecting the card. - Some cameras have LED indicators that show ongoing write processes. Wait for these indicators to signal the completion of operations before ejecting the SD card to avoid potential corruption. 4. Use a Card Reader - When transferring files from your SD card to a computer, use a high-quality card reader. This can reduce the strain on your camera's USB port and minimize the risk of data corruption during the transfer process. - Opt for a card reader with USB 3.0 support for faster data transfer speeds. This is particularly beneficial when dealing with large photo or video files, reducing the time your SD card spends connected to external devices. - Instead of transferring all files at once, consider doing it in smaller batches. This can further decrease the chances of data corruption, especially when dealing with a large number of files. - If your camera support dual memory card, use the extra slot as backup for your most important work. 5. Avoid Extreme Conditions - Keep your camera and SD cards away from extreme temperatures. High temperatures can cause physical damage to the card, while low temperatures may slow down data transfer speeds, increasing the risk of corruption. - Maintain a moderate humidity level in storage areas to prevent moisture-related damage to your SD cards. Extreme humidity can lead to corrosion on the card's contacts, affecting its functionality. - Avoid exposing your SD cards to strong magnetic fields, as this can potentially corrupt the stored data. Store your cards in protective cases and keep them away from devices generating strong magnetic forces, such as speakers or magnets.
My Thoughts About Photo Recovery
Being a photographer, I have faced an extremely stressful situation not once, but twice - with the same SD card. The experience left me feeling frustrated and immensely worried that I would lose all of the photos of my neon light photography that I had worked hard to capture and edit. It's quite daunting to think of losing all of your hard work and precious memories in mere seconds and trying to recover my photos.After testing multiple photo recovery tools, MiniTool Partition Wizard emerged as the sole solution and the best SD card recovery software that successfully restored my lost photos. It's time to discard your malfunctioning SD card and discontinue its use. I know how photographers feel when they have problems with corrupted files.The feeling of helplessness and vulnerability can be quite overwhelming. Having been through this ordeal, I urge all fellow photographers to be vigilant and to take necessary precautions to avoid such a situation. There are several ways to mitigate the risks, such as making backups regularly and purchasing high-quality SD cards.I understand the importance of preserving memories and the tremendous effort that goes into capturing them, and it is my mission to assist others in doing the same. Please don't hesitate to share your photo recovery experience in the comments section below if you find any of these suggestions helpful. Read the full article
0 notes
Text
Data Recovery Services Company

Our objective is to be one of the best onerous drive recovery services. We can work with all brands and mannequin onerous drives, including seagate and many others. We will exhaust every possible option in our effort to recover your misplaced data. With our certified Class-a hundred clear room setting and our totally outfitted lab, we are able to tackle essentially the most excessive cases of media failure. extension. We offer a broad range of services that include recovery of lost data from complex servers and storage to hard disk drive, SD cards you use with your USB Drives. We understand the city’s dire need for reliable IT support services - SSD Data Recovery.
Hard disk recovery, recovering deleted information, and restoring lost knowledge from failed RAID arrays are all routine services for our firm. Like any skilled data restoration lab we work in clean room environments if we open a disk drive for inspection, cleaning, or parts transplants. Most of the industries and business enterprises in the city deal with large amounts of customer data, project templates, inventory, and financial information. We have also best data recovery software development team, who have been developing software to recover data. Only a data recovery company can help you in such a situation. It may start with some minor problems which can be fatal in future. Our data recovery specialists can access and extract photos and files from any portable storage media that has experienced a data loss. Our data recovery service provider will have its experts first determine what happened to the hard drive in order to define the appropriate recovery process - Hard Disk Data Recovery.
We also offer a line of hardware-encrypted secure storage devices including flash drives and external exhausting drives. Looking into the turnaround time for knowledge recovery is another important feature, especially when your small business is relying on the info in a query. Our data recovery is one designed to find and/or fix lost or corrupted files. Now Data Recovery is one of the best data recovery company in India, usually the first thing they will want to know is how the files you want to recover were lost. We provide hard drive service plans that promise to recuperate lost data in the event of a drive failure. If you can afford to pay for professional data restoration, then there’s nothing stopping you from hiring skilled specialists to recover your data for you. For more information please visit our site https://www.nowdatarecovery.com/
0 notes
Text
How to Recover Deleted Files from SD Card on Mac (2023)
## Introduction to SD Card File Recovery on Mac
In the digital world, data is the new gold. We store our precious memories, critical work files, and essential documents on various devices, including Secure Digital (SD) cards. In the Apple ecosystem, Mac users often rely on SD cards for additional storage or easy data transfer. But what happens when you suddenly lose all that valuable data? This guide is for those who are looking to master the art of SD card file recovery on Mac.
The process of SD card file recovery on Mac might seem daunting, especially if you're not particularly tech-savvy, but don't fret. This guide will walk you through it in easy-to-understand steps. We'll start with why SD card file recovery is necessary, then delve into common reasons for data loss. From there, we'll explore the basics of SD card file recovery on Mac, practical steps for data recovery, the best software to use, and tips for preventing data loss in the future.
Why SD Card File Recovery is Necessary
The necessity for SD card file recovery on Mac arises more often than you might think. Whether it's due to accidental deletion, formatting errors, or a virus attack, data loss is a common problem that can lead to a lot of stress and frustration. Imagine losing years' worth of photos or an essential work document. That's where SD card file recovery comes in.
The process of SD card file recovery involves retrieving lost, inaccessible, or deleted data from an SD card and restoring it back to its original state. This can be a lifesaver in instances where you've lost important data due to unforeseen circumstances. It's crucial to know how to recover files from an SD card on a Mac because data loss can happen to anyone, anytime.
Common Reasons for SD Card Data Loss on Mac
There are several reasons why data loss can occur on an SD card when using a Mac. These reasons can range from human errors to technical issues. One common reason is accidental deletion. Sometimes, in the flurry of managing files, we might accidentally delete important data.
Another reason is the formatting of the SD card. While formatting is sometimes necessary, it erases all the data present on the SD card. If you don't have a recent backup, you could lose all your data. Additionally, virus or malware attacks can corrupt the data on the SD card, rendering it inaccessible.
Understanding the Basics of SD Card File Recovery on Mac
Firstly, it's essential to understand that when you delete a file from your SD card, the data isn't immediately erased. Instead, the system marks the space that the file occupied as available for reuse. Until new data overwrites it, you can still recover the file.
To ensure a successful recovery, stop using the SD card immediately after you realize you've lost data. This prevents new data from overwriting the lost files. Next, you need to use reliable SD card file recovery software. There are many options available, but not all of them are equal in terms of effectiveness and ease of use.
Steps for SD Card File Recovery on Mac
The first step in SD card file recovery on Mac is to connect the SD card to your Mac. If your Mac doesn't have an SD card slot, you'll need an SD card reader. Once the card is connected, you'll need to download and install data recovery software.
Next, launch the data recovery software and select the SD card from the list of available drives. The software will then scan the card for recoverable files. This process can take some time, depending on the size of the SD card. Once the scan is complete, you can preview the recoverable files and select the ones you want to recover.
Best Software for SD Card File Recovery on Mac (2023)
Finding the right software for SD card file recovery on Mac can be a daunting task, given the plethora of options available. However, ONERECOVERY stands out as the best data recovery software for Windows and Mac. It can recover lost or deleted photos, videos, and over 1000+ file types from various devices, including HDD, USB, SD Cards, and crashed computers.
ONERECOVERY is renowned for its robust recovery capabilities and user-friendly interface, making it a preferred choice for both beginners and professionals. It offers a high recovery rate and allows you to preview files before recovery.

Tips to Prevent Data Loss on SD Card
While knowing how to recover lost data is important, preventing data loss in the first place is even more crucial. Regularly back up your SD card data to another storage device or cloud service. This gives you a safety net in case of data loss.
Additionally, protect your SD card from physical damage by storing it properly when not in use and handling it with care. Also, protect your SD card from virus and malware attacks by using reliable antivirus software and not clicking on suspicious links or downloading files from untrusted sources.
How to Maintain Your SD Card for Longevity
Proper maintenance of your SD card can also help prevent data loss. Always safely eject your SD card from your Mac before removing it. This prevents data corruption. Avoid using the same SD card on multiple devices, as this can increase the risk of data corruption.
Additionally, keep your SD card away from extreme temperatures, as this can cause physical damage. By following these simple tips, you can extend the lifespan of your SD card and prevent premature data loss.
Additional Resources for Mastering SD Card File Recovery
Mastering the art of SD card file recovery on Mac involves continuous learning. There are numerous resources available online, including tutorials, forums, and blogs, that can provide further knowledge and tips.
Conclusion
Mastering the art of SD card file recovery on Mac is not as challenging as it might seem. With the right knowledge, tools, and practices, you can recover lost data and prevent future data loss. Remember to regularly back up your data, use reliable recovery software like ONERECOVERY, and maintain your SD card properly. With these tips, you'll be well on your way to becoming a master of SD card file recovery on Mac.
0 notes
Text
How to Recover Deleted Photos from SD Card - DIY Methods
Losing precious photos due to accidental deletion from SD cards can be quite painful and frustrating at the same time. There are several other reasons as well why pictures may get deleted from your SD card. Whatever is the cause for your photo loss, there’s no need to despair. You can use proper tools and techniques to recover deleted photos from your SD card and get your precious moments…
View On WordPress
0 notes
Text
Welcome to our comprehensive guide on the best 10 Data Recovery Software in 2023 that are available for free download.Curated just for you, a list of reliable software solutions that offers powerful features and user-friendly interfaces to recover your precious files and documents. Whether it's accidental deletion, formatting error, or system crash, we understand how distressing it can be to lose data in this digital age. Each software on our comprehensive list is designed to cater to specific needs, such as photo recovery, SD memory card retrieval, and overall comprehensive data restoration.
0 notes
Photo
Ever accidentally deleted precious WhatsApp photos? That sinking feeling…we’ve all been there! Losing those irreplaceable pictures of your family’s Diwali celebration, your child’s first steps, or that amazing trip to Goa? It’s heartbreaking. But before you resign yourself to a life without those digital memories, there’s good news. This guide will walk you through all the simple and effective steps you can take to learn how to restore deleted WhatsApp photos on your Android phone or iPhone, step-by-step. We’ll cover a range of methods, from utilizing WhatsApp’s own backup system to exploring recovery apps, ensuring you’ve got a solid recovery plan for various scenarios. Whether its recent deletes or anything older, let’s get those pictures back! And this guide is specifically designed with the Indian reader in mind!
Checking Your WhatsApp Backup Before You Begin
Before we jump into more complex techniques, the first and usually easiest method to recover most recently-deleted WhatsApp photos is checking your backup. WhatsApp automatically creates backups of your chats and media–including those precious photos–to Google Drive (Android) or iCloud (iPhone).
Restoring from Google Drive (Android)
Open WhatsApp: Launch the app on your Android phone.
Uninstall and Reinstall: Uninstall WhatsApp completely, then reinstall the app using google play store.
Verify Your Number: Follow the on-screen instructions to verify your phone number.
Following the above step, WhatsApp will give prompt that restore chat from Back ups on Google Drive.
Restoring from iCloud (iPhone)
Uninstall & Reinstall: On iPhones the reinstallation methods are similar to android. Completely Uninstalled WhatsApp application to start the process. Also remember to connect good and proper internet is must to complete process.
After completing the previous steps same as android user follow the prompt restore from iCloud backup will be provided as option for you.
Delved Deeper—Accessing WhatsApp Media Folder
If your WhatsApp backup isn’t where you hope, is that photos still be recoverable. You might be able to find the images in your Whatsapp media folder directly, especially if you recently lost the images. Do remember that, this wouldn’t ensure recovery of everything and a great reason to regularly backup always exists
Finding the WhatsApp Media Folder: Your Android phone
Location: Most phones keep the WhatsApp folder under ‘Internal Storage>WhatsApp>Media`. However, check your phone memory, as specifics vary. Sometimes some phones might save pictures on its SD Card instead of your Internal Storage as well.
Accessing the Folder: To do so a simple file explorer with permission will give you sufficient accessto help you locate images. It is extremely important that be careful enough not to loss unnecessary system data due to access the files not intended by itself therefore seek for a professional guidance will give always benefit on restoring or managing any kind of phone files. If you lost everything before then these steps can always prevent unnecessary problems.
Finding the WhatsApp Media Folder: Your iPhone
* Finding the files folder for iPhone works extremely different in compared of Android Devices most things are operated by specific features of iOS. Locating all folders usually available though app provided access will usually restrict viewing or deletion operations unlike android devices that have more permission option to help manage the storage more efficient. Therefore, if that the case always consult specialist is recommendable for all cases without damaging your iOS application.
Retrieving Older, Non-Backed Up Image files.
Sometimes that the above steps wouldn’t work in general situation this often implies the following conditions
Time Factor: If you haven’t backed up frequently enough.
Backup problems (or no Automatic Backup). In worst cases those all fails these recovery options may not feasible Failure cases can always occur depending on external various reasons but always consult specialists on necessary steps further.
Using Third-party Photo Recovery Apps: proceed with caution.
Disclaimer Regarding using these third-party application usually are requires extra and thorough attention before using this kind of App to gain enough trust before using that involves personal accounts it is essential especially for the matter which involve recovering images or files on specific circumstances and requirements also should follow the rules according to its terms and services in usage
Using professional’s application always help prevent unnecessary risks associated if it causes some undesirable events occur during restoring process then consulting with application experts or app developer and report will possibly give beneficial on both individual who want some results or prevent others too suffer of potential harms occurs in future. This guide can not be used for legal purposes, and any damage arising that you assume full implications before using. Always check apps with consumer advice for reliable performance records, such as on sites comparing various apps. Be aware of potential threats that may be involved; Always carefully check permissions and avoid sharing personal information excessively with those apps without necessity .
Some factors to consider whether this suitable and recommended enough?
Check user’s testimonials first. Before actually begin. This might prevent unexpected damage or events from harming others with certain risks, also considering all scenarios from reviews and comments might involve those could harm you. In doing so there will gain enough insights involve various aspects during entire process and what kind of requirements do fit during before actually doing instead rushing. Doing your own diligence and understanding before going any further gives maximum confidence before trying anything risks related to financial losses should not neglect either. Before relying solely apps, especially that claims recovery, do sufficient investigation properly through checking out any feedback comments available before going next step so you not just relying merely those claimed promises unless checked thoroughly yourself. Those factors will always minimise likelihood causing something unpleasant happens afterwards unless taking necessary cautions through checking it out carefully.
Frequently Asked Questions (FAQs)
Q: How often should I back up my WhatsApp photos?
A: It’s recommended to back up your WhatsApp data daily or at least weekly, specifically to avoid sudden or disastrous data-loss experience. The more regular a habit you could keep it always protects your sensitive images files safe effectively and also save possible efforts could done through recovering files from unexpected loss also.
Q: My phone was stolen! Can I recover photos without the phone, access?
A: That makes it even difficult the recovery process for certain devices, because recovery could significantly vary from situation another whether if cloud backup already set initially, also depends from kind phone user which whether it uses its backup features automatically during updates process in itself which saves lot time and resources spent in recovery case as well. But regardless of such difficulties exist, those methods previously discussed still help find potential ways. You’ll, ideally need access to the Google Drive (for Android) or iCloud (for iPhone which you link that was originally set) where WhatsApp images are often automatically back up to. You do not generally depend on phone accessibility solely if backup settings was initially carried out correctly.
Q: What if I updated my WhatsApp and lost my photos?
A: WhatsApp updates should ideally preserve your older data, but if something unexpected happens in the event, check to ensure enough enough to store on backup system originally, plus to remember reviewing regularly before actually attempting for update first as preventing data-loss events to keep away unexpected issue caused after updates. To fix these issues is essential enough by checking system configurations properly in prior, and do those frequently helps keep your valuable images safe without losing such essential or unexpected loss at end. This avoids frustrating situations in case where images lost as it requires significant additional steps needed instead of doing it regularly.
Q: Are Third Party applications completely to be relied upon?
A: Third-party apps available, however, do thoroughly and sufficiently investigated first. Many app do exactly help recover lost files, others might lack safety precautions so before using its functions always make safety checks is imperative before implementing everything it intends instead avoiding unnecessary financial losses also or worst cause for severe personal accidents that not worth taken unless ensuring fully protective measure first especially involves your financial account, hence always taking cautions against scam, checking feedbacks before signing up will assist greatly therefore those can assist great to minimising possibilities that cause harms that might occur when applying something that you are initially unfamiliar. Choose apps reviewed professionally, plus remember any damage from improper handling use it still will not be liable with responsibility unless ensuring full protections implemented from prior.
This guide does not provide financial or technical advice and everything advised mentioned in this guide should always treat this method accordingly. Please use this advice appropriately for your purpose but also ensure it won’t impact potentially causing risks to harm for causing financial damages during which could have financial issues accordingly. Consult professionals when help needed due to difficulties occurred using these guidelines also.
Let’s bring your precious memories back! If you managed to recapture your photos tell us in the comments below. And please share this post to help someone else go through same experience who urgently needing help. This guides could always be help. Thank you sharing article greatly helps to spread knowledge too
0 notes
Text
How to recover deleted photos from Insta 360?

Synopsis: Have Pen Drive Data Recovery lost your Insta360 camera photos? Could it be said that you are searching for simple methods for reestablishing them? You're perfectly positioned to know how to recuperate erased photographs from Insta360. Simply follow this article to find out more.
Since its beginning in 2014, Insta360 has progressed significantly to turn into a worldwide forerunner in 360-degree cameras. The organization's cameras assist you with catching remarkable minutes progressively. Insta360 cameras are accessible in a wide assortment, going from the expert Insta360 Ace to the flexible Insta360 ONE. You can shoot 360-degree photographs and recordings in superior quality and live transfer on Facebook, Twitter, YouTube, and other social stages with these cameras.
In spite of offering astonishing innovation, it is feasible for clients to unexpectedly erase photos or recordings from their Insta360 cameras, or coincidentally design the memory cards (SD cards, MicroSD, SDHC) without having an earlier reinforcement. Regardless, the media documents put away in the camera can get derailed. In such a circumstance, most clients would have no clue about what to do.
On the off chance that you're trapped experiencing the same thing, we might want to guarantee you that there is still expectation. It is feasible to recapture erased records from the Insta360 camera, and in this article, you will be aware of the straightforward techniques for photograph recuperation from Insta360. Yet, prior to examining the arrangements, we should investigate the situations wherein your photographs could get lost from your Insta360 camera.
Reasons for photograph misfortune from Insta360 camera
Basically, photographs and recordings can get erased or lost from an Insta360 camera because of human activities, whether deliberate or incidental. Yet, there could be different explanations behind it also:
Utilizing your camera improperly, for example, chancing upon things consistently, could crash its memory and delete some or every one of the media documents in it.
Low battery
On the off chance that you catch photographs on Insta360 on a low battery, it could interfere with its usefulness. Because of this, occasionally the photographs don't get saved in any case.
Eliminating and embedding memory cards a few times in the camera could hurt the information previously put away inside those cards and result in photograph misfortune.
Numerous clients associate their Insta360 to the web through their laptops or mobiles. On the off chance that they're not cautious about the sites, they visit when their camera is associated with the web, malware can penetrate their cameras and delete every one of the information inside their capacity.
Presently, how about we head on to the arrangements. Yet, prior to utilizing the strategies ahead to recuperate your photographs, it's critical to comprehend that when any document gets erased from a hard drive, it moves to a secret area that can't be open. To get it back securely from the Insta360 memory, you need to follow these insurances:
Try not to take new photographs until Insta360 photograph recuperation is finished.
Try not to utilize the memory card to store anything.
Perform recuperation when you learn about the photograph misfortune.
Strategies to perform photograph recuperation from Insta360
Note: The techniques recorded beneath are as per the various situations for reestablishing erased photographs from Insta360.
Check Reuse Receptacle
Lost or erased photographs can be recuperated from the Insta360 application straightforwardly. You should simply check the application's reuse container on your gadget. For instance, Insta360 GO application stores your as of late erased documents for as long as 30 days, after which they are for all time gone. Follow the beneath recorded moves toward reestablish your photographs.
Go to the settings of the Insta360 application.
Reuse Receptacle Insta 360
Tap on the Reuse Receptacle choice to check whether there are any erased photographs accessible.
Tap on the tick symbol in the upper-right corner to choose photographs. Then tap on the Recuperate choice. After this, the documents will be recuperated to your collection straightforwardly.
To reestablish every one of the documents without a moment's delay, tap on the tick symbol and afterward click Recuperate All.
As of late Erased Insta 360
On the off chance that your records are absent in the reuse canister, or you've erased your photographs from the memory card of the Insta360 camera, then, at that point, the following strategy is your just and best desire to recuperate erased photographs from Insta 360.
Use photograph recuperation programming
For the most problem free recovery of your erased photographs from the Insta360 camera, utilizing a photograph recuperation device is an ideal decision.
A few photograph recuperation applications are accessible on the web, however Heavenly Photograph Recuperation has a unique spot among them. A strong and well known device can reestablish practically all the significant document configurations like JPEG, PNG, GIF, Crude, and so forth. It upholds photograph recuperation from HDD, SSD, USB, SD card, memory card, streak drives, cell phones, Compact disc/DVD, and other stockpiling gadgets. This astounding instrument functions admirably on the two Windows and Macintosh gadgets and can recuperate 4K, 8K, 360, and VR recordings from cameras like Insta360, Red Weapon DSMC2 Cerebrum, Rylo 360, and others.
The course of Insta360 photograph recuperation turns out to be exceptionally simple with Heavenly Photograph Recuperation's basic and direct UI. Simply follow the beneath referenced moves toward recuperate your lost photographs with this product:
Download, introduce and send off the product on your gadget.
Select the drive or outer media from which you need to recuperate your erased photographs.
Heavenly Photograph Recuperation Principal
Presently click on Sweep to see the rundown of the relative multitude of recoverable documents on your screen.
When the checking is finished, review all the photographs you need to recuperate and choose them.
Heavenly Photograph Recuperation Recuperate
Finally, click on the Recuperate choice to save them to the ideal area.
You can likewise attempt the Profound Output choice in the event that you can't find your records in the Speedy Sweep (default).
To Close
Presently USB Drive Data Recovery know how to recuperate erased photographs from Insta 360 is a seriously basic interaction on the off chance that you follow the strategies referenced previously. Notwithstanding, we want to believe that you never need to make it happen. Continuously make sure to keep a legitimate reinforcement of all your photographs and recordings so on the off chance that you stall out in such a circumstance, you can recuperate your documents from the reinforcement.
#Pen Drive Data Recovery#USB Drive Data Recovery#Pen Drive Recovery#USB Drive Recovery#Pen Drive Recovery software#USB Drive Recovery software#Pen Drive Data Recovery software#USB Drive Data Recovery software
0 notes
Text
Get Your Deleted Photos Back with Restore Images - File Recovery App!
Have you ever accidentally deleted important photos from your phone and wished you could get them back? With Restore Images - File Recovery, you can easily recover deleted photos and images in just a few simple steps.
Key Features of Restore Images - File Recovery:
Photo Recovery: Restore deleted photos from your phone's internal storage or SD card.
User-Friendly Interface: The app is designed to be easy to use for everyone.
Quick Scan: Scan your device quickly to find and recover deleted photos.
Preview Before Recovery: Preview deleted photos before recovering them to ensure you're restoring the right ones.
Secure: Your recovered photos are saved securely to prevent any further data loss.
How to Use Restore Images - File Recovery:
Download and install the app from the Play Store.
Open the app and grant the necessary permissions.
Select the types of files you want to recover (in this case, photos).
Scan your device for deleted photos.
Preview the recovered photos and select the ones you want to restore.
Click on the "Restore" button to recover the selected photos to your device.
Don't let accidental deletions ruin your day. Download Restore Images - File Recovery today and recover your deleted photos with ease!
Download Restore Images - File Recovery and never lose a precious photo again!
1 note
·
View note
Link
#restore canon powershot g15 camera photos#Recover Canon PowerShot G15 Camera photos#Get back Canon PowerShot G15 Camera pictures#Easy recovery of Canon PowerShot G15 Camera deleted photos#ibeesoft data recovery#how to recover deleted photos from sd card#recoverit data recovery#repicvid photo recovery#canon rebel recovering deleted photos#how to recover deleted photos from canon eos rebel t6#how to recover deleted videos from canon camera free
0 notes
Text
Easeus Data Recovery Wizard For Mac Free Pour Mac Os
EaseUS Data Recovery Wizard. The Most Comprehensive and Reliable Mac Undelete Data Recovery freeware. Quickly & completely recover deleted, formatted, inaccessible and lost data. Recover videos, photos, music, documents, emails, archives etc. From Mac hard drives and most storage devices. Preview lets you enjoy data recovery. EaseUS Mac data recovery software can be applied to restore Mac hard drive data, deleted files in SD or external storage devices volumes on Mac OS X and macOS (10.13/10.14) in simple steps. Its free version - EaseUS Data Recovery Wizard for Mac Free assists users in restoring lost Mac data from Mac OS X or macOS effortlessly.
Frequently Asked Questions
Can you recover permanently deleted photos on Mac?
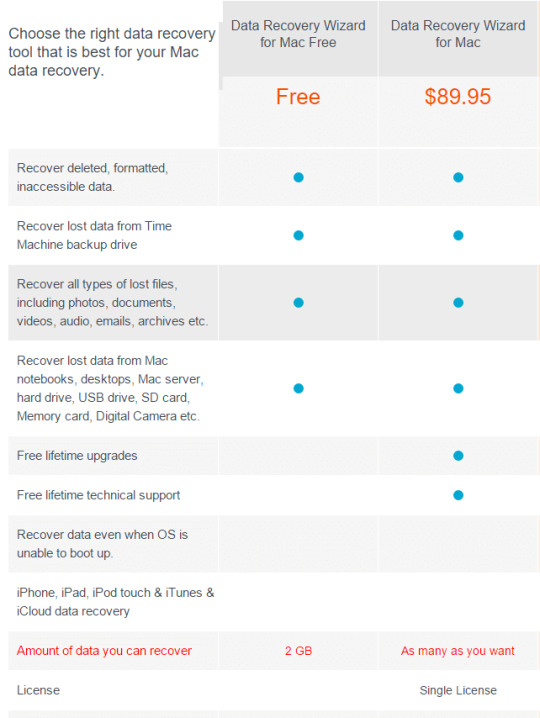

Here's how to perform photo recovery for Mac.
Step 1. Download, install, and launch EaseUS Data Recovery Wizard for Mac.
Step 2. Select the location where you deleted photos. Click the Scan button.
Step 3. Preview the pictures that were found. Select the ones you want to restore.
Step 4. Click the Recover Now button to restore your lost photos.
What is the best photo recovery software for Mac?
Top 5 completely free data recovery software for Mac:
1. EaseUS Data Recovery Wizard for Mac Free
2. Disk Drill
3. PhotoRec
4. TestDisk
5. Exif Untrasher
How can I recover permanently deleted photos from my Mac for free?
To recover permanently deleted Mac photos, follow these methods:
Easeus Data Recovery Wizard Crack


Method 1. Recover permanently deleted pictures on Mac with EaseUS
Method 2. Restore deleted Mac pictures using the Photos app (Within 30 days)
Method 3. Retrieve deleted files from Mac Trash
Method 4. Recover deleted photos on Mac with Time Machine (Don't empty it)
Method 5. Recover deleted Mac picture or images from iCloud
How do I recover photos from a formatted USB drive on Mac?
You can easily get back your photos from a formatted flash drive by using EaseUS photo recovery software for Mac. Follow these simple steps to recovering deleted photos on Mac:
Easeus Data Recovery Wizard Technician
Step 1. Connect your USB/flash drive to the Mac device.
Step 2. Download, install, and run EaseUS photo recovery software for Mac.
Step 3. Select your USB drive and click Scan.
Step 4. Preview the pictures that were found. Select the ones you want to restore.
Step 5. Click the Recover Now button to restore your lost photos from the USB drive.
How to retrieve deleted music files from my SD card?
Accidentally deleted songs or music can be recovered with the following steps.
Step 1. Connect your SD card or SF card to your Mac.
Step 2. Install and run the software - EaseUS Mac data recovery software on your system.
Step 3. Select the SD card and click Scan. The software will scan the connected SD card.
Step 4. Click Recover Now to recover the lost or deleted music files to the desired location.
Frequently Asked Questions
Can I recover data if the drive shows as unmounted?
The drive cannot be accessed if it's not mounted. Please try to mount it in Disk Utility, then run EaseUS Data Recovery Wizard and scan the disk to recover lost data.
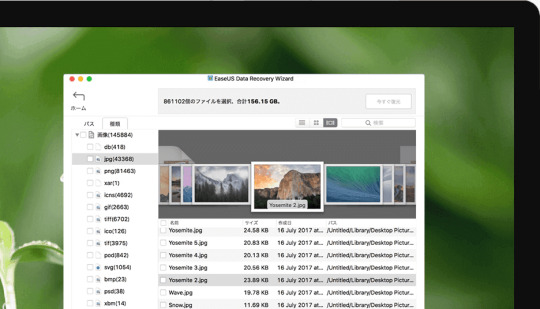
How can I find the lost data from the scan result?
EaseUS Data Recovery Wizard offers data filtering and search functions. You can filter the files by size and type, or search them by file/folder name or file extension.
Why cannot I recover 2GB data for free?
It is recommended to check the version installed is Free or Trial because they are different versions. The Trial has data preview function but cannot save any files, while the Free version enables to recover 2 GB files. The default free space is 500 MB and you may share the product on social media to get another 1.5GB.
Why cannot the recovered files be opened?
A file is saved as 2 parts on the storage device: directory information (which contains a file name, timestamp and size info, etc.) and data content. If the files with original file names and folder structures cannot be opened, one possible reason is the corrupted directory information. There is still a chance to recover the data content with the RAW Recovery method in our software.
How long does it take to scan the drive?
It strongly depends on the capacity of your hard drive and the performance of your computer. As a reference, hard drive recoveries can be completed in around 10 to 12 hours for a 1-TB healthy hard drive in general conditions.
1 note
·
View note