#hnng let me know if something doesnt make sense im a little stupid
Explore tagged Tumblr posts
Note
I often don't make things for poc because I'm scared of whitewashing them. Can you link to the tutorials that show how to go about this or could you explain it yourself? I'm always too scared of making things with poc in them and I don't want to whitewash anyone so advice would be amazing!
hi! i guess i could share the things i know about it but i do want to clarify that i’m not an expert at editing! so, if you want really indepth help, it would probably be best to ask someone else!
as for tutorials, these are the ones that have personally helped me! this one by @fadenet (specifically pale/pastel gifs including characters with dark skin), this one by @blueshelp (specifically about east asian and southeast asian celebs), and this one by @kispesan (specifically about edits). this is a post with a ton of resources for gif making, including things about coloring and other anti-whitewashing tutorials (highly recommend!).
when it comes to what i do, it really depends on what i’m making! i’ve made a couple of edits specifically about unwhitewashing characters of color which you can find here for examples, but overall what i do really depends on the kind of edit i’m working with.
i’d also like to quickly say that i use photoshop! while the basic coloring will cross into other programs, some of the tools/names might be different.
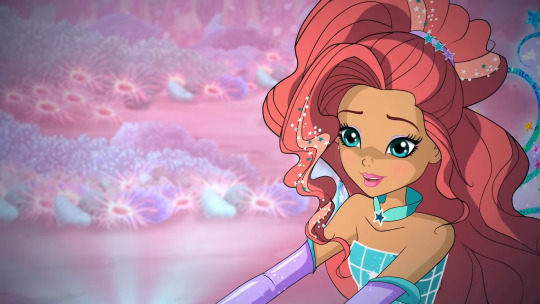
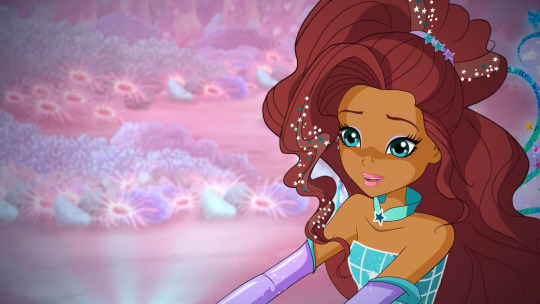
lets use an edit of the character aisha from winx club as an example! in season 8 of winx club, the characters aisha and flora (both having dark skin) were whitewashed. the following pictures are a screenshot from the series, showing the whitewashing, and the same sc but edited to reflect her original skin tone and hair color.


in this edit, i actually went in and recolored her skin using the brush tool (yes, it takes a hot minute to do, but you get faster the more you do it). the reason i do this for picture edits, is purely a personal preference. i like having the control of only editing the parts i want to edit and keeping the rest of the picture the same as before. personally, i don’t love using the selection tools so when i don’t need to,, well, i don’t.
if you have the time, patience, and ability to physically recolor still pictures, i’d definitely recommend it! it allows you to use the eyedropper tool on the original skin tone which makes for a much more accurate edit. taking advantage of the selection tools and paint bucket tool can make the process a lot quicker too!
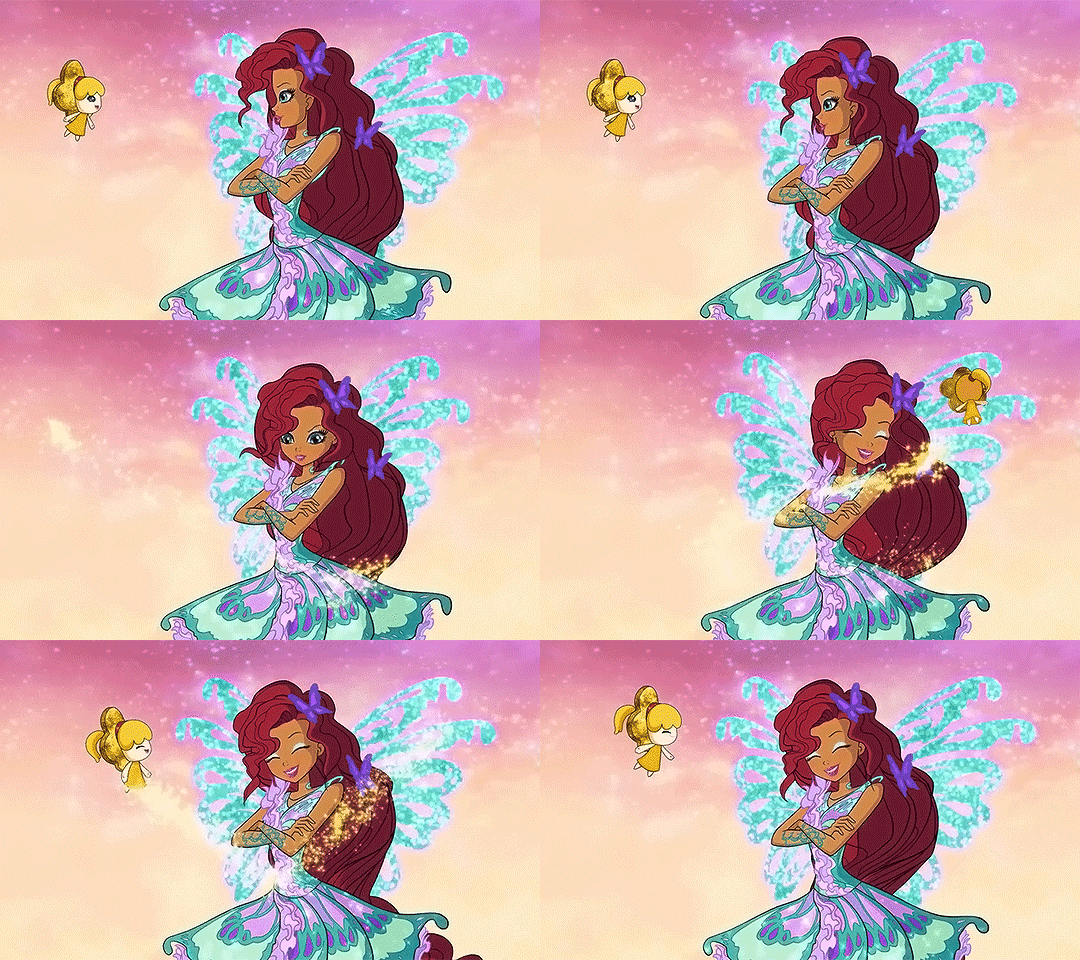
now, lets use a different method, one that i personally use for things like videos and gifs (basically, anything moving)!


these gifs come from the same season as the above example and as you can see, aisha is heavily whitewashed in the first one. now, this is where coloring becomes your best friend!
so, you have your gif ready for coloring, maybe you used a psd/filter or you did your own thing, regardless, the person in the gif is whitewashed and you want to fix it. so, what do you do? (now, obviously this is just one example. there are many others ways to do this!). what i do, is almost exclusively use the hue/saturation and the color selection layers (i will occasionally use the brightness and curves layers depending on the scene)!

^^this little “guide” or whatever shows what you need to find for this tutorial.
the first thing you should do, is figure out which colors primarily make up the person’s skin tone. a good way to figure this out is by using a hue/saturation layer. click the hue/saturation, which will show a menu similar to the one in the picture, and go through each color and turn the saturation all the way down, so it says -100. don’t mess with the hue or lightness levels yet, just the saturation. this will show which colors make up the person’s skin tone! as an extreme example, if someone’s skin was green and you turned the saturation of greens all the way down, that person’s skin wouldn’t look green anymore, it’d look like someone put on a black and white filter specifically for the color green. just keep a close eye on what changes! now, this saturation change is just temporary! after you know which colors are in that person’s skin tone, you can just delete the hue/saturation layer. (you really only need to do this if you aren't used to coloring darker skin. once you get used to it, you likely won't need to, but it can still be a good reference point if you're lost on what to do)
so, after figuring out what colors you need to focus on, go to the selective colors layers, so you can edit just those colors! for our example here, aisha’s skin tone is mostly made up of reds and yellows while her hair is mostly reds and magentas. when i’m editing her skin tone and hair color, i only focus on those colors. in the selective color layer menu, you have four other colors to control; cyan, magenta, yellow, and black. although it would help, you don’t need to know everything about colors or color theory for this! just mess around with the colors sliders until you get something close to their original skin tone. you may need multiple layers of selective colors to get this right! don’t panic if it doesn’t happen right away, just keep going.
something i think is incredibly important during this step, is having a picture of that person/character open! that way you can actually go back and forth to see if what you’re doing is close. another tip, having another file open with a completely white background with a colored circle of that person’s base skin tone on it really helps. this way you can use the eyedropper and brush tools to see how close what you have in the edit is to the original (basically, use the eyedropper tool to select the skin tone in the edit and then use the brush tool to color it next to the circle of the original skin tone. this helps you see up close how similar they are!). here's an example!

the first example is from the gif and the second is from the still picture edit! you'll notice that the gif example doesn't match up exactly because in that specific scene aisha was directly in sunlight, making her skin slightly brighter than usual, while the photo i used for reference has normal lighting. remember to pay attention to things like lighting and shadows!
now, at this point you might be thinking, “this tutorial only shows what to do for animated characters and i make edits with real people :(”. don’t worry! the second method still works! here’s an example using a real person, kim taehyung from the group bts.

obviously, this isn’t perfect because i spent like. two minutes on it. so the skin is blotchy, the lips are too red, and the background changed. but the way i edited it is mostly the same as the gif example i used! the only difference being that i also used a color balance level to darken up the whole picture. however, besides that i did the exact same things as i did with the gifs of aisha above. if you're making edits with real people, then just do whatever you usually do to make sure it looks more realistic.
i hope all of this made sense? i’ve never done a tutorial before and basically all of what i’ve said has already been said! but here are some more tips for the road:
-when editing black people/characters, don’t make their skin red
-when editing indigenous people/characters, don’t make their skin red
-when editing east asian and southeast asian people/characters, don’t make their skin yellow
-pay attention to lighting! if a scene has darker lighting, skin will look darker than it is!
-on the flip side, if a character is right in front of a very bright light, their skin will look lighter
-don’t avoid the colors red and yellow, especially for people with tan/darker skin. those colors are always essential. they won’t look bad in your pastel edit.
-don’t be afraid to ask for help! if you have mutuals who make edits you can try asking them. or even making a separate post asking for help from any followers that edit! basically, if you truly don’t know what to do, either look it up or ask for help.
-do not just post the whitewashed edit/gif/art with the excuse that it’s, “just the filter” or “just the psd”. take responsibility for what you’ve created.
-if you’re using a filter/psd and you really can’t figure out how to unwhitewash someone.. use a different filter! ik you might really like the one you picked, but that doesn’t excuse racism. there are lots of filters/psds out there that don’t whitewash. use one.
i’m gonna be honest, unwhitewashing is really easy as long as you know how to work whatever program you’re using. and even if you just started, it’s still pretty simple! if you’re scared of making edits with poc because of whitewashing, learn how to not whitewash.
anyway i hope this helps? let me know if something doesn't make sense or needs more explaining! but i'd really recommend looking at the tutorials i linked as they're more in-depth and offer a lot of insight!
#hnng let me know if something doesnt make sense im a little stupid#photoshop#photoshop tutorial#coloring tutorial#anti whitewashing#anonymous#answered#mine.edits#(kind of?)
42 notes
·
View notes