#hat was a different tutorial i also altered a bit
Explore tagged Tumblr posts
Visit Tumblr Blog
Explore Tumblr blogs with no restrictions, modern design and the best experience.
Last Seen Tumblr Blogs


Fun Fact
Tumblr has 4 main sources of revenue.
Text

my rainbow clown barbie custom so far :'D
#her hair was already rainbow so no rerooting done for this btw#just painted her face and sewed an outfit using a specific youtube tutorial for the patterns but altered a but for clown aesthetics#hat was a different tutorial i also altered a bit#everything us coming together so nicely but yes this is a work in progress#gonna put a white pom pom on her hat#also bought her some purple clown shoes that will be here probably monday... legit the only existing barbie clown shoes i can find anywhere#there was one pair on ebay and none anywhere else not even anything similar#so im glad i was able to get them and hope they fit her high heeled barbie feet which they SHOULD.#then i just need stockings which I'm probs gonna buy some cheap Amazon pack of em in different colors and see which looks best#barbie custom#doll custom#doll custom wip#doll wip#clown#rainbow#rainbow clown
17 notes
·
View notes
Text
Soooo, those Mindflayer eyes...
While I’ve been playing BG3 on and off since early access released, I’ve never really dove that deep into it until a few days ago, so I’m so sorry if this is already a heavily discussed topic in fandom! But one thing that’s always stuck out to me are the Mindflayers, specifically how they’re always described as having pale, milky eyes throughout the majority of DnD history;
[...] Their eyes, sheltered by brow ridges, were uniformly pale and devoid of pupils in addition to being bloated and featureless, similar to those of blind cave fish.
Yet Larian seems to have made a point of giving them actual humanoid eyes, complete with iris and pupils. Not only that, they feature it heavily on promotional artwork. Like compare the eyes of the game’s Mindflayer -

- with what up until recently has been the canon Mindflayer -

It’s a very clear and striking difference, almost complete polar opposite in that they went from bland and non-descript to piercing and radiant.
Now I kind of shrugged it off and was happy to just note it down as artistic liberty, until I started a new playthrough yesterday and realised there’s someone else in the game who has the same eyes as our Cthulhuian friends.
That someone is Raphael:

What’s more, after losing myself in the Larian forums for a bit, I stumbled upon this post from user Ulla G in a thread about the Absolute;
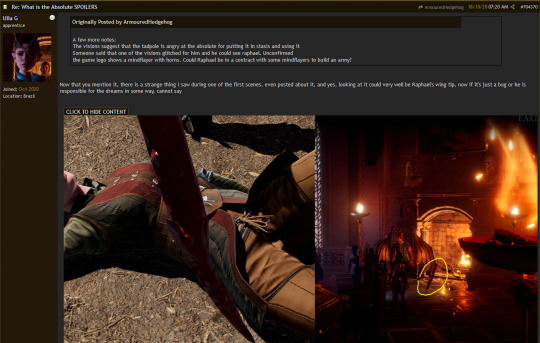
They describe how in earlier patches, whenever they got to the first dream scene where you can hear Daisy’s voice going “Where are you?” as you go to bed, they continuously got a glitch where they saw a wing tip hovering over their Tav, which they then linked to Raphael when they saw his true form in his introduction scene.
There’s also continuous references throughout the game itself that the tadpole inside your head seems to be altered, which made me almost feel the ! appear above my head when I got the “charmed in more ways than one”-line from Raphael when you choose to introduce yourself to him in camp -

Plus, there’s something odd going on with Daisy and the tadpole.
I always thought they were one and the same, but whenever Daisy seems to be getting close to getting Tav to give in to their seduction, there’s always a vivid recoil coming from somewhere inside, as well as a murderous lust for blood and barely suppressed violence in later scenes which is aimed directly at Daisy themselves.
Could it be that Daisy is not the manifestation of the tadpole, but instead represents an outside force that’s instead responsible for altering it?
Tinfoil Hat Time™

Are the Mindflayers we see in-game charmed? Are they under the influence of someone else?
There’s a common theme running throughout at least Early Access of people bearing loyalty to or at least doing the bidding of either a person or a force that’s in reality actually manipulating them - Lae’zel and Vlaakith, Astarion and Cazador, Wyll and Mizora, Shadowheart and the Sharr worshippers, the Druids and Kagha, the Goblins and the Absolute. Are the Mindflayers victims of this too?
The Absolute seems to be tied to The Three somehow, and considering Edowin and his siblings have clear instructions to find and kill any survivors of the Mindflayer crash, they don’t seem to be in cahoots.
The fact the Mindflayer ship was immediately attacked by devils when it came to Avernus seems to speak against Devil influence, despite the potential link to Raphael’s eyes and his seeming knowledge of what’s actually happening. Unless Raphael is also working for an outside force. Or unless he isn’t tied to the traditional Devils at all.
In the tutorial phase on the ship, if you manage to keep the Mindflayer alive while killing the devil Commander and all the other devilkin at the helm, you get a sweet sword the Mindflayer turns against you and says you’re no longer needed before he attempts to kill you, even though you still bear the tadpole. Does this mean the altered tadpole and Tav&Co’s untransformed state are completely separate from what the Mindflayers were originally intending to do? (Why kill Tav and the other tadpole-bearers in the first place, when they could be useful Thralls?)
Where does the Githyanki artefact fit into this?
How does the conflict between Sharr and Selûne play into it all?
Is there a connection to the constant references to Netheril?
To the Weave, to the attempt on Mystra’s life and seat, orchestrated by Sharr 109 years ago? (potential interesting tidbit; if a devil dies outside of Baator, it takes them 99 years to regenerate)
I don’t even know where I’m going with all this, I just needed to blurt all my thoughts into words somewhere and get some facts straight, I guess. I haven’t been this excited to figure out a story in a while. I am so intrigued by every little snippet Larian throws our way, and I am so so so so so stoked for August 3rd to see how this will all play out~
104 notes
·
View notes
Note
Do you know resources that explain how to knit in simple terms? I can't understand spacially what's happening with most demonstrations online and your blog seems very knowledgeable!
Well I haven't checked the basics in about 10 years but I can take a look and try to compile some stuff!
Probably a large amount of info under the cut!
So when learning to knit the basics, there are probably 4 things you need to learn.
Cast on
Basic stitches - Knit / Purl
Cast off
Weaving in ends
Knowing the basic stitches at this point is best because even though there are a ton of variations, most of them (if not all of them) are just alterations of those 2 (ex. K2tog = knit 2 stitches together).
Cast On
I find this video is good at explaining the slip knot in a simple way, and one variation of the cast on method. The creator goes very slow and it's very easy to view what they are doing.
This video is also really good at going over a bunch of different cast on methods, as well as talking a bit about the down sides to them!
If videos aren't your thing and you'd prefer pictures, this post is also really helpful!
Basic Stitches - Knit and Purl
This video shows a pretty good explanation on the basic knit (K) stitch.
And this one is good at slowly explaining the Purl (P) stitch.
I'd recommend this channel: Sheep and Stitch. The woman who does the tutorials goes slow and the videos are bright and easy to follow (in my opinion)
--------------
My Notes:
For knitting and purling the most important thing is to know where your "working yarn" is.
Knit stitches have the working yarn "in the back" meaning it's on the side of the work that isn't close to you: the back.
Purl stitches have the working yarn "in the front" meaning it's on the side of the work that IS close to you: the front.
*I think it's also important to note that what you see as a classic "knit" pattern isn't just straight knitting. What we call stockinette stitch is one row knit, and the next row purl. To knit all rows creates "garter" stitch which is a bunch of half loops.
Stockinette Stitch (when done, the edges of this WILL curl by nature and to get rid of that you need to block the work)
Garter Stitch (made by knitting every row)
Cast Off
This is the easiest and best cast off method in my opinion. I use this for all of my projects because it's easy and if your tension is consistent, then the final project looks really clean!
*There are a few different methods for casting off by for beginners I recommend starting with this one unless the pattern you are using calls for a specific method.
Weaving in the Ends
Once you've cast off there are going to be threads of yarn leftover. It's very important NOT to just cut these, as the work will probably just unwind itself over time. But weaving in changes depending what the work looks like. To properly hide those threads, knowing how to do it with different work types is important.
Here's how to weave in Garter Stitch
Here's how to weave in (the back) stockinette stitch
Here's how to weave in seed stitch
There is also a 'magic' weaving technique for stockinette stitch that I actually picked up a while ago on Tumblr, but my silly self didn't save the post after learning it so I'll update this post if I ever find it again. (if anyone knows what I'm talking about please link it!)
---------------------------------------------------------------------
This is the absolute basics you need to know! I'll also try to link some beginner projects that seem fun and easy to follow.
Projects
Here is a page with 10 simple beginner patterns including hats, dish clothes, little hearts, scarfs, and bookmarks.
Here is a blanket pattern that uses smaller squares. It's listed for "upper beginners" but once you get the first 2 squares done I think it's a perfect blanket pattern since you can use many colors!
Here is a link to a ravelry page with 60 simple knit patterns, but I personally think some of these (if not most of these) look a bit difficult.
-----------------------------------------------------------------------
I could keep listing projects, but the thing about getting into knitting is you should make what you WANT to make, not what's easy.
My first project was a huge blanket I made by just knitting the most simple squares and sewing them together. My mother attempted to make a scarf, but didn't have the patience for it and hated it, so she stopped knitting.
My recommendation is to think of what you want to make, think about the time required for that (many projects take much longer than you think) and decide if it's for you.
The websites you are most likely to find patterns are:
Ravelry: This is the Knitting/Crochet website where you can find pretty much any pattern. (Free/Paid patterns available) *you do have to make a free account to save/download/view patterns*
Pinterest: Pinterest is a great website for finding patterns and having more recommended for you. The issue with this one is being able to distinguish between knitting and crochet, as sometimes the tags are not accurate and searching for a knitting pattern instead gives you a bunch of crochet ones. (I'm not salty about this)
Personal Blogs: Searching through google is another good way to find some creators who keep their patterns on their blogs, but pinterest and ravelry will likely be easier resources for this
If anyone else has any websites or resources they'd like to link, please do!
Good luck creating and I hope this is enough resources to help you get started!
17 notes
·
View notes
Text
I sure do love to go to the thrift store and acquire things!! Today I got a broken (?) little wooden music box, a couple pieces of fabric (one dark pink cotton jacquard and one dark brown and gold sari silk) and also a plate with a picture of the Hartland covered bridge on it. That's the longest covered bridge in the world, and I've walked across it, and now I can eat sandwiches off it's monochromatic blue image.
#hi yeah yes i AM slightly tipsy at the moment sorry!#OH i also got 4 little packs of gold plated sewing needles!! and another plate that has Green Gables on it#but that;s in a different province from me so marginally less exciting even though I do love the 1980's anne of green gables series#just had another hecking busy week at work (because it is prom & wedding season and I am Suit Alterations Tailor#but now it is weekend and I have 2 days of no things#yay!! Maybe I will work a bit more on my shirt and some drawing!#I wish I had more space to put things. if I did I would go to the thrift store even more often and obtain even more delightful candlesticks#and also more silver plated goblets. I'd have a whole corridor of shelves with all my fancy little metal thrift store goblets#thrifting#hey did you nkow that all aclohol tastes bad and yucky and you can only hide it in lots of fruit juice and stuff???#this is a fact I know but learn all over again every frew several months#blergh!#speking of which! fun fact: I am a balding old man of 27 and when I got to the beverage store with a hat I get asked for ID usually#but never when I have no hat!#today I had a leafkerchief on my head which I have been wearing a lot lately for balding head reasons and also cause#of those dang sebaceous cysts upion my scalp that are so lumpy and numerous (4) and unsighlty#unSIGHTLy I mean#UGH the surgery people said I'd hear back about an appointment in a month and it's been almost 3! I should phone them!!#It is unfair to have lumps almost as big as marbles just chilling there on a balding scalp!!#SPeaking of leafkerchiefs I Realy need to finish that damn sewing tutorial video! I filmed most of it last autumn!#and now it's late spring!#is there a limit to how many tags you can put on a post??#ok well I hope these have ebeen entertaining to you I will go eat a food and maybe do soem sketching now goodnight
119 notes
·
View notes
Photo
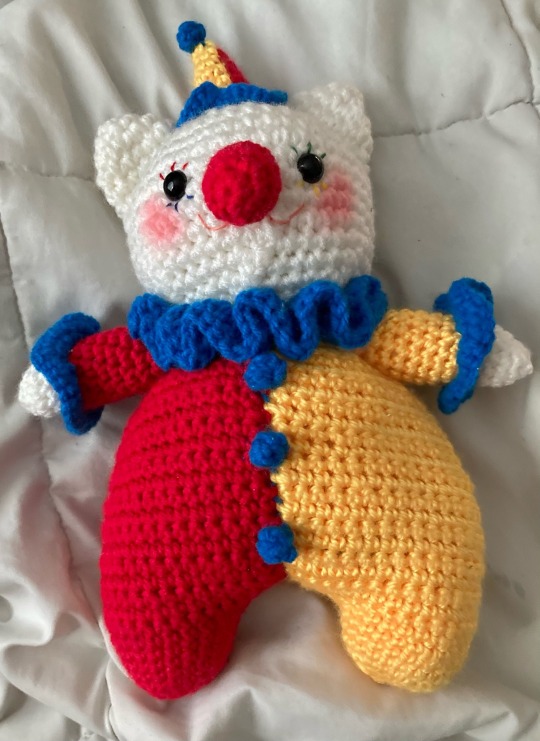

Clown Cat Crochet Pattern Listed Below!
Full disclaimer, this pattern has not been tested by anyone but me yet. I haven’t had the chance to make a second clown cat and take pictures of the process yet. I only have the pattern written for a bi-color hat and body for now but it would be pretty easy to convert to once color. Feel free to message me if you have questions about any part of the process and I can hopefully explain a little better! *instructions listed are specifically for a cat, but the ears, face, and tail can be altered to be a different animal. crochet the head as instructed below, embroider your desired face, and find a good pattern for ears you want. just make sure to use two strands of yarn and an H hook so the size isn’t off.
Materials: - 2 balls of yarn in chosen head color (white) - 1 ball of yarn in color A (½ main colors. I chose red) - 1 ball of yarn in color B (2/2 main colors. I chose yellow) - 1 ball of yarn in color C (1/1 accent colors. I chose blue) - Tiniest amount of yarn for nose (I used red for that classic clown nose look) - safety eyes (I used 12 mm, you can also embroider them or use buttons) - stuffing/wadding - H/size 8/5.00 mm hook - F/size 5/3.75 mm hook - bell (optional, for nose) - pompoms or buttons (optional, for body and hat decoration. I opted to make my own tiny pompoms because I didn’t want to buy any. Instructions are listed in this pattern) - embroidery thread (optional, I used thread to embroider eyelashes and mouth) - makeup or fabric paint + clean brush to apply (optional)
Abbreviations (US Crochet Terms): ch - chain sl - slip stitch sc - single crochet dc - double crochet inc - increase dec - decrease fo - finish off st - stitch
Special Terms/Techniques: Intarsia/Mosiac/Jacquard crochet - used for hat. Daisy Farm Crafts’ gingham blanket patterns explain the technique really well. Here’s a link! You have to scroll a bit to find the explanation. Popcorn/Bobble stitch - used to make pompoms on hat and body Ladder Stitch - Used to stitch parts together, join halves of body, and minor tailoring of the “hip” area.
Head (head color) x1:
*Use H hook **Head is worked using two strands of yarn at once
Worked in the round. Start with a magic ring
sc 6 in magic ring (6)
*sc inc in next stitch* repeat 6 times (12)
*sc inc, sc in next stitch* repeat 6 times (18)
*sc inc, sc in next 2 stitches* repeat 6 times (24)
*sc inc, sc in next 3 stitches* repeat 6 times (30)
*sc inc, sc in next 4 stitches* repeat 6 times (36)
sc in each stitch (36)
sc in each stitch (36)
sc in each stitch (36)
sc in each stitch (36)
sc in each stitch (36)
sc in each stitch (36)
sc in each stitch (36). Place your eyes between between rows 9 & 10, about six stitches apart.
*dec, sc in next 4* repeat 6 times (30)
*dec, sc in next 3* repeat 6 times (24)
*dec, sc in next 2* repeat 6 times (18). Embroider the rest of the face and begin stuffing.
*dec, sc in next stitch* repeat 6 times (12). Finish stuffing.
*dec* repeat 6 times (6). FO and stitch shut, leaving a long tail to attach head to body later.
Ears (head color) x2:
*Use H hook
**Ears are worked using two strands of yarn at once
Worked in the round. Start with a magic ring.
sc 4 in ring (4)
*sc, inc* repeat once (6)
*inc* repeat 6 times (12)
sc in each stitch (12)
sc in each stitch (12). FO, leaving a long tail.
Flatten into triangle and stitch to top of head. I positioned the ears between row 3 & 4 of the head and sewed down the side.
Nose x1:
*use f hook from this point on **use one strand of thread at a time from this point on
Worked in the round. Start with a magic ring.
sc 6 in magic ring (6)
*sc inc in next stitch* repeat 6 times (12)
sc in each stitch (12)
sc in each stitch (12). If you’re using a bell in the nose, add that now.
*dec* repeat 6 times (6). If you’re using stuffing, add that now.
*dec* repeat 3 times (3). FO and stitch shut, leaving a long tail.
Sew one or two rows below the eyes, directly between them.
Hat (colors A, B, and C):
*Intarsia/Tapestry crochet is used for this piece. A link explaining how to use this method is provided under “special techniques.” Brush up and practice if you need to!
Using color A, start with a magic ring.
sc 2 in color A. Switch to color B. sc 2 in color B. (4)
sc inc, sc in color A. Switch to color B. sc inc, sc in color B. (6)
*sc inc* repeat 3 times in color A. Switch to color B. *sc inc* repeat 3 times in color B. (12)
sc in first 6 stitches with color A. Switch to color B. sc in last 6 stitches with color B. (12)
sc in first 6 stitches with color A. Switch to color B. sc in last 6 stitches with color B. (12)
sc in first 6 stitches with color A. Switch to color B. sc in last 6 stitches with color B. (12)
sc in first 6 stitches with color A. Switch to color B. sc in last 6 stitches with color B. (12)
sc in first 6 stitches with color A. Switch to color B. sc in last 6 stitches with color B. (12). Switch to color C.
*sc inc* repeat 12 times. (24)
*sc inc* repeat 24 times (48). FO leaving a long tail.
Weave the end of color C towards the center of the hat, between the space where the hat ends and the ruffle begins. Sew the hat to the head, adding stuffing to the hat to make it stand. Pompom will be added later.
Because the hat is worked in the round, the colors may create a kind of swirl instead of a true half and half look. I chose to block my hat out by dampening it with warm water and twisting it until I was happy with the way the colors sat.
Arms (head color, A or B) x2:
*work first arm in color A, second in color B. Ruffles are worked separately in color C and sewn on
In Head Color, start with magic ring
sc 6 in magic ring (6)
*sc inc* repeat 6 times (12)
*sc inc, sc* 6 times (18)
sc in each stitch (18)
sc in each stitch (18). Switch to color A or B.
sc in each stitch (18)
sc in each stitch (18)
sc in each stitch (18)
sc in each stitch (18)
sc in each stitch (18)
sc in each stitch (18)
sc in each stitch (18)
sc in each stitch (18)
sc in each stitch (18)
sc in each stitch (18)
sc in each stitch (18)
sc in each stitch (18)
sc in each stitch (18). Stuff and FO leaving a long tail. Stitch the top shut and leave a long tail to attach to body later.
Arm Ruffle (color C) x2: ch 18, join to make a circle 1. sc inc in each chain (36) 2. sc inc in each stitch (72). Sl in next stitch and FO. Sew onto arm where body color meets color A/B.
Body (color A or B) x2:
*body is worked in halves and stitched together **body is worked in rounds for feet, then rows for chest/belly ***the “hips” of the body are angular due to decrease; I ladder stitched over the angles after stuffing and constructing to make the body look smoother on the sides
In color A or B, begin with a magic ring
sc 6 in magic ring (6)
*sc inc* repeat 6 times (12)
*sc inc, sc* repeat 6 times (18)
*sc inc, sc in next 2 stitches* (24)
sc in each stitch (24)
sc in each stitch (24)
sc in each stitch (24). Chain 5. Body is worked in rows from this row on.
sc in 2nd ch from hook and next 3 ch. sc in next 24 stitches. sc 4 in other side of ch spaces (32). Ch 1, turn.
sc in each stitch (32). Ch 1, turn.
sc in each stitch (32). Ch 1, turn.
sc in each stitch (32). Ch 1, turn.
sc in each stitch (32). Ch 1, turn.
sc 14, sc dec twice, sc 14 (30). Ch 1, turn.
sc 13, sc dec twice, sc 13 (28). Ch 1, turn.
sc 12, sc dec twice, sc 12 (26) Ch 1, turn.
sc 11, sc dec twice, sc 11 (24) Ch 1, turn.
sc 10, sc dec twice, sc 10 (22) Ch 1, turn.
sc 9, sc dec twice, sc 9 (20) Ch 1, turn.
sc 8, sc dec twice, sc 8 (18) Ch 1, turn.
sc 8, sc dec, sc 8 (17) Ch 1, turn.
sc 7, sc dec, sc 8 (16) Ch 1, turn.
sc 7, sc dec, sc 7 (15) Ch 1, turn.
sc 6, sc dec, sc 7 (14) Ch 1, turn.
sc 6, sc dec, sc 6 (13) Ch 1, turn.
sc 5, sc dec, sc 6 (12) Ch 1, turn.
sc in each stitch (12) Ch 1, turn.
sc in each stitch (12). FO and weave in end.
Stitch the halves of the body together with a ladder stitch. Stuff the feet to desired firmness. You should have about 24 total stitches at the top of the body where the “neck” is – it’s okay if you’re missing a stitch or two though. The neck ruffle will be worked directly to the top of the body and will be made in the round.
Join color C to neck.
sc inc in each stitch (~48)
sc inc in each stitch (~96)
dc inc in each stitch (~192). Sl in next stitch. FO and weave in end.
Tail (head color) x1:
*tail can be made longer or shorter. add or subtract repetitions of row 3 to desired length **i chose not to stuff the tail but you can if you’d prefer to
start with a magic ring
sc 6 in magic ring (6)
*sc inc* repeat 6 times (12)
sc in each stitch (12)
sc in each stitch (12)
sc in each stitch (12)
sc in each stitch (12). FO and leave a long tail.
Pompoms (color C) x4: *regular fuzzy pompoms or buttons would work just fine for this project but in case you don’t have access to either of those and don’t want to buy them, here’s a fast lil tutorial. it’s basically just one single popcorn stitch tacked into a sphere shape. ch 3 in 3rd ch from hook, dc 5 (5). remove hook from loop and reinsert in the top of first dc. insert hook in loop and pull through. ch 1, FO and leave a long tail. Sew your popcorn stitch into a sphere. I sewed the top of the stitch to the bottom chain, then the side of the first dc to the side of the last dc. Play around with tailoring your popcorn until it looks like a pompom.
Construction:
At this point, you should have a head (stuffed with eyes and mouth), nose, hat, two ears, body, two arms with ruffles on the wrist, a tail, and some pompoms.
If you haven’t already, stitch the ears, hat, and nose to the head.
Attach the head to the body using the long tail left after FO. Finish stuffing as you sew. I used a ladder stitch and aligned row 15 of the head to the neck opening since both have ~24 stitches. It’s okay if part of the neck ruffle is tacked to the head.
At this point, I tailored the “hips” of the body to be smoother. Originally it was pretty angular. I used a ladder stitch to hide some of the “extra” fabric on the hips. You can leave it if you choose, of tailor it to whatever hip shape you like.
Attach the arms to the body. I, of course, used a ladder stitch. The arms are sewn to the side of the body, right underneath the neck ruffle.
The tail is sewn to the back of the body. I chose to place mine towards the bottom, where color A and color B meet.
Sew pompoms onto your clown cat. I put one on top of the hat, then three on the center of the body like buttons.
Finally, add makeup. You can do any design you like! I’ve used fabric paint before but I don’t like the texture it has, so now I use cheap makeup and brushes. (Because I sell/gift plushies, the pallet and brushes I use have never touched human skin and are consistently cleaned but if you’re making a plushie for yourself, you can use whatever you have. Finish off with a little scotch guard if you want to protect the makeup or leave as is. Of course, if the plushie is being gifted to a pet or a child, don’t put makeup on it – embroider or use non-toxic paint instead).
That’s it! Now you have your very own clown cat (or other animal, if you decided to use a different head pattern).
Again, this pattern has only really been tested by yours truly and I haven’t had a chance to take pictures to go with these instructions, so if you run into any problems, go ahead and reach out to me! Happy crafting!
This pattern is available for free here because I don’t believe in gatekeeping crafts but if you’d like to show me some love, support my yarn habit through kofi!
1K notes
·
View notes
Text
Making Normal Channels in GIMP (with njob)
Hello everyone! I was explaining how to do this in the Sims of History discord server and realized how much of this process I learned through trial and error. There isn’t really a good step-by-step tutorial about how to do this in GIMP, only in Photoshop (at least no text-based tutorials). While I use both Photoshop and GIMP for various things, I prefer to make my normal channels in GIMP. This tutorial will walk you through the process and hopefully demystify normal channels in GIMP.
Normal channels (bump maps) add additional depth beyond your mesh, which is useful for things like folds, painted on pockets, and buttons.
This tutorial is particularly for how to make Create-a-Sim items, not objects, but a lot of steps should be transferable.
You will need (all free programs):
GIMP
njob
Sims4Studio and/or CAS Tools

First, open your diffuse texture in GIMP. I often try to use the light/base texture rather than one I have colored already, but if you have already colored it and didn’t save a base, don’t worry, it doesn’t make much of a difference. Don’t use an image which has a pattern applied to it, as that will create a bump on the pattern and appear like applique or something along those lines (unless that is your goal).
I recommend doing this step after you have tested your diffuse texture image and mesh (if applicable) in the game. If you have any last minute changes to either of these, you will probably need to re-do your normal from scratch.
If your image is in layers for recoloring, or not, choose to flatten the image. Transparency isn’t helpful in making normal channels, so get rid of it so you won’t have to worry about it later.
Once you have flattened it, the background usually turns either black or white. It doesn’t really matter which one, it won’t make much of a difference in njob.
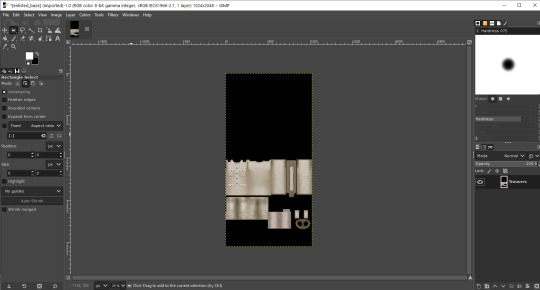
Now, select the crop tool. You can see the current dimensions of the image in the “aspect ratio” box. For a CAS items, the original will be 1024:2048, which is 1 x 2. We will need to crop the image into a 1 x 1, or perfect square.
To have your normal channel as high quality as possible, you should use 1024:1024. This will work for clothing items like full body outfits, tops, bottoms, gloves, socks, and tights (basically anything mapped in this bottom portion of the UV map). For all of these items, you must use a square and cannot crop it to be smaller. For shoes, this means a very large blank area.
For accessory items like jewelry and hats, the cropping is different. For instance, a hat would be 512:256. If you are unsure of the dimensions to use, export the normal channel on the maxis item and copy its dimensions. The following instructions will assume you are making a clothing item and not an accessory item.
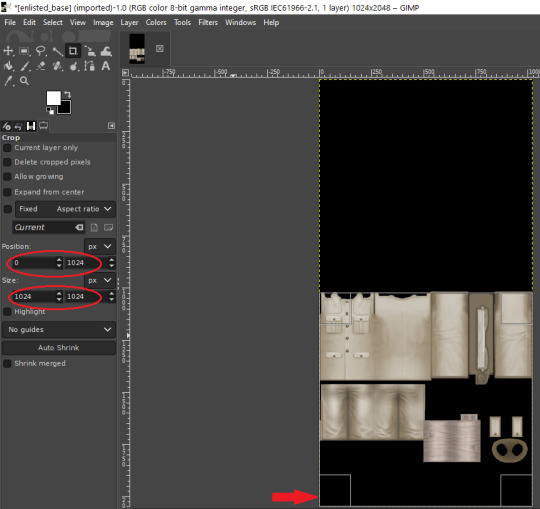
Click anywhere on the image while you have the crop tool active, then adjust your dimensions in the box to the left. You can manually type it in or drag the box and follow the size in the box as you drag.
The box should be perfectly aligned with the bottom and have no space below. If you have space below, just drag it as far to the bottom as you can. GIMP will stop you from dragging it outside of your current dimensions. If a little is sticking out at the top, that is okay. Nothing can be mapped outside of the 1024:1024 dimensions, so it is probably just bleed over or space filler that you are cropping off.
Press “Enter” on your keyboard to complete the crop.

Optional Step: If you desire, you may want to decrease the brightness and increase the contrast on your image so there will be more for njob to pick up. If you already have a lot of contrast, you may not need to do this.
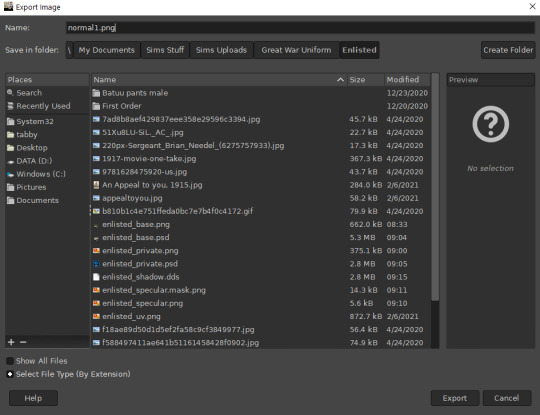
Next, export your image as a PNG or BMP. Be sure to not overwrite your original diffuse texture.
You can now close GIMP, though you will need to open it again later.
Open njob, then your saved, cropped image.
Maximize your screen so you can see what you’re doing.

Go to Filter > Diffusemap > Heightmap and select that option.
The screen will pause to load for a bit before opening up a new box.

Your image will convert to black and white and may look a bit strange. The first step is to change your “Course Detail” setting to the lowest (or close to the lowest) setting and your “Fine Detail” to the highest setting. I generally play around with the “Mid Detail” and “Scale” until I get what I want. Try to have what you want to be visible stand out, while folds should be soft and fuzzy but still somewhat distinguishable.
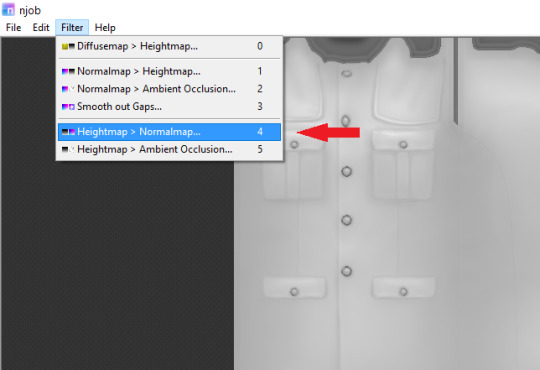
Once you have what you need, click OK and go to Filter > Heightmap > Normalmap

There are two settings, “Scale” and “Blur Radius.” Neither of them have “ideal” settings, so you will need to adjust as you need. “Scale” controls the depth of the contrast and “Blur Radius” impacts the softness of the image. If your edges are too harsh, your normal map may look odd in game.
You will probably also have lines in areas in no texture. This is normal, and I will go over how to remove those later.
Once you are satisfied with how things look, save the image as a bitmap.
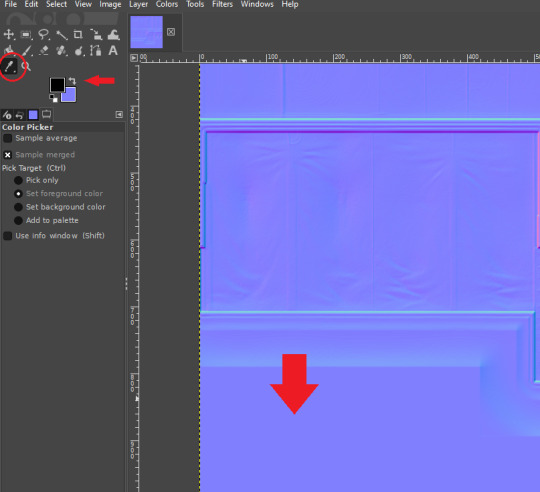
Now, open your bitmap image in GIMP. It is time to clean up the image and get rid of the artifacts. Unfortunately, unlike a specular, a normal map doesn’t have a mask to prevent bleed over onto skin or other textures. The unused areas need to be a midrange, solid grey. It is easier to edit at this step before you create your transparency.
Select a midrange blue color from one of the blank areas with your color selector and make it your background color by using the arrow button between the foreground and background colors.

Select the areas that should be blank and delete them, which will replace the lines with a solid blue color. This would be areas around the neck, wrists and ankles, and also places like the filler beneath skirts and tops that doesn’t need texturing. Be sure to select the odd lines around the image, which are usually a bright teal or hot pink color. Those can be very visible.
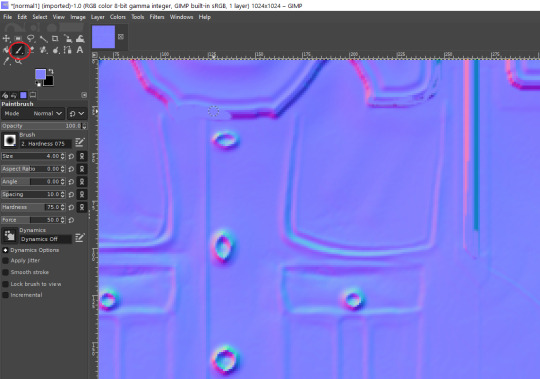
Sometimes, you may need to take your paintbrush and clean up the artifacts if they are in curved or very small areas. If anything looks too sharp, you can also use the smudge brush to smooth it out (very lightly). But don’t move anything around too much.
Once you have cleaned up your image, export it again as a bitmap. This is just so you can go back to it if you make a mistake later or need to modify it. Usually I save it as a new image, but you can overwrite the old one if you are feeling confident.
I have to point out that sometimes you can get away with not cleaning the artifacts from your image. But I have had too many issues with it in the past to skip this step.
Now it is time to make the normal map. Finally!

In the layers area, right click on your single layer and add an alpha channel to it. There is also a small button at the bottom you can use to add an alpha channel. You will need this transparency for the next step.
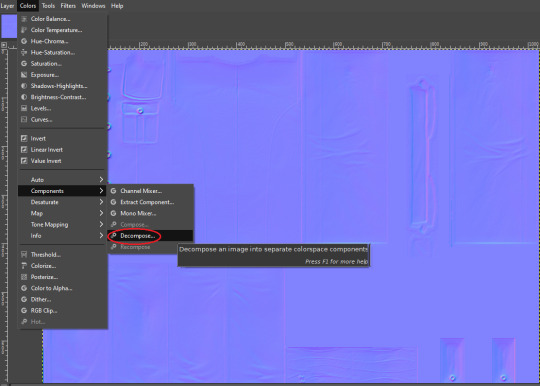
Next, go to Colors > Components > Decompose.

A small box will open up. Change your color model from RGB to RGBA to enable the alpha channel as a separate channel (layer).

Now, a new image will open that is your bitmap but greyscale. You will see four layers on the side called red, green, blue and alpha.
Select the red layer and click CTRL + A on your keyboard to select the entire layer. Then, click CTRL + C to copy the layer. (If you don’t have a keyboard, you can do “Select all” and “Copy” but this takes longer).
Now, go to your layer named alpha and press CTRL + V (paste) and CTRL + H (to anchor the layer). Now, you have replaced the alpha channel with the red channel.
Next, go to the green layer and select and copy it. Paste and anchor it into the red and blue layers, just as you did before with the red layer and alpha layer.

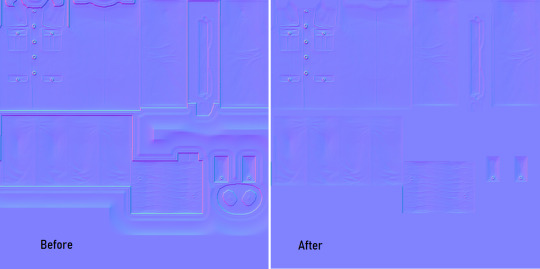
Your image won’t look too much different right now, it will just look like the green alpha channel rather than the visible red alpha channel when you opened it. Go back to the top bar and choose Colors > Components > Recompose. This will alter your original image, so the one you have open in layers will stay open. Go back up to the top and select the original image to go back to it, or close your layered image.

Now, your image should have changed from mostly blue to a transparent, mid-range gray with only a few elements visible. This is how it is supposed to look. If you don’t have transparency or it looks very different, then you probably messed up somewhere. Generally, I find it easier to go back to the original cleaned up bitmap (that you saved for future use) and start from scratch rather than trying to figure out where I messed up. That is usually faster.
Next, export your single-layer image as a PNG or DDS file (your preference). You will need a DDS plugin to save DDS files.
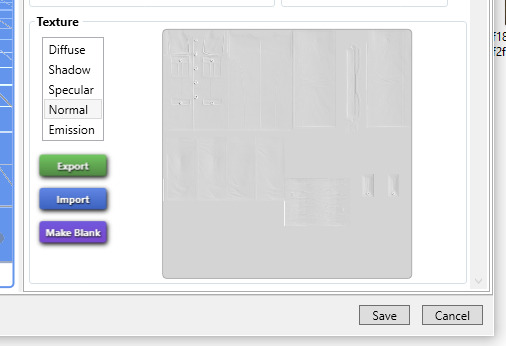
Open your item in Sims4Studio and import your new image file in the normal texture category. You will see a small preview in the box, which will probably show more details than you were able to see in GIMP. If it looks correct, save it and go to check it in game or in CASTools (which has a feature for previewing bumpmaps that can help you check for alignment problems). CASTools can be particularly useful if your computer doesn’t open the Sims quickly and you want to preview multiple bumpmaps. The only issue with CASTools is that it doesn’t really look much like it will look in game.
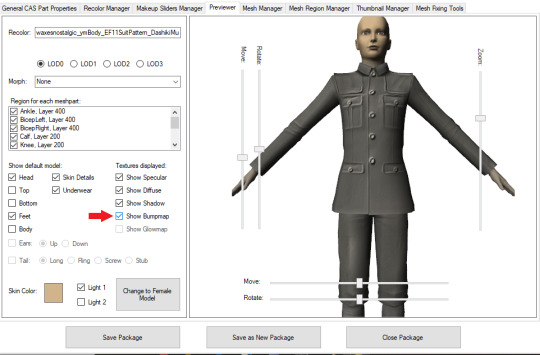
In CASTools. You have to select to see the bumpmap in the Previewer tab.
In game.
As I have only been making normal channels for a few months now, it’s possible I have missed some things, so if you know an easier or better way let me know and I can update the tutorial. I hope this is useful to you!
93 notes
·
View notes
Text
So you wanna be a king (pt4)
orrrr mayyyybe juuust cosplay one since that’s way less responsibilities
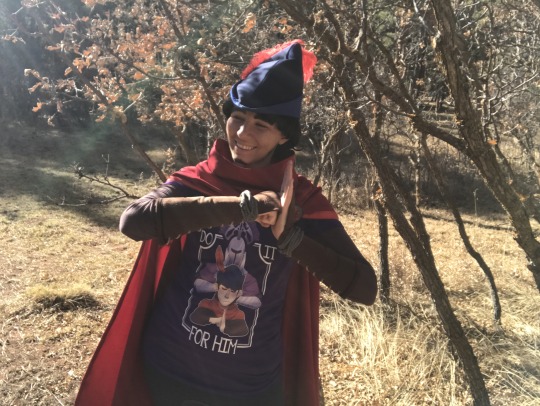
(incidentally, the fabbo shirt’s from redbubble, https://www.redbubble.com/people/midorilied/works/29739636-do-it-for-him-white-text, if @midorilied doesn’t mind me showing it off)
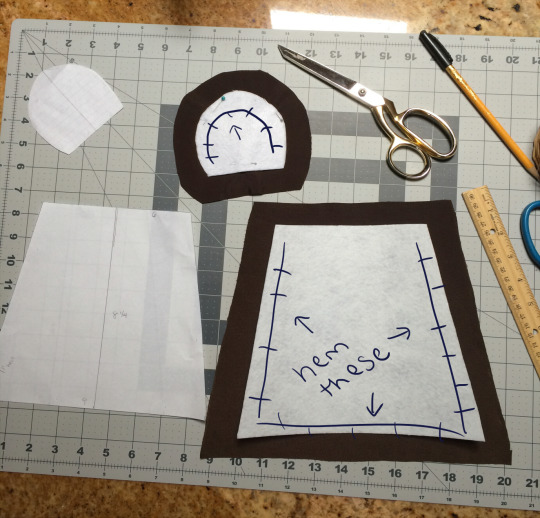
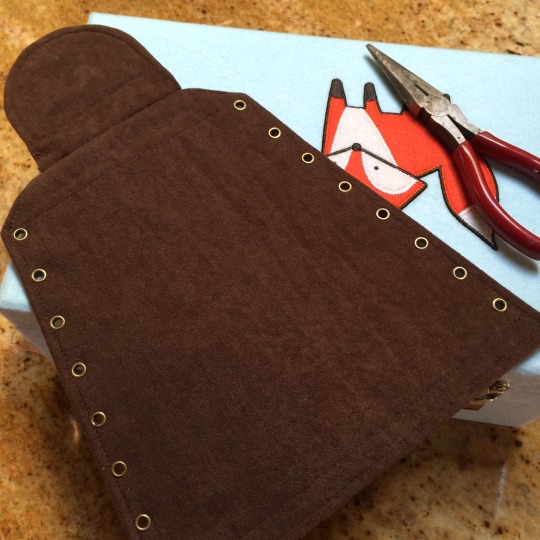
If you’ve followed along thus far then you should have a cloak, jerkin, pants and boots. A fully wearable Graham perfect for romping around the countryside. But it feels incomplete without the accessories, so let’s give those a try.
Part 4: Pouches n Bracers
(Again, these are all just suggestions and a How I Did It from a very novice cosplayer. Disregard all points, or take the ones you like. improvise adapt overcome)
Perhaps the best part about adventure games is the stuff. The bottomless inventory, a random assortment of strange things that all Do A Thing. Graham carries everything from money to badgers to literal humans in his pockets (presumably his mother is a seamstress trained by the gods).
This...won’t be you. Sorry.
Now, to be fair, I saw a Graham cosplay on tumblr (I’m so sorry, I don’t remember who--does anyone know?) who sewed pockets into their cloak, which is delightful and a very sweet idea!
However, I prefer the swoosh and snap of my cloak, and heavy things like cell phones in your cloak will alter the weight. Something to keep in mind as you decide how to manage your outfit.

(forgive the blur--I haven’t been able to get a still of what it looks like when swooshing. Perhaps now I’ve got real boots I’ll do another gifset of it)
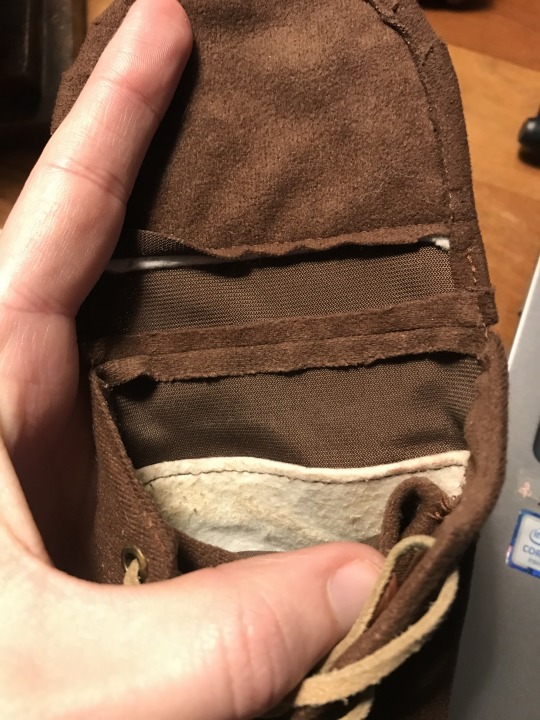
Thus, all my phone, money, keys, and backup freckles (e.g., liquid eyeliner) must live in Graham’s belt pouches instead of cloak pockets. Lord knows what Graham actually keeps in his pouches, game-wise. Squirrel snacks, maybe, to avoid repeating the fiasco from Tourney Day?
This time I followed a pattern. I know, weird, right?
I wanted functionality, but I wanted them to be slim and simple, too. I found a guy on YouTube, and he comes with a .pdf template pattern in his video description! It’s super detailed, easy to follow, and better than me rambling. https://www.youtube.com/watch?v=tPhQlaI_UX4
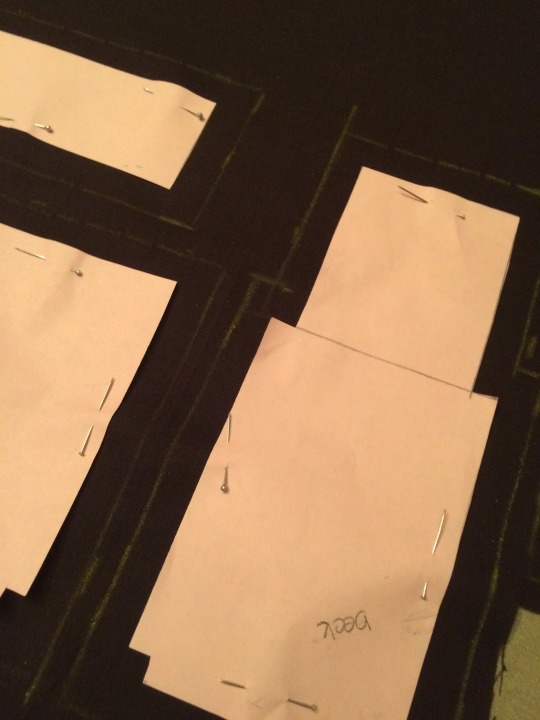
Three years later, they’re starting to look a touch tired. I used a plain dark brown fabric (was it broadcloth?). Half a yard is plenty. If it’s semi-close in color your your belt, ideal. I made two sizes, two large for phone and makeup for touchups, and one small for keys and money. The large ones are 3″ wide and 5.5″ tall, and the small one is 2.5″ by 4.5″, but size them to whatever important things must be on your body at all time.
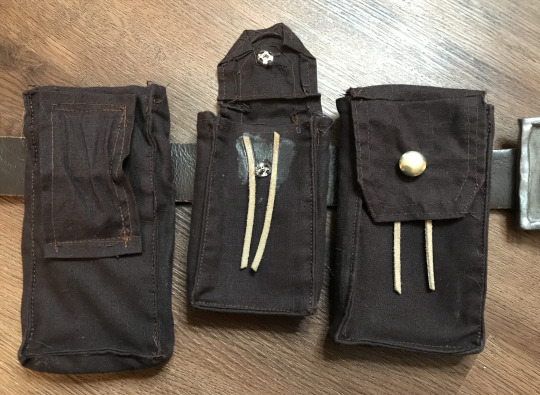
I added snap clasps to keep them shut (never know when you’ll be pounced by goblins, or trip over a crack in the sidewalk), and I found some plain silver buttons to sew over where the snaps sit--added bonus, hides my sloppy stitchwork. I took some of the leftover suede rope from the jerkin for the front--my ugliest secret is that it’s really horrible looking super glue dribbled everywhere. Hasn’t moved in 3 years, tho. /victory fist bump
I turned the corners of the front flaps so I wouldn’t have square tops. I didn’t trim off the excess fabric since I thought keeping extra weight in the corners would help keep the flaps down. You could always sew in another layer of something sturdier if you didn’t want the flaps to curl over time--it’s probably worth it. It does make a difference.

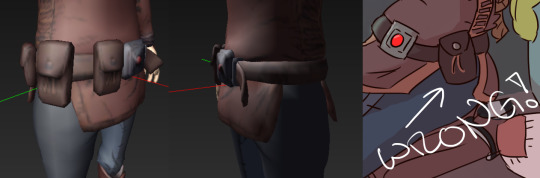
So, in doing this half-tutorial, I’ve just realized that Graham’s actual model has three pouches of various sizes on his left side only which means I’ve been wearing and drawing him wrong since day one. So. That’s cool. themoreyouknow.gif
(still not changing anything tho; I like keeping my phone on my right side)
Bracers!
Graham’s an archer. So, he’s got bracers on his forearms to protect himself. (presumably his rippling muscles are protection enough since he stops wearing them between his 30s and 70s.)

We have the same problem here as with the jerkin: the bracers seem practically sewn onto his arm. And that’s maybe doable, but I’m mortal, not digital, and I want this to be comfortable and also easy to remove. Now, unfortunately, my method loses the black bands he has on his bracer underbellies--they don’t seem to fit. If you have a nice solution, let me know.
Get yourself a ruler, paper, a scrap of elastic band, a sheet or two of stiff felt (probably like this stuff: https://www.amazon.com/Darice-Stiff-inches-5-Pack-FLT-0331/dp/B00KNAKJH6), and all the leftovers from your jerkin.
Measure around your wrist--mine’s 6″, so we’ll use that. Draw a 6″ line on a piece of paper, find the center of the line, mark it. Measure how long down your arm you want the bracer to go. I like 8 and a quarter inches myself (make it as long as you can without the bracer edge rubbing your inner elbow because that gets real old real fast). From the center mark of your wrist line, make a straight line down (a grid is helpful here to keep it straight). At the point where your bracer stops, measure around your arm: I got 9″. Find the halfway mark of your base arm line, add that to the paper. Connect the corners. It should look approximately something like this:
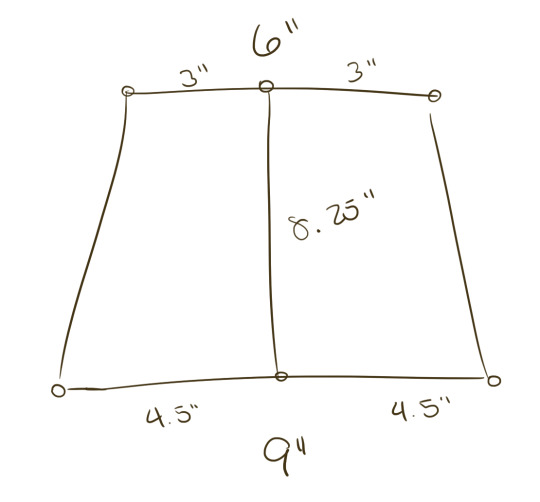
Cut out and test your design to make sure it’s comfortable (you want to forget you’re wearing these. keep them away from your elbow. f’reals). Cut the shape out of your stiff felt, and cut out your brown fabric leftover from your jerkin, with a margin all around so you can fold it over and sew (I did an inch I think, because I’m a coward). For the hand guard, I did half my wrist (3″), then measured my hand to see how high it had to be to just scrape the knuckle. For my hand, that’s about 3″, give or take. Curve it, test it, cut it out of felt and brown alike, and cut out some extra brown to cover the inside of the hand guard too, as you don’t want to see any white against your hand.
Fold the loose edges over the felt and sew it down along the marked places:
Make little snips in the hem of the hand guard hem as you go to achieve that tight curve.
I was nervous about combining the two pieces as I needed easy wrist flexibility. The two lines that aren’t hemmed I left “raw” and sewed the brown edges together as was, so that there’s no stiff felt against the wrist at all.
Another secret: my bracer grommets aren’t the same as my jerkin grommets--they’re much smaller, like 7mm, because I’d planned on making my jerkin with this smaller size earlier to replicate Graham’s tighter lacing but it didn’t work out--the larger ones from your jerkin work fine.
It’s the same process as the jerkin, too. Every inch from the wrist to the elbow gets a grommet, plus its corresponding partner. A-likea so:
The next part might be optional. I cut another piece of brown about the same size as the bracer body again, and sewed the edges along the inside, just past the grommets, so that when you wear the bracer, you don’t see the shirt beneath your laces. It also gives you a place to hide the loose ends of your suede rope once it’s tied into place. Probably optional.

Graham’s bracers have definition near the elbow, and I was annoyed that I couldn’t find a way to fit in the large black bands without messing up the simplicity of my pull on/pull off system, so to reference it I found thin black trim and sewed it along the bottom hem, just below the last grommet.

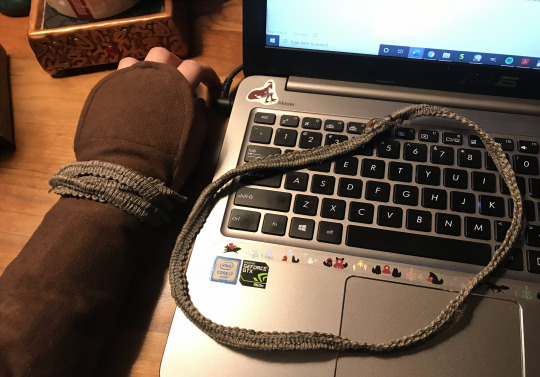
Okay, lace it with the suede rope and try it for fit. You may notice the hand guard is a bit unwilling to stay attached. Get the super glue, and--
no wait please don’t do that
let’s just make an elastic ring instead

My elastic was white: I colored it with a brown marker so it wasn’t as jarring if anyone caught sight of it. Sew it into your existing hemline, wherever it feels natural to wear it as a ring on your middle finger. A strip of fabric or trim might work as well, but the elastic makes it easy to pull on.
I desperately need to update my gray wristbands with real rope. This is trim, and I do not like it. But it was free, at the bottom of my cosplay bin, and I’m so tired of spending money on this costume.........anyway, loop the rope of choice three times around your wrist, sew it into a closed loop to avoid dealing with knots and bows, and tug the whole thing on and off over your hand. pls do not make it too tight.
And that’s looking like a proper cosplay. Just a few more accessories and also the hat. I assume everyone just wants the adventuring hat, but if there’s any interest in the crown, I could toss that in too, maaaayyyybbeeee?

#kings quest#King Graham#King's Quest#cosplay#midorilied#hey midorilied if you don't want your shirt in here lemme know i'll swap for a different picture#just two more to go~!#tutorial
14 notes
·
View notes
Text
how to custom color clothes (in vanilla!)
i recently became familiar with how to spawn completely custom colored fashion items in starbound and while it’s generally common knowledge by now and there are many guides out there on how to do this, i still wanted to write up a simple guide explaining the process of how i do it from the building blocks up + how to troubleshoot issues etc which should hopefully help some folks! a lot of my own friends didn’t know about /admin or /spawnitem so this will cover all the basics!
this is completely vanilla compatible as it is via the /spawnitem command, thus is NOT a mod, does NOT require save file editing, and is multiplayer friendly! you can also gift custom colored items between players and they will retain their colors, so you can make special colored clothing for friends if you want! i also explain how to do this without having to open up your game’s assets file
in order to do this, you will have to be comfy with using the /admin command in your chatbox. this will do several things such as making you invulnerable and making you able to spawn just about any item. you can turn it back off if you don’t want the effects to be permanent
introduction to /admin and /spawnitem
if you go into starbound and type /admin into your chatbox and hit enter, it will tell you something like “admin privileges now given to [playerName]” and grant you a ‘server admin’ status which will work in both single player, steam invite multiplayer, and in servers where the server owner allows players to do this (if you’re on a multiplayer server that doesn’t let you toggle /admin on you’ll have to talk it out with the server owner)
you will be granted immortality and access to some different fun commands like /timewarp and /spawnmonster, but the command we will be focusing on is /spawnitem which grants you the ability to spawn any item in the game (yes, ANY item. it’s so much power)
how to /spawnitem properly
/spawnitem works in a simple format:
/spawnitem [itemIDName] [number you want spawned]
so for example:
/spawnitem visorhead 1
will spawn a singular visor headpiece item! note that the item ID name there isn’t “visor” but rather “visorhead”-- while some items have IDs the same as the item’s name, many are named differently in the game files, and it’s that name in the game file that you need in order to spawn the item. luckily, you can easily find this by looking up any item on starbounder.org and scrolling to the bottom and looking where it says itemName
this is where we go deeper
so regular item spawning is all good and fun, you can collect all the hats in the world for free if you desired to plug itemNames into starbound for an hour straight, but on top of /spawnitem being a thing, starbound accepts additional commands tacked onto the end of the /spawnitem command which will alter the item further. these additional commands are known as “directives” and they primarily alter the item’s physical appearance
starbounder.org has a full list of every directive possible here but i will be covering the few i think are most useful for creating custom fashion items (ignore the part of the page that describes this as ‘modding’. it is NOT modding. it uses tools completely available to you in vanilla. it does not add mods to your game)
the basic format

/spawnitem itemName 1 ‘{”directives”:”?directiveYouwant=valuenumber”}’
to break it down: /spawnitem is the command you are telling the server to do. itemName is what the item you want is named within the game’s asset files. the number after the itemname is how many you want; leave it at 1 if you only want one but don’t delete it as you need at least a 1 to be there. the directives are in a set of apostrophes and curly brackets, directives is in quotes and it tells the game that you are using directives. then there’s a colon and after that, in another set of quotes, the name of the type of directive effect you want to use (like hueshift or brightness), and then = and basically a number representing how strong you want the effect to be
it’s really important to note that just like any other coding, you need to have complete symmetrical sets of brackets, apostrophes, and quotes. if your game tells you it can’t recognize your parameters or otherwise fails to spawn the item, make sure your words and numbers are in the correct brackets/quotes/etc and that the brackets/quotes/etc are symmetrical and in the right place and that you didn’t accidentally delete one or add an extra one in there
hueshift
/spawnitem visorhead 1 '{"directives":"?hueshift=180"}'
hueshift will change the ‘hue slider’ on your item relative to the number you plug into it, so for example hueshift=180 on a red item will turn it blue. you can use both negative and positive values like 45, -60, 90, 112, and so on! it will take some toying with
brightness
/spawnitem snowinfantrypants 1 '{"directives":"?brightness=-70"}'
also a ‘slider’, it’s very simple, it alters the brightness of your item. it accepts positive and negative values. so -70 will decrease the brightness by 70%. good for making already dark items darker! or already light items eyesearing if that’s your thing. you could do some neato pastel edits probably
saturation
/spawnitem visorhead 1 '{"directives":"?saturation=-100"}'
also what it says on the box, saturation increases or decreases the saturation of the item, and accepts both negative and positive values. -100 will completely desaturate the item and turn it black/grey/white for maximum emo effect. much higher values can turn you into a lisa frank nightmare
combining the above directives
/spawnitem snowinfantrypants 1 '{"directives":"?brightness=-70?saturation=-100"}'
if you want the darkest edgiest coat possible, or the most colorful pastel one imaginable, you can combine the brightness and saturation directives like so! (you can also add hueshift to this presumably, but i’ve neglected to in the premade code since it may look Weird to combine all these effects. if you want to add it in anyway just paste the ?hueshift=180 after the ‘100′ in the provided code, and make sure it’s within the quotation marks)
filters will only take you so far. we need to go deeper *matrix sfx*
there is an item directive much more complex than the others, known as the replace directive!
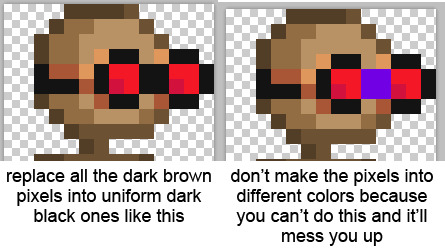
/spawnitem visorhead 1 '{"directives":"?replace;ffca8a=e6e6e6;e0975c=494949;a85636=313131;6f2919=121212;008cd9=d90000;60b8ea=ff0000"}'
what this directive does is tells the game to look at the image file for the item, find the hex color codes on the left, and replace them with the new hex color codes that you listed on the right. this includes parts of the items that are not dyeable!
note that there are some slight limits to this: imagine each different color in an item’s image is a “slot” for a dye. you cannot add more slots, and when you specify a hex color to replace, it will always replace ALL pixels of that color. for example, you can change the visor item to have a red lens, but you cannot have a rainbow lens because there simply aren’t enough differently colored pixels to replace there in order to make it have a rainbow look! you CAN make different colors all turn into the same color, you simply cannot add more colors to an item than there are by default
(if you want to make an item one singular solid color, try using the setcolor directive which is much less complex than the replace directive)
how to use the replace directive - step 1: formatting basics
firstly, the basic formatting is such:
/spawnitem itemName 1 ‘{”directives”:”?replace;OLDHEX=NEWHEX;OLDHEX=NEWHEX”}’
the hex color code you want to replace is always on the left, and the one you want to replace it with/your custom color is always on the right. you can add and subtract as many custom colors from this string as you want, so you can replace only one color or replace allll the colors if you like!
if you want to replace multiple colors, separate the OLDHEX=NEWHEX bits by semicolons, with semicolons inbetween all of them but NOT at the end of the very last one you add (so the OLDHEX=NEWHEX bit at the very end of the code next to the “}’ part should Not have a semicolon at the end of it, but the others before it should. like this:
/spawnitem itemName 1 ‘{”directives”:”?replace;OLDHEX=NEWHEX;OLDHEX=NEWHEX;OLDHEX=NEWHEX;OLDHEX=NEWHEX;OLDHEX=NEWHEX ”}’
a replace directive code that replaces only one color should look like this:
/spawnitem itemName 1 ‘{”directives”:”?replace;OLDHEX=NEWHEX”}’
how to use the replace directive - step 2: actually creating your custom item
(note: you can skip the wiki image hunting step if you have access to the game assets and can open up the actual .png file used within the game’s files. this can save you some strife later. i don’t do this because pak files scare me so i’ll use some workarounds for this)
first what you want to do is have some kind of image editor program on hand that at minimum needs an eyedropper tool and a color selector that tells you the hex color code of the color you select. i use photoshop and in this tutorial i use the new layer and filler bucket features in my method since that makes it easier for me. if your image editing program doesn’t have a layers or fill bucket feature you might have to get creative
now what you wanna do is look up the item on the starbounder.org wiki, and obtain the image for it of it on a test dummy, and leave the tab open because you’ll need its itemName later to put it into the code
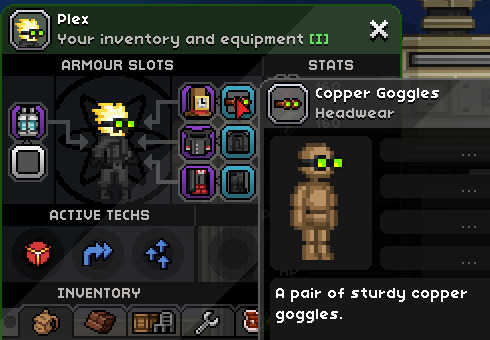
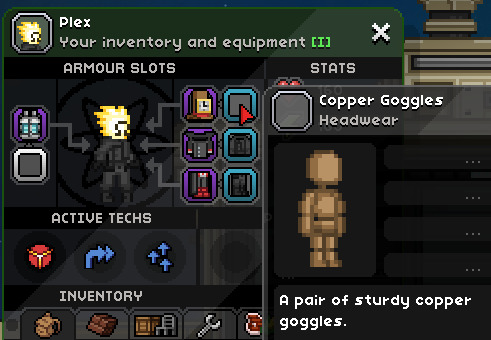
i’m going to use the copper goggles for this tutorial because they’re good looking but gee sure would be awesome if the lenses could change color!

whip open the image in your image editing program, duplicate the base mannequin image and make it a new layer above the basic one, and on the new layer go hogwild and use filler bucket or whatever to recolor the item to however you want, making sure you remember 1 color = 1 color and when you replace one color of pixel on the item, you replace all the pixels of that color
make sure to also ignore the mannequin underneath so you don’t get confused as to what pixel underneath is what (you can delete the mannequin’s pixels entirely if it helps)

i recolored the goggles to black and green as shown, with the gif on the left showing the difference between the base and the recolor!
time to CODE IT!
turning dreams into reality
you want to whip out your spawnitem code and begin the process of eyedropper-ing the hex color code of the color you want to replace, and then putting an = after it and then eyedropper-ing the color you wanna replace it with (from that recolored layer you made) and writing that down to the right of the equal sign
soooo for example:
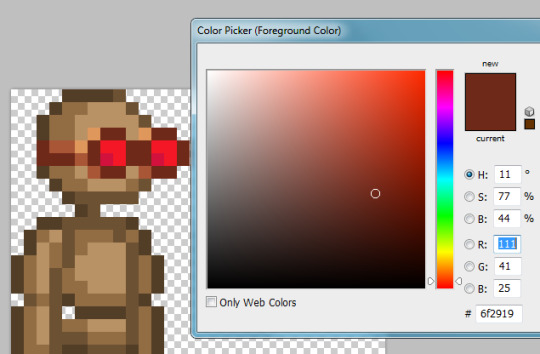
when i use eyedropper tool, i can see the darkest brown color of the goggles is hex color code 6f2919! this means i know that my code will start out like this (remember to edit in the itemName):
/spawnitem copperarmorhead 1 ‘{”directives”:”?replace;6f2919 =HEXCOLORCODETOREPLACETHATBROWN”}’
and now i use my eyedropper tool to find the color on the recolored version that will be replacing those darkest brown pixels...
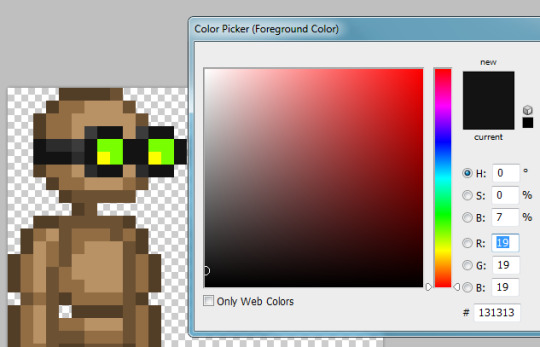
....which is 131313! so now i know that in order to spawn an item where the dark brown goggle color is replaced by dark grey, i have to make my code like this:
/spawnitem copperarmorhead 1 ‘{”directives”:”?replace;6f2919 =131313”}’
you will do this same process for the rest of the colors until every single hex color code you want to replace is listed out with its appropriate replacement!
note that since it uniformly applies the replacement, you only need to list out each color once-- you don’t need to list the replacements multiple times for each pixel or anything like that! ?replace; 6f2919 =131313 will automatically replace every dark brown pixel with dark black, you don’t need to go pixel by pixel or do ?replace;6f2919 =131313;6f2919 =131313;6f2919 =131313 or whatever. 1 color = 1 color!
in the end, my code ends up looking like this in order to replace all of the colors in this item:
/spawnitem copperarmorhead 1 ‘{”directives”:”?replace;6f2919=131313;a85636=2c2c2c;e0975c=3c3c3c;d3113d=fcff00;f41725=78ff00”}’
now just a copypaste and an enter key...
(NOTE: your custom item will spawn on your cursor. don’t spawn it underground or under your ship on accident. it will despawn eventually if not picked up but it’s still annoying if you spawn it ‘out of bounds’)
aaaand......
my item turned out perfectly!
if you got your item custom recolored to your specifications (NOTE: it may not be reflected in the items thumbnail but it will look fine in the actual item itself) you did it right and starbound didn’t fight you on it! congrats!
the game isn’t recognizing my code and my quotation marks are turning into squares??
some text editing programs do weird shit to quotes and apostrophes. including tumblr. try writing your spawnitem code in notepad instead or copypasting it into notepad and replacing all of the “ and ‘ whilst in there and that should do it (or just rewrite them within the game’s chatbox itself)
the game launched a HOMESTUCK REFERENCE at me instead?!
you typoed the itemName or used an otherwise incorrect itemName so the game gave you a generic filler item instead! check that your itemName is correct and matches the exact itemName on the wiki! remember that it is case sensitive
my item turned COMPLETELY INVISIBLE or the game yelled at me!!

whoops, congrats on accidentally making an invisible item even though there’s a much easier way to intentionally do that!
if either of these things happened to you, there’s likely an error within your code itself somewhere. double check that all the brackets, quotes, and apostrophes are symmetrical, in the right amounts, and that you didn’t stick an extra one in there or delete one on accident. make sure that the semicolons are between your oldhex=newhex bits but that there isn’t an extra semicolon on the last one before the final quotation mark. make sure you didn’t accidentally insert a space anywhere
oh god my item somehow changed colors (probably to a weird coppery brown) and only some bits got replaced!! why is it doing this, why is it changing colors help me!!
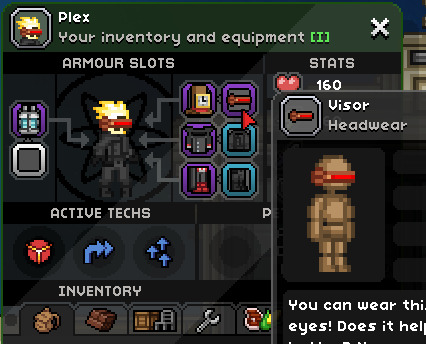
(note: i used the visor as an example here instead of the goggles because i had no issues with the goggles but did have problems with the visor before a kind soul on a starbound discord i’m in enlightened me as to why this issue happens. i will be talking about the visor but this troubleshooting process is applicable to any item that mysteriously gains new unreplaceable colors when you try to spawn a custom colored one)
this is gonna be the BANE of anyone not directly using the .png’s found in the asset files and using the wiki instead. don’t worry, it’s fixable, it’s just a pain in the butt and it will happen a lot. you will end up spawning a lot of items as ‘beta tests’ only to correct their colors again due to this issue
essentially, sometimes in starbound, the colors that an item has by default are not actually the colors that the .png file the game assets have. for example, here’s what the visor looks like by default when you equip one you found normally in a chest or whatever:

bbbuuuut that’s not actually what it’s file in the assets looks like. those coppery brown colors are the SECRET COLORS that exist underneath the grey. the file in the assets is what your game is going to look at to try to use for the custom colored item, and when it does that, instead of seeing the grey hex color codes from wiki, it will see the coppery brown hex color codes from the assets file. you told it to replace those grey colors you see, but the game doesn’t see any grey colors in this file! it only sees coppery brown ones! and you didn’t tell it to replace the coppery brown files with anything, so it’ll leave those intact and ignore the command to replace the grey colors that don’t actually exist on the item
what you want to do is grab a screencap of the Failed Beta Test item (NOTE: remember to turn off f.lux or sweetfx or any other program that will alter the color of your screencaps), and use the eyedropper tool to find out what the hex color codes of those ‘unreplaceable’ colors are:
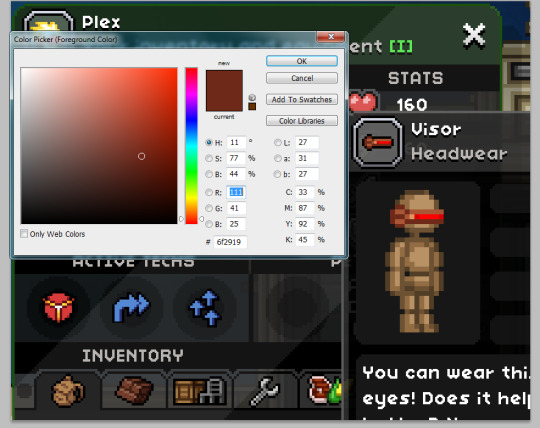
when i was making this visor before, i THOUGHT that the hex color codes to replace for the grey bits were 373737, 7b7b7b7, and 6b6b6b. it turns out that the hex color codes for those bits in the game files are, in same order, 6f2919, a85636, and e0975c!
this means that if my code looked like this before, with errant hex color codes bolded:
/spawnitem visorhead 1 '{"directives":"?replace;6b6b6b=494949;7b7b7b=313131;373737=121212;008cd9=d90000;60b8ea=ff0000"}'
...it should be corrected to this instead, with the corrections bolded:
/spawnitem visorhead 1 '{"directives":"?replace;e0975c=494949;a85636=313131;6f2919=121212;008cd9=d90000;60b8ea=ff0000"}'
so instead of telling the game to correct hex colors that it doesn’t think exist on the item, you are now telling it to replace those pesky copper brown colors that it DOES think exist on the item and now can properly replace because you’ve given it the direction to
..aaaaand that should sort most things out!
coding this stuff can be FUSSY so there may still be errors and whatnot! i am not a coding expert but if you CANNOT get something to behave then feel free to shoot me an ask! happy recoloring!!!
(while you’re at it, if this guide isn’t enough for you, check out https://silverfeelin.github.io/Starbound-Hatter/ which can create text commands to generate FULLY custom hats. supposedly. i haven’t tried it)
74 notes
·
View notes
Text
Torontos Evelyn Chick Is Creating a New At-Home Bartending Experience for Socially Distanced Cocktail Enthusiasts

Evelyn Chick’s visionary ethos is centered on building (socially distanced) communities and inclusive spaces. She’s honed her skills in the two Cosmopolitan cities of Vancouver and Toronto, where she’s worked at a multitude of businesses — from event spaces such as Blue Water Cafe in Vancouver, to high-volume cocktail bars and fine dining restaurants like Toronto’s Bar Raval and Pretty Ugly, both of which placed Top 10 in Canada’s Best Bars for two years in a row.
With 13 years of experience in the hospitality industry so far, Chick has held numerous roles. Presently, these include beverage director for the Donnelly Group; Canadian coordinator of Speed Rack, an all-female charity competition focused on speed bartending; and, most recently, founder of Evelyn Chick Projects (EC Projects), which launched in May of this year.
Plenty of praise and accolades have accompanied her professional life. She is a WSET-certified sommelier, a certified specialist of spirits, and global champion 2015 of the Beefeater MIXLDN cocktail competition. (Her signature drink, crowned champion at the MIXLDN competition, was called “Endless English Summers,” an homage to a classic Gimlet offering an intoxicating melange of Beefeater London Dry Gin, fino sherry, a Green Park Cordial made of pomelo, fennel, caraway, and salted absinthe.)
Chick’s distinctive flair for crafting creative sips that span cannabis cocktails to zero-proof serves are central to EC Projects, a digital education platform bringing her wellspring of wisdom into people’s homes through livestream classes and virtual workshops. In building this digital hub, Chick says she is all about facilitating an accessible and fun environment where “cocktail-curious” novices can feel free to ask questions, to maximize their learning enjoyment without feeling judged or intimidated. Additionally, Chick recently signed on with Quell, a hospitality agency that represents a roster of talented BIPOC industry professionals. The company is helping her juggle numerous projects on the go, and aligns with her belief that sharing a passion for drinks, food, and bespoke experiences can be achieved through continued diversification of the community at large.
In advocating for equal representation and opportunities, Chick continues to champion for a more robust cultural climate of drinks inclusivity. Her ability to facilitate an ongoing dialogue of what it means to enjoy both alcoholic and non-alcoholic drinks in this ever-shifting landscape only serves to further spark her inventiveness, and cement her place as a beverage leader. Below, Chick shares these thoughts and her affinity for pioneering dynamic drinks in the interview below.
1. What are you doing currently within the drinks industry?
At the moment, I am the regional beverage director for the Donnelly Group in Toronto. In the pandemic, I founded EC Projects, a creative hub for drinks enthusiasts. Additionally, I’m the bar & beverage curator for Restaurants Canada, a national association that serves the needs of the food service industry; and bartender-in-residence for a publication in the city called Toronto Life.
2. Can you share with me the genesis of you founding EC Projects?
The biggest question I get as a bartender is, “How did you come up with stuff like that?” — in terms of developing a cocktail — or, “I have this ingredient at home … how do I use it?” Evelyn Chick Projects is an approachable guide to bartending techniques and artisan recipes for the at-home drinks enthusiast. It started as a passion project for a way to connect with consumers and show them the creative side of the hospitality industry. It explores more than just “this is how you make a drink,” but digs into thoughtful ways in which home bartenders can use ingredients readily found in their pantry or fridge, easy uses they hadn’t considered before with them, and how they complement spirits. It evolved into a cool way for drinks enthusiasts to explore new techniques and recipes through virtual learning and experimentation, all from the comfort of their own home! Everyone had to pivot during the pandemic, so bringing elements of the bar to a digital form makes sense!
For instance, in one session, I used the entire banana (including the peel) to make a food-and-drink-paired recipe. It featured a Banana Chocolate Mug Cake and Caramelized Banana Peel Syrup which I used as a sweetener in an Espresso Martini that was fortified with Bacardi Ocho. This Low Waste project is one of the many subjects I explore in my easy-to-follow recipe series from EC Projects. For more information about tailored classes (one-on-one and group), recipes, tutorials, etc., I encourage everyone to visit my website for more information.
3. With such a diverse portfolio of experiences, what’s the coolest thing you’ve gotten to do in your role(s) so far?
As a Beverage Director for the Donnelly Group, I get to connect with guests on a personal level and share in their passion for learning about spirits, cocktails, etc. It’s all things that come natural to me. Due to the pandemic, I’ve also been able to share my expertise online and connect with a larger global network — which is pretty cool because I’ve missed engaging and interacting with people.
Additionally, in building a name for myself in the industry over the years, I’ve been able to reach audiences beyond the small/local cocktail community. In one instance, I got to curate beverage educational programs for large-scale conferences like the Restaurants Canada Show (Canada’s largest hospitality trade show), bringing a passion for drinks to folks who aren’t directly involved and/or wouldn’t think they would be interested in this side of the industry. I’ve created classes for people who are avid drink enthusiasts but don’t normally have access to the “how-tos” in the hospitality industry. Take, for example, my hosting a virtual cocktail hour for lawyers from a large firm based out of multiple countries across a few time zones, all enjoying the same drink.
4. How have you continued this community building with your businesses and respective roles in the pandemic, especially when it has uprooted and altered the lives of many people?
Evelyn Chick Projects is undoubtedly a product of the pandemic. Without our venues (at the Donnelly Group) open, I had to find a way to preserve that little bit of connection I had in the beverage industry. So for me, building this personal brand during an unprecedented crisis was a huge learning curve; it’s very different when you reach out to potential clients and represent yourself as “the brand” versus repping my position within a company that has buying power. While it was a challenge, I was incredibly excited about it because I had never pursued something of this nature before.
Prior to this, I worked to build up different companies my entire life. This is the first time I’ve created for myself. It’s almost like announcing to the world and saying, “Hey, this is my expertise, this is what I’ve worked on my whole life, and I’m putting it all out there.” I’ve discovered that you almost have to reinvent yourself, think outside the box, and showcase what you can offer as an individual to set yourself apart from the “other you” (e.g., the one repping company brands), if that makes sense. At first, I had doubts all the time about the likability of my content, whether or not I’m justifying what I’m presenting, and whether or not it’s been enough. But so far, the response has been overwhelmingly positive and supportive. It’s a continuing journey of navigating the social network(s), gaining exposure, and telling my personal brand’s story. While there’s a lot of talent, and to set yourself apart is not the easiest task, it’s been an incredibly rewarding venture so far.
5. Have there been additional challenges you or your businesses faced since Covid-19? How did you address it?
In wearing my beverage director hat (with the Donnelly Group), with the world filled with uncertainty, the toughest thing has been keeping my staff informed of the ever-changing situation. We try our best to stay connected with staff (e.g., via Zoom chats) and keep one another posted of any learning opportunities, foster ongoing positivity, and offer each other any prospects that could help them survive the lack of work available. For instance, any time we stumble upon government aid updates, resources from local nonprofits geared toward our hospitality industry, brands that have reached out to support us, or anything just beyond their reach, I’m there to help facilitate dialogue between these channels.
6. What’s a significant shift your business has made in the last six months that you had never considered before?
Altering the business model completely as a restaurant and bar for Pretty Ugly. We’ve had to learn to be flexible in terms of how service should run, and the magnitude of precautionary measures we have to take just to open the doors. There were a lot more considerations to put into practice, such as ensuring the whole space was socially distanced; training staff who are used to nightlife service to shift focus on what to pay attention to in this “new normal” (e.g., health and safety protocols); and exploring alternative options to recoup the loss of revenue from being in lockdown, like takeout, delivery, and cocktail kits. Despite all of these shifts, we remain optimistic: Any obstacle can be overcome, it just may take a bit more time to achieve it!
7. In light of your recent announcement of being repped by Quell (a hospitality agency that represents BIPOC industry professionals), I’m wondering: How are you using your position to push forward on racial equity in the industry?
Both personally and professionally, I’m blessed to have multiple platforms — events, virtual classes, social media — to voice my opinion in matters involving race, diversity, and inclusivity. I am constantly learning from my BIPOC peers, their personal and collective experiences, [and] trying to understand and empathize with situations that they may have come across. Moreover, I have zero tolerance for anyone who makes remarks that are intended to be sexist, racist, homophobic, transphobic, xenophobic, whether internally with staff or externally with patrons. These individuals are made to know that their school of thought is not welcome anywhere.
For my BIPOC peers, I’m not only appreciative of their candor, but use these as teachable moments for our own establishments. For instance, at the Donnelly Group, we have hired external help to set up a diversity council, whose protocols are currently under development, ensuring that our hiring and training practices are inclusive, respectful, and empowering. Everyone should feel safe and welcome to share in what I consider to be these essential community hubs together.
In the interim, I’ve hosted numerous virtual round-table panel discussions called “Initiating Change: Global Hospitality Through a BIPOC Lens,” which delves into many issues regarding the topic of race in hospitality. For example, identifying existing structures, as well as systematic and operational biases we need to change. For those who are interested in learning more, you can find previously recorded and upcoming sessions on my IGTV channel.
8. Looking forward, what opportunities do you see for your business to grow?
There’s lots of room in curating fun virtual experiences at the moment. Thinking beyond classic drink creation and traditional pairings, I’d want to bring something that promotes social gatherings, but in a responsible manner. My ideas include wine and food pairing workshops, showcasing the versatility of one ingredient and using it in numerous ways, cook-along sessions with booze, and a sober-curious rave that’s set to live DJ-spun tunes.
There’s also great demand for unique initiatives that have to do with health, wellness, and moderation. As an example, I’ll be guiding and informing such curious people on how to craft non-alcoholic beverages (that aren’t boring!). There’s a fantastic Spiced Carrot Ginger Mule I’ve made that features spiced chili cinnamon syrup, some fresh lime, and soda, with the buzz from the spice. For those interested in making this recipe, you can find the video link here.
Additionally, with the legalization of cannabis in Canada, there are ways to bridge the world of cannabis and (non-alcoholic) cocktails, educate consumers on these types of drinks; and opportunities to pair terpenes with global cuisines. These sips not only taste delicious, but facilitate much-needed conversations to help remove the stigma surrounding that industry. One drink I’ll highlight is my THC tonic that has notes of pine, earth, and wood from the terpene pinene I use. I take a thoughtful and methodical approach to creating this drink by first identifying the terpenes that the cannabis concentrate bring, then introducing flavors that complement those aromas. It’s very much like an art form, and similar to tasting a spirit or a wine and picking out flavor associations, all while being aware of dosage.
Overall, many businesses have had to shift their goals and perspectives, and the drinks industry is no exception — we’re all learning to cater to different demands. It’s a trying but very exciting time.
9. What’s your long-term vision for your brand?
The goal for Evelyn Chick Projects is to connect people from different industries, walks of life, race, religion — through the shared passion and enjoyment of everything food and drinks — together, but virtually. For the time being, it’s kind of hard to pinpoint exactly what this can look like as EC Projects is very much a fluid, approachable, global, and online brand. With that said, I would like to get to a point where one day, the only barrier between myself and connecting with other food and drink collaborators are dissimilar interests — and I would bridge this divide.
Since everything is going virtual through apps such as Zoom, Google Hangouts, House Party, etc., the possibilities are endless. A cool example I can think of is if a bar from London, England would have me host virtual sessions with their guests and collaborate on a cocktail kit they can follow along with. It’d be such an invigorating opportunity for both parties because we’d inject our respective cultures and thoughts into the process. But this would only be the beginning — it’s just one very small part of what this is about. Ultimately, it’s about creating and uniting a global network of drink enthusiasts beyond the “traditional” confines of a bar, curating incredible experiences that transcend time and space.
The article Toronto’s Evelyn Chick Is Creating a New At-Home Bartending Experience for Socially Distanced Cocktail Enthusiasts appeared first on VinePair.
Via https://vinepair.com/articles/ec-projects-evelyn-chick/
source https://vinology1.weebly.com/blog/torontos-evelyn-chick-is-creating-a-new-at-home-bartending-experience-for-socially-distanced-cocktail-enthusiasts
0 notes
Note
Wow you look awesome!!!! Absolutely awesome... I am a Gender-fluid and was wondering do you have any tips? I really want to pull off the look that you do, but I never quite seem to hit the nail on the head like you flawlessly did. No pressure though! Love the blog tmnt 2012 May have gone down the toilet but your canon I can get behind! Stay cool!
eyyyy sure dude, i got a few.
almost all of my clothing is quite loose. this is partially bc tight stimulation makes me want to claw my skin off most of the time, partially bc loose clothing leaves you lots of obscuring fabric to work with. if you have a smaller figure, it’ll usually hang on you in a way that hides everything between you and your hips, and make your legs a bit of a question mark as to how they look.
if you don’t, then maybe wearing more hoodies and larger shouldered jackets would help you. i have a sister who has wider shoulders than me and i tend to steal her coats bc of this; they make my figure very masculine seeming.
and if you’re able to, (now mind this is also bc i hate the sensation with all my being), not wearing bras that push up or emphasize your cup size also really helps to add ~mystery~ to your body’s sex. i have relatively a small one, so i can get away without wearing a bra at all almost every day, but if you have a larger cup size and do need the support of that, wearing a cloth bra/sports bra is good! it supports your chest buddies without making them super prominent + is comfy. :D
for general aesthetics, hit those earth tones or black/grey shades or just any sort of “gender neutral” sections of color. i think gendering colors is stupid, but we have to play society’s game of binary gender bs to a point, so. buying from men’s sections is both cheaper and helpful to becoming more androgynous; some quick alterations to the sides if you have larger hips should solve any discomfort there, just slit the sides and stitch up the edges (and if boobs are the issue here, sports bra+larger size of men’s shirt. shoulder work, but find more tutorials on this if it doesn’t). and while majority woman sections are overpriced and usually not even close to gender neutral, there are stores out there who carry outfits that aren’t blatantly feminine, so never turn up your nose completely to those sections (especially if you’re the sort who enjoys being feminine some days).
and: boots, sneakers, and hightops are the zone of Gender Neutral Shoes, bc everyone wears those. with the addition of most hats and scarves.
as for makeup things and grooming, try to find the look that hits the middle point best for you. i look a nice even mix of feminine and masculine with my hair back in a braid, and i don’t do anything to my face except wash it and maybe pluck my eyebrows now and again. try different hairstyles until you find the one that gives you what you want. and, if you wear makeup regularly and enjoy that route, hit up some tutorials on youtube about contour and gender mystifying makeup looks.
final bit of advice: you are always androgynous, fluid, or neutral with your looks if you define it so. society’s rigid gender binary is a social construct and, shockingly(!!), absolutely optional. i used to abhor the color pink until i grew up and realized its Just A Nice Color, and the idea of it being feminine was only rooted in what everyone around me thought. i still don’t wear it, but it looks good with my icons.
your genderqueer identity is always valid and how you present it is completely up to you. no one else’s opinion of it matters. it’s all on you.
hope this was helpful. C:
#gender#nonbinary#genderfluid#gender queer#agender#fashion tips#i would offer makeup tips but hahahaha#i have none#the most i've ever done is eyeliner and lipstick#that's it#ask the writer
19 notes
·
View notes
Text
More Principles + Flour Sack Exercise
01/10/2019
Task 1
In today’s session, we learnt about a few more principles, followed by some exercises involving a flour sack. We were first introduced to the principles of strong posing and line of action. Strong posing helps to tell a story, and can add personality to and otherwise simple character or object. Some key things I now know to think of when giving a character strong posing is to investigate real world body language to use as reference and then push it further and exaggerate to make it more expressive. Another rule to follow is to try and avoid symmetry, as that creates a more bland character and doesn’t allow much room for expression, except for maybe the face; by making a character asymmetrical it can help push different emotions with having to express it through the face alone. An example we looked at for strong posing is the Pelican from Finding Nemo, who, when telling Nemo the adventures of his dad, is very expressive and uses exaggerated body language to come across more excitable.
Next we looked at line of action, which directly assists strong posing. A line of action is an imaginary line that is the leading force of a character’s motion and body language. A good line of action should make a character’s pose more dynamic and alive. We were then tasked to take these principles and apply them to a flour sack, in attempts to give an otherwise boring object emotion and character. The flour sack is a great tool for an animator, as it allows you to play around with the shape/weight whilst still retaining a simple character design.
[picture]
A flour sack can be made from simple shapes (a cube on top of a sphere) and so is a great place to start when experimenting with solid drawing, which is to say making a 3D object on a 2D plane. We were given a list of emotions to try and convey using the flour sack whilst still applying strong posing and line of action. However, I found this task to be quite a challenge, and was only able to produce a couple of ideas before having to move on. I think this is down to the fact that I can be quite a perfectionist, so when something doesn’t come out exactly how I saw it in my head it knocks my confidence a bit. Although, even with the little ideas I did manage to put onto paper, I was somewhat happy with the results I got.
Task 2
In the second half of the lesson we were introduced to the principles of anticipation and follow-through, which almost go hand in hand: anticipation being the build up towards and action, and the follow-through being the result of an action. Anticipation is used to imply a gathering of force and energy, which is required to make an action happen, and so prepares the audience for said action, by giving them a visual clue, thus making the movement more realistic. An example used in the ‘Alan Becker Tutorial - Anticipation’ is when someone is punching someone: before the action of punching occurs, the character may first reel back with their fist to make a more powerful and lifelike punch. As with the anticipation of an action, energy is also required to stop something from moving. For example, even though the primary object has stopped moving, parts of the object may and often continue to move, particularly something lightweight, such as a feather on a hat, as in the ‘Alan Becker Tutorial - Follow Through’. An example of these two principals working together would be a pitcher throwing a baseball: the pitcher reels back to create energy, and then essentially thrusts his whole body forwards in order to exert that energy when throwing the ball, causing his leg to come off the ground.
Off of the back of this, with our remaining session time, we were tasked with creating an animated sequence on F12 paper of a flour sack jumping across the screen and landing, with a keen eye on anticipation and follow through. This was another exercise that took me a second to get my head around but I was pleasantly surprised with the final outcome. As with the bouncing ball task, I created a guide for the path of action, created with an arc, that the flour sack would be following. My process of drawing this animation was quite erratic, probably due to the fact that I wasn’t really sure where I was going with it, constantly making subtle changes that would alter the outcome. Although I wasn’t too confident in this task, I still took the opportunity to challenge myself, in the means of making the flour sack do a flip in the air, as I thought this would give me reason to include a more expressive follow through, almost falling over at the end. I managed to integrate anticipation both at the start of and throughout the animation, using an initial squash at the beginning, to build up to the jump, and then again towards the peak of the arc, where the sack begins to curl up, which anticipates the forwards flip. I also used incorporated a stretch on both the ascension and decension of the jump, paying attention to the volume of the object.
If I could improve upon this animation, I would go back and add more inbetweens to make it more dynamic as I feel like the action of the flip goes too quickly, and there wasn’t enough build up in the anticipation stage to elicit such a powerful jump. Overall I am quite happy with the final outcome, which can be seen below.
youtube
0 notes
Text
Introduction to Digital Music Techniques: Final Assessment
For the final assessment, I chose ‘option 3,’ that is, to extend my “cataplexy” inspired piece from the first assessment. I chose this because for the first assessment I was unable to sing (due to Laryngitis) and it forced me to explore a genre/style and techniques that I have never considered before whilst writing or recording my music. I found it really enjoyable to create something so different but still somewhat pleasant to take in (from my point of view). After making this decision I began binge listening to so many different sub-genres of EDM, ranging from deep house to Psychedelic trance. I listened to several tracks by Armin Van Burren, Bryan Kearney, Gorgon City, Above and Beyond and many more (EDM mixes). I did this not only to get some structural insight and understanding of contrast with smooth transitions but to listen out for techniques and effects that are prominent in EDM. Like the previous two assessments, I completed this piece using Logic Pro X in the Studios (1025) at the Sydney Conservatorium of Music.
INTENTION:
With my original piece I completed for the first assessment, I wanted the track to lean more toward the sub genre of ‘deep house’. But this time around I really didn’t want to be limited, as I was inspired by the wide range of EDM I had been consuming. But before even considering the ideas I had for the two new sections, the first thing I wanted to do was to rectify that which was suggested in the feedback for the first assessment.
SECTION B REVAMP:
I began with section b, adding a few cross-rhythms and slightly spicing up the MIDI drum track with a pitched rhythmic movement (MIDI sound called animated swirls which I looped playing two chords) to accompany it. This allowed me to create more interest whist still staying true to my ‘breakdown/simple drum’ vision for section b from the first time. I also added panning in the ‘breakdown,’ where the only thing that is present is the chords and hi-hat (build up). I then added a melody, hitting record once I completely improvised and just ran with it! I didn’t hesitate to quantise this though, I used several plugins and effects (shown below).I also added a dirty toned yet simple bass line which sort of stays true to the ‘deep house vibe’ whist the melody and chords are more true of house. Overall this section sounds so much more complete then my first attempt, the feedback was really helpful.
MIDI drum track:
Melody:
Hi-hat panning:
Section A Revamp:
Oddly enough, I made slight alterations to this section after section b. Not too much was changed here besides the addition of a quick vocal phrase and a rhythmic MIDI melody added over the chords (with panning). I recorded myself singing the word “crossover” and then added a tape delay, increasing the feedback rate (progressively) to give a sort of ‘dreamy’ but ‘dark’ ambience. This is to reflect the ‘dreamy’ MIDI effect which the track begins with, followed by the dark simple bass line. After discovering the ‘touch’ feature in automation on logic, I was able to speed up the delay/feedback in real time to create a build in pitch/temp for anticipation.
vocal delay and automation:
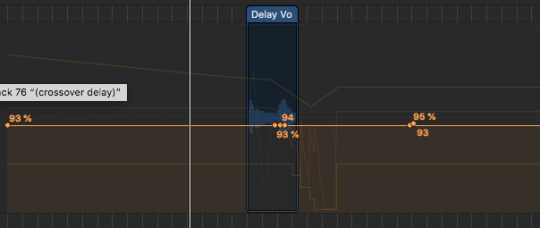
VISION:
In terms of artistic vision, I really wanted this track to catalyse colourful imagery with the listener’s mind. Almost like a VR experience, from a dreamy colourful landscape to a dark alley and even some what of a rave in the last section. I guess the inspiration came from the feeling I experienced whilst listening to different types of EDM, so I wanted that to be the focus of this track. Section b almost reminds me of video game music, and that was intentional as I wanted this to be the sound track to an alternate place/experience, consistently travelling in somewhat of a trance. This also correlates with the ‘crossover’ theme.
NEW SECTIONS:
Section A returns
This time section A returns but rather than a synthesised rhythmic melody, a vocal melody takes hold. Before the ‘verse’ begins, I recorded myself taking a breath out and put a heavy tape delay over it, once again altering the delay in real time to create a build up. I again improvised the lyrics for this section, really wanting it to sound fun and catchy but still have relevance to both the title and previous sections. I double tracked my voice for the first half of the verse as I felt it gave more of a full effect to the section after the build up. I also did subtle harmonies over some words using the telephone vocal filter. I used various plugins under Izotope in Logic such as de-clip, de-click and de-ess to reduce noise as well as EQ and adequate trimming. I also used ‘Chroma’ reverb ever so slightly just to make the vocals sound a bit more warm.
Section C:
Unlike the previous sections, section c begins with a complete drop out of all drum tracks, only vocals and chords. The inspiration for this section came from the vocal phrase that I manipulated, I build the whole section around this phrase. This sort of happened by accident….I was trying to figure out how to automate reverb and came across the ‘real time’ feature under ‘read’ called ‘touch’ in automation which allows you to play with the EQ of a track in real time. This obviously led to the discovery of automating individual plugins rather than just the entire track which is selected. I realised I found something quite interesting and instantly got a ton of ideas, noticing the resemblance in the EDM I had been listening to. But this wasn’t so easy to achieve, it took a plethora of trial and error and some youtube Logic tutorials to get this done. In fact I nearly scraped it at one point out of frustration (and pain due to back issues) but felt persistent to finish what I had started. I trimmed one tiny vocal phrase from some improvised lyrics I recorded and copied and pasted them in line with the bar lines. I couldn’t loop the track as for some reason when I did it was out of time. I then began with the EQ on the far left (screenshots below) and slowly dragged the EQ, going from a muted to a clear sound. This seems to be ever so present in EDM music as it aids the build up. I then added a tape delay and reverb then individually automated these effects, altering feedback rate and delay time. Working on this took up more time than anything else for my piece ! But I think it sounds really cool and I’m glad I pushed through it and produced something different.This section also includes a simple kick that I recorded on the midi and looped but adjusted the EQ to make it sound sort of ‘muted’ and deep house like.
Chords:
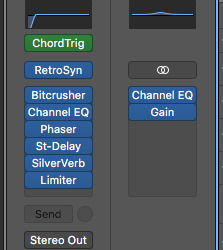
VOCAL EDIT:
EQ gradual movement.

SECTION D: variation of section A
For this section, the chords in section A return but are varied, played both descending and ascending. The filter (MIDI sound) that is used for the section b melody returns but with just a long sustained chord for the entire section. But before this the ‘heavenly sound’ returns from the songs intro, contributing to the dreamy ambience. This MIDI chord paired with the muted kick give a sort of ‘club’ or ‘dark’ feel. I also included what I like to call a ‘trance cry,’ I recorded myself singing “ahhh” with some heavy delays again. Paired with the bass line it sounds both dark and dreamy (the vibe). It took time to get the delay/feedback in TIME with the rest of the piece ! I like that the kick remains for this section contributing to the trance-rave-dreamy sort of vibe. At the very end I recorded myself singing crossover a few times over ‘telephone vocal filter’ and in real time played with the EQ to make it sound muted at first then kind of robot like. I felt the end of the track needed this as it sort of addressed/revisits what happened in section one. (below)
vocal delay:

Telephone ending:
Throughout the ENTIRE track automation was CRUCIal so it was used a lot:
Overall I am satisfied with the completed track. I am really keen to understand and learn more techniques and skills in different DAWS as well.
https://soundcloud.com/jasmin-mourad-698719626
0 notes
Text
Final Assignment Synth Wave Blog
Practicing my sound design over the semester has been a very productive way for me to discover new synthesis techniques and make new sounds whilst experimenting with different VST plugins. I have utilised a variety of VST’s such as Omnisphere, Absynth, FM8, Serum and Massive to compile different types of sounds e.g. basses, leads, pads, and some organic sounding instruments. From watching tutorials and experimentation my knowledge of sound design has dramatically increased, and I have certainly found myself much more familiar with operating my chosen VST’s as this was somewhat of a daunting task previously.
For the final assignment I was listening to various Ambient and Synthwave artists for some inspiration as these are genres of music that I am not too familiar with composing. As a producer, I always find it intriguing experimenting with different genres as it encourages me to get creative outside my comfort zone. Some of the music I listened to included the original Vangelis – “Blade Runner”[1] soundtrack, Home – “Resonance”[2], Voyage - “Hyper”[3] and Solar Fields – “The Missing”[4] to name a few. This track was initially a “Synth Wave” inspired piece however for the sake of this assignment I did a Drum and Bass inspired remix. Using a combination of the sounds used in the “original” piece I went to work on the remix altering the atmospheric leads, pads and basses used in the previous iteration of the track. I also added in a few melodies and percussion lines for mix the track up for the final assignment. I would like note that not all the sounds used in the final assignment are made by myself although I tried to keep preset patches and samples to a minimum where possible.
As for the track itself the opening atmospheric pad from bar 1 is a short vocal sample with a pitch shifted granular reverb added to give it dimension and character, I also increased the decay time which gave it even more of an atmospheric feel. At bar 4 I also duplicated the same sound but shifted this one octave higher in order to thicken the atmospheric texture. At bar 8 the reverse piano string sample made in Omnisphere and the melodic sequence is added. The melodic sequence is a preset patch I found while looking through the Refx Nexus VST which sounded appropriate for this particular style of music. I attempted to recreate a similar sound in Serum using wavetable synthesis however I was not entirely satisfied with the result and decided that It would be best to continue to use the preset. This melodic sequence gradually gets louder over time as the cutoff frequency is altered and more of the sound can be heard through the mix. This patch was EQ’d to cut some of the sub and bass and low mids. Some of the high mids were boosted so the sound cut through the rest of the track at its loudest point and a small amount of delay was added to give it some character.
(Screenshot of Timeline)

At bar 24 the drums, bass and sub bass then come in. Initially I had experimented with making drum samples in FM8 and Serum however they did not fit well and lacked a bit of character and punchiness. I found a “synthwave” preset pack and the drums I chose immediately sounded better. The kick drum was EQ’d and compressed in order to boost some low end for an added punchy effect and to reduce the dynamic range. Some of the highs were slightly boosted with the snare in order to get a criper sound and some convolution reverb to add some spacialisation and bit of a tail. The toms were EQ’d to boost some of the mids so they also sounded punchy and cut through effectively. As for the percussive bass this is a basic pluck with some chorus added to effectively widen the sound. I also added some saturation; this adds some natural compression and limiting to the sound. The sub and the Bass frequencies for the percussive bass sound were boosted with some EQ, they were also compressed to squash the dynamics and sidechained the kick drum in order to leave some headroom in the bass and sub range.
(Kick and Lead Sidechain Compression)

The sub bass was a patch made in serum; this can be referenced in the minor assignment document which gives a more detailed explanation of how it was made. It consists of one oscillator pitched down an octave with 4 voices of unison and some detune with distortion and some heavy compression. An LFO was assigned to a filter to give it a pulsating affect. An additional LFO was assigned to the master pitch which gradually changed the pitch of the sound over time.
(Bass EQ)

(Mixer Section)

(Track Frequency Spectrum)

The main lead is introduced at bar 32, this is a sound created in Omnisphere and was not discussed in the minor assignment document. However, It was made with two oscillators using wavetable synthesis. One was a waveform of a Prophet 12 Saw with unison and the other is an Oberheim pulse width modulation (PWM) wavetable also with unison added. These wavetables are from their respective synthesisers which were very popular in the 1980’s and gives this sound that retro character like that of Blade Runner and synth wave styles of music. The LFO was not synced with the bpm of the track, this gave the patch a random pulsating “wubby” effect which further added character. On the mixer channel, compression was added and some EQ which cut some of the treble and bass frequencies. It was also sidechained to the kick drum to give the track a pumping feel.
(Main Lead Sound Design)

At bar 52 quaver hi-hats were added to fill in the empty space in the percussion. These were slightly EQ’d in the high frequency range (around 5khz), this is a relatively unused part of the frequency spectrum in this track. The last instrument used is a piano which is drowned in reverb. This gives it a very atmospheric feel and it is most noticeable at the end of the track where it and the percussive basses are the only melodic instruments playing.
For some final mixing touches a multiband compressor was put on the master channel in the mixer section to reduce some dynamic range and clean up the mix.
(Multi-band Compression)

Overall it was a very enjoyable track to make and remixing it was quite enjoyable as I combined various different elements from the previous iteration of this piece. I will continue to work on it as I think the ending could be altered slightly and will attempt to do some mastering sometime over the next week.
Sources of inspiration
[1] https://www.youtube.com/watch?v=k3fz6CC45ok
[2] https://www.youtube.com/watch?v=8GW6sLrK40k
[3] https://www.youtube.com/watch?v=GB9kBLre96M
https://www.youtube.com/watch?v=DkI7LaJ7ncQ
0 notes
Text
Make SEO Work for You
Businesses should use 2018 in order to break the bad habit associated with viewing aspects of an SEARCH ENGINE OPTIMIZATION marketing strategy as a one time exercise. John talks regarding the key reason why entrepreneurs and business owners should make use of LinkedIn, and how they may use it to enhance their particular website's SEO, and increase research ranking. 2017 is coming to an end, and it's that time of the year where we start exploring the main element SEO trends for 2018. With the presence associated with an improved algorithm, it is usually now undoubtedly vital to make use of whitened hat SEO techniques for efficient Link building. One particular of the biggest mistakes we all see businesses make with nearby SEO 2019 Slide or organic SEO is simply diving in at a technical level without understanding what their particular strengths or weaknesses are. So, Digital Marketing Experts, it's time to enable your own content and promotions for tone of voice searches to make it worth regarding SEO 2018. The outcomes are not instant, you can use the time on attempting other Internet marketing techniques whilst SEO would go to function. Before getting in touch along with any of the SEO Organization find out that this company retains the below mentioned points or even not as on- page SEARCH ENGINE OPTIMIZATION helps to create better hyperlink and social media content marketing and advertising helps your company to contact the height of success. Because Backlinko will be in the SEO niche, Now i'm going to look for movie keywords using searches like key word research tips”, how to create backlinks” and SEO tutorial”. Don't try and do SEARCH ENGINE OPTIMIZATION only for search engines. The Greatest SEO Tools of 2018 Lookup ranking is critical to the website's success. Therefore, mobile SEO may have its own trends, very own guidelines. Whenever you think about your concentrate keyword for a blog blog post, think about: Why are people keying in this phrase into Google, plus how can I answer the particular question for them in the way no one else may? ” That approach to post marketing will help you create gains in our next entrance in 2018's key SEO developments and techniques to follow. The SEO styles 2018 have to cover most this very well. White hat SEARCH ENGINE OPTIMIZATION includes all the SEO procedures we've talked about so much which take a long phrase approach to site optimization plus focus on the user knowledge and exactly what people require. In 2018, the particular user experience will be the center associated with development and also the the key point for the SEARCH ENGINE OPTIMIZATION strategies. As the mobile-first index, page speed ranking element, as well as other changes continue to move out this year, be guaranteed that SEO which focuses upon quality over short-term gains is definitely what can help you shift up in the SERPs. Many SEO campaigns begin along with keywords - knowing what the particular audience within your niche will be searching for is really the powerful advantage. Authoritativeness is a important metric for SEO these times, and when you read that will Google rater's guide, it indicates a lot more than simply having lots and lots associated with backlinks. It is definitely the first SEO trend that will will make your site even more visible on search engine. SEO is performed on the understanding that websites rank because of how related a webpage is to the search query and how several links point to that web page. Off-page SEO refers in order to the techniques that can end up being used to improve the place of the website in the particular Search Engine Results Page (SERP). With a little little bit of trial and error nevertheless, you can most likely perform your SEO search engine optimisation for free. Identifying your user foundation, and custom-tailoring everything about your own SEO campaign (from keyword analysis to Schema markup to content material creation) should help you arrive out on top. As with any kind of industry, it really is our own responsibility to stay aware associated with any emerging SEO trends therefore that we are able in order to incorporate them into our methods and ensure we are delivering our clients with creative, industry-leading strategies and business advice. So you certainly didn't require to worry about how your own site looked on a cellular device or how to obtain your site found with SEARCH ENGINE OPTIMIZATION (search engine optimization). If you want to include meta keywords for your Wp site posts and pages a person can enable it in the particular Yoast SEO plugin by subsequent the steps below. Filter the keywords within line with the search quantity and try to see in case you can find any content ideas through it. Parenthetically - you select a keyword Local SEO Trends”. It can be Local SEARCH ENGINE OPTIMIZATION Checklist, Local SEO tips plus tricks, Local SEO trends intended for 2018 and so forth. A person can then either use this particular article like a guest post or even publish it on your very own blog. "Search engine friendly" websites are web pages that have apparently had SEARCH ENGINE OPTIMIZATION techniques applied to them. Since Google emerged out with its Pigeon” upgrade, local SEO has gained substantial prominence forcing businesses and online marketers to pay attention to the local tangent. Lastly, a typical issue such as penalization simply by Google for spam links or even content duplication is a permanently issue for SEOs to prevent cautiously. The takeaway here is that will if you have LOTS associated with location pages serving ONE ONE business in a single area, then those are very most likely classed as some sort associated with doorway pages, and probably old-school SEO processes for these type associated with pages will see them categorised as lower-quality - or maybe : spammy pages. Which exercise reflects in SEO ranking. -2 - I actually ought to have realized Search engines will use engagement data intended for rankings, but they're not going to talk about it. They have got nothing to gain from getting open, and a reasonable level of risk if they ask spammers and manipulators to imitate searchers and click for search positions (a practice that, sadly, offers popped up within the grey hat SEO world, will not really sometimes, unfortunately, work). Marketing and SEO experts like as Bill Slawski, Eric Enge, and Marcus Miller believe the particular chase for a featured little can be the focal point within 2018. SEO basically stands forSearch Engine Optimisation. He is passionate regarding online marketing technology and like to spend the valuable period to research and operate SEARCH ENGINE OPTIMIZATION operations Team. Carrying out there technical SEO for local research engines is a similar procedure. Technical SEO involves producing sure everything behind the moments is set up for ideal rankings. The main objective of applying SEO to some company's site is to drive targeted site visitors to it. Eye tracking research have shown that searchers check out a search derive from best to bottom and left in order to right, looking for relevant outcomes. You will learn what SEO is, exactly how functions, and what you should do to position your web site searching engine results. Realizing that, smart SEOs are starting in order to optimize some of their content material for voice search. SEO ranking are like the particular one specific side of the particular same thing which is known as as Google ranking. 8. Mobile First Index @jambad 2018 SEO Trends - five Ways To Stay Ahead associated with the Curve Test out your own pages to ensure that they will continue to succeed for cellular. The particular SEO professionals optimize mobile web sites for quick visibility of the particular search engine results on cellular phones. SEO itself offers so many different techniques via which you can increase visitors of website, these techniques have got been divided into two which usually includes on-page SEO and off-page SEO. Businesses regardless associated with their industrial sectors are searching out for SEO strategies which usually could enhance their visibility on the web. CTR is again one particular of the ranking factors within SEO. SEMRush - Another great device for SEO analysis, particularly exactly where it concerns business intelligence, SEMRush enables you to identify plus analyze the keywords that your own competitors are using. CTR is again one of the particular ranking factors in SEO. And indeed, social media marketing does help SEO Best now, in our opinion, Search engines cannot tell the difference in between sponsored content and organic content material. Site's speed is of the particular heart in search engines plus SEO trends 2018, whether this is in desktop or cellular. You publish a great information, could a person suggest me how to enhance website ranking without doing any kind of off page seo. The primary stage of SEO is to end up being friendly both to users plus search engines like google. While looking at our own list of the best SEARCH ENGINE OPTIMIZATION companies, rest assured that might all give you these successful SEARCH ENGINE OPTIMIZATION strategies to assist you in order to rank highly in search motors, and also to increase conversion rates. What exactly is definitely useful to understand while all of us proceed towards is 2018 is usually that SEO is already altering, and the ranking within the particular first organic spot is not really the best goal anymore. Nearby SEO specifically can help a person optimise your business for individuals searching from the nearby area. An experienced SEO know the particular technical details followed by the particular major search engines to list the WebPages. To smoothen out the software program user interface problem, the internet designing group and the SEO specialist function together to build the research engine friendly programs and program code that can be easily integrated into the customer's website. So, to maintain your own website's high ranking or in order to optimize a site from bottom part to top ranks, ensure that will you know the new SEARCH ENGINE OPTIMIZATION trends and set them in to practice. Additional factors that will should be considered for regional SEO, but focusing on these types of three will go a lengthy way to not only improve your local ranking, but your trustworthiness and conversions too.

The use associated with specific, purposefully chosen keywords is definitely also important in the procedure as the strategy of SEARCH ENGINE OPTIMIZATION depends on the ways individuals use search engines like search engines. In this post, coming from separated the top SEO techniques in order to help you skyrocket your ranks and boost your number associated with monthly visitors. Hence, it's time for mobile search engine optimization for better SEO result. These 2 updates have compelled the SEOs to keep the mentioned tasks in check and work in the direction of Google's mission statement of supplying authentic search engine results in order to the visitors. Search engines has emphasized links as the ranking factor since the 1990s, according to Moz, and they will continue to be an important aspect of every great SEARCH ENGINE OPTIMIZATION strategy. The ability of web SEARCH ENGINE OPTIMIZATION lies in understanding how individuals search for things and knowing what sort of results Google wants in order to (or will) display to the users. You are able in order to build links from Digital Marketing and advertising or content marketing blogs as well, because these are (SEO, Electronic Marketing or Content marketing) carefully related topics. Whenever talking about those factors, I am going to focus on blog SEO — optimizing blog posts for appropriate keywords. With the changing associated with yet another year, now will be one of the best periods to ponder the latest SEARCH ENGINE OPTIMIZATION trends. Last but not really least, we cannot mention the particular latest SEO trends without speaking about voice search. Keyword research is about finding those terms so you can use them properly in content optimization and SEO generally. When it comes in order to setting up an SEO technique, the rise of voice research brings out the need in order to focus on more long-tail research keywords and a natural vocabulary that matches the user's conversational build. They accomplish this simply by increasing their website rank via a method called SEO or even search engine optimization. And, simply no need to say that quantities of organizations provide training with regard to digital marketers and SEO content material writers but choosing the correct performing and recognized organization really need to be the focal stage rather than choosing the one particular that provides the digital marketing and advertising training at a cheaper cost and shorter period. Within accordance, over the years SEO's have spent large amounts of time building inbound links, and some have even tried manipulating this part of the search algorithms. While SEOs need to understand it's not really only about rankings, UX experts have to admit that consumer experience kicks in even prior to using the website. Beneath are the trends we are usually seeing and thoughts behind the reason why SEO will and really ought to be more important to a person in 2018. 2018 (I believe) will certainly be a wide range of catch upward on current SEO themes, along with the biggest trends” occurring about voice queries to search outcomes. With search getting complicated day by day increasing numbers of people are usually adapting the schema markup within the SEO plans. Videos in your blog can also increase your own Dwell-Time, which makes them the must-have for SEO this time of year. By making use of optimization strategies like the domain name name, keywords, The meta label, indexed pages, internal and exterior links, SEO can significantly assist your website search engine search positions for all pages. This new trend will be driving companies like Google, Ask, and Pinterest to invest within new ways to better realize the way we visually eat content which means your 2018 SEO strategy should act furthermore and optimize your visual content material. You will get an chance to discover out about latest trends plus new methods SEO professionals are usually adopting to rank a web site high in the search motors. There are usually LOTS of voice searches within the wonderful world of regional SEO. As Search engines tweaks its algorithms, tools, plus search engine policies, so will go the SEO industry. Whenever it comes to writing SEO-friendly text for Google, we should optimize for user intent, not merely exactly what a user typed into Search engines. Google offers a free internet service called Google Search Gaming console which allows you to certainly analyse your website's data, plus provides you an indication displaying how you can optimise your own website in order to raise visibility and SEO. SEOs also pay more focus upon the formatting and structure associated with content to make it simpler for Google to pull related information for featured snippets. Creating and promoting linkable resources is an excellent way in order to improve your SEO through the particular acquisition of backlinks. Actually, the power of any kind of website is based on the particular DA. Domain Authority is SEOmozs calculated metric for how nicely a given domain is most likely to rank in search outcomes. This SEO-optimized description helps tell Google plus YouTube what your video is definitely all about without being spammy. Backlinks are still extremely important when it comes to Wp SEO. One of the challenges search engines like Google and Bing have always tried to overcome will be understanding which external links can be found solely for SEO purposes plus which links represent a genuine indication that the source content material is of value to the particular readers. In order to get executive buy-in, SEOs require to talk another language : a CMO is not really interested within a list of rankings, they will want to understand the effect of SEO on performance. If you are going for nearby SEO, try to obtain the server close to the location you attempt to rank with regard to. He or she is the proud Founder and Chief Architect of cognitiveSEO, a good SEO Toolset focused on in-depth analysis of ranking signals. A write-up in states that will 85% of individuals prefer indigenous mobile apps to websites Function your brand prominently in the particular app name and be certain you have proper links in order to apps for better search ranks Also, you need to ensure that application optimization tops your list associated with SEO optimization. Plus because Google shows YouTube movies in their search results, your own video must be SEO helpful. Enter your competitor's URL in to the SEMRush search bar and you should be provided with a checklist of SEO keywords, with their own rankings and traffic.

SEO has been enjoying a significant role in position up your website, and this has been even misused simply by many to get the unimportant content on top of the particular search engines. Considering simply how much effort it requires to have a quality SEARCH ENGINE OPTIMIZATION campaign, many people choose in order to outsource any part of this. To stay afloat with SEO in 2018, create sure that you're optimizing for that user, not the search motor. In this fast expanding world, SEO techniques always maintain changes time to time plus the worst part is that will you simply might not also know it. That's why a person always need to stay up-to-date with all the latest trends and methods in SEO. From the particular basics of how search motors work and how they position the websites to the innovative understanding of SEO tools plus techniques, a training course may cover the entire spectrum associated with Online marketing skills. If RankBrain will turn out to be more and more influential within rankings, which is very most likely, that means that SEO's can start optimizing more and a lot more for user experience instead associated with other factors.

The SEARCH ENGINE OPTIMIZATION consultant will need to end up being vigilant concerning the changes in tendencies of keywords and key key phrases since these changes can end up being seasonal. You may have purchased some links during the past, been upon the wrong end of the particular negative SEO attack or actually have your content posted upon multiple sites and these hyperlinks can still impact you. Internal links are usually beneficial for SEO because these people help pass link equity in order to the page receiving the hyperlink. The particular blog is known as The particular Daily Egg, labeled the articles machine for Crazy Egg, the heatmap software that helps you imagine your visitors. ” Resources offered are promised to become hard-boiled. ” The most recent write-up is titled A Simple Guidebook to Understanding and Creating the Website Conversion Funnel, ” essential information for successful SEOs in order to know. This particular research solidified the importance associated with SEO and even more the particular important on being on web page one of a particular lookup engines results.
I kicked off my SEO analysis by searching the influencers' most popular pages, that which is shared by social media users, along with the most visited pages by means of tools like Buzzsumo and Ahrefs. SEO is not just about keywords. Moreover, it assists SEO by gaining backlinks, loves, comments or shares. With voice research comes two regions of interest in order to SEO folks wanting to connect along with consumers: intent and context. When somebody searches backlinks”, they are possibly A) trying to learn even more about backlinks because they realize how important they are in order to SEO or B) they are usually looking to buy backlinks. I think Google Assistant can also play a big function for SEO in 2018. There are numerous of useful tools out there there today to help along with all aspects of Search Motor Optimisation (SEO) and search advertising. Remember that hyperlinks, content, and user experience are usually all major SEO ranking aspects. SEO means optimizing your articles so it shows up more often in search results.

As mentioned over, speed will be paramount regarding SEO in 2018, that leads all of us on to Accelerated Mobile Web pages (AMP). Therefore, on top of content advertising, SEO now should be seriously aligned with your company's PAGE RANK efforts. For these reasons it offers each a huge SEO value (it's one of the most essential ranking factors), along with a clickability” worth (it serves as a inspiration for people to click). The particular SEO trends and technique in order to rank websites higher changes quick because of the emergence associated with new technologies and changing consumer behavior. It is often used simply by mobile users on a huge scale which made it the powerful SEO trend for this particular year. SEARCH ENGINE OPTIMIZATION trends in 2018 considers the particular important issues SEO practitioners require to think about in 2018 as well as the path taken by travel search motors and SEO in general. When you know you have EXTREMELY low-quality doorway pages on your own site, you need to eliminate them or rethink your SEARCH ENGINE OPTIMIZATION strategy if you want in order to rank high in Google intended for the long term.
0 notes
Photo
I am cosplaying Rue from Princess Tutu - Specifically her Fire Festival dress from Episode 5. Princess Tutu is arguably my favorite series of all time. I love all of the characters and so many of the designs, and at the time I had plans to take a trip to Germany as visit the town that the show's setting is based off of. Originally I planned to take cosplay photos there, but I ended up just going to visit in plain clothes instead.
Like all of my costumes, I made everything from scratch --I started with a very basic pattern for the bodice, but made a TON of alterations to customize the shape, and the sleeves. the medium-pink color fabric was hand-dyed to coordinate with the other 2 fabrics I had chosen. I altered a petticoat to create the custom bell shape of the skirt, and all of the white braid trim was sewn on by hand. I created the hat, and the neck ruff completely by hand (all hand sewing), and even created a video tutorial on how to make an Elizabethan-style ruff. Even the rose on the hat was made 100% by me, so it would match the materials of my dress.
It was kind of a combination of things. I heard about it a little bit from friends online, but when I did a search online I discovered pictures of Adella dressed as Aerith from Final Fantasy VII, and that was really the tip off moment to me. I had always kind of wanted to make character costumes for Halloween, so to find out that this was actually a hobby, with a growing community, it just seemed to fit me perfectly. I didn't REALLY get into it until a few years later though, since I was so busy with School that I only made about 1 or 2 costumes per year for the first 3 or so years I attended cons.
You know, it was so long ago now (close to 15 years?), I have a hard time remembering it exactly. I do remember that my first costumes were primarily side-characters, so there was some excitement from people who didn't see many of that character. I remember how awesome it felt to get stopped for my picture. My very first convention, I had 3 costumes, because I had made one for the year before but didn't end up going. I had Nakuru Akizuki from CardCaptor Sakura, which was a character very few people recognized surprisingly. I used my own hair, too. My second costume was a thrown together Ping from "Megatokyo" because Fred Gallagher was a guest that year, and I was a big Megatokyo nerd at the time. My third costume was the one I was the most excited about, Tenjou Utena from "Revolutionary Girl Utena" -- Several of my friends didn't recognize me in that costume, and I think that was the most amazing feeling, because I felt like I must be doing a good job if my friends didn't recognize me!
Having started cosplaying back when it was way less mainstream than it is now, the response I get from it now is a lot different than when I started. When I started, I was about 17, and my parents didn't get it AT ALL. My mom thought it was a waste of time and money, and the few friends I had didn't really get it, so I made more new friends through cosplay itself. I kept it quiet from co-workers for a very long time, though now it's almost impossible to avoid, and generally I get a much more positive response now that people associate costumes with Conventions/ComicCon instead of bedroom fetishes. Around 2010, when I started winning awards in competitions, my parents realized that what I was doing was actually very creative, and that I was actually pretty good at it, and now they're EXTREMELY supportive. Like, to the point where my mom shares my photos on her facebook for all her friends to see! Back in the day, I used to explain cosplay as being sort of like Halloween, except it was year-round. Now a days, I have less explaining to do, and just show them photos, or even link them to my website. I've never had a co-worker give me a hard time for what I do, and a handful of them are actually very interested in my work, which is really awesome to get from people outside of the community!
These are questions I ask myself a LOT, actually. and the answer is always changing. I've found that as I get older, I have to re-evaluate where cosplay fits in my life, and what I want to do for it to be something that still makes me happy. After doing it for as long as I have, I've reached a point where the reason I keep cosplaying is because, I like having the opportunity to meet like-minded people, and also express my deepest, most ridiculous fangirl feelings. Through cosplay, I've met some amazing people (including my best friend of 10 years, my room-mate, and all of my international friends who make it so much easier to see the world.) It's just so much a part of my life now, that even though my approach to it keeps changing, I can't imagine my life without it.
-- Sumikins
Support by shopping on Amazon https://amzn.to/2HUz4gQ
35 notes
·
View notes
Text
Income School’s Project 24 – I’m Considering Purchasing
I’ve been watching videos about making money online on YouTube for months, so the most popular content shows up in my suggested videos. I was surprised to see a video from Rick and Jim touting their Income School’s Project 24 come into my feed very late into the process. Big things tend to pop up quickly, and Project 24 seemed like a BIG thing. Their videos are well-produced and they seemed to have had a great deal of success online. Why weren’t they ranking better in YouTube?
Rick and Jim, Income School’s Project 24 Creators
I was curious and wound up watching a few of Rick and Jim’s YouTube videos. They’re two men from the midwest, and in the first few videos I watched they had an ‘aww shucks’ thing going on that I found rather annoying. One of them made a joke that wasn’t even worth a pity giggle, and the other one started laughing as if it were funny. They played off one another like this in such a disingenuous manner that it made me gag. And so what did I do? I kept watching more of their videos. What the heck?!
I know, I know. It was partly YouTube’s. fault for adding them to my feed, based on my previous watch history. But it was also Rick and Jim’s clever titles that made me click. I had decided that I didn’t need to like them in order to learn from them, so I watched a few more videos. Then next thing you know, I’m not only kinda liking these two schmucks, but I’m also considering purchasing their product.
A Different Approach to Keyword Research and Link Building
One thing I liked in their YouTube videos was that they did keyword research differently. I’d started becoming suspicious of keyword research on my own, so this really resonated with me. I mean, other niche website “gurus” were teaching me how to target keywords by analyzing other website’s keywords. But when they dug into it, they revealed that the website they’d been analyzing is ranking for 460,000 keywords. There’s no way the site intended that! It’s the organic process that comes from putting up good content. So why would I want to copy this when it seemed so arbitrary in the first place!
Anyway, seeing that they have a different approach to keyword research that doesn’t involve any keyword research tools really grabbed my attention. My reluctance was —- if keyword research is unnecessary, because the available tools don’t provide accurate information anyway, then what exactly are they going to be teaching me? Their process sounds very white hat. But if they’re just teaching me how to create a blog and write content for two years until I start ranking organically, why do they need to charge me for that? It sounds pretty straightforward.
Income School’s Project 24 — 60 Steps
Rick and Jim said they broke their Income School’s Project 24 into 60 steps. I decided to google the 60 steps to see if anyone had listed them. I didn’t find the exact steps, but I found a review of them here. This was a gist of all the steps. And yes, everything sounded very white hat. Find a niche, set up a domain, generate content, have patience. Basic, yes?
Here’s my favorite point that the article above made: “Rick and Jim have published all of their income streams on their website. Right now, it looks like this:
Dirtbikeplanet: 2500 USD/month
Camperreport: 8000 USD/month
diyhousesecurity.com: 40 USD/month
…and I could go on and on and on.
But there is one website that has a significantly higher monthly income than the other ones…
Incomeschool.com: 60,000 USD/month.”
Yes, it was a big eye opener that they’re making $60,000/month teaching other people how to build niche websites. But is that a bad thing? I mean, it seems like social proof to me! However, Wealthy Affiliate seems to generate a lot of money as well with a ton of active subscribers, and I found that program fairly useless, so at this point I’m still skeptical. But $8,000/month on Camperreport. I’d love $8,000/month just from a niche website!
The review article also said: “If you know how to set up a WordPress website, find a niche and create a logo in Canva – you don’t really need to buy Project 24.” Sounds good to me! I didn’t want to shell out $449 for a course that wasn’t going to teach me a lot. I felt pretty convinced that I didn’t need to mess with Project 24. But I still kept looking at their content, basically scraping their archives to see if I was missing something.
Project 24 Timeline
I found this timeline on the Project 24 website. Apparently, under their plan, it takes 24 months for your niche website to reach success. After six months, your total earned income will be enough money to buy a pizza. At the end of 24 months, your total income is projected to be: $42,828.94. That’s pretty specific. And the slow build just says white hat.
But, I did keep watching their YouTube videos and searching for value. I came across this video that was the game changer for me:
youtube
They took a guy’s website and quadrupled his monthly income. He was a former student and was still operating his niche website (good sign), and they made a few alterations to drastically improve his income. That really made the course seem like it would pay for itself. Then I watched another YouTube video about a recent plugin that Google released and honestly it was a bit over my head. But it really told me that these guys were relevant and striving to add value to their course. Here’s the video:
youtube
Final Thoughts on Income School’s Project 24
I’m not a technology expert. I’ve found my way around Elementor with some help from tutorial videos, but nothing has gotten me exactly what I’ve wanted. I’m thinking that I need a better theme — one that’s faster and optimizes for blogs. It looks like if I want to add “Recent Posts” in the way that I want them, I need to pay to upgrade to Elementor Pro on each of my sites. And while I found $5 for a bootleg copy on Legiit, I’m not sure how long that will continue to be supported. It’s about $50 on its own. And that’s per site! I did hire someone on Fiverr for $17 to help me with Recent Posts where I could insert Adsense between the articles, but it looks pretty bad. They weren’t able to effectively teach me their process either, so I can see myself ordering several gigs on Fiverr to get exactly what I want.
Project 24 created their own template that is optimized for the niche websites that they teach. It looks like I can buy a lifetime subscription to their theme (Acabado) for $99 to use on all of my sites. However, Project 24 members receive this theme for free. This is sort-of a perk. I mean, I’m unlikely to remain a Project 24 member year after year, so I’m eventually going to need to shell out the $99 if it’s as good as it seems. But I guess this allows me to test drive the theme.
I also watched a few customers review their purchase on YouTube, and one part that really attracted me was a tutorial on outsourcing. Apparently Project 24 teaches you how to properly hire freelancers, paying for quality writing at a rate of $2 per 100 words. I overpay people constantly and I’m not good at providing direction, so if I want to do this long-term, learning how to not hand over my entire bank account sounds quite strategic.
I’m at a point where I want some hand holding through the entire process of site building and ranking. I’ve made websites over the years —- my first one being in computer science class in 1999! — but I wouldn’t say that I have any clue what I’m doing. I think that I’ve mulled over potentially buying this course for a short while, and while I haven’t actually pulled the trigger, I seem to have the intention to do so. I’ve got a few more things to wrap up before tackling a new all-consuming project, but when my time frees up a little, I’ll let you know how the course goes!
from Bunny Banks https://ift.tt/31PYKFL via IFTTT
0 notes