#graphic eyeliner tutorial
Explore tagged Tumblr posts
Text

this is how I imagine I would do my makeup if I were an alien hehe
youtube
#alt girl#alternative#makeup#eyeliner#mua#youtube#alt#makeup artist#alt aesthetic#alternative girl#alt makeup#alt fashion#emo eyeliner#2000s emo#emo scene#emo girl#emo#graphic eyeliner tutorial#graphic eyeliner#star#star makeup#star graphic eyeliner#star eyeliner#Youtube
13 notes
·
View notes
Text
youtube


#melanin#blackout#melaninmatters#nubianqueen#selfie#me#black out#beyonce#black women#winged eyeliner#euphoria makeup#graphic makeup#makeup for black women#black girl makeup#inspired makeup#creative makeup#halloween makeup#makeup tutorial#winged eye makeup#makeup#supportblackauthors#like and subscribe#like4like#like#50 likes#100 likes#500 likes#fypppppppppppppppppppppppppppppppppppppppppppppppppppppppppppppppppppppp#fypfypfypfypfypfypdypfypfypfypfypfypfyfpfyfpfyp#follow me
2 notes
·
View notes
Text

Spider liner
#editorial makeup#fashion editorial#makeup#makeup artist#makeup blogger#makeup looks#makeup of the day#mua#makeup tutorial#makeup inspo#eyeshadow#graphic eyeliner#spider#halloween makeup
3 notes
·
View notes
Text
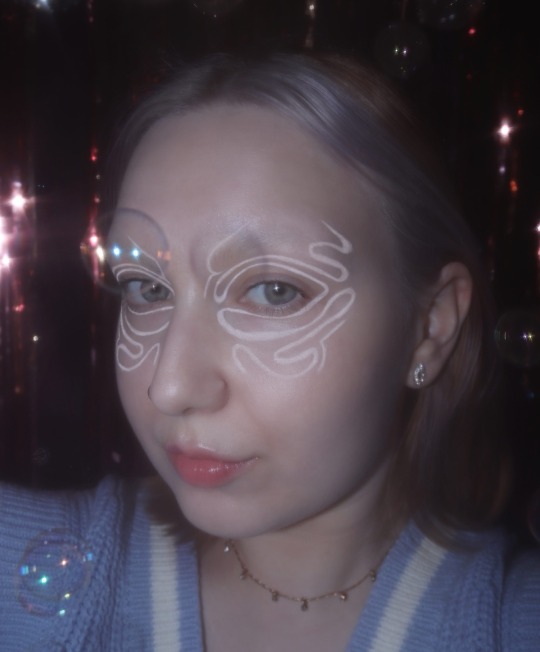
instagram
DAY 20!!
Only 11 to go🙈 Go Follow me on Instagram so I can reach my 1500 followers goal🥹
#beauty#makeup#lips#eyes#lipstick#eyeshadow#eyebrows#cosmetics#instamakeup#beautiful#creativemakeup#creative makeup#editorialmakeup#editorial makeup#editorial#graphicmakeupmonth#graphicliner#graphic makeup#graphic liner#winter aesthetic#spring aesthetic#aesthetic#white aesthetic#perfect makeup#makeup tutorial#makeup art#makeup artist#eye makeup#white eyeliner#eyeliner
2 notes
·
View notes
Text
youtube
FLASHBACK FRIDAY
Two-Toned Eyeliner Makeup Tutorial
hazeltailofficial on ig / hazeltail on youtube / hazeltailofficial on tiktok
#hazeltailvideos#makeup video#makeup videos#beauty video#beauty vlog#makeup tutorial#makeup tutorials#beauty tutorial#winged liner#winged eyeliner#graphic liner#graphic eyeliner#purple makeup#eye makeup#makeup of tumblr#makeup tumblr#beauty community#beauty youtuber#makeup#cosmetics#beauty#makeup blogger#beauty blog#beauty blogger#flashback friday#fbf#hazeltail#hazeltailxo#hazeltail official#hazeltailofficial
2 notes
·
View notes
Text
Mastering Bold Eye Looks for Every Occasion: From Daytime Drama to Nighttime Glam
Title: Mastering Bold Eye Looks for Every Occasion: From Daytime Drama to Nighttime Glam Let’s face it, queens: our eyes are the showstoppers. You can rock the most basic outfit, but if your eyeliner is sharp enough to cut glass, you’re turning heads. So, whether you’re doing a coffee run, heading to the office, or hitting the dance floor like you own it (because you do), it’s time to up your…
#Bold eye looks#Bold eyeliner looks#Cat eye tutorial#Colorful eyeliner#Daytime eyeliner look#Eye makeup inspiration#Eye makeup trends#Eyeliner styles#Graphic liner tips#Nighttime eye makeup#Smoky eye tutorial
0 notes
Text
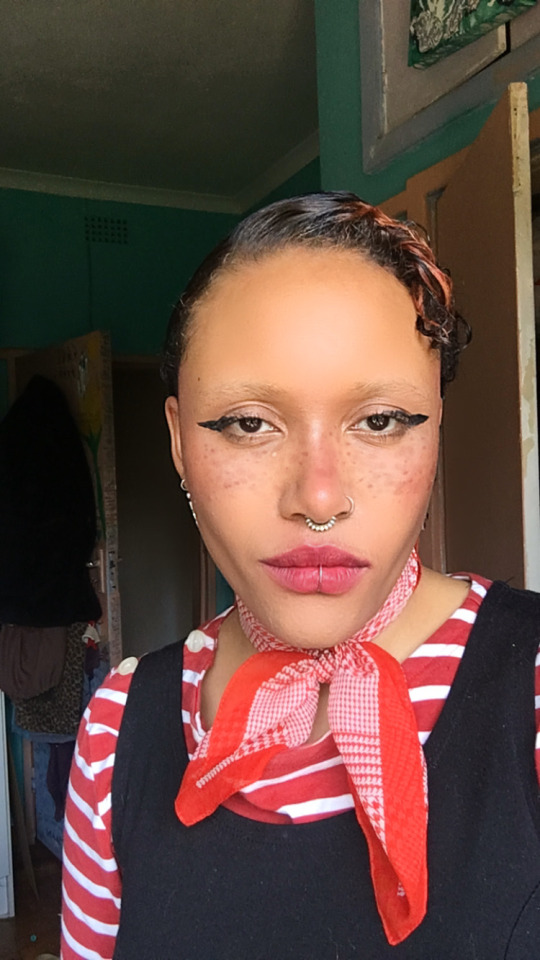
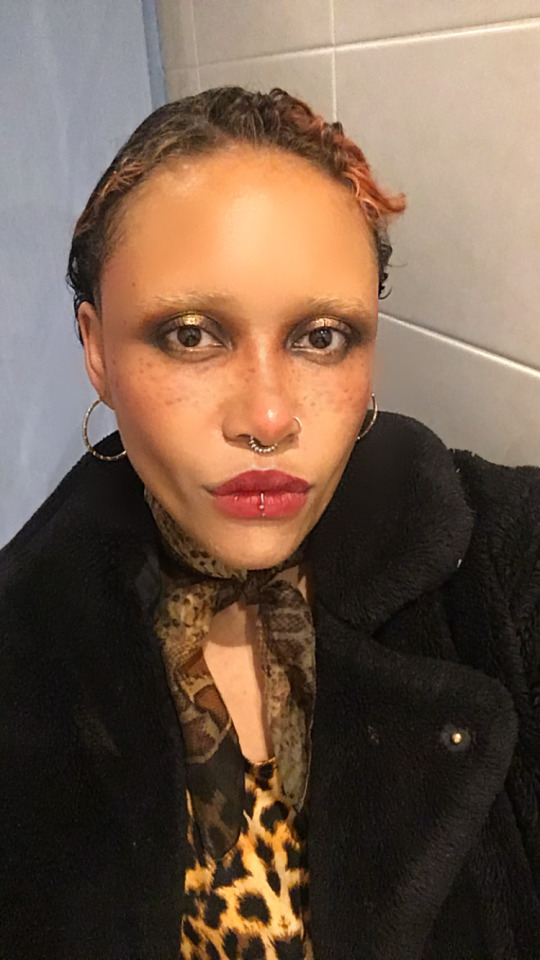
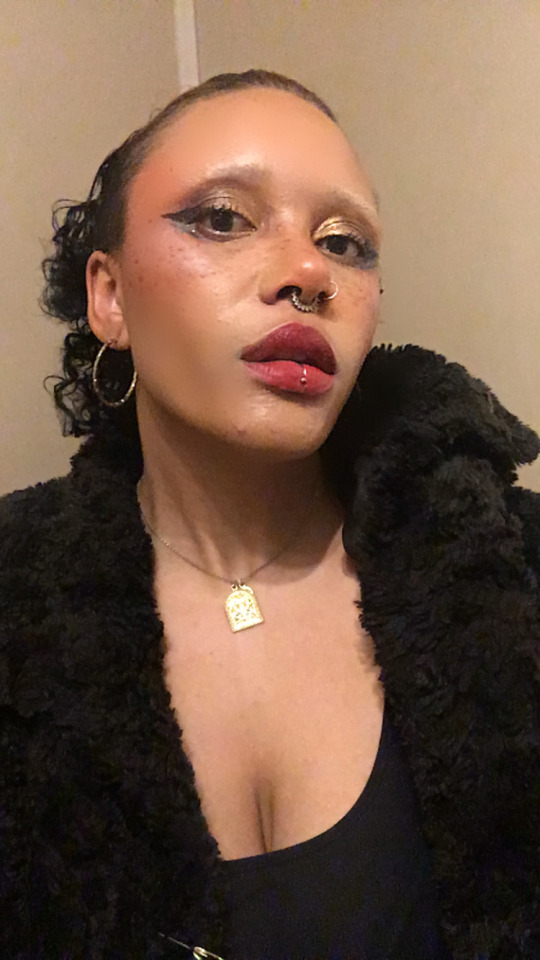
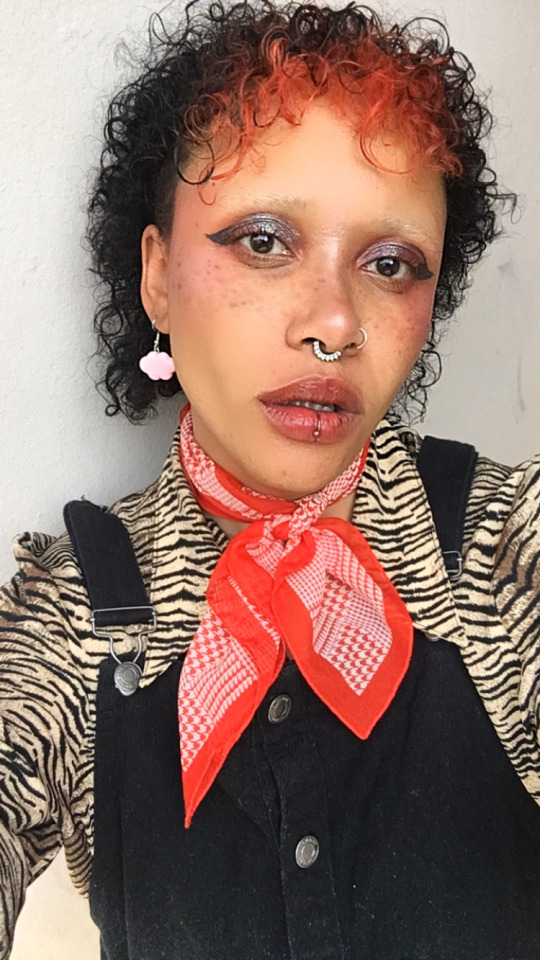

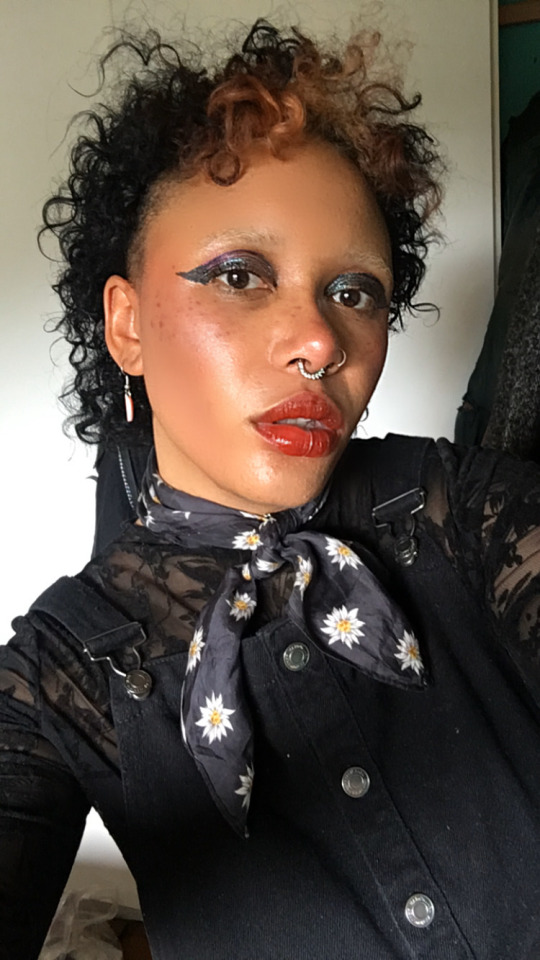
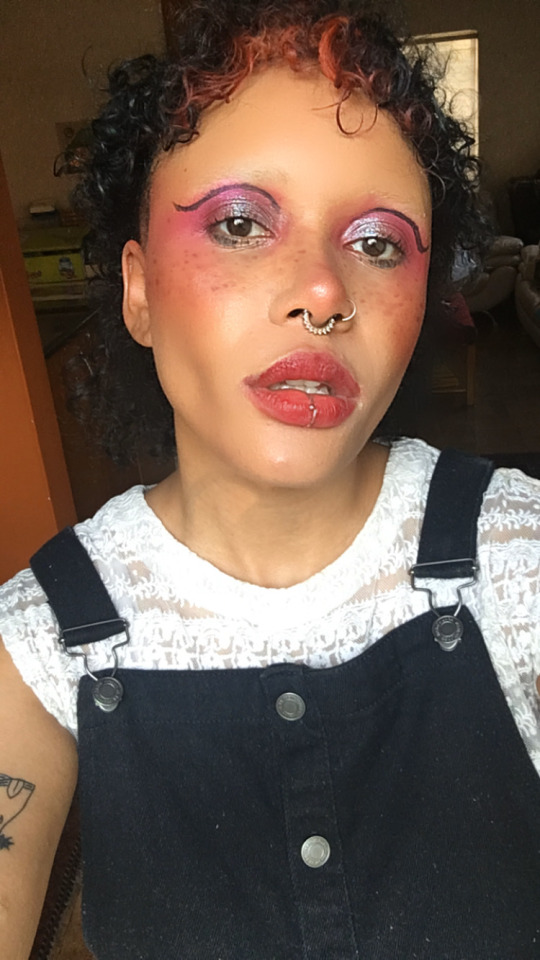
January in selfies so far
#makeup#mua#glitter#graphic eyeliner#eyeshadow#makeup tutorial#south africa#mullet#gothcore#goth aesthetic#nu goth#red aesthetic#selfie#nonbinary#she they#idk how to tag this#i think i look good#january#january selfies#mine#it’s me#just girly things#ascot#silk scarf#girls with piercings#septum piercing#labret piercing#nose ring#dyed hair
0 notes
Text
How To Convert Eyelashes
I was asked to make a tutorial on converting eyelashes. Well, here it is. Dirty, badly explained tutorial by Rollo. I'm assuming you know how to work with required programs, it won't teach you the basics, just a process of converting eyelashes from ts4 to ts3.
Requirements:
S4Studio
s3pe
TSR Workshop
Sims 3 Pack Multi-Extracter
These files (full credit goes to @gruesim)
Graphical program that works with .dds files
Let's go:
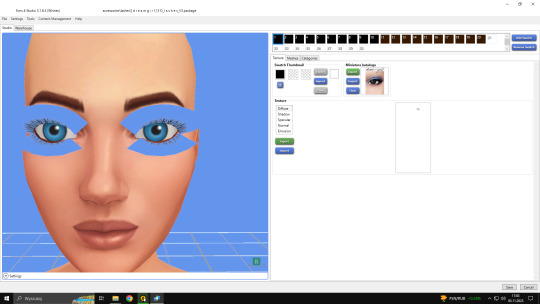
Open the desired lashes in S4Studio. Export diffuse of the ones you want to convert (you only need the black ones). You can also export the thumbnail. Close the program.
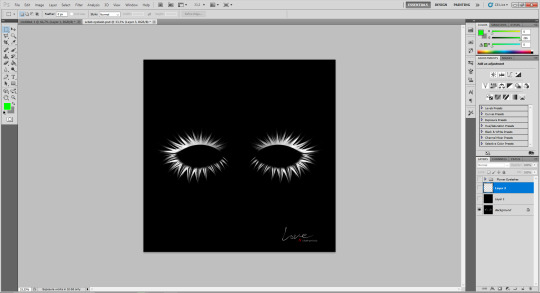
2. Unzip the folder that you downloaded from this tutorial. You will find a .dds files called "sclub eyelash". Open it up in the graphical program. Make a black layer above it and hide it for now.
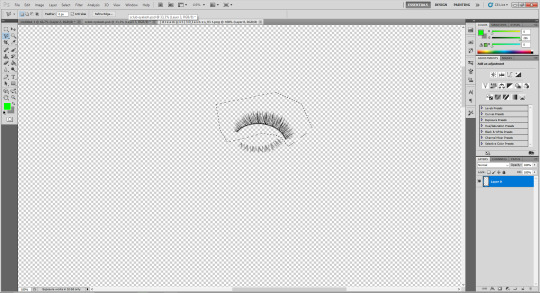
3. Now open up your ts4 eyelashes file. Start from the upper eyelash, crop it and go to the sclub eyelash.
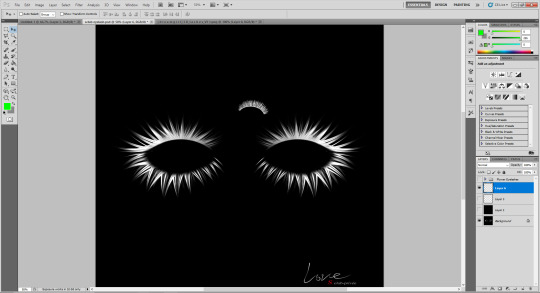
4. Paste it, click ctrl+i, it will make ts4 eyelash white.

5. This is the worst part. You have to make the ts4 eyelash fit to the sclub one as close as possible. Use every method possible!
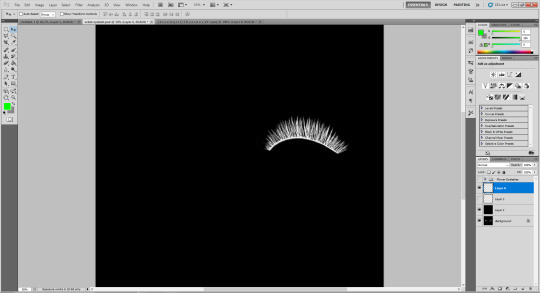
6. Unhide the black layer and see if your eyelash look alright. It may need some sharpening.
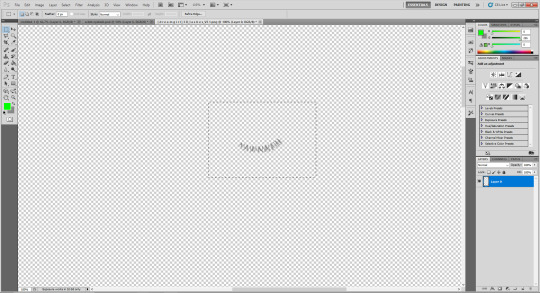
7. Now crop the bottom eyelash and follow the exact same steps as for the upper eyelash.
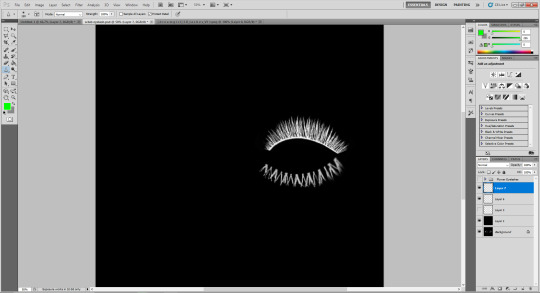
8. It should look more or less like this. Bottom eyelashes are always harder to adjust and may need even more sharpening.

9. Merge your upper and bottom eyelashes, duplicate the layer. Click ctrl+a, ctrl+t, then right mouse button and choose "Flip Horizontal".

10. Voila. You should have a complete set of your new shiny eyelashes! Save them as .dds. You can close the program. We're moving to TSR Workshop.
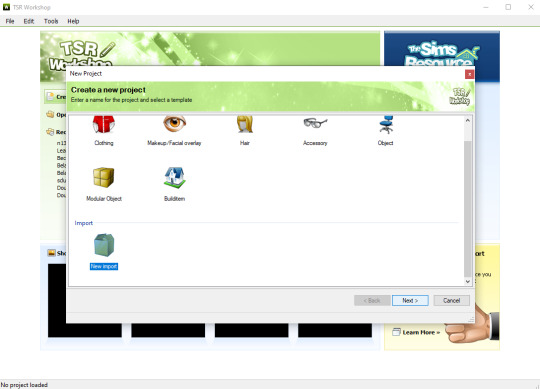
11. New Project -> New Import. Import Eyelashes AFBase from the downloaded folder.
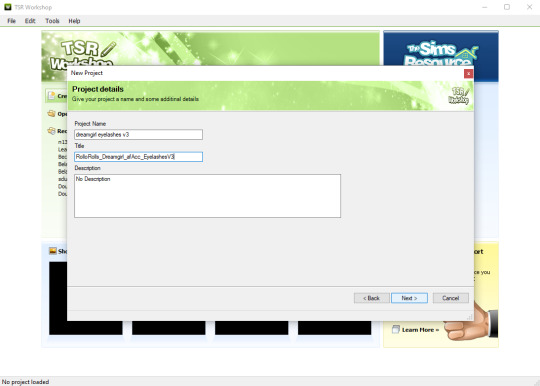
12. Name your project, name your file and click "Next".

13. You should see this. Go to Texture tab and click "Edit" on the Transparency Map.
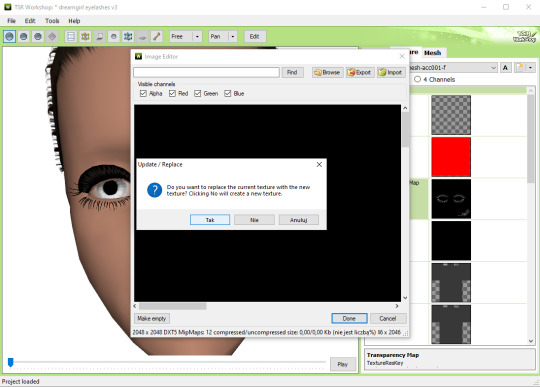
14. Import your eyelashes and click "Yes" when asked.
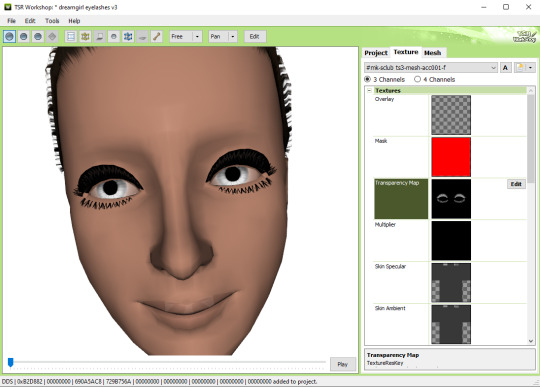
15. You should see your lashes, yay! But this is TSRW, they won't look exactly the same in game, as they look here. If you want a set of eyelashes, add more presets.
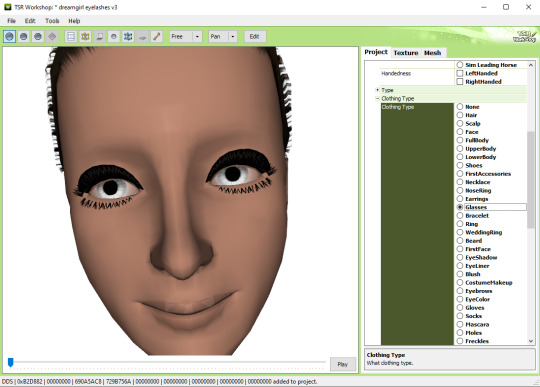
16. Now this is important. If you want to see your eyelashes in Accessories, go to Project tab, Clothing Type and change it from eyeliner to glasses. You also have to do this if you have more than one preset in one file. They won't show up in Eyeliner section. If you want to have set of eyelashes in Eyeliner category, you have to make each preset into seperate file. Also, eyelashes are recolorable ONLY in Accessories section. Don't forget to check Categories section to see which outfit has the eyelashes available.
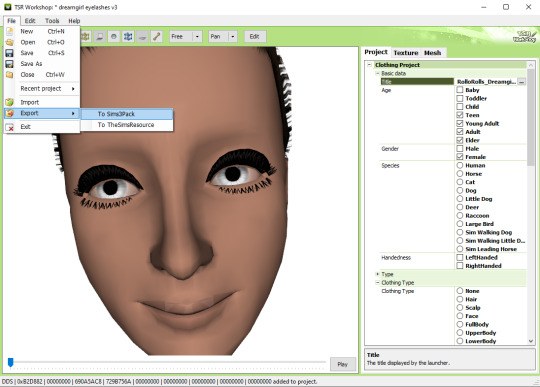
17. Now you're ready to export your file! Export -> To Sims3Pack. Use the Sims 3 Pack Multi-Extracter to convert your sims3pack to package file. We're moving to s3pe.
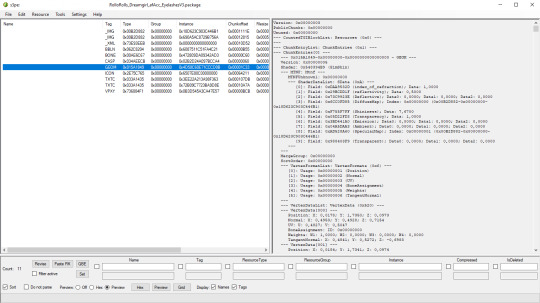
18. THESE STEPS ARE ESSENTIAL! Open up your shiny new package in s3pe. Click on the GEOM with the right mouse button.

19. Click Replace and choose AUID.simgeom from the downloaded folder. AUID is for adults, CUID for kids and PUID for toddlers. We have one more step to do.
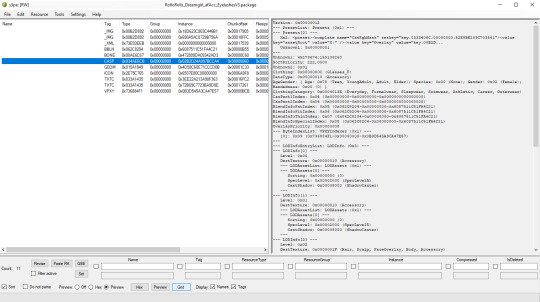
20. Now click on the CASP normally (left mouse button) and click Grid on the bottom of the program.
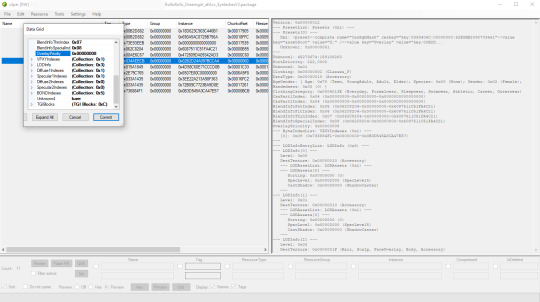
21. A small pop up window appears. Scroll to the very bottom and find a line called OverlayPriority.
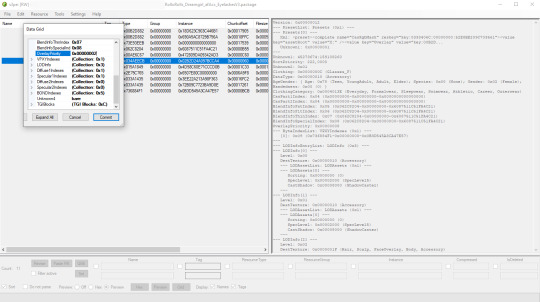
22. Change the 8 to 2. This will make eyelashes not being visible through hair that's covering eyes.
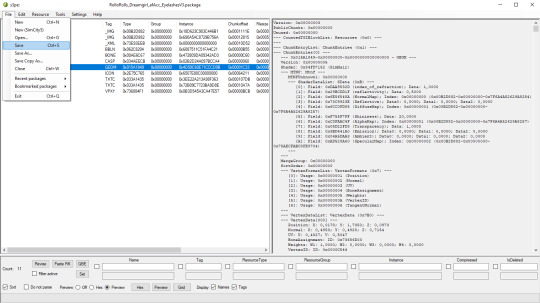
23. Save your package. You're ready to test your converted eyelashes in game!

Here they are. Nothing fancy, it was a quick conversion :D They're also compatible with S-Club eyelash sliders ^^
Btw, you don't necessarily have to convert both upper and bottom eyelashes. You can have upper or bottom only. Play with the lenght, not all eyelashes have to be very long. Convert it for males, kids, toddlers. You just have to remember to change the options in TSRW and replace the correct .simgeom file in s3pe. There is a lot of possibilities and you'll probably get better in this than me :D
Good luck! ♥
190 notes
·
View notes
Note
This is super random, but I REALLY admire your style and makeup, and I've wanted to do makeup for a rly long time but have trouble finding good tutorials for punk-y makeup that works with monolid/Asian shaped eyes (I'm Korean.) Do you have anyone you look up to for makeup? Or any good recommendations/tips/etc for Asian ppl who want to try your makeup style?
I’m Korean too! It took many years of trial and error and trying to see what looks good with my features so make sure to alter this to your own face! This is going to be long, so bear with me.
Imagine your face split up into 3rds like this. This is the golden ratio for a face.

But we Asians have a typically longer mid face, and monolid/or hooded eyelid. And a lot of Western makeup depends on brightening the under eye and focusing the majority of the makeup on the upper eyelid. But do you see how this shortens my eyes, and makes my mid face longer? It’s not very flattering. (Jump scare warning - This is when I had my makeup done by someone else for a shoot 😳)

(no shade to this makeup artist, I just think they lack knowledge/experience with Asian faces which is why I'm here to teach you)
What a lot of Asian makeup focuses on is widening the eyes to shorten the mid face. This is done through aegyosal (eye bags contour) or drawing the lower lash line really low. (I personally like the latter because aegyosal makes me look busted lol)

But make it goth- and what makes something inherently more goth? To me it’s a look that’s very extreme, dark, and exaggerated. Almost like drag. i also like to take the aspect of drawing a faux crease above your eyelid for more of that cartoony look.

So combining all these- lowering my eye line, making an exaggerated graphic eyeliner, and inspired by anime is how I get my own look!

But all faces are different so replicating mine exactly might not be right for you, so it takes a bunch of trial and error until you get yours looking right for you!
17 notes
·
View notes
Text

idek what to call this one but I love it lmao
youtube
#alt girl#alternative#makeup#eyeliner#mua#youtube#alt#makeup artist#alt aesthetic#alternative girl#alt makeup#alt fashion#emo eyeliner#emo makeup#emo scene#emo girl#2000s emo#emo#graphic eyeliner#graphic eyeliner tutorial#bold eyeliner#bold makeup
8 notes
·
View notes
Text


youtube
#melanin#blackout#melaninmatters#nubianqueen#selfie#me#black out#black women#beyonce#winged eyeliner#winged eye makeup#makeup for woc#black girl makeup#graphic makeup#inspired makeup#makeup for black women#creative makeup#makeup tutorial#makeup#Youtube
3 notes
·
View notes
Note
makeup routine? (If you have one)
OHH yes, this is so fun!
My makeup takes a lot of inspiration from the 1940s-50s and some of those old, romantic Victorian paintings. I like my makeup natural but still glamorous.
I always start with splashing my face with warm water first, pat dry with a towel (do NOT scrub!) then use moisturizer. (This step is always very important!)
Then I apply Hydro Grip Primer for my face and eyelids, gently rub into skin, then pat down your face with your hands to really soak in the primer. Primer helps to make your makeup glide on smoother and make it last longer. It also makes your skin appear smoother!
I take a light brown eyeshadow and apply it into the creases of my eyelids. This helps to give your eyes a bigger look to them! Then I'll take just a *slightly* darker color to the previous one and apply it into the creases of my eyelid at the outer corners of the eye. Don't go into the inner corner! This gives your eyes a sunken appearance. Of course, you can switch this up in any way to match the structure of your face and eyes. If it helps, my face is oval-shaped and I have high set cheekbones and slightly upturned eyes.
After this, I take a light shimmery shade that's either the color of my skin, or a slightly off white color. I apply this to the center of my eyelids to make my eyes look brighter and more awake. Then I'll take the light brown color that I started with and go back into the creases of my eyes to sort of even out that shading and give it more blur. Only use a little bit; you don't want to completely shade out that darker color that you used on the outer corners earlier!
Then after the eyeshadow is finished, I take a light brown gel eyeliner and carefully draw a line on the center at the base of my lashes. (You can also use black! Preferably a gel liner because liquid liner is just a bit too bold for this look.) You don't want to go into the inner corner, and definitely not too much into the outer corner. This makes your eyes appear more awake.
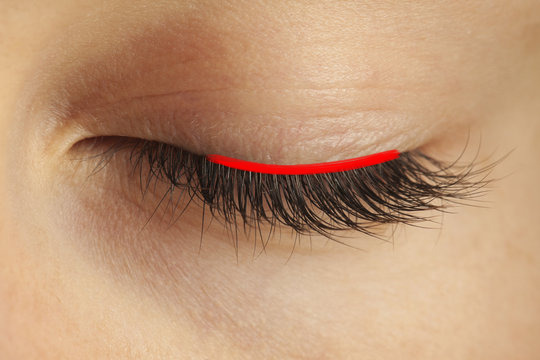
I use this makeup tutorial as inspiration for my eye look. Of course, some of it is definitely modified to my liking.
Then after this, I'll use a slightly slanted brush and then gently blend out that line so that it's not too bold. Then I'll use the eyeliner at the bottom of my eyes just under my bottom lashes, draw three little dots. All spaced out just a little! Then I'll go back in with that slanted brush and blend it; making sure it's just subtle and kind of barely there looking. Then I'll draw a very small wing extending from the outer corner of my eye. I'm not a fan of the big/bold graphic wing looks. I like the wing to be very small and natural.
After this I'll take my light brown gel liner again (use whatever matches your hair color; I use the brown gel liner because I'm ginger and it matches my brownish-orangeish hair color)
Then I apply it to my eyebrows in a very subtle manner. I don't like my eyebrows too dark. You don't have to use the eyeliner by the way, you can also use your eyebrow pencil if you want! I like to keep my eyebrows on the thinner side, as thicker eyebrows aren't really my style. If it helps, I take inspiration from the 1960s model Dame Lesley Lawson - AKA Twiggy, when doing my brows. I keep them very light and thin.
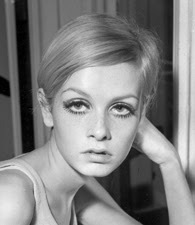
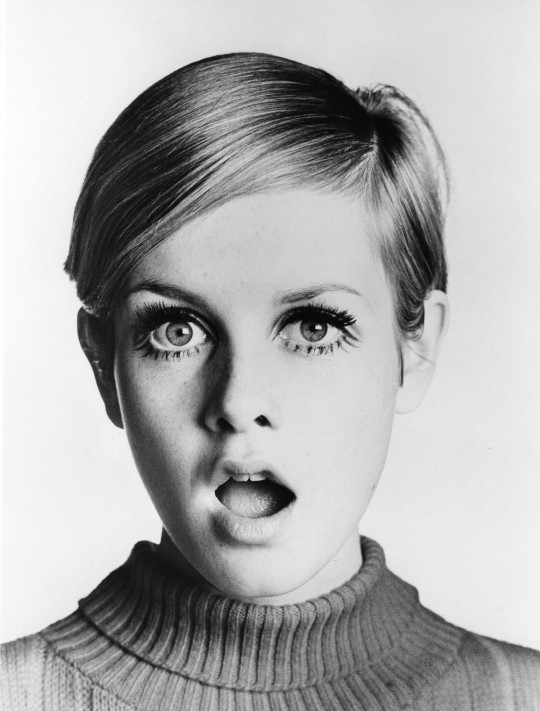
The only difference is that I usually don't angle the tail ends *too* high. I'm not Marilyn Monroe, even if I wish I was.
After the brows are done, I use an eyeshadow that is the same color as my skin and apply it on the brow bone under my eyebrow.
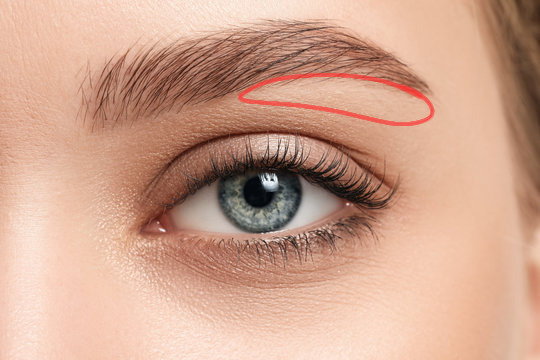
It give your eyebrows that lifted look, and also makes your eyes appear bigger.
And now it's mascara time! I usually use black mascara because I like my eyes to pop! Apply generously to your top lashes (especially focusing on those outer corners) and then sparingly to your bottom lashes. Note: I don't usually wear fake lashes, but those are fine and welcome if you want to.
Now, I don't usually use foundation at all because my skin is good enough to where I feel I don't need it, but sometimes I like to mix stuff up! I like to apply a very small amount because I don't like to cake on foundation.
I like my skin to have that nice, natural smooth look. I always wet my makeup sponge with warm water and dab some foundation on a piece of toilet paper. You can also use the back of your hand!
Then I will dab the sponge gently onto my forehead, cheeks, nose, chin, and neck. You don't want your color of your face to contrast with the skin on your neck and chest. Make sure to blend it out nicely. Then I use "Dew You Boo" setting spray and spray my face and neck a few times. I don't use setting powder because I'm not a fan of the matte look. I like my skin to have that natural dewy glow to it.
Then I go in with a light dusty reddish-pink powder blush and rub it from my temple to my cheekbones, the tip of my nose, and chin. Then I use a shimmery highlighter from my eyeshadow palette and use my finger to rub it on my cheek bones, the inner corners of my eye, the bridge of my nose, and the tip of my nose to give my skin a shimmery and glowy look.
Last but not least, lipstick! My favorite shade to use is Revlon's Rum Raisin. I don't like to apply it very heavy. I just use one small swipe and then rub my lips together. Lipgloss is optional. <3
Ta-da! You're finished!
PS: Sorry if this was unnecessarily long and complicated. OTL I'm bad at explaining my process with my makeup honestly. ;u;
#lesbian#lesbian blog#wlw blog#queer#lesbo#wlw#dyke#queer community#sappho#dykeposting#ask me questions you'd like to know#anon ask#lesbianism#femme lesbian#femme dyke#femme#high femme#makeup#makeup routine#Princess Talk#angel answers
5 notes
·
View notes
Text

THROWBACK THURSDAY
Revlon ColorStay Liquid Liner in Blackest Black Claire's Lavender Liquid Eyeliner L'Oreal Paris Voluminous Million Lashes Mascara
VIDEO BLOG POST
Two-Toned Eyeliner Makeup Tutorial
@hazeltailofficial / @hazeltail / hazeltail on youtube / hazeltailofficial on tiktok / hazeltailofficial on ig
#makeup tutorial#makeup tutorials#eye makeup#eyeliner#winged liner#winged eyeliner#graphic liner#graphic eyeliner#makeup of the day#motd#makeup of tumblr#makeup tumblr#beauty community#beauty youtuber#makeup#beauty#makeup looks#makeup lover#makeup blogger#beauty blog#beauty blogger#throwback thursday#tbt#hazeltail#hazeltail official#hazeltailofficial
0 notes
Text


Hi guys,
If you have been reading my blog for a while you will know I like to play around with colours but one thing I have never been that good at is graphic liner. Online everyone has been obsessed with this style of makeup for a while and so many tutorials feature eye products from Made By Mitchell so I decided why not try out some products.
Though his brand is very well known for his cream blushes a lot of people also recommend his liquid eyeliners named Graph-Ink Liquid Liners , £12.00. His eyeliners have a beautiful range of colours from neturals to neons to pastel shades so of course I had to grab a few shades.
I went for the pastel shades and picked up Candy Man (baby pink), Bubbles (baby blue) and Lielac (pastel lilac purple). I figured the pastel shades would be great for spring makeup looks. Each liner has a thin brush tip and pot to apply your liner and personally I am a massive fan of the formula. Each liner is crazy pigmented and once applied dries down so it lasts all day!
I managed to create this colourful look using Candy Man and Bubbles which you can see above. Usually I think graphic liner looks really hard to achieve but using these liners made it so much more easier! If you want to check out the rest of the colours I have linked them above and if you want to see more tutorials with these liners then let me know!
Lots of love
Bella x x
#MADE BY MITCHELL#GRAPH-INK LIQUID LINER#made by mitchell graph-ink liquid liner#liquid liner#liner#colourful eye makeup#colour eyeliner#eyeliner#graphic liner#mua#beauty blog#beauty blogger#blog#makeup review#viral makeup#lifestyle#lifestyle blog#beauty review#makeup#beauty#make up#photography#cosmetics#makeup blogger#me#my photography#makeup look#girl#makeup bag#grwm
3 notes
·
View notes
Text
Unlock the Secrets of Perfect Eyeliner with These Amazing Hacks! 💄✨

Are you ready to take your eyeliner game to the next level? Look no further because I've got some incredible hacks to share with you! 💁♀️💅
#SmokeyEye: Master the art of the sultry smokey eye for a glamorous look that will turn heads!
Don’t Tug the side of your Eyes: Protect your delicate skin by avoiding tugging when applying eyeliner.
Eye Shape Tutorial: Learn how to enhance your unique eye shape for a customized eyeliner look.
Eyeliner Pencil for The Most Beautiful Smokey Eye: Achieve a flawless smokey eye using an eyeliner pencil for precision and depth.
Fade Your Eyeliner To Make Your Eyes Bigger: Create the illusion of larger eyes by softly fading your eyeliner at the edges.
Get Your Eyeliner Color By Using Eye Shadow: Experiment with different eyeshadow shades to customize your eyeliner color.
Know Your Eyeliners Well Before You Apply them: Familiarize yourself with different types of eyeliners and their application techniques.
Place Dots on Your Eyelid and Connect Them!: Use dots as a guide to create a perfect eyeliner wing.
Spooning For Curved Wing: Use a spoon as a tool to achieve a flawless curved eyeliner wing.
Taping the Eye For Perfect Eyeliner Line: Use tape to create clean, precise lines for your eyeliner.
The Graphic Guide: Master the graphic eyeliner trend with step-by-step guidance.
The Right Eyeliner Color Changes Your Look: Choose eyeliner colors that complement your eye color and skin tone for a stunning effect.
Trace & Fill In: Outline your eyeliner shape before filling it in for a polished finish.
Use a Business Card for Perfect Cat Eye: Achieve the perfect cat eye flick using a business card as a stencil.
Use Your Pinky Finger as a Stabilizer: Improve precision and control by resting your pinky finger on your cheek while applying eyeliner.
awesome eyeliner hacks how did you miss this
Congratulations, you're now equipped with insider tips to elevate your eyeliner game like never before! 💃💄 Don't keep these secrets to yourself – share them with your friends and let's slay those eyeliner looks together! 🔥✨
1 note
·
View note
Text
Graphic Eyeliner Looks For Every Occasion

The Artistry of Graphic Eyeliner Trends
Get ready to dive into the mesmerizing world of graphic eyeliner looks that are shaking up the beauty scene.
At MobileStyles, we believe in empowering your unique style, and what better way to express your creativity than through your eyes?
Buckle up as we explore the evolution, techniques, and everyday wearability of graphic eyeliner looks that will make you the talk of the town!

Evolution of Graphic Eyeliner
Imagine a world where eyeliner is not just a line but a canvas for your artistic expression. Graphic eyeliner has come a long way, evolving from a subtle accent to a bold statement. From the runways to everyday street style, the graphic eyeliner trend has infiltrated the beauty routines of makeup enthusiasts worldwide. At MobileStyles, we celebrate the evolution of beauty trends, and graphic eyeliner is no exception.
The influence of pop culture and historical artistry has paved the way for geometric shapes, double lines, and negative space designs. As we delve into the origins of graphic eyeliner, it's clear that it's not just makeup; it's a form of self-expression and a celebration of individuality.

Types of Graphic Eyeliner Looks
Let's talk shapes, lines, and a touch of the avant-garde! Graphic eyeliner looks offer a playground of possibilities for your eyes. Whether you're into bold triangles, sleek rectangles, or abstract designs that defy convention, the options are as diverse as your imagination. Double and triple lines add depth and drama, while negative space allows you to play with edgy aesthetics.
Experiment with Geometric Shapes:
Play with triangles, squares, and rectangles for a modern twist.
Embrace abstract shapes for avant-garde, runway-inspired looks.
Layering Double and Triple Lines:
Create depth by layering multiple lines with precision.
Use contrasting colors for an eye-catching and dynamic effect.
Mastering Negative Space:
Integrate empty spaces strategically for an edgy and sophisticated look.
Balance negative space with filled-in areas for a harmonious composition.

Tools and Techniques
Let's talk tooling! Achieving those flawless graphic eyeliner looks requires the right products and techniques.
Versatile Eyeliners:
Opt for liquid, gel, or pencil eyeliners in pigmented, long-lasting formulas.
Choose colors that complement your unique style and the mood of your look.
Precision Brushes:
Fine-tipped brushes for intricate designs and details.
Angled brushes for sharp lines and seamless application.

Graphic Eyeliner for Every Eye Shape
No two eyes are the same, and neither should your graphic eyeliner looks be! Whether you have almond-shaped, hooded, round, or monolid eyes, there's a graphic eyeliner style that will enhance your natural beauty.
Almond-Shaped Eyes:
Emphasize your natural shape with bold lines along the lash line.
Experiment with winged tips for added drama.
Hooded Eyes:
Create the illusion of larger eyes by extending your graphic liner slightly above the crease.
Opt for thinner lines to avoid overwhelming the eyelid.
Round or Monolid Eyes:
Elongate the eyes with upward-angled lines for a lifted look.
Experiment with graphic shapes that enhance the unique curvature of your eyes.

Future Trends in Graphic Eyeliner
As we look to the future, the world of graphic eyeliner is poised for even more innovation and creativity. Social media platforms and beauty influencers will continue to shape trends, offering new ideas and techniques to beauty enthusiasts.
Technological Integration:
The use of augmented reality (AR) for virtual makeup try-ons and tutorials.
Beauty apps, like MobileStyles, offer interactive features for trying out graphic eyeliner looks virtually.
Sustainable and Inclusive Designs:
A focus on eco-friendly eyeliners and brushes.
Embracing diverse styles and techniques for all beauty enthusiasts.
At MobileStyles, we stay ahead of the curve, bringing you the latest trends and innovations in the beauty industry. Our platform is designed to connect you with skilled beauty professionals who can help you stay on-trend and express your unique style.

Conclusion
Graphic eyeliner is not just a trend; it's a form of artistic expression that allows you to showcase your personality and creativity. At MobileStyles, we celebrate beauty in all its forms and offer a platform to connect you with beauty professionals who understand your unique style.
Book a session through MobileStyles to embark on a personalized journey of graphic eyeliner artistry. Our beauty professionals are ready to guide you, inspire you, and bring your graphic eyeliner dreams to life. Join us in embracing the future of beauty through expressive and bold graphic eyeliner looks!
0 notes