#godmode9
Explore tagged Tumblr posts
Text
Accidentally fixed my bootleg Pokémon HeartGold!
I got a loose bootleg cartridge of Pokémon HeartGold at some point in the past, but I ran up against an apparently common bootleg glitch where it stopped properly loading my save and was effectively hardlocked.
I’ve run the game on a few different emulator saves since then, so I decided “What the hell?” and reset the cartridge to see what it would do… and it totally fixed it! Used GodMode9 to restore a new save file of mine, and now I can carry on my new main save (hopefully my last one to go for 100%) on my cartridge, and swap it between systems! Suuuuuper happy, as that makes swapping systems for trading way easier :3
3 notes
·
View notes
Text
youtube
After you've modded your system, remember to backup your entire game collection using GodMode9!
Both video guides are up on Patreon right now for folks who don't feel like using YouTube.
Extra links:
Patreon: https://www.patreon.com/gamexdata
Ko-Fi: https://ko-fi.com/gamexdata
Twitter: https://twitter.com/_GameXData
How to Mod Your 3DS: https://youtu.be/UZ8U5hKITYw
Citra Game Dumping Instructions: https://citra-emu.org/wiki/dumping-installed-titles/
youtube
Quick! eShop's closing! Mod your 3DS!
Here are the links from the video description on YouTube, by the way. I'm currently in the process of uploading the video to my Patreon page in case you want a higher-quality, ad-free version to watch.
Patreon: https://www.patreon.com/gamexdata
Ko-Fi: https://ko-fi.com/gamexdata
Twitter: https://twitter.com/_GameXData
3DS Hacks Links:
Main Page: https://3ds.hacks.guide/
Seedminer: https://seedminer.hacks.guide/
Bannerbomb Injector (3dstools): http://3dstools.nhnarwhal.com/#/bb3gen
Boot9Strap Setup (w/ Safe Mode): https://3ds.hacks.guide/installing-boot9strap-(usm)
Boot9strap Setup (Fredtool): https://3ds.hacks.guide/installing-boot9strap-(fredtool)
App Downloads (Finalizing Setup): https://3ds.hacks.guide/finalizing-setup
41 notes
·
View notes
Text
did u guys know that godmode9 has a hidden paint feature??? pretty cool huh :o]c

#''what program do you use for your art'' I USE GODMODE9 BABEY#ive been tweaking my artstyle a little#i kinda like it :oP#i wish i knew how to make characters more expressive tho. im working on it.....#sovstuck#sovereignstuck#pleome alrium#ᯓ★ p@rrdy cre@tes ✮⋆.˚#ᯓ★ p@rrdy @rrt ✮⋆.˚
2 notes
·
View notes
Text
cant even pirate project mirai fuck this stupid baka life
#i have a Specific reason why i can't and it's kind of convoluted but AUGH#basically. i have my 3ds' sd card formatted. and because it's formatted i can't put any files on it that are 4GB or larger#project mirai's rom is exactly 4GB#so like. okay. just convert it to a cia file. right#but the only way i know how to do that is using godmode9. which would require the file BEING ON THE SD CARD ALREADY#i've looked for .3ds to cia converters but they're uh. complicated ?#complicated in that they actually seem difficult to use and complicated in that they're explained in terms that don't make any sense to me#cause i dont actually know shit about computers i just work here#i just wanna play mikugame😔#blabber tag
2 notes
·
View notes
Text
If you ever feel too cringe: a joke I made with friends spiraled into an anime plot involving Nintendo 3DS programs as human versions of themselves. Homebrew/CFW included.
#my stuff#the comment was 'checkpoint and godmode9 should kiss with tongue'#if it helps the dsi version of flipnote studio is a bright orange dude with a froggy hat and frog-themed clothes
2 notes
·
View notes
Text
i fucked all this shit up moving stuff from my old 3ds to my new one :( now i have to completely start over in all the games i was playing. which is so sucks because i was 6 badges into pokemon y and now i have to START OVERRRRR
#☀️#and its all because this fucking 3ds came with luma so i had to format my sd card and do a bunch of fucking#cocomelon ass shit to my new 3ds to get it running with godmode9 and all the homebrew apps#and i think something got fucked up along the way because i lost my movable.sed from my original 3ds :'/#and my sd card seems to have lost about 80% of the stuff on it.#SIGHHHH#all that yarn game and for what...
1 note
·
View note
Text
Oh no! What do I use now?
Been seeing some comments and posts of people wondering what they should do now that dashboard unfucker no longer works and whether there are alternatives, so I thought I'd just say that there are plenty of options!
Some are better than others, and personally I use godmode9, but the thing I would MOST recommend to the average user who isn't super code-savy is to simply develop a strong sexual desire for an inanimate object or two! It's completely free and is perhaps the best way to improve your tumblr experience!
131 notes
·
View notes
Text
this is THE scariest thing i've ever done to this device, actually
gonna hack my 3ds >:3
#ace rambles#self reblog#making a sysnand backup in godmode9 rn#i think i'm almost done with the whole process (◍^ᴗ^◍)✧*。#3ds hacking#ace's 3ds hack adventure
19 notes
·
View notes
Text
ACNL CUSTOM VILLAGER/NPC/NPC VILLAGER GUIDE 2025
PLEASE READ THROUGH EVERYTHING BEFORE ATTEMPTING!!!
I AM NOT RESPONSIBLE FOR ANYTHING THAT HAPPENS WITH YOUR 3DS OR GAME!!!
PLEASE BACKUP YOUR FILES BEFORE ATTEMPTING!!!
Hi! I'm here to make a guide on how to make a custom villager/switch an npc to a villager in 2025, since there are not a lot of guides, and any guides out there are now old and obsolite
WHAT YOU'LL NEED:
A hacked 3DS with CFW
Computer
7-Zip or Winrar
Animal Crossing: New Leaf (cartridge or digital)
Any Image Editing Software (i.e FireAlpaca, Gimp, Photoshop)
Ohana 3DS [link]
Ohana 3DS Rebirth [link]
HxD [link]
First things first- you're gonna need the romfs files of your game. The way to get them is through GM9 (GodMode9) The way to acsess GM9 is to turn on your 3DS, and as it boots up, hold down the START button.
Besides editing the sprites, this will be the LONGEST part out of this entire process. The romfs has EVERY SINGLE GAME ASSET, so youre basically dumping every single thing from the game onto your SD. For me, this took ALMOST 2 HOURS, so be ready!
FOR CARTRIDGE
Go to [C:] GAMECART ()
Go to the file that has .3ds (NOT THE .trim.3ds)
Click NCSD image options…
Click Mount image to drive
Click yes when prompted
Click content0.game
Go down to romfs and hit Y to copy the romfs files
You can now paste the romfs files to any folder on your SD, but if you want to be organized, created a designated folder for your romfs on the root of your SD
To get to your SD, go back by hitting B until you get to the first page
Go to [0:] SDCARD and click on it, and you'll be in your SD card.
Find the folder you'd like to paste your romfs in
Open the folder and hit Y to paste the romfs, and now you wait
FOR DIGITAL
Hit the Home Menu button in GM9
Go down and click on Title manager
Click [A:] SD CARD
Find Animal Crossing: New Leaf
Go to Open title folder and click it
Click 00000000.app
Click NCSD image options…
Click Mount image to drive
Click yes when prompted
Click content0.game
Go down to romfs and hit Y to copy the romfs files
You can now paste the romfs files to any folder on your SD, but if you want to be organized, created a designated folder for your romfs on the root of your SD
To get to your SD, go back by hitting B until you get to the first page
Go to [0:] SDCARD and click on it, and you'll be in your SD card.
Find the folder you'd like to paste your romfs in
Open the folder and hit Y to paste the romfs, and now you wait
When that is finished, power off your 3DS, eject your SD, and put it into your computer.
Move your romfs to your computer or a USB, that way you don't have them clogging your 3DS' SD and you have a backup of the vanilla files
To keep things organized, make a folder to copy any files you're going to edit to that folder.
Finding NPC files
FOR VILLAGERS
romfs> Npc> Normal> Model
There you can find the .bcres files of every villager
FOR NPCs
romfs> Npc> Special> Model
There you can find the .bcres files of every NPC
Open Ohana3DS rebirth to open and view the .bcres files so you can find the villager or NPC you're looking for
Once you find them, copy them to your desiganted folder
If you want to edit a villagers name you'll need the STR_NNpc_name.umbst file
To find the file go to romfs> Script> Str and find the file, then copy it to your designated folder
If you want to edit your villager's icon go to
romfs> Item> Model
the file will look like brm_(villager id).bcres , FOR EXAMPLE brm_mus17.bcres
When making an NPC into a villager, you're going to have to find a villager to replace. FOR EXAMPLE I edited Sabel and replaced Penelope, so I renamed Sabel's file, hgc.bcres, to mus17.bcres
EDITING THE VILLAGER/NPC
use this guide when it comes to editing the textures and renaming your villager [link]
LOADING YOUR FILES
Now that you have finished your character, heres how you'll put your files on your SD so they'll load into the game
Put your 3DS's SD card into your computer
on the root, located the luma folder
now go to luma> titles> and find Animal Crossing: New Leaf's title ID
US title ID's are
0004000000198F00 for New Leaf
0004000000086300 for Welcome Amiibo
If there is no title ID folder for ACNL, make one
Inside the title ID folder make a romfs folder
In the romfs folder, make a folder for whatever files you edited, so if you edited an NPC, the script, and the NPC icon make 3 folders and name them: Item, Npc, Script
Lets start with Npc first, if you edited a villager or replacing a villager with an NPC, open the Npc folder, make a folder named Normal, open the Normal folder, and make a folder named Model, and in the Model folder put your .bcres file
So luma> title> (title ID)> romfs> Npc> Normal> Model
If you edited an NPC open the Npc folder, make a folder named Special, open the Special folder, and make a folder named Model, and in the Model folder put your .bcres file
So luma> title> (title ID)> romfs> Npc> Special> Model
Now with the script, open the Script folder, and in the Script folder, make a folder named Str, and in the Str folder is where you'll put the .umsbt file
So luma> title> (title ID)> Script> Str
Finally, the villager icon. In your Item folder, make a folder named Model, and in your Model folder, put in the .bcres file that is the villager's icon
So luma> title> (title ID)> Item> Model
Once you have finished that, put your SD back into your 3DS, turn on your console, boot up Animal Crossing, and your custom villager should be there waiting!!
That's All!!
#fan#fandom#animal crossing#animal crossing new leaf#animal crossing hacking#hacking#hack#acnl#ACNL#custom#customs#3DS#3ds#CFW#cfw#rom hack#rom hacking#guide#animal crossing hacks#mod#modding#tutorial#nintendo#Nintendo#Nintendo 3DS#nintendo 3ds#villager
4 notes
·
View notes
Text
a comprehensive guide to custom villagers
when making my custom villager it was very difficult to find good tutorials as many of them would point to deleted pages or only cover things i already knew, so i have decided to make my own complete tutorial. please let me know if you need any aditional help! i will try my best to keep this tutorial up to date and clarify it if needed.
it's important to note that these villagers will NOT show up in online play and dream towns. since only your game is edited, other players will see whichever villager you've replaced instead of the one you've made unless they also mod their game.
first things first, you will need a hacked 3ds with luma3ds and an SD card for this. you can probably play in citra, but i dont really know how using mods in citra works so i will focus on luma3ds for this tutorial.
if you haven't hacked your 3ds yet, do not follow a video tutorial: they can become outdated very easily with no indication of it and following outdated guides makes it a lot more likely that you'll brick your console. follow the guide on 3ds.hacks.guide instead.
other software you will need:
hackingtoolkit9ds to decrypt and unpack the rom
kukkii to extract the textures and put them back in
a drawing software (can be anything, even mspaint) to edit the textures
blender or another 3d editing software to preview what you're doing
010 editor to edit the bin and .umsbt files
step 1: getting a rom
if you're simply downloading the rom online, you may skip this step.
for those who wish to dump the rom from their console, you must first turn it on while pressing the START button to enter godmode9's menu. click the HOME button to see more options, then select "Title manager", then select where you've installed the title (SD card or the console itself). a list of all your installed games will appear. scroll down to Animal Crossing New Leaf or Happy Home Designer depending on which game you want your villager to be injected into.
once you've chosen the game, select "Manage title..." and choose either "Build CIA (standard)" or "Dump CXI/NDS file". you may then shut down the console and insert the SD card into your computer. the rom will be in the folder \gm9\out on the root of your SD card
step 2: decrypting/unpacking the rom
drag and drop your rom to the "PackHack" folder that hackingtoolkit9ds is in. rename it so that it doesn't contain any spaces or special characters.
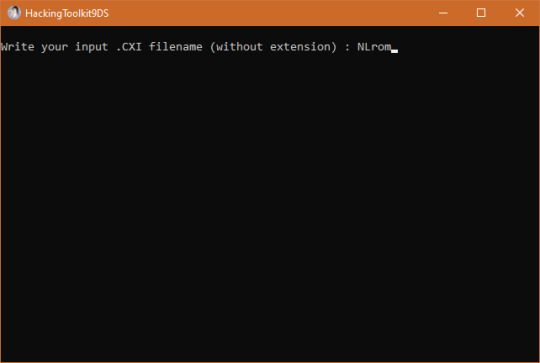
open up hackingtoolkit9ds and type either CE (for .cia roms) or CXI (for .cxi files) in the window that appears depending on the format of your rom. it will ask you to write the name of your file without the extension. type it and press enter and wait for it to do its thing.

step 3: making your textures!
you'll find your extracted villager models in the folder \ExtractedRomFS\Npc\Normal\Model
the first three letters in each .bcres file name represent the species. open up one of the files of the species you want to make yoir villager be. it doesn't have to be the file of the specific villager you want to replace as we can rename it later, but do be careful that certain villagers have slightly different models than the rest of their species (tucker having tusks or étoile having hairpins, for example)
since i wanted to make an elephant with tusks, i've picked tucker as my base. he uses model elp09.bcres


click the "Batch export PNG" button and choose the folder you want the textures to go in. you may then edit them as you wish. your textures do not need to be semi-transparent like the extracted textures are.
i like seeing the way things look as i work, so i get a copy of the model as a .dae file to open it in blender. you may get those from models-resource.com or you may extract them yourself using ohana 3ds rebirth, though ohana can be a bit unreliable at times. blender's "texture paint" tab also allows you to draw directly on the model, though i don't find it precise enough to my taste so i mostly use it to lay guidelines for me to draw over.

once you're satisfied with your model, make sure to draw the different expressions as well.
eyes 0: neutral
eyes 1: half-blink
eyes 2: blink
eyes 3: angry
eyes 4: sad
eyes 5: happy closed (think ^_^)
eyes 6: surprised
eyes 7: >_< face
mouth 0: neutral/smile
mouth 1: half-open
mouth 2: fully open
mouth 3: frown
mouth 4: half-open frown
mouth 5: fully open frown
you do not have to follow those expressions exactly: for example, being a plush elephant, tusker's mouth moves up and down as he speaks instead of opening and closing.
once everything is done, open the .bcres file in kukkii again and import all of your textures in the right slot (i've found the mass import button does not work for me), then save the file.

step 4: editing names and catchphrases
note: if the villager you are replacing is already in your town, editing the catchphrase in the game's files will NOT change it in-game. similarly, if you are putting the villager in your town with marc robledo's save editor, they will have the catchphrase of the villager you've replaced unless you change it in the save editor yourself.
editing a villager's name or default catchphrase is quite simple, but the new name/catchphrase cannot be longer than the old one. if it is, it will mess up the names and default catchphrases of all the following villagers in the game files.
since you can edit the villager's personality in the game files, simply pick a villager with a long enough name and the right gender. you may also look at the villagers' favourite colors and styles on nookipedia to find one that most closely resembles the villager you wish to make.
since i want tusker to have the sisterly personality, i looked at all the sisterly villagers and i found that pashmina's tastes were close enough, so this is who tusker will be replacing. since her id is goa08, tusker's model needs to be renamed to goa08.bcres
you will find villager names in \ExtractedRomFS\Script\Str\STR_NNpc_name.umsbt and \ExtractedRomFS\Script\Str\STR_NNpc_name_ASR.umsbt
scroll down until you find the name of the villager you wish to replace and change it. the dots between each letter are NOT periods! make sure not to delete them. if you do delete one, or if the villager you're replacing has too many letters in its name, you can copy a dot from another name and paste it between the letters or in place of the extra letters.

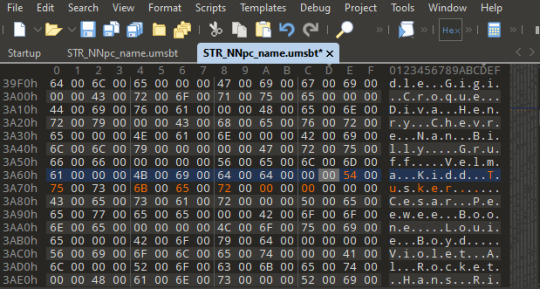
catchphrases are found in \ExtractedRomFS\Script\Str\STR_NNpc_habit.umsbt
step 5: editing birthdays, species and personalities
you may skip this step if you only wanted to edit the villager's name. as far as i know, this does not work in happy home designer.
first, download this template.
then, open up \ExtractedRomFS\Npc\Normal\ConstPack.bin in 010 editor and click View -> Line Width -> Custom Width... and enter a value of 34 to make all the villager IDs align.

next, click Templates -> Run Template and select the template we've downloaded. a list will appear at the bottom of the window. scroll through it until you reach the villager you wish to edit, (it will be highlighted in the top half of the window) mine being goa08.
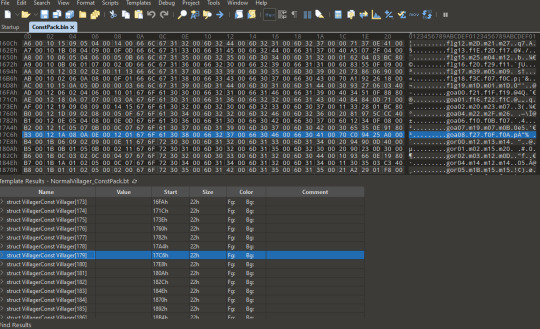
clicking the arrow to the left of struct VillagerConst will reveal a list of all the data this line contains. i will show you how to change birthday, species and personality.
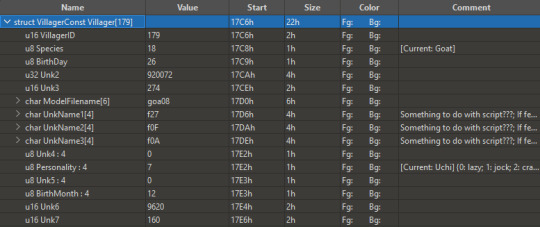
the page we downloaded the template on shows a list of "cases" for each field . for example, for the species field, we want tusker to be an elephant, which is case 0x01 on the page. we will thus type 0x01 in the u8 Species field of 010 editor. the same thing goes for the u8 Personality field. sisterly is 7.
the birth month and day simply require the date. tusker's birthday is may 1st, so i typed 1 in the u8 BirthDay field and 5 in the u8 BirthMonth field. leave everything else alone.

step 6: putting them in the game
luma3ds makes it really easy to put your villagers into the game as long as you pay attention to the folder structure of the original rom.
on the root of your sd card, there should be a folder named luma, and within it a folder named titles (if there isn't, you can create it.)
within that folder, create a folder named with the title ID of your animal crossing game. that title ID will depend on the region of your game.
you can then create a folder named romfs in which you will place your mod files while respecting the path of theoriginal files. for example, the path for the models will be \luma\titles\<game title ID>\romfs\Npc\Normal\Model
when all the files are in place, pop your sd card back into your 3ds and open the game. if the villager isn't in your town, use wisp and an amiibo card (or wumiibo) to see if they show up properly.
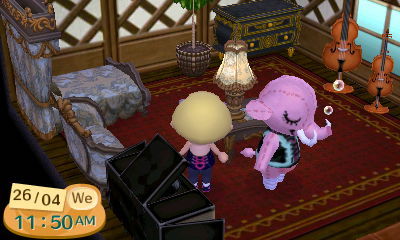
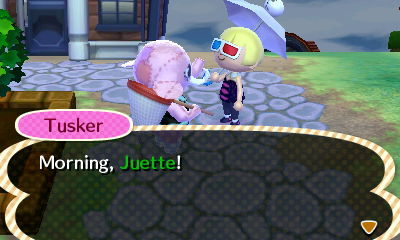
and that's it! enjoy your new villagers <3 feel free to tag me in your custom villagers, i'd love to see what you make!
did you find this tutorial helpful? you can buy me a ko-fi as thanks!
#animal crossing#acnl#acnl hack#animal crossing new leaf#animal crossing happy home designer#achhd#3ds#tutorials#nintendo 3ds
133 notes
·
View notes
Note
hi, game problem haver here!! gph from here on out. i cant get cia files to work. i think it may be a case of corrupted files being downloaded bc i have found the "activate cia files" option but they always fail so ill try again this weekend when i have time and repot back o7
by 'cant get CIA files to work' do you mean you're getting errors trying to install them from FBI? because in that case yeah you've likely got corrupted files. I would try to find different files. if you can't find different CIAs for the games you're looking for you may want to try taking unencrypted (3DS) files and converting them manually to CIA in godmode9. (I can give you a tutorial for this if you need it!)
11 notes
·
View notes
Text
After much toil and trouble(taking an hour and a half to remember I can reformat sd cards with godmode9) the new 3ds is moddedddd
Still working on a custom theme and splash screen and I'm gonna try n make a custom skin to rly show off when I do film customizing it but like!! <333333
Also in only vaguely related news the next villager to chose to move in in new leaf was tangy so clearly this save is blessed<333
#this is gonna be so fancy. My prized possession to match my bag<3#Also I might try n redo the 2ds homebrew or transfer everything if I feel like keeping the save files for. Some reason considering I have#Like nothing fully done on there#Ig I'm like halfway through steamworld dig but its not exactly a long game yk#So starting over would be cleaner and more convenient long term tbh
2 notes
·
View notes
Note
in godmode9, to make "brick my 3ds" appear as an option so you can access paint9, hold R while you press HOME
thank you for this knowledge heres a pic of my dogs in halloween sweaters :)

9 notes
·
View notes
Text
when you install a game onto your 3ds through godmode9, you dont need to keep the install files on your sd card... do you?
#my sd card is only 32gb and i have more game to uploag...#i guess that 999 will need to stay on there because. well i boot directly with twimenu#but if i've already INSTALLED smtiv....
4 notes
·
View notes
Note
hi, thank you for your work in trying to help keep gay awakening updated! Question: is there any way for someone to individually remove specific support options from the mod? I’d like to use it but would very particularly like to remove the chrom/Frederick option for my own playthroughs because Frederick is canonically stated to have helped raise chrom and lissa according to the drama cd so it makes me uncomfortable :’) if it’s not something that can be done I understand, but if it is id very much love to know how to do that!
Hey there, sorry to hear that Chrom/Frederick makes you uncomfortable! This is the first time I'm hearing about this part of the drama CD-I should really listen to/read that one of these days.
It's actually really easy to add/remove support options nowadays, you just need a program called Paragon and a full dump of the vanilla game's romfs (what the folder containing all of the game's files is called). I'll include instructions here below the readme. If you get stuck or can't get things working, feel free to join the discord and we'll be able to help you more directly!
Step 1 - Get a clean dump of your game's romfs.
Citra users: Right click on your game and select 'Dump RomFs'
Luma users: Launch your 3ds while holding Start to run GodMode9. (note: this guide was written for version v2.1.0 of GodMode9 and any older or newer releases may have different wording) - Physical: Select 'GAMECART' - Digital: Select 'SYSNAND SD' and go into 'title' folder. Open the '00040000' folder to find your games and select FEA's title ID. NA: 000A0500 EU: 0009F100 - Open 'NCSD image options…' and select 'Mount image to drive' then press A. Open 'content0.game' and press R+A while hovering over the romfs folder. Copy to 0:/gm9/out. This is the filepath you'll use to find it when you move to your computer.
Step 2 - Now that you have your romfs dump, you're going to download Paragon and start a new project. The project name can be whatever you want it to be, but make sure you select the right language and game. Your Extracted RomFS Directory is the vanilla romfs dump that you just grabbed, and the Output Directory is going to be UGA's romfs folder. The filepaths will be different when using Luma or if you move anything around for ease of access, but it should look something like this when you're done:
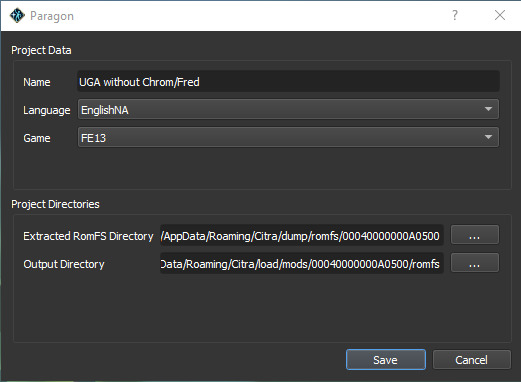
Step 3 - To remove the support options itself, you're going to open the Characters module in the section labeled "Core Data". From there, go to Chrom's name and switch to his Supports tab. Scroll down until you see Frederick's name, and change the Support Type from Fast to Non-romantic. Do the same thing for Frederick- select him and look for Chrom in his support tab to change the Support Type from Fast to Non-romantic. If the support type doesn't match for both characters, they won't be able to gain any support ranks at all, so make sure you change both of them!
Step 4 - The previous step removed the ability for them to support, but you probably want to remove the S support from the support log as well. In the main Paragon menu, you're going to look at the left side where it says "Nodes" and look for the option called "Support / Reliance List". From there, go to both characters and delete their last support (the one that says Support Level 4, with 0 as the Support Number). Make sure to select the correct Delete button as shown in this image:
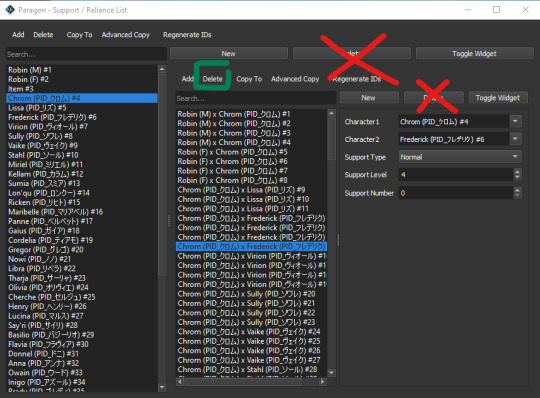
For Frederick, you're also going to want to delete his PC supports with Lucina, so scroll down and delete all three of the Fredrick x Lucina posts that have the Support Type set to Parent/Child. Now, make sure you also go to select the first support in these lists (the first support with male robin) and select the Regenerate IDs option furthest to the right (not the one on top!). The automatic 0 it gives you is fine, this step is to ensure the game reads the edited support log correctly- failing to regenerate IDs may cause issues. Now that that's been done you're finished in Paragon, so you can go to File > Save to save those changes!
Step 5 - The last thing you can do (if you so desire) is delete the actual supports themselves. You can find the support files in romfs/m/E, where you'll see a ton of files named with Japanese characters. Chrom and Frederick's modded supports are named "クロム_フレデリク.bin.lz" while Lucina and Frederick's PC support is named "マルス_フレデリク_親子.bin.lz"
Step 6 - After that, just make sure your romfs folder is where your mods go and you should be set! You should be able to see the changes both in-game and in the support log now.
Lastly, here are a few things you should know when it comes to updates:
The two files you've edited are the static.bin.lz (this controls many things in the game, including support options) and the RelianceList.bin.lz (the support log)
Unless the support options in the latest update change, or there's a bugfix regarding support gain, you will not need to replace your static.bin.lz! Just keep the one you edited when you update, everything will work perfectly fine. I don't expect the static.bin.lz to be updated frequently, but I will be tweaking support options for the Spotpass characters later down the line so you will have to redo Step 3 when that happens.
The support log for UGA has not been finished yet, so the RelianceList.bin.lz WILL get updated in the next major release, so you will have to replace your own edited one. When that happens, you'll have to repeat Step 4 again, but that doesn't take too long so hopefully that's not an issue! When I finish the support log, you won't have to do this ever again.
And that should be everything! I hope it wasn't too confusing- after you set up Paragon for the first time it's honestly really easy to make changes to the game. It's a super friendly program, and you can do all sorts of silly things with it. Like I said though, you're welcome to join the discord for more direct help from us! We're friendly, I promise :P
6 notes
·
View notes
Text
I homebrewed my 3ds ages ago, and for the longest time, I wasn't able to create a SysNAND backup for whatever reason.
I've tried multiple uncourrupted SD cards with plenty of space to no avail. No one in the Godmode9 discord could figure it out either.
Everything else works fine, so I could've left it, but it taunted me every day. So I've decided to replace the SD card reader entirely as a last resort (and my circle pad while I'm at it).

If all else fails, at at least I'll have an excuse to splurge on a nicer used 3ds.
1 note
·
View note