#fyphotoshop
Explore tagged Tumblr posts
Photo
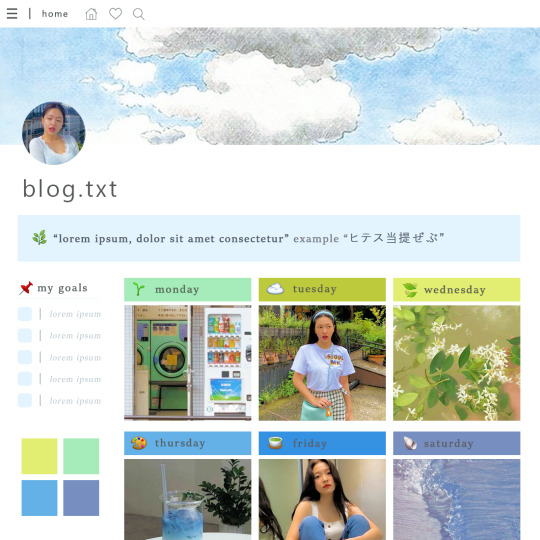
남 ノ … template.psd ♡ # 59 * !
♡ likᥱ/reblog this post if you downloɑd。
♡ plᥱɑse don’t repost。
♡ don’t claim as your own。
download
#template#completeresources#resources#donwload#yeri#red velvet#template psd#psd#fyresources#photoshop#psd file#PS#fyphotoshop
127 notes
·
View notes
Note
can you make a icon tutorial without the cut part but about combination with psd + colored backgrounds (gradients)? I do everything right, but I embarrass myself with the finalization.
okay so in this tutorial we are going to go from
this:

to this:

to this:

more under the cut…
okay so I use photoshop for my editing
once you have your image all set up your document should look something like this:

first I use the paint bucket tool to fill in the background behind Daisy:

and behind the paint bucket tool is the gradient tool which is the main point of the tutorial (the keyboard shortcut is G):

the key to this tutorial is to use layers, I find that my gradients always look better when I have each step on a different layer:

I typically end up using three layers, one for the highlight, one for the color, and the third for the main background:

on the very bottom layer underneath daisy I use the paint bucket tool and from the swatches pick out a nice shade of blue:

your document should look something like this:

now I do the highlight, to find the highlight for the icon I look at the character and with the white swatch and the gradient tool I recreate where the light is coming from on the layer above the background:

then I go and do something similar on the layer above that with a different color to get that gradient look:

feel free to experiment with colors! this is the main reason why I put the gradients on seperate layers so that I can experiment with color combinations
blue and a dark pink:

yellow and that same dark pink

purple and green

okay now comes the coloring part

I always just do a new adjustment layer and play around with things until it looks good, I really wish I could add specifically what works best but I found that for the best icons to just make a new PSD for every single one

be sure to click on that small arrow in the properties box so that you are editing the picture to go with the gradient and not the whole canvas the arrow is pointing down to indicate you are only working on that one particular layer

Daisy looks much better now!
now I select parts of her clothes to do some additional coloring fun;

I chose to do her shirt underneath the vest and using a new adjustment layer I did color balance and now I just slide around the bars till it looks good


then experiment with different colors and different gradients

finally, I just find a white texture (usually on google images) and I open it to the document and put it above all the gradient layers but underneath the character layer and change the mode to color burn

and that leaves you with:


#tutorials#itsphotoshop#chaoticresources#fyphotoshop#icon tutorials#my tutorials#totalnerdsicons#my icons#totalnerdstutorials#long post#so long I'm so sorry non editing people#answered#Anonymous
103 notes
·
View notes
Note
can you make a tutorial on how you make gifs?
why yes anon i think i will!!!
now before you decided to read-on just know that i do not do the classic screencap way and you need to have videos of whatever you are giffing already downloaded.
so read on if you wanna see how i make gifs like this:

for this i do not use torrent/s cause tbh idk how to use them so i use filmxy or if its a youtube video i use this converter. i do not currently have a site for tv shows tragicially but if you find one lemme know. but do try and keep the quality at 720 or 1040 just so your gifs look good
now that you have your video open photoshop (i use photoshop CC 2015 so if it looks different that is why) and go to file -> import -> video frames to layers
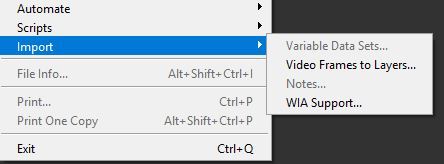
so this will open your files so you can pick your video you want to gif (I’m gonna gif cevans for this tutorial)
so once your video opens you will get a window that allows to pic the part you are going to gif. now the half triangles that are in blue, are the boundries for the gif layers, and the big triangle, that i pointed to in red, just shows you the video and you can move that arround to make sure that you have the right part. also i always click limit to every two frames (that way i can get in more layers and i dont think it makes all that much of a difference if you ask me)
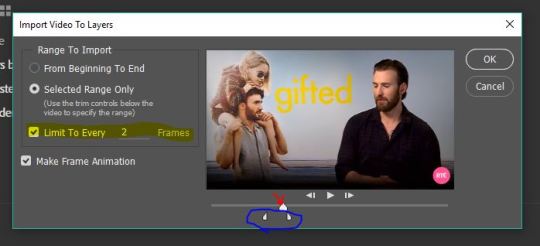
so once you have your pirameters click okay and it’ll convert it to layers, (now it make come up that the gif is too long if it says its less than 500 then your good to go, but if it says it more than 500 go back to this screen and make it shorter, your gonna have to import the video again if you want to make a gif that is right after that)
okay so now that your video has loaded your going to want to get your workspace set up sometimes essentials work instead of start (cause start doesnt have anything.

so mine is called untitled-1 and these are all the workspace that i use, the ones that i have checked atleast, go to window (once you have clicked all of them you can save as a new workplace the same place that i have highlighted in the above picture)
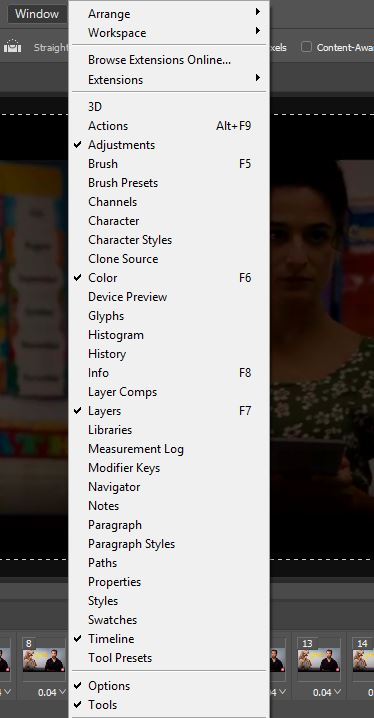
so now your screen will look something like this, and now you can start your process
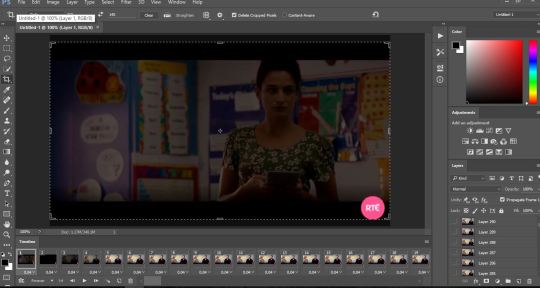
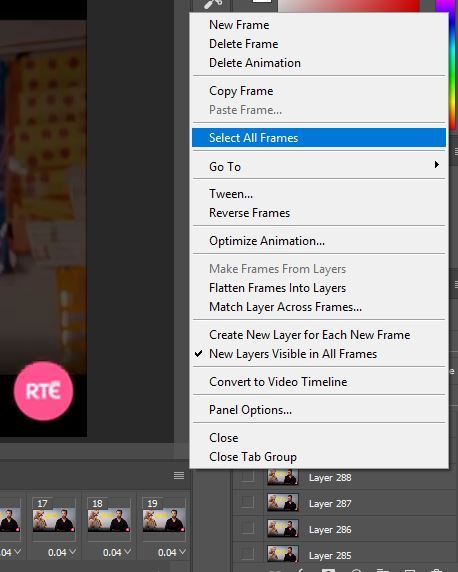
next step is to select all the frames so you can make them 0.1 seconds in between. (click the three little lines to select all the frames and then while they are still highlighted click the arrow at bottom of one of the frames of the timeline and convert to 0.4 seconds)
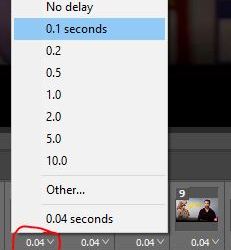
now we delete all the unwanted frames you can view the frames using the play button (which i circled in blue) and then select the first frame hold down the shift key and select the last frame. once all of the frames are selected press the delete button. repeat this till you only have the frames you want in the gif.

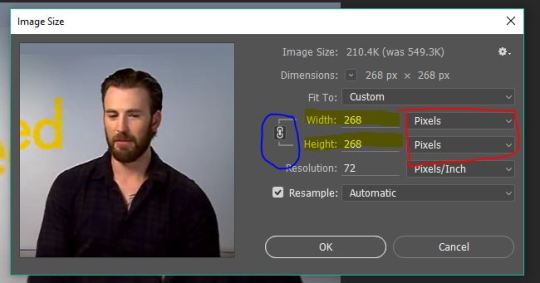
so now your gonna crop, its just like cropping any other picture just keep it within the layer so you don’t have to add in a fill layer. for dimensions reference you can check out this post. for mine I’m making squares of 268 x 268
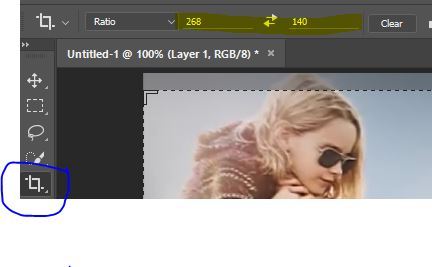
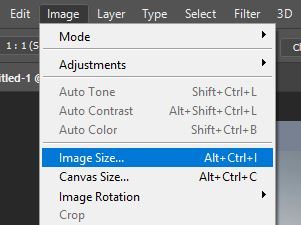
once your gif is cropped I change the actual dimensions of it, as in I make the gif actually 268 x 268. imagine -> imagine size (or press ctrl+ alt + i, thats what I usually do tbh)
so now you type in the dimensions, make sure to click the chain so that it stays the same that you cropped your gif and that way you only have to type in one measurement. also be sure that the dimensions are in pixels (!!!! very important)
so now is the fun part of coloring !!! but for this I’m just gonna say use a psd. Here is a whole bunch of psd’s you can download and use at your leisure here, here and here. So once you have a psd go to file -> open and pick out your psd.
once it is open I move the tab of the psd so that it is in its own window. now make sure it is clicked and go to the right side of ps and click group one. Once youve clicked it drag it over to your gif. (You can tell its going to the right gif because you can see the white line on the outside - noted by the black squiggle)
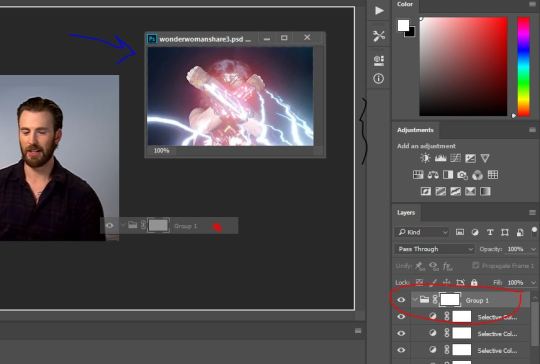
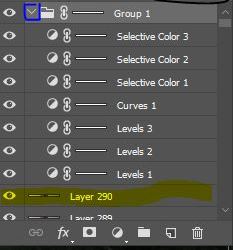
okay so once this is moved over you can edit the individual coloring layers , but just make sure it is all after your last picture layer. you can also collapse the group with the arrow on the side that i highlighted in blue. (note: i cropped the image so you could see all the different coloring layers and the last layer. but if you accidentally do this just click control z and it’ll undo it for you)
so once your happy with your coloring now we convert to video timeline which is super easy you just press this button at the bottom of the timeline
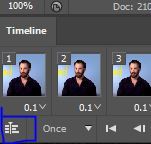
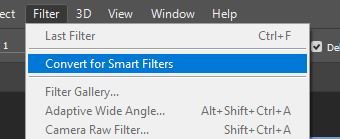
so once you have converted it select all the frames, select -> select all layers (or alt+ctrl+A). once all layers are selected you are going to convert for smart filters, flters -> covert for smart filters (if a dialog pops up just click yes).
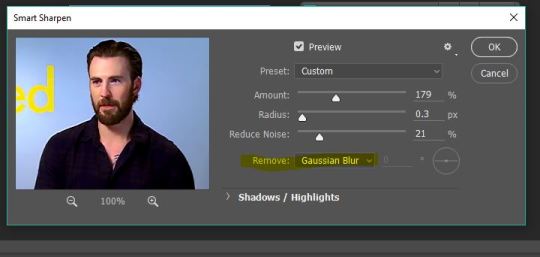
now is we are going to sharpen the imagie. filter -> sharpen -> smart sharpen. and this image will come up, set to custom and play around with the amount and stuff, also make sure it removes gaussian blur. (if you want to use my same amount radius and noise thats cool too)
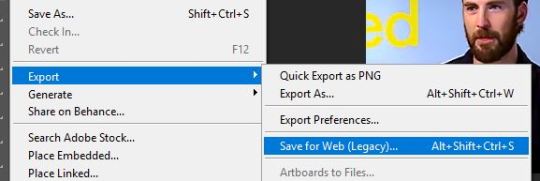
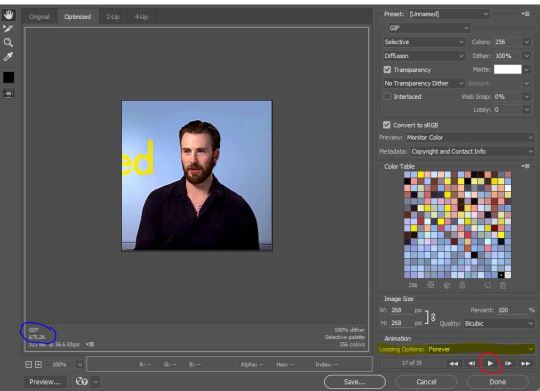
so now that your gif is sharpened we are ready to export. file -> export -> save for web legacy
now you are about to save it but before you do, make sure you play your gif to make sure it looks good (use the play button circled in red). make sure its less than 3 mb (you can see where I circled it in blue) and MAKE SURE!!! you looped it forever (that is highlighted in yellow, it is usually once so you have to change it to forever)
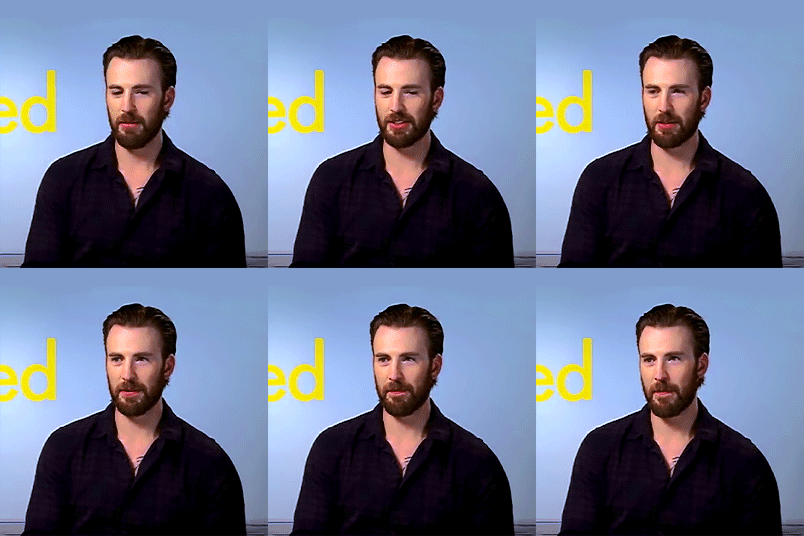
and then last but not least press save and name it whatever you want in your folder !!! (its just like any other picture your saving) and then you’ll end up with something like this!!!
well anon I hope all that made sense and was atleast a lil bit helpful
#gif tutorial#fyphotoshop#photoshop tutorial#yeahps#completeresources#lmao i was too lazy to tell you how to make your own psd sorry#anyway i hope this was helpful#it took me forev"#Anonymous#nat answers#mine
41 notes
·
View notes
Photo

Soy Hurrem, saltana de sultanas!
#hurrem sultan#hurrem hasseki#hurrem x suleyman#the magnificent century#sultan suleyman#hasseki's dinasty#itsphotoshop#its love#ItsMozali#fyphotoshop
28 notes
·
View notes
Photo

S O L T I U D E 09
4 customizable links
updates tab included
custom favicon (masterpost)
500px posts
pop up ask
live preview || code
T I B E R I U S 10
3 customizable links
updates tab included
custom favicon (masterpost)
500px posts
pop up ask
live preview || code
R U L E S
Please don't remove the credit
Don't repost and claim as your own
Feel free to edit and customize as much as you want!
♥ or reblog if you're using
#html#themes#theme rec#yeahps#fyphotoshop#itsphotoshop#yesphotoshop#theme-hunter#theme directory#codes#my themes
231 notes
·
View notes
Photo
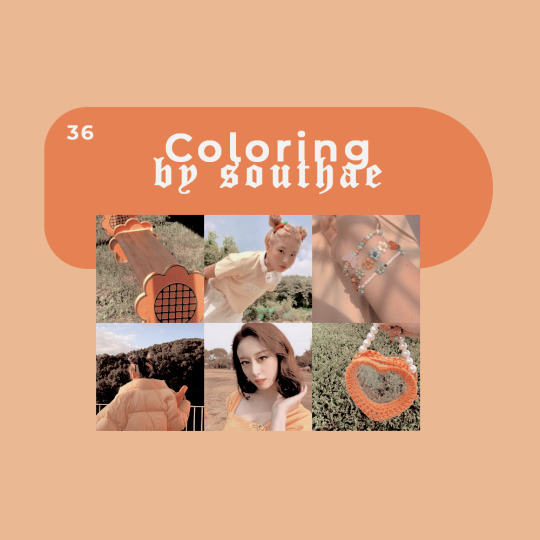
남 ノ … coloring.psd ♡ # 36 * !
♡ likᥱ/rᥱblog this post if you downloɑd。
♡ plᥱɑsᥱ don’t rᥱpost。
♡ don’t clɑim ɑs your own。
download
135 notes
·
View notes
Photo

남 ノ … template.psd ♡ # 54 * !
♡ likᥱ/reblog this post if you downloɑd。
♡ plᥱɑse don’t repost。
♡ don’t claim as your own。
download
#template#psd#dailyresources#completeresources#fyphotoshop#photoshop#japanese#templates#ps#kiko mizuhara#psd template#template psd#rp#rp resources
79 notes
·
View notes
Photo

남 ノ … coloring.psd ♡ # 38 * !
♡ likᥱ/rᥱblog this post if you downloɑd。
♡ plᥱɑsᥱ don’t rᥱpost。
♡ don’t clɑim ɑs your own。
download
#coloring#psd coloring#download#completeresources#fyphotoshop#ps#photoshop#resources#dailyresources#psd
89 notes
·
View notes
Photo
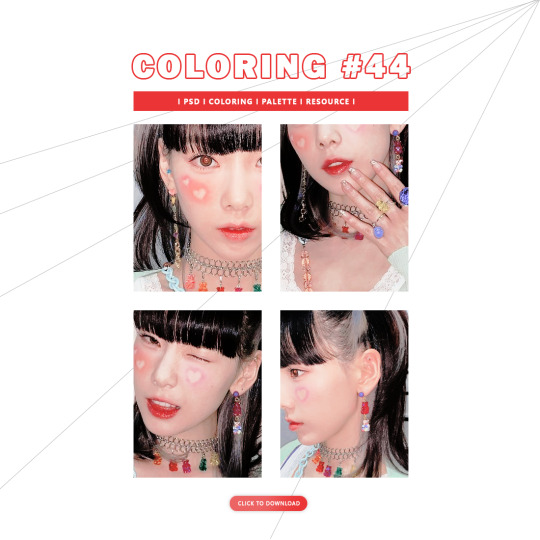
남 ノ … coloring.psd ♡ # 44 * !
♡ likᥱ/rᥱblog this post if you downloɑd。
♡ plᥱɑsᥱ don’t rᥱpost。
♡ don’t clɑim ɑs your own。
download
55 notes
·
View notes
Photo

남 ノ … coloring.psd ♡ # 39 * !
♡ likᥱ/rᥱblog this post if you downloɑd。
♡ plᥱɑsᥱ don’t rᥱpost。
♡ don’t clɑim ɑs your own。
download
#coloring#freepsd#psd#photoshop#completeresources#resources#dailyresources#momoland#pinkpsd#ps#fyphotoshop
67 notes
·
View notes
Photo

남 ノ … coloring.psd ♡ # 45 * !
♡ likᥱ/rᥱblog this post if you downloɑd。
♡ plᥱɑsᥱ don’t rᥱpost。
♡ don’t clɑim ɑs your own。
download
31 notes
·
View notes
Photo

남 ノ … coloring.psd ♡ # 37 * !
♡ likᥱ/rᥱblog this post if you downloɑd。
♡ plᥱɑsᥱ don’t rᥱpost。
♡ don’t clɑim ɑs your own。
download
56 notes
·
View notes
Photo

남 ノ … coloring.psd ♡ # 41 * !
♡ likᥱ/rᥱblog this post if you downloɑd。
♡ plᥱɑsᥱ don’t rᥱpost。
♡ don’t clɑim ɑs your own。
download
23 notes
·
View notes
Text
Efecto B&W profesional/ Professional black and white effect.
Hi! this is my first tutorial, sorry for my bad english. Let’s Go!!
How to make a professional B&W effect like this:


1, First, In the selection image, right-click and select "Duplicate layer"

2. In the "Destination" section we select "New Document"

3. In our new document, we selected "Image > Mode" and "Color Lab"

4. In the "Channels" bar Select "Luminosity"

5. “Select” > “All” or “Ctrl+A”

6. Copy and paste in the original document

7. Again we go to "channels" and select "Red" or "green" or "blue", which prefers

8. In the thumbnail we give "Ctrl + click"

9. Inverts the selection

10. Create a new fill layer and select the "Uniform color" option

11. We finally chose the black color

Basically it's all, that's how the result remains

If you have any questions please let me know
#graphic tutorial#itsphotoshop#ItsMozali#photoshop#Photoshop resources#photoshop help#fyphotoshop#wanna one#ha sungwoon#cloud#kim jaehwan#vocalteam#produce 101#black and white#special effects
12 notes
·
View notes
Photo

PSD OO7
(+) Like/reblog if you use (+) Don’t reclaim as yours (+) link: touch the image or here
#orange#snsd#sooyoung#seohyun#dreamcatcher#siyeon#jiu#wjsn#exy#kpop icons#itsphotoshop#itsmozali#pastel-net#aesthetic#png#psd#freelance#friends#my edit#fyphotoshop
13 notes
·
View notes
Photo

PSD OO4
(+) Like/reblog if you use (+) Don’t reclaim as yours (+) link: touch the image or here
#meiqi#wjsn#pink aesthetic#red#psd#itsphotoshop#itsmozali#fyphotoshop#kpop icons#kpop roleplay#pastel-net#free psd#love#ulzzang couple
5 notes
·
View notes