#first time making gifs for a while! photoshop finally allowed me to again
Explore tagged Tumblr posts
Text
There's a 2px radius Noise filter on all of these to make a faux "film grain" look to it and also to hide the not good film quality.
I don't know why the last gif needed so little frames to get under the size limit when the optimization was so generous with the second gif. I really wanted to capture the long, languid strokes the character was doing to his beard but Photoshop was like fuck you you only get less than two seconds of footage to gif.
Narrowing a sequence of actions down to ~30-40 frames was a nightmare for the third and because the character keeps moving around the screen and changing expression and mouth shape.
I find deleting frames easier in the "Frame Animation" stage because I can see immediately which numbered frame I'm removing and the final total frames. However, by all logic I know I should be using "Timeline" stage to clip the gifs because the frames don't get erased and I can freely go back to clipped frames without using the Undo function.
I didn't want to use the first gif's scene because he's not wearing glasses and looks like 15 other of Ewan's roles, but it's one of the handful of waist-up shots focused on him in the film.
MPV Player is suddenly working again and is capturing screenshots frame-by-frame now. I think the program resets its file-suffix for screenshots when it closes. If it's screencapping again without closing, it detects the missing numbers in the screenshot folder and adds to it, messing up the order of frames.
It's why for a while I was using PotPlayer's built-in screencapping feature because it allowed you to add a file prefix for the capture sequence and choose how the files were named (the suffix) before you start capturing -- they had timestamp in milliseconds, local time in ms, and sequential suffixes. Having a prefix made it way easier to separate different capture sequences. Unfortunately, at higher-resolution films I found that PotPlayer starts to fail at capturing every frame, making me resort to using MPV Player.


EWAN McGREGOR as BILL FORDHAM August: Osage County (2013)
184 notes
·
View notes
Photo


dangerinfiction/nik’s top 10 unus annus videos • inspired by markired & astralnexus!
thank you, mark, ethan, amy and all the team, for making my 2020 a whole lot better. memento mori. see you on the other side 🖤🤍
#crankgameplays#markiplier#unus annus#unus annus gifs#memento mori#ua#mine*#markired#first time making gifs for a while! photoshop finally allowed me to again#had to send them off with something.....#and yeah im super late#i was trying to do these during the stream but failed skdjskjdkjs#also were supposed to be just a top 5 but decided. fuck it. cant choose between all these masterpieces#mygifs
546 notes
·
View notes
Photo
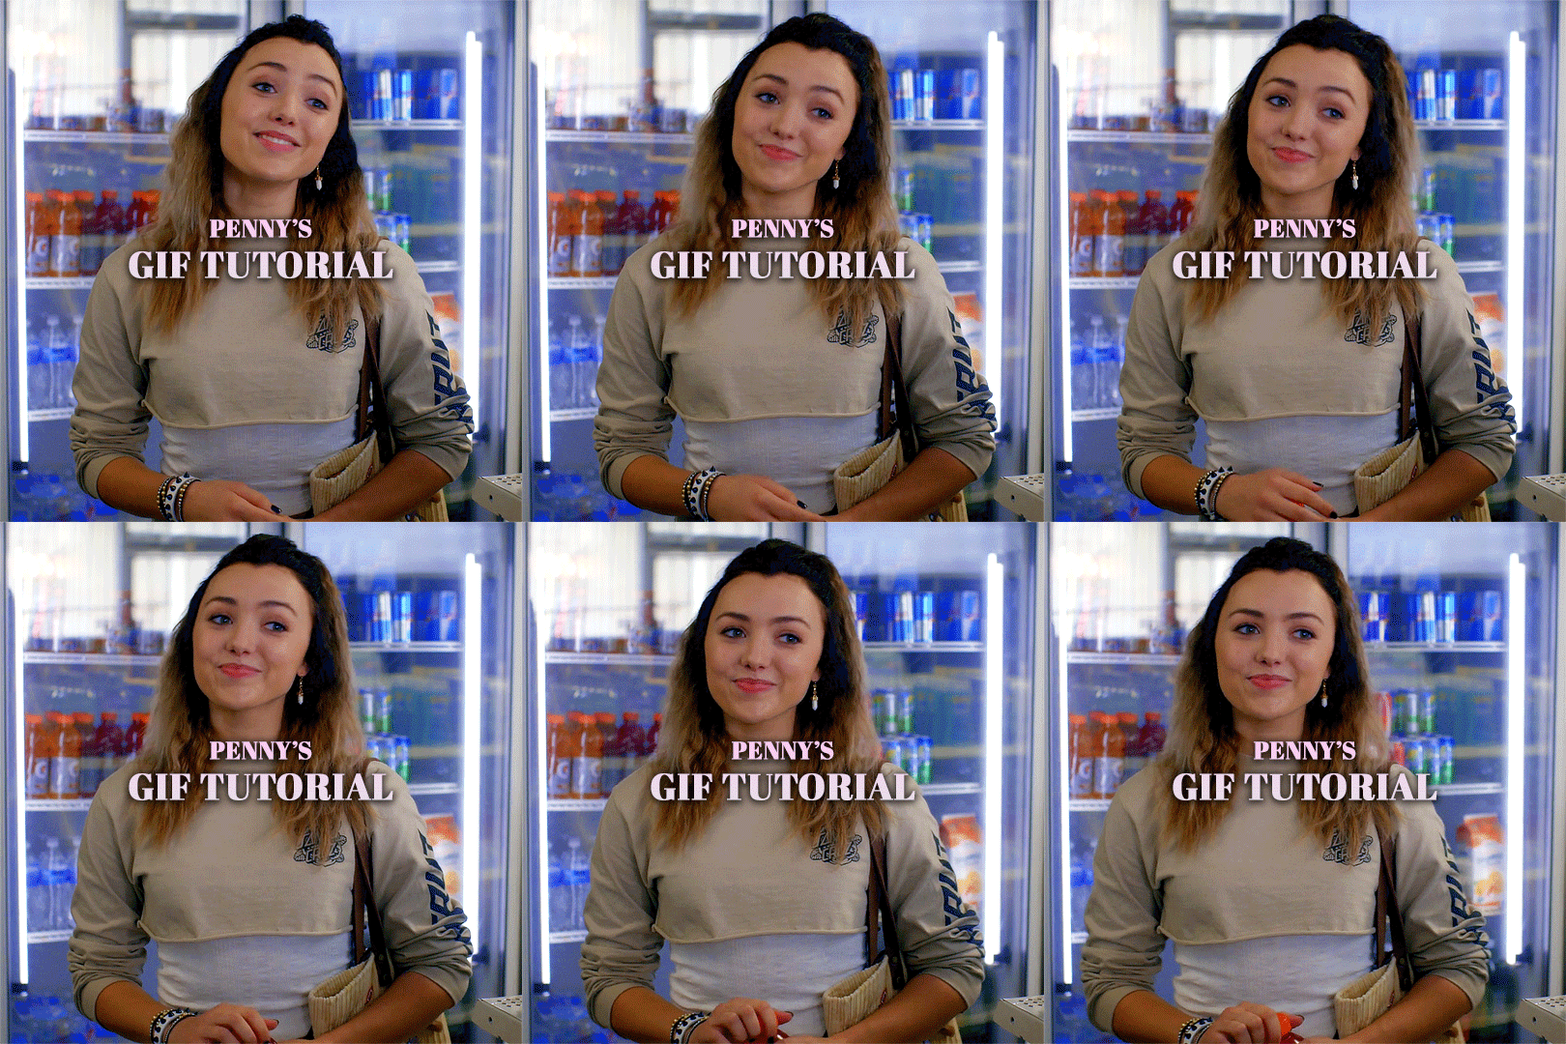
Hello! I was asked to make a tutorial for how I make gifs. I’m going to try and explain everything as best I can, but please don’t hesitate to reach out if you have questions :)
What You’ll Need
A video to gif
Photoshop with a video timeline option (I use creative cloud)
Step 1: Uploading frames to layers
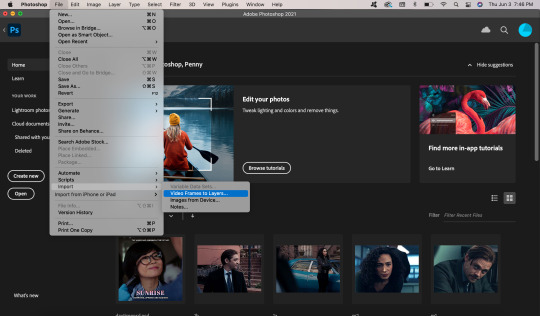
Once you have your video ready, you’re going to import it on photoshop through the file > import > video frames to layers.
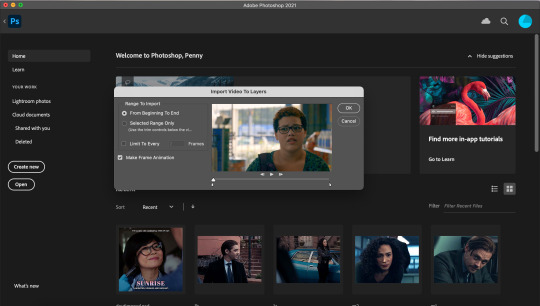
After you select which video you want to use, this screen will pop up.
Click on “selected range only” and use the little tick marks to shorten the video to the frames you want. TIP: The shorter the video, the easier it is to find the frames you want, so if the video I’m using is longer than about 5 minutes, I shorten it. My macbook allows me to shorten videos, but I used to use this program to shorten them when I had a windows computer.
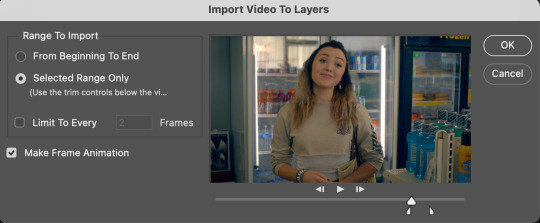
Click okay and photoshop will open your video clip as layers!
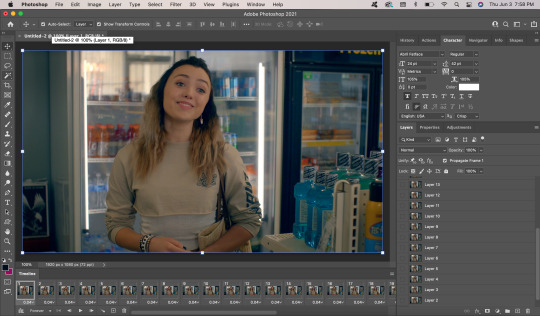
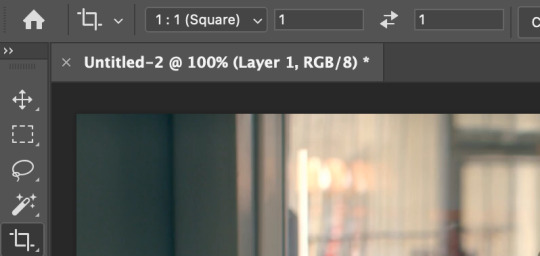
Step 2: Cropping, sizing, sharpening, and making the gif
First thing I do in photoshop is crop my gif. Click on the little square icon on the panel on the left side of your screen (highlighted below). You can either enter the dimensions you want the gif to be, or click on a premade option. Since I want my gif to be square shape, I selected “Square.”
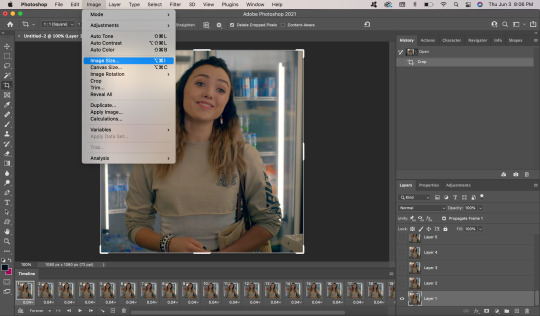
Next, I go to image > image size.
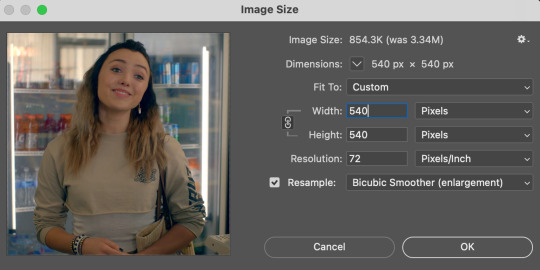
This box will come up, asking you to enter the width and height. Make sure the width is always 540p because that’s the dimensions for tumblr, but the height can be anything you want.
Next, you want to select all your frames. Do this by clicking on the first one, then clicking on the last one while holding the “shift” button.

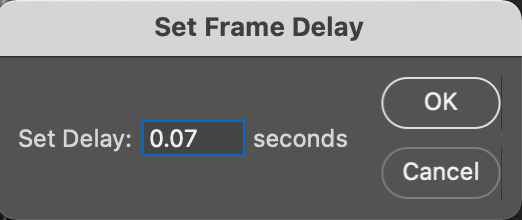
Click on the part that says the time (in this case, 0.04). A box will pop up. Change the time to some time between 0.06-0.08, depending on how many frames there are (the more frames, the shorter the time). This gif only has 22 frames so I’m going to put it at 0.07.
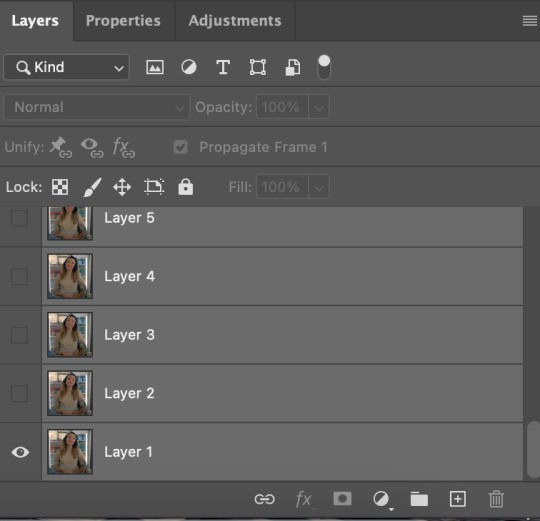
Next, you want to go to the side of your screen and select the layers. Do the same thing you did with the frames; click the first layer, then click the last layer while holding “shift.”
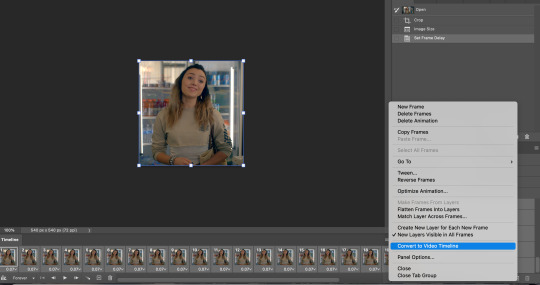
After all your frames and layers are selected, click on the little button that has four lines, on the top right of your frames. Click on “convert to video timeline.”
Next, go to filter > convert for smart filters.
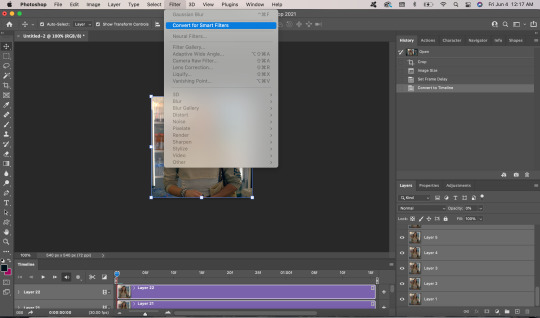
Your screen should now look like this.
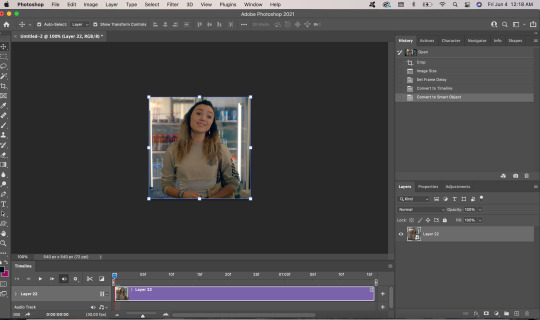
Now it is time to sharpen your gif! I use a sharpening action because it’s quicker, but I’ll show you how to do it manually. I used this tutorial to learn how to sharpen my gifs! Go to filter > sharpen > smart sharpen.
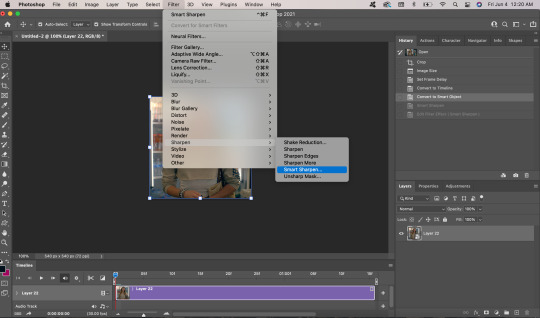
These are my smart sharpen settings, but you can play around with whatever looks good!
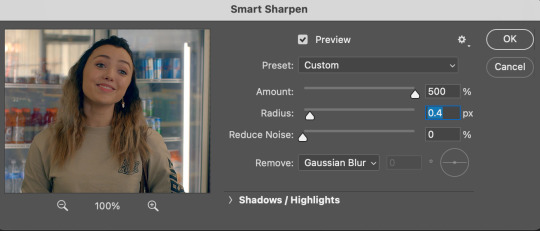
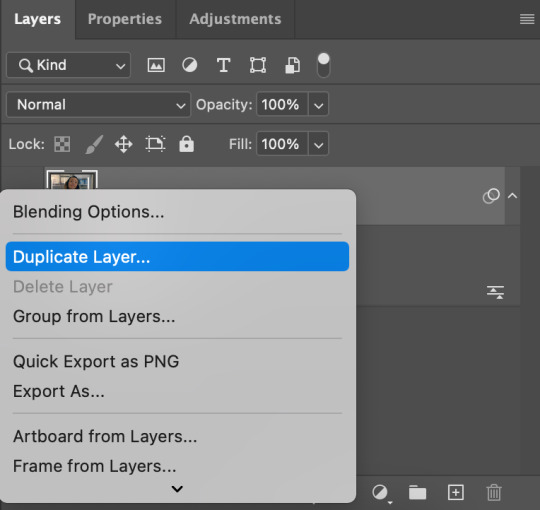
Next, I right click on the layer (that is now sharpened) and click “duplicate layer.”
Then, I go to filter > blur > Gaussian blur. These are my settings for it, but again, you can play around with them.
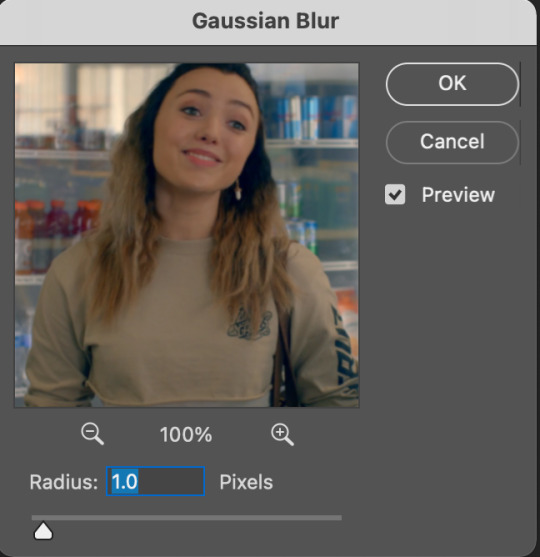
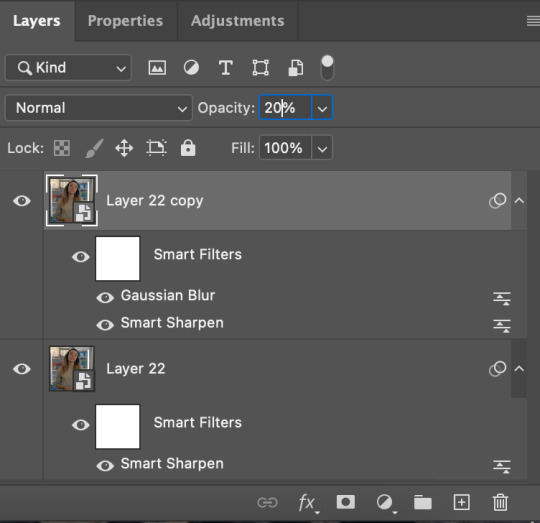
The last step for sharpening is to change the opacity to 20%. Go to your layers section and enter “20″ into the opacity box.
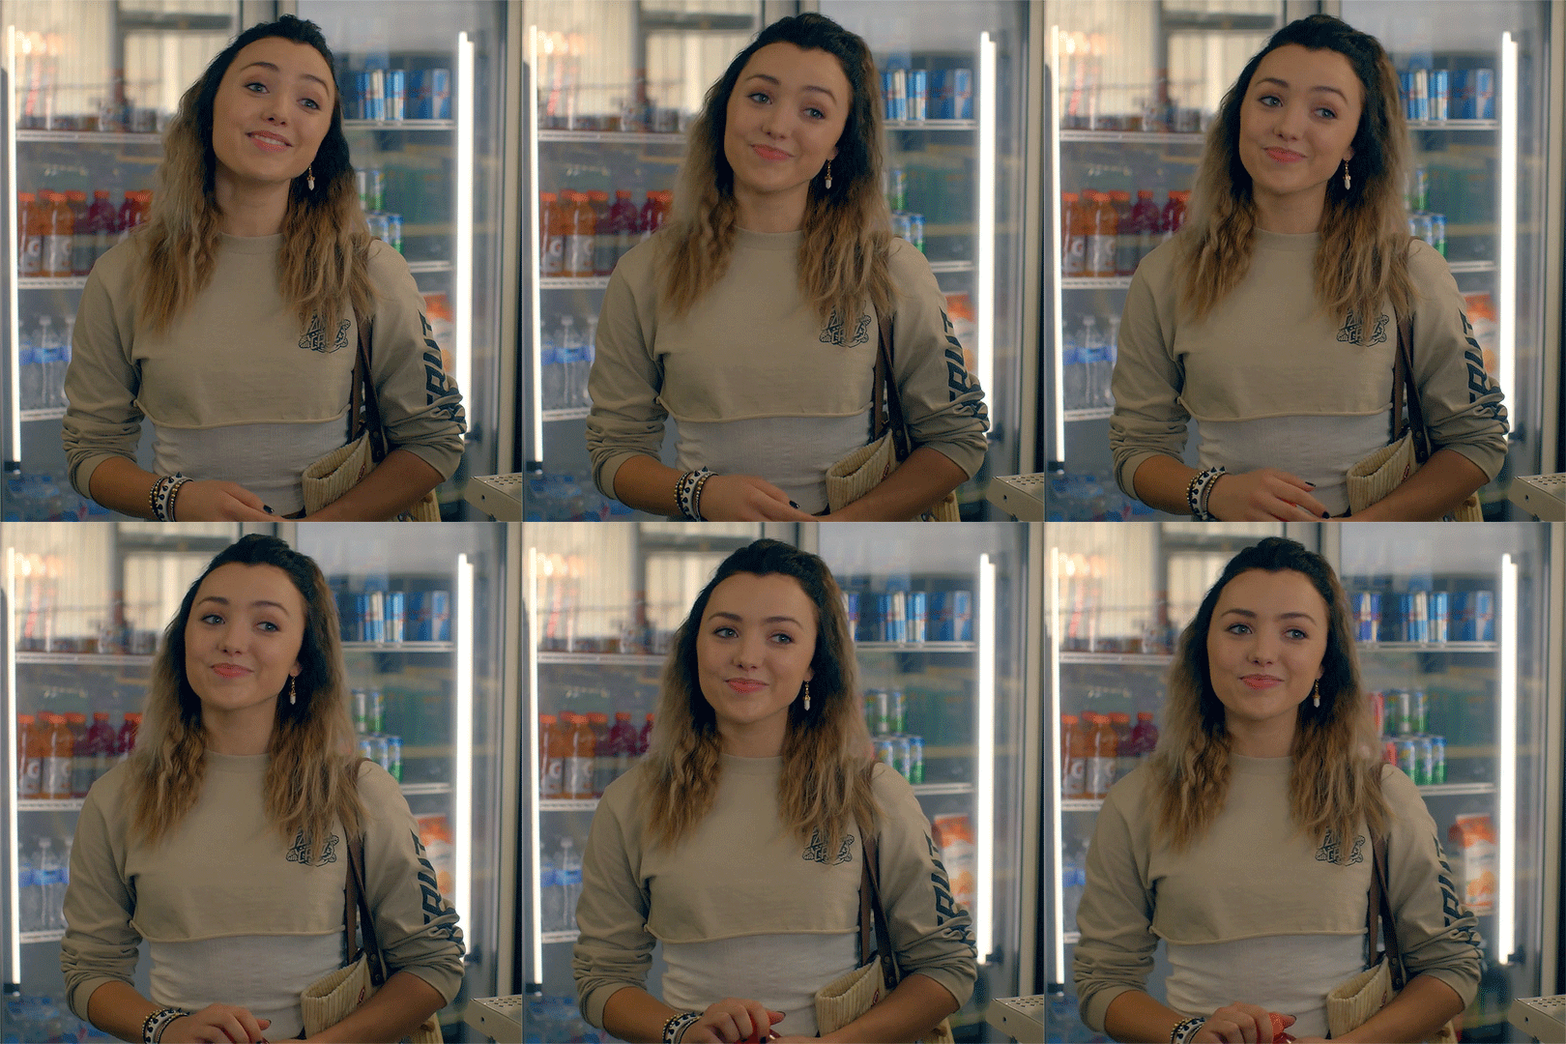
Here is the gif so far.
Step 3: Coloring
Now the fun part! I color every gif differently depending on the lighting in the scene, but I’ll do an overview of the things I usually do when coloring. All of the tools you need for coloring are in the “adjustments” tab, next to the layers.
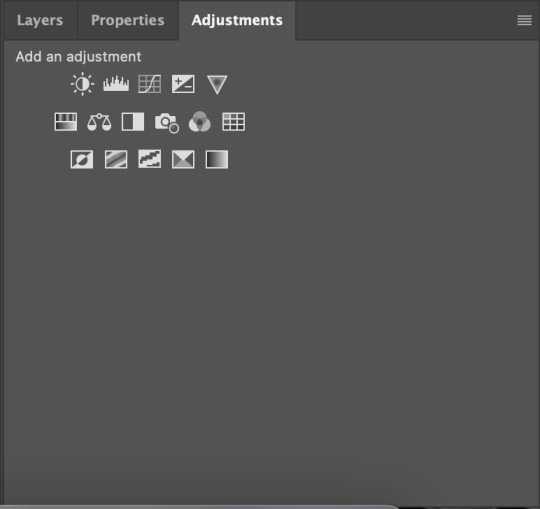
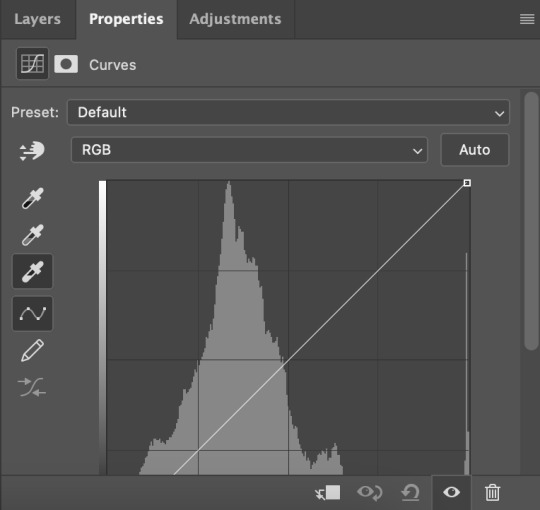
I start with curves. I use the white eye drop tool (selected in the photo below) and use it to click on the whitest part of the gif. In this case, that was the bar of light in the fridge.
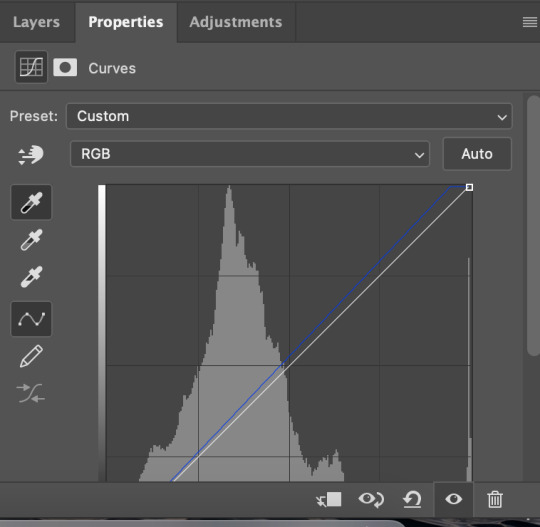
Next, I use the black eye drop tool to select the darkest part of the image. I used the black in Tory’s hair.
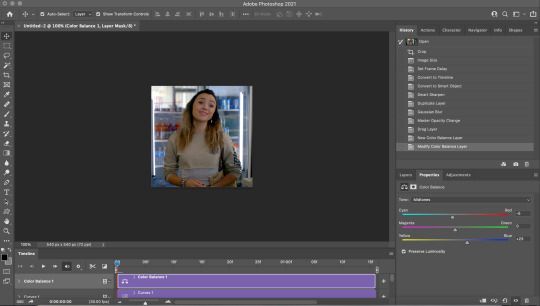
Next, I go to color balance, since the gif looks pretty yellow. I upped the cool tones (blue and cyan). Here are the settings I used.
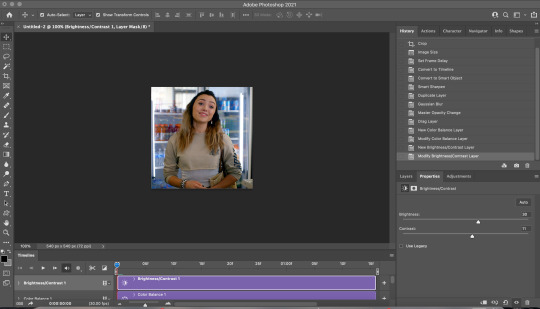
Afterwards, I go to brightness/contrast and up both of those.
Then I go to selective colors and adjust the reds to make her skin tone look brighter, and the blues to make the background more vibrant.
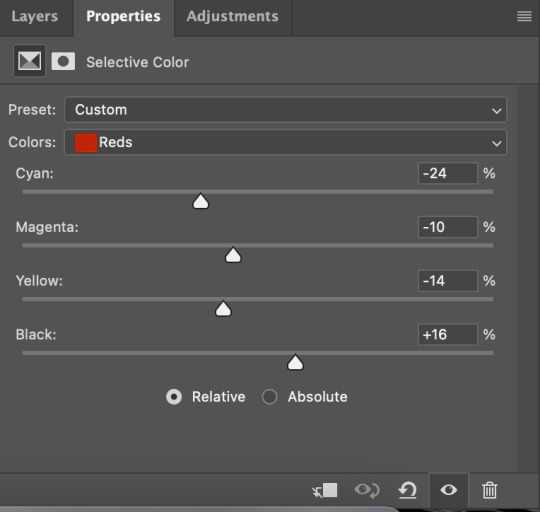
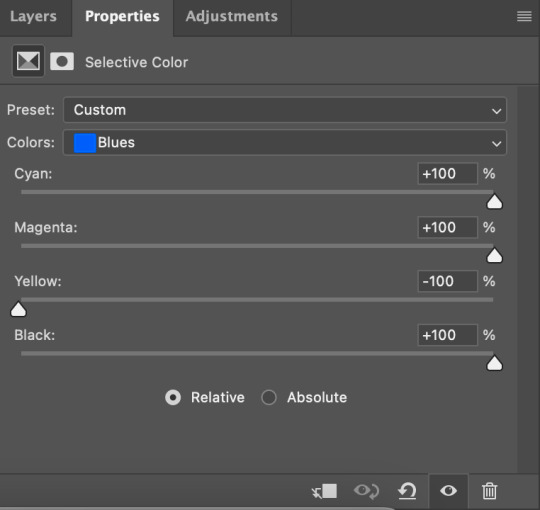
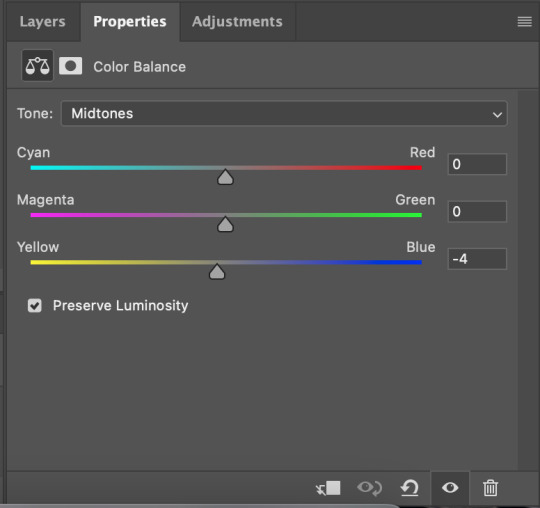
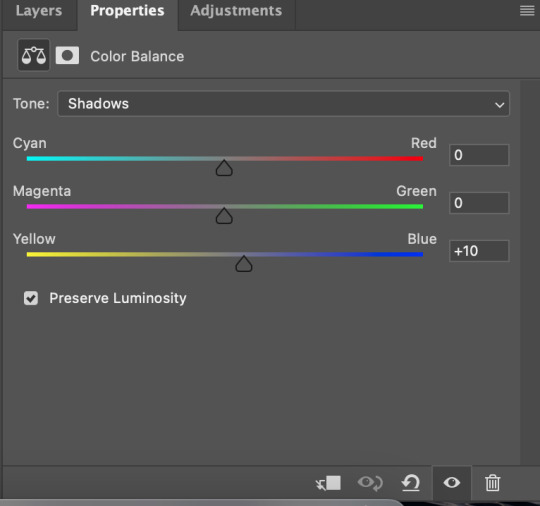
Finally, I go back to color balance and up the yellow in the midtones a bit to level out the blue. Then I go to shadows and up the blue in the background.
Step 4: Saving your gif
This is the final step! To save your gif, you go to file > export > save for web (legacy).
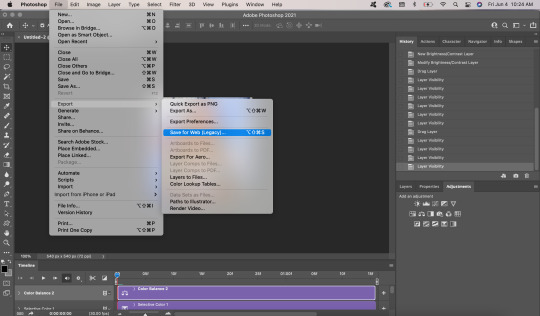
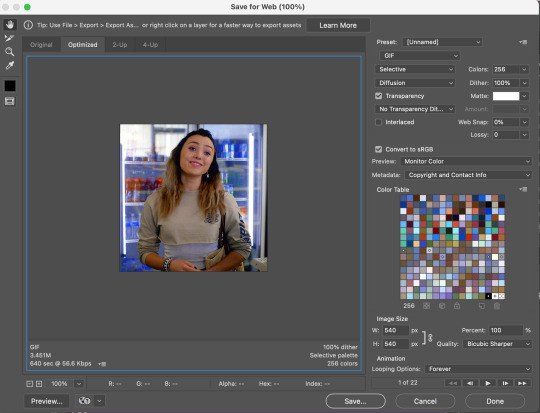
These are my save settings. Then you just click “save” and you’re done! Make sure your gif is under 10m (you can see how big it is in the bottom left hand corner under your gif).
That’s it! Here is your final gif:

Thanks for reading :) Feel free to reach out if you have questions!
#gif tutorial#tutorial#ps tutorial#ps resources#resource#coloring tutorial#mine#my gifs#click on the photos for best quality!
207 notes
·
View notes
Note
can you please link us some tutorials on how to make good gifs? not as good as yours of course but decent ones!
im very late to this im sorry ! and yes i could link you to some tutorials but i thought if thats okay i could just make my own, on how i make my gifs ! this might take a while so bare with me please
here's what we'll make (it's a gif!)

WHAT YOU'LL NEED:
1. potplayer
2. adobe photoshop (any works, i have the 2020 one)
3. please like/reblog if this was useful !
1. POTPLAYER
you might see that most people use kmplayer, and i used to use that as well but last year, for some reason, it stopped working for me so i changed to potplayer.
so, you'll need a video file first, and id recommend always using 1080p or 720p unless you truly can't find what you want in that size. why? because both of those sizes are best as they have better quality and your gifs will look better. tip: the bigger the file size the even better quality itll have (i can't bother downloading 40GB files so i always just use small ones, it still works fine for me)
when you have your file, you open it with potplayer, choose the scene you want to gif and click ctrl + g to pull up a little window which will make your screencaps for your gifs.
this is how the window looks like:
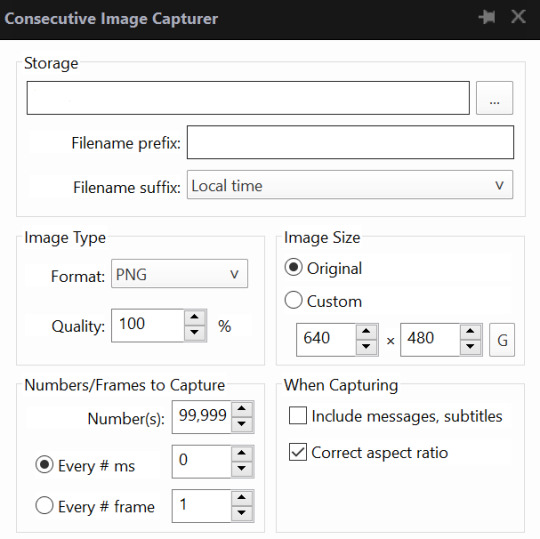
in storage you choose which folder you want the frames to go to. the format i use is png because it has the higher quality, always choose original size and the rest you can just copy from me. then you click a button bellow all of this that says start and once you're done you can click again on that button to stop.
theres another method i used back when i was starting to gif, that doesnt need any other app and its just on ps, but frankly i dont think that method is good at all.
2. ADOBE PHOTOSHOP
now that you have all you need to make your gifs, lets start making them !
open photoshop and load the files needed for the gif.
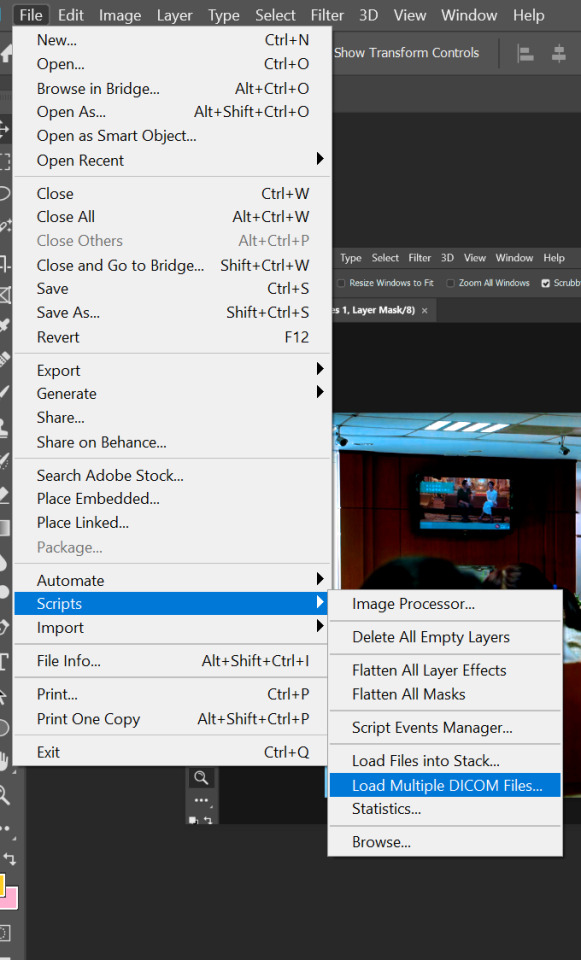
to load the files i use load multiple DICOM files, BUT, for newer versions of photoshop this won't work as DICOM files are not png, or jpeg... i was only able to make it work cause i had an older version of ps and copied the file that would allow this to work to my newer version. most people use load files into stack which is how i will teach you how to make your gifs. the difference between these two options is that the DICOM one loads your files in order while with the into stack one you will have to do an extra step which i find very annoying.
select load files into stack.
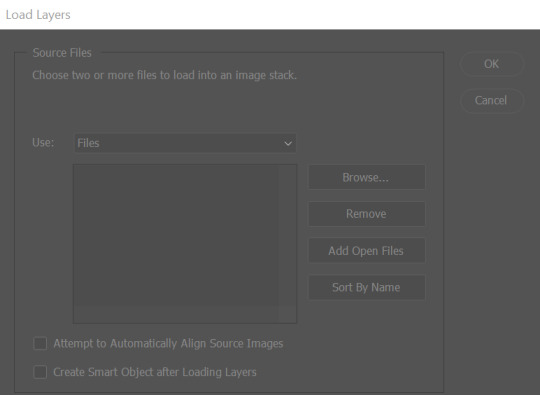
then you click browse, select the folder where your pngs are and just select all of them. click ok and they will slowly load. once they're done loading you will see the picture above again this time will all of the files on the rectangle and you can click ok. theyll start appearing on photoshop.
now onto the gif making, finally !
your timeline will look like this:

click create video timeline and then you'll have your files stacked in a vertical manner. on the bottom left corner of your timeline you have a 3 square icon called create frame animation. click that.
now you will have one frame only on your timeline, but that won't make a gif so, you will go to the upper right corner of the timeline, select the 3 line icon and click on make frames from layers.

there, all your frames are loaded, but, they're on the wrong order so you will once again click on the 3 line icon > select all frames and once they're all selected you will again, click on the 3 line icon > reverse frames. this time they're in the correct order.
now let's crop our gif and resize it.
go to the crop tool and click it.
crop it around to how you want it to look like. i always use the same crops which is why i saved them as presets on ps so its easier, as i just have to click the one i want and i don't need to keep guessing how to size it so all the gifs look the same.
once your gif is cropped go to image > click image size and a window will appear:
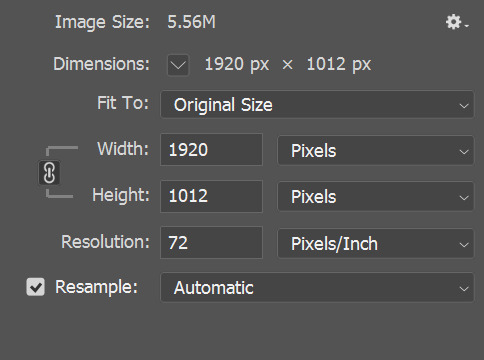
depending on the gifset you want to make, there are different dimensions you should choose so your gif is shown with better quality. here's a guide on the best dimensions for tumblr (the crop has nothing to do with this, you can choose any crop you want and as long as the sizes are these it'll look fine):
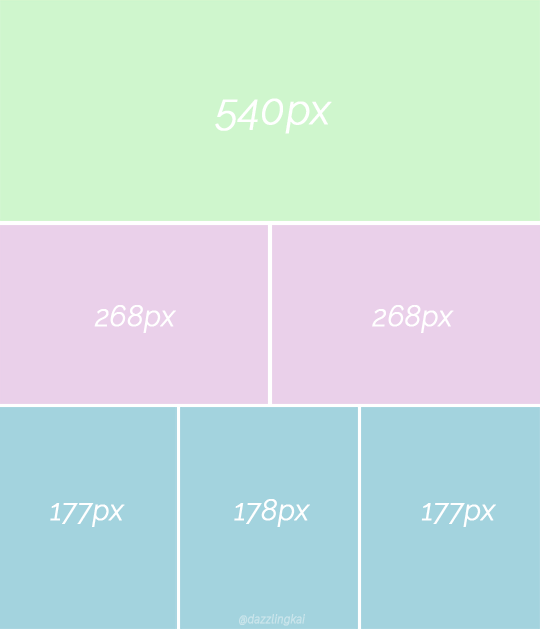
choose the type of gifset you want and on width change the number to 540px, 268px or 177/178px (the height will be calculated by ps automatically so you don't need to touch that).
now that your gif is resized you will notice that your frames are all still selected, and you will need them that way to change the seconds of your frames (basically each frame will last a limited amount of seconds until the next frame comes on your gif).
with all your frames selected just click on the arrow next to 0 secs > other and a window will appear (any frame works as long as they're all selected, remember that!).
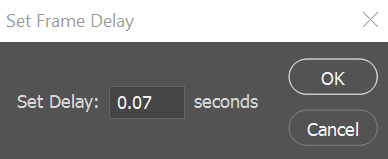
type how many seconds you want the delay to be, most gif makers use between 0.05, but i personally prefer 0.07 seconds. click ok.
right bellow the frames on your timeline you'll notice an arrow that has the word "once" or "3 times" right next to it. click on the arrow > forever (this way your gif will loop forever, otherwise it'll work once and then stop)
color your gif using the adjustments available.
lastly we will sharpen our gif so it looks extra crispy.
on the layers section of your ps, click on the first frame and then press shift. while pressing shift scroll down until the last frame and click. now all your layers are selected (except your adjustments!).
with all your layers selected look at your timeline once again and on the bottom left you will notice a small icon "convert to video timeline". click it (your layers have to be selected!).
go to filter > convert to smart filters and you will have a smart filter layer (where all your frames are put together). with that layer selected go once again to filter > sharpen > smart sharpen. choose your options to how you want to sharpen your gif. try not to have your radius too big or your gif will look weird !
and we're done ! now you just have to save it. go to file > export > save for web.

im not very good at explaining stuff but hopefully this helped ! if you have any questions don't be afraid to ask away on my inbox !
20 notes
·
View notes
Text
HELP WANTED (PART 1)
WOLF QUIRK F!READER x HANTA SERO x EIJIRO KIRISHIMA WORD COUNT: 1,724 TW/CW: BULLYING MENTION, PARENTAL ABANDONMENT, PANIC ATTACK MENTION (ONCE)
NOTES: I’ll make a banner for this series whenever I get my shit together on Photoshop, lol. I’ve been on a Sero/Kiri thing lately plus this was brewing in my head so I wanted to hurry and type it all down before I forgot it.

“ HELP WANTED! 3RD AND FINAL ROOMMATE FOR A 3 BEDROOM, 2 BATH HOUSE. — MUST BE RESPONSIBLE AND RELIABLE. TEXT THE NUMBER FOR ANY QUESTIONS. NAME IS KIRI. ”
You had been staring at this ad for a couple of days now. Surely they must have found someone by now, right? You were new around the area and being on your own, wasn’t quite what you had imagined. Your parents? Well, your mom up and decided to leave you behind after bringing you home from the hospital and your dad.. He’s always been there but you wanted to prove you could finally be on your own. You were 24 for God’s sake, of course you could do it, but sometimes— you found yourself wondering if you bit off more than you could chew. Living in this big city full of crazy quirks of all kind, including yours, it was pretty overwhelming.
Oh, your quirk? Well, you were part wolf and people could tell that from looking at you, due to your pointed black ears that rested on either side of the top of your head plus a tail that was pretty fluffy and was also black in color.. Can’t forget the fangs that you have, too. Your howl could deafen someone for a brief amount of time, distracting them. You also had the agility which mean you could run— fast.
Growing up wasn’t easy at all. You were often teased about your appearance. Kids would pull your tail, thinking it didn’t hurt you when in reality, it did. You spent majority of your childhood wondering why you had to have such an awful quirk, blaming your father since he was also part wolf. However, as you got older, you became more mature and focused more on yourself. Of course, you apologized to your father, which brought the two of your closer, allowing you to confess the reasoning behind why your child days were so… dark and why you lashed out in such ways.
Your father was a strong man, taking on a few jobs at a time to support you and his self while also keeping the bills paid on time. You admired him for that but you didn’t want to depend on him anymore which led you to where you are right this second— staring at this damned ad, wondering when you’re going to build up some type of courage to text the number. “Oh, for all that is holy, just do it.” You grew tired of being scared so you brought out your phone and texted the number.
TO KIRI: Hey… I was texting about your ad about needing a third roommate and wanted to inquire about it, if you haven’t found anyone yet.
You thought about it again.. What if it was a scam? Oh, you literally brought your palm to your forehead, tapping it a times then halted when your phone buzzed. You looked at the screen, eyes widening in surprise because it was the number from the ad. You had your phone set to where you wouldn’t be able to see previews of your messages unless you unlocked it fully. You braced yourself for a ‘Sorry, we’ve found someone’ or something along those lines. You wouldn’t be surprised since it did take you forever to even act on this whole thing. You swiped left on the message, unlocked your phone, squeezing your eyes shut then took a deep breath. Your right eye slowly opened, eyesight adjusting to the brightness of your screen then falling amongst the words of this Kiri’s response. Your other eye shot open in shock, both your ears perking up.
FROM KIRI: Awesome! We haven’t really had any luck with anyone reliable.. so since that’s the case.. would you mind if me and the other roommate meet you for, say.. coffee? How’s tomorrow morning sound around 8:30-ish?
Thinking to yourself, were you reliable? Of course, you were. Responsible? Absolutely. You worked at a local animal shelter, coincidentally. You worked more with dogs than cats, though, which came with the territory. Dogs obviously gravitated more to you given your natural wolf scent that only they detected with their sense of smell. Recently, you were moved into a management position so you were paid pretty well, which struck up this whole idea to be on your own, per se. Before you could think any further, did you work tomorrow? No, perfect. You rolled over onto your stomach on your bed, tail moving from side-to-side.
TO KIRI: Of course! That sounds great. There’s a coffee shop a few blocks from where I currently stay.. called Camille’s Cafe, not sure if you have heard of it or would prefer something else?
Were you coming off pushy? Demanding? At this point, you didn’t know and you were so nervous that it was driving you crazy but before you could go into panic mode— you got a text back, agreeing on the meeting place and everything. That was… easy.. almost too easy.. Either way, you were thankful they wanted to meet in a public setting in case they really were scammers. That’s when the thought had hit you.. What if they were guys? Kiri didn’t necessarily sound like a guy’s name.. did it? You laughed at your overthinking. No way these were guys.
With that, you looked at the clock on your bedroom wall, it reading 9:30 PM. You decided to go ahead and settle into bed to get enough rest so you didn’t look like a walking zombie when you met your potential roommates for coffee. You plugged in your phone to the charger and laid down, laying awake for an extra hour or so before drifting to sleep.

After a long day of getting phone call after phone call, text after text from different people saying they were interested in their ad, Eijiro and Hanta were close to giving up. Everyone who showed interest had some type of flaw about them, whether it be a bad history of paying rent on time or being an awful roommate in the past. It was becoming annoying, to say the very least. After denying everyone who reached out, Eijiro thought it was best to just block all the numbers to prevent further contact.
“Bro, I’m beginning to lose hope. We probably won’t ever find someone else to move in with us.” Hanta sat down on the couch in the living room with a sigh, kicking his feet up on the table in front of him. “Might as well talk to Kats about ditching that condo he’s in to move in over here with us.” They had thought about that a few times but even the slight mention of a roommate the first time, their friend, Katsuki, was the first to say not to even consider him because he valued his privacy. They didn’t press further because they understood and knew how he was.
Eijiro sat on the other end of the couch, directly across from Hanta, leaning forward to prop his elbows on his knees and his head on his hands. “You know exactly how that’ll go, Sero. I say the next person that texts us, we invite to coffee and really figure shit out. It’s been days since we posted that ad, and you know that we need the help we can get.” Hanta nodded in agreement then both their eyes shot down to Eijiro’s phone that lit up with a unsaved number, inquiring about the roommate situation. Hanta moved over to the same side as where Eijiro was to sit down once the red head picked up his phone to look at the message.
“Huh, look at that! It’s almost like this person heard you.” Hanta chuckled, looking over the message. “What do you think? Coffee?” Eijiro nodded then sent his first text out in response to the inquirer.
TO (YOU): Awesome! We haven’t really had any luck with anyone reliable.. so since that’s the case.. would you mind if me and the other roommate meet you for, say.. coffee? How’s tomorrow morning sound around 8:30-ish?
Sero scowled, “8:30 in the morning, dude? You really must be desperate because we sleep till like noon on our days off. That or you’re hoping it’s a girl.” He laughed then got up to circle around the furniture to head to the kitchen. “I mean, it might be a girl… and it might be good for us. Could teach us a few things.” Kirishima didn’t think about what all that last statement could entail but Sero, thankfully, didn’t catch onto it. “I guess so. Did they respond?” Just as soon as he finished asking his question, another text came through.
“How do you feel about Camille’s down the road?” Kirishima looked over to Sero who thought for a minute then shrugged with a nod, “Alright, yeah. I could go for one of her bagels. We haven’t seen the lady in a while so we should pay her a visit.” Camille was an older woman who had a heart of gold and loved both Kirishima and Sero. They always were such gentleman when they came in but they stopped going once the crime rate escalated the past few weeks.
“That’s true. I told the person it sounded great so. Let’s head to bed so we can actually wake up early and look decent instead of a mess.” Kirishima rose from the sofa to head toward his room. Sero called out, “Wouldn’t have to get beauty sleep at all if you didn’t schedule this meeting at the crack ass of dawn.” With that, Kirishima held out his arm behind him, giving Sero the middle finger. “Stop your bitching and go to bed, princess.”
Sero laughed and both settled into bed for the night. While one went to sleep pretty quick, the other laid awake, wondering who this mystery person could be. The thought of whether it was a female or not, really stuck to Eijiro’s mind. He had hoped that if it was, they wouldn’t be scared away by the fact that they’d be living with two guys should they accept the offer at all. Kirishima wanted them to be as comfortable as possible and that’s what he intended on doing and without noticing, he drifted into a deep sleep.
#eijiro kirishima x reader#Kirishima x reader x Sero#mha x reader#Hanta Sero#Eijiro Kirishima#Hanta Sero x Reader
29 notes
·
View notes
Photo


J A N U A R Y 2 9 — herzlichen glückwunsh zum geburtstag ❤️🖤💙
last year i broke the streak of cute birthday posts because my gift was going to be hand delivered to you in mexico in september 😛 but 2020 had to teach me not to take things for granted haha i realized in the past couple of years i let a lot of things go and now i’m returning to my normal self and old habits, so it’s good to sit down and plan a little birthday surprise for you again 🥺
i thought about it for a while and i had this habit of making photoshop collages for my friends all the time, and i do know it’s very 2015 haha buut, i think i’ve never made you a proper collage? so here’s my little birthday collage for uuu here are a few things from our friendship but also 👀 i put in there some tips. hidden (not so much tho haha) in that very 2015 tumblr collage are tips for the surprise gift you’ll (hopefully) get in september when we finally meet 💖 i don’t know if i made it too obvious haha but i guess you’ll have a few months to guess 😛
so today i come here to tell you how happy i am that you’re in my life. a lot of things changed through the years, but our friendship remains strong, and i can’t tell you how happy this makes me and how good it is to know that no matter what, we’ll always have each other’s back ✨
finding you in this hell site was honestly one of the best things (if not the best) to come out of my years here on tumblr. when i sent you that first ‘hey thanks for following me’ ask, i had no idea we’d be out here, years later, planning a trip to meet and see the band that brought us together.
i’m honestly so grateful to have you in my life and for all the little moments we shared, even if through a phone screen or a microphone (you’re probably the only one that gets to listen to my broken english 😂🖤). all the talks, the moments, the trust we have in each other and being able to know that no matter what, there’ll be no judgments and we’ll always be true to each other. i’ve told you before but growing up i saw all those movies with the badass punk chick and thought ‘wow, i want a best friend like that’ and now i get to say my best friend is a badass punk chick that isn’t afraid of walking into a mosh pit (even after losing a sneaker once 😛😂). you are, without a doubt, one of the gifts this life gave me, and everyday i’m grateful that you allow me to be a part of your life.
i love you very much and i hope you know that you’re amazing and everyone should have a friend like you, because you’re honestly the best. you’re inspiring, and strong, you’re SO smart and funny, the go to if you’re need of an adventure, or if you need a honest but kind advice, and of course, the one person i can go to for anything 🖤 thank you for everything, you know that i love you very very much, and you’ll always be the Paulie to my Reesh and the Joey to my Chandler ❤️ soulmates never die and i know this friendship will last for a lifetime, i can’t wait to be two old ppl complaining that they don’t make music like they did before 😂😂😂
i love you, Lily, and I hope you have an amazing day today 💙 you deserve the world and all the good things in it. happy birthday ❤️
@thunder-lightning-strike @thunder-lightning-strike @thunder-lightning-strike
#lily#lilys bday#HAPPY BIRTHDAY#i'm very rusty with the photoshop thing and i'm trying to get back to it lmao BUT i wanted to make you something <3#i love youuuu
6 notes
·
View notes
Photo

How We Picked Our Beach House Color http://ift.tt/2jlfFZG
Picking paint isn’t always easy, and boy did we have a hard time deciding on a beach house color. If you follow us on Instagram or Facebook, you probably saw us share a bunch of photoshopped options a few weeks ago that flashed by, slideshow-style, like this:
And if you listen to our podcast, you’ve heard all about the house colors next door and the other factors that need to be taken into account (like not wanting to paint our original wood door, for example). All of that’s in Episode #28, which you can play below to get all caught up. Note: If you’re reading in a feed reader, you might have to click through to the post to see the player.
Podcast listeners were also the first to hear the conclusion of the debate this week in Episode #31, where we talked through a few of our initial instincts, how we changed our minds along the way, and what unexpected object finally inspired a firm choice. There’s no going back now, guys!
So consider this a visual recap of a lot of the details we shared in those two episodes above. We thought the most logical way to go about this was to address each potential color (or color category) one at a time, starting with…
The Existing Color
When we bought the house it was sporting a green-gray siding color with creamy yellow trim (see the before here). We knew immediately we were going to paint the trim white to make it look fresher and beachier (many of our neighbors have white trim, which looks great). So we photoshopped white trim into the picture above, and we fleetingly considered keeping the siding the same green-gray color. You know, to honor its existing look?
But it felt a little muddy and dull compared to many of the other colorful houses around it in this beachy and bright community. And ultimately we decided that we wanted a clearer signal to the neighborhood that this house is coming back to life (as if the dumpster out front isn’t a clue) and a new exterior color felt like a great way to do that. Plus if you’re paying all this money to replace rotted siding and repaint everything, it’s part of the fun to get to choose a new color. Also part of the fun: second guessing yourself a million times as you go!
Blue
We’re SUCKERS for blue (yes, that deserves all caps due to our extreme unwavering affinity). We’ve used it a lot in all of our houses, we painted our showhouse a deep blue, and our current house’s front door is a bold teal. There are so many great options to choose from (light blue-gray, navy, cobalt, aqua, teal) that would make for a pretty inviting beach house. The problem? All of our neighbors already had the same thought.
We’re one of four identical houses in a row on our block (same porch columns, same stained glass window up top, etc). And the other three are already some shade of blue. We debated going for blue too, so we’re all sort of a gradient or a little “blue house” team, but every instinct we had told us that it would be better to do something different instead of just blending in and becoming ombre house bros (ombre hombres?). We liked the idea of being “the _____ house on the street” versus being “yet another blue house on the street.” Plus some of the cutest parts of this town have more of a “painted ladies” feeling, so we moved on to the next option.
Green
Most of the greens we considered got nixed for the same reason above. We loved the idea of something minty or in the seafoam family, but every tester we tried just felt too close to blue (see the neighboring house colors peeking into frame above?). Even if we chose something on the yellower side of the green spectrum – you know, more avocado – we didn’t feel like it would bring enough contrast to the blueness on the street. We decided that if we really wanted to contribute to that happy almost rainbow feel of beach towns then we should choose more of a complementary color instead of one so close on the color wheel.
Gray / Beige
Now I realize it sounds weird to say a “rainbow feel” and then talk about painting ours a neutral color. But we do love a good neutral – especially because in this context it would allow us to pick bright porch furniture or even put colorful accents elsewhere on the house (some houses paint the eaves, the porch ceiling, or even some details around the window). We also thought that maybe a neutral would bring some balance to all of the bold blues on our side of the street. We spotted quite a few light tan and gray houses around town that look great, so we didn’t want to rule it out.
And when Sherry scoured her inspiration folders (she’s been pinning and tearing beach houses out of magazines for years), she realized light gray/tan houses were some of her favorites – and they still felt plenty beachy. Especially with all the colorful planters and furniture that can be layered into those pictures (don’t forget that staged colorful bike out front!).
(images found here & here)
In addition to Pinterest, we also looked around Cape Charles itself for what stuck out to us. As much as there are lots of colorful houses, the soft neutral houses with crisp white trim certainly felt at home near the water too. Our minds swirled around neutral colors like this for a while. Partly, I’m sure, because it’s a pretty “safe” choice – which isn’t always a bad thing. Heck, safe can also mean classic and relaxed (and not “that one all the neighbors hate because it’s crazy!”), right? Maybe we didn’t need to be too in-your-face with color after all? Hmm….
White
Heading down that same neutral rabbit hole was white. Man, if you thought Sherry’s Pinterest board had a lot of gray or tan beach houses, don’t even get me started on the whites. SO. MANY. WHITE. HOUSE. PINS. And after spotting some around Cape Charles too – including an immaculate bed & breakfast that is crazy charming – we were starting to seriously consider white. With a dark roof and a hit of tin (our beach house’s front porch has a tin roof) along with little hits of color (like a porch swing, planters, some colorful adirondak chairs, etc) we were definitely warming up to the idea. The white felt very crisp and undeniably beachy. There’s that bike again!
(image found here)
But two things poked holes in this idea for us: greenery & maintenance. On the latter front, we asked one of our friends about the white HardiePlank siding she put on her house a few years ago (which you’ve seen here on Instagram). She – like us – loves the look, but she warned us that it looks dirty faster than she’d like, so they have to clean it regularly (lots of power washing). That didn’t sound like a great idea for a rental house we were trying to minimize maintenance time/costs on.
Plus, we realized a lot of our pins – and even the local B&B – are often surrounded by beautiful, lush greenery that provides a colorful backdrop for the white to pop against. We don’t have that at our house since the houses are all lined up and pretty close to each other (no room for even a tree between them). So besides a few medium bushes, you definitely wouldn’t describe them as “lush” or “nestled in the trees.”
The nail in the coffin for white was that the cool ornate columns we have on our porch sort of get lost in the white-on-white look, and it feels sad to make all that architectural detail blend into the background. So the white house of our dreams was probably not the best choice in reality. Onward!
Yellow
Yellow was one of the most popular picks on Instagram and Facebook, despite the fact that many other people warned us that yellow fades the fastest and can show a lot of dirt (something I sense is an issue with any lighter siding color). We have this painting of my grandma’s house rendered yellow that we LOVE (the house is white in real life, but she loves yellow and the artist likes to paint houses to “match” their owners) so it felt kinda sweet to have a yellow house of our own.
Around this point our contractor called with a curveball that meant we had to reside the entire house (more on this in podcast Episode #31), which impacted our color debate because there were some stock, factory-finished colors that we could choose from. They’re more expensive than just the plain primed HardiePlank (which you then have to pay to get painted), so cost-wise it would be about the same, but we thought looking at their stock colors might help us narrow down our choices.
We’re going with HardiePlank fiber cement siding because it’ll hold up better to moisture/termites/cold temps/etc (it’s even fire resistant!) and doesn’t need to be repainted nearly as often as wood siding, which will save us money and maintenance in the long run. So we ordered a few samples of their stock colors. They mostly offer neutrals, but they did have a light buttery yellow option called Woodland Cream, along with some other grays, tans, and even a light green.
To better visualize the stock colors, we drove around some new construction neighborhoods near us to hunt down full houses sided with it (holding up our samples to make sure we were judging a true match). That was a really helpful exercise because aside from some of their neutrals, like light gray, white, and light blue-green, we realized we didn’t really love any of the stock colors. They were all nice, but a bit more muted than we could get away with in a fun little beach town (they’re probably best suited for the suburban neighborhoods they’re most typically used in). Obviously, we knew we could just order the primed siding and choose any yellow paint that we wanted, but seeing a bunch of yellow houses in person kinda cooled our excitement for it. I can’t really pinpoint why, but we just didn’t have that “this is it!” feeling.
Pink / Coral
Along with yellow, the other most popular pick in the comments on Instagram and Facebook seemed to be pink (can you believe over 1500 people weighed in?!). It certainly stands out as one of the more “fun” choices in the slideshow when you see them all flashing by, but a pink or coral color is a pretty far cry from the calm, classic blues and neutrals we’re used to decorating with.
We have a few small doses of pink in our house (some art here, a pillow there) but this would definitely be a BIG statement – and a BIG commitment – by comparison. But as you can see from one of our early batches of test colors below, pink was on our consideration list from the very start. It just felt like a good complementary color to go between the blue houses on either side AND to work with our wood door AND to feel colorful and fun and beachy. A pink house wouldn’t exactly fit into our suburban neighborhood, but in Cape Charles? Sure!
The idea of something in the pink family took a backseat during our detour to try to fall in love with a stock HardiePlank color (of course there were no stock pinks). But around the same time we decided to just order primed boards that we could paint any color we wanted, we happened to lay our eyes on this:
Yes, it’s a coffee cup. And it solved this entire dilemma.
It’s from a boutique hotel here in Richmond called Quirk, where my youngest sister stayed for one night over the holidays with her husband (to escape everyone with screaming kids! ha!) and this little paper cup came with her to our Christmas Eve gathering. Sherry spotted it and immediately said to me “beach house paint color?” with a gleam in her eye. It’s probably best described as peach, but also is definitely in the coral family (in fact the best match we’ve found is a Sherwin Williams color called Mellow Coral).
So less than a week later we were excitedly painting cup-matching swatches on the house and stepping back and feeling something we hadn’t felt before. Instead of “nope, keep trying” it was more like “yes, yes, yes!” – and when a few neighbors stopped by to stand back and stare at our 20+ swatches on the house (this isn’t an exaggeration) it was unanimous. Peachy coral beach house, here we come! This is but a lowly photoshopped rendering, but you get the idea.
I can’t say that we thought that after ALL THIS TIME our answer would come in the form of a friggin’ paper cup, but I’m not arguing with it. Best of all, we think it’ll really help the house stand out to renters and neighbors alike. If you look closely at the picture above you can see how great it’ll be between those two blue houses. Complementary colors for the win!
So there you have it, folks. The coffee cup that saved the day, and one HUGE decision made. Now we just have 572 more to go…
The post How We Picked Our Beach House Color appeared first on Young House Love.
0 notes