#first mb in this account!
Explore tagged Tumblr posts
Text
(⭒ ˘˘) 🍓 ⟢ 𝆴
(⭒ ˘˘) 🧇 ⟢ 𝆴
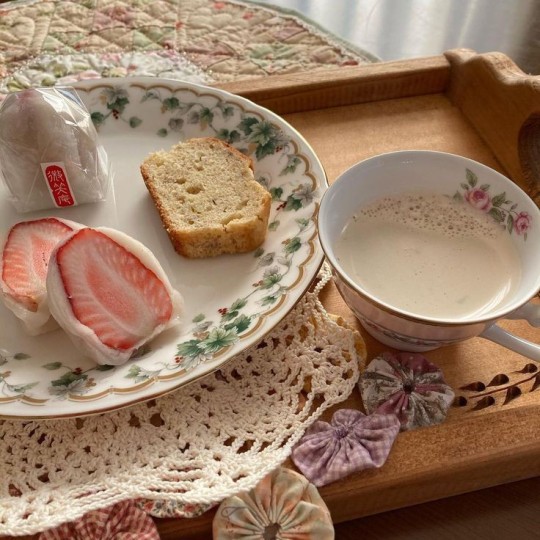
#➳ miu 's deco#first mb in this account!#i kind of liked it erm#like and reblog if appreciated#pinterest moodboard#fresh moodboard#alternative moodboard#detailed moodboard#simple moodboard#minimal moodboard#fruity moodboard#peach moodboard#green moodboard#white moodboard#gray moodboard#spring moodboard#light academia moodboard#ulzzang#ulzzang moodboard#aesthetic moodboard#locs#moodboard locs#kaomoji#f eori
60 notes
·
View notes
Text
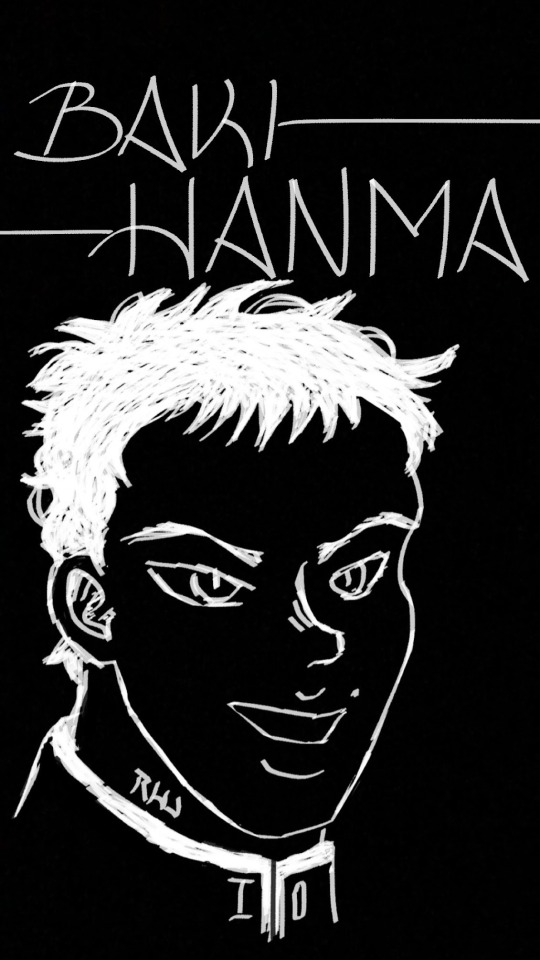
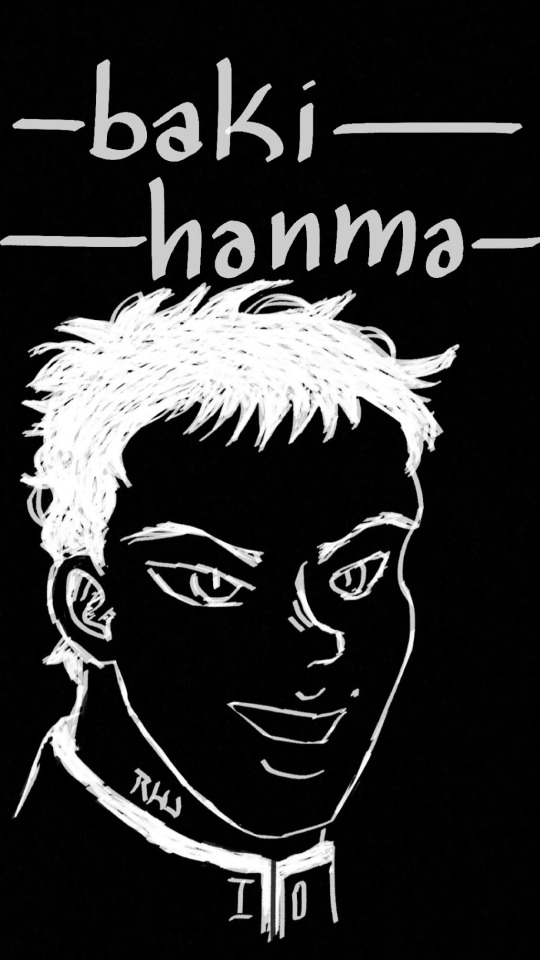
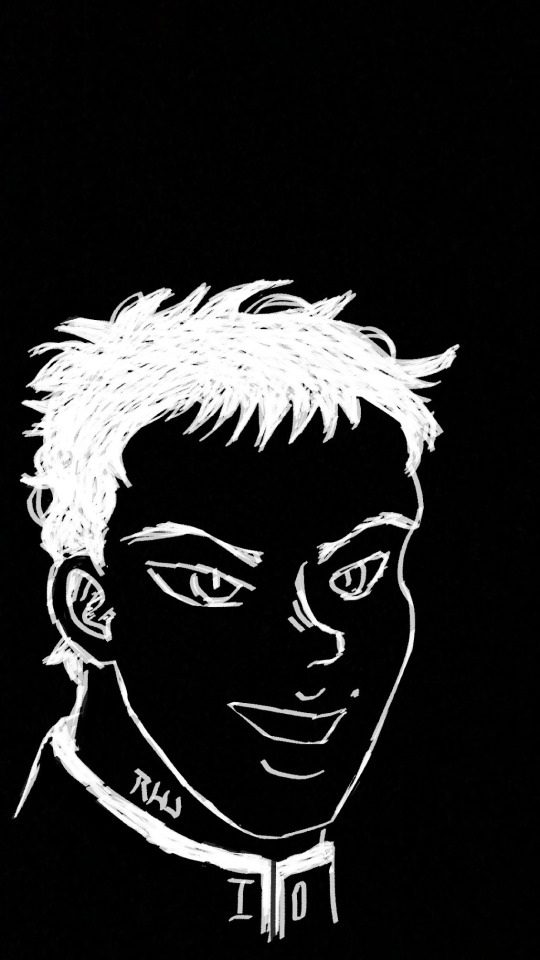
SCHEDULING this post. This art is old, from like 2020 but I still figured I’d post it because I really like how it looks. I miss drawing on instagram! It’s super fun (except when you start getting more strokes and it threatens to crash on you LMAO.) Enjoy a little Baki! Goober.
#pt78 art#NEW TAG YOU GUYS#pt78 btg#pt78 btga#<-the tag SPECIFICALLY if people come onto my account looking for my btg art#baki hanma#hanma baki#baki the grappler#grappler baki#ok i have figured out#i will use spelled out btg for when i post anything related to baki as a whole#instead of using ALL the baki series tags#BUT when i ALSO tag something with grappler baki#it does mean i am SPECIFICALLY talking about baki’s first series#like right now!#platinum unknown fact#those letters are my basic initials!#i actually have 6 but those 3 are the main which is why i said basic#that first letter is an R lol mb if it's ugly#RHJ!#pt78 digi
15 notes
·
View notes
Text
If anyone needs me the crushed and broken down 8 year old inside of me is going to be crying she just heard some devastating news about a book series she liked
#context. there was this book series called avalon.#i had the first and third books. no not the second#they were beautiful. beautiful cover art. beautiful illustrations inside the books.#(they are actually still on my bookshelves. on account of being pretty.)#eventually i found the fifth book. it was hideous.#looked like some sort of low budget mass printed nightmare. ugly photoshop cover NO illustrations inside of it#i thought. oh okay. died a little inside. but i reluctantly put it next to my beautiful first and third.#saw it on goodreads while looking for a different list. checked the editions for the last book. HIDEOUS covers. they have murdered my girl.#anyway im going to console my 8 year old self she doesnt deserve this#mb's two am rambling
4 notes
·
View notes
Text
hello! this is a draft for the orv thoughtspost that's been rattling around my head for a good while and i realized that i haven't posted in like months so. hi. hey, i'm still here haha :"D

#miyo.chatting#kdj.togo#orv.moment#this is so embarrassing oml i had to go through my blog just to learn how to tag again#i swear i havent abandoned this account i just lost on the way back and fell into the manhwa/webnovel rabbithole again ;-;#idk where my muse for genshin went yall cause all i can think of nowadays are my novel favs#klein moretti my dearly beloved <33#if i started a reader-insert (or mb even an oc-insert) series for one of said novels would any of u be interested question mark#i havent felt this compelled to write since i first discovered kaveh n childe dbfhbfd#it feels so awkward to ramble in the tags again after being away for so long help#rip to all my genshin drafts but i physically cannot bring myself to continue them bc i am no thoughts brain empty-#-“which novel/manhwa am i diving into headfirst and brainrotting about for a week next” only#shdfhdb ok enough of that i talk so much in the tags but!! if u like orv n are interested in the draft#lmk!! i am so down to scream n rant in dms or whatever abt this silly sad novel!!
4 notes
·
View notes
Text
the pope is dead. i sense mbs' downfall coming soon, so here are my rules *when* i become president of the fia
profanity is absolutely allowed. matter of fact, you must swear at least once on radio, and once in the media pen. i believe if you're not swearing, you're not being truthful about your feelings. honesty is, in fact, the best policy.
all drivers are entitled to 2 fights against any another driver per season, only applicable after the first 5 races. it's a good outlet, and it can't be done between australia and jeddah because then you're doing too much. let's calm down please. applications are done online, and drivers are allowed to reject offers. but they won't, i know these men.
all hate accounts on twitter will be deleted and reported to the users' current working/schooling institutions.
by 2030, half of the grid will be women. i will make sure of it
any statements pertaining to 'championship mindset' or 'mental weaknesses' are punishable by a 50k fine. thinking of those words will warrant a 25k fine because i'm nice.
NO, I REPEAT, NO PROBLEMATIC FIGURES ARE ALLOWED TO BE INVITED TO ANY RACES!!! idc who is inviting them, you both will be fined and the inviter will receive a 2-race ban. a 3-race ban will be inflicted on team principals who do such. stop setting people up.
secret santa gifts have to be MINIMUM £20. no vouchers, no coupons, no calendars. let's put some effort in guys, it's been a long ass year. drivers are rich enough anyways.
a team's chief strategist cannot be a driver's personal strategist. wtf.
pr captions are forbidden. the dichotomy between 'radio thoughts' and 'ig caption thoughts' are unacceptable. if you wanna call your team a mountain of pisstakes, sprinkled with bullshit shavings, please stand on business and do so.
if you disagree with any of these, you're not fun and you're getting a fine!!!!
#this is a very serious!!!!!#please don't forget to support my endeavours#i will also promise lower ticket prices because those are egregious as well#f1#formula 1#lando norris#max verstappen#george russell#yuki tsunoda#alex albon#carlos sainz#lewis hamilton#charles leclerc#pierre gasly#esteban ocon
338 notes
·
View notes
Text
National Showdown!
Summary: In which, the students of RSA had caught a rumor of a magicless prefect from another world staying in... NRC!?!?!?? Now you, reader are about to experience a whole ass Rollercoaster with these guys. So much chaos running around, declarations of love being thrown around, and unspoken yearning from their hidden heart almost boils over and accidentally spills over. Which, you almost caught them. (But, you didn't. Since you're too busy holding in your sanity from being thrown into an RSA boy and another so forth.) [💋VERSION1]
A/n: Okay, so idk what I'm doing. My writing is ass. Please forgive me, my angels. 🙏🙏🙏 like this is prolly my second post abt Twst (the other posts are just me talking random sht) and although, it isn't as good as the other writers I look up too, please note this is my first time writing and that expectations make me nervous 🙏 Again, forgive me for my dumbass that may get lost in this fic.
💋⚠️⁉️(Warnings!): Too much love and jealousy in the air, OOC (maybe), some bad Grammer (I just KNOW that ima write smth wrong here), Vil probably internally losing his shit bc the reader got kidnapped, Floyd is abt to fcking implode Royal Swords Academy, Jade is prolly thinking of hiring hitmans (but ultimately decides not to, bc he maybe one himself), everyone at NRC is plotting assassinations for the RSA students (excluding scarabia, Kalim might get ptsd from this, mb gang), ima add my own RSA characters bc I don't wanna use other people's RSA OCs without permission (but if you don't mind, I want to add the princesses' and princes' and other side characters that ppl had already taken as inspiration if you don't mind), this sht is getting long so, LOTS OF CUSSING BC I DONT HAVE A CLEAN MOUTH (or I just can't go without it), lots of fluff, no suggestive sht allowed in this account (Maybe in other accs if I'm up for it), good luck, reader. (USE OF [NAME] ‼️‼️)
🪷Angel of the beginning (your here) Angel of Journey 🪽-> (upcoming, maybe.)

Okay so maybe it wasn't a good idea to take a selfie with Cater and let him post it in Magicam. Why? One (if you haven't read this then I'm pretty sure you should! Or not, and you can ignore this, bby🫶), you decided to remove your mask and take ONE selfie with him, ONE. Second, you didn't know he'd send this in PUBLIC, with so many pretty photos of women and men alike in that God-forsaken social media platform. Third, you already had Night-motherfucking-Raven COLLAGE to deal with. Like college boys who r still immature (exception for a few [maybe] and we'll be good), dealing with their bullshyte, while dealing with a headmage that refuses to take the big ass responsibility called "Overblot prevention", 5 missing essays, assignments, homework, paperwork that clearly should be dealt with by an adult, and having friends that acts weirdly around you whenever you do something nice for them.
But, in the end. You still cared, sure, you may not love them (or do you?), but you don't need to love them in order to care for them. Maybe, that's why they all (love) like you so much, so protective, and so caring in the end. (I'd like the twst characters to give the same treatment as the MC treated them yknow? A sweet treat for the Ramshackle Prefect) And on the other hand, they all loved and cared for you! I mean, who wouldn't? They want you to step out of your shell every once in a while, even if it's just for a breather. Your beautiful, inside and out. You don't need to appeal them physically, just your company is enough for them. But, oh, that photo that Cater posted on magicam? Yeah, everyone saw it, the entirety of NRC. Even Vil Scheonheit himself liked the post. It can't get crazier from then on, right?
...
WRONG.
You checked your old ass phone (and let's say you're mutual with Cater in Magicam, besides Ace and Deuce), to, not only to see your face ONLINE IN PUBLIC, but also seeing the amount of likes that specific photo of you, received. THAT IS A SHIT TON OF VIEWS OH SWEET *Mentions of your religion or a random ass word*. WHY? Okay, it can't be that bad! Like, at least your in a school, where no one from outside of it will get you, but you doubt that someone will kidnap you. Cause' like, for what? Ransom or smth? So, for funsies, you decided to check the comments that has like... 23.7k comments... holy gates that's a lot...
In the comments there were:
isukballz: Yoo, who's that pretty GAL/LAD/PERSON???
WifeyC0ll€cter: Wifey material, SPOTTED. ima kidnap this hot stuff, what's their @???
Fiendriding: Honey wake up!! Cay-cay just posted!!... WHO'S THAT PRETTY MAIDEN? (Ik it's suppose to be kept as gender neutral, but just pretend their calling you a Maiden despite your gender)
Snipping-Mens-banana: YO CAY-CAY HOW'D YOU PULL THIS BADDIE? MOVE ASIDE ITS MY TURN.
And so on with the topic being you and cater in this post only. And a shit ton of conspiracies and possibilities that maybe you and Cater might be dating. And speaking of Cater...
Someone just barged into your dorm.
"Heyy!~ [Name]-chan! Look at the amount of likes you got! See?? I told you that you'd get popular within seconds! And look! Your face is trending as well! Doubling your luck in social media, eh?~" a singy-songy voice comes scraping your ears like cheese cheddar. It was Cater. So of course, like the 'good' friend you are you greeted Cater (Maybe in a panic or not, you just need to make sure who liked that post containing your face with it prolly) and asked if he could show you the people that had liked the post (but I'm not letting 'you' say anything since I want YOU to imagine how YOU say it), so Cater showed you the likes from different user names. And most of them seemed terrifyingly familiar...
For example...
[Ace's username]
[Deuce's username]
Is that mf TREY? (Let's say Cater pestered him into getting the app in his phone so they can talk all the time. Oh, and yes Trey rlly did see the post and smiled. 🤫)
...And maybe when Cater snuck in Riddle's phone to get him an account as well... IS THAT RIDDLE'S ACCOUNT?
Leo0onak1ngsch00lar... (TF IS HE DOING HERE?)
__Howl_ [<- just pretend he places his last name in there along with random usernames]
Bucch1__shishi (I'm not good with these names bro, HELP)
Monstro_lounge-Official (Azul, wrong acc bro)
MushroomLoversClub🍄(Insert Jade's username bc I can't find anything creative)
I-will-dunkyouintothe-basketball-hoopLeech (Floyd what fucking name is that.)
[Imagine the rest of the main casts usernames, bro. I need to waste my energy on writing the rest of this fic.]
What the fuck. You really thought, that you wouldn't be that popular in just, JUST a few fucking minutes. But, I mean a logical part of you thinks that since this is a post from Cater, of course, everyone would be nice to you as well. Being his friend and all. And, just maybe, your friends liking this post because they wanted to show you some support (but Malleus can't use Magicam and was only shown that photo by Lilia) so, I guess it's not that bad that your quite popular online? (Atp your starting to believe your pretty by some chances since the comments was just boosting your [if non-existent] ego, so you were slightly happy from this) And actually? Maybe you liked the attention (or nah, your choice).
And, maybe. People do think you're pretty, in a romantic- platonic way(?).

Meanwhile, at Heartslabyul...
So maybe as soon as Cater had left (after a few chats and hangouts with you, just imagine bonding off-screen) he's just scrolling through the comments of the recently popular post he sent, with you in it. Of course, you can attract people online! Who even said you were ugly in the first place? You're not! It's okay not to be humble every once in a while. And maybe if he jussstt stare at your face a littlee longer...
...Is that an RSA student in HIS comment section?
Oh no. Oh, nononnonononononononono-
Breath. Calm down Cater. Maybe, they just liked it for coincidence?
EinEnchanté: Why, is that a fair maiden I see? Why are they in a villain's school? If I may ask, what made you think you could take a photo of their glorious figure? I knew you, nefarious villains, were terrible. How could you hide something from the world!?
... I think Cater fucked up. This wasn't supposed to happen, like, at all! That photo was meant for NRC. And NRC only. Not with these prissy do-gooders, No! Oms, he can feel the headache plummeting into his head like a needle being stabbed at the side of his skull already! Prefect was already popular as they were, now he made them extra popular by sending it to the whole world! No point in deleting this photo, because tons of people had already saved it and sent it to the others! Spreading quick... and soon, it might reach... those guys.
Cater barges into the heartslabyul kitchen, in a panic, since the RSA comments are on the rise. They need to do something! "Cater!- what in the great sevens are you doing?" Sighed Trey, slightly startled. "It's an emergency! Okay, so I may or may not have-" "CATER! NO RUNNING IN THE HALLS!" Shouted Riddle, interrupting Cater's panic rambling, "What made you think it was a good idea to run in the hallways!? Do you know you might slip-" "Not the point rn, Riddle! RSA students had commented on my posts with one of the prefects in them and now they're assuming we kidnapped them or something!" Cater quickly retorts with haste.
... both of the dorm head and vice had gone silent.
...Cater stared back.
Trey's face was unreadable, blank. Riddle was dead silent.
"....Just, check the comments, again." Cater breathed out, the tension thick. Both the vice and head took out their phones to check.
... there's more comments from RSA now.
...Shit.
"Guys? What's up with you all? Why are you so silent -" Ace paused, feeling the tension thickening the moment he stepped in, alongside Deuce, "Housewarden...?" Deuce said in a hushed tone. The red-haired leader and green-haired vice looked up from their phones to turn to the two freshmen, with Cater looking slightly panic and pale.
Wtf happened here? Is some war about to go on? "Uhhh, guys? Are you alright? What even happened in here, like, seriously? You guys look like something died in here-" "Yes, Cater is brain-dead for posting that photo." Riddle sighed, exasperated. "Photo? What photo? You mean, the prefect and him? What about it?" Deuce questioned, confused since he just looked at the new post a few hours ago, now taking out his phone to take a peak on what had happened, even Ace.
What could've possibly happened in that post? Did someone hate on them? Cyber-bullied? Doxxed? Or something else entirely worse?
...
It is something worse.
There were so, so, so many RSA comments and other schools from different districts. Ace was silently reading every comment that belonged to an RSA student, even Deuce.
All five of them were in complete silence.
Riddle Rosehearts
Was just in complete silence. Like, he just heard his execution date. The moment he saw the last name "Wondre" in the comments, he knew this person. That untidy boy from the other school.
xXAllieeeeWndresonXx: woahhh who's that person? They're so pretty! Riddle-San won't mind if I hung out with them, right? :D
....
This little shit- who does he think he is!?
Trey didn't hold back a sigh, knowing that this was going to cause trouble. Ace is already complaining about people stealing his crush- best friend away. Deuce is muttering incoherent shit to himself like he's having a crisis. Cater was just stunned to see these guys care so much (like he is), but on the other hand, maybe he shouldn't have sent that selfie at all. But, mistakes can happen and Cater sure did learn a lesson.
And all this just started because of a photo on Magicam.
...
.... what the fuc-

Meanwhile, in Savannaclaw...
Leona is just sleeping in his bedroom, Ruggie doing chores and making extra money from part-time jobs, and Jack is doing his regular laps around the dorm. Everything was going great. Until-
"Hey, are those RSA students commenting on Cater's new post?" A stupid fucking Savannaclaw NPC said.
...Cater's latest post was with the prefect..
Huh?
Leona checked his phone, Ruggie wanted to do it too but was absent (and missed the convo), and Jack stopped mid-jog. Taking out his phone (from wherever he placed it in), and checking the comments. Said nothing. And sent it to Ruggie. Safe to say, none of them (or the entirety of NRC - Scarabia) are happy to hear abt RSA's delusional comments.
Leona Kingscholar
Man's look like he just witnessed his wife getting killed (spoiler alert!!: u r the wife/hj) just sayin', herbivore. Wtf made you think it was a good idea to show your face in public like that? Not that he cared, but the fact those personified heroic-syndrome disorders came to a fake-ass conclusion that they kidnapped you because of this school's reputation. What the fuck.
...And the fact he saw a familiar but annoying name in that comment section did not make it any better. This guy had the full-on audacity to even set his eyes on HIS herbivore.
No. He doesn't need more competition. He already has more than enough in this entire fucking school with these lil' shits. Do NOT make this worse for him.
...
What if you'll be better off without him? They are sooo much better, right? Surely, there's no use in keeping you here when all he and everyone else here made you suffer. So, why should he stop you? But, then again, you DID stay here and have yet to go home... Why should he let them take you?
.... What if they find your home quicker? Then what he'll do? What is the point if they can treat you so much better? What is the point if they can do it better? What is the point because they are so much more recognized and appreciated than him? What is the point-
...Do you like those RSA princes? Thinking about it, you haven't even met them. And, some of their personalities might rub you off the wrong way (Maybe, or it's just the fact that you told [<-if you did] Leona that you had a bad relationship with men in general and needed space whenever you get uncomfortable, so he's secretly and indirectly protecting you by placing rules to respect you and your boundaries), some might disturb you in a way since SOME *Looks at prince Wintergreen.* are... persistent with their catch.
Nonetheless, he's going to bury all these feelings underground (like his dream) and just look out for you as usual.
Ruggie's phone vibrated with a notification, he checks it. Only to be met with Jack's name with a photo attachment, it's the same post Ruggie liked recently, but Jack texted:
"Check the comments."
... Why the fuck is he so ominous about it? Nvm, Ruggie goes to check-
...aaannddd- he knows somewhere deep into his heart, the prefect's ass is gonna get into some uninvited trouble.
Sigh... wait. Is that- ZAPHY RETRO? HIS CHILDHOOD RIVAL? [And the one who keeps taking his donuts for the "fun" of it]...
...
No.
Ruggie shuts his phone off with an [???] Expression, he's not saying a word. But he's doing his job a bit faster now and it's scarily efficient.
What is he planning?
Jack is probably the most normal one here (besides Silver), and is still contemplating on what the fuck is happening with his dormmates? Suddenly, they're all about plotting murder against RSA??? He thought they were talking abt the recent photo- oh, nvm he's a dumbass. He just remembered the comments.
Yeah, your going to really need that protection. Like man's people from other schools had spotted you.
...
...this is going to be a big mess...

At Octavinelle, in the Monstro Lounge...
The Lounge was busy as usual, with customers talking about the recent post an upperclassman from Heartslabyul posted. Jade was taking orders from table 3, Floyd wanted to ditch but was reluctantly serving table 10, next to table 8.
In Table 8 the group of Heartslabyul students gathered in a gossip talk, "And like, it was crazy! Riddle-senpai was just dead silent! After checking the recent photo that Cater-senpai posted. He was like- ten times scarier with that expression! And, ngl if I were in his heels, I'd also react that way after seeing those comments of those goody-two shoes!"
Eh...? What did this guppy say? Kingyo-chan's silent expression instead of bursting red? Whaaaat??? And, it's all about a recent post from Hanadai-kun. Hmm, but the recent post was with Koebi-chan...
Floyd places the tray down on table 10, puts his hand in his pocket, taking out his phone to check what all this is about, in the middle of his work. Checking the comments, he saw... Florence?
Fl0underf1sh: Wahhh! They are so beautiful! Who are they? I wanna see them in real life! Too bad they are at NRC... :( Oh well! I can always take a visit with Rielle and Sabasty [<- Sébastien] !!!
Hell nawh.
*Cue to Floyd leaving the Monstro Lounge, running straight towards Ramshackle. [And add some discord sound effects like leaving the chat]*
Jade just watches in amused silence as Floyd bolts out of the Lounge.
Azul, doing his usual work with the papers and students he had recently made deals with for the past few weeks, had his phone kept on while he stared at it from time to time. A post about you and Cater. But besides Cater, you.
...And he can see the odd growing numbers in the comment section.
But there was no time to rest so-
*Knock knock knock* a familiar rhythm tapped gently on his office door, "Come in, Jade." Azul permitted. Jade enters with an amused smile, "Where's Floyd?" Azul questioned before Jade could say anything. "Fufu~ Floyd ran outside the Monstro Lounge," Jade said with amusement, eyes gleaming with intentional mischief. "Sighh, for what?" "I do not exactly know. But, if I could guess, it could be the topic the.. customers were talking about recently, about the Prefect and Cater-senpai's post. From what I know, they were mainly talking about the Prefect before Floyd took out his phone and went outside in haste." Jade explained, putting his hand on where his heart should be.
...What..? Azul takes his phone out of curiosity, not before "Go and get Floyd back here, he has unfinished tasks to do." "As you wish." Jade leaves to fetch Floyd.
Azul Ashengrotto
The moment he checked the comments, his brain was instantly thinking of a plan. No hessy (<-Jay reference).
He looked through the comments like he's peaking through government files.
Then that comment hits him.
RielleAtlantic!!!: woahhh! They're such a fairytale! Are they human? They look super pretty like a princess, maybe Florence should take me to NRC sometime!
......
NOT HIM AGAIN-
*Cue to an internally panicking and screaming Azul*
Meanwhile, with Jade, he had gone out to look for his brother, suspecting he might be in Ramshackle's since that is where the dear prefect is usually located (or probably chilling in there since you could be an introvert and prefer to stay at home rather than going out all the time), while Jade is strolling down the rocky pathway (to other students: jogging, mf is THAT tall) he checked his phone to see what chaos you had started (unintentionally or not) and was met with a ton of chaos in the comments specifically. Some RSA students are basically declaring war, while NRC students had commented to defend themselves and prevent the RSA lads get any closer to the prefect, and what's this? Other schools have also taken notice of this post you. My~ you really do attract trouble anywhere, even in media's where you can socialize from far distances by using these cellular devices. But he sees-
Forward reply to RielleAtlantic!!! <- Sébastien_Warford: Rielle, you've just met them online, there is no need for you to write poems about them now unless you want us to take a small visit to Night Raven. But I must say, they do look stunning. A shame that they are still single. Maybe we'd get a chance with them if they'd get to know us first.
...ah. Well, that was quite an... unpleasant surprise. But it's not surprising when you can attract even the most prominent figures in some other countries and sea.

At Ramshackle...
Jade arrives and enters the gate to Ramshackle's. It was already opened, Jade noted. Floyd had definitely gone in here.
And the front door of the Ramshackle's is opened as well, with no damages either, hm.
"KOEBI-CHAN????" yelled out a confused eel inside the dilapidated house, Jade mused.
He explored a little in the house, it looked quite habitable despite its poor appearance. So he went upstairs to where his brother is, since it was just Floyd looking for dear prefect and would probably skip his shift again, "Floyd, it's time to go back to the Lounge, Azul is looking for you, let us not bother the prefect-"
As he walked in he only saw his brother, no sign of the dear prefect. Huh...?
"Koebi-chan isn't here... you didn't find them either, Jade?" Floyd said, still looking around at for the said absence of prefect.
Oya?~ Well, this is quite the predicament. Very amusing if the... Royal Swords Academy students just foolishly decide to kidnap the beloved prefect in this school, without knowing the consequences afterwards.
Floyd looked irritated, first he heard those guppies yappin' about Koebi-chan about that dumb (but pretty) post and now Koebi-chan is gone!? Where tf did they go?? Unless...
"They were taken by those little shits were they..?" Floyd said calmly with a blank face, a sudden 180 turn from his previous mood, he couldn't find his Koebi-chan in the house nor the school, he couldn't even smell their cologne, except...
Except for this annoying flowery scent that does not belong to Koebi-chan, more likely, its smell is intertwined with Koebi-chan's scent, and it irritates him.
Jade smells it, too. And so, he sighs, "Let us go inform the others, shall we?" Jade said ominously, with a big, fat, shit-eating grin.
Floyd looks like he's about to commit homicide with that frown and glare painting his darkened face.
He did not enjoy this one bit. Taking what's not theirs.

Meanwhile, with Vil...
After a photoshoot session, he received a notification, from Rook.
Hunt: Mon dieu! Monsieur Prémédite had informed the Vices- that mon Trickster/Étoile went missing!
Vil Scheonheit
... WHAT.
Just RIGHT AFTER his PHOTOSHOOT? Seriously! Can't sweet potato catch a break already?
Wtf happened anyway?
Wasn't it a FEW HOURS ago they were with Cater?
... well WAS before they just vanished!
...Rook sent an attachment. And it's the recent post everyone saw today.
Why the fuck are there RSA students in there?
Until he sees that ONE username.
NeigeLeblanc: Oms! It's the VDC manager I saw before in the event! Can I get their @?
NeigeLeblanc Replied to NeigeLeblanc: Nvm! They're here now! Omss! They look like they came straight out of a fairytale! Stay tuned for our selfies later!
... DAMN SEVENS NEIGE-
Vil then returns to his dorm, calling out for a housewarden meeting tomorrow.
To be continued... (it took too much energy outta me but I'll make a part two for the rest of the main cast!)💋
Until then. Prefect.
#National Showdown!#💋version#this is so long omg#twisted wonderland x reader#floyd leech x reader#riddle rosehearts x reader#rook hunt x reader#trey clover x reader#twisted wonderland#cater diamond x reader#ace trappola x reader#deuce spade x reader#leona kingsholar x reader#ruggie bucchi x reader#jack howl x reader#azul ashengrotto x reader#jade leech x reader#vil scheonheit x reader#twst x reader#twisted wonderland oc#twisted oc#OC x reader
115 notes
·
View notes
Text
He had a little failed science experiment and I have to take him to the healers, but I’m here now!
davidcore ✌🏽
#I acidentally posted this on the wrong account at first mb guys😭#grishaverse rp#grishaverse#shadow and bone#ruin and rising#Genya Safin rp
20 notes
·
View notes
Text

🌸🌟🍀 𝐌𝐎𝐓𝐇 𝐎𝐑𝐂𝐇𝐈𝐃𝐒 : 𝐓𝐇𝐄 𝐄𝐕𝐄𝐍𝐓 a @tzulipss 1.5k special


first off, thank you all so so much for 1.5k!! it means so much to me that you all continue to support me, my mbs, and blog in general and i cherish each and every one of ya’ll. i never thought i’d get far on tumblr and the fact that i reached my first “k” (1k) on here and i’m only 500 away from my second (2k) is such a big deal for me. in celebration of this huge milestone, i’ll be holding an event!! and this time i promise to actually finish the event and not leave for 7 months :P (only the ogs know what i’m talking about lmao)
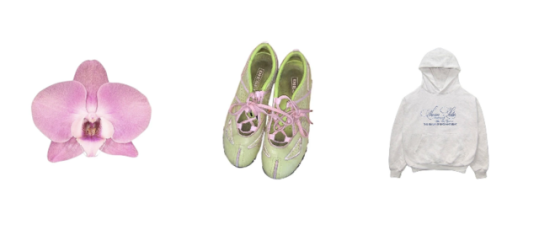
ㅤㅤㅤㅤㅤㅤㅤㅤㅤㅤㅤ ㅤ ㅤαboυt 𝑀𝜎𝜏𝘩 𝛳𝑟𝑐𝘩𝜄d𝑠 : the event is centered around a flower called moth orchids. despite not being a tulip, in my eyes, i see moth orchids as a symbol of my account. visual wise, moth orchids are known for their unusual color combinations and intricate design which i think resemble my moodboard style and personality as a whole if that makes sense. with the addition of them in your moodboard entries it will give them a personal tzulipss touch and create a plethora of masterpieces!


ㅤㅤㅤㅤㅤㅤㅤㅤㅤㅤㅤ ㅤ ㅤhoω to joιn ㅤ—— comment joining! ㅤ—— reblog & tag 3 or more users ㅤ—— the deadline is oct 4th

ㅤㅤㅤㅤㅤㅤㅤㅤㅤㅤㅤ ㅤ ㅤrυles ㅤ—— your mb has to include a type of moth orchid ㅤ—— mb must be made completely by you (divs and locs fine) ㅤ—— no specific idol or aesthetic is necessary ㅤ—— tag me in your entry or else it won't be counted —— use the tag #𝑀𝜎𝜏𝘩 𝛳𝑟𝑐𝘩𝜄d𝑠 : the event ㅤ—— maximum two entry per person

ㅤㅤㅤㅤㅤㅤㅤㅤㅤㅤㅤ ㅤ ㅤρrιzes
—— ⓵ : 3 mbs, 100 rblgs, 2 user packs, fb from my tumblr & pin —— ⓶ : 2 mbs, 80 rblgs, 1 user pack, fb from my tumblr & pin ㅤ—— ⓷ : 1 mb, 50 rblgs, fb from my tumblr & pin • reblogs will be done on @miuadior ㅤ • user packs will be done on @kk-urisma ㅤ • all participants get 25 reblogs for joining!!

ㅤㅤㅤㅤㅤㅤㅤㅤㅤㅤㅤ ㅤ ㅤtαgs
ㅤ@kurcmia @soulari @sugarish @f-loqweres @floriseu
ㅤ@n-americano @hadaura @rubyouts @yoonitos @rosaditas
ㅤ@dollyrin @ningrlz @y-vna @wonlita @wonyange
ㅤ@blissara @aqualogia @dojeoies @hyetart @fairytopea
ㅤ@i-kyujin @jaexiyu @chaeyve @hyelita @obdosant
ㅤ@miuhyein @jenfaery @lil-liaa @sooyaafluers @sseulr1n
ㅤ@p-oisn @yeonzzens @7hyein @lacediore @iluvrei
ㅤ@owatazumi @seulzitos @y2jiz @poemale @yunjidoll
ㅤ@shuasfilm @minguukie @vg-k @ecojinri @ecojinri
ㅤ@y-unjins @koosuvi @i04rei @fre-sitas @kyuwebs
ㅤ@trivijoy @chaey2k @baesol @y0oni3
ㅤ+ anyone else wishing to join !
#𝑀𝜎𝜏𝘩 𝛳𝑟𝑐𝘩𝜄d𝑠 : the event#moodboard event#moodboard challenge#kpop event#kpop moodboard#icons kpop#kpop#kpop layouts#messy moodboard#pastel moodboard#cute moodboard#aesthetic moodboard#event#kpop moodboard event#pastel moodboard event
344 notes
·
View notes
Text


Lucky⠀Clover:⠀TheㅤEvent ㅤ 🍀
ㅤㅤㅤㅤㅤㅤㅤhosted byㅤ﹕ㅤ@aeraras
You let out a deep breath, enjoying the morning sunlight. Today felt special, and you were excited to be productive and have fun. You jumped out of bed, opened the curtains, and checked your watch—7 a.m. already?
After a quick glass of water, you headed outside for a morning jog. As you picked up your pace, you spotted your partner strolling with a big smile, earbuds in. You grinned and called out, “Hey!”
They looked up, smiling wider. “Oh hi! Want to walk with me?”
You both chatted as you walked, and soon, you noticed a four-leaf clover on the path. You picked it up and showed it to them. “Look at this! Maybe it’s a sign that I am lucky.”
ㅤㅤㅤㅤㅤㅤㅤㅤㅤㅤ ㅤㅤㅤhow to enter
ㅤㅤㅤ:ㅤcomment joining on this post ㅤㅤㅤ:ㅤreblog this post, tagging 4+ blogs that may want to join ㅤㅤㅤ:ㅤwhen posting your moodboard, mention me so i can see it ㅤㅤㅤ:ㅤuse the hashtag “lucky⠀clover:⠀theㅤeventㅤ🍀🎶” ( pls copy and paste ㅤㅤㅤotherwise entry will be invalid ) ㅤㅤㅤ:ㅤremember to be creative and have fun!
ㅤㅤㅤㅤㅤㅤㅤㅤㅤㅤ ㅤㅤㅤㅤguidelines
ㅤㅤㅤ:ㅤmust be at least 90% made by you. using dividers and locs made by ㅤㅤㅤㅤㅤothers is fine ㅤㅤㅤ:ㅤno copying or stealing moodboards ㅤㅤㅤ:ㅤonly one entry per person ( only your first entry counts ) ㅤㅤㅤ:ㅤmoodboards must include an icon with a clover ㅤㅤㅤ:ㅤends october 10th ㅤㅤㅤㅤㅤㅤㅤㅤㅤㅤ ㅤㅤ ㅤ ㅤ prizes!
ㅤㅤ-ㅤ1st placeㅤ:ㅤ100 reblogs of a mb of your choice, four custom moodboards & a follow back ㅤㅤ-ㅤ2nd placeㅤ:ㅤ75 reblogs of a mb of your choice, three custom moodboards ㅤㅤ-ㅤ3rd placeㅤ:ㅤ50 reblogs of a mb of your choice, two custom moodboards ㅤㅤ-ㅤhonourable mentionsㅤ:ㅤ25 reblogs of a mb of your choice, one custom moodboard
ㅤㅤㅤㅤㅤㅤㅤㅤㅤㅤ ㅤ ㅤ ㅤ claiming
ㅤㅤㅤ:ㅤdm to claim prizes ㅤㅤㅤ:ㅤyou username will be mentioned in the winners section of the results post ㅤㅤㅤ:ㅤi will reblog from my personal reblog account ( @aeraluvs ) ㅤㅤㅤ:ㅤplease do not rush me when posting your prizes
ㅤㅤㅤㅤㅤㅤㅤㅤㅤㅤ ㅤㅤ my tags!! ( sorry )
@yuzchaes,ㅤ @i-kyujin,ㅤ @y-vna,ㅤ @chuwerii,ㅤ @wonjuii,ㅤ @y-unrei,ㅤ @iluvriri,ㅤ @hyelita,ㅤ @obdosant,ㅤ @p-oisn,ㅤ @sugarish,ㅤ @iluvrei,ㅤ @jicito,ㅤ @floriseu,ㅤ @c-heriis,ㅤ @7hyein,ㅤ @chaeneuu,ㅤ @seulzitos,ㅤ @rkkuri,ㅤ @bambicito,ㅤ @n-americano
#lucky⠀clover:⠀theㅤeventㅤ🍀🎶#kpop event#moodboard#moodboard event#kpop#kpop icons#kpop moodboard#kpop gg#kpop layouts#kpop moodboard event#event#alt mb#wonyoung moodboard#clover event#ive moodboard#loona#loona moodboard#event moodboard#icons kpop#icons#gg icons#girls icons#layouts#bios#simple layouts#archive mb#visual archive#four leaf clover#clover
207 notes
·
View notes
Text
Huh?
#i have an ff.net account but i havent used it in like actual years#but i just got a dm from someone asking if they could make art for one of my old fics???#and also like seriously its old its like the first actual fic i posted#...is this like real? is it? what is going on???#mb's two am rambling
0 notes
Text
More Cleo
Some more Cleo updates since my last post about her on here! I mostly post on twitter nowadays but I like to keep this account somewhat up to date, especially since I can be more long-winded here lol "Casual" Cleo (rerooted Ghoul Spirit Cleo) is finally finished! She's been mostly finished for a month or so but I dragged my feet doing the hair rings lol.
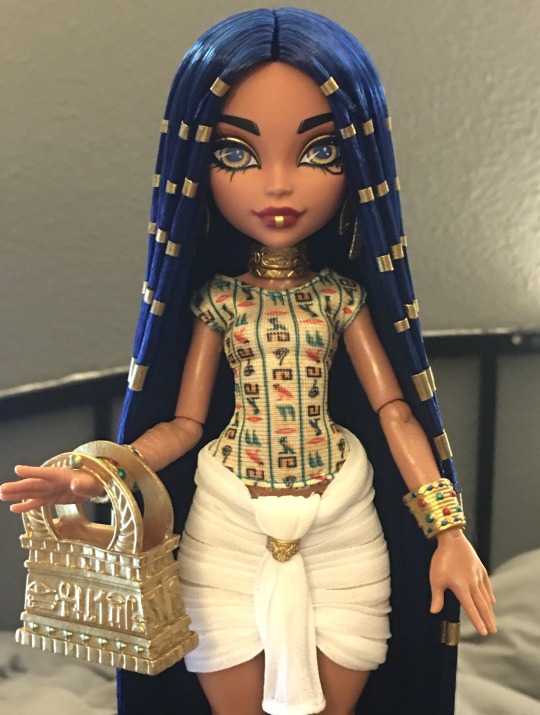
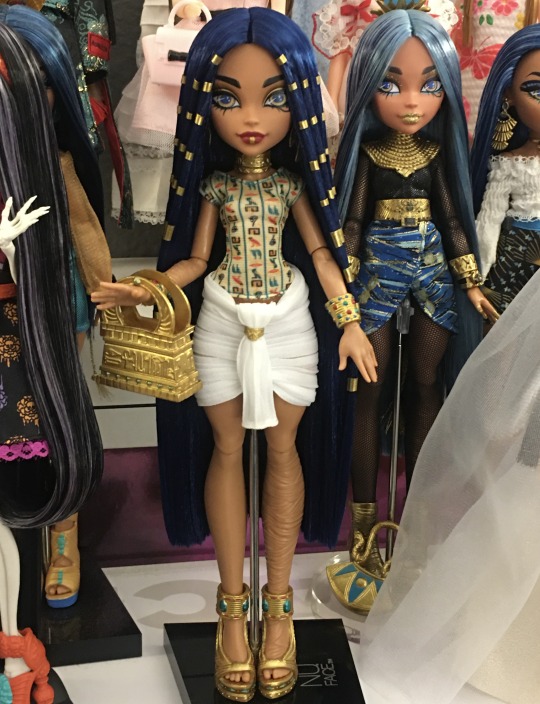
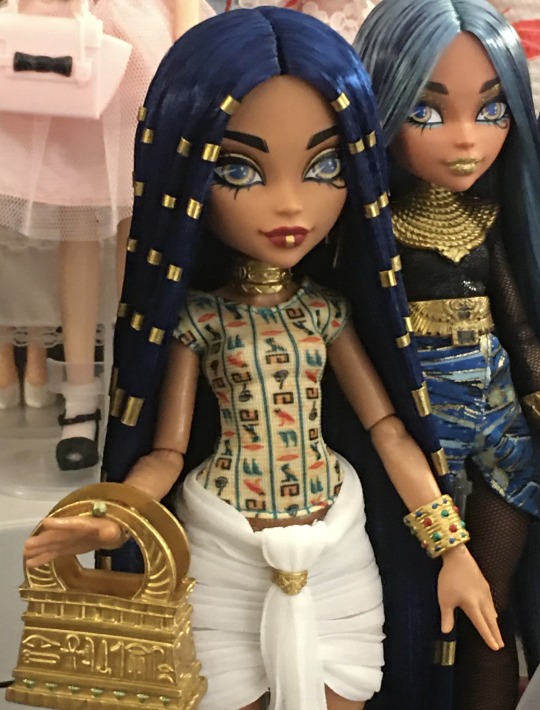
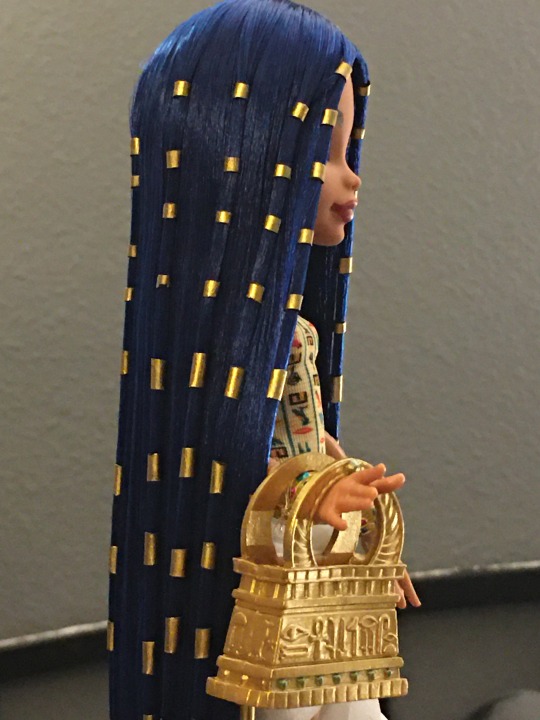
They're inspired by a set of wig rings found in the tomb of Sithathoriunet (Middle Kingdom, 12th Dynasty), shown here at The Met and here in an earlier Met exhibit, displayed on reconstruction wigs.
I couldn't find any metal beads in the right sizes or color (and I wanted them to be the same shade of gold as her accessories) so I made these myself with a handful of coffee stirrers that I painted and cut into little rings lol Other than the hair rings, she's been given a pair of shoes since my last post (Goreganizer Cleo's shoes with the Skullettes dremeled off and painted), a new choker that I made by cutting MB Cleo's ponytail holder into separate pieces, sanding off a few parts and reassembling it (the cartouche on it actually spells her name btw!), a Gloom and Bloom Cleo purse that I painted to match her shoes and a new clasp on her kilt made with a G1 Cleo vanity bracelet. Also, it was pointed out to me yesterday that the hieroglyphs on this top (from G1 I Heart Fashion Cleo) spell out to say "oh my Ra" phonetically lol. A nice touch that I never noticed! And I also finished up this Cleo a while back but never posted her here lol
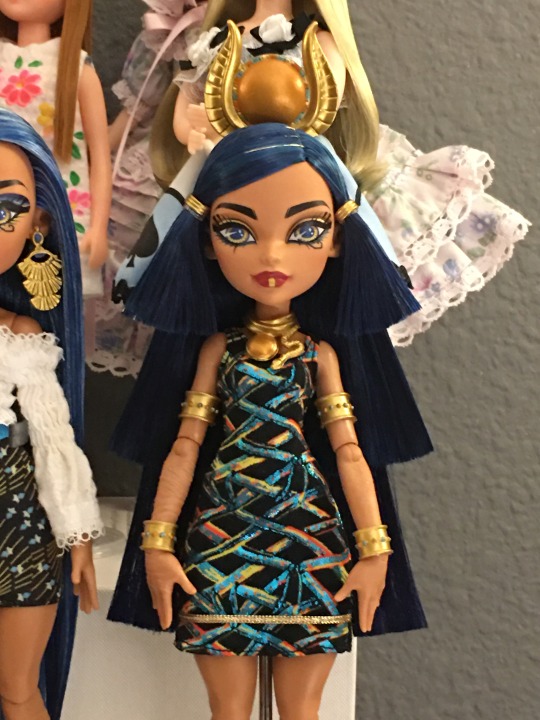
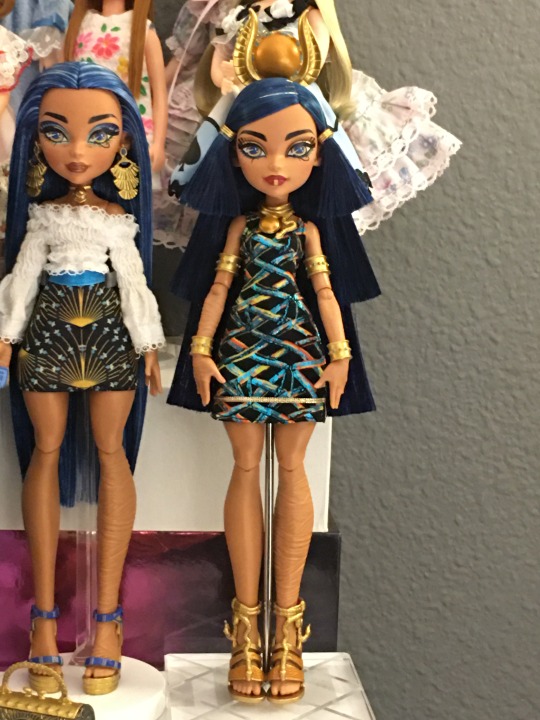
Her headdress is a heavily altered and repainted Monster Ball Cleo headdress; I just wanted the "core" of the headdress so I removed everything but the cow horns and sun disk with my dremel, then drilled a hole through the back and pinned it to her head lol. The bracelets are all g1 Nefera bracelets that I repainted (as well as Nefera's necklace) and her shoes are from Skulltimate Secrets Cleo but repainted to match the rest of her accessories, and the hair rings are repainted G1 sig/Howliday Cleo bracelets. The first two 'tiers' of hair are her original rooted hair, but the longest tier is an extension that I made and pinned to her head. My general idea is that this is something she'd wear for temple ceremonies or religious events, or as a model for portraiture and statuary that represents her as an embodiment of Hathor? Not sure! My SS2 Cleo custom got some small updates shortly after my last tumblr post about her, mostly just her new headdress and new fishnets that actually fit her lol
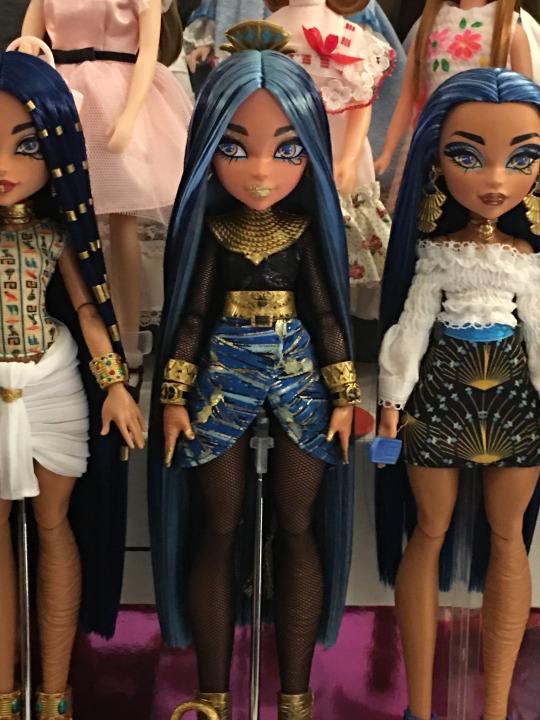
And finally a group shot of my current Cleo lineup:
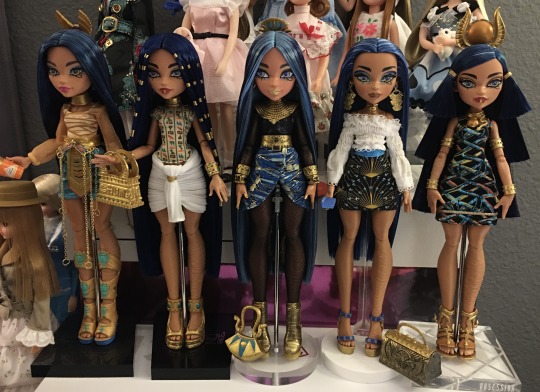
Skulltimate Secrets Cleo (far left) and Goreganizer Cleo (second to the right) are still WIP but they look good enough to be part of the shot! I also have a partially rerooted Monster Ball Cleo waiting for a new fit too, but there's no room on this display for her and she's barely dressed anyway lol
#monster high#monster high g3#cleo de nile#ancient egypt#mh#cleo#skulltimate secrets#ghoul spirit#goreganizer
805 notes
·
View notes
Note
I know you've reblogged some fic art before, but do you have any other Harry/Kim fics you really liked/would recommend? (Maybe even non-harry/Kim fics if you're into that lol)
oh my god i didnt answer ok ok yeah i'll find some and mb add to it later when i log back into my ao3 account. fanfiction man over here. no smut except incidental to fics i rlly enjoyed bc sex repulsed (sad + sorry).
FAV EVER is the repeater corpse conundrum , adore how the pale is written and it was very touching to me personally bc i felt like the experience of delerium was genuinely written perfectly, it felt like a memory or some shit i adore it, vaguely triggering to if u have experiences of delerium states ig bc its so vivid but yeah fucking sick.
the catacomb killer is a personal favourite bc the trope of like, false accusation and shit has been deeply deeply appealing to me since i was like 4, it was why i got my first ever special interest (christianity and the bible) and got christened bc i have always fucked w it harrrd.
the rescue is really odd- def not for everyone bc yk like human cow milk stuff- but i found it rlly touching and like just a really moving and rlly insightful metaphor for how ostracisation and dehumanisation functions in the characters. i have drawn fanart of this b4 :-b
the birdcage series was a longass rlly well thought out casefic- i just really liked how obviously passionate about writing a mystery the author was and good if u r into worldbuilding.
a toast to the pigs is currently unfinished and on hiatus but i fucking LOVE this au, kim and harry are so well thought thru j awesome, i have also drawn fanart 4 this one before i j love it.
rewind, refine is an awesome roleswap, especially love how harry is written in it- feels really thought out and j a lovely au tbh.
100 notes
·
View notes
Note
hi I really like your mb and I'm new here. Do u have any suggestions or tips to make mb? like where did u get the pics and the captions.
𝓜oodboards: a guide for beginner blogs!
I decided to bring here a small tutorial that can help other blogs that are starting out and still have questions that need clarification, with tips and links that you may need. I wrote this from my point of view of creating moodboards and I tried to be as brief as possible in my explanation, there may be errors in English as I'm not fluent in that language and everything here was translated using Google Translate, any questions you can contact me via asks or by message.

how do I find pics for moodboards?
Pinterest is where you will find most images for moodboards, so create a Pinterest board just for these images, separating them into subboards for each color or aesthetic to make it easier.
Some blogs leave the link to their Pinterest accounts in pinneds or in the carrd, you can follow them and save the pics they published on the app in your boards, this will influence the Pinterest algorithm so that they recommend more of the type of images you want.
You can also search on Pinterest for the aesthetic and color you want (coquette pink aesthetic, cottagecore aesthetic, y2k, etc.).
how to make moodboards + tips:
Well, it's not such a complicated thing for me. I generally make moodboards with 6 or 9 images, taking inspiration from the moodboards of other blogs that I admire, so I can get an idea of how to make the captions and how to position the photos in a way that matches them.
To make it easier, first I create the moodboard and then I look for an icon of a kpop idol that can match the aesthetics and color of the moodboard. The reverse can also be done: first choose an icon and make a moodboard for that image, paying attention to the color palette and tonality (and for some reason, for me it's better to create moodboards in Tumblr's light mode instead of dark mode)
When I finish the moodboard, I add the caption, the hashtags (which will be very important for your post to reach other people) and maybe a divider. You can find these dividers on other blogs or by searching for "dividers" on Tumblr.
If you want to split a photo into two or more images, use this site.
how to create captions:
To make the captions, I use parts of songs that I like or that I found searching on Pinterest for "Spotify song lyrics", but they can also be album or song names, movie names, a phrase you thought, etc. The symbols you will put in the caption can be found on this website or just by searching for "symbols", "kpop symbols", "kaomojis" on tumblr.
If you want to use a different font for the letters, there are these two websites (01 and 02). And to change the color, there are also these two tutorials (01 and 02).
what to do to make your blog "popular":
Add popular hashtags that relate to the content you are posting. If you use almost the same tags as other big blogs, your posts will have more reach. Posting frequently and your account looking nice and organized helps too.
Ask several other popular blogs to promote your account. This was very important for my profile to grow in the number of followers and engagement.
Join the events that some blogs do, as they offer good prizes like reblogs if you win. And remember to have patience, as it often takes a while to get good engagement on Tumblr.
242 notes
·
View notes
Text


welcome to animal crossing: the event

how to enter : — comment joining — reblog and tag 3+ people who you think might join — dm me a number 1-14 for your animal villager species (species as in ex: cat, frog, horse.. ) — use the tag: "⠀⤷⠀𝚜𝚑𝚞𝚊𝚟𝚎𝚛﹕welcome to animal crossing ✸ ˚⠀" (found in the tags below) and please tag me somewhere in the post ( or comments ) when posting your mood board or else it will not be counted

follow these rules : — your mood board must be 90% by you (stuff like dividers, gifs, and locs that are made by others are allowed) — no copying or stealing. plagiarism is different from inspo one mood board entry per person — you must create a mood board based on type of animal you received (for ex: you got cat, you can can create a mb based on rudy, raymond, lolly.. there are tons to choose from !) — please do some simple research before choosing an villager to use ! some species look similar but are not the same (ex: bears are not the same as cubs) — please include your villager at least once or twice in your moodboard not a tiny glimpse or an unnoticeable png — the deadline is september 30th (please lmk if you need any extensions !)

here are the prizes : — 1st place: 100 reblogs, 3 custom mood boards created by me, a reblog on this account — 2nd place: 75 reblogs, 2 custom mood boards created by me, a shoutout — 3rd place: 50 reblogs, 1 custom mood board created by me honorable mentions: 25 reblogs

HAPPY 200+ FOLLOWERS TO ME !! thank you all so so much :> i never thought i would reach to such a big number so fast. i used to get excited over the number 50 on my posts :') time flies as my first moodboard was posted on march. only 5 months in and were at 200+ im so happy :D school is starting in 2 weeks so i may or may not be as active? but im back from camp now and am very excited to share more moodboards with you all <3 enjoy the event~

tags: (feel free to ignore)
@rkkuri @jicito @wnhee @w3berry @purinkiss
@taroism @galavande @awwriri @i-mmaculatus
@gyareii @chaewavs @l1nque @aqualogia @fre-sitas
@yuqi-luv @cupiddoe @aeraras @aericita
@c-heriis @yangqvr @gigipng @nikist-4-n
@7kyujin @haeheyy @n-americano
@sleepd4rling @liilithmin @hyetart @m00nbap
@nayeondoll @daddldee @seorain @s2kahei
@cg1rl @sgyuzzz @petieon @yawnznn
@jimzittos @suag @imwonyoungs @hyelita @seulzitos

#ㅤ(❁ ´ ♡ `) 𝚜𝚑𝚞𝚊𝚟𝚎𝚛 ✽ ˚#⠀⤷⠀𝚜𝚑𝚞𝚊𝚟𝚎𝚛﹕welcome to animal crossing ✸ ˚⠀#divider by strangergraphics archive#divider by animatedglittergraphics n more#kpop event#kpop moodboard#kpop#kpop gg#kpop bg#kpop layouts#kpop icons#acnh#acnh community#acnh villagers#animal crossing new horizons#animal crossing#anch moodboard#animal crossing villagers#animal crossing community#anch event#tumblr event#animal crossing event#animal crossing pocket camp#moodboard event#animal crossing new leaf#animal crosing new horizons#new horizons#tom nook#nintendo
131 notes
·
View notes
Note
hi!! i recently found ur account while scrounging thru the bi han tag (theres so little bi han x reader fics 😭) and i love ur writing so i was wondering if you could do a bi han x princess reader? maybe the lin kuei made some kind of alliance with a king and he falls jn love (or lust) with his daughter? idk if that makes a lot of sense lolll. anyways thank u and i love ur work!!
i gen never expected people to really like Bi Han that much
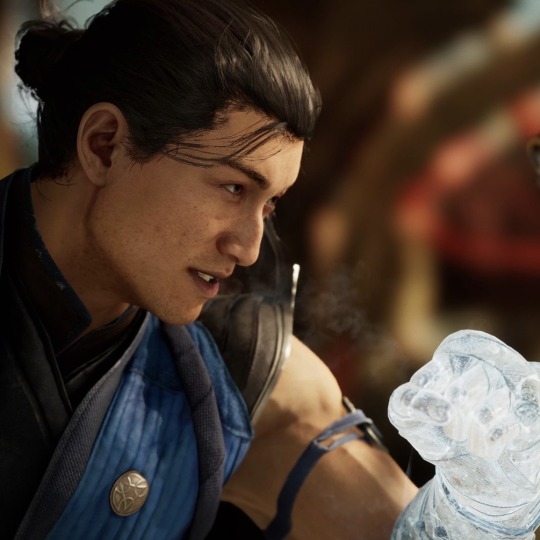
Bi Han x Princess Reader
MK1 short story with smut at the end starring guess who?? BI HAN <3
TW: 18+, smut at end, fingering, praises, suggestive, boobs, Bi Hans not as degrading, forbidden love
A/N: mb for this shittiness anon i tried LMAO- I feel like by now everybody should know i dead just don't proofread
Your father, the kind, wanted to strengthen his kingdom's defenses. So, to achieve this, he proposed an alliance with the enigmatic Lin Kuei.
You first met Bi Han at a banquet to congratulate your alliance. Your father introduced him to you as the Grandmaster of the Lin Kuei. You couldn't help but feel attracted to his cold and rough attitude, not to mention how handsome he was.
Bi Han's heart fluttered when he saw you, but he tried to push it deep away, feeling unfamiliar with this feeling. But as time passed, he couldn't help but try to be closer to you. He wanted to hear your rambles and see your beautiful eyes and elegance.
He would purposefully run into you, planning and taking notes on locations you would stop by. One of these is the royal garden, where you'd take a walk every day. Slowly, you noticed how often you would see the Grandmaster. You found it unusual, but you didn't mind his presence.
Slowly, it went from seeing each other to striking up conversations with him. He would often give you advice for your duties as a princess.
As you two grew closer, you would often find yourself openly complimenting him and subtly flirting.
"I'm aware you're a cryomancer, but does your heart ever get cold? Maybe my presence can warm it," You spoke, gaining a little smile from him. It was the first time you had ever seen him smile, and it made the butterflies in your stomach go crazy.
Considering he's unfamiliar, you are likely the first to admit your feelings. You asked him to meet you in the royal garden at night, and when he showed up, you began confessing.
The garden was very serene and peaceful. The moon cast a pale, silvery light over the garden, illuminating the flowers and trees. It was filled with the sweet fragrance of the blooming flowers. The pathway was dimly lit with the soft glowing lanterns, casting a warm and inviting light onto you both.
"Princess," He greeted you with a bow. "Is there a reason you requested to see me this belatedly at night?" He questioned, his voice gruff, but his eyes betrayed him.
"Yes…" You took a deep breath. "Grandmaster, I believe I'm in love with you," You admitted, wasting no time admitting your feelings. Though you were nervous, you were also confident.
"Princess…" He trailed off, unsure what to say.
You stepped closer to him, feeling your heart beating faster with anticipation. "Please, don't say anything if you don't feel the same way. I just had to tell you how I feel," You said, trying to hide your disappointment.
But before you could leave him, he pulled you in and kissed you. He backed you into one of the pillars, pressing your back against it. The kiss became passionate. All his pent-up lust for you is pouring out now. His cold hands were going to cup your cheek.
Your love was forbidden, a princess with a Lin Kuei assassin? Not to mention, you were the next heir to the throne. Your father would prohibit you from ever seeing Bi Han again and most likely change the relationship between your kingdom and the Lin Kuei.
A secret relationship between you both blossomed. Bi Han would often meet you in your chambers or the garden. Occasionally, he would convince your father that he was best fit to guard you whenever you had events.
BONUS
You would leave your balcony window open for Bi Han to climb through at night. This was one of the nights when Bi Han visited you.
"Grandmaster!" You almost exclaimed, getting up off your bed to see him closer.
"Bi Han," He corrected you with a slight smirk.
"Sorry," You giggled, taking hold of his hand and bringing it to your cheek. His excellent hands felt cold against your warm cheek. "I missed you, Bi Han," You smiled, looking up at him.
His thumb grazed your cheek as you continued to hold it. "I did too, my princess," He spoke, leaning over to kiss you.
His lips pressed against yours, and you both were locked into a fiery kiss. Bi Han's other hand gripped your waist, pulling you deeply into the kiss. His tongue grazed your bottom lip, gaining entry into your mouth.
Bi Han couldn't contain his desire anymore. Pulling away from you, he threw you over his shoulder, carrying you over to your bed. You giggled at his roughness and kicked your legs, but he easily held them in place.
He threw you down on the bed, got on top of you, and continued your kiss. One of his hands gripped your thigh, pushing up your nightgown just enough to expose your panties.
Your hands went up to his hair, fingers reaching his bun. You quickly undid it, letting his hair down.
He pulled away from the kiss again, pinning your hands above your head. His hair fell around his shoulders.
"You're so handsome with your hair down," You looked at him lovingly.
"Is that so?" He spoke, his hand trailed closer to your core.
You couldn't help but shiver, feeling his cold fingers touch the sensitive part of your thigh. He then let go of your hand, using both to pull the nightgown over your head.
You sigh softly, feeling Bi Han's hands run over your body. His lips followed down your body, stopping to give your breasts extra attention. Rubbing your nipple in between his fingers while sucking the other one. His eyes looked up at you, watching as your face contorted into one of pleasure.
His hand slid down to your stomach, holding you in place as he kissed your body.
"Tell me, do I have your approval, Princess?" He said teasingly, smirking.
"Yes-Yes," You babbled, running your hand through his long hair.
He pulled your panties off, and his thumb massaged your clit as the other hand spread your thighs further apart.
You bit your bottom lip, keeping your legs open for Bi Han.
He inserted two digits into your heat, the cold of his fingers giving you goosebumps. He began pistoning his fingers in and out of you at a fast pace, not giving you any warning.
"Bi-Bi Han!" You grabbed at his shoulders as he continued his assault on your pussy.
"Tell me how you feel, pretty girl," He spoke, his eyes never leaving your face, obsessed with your reactions.
Let's hope you don't wake the whole castle up.
#bi han x reader#mk x reader#mk1#mortal kombat#mortal kombat 1#mortal kombat smut#afab reader#bi han#bi han smut#bi han x you#lin kuei#bi han sub zero#bi han mk#mk1 sub zero#drabbles#one shot#smut#bi-han x reader#'
954 notes
·
View notes
Text


𓂅 ⁺ 𖨂 4,000 followers
: thank you all so much for 4k followers!! we actually grew a lot very fast, like i swear a week ago was like 3,830 something and a day ago was like 3,980 something 😭 thank you all so much for you continuing support!! i appreciate it so much, only if we got our old followers back from our old account then we’d probably be at like 6-7k rn or almost 8k 😞, but it’s okay because that won’t happen heh.. but once again i’m super grateful for reaching this amount of followers. it was hard to grow again when my old account got deleted for no reason, it wasn’t easy 😭 but i never gave up at all soo.. but we literally reached and grew 4k in a year?? that’s actually so crazy because this account was like remade or something last december 17, 2023 and the fact we got 4k in a year is actually so crazy 😭😭‼️‼️ at first i thought i wouldn’t be a big blog and famous (lol i’m not) but i didn’t think it would reach this big but yes yes thank you all once again and i love you all so so much!!
@yuzchaes , @y-unrei , @i04rei , @aeraras , @wonjuii @heavenurl @y-vna @yeritos (i missed u so muchu) , @tzulipss , @7kyujin , @p-oisn , @soulari , @baesol , @umiena , @koosuvi , @yeribbon , @fairytopea , @rkkuri , @n-americano , @eliatopia , @sseulr1n , @iluvrei , @thsv , @ningrlz , @qqmariztwsse , @liilithmin , @lilaquette , @kthemes , @yunjidoll , @y-urios , @yeossemble (thank u so much for commenting on my mbs 😞☹���) , @sugarish , @chaeryeos , @beompercar , @nikist-4-n , @bitchey , @minguukie , @seulzitos , @bambicito , @heavenurl and many more 😞
please join my server!!
https://discord.gg/hN6w266Zf4
# . ゛i-kyujin ໒ྀི collection⠀ ⁺ #i-kyujin#i-kyujin 4000 followers
76 notes
·
View notes