#fail2ban
Explore tagged Tumblr posts
Visit Tumblr Blog
Explore Tumblr blogs with no restrictions, modern design and the best experience.
Last Seen Tumblr Blogs


Fun Fact
Tumblr was created by web developers David Karp and Marco Arment.
Text
I guess
That this blog is back..? Apparently it just turned 9 years old. So why not celebrate?
Lately I've done a little coding. Just bash. My mom got hit with a ransomware attack so I went a tad crazy with a Pi-hole, Fail2Ban and now Firewalld (original Uncomplicated Fire Wall). It's all on a Fedora server running on that ancient nettop I was going to make into a NAS.
Current problem: Pi-hole web console won't cooperate and 403's me. Forbidden why? Fuck if I know. Fuck if I've had the energy to find out. I've got other, completely unrelated work.
But. yes so first order of business is unfuck the Pi-hole web console. It isn't the web server malfunctioning because Webmin still works, and it was previously working so it's something relatively recent. At any rate I can at least monitor its status if not its activity.
Next up on the docket: "Linux Attentive SERver Console". It's a silly name but it has some clear objectives:
Backup management
System resource monitoring
Fail2ban, Firewalld, and Pi-hole metrics
Email summaries and alerts
Web-based interface
Security and authentication
So it's a big project but one step at a time. First backup management, which already sort of exists. I have scripts that I need to get running properly with cron jobs with basic backup creation and management. So next step is to start expanding user control.
1 note
·
View note
Text
#fail2ban#linux#linuxposting#technically#technology#ubuntu#open source#python#programming#linux tutorial
0 notes
Text
What is Fail2ban? And how to install & configure it?
Fail2ban is open-source software used to increase server security by automatically blocking IP addresses that attempt unauthorised access. Fail2ban accomplishes this by monitoring server logs for specific patterns of repeated failed login attempts, which can indicate a brute-force attack attempt or other malicious activity. After identifying a malicious IP address, Fail2ban can block it by adding…

View On WordPress
1 note
·
View note
Text
0 notes
Text
No Kitten you've been bad. The rules say you must spend the night in the fail2ban jail
35 notes
·
View notes
Text
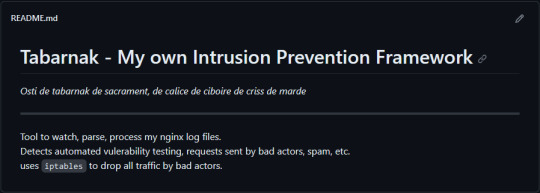
(this is a small story of how I came to write my own intrusion detection/prevention framework and why I'm really happy with that decision, don't mind me rambling)
Preface

About two weeks ago I was faced with a pretty annoying problem. Whilst I was going home by train I have noticed that my server at home had been running hot and slowed down a lot. This prompted me to check my nginx logs, the only service that is indirectly available to the public (more on that later), which made me realize that - due to poor access control - someone had been sending me hundreds of thousands of huge DNS requests to my server, most likely testing for vulnerabilities. I added an iptables rule to drop all traffic from the aforementioned source and redirected remaining traffic to a backup NextDNS instance that I set up previously with the same overrides and custom records that my DNS had to not get any downtime for the service but also allow my server to cool down. I stopped the DNS service on my server at home and then used the remaining train ride to think. How would I stop this from happening in the future? I pondered multiple possible solutions for this problem, whether to use fail2ban, whether to just add better access control, or to just stick with the NextDNS instance.
I ended up going with a completely different option: making a solution, that's perfectly fit for my server, myself.
My Server Structure
So, I should probably explain how I host and why only nginx is public despite me hosting a bunch of services under the hood.
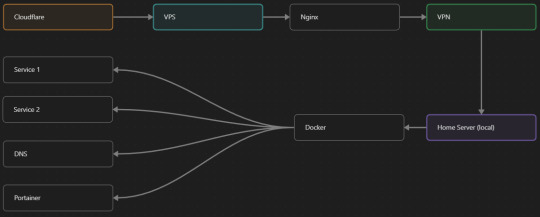
I have a public facing VPS that only allows traffic to nginx. That traffic then gets forwarded through a VPN connection to my home server so that I don't have to have any public facing ports on said home server. The VPS only really acts like the public interface for the home server with access control and logging sprinkled in throughout my configs to get more layers of security. Some Services can only be interacted with through the VPN or a local connection, such that not everything is actually forwarded - only what I need/want to be.
I actually do have fail2ban installed on both my VPS and home server, so why make another piece of software?
Tabarnak - Succeeding at Banning
I had a few requirements for what I wanted to do:
Only allow HTTP(S) traffic through Cloudflare
Only allow DNS traffic from given sources; (location filtering, explicit white-/blacklisting);
Webhook support for logging
Should be interactive (e.g. POST /api/ban/{IP})
Detect automated vulnerability scanning
Integration with the AbuseIPDB (for checking and reporting)
As I started working on this, I realized that this would soon become more complex than I had thought at first.
Webhooks for logging This was probably the easiest requirement to check off my list, I just wrote my own log() function that would call a webhook. Sadly, the rest wouldn't be as easy.
Allowing only Cloudflare traffic This was still doable, I only needed to add a filter in my nginx config for my domain to only allow Cloudflare IP ranges and disallow the rest. I ended up doing something slightly different. I added a new default nginx config that would just return a 404 on every route and log access to a different file so that I could detect connection attempts that would be made without Cloudflare and handle them in Tabarnak myself.
Integration with AbuseIPDB Also not yet the hard part, just call AbuseIPDB with the parsed IP and if the abuse confidence score is within a configured threshold, flag the IP, when that happens I receive a notification that asks me whether to whitelist or to ban the IP - I can also do nothing and let everything proceed as it normally would. If the IP gets flagged a configured amount of times, ban the IP unless it has been whitelisted by then.
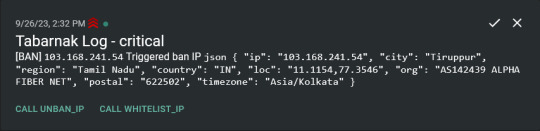
Location filtering + Whitelist + Blacklist This is where it starts to get interesting. I had to know where the request comes from due to similarities of location of all the real people that would actually connect to the DNS. I didn't want to outright ban everyone else, as there could be valid requests from other sources. So for every new IP that triggers a callback (this would only be triggered after a certain amount of either flags or requests), I now need to get the location. I do this by just calling the ipinfo api and checking the supplied location. To not send too many requests I cache results (even though ipinfo should never be called twice for the same IP - same) and save results to a database. I made my own class that bases from collections.UserDict which when accessed tries to find the entry in memory, if it can't it searches through the DB and returns results. This works for setting, deleting, adding and checking for records. Flags, AbuseIPDB results, whitelist entries and blacklist entries also get stored in the DB to achieve persistent state even when I restart.
Detection of automated vulnerability scanning For this, I went through my old nginx logs, looking to find the least amount of paths I need to block to catch the biggest amount of automated vulnerability scan requests. So I did some data science magic and wrote a route blacklist. It doesn't just end there. Since I know the routes of valid requests that I would be receiving (which are all mentioned in my nginx configs), I could just parse that and match the requested route against that. To achieve this I wrote some really simple regular expressions to extract all location blocks from an nginx config alongside whether that location is absolute (preceded by an =) or relative. After I get the locations I can test the requested route against the valid routes and get back whether the request was made to a valid URL (I can't just look for 404 return codes here, because there are some pages that actually do return a 404 and can return a 404 on purpose). I also parse the request method from the logs and match the received method against the HTTP standard request methods (which are all methods that services on my server use). That way I can easily catch requests like:
XX.YYY.ZZZ.AA - - [25/Sep/2023:14:52:43 +0200] "145.ll|'|'|SGFjS2VkX0Q0OTkwNjI3|'|'|WIN-JNAPIER0859|'|'|JNapier|'|'|19-02-01|'|'||'|'|Win 7 Professional SP1 x64|'|'|No|'|'|0.7d|'|'|..|'|'|AA==|'|'|112.inf|'|'|SGFjS2VkDQoxOTIuMTY4LjkyLjIyMjo1NTUyDQpEZXNrdG9wDQpjbGllbnRhLmV4ZQ0KRmFsc2UNCkZhbHNlDQpUcnVlDQpGYWxzZQ==12.act|'|'|AA==" 400 150 "-" "-"
I probably over complicated this - by a lot - but I can't go back in time to change what I did.
Interactivity As I showed and mentioned earlier, I can manually white-/blacklist an IP. This forced me to add threads to my previously single-threaded program. Since I was too stubborn to use websockets (I have a distaste for websockets), I opted for probably the worst option I could've taken. It works like this: I have a main thread, which does all the log parsing, processing and handling and a side thread which watches a FIFO-file that is created on startup. I can append commands to the FIFO-file which are mapped to the functions they are supposed to call. When the FIFO reader detects a new line, it looks through the map, gets the function and executes it on the supplied IP. Doing all of this manually would be way too tedious, so I made an API endpoint on my home server that would append the commands to the file on the VPS. That also means, that I had to secure that API endpoint so that I couldn't just be spammed with random requests. Now that I could interact with Tabarnak through an API, I needed to make this user friendly - even I don't like to curl and sign my requests manually. So I integrated logging to my self-hosted instance of https://ntfy.sh and added action buttons that would send the request for me. All of this just because I refused to use sockets.
First successes and why I'm happy about this After not too long, the bans were starting to happen. The traffic to my server decreased and I can finally breathe again. I may have over complicated this, but I don't mind. This was a really fun experience to write something new and learn more about log parsing and processing. Tabarnak probably won't last forever and I could replace it with solutions that are way easier to deploy and way more general. But what matters is, that I liked doing it. It was a really fun project - which is why I'm writing this - and I'm glad that I ended up doing this. Of course I could have just used fail2ban but I never would've been able to write all of the extras that I ended up making (I don't want to take the explanation ad absurdum so just imagine that I added cool stuff) and I never would've learned what I actually did.
So whenever you are faced with a dumb problem and could write something yourself, I think you should at least try. This was a really fun experience and it might be for you as well.
Post Scriptum
First of all, apologies for the English - I'm not a native speaker so I'm sorry if some parts were incorrect or anything like that. Secondly, I'm sure that there are simpler ways to accomplish what I did here, however this was more about the experience of creating something myself rather than using some pre-made tool that does everything I want to (maybe even better?). Third, if you actually read until here, thanks for reading - hope it wasn't too boring - have a nice day :)
8 notes
·
View notes
Text
Basic web hosting for a low resource site is $5 a month, and those absolutely provide enough power for a low traffic forum. The main issue is that setting up servers has not seen the same increase in usability as consumer facing products, so there's a major barrier to entry for anyone not familiar with server stuff. Imo there need to be preconfigured operating system images with stuff like ports and DNS and fail2ban and everything preconfigured, so someone who wants to start a forum can just buy a domain and hosting from whoever, choose an iso, and have a simple gui setup process for authentication and administration and stuff. A lot of people who care deeply about online communities and want to help foster them are going to nope out when presented with a blank command prompt, so the best way to encourage forums and stuff is to make creating them easier.
It sucks that people are treating the Reddit blackout as a joke or assuming it's impotent rage over a minor decision bc it's Reddit when like. No, a tech company shutting down access to their API by forcing third-party devs to pay completely unreasonable fees ($12,000 per 50 million API requests, which to the largest third party clients would be tens of millions of dollars) and in the process destroying both accessibility apps and moderation tools is Bad Actually
47K notes
·
View notes
Link
Cómo Defenderse Contra los Ataques de Fuerza Bruta con Fail2ban | #Bruteforce #Fail2ban #FuerzaBruta #SeguridadInformática #SeguridadOfensiva #Seguridad
0 notes
Text
Hardening Your Linux Systems with Fail2Ban: Boost Security and Safety
Introduction Hardening Your Linux Systems with Fail2Ban Fail2Ban is a widely-used, powerful tool for hardening Linux systems and securing access to services. By detecting and responding to repeated login failures, Fail2Ban helps prevent unauthorized access, brute-force attacks, and other malicious activities. Importance of Hardening Linux Systems with Fail2Ban Fail2Ban plays a crucial role in…
0 notes
Text
【初心者向け】Fail2banのインストールから設定まで完全ガイド - failregexパターンのカスタマイズについても解説
Fail2banとは Fail2banはサーバーセキュリティを向上させるためのツールです。 認証ログを監視し、不正なログイン試行を検知すると、該当IPアドレスからのアクセスを一時的にブロックします。 SSHやWebサーバーなど、様々なサービスに対応している点が特徴です。 Fail2banのインストール方法 Debian/Ubuntuベースのシステムでは、aptコマンドでインストールできます。 sudo apt update sudo apt install fail2ban Red Hat系のシステムではyumコマンドを使用します。 sudo yum install epel-release sudo yum install…
0 notes
Link
0 notes
Text
What is the Difference Between Plesk and cPanel?

When it comes to web hosting control panels, Plesk and cPanel are the two giants in the industry. Both offer comprehensive tools for managing web servers, websites, databases, emails, and more. However, they have their differences, and choosing the right one for your needs can significantly impact your hosting experience. In this article, we will explore the difference between Plesk and cPanel, focusing on their features, user interface, security, compatibility, and pricing, while highlighting the positive aspects of Plesk hosting.
1. User Interface and Ease of Use
One of the most noticeable differences between Plesk and cPanel is their user interface. Both platforms have designed their interfaces to be user-friendly, but they do so in different ways.
Plesk:Plesk is known for its clean, modern, and intuitive interface. It organizes its features into categories, making it easy for users to find what they need quickly. The dashboard is less cluttered, and the navigation is straightforward, which is especially beneficial for beginners. Plesk’s interface is also responsive, meaning it works well on various devices, including tablets and smartphones.
cPanel:cPanel’s interface, while powerful, can feel a bit outdated compared to Plesk. It organizes tools into icons, and while this can be effective for users who are familiar with the layout, it can be overwhelming for beginners. The interface is also less customizable than Plesk, which might be a drawback for those who want to tailor their control panel experience.
Verdict:When comparing the difference between Plesk and cPanel in terms of user interface, Plesk takes the lead. Its modern design, simplicity, and responsiveness make it more user-friendly, especially for beginners.
2. Operating System Compatibility
Operating system compatibility is another critical factor when choosing a web hosting control panel. The ability to work with different OS platforms can be a deciding factor for many users.
Plesk:Plesk is highly versatile and works on both Linux and Windows servers. This cross-platform compatibility makes it an excellent choice for users who may need to switch between different operating systems or those who prefer Windows-based hosting. The ability to manage both Linux and Windows servers from the same interface is a significant advantage of best plesk hosting.
cPanel:cPanel is limited to Linux servers, specifically CentOS, CloudLinux, and Red Hat Enterprise Linux. This limitation can be a dealbreaker for those who need Windows hosting, as cPanel does not support Windows servers.
Verdict:When considering the difference between Plesk and cPanel in terms of OS compatibility, Plesk emerges as the clear winner. Its ability to work seamlessly with both Linux and Windows servers gives it a significant edge over cPanel.
3. Security Features
Security is a top priority for anyone managing websites and servers. Both Plesk and cPanel offer robust security features, but there are some differences worth noting.
Plesk:Plesk is known for its strong security features. It comes with integrated security tools like Fail2Ban for intrusion detection and prevention, and ModSecurity for web application firewall protection. Plesk also supports Let’s Encrypt, allowing users to install SSL certificates easily. Additionally, Plesk offers advanced security options like two-factor authentication (2FA) and anti-spam filters. The platform's security is further enhanced by regular updates and patches, ensuring that vulnerabilities are addressed promptly.
cPanel:cPanel also offers a range of security features, including a virus scanner, SSH access management, IP blocking, and password-protected directories. cPanel integrates with several third-party security tools, which can be a plus for users who prefer specific security solutions. However, some of these features might require additional configuration, making them slightly less user-friendly compared to Plesk.
Verdict:In the battle of security features, Plesk has a slight edge due to its out-of-the-box security tools and ease of use. Plesk’s comprehensive security measures make it a preferred choice for those who prioritize a secure hosting environment.
4. Application Support and Management
The ability to manage and deploy applications efficiently is a crucial aspect of any control panel. Both Plesk and cPanel offer application support, but they differ in how they handle it.
Plesk:Plesk excels in application management with its integration of the Plesk Application Catalog. It supports a wide range of applications, including WordPress, Joomla, and Drupal, allowing users to install and manage these applications with a single click. Plesk’s WordPress Toolkit is particularly impressive, offering features like cloning, staging, and automatic updates, which are invaluable for WordPress users. Additionally, Plesk’s Docker support allows users to run Docker containers directly from the control panel, making it a versatile choice for developers.
cPanel:cPanel also supports a variety of applications through its Softaculous Apps Installer. Users can install popular CMS platforms, e-commerce tools, and more with just a few clicks. However, cPanel’s application management features are not as advanced as Plesk’s. For example, while cPanel supports WordPress, it lacks the comprehensive management tools found in Plesk’s WordPress Toolkit.
Verdict:Plesk takes the lead in application support and management. Its robust tools, especially for WordPress, make it an ideal choice for users who rely heavily on CMS platforms and need efficient management options.
5. Customer Support and Documentation
Reliable customer support and comprehensive documentation are essential for users of all experience levels.
Plesk:Plesk offers a wide range of support options, including an extensive knowledge base, community forums, and ticket-based support. The platform’s documentation is detailed and covers a wide array of topics, making it easy for users to find answers to their questions. Plesk also provides premium support options for users who require personalized assistance.
cPanel:cPanel also offers a comprehensive knowledge base and community forums. Additionally, cPanel provides ticket-based support, though some users have noted that response times can vary. Like Plesk, cPanel offers premium support for those who need more dedicated assistance.
Verdict:Both Plesk and cPanel offer strong customer support and documentation. However, Plesk’s extensive documentation and the variety of support options give it a slight advantage in this area.
6. Pricing and Licensing
Pricing can be a significant factor when choosing between Plesk and cPanel, especially for businesses or individuals managing multiple websites.
Plesk:Plesk’s pricing model is flexible and varies depending on the features and the number of domains you need to manage. Plesk offers three main plans: Web Admin, Web Pro, and Web Host. These plans cater to different needs, from managing a single website to hosting multiple domains. Plesk’s pricing is generally considered competitive, especially given the extensive features it offers. Additionally, Plesk often comes bundled with hosting packages, which can be cost-effective.
cPanel:cPanel’s pricing is based on the number of accounts managed on the server. This pricing model can become expensive for users who manage multiple accounts or websites. cPanel offers three main tiers: Solo (for one account), Admin (up to 5 accounts), and Pro (up to 30 accounts). For larger businesses or hosting providers, the Premier plan allows for more accounts, but at a higher cost.
Verdict:When comparing the difference between Plesk and cPanel in terms of pricing, Plesk’s flexible pricing structure and cost-effectiveness for multi-domain management make it a more attractive option for a broader range of users.
7. Backup and Restore Options
Having reliable backup and restore options is critical for website management. Both Plesk and cPanel provide these features, but they differ in execution.
Plesk:Plesk offers robust backup and restore options that are easy to use. Users can schedule automatic backups and store them in various locations, including remote storage. Plesk also allows for incremental backups, which can save time and storage space. Restoring from backups is straightforward, with options to restore entire websites, databases, or individual files.
cPanel:cPanel provides similar backup and restore functionalities, with the ability to perform full or partial backups. However, some users find cPanel’s backup system to be less intuitive compared to Plesk’s. cPanel also supports remote backups, but setting this up might require more configuration.
Verdict:Plesk’s backup and restore options are more user-friendly and versatile, making it a better choice for users who prioritize ease of use and flexibility in managing their backups.
8. Server Resource Management
Efficient server resource management is crucial for maintaining optimal performance, especially for websites with high traffic.
Plesk:Plesk provides detailed resource usage statistics and monitoring tools. Users can track CPU, memory, and disk usage, and manage resources efficiently. Plesk’s integration with tools like Grafana and Prometheus allows for advanced monitoring and alerting, which can be invaluable for larger websites or hosting providers.
cPanel:cPanel also offers resource management tools, but they are not as advanced as those provided by Plesk. While cPanel allows users to monitor resource usage and set limits, the lack of integration with more sophisticated monitoring tools might be a drawback for some users.
Verdict:Plesk’s advanced resource management tools make it a superior choice for users who need detailed monitoring and efficient management of server resources.
9. Customization and Extensibility
The ability to customize and extend the functionality of a control panel can greatly enhance the user experience.
Plesk:Plesk is highly customizable.
0 notes
Text
Cómo bloquear bots, SPAM y tráfico malicioso con el firewall CSF y LFD
Cómo bloquear bots, SPAM y tráfico malicioso con el firewall CSF y LFD #RockyLinux #CSFFirewall #Bots #Spam
CSF o Config Server Firewall, es una de las opciones más sencillas que puedes instalar en tu servidor VPS para mejorar la seguridad de tu instalación web. Es un firewall sencillo de configurar (o por lo menos más sencillo que firewalld, fail2ban), pero eso no quita para que haya que prestar un poco de atención a varios parámetros menos conocidos de su configuración para mejorar la seguridad del…

View On WordPress
0 notes
Text
Fail2Ban: Ban hosts that cause multiple authentication errors
http://securitytc.com/T7KKfn
0 notes
Text
How to Allow IP Addresses through Firewall Linux?
Configuring IP Access with iptables
Verifying iptables Installation
Listing Current Firewall Rules
Allowing Specific IP Addresses
Saving iptables Rules
Creating a Secure IP Whitelist
Defining Your IP Whitelist
Configuring iptables Rules
Testing Connectivity
Streamlining Firewall Management with BeStarHost
Introducing BeStarHost
Using BeStarHost for IP Whitelisting
Best Practices for Linux Firewall Management
Regularly Review and Update Whitelist
Implement Fail2Ban for Additional Security
Conclusion:
Effectively managing your Linux firewall is an integral part of maintaining a secure server environment. By mastering iptables and understanding how to allow specific IP addresses, you fortify your defenses against potential threats. Whether you opt for manual configuration or utilize tools like BeStarHost, the key is to stay vigilant, update your rules regularly, and adapt your security measures to evolving threats. Implementing these practices will empower you to keep your Linux server secure and resilient.
To Learn More, Click this Link:
#Linux Firewall Configuration#IP Address Whitelisting#Linux Firewall Rules#Network Security on Linux#Firewall Tutorial
0 notes