#everything in the kit was safe to use in soap including the oils and dyes and imbeds
Explore tagged Tumblr posts
Visit Tumblr Blog
Explore Tumblr blogs with no restrictions, modern design and the best experience.
Last Seen Tumblr Blogs


Fun Fact
There were a total of 171.5 billion posts on Tumblr in 2019.
Text
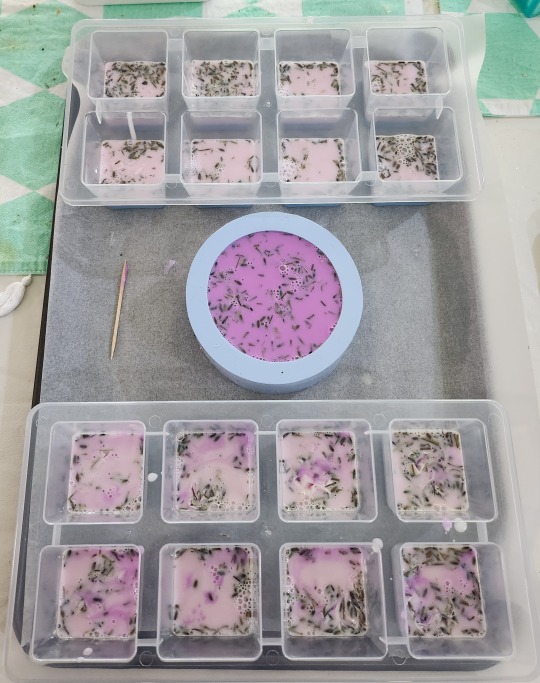

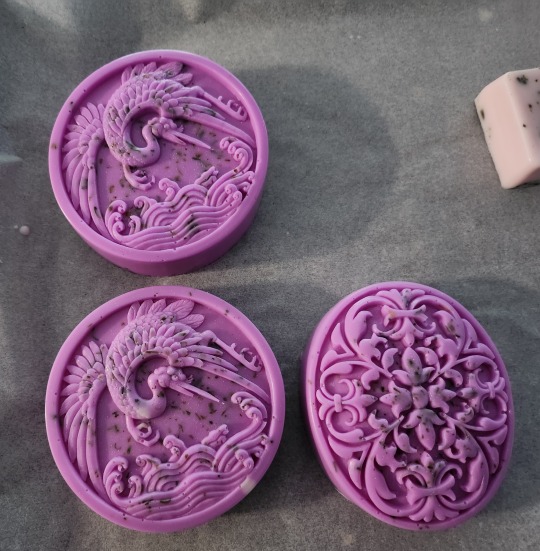
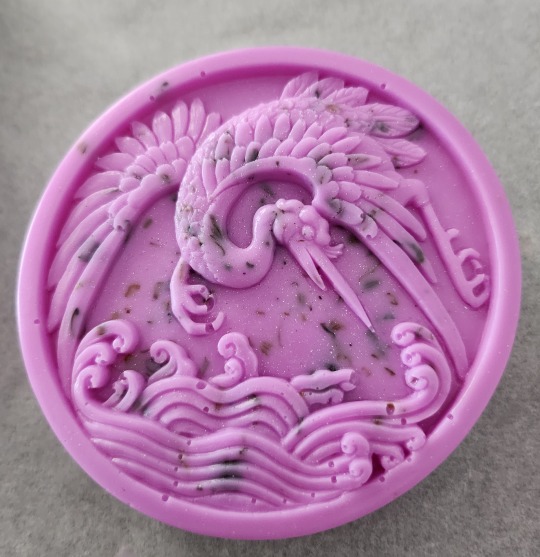
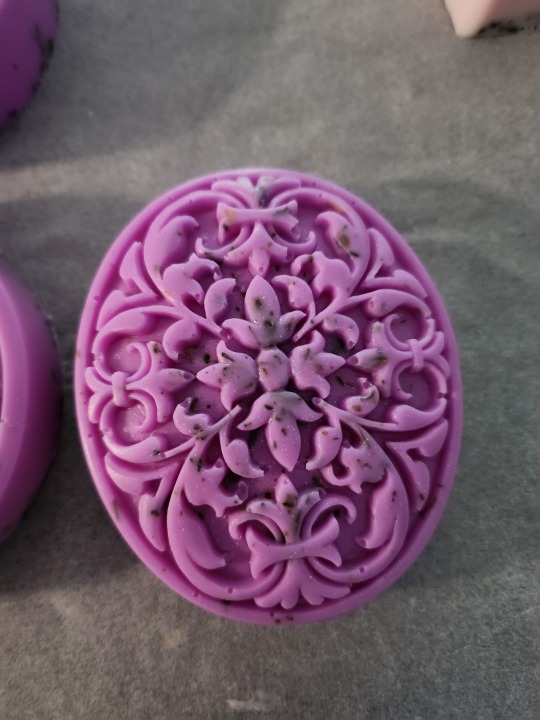
Made a foray into soaping today. Just Melt & Pour soap - I ain't ready to commit to cold processed soaping.
Mum wanted some small square soaps for her Christmas gifts for the ladies at her craft group and I had a melt and pour soaping kit I'd bought off facebook a few years ago from a Lady who was getting out of the hobby.
They're Lavender scented with dried Lavender flowers mixed in a Cocoa melt and pour base.
#XennyTalks#soap making#melt & pour soap#i wanted to go with brambleberry's mid range scent oil calculations#but man was that oil strong so I went with the light scent calcs instead#everything in the kit was safe to use in soap including the oils and dyes and imbeds#I watch too much Royalty Soaps and Cat & Raven vids on youtube to not know what online soaping resources there are#the molds are cute but I gotta figure out how to get the bubble out of the detail a bit better than just smacking the molds a few times
5 notes
·
View notes
Text
Non-Toxic Cleaning Products
When you enter the paleo community, or really just the clean eating community, you begin to think more and more about your daily life and what is involved in it. Not only do you think about the food that you put into your body, but you begin to become aware of other things that are part of your daily life. Like lotions you’re using on your skin or makeup you’re putting on your face. And you also become aware of some of the chemicals you’re using at home daily to clean your kitchen, bath and everywhere in between. But knowing what ingredients are harmful and which ones are not can be a bit challenging. There is so much information out there that it’s hard to wade through.
Well today I’m here with a solution – Thrive Market! I’ve talked about Thrive Market many many times in the past because it’s one of my favorite ways to grocery shop, but Thrive Market has way more to offer than just food. They have vitamins and supplements, beauty products, bath & body products, pet supplies, and they also have cleaning products for your home. But instead of having to look up all the harmful ingredients online, write them all down, them skim through all the products at the grocery store; you can simply click on the Home tab on Thrive Market, search Cleaning Supplies, and find non-toxic products in seconds! It’s that easy! You can shop cleaning products by different categories including: Non-Toxic, Dye & Color Additive Free, Fragrance Free, Hypoallergenic, Essential Oils, Paraben Free, Phthalate Free, and SLS Free. This is exactly how I’ve started to stock my cleaning supply cabinet at home. It’s easy, it’s simple and I know I can trust the products that are being delivered to my house! And guess what? All the products are below MSRP!
Before I share my favorite non-toxic cleaning supplies, I think it’s important that you know that the Environmental Working Group reports that indoor pollution is a health hazard, and cleaning products can be a major contributor. It’s so easy to understand how terrible smoking nicotine is and even how secondhand smoke can be just as bad. But we often forget about the products we are spraying in our home and therefore inhaling ourselves. Or the products we are washing our dishes with then eating off of. I personally think it can feel a little overwhelming at times so I often just push the thought aside. But with Thrive Market, I don’t even have to think or worry! Thrive Market only carries brands that are non-toxic, clear of any harsh chemicals, and most are scented by plant-based essential oils!
If you’re looking for some cleaning product alternatives, here are the items that I’ve swapped out in my own home –
Thrive Market Citrus Dishwasher Packs – These dishwasher packs use only plant and mineral based ingredients! And they are 27% off MSRP, only costing $7.99 for 45 loads!
Thrive Market Glass & Mirror Cleaner – This glass cleaner is made without harsh chemicals, dyes, or fragrances so you can breathe easy every time you use it. Plus it’s only $3.29 which is 45% off MSRP.
Truce Yoga Mat Cleaner – Since I just started yoga back up, I need to keep up with keeping it clean and fresh. And this yoga mat cleaner comes in peppermint fragrance and only has five simple ingredients – rubbing alcohol, water, pure soap flakes, hydrogen peroxide, and aromatherapeutic essential oils. Plus it’s 33% off MSRP!
Truce All-Purpose Cleaner – If you want your house to smell amazingly fresh, get this clean! It uses peppermint and rosemary essential oils to refresh while it safely shines and cleans everything from mirrors and glass to granite, stainless steel, tile, linoleum, slate, natural stone, and even concrete surfaces. The bottle comes with the concentrate so you just have to add your own water. And it’s only made with five ingredients – Water, Rubbing Alcohol, Hydrogen Peroxide, Organic Castile Soap, Essential Oils. Oh yeah, as for savings – it’s 37% off MSRP!
Seventh Generation Disinfectant Wipes – This is my least favorite product of all that I’m listing today just because I’m not a huge fan of the smell. BUT I’m happy to have disinfecting wipes on hand for quick clean up, especially since these ones are non-toxic and get rid of 99.99 percent of germs and bacteria. You’ll see these in the grocery store almost everywhere but only on Thrive Market can you get them 13% off MSRP!
Spruce & Co Screen Cleaning Wipes – How often do you clean your phone and/or computer. If you’re like me, close to NEVER. So gross. Our phones are computer hold so many germs and bacteria, but thanks to these individually-wrapped screen cleaning wipes, you can remove all the smudges and sketchy things that cover your screens. And they are 25% off MSRP!
What we put in our bodies is so important and I think I’ve pressed that subject quite enough over the 8 years I’ve had this blog. But I think it’s time we all start to take a deeper look at what is in our cleaning supply drawer and if we are comfortable with the ingredients that we are spraying in the air. It may feel a little overwhelming at first, but if you have Thrive Market, there is really no need to stress. I’ve even created my own PaleOMG Spring Cleaning Kit on Thrive Market so you don’t have to write all these items down. All you have to do is click here to enter your email and it will take you straight to my non-toxic cleaning products page!
And if you are new Thrive Market, not only will you get up to 30% off your Thrive Market’s prices, but today you can get an EXTRA 25% off your first order + free 30 day trial! All you have to do is click here and it will add the discount to your first order! Something that I absolutely LOVE Thrive Market is that every time you shop, you get a breakdown of how much you saved just because you shopped with Thrive Market. Then at the end of the year, you’ll get an email letting you know how much you saved that year with all your purchases! My membership just renewed last week and I got an email that I saved $691 last year by shopping through Thrive Market. $691!! Think about how much you could do with an extra $691 in your pocket! So cool. I hope you love Thrive Market as much as I do and this post gave you a help in the cleaning supplies world. I know I was totally lost before I started shopping through Thrive Market.
___________
This post is brought to you by Thrive Market. It contains some affiliate links and I may be compensated for this post, but all opinions are my own. This compensation helps with expenses to keep this blog up and running! Thank you for all your support!
The post Non-Toxic Cleaning Products appeared first on PaleOMG.com.
Sourse of this article: http://paleomg.com/
3 notes
·
View notes
Text
The Basics to Making Melt and Pour Soaps
Several years ago I had been given a few bars of hand made soap as a gift and I loved how amazing and different that they are to the ones we're so utilized to buying at the stores. This got me started into creating my own melt and pour inventions. I understand when we believe about soap making, the majority of us will conjure up thoughts of pilgrim women making soaps with animal fat and lye and stirring them for what seemed like forever.
Now with the discovery of glycerin or apparent additives, they can be made at home quite simply. Melt and pour soaps are made by melting a base that could be bought at most craft shops and including your favorite fragrances and colorants, then massaging it into a mould. If it hardens back to room temperature, you just pop the soap out of the mould and it is prepared to be used. This is only a basic description of making melt and pour soaps and perfect for any novice. As you get more to this craft, you may experiment with various types of additives, inserts, molds, and then perhaps explore the areas of making other bathroom products using some of these fundamental ingredients.
Making melt and pour soaps is actually a very affordable craft to get into. The soap bases can be found in many craft stores ranging from clear bases, white bases, all vegetable foundations, animal established, aloe vera, and even made from goats milk. It's basically up to your personal taste and what you need your last soaps to look like. I would suggest searching for kits when getting started only so you can learn the process and see if you're really going to like soap making. I've found kits which have a few pounds of this soap base, a odor, color dyes, and a mold.
These generally have enough supplies to make about six bars of soap. Afterwards, if you see that soap manufacturing is something you wish to do, there are many sites which allow you to buy soap making materials in bulk. Other than this, you will require a microwave to melt off your soap in, a good cutting edge knife, a cutting board, a spritz bottle of rubbing alcohol, a few glass measuring cups, and that I found grip sticks or Popsicle sticks to be very handy in stirring your own soaps.
Apart from being an inexpensive craft, soap making is very imaginative from the expression of the soap all the way to how you decided to pack it. The popular types of additives to make are pub and loaf soaps. Bar soaps are where additives are produced from different molds. Loaf soaps are in the shapes of loaves of bread and are cut by the slice. Most soap makers who are in the company of selling their soaps use this method as it creates more soap in significantly less time. They are both so amazing and the design possibilities are confined to the soap makers imagination.
Packaging your melt and pour soaps is also an essential process. Since they contain glycerin, it is essential to wrap them in clear wrap to avoid bringing moisture to your soaps. Another concept would be to package your additives in cellophane bags or soap boxes. Several online soap supply companies offer ways of packaging your soaps to make them eye catching.
Whether you start soap making as Only a hobby or develop it into a home based business, your creativity is a large Factor in how your turn out. I like soap producing but I have also loved knowing I can turn it into a part-time company and share this love with others. There are now online sites for the house crafters and remember that there are lots of craft fairs that love for individuals to sell their homemade goodies.
Want to make organic melt and pour soap? Yes, you can purchase organic melt and pour soap bases to create your own organic hand made soap. The benefit of making and using organic soap is you know it's good for you and your skin and it does not contain any harsh, nasty compounds.
First, find a natural melt and pour soap base. It should be simple to find a soap distribution site selling this on Google. Just type in organic melt and pour soap base. Once you've found your natural melt and pour soap base (check the components it comprises first) you can start searching for organic soap aromas and colours. The site where you discovered the organic melt and pour soap base can sell them. This way your soap will be truly organic.
Of course, if you simply need the soap base to be organic, you don't need to worry about the fragrance and colours being organic and you can use soap suitable ones which will most likely be more economical.
What kind of molds are you really going to use? Would you wish to produce shaped soap, like hearts or stars, or plain bars of soap?
Once you've decided in your components and possess the essential equipment (including safety equipment) ready, it's time to start making your organic soap.
Of course, it is really very important to follow your soap making recipe so you know exactly when to add each ingredient but basically to make melt and pour soap you melt the soap at a proper double boiler or microwave safe bowl or jug, then put in the soap coloring and fragrance. Then you put it into molds and then leave it to place. Then you're able to unmold it. To unmold your soap, softly pop it from the mould. If it sticks, then consider running some water over the bottom of the mold and then try to pop it out of the mould again. When it is unmolded you can utilize it straight away!
While I go about creating something and I find out that there is an easy way and a hard way, chances are I will take the easy route. It's not because I'm lazy or something but it's because time is hard to come by and so if there's a faster route, count me in. Take me and my passion for making soaps. I really like to have homemade soap but awaiting it to heal is torture. The moment it is ironic I wish to utilize it, plain and simple. Fortunately with melt and pour soap making, I could. No longer having to wait for three months on it to heal and no more walking by my lovely bars of soap wishing I could use only one.
The melt and pour soap making technique is one which is now loved by most. It is neither a hot or cold process soap but one which you merely melt, mold and use. It is fantastic. If you are one that really tries to remain as organic as you can, there are organic forms of melt and pour soap making that you can test out. The process is quite easy.
To being with melt and pour soap making you Only require a couple of things. The base (that can be bought at any craft store), some colors or fragrances if you want, a pot for on the stove with a glass measuring dish, and a mold. Pretty simple huh? Not needing to be concerned about using lye and burning yourself, no gloves and safety goggles (unless you only like them) without a smelly chemical reaction from the lye. It's great.
Now that you have everything accumulated that you'll need for melt and pour soap making, take the base and block it, placing the cubes inside of the glass container. After all cubed up, set the glass container interior of the pot that's about half full of water. Turn the stove on to start heating the water up, keeping it just below a boil. When you see that the entire soap base has melted you can remove the glass container from the pot and add any fragrances which you want. If scents aren't something you like then do not be worried about it.
But I do like fragrances and so I try to add a few drops of my favorite oil equaling about .25 oz per pound of soap base. Should you like less or more then you're able to play with it as you like but this is just my general rule of thumb.
Together with your soap now still a liquid and smelling great, you may add the colours. It is possible to use regular food coloring however remember that if you use a lot of it can stain your skin or towels. Not a good thing. There are several sorts of coloring accessible for soaps which will not irritate anything and are comparatively inexpensive. You may only need around and eighth to a quarter teaspoon to improve a pound of base. So a bit will go a very long way.
Now that you have added everything, your melt and pour soap making process is all but complete. All that is left is your pour. Find a mold of your choice and just pour the liquid inside. In a few hours that the soap will be difficult and ready to work with. If you go to remove it out of its mold and it won't budge, simply run it under just a little bit of water and it should pop right out.
I love making soap with the melt and pour soap making approach. In my experience it is the easiest way to produce your own hand made soap. A good recipe is essential if you're just starting out, but once you're experienced, you can make up your own recipes and get really creative. How about Double Chocolate Brownie soap?
Melt and pour soap comes from soap cubes, ready to melt down and pour in the mold of your choice.
But the exciting part comes after you have melted the soap block. Then you have to add your own selection of soap coloring, odor and additives that are fun; for example, oatmeal, flower petals or herbs.
Once that's completed, it's time to put it into the molds of your decision. There are some really cute soap molds out there. For example, hearts, flowers, seashells, gingerbread men and lots of more.
Melt and pour soap only requires a few hours to set at room temperature. If you don't want to wait for long, you can set the molds in the fridge for about one hour. But not place the molds in the freezer.
When the soap has put in the molds, it is time to unmold it. Just turn the mold upside down to a clean Soft coating (so the soap doesn't chip if it comes out with a rush) along with the soap should pop out. If you are having trouble getting the soap out of the mould, run some hot water on the bottom of the mold and try again.
Now your very own hand made soap is ready to use! It creates great gifts to give to your family and friends, particularly in the event that you use cunning molds like the ones mentioned above. I know my friends are impressed when I give them gorgeously scented and colored heart or flower shaped additives and tell them I made them myself.
Soap making is an art that has been passed down to generations. Due to the use of lye, many people are frightened away from making soap. If you're considering soap making but don't wish to mess with lye, there is an alternative. It is called "melt and pour" soap making. Basically this method involves melting a ready made soap base and adding aromas before pouring into a mould.
Melt and pour soap making permits you to make soap out of the comfort of your own kitchen without even using any caustic chemicals that may harm you or your environment. This method is much quicker than the conventional way particularly since one does not have to wait around for the soap to cure.
The soap base is bought in blocks and that could be found at craft stores or on the world wide web, they cost between three and five dollars Make Your Own Soap a pound. You can also buy soap making kits that come with everything you'll need. This is good idea for the start soap manufacturer
To begin making soap, take your cube of soap base and cut it into small pieces or cubes for melting in a double boiler or microwave oven. When the soap is melted, color and odor is inserted it could be poured into a mold. An hour or two later, soap is born.
These handmade soaps are great for placing in holiday or birthday gift baskets. Who wouldn't wish to obtain an assortment of attractive, fragrant soaps made from the heart? This is a job that's safe, easy and does not take too much time. If you receive the kids involved it can develop into a fun project for the whole family.
Although soap making has been done by so many soap manufacturers for such a long time already, there are restrictions into it such as with regards to the application of lye. Some soap makers have ceased making soap due to the danger involve in using this ingredient. There are various processes in soap manufacturing. An interesting method is melt and pour making that doesn't involve using lye.
Melt and pour involves liquefying a soap base and placing in fragrance oils before pouring the mixture in molds. Melt and pour could be done at home. What is good about it is it does not utilize the lye substance that may lead to harm and skin complications. It is faster than any conventional way of producing soap as it does not involve healing.
To do the melt and pour process, you want a soap base which can be bought from specialty stores and institutions that provide soap making ingredients and resources. You can even purchase these needed items from online shops and mostly, these can already be sent to your door steps after you set the order and paid for this. Beginners should be sure that you have all of the soap making equipment needed to go through the process smoothly.
0 notes
Photo

New Post has been published on http://www.kidstoysnews.com/top-10-best-selling-thames-kosmos-stem-toys/
Top 10 Best Selling Thames & Kosmos STEM Toys

Contents
1 Thames & Kosmos CHEM C1000 (V 2.0)
2 Thames & Kosmos Breeze Power 2.0
3 Thames & Kosmos Remote Control Machines
4 Thames & Kosmos Crystal Growing
5 Thames & Kosmos Magnetic Science
6 Candy Chemistry
7 The Thames and Kosmos Gyrobot-Gyroscopic Robot Kit
8 The Thames and Kosmos Classic Science Archaeology: Pyramid
Thames & Kosmos CHEM C1000 (V 2.0)

Thames & Kosmos CHEM C1000
Enroll Begin of chemistry and also famous chemists. Set up and find out how to safely take care of the lab equipment and chemicals.Learn about Indexes Using litmus Alternative and write a secret Message in invisible ink. Test the inks from the colored markers on the chromatography racetrack to reveal their color components. Experiment with air pressure, surface tension, and also the properties of fluids. Thorough safety precautions and instructions ensure safe experimentation. Quality equipment makes it possible to make the majority of your chemistry experiments.


Thames & Kosmos CHEM C1000
Read Customer Review On:
Thames & Kosmos Breeze Power 2.0
Electricity Generating Turbines. Build wind generators charge your rechargeable batteries and also to energize your vehicles. The wind spins the turbine, which turns an electric generator, which in turn charges your rechargeable AA batteries (not included). You can then use those end charged batteries to force the prototype vehicles you build. The six models include sail vehicle, a glider, jet car, tractor, race car, and tricycle. This kit includes two styles of wind turbine blades and a gearbox. You can adjust the angle and number of wind turbine blades to charge the rechargeable battery, and also to make the best use of the wind up brightly. Explore this amazing source of energy that is renewable and stores the electricity you generate to be used in practical programs. 40-page color instruction book. 133 building pieces.
Thames & Kosmos Remote Control Machines
Build your own vehicles and machines and control Them with a remote control unit. An infrared remote allows you to control three distinct motors simultaneously, moving them each in reverse or forward, with touch detectors that are easy-to-activate. The three motors can be combined to create complex machines and vehicles in configurations. Assemble 10 models demonstrating different ways in which the motors may be utilized including folding vehicle, plow, a bulldozer, vehicle, three-wheeler, crane, antique car, formula one racer dozer, and arm. You are able to design your own remote control inventions once you have assembled the models in the instructions.
Thames & Kosmos Crystal Growing
Increase Heaps of Run and Also dazzling crystals 15 illuminating Experiments with this science kit that is timeless. Experiment with four chemically different crystals each such as potassium alum crystals that form octahedrons, long sodium acetate crystals, fast growing sodium sulfate crystals, along with plaster that’s made from gypsum crystals. Mold fun plaster shapes, such as lightning bolts stars, dolphins, and pyramids, and grow layers of crystals on them. Use dyes mix a rainbow of custom crystals to develop, and to produce crystals that are colored. Your crystal creations in a transparent treasure chest with a locking lid. Damage your geode — a stone with crystals growing inside –and create a crystal cavern indoors. With growing crystals gradually and quickly experiment, and observe the crystal structures impacts. See whether you are able to grow lots of tiny crystals on the surface of a rock and one giant crystal. Measure the crystallization of also the dissolution of crystals, and also solids out of a solution back into alternative, affect the temperature of this solution. Learn about the energy. Find out about the structures and geometries of different crystal shapes. This kit is protected and thoroughly tested: Over one thousand units of this kit have sold. A 32-page experimentation manual guides your experiments in crystal chemistry and Earth science. Kick off a chain reaction of fun-filled experiments This Particular Introductory chemistry set designed especially for young children. Junior chemists may safely investigate chemistry using the tools from the bathroom, the kitchen, and laundry area in this kit and household substances. Learn to use chemistry equipment such as pipettes, test tubes, filters, and measuring beakers, and spoons. Make your own test tube stands and learn about the chemical reaction that formed them. Conduct experiments to identify unique chemicals using heat, heat, evaporation, and crystallization. Examine the composition of dyes and inks with chromatography experiments, where colors magically separate. Research the properties of soaps, water, and oils. Experiment with acids and bases using indexes (pH strips and honey juice) to identify them. Make reactions with acids and bases to dissolve shells and replenish balloons. Discover the gas carbon dioxide and its outcomes that are visible. The full-color, 48-page manual guides inquisitive young chemists and their adult supervisors throughout safely conducting all the 25 experiments.
Thames & Kosmos Magnetic Science
Learn More about the invisible and amazing power of magnets Together with 33 Participating experiments and games consoles. This science experiment kit contains many magnets of different shapes and sizes and a variety of different components with which you may explore this traditional scientific subject. Experiment to determine which materials are magnetic and which are not. Learn about magnetic fields and poles. Discover how Earth behaves like a single giant magnet, and we use compasses to take advantage of the phenomenon. Conduct a series of experiments to learn first hand how magnets behave and socialize understates that are different. Make magnetic fields that are invisible observable using iron filings in a box. Build an electromagnet to understand how power relates to magnetism. Have some fun by playing a few games using 16, with what you have heard. The full-color manual guides your experiments. Conduct over 60 experiments with circuits And charismatic contraptions to learn about magnetism and electricity, and how these two fundamental properties are related. Kids eight and up can safely and easily experiment with magnetic fields and electric current with the vibrant blocks and parts in this kit that is hands. Build parallel and series circuits to light a light bulb up. Experiment with on-off switches and push buttons. Assemble circuits that include up to 3 light bulbs, two switches, and a spinning motor. Conduct tests to see that materials are magnetic. Learn about the force. Magnetize a metal. Utilize iron fillings to produce invisible fields visible. Investigate direction and magnetic force. Find out how a compass works and about the magnetic fields of Earth. Conduct a series of experiments using a hardy electromagnet. Finally, put everything you’ve learned to good use by assembling an electromagnetic relay switch a loudspeaker, and a morse code telegraph key. The parts are designed to make learning accessible and fun. The blocks fit with simple connectors. The blocks are brightly colored and have contours that are unique, since, it is simple to follow the meeting diagrams to build functional devices. The 64-page, full-color experiment manual guides you with diagrams through experiments.
Candy Chemistry
Research chemistry as you cook Up chocolates and sweets in the kitchen. Perform numerous experiments that are sweet and learn important physical science principles related to candy and cooking. Learn about the phases and heat of issue. Use a thermometer and learn whilst sugar about heat and fever. Gain experience with conversions and measurements, volumes, and weights. Investigate the chemistry of bears. Find out about the phenomenon of triboluminescence using wintergreen candy. Make candies, chocolate shapes, and sugar candy utilizing the specific tools included: candy thermometer metallic and plastic molds, dipping fork, spatula, and much more. Finish them using paper cups foils, sticks, and wrappers. The 48-page manual provides explanations and instructions. Does not contain hazardous chemicals or food items; the ingredients are supplied by you.
The Thames and Kosmos Gyrobot-Gyroscopic Robot Kit
In devices. From tablets, smartphones and game controllers to planes and space telescopes, gyroscopes perform tasks which range from the every day to the extraordinary. With this kit, children can explore the astonishing powers of this gyroscope by building seven motorized versions. Children are going to learn about the physical science principles that maintain the robot balanced. Young engineers may experiment with and find out about the fundamentals of gyroscopic devices and also the role they play in our lives by constructing seven versions with the gyroscope unit. A Full-color, 24-page, illustrated experiment manual offers explanations and step-by-step assembly directions. 102 pieces.
The Thames and Kosmos Classic Science Archaeology: Pyramid
As you Investigate this play the role of archaeologist Pyramid model as well as the treasures buried within. Decipher the secret to unlocking the pyramid, use tools and techniques similar To those of a real archaeologist to excavate a sarcophagus Mask, and four canopic urns from within it. Open the sarcophagus and you will Find a model. As you Find the artifacts in the Pyramid, you will learn about science, including excavation, Conservation, dating, and remote sensing. You will also learn about ancient Habits, pyramid construction, mummification, and hieroglyphics. Look into the layout of This pyramid, its Respective chambers, hidden passageways, And security apparatus. Full-color experiment manual.
0 notes