#double width weaving
Explore tagged Tumblr posts
Visit Tumblr Blog
Explore Tumblr blogs with no restrictions, modern design and the best experience.
Last Seen Tumblr Blogs


Fun Fact
69% of Tumblr users are millennials.
Text

Double width weave blanket is off the loom! Unfortunately, I made a mistake in the warping phase and didn't realize it until I was halfway done weaving. In the middle, there are two repeats of the green square right next to each other. I know how to fix that if I tried this project again, and I do want to give it another go at some point. Overall, not bad for my first time trying this kind of thing!
29 notes
·
View notes
Text
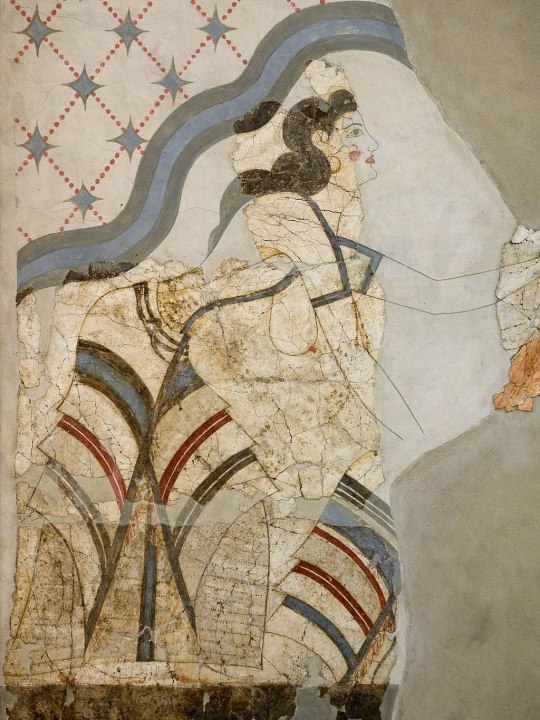
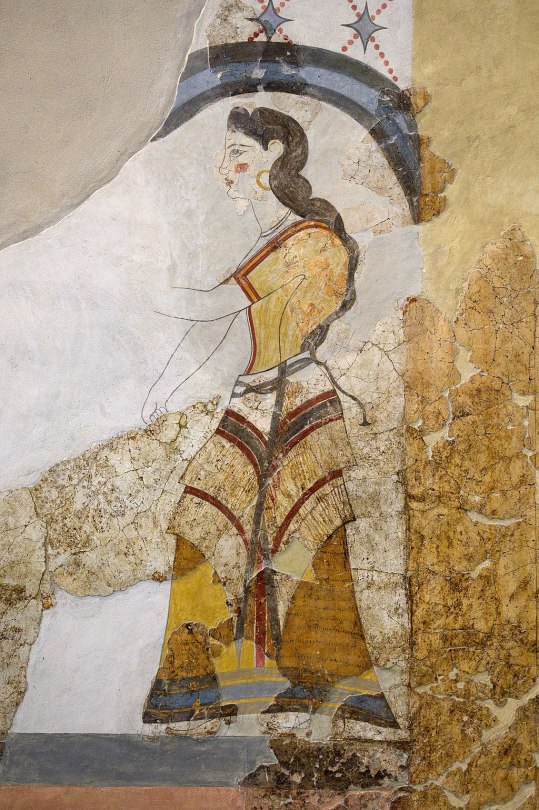
Minoan Kilt
The large, structural skirt worn by Minoan women in art is instantly recognizable, and when I made my own I combined current best guesses with my own personal tastes.

My kilt shape follows the hypothesis laid out by Bernice Jones in her book Ariadne's Threads: The Construction and Significance of Clothes in the Aegean Bronze Age. She describes the shape of that of a labrys, a double-headed axe with apparent ceremonial significance in Ancient Minoan culture. This garment may be depicted in Linear-B logogram *166 + we, we-being the backwards-s-shaped squiggle in the center which identifies the piece as a garment.

See pages 336 and 341 in Marie-Louise B. Nosch, The Textile Logograms in the Linear B Tablets
Actual details on construction and materials below the cut:
Construction:
The top and bottom edges of the kilt are concave, so the sides are longer than the middle. This gives the chevron-shape seen on layered kilts in art. In addition, the curved top half makes the skirt flare out, accommodating the hips and giving more freedom of movement to the legs. My kilt measured from my waist to my anklebone at the longest point, and about 1.5 times around my waist.
I chose to make a flounced kilt, with smaller strips of fabric and trim applied to a large base piece, rather than a tiered kilt, in which multiple kilt shapes of varying length are layered one on top of the other, so you end up wrangling 3 layers of fabric around the waist. The flounced kilt saves fabric and gives you a lot more freedom with whatever trim you might want. Jones' diagram for a flounced kilt is seen below:

Unlike the version in the diagram above, I chose not to attach ties to the garment itself both because the linen I used was very heavy and I was concerned about weight, and also because folding the skirt and securing it with a separate tie worked just fine for my tastes. In total I had four flounces: 2 alternating rows each of fabric and fringe.
The vertical edges of most kilts are left plain, probably representing either the selvage or an edge otherwise finished off to prevent fraying. For my kilt, however, I ended up with a couple inches of self-fringe on either side as I adjusted the fabric to the correct width. At least three examples of kilts with fringed vertical edges are known, all three from the so-called "House of the Ladies" in Akrotiri
Photos from Wikimedia Commons. Image 1. Image 2.
The vertical edges of these kilts are reinforced with a colored band or tape, probably to keep the garment from unintentional further fraying. Accordingly, I did the same on my kilt. I also like that it gave a nice vertical diagonal to counterbalance the horizontal ones.
Materials
I tried to use mainly linen and wool, the fibers most available on Ancient Crete, but some of my trim was cotton because sometimes you just have to use what's cheap and available in the today times.
The base of my kilt is a heavy, patterned linen in what's called a diaper weave, meaning that a repeating diamond pattern is woven into the pattern itself. A lot of the Minoan textiles depicted in frescoes are characterized by repeating geometric patterns, likely woven into the fabric itself, and that was something I wanted to capture in my own piece. My linen is woven with both cream and natural colored threads. The heavy weight is important to give structure to the garment--otherwise it would be kind of limp. My linen was from Burnley & Trowbridge (shameless plug), as was the plain cotton twill tape I used to bind the top and bottom edges of the kilt, and the dark red wool twill tape I used along the vertical edges.
I bought my cotton fringe from a rug supply store. I had to search a while to find a fringe that would work for me, and I ultimately chose fringes with a woven header rather than the more common knotted one, so that it would lay flat against the kilt. I hid the woven header under a layer of cotton fringed trim from Michaels (yes, Michaels) with this really great diamond and dots pattern woven in black.
The blue layers are from a bolt of vintage wool Kimono fabric. Blue appears frequently in frescoes, likely achieved with indigo or woad dye, or even murex/mollusk dye. The fabric is printed with an imitation ikat pattern of diamonds and squares that made me think "the vibes seem right!" because quite frankly, you aren't going to get "historically accurate" Minoan textiles (which there probably isn't enough archaeological evidence to definitively describe) without, like, hand-weaving it yourself or paying someone hundreds of dollars to do it for you (and that price is if the weaver really likes you). Neither of which appealed to my desire to just make a fun, low stress project. Good enough is good enough.
The narrow trim on the bottom of the blue flounces is vintage cotton/poly woven trim. This trim, while narrow, was quite thick and stiff, which was great because it added more weight and structure to the end of my flounces since the wool fabric itself was quite thin.
The top layer is a custom tablet-woven wool trim that I commissioned from MAHTAVAhandicraft on Etsy. I imagined this as the "centerpiece" of my kilt, and I'd arrange everything to complement it.
It's a kivrim pattern, which has itself only been traced to 19th-century Anatolia, but I didn't care. The way it looks like waves reminded me of how central the sea was to life in the Ancient Aegean and Mediterranean and it captured the idea and aesthetic I was pursuing. I mean, doesn't it remind you of these dolphins?

(I like the dolphins)
The whole thing was machine sewn with the exception of hemming and adding trim to the blue flounces. If you were to look at it from the back, you'd see lots of zigzag stitches, because i wanted to be fast! and have fun! not chase some unreachable ideal of "accurate."
As for wearing it, I chose to wear it with the top part folded/rolled down over a belt, so I have a thick tube of fabric around my waist. Many images, like the frescoes above of women with fringed kilts, appear to just show the kilt being tied closed. Other images are so fragmented or stylized that it's unclear what kind of skirt closure was used. Sculptures and figurines definitely show some kind of SOMETHING around the waist, whether this is folded fabric or a kind of belt is unclear. Different art could show different things!

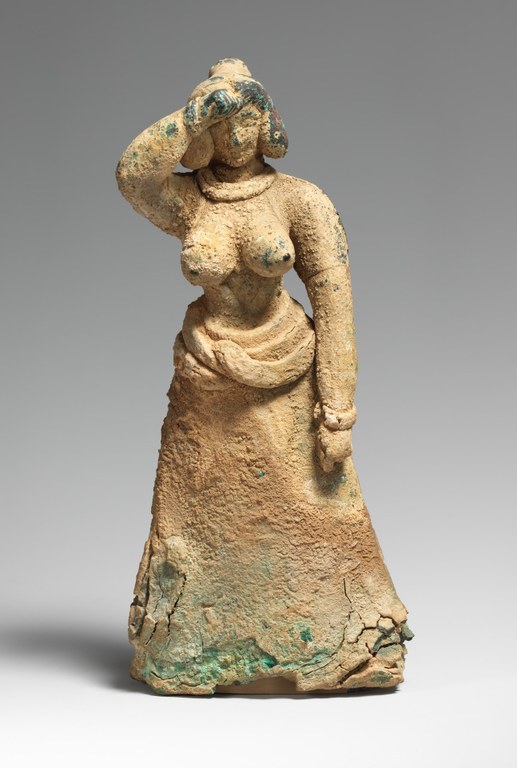
I think I see evidence of a continuous line from the skirt to the waist-roll on the figure on the left, found in Troas, which I think indicates some kind of skirt-folding situation. The woman on the right, found in Crete, looks more like she's wearing some kind of long coiled belt, or perhaps snakes. Who knows? I don't! For my own part, I found the combination of rolled waist + tie belt the most secure for doing things like kneeling, stomping around, and wading into rivers to rescue bees. I also liked that it gave me the bulk around the hips that gives Minoan figurines such a powerful silhouette, and proportionally gives more of an hourglass shape. If you wanted to do something more firmly grounded in the sources, stick just with the waist tie or belt, wrapped around a couple times and tied in back. If you want to be like me, just say "well we don't KNOW it didn't happen" and just do whatever you want. Have fun! Whatever happens, it should be fairly easy to move around in the kilt--this is not a restrictive garment, just a heavy one.
876 notes
·
View notes
Text


↻ 𝘀𝘆𝗻𝗼𝗽𝘀𝗶𝘀: a gripping tale of love as the reader navigates a complex relationship with the infamous toji fushiguro OR toji fushiguro being a shit boyfriend should be a case study!
↻ 𝘄𝗮𝗿𝗻𝗶𝗻𝗴𝘀: age gap (20’s ↝ 30’s), toxic relationship, smut.
↻ 𝗯𝘆𝗿: female reader, female bodied reader.
You see, the thing about Toji Fushiguro is that he’s always been unapologetically and shamelessly him— he’ll always be a man that will be forever stuck in his own ways. He’s selfish, crude, insensitive, and would do anything no matter how foul and evil to put him forward.
So.. it’s cute— no, admirable that you thought you could change him. A pretty, young thing in her twenties dealing with a wreck of a man like him. How sick is that? Really, your first red flag should have been him wearing a shirt three times too small.
Yeah, the age gap was certainly.. more than a few years, which heavily attributed to the mental disconnect in the relationship. You were bright-eyed and naïve, so much life in you and hadn’t experienced a drop of what real life was like. You often romanticized life, finding beauty in the simplest of moments and weaving dreams from the fabric of everyday experiences. Your vivid imagination painted the world with colors unseen by most, turning mundane occurrences into enchanting adventures.
You held on to the “love could conquer all!” and “I can fix him!” mentality or something like that. But your optimism was a double-edged sword, pushing you to cling to the relationship while also blinding you to the reality that perhaps you both needed different things in life. You needed a life partner and he needed a tight cunt to fuck.
It’s ironic because you approached him first.
“Mister Toji..? What’s your wife like?” You shyly played with the ends of your hair, avoiding his gaze like the plague. “Ah?” Toji raised a brow at you, slightly surprised by the forwardness of your question. “Oh right, ‘don’t have a wife.” “Oh..” You feel your face and the tips of your ears become hot with embarrassment. “Well maybe I could.. make you dinner sometime..?”
Toji liked the appeal of having a woman half his age on his arm. But what he simply could not stand was the amount of energy required for it— oh, don’t misunderstand, he never put forth any real efforts anyway, but it was simply the.. expectation. Toji didn’t give a fuck about dates or anniversaries, all he cared about was emptying his balls inside of your pussy, the hot dinners you make for him and cozy shelter you provide.
You liked to play housewife in your own silly little delusion, finding comfort in the make-believe world where everything was picture-perfect. The idea of being the nurturing, organized, and devoted partner gives you a sense of purpose, shielding you from the harsh realities of what really was. It was a cozy escape, a refuge where you could pretend that all your worries were mere fiction.
Yet, there were moments when the illusion began to unravel, and a whisper of doubt crept into your mind. Were you truly content with this role you had assumed, or were you sacrificing your true desires in pursuit of an idealized version of yourself? The nagging ty made you question if he really loved you as much as you were in love with him. Or at all for that matter. He was a busy man but would returning a call really hinder his day? Would a text twist his arm so much? You never ask though, you would hate to upset him or come across as “immature.”
But if he’s just so horrible, this.. big, bad man who found it annoying that you..? That you wanted to hold hands in public! What made you stay? Why stay with a man that seemed to only have his best interest in heart and you were a second, sometimes third, or forth.
His cock.
That cock was an addiction that you had no intention of quitting. The way this man fucked you was enough to liquidate your mind— leaving you nearly brain-dead as his warm seed oozes from your hole. The width of his cock alone made you stretch an absurd amount, teetering the edge of comfortability. His tip relentlessly gives your cervix a beating— bruising it and leaving a delicious soreness that lasts for nights.
Toji’s physical presence was undeniably imposing and large, that alone makes you feel like a delicate trinket, one treasured and protected. Yet, paradoxically, the way he handled you was anything but delicate. His hands, strong and calloused, held a certain roughness that spoke of a life lived on the edge, battle-hardened and weathered. He folds your body as though you were a ragdoll— regardless of your size.
When he’s gone for days on end, you find yourself yearning for his fulfillment— no hand or toy will satisfy you the way he does. Toji’s ruined sex for you.
Toji withheld affection from you whether it was intentional or not. So when he did praise you it felt as though you were a pretty princess— chemically altering your pretty little brain more than a little bit.
He often kept his emotions locked away, leaving you hesitant of where you stood in his heart. The lack of affection was a constant ache, leaving you yearning for even the smallest crumbs of his praise. Yet, when those rare moments arrived, it felt like a euphoric rush, flooding your mind with a mix of serotonin and dopamine.
His praise, though infrequent, had an intoxicating effect on you. It was like soaring to the highest of heavens, as if the whole universe had aligned in your favor. In those fleeting instances, self-doubt dissolved, and you basked in the warmth of his approval, feeling valued and cherished.
But the hesitation lingered, a cloud of doubt that never fully dissipated. You wondered if his praises were genuine or merely an act of throwing a dog a bone, a way to keep you satiated so you wouldn’t throw one of your fits. The chemistry of emotions within you danced between soaring highs and daunting lows, creating a rollercoaster of feelings you couldn’t control.
You found yourself seeking those rare moments of praise like an addict craving their next fix, yearning for his validation and acceptance. The intoxicating mix of emotions left you captivated and vulnerable, making it hard to see beyond the haze of his allure and your love goggles. You chose to believe a ring is on it's way at the end of the day.
“You did a good job today, lovebug.” “Really?” “Mm.”
And you jump, just like a lap dog. But don’t feel bad, I would too if I had a man as fine as Toji. Woof. ♡
#�� ➶ 。˚ ° bria writes!#toji fushiguro#toji fushiguro x reader#toji x reader#jujustsu kaisen smut#jujustsu kaisen x reader#jujutsu kaisen x reader#toji smut#toji x you#toji zenin#jjk x reader#jjk smut#jjk toji#toji fushiguro imagine#toji fushiguro smut
853 notes
·
View notes
Text
Robe à la Française
French, ca. 1770
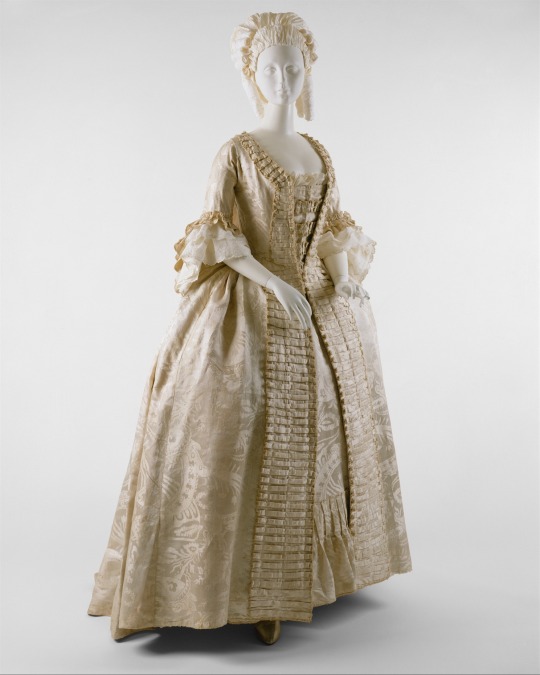
The robe à la française, with open robe and petticoat, was the quintessential dress of the eighteenth century. Characteristic of 1770s costume are the piece's low neckline, fitted bodice, narrow sleeves with double layered cuffs, as well as the sack back and fullness at the hips supported by panniers. This exquisite example is constructed from a rare Chinese export silk dating from the first quarter of the eighteenth century. The textile is an ivory "bizarre" patterned damask (created by reversing the weave structure so that both the warp-float and weft-float faces of the satin are on the same surface).
As early as the late sixteenth century, Chinese craftsmen created silks for the European market, which were exported by the East India companies of England, France, and Holland. Due to the exchange of design motifs by both Eastern and Western artisans, Chinese export silks often bore little relation to traditional Chinese aesthetics. While this patterned damask closely resembles the European "bizarre" silks popular during the first quarter of the eighteenth century, the selvedge-to-selvedge width, fabric weight, and selvedge markings all indicate Chinese manufacture. To fully appreciate the sumptuousness of this dress, one might imagine the sense of movement candlelight would have created across its surface.
The MET Museum
209 notes
·
View notes
Note
For some reason I never considered that looms could be small and projects could be accessible ?? How did you get started weaving and what resources did you use?? I saw some of the work you’ve made and I want to get started learning so badly!! Help!
Yess! Weaving is great because of how accessible it can be!! Something I also only recently realized!
I've been enamored with weaving ever since 6 year old me saw an enormous floor loom in action at a textile museum. Despite my fascination with textiles, it still took 20ish years before I picked up weaving as a hobby. Looms were pricy, big, and complicated. It wasn't until I came across bandweaving that it really felt like something I could casually pick up without committing to spending a ton of time and money. I started with tablet weaving, but have since switched to weaving with a heddle. I've been learning by referencing books, looking up weaving process videos, and a lot of trial, error, and experimentation.
Here's a list of resources for two very accessible types of weaving that don't need a loom:
Resources for tablet weaving
Tablets can be bought, but are also easy to make at home from a deck of cards, cereal boxes, recycled plastic, etc. You can find a tutorial for creating your own here.
Tablets at Work by Claudia Wollny An incredibly comprehensive book featuring 22 tablet weaving techniques. The book is written in German and English. Highly recommend for the very enthusiastic.
Card Weaving by Candace Crockett The book that got me started. Easy to follow, informative, and much cheaper and easier to find than Tablets at Work.
Elewys of Finchingefeld A great youtube channel for historic tablet weaving.
Resources for weaving with a heddle
Rigid heddles can be bought or laser cut, and string heddles are created at home out of yarn/string. They are similar, but offer different advantages. Rigid heddles can be simpler to work with, especially if you're working with multiple sheds. String heddles require a few more steps to open the down shed, but don't distort the width of your warp threads. This allows you to weave further down your warp, and makes it easier to keep an even band width.
Here is tutorial for creating your own string heddles.
Norwegian Pick-Up Bandweaving by Heather Torgenrud The book that I learned from! Focuses on pick-up weaving, but is a good introduction to bandweaving in general.
Durham Weaver has a blog and youtube channel. They tend to focus on Scandinavian style weaving, and feature content on weaving with a double slotted heddle, as well as how to set up your warp.
Backstrap Weaving by Laverne Waddington is a blog packed with information about weaving with string heddles. They tend to focus on Latin American style weaving.
A Spinner Weaver is a blog about inkle weaving, though the techniques can be done off of a loom as well. Inkle looms are among the cheaper looms and are designed for bandweaving.
#resources#btw the style you see me use most is scandinavian pick-up (also known as baltic pick-up or more broadly as supplementary warp weaving)#it seems to only be done on a heddle but I'm quite confident you can do it on tablets and I'm eager to test this theory out#ask#weaving#textiles
91 notes
·
View notes
Text
PROBABLY BARELY UNDERSTANDABLE CROCHET LAIN HAT TUTORIAL

the hardest part for me was the top of the hat because i've never done crochet flat circle tapestry before. but i found similar pattern for it. i edited this so it looks like lain's hat. that's basically what i followed.
so i didn't find any lain hat tut online (or i probably looked bad for it) so i tried to make it all on my own.
for this project i used fine weight wool + acrylic yarn and 3,5 mm hook. the hat itself was done in half-double crochet stitch but i think it will also look good with light weight yarn and single crochet.
i don't really think that this tut is beginner friendly, sorry :(

i made a video on how to do strands on top of the head (idk how to call these long thingies), i hope it's understandable:
so blue strips are the increases. the main problem with this pattern may be that the star might look swirly.
so i suggest to watch this (the end of the video) and also this tuts to look how to do it right (these are all about that original pattern but i think you can understand how to adjust it for your lain hat), i'm bad at explaining, really :(
crochet the circle until it's the size of your head (diameter of top of the hat = head circumference/π). then crochet it without increases until it's comfy for you to wear.
or you can do a pompom, it will look cute too.
to the bear. first do a mc, sc and crochet until it's the size you want it to be. then the ears. i made a video but tumblr said i can't add more than one :( basically you insert the hook, do a sl st, then hdc, 2 dc in next stitch, hdc again, then you do 4-5 sl st and repeat for the second ear. do a circle smaller than the first one: it will be its muzzle. embroider a nose. sew head and muzzle together. do french knots for eyes. sew it on your hat.
mark where your earflaps should be, the width of earflaps is 19 stitches. the pattern for them:

then in the end of the earflap do strings: ch 21 and then sl st.
good luck!
weave in all the ends and you're done! you can block it if you want to.
it took me about 6 hours to crochet this but you could probably do it faster than me, lol.
here's the hat after blocking (almost nothing changed, haha)

PS it also will be cool if you show me your lain hats if you'll actually crochet it, just tag me!
#serial experiments lain#lain#crochet#crochet pattern#i REALLY hope you can understand it#i tried really hard#ed: i forgot to write about mc in the bear part#edit: added pic of hat on myself#edit: earflaps pattern was kinda wrong not critical but wrong
23 notes
·
View notes
Note
Hi, hope you're doing well!
I was wondering if you have a specific resource you use for weaving project inspiration? I struggle with finding ideas for projects that aren't another scarf (I have 6 now...) or teatowels. My next project for my 4 shaft loom is going to be a lining for my pinic basket with matching napkins+cutlery roll, but after that I'm out. I would specifically like try overshot sometime soon, but I don't know what yet.
Thank you and have a nice day!
Hello and I hope you're also doing well! A picnic basket set sounds amazing!
I don't have a specific suggestion for you, alas. I've been weaving for less than a year and so far I have always had more ideas than I have time for (they form an orderly queue but usually the newest shiniest idea jumps to the front, how rude). I try to write them down as they come, to hoard against barren patches in the future.
I get ideas in a few places: a lot from my books because I want to try all the different structures I can, #weaving and related tags (shitty as tumblr tag tracking functions are) because I want to join in with the cool things other people make, nature stuff. I make a project and then make something completely different because I want a fresh experience (and different frustrations!) - a few cotton projects and then another wool one, several shuttles then one shuttle then two - but I also return to old projects and weave a new variation to see what happens. I've abruptly reached the age where several of my friends want to have babies, so I'm plotting more wide warps and double-width projects as baby blankets, which have their own restrictions.
But I make more tea towels than anything else because they have infinite give-away potential: even if I have too many towels in my life and I don't want the faff of selling them, someone will always be glad to have them. I can fuck up as much as I want and make them in any design at all and they will be useful, except for, like, lace. Some of my things have a recipient in mind when I make them, but most don't.
I struggle a bit coming up with palettes - it's part of why I'm not very interested in doing plaid - so I often go for pride flag palettes because they make a thing into A Thing (even if the palette isn't, like, relevant to me personally). Might do similar with bird-themed palettes in the future, like I did for the pigeon towels. Or when using wool, I only have cones in a few colours so I just use those.
Whatever you're doing, assuming you aren't using up a one-of-a-kind material in a way you don't want to use it, it's not wasted. If you enjoy the process, not all of it has to be for a result you are interested in, and it will still refine your skills for results you do like in the future. Not everything has to be the pinnacle of inspiration and craft but it may help you towards finding the next thing that really gets you excited - exercising your inspiration muscles whether they want it or not. This is a parable not an experiment that ever happened, and it's only vaguely related here, but this is my favourite retelling of it:
There was an experiment a professor did. I think it was pottery students. He did an experiment of “quality” vs “quantity”. One half of the class he told; you have to make as many pots as possible. Good pots, bad pots, shitty pots, whatever. The more pots you make, the higher your grade. The other half of the class were told, “you can make only one pot”. But that pot had to be perfect. The quality had to be high; the highest quality pot would get the best mark. But when it came to the grading, they noticed something weird. All the best quality pots were in the ‘quantity’ group. The guys who were literally churning out pots, trying to make as many as possible, not concentrating on the quality. But every pot they made, made them better at making pots. By the end of the month (I think it was a month) - they had some pretty awesome pots coming out, because they enjoying finding all the ways and all the things they could do to make all their pots. Where as the ‘quality’ guys had spent their time reading up on pots, and technique, and researching and planning; which was all great but they’d had no further practice at actually making pots. The best way to get really good at something, the only way to be really good at something, is to make lots of shitty attempts at that thing several of which will fail. If all you create are perfect things then you won’t improve, because how can you improve on perfect? tl:dr MAKE YOUR SHITTY POTS.
https://www.tumblr.com/darkandstormyslash/154648694948/fireandlifeincarnate-look-write-as-much
12 notes
·
View notes
Text

So far, so good! It's going a bit slower than normal because I have to crawl under my loom every few picks to check that backside for floats but progress is being made.
13 notes
·
View notes
Text
Spent two episodes of Critical Role working on my first attempt at double-faced tablet weaving, and I'm quite pleased with how my little sampler band is turning out! Warped it in gray and black to try some Vax'ildan-inspired patterns given what I was planning to listen to while working (and because simple daggers seemed like an achievable pattern).

It did include some frustrating periods of unweaving to correct things (requiring some sleuthing to figure out exactly how to turn the cards back), but frankly surprisingly little considering I was tweaking the designs of both the daggers and the letters on the fly. (Apparently luck really was on my side today. 😉)
The back side comes out in the same pattern but reversed colors.

The original alphabet pattern I used as a starting point was from Jeanne Clifton (https://sites.google.com/site/elenasthreads/card-weaving/my-card-weaving-patterns). I made multiple tweaks to the letters for my weave, including thickening all the horizontal pieces to get more even width in the woven letters.
78 notes
·
View notes
Text
Dracula Daily Blanket October Update
November 21st
We’re fast approaching the end of the main section of this blanket. Only 7 days left!
Here’s how it’s looking so far:

(This thing is Big btw. It’s kinda hard to convey the size of it in photos but it is Large. Width-wise, it’s roughly the same size as a double bed.)
Ngl I���m so proud of how it’s looking so far. I have plans for some extra bits to add and there are Many ends to weave in yet but I’m really happy with how it’s going.
10 notes
·
View notes
Note
I should add that space is a bit of a concern for me, so a standard non folding floor loom unfortunately has too big of a footprint for me at the moment... but the other one I had my eye on was the Harrisville T4, which has double the weaving width. I just don't have enough experience to know if I should save up for the bigger one, or get the less expensive one now 😖
It folds up really well, even with a weaving project on it !!!! I loveeeeee mine and it compacts in my craft room well, it's a very good/forgiving loom for beginners and it is easy to get tension even. At that price, it's an absolute *steal* I would say go for it!!!!!
Especially is space is a concern I would really consider what big project plans you have for the future, because it only has a weaving width of 15". If you want to do wider cloth I would look into the Harrisville, but if you want to do scarves or like I use mine for bag fabric/demoing, it's a very solid pick.
18 notes
·
View notes
Text


i learned you can weave double-width fabrics or even tubes using a double rigid heddle loom
this is magic to me and i still don't know how it works!!
5 notes
·
View notes
Text
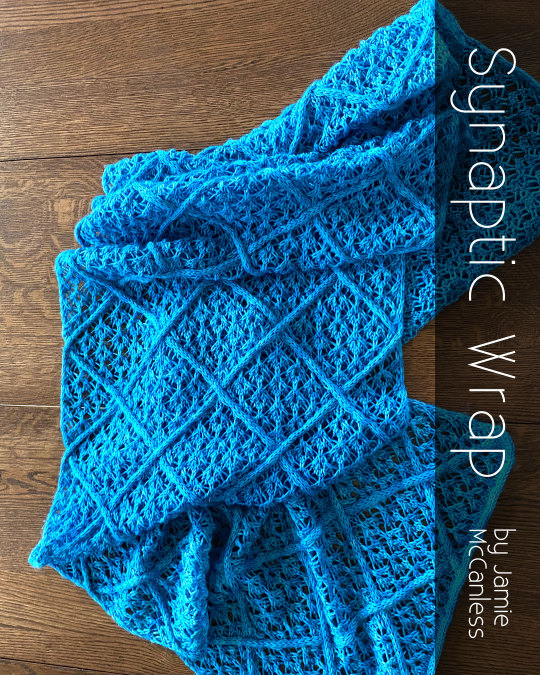
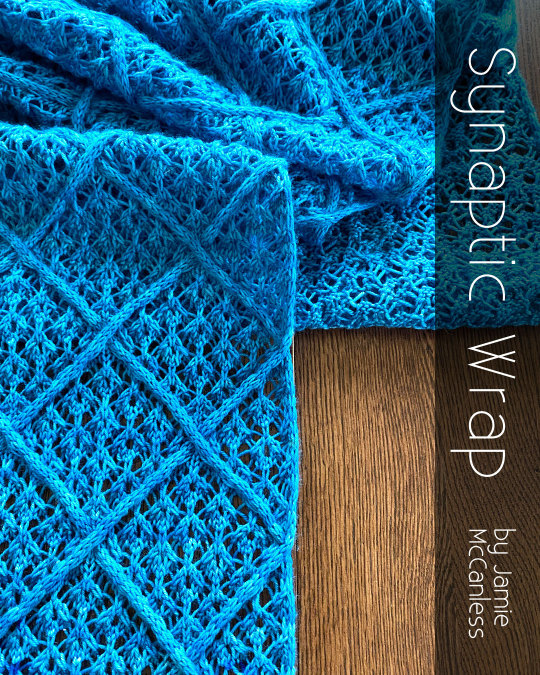
Synaptic Wrap
I’m excited for knitters to make a Synaptic Wrap for themselves, to see how cables weave across the width and run along the sides, to find that a centered double decrease on the wrong side is not so hard, to finish and hear a quiet voice say “yer a wizard now.”
Yarn: Fidalgo Artisan Yarns Rosario Sport 0421 Brilliant Blue

#SynapticWrap#KnittedWrap#CableKnit#CableKnitting#KnittedLace#LaceKnitting#Handmade#NeverNotKnitting#KnittingPattern#KnittingInstagram#KnittingLife#InstaKnitting#KnittingProject#HandKnitting#KnittingDesigner#YarnLove#RavelryDesigner#RavelryKnitter#Ravelry#KnittersOfInstagram#MenWhoKnit#GuysWhoKnit#GayKnitter#RealMenKnit#BeardedKnitter#HairyKnitter#PNWknitters#Yarn#Knitting#Style
8 notes
·
View notes
Text
“Discover: Types of Loom in Textile Manufacturing”

Loom? What are They? What Do They Manufacture?
Looms is the weaving machine which converts the yarn into a fabric. There is no history of when looms were discovered but one thing is clear that it was before the birth of Jesus christ. There are 2 types of looms: Shuttle Looms and Shuttleless Looms. Below we are going to learn about various types of looms. The end result of this machine is fabric and wholesalers and retailers buy t-shirts in bulk made out of those fabric.
Learn About Shuttle Looms
This is the most primitive loom in the history of loom. In this machine there is a shuttle which contains bobbins and around bobbins there are yarn wounded. In this weaving machine the shuttle travels from one corner to the other and hence the fabric is made. The speed of this machine is 110-225 ppm [Picks Per Minute]. It is quite noisy and inefficient.
Fabric Weaving Without a Shuttle in the Loom Is It Possible?
Projectile Loom
Projectile loom is a shuttleless loom, in this looms instead of a shuttle projectile are there. Projectiles are made out of stainless steel and hence it was light weight. As the projectile lightweight this saves lots of energy and increases the efficiency of the machine. This loom speed was 300 ppm. The weaving takes place when the projectile goes across the width of the loom with the yarn.
Rapier Loom
This loom is also shuttleless. In this loom the weft is carried by a rapier which is a long rod like structure. Many kinds of fabric could be made using this loom and it is highly efficient. The range of GSM things loom could weave is 20-850 GSM. From home fabric to industrial fabric can be made using this loom. There are 4 types of rapier loom in the market.
Single Rigid Rapier Loom
Double Rigid Rapier Loom
Double Flexible Rapier Loom
Telescopic Rapier Loom
Air-Jet Loom
In this loom the yarn is transferred from the force of air, it does not have any shuttle. This loom is highly efficient and versatile. This loom does not make noise because it does not have many moving parts. As the moving parts are less then the floor space requirement and maintenance is low. The weft travels with the help of air pressure and once it reaches the shedding area interlacement takes place. This machine can be used in manufacturing Denim fabric, polyester dress material and cotton shirting fabric.
Water Jet Loom
Water pressure is used in this loom to transfer weft from one end to the other. It is a shuttleless loom machine. The speed of this machine is 600 ppm. This machine is highly efficient but we can use yarn which is hydrophobic, like polyester, polyamides etc. Hydrophilic yarn can not be used.
#textile#manufacturing#textiles#yarn#clothing#dyeing#knitting#business#fiber art#pattern#fabric#fiber#cotton#linen#wool#tshirt#weaving#small business#entrepreneur#india#made in india#trade#wholesale t shirts#wholesalers
8 notes
·
View notes
Text
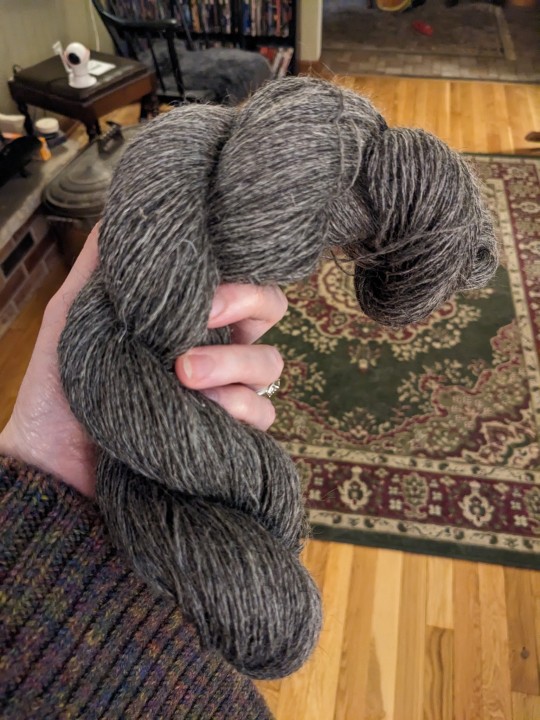


I need to put more stuff over here! I've got a short WIP thread about this project over on my Twitter, but the long and the short of it is that I do big fiber arts projects better if I have a goal in mind, and the goal of this one is to get good enough at handspinning and weaving drafts that I can reproduce some of the fabric used to make the Lothlorien cloaks from Lord of the Rings. This is some Gotland wool yarn I finished plying tonight (not very well as it's still pretty unbalanced, but I wanted to free up bobbins more than I cared about a perfectly balanced yarn). I'm not expecting to do a 1:1 reproduction because I'm just not that good, but here's the rough plan:
- The Lothlorien pattern is a shadow weave variant made of alternating gray and white yarna. It's a REALLY cool color-and-weave optical illusion, where both warp and weft threads alternate between dark and light, and subtle skips in the pattern create either vertical or horizontal bars. I still haven't made a weaving draft that I like, but messing around with weaving software has been very useful in helping me learn what leads to what with shadow weave. My big unknown rn is how many shafts are needed to reproduce the pattern.
- For the gray yarn, Stansborough Wool used their own proprietary sheep breed developed in New Zealand. You can't buy unspun roving from them anymore, so I picked Gotland wool instead which is apparently the origin breed for Stansborough's variant.
- For the white yarn, I'm using a 33% merino 66% alpaca blend that I have no other reason for choosing other than that's what the fiber content on a Stansborough scarf I bought said, so I went with it. So far it's been a little bastard to spin and I much prefer the Gotland. I still haven't mastered spinning high twist singles for long periods of time without my hands cramping up, and the longer Gotland fibers don't need as much twist to stay together.
- I know weaving yarn is typically used as singles, but since the fabric made by Stansborough seems to use a 2-ply and I enjoy my yarn not acting like it's haunted, I decided to also go with a 2-ply for this project. I'm spinning both yarns as skinny as I can with a worsted draft, but I'm not physically capable of drafting out yarn as fine as what was used in the Stansborough fabric. I think their stuff is around 30 wpi and I'm clocking in around 20-25 wpi for my finished yarn.
- One sticking point to this project that I don't have quite figured out is the loom I'll use. The cloaks are half circles which requires a fairly wide fabric, and my Ashford table loom maxes out at 32". Up until recently that left me considering a couple options: 1) do some weird doubleweave bullshit to double the effective width of my loom at the cost of cutting the number of shafts I get to use in half, 2) rent time with a bigger loom at a local weaving studio and pray to god I spin enough yarn before I start so I don't run out halfway through, or 3) ctfo and be content with reproducing the fabric at a skinnier width even if I don't make a cloak out of it.
I'll be throwing up random bits of progress here as I make it, but I'm fully expecting this project is at least 1-2 years away from having a lot to show for itself.
20 notes
·
View notes
Text
Silly Question the Third
So I'm looking over my weaving maths and need some help figuring out if I am calculating my EPI incorrectly for that double weave project.
19 WPI ÷ 2 = 9.5 EPI (this half # feels off)
× 15" (width on loom)
= 142.5
× 2 (for the double weave)
= 285 Warp Ends
Should I have rounded the 9.5 up to 10?
12 notes
·
View notes