#despeckle noise
Explore tagged Tumblr posts
Text
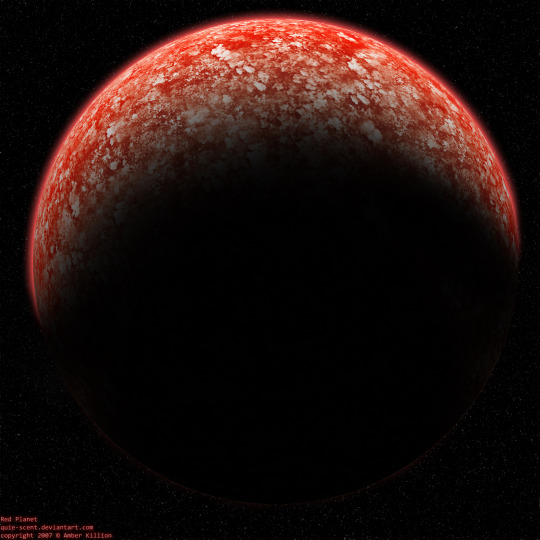
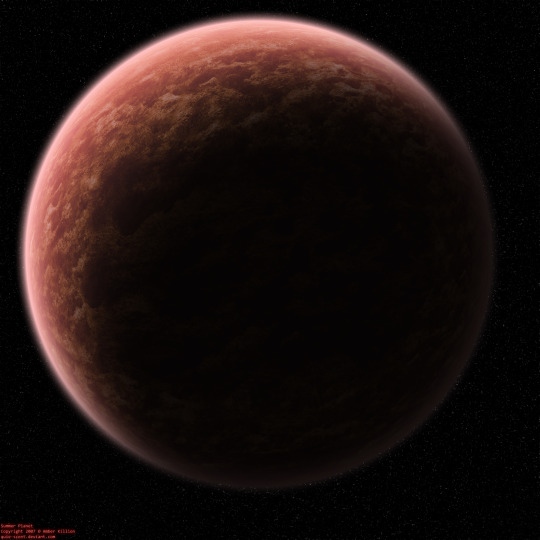
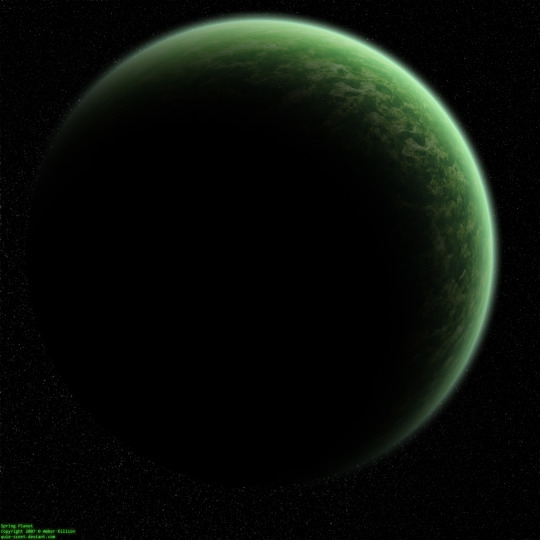
Kelpalots at @deviantart unilateral real life planets now.
0 notes
Text
Despixelar imágenes
CON ADOBE PHOTOSHOP (O INDESIGN)
En realidad existen muchos métodos para lograr un resultado similar. En Photoshop recomendamos esta ruta:
En primer lugar, abrimos la imagen en Adobe Photoshop. Una vez abierta, quitamos el candado a la imagen pulsando sobre él y verificando que la imagen esté en su propia capa (la cero).
Ahora vamos a “Imagen > tamaño de imagen” y aumentamos la resolución de 72 a 300 p.p. Es importante seguir esta ruta.
Después seguimos esta ruta: “Filtro > Ruido > Destramar” (‘Despeckle’). Lo hacemos dos veces, repitiendo el proceso. Tardará un poquito en aplicar los valores que hayamos marcado. También podemos atajar usando las teclas CTRL y F.
Ahora vamos a “Filtro > Ruido > Reducir ruido” (‘Reduce noise’). Utilizaremos unos valores idénticos o muy similares a los que podemos ver en la imagen —es decir, ajustando el radio a 1,5 píxeles y el umbral a 15 píxeles—. Importante: marcar “quitar defecto JPEG”. Pulsamos ok. (10,0,85,55 = /,%,%,%)
Por último, vamos a “Filtro > enfocar y enfoque inteligente” (‘Smart Sharpen’). O, en las nuevas versiones de Photoshop, encontraremos esta opción llamada “enfoque suavizado”. Pulsamos OK. (100,0.5,10 = %,pls,%)
Una vez realizados todos estos pasos, cuando guardemos la imagen, en compresión elegimos “ninguno” y pulsamos OK.
Cuando guardes la imagen final, por favor, no la comprimas, guárdala a la máxima calidad posible (12).
Fuente: https://www.nobbot.com/como-despixelar-imagenes/
0 notes
Photo
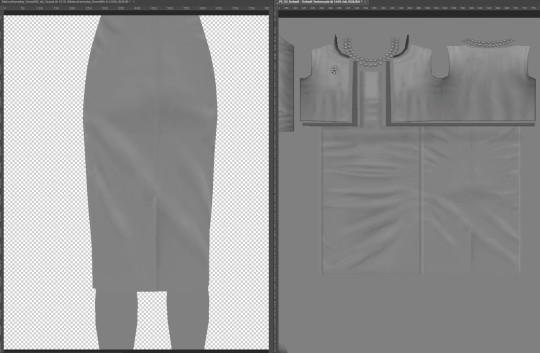
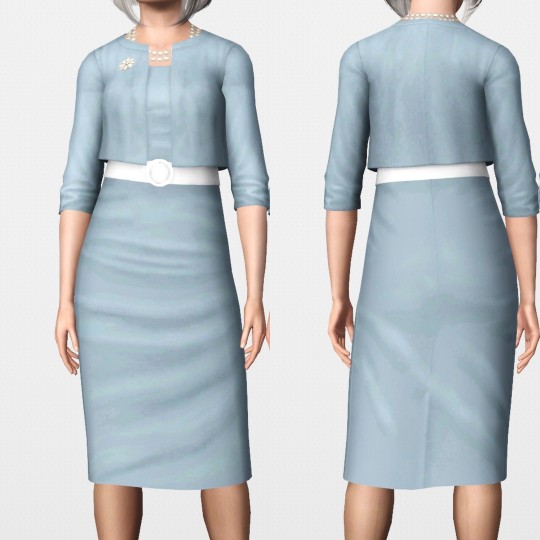
I need serious opinion and / or help on this dress. It's making me crazy. The gray picture is what the texture looks like in photoshop. See .. nice smooth textures. Then it turns into this horrid bandy mess in game. I know this is related to the anti-aliasing issue and there is only so much I can do about it.
Am I being too hyper critical about it? Is it good enough?
If not, what can I do to fix it? I have tried everything I can think of:
Add noise (I read that somewhere in a tutorial about making tattoos / makeup)
Gaussian blur (also read in a makeup tutorial)
Despeckle - an offhand comment made by someone, but with no specifics on settings
Denoise AI (plugin for PS) - offhand comment, but with no specifics on settings. I tried using “auto” mode. I tried setting Denoise really high and sharpen to none. I tried adding in post processing reclaim original details.
Using airbrush to go over the areas a little more.
Created a dual brush “noise” brush to selectively detail the areas.
I have even tried stacking multiple techniques.
Adding blending layers like soft light, overlay, etc.
Bottom line is, everything I have tried has resulted in something even worse. I'm at a loss. Halp, plz ???
PS: Forgot to mention this is 1024 x 1024 because I was frankenmeshing and kept part of the original textures. Didn’t want to make matters worse by sizing up. But.. if it will help?
18 notes
·
View notes
Note
What are your sharpening settings?? I can’t get mine the way I want them to look..
i use this sharpening action, specifically the hd one! this is extra info, but afterwards i duplicate the gif layer (new smart object via copy) and switch the opacity to 20% once i despeckle it (filter > noise > despeckle) to lower the graininess a bit
#i changed the way i sharpen quite a lot so i get where you're coming from#but this one's my favorite so far#anonymous#ask
1 note
·
View note
Text
VeryUtils OCR to Any Converter SDK
VeryUtils OCR to Any Converter SDK can be used to convert scanned PDF, TIFF and Image files (JPEG, JPG, PNG, BMP, GIF, PCX, TGA, PBM, PNM, PPM) to editable Word, Excel, CSV, HTML, TXT, Pure Text Layer PDF, Invisible Text Layer PDF, etc. formats. VeryUtils OCR to Any Converter SDK can be called from C#, VB.NET, ASP.NET, VB, VC, Delphi, ASP, PHP, JavaScript, VB Script, etc. program languages to do the batch OCR conversion. OCR to Any Converter SDK includes a great Table Recovery Engine, all table contents in scanned PDF, TIFF and Image files can be recognized as table objects and inserted into Word, Excel, HTML, Text, CSV, etc. formats.
The software development kit VeryUtils OCR to Any Converter SDK allows software developers to create applications that extract textual information from paper documents, images or displays. This AI-powered OCR SDK provides your application with excellent text recognition, PDF conversion, and data capture functionalities, enabling it to convert scans into searchable PDF, Word or Excel documents, and access data on photos or screenshots.
You are welcome to download the trial version of OCR to Any Converter SDK/COM to try for free,
The OCR to Any Converter SDK is a fast, lightweight OCR engine designed to let developers add basic OCR functions to an application with minimal cost and none of the drawbacks of open source solutions. OCR to Any Converter SDK is implemented as C++ DLL files, wrapper DLL files and sample code for easy ActiveX and .NET integration are also provided.
OCR to Any Converter SDK is able to convert image/PDF to Microsoft Word, Excel, PowerPoint, HTML, Text, Text Based PDF etc. formats. Advanced Document Recognition Technology offers an unrivaled capability to understand and recreate the structure and layout of the original document, while converting the scanned image or PDF version of the document into its original editable Microsoft Office format.
OCR to Any Converter SDK is able to convert image/PDF to searchable PDF and PDF/A files. Advanced PDF conversion features reduce the size of scanned images and PDFs up to 10 times, while preserving the visual quality via powerful MRC compression technology and support of searchable PDF and PDF/A formats.
VeryUtils OCR to Any Converter SDK has following features:
Auto rotate image pages, accurately finds correct image orientation.
Noise removal, improved for shaded regions and speckles.
Greatly improved for Error Handling.
Example projects, includes C++, Visual Basic, ASP, VB.NET and more examples.
Returns coordinates of recognized words and images.
Map text to original image, correcting hidden text PDF
Add AI to your application via the World Leading OCR and Capture API.
Recognize printed text (OCR) on images.
Convert image-only documents to searchable PDF or editable Microsoft Office formats.
Extract data from receipts, business cards and IDs through the OCR API.
Text recognition. Full-page and zonal OCR (printed text) for more languages.
Document conversion. Convert image/PDF to searchable PDF, HTML and Microsoft Word, Excel, PowerPoint, etc. documents.
Data extraction. Receipt recognition, business card recognition and ID recognition.
Provide your clients with the high-quality text recognition on Windows platform.
Imaging module. Load and save pictures in formats such as BMP, PNG, TIFF, PDF and JPEG. Use JPEG2000 and JBIG2 compression, with a separate extension.
Pre-processing. Optimize your OCR results and clean up original images, with features like adaptive binarization, despeckle filters, deskew feature, document rotation. Dark border removal, line removal, color dropout are available in a separate extension.
Text recognition. Standard version of OCR SDK is available in 20+ languages, with various add-ons: Asian, Hebrew, Arabic, Banking Fonts, etc.
Document output. Document output formats in standard OCR SDK are: PDF, PDF/A, HTML, XML, RTF, TXT, ODT, WordML, SpreadsheetML, CSV, DOCX, XLSX and XPS.
Desktop, Server & Mobile OCR SDKs
Improve the data entry in your company or in your software by using one of VeryPDF OCR SDks. With world class recognition accuracy and fast speed, we can help you reduce the cost of digitizing your paper documents or extracting text from images.
We provides solutions for Telecom Companies, Financial Institutions, Mobile Phones Manufacturers, Scanner&Camera Manufacturers, as well as Internet Companies. With more than an hundred partners around the world, our solutions are used daily by millions of end-clients.
If you have special requirements, we are able to develop custom OCR SDK to fit your needs of text recognition on digital images, please feel free to contact us on VeryPDF Ticket System if you have any questions.
0 notes
Text
Danh sách 5 clean up pixelated image photoshop tốt nhất
Danh sách 5 clean up pixelated image photoshop tốt nhất
1 How to Reduce Pixelization in Photoshop | Small Business – Chron.com Tác giả: smallbusiness.chron.com Ngày đăng: 05/28/2022 Đánh giá: 4.88 (691 vote) Tóm tắt: Right click the image and create a new layer. Choose Blending Options from the header menu and click Soft Light. Click Filters and Noise then Despeckle to open a slider. Adjust the slider until the pixelation clears Nguồn:…
View On WordPress
0 notes
Text
2 cách giảm Noise trong Photoshop
Đôi lúc chụp ảnh bằng điện thoại sẽ làm những tấm ảnh của bạn không được như ý, bị nhòe, nhiễu hay không đủ ánh sáng. Đây chính là bài viết giúp bạn khắc phục được những khuyết điểm trên bằng cách khử Noise trong Photoshop cực hiệu quả.
Noise là hiện tượng bị nhiễu hạt ở ảnh khi chụp trong môi trường thiếu ánh sáng. Ảnh bị Noise sẽ trông không được mịn, thiếu tính thẩm mỹ và không đẹp mắt. Tuy vậy, chúng ta vẫn có cách để khắc phục được hiện tượng này bằng Photoshop đơn giản nhất.
Noise được chia thành 3 loại sau:
- Random Noise: thường xuất hiện khi tốc độ chụp ảnh nhanh, ISO (độ nhạy sáng) cao và Noise thường được phân bố ngẫu nhiên
- Fixed Noise: Noise thường xuất hiện khi nhiệt độ môi trường cao và thời gian chụp ảnh chậm
- Banding Noise: xuất hiện khi người chụp tăng sáng ở các vùng tối. Khi đó, Noise sẽ xuất hiện cùng các đường kẻ sọc. Banding Noise còn phụ thuộc nhiều vào công nghệ sản xuất cảm biến của các hãng

Cách 1: Khử Noise bằng hệ màu Lab
Bước 1: Mở trên Photoshop ảnh cần khử Noise theo hướng dẫn: Click File > Open hoặc có thể kéo và thả ảnh muốn khử Noise vào phần mềm Photoshop
Bước 2: Chuyển ảnh về hệ Lab để bạn có thể giảm bớt Noise trên các vùng của hệ màu Lab: vào Image > Mode > Lab Color
Bước 3: Mở Tab Channel (cạnh Tab Layer) > Chọn kênh Lightness và thực hiện theo hướng dẫn: Chọn Filter > Noise > Despeckle để giúp hình ảnh trở nên mịn hơn
Bước 4: Tại Channel Lightness, chọn Filter > Noise > Reduce Noise và điều chỉnh các thông số (bạn cũng có thể tự thay đổi các thông số để phù hợp với ý của mình)
Bước 5: Chuyển sang Channel a > Filter > Blur > Gaussian Blur
Bước 6: Bước này giúp bạn làm mịn điểm nhiễu trên kênh a và b. Thông số Radius thường khoảng từ 0.5 – 1 pixel
Bước 7: Trở về Tab Layer > Chuyển hệ màu về RGB là bạn đã có được thành quả của mình
Cách 2: Sử dụng Plugin khử Noise trong Photoshop
Bước 1: Tải Plugin tại trang chủ > nhập email của bạn để tải plugin về máy > Vào email của bạn để lấy đường link tải
Bước 2: Bật file vừa tải và cài đặt > Next > Next > Install > Finish
Bước 3: Sau khi cài đặt xong, plugin sẽ tự động cập nhật trong Photoshop khi bạn bật ứng dụng. Mở ảnh cần khử Noise trong Photoshop và truy cập Plugin theo hướng dẫn: Filter > Imagenomic > Noiseware
Bước 4: Đây là chức năng tự động nên các thông số đã tự điều chỉnh, bạn cũng có thể thay đổi các thông số ở cột bên trái theo mong muốn của mình. Sau khi điều chỉnh các thông số khử nhiễu vừa ý > Click OK
Hy vọng bài viết này sẽ giúp bạn nắm vững kiến thức về Noise (nhiễu) ảnh và cách chỉnh sửa cũng như khắc phục nó một cách thật dễ dàng.
0 notes
Text
does anyone know how to get rid of all this pixel stuff bc i've been trying to get rid of it in any way i know how (despeckling, reducing noise, etc.)- but nothing is working.
close-up:

actual gif:

am i just being too nit-picky or..? idk i just can't stop focusing on it lol
i've been working on the same gif for the past three hours :)))))))
#i use photopea btw NOT photoshop so maybe there's something there that i don't have that would probably help me out lol#most of yoongi's face looks fine to me but it's his lips that are really giving me a hard time#is it just something that you can't fix? maybe i have too much coloring?#i mean#right now i have 2 selective color layers + 1 brightness/contract layer + 1 vibrance layer + 1 curve layer#and that's my main coloring#maybe it's too much for yoongi lol
3 notes
·
View notes
Text
Image to PDF Converter Command Line with OCR, JBIG2, JPEG2000
VeryUtils Image to PDF Converter Command Line is a Windows Application which can directly convert image files (TIF, JPG, GIF, PNG, BMP, PSD, WMF, EMF, PDF, PCX, PIC, etc.) to PDF files. VeryUtils Image to PDF Converter does support skew-correct and despeckle for black and white image files. VeryUtils Image to PDF Converter software doesn't depend on Adobe Acrobat and Adobe Reader applications.

VeryUtils Image to PDF Converter Command Line is a Windows application which can directly convert dozens of image formats, such as TIF, TIFF, JPG, JPEG, GIF, PNG, BMP, PSD, WMF, EMF, PCX, PIC and so on, into PDF format. VeryUtils Image to PDF can automatically clear and skew-correct B/W images by employing special techniques to insure high quality output after conversion. VeryUtils Image to PDF can operate independently of Adobe Acrobat and has faster processing speed. VeryUtils Image to PDF provides a very convenient, simple way to compose electronic books which can then be issued to the Web. You can scan paper documents directly to image files and then convert them to PDF using VeryUtils Image to PDF Converter.
VeryUtils Image to PDF Converter Command Line is a Command Line product, it allows you to manually issue commands or include them in scripts, for example, a web site or intranet to convert TIFF or other image files to PDF on the fly. VeryUtils Image to PDF is perfect for high-volume document archive/database systems that require unattended batch image conversions (TIFF or other images) to PDF format.
VeryUtils Image to PDF Command Line Features (License 1, USD$59.95):
Support TIF, TIFF, JPG, JPEG, PNG, GIF, PCD, PSD, TGA, BMP, DCX, PIC, EMF, WMF, etc. image formats.
Combines multiple directories and images into one PDF file.
Do NOT need Adobe Acrobat software.
Support Win98/ME/NT/2000/XP/2003/Vista and later systems.
Support both 32bit and 64bit Windows systems.
Support Multi-page image file (TIFF) to PDF conversion.
Support sorting on file name when converting batches.
Set automatic despeckling (of B/W images; removes noise) and skew-correction.
Merge several image files into a single PDF file during batch converting, or convert each image file into individual PDF file.
Makes use of effective compression processing to minimize space occupied by the created PDF files.
for example, an A4 paper size TIFF file with a B/W image the output size is about 40KB to 50KB per page.
Color and grayscale images are also compressed and optimized.
Password protection for PDF files with 40 or 128 bit encryption.
Set file permissions to restrict printing, copying, and future modifications to the document.
Automatically open PDF file after creation.
Specify any resolution in the generated PDF file.
Specify paper size (paper width and paper height), rotation, margins to the generated PDF file.
Overwrite, append or insert image files to an existing PDF file.
Set document title, subject, author, keywords, producer, creator, creation date, modify date to PDF.
Generate bookmarks.
Merge to an existing PDF file (insert before the first page or append to the last page).
Merge several PDF files into one PDF file.
Burst one multi-page PDF file into several PDF files.
Create PDF/A PDF file.
Create PDF/X PDF file.
Set watermark into PDF file, include watermark content, type, font name, font size, bold, italic, underline, strikeout, angle, text color, X/Y offset, etc. attributes.
VeryUtils Image to PDF OCR Converter Command Line (License 2, USD$399.95):
Include all features in VeryUtils Image to PDF Converter Command Line Basic version.
Convert scanned TIFF and Image files to full text searchable PDF files.
VeryUtils Image to PDF Compressor (JBIG2, JPEG2000) Command Line (License 3, USD$1295.00):
Include all features in VeryUtils Image to PDF Converter Command Line Basic version.
Compress color and grayscale pictures into PDF file with JPEG2000 compression.
Compress black and white pictures into PDF file with JBIG2 compression.
VeryUtils Image to PDF OCR Compressor (JBIG2, JPEG2000) Command Line (License 4, USD$1995.00):
Include all features in VeryUtils Image to PDF Converter Command Line Basic version.
Compress color and grayscale pictures into PDF file with JPEG2000 compression.
Compress black and white pictures into PDF file with JBIG2 compression.
Convert scanned TIFF and Image files to full text searchable PDF files.
PDF Compressor (JBIG2, JPEG2000) Command Line (License 5, USD$1495.00):
Include all features in VeryUtils Image to PDF Converter Command Line Basic version.
Compress color and grayscale pictures into PDF file with JPEG2000 compression.
Compress black and white pictures into PDF file with JBIG2 compression.
Convert existing PDF files to new PDF files with high compression.
Convert PDF to BMP, JPEG, GIF, PNG, MNG, TIF, TGA, PCX, JPEG2000 (JP2), etc. image files.
PDF OCR Compressor (JBIG2, JPEG2000) Command Line (License 6, USD$2495.00):
Include all features in VeryUtils Image to PDF Converter Command Line Basic version.
Compress color and grayscale pictures into PDF file with JPEG2000 compression.
Compress black and white pictures into PDF file with JBIG2 compression.
Convert existing PDF files to new PDF files with high compression.
Convert scanned TIFF and Image files to full text searchable PDF files.
Convert PDF to BMP, JPEG, GIF, PNG, MNG, TIF, TGA, PCX, JPEG2000 (JP2), etc. image files.
PDF OCR Compressor Toolkit (SDK) (License 7, USD$3495.00):
Include all features in VeryUtils Image to PDF Converter Command Line Basic version.
Compress color and grayscale pictures into PDF file with JPEG2000 compression.
Compress black and white pictures into PDF file with JBIG2 compression.
Convert existing PDF files to new PDF files with high compression.
Convert scanned TIFF and Image files to full text searchable PDF files.
Convert PDF to BMP, JPEG, GIF, PNG, MNG, TIF, TGA, PCX, JPEG2000 (JP2), etc. image files.
0 notes
Text
Facebook reveals holographic optics for thin and light VR headsets
Today’s virtual reality headsets are universally big — closer to goggles than glasses, and even then, larger and heavier than modern ski goggles. While Facebook has shown prototypes of bigger and more complex Oculus VR headsets, it’s made no secret of its interest in creating lightweight models that can be worn all day. Now it’s revealing a holographic optical architecture designed for thinner, lighter VR headsets, which it expects will appear in future “high performance AR/VR” devices.
Discussed in a Siggraph 2020 research paper titled “Holographic Optics for Thin and Lightweight Virtual Reality,” the system uses flat films to create a VR display only slightly thicker than today’s typical smartphones. Facebook’s “pancake optics” design combines several thin layers of holographic film with a laser projection system and directional backlights, delivering either flat imagery or volumetric holograms depending on the sophistication of the design. Depending on how many color, lighting, and alignment-enhancing components a prototype contains, the thickness of the optical system can range from 11mm to just under 9mm.
In wearable prototype form, each eye display features a resolution of roughly 1,200 by 1,600 pixels — comparable to current VR goggles — with a field of view that’s either a 93-degree circle or a 92-by-69-degree rectangle. That’s roughly comparable to the display specs of a 571-gram Oculus Quest, but in a glasses-like form factor that weighs less than 10 grams in total, albeit with only a single eye display in the prototypes. The researchers note they could cut parts and change materials to achieve a 6.6 gram weight equivalent to plastic aviator sunglasses, but would compromise performance by doing so.
There’s one major caveat: The technology isn’t ready for near-term deployment. As of now, Facebook’s researchers have three prototypes, including a full-color display that’s mounted on a test bench rather than wearable, and two wearable prototypes that deliver green-on-black imagery in either moving or static form. All of the prototypes use laser LCD illumination systems, and the three-laser full color prototype exhibits shimmering speckles, requiring a despeckler that’s fine for static images but leaves color noise when displaying dynamic content. In addition to developing a more performant custom despeckler, the researchers say that they could deliver a wearable full-color prototype by adding either a holographic backlight or lens, but need more engineering work to get to that point.


Above: External captures of the single-color wearable and full-color bench-mounted displays don’t do full justice to their color gamuts, but provide a sense of their resolution.
Image Credit: Facebook
As most of today’s VR headsets use large, deep lens systems, replacement with a near-eye holographic system could cut their volume by 75% or more, though other components such as processors and storage would still need to be inside or wirelessly offloaded to a separate housing. Facebook’s glasses-styled prototypes have most of their components mounted outside of the displays, which means their real-world implementation would be closer to Nreal’s Light AR glasses than Oculus Quest, depending on a smartphone or other device to create their visuals. Scheduled for release this year, Light weighs 88 grams and has a 52-degree field of view.
At this stage, the researchers believe that the system comes closer to delivering a viable lightweight VR solution than Microsoft’s HoloLens 2 and Magic Leap 1, which are limited by roughly 40-degree fields of view, far less than is necessary to fill the eye with digital content. Over time, Facebook’s goal is to deliver both resolution matching normal human vision and a large viewing eye box so that eyes can rotate to see content rather than just staring forward at a small window. The headset could be used for everything from office productivity — displaying a virtual computer and other tools — to Facebook-powered social interactions and games.
Facebook isn’t the only company working on holographic optical systems for mixed reality applications. Apple-acquired company Akonia was working on solutions years ago, and has sought to patent a retinal hologram projector system among other XR display technologies. U.K. startup WaveOptics is another player, backed by China’s Goertek, while Samsung and Sony have backed a thin film holographic waveguide display from DigiLens. As an alternative, Germany’s Fraunhofer has developed microdisplays that are much smaller than traditional VR screens and can be brought closer to the user’s eyes, reducing the optical system’s volume by 75% and weight by 50%.
0 notes
Photo
Держите перевод меню фотошопа на русский ⠀ Часть 4, Filter – Фильтр: ⠀ 🔺Last Filter – Последний фильтр (Alt+Ctrl+F) ⠀ 🔺Convert for Smart Filters – Преобразовать для смарт-фильтров ⠀ 🔺Adaptive Wide Angle – Адаптивный широкий угол (Alt+Shift+Ctrl+A) ⠀ 🔺Lens Correction – Коррекция дисторсии (Shift+Ctrl+R) ⠀ 🔺Liquify – Пластика ⠀ 🔺Vanishing Point – Исправление перспективы (Alt+Ctrl+V) ⠀ 🔺Blur – Размытие ⠀ 🔺Field Blur – Размытие поля ⠀ 🔺Iris Blur – Размытие диафрагмы ⠀ 🔺Tilt-Shift – Наклон-смещение ⠀ 🔺Average – Среднее ⠀ 🔺Blur – Размытие ⠀ 🔺Blur More – Размытие + ⠀ 🔺Box Blur – Размытие по рамке ⠀ 🔺Gaussian Blur – Размытие по Гауссу ⠀ 🔺Lens Blur – Размытие при малой глубине резкости ⠀ 🔺Motion Blur – Размытие в движении ⠀ 🔺Radial Blur – Радиальное размытие ⠀ 🔺Shape Blur – Размытие по фигуре ⠀ 🔺Smart Blur – "Умное" размытие ⠀ 🔺Surface Blur – Размытие по поверхности ⠀ 🔺Distort – Искажение ⠀ 🔺Pinch – Дисторсия ⠀ 🔺Shear – Искривление ⠀ 🔺Polar Coordinates – Полярные координаты ⠀ 🔺Ripple – Рябь ⠀ 🔺Twirl – Скручивание ⠀ 🔺Displace – Смещение ⠀ 🔺Spherize – Сферизация ⠀ 🔺Noise – Шум ⠀ 🔺Add Noise – Добавить шум ⠀ 🔺Despeckle – Ретушь ⠀ 🔺Dust & Scratches – Пыль и царапины ⠀ 🔺Median – Медиана ⠀ 🔺Reduce Noise – Уменьшить шум ⠀ 🔺Pixelate – Оформление ⠀ 🔺Color Halftone – Цве��ные полутона ⠀ 🔺Crystallize – Кристаллизация ⠀ 🔺Facet – Фасет ⠀ 🔺Mezzotint – Меццо-тинто ⠀ 🔺Pointillize – Пуантилизм ⠀ 🔺Render – Рендеринг ⠀ 🔺Difference Clouds – Облака с наложением ⠀ 🔺Fibers – Волокна ⠀ 🔺Lens Flare – Блик ⠀ 🔺Lighting Effects – Эффекты освещения ⠀ 🔺Sharpen – Усиление резкости ⠀ 🔺Shake Reduction – Стабилизация изображения ⠀ 🔺Sharpen – Усиление резкости ⠀ 🔺Sharpen Edges – Резкость на краях ⠀ 🔺Sharpen More – Резкость + ⠀ 🔺Smart Sharpen – "Умная" резкость ⠀ 🔺Unsharp Mask – Контурная резкость ⠀ 🔺Stylize – Стилизация ⠀ 🔺Diffuse – Диффузия ⠀ 🔺Emboss – Тиснение ⠀ 🔺Extrude – Экструзия ⠀ 🔺Find Edges – Выделение краев ⠀ 🔺Glowing Edges – Свечение краев ⠀ 🔺Solarize – Соляризация ⠀ 🔺Tiles – Разбиение ⠀ 🔺Trace Contour – Трассировка контура ⠀ 🔺Wind – Ветер ⠀ 🔺Oil Paint – Масляная краска ⠀ 🔺Other – Другое ⠀ Написать пост про резкость, кстати? (at Верхние Печеры) https://www.instagram.com/p/B3BZBz0AjD6/?igshid=4pi04us862gp
0 notes
Text
How Image To Text Works

Nowadays, it is not easy to get a text out of images, thanks for the optical character recognition (OCR) technology.
OCR allows us to do all the useful things, such as searching for images through text queries, creating documents without the need to write by hand and even handwritten digital text.
How is the optical character identified?
To understand how text is extracted from an image, we must first understand what images are and how safe it is on the computer.
A pixel is the only point of a specific color. An image is basically a collection of pixels. More pixels in an image, your solution. A computer does not know that the image of a sign mark is really a signal; simply know that the first pixel is the color, the next pixel color is shown and it shows all its pixels to see it.
It does not mean that the text and the non-computer are different from the computers, and therefore, the ideological character is very difficult. With this, how does this work here?
Step 1: Image preprocessing
Before you can extract the text, the image is easier to extract and more successful in some aspects, the mass needs a message. It's called early preprocessing, and different software solutions use different combinations.
The most common preprocessing techniques include:
Binarization
Each pixel of the image changes in white or black. The objective is to make clear that pixels are textiles and that the Council belongs to Pixel Background, which accelerates the real OCR process.
Deskew
As the documents are scanned perfectly with perfect alignments, the characters can end or even from top to bottom. The purpose of this objective is to identify horizontal text lines and then rotate the image so that they are horizontal in the lines.
Despeckle
Whether the image is binary or not, the noise can interfere with the character of the characters. Despeckling gets rid of this noise and tries to get out of the picture.
Elimination of line
Identify all lines and identities that probably do not contain characters, then delete them so that the original OCR process is not confused. It is particularly important when scanning documents with tables and tables.
Zoning
This image separates the text from a different text, such as identifying columns in multi-column documents.
Step 2: Image processing
In the first place, the first attempts to establish the baseline for each line of text in the ORR process image (or if it enters the zone in the preprocessing, will work at every moment through each zone). The identification of each of the characters is handled one by one line.
For each character line, the OCR software indicates the interval between characters that look for vertical lines of unusual pixels (which should be clear with the appropriate binaries). Each of the pixels in these non-proportional lines is marked as a "token" that represents a character. Therefore, this step is called a token.
Once all the possible characters in the image receive a token, the OCR software can use two different techniques to identify which characters are the real tasks:
Recognition of patterns
Each token increases the number of pixel pixels compared to the general set of street sizes, including number, multiplication, and other special symptoms, and close matches are generated. This technique is also known as matrix matching.
There are several problems here. First, token and glyphs need the same size or none will be found. Second, the tokens must be in the same sources as the glyphs, which must be exhausted. But if the source of the token is detected, pattern recognition can be sharp and precise.
Feature extension
Each token is related to different rules that describe what kind of role it is. For example, it is likely that two vertical lines of equal height joined to a horizontal line capitalize the capital H.
This technique is useful because it is not limited to a specific font or size. It can be even worse to recognize the fine differences between investor I, lowercase and number 1. Programming rules is more complicated than just pixels in a pixel token in a single guide.
Step 3: image processing
Once all token matches are complete, the OCR software can only call one day and the results can be submitted to you. But in general, you have to be careful not to look at hidden results.
Lexical restriction
All words are contrary to the word's written leaks, and whoever does not find the word of appliance changes nearby. There is an example of a dictionary. These erroneous words can help inaccurate words with "thorn" instead of "th0rn".
Application-specific optimization
When used in OCR spaces, such as medical or legal documents, special types of OCR may be used specifically designed for this parameter. In these cases, the OCR software can find mathematical equality, sector-specific terms, and so on.
Natural language
This advanced technique corrects the sentence using an oral model, which describes how the words of certain words conform to other words. It's like a technology that predicts which word you want to type on a mobile keyboard.
0 notes
Text
فیلتر despeckle در فتوشاپ - Despeckle Filter
پست جدیدی در وبسایت گرافیشا منتشر شد.
فیلتر despeckle در فتوشاپ - Despeckle Filter
فیلتر despeckle در فتوشاپ ، کل تصویر را در نظر می گیرد و پیکسل های تصویر را لکه لکه کرده و سپس کمی آن ها را جابه جا می کند تا یک تصویر صاف تر ایجاد شود. فیلتر despeckle در گروه فیلتر های noise قرار دارد. از فیلترهای دیگر این گروه، می توان فیلتر add noise، فیلتر reduce noise، فیلتر median و فیلتر dust & scratches را نام برد.
اعمال فیلتر despeckle در فتوشاپ
ابتدا در پنل layers، لایه ی مورد نظر را انتخاب می کنیم.
سپس از filter->noise->despeckle را انتخاب می کنیم.
نکته: اگر بعد از اعمال این فیلتر، از نتایج راضی نبودیم، به هر تعداد دلخواه می توانیم آن را دوباره اضافه کنیم.
استفاده از این فیلتر، زیاد انتخاب مناسبی نیست چرا که فتوشاپ به صورت اتوماتیک کارها را انجام می دهد و ما کنترلی بر روی فیلتر نداریم. به عبارت دیگر، نمی توانیم آن را به صورت smart filter اعمال کنیم.
نکته: با وجود فیلترهایی مثل add noise که از filter->noise->add noise می توانیم به آن دسترسی داشته باشیم و می توانیم آن را بر روی smart object ها نیز اعمال کنیم، (یعنی به صورت یک smart filter)؛ کمتر پیش می آید که از فیلتر despeckle در فتوشاپ استفاده کنیم؛ اما ارزش امتحان کردن را دارد.
مثالی از اعمال فیلتر despeckle در فتوشاپ به صورت زیر است:
آموزش کامل Effect ها، Adjustment ها، پنل ها، ابزار و فیلتر های فتوشاپ در گرافیشا.
#best photoshop filters#filters in photoshop#how to learn photoshop filters#how to use photoshop filters#how to work with photoshop filters#photoshop filters#practical photoshop filters#smart filter ها در فتوشاپ#smart object ها در فتوشاپ#آموزش پنل layers#آموزش فتوشاپ#آموزش فیلتر despeckle#آموزش فیلتر despeckle در فتوشاپ#آموزش فیلتر despeckle فتوشاپ#آموزش فیلتر های بخش noise#آموزش فیلترهای فتوشاپ#آموزش فیلترهای فتوشاپ cs5#آموزش فیلترهای فتوشاپ cs6#آموزش فیلترهای فتوشاپ به زبان فارسی#آموزش مهم ترین فیلترهای فتوشاپ#آموزش نرم افزار فتوشاپ#آموزش همه فیلترهای فتوشاپ#استفاده از فیلتر های بخش noise#انواع فیلتر های noise در فتوشاپ#انواع فیلترهای فتوشاپ#پنل layers#پنل layers در فتوشاپ#پنل layers فتوشاپ#دانلود فیلترهای جدید فتوشاپ cs6#فتوشاپ
0 notes
Text
Facebook reveals holographic optics for thin and light VR headsets
Today’s virtual reality headsets are universally big — closer to goggles than glasses, and even then, larger and heavier than modern ski goggles. While Facebook has shown prototypes of bigger and more complex Oculus VR headsets, it’s made no secret of its interest in creating lightweight models that can be worn all day. Now it’s revealing a holographic optical architecture designed for thinner, lighter VR headsets, which it expects will appear in future “high performance AR/VR” devices.
Discussed in a Siggraph 2020 research paper titled “Holographic Optics for Thin and Lightweight Virtual Reality,” the system uses flat films to create a VR display only slightly thicker than today’s typical smartphones. Facebook’s “pancake optics” design combines several thin layers of holographic film with a laser projection system and directional backlights, delivering either flat imagery or volumetric holograms depending on the sophistication of the design. Depending on how many color, lighting, and alignment-enhancing components a prototype contains, the thickness of the optical system can range from 11mm to just under 9mm.
In wearable prototype form, each eye display features a resolution of roughly 1,200 by 1,600 pixels — comparable to current VR goggles — with a field of view that’s either a 93-degree circle or a 92-by-69-degree rectangle. That’s roughly comparable to the display specs of a 571-gram Oculus Quest, but in a glasses-like form factor that weighs less than 10 grams in total, albeit with only a single eye display in the prototypes. The researchers note they could cut parts and change materials to achieve a 6.6 gram weight equivalent to plastic aviator sunglasses, but would compromise performance by doing so.
There’s one major caveat: The technology isn’t ready for near-term deployment. As of now, Facebook’s researchers have three prototypes, including a full-color display that’s mounted on a test bench rather than wearable, and two wearable prototypes that deliver green-on-black imagery in either moving or static form. All of the prototypes use laser LCD illumination systems, and the three-laser full color prototype exhibits shimmering speckles, requiring a despeckler that’s fine for static images but leaves color noise when displaying dynamic content. In addition to developing a more performant custom despeckler, the researchers say that they could deliver a wearable full-color prototype by adding either a holographic backlight or lens, but need more engineering work to get to that point.
VB Transform 2020 Online – July 15-17. Join leading AI executives: Register for the free livestream.
Above: External captures of the single-color wearable and full-color bench-mounted displays don’t do full justice to their color gamuts, but provide a sense of their resolution.
Image Credit: Facebook
As most of today’s VR headsets use large, deep lens systems, replacement with a near-eye holographic system could cut their volume by 75% or more, though other components such as processors and storage would still need to be inside or wirelessly offloaded to a separate housing. Facebook’s glasses-styled prototypes have most of their components mounted outside of the displays, which means their real-world implementation would be closer to Nreal’s Light AR glasses than Oculus Quest, depending on a smartphone or other device to create their visuals. Scheduled for release this year, Light weighs 88 grams and has a 52-degree field of view.
At this stage, the researchers believe that the system comes closer to delivering a viable lightweight VR solution than Microsoft’s HoloLens 2 and Magic Leap 1, which are limited by roughly 40-degree fields of view, far less than is necessary to fill the eye with digital content. Over time, Facebook’s goal is to deliver both resolution matching normal human vision and a large viewing eye box so that eyes can rotate to see content rather than just staring forward at a small window. The headset could be used for everything from office productivity — displaying a virtual computer and other tools — to Facebook-powered social interactions and games.
Facebook isn’t the only company working on holographic optical systems for mixed reality applications. Apple-acquired company Akonia was working on solutions years ago, and has sought to patent a retinal hologram projector system among other XR display technologies. U.K. startup WaveOptics is another player, backed by China’s Goertek, while Samsung and Sony have backed a thin film holographic waveguide display from DigiLens. As an alternative, Germany’s Fraunhofer has developed microdisplays that are much smaller than traditional VR screens and can be brought closer to the user’s eyes, reducing the optical system’s volume by 75% and weight by 50%.
Source link
قالب وردپرس
from World Wide News https://ift.tt/2Bljxrs
0 notes
Text
Photoshop 的功能表中英文作對照整理如下:
主功能
File〔文件〕 檔案
Edit〔編輯〕
Image〔圖像〕 影像
Layer〔圖層〕
Selection〔選擇〕 選取
Filter〔濾鏡〕
View〔視圖〕 檢視
Windows〔窗口〕 視窗
一、File〔文件〕
PDF Image
Annotations〔注釋〕
Check In〔登記〕
Undo Check Out〔還原註銷〕
Upload To Server〔上載到伺服器〕
Add To Workflow〔添加到工作流程〕
Open From Workflow〔從工作流程打開〕
Batch〔批次處理〕
Create Droplet〔創建快捷批次處理〕
Conditional Mode Change〔條件模式更改〕 合作模式更改
Contact Sheet〔聯繫表〕
Fix Image〔限制圖像〕
Multi 〔多頁面pdf到psd〕
Picture package〔圖片包〕
Web Photo Gallery 網頁相片收藏館
二、Edit〔編輯〕
Again〔再次〕 再一次
Sacle〔縮放〕
Rotate〔旋轉〕
Skew〔斜切〕 傾斜
Distort〔扭曲〕
Prespective〔透視〕
Rotate 180°〔旋轉180度〕
Rotate 90°CW〔順時針旋轉90度〕
Rotate 90°CCW〔逆時針旋轉90度〕
Flip Hpeizontal〔水準翻轉〕
Flip Vertical〔垂直翻轉〕
Undo〔還原〕
Clipboard〔剪貼板〕
Histories〔歷史紀錄〕 步驟記錄
All〔全部〕
General〔常規〕 一般
Saving Files〔存儲檔〕
Display & Cursors〔顯示與游標〕
Transparency & Gamut〔透明區域與色域〕
Units & Rulers〔單位與尺規〕
Guides & Grid〔輔助線與網格〕 傘考線、格線與切片
Plug 增效模組
Memory & Image Cache〔記憶體和圖像快取記憶體〕
Adobe Online
Workflows Options〔工作流程選項〕
三、Image〔圖像〕 影像
Bitmap〔點陣圖〕
Grayscale〔灰度〕
Duotone〔雙色調〕
Indexed Color〔索引色〕
RGB Color
CMYK Color
Lab Color
Multichannel〔多通道〕 多重色版
8 Bits/Channel〔8位通道〕 8位元色版
16 Bits/Channel〔16位通道〕 16位元色版
Color Table〔顏色表〕 色彩表
Assing Profile〔制定設定檔〕 指定描述檔
Convert to Profile〔轉換為設定檔〕 轉換為描述檔
Levels〔色階〕〕
Auto Laves〔自動色階〕
Auto Contrast〔自動對比度〕
Curves〔曲線〕〕
Color Balance〔色彩平衡〕
Brightness/Contrast〔亮度/對比度〕
Hue/Saturation〔色相/飽和度〕
Desaturate〔去色〕 黑白
Replace Color〔替換顏色〕 取代顏色
Selective Color〔可選顏色〕 選取顏色
Channel Mixer〔通道混合器〕 色版混合器
Gradient Map〔漸變映射〕 漸層對應
Invert〔反相〕 負片效果
Equalize〔色彩均化〕 均勻分配
Threshold〔閾值〕 臨界值
Posterize〔色調分離〕
Variations〔變化〕 綜觀量變
180°〔180度〕
90°CW〔順時針90度〕
90°CCW〔逆時針90度〕
Arbitrary〔任意角度〕
Flip Horizontal〔水準翻轉〕
Flip Vertical〔 垂直翻轉〕
四、Layer〔圖層〕
Layer〔圖層〕
Background From Layer〔背景圖層〕
Layer Set〔圖層組〕
Layer Set From Linked〔 圖層組來自連結的〕
Layer via Copy〔通過拷貝的圖層〕
Layer via Cut〔通過剪切的圖層〕
Blending Options〔混合選項〕
Drop Shadow〔投影〕 陰影
Inner Shadow〔內陰影〕
Outer Glow〔外發光〕 外光暈
Inner Glow〔內發光〕 內光暈
Bevel and Emboss〔斜面和浮雕〕 斜角和浮雕
Satin〔光澤〕 緞面
Color Overlay〔顏色疊加〕 顏色覆蓋
Gradient Overlay〔漸變疊加〕 漸層覆蓋
Pattern Overlay〔圖案疊加〕 圖樣覆蓋
Stroke〔描邊〕 筆畫
Copy Layer Effects〔拷貝圖層樣式〕
Paste Layer Effects〔粘貼圖層樣式〕
Paste Layer Effects To Linked〔將圖層樣式粘貼的連結的〕
Clear Layer Effects〔清除圖層樣式〕
Global Light〔全域光〕 整體光源
Create Layer〔創建圖層〕 建立圖層
Hide All Effects〔顯示/隱藏全部效果〕
Scale Effects〔縮放效果〕
Solid Color〔純色〕
Gradient〔 漸變〕 漸層
Pattern〔圖案〕 圖樣
Levels〔色階〕
Curves〔曲線〕
Color Balance〔色彩平衡〕
Brightness/Contrast〔亮度/對比度〕
Hue/Saturation〔色相/飽和度〕
Selective Color〔 可選顏色〕
Channel Mixer〔通道混合器〕
Gradient Map〔漸變映射〕
Invert〔反相〕
Threshold〔閾值〕
Posterize〔色調分離〕
Create Work Path〔創建工作路徑〕
Convert to Shape〔轉變為形狀〕
Horizontal〔水準〕
Vertical〔垂直〕
Anti-Alias None〔消除鋸齒無〕
Anti- Alias Crisp〔消除鋸齒明晰〕
Anti-Alias Strong〔消除鋸齒強〕
Anti-Alias Smooth〔消除鋸齒平滑〕
Covert To Paragraph Text〔轉換為段落文字〕
Warp Text〔文字變形〕
Update All Text Layers〔更新所有文本圖層〕
Replace All Missing Fonts〔替換所以缺欠文字〕
Type〔文字〕
Shape〔形狀〕
Fill Content〔填充內容〕
Layer Clipping Path〔圖層剪貼路徑〕
Layer〔圖層〕
Linked Layers〔連結圖層〕
All Layers〔所以圖層〕
Reveal All〔顯示全部〕
Hide All〔隱藏全部〕
Reveal Selection〔顯示選區〕
Hide Selection〔隱藏選區〕
Reveal All〔顯示全部〕
Hide All〔隱藏全部〕
Current Path〔當前路徑〕
Bring to Front〔置為頂層〕
Bring Forward〔前移一層〕
Send Backward〔後移一層〕
Send to Back〔置為底層〕
Top Edges〔頂邊〕
Vertical Center〔垂直居中〕
Bottom Edges〔底邊〕
Left Edges〔左邊〕
Horizontal Center〔水準居中〕
Right Edges〔右邊〕
Top Edges〔頂邊〕
Vertical Center〔垂直居中〕
Bottom Edges〔底邊〕
Left Edges〔左邊〕
Horizontal Center〔水準居中〕
Right Edges〔右邊〕
Define〔去邊〕
Remove Black Matte〔移去黑色雜邊〕
Remove White Matte〔移去白色雜邊〕
五、Selection〔選擇〕
Border〔擴邊〕
Smooth〔平滑〕
Expand〔擴展〕
Contract〔收縮〕
六、Filter〔濾鏡〕
Colored Pencil〔彩色鉛筆〕
Cutout〔剪貼畫〕
Dry Brush〔幹筆劃〕
Film Grain〔膠片顆粒〕
Fresco〔壁畫〕
Neon Glow〔霓虹燈光〕
Paint Daubs〔塗抹棒〕
Palette Knife〔調色刀〕
Plastic Wrap〔塑膠包裝〕
Poster Edges〔海報邊緣〕
Rough Pastels〔粗糙彩筆〕
Smudge Stick〔繪畫塗抹〕
Sponge〔海綿〕
Underpainting〔網底效果〕
Watercolor〔水彩〕
Blur〔模糊〕
Blur More〔進一步模糊〕
Gaussian Blur〔高斯模糊〕
Motion Blur〔動態模糊〕
Radial Blur〔徑向模糊〕
Smart Blur〔特殊模糊〕
Accented Edges〔強化邊緣〕
Angled Stroke〔成角的線條〕
Crosshatch〔陰影線〕
Dark Strokes〔深色線條〕
Ink Outlines〔油墨概況〕
Spatter〔噴筆〕
Sprayed Strokes〔噴色線條〕
Sumi
Diffuse Glow〔擴散亮光〕
Displace〔置換〕
Glass〔玻璃〕
Ocean Ripple〔海洋波紋〕
Pinch〔擠壓〕
Polar Coordinates〔極座標〕
Ripple〔波紋〕
Shear〔切變〕
Spherize〔球面化〕
Twirl〔旋轉扭曲〕
Wave〔波浪〕
Zigzag〔水波〕
Add Noise〔加入雜色〕
Despeckle〔去斑〕
Dust & Scratches〔蒙塵與劃痕〕
Median〔中間值〕
Color Halftone〔彩色半調〕
Crystallize〔晶格化〕
Facet〔彩塊化〕
Fragment〔碎片〕
Mezzotint〔銅版雕刻〕
Mosaic〔馬賽克〕
Pointillize〔點狀化〕
3D Transform〔3D 變換〕
Clouds〔雲彩〕
Difference Clouds〔分層雲彩〕
Lens Flare〔鏡頭光暈〕
Lighting Effects〔光照效果〕
Texture Fill〔紋理填充〕
Sharpen〔銳化〕
Sharpen Edges〔銳化邊緣〕
Sharpen More〔進一步銳化〕
Unsharp Mask
Bas Relief〔基底凸現〕
Chalk & Charcoal〔粉筆和炭筆〕
Charcoal
Chrome〔鉻黃〕
Conte Crayon〔彩色粉筆〕
Graphic Pen〔繪圖筆〕
Halftone Pattern〔半色調圖案〕
Note Paper〔便條紙〕
Photocopy〔副本〕
Plaster〔塑膠效果〕
Reticulation〔網狀〕
Stamp〔圖章〕
Torn Edges〔撕邊〕
Water Paper〔水彩紙〕
Diffuse〔擴散〕
Emboss〔浮雕〕
Extrude〔突出〕
Find Edges〔查找邊緣〕
Glowing Edges〔照亮邊緣〕
Solarize〔曝光過度〕
Tiles〔拼貼〕
Trace Contour〔等高線〕
Wind〔 風〕
Craquelure〔龜裂縫〕
Grain〔顆粒〕
Mosained Tiles〔 馬賽克拼貼〕
Patchwork〔拼綴圖〕
Stained Glass〔染色玻璃〕
Texturixer〔紋理化〕
De
NTSC Colors
Custom〔自訂〕
High Pass〔高反差保留〕
Maximum〔最大值〕
Minimum〔最小值〕
Offset〔位移〕
Embed Watermark〔嵌入浮水印〕
Read Watermark〔讀取浮水印〕
七、View〔視圖〕
Custom〔自定〕
Working CMYK〔處理CMYK〕
Working Cyan Plate〔處理青版〕
Working Magenta Plate〔處理洋紅版〕
Working Yellow Plate〔處理黃版〕
Working Black Plate〔處理黑版〕
Working CMY Plate〔處理CMY版〕
Macintosh RGB
Windows RGB
Monitor RGB〔顯示器RGB〕
Simulate Paper White〔模擬紙白〕
Simulate Ink Black〔模擬墨黑〕
Selection Edges〔選區邊緣〕
Target Path〔目標路徑〕
Grid〔網格〕
Guides〔輔助線〕
Slices〔切片〕
Notes〔注釋〕
All〔全部〕
None〔無〕
Show Extras Options〔顯示額外選項〕
Guides〔輔助線〕
Grid〔網格〕
Slices〔切片〕
Document Bounds〔文檔邊界〕
All〔全部〕
None〔無〕
八、Windows〔窗口〕
Cascade〔層疊〕
Tile〔拼貼〕
Arrange Icons〔排列圖示〕
Close All〔關閉全部〕
Show/Hide Tools〔顯示/隱藏工具〕
Show/Hide Options〔顯示/隱藏選項〕
Show/Hide Navigator〔顯示/隱藏導航〕
Show/Hide Info〔顯示/隱藏資訊〕
Show/Hide Color〔顯示/隱藏顏色〕
Show/Hide Swatches〔顯示/隱藏色板〕
Show/Hide Styles〔顯示/隱藏樣式〕
Show/Hide History〔顯示/隱藏歷史記錄〕
Show/Hide Actions〔顯示/隱藏動作〕
Show/Hide Layers〔顯示/隱藏圖層〕
Show/Hide Channels〔顯示/隱藏通道〕
Show/Hide Paths〔顯示/隱藏路徑〕
Show/Hide Character〔顯示/隱藏字元〕
Show/Hide Paragraph〔顯示/隱藏段落〕
Show/Hide Status Bar〔顯示/隱藏狀態列〕
Reset Palette Locations〔復位調板位置〕
資料來源: http://pigs-blood-cake.blogspot.tw/p/photoshop.html
0 notes
Text
فیلتر dust & scratches در فتوشاپ - Dust & Scratches Filter
پست جدیدی در وبسایت گرافیشا منتشر شد.
فیلتر dust & scratches در فتوشاپ - Dust & Scratches Filter
با استفاده از فیلتر dust & scratches در فتوشاپ ، می توانیم noise های موجود در تصویر را حذف کنیم. در این آموزش، مراحل استفاده از این فیلتر را می آموزیم. فیلتر dust & scratches در گروه فیلتر های noise قرار دارد. از فیلترهای دیگر این گروه، می توان فیلتر add noise، فیلتر reduce noise، فیلتر median و فیلتر despeckle را نام برد.
روش کار فیلتر dust & scratches، به این شکل است که: پیکسل هایی که مشابه هم نیستند و باعث noise می شوند، را طوری اصلاح می کند که یک تعادل بین میزان sharpen بودن آن ها و میزان نمایش (یا مخفی بودن) آن ها برقرار شود.
مراحل اعمال فیلتر dust & scratches در فتوشاپ
در پنل layers، بر روی لایه تصویر راست کلیک کرده و گزینه ی convert to smart object را می زنیم. در این صورت، وقتی که فیلتر را اعمال کردیم، می توانیم آن را تغییر دهیم و blending مربوط به آن نیز قابل تغییر خواهد بود.
از قسمت filter->noise->dust & scratches می توانیم پنجره ی مربوط به این فیلتر را باز کنیم.
در وسط پنجره، یک thumbnail از تصویر می بینیم. بهترین کار، این است که بزرگ نمایی آن را بر روی 100 درصد قرار دهیم. تا ببینیم که پیکسل ها در واقعیت به چه شکل در می آیند و نه در حالتی که ما آن ها را می بینیم.
دقت کنیم که ویژگی threshold بر روی 0 باشد ، سپس ویژگی radius را یکی یکی افزایش می دهیم تا به اندازه ی کافی از noiseهای تصویر حذف شود.
در نهایت با کم و زیاد کردن ویژگی threshold، آن را تعدیل می کنیم.
وقتی به یک تعادل رسیدیم، ok می کنیم.
تبدیل لایه تصویر به یک لایه ی 3 قسمتی بعد از اعمال فیلتر dust & scratches در فتوشاپ
بعد از اعمال فیلتر dust & scratches در فتوشاپ ، لایه ی تصویر که در ابتدا یک لایه ی یک قسمتی بود، به یک لایه ی 3 قسمتی مطابق شکل رو به رو تبدیل می شود:
خود لایه ی تصویر
یک mask بر روی آن به نام Smart Filters که اگر بخواهیم فیلترهای اعمال شده بر روی عکس را ناپدید کنیم، می توانیم بر روی آیکون چشم کنار آن کلیک کنیم.
در قسمت سوم نیز نام فیلتر اعمال شده را می بینیم. با دابل کلیک بر روی آن پنجره ی مربوط به فیلتر دوباره باز می شود و می توانیم ویژگی های فیلتر اعمال شده را دوباره تغییر دهیم.
مثالی از اعمال فیلتر dust & scratches در فتوشاپ به صورت زیر است:
آموزش کامل Effect ها، Adjustment ها، پنل ها، ابزار و فیلتر های فتوشاپ در گرافیشا.
#best photoshop filters#filters in photoshop#how to learn photoshop filters#how to use photoshop filters#how to work with photoshop filters#photoshop filters#practical photoshop filters#آموزش فتوشاپ#آموزش فیلتر dust & scratches#آموزش فیلتر dust & scratches در فتوشاپ#آموزش فیلتر dust & scratches فتوشاپ#آموزش فیلتر های بخش noise#آموزش فیلترهای فتوشاپ#آموزش فیلترهای فتوشاپ cs5#آموزش فیلترهای فتوشاپ cs6#آموزش فیلترهای فتوشاپ به زبان فارسی#آموزش مهم ترین فیلترهای فتوشاپ#آموزش نرم افزار فتوشاپ#آموزش همه فیلترهای فتوشاپ#استفاده از فیلتر های بخش noise#انواع فیلتر های noise در فتوشاپ#انواع فیلترهای فتوشاپ#پنل layers#دانلود فیلترهای جدید فتوشاپ cs6#فتوشاپ#فيلترهاي فتوشاپ#فیلتر add noise#فیلتر despeckle#فیلتر dust & scratches#فیلتر dust & scratches در فتوشاپ
0 notes