#currentdes
Explore tagged Tumblr posts
Visit Tumblr Blog
Explore Tumblr blogs with no restrictions, modern design and the best experience.
Last Seen Tumblr Blogs


Fun Fact
Tumblr is available in 18 languages.
Text
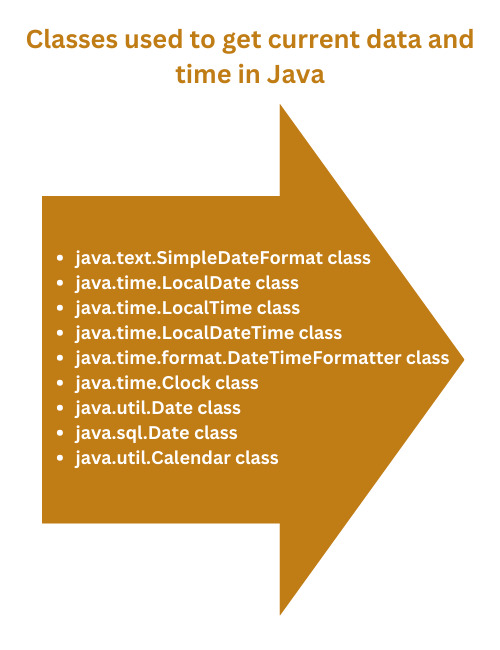
Classes used to get current data and time in Java
Let us see the classes used to get current data and time in Java:
#java#programming#javaprogramming#code#coding#engineering#computer#computerscience#computertechnology#software#softwaredevelopment#education#technology#currentdate#currenttime#date#time#online
2 notes
·
View notes
Text
Date
Calendar calendar = Calendar.getInstance(); Date currentDate = calendar.getTime(); SimpleDateFormat dateFormat = new SimpleDateFormat("MMMM d, yyyy", Locale.getDefault()); String date = dateFormat.format(currentDate); btn.setText(date);
0 notes
Text
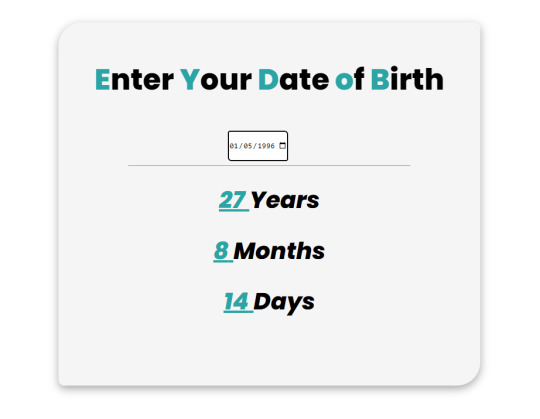
Build a Age Calculator in React framework
The provided code snippet is an example of an age calculator implemented in the React framework. It utilizes functional components and hooks to calculate and display the age based on the user's input. Here's a breakdown of the code:
Index.js FIle import React, { useState } from 'react' const Age = () => { const [birthDate, setBirthDate] = useState(""); const [date, setDate] = useState(null) const [month, setMonth] = useState(null) const [year, setYear] = useState(null) const calculateAge = (birthDate) => { if (!birthDate) return; const currentDate = new Date(); if (new Date(birthDate) > currentDate)…
View On WordPress
0 notes
Text
Ultimate Portability, Maximum Reliability: Our Top Picks for Portable Power Sources

Introduction
Portable power stations have become increasingly popular in recent years as people seek alternative power sources for their outdoor adventures or in case of emergency power outages. These devices store energy from various sources, such as solar panels, AC outlets, or car batteries, and convert it into usable electricity. Here we take a look at the best portable power stations on the market, and what to consider when purchasing one.
What to Consider When Purchasing a Portable Power Station
Before investing in a portable power station, it's important to consider a few key factors:
Capacity: The capacity determines how much power a device can store. Consider the amount of power you need for your particular needs, such as charging electronic devices, powering lights, or running a mini fridge.
Charging: The device should come with a charging cable and be able to be charged from multiple sources, such as AC outlets, solar panels, or car batteries.
Weight and Size: Depending on your needs, you may want a device that is lightweight and easy to carry or one that is more heavy-duty but comes with wheels and a handle for easy transportation.
Additional Features: Some portable power stations come with added features such as built-in LED lights, multiple AC outlets, or USB ports. Consider what additional features may be useful for your specific needs.
Top Picks for Portable Power Stations
Goal Zero Yeti 400 Lithium Portable Power Station
The Goal Zero Yeti 400 is a reliable yet rugged portable power station that has a capacity of 428Wh. It can power small appliances, charge electronics, and connect light sources. It can be charged from an AC wall outlet or a solar panel, making it highly versatile. The device also has a user-friendly LCD display that shows the battery level and consumption, and it's easy to carry thanks to its compact size and built-in handle.
MAXOAK Bluetti AC50 Portable Power Station
The MAXOAK Bluetti AC50 is a compact and lightweight portable power station that has a capacity of 500Wh. It comes with multiple charging options, including AC, car, and solar, and it can power various devices simultaneously thanks to its six outlets and four USB ports. What sets this device apart is its safety features, including overcharge, overcurrent, and short-circuit protection, making it a reliable and safe choice for any adventure.
JACKERY Explorer 1000 Portable Power Station
The JACKERY Explorer 1000 offers a substantial 1000Wh of capacity, making it one of the most powerful portable power stations on the market. It can power larger devices like mini-fridges and even a small electric grill, and it has a range of charging options, including an AC wall outlet, car socket, and solar panels. The device has a simple and intuitive interface with a digital display that shows the battery level and displays currentd power usage. The compact and lightweight design makes it perfect for outdoor adventures.
Rockpals 500 Portable Power Station
The Rockpals 500 is an affordable and reliable portable power station that has a capacity of 500Wh. It can charge up to nine devices simultaneously, and it can be charged from an AC wall outlet, car socket, or solar panel. The device has a user-friendly display that shows the remaining battery life and current output. The rugged design and easy-to-carry handle make it an excellent choice for any outdoor enthusiast.
Conclusion
Overall, there are many high-quality portable power stations on the market, each with its own unique set of features and abilities. It's important to consider your specific needs and preferences before investing in one. Whether you're embarking on a camping trip or preparing for a power outage, a reliable and efficient portable power station can provide peace of mind and ensure that your electrical devices stay powered.
Sources:
EnergySage
Outside Online
Wired
*This article is written by None. *
0 notes
Photo

This pair of line art prints by Marcus Uzilevsky are just the coolest 😍😍😍 _______ posted on Instagram - https://ift.tt/2HcUSFn
#iridiumhome#iridiuminteriors#losangeles#vintageart#marcusuzilevsky#lineart#1980s#damascus#currentdes
1 note
·
View note
Photo

Hey my lovelies, I’m back! 💕almost got my voice back after this cold, but still need time to recover. Meanwhile, just in case you missed my latest #blogpost on how to save big this week - it’s up on my blog -> #linkinbio ✨I plan to do such posts regularly, what you think of this? 🤩 #beautybloggers #beautyhacks #deals #currentdeals #offers #savings #discounts #beautyblog #houstontx #houstonblogger #shopping (at Houston, Texas) https://www.instagram.com/p/BpSGkWdAMSs/?utm_source=ig_tumblr_share&igshid=1f96chktnbou7
#blogpost#linkinbio#beautybloggers#beautyhacks#deals#currentdeals#offers#savings#discounts#beautyblog#houstontx#houstonblogger#shopping
1 note
·
View note
Note
hello! could you teach how to work with newdate? teach how to work it and infinity scroll together so the date doesn't repeat itself when you go to another page. thks ❤
If by teach you mean you want me to make a full tutorial then no sorry. If you know jquery then it's simply just:
var previousDate = 0; $('.post').each( function() { var currentDate = //current date variable; if (previousDate != currentDate) { $(this).text(currentDate); previousDate = currentDate; } });
5 notes
·
View notes
Text
selenium online training | selenium online courses
Apache Ant with Selenium and flash testing overview
When producing a full software product, numerous third-party APIs, their class route, the cleaning of previous binary executable files, the compilation of our source code, the execution of source code, the development of reports and the deployment code base, etc. You need to take care of everything. It would take an immense amount of time if these tasks are performed one by one manually, and the process will be vulnerable to errors. selenium online training
Apache ANT with Selenium
The meaning of a building tool like Ant comes here.
The benefit of creating an Ant
The application life cycle is generated by Ant, i.e. clean, compile, dependency set, run, report, etc.
The third-party API dependency can be set by Ant, i.e. the classpath of another Jar file is set by the Ant build file.
For End to End Delivery and deployment, a full application is developed.
It is a simple build tool where you can use the XML file to make all configurations and which can be executed from the command line.
As the configuration is separate from the actual application logic, it makes the code safe.
How to install Ant for installation
The following steps are taken to mount Ant in Windows
Step 1)
Download the .zip file from apache-ant-1.9.4-bin.zip to http:/ant.apache.org/bindownload.cgi
Step 2)
Unzip the folder and go to the root of the unzipped folder and copy the path.
Step 3)
Go to Start -> Machine -> right-click here and choose 'Properties' and then click Advanced Device Settings
Step 4)
This opens a new window. Click on the 'Factor Environment...' icon.
Step 5)
Click 'New...' and set the name of the variable as 'ANT HOME' and the value of the variable as the root path to the unzipped folder, and then click OK.
Step 6)
Now select the 'Path' variable from the list, and then click Edit' and add;%ANT HOME%\bin.
You can restart the machine once and now you are ready to use the Ant build tool.
Step 7)
Use the command line to verify your version of Ant:
Ant-Version Build.xml comprehension
The most critical component of the Ant compilation tool is Build.xml. For a Java project, all tasks related to cleaning, setup, compilation, and deployment are specified in this XML format file. If we use the command line or any IDE plugin to execute this XML file, all the instructions written in this file will be executed sequentially.
Inside a sample build.XML, let's understand the code.
The project tag is used to define a project name and an attribute-based on it. The foundation is an application's root directory.
● Property tags are used in the build.xml file as variables to be used in further steps.
<property name="build.dir" value="${basedir}/build"/>
<property name="external.jars" value=".\resources"/>
<property name="ytoperation.dir" value="${external.jars}/YTOperation"/>
<property name="src.dir"value="${basedir}/src"/>
● Goal tags are used as steps to be performed sequentially. The name attribute is the target's name. In a single build.xml, you can have different targets
● The path tag is used to logically bundle all files that are in the commonplace
● Path element tag sets the generic location root path where all files are stored.
● The path convert tag is used to convert all common file paths within the path tag to the classpath format of the framework.
● Used to set classpath for various third party jars in our project files tag
● The echo tag is used on the console to print text.
● The Delete tag cleans data from the designated folder
● A new directory will be created with the mkdir tag
● Used to compile java source code and transfer .class files to a new folder, javac tag
● The jar tag creates a jar file from the .class files
● The manifest tag will set your key execution class to
● The attribute 'depends' used to make one goal depend on another destination
● The java tag executes the main function from the jar created in the target compile portion.
Run Ant using the plugin Eclipse
Go to build.xml file to run Ant from eclipse -> right-click file -> Run as... -> click Build file -> right-click file -> Run as... -> click Build file
EXAMPLE:
We will take a small sample program that will very clearly demonstrate the features of Ant. Our project architecture is going to look like follows.
We have 4 goals here in this example.
Class route setting for external jars,
Clean code, previously complied with,
Compile current Java code for yourself
Run the code, run it
AntClass.class
TestAnt's package;
Java.util.Date import;
AntClass Public Class {
Static public void main(String...s){
System.out.println('HELLO PROGRAM ANT');
System.out.println("DATE IS TODAY->"+ currentDate());;"
}
Public static String currentDate(){
Fresh Date().toString() returns;;
}
}
Construct.xml
How to execute code for TestNG using Ant
Here we will construct a class using the TestNG method and set the Testing classpath in build.xml.
Now we'll create another testng.xml file to run the test method and call this file from the build.xml file.
Step 1)
In the testing kit, we build the "AntClass.class"
TestAnt's package;
Java.util.Date import;
Org.testng.annotations.Test imports;
AntClass Public Class {
The @Test
AntTestNGMethod(){{ Public Void
System.out.println('HELLO PROGRAM ANT');
System.out.println("DATE IS TODAY->"+ currentDate());;"
}
Public static String currentDate(){
Fresh Date().toString() returns;;
}
}
Step 2)
Construct a target for this class to be loaded into Build.xml
Step 3)
Create testng.xml
Testng.xml for checking
rg/testng-1.0.dtd" ">
Step 4)
In Build.xml, create a Target to run this TestNG code.
Step 5)
Absolute Build.xml Complete
Selenium Ant with Web driver:
We have discovered so far that we can place all third-party jars in a specific place in the system using ANT and set their direction for our project. Using this approach, we set all of our project's dependencies in a single place and make it more stable for compilation, execution, and deployment.
Similarly, we can easily discuss selenium dependency in build.xml for our testing projects using selenium, and we don't have to manually add a classpath to our program.
So now you can disregard the conventional way to set classpaths for the project listed below.
EXAMPLE:
The previous example we are going to change is
Step 1)
In the resource folder, set the selenium. jars property to a selenium-related container.
Step 2)
Add the selenium files to the set classpath target
Step 3)
Build.xml Com
Step 4)
Update the previously generated AntClass.java class to a new code.
TestAnt's package;
The java. util.List import;
Org.openqa.selenium.By import
Org.openqa.selenium.WebDriver Import;
Org.openqa.selenium.WebElement Import;
Org.openqa.selenium.firefox.FirefoxDriver importation;
Org.testng.annotations.Test imports;
AntClass Public Class {
The @Test
AntTestNGMethod(){{ Public Void
Driver for WebDriver = new FirefoxDriver();
driver.get;
List listAllCourseLinks = driver.findElements(By.xpath("/div[@class='canvas-middle']/a"));););
For(WebElement WebElement: listAllCourseLinks){ WebElement WebElement: listAllCourseLinks
System.out.println(webElement.getAttribute("href"));
}
}
}
Step 5)
The production after successful execution looks like this.
Flash testing varies from other component components
Flash is a technology that is obsolete. Capturing a flash-object is challenging as it is distinct from HTML. Flash is also an embedded SWF file that is (Small Web Format). Accessing Flash artifacts on a mobile device is often challenging.
Flash creation is more complex than SEO (Search Engine Optimization) HTML page development because flash is not completely readable by the search engine. Advanced technologies such as HTML 5 are, however, applied to solve problems such as performance and security.
Check it with the flash application.
There are two methods of testing Flash Applications:
Manual
By running test cases manually, you can test the Flash object as it is quick and easy to test. You ensure that the flash works properly as planned after bug fixation and provide sign-off.
Automation:
Use any automation method such as Selenium, SoapUI, TestComplete, etc to write a script and execute the script.
Conclusion
The key difference between flash and other elements, as described above is that Flash is embedded in SWF files, while other elements are embedded in HTML files. This is why, compared to flash, HTML is simple to catch. You can learn more about Ant build and flash test in selenium through Selenium online training.
#selenium online training#selenium online courses#selenium online training Hyderabad#selenium online training India#selenium with java online training#best selenium course online#selenium testing course online
2 notes
·
View notes
Text
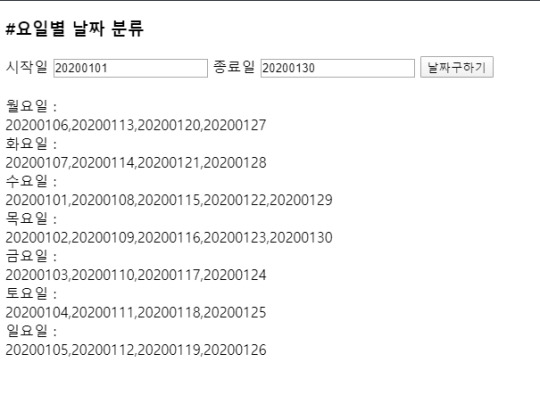
[JAVASCRIPT]요일별 날짜분류
#설명
시작일, 종료일을 입력하면 시작~종료일 사이에 있는 모든 날짜들을 요일별로 분류하는 스크립트 이다.
#TAG
javascript, jquery, html
#HTML
<h3>#요일별 날짜 분류</h3> <lavel>시작일</lavel><input type="text" id="sDate"><lavel>종료일</lavel><input type="text" id="eDate"><button id="execute">날짜구하기</button> <br><br><lavel>월요일 :</lavel><div id="mon"></div> <lavel>화요일 :</lavel><div id="tue"></div> <lavel>수요일 :</lavel><div id="wed"></div> <lavel>목요일 :</lavel><div id="thu"></div> <lavel>금요일 :</lavel><div id="fri"></div> <lavel>토요일 :</lavel><div id="sat"></div> <lavel>일요일 :</lavel><div id="sun"></div>
#JAVASCRIPT, JQUERY
var weeks = ["sun","mon","tue","wed","thu","fri","sat"]; var kWeeks = ["일","월","화","수","목","금","토"]; var lang = "en"; $("#execute").on("click",function(){ var sDate = $("#sDate").val(); var eDate = $("#eDate").val(); if(sDate != "" && eDate != ""){ if(lang == "ko") { kWeeks.forEach(function(wk) { var results = getWeeks(sDate,eDate,wk,lang); $("#"+wk).text(results.toString()); }); }else if(lang == "en"){ weeks.forEach(function(wk) { var results = getWeeks(sDate,eDate,wk,lang); $("#"+wk).text(results.toString()); }); } } }); // 시작일 ~ 종료일 에서 특정요일의 일자를 배열로 리턴 function getWeeks(sDate,eDate,week,lang){ var resultWeeks = new Array(); var dates = getDates(sDate,eDate); dates.forEach(function(date) { var strDate = parseDateToStr(date); var conditionWeek = getWeekday(strDate,lang); if(conditionWeek == week){ resultWeeks.push(strDate); } }); return resultWeeks; } // 해당일의 요일 구하기 function getWeekday(mdate,lang){ var yy = parseInt(mdate.substr(0,4), 10); var mm = parseInt(mdate.substr(4,2), 10); var dd = parseInt(mdate.substr(6,2), 10); var d = new Date(yy,mm -1, dd); if(lang == "ko"){ return kWeeks[d.getDay()]; } else if(lang == "en"){ return weeks[d.getDay()]; } else { return weeks[d.getDay()]; } } // 두날짜사이의 날짜 배열로 리턴 function getDates(sDate, eDate) { var startDate = parseStrToDate(sDate); var endDate = parseStrToDate(eDate); var dates = [], currentDate = startDate, addDays = function(days) { var date = new Date(this.valueOf()); date.setDate(date.getDate() + days); return date; }; while (currentDate = width ? n : new Array(width - n.length + 1).join('0') + n; }
#실행결과
#jsfiddle
https://jsfiddle.net/Kimby91/v0je427c/8/
1 note
·
View note
Text
Console.WriteLine(vbCrLf + "What is your name? ") Dim name = Console.ReadLine() Dim currentDate = DateTime.Now Console.WriteLine($"{vbCrLf}Hello, {name}, on {currentDate:d} at {currentDate:t}") Console.Write(vbCrLf + "Press any key to exit... ") Console.ReadKey(True)
4 notes
·
View notes
Text
During the commutation period in 3 phase converter, overlap time is____________?
During the commutation period in 3 phase converter, overlap time is____________?
A. Dependent on the load currentB. Dependent on the voltageC. Dependent on both the load current and load voltage behind the short circuit currentD. Independent on both the load current and load voltage
View On WordPress
0 notes
Text
Date setup

এইভাবে কোড লিখতে পারেন ।
কোডঃ
Calendar calendar = Calendar.getInstance();
Date currentDate = calendar.getTime();
SimpleDateFormat dateFormat = new SimpleDateFormat("MMMM d, yyyy", Locale.getDefault());
String date = dateFormat.format(currentDate);
btn.setText(date);
0 notes
Text
How to Create Custom Pipe in Angular 13 Application

Pipe tutorial for Angular 12; In this tutorial, we'll learn about Angular's default and custom pipes. Angular comes with a plethora of built-in Pipes that can help you solve a variety of programming issues while designing a single-page web application.
We'll also learn how to build custom Angular Pipe from the ground up. Let's get started without further hesitation:
Angular 13 Pipe Example
- Working with Angular Pipes
- Angular Built-in Pipes
- Creating Custom Pipe in Angular
Getting Started
Pipes are incredibly important when it comes to managing data within interpolation " | ", and we'll talk about them in Angular. Pipes were once known as filters in Angular, but they are now known as Pipes.
The letter | can be used to alter data. The syntax for the same can be found below.
{{ i will become uppercase one day | uppercase }} Dates, arrays, texts, and integers are all acceptable inputs for pipes. | is used to separate inputs. Before being shown in the browser, the inputs will be transformed into the desired format. We'll take a look at a few pipe-related instances. We're attempting to show the given text in uppercase in the given example. You'll be able to do that with the use of pipes, as demonstrated below — The convertText variable is defined in the app.component.ts file - app.component.ts import { Component } from '@angular/core'; @Component({ selector: 'app-root', templateUrl: './app.component.html', styleUrls: }) export class AppComponent { convertText: string = "I Am Being Managed By Pipes"; } The following code section can be found in the app.component.html file. app.component.html {{convertText | lowercase}}
{{convertText | uppercase}}
Angular Built-in Pipes
Angular Pipes allow you to rapidly recreate data in your Angular app. Angular has a built-in Pipes API that allows you to quickly change your data. You may also use it to make custom Pipes in your app. Let's take a look at some of the most helpful Angular Pipes. Built-in Angular Pipes - Async Pipe - Currency Pipe - Date Pipe - Slice Pipe - Decimal Pipe - Json Pipe - Percent Pipe - LowerCase Pipe - UpperCase Pipe
How to Use Built-in Pipes in Angular 13
Let's see how we may make advantage of the built-in Angular pipes. 1. Async Pipe When obtaining data in the form of observables, the Async pipe is regarded the best technique. The async pipe automatically subscribes to an Observable/Promise and returns the values delivered. {{ users.name }} 2. Currency Pipe The angled currency pipe allows you to convert numbers between different currencies. import { Component } from '@angular/core'; @Component({ selector: 'app-root', template: ` Currency Pipe {{ itemPrice | currency:'USD':true }}
{{ itemPrice | currency:'EUR':true}}
{{ itemPrice | currency:'INR' }} ` }) export class AppComponent { itemPrice: number = 5.50; } 3. Date Pipe In Angular, the date pipe is used to format the Date. import { Component } from '@angular/core'; @Component({ selector: 'app-root', template: ` Date Pipe {{ currentDate | date:'fullDate' }}
{{ numDateFormat | date:'medium' }}
{{ getYear | date:'yy' }}
{{ getTime | date:'Hm' }} ` }) export class AppComponent { currentDate = Date.now(); numDateFormat = 1478496544151; getYear = 'Tue Dec 12 2018 11:20:18 GMT+0530'; getTime = 'Wed Jan 20 2019 12:20:18 GMT+0530'; } 4. Slice Pipe In Angular, the Slice pipe API creates a subset list or string. {{ users }} 5. Decimal Pipe In Angular, the Decimal pipe is used to format decimal numbers. CommonModule in Angular has issues with the Decimal Pipe API. import { Component } from '@angular/core'; @Component({ selector: 'app-root', template: ` Decimal Pipe {{myNum1 | number}}
{{myNum2 | number}} ` }) export class AppComponent { myNum1: number = 7.4364646; myNum2: number = 0.9; } 6. Json Pipe The JSON pipe API allows an Angular app to expose an object as a JSON string. Behind the scenes, it complements the JSON.stringify function. {{ objectName | json }} 7. Percent Pipe In Angular, the Percent pipe API converts an integer to its percentage value. import { Component } from '@angular/core'; @Component({ selector: 'app-root', template: ` LowerCase & UpperCase Pipe A: {{numA | percent}} B: {{numB | percent:'4.3-5'}} ` }) export class AppComponent { numA: number = 0.349; numB: number = 2.4595; } 8. LowerCase & UpperCase Pipe In an Angular app, lowercase or uppercase pipes help format text to lower or upper case. import { Component } from '@angular/core'; @Component({ selector: 'app-root', template: ` LowerCase & UpperCase Pipe {{convertText | lowercase}}
{{convertText | uppercase}} ` }) export class AppComponent { convertText: string = "I Am Being Managed By Pipes"; }
How to Create Custom Pipe in Angular 13
Let's look at how we can make a custom pipe now. Run the following command in Angular CLI to construct a custom pipe to count words: ng g pipe wordcount After running the command in Angular CLI, this is how it will look. ng g pipe wordcount # CREATE src/app/wordcount.pipe.spec.ts (199 bytes) # CREATE src/app/wordcount.pipe.ts (207 bytes) # UPDATE src/app/app.module.ts (433 bytes) This command will automatically generate the files wordcount.pipe.ts and wordcount.pipe.spec.ts, as well as update the app.module.ts file. app.module.ts import { BrowserModule } from '@angular/platform-browser'; import { NgModule } from '@angular/core'; import { AppComponent } from './app.component'; // Custom Pipe imported here by Angular CLI import { WordcountPipe } from './wordcount.pipe'; @NgModule({ declarations: , imports: , providers: , bootstrap: }) export class AppModule { } Now, utilizing the PIPE API service, let's construct a logic for word counting in a string in Angular. Use the code below to open the wordcount.pipe.ts file. import { Pipe, PipeTransform } from '@angular/core'; @Pipe({ name: 'wordcount' }) export class WordcountPipe implements PipeTransform { transform(value: any, args?: any): any { return value.trim().split(/s+/).length; } } app.component.ts import { Component } from '@angular/core'; // Usage of wordcount pipe within interpolation @Component({ selector: 'app-root', template: ` Word Counter Pipe in action below
{{ customText | wordcount }}
` }) export class AppComponent { customText: string = "Java is to JavaScript what car is to Carpet."; } I hope you will like the content and it will help you to learn How to Create Custom Pipe in Angular 13 Application If you like this content, do share. Read the full article
0 notes
Text
SAP BusinessObjects Web Intelligence 4.3 C_BOWI_43 Questions and Answers
In order to help you pass your C_BOWI_43 SAP Certified Application Associate - SAP BusinessObjects Web Intelligence 4.3 exam, PassQuestion has created high-quality SAP BusinessObjects Web Intelligence 4.3 C_BOWI_43 Questions and Answers for the preparation to achieve high score in you SAP C_BOWI_43 exam. Make sure that you are using all the SAP C_BOWI_43 Questions and Answers that will allow you to improve the preparation level before attempting a real exam. After using SAP BusinessObjects Web Intelligence 4.3 C_BOWI_43 Questions and Answers created by certified professionals, you will be able to clear SAP C_BOWI_43 exam on your first attempt.
C_BOWI_43 Exam Description - SAP Certified Application Associate - SAP BusinessObjects Web Intelligence 4.3
The "SAP Certified Application Associate - SAP BusinessObjects Web Intelligence 4.3" certification exam verifies that the candidate possesses proven skills and fundamental knowledge of SAP BusinessObjects Web Intelligence 4.3 to create and maintain queries and reports that will help organizations analyze and interpret important information. This exam will measure the candidate's knowledge of SAP BusinessObjects Web Intelligence 4.3, from the creation of queries and design of reports to the analysis of data and document sharing. This verifies that the candidate is able to implement this knowledge practically in projects under guidance of an experienced consultant.
Exam Information
Exam Code:C_BOWI_43 Exam Name: SAP Certified Application Associate - SAP BusinessObjects Web Intelligence 4.3 Exam:80 questions Cut Score:69% Duration:180 mins Languages:English, French
Topic Areas
Presentation of Data in Documents > 12% Query Filters > 12% Web Intelligence Query Creation and Usage > 12% Web Intelligence Document Design > 12% Web Intelligence Formulas and Variables > 12% BI Launch Pad and Web Intelligence > 12% Web Intelligence Document Formatting 8% - 12% Web Intelligence (Concepts) < 8% Drilling Functionality < 8%
View Online SAP BusinessObjects Web Intelligence 4.3 C_BOWI_43 Free Questions
How does WHERE operator affect a formula? A.It adds the dimension to the default context. B.It removes the dimension from the default context. C.It determines the order of the results. D.It restricts the dimension used to calculate a measure. Answer : D
How do you access the Format Table option? A.Right click the footer of the table B.Right click the column header of the table C.Right click the border of the table D.Right click the data of the table Answer : C
What happens when you create a section in a report? (2 answers) A.Blocks in the report are repeated for each section value. B.Page breaks are created to divide each section value C.Header and footer cells are created for each section value. D.Free-standing cells are created to label each section value. Answer : A, D
How does SAP recommend you print a Web Intelligence document to ensure the document layout is preserved? A.Export the document to a PDF file and print the PDF file. B.Export data to a CSV file and print the CSV file. C.Use the print option in the browser D.Use the Print Screen button on your keyboard Answer : A
You have two columns: order date and ship date. How do you calculate the processing time from the order date to the ship date? A.Use the 'daynumberofyear' function after subtracting both dates. B.Use the 'daysbetween' function with order date and ship date. C.Use the 'currentdate' function and subtract the ship date. D.Use the 'isdate' function on both dates and subtract the dates. Answer : B
0 notes
Photo

Happy Independence Day! 🇺🇸 What are you guys up to? 😍😍 To celebrate this holiday in style, I compiled a list of current deals from top brands and stores! Make sure to check my link in bio( Current Deals), because sales are up to 75% off 🤗😍 #july4th #happyfourthofjuly #4thofjuly #holidaysales #sales #currentdeals #the4th #thefourth #discoverunder5k #houstonblogger #houstontx https://www.instagram.com/p/BzgjjUbDwj-/?igshid=2vit102f0ncv
#july4th#happyfourthofjuly#4thofjuly#holidaysales#sales#currentdeals#the4th#thefourth#discoverunder5k#houstonblogger#houstontx
0 notes
Link
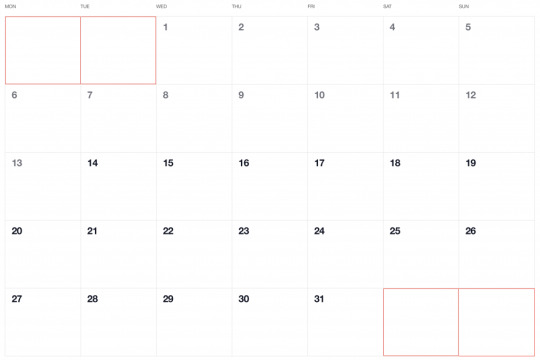
Have you ever seen a calendar on a webpage and thought, how the heck did they did that? For something like that, it might be natural to reach for a plugin, or even an embedded Google Calendar, but it’s actually a lot more straightforward to make one than you might think. Especially when we use the component-driven power of Vue.
I’ve set up a demo over at CodeSandbox so you can see what we’re aiming for, but it’s always a good idea to spell out what we’re trying to do:
Create a month view grid that displays the days of the current month
Display dates from the previous and next months to so the grid is always full
Indicate the current date
Show the name of the currently selected month
Navigate to the previous and next month
Allow the user to navigate back to the current month with a single click
Oh, and we’ll build this as a single page application that fetches calendar dates from Day.js, a super light utility library.
Step 1: Start with the basic markup
We’re going to jump straight into templates. If you’re new to Vue, Sarah’s introduction series is a nice place to start. It’s also worth noting that I’ll be linking to the Vue 2 docs throughout this post. Vue 3 is currently in beta and the docs for it are subject to change.
Let’s start with creating a basic template for our calendar. We can outline our markup as three layers where we have:
A section for the calendar header. This will show components with the currently selected month and the elements responsible for paginating between months.
A section for the calendar grid header. A table header that holds a list containing the days of the week, starting with Monday.
The calendar grid. You know, each day in the current month, represented as a square in the grid.
Let’s write this up in a file called CalendarMonth.vue. This will be our main component.
<!-- CalendarMonth.vue --> <template> <!-- Parent container for the calendar month --> <div class="calendar-month"> <!-- The calendar header --> <div class="calendar-month-header" <!-- Month name --> <CalendarDateIndicator /> <!-- Pagination --> <CalendarDateSelector /> </div> <!-- Calendar grid header --> <CalendarWeekdays /> <!-- Calendar grid --> <ol class="days-grid"> <CalendarMonthDayItem /> </ol> </div> </template>
Now that we have some markup to work with, let’s go one step further and create required components.
Step 2: Header components
In our header we have two components:
CalendarDateIndicator shows the currently selected month.
CalendarDateSelector is responsible for paginating between months.
Let’s start with CalendarDateIndicator. This component will accept a selectedDate property which is a Day.js object that will format the current date properly and show it to the user.
<!-- CalendarDateIndicator.vue --> <template> <div class="calendar-date-indicator"></div> </template> <script> export default { props: { selectedDate: { type: Object, required: true } }, computed: { selectedMonth() { return this.selectedDate.format("MMMM YYYY"); } } }; </script>
That was easy. Let’s go and create the pagination component that lets us navigate between months. It will contain three elements responsible for selecting the previous, current and next month. We’ll add an event listener on those that fires the appropriate method when the element is clicked.
<!-- CalendarDateSelector.vue --> <template> <div class="calendar-date-selector"> <span @click="selectPrevious">﹤</span> <span @click="selectCurrent">Today</span> <span @click="selectNext">﹥</span> </div> </template>
Then, in the script section, we will set up two props that the component will accept:
currentDate allows us to come back to current month when the “Today” button is clicked.
selectedDate tells us what month is currently selected.
We will also define methods responsible for calculating the new selected date based on the currently selected date using the subtract and add methods from Day.js. Each method will also $emit an event to the parent component with the newly selected month. This allows us to keep the value of selected date in one place — which will be our CalendarMonth.vue component — and pass it down to all child components (i.e. header, calendar grid).
// CalendarDateSelector.vue <script> import dayjs from "dayjs"; export default { name: "CalendarDateSelector", props: { currentDate: { type: String, required: true }, selectedDate: { type: Object, required: true } }, methods: { selectPrevious() { let newSelectedDate = dayjs(this.selectedDate).subtract(1, "month"); this.$emit("dateSelected", newSelectedDate); }, selectCurrent() { let newSelectedDate = dayjs(this.currentDate); this.$emit("dateSelected", newSelectedDate); }, selectNext() { let newSelectedDate = dayjs(this.selectedDate).add(1, "month"); this.$emit("dateSelected", newSelectedDate); } } }; </script>
Now, let’s go back to the CalendarMonth.vue component and use our newly created components.
To use them we first need to import and register the components, also we need to create the values that will be passed as props to those components:
today properly formats today’s date and is used as a value for the “Today” pagination button.
selectedDate is the currently selected date (set to today’s date by default).
The last thing we need to do before we can render the components is create a method that’s responsible for changing the value of selectedDate. This method will be fired when the event from the pagination component is received.
// CalendarMonth.vue <script> import dayjs from "dayjs"; import CalendarDateIndicator from "./CalendarDateIndicator"; import CalendarDateSelector from "./CalendarDateSelector"; export default { components: { CalendarDateIndicator, CalendarDateSelector }, data() { return { selectedDate: dayjs(), today: dayjs().format("YYYY-MM-DD") }; }, methods: { selectDate(newSelectedDate) { this.selectedDate = newSelectedDate; } } }; </script>
Now we have everything we need to render our calendar header:
<!-- CalendarMonth.vue --> <template> <div class="calendar-month"> <div class="calendar-month-header"> <CalendarDateIndicator :selected-date="selectedDate" class="calendar-month-header-selected-month" /> <CalendarDateSelector :current-date="today" :selected-date="selectedDate" @dateSelected="selectDate" /> </div> </div> </template>
This is a good spot to stop and see what we have so far. Our calendar header is doing everything we want, so let’s move forward and create components for our calendar grid.
Step 3: Calendar grid components
Here, again, we have two components:
CalendarWeekdays shows the names of the weekdays.
CalendarMonthDayItem represents a single day in the calendar.
The CalendarWeekdays component contains a list that iterates through the weekday labels (using the v-for directive) and renders that label for each weekday. In the script section, we need to define our weekdays and create a computed property to make it available in the template and cache the result to prevent us from having to re-calculate it in the future.
// CalendarWeekdays.vue <template> <ol class="day-of-week"> <li v-for="weekday in weekdays" :key="weekday" > </li> </ol> </template>
<script> const WEEKDAYS = ["Mon", "Tue", "Wed", "Thu", "Fri", "Sat", "Sun"]; export default { name: 'CalendarWeekdays', computed: { weekdays() { return WEEKDAYS } } } </script>
Next is CalendarMonthDayItem. It’s a list item that receives a day property that is an object, and a boolean prop, isToday, that allows us to style the list item to indicate that it’s the current date. We also have one computed property that formats the received day object to our desired date format (D, or the numeric day of the month).
// CalendarMonthDayItem.vue <template> <li class="calendar-day" :class="{ 'calendar-day--not-current': !isCurrentMonth, 'calendar-day--today': isToday }" > <span></span> </li> </template>
<script> import dayjs from "dayjs"; export default { name: "CalendarMonthDayItem", props: { day: { type: Object, required: true }, isCurrentMonth: { type: Boolean, default: false }, isToday: { type: Boolean, default: false } }, computed: { label() { return dayjs(this.day.date).format("D"); } } }; </script>
OK, now that we have these two components, let’s see how we can add them to our CalendarMonth component.
We first need to import and register them. We also need to create a computedproperty that will return an array of objects representing our days. Each day contains a date property and isCurrentMonth property.
// CalendarMonth.vue <script> import dayjs from "dayjs"; import CalendarMonthDayItem from "./CalendarMonthDayItem"; import CalendarWeekdays from "./CalendarWeekdays";
export default { name: "CalendarMonth", components: { // ... CalendarMonthDayItem, CalendarWeekdays }, computed: { days() { return [ { date: "2020-06-29", isCurrentMonth: false }, { date: "2020-06-30", isCurrentMonth: false }, { date: "2020-07-01", isCurrentMonth: true }, { date: "2020-07-02", isCurrentMonth: true }, // ... { date: "2020-07-31", isCurrentMonth: true }, { date: "2020-08-01", isCurrentMonth: false }, { date: "2020-08-02", isCurrentMonth: false } ]; } } }; </script>
Then, in the template, we can render our components. Again, we use the v-fordirective to render the required number of day elements.
<!-- CalendarMonth.vue --> <template> <div class="calendar-month"> <div class="calendar-month-header"> // ... </div> <CalendarWeekdays/> <ol class="days-grid"> <CalendarMonthDayItem v-for="day in days" :key="day.date" :day="day" :is-today="day.date === today" /> </ol> </div> </template>
OK, things are starting to look good now. Have a look at where we are. It looks nice but, as you probably noticed, the template only contains static data at the moment. The month is hardcoded as July and the day numbers are hardcoded as well. We will change that by calculating what date should be shown on a specific month. Let’s dive into the code!
Step 4: Setting up current month calendar
Let’s think how we can calculate the date that should be shown on a specific month. That’s where Day.js really comes into play. It provides all the data we need to properly place dates on the correct days of the week for a given month using real calendar data. It allows us to get and set anything from the start date of a month to all the date formatting options we need to display the data.
We will:
Get the current month
Calculate where the days should be placed (weekdays)
Calculate the days for displaying dates from the previous and next months
Put all of the days together in a single array
We already have Day.js imported in our CalendarMonth component. We’re also going to lean on a couple of Day.js plugins for help. WeekDay helps us set the first day of the week. Some prefer Sunday as the first day of the week. Other prefer Monday. Heck, in some cases, it makes sense to start with Friday. We’re going to start with Monday.
The WeekOfYear plugin returns the numeric value for the current week out of all weeks in the year. There are 52 weeks in a year, so we’d say that the week starting January 1 is the the first week of the year, and so on.
Here’s what we put into CalendarMonth.vue to put all of that to use:
// CalendarMonth.vue <script> import dayjs from "dayjs"; import weekday from "dayjs/plugin/weekday"; import weekOfYear from "dayjs/plugin/weekOfYear"; // ...
dayjs.extend(weekday); dayjs.extend(weekOfYear); // ...
That was pretty straightforward but now the real fun starts as we will now play with the calendar grid. Let’s stop for a second a think what we really need to do to get that right.
First, we want the date numbers to fall in the correct weekday columns. For example, July 1, 2020, is on a Wednesday. That’s where the date numbering should start.
If the first of the month falls on Wednesday, then that means we’ll have empty grid items for Monday and Tuesday in the first week. The last day of the month is July 31, which falls on a Friday. That means Saturday and Sunday will be empty in the last week of the grid. We want to fill those with the trailing and leading dates of the previous and next months, respectively, so that the calendar grid is always full.
Adding dates for the current month
To add the days of the current month to the grid, we need to know how many days exist in the current month. We can get that using the daysInMonth method provided by Day.js. Let’s create a computed property for that.
// CalendarMonth.vue computed: { // ... numberOfDaysInMonth() { return dayjs(this.selectedDate).daysInMonth(); } }
When we know that, we create an empty array with a length that’s equal to number of days in the current month. Then we map() that array and create a day object for each one. The object we create has an arbitrary structure, so you can add other properties if you need them.
In this example, though, we need a date property that will be used to check if a particular date is the current day. We’ll also return a isCurrentMonth value that checks whether the date is in the current month or outside of it. If it is outside the current month, we will style those so folks know they are outside the range of the current month.
// CalendarMonth.vue computed: { // ... currentMonthDays() { return [...Array(this.numberOfDaysInMonth)].map((day, index) => { return { date: dayjs(`${this.year}-${this.month}-${index + 1}`).format("YYYY-MM-DD") isCurrentMonth: true }; }); }, }
Adding dates from the previous month
To get dates from the previous month to display in the current month, we need to check what the weekday of the first day is in selected month. That’s where we can use the WeekDay plugin for Day.js. Let’s create a helper method for that.
// CalendarMonth.vue methods: { // ... getWeekday(date) { return dayjs(date).weekday(); }, }
Then, based on that, we need to check which day was the last Monday in the previous month. We need that value to know how many days from the previous month should be visible in the current month view. We can get that by subtracting the weekday value from the first day of the current month. For example, if first day of the month is Wednesday, we need to subtract three days to get last Monday of the previous month. Having that value allows us to create an array of day objects starting from the last Monday of the previous month through the end of that month.
// CalendarMonth.vue computed: { // ... previousMonthDays() { const firstDayOfTheMonthWeekday = this.getWeekday(this.currentMonthDays[0].date); const previousMonth = dayjs(`${this.year}-${this.month}-01`).subtract(1, "month"); const previousMonthLastMondayDayOfMonth = dayjs(this.currentMonthDays[0].date).subtract(firstDayOfTheMonthWeekday - 1, "day").date(); // Cover first day of the month being sunday (firstDayOfTheMonthWeekday === 0) const visibleNumberOfDaysFromPreviousMonth = firstDayOfTheMonthWeekday ? firstDayOfTheMonthWeekday - 1 : 6; return [...Array(visibleNumberOfDaysFromPreviousMonth)].map((day, index) = { return { date: dayjs(`${previousMonth.year()}-${previousMonth.month() + 1}-${previousMonthLastMondayDayOfMonth + index}`).format("YYYY-MM-DD"), isCurrentMonth: false }; }); } }
Adding dates from the next month
Now, let’s do the reverse and calculate which days we need from the next month to fill in the grid for the current month. Fortunately, we can use the same helper we just created for the previous month calculation. The difference is that we will calculate how many days from the next month should be visible by subtracting that weekday numeric value from seven.
So, for example, if the last day of the month is Saturday, we need to subtract one day from seven to construct an array of dates needed from next month (Sunday).
// CalendarMonth.vue computed: { // ... nextMonthDays() { const lastDayOfTheMonthWeekday = this.getWeekday(`${this.year}-${this.month}-${this.currentMonthDays.length}`); const nextMonth = dayjs(`${this.year}-${this.month}-01`).add(1, "month"); const visibleNumberOfDaysFromNextMonth = lastDayOfTheMonthWeekday ? 7 - lastDayOfTheMonthWeekday : lastDayOfTheMonthWeekday; return [...Array(visibleNumberOfDaysFromNextMonth)].map((day, index) => { return { date: dayjs(`${nextMonth.year()}-${nextMonth.month() + 1}-${index + 1}`).format("YYYY-MM-DD"), isCurrentMonth: false }; }); } }
OK, we know how to create all days we need, so let’s use them and merge all days into a single array of all the days we want to show in the current month, including filler dates from the previous and next months.
// CalendarMonth.vue computed: { // ... days() { return [ ...this.previousMonthDays, ...this.currentMonthDays, ...this.nextMonthDays ]; }, }
0 notes