#crochet diagram
Explore tagged Tumblr posts
Visit Tumblr Blog
Explore Tumblr blogs with no restrictions, modern design and the best experience.
Last Seen Tumblr Blogs


Fun Fact
In February 2021, Tumblr had 518.6 million blog accounts.
Text
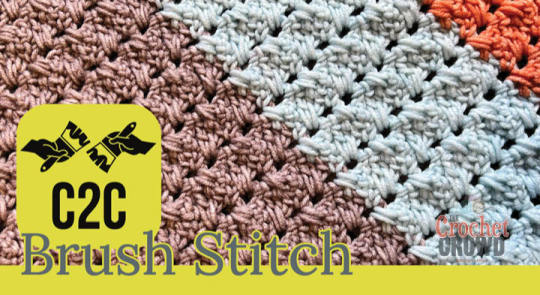
NEW Corner to Corner C2C Crochet Brush Stitch
Mikey developed a stitch combination called the Brush Stitch. Crochet diagonally with lines going in the opposite direction. The stitch is similar to the corner-to-corner with different anchoring points. The stitching causes space to appear, and the space is going in the opposite direction, which looks like eyelets. Very easy to understand once you get your mind wrapped around it. The stitching…
View On WordPress
#Blanket#Bush Stitch#C2C#Corner to Corner#Crochet Brush Stitch#Crochet Diagram#Crochet Stitch#Crochet Tutorial
5 notes
·
View notes
Text
Another bonus to learning a fiber art is being able to speak to others in a Lovecraftian language that nobody else understands...
...and also being able to read things like THIS:
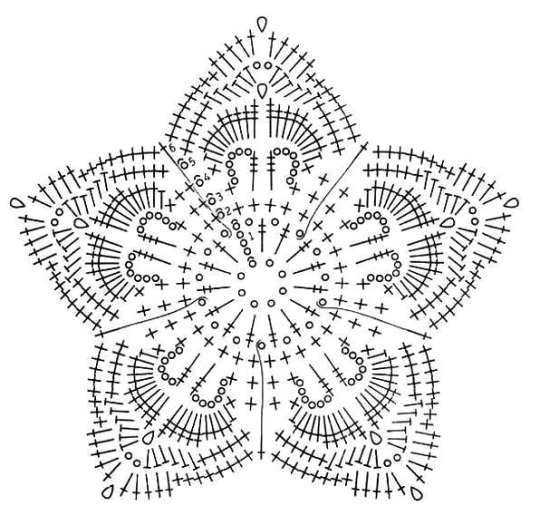
#art#crochet#fiber art#described images#image description in alt#used a crochet pattern for this because it's just INSANE#see i can recognize some of these stitch markings but i haven't done them all yet#i actually kind of prefer the diagram pattern because it actually shows you the shape and the way stitches compliment the piece#with a 'normal' pattern (e.g. 1 dc in fifth ch from hook ch 2 4 dc) i understand it sure but. it isn't the same.#i was reading somebodys recommendations for tapestry yarn and understood all the abbreviations and what they mean#plus i feel like diagrams can be a great way to teach you not only how stitches look but how they contribute to the larger piece#one of my crochet proficiency goals is to be able to look at a piece and know instantly what made it#*cue me at the store analyzing a crochet piece so i can replicate it for 5× the cost*#if you're selling a crocheted piece for like $20 then it's my imperative to replicate it and not buy it 🫡#i think that has the same moral implication as like... 'proplifting'#did crochet as the example because thats what i do as a fiber art. if theres a similar thing for knit/weave/ect then DROP IT BELOW I BEG YO#i want to learn all the lovecraftian languages of the fiber artists <3#i feel like describing the image in exactly what stitch marking indicates what would have been too much so hopefully the explanation as to..#...what the diagram DOES and how it visually indicates a pattern was helpful <3
850 notes
·
View notes
Text
All my current worries about how much this bag will shrink would have been allayed had I felted a swatch.
Yet, did I felt a swatch ? No. Will I felt a swatch next time ? Probably not.


Working on a wheelchair bag again. My first two were always intended to be replaced, as they were just prototypes. Hopefully this one will be more permanent.
Idk if my notes and vague diagrams are readable at all, but I've been really thinking this one thru. Or trying to, anyway. My other two wheelchair bags have not included a way to cover the contents, which was a poor choice that I am now reaping the consequences of (everything gets wet when it rains). So the flaps are a new element that I'm not sure of, but I think will be necessary. Also will be lining it in black felt from a thrifted and then felted merino sweater. Actually, it was already a little felted when I got it. Probably why it was donated in the first place. I just felted it way way more.
Kinda worried about running out of yarn actually. And about the bag turning out small.


#the problem with felting swatches is im felting them using the washing machine bc thats also how i will felt the FO#which means several extra trips down the stairs#i havent fallen yet but i have at least one close call every single time#so i dont fuckin wanna ! but then also. the worries.#crochet#handspun yarn#crochet bag#wheelchair bag#powerchair user#watching a cubfan stream. drawing diagrams while watching live improv redstone is fun#idk how tf he does redstone live and without planning. and it works like first time#i could never
46 notes
·
View notes
Text


crochet guides from 'good shephard fingering yarns and their use,' elsa schappel barsaloux, 1917.
26 notes
·
View notes
Text
Maybe I did this to myself but it does irk me when people see me knitting and they ask who it’s for and I say it’s for me and the immediate reaction is “you should sell it” yeah… let me spend at least a week’s worth of my free time making an item I like, want, and would wear just to sell it on etsy, making at most a £2 profit on materials and not being compensated for my time whatsoever 👍🏻
#i say maybe i did this to myself because historically i have gifted most of the items i have knitted#because the venn diagram of things i like to knit vs things i like to wear is actually 2 circles that don’t touch#i looove making hats. i HATE wearing hats#also i love making baby clothes but i don’t have a baby and i’m not going to have a baby#however lately i’ve gotten really into knitting socks and i really like to wear knit socks. it’s like the most affordable way for me to get#quality wool socks. and i’m going to be watching my shows anyway. the time will pass anyways#but it feels like people are deliberately making me feel weird for wanting to make stuff for myself and not profit off my hobby#and like i’ve made 3 pairs of socks to gift already because ‘tis the season or whatever. and i’ve started another pair for a friend whose#birthday is in january#genuinely it’s very weird to hear ‘you should sell it’ or ‘oh i want one!!’ about an item i’m making for myself. after 18 years of gifting#or donating basically everything i’ve ever knitted. like i’ve gifted 2 double bed size crochet blankets#everyone i’ve known who’s had a baby has gotten a cardigan or a blanket or hats or all of the above#i spent october making poppies for the church. i’ve never even stepped foot in my village church mind you. my neighbour asked me to help#do you know what i own? that i’ve knitted? a pair of mittens and a pair of socks.#you want some socks from me? alright. that’s anywhere between £6 and £10 for the yarn and that’s optimistic#i’m currently making myself a pair with hand-dyed yarn that cost me £18 including delivery#the needles i use cost me more than £10. time… let’s call it 24 hours per sock#i don’t know anyone with 18 years experience who makes minimum wage so let’s call it an even 600 for my time. tbh#DO YOU SEE how this isn’t a viable side hussle??? i physically cannot charge what my socks are worth#if i like you and you’re willing to wait; socks are free or cost whatever the yarn costs#if i don’t like or know you venmo me £620. and you’re still going to have to wait.#just pisses me OFF when people suggest i make an etsy page and they say it like they’re doing me a favour or giving me great financial#advice. like you’ve seen me sitting here all evening and i’m barely done with the cuff.. do you actually think selling these for £20 maximum#is going to help me out. i’m not selling them. they’re FOR me. i’m making them because i want them#also when my friend’s family was saying this to me and i was like ‘well the yarn cost a fiver’ and they got quiet and i was thinking yeah…#a fiver is the maximum you cheapskates would pay isn’t it. a fiver is cheap sock yarn bought on sale. or yarn that probably isn’t actually#good for socks. like don’t presume to give me financial advice when you’re this out of touch with the market please#next person who asks when i’m going to start selling socks is getting this whole rant in entirety tbh i don’t care anymore#personal#edited to add that i didn’t even get into etsy fees or whether i would even be noticed among the mountain of dropshippers LOL
9 notes
·
View notes
Text


Slowly getting bigger. I'm only working on it about once every week or two, so it's going to take a while to finish. Soon though, I should be able to start the second skein. Pattern is "For" from Hooked On Sunshine.
#birdy crochets things#this is my first hooked on sunshine pattern and it's been an interesting experience#it's been pretty easy so far though sometimes i wish it came with diagrams#between pain and taking care of partner and multiple doctor's appointments i just can't focus for long#I'm really hoping i can get back to my other yarns this year
4 notes
·
View notes
Text

Yes im a bereal user i think it’s so fun to see what my friends are doing. and im glad i am. i love having these random photos of myself Truly in the trenches over men on my tv 🫶
#its all about love. all of it#personal#me.jpg#Dont look at the folded laundry on the back of the couch i put it away after the game. (the pper is a crochet diagram)
2 notes
·
View notes
Text
*staring at a garment project I’ve been crocheting since March* Maybe it’ll look right once I block it.
#did I do a gauge swatch?#technically yes but it didn’t really…make sense#so I gave up and just went at it#guess what! that project looks funky#in my defense tho! there is not a SINGLE photo that actually shows what the piece looks like laid flat#not one#it’s all different folds on models and one diagram that does t match the pattern#WAIT I JUST LOOKED AT IT#I BET I HAVE A ROW COUNT OFF#and I am willing to bet it was the pattern and not me#I’ve already found a few errors in the pattern#the one person I could ask about this who isn’t my mother is the person I’m making this for 😂#and mom is busy#ugh#anyone wanna facetime me 😂😂😂#crochet
17 notes
·
View notes
Text

in case you were wondering what i've been doing this evening instead of typing out fic
9 notes
·
View notes
Text
p.s.
daily:
- 20 swimming laps OR 30min running (minimum)
reminders:

#p.s.#img#ref#the chain of connection#on love: body and soul apart#of burning hearts#empty-chested#video#archive#religion#priya#sw#n#quote#diagram#my stuff#crochet#woven heartstrings#snapshots of the future#x files#plushie#quiz#mental health#asks#love letters#angels of summer#judas tag#lookbook
4 notes
·
View notes
Text
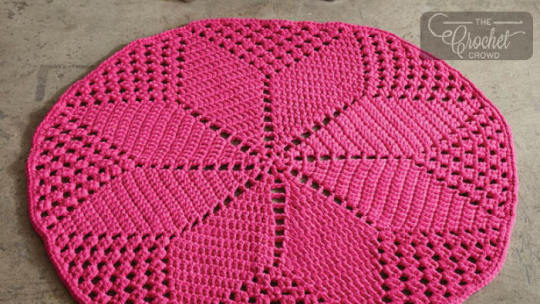
Crochet Daisy Diamond Rug Pattern
Crochet Daisy Diamond Rug Crochet Daisy Diamond Rug I made one of these Crochet Daisy Diamond Rug Patterns for our cats. Cats are attracted to circles and we strategically placed this in our home. I made mine with T-Shirt yarn that was about the same thickness as 4 plies of Lily Sugar’n Cream yarn put together for the thickness. Riverstone loved her rug. Her safe spot to sit and keep off the cold…
View On WordPress
#4 Yarn#cotton#Crochet Daisy Diamond Rug Pattern#Crochet for Floor#crochet mat#crochet rug#Crochet Tutorial#Daisy#Daisy Diamond Rug#Diagram#Floor Coverings Crochet Floor Coverings#flower rug#mat#Rug
4 notes
·
View notes
Text
I've been SCOURING the internet looking for a good pattern for crochet lace gloves because I want to make pairs of gloves like they wear in Bridgerton. I've been crocheting a mock-up based off the best pattern I could find but it still wasn't what I wanted and I was trying to adapt it without much success.
While looking for something I emailed to myself like 2 years ago for another project, I found out that almost exactly a year ago I had emailed myself the PERFECT crochet lace glove pattern. Apparently I never actually opened the email after sending it.
God my past self is so helpful sometimes.
#crochet#bridgerton#now let's hope that the thing i ACTUALLY am looking for in my emails is there#it's a diagram for the embroidery project i'm doing. i put all the colors i wanted to use for which parts#and i can't remember it because it's been literally 2.5 years since i last worked on it#until this week when i picked it up again. so i really hope i can find the diagram.#i own all the colors. i just don't know what i intended to put where.#update: i went to save the pattern in my crochet patterns folder so i don't forget about it being in my email again.#it's already in my crochet patterns folder.#god i'm stupid#thanks past self for looking out for me and saving it in both my email and my actual computer files#too bad my present self can't remember anything to save my life
3 notes
·
View notes
Text
Okay so I had an idea like a week ago and-

It's idea-ing! I think? Probably
#the idea was me realizing i havent made a doily in a little while and decided to incorporate my newly acquired cb brainrot into that somehow#okay okay the ACTUAL idea is vague at best#but its currently just making a key doily in the color of each key as we actually see them in the comic#and then idk sewing them all together into some kind of wall art or something probably#anyway ive never made a filet crochet diagram#and the first much smaller one i made didnt work#so fingers crossed#lee speaks
1 note
·
View note
Text
occasionally they are like pastry patterns but missing the number of hours you should ideally let the pastry rest (missing any indication of stitch count except what you can scrounge from various ever changing abbreviations) and sometimes the amount of butter listed in the ingredients list is different to the amount listed when the step actually comes (what the pattern says the stitch count should be but despite unravelling and reravelling you find you are always the same number off, without making any mistakes, hence the pattern is wrong) AND YET they still expect the pastry to be perfect
Some knitting patterns are like pastry recipes* and some are more like soup recipes**.
Normally, I knit soup, but I’m knitting pastry at the moment and it is a different experience.
*follow these instructions exactly
**here is one way to make soup, but you can always just use this as a jumping off point and add whatever’s in your fridge and you will still get soup
#knitting rant#I’m looking at you#paid commercial patterns#with the free patterns I get it like there’s no reason for you to meticulously check#but if I’m paying and especially if it’s a big company I do expect the stitch count to line up#don’t even get me started on crochet patterns#is the first stitch the turning chain or does it not count?#please say if you are using uk or us terms#stitch diagrams need keys
1K notes
·
View notes
Text
also. I forgot how to hdc. bc of course.
0 notes
Text
my sister is a biochem major and she suggested to help me come up with the realistic morphology and evolution of my oc loopy, the scary 8 foot tall star head guy…. i’m so excited
#i want to like draw a bunch of fake scientific diagrams of him and shit lmao#she crocheted me a loopy doll and ever since then she’s loved him as much as me ❤️#she wants to crochet a big poofy blue sweater like he wears and with his head on the back#and she didn’t want to tell me her idea bc she wants it for herself LMAO#well now she has to make two 😁💪#she’s the best everypony#lorim.txt
0 notes