#colored version of this with alternate messaging coming when the bracket is done :]
Explore tagged Tumblr posts
Visit Tumblr Blog
Explore Tumblr blogs with no restrictions, modern design and the best experience.
Last Seen Tumblr Blogs


Fun Fact
Premium Tumblr themes are available from anywhere between $9 to $49.
Text

AND I'M THINKING THAT THEY MUST HAVE MISSED THE POINT HOLD ON, WE JUST HOLD ON FOR AN EXIT
hey! you! go vote for Pearl's Alien Landscape in the @mcyt-builds-contest today!
(and shoutout to @fallow-foot -- thanks for letting me use your Extraction design for Postmaster Pearl!)
#yt#art#orig#mcyt builds contest#pearlescentmoon#hermits#extraction#colored version of this with alternate messaging coming when the bracket is done :]
70 notes
·
View notes
Text
“Figure Skating Fan” Magazine 2018-2019「羽 から生まれる」Translation
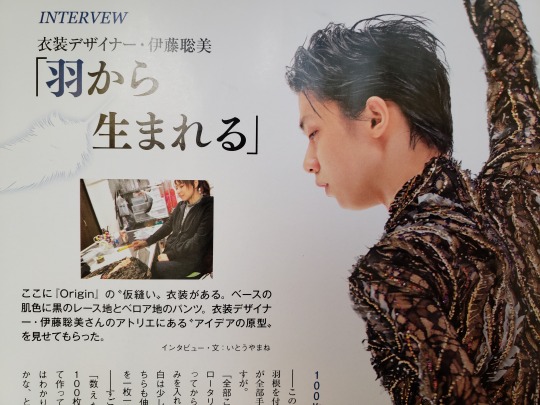
This is the interview with costume designer Satomi Ito on the construction of Yuzuru Hanyu’s Origin (and a little on Otoñal) costume featured on pages 42-43 of the February issue of フィギュアスケートファン (Figure Skating Fan) magazine released Dec. 22, 2018.
I’m formatting this to resemble the original formatting in the magazine.
Words after a long dash ------ are the interviewer talking/asking questions.
Words in「Japanese quotation marks」are Satomi’s responses.
Where text color changes for emphasis, I’ve used bold italics.
The interviewer tends to put technical terms, concepts, and key words in “quotations”. Which means:
When they bring up titles of literature, program names, and quoted phrases, those are in 『blocky quotes』instead.
Anything within (parenthesis) was originally in parenthesis within the article.
[words between brackets are my translator’s notes]
Following English conventions, I’m writing her name as Satomi Ito. For reference in Japanese: 伊藤聡美 いとうさとみ Itou Satomi The interviewer/writer is いとうやまね (Itouyamane) - a writer unit composed of Itou Miho and Yamane Seiji.
I’ve left the honorifics. They refer to Yuzuru as “Hanyu-senshu” (athlete Hanyu) throughout the entire article. -senshu is the respectful term for athletes. -san is the general honorific (Mr./Ms./Mrs.).
---------------------------------------- I agonized over capturing the ways they said certain phrases, but even so, I’m just an amateur translator, which means there are some turns of phrase I probably could have translated better. I originally wrote this all by hand, so there’s no Japanese transcription typed up, but if you’d like a specific section to see what exactly they said, send me an ask or a message and I’ll be happy to type that up. For more learning, sewing/fabric/technical terms will have a glossary at the bottom, along with various notes.

INTERVIEW[<---the original text is actually in English, but misspelled as INTERVEW]
Costume Designer・Satomi Ito
「羽 から生まれる」Born from feathers
Here is Origin’s “temporary-stitched”[baste-stitched] costume. Black lace on a flesh-toned base, and velour pants. In costume designer Satomi Ito-san’s atelier, she let’s us see the “idea’s prototype.” Interview/text: Itou Yamane
100 feathers
-----Black and white feathers are being attached to the lace on the upper body, aren’t they! Although it’s surprising that the feathers are all handmade.
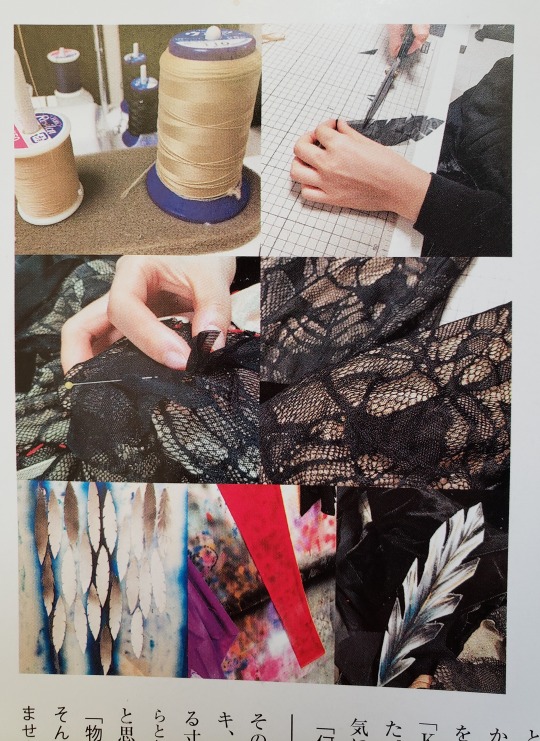
「I made all of them here. First, I cut leaf shapes with a rotary cutter, then I cut into the sides with scissors. The black is [made of] PowerNet, the white is a 2-way with a bit of thickness. Both are fabrics with elasticity. One by one, I would sew this by hand.」
-----It must be a large number of feathers isn’t it?
「I wasn’t counting, but it’s probably around 100. I don’t know the exact number of feathers that I’ve cut each and every time. I’ll feel like “it’s not quite enough, huh” so they increase. The entire weight is light, though.」
-----When I first saw what Hanyu-senshu was to wear, a structure, or should I call it a construction?, I thought “it’s like an architectural structure.” By way of intricate three dimensionality, there’s a sense of great depth.
「I’m doing that quite consciously. If you just simply put the feathers down it won’t feel very 3D, so I kind of group creases to make it feel like the feathers float. When it’s just right, I pin it.」
-----As for the white feathers, there’s also a gradation on the front side, huh.
「The appearance would be too jarring if white abruptly appears on the black fabric, so I put in a bit of airbrushing. Filling just the center part with black. Furthermore, there’s factoring in the sketch too. Whatever pattern there is. I’d try and put it on the [mannequin] torso and it’s like let’s place this feather on this area.」
-----You do the airbrushing on the styrene boards by the wall, right?
「I’ll fasten with pins. Lining up a large quantity.」
-----On these boards, numerous......starting from Hanyu-senshu, [Shoma] Uno-senshu, [Marin] Honda-senshu, [Wakaba] Higuchi-senshu, [Mai] Mihara-senshu, and others. Thinking about the airbrushing for the various costumes, I’m deeply moved. I thought “is this fine art”?
「It’s not. (laughs)」
-----The inlet-like form of the chest is wonderful isn’t it. I was impacted by the inlet being composed of black feathers.
「To start, I cut the lace on the chest area roughly, then apply the feathers there. In the middle of that process, I also cut hole shapes here and there in the lace. It’s a sense of torn holes.」
-----Also on the lace itself there’s an intricate pattern of light-and-dark, furthermore, you make light skin-tone portions. This is the secret of “depth” isn’t it.
「And I put feathers on top of that. I’m pretty interested in this technique. Of all the costumes I’ve made for Hanyu-senshu so far, this one is my favorite.」
-----The curves on the back are also technical. The detailed flow of gold is beautiful. It’s a little terrifying.
「I kind of thought it’d be nice if it looks a bit bone-y. I could do lines which run along the shoulder blades. Then in addition the crawling-like gold stones and bugle beads, and putting in purple rhinestones too.」
-----At the sketch stage, did you have an image for the white feathers? 「At first I was thinking of just black feathers. But because that didn’t really stand out, I kind of thought maybe adding in white feathers would better bring out the “sense of feathers being attached.” I’m glad I did put them in.」
-----It’s effective. The amount and arrangement are also nice.
「As for the design image, the [costume’s] flow changed a little. The result: I was correct that the feeling of ascending/rising would come out more than before. Entering production, I mostly don’t look at the design image. I won’t know the full picture not putting it on the [mannequin] torso and making it. Although because there is the initial image, there are times where I do more-or-less stick to it. That’s why the completed piece isn’t faithful to the sketch.」
The concept is from the “surname”
-----As for these costumes, for stuff like attaching feathers, or setting rhinestones, to give some examples, was there an assistant?
「For 『Origin』, the craftsmanship is brutal, so I did it all myself. For the Short [Program] 『Otoñal』 I received help.」
-----This is about the part most essential to a designer. Can we say that the design’s concept comes from Hanyu-senshu’s “surname”?
「『The nonhuman born of feathers』. All along I’ve thought I want to make a costume with that theme. This time it came true.」
-----Hanyu-senshu feels superhuman doesn’t he. He’s not an ordinary human. Shae-Lynn Bourne also said as much.
「The Hanyu name, isn’t that by itself cool? The song’s starting pose too, it has the air of spreading one’s wings. Although I knew absolutely nothing of the choreography, so having the image link pretty well was surprising.」
-----I thought you must have heard the concept for the choreography beforehand. It seems Shae-Lynn conceived it from the 『Kojiki』. Without establishing some [sort of] story and image with the choreography, the world won’t unfold, I heard.
「Design is like that too, isn’t it. With nothing, you can’t create. That is the same. Hanyu-senshu is Hanyu-senshu, so he likely has yet other different ideas.」
Each Individual 『Origin』
-----From this one piece various worlds unfold, it’s wonderful isn’t it. I as well, from the concept 『born from feathers』and the 『Kojiki』information, researched various things on birds coming from Japan’s creation myths. I also more-or-less tried reading the English version『KOJIKI』. Because I was interested in how it’s conveyed to foreigners.
「Was there something?」
-----Quite a lot of birds appear. Within those, the black Yatagarasu and the golden kite, after that I came across the egret that Yamato Takeru, on the cusp of death, metamorphosed into and flew away. I thought “this is nice,” and I wrote it in the [article] column.
「There’s a story nature to it, right? Exactly. Although, I didn’t consider it to that extent when I designed [it] (laughs).」
-----Hanyu-senshu himself likely wasn’t thinking of the『Kojiki』either. I think it’s good that the performer, creator, narrator, and fans each have their own 『Origin』. As for the design check-in, did you send the image to the person himself [Yuzuru]?
「This time, because I was able to take the time to meet personally with Hanyu-senshu, the design image and fabric were shown at the place to him himself. As for baste-stitching, it’s done when he’s in Japan at ice shows and such.」
-----What about the final fitting?
「That’s also just before he flies to the actual competition. The product delivery itself is passed on through the manager.」
-----About how long did it take to design and construct the costumes this time around?
「The ornamentation alone takes 1-2 weeks. From design to product delivery it takes about 2 months. For 『Origin』 the image solidified relatively quickly, but the Short kinda ended up taking a lot more time.」
-----The blue of the Short is pretty too, isn’t it. Rather than fall, [it’s] winter-like. The crackling line of rhinestones is characteristic.
「It’s the image of ice crystallization. And you can also see it as the tracings left by blades on the rink. He’s the champion of the ice, so I thought it would be nice if [the costume] could have that symbolization. Because he’s the young noble of the ice.」
-----We can say the fundamental [costume]order was the blue and black-gold of the tributes’ original designs from Johnny Weir-san and Plushenko-san, but could you also be making alternate versions?
「The Short and Free each have two [costumes]. The B version too is a similar feel.」
-----I’m looking forward to the day we can see those too. First off, wishing for Hanyu-senshu’s return from his injury.
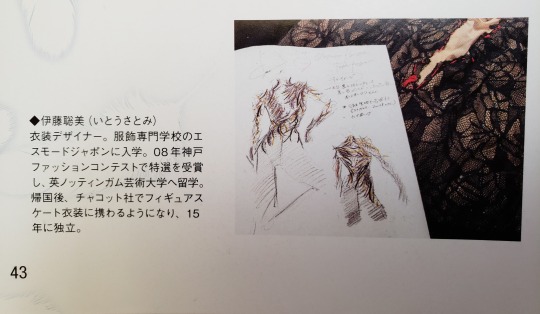
(Itou Satomi) Costume designer. [After high school] enrolled in the Esmod Japon school of fashion and design. The ‘08 Kobe Fashion Contest special choice award winner, studied abroad at England’s Nottingham Trent University School of Art & Design. After her return, [while] at Chacott she came to be engaged in figure skating costumes; [has been] independent for 15 years. --------------------------------------------------------------------------------
Glossary/Notes:
Baste-stitching - a temporary loose stitching to hold the pieces of fabric together while the initial form and alterations are being made.
PowerNet fabric/PowerNet mesh fabric - a type of high compression 4-way stretch fabric
2-way fabric - fabric that stretches in 2 directions, meaning it has some elasticity (4-way fabric stretches in all four directions)
bugle beads - the thin tube-like beads often associated with embroidery
the title of the article 羽から生まれる“Born from feathers” or “Born of feathers” is a pun on Yuzuru’s last name: 羽生
In a previous interview, Satomi talked to Itou Yamane about her past work focusing on fashion as architectural structures, and deciding which kind of architectural design to use as a motif. Which is why the interviewer brings up “structure, or should I say construction?, architectural structure”
I translated this 王者 as “champion,” because it’s slightly different from the court title “king”王様. Satomi is giving reasoning behind her expression of ice crystallization - saying that he’s a champion (“ouja”) of the ice, then adding further: “because he’s the young noble of the ice”- which would sound a bit odd and redundant if she had just called him a “king.”
Yamato Takeru and the egret - "isn’t it a swan?” The Japanese text is 白鳥 which normally would mean “swan”(hakuchou), but in parenthesis the interviewer clarifies the reading as “しらとり” (shiratori). It seems the white bird that’s referred to as 白鳥 in the Kojiki and Nihonshoki is considered to be referring to the bird 白鷺 (shirasagi) in modern Japanese. Here’s a site (JP only) about the myth, with pics of the shrine.
the interviewer tweeted pics too
The column that the interviewer mentions, I think they’re talking about how they wrote down the birds to mention in this interview column itself. They’ve written various pieces before for magazines and online articles, and they published a book last year called 氷上秘話―フィギュアスケート 楽曲・プログラムの知られ���る世界 (secrets on the ice - knowing the world behind figure skating songs and programs). They dig up information on the music, art, design, history, and legends (basically, an entire meta book on theories and relevant links), and shed light on the actual choreography and program’s concept. So it’s possible they could be writing something else too.
I want to include photos of the full two pages, but I feel that’s probably something I shouldn’t do... so I’ll wait a while longer and then edit this post.
#satomi ito#interview#figure skating#yuzuru hanyu#origin#otonal#my translation#translation#フィギュアスケートファン#figure skating fan magazine#itouyamane#itou yamane#magazines
325 notes
·
View notes
Text
How To Start Your Car With Your Cell Phone
How to start your car from your phone?
Introduction:
In this article I will show you how to start your car from your cell phone. I already had a car starter installed in my truck years ago but the range was terrible and you had to press the button for a precise amount of time, otherwise it would just ignore it. So instead of pressing a button all day long from 10 feet away I decided I wanted to start my truck from anywhere in the world! I built this a few years ago, and some newer products have come out that integrate cell phones with vehicles, but this still works for older vehicles, and can also be adapted to many other kinds of appliances as well.

This isn't just limited to vehicles. Many DIY types have attached these to their cabin's furnace, aircraft pre-heaters, irrigation pumps on farms, servers, routers, and all sorts of other appliances and electronics.
Parts required:
Parts:
-GSM activated relay. This device will contain a SIM chip that can connect to the GSM cell phone network. It's relays must be able to be activated by phone call or text message. In my first build I used a GSM-AUTO, but found a cheaper alternative on eBay for the Quad Band version (North America) or the Dual Band (Europe, Asia, etc.). it costs around $150 which has 7 relays. Another alternative is to purchase from the online store called Relay Supply. One relay is controlled by phone call and the rest are activated by text message. The relays can be set as either momentary or latched.
-Car Starter Key Fob (the remote control thing on your keychain).
-12V DC cigarette power cord
-Small plastic bag or ESD bag.
-A few wires.
Tools:
-A few screw drivers -Soldering Iron
Step 1:
Begin with canabalizing the key fob. Instead of consuming one of my existing remotes, I turned to eBay. I found the model number of mine on the back. Its an Auto Start 05-A433. I entered this in on eBay and up popped a bunch of used key fobs that are compatible with my system. WARNING: Some of these remotes may look exactly like the one you want but they come in many revisions. Some revisions are not compatible with others. If you are not sure which to buy on eBay, try buying one new online.
You will have to sync your remote with your car starter. As all car starters and car starter installations are different, I won't go into detail on how to do this. Whoever installed your car starter can usually do it for a fee but I strongly recommend you Google for the models manual as its a rather simple process. It usually involves either depressing the hood pin in a particular fashion (a pin that detects if your hood is popped), or pressing a button on the side of the remote starters brain under your dash.
Now remove any screws from the case and pry it apart. The circuit inside and battery are not secured in any way and came out easily.
Step 2:
Find the button that corresponds to the "start" button on your remote. Some remotes can require a combination of buttons to be pressed in a certain order, or multiple buttons pressed at the same time. This can be accomplished by soldering up two connections that are both wired through the relay (for multiple button presses) or a capacitor can be added to time delay one of buttons.
The contact in the center of this picture is already powered. When a user pushes the button, the connection is made between the interlocking contacts (they look like interlocking letter E's) and the starter signal is sent. We will be soldering one wire to each corner of the contact. This takes a great deal of precision to ensure that you do not join the two contacts.
Step 3:
Next, solder a wire onto each connector that supplies power to the remote. Color coding the wires is a good idea. This remote takes a small but powerful 12V battery. Note that if your remote can not handle this high of voltage (some cigarette lighters can pump out around 15V so be sure that the remote can handle this), you will have to continue using the existing battery.
Step 4:
The GSM Relay has 7 relays. The first is controlled by phone call. When called, the relay will open for a set amount of time that can be programmed into the device by text message. Mine is set for 1200 milliseconds.
I would recommend wiring the power cables into the device first. Take the 12V DC cigarette power cord and strip the ends of the cables and slide the cable through one of the ports on the side of the device. These ports can be tightened to ensure the device is weather proof. I fed the wire through the port closest to the power connector, but if your wires are higher gauge this can be difficult. Consider running the wire through the far port. The remote key fob will remain inside the device and its wires will not be run through on of the ports.
GND (ground) is clearly marked as the top most connector. Wrap the negative (black) wire from your remote key fob around the negative cigarette power connector wire and feed it into the GND connector. Screw it down tightly to ensure a solid connection.
Wrap the positive (red) wire from your remote key fob around the positive cigarette power connector wire and insert it into the +12V connector on the GSM device. Screw it down tightly and test both wires for looseness.
Step 5:
Next, run the wires from our "start" button into the relay controlled by phone calls. Each relay is simply a pair, with the first relay being controlled by phone call, and the rest being controlled by text message. Push the wires into each connector and screw them down tightly. Remember, the remote will reside within the GSM devices case, so do not run the wire through one of the case ports.
Once this is done, consider sliding a small plastic bag or ESD bag over the remote key fob to prevent any shorts.
Step 6:
Slide back the metal bracket covering the SIM chip holder to allow it to pop up. Insert the SIM chip as shown and press it down again, securing the metal bracket to hold it down.
The GSM device has 3 LED's on it:
-One for network connectivity. This LED won't turn on for the first 10 seconds, and then will blink quite fast when the device initializes. The rapid blinking means its searching for a network to connect to. Once it establishes a connection (this will only occur if the SIM chip is a valid one and the device is in GSM range), the light will blink much slower, indicating that the connection has been made.
-One for indicating power status (blinks regularly to indicate it is powered).
-One for indicating TX or RX. Whenever the device receives or sends a text message/phone call, this light will flash.
Connect the device to your vehicles cigarette lighter! The power LED should be flashing, as should the network LED. Once the device achieves network connectivity, the flashing of the network LED should slow down.
Step 7:
Programming the device is simple. I have attached a PDF to this Instructable containing the instructions. To quickly add a phone number to the list of valid phone numbers that can call the device (also called a white list), send the following text message to the device:
#PWD123456#WHL01=0001112222
PWD is the password (which can be changed), and WHL01 is the first position in the white list. If you wanted to add a second number you would use WHL02, etc. and so forth.
The phone number to be entered should contain the area code and regular phone number with no dashes. Occasionally the international country code must be prepended to the start of the number, but try without this first.
Call the device and the first relay should loudly clack open and closed for 300 milliseconds (default length of time). The device will never pick up the phone call; rather it merely checks whether that phone number is in its white list, and then either ignores it or acknowledges it. It usually activates itself on the second ring and causes you to hear two rings to occur quickly one after another when it activates.
youtube
0 notes