#click for higher quality on my stupid big canvas
Explore tagged Tumblr posts
Visit Tumblr Blog
Explore Tumblr blogs with no restrictions, modern design and the best experience.
Last Seen Tumblr Blogs


Fun Fact
There are dozens of funny blogs to kill time on Tumblr.
Text

Doodling with some random star brushes
#also the good pen#I love this inking brush so much I swear#doodle moons to heal the souls#fnaf daycare attendant#moondrop#they're on Clip Studio Paint btw - just search for 'star' and you'll find all of em#I think the bottom right stars are my fave#DEF gonna use the top right ones for something tho#click for higher quality on my stupid big canvas#crows sketchbook
179 notes
·
View notes
Text

hi sweetheart;; first of all i’m really sorry for the delay in answering this question, i was sorta busy today, so thank you for waiting so long! and secondly, i really hope you were looking for a tutorial fnoawiefoawf bc that’s what i’m gonna give you!!
edit: this got fairly long because i included pictures and did my best to explain everything in detail !!! i hope it made sense and that you like it!!
edit edit: also, the ask wouldn’t let me use the read more option so i’m having to do it the hardway :[ sorry about that!
so the process is fairly simple, all you really need is:
photoshop
whatever pic you’re using
so, firstly, open the image in photoshop, and while the image layer is selected, go to ‘Select > Select and Mask’ (or ALT + CTRL + R)

a window like this will open up:
in the dropdown window titled ‘View,’ select whichever one will be easier for you. personally i tend to go with ‘Overlay’ because its the easiest option to distinguish what has been selected and what hasn’t (for me at least.) plus, you can change the colour of the overlay if it’s too hard to see so i find it the most useful!

so now, using the tools on the left, you can mask your object out of the background.

the Quick Selection Tool is great for large areas of the same colour, as it’s a going to find pixels that are largely similar and select those. the Refine Edge Brush Tool is good for areas that are very fine and thin, things like hair can be masked using this. the Brush Tool is much like a paint brush and you can control exactly what you’re masking. the Lasso Tools (both freehand and polygonal ones) are good for large areas that aren’t specific in shape, rather getting a whole area. the Hand Tool is to move around the canvas. and the Zoom Tool is to oiawnefoaneiw well... zoom...
anyway, so i usually use a combination of the quick selection tool + the brush tool. i use the quick selection to get the major areas that i want, and then i use the brush tool to be more precise and specific in my selection.
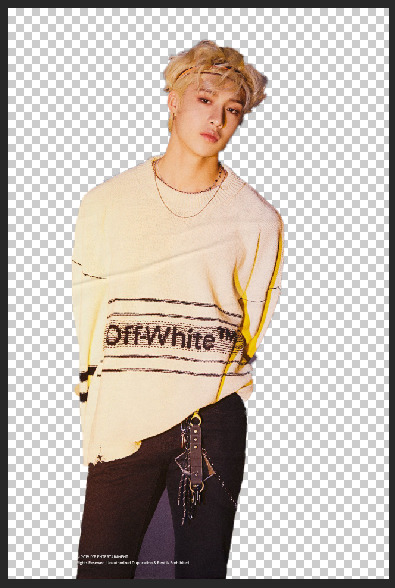
the above image is using just the quick selection tool, it gets the major areas that i want, but as you can see there are certain places (between his legs, his hair, etc) that aren’t very accurate. for the purposes of my icon, i don’t really need anything below his shoulders, so i wouldn’t worry anything there. rather, now i’d use the brush tool to be more accurate with my selection.
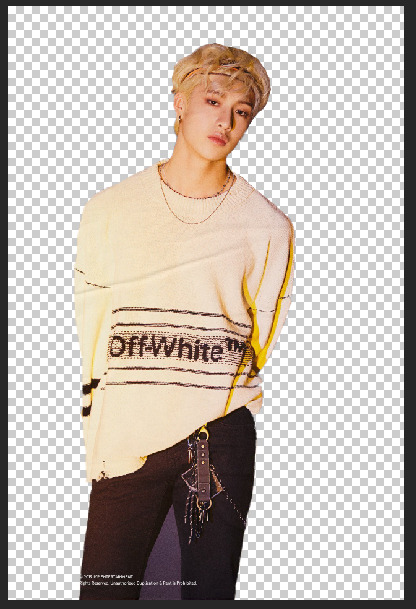
(this is fairly rough oaiwnefoainefoawn but you get the basic idea!!!)
ok so now, on the Properties panel on the right, if you scroll down, you can play with the adjustments. i rarely use these because i try to mask my image as carefully as i can so i have a fairly clean and cut image, but if you’d like to you can!

so, with the ‘Output Settings,’ in the dropdown menu ‘Output To:’ i’d either pick: ‘New Layer’, or ‘New Layer with Mask’. the ‘New Layer’ option will simply open up the masked image in a new layer and nothing else. the ‘New Layer with Mask’ option will open up a new version of your image but with a layer mask. a layer mask is simply a cover that goes over the layer and hides parts of the image from being seen. i usually use the second option because it’s easier to find mistakes and fix them, rather than going back and doing your masking all over again! so again its up to you! but if you’re happy with your selection then go ahead and use ‘New Layer’ as the output option. then hit ‘OK’
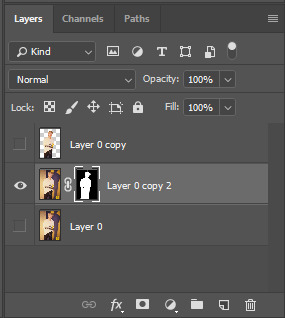
as you can see, in the layers panel, the first layer is what ‘Output to New Layer’ would look like, whereas the second layer would be ‘Output to New Layer with Mask.’ to keep fixing the mask, you’d just double click on the mask, and that will open up the select and mask panel again!
okay, so now, back to the image, you want to select the area that you’re going to be use for the icon, whether that be the whole image or in this case part of the image. (you can do this step right at the beginning tbh, it’ll save you time if you’re not trying to mask everything perfectly, but i tend to do more of the image than i think i’ll need in case i want to tilt the image or smth!)
using the rectangular marquee tool, i’d select what area i want, and then (making sure you’re on the correct layer) copy that part of the image.

once copied, go ‘File > New’ or ‘CTRL+N’

this panel will open up, and you can chose your specifications from here. i tend to go 500x500pixels but in this case my original image was about 754 pixels so i did that by itself, and made a square as my new canvas. depending on how good quality your image will result in higher or lower amt of pixels, which will in turn give you a different size to work with. so when you have the proportions hit ‘Create’

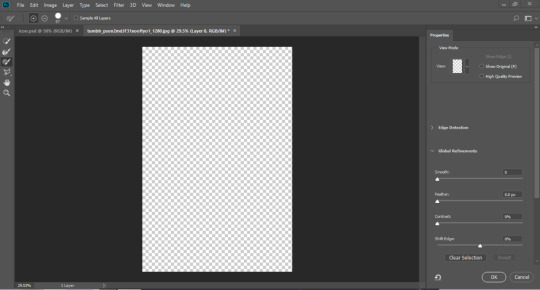
you’ll get a new blank canvas like this

go ahead and delete the white layer so you’re left with a transparent canvas (you can do this from the creating a new page panel but oaoifnwaoife i never do it i’m Big Stupid..... anyway...
so now, paste the image on this screen and resize as needed.

now, set that layer to invisible by clicking the little eye beside the layer. now, selecting the ‘Elipse Tool,’

click on the screen and you should get a window that looks like this:

click ‘OK’ and this is what your screen should look like
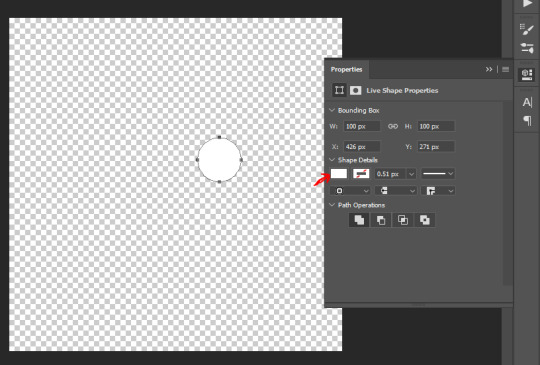
so, you can change the colour of the shape by using the square i’ve pointed to. i changed my colour to black, then centered it using the moving tool. now, while holding the ‘shift’ and ‘alt’ key on your keyboard, drag the transform corners out.
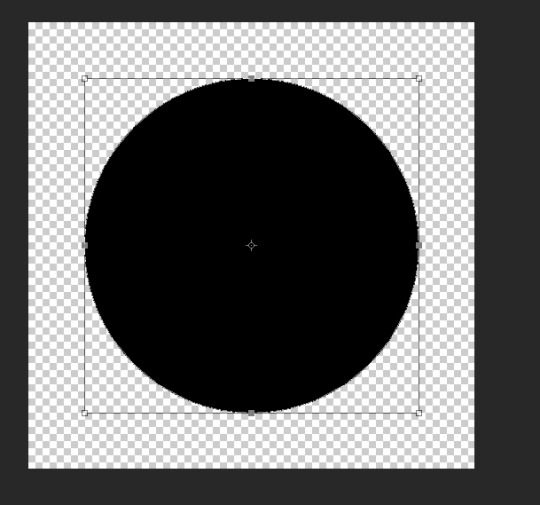
making it as big as you want, but not bigger than the canvas, click the checkmark on the upper right hand corner.

okay, so now, make the hidden layer visible, and make sure everything is centered how you like it.
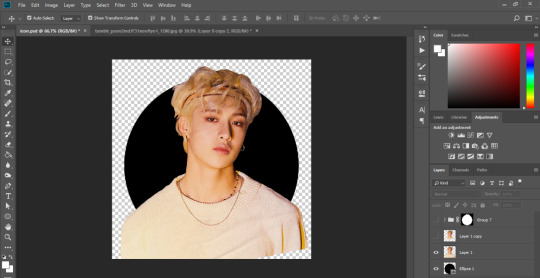
select your image layer, and hit ‘ctrl + j’, this will duplicate the image in the exact same place. hide the duplicated layer, that’s for later. now, while staying on the visible image, hover over the shape, while holding ‘alt’ on your keyboard. a little downwards arrow and box should appear there while you’re hovering. click on the shape layer while holding alt and what should happen is this:

basically what this does is it makes it so that the only things that are visible from the image layer are whatever area of the layer below it is showing.
anyway, so now, looking back at the duplicated image, make it visible, and erase the bottom part of the image that you don’t want. in my case, its the part of his shirt.
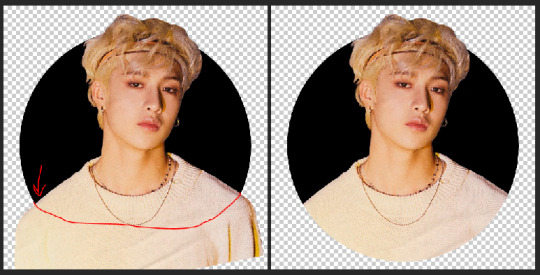
so you can erase as far up as you want, as long as you don’t cut off the part that you want over hanging from the shape.
at this point, your icon is pretty much done! i usually add a colouring on top of the icon to make it more my style and more to my taste!! but that’s not really necessary!

and that’s that! you’ve got an icon! now, when you go to save it, make sure you save it as a PNG rather than a JPG. a png will preserve the transparent background that we made!
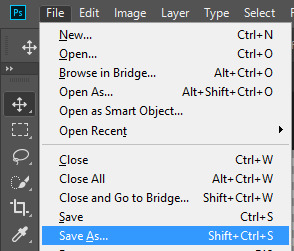
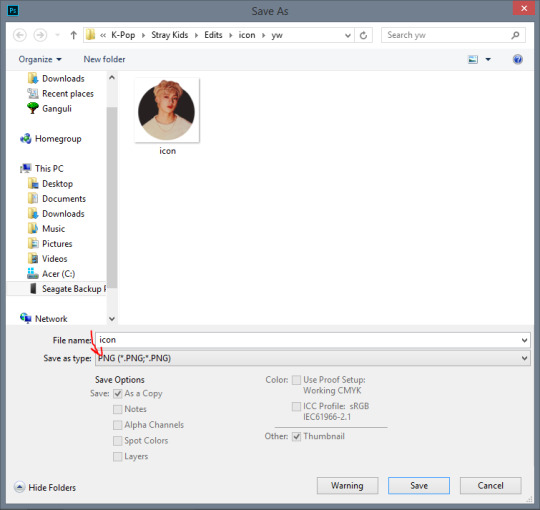
and save! and that’ll give you!! a transparent icon!!!
i really hope this helped/explained it well! sorry that it took me so long and that my tutorial was fairly lengthy, but i wanted to be thorough in my explanation! mwah i hope you have a good day!
#m.tut#long post#sorry abt that anon#idk why the ask wouldn't let me use the read more option?? its weird??
10 notes
·
View notes