#clear epoxy for craft
Text

Looking for the perfect clear epoxy resin for crafts? Our high-quality resin provides a crystal-clear finish that is perfect for all types of crafts. Whether you're working on jewelry, coasters, or other small items, our clear epoxy resin will help you assemble a stunning final product. Order now and take your crafts to the next level!
#clear epoxy resin for crafts#crystal clear epoxy resin#epoxy resin and hardener#mica powder for resin#clear epoxy for craft#epoxy resin art starter kit#diy resin starter kit
1 note
·
View note
Text
I'm all for my fellow merch makers making whatever decisions they want with what they produce. But I wish it were more widely known that a clear epoxy coat over acrylic pins and charms will yellow over time. ;;
#there are pros and cons to many things epoxy included!!#like if its a coat over the print then like. it can protect the print itself from getting scratched#and hell it just Looks Nice. the domed effect is very cool :)#when theres glitter in there too??? whoa mama#but yeah. the yellowing. granted it could take a few years for that to start#perhaps also depending on the manufacturer and the epoxy used#as well as sometimes the epoxy surface has like. a residual tackiness to it? (from my vograce experiences)#if you're slow to move merchandise like I am tho. it kinda makes stuff with epoxy feel like a ticking timebomb#unfortunately all my previous charms are epoxy domed bc i didn't know this at the time!! but I'm avoiding epoxy for my new pin sets#and won't be using it for charms again in the future. just as a personal preference.#like dont get me wrong. they'll be fine for a good long while#but i was going through my old charms bought from cons again the other day and even some of the ones from just two years ago#were yellowing 😞#grafftalk#delete later#also the same with clear epoxy resin in typical resin work. bc its the same stuff#but thats why a lot of resin crafts are best done with colour bc it usually hides the effects of the oxidation
17 notes
·
View notes
Text
Crystal Clear Epoxy Resin

Crystal Clear Epoxy Resin, Bubbles Free Epoxy Resin, Table Top & Bar Top Casting Resin, Clear Epoxy Resin For Art Crafts
👉 EXTRA 30% OFF❤️
🎉 Exclusive deal[$0.69]
👉 item link: https://temu.to/m/uvbkubt1r5i
⚠️ Every New App User can only enjoy once
1 note
·
View note
Text
Recently, I was alerted to the fact that folks are shoving perfectly good playing cards into chunks of plastic and then having those cards valued. That seems like the kind of scam that I would normally be into, but the business is way too crowded. All I know about is cars, and cars already have several "appraisal" scams going on as well. No: where I saw money was in the plastic slab business.
You might not realize this, but making things out of plastic is insanely cheap. It's part of the reason why we're all drowning in little gewgaws and shitty strawberry clamshell containers we can't safely get rid of. Spend a few grand making some moulds, then press cheapo squashed-flat dinosaurs into them for years and years, and sell them at a thousand-times markup.
Me, I don't have "a few grand." I don't even have a grand, most of the time. Actually, I just lied to you (force of habit.) I do have a grand: a Plymouth Grand Voyager with no wheels or suspension. And it's got lots of little enclosed spaces that we could make into low-pressure plastic moulds. After a quick trip to swap some pricetags at the local Hobby Lobby, I was in business pouring huge amounts of high-grade synthetic craft resin into the nether regions of my van. And watching that resin pour right out onto the ground, through the gaping rust holes. Right. Now I remembered why I didn't fix this thing.
Don't worry, though: there's a customer for everything. You see, art buyers are also very interested in speculation that inflates the value of their holdings. And if you wear a different hat when you appraise "modern art in semi-clear epoxy resin," then you can sell that pile of goop on your driveway to someone who surely isn't just using it to launder money for the CIA. Everyone wins! I love the new economy.
249 notes
·
View notes
Text
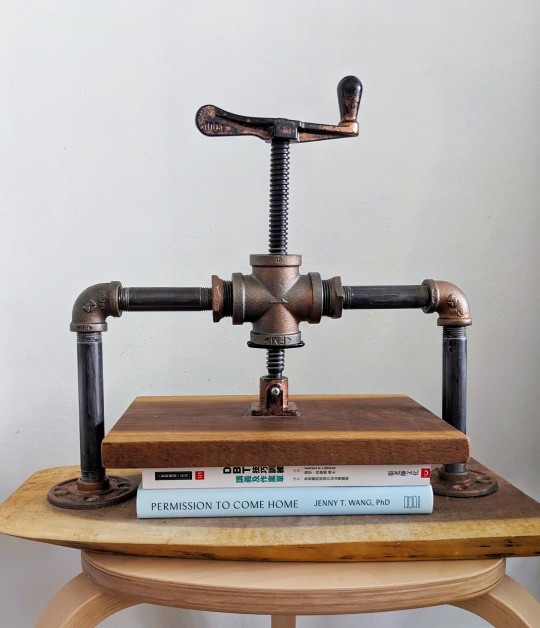
FanFic Pipe Book Press
In 2022, I prototyped an affordable nipping press using black steel pipe fittings. The challenge: To make something under $100, compact, portable, and easy to make without electric tools.
I'm sharing the supply list here (under the cut) with updated thoughts and notes.
Please note that when I've linked to Amazon in this post, I'm using an affiliate link.
Basic Materials
QTY
1 - Press Screw
2 - ½ pipe Mini Flanges
2 - ½ pipe 90° elbow fittings
2 - ½ pipe 4in nipples
2 - ½ pipe 6in nipples
2 - 1x½ pipe hex bushing reducer
1 - 1x1 pipe cross tee
1 - Large hardwood board at least 16"x6"
1 - Smaller hardwood board ~ 9-10" across and at least 6" wide
8 - #8x¾ flat head wood screws
Press Screw
The press screw is the crank/long screw in the middle of the nipping press. As of this writing, the most affordable press screws are the one by Pony Jorgenson or the one by ShopFox. For just a little bit more, McMaster Carr sells a beautiful stainless steel hole mount screw clamp from Taiwan.
½ pipe parts
These form the bones of this book press. Pipe fittings are designed to be resistant to water pressure and are easy to assemble. You can find some at your local hardware store (cheaper) or order on Amazon. You have the option to use basic black carbon steel pipe or go fancier by using stainless steel. This will likely run you between $40-$65.
Wood & Screws
You'll want a hardwood (like Oak, Birch, Walnut, etc.) not a softwood (pine or basswood) for this project to prevent warping. A strong plywood such as baltic birch may work as well. Most hardware stores will cut wood to size for you. The screws are for attaching the pipe to the wood--but, depending on how you want to engineer the press, you could also use bolts.
Additional Supplies
Sandpaper in various grades
Sealant for the pipes (especially if you use pipe that sheds carbon, so you don't stain your books. I used clear coat, you can look into shellac and other finishes that work for you.)
Wood Finish (I used tung oil, you have so many options)
Screwdriver, Hand Drill, or Electric drill
Mallet (if you want to pound the lead screw into the cross pipe
Epoxy to glue the lead screw into the cross, or to affix the base of the screw to the wood.
Optional Upgrades
Use a hole saw to drill through the wood and a forstner bit the size of the flange to run the flange through the wood from the bottom. That way, pressure isn't put on the wood screws and the press will last longer.
Use Rub N' Buff to decorate the press
Use longer nipples, such as 8" or 10" nipples, instead of the 6" to get more daylight.
This press is sized for fanfic binders, but if you want a bigger one you can size up the pipes.
If you can afford thicker wood, especially for the base, you may want to opt for 8/4 wood instead of 4/4 wood.
Happy crafting! Let me know how things go, and if you end up making one, I'd love to see a picture.
103 notes
·
View notes
Text
How To: Bead Trees With Resin Base


You Will Need:
Tools:
Mini Pin Vice ($8.99 on Amazon)
Basic Jewelry Making Tool Set
Silicone Soap Mold
Helping Hands Rigid Arm Station ($25.99 on Amazon, if your craft store has a rigid-arm version, it would be with the modeling kits. You want those big chonky arms, the thinner ones are useable, but frustrating)
Clear Epoxy Resin (NOT UV RESIN) PLEASE BE AWARE THAT WHEN WORKING WITH EPOXY RESIN, YOU MAY ALSO NEED A FILTRATION MASK FOR SAFETY!


Wire
There are a couple of options to choose from for wire, I keep both in stock. You'll notice they have the exact same specs, but the AliExpress wire is much thinner.
0.3mm (28 gauge) wire ($15.49 on Amazon, enough wire to make 7-8 trees) || Suitable for 3-bead branches or metal bead branches.
FAIR WARNING: If you use the Amazon wire, prepare to bleed a bit. It is wicked sharp at the ends and will scratch or poke through skin easily.
0.3mm (28 gauge) wire from AliExpress ($0.99 - $3.00 per roll, enough wire to make ~5 trees per roll) || Suitable for 5-bead branches using seed beads with occasional inclusions.
If you're new to tree making, honestly I'd recommend ordering the AliExpress wire. The Amazon wire is brutal on the fingertips at first, the AliExpress wire is more like thread.
The wire in the image below is the AliExpress wire. It doesn't come with the nifty holder, I made that myself.

Beads
You can really go nuts with the beads, there are very few guidelines:
If you're doing a 5 bead branch, you'll want 4mm (6/0) seed beads.
Chip beads are great for 3 bead branches.
You want a bead with some flat side, pure spheres are kind of a pain in the ass to twist on the wire. Absolutely do-able, but annoying.
I'll also get novelty bead shapes (flowers, ribbons, butterflies, etc.) and mix those into 5-bead trees as fun little inclusions (you can see examples further down)

--- Step by Step below the cut ---
Step 0: Mix up 20 mL of epoxy resin and pour it into the bottom of the mold you're using.
Resin can take 24 hours to set, so you'll want this done before you get to Step 10.
You don't need a lot, just a thin thin layer right at the bottom, colored or not.
In the image below, you can see that there is 2-3mm of just clear resin as the base. You can add inclusions (like glitter) or whatever you want, you're just making a protective base for the mold for later.

Step 1: Cut a length of wire just a bit longer than your keyboard.
It's a bit more than you probably need, but you'll get a feel for the right length.

Step 2: Wrap your beads, either 3 or 5 per wire. If you're using the AliExpress wire, be a bit careful, that wire can break if you twist too hard.
Again, if you're using the Amazon wire, do not attempt the 5-bead branch. More often than not, it will snap.
FAIR WARNING x2: If you use the Amazon wire, prepare to bleed a bit. It is wicked sharp at the ends and will scratch or poke through skin easily.
In my experience, the AliExpress wire is too thin to manage that easily.


Step 3: Trim both ends of the wire so they're the same length, then make a little loop to connect them.

Step 4: Put that loop into the Pin Vice (the little pen-like tool) and tighten it as much as you can. In my experience, the Pin Vice was really stiff at first, and it can really chafe your fingers getting it to tighten or release. It's a clunky tool, but worth it.
**You will have to twist it down harder for the AliExpress wire, that has a tendency to pop out. The loop you made is to give the clamp more to grab on to.
If you ordered the Pin Vices linked, be aware that each of the 2 “Pens” has 4 clamps within it (each end unscrews, you can pull out the middle, and flip it.
You need the second smallest option. It took some time for me to find the right one...

Step 5: Twist for Eternity.
This is the part where you have to be a little weary of your wrist, it's a lot of repetitive motion. You can lay the pen tool flat on a desk and push it with your hand to spin it that way and spare your fingertips, but it doesn't really save you anything overall.
You only use the Pin Vice for this step, do not use it for any later step that twists wires!
If you're using the Amazon wire, you won't get as fine of a twist as you see in the photo, the wire will break first.
When you take the wire out of the vice, the clamp might stick in place when you loosen it. Pinch your wire right at the base where it goes into the vice and shove that metal back in. It will pop and you can easily pull the wire out.

Step 6: Repeat Steps 1-5. A Lot.
I make 36 branches per tree.
If you're using 3 beads, that's 108 beads.
If you're using 5 beads, that's 180 beads.
What I usually do is bead sets of 9 branches, then twist the wires. Or I'll do all the beading, then all the twisting.

Step 7: Create stacks of 3 branches and twist them together with the pliers
It can look nice to stagger the branches a little, but only 1-2mm.
Put the pliers close to the base of the branches, maybe 1cm down max.
Only twist for 1cm or less. You'll get a feel for how much to twist here to get the density of branches you want.
Fan out the beads a little when you're done to puff it out.


Step 7b: IF YOU ARE USING AN INCLUSION BEAD
With 5-bead branches, I like to do inclusions. Bells, flowers, etc.
For an inclusion branch, for the first bead (the one at the very top middle), use whatever inclusion bead you want. In the photo below, I added flowers.
Sandwich that strand between two "normal" strands, and twist together.

Step 8: Repeat until you have 12 bundles of 3 branches each.
Take 3 bundles of wire and combine them the same way you did the individual branches.
Only twist 2-3 times around, you really barely need them connected.


Step 9: Once you have 4 of these bundles of branches, start combining them to form a tree!
You'll get a feel for how to do this, but what I usually do is combine 2, then feed in one more, then feed in one more, each time barely twisting. Just enough to create a staggered branch look.
At some point, it will become easier to use your hands instead of the pliers.
Using your hands will create a smoother trunk, using the pliers will add harsh ridges and give it more of a bark look.

Step 10: Go nuts with the "roots"
If you did not do Step 0 (a thin layer of resin in the base of your mold, DO THAT FIRST) otherwise, the roots will poke holes through your mold.
Just grab random bits and start twisting, randomly drop wires as you're twisting.
FAIR WARNING x3: If you use the Amazon wire, prepare to bleed a bit. It is wicked sharp at the ends and will scratch or poke through skin easily.
Bend wires after twisting, tree roots don't run straight.
Basically do whatever the hell you want, just be mindful of the size of your silicone mold.
You really cannot set the tree down once you start making the roots. I tend to hold it while I do the roots, but you can also use the Helping Hands at this stage.


Step 11: Use the Helping Hands to hold your tree in the mold, then fill with epoxy resin.
For a thinner base, you'll need to keep the roots pretty flat. I do that by gently curving the roots down as I'm making them, so when I press the tree into the base, they're more inclined to flatten out.
Thicker bases, you can add more lateral movement to the roots, making them stand up more.
Add inclusions to the resin (color, glitter, beads, etc.), and pour it until it covers the roots.
Minimum, I like to add a little teeny bit of opal mica powder, just to give the base a hint of shimmer.
Let resin cure for 24 hours.


Why do I use resin instead of attaching the tree roots to a geode or other object? Because I have a curse on me where any glue that I touch will not dry.
So I have to use resin until the curse is lifted.
25 notes
·
View notes
Text
Mermaid's Tear Amulet: A Distinctive Crystal Pendant Capturing the Essence of the Ocean's Magic

Creating your own Mermaid's Tear Amulet can be a delightful and meaningful endeavor, allowing you to infuse it with your intention and energy. Here's a simple guide to crafting your own enchanting amulet:
Materials Needed:
Glass or Crystal Teardrop Pendant:
Choose a pendant that resonates with you. It can be made of glass, crystal, or any transparent material resembling a teardrop shape.
Chain or Cord:
Select a chain or cord that complements the style of your pendant. Consider using materials like silver, gold, or leather.
Beads or Charms (Optional):
Enhance the amulet's aesthetic by incorporating beads or charms that evoke the sea, such as shells, pearls, or small ocean-themed charms.
Clear Epoxy Resin:
To symbolize the oceanic essence, you can use clear epoxy resin to fill the pendant.
Small Funnel:
A funnel will help you pour the epoxy resin into the pendant without spillage.
Mermaid Essence (Optional):
This could be a symbolic representation of the ocean, such as a drop of seawater or a tiny piece of a seashell.
Step-by-Step Guide:
Prepare Your Workspace:
Set up a clean and well-lit workspace. Lay out all your materials and ensure you have adequate ventilation if working with epoxy resin.
Attach the Pendant to the Chain or Cord:
Securely attach the pendant to the chosen chain or cord. Ensure it's well-positioned for comfortable wear.
Customize with Beads or Charms (Optional):
If desired, thread beads or charms onto the chain or cord to enhance the amulet's aesthetic appeal.
Mix the Epoxy Resin:
Follow the instructions on the epoxy resin packaging to prepare the mixture. Typically, this involves combining equal parts resin and hardener.
Use the Funnel to Fill the Pendant:
Place the funnel securely into the opening of the pendant. Carefully pour the epoxy resin into the pendant, ensuring it doesn't overflow.
Add Mermaid Essence (Optional):
If you have chosen to include a symbolic representation of the ocean, add it to the pendant before the epoxy resin sets.
Allow the Resin to Cure:
Follow the recommended curing time for the epoxy resin. This can vary, but it often takes several hours or overnight.
Inspect and Adjust:
Once the resin has fully cured, inspect the amulet. If there are any imperfections, you can consider sanding or polishing the surface.
Charge with Intentions:
Hold the amulet in your hands and infuse it with your intentions. Visualize the amulet as a conduit to the magic of the ocean and mermaids.
Wear and Enjoy:
Your Mermaid's Tear Amulet is now ready to be worn! Wear it close to your heart and let it serve as a reminder of the enchanting depths it represents.
💧 The Artistry of the Mermaid's Tear Amulet:
Crafted with precision and reverence, the Mermaid's Tear Amulet is a testament to the intersection of artistry and mysticism. Its form, reminiscent of a crystalline teardrop, symbolizes a profound connection to the vast depths of the ocean—a union of elegance and elemental power.
🧜♀️ The Mythic Origins:
Believed to encapsulate the very essence of the ocean, the Mermaid's Tear Amulet is steeped in the lore of mermaid magic. As the lore goes, mermaids shed tears of joy or sorrow, and these tears crystallize into rare gems. The amulet, then, becomes a conduit to the enchanting realms of these mythical beings, a vessel for the subtle energies and mysteries of the deep.
💫 Sacred Symbolism:
The symbolism inherent in the Mermaid's Tear Amulet is profound. It serves as a talisman for emotional depth, intuition, and a connection to the vast expanses of the subconscious. Wear it as an emblem of serenity, or harness its energy for introspection and unlocking the hidden facets of the self.
🌌 How to Embrace the Magic:
Intentional Adornment: Wear the Mermaid's Tear Amulet with intention, allowing it to become an extension of your personal energy field. Its proximity to the heart chakra enhances its potency as a conduit for emotional well-being.
Meditative Reflection: In moments of quiet contemplation, allow the amulet to guide you into the depths of your own consciousness. Its mercurial magic may reveal insights and illuminate the paths to self-discovery.
Cleansing Rituals: As a vessel of oceanic essence, the amulet benefits from periodic cleansing rituals. Submerge it in saltwater or allow it to bask in the moonlight, renewing its connection to the natural forces it embodies.
Shared Symbolism: Gift the Mermaid's Tear Amulet to kindred spirits or loved ones, sharing the enchantment and fostering connections through the shared symbolism of this exquisite piece.
#witchcraft#water magic#sea witch#ocean spells#river rituals#lunar tides#water witchery#aquatic enchantments#spellwork by the shore#mermaid vibes#underwater energy#moonlit reflections#potion crafting#mystical waters#sacred wells#divination by water#nautical spells#tidal energy#sea goddess#river nymph#oceanic mysticism#water alchemy#rainwater spells#storm magic#lake rituals#enchanted seas#water spirits#aquatic symbolism#crystal-infused baths#maritime witch
27 notes
·
View notes
Text
Cosplay Fixin' Time: Infinity Train
So a while back I made posts about some props I'd created for my Simon Laurent cosplay. There was the harpoon pack, and the boots.
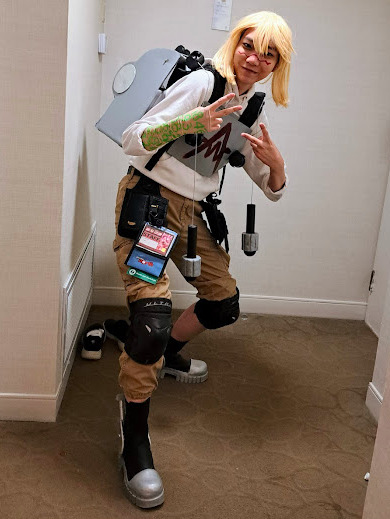
Pictured: An embarrassing idiot cosplaying an embarrassing idiot.
So at the time I was a cheapass, and just used whatever I could find that was left over from a bunch of other stuff, or the cheapest materials from my local craft store, even stuff from the dollar store!
I'm not really going to make any huge modifications, but after wearing it a few times there were some signs of wear and tear. I'm going to show you how I fixed it, and suggestions for substitute materials you can use so that yours will be sturdier and less prone to breaking!
NOTE: These tips are going to involve TOXIC SUBSTANCES. But for safety reasons, I will also give substitutions for non-toxic replacements.
The Boots
The first thing I found out was that after a weekend of walking around in them, the toe caps had large cracks in them!
[I forgot to take pics of the cracks, but you can see from the images below how extensive they were. ]
This is because I had used Model Magic to fill in the gaps initially, instead of a stronger air dry clay. So in order to fix it, I knew what I needed to do.
First I glued down the cracks with superglue so it's nice and solid, and won't crack more. Then, I used... Milliput!
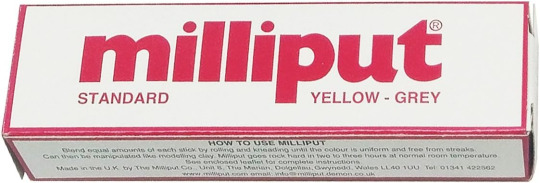
It comes in a variety of colours: white, black, turquoise blue, sad puke-brown, I went with the last one because it was on sale.
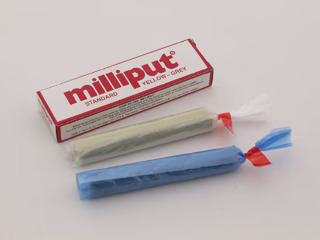
This is an epoxy putty, which means that it has two parts you need to mix equal portions of together in order for it to cure. Otherwise it stays malleable.

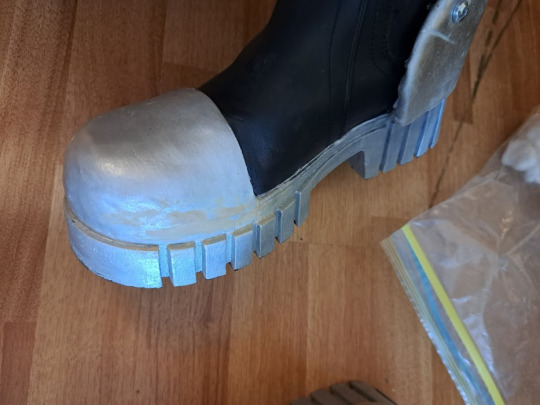
Now, because it is an EPOXY PUTTY, it is therefore TOXIC, and you must wear gloves while handling it!!!! But once it dries, it takes on a hard, smooth, plastic-like texture! And it isn't brittle and flaky like Model Magic.
For a non-toxic substitute, you could go with traditional air dry clays, but just not Model Magic, or anything as light and fluffy. I would recommend something like Paperclay.
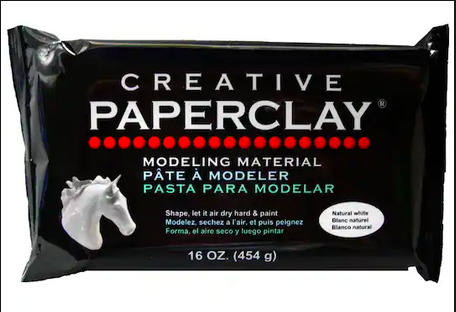
I've used Paperclay before to make stuff like horns, and even details on Pearl's staff! It definitely dries into more of a clay texture than Milliput though. (Yes I have cosplayed Pearl from Steven Universe before. No, I will not be posting pictures. They are embarrassing.)

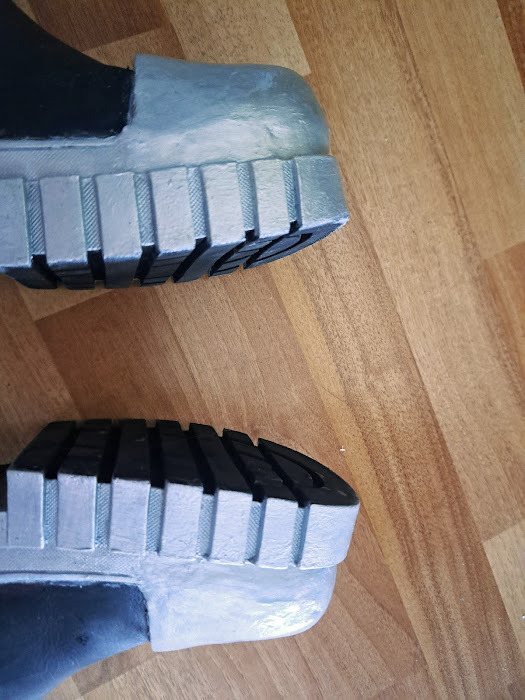
Here's how the boots looked after the Milliput dried, and I sanded and repainted the boots. Pretty good! Well okay I know that it still looks like blobs of stuff but hey, for me, pretty good is it'll look good in photos, not in extreme closeups.
Another thing I did for the paint was that I noticed glossy Mod Podge is kind of sticky even when dry? So I sprayed everything with Mr. Super Clear Gloss Varnish.
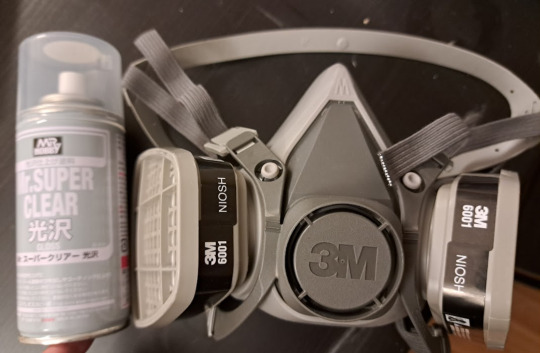
This sealant is HIGHLY TOXIC so I had to spray it in a well-ventilated area with a vapour respirator!!!! No joke, you need to be extremely cautious with spray sealants. But the result was amazing. The glossy parts of the boots are smooth and slick and not weirdly sticky!!!
Non-toxic alternative: Liquitex Gloss Varnish should also work. I used that on the repaint of the harpoon pack's front panel.

Also, you may be wondering, did I add the extra strap that Simon has on his boots? No. Because it looks uggo. And I want my boots to look nice, and not uggo.
But if you want to, just do this:
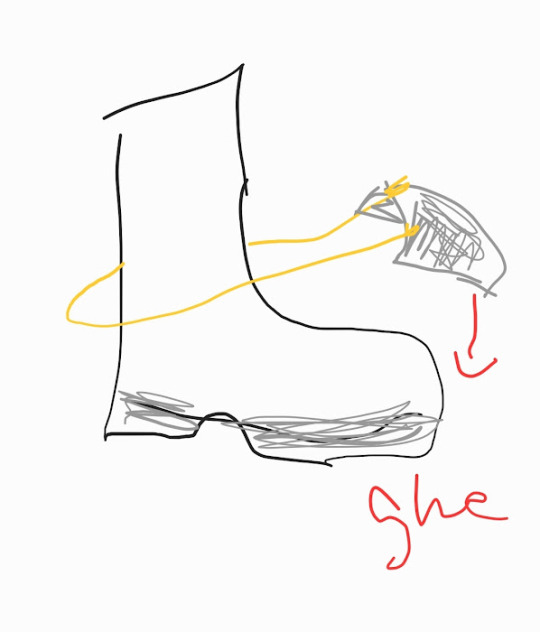
graphic-design-is-my-passion.jpeg
The Harpoon Pack
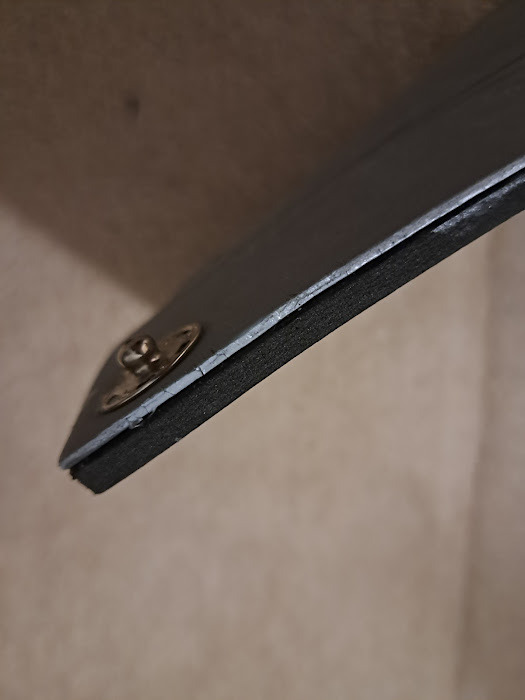
The first thing I did was improve the hinges:


Hey guess what nuts and bolts are really sturdy who knew? Yeah the hinge still works and yes my old backpack is still inside.
Next were more drastic changes. What I realized was that my initial design had stressed out the front panel way too much, and it was just two flimsy pieces of 2mm thick craft foam held together with snap buttons!
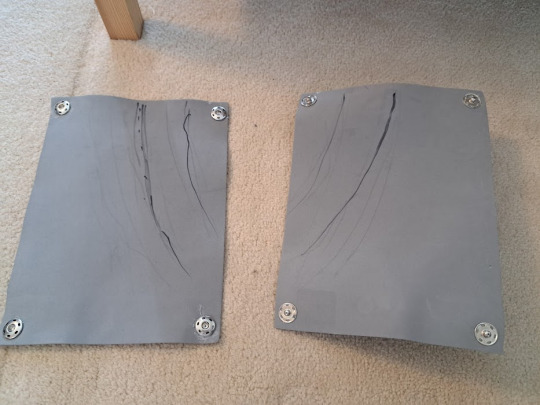

This is the face of sadness...
So I needed to do 2 things:
Make the front panel sturdier
Redo the backpack straps to better resemble how the harpoon pack straps are worn in the show.
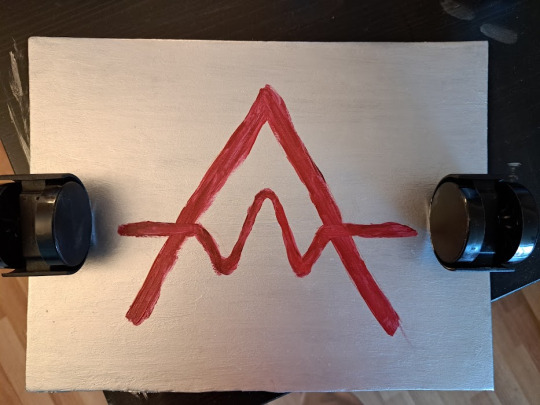
Panels
For the first part it was very simple: buy thicker craft foam, stick the old panels onto the new panels.

I even did a fancy new paint job because the old one was honestly, not it. I painted the Apex logo on too thick at first. But now, it is sized correctly!!!
The Backpack Straps
This took me a while to figure out, but it's not too hard once you get the hang of it.
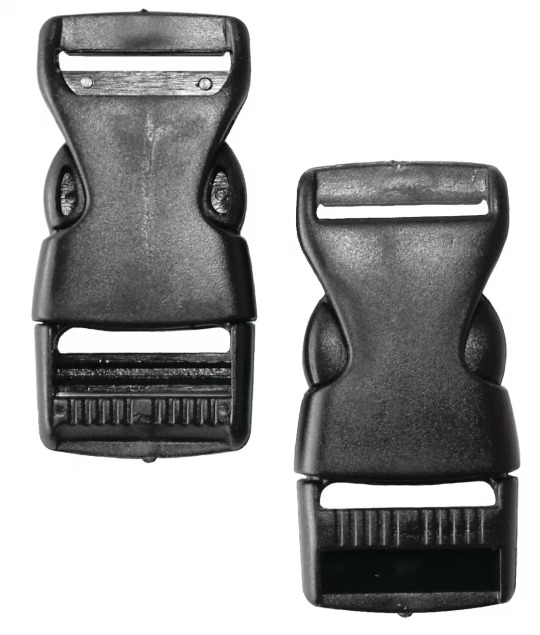
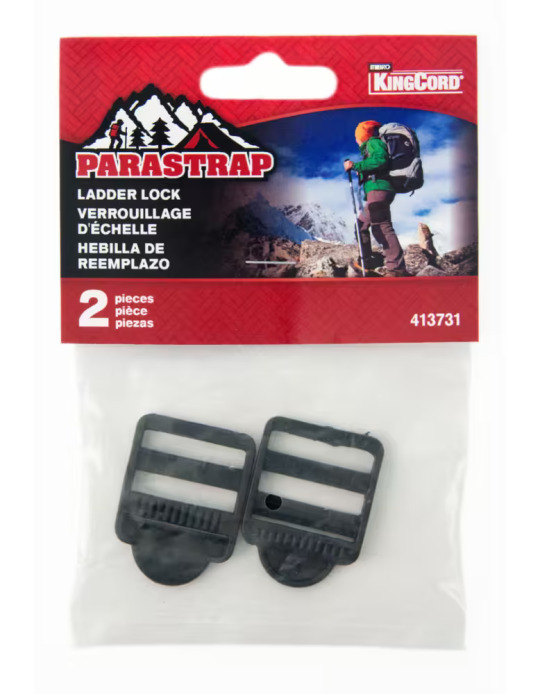
What you'll need:
3 backpack snap buckles
2 to 4 ladder locks for strap length adjustment (depending on if your original backpack has ladder locks included on its shoulder straps)
Utility strap/Webbing rope (you can buy them in brown if you want a more show-accurate look. I had some black just lying around at home so i went with that.)

Now let's take a closer look at how it all comes together:


So I undid the utility straps from the bottom of my backpack. This may require a seam ripper if the ends of the straps were sewn in place. This left me with 4 separate pieces connected to my backpack: two shoulder straps, and two waist straps.
I used this tutorial to learn the proper way to thread ladder locks.
I placed one set of plastic buckles on the waist straps so they can clip together. Then, to make sure that the straps are adjustable and well-fitted to my tiny-ass torso, I also threaded the ladder locks into the waist straps.
You need to cut out two new strips of webbing rope in order to both thread in the buckles and the ladder locks.
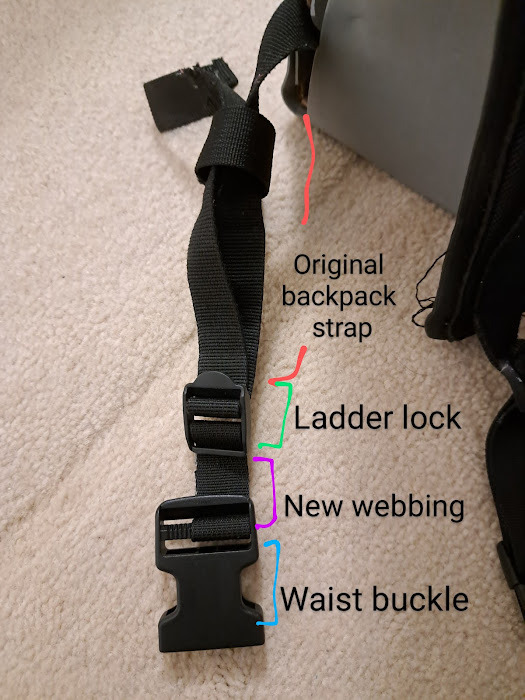
After that, it gets trickier.
Thread one half of the buckle closure through a piece of webbing that wraps around the waist strap. Do this on both sides.

Then, on your shoulder straps, if you already have a ladder lock, thread a long piece of new webbing through the bottom hole. Attach the other half of the plastic buckle to it, but make sure it's through the BOTTOM HOLE of your buckle.
Then, take the other end of the long webbing, and thread it through the SECOND HOLE on the TOP of your plastic buckle! This is to ensure that the top straps remain adjustable.

The layout should look a bit like this:


It's not perfect, but it's much better than before.
#infinity train#infinity train cosplay#simon laurent#cosplay tutorial#cosplay#infinity train book three#infinity train book 3
34 notes
·
View notes
Note
omg is that epoxy/resin?? how did u do it :O
// shrink plastic :3 cut out a square and taped it to my phone LMAO and then just traced bdirk with sharpie and colored in with a paint pen. Threw it in the oven (sandwiched between parchment paper) at 320 Fahrenheit for 3-4 minutes and boom. Fuckass baby. It does shrink a tonnnnn though so always keep that in mind if you try it yourself :3 you don’t actually need shrink plastic— certain types of clear plastic container lids (like ones you get at restaurants for food) will work! Fun craft.
19 notes
·
View notes
Text
The Whole World Stopping, Just For You
you meet a werewolf at a craft fair. a distant prologue to goretober day 3: "ountumbered."
->contains feral and vaguely sinister behavior.
.
.
.
The box is what grabs your attention. It glints, catches the sun just right, as you’re walking by.
The vendor stands stiff and straight-backed in the shade of his tent and there are dozens of beautiful pieces all around him—rustic end tables, decorative hanging shelves, a table full of adorable, handmade birdhouses with more craftsmanship and creativity than most suburbs—but your eyes are on the box. The wood is unpainted, a warm, reddish-brown with an antique clasp, but the most remarkable part is the lid. You mistake it for a slice of geode at first because it has the same luster, brilliant blues and ingidos with a glassy shine. A speckled arch of silver makes you think of clouds or mountains against the night sky.
By now, most vendors would have started chatting you up, but this one’s completely silent. He hasn’t moved at all since you walked over or made a single sound. His hair is short but wild with his bangs hanging in his face, his eyes a striking shade caught between green and amber. He’s wearing a tank top that shows off thick, defined biceps and jagged lines of scar tissue. You have to break eye contact because his stare is just a little too intense and your gaze meanders just slightly past him, a banner stretched along the back of the stall bearing the words “Shelter Mountain Pack.”
A small sound of surprise slips out before you can stop it, something not quite a word. You’ve only met city wolves before, never a wild one. Rumors paint a dramatic picture of feral marauders who run through the woods naked with leaves and twigs stuck in their hair, but you always figured people who said that were full of shit. He looks like anybody else save the yellowed hazel of his eyes, but his complete silence and stillness unnerves you more now that you recognize it for what it is—a predatory animal spotting something of interest and watching, waiting, with bated breath.
“This is beautiful,” you tell him, your hand still on the box. You’ve been stroking the lid absently, your thumb rubbing over curves of silver.
He grunts. The sound is deep, feral and sends a shiver down your spine. You must be giving off some sign that you’re wary—could be your heartbeat, your posture, even your scent—because he covers it by clearing his throat. “That’s cherry wood,” he says. “Got that color with a coat of shellac. Lid inlay’s epoxy resin. Don’t usually work with pigments or paint, but I thought I’d try something new.”
You drift further into the tent and he turns, following you with his eyes, as you admire meticulously carved animal figurines, sturdy planters, and even more ornate boxes with intricate patterns carved into their lids and sides. You pick one up for a closer look, smoothing your fingers across patterned carvings, the leaves of a tree rendered in precise detail. “Everything in here is incredible. You make all of these yourself?” you ask.
You hear a brisk exhale. “It’s all me. Can’t get anyone else in the pack interested in woodworking.” His gaze burns into your back as you set the box down. You pick up another and your fingers brush against a circular indent in the bottom. Flipping it over, you find a stamped signature, a stylized outline of a mountain with the words “LANCE - SHELTER MOUNTAIN” inside. No last name. Is that normal? Do wild wolves not use surnames? You’re curious but you don’t want to be insensitive. Gently, you set the box back down.
There’s a sharp huff, the kind of sound a dog makes. You look back just in time to catch a slight twitch at the corner of his lips, an almost-smile. “Don’t have to be so dainty with my stuff,” he says, jamming his hands in the pockets of his ragged jeans. “You scared of getting your scent on it? It’s not a big deal, seriously. Wouldn’t be here selling to humans if I couldn’t stand the smell.”
“Oh,” you say, a little embarrassed. Lance doesn’t seem bothered, though. He gets a bit more talkative the longer you poke around his tent, more than happy to tell you about his pieces, how long they took to make, his personal favorites. Everything has a story—a whim one sunny afternoon, a bit of inspiration from a bird he saw. He shows you a paperweight shaped like a napping cat and there’s a craftsman’s warm pride in his eyes as he tells you how he carved it and sanded it down and added just a bit of darkening finish to the ears and tail. He favors nature patterns, you notice, lots of plants and animals depicted in his more decorative work.
In the end, though, you go back to the box. That starry, winter sky pattern across the top pulls you in again. You cradle it in both hands, your thumb smoothing across the resin. “Do you take card?” you ask him.
It’s like flipping a switch. All of his casual, carefree body language vanishes and he’s guarded again, frowning tightly. “No,” he says. He follows your gaze down to the card reader sitting on the table in front of him, a white touchpad cradled in a beautiful wooden dock, and lets out a long sigh. “Are you in a hurry?” he asks. “One of my packmates is around here somewhere. He knows how to work that thing.”
“There’s no rush. But if it’s easier, I can just find an ATM—”
“It’s not a big deal. He’s supposed to be back here anyway,” he insists, fishing a cheap flip phone out of his pocket. You keep browsing while he sends a slow, clumsy text, bending to look at a squat storage cabinet. The door panels are carved with simple but elegant flowing designs, floral Art Nouveau whirls and a thin, leafy border. “Are you local?” Lance asks, leaning casually against the nearest display table. “I don't recognize you.”
That would strike you as an odd comment from anyone else. This isn’t a huge city by any means but it’s not a tiny town either. You can’t fool a wolf’s nose, though. He’d know if you’d been by his stall before. “I’m just passing through,” you say. “Saw a sign for the craft fair and thought it’d be a fun detour. I still have a long drive home ahead of me.”
“Are you headed east? Through the mountains?”
“Yeah.”
He makes a softer grunt, glancing at the sky. “Gonna be dark before long,” he says. “Better not take those roads at night. You could stay with us, if you want, head out fresh at dawn. We’re only an hour or two up the mountain.”
The invitation completely blindsides you. Wild wolves don’t do things like this. They don’t tell you, even vaguely, where their packs live, and they certainly don’t invite you to waltz right in. “I’m not sure your alpha would appreciate that,” you say, laughing nervously.
Lance grins. His teeth are somewhere between yours and a dog’s with prominent canines and everything just a little too sharp. He leans in across the table and speaks in a low rumble. “Well, seeing as I am the alpha, I don’t think you have to worry about it.”
He’s close enough that you notice his scent for the first time, an earthy musk like grass and rain. You’re frozen in place when he reaches for you, holding your breath, waiting for something you can’t name. His fingers smooth across the back of your hand, nails long and a little sharp. He never breaks eye contact as he takes the box back from you and you see his nostrils flare, his pupils dilating.
“Blake,” he says, and you jump when someone brushes past you to get into the stall. You catch yourself against the table and realize you were leaning in, shifting closer to him without even realizing it. “Need you to run a card.”
The new guy is slimmer than Lance and looks much softer in comparison, wearing a cardigan sweater and fully intact jeans. His hair is longer and much neater, held in a low ponytail with his bangs combed out of his face. The color is unusual, black with uneven veins of stark white and gray, reminiscent of the streaks in a gray wolf’s fur. Lance moves aside, finding a different table further into the stall to lean against. He still hasn’t put the box down since he took it back from you, and he’s staring intently at the lid.
“Sorry for the wait,” Blake says, flashing a practiced customer service smile. “Just the keepsake box, then, or are you still browsing? Lance can be a little standoffish, but I promise he doesn’t mind you looking around.”
“I heard that,” Lance mutters.
“Just the box,” you say. Sticking your card into the reader, you add, “He’s not so bad, actually. He told me all about his work. I don’t know much about carpentry and stuff like that, but I can tell he’s really passionate.”
There’s a pause, and then Blake says, “Really?” The word doesn’t come out in a mild, smalltalk kind of tone, but with legitimate shock and disbelief. You find him staring in the same intense way Lance did when you first walked up. He turns back to Lance and they look at each other for a moment in silence.
“I invited them,” Lance says, the words slow and deliberate, “to spend the night with us.”
Blake turns back to you slowly. You get the feeling that he’s really looking at you for the first time, not as a customer but as something else. His gaze is heavy, weighted with expectation. Soft surprise morphs into realization of some kind. You feel uncomfortable beneath his scrutiny. “I don’t have to,” you assure him. “I don’t want to impose or be in the way, and I’m sure I could find somewhere to stay in town—” The card reader beeps and you reach to take your card back. Blake’s hand catches yours, his fingers closing like a snare.
“You’re more than welcome,” Blake says. His smile is broad and warm and irresistibly charming, his thumb stroking the back of your hand in soft, soothing motions. “More than welcome. It’s no trouble, really. There’s plenty of room. We’d love to have you.”
“If you’re sure,” you say, a little uneasy. Blake lets go of your hand with a sheepish smile. It doesn’t bother you that much. Wolves, no matter where they live, tend to be touchier than most people.
“Did you tell the pack?” you hear him ask, his voice lowered.
“Texted Max a little bit before you got here,” Lance murmurs. “Word’s spread by now.” He shoulders past Blake, around the tables and out of the stall. You smile, expecting him to hand you your box. He does. And when you take it, he snags your wrist and drags you into a firm embrace, burying his nose in the crook of your neck. He takes a deep breath and lets out a shuddering exhale, hot breath fanning your throat. You’re startled and a little nervous, staying perfectly still while he noses against your skin on one side and then the other. That’s a scenting thing, right? They do that to each other sometimes. Maybe he’s making sure the pack knows he invited you? That makes sense, you think.
But then he stops and pulls back far enough for you to see his face, and you’re not so sure anymore. His pupils are blown, his eyes half-lidded. His tongue darts out and you see a brief flash of a prominent canine as he licks his lips. “Well,” he says, squeezing your shoulder, “I’ll grab the truck and you can follow me up. Where’re you parked?” You look from Lance to Blake, bewildered. The fair’s still on for a few more hours. You really don’t want him going out of his way like this.
Blake seems to pick up on your worry, though, waving you off with a smile. “You’re fine,” he says. “Someone else from the pack will be here later. Lance just wants to make sure you get there in one piece on those awful roads. Easier with some daylight left.”
You take his word for it, partly because he really does seem excited to have company, and partly because Lance starts walking and you have to rush to catch up with his quick, long-legged stride. The crowd thins as you leave the mazelike aisles of craft vendor tents. You pass into the shadows of a parking garage, wrestling with an odd, uncomfortable feeling. The hair on the back of your neck is standing on end. Something feels wrong. You clutch the box to your chest. The wood is warm where Lance handled it.
“You’re really sure this is okay?” you ask him one last time. “I won’t be offended if you change your mind. I don’t want to step on anyone’s toes, especially if your pack isn’t expecting visitors.”
“It’s fine. Don’t worry so much.” He sounds a little exasperated but he’s smiling very slightly, his hand resting on your back. “I gave them a heads up so they know you’re coming. And trust me,” he says, his voice dipping into nearly a growl, “they can’t wait to meet you.”
105 notes
·
View notes
Text
Murder on the Sunspot
Here is the first murder of passion we've ever written. In a recent book, we've written a couple of fascist executions, and prior to that an accidental manslaughter. But this one's got a struggle and a handful of vicious cusses preceding the deed. It's at the end of the first chapter of our next book, so not a spoiler. CN for murder, vividly coarse language, emetophobia, and all that:
“Shegrräo, you suppurating anus! My rejection of your sibling’s advances is none of your fucking business!” hissed the murder victim, probably Rrefka, still alive, but certainly not for long. They were brandishing the stake that would eventually make its way through their gut.
Shegrräo was bigger than them, and had six arms and legs like `errke and Nir had. Where the victim expressed mostly reptilian phenotypes, Shegrräo more closely resembled the forward grassland dogs that had a symbiotic relationship with the primates there. Only much bigger, and wearing a colorful poncho. And the dogs didn’t have six legs. Few fauna did.
Sharwe could see all this playing out, superimposed on the very real scene of the murder that was before them all. The others were possibly watching their own versions at their own paces.
“No. Pause,” Nir murmured.
Sharwe kept watching.
“I’ve made it my business,” Shegrräo’s recording growled.
“You sure the fuck have,” Rrefka shouted back. “And I need you to back off!”
“Or what?”
The two stared at each other over the firepit, muscles tense and twitching. A pot that was no longer present was bubbling, placed directly in the fire. Shegrräo had a large enough bag to carry the pot, some food, and maybe a few other things. Rrefka appeared to be empty-handed besides the big stake, which looked like it was made from fresh wood.
People normally didn’t craft things out of actual wood. Not unless they were ceremonially honoring a recently dead tree. But there were processed laminates, epoxies, and forms of nanite clay that could very closely mimic wood, even when worked by hand. This looked like genuine wood.
Sharwe activated the recordings annotations.
Yep, real wood, from a Sunspot Fir. Oh. Shegrräo’s pronouns were xe/xyr/xem, and Rrefka’s was rrem.
Hissing menacingly, Rrefka started to stalk rrems way into the little clearing. Cautious but threatening. Rrem already held the stake high, but rrem managed to lift it even higher before slowly lowering it and gripping it with both hands, eyes narrowed.
“You better be awfully certain of your next actions, Rrefka, because there’s only one ending the steps your taking now are gonna lead you to,” Shegrräo intoned.
“I don’t know,” Rrefka said. “I see a couple of possibilities.”
“You must be an optimist.”
“Apologize and back off, or shut up, Shegrräo.”
“You must love that stick, Rrefka, because I can see you humping the fuck out of it in a few seconds. It’s such a clear vision, you know?”
“Must be hallucinating.”
“Pretty sure I’m not…”
Snarling, Rrefka lunged to the left, then drove to the right to step around the campfire.
Shegrräo calmly watched the other Monster feint, then stepped in time with Rrefka right into rrems lunge, rising up on hind legs, and grappling with all four hands. Top hands went to Rrefka’s shoulders, lower hands to the stake to push it aside.
Rrefka’s enormous hind claws and surprisingly long and supple tail gave rrem considerable balance. Rrem was pushed back only a decimeter or so, and stayed stoic and upright, bearing rrems teeth.
Rrem jerked rrems head to the side as Shegrräo snapped at rrems face with finger sized canines.
“You fucker,” Rrefka shouted in Shegrräo’s parabolic ear. Then rrem tried a downward swiping kick with rrems left foot, right foot digging further into the ground.
Shegrräo flinched at the shout, then deftly avoided the kick by holding Rrefka back and finally putting rrem off balance momentarily. Then, as Rrefka dropped rrems foot and regained rrems balance almost immediately, xe quietly twisted the stake out of Rrefka’s grasp, turned the point toward rrems gut, and pulled with xyr top arms while shoving with xyr arm legs, which gripped the stake.
In that one, swift, vice-like action, Shegrräo put the stake right through Rrefka’s bowls and out past rrems spine as easily as skewering a mushroom.
Sharwe sympathetically exhaled, clenching gems stomach, and then felt like vomiting. A few seconds later, Togi had a similar reaction.
As xe almost gently lowered the astonished Rrefka to the clearing floor, Shegrräo whispered, “You walked right into your own weapon there, friend. But you sure did it with way more conviction than just about any other time you were faced with a choice. Gotta give that to you. I respect it. I’ll make sure the others know.”
#Sunspot Chronicles#murder scene#science fiction#It's actually still going to be a bit of a mystery even though it's all recorded clearly and played out for everyone
7 notes
·
View notes
Text

Unleash your creativity with our top-quality resin epoxy starter kit. Perfect for beginners and enthusiasts alike, our kit includes everything you need to craft stunning resin projects. From precise measurements to expert tips, embark on your artistic journey confidently. Elevate your DIY projects today - get your resin epoxy starter kit now and start creating masterpieces!
#epoxyresin#craftresin#diy resin starter kit#epoxy resin art starter kit#premium quality clear epoxy resin#craft ideas#diy craft#craft
0 notes
Text
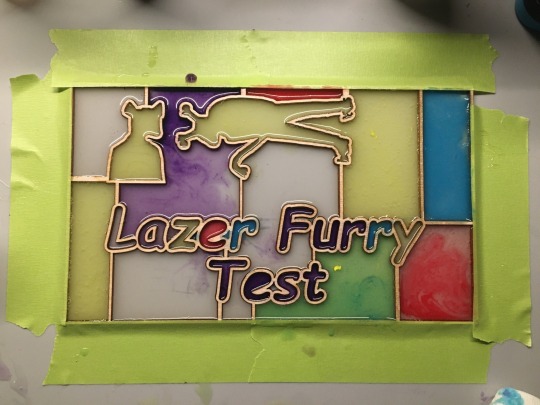
epoxy test
clear/purple = high gloss
yellow/green = low voc
red/blue = gorilla 5 minute
colored with acrylic craft paint
~100ml total, ~0.3 sq ft, 3mm birch ply
3 notes
·
View notes
Text
3 Beautiful Ways to Use Pressed and Dried Flowers | DIY Crafts You’ll Actually Keep!
I started working with dried flowers and pressed botanicals a few years ago, and it has taught me a few things.
Delicate dried flowers can burn or disintegrate in epoxy resin.
Glossy Mod Podge however much we love it, can make you cry (and even ruin your floral project).
Depending on your project, pressed flowers MUST be chosen as carefully as you would choose fabric, paper, or paint colors.
So how can you still work with these lovely mediums and create long lasting, archival art that you can be proud of? Read more to learn about 3 of the most botanical-friendly crafts.
Framed Glass Art
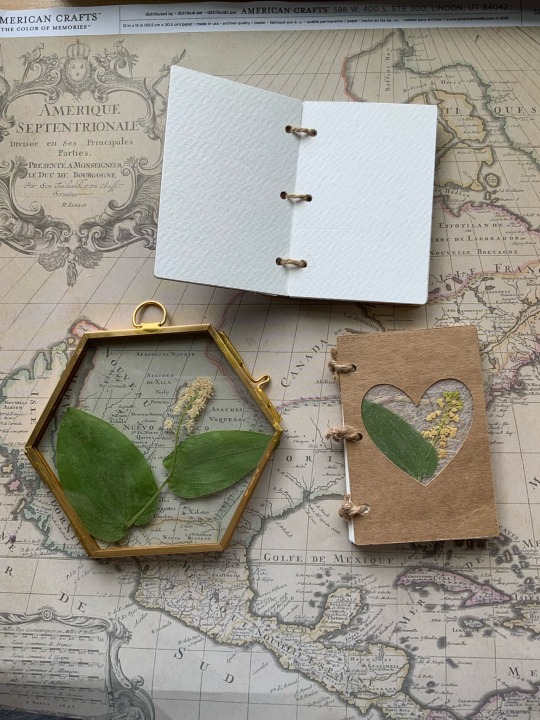
What you’ll need:
Double sided glass frame. (any size)I buy mine on Aliexpress or Amazon.
Clear glue, glossy mod podge, or a tape runner.
Pressed flowers
Scissors
How to make it:
Start by selecting your botanical specimens and arranging them in your frame. Use scissors to trim and refine your arrangement until it is to your liking.
Remove all of the flowers, and strategically place dots of clear glue on the inner glass. Wait until your glue becomes tacky. The time will depend on the type of glue that you’re using.
Tip: Test out the cure time by placing a few different sized glue dots on a plastic surface. See how long it takes for the glue to become more viscous and less runny.
Place the flowers onto the glass. Make sure to tack down all specimens with glue until they’re difficult to move. Allow the glue to dry completely before closing the glass frame.
Once dry, display your beautiful arrangement!
I love making smaller arrangements for office spaces and display shelves. These also make adorable secondary gifts in care packages.
Glass offers a more eco-friendly alternative to epoxy resin. Though I love working with resin, I’ve started to become more conscious and selective of my usage to creation ratio.
2. Floral Bookmarks
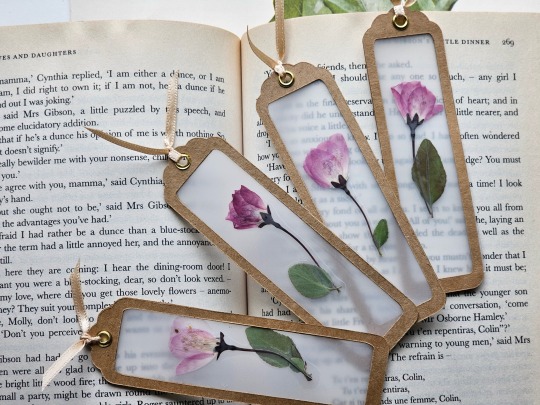
What you’ll need:
Pressed flowers. Preferably long stem flowers that press very flat such as fleabane and daisies. You can also use small flowers without stems.
Self or thermal laminating sheets.
Thermal laminator. (If using thermal lamination)
Scissors
Cricut Cutting Machine (highly recommended for a cleaner result) However, you can also create your own frames. Simply use two gift tags or rectangular pieces of paper. Measure and cut out another rectangle of your preferred size in the center of your paper. Use an X-Acto knife to make the cut out.
Kraft paper cardstock
Glue stick, or my personal recommendation, Kuretake Glue Pens. They will make less of a mess, and create a longer lasting bond on kraft paper.
How to make it:
If using a Cricut machine, start a new project in Cricut Design Space.
Search for “bookmark frame” in the “images” section.
Select a design you like the shape of. You can also create your own by “slicing” new shapes into existing templates.
Resize your design. Choose whatever size will accommodate the shape of your flowers.
Cut out your frames out on kraft paper.
Once you’ve cut out your design, remove half of the frames from the mat. Leave the other half on the mat. This will make keeping them flat easier once you’re ready to assemble everything.
Laminate your flowers. Be sure to use your frame as a guide to arrange them within the window. Leave an inch of space between each arrangement for cutting if you’re making more than one bookmark.
Cut around the flowers, leaving a bit of allowance for gluing them onto the frame. I never measure like I should. Just use the frame as guide to avoid cutting off too much laminating plastic. We will hide the ugly jagged cutting job later. 😅
Return to the mat and apply a generous layer of Kuretake glue to the entire surface of the frames still stuck to the Cricut mat.
Carefully place the laminated floral arrangement on the frame.
Apply another layer of glue around the edges of the lamination, and also on the other frame.
Place the second frame over one of the mat frames, and press down firmly. Tip: You can also place a book on top to keep them flat.
Let your bookmarks dry for about 20 minutes before adding your embellishments. I love using key charms, grommets, ribbons, or tassels.
Check out my inspo photos below! Get creative with decorating.
3. UV Resin Pendants
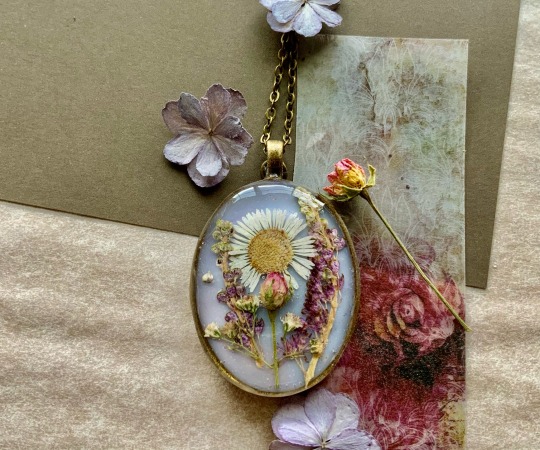
Before I started working with UV resin, I was told that it isn’t light fast. Which is true for most resins on the market. I’ve also heard that it yellows over time and that the UV light burns flowers.
These are all things that I’ve experienced working with flowers in UV resin. However, I’ve managed to make projects that have stayed glossy, clear, and beautiful for over 2 years now, and I want to share my tips and tricks!
Tip #1: USE a high quality UV resin such as the one from Counter Culture DIY.
Tip #2: AVOID using delicate flowers such as forget-me-nots, hydrangeas, larkspur, etc. If the petals are thin and delicate, they WILL become distorted or burn. Think florets, spaced petals, and small leaves.
Tip #3: USE opaque, strong, and VERY flat flowers such as pressed Violets, Chamomile, Fleabane daisies, Rosettes, Queen Anne’s Lace, and Baby’s Breath.
Tip #4: AVOID flowers with too many overlapping petals. These will trap air bubbles inside of your resin layers that tend to express during curing. They tend to cause very large holes and gaps.
What you’ll need:
Very high quality UV resin (My suggestion: Counter Culture DIY)
Cabochon bases or frame pendants
Barrier tape (if using a frame instead of cabochon base.)
Toothpicks to pop bubbles (I actually prefer using a sewing needle)
Light Curer such as a nail lamp. I use the Melody Susie 36W nail lamp from Amazon. Counter Culture DIY sells one specifically for their UV resin as well.
Pressed Flowers (My favorite seller on Etsy)
Optional: Colorants. I use mica powders, acrylic paints, and black and white resins from Counter Culture DIY (not sponsored, I wish!) These give your resin a background to stand out against.
Nitrile gloves
How to make it:
Start by applying a thin layer of UV resin to your base or taped frame. This will be the layer with color (if using pigments).
2. Pop any visible bubbles with a toothpick and cure the first layer for about 1-3 minutes.
3. Apply a thin dot of clear resin to the first cured layer. This will give your flowers something to stick to as you arrange them.
4. Once your flowers are arranged, apply a few strategic dots of resin around them to keep them in place. Cure the first thin layer without covering the flowers completely. Remember to pop bubbles!
5. Continue to add thin layers. Cure each layer for 1-3 minutes each. Repeat this process until your flowers are covered and your top coat has a domed appearance.
6. Finished! Avoid touching your project for several minutes until fully cooled. You don’t want fingerprints in your shiny top coat!
For more floral project ideas, check out my Pinterest below!
#pressed flowers#unique gifts#vintageinspired#art#home & lifestyle#floraldesign#fashion#books and literature#cottagecore#beauty#art tutorial#easy art#art ideas#artists on tumblr#books & libraries#floralart#handmade art#diy art#diy tutorial#journaling#inspo#writing#craftinspiration#my art#art supplies#artwork#floral#flowers#paper craft#diy ideas
3 notes
·
View notes
Text


Condor – Warlok Machete
Designed for clearing the toughest of brush and tactical self defense, the Condor Warlok Machete is a reliable everyday companion for the survivalist. The broad forward-weighted blade brings ferocious chopping and cleaving power to bear, and it is built as durably as possible with a full tang construction featuring grip scales of tough composite Micarta which are riveted directly to the thickened blade tang. The blade itself is crafted from well tempered 1075 high carbon steel and finished with a practical black epoxy coating.
Included with this tactical Machete is a sheath made from thick welted leather which is completed with buttoned retention straps and a swivel-mounted belt loop for wear.
#Kult of Athena#KultOfAthena#New Item Wednesday#Condor#Warlok Machete#machete#machetes#sword#swords#weapon#weapons#blade#blades#Modern Tactical Swords#Modern Tactical Weapons#Modern Swords#Modern Weapons#Tactical Swords#Tactical Weapons#new item#new items
3 notes
·
View notes
Text
How to Make Epoxy Resin Coasters with Embedded Objects
Epoxy resin crafts have taken the DIY world by storm, and one of the most popular projects is creating beautiful coasters with embedded objects. These coasters not only serve as functional items but also make for stunning décor pieces or personalized gifts. Whether you want to embed flowers, glitter, stones, or small trinkets, epoxy resin offers a versatile way to turn ordinary materials into extraordinary art.
In this article, we’ll walk you through the steps of making epoxy resin coasters and give you tips on using the right epoxy resin products to achieve the best results.
What You’ll Need:
Before diving into the process, make sure you have the following materials:
Epoxy resin (choose high-quality epoxy resin products from trusted epoxy resin suppliers)
Coaster molds (silicone works best)
Embedded objects (dried flowers, glitter, small shells, stones, etc.)
Mixing cups and sticks
Protective gear (gloves and a mask)
Heat gun or torch (to remove bubbles)
Sandpaper (optional, for finishing edges)
Step-by-Step Guide to Making Epoxy Resin Coasters
Step 1: Prepare Your Workspace and Materials

When working with epoxy resin, it’s essential to prepare a clean, well-ventilated space. Cover your work area with a disposable surface (like wax paper or plastic) to protect it from spills. Wear gloves and a mask to avoid direct contact with the resin and its fumes.
Make sure to purchase quality epoxy resin for optimal results. You can buy epoxy resin online from reliable epoxy resin suppliers to ensure you are using products that provide a clear, glossy finish with long-lasting durability.
Step 2: Mix the Epoxy Resin

Follow the instructions provided by your epoxy resin suppliers for mixing the resin and hardener. Typically, epoxy resin is mixed in a 1:1 or 2:1 ratio, depending on the product. Pour equal amounts of resin and hardener into separate mixing cups, then combine them and stir slowly for about 3-5 minutes. Be sure to scrape the sides and bottom of the cup to ensure the mixture is thoroughly combined.
Take care to avoid introducing too many air bubbles during the mixing process. If you want to add color, you can mix in epoxy-safe pigments or dyes at this stage.
Step 3: Pour a Thin Base Layer of Resin

Before embedding your objects, pour a thin layer of mixed epoxy resin into each silicone coaster mold. This will act as the base layer and provide a smooth surface for your embedded objects. Use your heat gun or torch lightly over the surface to remove any air bubbles that may have formed.
Allow this base layer to set for a few minutes, but don't wait too long as you’ll want the resin to still be tacky when you place your objects.
Step 4: Place Embedded Objects
Carefully arrange your chosen objects (such as dried flowers, stones, or glitter) into the resin layer. Get creative with your designs—just make sure the objects are relatively flat so they don’t protrude from the finished coaster.
Gently press the objects into the resin to ensure they’re fully immersed and not floating on the surface. You can use a toothpick to adjust the placement if necessary.
Step 5: Pour the Final Layer of Epoxy Resin

Once your embedded objects are arranged, pour another layer of epoxy resin over them, covering them completely. This final layer should bring the resin to the top of the mold. Use your heat gun again to remove any bubbles that have surfaced during pouring.
Let the resin cure according to the instructions provided by the epoxy resin suppliers—this can take anywhere from 24 to 48 hours. Be sure to protect the coasters from dust while they cure by covering them with a clean box or plastic sheet.
Step 6: Demold and Finish

After the curing process, gently remove the coasters from the silicone molds. If there are any sharp edges or imperfections, you can use fine-grit sandpaper to smooth them out. This will give your coasters a professional, polished finish.
Where to Buy Epoxy Resin for Your Projects
To ensure your DIY coasters turn out perfectly, it’s essential to use high-quality epoxy resin products. You can buy epoxy resin online from trusted epoxy resin suppliers who offer a range of products suited for crafting, art, and industrial uses. Look for suppliers that provide clear, UV-resistant resin with minimal bubbles for the best results.
If you’re planning multiple projects or experimenting with various designs, buying from reliable epoxy resin manufacturers can save you both time and money, as bulk purchases often come with discounts.

Creating epoxy resin coasters with embedded objects is a fun and rewarding DIY project that allows you to unleash your creativity. Whether you’re making personalized gifts or adding a unique touch to your home, working with epoxy resin is a versatile and exciting craft. For the best results, always use high-quality epoxy resin products from reputable epoxy resin suppliers.
When looking for premium epoxy resin for your DIY projects, consider MB Epoxy, a leading supplier of reliable and durable epoxy products.
0 notes
Last Seen Blogs

hartbreak-motel
Enough is Enough and it's Time for a Change

treeetales
Unrelated

geekanoids
Geekanoids

uravitypng
𝐆𝐑𝐀𝐕𝐈𝐓𝐘 𝐆𝐈𝐑𝐋

poppythetoppy
since when have the kidneys been so high