#cc creation
Explore tagged Tumblr posts
Text
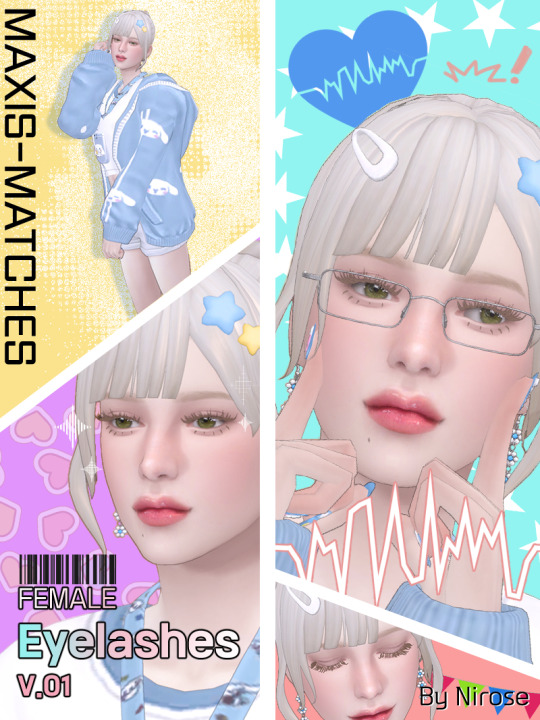


Maxis Matches Eyelashes V.01
[Detail information]
Base Game Compatible
Feminine Only
EA 24 swatches
Makeup > Eyelashes Category
Every ACC Compatible (No texture overlap!!! : Hat / Glasses / Piercings / Necklace / Bracelet / Nails / Rings / Socks ALL COMPATIBLE) YAY!
Teen-Elder
vertex 16842 / polygon 22608 (Veeeery High Polygon! Please be careful to use when playing... Maybe Okay for making lookbook)
Need to adjust the eyelid for some eye preset!
Don't claim as your creation / Don't share the file , plz~
Happy simming :D
Download (Patreon) FREE!
Alternative Download (Simfile Share)
---------------------------------------
안녕하세요! 드디어 첫 CC를 배포합니다 ㅎㅎ 여심용 속눈썹이에요
[세부 정보]
기본 게임 호환
여심 전용
기본 24컬러
메이크업 > 속눈썹 카테고리
모든 악세사리와 텍스쳐가 겹치지 않습니다! (행복)
청소년~노인심 적용
버텍스 16.8K / 폴리곤 22.6K (첫 제작이라 굉장히 폴리곤이 큽니다... 저사양 컴퓨터나 노트북에서는 플레이 시 렉이 있을 수 있어요 ㅠㅠ)
눈꺼풀이 상당히 높거나 낮은 눈 프리셋인 경우 위치가 맞지 않을 수 있습니다!(눈꺼풀 위치 조정 필요)
공유와 재배포는 금지합니다.
즐거운 심즈 플레이 되세요~ >.<
Download (패트론) 무료 공개!
다른 다운로드 경로 (심파일쉐어)
#sims 4 cc#ts4#ts4 simblr#sims4#cc creation#ts4 eyelash#ts4 maxis match#maxis match cc#sims 4 maxis match#ts4 mm eyelashes
54 notes
·
View notes
Note
I have been playing sims 3 for years and love it. I wanted to know if you take requests or know anyone who does. I know sims forever will grow because of the CC. i wanted to know if someone could create a way to park on the streets? Also, if babies could be transported in cars by single parents, and if horses could share the training poles so they could race? I have so many ideas, I just do not know how to code to make CC. Any links you could send me would be great. Thank you.
Hi shelterdog31, I'm so sorry for getting back to you so late. CC requests are more common than mod requests and I can't think of anyone taking mod requests, unfortunately. If you want to try to make some CC or mods yourself/get started on the journey, I recommend the forums at modthesims.com for modding resources. You could also check there if maybe someone made the mods you are looking for already at modthesims! It's the #1 site where modders post their mods, but I bet you are already familiar with it. If you want to make CC, @sims3tutorialhub here on tumblr is a good place to start, there are a lot of tutorials and resources to find there. Most CC creators and modders started with an idea and a strong desire to make it happen! Maybe you cannot make the exact mods you have in your mind right away, but you can learn step by step and eventually get there if you are willing to put the effort and time in. There is also the TS3 creator's cave discord where you can find help if you're stuck or looking for advice. I also have been known to lend a hand to beginner CC creators; unfortunately, I don't have the capacity for it at this time. But I also have tutorials and info on how to make CC published on my tumblr (though they are rather snippets/tips and tricks than complete tutorials). For getting started with modding, maybe you could ask the legendary @greenplumbboblover, she has a lot of experience and could maybe point you to some resources. Good luck!
2 notes
·
View notes
Text
Posing in Blender 101
Checked December 2024, Blender v4.3.2 (+ v3.3.0 + v2.67)
In this tutorial we will create a custom Pose in blender, make sure you know the basics of Blender usage first (selection of nodes, rotation, movements, etc).
Make sure your S4S Blender setting points to the same version as the one you created your pose in, or newer, or you will only get the default pose in game.
The most basic thing is to ensure your are in "Pose Mode" in Blender, with the sim's rig selected.
Inverse Kinematics
When opening up a blank rig from S4S there is one thing to make posing much easier; Inverse Kinematics. This makes it so nodes connected "towards" the base also moves when moving ("grabbing") the node with an IK constraint.
So instead of the node stretching and moving independently.
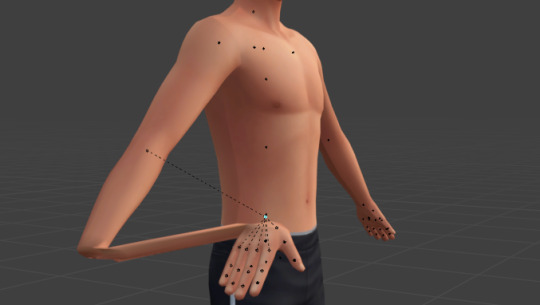
You can have a few nodes adjust their positions to have a more natural movement.

To add Inverse Kinematics you select the node (the bone) and select Bone Constraints (the bone with a circle-ish in v3.3/4.3, or the bone with a chain link in v2.76).


Click to add a new Bone Constraint, and select Inverse Kinematics.
The setting you are interested in is the Chain Length value, you most likely want it to be 3, but it depends on the node. The number is how many nodes should be affected. If you add IK to the wrist, and up the Chain Length to 4, for example, it will move the shoulder too. Feel free to test and experiment to see what you like best.

Add IK to relevant nodes, for example the wrists, finger tips, and ankles.
Remember that this is affected when moving (G) nodes around, but not when rotating (R).
Finalise the pose
Once you've done with posing, you need to select all nodes in the rig with A, then click I. In v4.3 this is enough, but in 3.3/2.67 it "only" opens the Insert Keyframe Menu and you then need to select Location & Rotation (or LocRot in v2.67).
I'm not sure about this, but I think this is to add the pose into the animation timeline, since all poses in Sims 4 are animations "behind the scenes".
3 notes
·
View notes
Text
i bought nomad on the ipad (i was gifted money on apple and couldnt think of anything else) has anyone used it? can i make cc with it?
#its kinda scary lmao#i opened it and immediately closed it#nomad#sims 4 cc creation#cc creation#cc questions
0 notes
Text


Framed "University Acceptance Letter"! It's not functional and doesn't act like a real letter, but it's nice to pretend and put on a wall alongside your sims diploma!❤ • Base Game Compatible; • 15 swatches; • Low Poly, all maps; • Recolors and conversions are allowed; • Frankentexture by me.
DOWNLOAD [always free, no adfly]: SFS | MediaFire | Patreon
@alwaysfreecc thank you!♥
#iloons cc#s4cc#sims4#sims 4#the sims 4#the sims community#sims 4 creation#sims4cc#ts4 cc#publicCCfinds
3K notes
·
View notes
Link
Link via the WayBack Machine: https://web.archive.org/web/20230705072454/https://voidfeathersims.blogspot.com/2018/11/tutorial-sims-4-vertex-painting-colors.html
Vertex painting tutorial
Created for: The Sims 4 by voidfeathersims
53 notes
·
View notes
Text


TS4 Crystal Creations SP - 4t3 conversion
I wanted to finish this one before Halloween but alas. At least it's done!
The fancy TS4 scripted objects are just... regular surfaces in TS3. The jeweler desk works like a regular one, the sales table is a (very nice imo) dining table and the round mystical grid thing is just a pretty tray.
That said, I managed to add vertical modularity to the cube shelf :) It's... just a slot, but they do stick to each other even against a wall!
Again, the uncluttered dining table is an edit of my own and not Peacemaker's, but I -do- plan on converting his add-ons later!
The rest is all straightforward :P All BGC, recolorable, highest polycount is around 1.8k for the jeweler desk. The missing items from the pack were made by @bioniczombie already!
(I do have decor, recolorable gems here if you're interested)
DOWNLOAD (package): Dropbox (SFS is acting up right now, will add a link when it goes back)
#ts3cc#s3cc#sims 3 cc#4t3#download#functional#seating#surfaces#lighting#storage#decor#crystal creations sp
567 notes
·
View notes
Text


one gifset per episode 。・:*: cardcaptor sakura
S1E016 ━ Sakura and the Rainbow of Memories (August 4, 1998)
#cardcaptor sakura#sakura card captor#shoujoedit#clamp#ccsedit#ccs#dailyshoujo#animeedit#animedaily#allanimanga#touya kinomoto#sakura kinomoto#yukito tsukishiro#creations
385 notes
·
View notes
Text
*I could've been doing this all along!?!?!?!*
Sims 4 Studio Batch Export/Import Cheats
I’m minded not everyone may know about the batch export and import cheats in Sims 4 Studio. They make it a lot, lot easier to get your files in and out of the program (which is especially welcome when making walls and/or anything with a lot of swatches).
Here’s how it works:
Step 1: Open S4S and ready your package by creating your swatches (the easiest way to do this is to load a colour palette you’ve already prepared using Tools > Color Palette but you can do it manually if you need to)
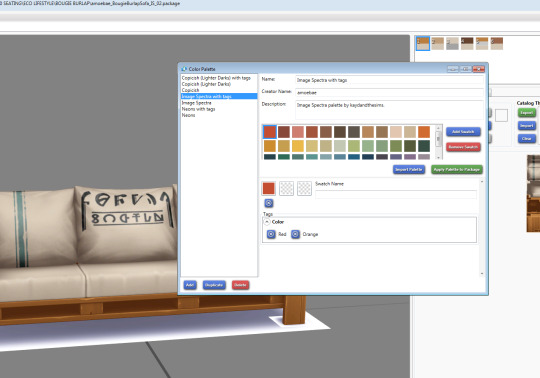
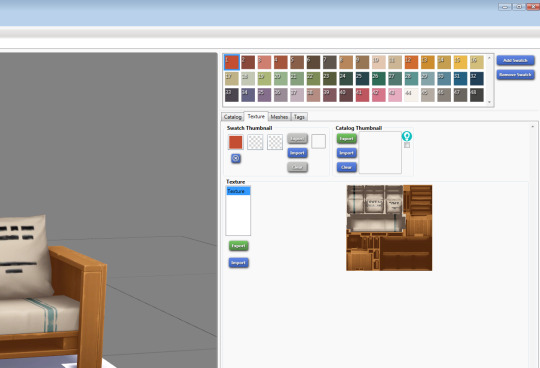
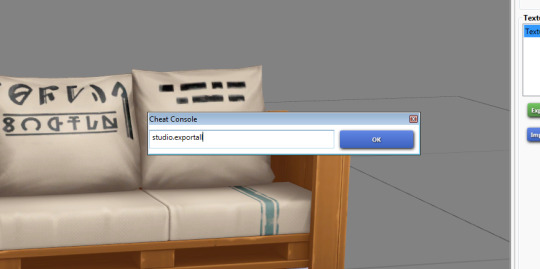
Step 2: Once you have your swatches in place, press CTRL+SHIFT+C (the same command to open the cheats window in TS4) and type studio.exportall
S4S will create a folder in the same location as your package that has all the various texture files associated with your package in PNG format.
Go into that folder and delete everything that isn’t a main diffuse texture (all the files highlighted in the picture below are the ones you want to delete). You’ll be left with the same amount of identical diffuse textures as there are swatches in your package.

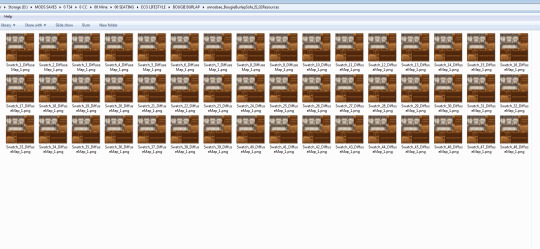
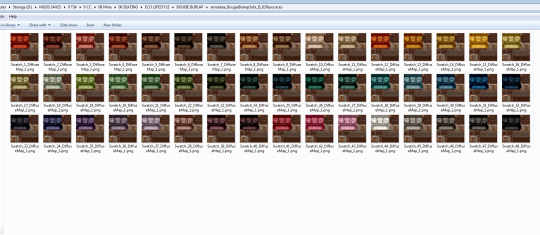
Step 3: Create your recolours/textures and save them with the file names of the corresponding diffuse textures/swatches you have in the folder S4S made. (You have to save them as PNG.)
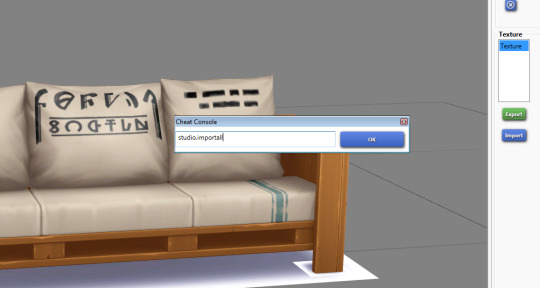
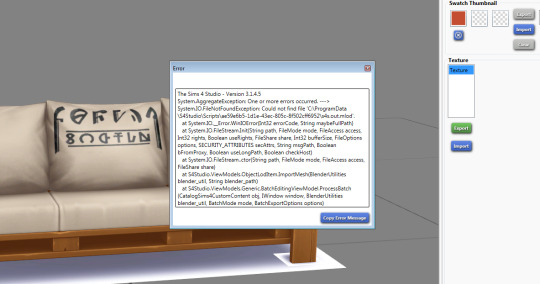
Step 4: This is why it’s important to save the files in the same folder and with the names S4S created. Go back to S4S and in the cheats window (CTRL+SHIFT+C) type studio.importall and watch as it imports all of those nice new textures for you. It will likely throw an error at the end, but you can safely ignore it and close the error window (close it with the little red x in the top right corner).
(At first you won’t see any change. You have to click on a new swatch to see it’s imported them all.)
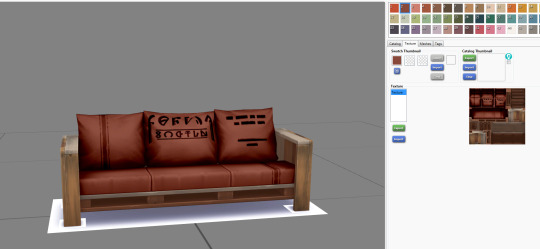
You’re done! You now have 48 (or a far more sensible number of) nice new textures and can save your package and check it in game.
This works for all objects and walls and floors. I haven’t tried it on cas objects because I don’t make them.
Sometimes when importing wall textures if you’ve been using S4S for a while its memory can get a little overloaded and it won’t import them all. If this happens you can either close the program and start again, which will clear the memory, or you can just keep typing the batch import cheat and eventually it will import them all. It just needs a little coaxing.
And for walls and floors S4S will automatically create the thumbnails for you. You still have to generate them yourself for all other objects by viewing them in game (or add your own in S4S).
This makes creating recolours in particular quick and easy. The most time consuming part is doing the recolouring itself. Gone are the days of individually importing hundreds of textures.
2K notes
·
View notes
Text
MEDIEVAL CEILINGS BUILD SET

-1 MONTH EARLY ACCESS ON PATREON-
-PUBLIC ACCESS ON PATREON NOW-
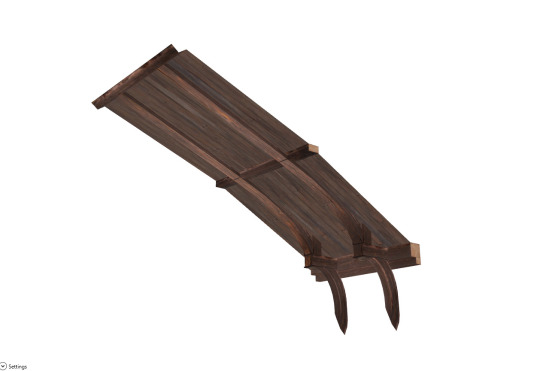

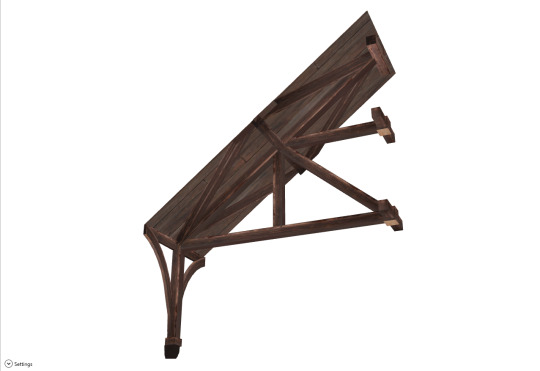
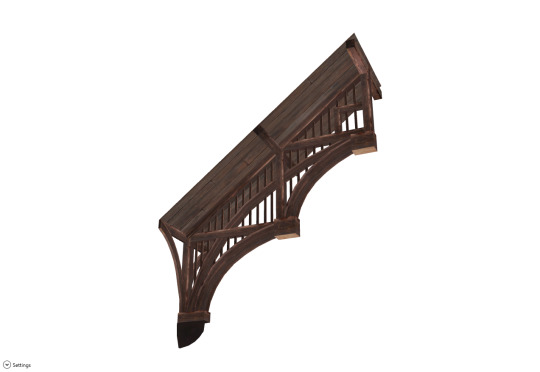
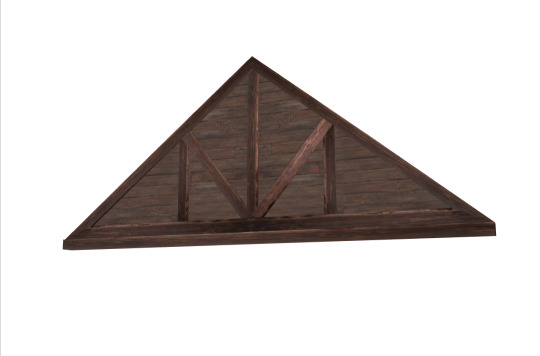

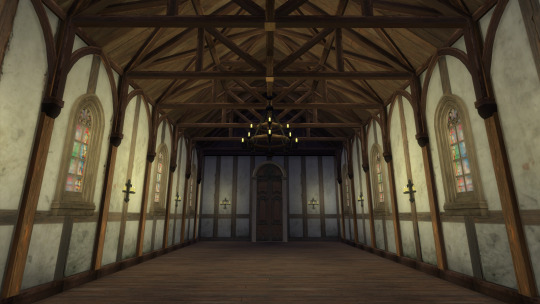

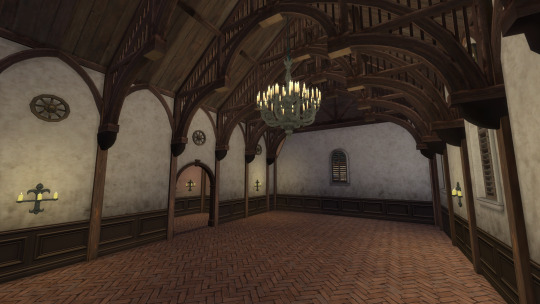
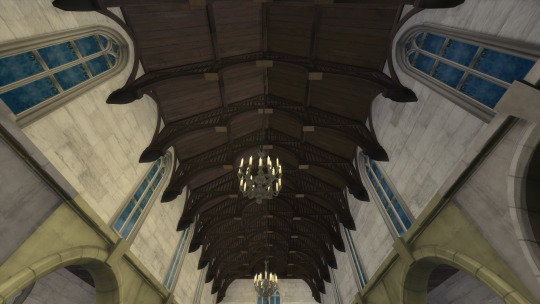
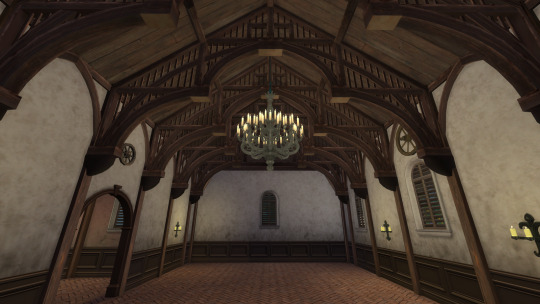
First of ALL, we are terribly sorry for this long period of absence, we had study, work, complications, and thousands of things going on !!!
We have been working for the last week on these medieval ceiling ideas and medieval beams, and it came out as a mini amazing set which you can use to create a lovely wood cabin, or a great hall with these new medieval wood ceilings.
This Set Includes
5 Ceilings
3D Beams that you can place anywhere, as you like
4 Triangular Wall covers (For hiding exposed ceiling spaces)
It's ALL BASE GAME Compatible, as usual !!
Swatches in light, dark and colourful options !!!
The ceilings are easier to place since they're wall sculptures and can be placed at your desired height. They are found in ceiling decor and wall sculptures in build/buy
One month early acces.
PUBLIC ACCESS NOW AVAILABLE...
LINK BELOW:
We Hope You Enjoy!
#sims4#sims 4 cc#sims 4#the sims 4#thesims4#sims4cc#historical sims#sims 4 historical#sims 4 creations#historicalsims#sims 4 medieval#medieval sims 4#medieval sims
498 notes
·
View notes
Text

Almaz Nose Ring
HQ Mod compatible
Base game compatible
With custom thumbnail
Original Mesh
5 swatches
Download (Early Access) Public release on 11/07/2023
Download (Blender Version) Patreon Exclusive
T.O.U. Please do not reupload my CCs. Tag me in your photos with my CCs, please, I would love to see them. ♥ Do you wanna support my work? Check out my Patreon page. Thanks for the support ♥
#s4cc#ts4cc#sims4cc#s4ccfinds#thesims4#the sims 4 custom content#sims 4 download#MaxiMoons#sims 4 cc#sims 4 cc finds#the sims 4#the sims 4 creations#sims 4#ts4 simblr#ts4#simblr#sims 4 accessories#sims 4 piercings#sims 4 accesory#sims4accessories#sims4accesory#sims4piercings#sims 4 early access#sims4piercing#sims 4 piercing
2K notes
·
View notes
Text
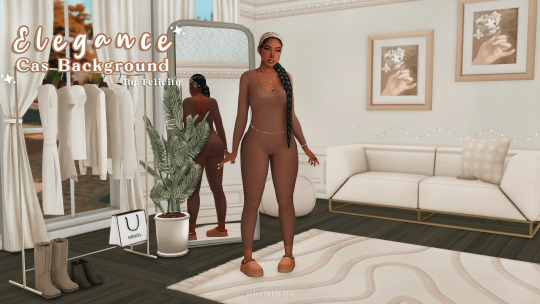
Elegance Cas Background — By Felicity
In Game Preview:
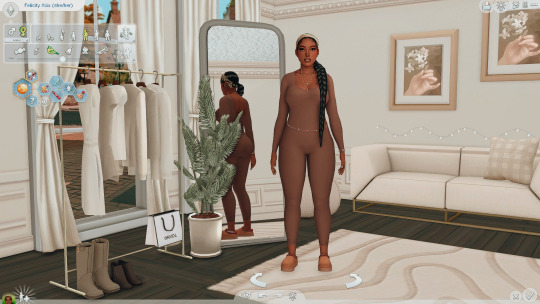
Download ♡ (Free)
Terms Of Use: Please do not claim or reupload as your own.

youtube | twitter | tiktok | twitch
#cas background#cas backgrounds#sims 4 cas background#the sims 4#sims 4#thesims#creations#simblr#the sims#sims4cc#ccfinds#cc finds#sims 4 screenshots#sims4#thesims4#the sims cc#simscc#the sims 4 cc#ts4#cas mods#sims 4 cas#ccmods
550 notes
·
View notes
Text
Posing in Blender 103
Checked December 2024, Blender v4.3.2
In this tutorial we will create a custom Pose with an Accessory.
1. Import Accessory
Select the blend file, go into the Object folder, and then select one of the s4studio_mesh_x, if the item doesn't show up then try another numbered s4studio mesh.
Feel free to remove the big circles called bone_bone_shape.001, but you don't have to.
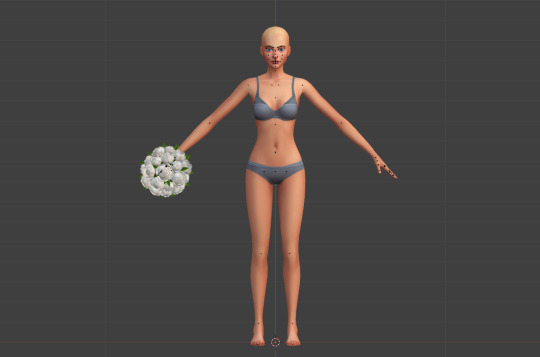
2. Connect Accessory to Rig
If we start to create the pose we will notice that the accessory will stay in it's original place even when moving the parts it's supposed to be connected to.

To connect the item to the sim you need to select the accessory, and go to Modifiers (wrench icon). In the Object field, change it to the sim rig (probalby called "rig" as it's the original rig).
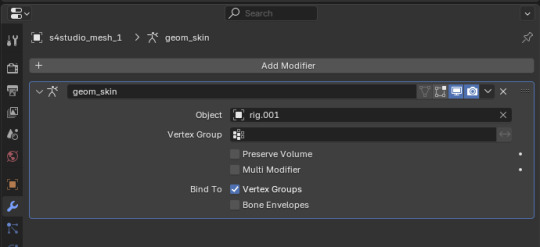
Now when you move the part the accessory is connected to, the item will move along with it.

3. Make your pose
Then you continue as you usually would, ending with the LocRot thing. Some items (but not all?) can be moved and rotated independently of the sim, making posing with it even easier.
You don't need to do anything special about the accessory, it is just there.
0 notes
Text

Help I was unprepared for how absolutely adorable and handsome this man is in person Jesus Christ.
#AND I HAVE TWO PICS AND THE FREAKIN MEET AND GREET#I MAY DIE#creation orlando#cc orlando#misha collins#spn
217 notes
·
View notes
Text

You like chunky "cartoonish" tears? Cool, me too! (Been asked a few times what tears i use, truth is, i just draw them on while editing lol) So here are tears for your sims drawn by yours truly and packed as face paint♥

• Face paint category; • Base Game Compatible; • 10 swatches; • Disallowed for random; • Hand-drawn by me.
DOWNLOAD: SFS | MediaFire | Patreon [no adfly, always free]
@alwaysfreecc @sssvitlanz thank you💖
#iloons cc#s4cc#sims 4#the sims 4#the sims community#sims 4 creation#sims4cc#ts4 cc#cas cc#sims 4 cas#publicCCfinds
1K notes
·
View notes
Text


the pottery studio next door
inspired by @moonwoodhollow's Zora Ceramics build
#i don't think i can handle the love that this build is getting <333#especially when you have such a negative insight on your own creations#and everything always seems not good enough or unfinished#i feel like documenting my progress is helping me love my creations more#ts4#the sims 4#simblr#screenshots#aesthetic#sims 4 build#sims build#ts4 build#no cc build#no cc lot#businesses and hobbies#notting hill#pottery studio#ceramics room#reshade#work in progress#wip#my builds
103 notes
·
View notes