#cantilever sign
Explore tagged Tumblr posts
Video
Wiesbaden, Marktstraße, Fisch-Frickel by HEN-Magonza
#Wiesbaden#Marktstraße#Fisch#fish#Werbeschild#shop sign#cantilever sign#Hessen#Hesse#Deutschland#Germany#Auslegerschild#flickr#engrish#frickel
0 notes
Text
Boulder Club in 1945 marked the beginning of the big neon spectaculars in Las Vegas.
It featured a scene in action on the front of the marquee, the movement of water flowing at Boulder Dam. The effect was created with a series of masks rotating on drums between the light and the hand-painted scene on translucent plastic. Young Electric Sign Co. (YESCO) created the sign, and opened their first shop in Las Vegas to oversee its full-time maintenance.
Prosper J. Goumond and partners opened Boulder Club 7/27/29 in their new 2-story building at 118 Fremont St. They had one of the first neon signs in Las Vegas. In the early 30s they upgraded their sign, the new one being the first major sign by YESCO in Las Vegas. Boulder Club later expanded into 120 Fremont St, doubling their frontage to 50-feet.
Thomas Young Sr., founder of YESCO, came to Las Vegas in 1945 to sell the new sign to the Boulder Club. His son Thomas Young Jr. says, "Dad sketched out the sign on butcher paper on a wall at El Cortez Hotel."
The marquee with the slogan “Enjoy the Old West” covered the 50 feet of 118-120 Fremont and extended 12 feet over the sidewalk. The top of the sign was 42 feet from the bottom to top, or as big as the building itself. The sign is constructed with an internal steel structure, welded, without the use of bolts, and supported by cantilever. Construction began in July and was completed in Fall.
Boulder Club announces completion of Nevada's Most Spectacular Giant Fluron-Neon Sign and New York Type Markee. See Boulder Dam in Action. Designed, Built, Originated: Young Electric Sign Co., plants at Salt Lake City and Las Vegas. - Review Journal, 10/20/45.
Sources: 2-Story Club to Be Built Soon. Las Vegas Age, 5/23/29 p1; New Sign for Boulder Club. Review-Journal, 7/13/45 p13; Boulder Club Sign A Dilly. Review-Journal, 7/17/45 p9; Thomas Young Jr. oral history interview (OH-03255), UNLV Special Collections & Archives.
16mm color film, circa '47/48: Prelinger Archives, Jamison Collection.
Below: (1) Young Electric Sign Co. (YESCO) installs the second Boulder Club sign, July 1945. Young Electric Sign Company (YESCO) Corporate Records (MS-00403), UNLV Special Collections. (2) Postcard, circa early 50s. The section reading, "Boulder Club: Bets from a Dime Up," was added circa '52, and removed in '55.


77 notes
·
View notes
Text
my live reaction to the Brooklyn Queens Expressway in new york:
"wow how did this person find a time with no traffic delays?"
"is this really how people drive in new york?"
"wow those lanes really are narrow, how is this even considered a highway?"
"that ford escape is gonna cause a fucking accident!"
"wow, think of all the buildings that used to be here before this highway was build over them..."
"this is way to much space to dedicate to a highway in an urban area"
"why are there so many schoolbuses??"
"ive never seen a "hill blocks view" sign before"
"why are the lane markers solid here? why cant you change lanes??"
"cant they choose a fucking road surface to use and stick with it?"
"45 mph speed limit enforced by radar?? thats harsh"
"ooh we're elevated"
"i feel for those people going the other direction, about to run smack into a traffic jam"
"dude, you had so much time to move into that exit lane, and then you decide to do it the moment youre not legally allowed to?? what??"
"wow theyre really keeping us waiting with the promise of 'road work: expect delays'"
"12' 4" of clearance?? brutal. jeez"
"omg its the triple cantilever!!!"
"oh my god its a suburban. wow, it can barely fit in that lane!"
"40 mph around that corner?? that f150 better slow down, my god"
"oh hey a BQE tour from the 90s?"
#196#r/196#r196#literally 19684#bqe#brooklyn queens expressway#highways#new york#brooklyn#queens#freeways#urbanism
7 notes
·
View notes
Text
This signage falls into a category I like to call "Stupid Human Signs."
A Stupid Human Sign is a sign that exists to state a rule that we know someone would obviously break if it were not explicitly stated, just because that's how humans are. We are all delightfully absurd children at heart.
Examples include:
"Please do not sit" placed on an art display of a giant chair.

"Do not jump" placed on a cantilevered glass catwalk scenic overlook shaped exactly like a giant diving board.

"No graffiti on ancient city walls" and "Please do not climb on the walls" placed on, well, the ancient city wall.

And my personal favorite, found on every single plinth in an entire room full of dick sculptures at an art museum dedicated to sex and sexuality:

no swimming sign at 虎跳峡hutiaoxia by 如果我叫桥子


38K notes
·
View notes
Text
How to Choose the Right Scaffolding Company in Guildford

When embarking on a construction or renovation project, safety and efficiency are paramount. This is where selecting the right scaffolding company Guildford comes into play. Guildford is home to a number of reputable firms offering scaffolding solutions, but choosing the right one for your needs can be challenging. This guide will help you navigate the process, ensuring your project is in safe hands.
Why Scaffolding is Essential in Construction
Scaffolding forms the backbone of construction and renovation projects by providing a stable and secure platform for workers. Its importance includes:
Safety: Reduces the risk of accidents by offering a secure working environment.
Accessibility: Allows workers to reach high or awkward areas easily.
Efficiency: Improves project timelines by offering a structured workspace.
Versatility: Can be tailored to suit various project sizes and complexities.
Opting for an experienced scaffolding company Guildford ensures you benefit from high-quality materials and professional expertise.
Types of Scaffolding Services in Guildford
When considering scaffolding companies Guildford, it’s important to understand the types of scaffolding available to suit different projects:
1. Suspended Scaffolding
Ideal for projects involving tall buildings.
Platforms are suspended by ropes or chains.
2. Supported Scaffolding
Common for construction and painting projects.
Built from the ground up with poles and frames.
3. Rolling Scaffolding
Equipped with wheels for mobility.
Best for projects requiring frequent movement.
4. Cantilever Scaffolding
Used when ground support is limited.
Extends outward, supported by strong structures.
5. Single and Double Scaffolding
Single scaffolding is used for brick masonry.
Double scaffolding is preferred for stone masonry due to added stability.
Discuss your specific needs with a scaffolding company Guildford to determine which solution is right for your project.
Benefits of Hiring Professional Scaffolding Companies
Working with established scaffolding companies Guildford offers several advantages:
1. Safety Assurance
Professional scaffolding firms adhere to strict safety regulations, ensuring the wellbeing of workers and bystanders.
2. Customised Solutions
They provide tailored scaffolding designs to meet the unique demands of your project.
3. High-Quality Materials
Reputable companies use durable materials that comply with industry standards.
4. Time and Cost Efficiency
Efficient scaffolding setup and dismantling save time, while competitive pricing reduces overall costs.
5. Liability Coverage
Most professional companies carry liability insurance, protecting you in case of unforeseen accidents.
How to Choose the Right Scaffolding Company Guildford
Selecting the best scaffolding company Guildford requires careful evaluation. Here’s a step-by-step guide:
1. Check Credentials
Verify the company is accredited by relevant industry bodies like the NASC (National Access & Scaffolding Confederation).
Ensure they have appropriate licenses and certifications.
2. Experience Matters
Opt for companies with extensive experience handling projects similar to yours.
Request case studies or references to assess their track record.
3. Safety Standards
Confirm the company follows robust safety protocols.
Ask about their approach to risk assessment and worker training.
4. Customisation Options
Choose a firm that can tailor scaffolding solutions to meet your specific requirements.
5. Transparent Pricing
Get detailed quotes to avoid hidden costs.
Compare prices among several scaffolding companies Guildford to find the best value.
Top Considerations for Scaffolding Safety
Safety should be the top priority for any scaffolding project. Both workers and property owners must adhere to these guidelines:
Regular Inspections: Ensure scaffolding is inspected daily for signs of wear or damage.
Weight Limits: Avoid overloading scaffolding with excess materials or equipment.
Proper Training: Workers must receive adequate training before using scaffolding systems.
Weather Conditions: Avoid using scaffolding during adverse weather, such as high winds or rain.
Secure Anchoring: Ensure scaffolding is properly anchored to prevent collapse.
A trustworthy scaffolding company Guildford will take these factors into account, ensuring maximum safety on-site.
FAQs About Scaffolding in Guildford
1. How much does scaffolding cost in Guildford?
Costs vary depending on the project’s size and complexity, but typical rates range from £250 to £1,000 per week. Contacting several scaffolding companies Guildford for quotes is the best way to determine costs.
2. Do scaffolding companies provide insurance?
Yes, most reputable scaffolding companies carry liability insurance to cover potential accidents or damages.
3. How long does scaffolding take to set up?
Setup time depends on the project’s scale. Small projects may take a few hours, while larger ones could require a couple of days.
4. Can scaffolding be used on uneven ground?
Yes, professional scaffolding companies can install scaffolding on uneven terrain by using adjustable base plates or levelling tools.
5. How often should scaffolding be inspected?
Scaffolding should be inspected:
Before initial use
At least once every 7 days
After any alterations or extreme weather conditions
Conclusion
Choosing the right scaffolding company Guildford is crucial for the success and safety of your construction project. By understanding the types of scaffolding available, evaluating companies thoroughly, and prioritising safety, you can ensure a seamless and efficient process. Reputable scaffolding companies Guildford bring experience, quality, and professionalism, making them a valuable partner for your project.
Take the time to research and select a provider that meets your needs, ensuring your project is completed safely and efficiently.
0 notes
Text

Frank Lloyd-Wright, Fallingwater - Architecture Fallingwater is located in the mountains of Southwestern Pennsylvania, about seventy miles southeast of Pittsburgh. This house captivates me due to the concept of people living in harmony with nature however, the house almost seems juxtaposed to its surroundings as the building was man-made, it completely goes against nature and doesn’t sit naturally in its environment. Fallingwater is made out of varied materials, such as concrete, stone, steel, glass, and wood. These materials were all used due to Mr Wright's concept of ‘organic architecture’ and man living in harmony with nature. Frank Llyod-Wright used a cantilever for his building to hang over the waterfall. A cantilever structure allows overhanging structures without any additional support, which would have worked perfectly for Mr. Wright as it allows the building to seem more minimalistic and modern without metal beams or any kind of support. In my opinion, the metal beams and industrial architecture would have ruined the houses’ aesthetic. This private building clearly shows signs of wealth, status, and power, the materials would have been very costly. The building and planning would have been a very long process and the private land tucked away clearly indicates the status and importance of this architecture.
0 notes
Text
Cantilevered Canopies Installation: A Comprehensive Guide
Cantilevered canopies are more than just a stylish architectural feature; they provide practical benefits like shelter from the elements, enhanced aesthetics, and an inviting entrance to buildings. Whether you're an architect, contractor, or a DIY enthusiast, understanding the installation process is key to ensuring the canopy is both functional and durable. This blog will guide you through the steps involved in installing cantilevered canopies, offering tips and insights along the way.
What Are Cantilevered Canopies?
Cantilevered canopies are structures that project outward from a building without external supports like columns or posts. Instead, they rely on strong, anchored connections to the building, creating a clean and unobstructed space underneath. These canopies are commonly used in commercial buildings, residential entrances, and public spaces.
Pre-Installation Planning
Before diving into the installation process, thorough planning is essential. Begin by assessing the building's structure to ensure it can support the additional load. Consulting with a structural engineer may be necessary, especially for larger canopies or those in areas with high wind loads or heavy snow. Obtain any required permits, and ensure that your design complies with local building codes and regulations.
Selecting the right materials is another crucial step. Common materials for cantilevered canopies include steel, aluminum, glass, and wood. The choice depends on the aesthetic preferences, budget, and environmental conditions.
Step-by-Step Installation Guide
Site Preparation
Measurement and Marking: Begin by accurately measuring and marking the area where the canopy will be installed. Use a laser level to ensure precision in marking the mounting points.
Surface Preparation: Ensure the building surface is clean, flat, and free of debris. Any imperfections in the surface should be repaired to provide a solid base for mounting.
Mounting Brackets Installation
Bracket Selection: Choose heavy-duty brackets capable of supporting the weight of the canopy. Stainless steel or galvanized steel brackets are commonly used for their strength and corrosion resistance.
Drilling and Anchoring: Drill holes into the marked points on the building’s structure. Insert appropriate anchors, such as expansion bolts, and securely fasten the brackets. Ensure each bracket is perfectly aligned with the others to distribute the load evenly.
Canopy Assembly
Pre-Assembling Components: Depending on the design, some parts of the canopy may need to be pre-assembled on the ground. For instance, glass panels or metal sheets may be attached to the frame before lifting.
Lifting the Canopy: Use mechanical lifts or cranes to hoist the canopy into place. This step requires precision and safety, as the canopy must align perfectly with the installed brackets.
Securing the Canopy: Once in place, secure the canopy to the brackets using high-strength bolts. Double-check all connections to ensure they are tight and stable.
Final Adjustments and Inspection
Alignment Check: After securing the canopy, recheck the alignment to ensure it is level and straight. Any misalignment can affect the canopy's structural integrity and appearance.
Sealant Application: Apply sealant around the joints and edges where the canopy meets the building. This step is vital to prevent water ingress and protect the building’s facade.
Safety Inspection: Conduct a thorough inspection to ensure that all connections are secure, and the canopy is stable. Verify that there are no sharp edges or protrusions that could pose safety risks.
Post-Installation Considerations
Once the installation is complete, regular maintenance is essential to ensure the longevity of the cantilevered canopy. Inspect the canopy periodically for signs of wear, corrosion, or structural damage. Cleaning the canopy, especially if it includes glass or metal, will help maintain its appearance and functionality.
In areas prone to harsh weather conditions, additional inspections may be necessary after storms or heavy snowfall. Address any issues promptly to prevent further damage.
Conclusion
Installing a cantilevered canopy is a complex process that requires careful planning, precise execution, and ongoing maintenance. When done correctly, it not only enhances the visual appeal of a building but also provides practical benefits that can be enjoyed for years to come. By following the steps outlined in this guide, you can ensure a successful installation that meets both aesthetic and functional requirements.
Whether you're working on a commercial project or adding a stylish entrance to your home, a well-installed cantilevered canopy is a valuable addition that reflects quality craftsmanship and thoughtful design.
1 note
·
View note
Text
Safety and Efficiency: Essential Storage Solutions for Every Warehouse
In the dynamic world of warehousing, safety and efficiency are paramount. As warehouses evolve to meet the demands of modern business, implementing essential storage solutions becomes critical. These solutions not only streamline operations but also ensure a safe working environment for employees.

At Sigma Racks, we prioritize safety and efficiency in warehousing. Our essential storage solutions, including pallet racking systems, mezzanine systems, and cantilever racks, ensure optimal space utilization and secure storage. Invest in Sigma Racks for a streamlined, safe, and productive warehouse environment. This blog explores key storage solutions that enhance both safety and efficiency in any warehouse setting.
Pallet Racking Systems
Pallet racking systems are the backbone of most warehouses. They offer a structured and organized way to store palletized goods, making them easily accessible and maximizing vertical space. Various types of pallet racking systems, such as selective, drive-in, and push-back racks, cater to different storage needs.
Safety Considerations:
Ensure racking systems are installed by professionals and inspected regularly.
Use load capacity labels to prevent overloading.
Implement anti-collapse mesh at the back of racks to prevent items from falling.
Efficiency Benefits:
Facilitates easy access to goods, improving pick times.
Optimizes space utilization, allowing for more inventory storage.
Mezzanine Systems
Mezzanine systems add an extra level within the warehouse, creating additional storage space without expanding the footprint. They are versatile and can be used for various purposes, including storage, office space, or production areas.
Safety Considerations:
Ensure mezzanines are designed to handle the intended load.
Install guardrails and handrails to prevent falls.
Provide adequate lighting and clear signage for safe navigation.
Efficiency Benefits:
Increases usable space without significant construction costs.
Separates different operations, reducing congestion and improving workflow.
Cantilever Racks
Cantilever racks are ideal for storing long, bulky items such as pipes, lumber, and steel bars. They consist of arms extending from a central column, allowing easy access and flexible storage options.
Safety Considerations:
Ensure arms are correctly secured and checked for wear and tear.
Use locking pins to prevent accidental dislodging of items.
Maintain clear aisles to prevent collisions and accidents.
Efficiency Benefits:
Simplifies storage of awkwardly shaped items.
Allows for quick and easy loading and unloading.
Automated Storage and Retrieval Systems (AS/RS)
AS/RS technology brings automation into the warehouse, utilizing computer-controlled systems to store and retrieve items. These systems are highly efficient and can significantly reduce labor costs.
Safety Considerations:
Ensure systems are regularly maintained and inspected.
Train staff to understand and safely interact with automated systems.
Implement emergency stop mechanisms and safety barriers.
Efficiency Benefits:
Drastically reduces retrieval times, enhancing productivity.
Minimizes human error, improving inventory accuracy.
Longspan Shelving
Longspan shelving is versatile and can store various items, from small parts to larger, heavier goods. It’s perfect for warehouses that require flexible and adjustable storage solutions.
Safety Considerations:
Regularly inspect shelves for signs of damage or instability.
Clearly label weight capacities to prevent overloading.
Use appropriate material handling equipment to reduce the risk of injury.
Efficiency Benefits:
Adjustable shelving heights accommodate a range of products.
Easy assembly and reconfiguration to meet changing storage needs.
Conclusion
Implementing these essential warehousing storage solutions enhances both safety and efficiency in warehouses. Pallet racking systems, mezzanine systems, cantilever racks, automated storage and retrieval systems, and longspan shelving each offer unique benefits tailored to various storage needs. By prioritizing safety measures and optimizing efficiency, warehouses can improve productivity, reduce accidents, and create a more organized and functional workspace. Investing in the right storage solutions is crucial for the long-term success and sustainability of any warehousing operation.
#industrial storage rack manufacturer#manufacturer#mezzanine#racking#cantilever racking#pallet racks#heavy duty racks
0 notes
Text
Arctic Circle and Narvik
And it is a fine day! I put the roof down for the first time since Lillehammer and an easy hour drive takes me to the arctic circle and the proof is below.


Inevitably there is a jolly junk shop and equally inevitably I bought some souvenirs. They are of the sort that when I get home I will have no idea what to do with them - but the Christmas present season is coming!
There is a monument to 68°34', but as I walk back to my car, I see another with 1942- 1945 and look that up later. It is in remembrance of the prisoners who were used as slave labour to build the roads and died during the nazi occupation of Norway. More of this later as north Norway was both occupied and strategic in WW2.

The weather continued to improve and on a lovely sunny afternoon after a magnificent scenic drive, the road ended with a choice of a ferry to Lofoten and one to Narvik. Blue water, flat calm, warm sun, perfect! The hotel I booked apologised for a broken lift (I was on the top floor), that their advertisement to say they had parking was a ‘mistake’, there was no air conditions but I could borrow a fan and the chef was on holiday. But what the hell- it’s warm and beautiful.

In the morning I decide to catch the gondola up their skiable mountain. I meet a friendly Swedish group and have a good chat and a coffee in the cantilevers cafe at the top. Thanks to them it finally registers why wine is so expensive and not available in supermarkets. It’s a government monopoly. Should have worked this out sooner as the wine ships are called vinmonopoli, both there we are. ics below.


I have seen little about the occupation of Norway during my trip, but in Narvik is different. There are a lot of signs highlighting the battles of Narvik. The history is told in Norway as follows.
Narvik is an ice free port and which exported iron ore from the north Swedish mines. The Nazis wanted to control and this and the allies wanted to prevent this happening. I believe that what is left of the old port is in my pic below

In April 1940 10 German destroyers entered the Narvik fjord and landed 2000 Austrian troops. They took the town. Two days later five British destroyers sailed in and in the subsequent battle, two destroyers on each side were sunk along with some merchant vessels and the remaining ships on either side, damaged. The harbour was now full of wrecks. The British came back a few days later with more ships and sank the remaining German destroyers and freed Narvik from the sea. But on land the Austrian troops were defeating the Norwegians.
The French foreign legion and some Polish forces then arrived and cut off the German troops who in turn blew up the harbour and retreated inland. This was the first land battle of WW2 won by the allies, but then in June, the allies retreated and so Narvik was retaken.
Enough of the history for the moment and from the bottom of the gondola I check my oil and water and head for Stockmarknes on the Lofoton islands for the night


1 note
·
View note
Text
Building Effective Retaining Walls: What You Need to Know

Retaining walls serve a crucial function in landscaping and property development, particularly in regions like Saskatchewan where the terrain can vary significantly. Before embarking on a retaining wall project, it's essential to understand the specific considerations that apply to construction in this province. From regulatory requirements to practical design aspects, here are the key factors to keep in mind when planning your retaining wall.
Understanding Regulatory Requirements Building any structure, including retaining walls, requires adherence to local building codes and regulations. Depending on the height and location of the wall, you may need to obtain permits or approvals from municipal authorities. This process often involves submitting detailed plans that include information on the wall's design, materials, and intended purpose. Consulting with a qualified land surveyor can help ensure that your project complies with all necessary regulations and avoids potential legal issues down the road.
Choosing the Right Location and Design The location of your retaining wall is critical to its effectiveness and longevity. Before construction begins, consider factors such as soil type, drainage patterns, and slope stability. A professional land surveyor can conduct a site analysis to assess these factors and recommend suitable design options. Whether you opt for a gravity wall, cantilevered wall, or another type of structure, the design should be tailored to the specific conditions of your property to maximize durability and functionality.
Surveying for Accuracy Accurate surveying is essential during the planning and construction phases of a retaining wall project. Land surveyors use advanced equipment to precisely measure property boundaries, assess elevation changes, and identify potential challenges such as underground utilities or natural features. By investing in professional surveying services, you can avoid costly mistakes and ensure that your retaining wall is built on solid ground—both literally and legally.
Materials and Construction Techniques The choice of materials and construction techniques can significantly impact the performance and aesthetics of your retaining wall. In Saskatchewan, where weather conditions can vary from harsh winters to hot summers, selecting durable materials that withstand freeze-thaw cycles is crucial. Popular options include concrete blocks, timber, natural stone, and engineered retaining wall systems. Consult with contractors and suppliers to explore different options and choose a solution that meets your budget and aesthetic preferences while complying with local building codes.
Maintenance and Long-Term Considerations Once your retaining wall is built, ongoing maintenance is essential to preserve its structural integrity and appearance. Regular inspections, particularly after severe weather events, can help identify any signs of erosion, settlement, or drainage issues early on. Proper drainage behind and below the wall is also critical to prevent water buildup and potential damage over time. By addressing maintenance needs promptly and proactively, you can extend the lifespan of your retaining wall and avoid costly repairs in the future.
Building a retaining wall requires careful planning, adherence to regulations, and professional expertise. By considering the factors outlined above—regulatory requirements, site analysis, materials selection, and ongoing maintenance—you can ensure that your retaining wall project is successful and enhances the functionality and aesthetics of your property. For personalized advice and assistance, consult with local experts in land survey services and construction to navigate the complexities of building retaining walls in Saskatchewan effectively. With the right knowledge and preparation, you can create a durable and visually appealing retaining wall that stands the test of
For more information about Calgary Land Survey Services and Real Property Report Calgary please visit:- CORE Geomatics
1 note
·
View note
Text
Installing Glass Staircases Safely

Glass staircases are a stunning addition to modern homes and commercial spaces, blending elegance with a sense of openness. However, their installation demands meticulous planning and adherence to safety standards to ensure both aesthetic appeal and structural integrity. Here are key considerations and steps to follow for installing glass staircases safely.
Design and Planning
The first step in installing a glass staircase is careful design and planning. Collaborate with architects and structural engineers to create a blueprint that considers the load-bearing capacity, local building codes, and the overall design aesthetic. Glass staircases come in various styles, including cantilevered, spiral, and floating designs. Each style has unique structural requirements and challenges.
Material Selection
Selecting the right type of glass is crucial for safety. Tempered glass and laminated glass are the preferred choices for staircases. Tempered glass is up to four times stronger than regular glass and breaks into small, blunt pieces, reducing the risk of injury. Laminated glass consists of two or more layers of glass bonded with a plastic interlayer, which holds the glass together if it breaks, preventing shards from scattering.
Load-Bearing Capacity
Understanding the load-bearing capacity of the glass and supporting structures is essential. The glass must be thick enough to support the weight of people and any additional loads, such as furniture being moved up and down the stairs. The thickness typically ranges from 10mm to 25mm, depending on the staircase design and anticipated load.
4. Adhering to Building Codes
Compliance with local building codes and regulations ensures safety and legality. Building codes often dictate the thickness of the glass, the height of the handrails, and the spacing between balusters. Consulting with local authorities and obtaining the necessary permits is a crucial step in the planning process.
Installation of Handrails and Balustrades
Handrails and balustrades are essential components of a glass staircase, providing support and preventing falls. They can be made from various materials, including stainless steel, wood, and even glass. Ensure that handrails are securely attached and at a comfortable height, usually between 34 and 38 inches. Balustrades should be spaced closely enough to prevent children from slipping through, typically no more than 4 inches apart.
Anchoring and Support Structures
Proper anchoring and support are vital to the stability of a glass staircase. The supporting structures, such as metal frames or wooden beams, must be securely anchored to the floor and walls. Special fittings and connectors designed for glass installations help distribute weight evenly and reduce stress on the glass panels.
Professional Installation
Given the complexities and potential risks, hiring experienced professionals for the installation is highly recommended. Skilled installers understand the nuances of working with glass and can ensure that all components are securely fitted and aligned correctly. Professional installation also often comes with warranties and guarantees, providing additional peace of mind.
Regular Maintenance and Inspections
After installation, regular maintenance and inspections are crucial to ensure long-term safety. Check for any signs of wear or damage, such as cracks, chips, or loose fittings. Clean the glass regularly with appropriate cleaning agents to maintain its transparency and appearance. Annual professional inspections can help identify and address any potential issues before they become serious problems.
Conclusion
Installing a glass staircase can significantly enhance the aesthetic appeal and value of a property, but safety must be a top priority. By carefully planning the design, selecting the right materials, adhering to building codes, and ensuring proper installation and maintenance, you can enjoy the beauty and functionality of a glass staircase with confidence. Always prioritize safety and consult with professionals to achieve the best results.
0 notes
Text
MISSISSIPPI
2024 May 4 (Sat) – We worked around the rig today, getting ready for tomorrow’s move.
2024 May 3 (Fri) – We went out to pick up a few groceries at WalMart. We drove into town later and toured the Mississippi Arts & Entertainment Experience. What a great museum! They chronicled the history of the different types of music and how they affected each other. We were there for about 3 hours. We took time out for a quick lunch then went to the Merrehope Home for a tour of an historic house. What was amazing is that when they left the house, they just left all the furnishings. Most of the furnishing in the home were original to the period. It started as a cottage and over the years, additions were made until it became of home with 13 fireplaces, a carved stairway, and a cantilevered balcony. The house was moved from its original location to where it sits now. The docent was the “famous” Wilson Levett from California, known for many architectural buildings.
We also went to the MSU Riley Center to see the largest pipe organ in the world. The place was old and run down. The docent owned the building at one time, then turned it into a 501(c)3 so it could be self-supporting. The motif around the building was very Egyptian. He told us the building used to belong to the Shriners and they copied the Egyptian design.
2024 May 2 (Thu) – We pulled up stakes, dumped the tanks, and left the Elks Lodge in Slidell, LA with Joe & Diane leading the way. The ride was over 4 hours straight down I-59. We pulled into Bonita Lakes RV Park in Meridian at 1:30 p.m. The office was closed. A sign said they were open 2 to 6 p.m. and to park then come to the office to pay when it was open. So we did that. At 3 p.m. we went in to pay for our campsite. The woman at the counter was an 82-year-old born and bred Mississippian. She could talk! Oh, my. It was a job to get away.
We bundled up our laundry and brought them to the laundry room in the campground. Paul put the colors in a machine and I put the whites in another. When I went to set the temperature, I found part of the controls were taped up. I could not get a hot setting. So, I pulled the items out of that washer and transferred them to the next washer, put in the money, pushed START and left. When we came back half an hour later, the colors were washed, the whites had not washed. The clothes were as dry as when I put them in the machine. Sooooooo, I pulled the clothes out of THAT machine and transferred them to another machine. We moved the colors to the dryer, got the whites started and left. When we came back an hour later, everything was as it should be. So we folded the colors and moved the whites from the washer to the dryer and waited another hour before getting them.
When our shenanigans at the wash room were done, Joe & Diane and we went to dinner at Weigmanns. It was a historic restaurant in town. The food was very good.
0 notes
Text
Road Safety Signs: Ensuring Safety on the Roads
Road safety is of utmost importance to ensure the safety of drivers, pedestrians, and other road users. A crucial component of road safety is the presence of clear and properly placed road signs. These signs not only provide essential information but also guide drivers, alert them of potential hazards, and increase overall road awareness.
One company that is dedicated to manufacturing high-quality road safety signs is Aarneel Technocrafts. With their advanced technology and expertise, Aarneel Technocrafts offers a comprehensive range of road safety sign solutions for various needs.
Sizes/Ranges:
Below are some of the sizes and ranges of road safety signs offered by Aarneel Technocrafts:
Single Post Signs: These signs are installed on a single post, providing clear and concise information to drivers.
Double Post Signs: These signs are larger and require double posts for installation, making them highly visible and prominent.
Place Identification Boards: These boards display the names or identification of specific places or locations, enabling easier navigation for drivers.
Advance Direction Boards: These signs provide advanced directional guidance, allowing drivers to prepare for upcoming turns or intersections well in advance.
Overhead Cantilevers Boards: Mounted on overhead structures, these signs span over the road, making them easily visible from a distance.
Overhead Gantry Boards: Similar to cantilevers, gantry boards are larger and are typically used on highways or major roads to display important information.
Toll Boards: These signs are specifically designed for toll plazas, informing drivers about payment options, lanes, and other relevant information.
Variable Message Sign (VMS): VMS signs are electronic displays that can be updated in real-time, providing dynamic information such as traffic alerts or detour guidance.
Smart City Overhead Gantries, Cantilevers, RLVD Poles & Other Sign Boards: Aarneel Technocrafts also specializes in providing customized road safety signs to meet the unique needs of smart cities and urban areas.
Aarneel Technocrafts also offers various other customized road safety sign products, ensuring that each client's specific requirements are met.
Conclusion
With a commitment to quality, Aarneel Technocrafts uses durable materials and adheres to international standards for road safety sign manufacturing. Their signs are designed to withstand harsh weather conditions and ensure long-lasting visibility, thereby increasing road safety and reducing accidents.
Remember, road safety is a collective responsibility. By investing in reliable road safety signs from companies like Aarneel Technocrafts, we can contribute to creating safer and more efficient roads for everyone.
0 notes
Text
Owl-night, moon-gone, my wherewithal is yellow pine. Is trillium and unfurled frond.
Clouds,—a cantilever of the trees, vapor- plied architecture of the ephemeral—teach me
the apparition-life, what tunes the branches’ nocturne off-key: how do bodies turn into
song? Glow of dust and sandstone light, stars dropped like pebbles, like crumbs, heretofore
a fairy tale trail. Barn owl, secretive and out- spoken, you spout two minds, a hiding place
and a traffic sign. What’s this absence you speak of? Nonsense-yakking lost soul,
lost soul, the self-question that grows— Who what?—odd and old.
Build me up into the fog, into brevity made beautiful, the wet-dressed disaster
that’s rain, that’s the storm-threat of forest fire. I want to be ornate and ornery. More than
a vapor-child, a night’s ward like the white monkshood tucking under its bud, too shameful
to flower. I am hearing it: spring’s first wild melt, each drop trickling into the next, a minor
chord. So snow’s gone, so how can I be ice dissolving in water?
Cloud me, sparrowing and bark-loose, each season’s dark ambition: a patient pattern
gone. O, I am hearing it: this say-nothing noise, how the world’s clamor-born and
sorrowful, tricked for loss, the silent purpling of crocuses mouthing back at the owl:
I will not, and soon—
Conversation with Owl and Clouds by Jennifer Chang
0 notes
Text
Open House: 2823 Montcalm, Hollywood Hills
I had high hopes for this open house after seeing the listing, and it did not disappoint.
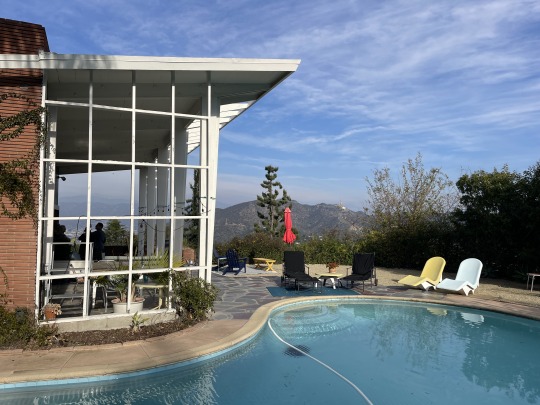
Yes, the view actually lives up to the picture. This is up the steep driveway, around the back of the pool. Midcentury excellence.
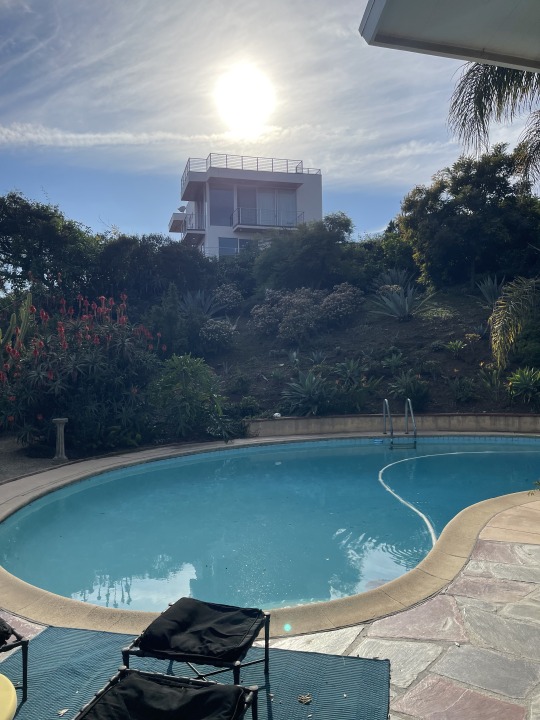
What the listing doesn't show you (of course) is nosy neighbors. Would be planting some sky-high bamboo, posthaste.
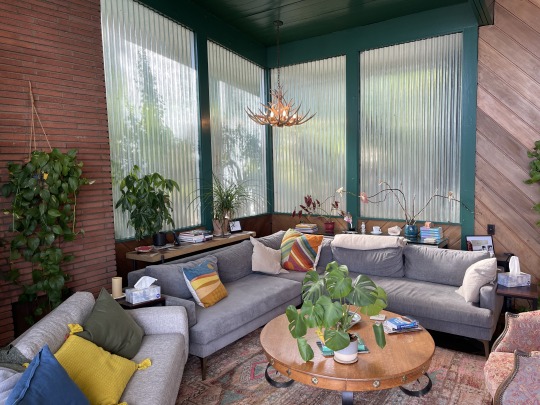
Groovy, 70s-but-now living room with on-trend paint colors and rustic touches. Relaxing and unfussy.
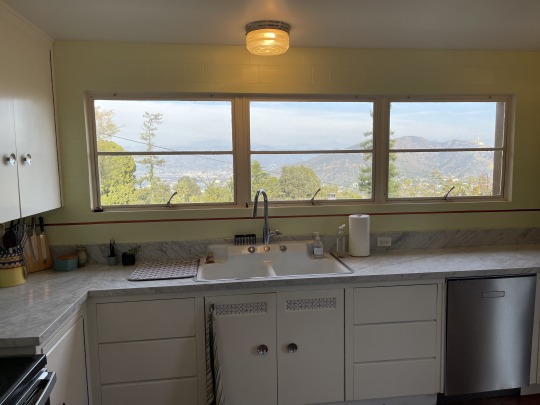
Step into the kitchen which retains the original windows and feel of the era. I love *real* countertops like this which aren't shiny/perfect quartz, but cool marble that's used.
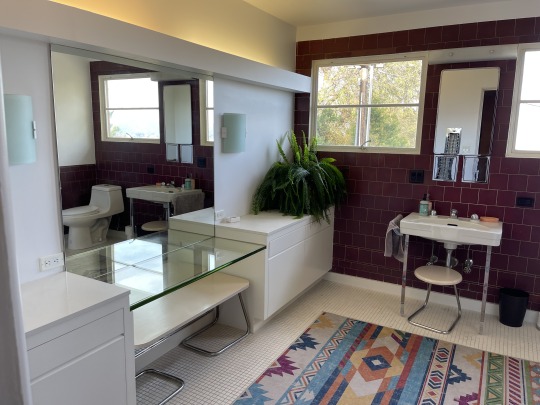
The first bathroom echoed the vibe of the kitchen, with fun colors, original tile, and views of the Valley.
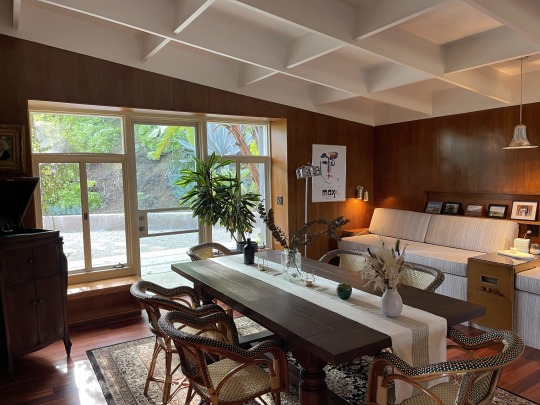
The less-formal family room is cozily set as a dining and hangout room. They don't make built-ins like that anymore.
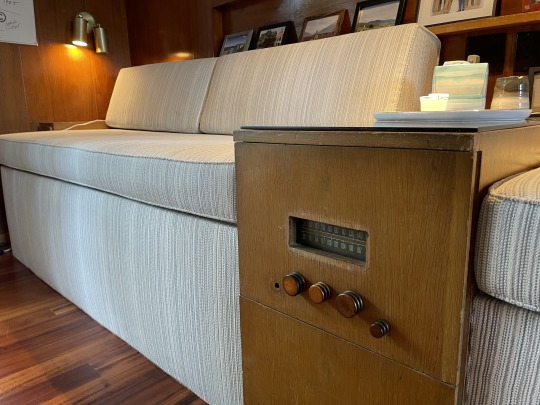
Close-up on the details - a radio!
Bring back audio furniture!
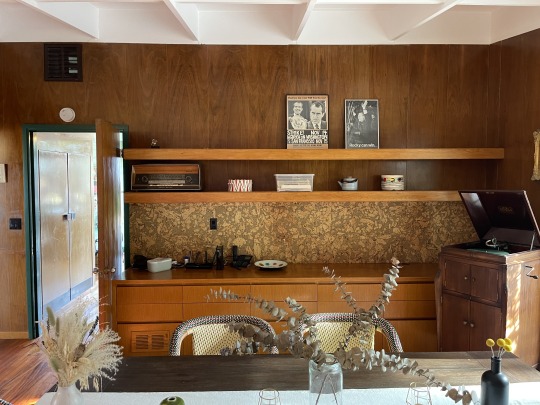
The view from the sofas. Lots of of-the-period art and ads in this home. The wood paneling doesn't feel heavy in this house, it's very grounding.
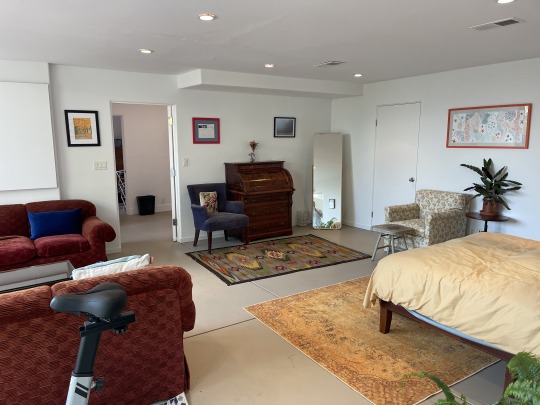
Downstairs, a garage has been converted into a guest room / office space.
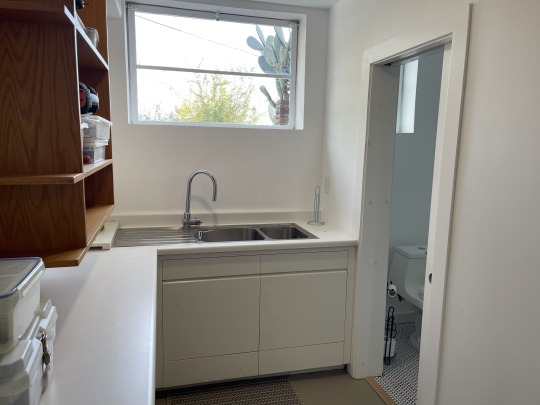
...with a bathroom too, and one of those neat all-stainless sinks with the built in wash rack.
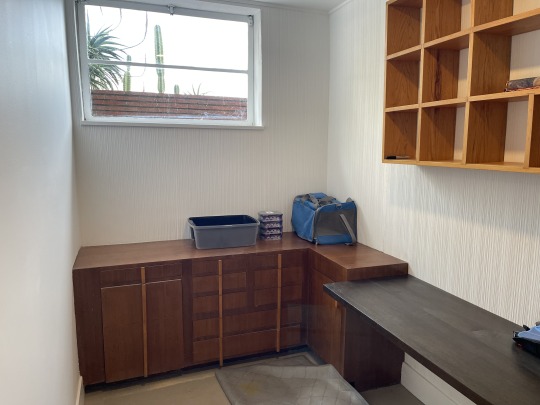
The furnishings add to the home, with these Danish modern built-ins of the era.
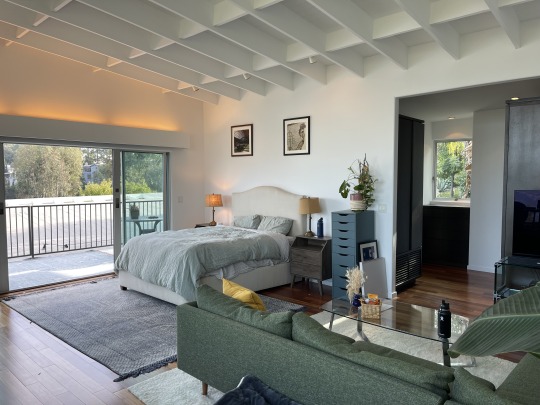
Back up two flights of stairs is the master bedroom, with those delicious waffle ceilings again.
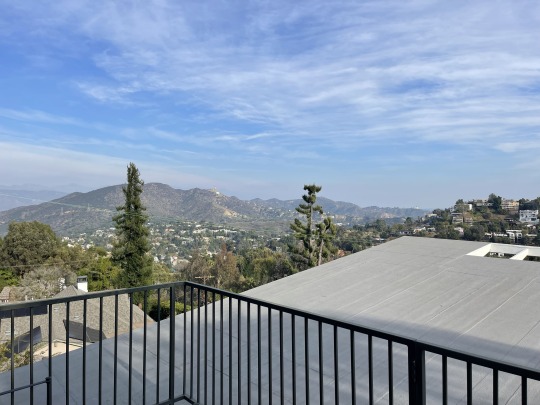
And of course, impeccable views. Rare to be able to see both the Hollywood Sign *and* Griffith Observatory from one house.
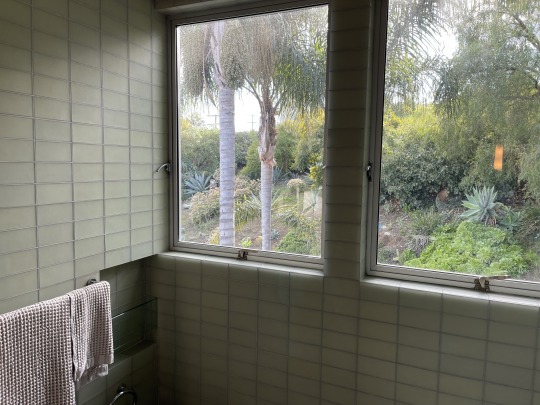
The bathroom had this neat green glass tile floor to ceiling, giving a real early-00s zen feel to the space.
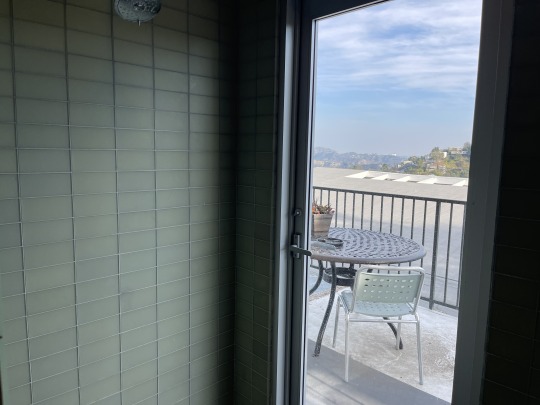
And yes, even the shower has a view.
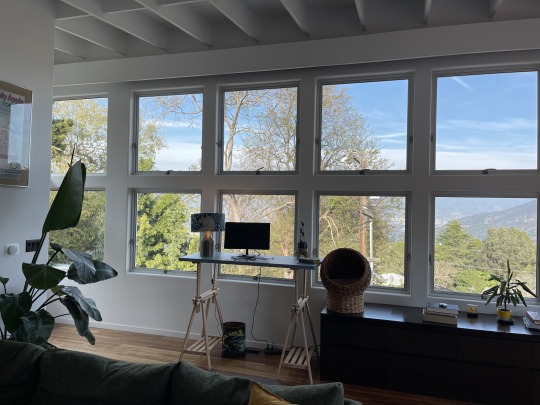
Tons of windows for both light and ventilation. I'd rather have a wall of windows like this than a blank wall.
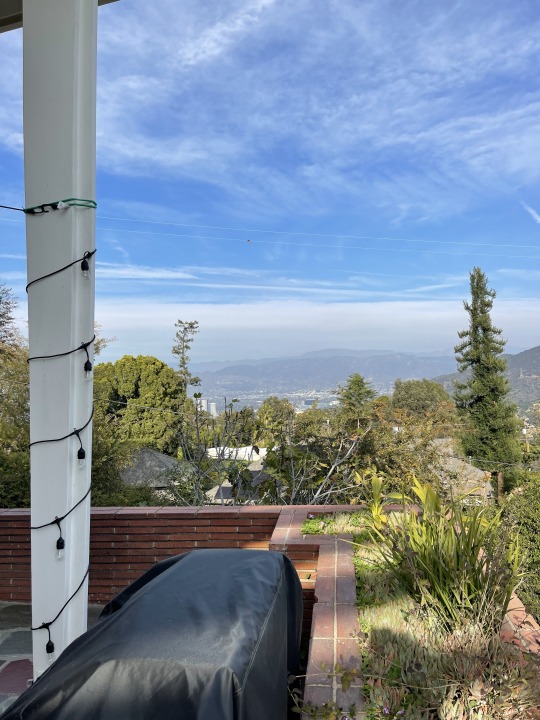
The agents informed me that the white cantilevered roof is David Hockney's residence. A fitting end to an artistic, midcentury dream.
1 note
·
View note
Text
Understanding the Racking Inspection Process in the West Midlands
Racking systems are crucial components in warehouses and distribution centers, providing the structural framework for storing goods efficiently. With the increasing reliance on these systems, particularly in the bustling logistics sector of the West Midlands, understanding the racking inspection in west midlands process has become essential. This article delves into the nuances of racking inspections, their importance, regulatory requirements, and best practices, ensuring that businesses maintain safety and compliance in their operations.

Importance of Racking Inspections
Racking inspections serve as a critical line of defense against accidents that can lead to injuries, property damage, and operational disruptions. Regular inspections help identify potential hazards, such as structural weaknesses, improper usage, and signs of wear and tear. By conducting thorough inspections, businesses can:
Enhance safety for employees
Protect assets and inventory
Ensure compliance with health and safety regulations
Minimize the risk of costly accidents and downtime
In the West Midlands, where logistics and warehousing are key economic drivers, prioritizing racking inspections is not just a good practice; it is a necessity.
Regulatory Framework
In the UK, the Health and Safety Executive (HSE) provides guidelines on workplace safety, including the use of racking systems. The Provision and Use of Work Equipment Regulations (PUWER) 1998 mandates that equipment, including racking, must be suitable for its intended use, maintained in a safe condition, and inspected regularly.
Additionally, the British Standards Institution (BSI) has published specific standards, such as BS EN 15635, which outlines the requirements for the safe use of storage equipment. This standard emphasizes:
The need for regular inspection by a competent person
The documentation of inspection results
The implementation of corrective actions when issues are identified
Understanding these regulations is vital for businesses in the West Midlands to ensure compliance and minimize legal liabilities.
Types of Racking Systems
Before delving into the inspection process, it is essential to recognize the various types of racking systems commonly used in the West Midlands. Each type has its inspection requirements and potential issues:
Selective Racking: This is the most common type, allowing direct access to each pallet. Inspections focus on checking for damaged beams and upright frames.
Drive-In Racking: Ideal for high-density storage, this system requires inspections to ensure that the structural integrity is maintained, especially in high-traffic areas.
Push Back Racking: This system uses a series of nested carts to store pallets. Inspections should focus on the functionality of the carts and the overall alignment of the system.
Pallet Flow Racking: Utilizing gravity to move pallets, this type requires inspections to ensure that the flow mechanism is functioning correctly and that there are no blockages.
Cantilever Racking: Primarily used for long items, inspections should check for any bending or warping of the arms.
Understanding these different types of racking systems helps in tailoring the inspection process to the specific needs of the storage environment.
The Racking Inspection Process
The racking inspection process consists of several key steps that ensure thorough evaluation and compliance with safety standards.
Initial Assessment
The inspection begins with an initial assessment of the racking system's overall condition. Inspectors should look for visible signs of damage, such as:
Bent or twisted frames
Cracked welds
Loose connections
Missing or damaged safety pins
This initial visual check is crucial in identifying any immediate hazards.
Detailed Inspection
Following the initial assessment, a more detailed inspection is conducted. This involves:
Measuring the vertical and horizontal alignment of the racks
Checking the load capacity signs and ensuring they are legible
Assessing the condition of the flooring beneath the racks
During this phase, inspectors use specialized equipment, such as laser levels, to ensure that the racking systems are installed correctly and are safe for use.
Load Testing
For some racking systems, load testing may be necessary to ensure that they can support the weight they are designed to hold. Load testing involves placing weights on the racks to simulate real-world conditions and identify any weaknesses in the structure.
Documentation
Proper documentation is a critical part of the racking inspection process. Inspectors should record their findings, including:
Any damage identified
Recommendations for repairs or maintenance
The date of inspection and the name of the inspector
This documentation serves as a record for compliance and can be valuable during audits or inspections by regulatory bodies.
Follow-Up Actions
After the inspection, it is vital to address any issues identified. This may involve:
Repairing or replacing damaged components
Updating load capacity signs
Training staff on proper usage and safety protocols
Timely follow-up actions not only enhance safety but also contribute to the longevity of the racking systems.
Best Practices for Racking Inspections
To ensure an effective racking inspection process, businesses in the West Midlands should consider implementing the following best practices:
Schedule Regular Inspections
Establishing a routine inspection schedule is essential. Depending on the type of racking system and the volume of activity, inspections may be needed monthly, quarterly, or annually.
Train Competent Inspectors
Ensure that individuals conducting inspections are adequately trained and knowledgeable about racking systems and safety regulations. This expertise is vital for identifying potential hazards and ensuring compliance.
Encourage Employee Reporting
Create a culture where employees feel comfortable reporting any concerns or damages they notice. Implementing a straightforward reporting process can help identify issues before they escalate.
Use Technology
Consider using software solutions for tracking inspections, managing documentation, and scheduling follow-ups. Technology can streamline the inspection process and enhance accountability.
Conduct Employee Training
Regularly train employees on safe racking practices and the importance of inspections. Educated employees are more likely to adhere to safety protocols and recognize potential hazards.
Conclusion
Understanding the racking inspection process in the West Midlands is crucial for businesses that rely on effective storage solutions. Regular inspections not only enhance safety and compliance but also protect assets and improve operational efficiency. By adhering to regulatory guidelines, recognizing the different types of racking systems, and implementing best practices, companies can create a safer work environment. As the logistics sector continues to grow, prioritizing racking inspections will be paramount in ensuring the sustainability and safety of operations in the region.
0 notes