#but its like 0.1mm too big
Explore tagged Tumblr posts
Visit Tumblr Blog
Explore Tumblr blogs with no restrictions, modern design and the best experience.
Last Seen Tumblr Blogs


Fun Fact
Women make up for the other 50% of Tumblr’s audience.
Text
Daily TV #198: It Wasn't Included

First Previous Next
#daily tv#daily tv 198#also ever heard of a fuckin usb charger#the pen charger that wouldve been included had i got this new wouldve been a usb to dc 5v#hhhhhhhhh#guess i gotta go order one online#worst part is i actually have a dc 5v barrel jack#but its like 0.1mm too big
1 note
·
View note
Video
tumblr
Hey all, made a Hexasphericon, or as I like to call it a wibbly
Check it out on my thingiverse as well!

Its a volume with 1 face (dark) and 2 edges (light), think of it a bit like a 3D Mobius strip, its heavily inspired by the somewhat recent Maker’s Muse video, but its also a brass casting. It rolls by turning 2/3 of a turn in one direction, then turning 90˚ in another direction for the last 1/3 of a turn, then repeating that

I did the 3D design myself (in sketchup), printed it out (sadly didn’t take a photo of the 3D print though), and then cast it in brass using my dad’s vacuum casting machine/ setup.

It’s relatively easy to make, assuming you’re familiar with vacuum casting and have a 3D printer. Since this a 2-piece print (as it was for Maker’s Muse), the first step is to use wax to fill in/ hide the seam, then attach sprues/ air holes using wax. Next is to make the mould, which is just pouring in the normal mould mixture, and set it in the vacuum caster to vacate the air in the plaster, then let it dry. Next is the burnout procedure, where the mould is first taken to 200-400˚F to melt the wax out, then taken to 500-700˚F to melt out the plastic, during this step, the tray under the mould had to be cleaned several times, before the plastic on it caught too badly and vitrified to the plate, last step was to take the mould up to about 1200˚F to fire it/ prepare it for pouring. To pour, a... generous overestimate of brass was melted using an oxy-acetylene torch and quickly poured into the mould, which was set in the vacuum casting machine, and all the air was vacated from the brass.

The end result shows every 3D-printing layer (which was quite a few with only a 0.1mm layer height), and on the polished edge, it looks a little like Damascus patterned metal. I didn’t think I’d like seeing the layers, but it actually looks really good on the polish, and while I may polish it more, its more or less done at the moment.
Casting 3D prints is actually way easier than I thought it would be (with the big fancy vacuum caster), and there is a good chance I’ll be doing more of it!
2 notes
·
View notes
Text
The Lotmaxx SC-10 Shark V2 Review: Impressive and Affordable 2-in-1 3D Printer
Lotmaxx SC-10 Shark V2
8.50 / 10
Read Reviews
Read More Reviews
Read More Reviews
Read More Reviews
Read More Reviews
Read More Reviews
Read More Reviews
Read More Reviews
Read More Reviews
Read More Reviews
Read More Reviews
Read More Reviews
Read More Reviews
Read More Reviews
Read More Reviews
Read More Reviews
Read More Reviews
Read More Reviews
Read More Reviews


Shop Now
Compared to its first version, the Lotmaxx SC-10 Shark V2 offers several upgrades and now standard features, including a dual-extruder and laser etcher, making it a great choice for both beginners and those looking to stay under $500.
Specifications
Brand: Lotmaxx
Build Volume: 235x235x265mm
Printing Accuracy: ± 0.1mm
Connectivity: Micro SD and USB
Heated Build Plate: Removable Magnetic Plate
Feed Type: Bowden Tube
Dimensions: 17x18.3x19.21in
Weight: 18.5lbs
Dual-Color Printing: Standard Dual Extruder
Pros
95% pre-assembled
Removable flexible build plate
Laser etcher is simple to install and use
3D prints are accurate
Cons
Initial installation and setup directions are limited and confusing
Manual and auto-leveling takes getting used to
Laser etching goes line-by-line, making it slow
Learning process involves lots of patience
Bi-color printing involves lots of waste
Buy This Product
Lotmaxx SC-10 Shark V2 other
Shop
// Bottom var galleryThumbs1 = new Swiper('.gallery-thumbs-1', { spaceBetween: 10, slidesPerView: 10, freeMode: true, watchSlidesVisibility: true, watchSlidesProgress: true, centerInsufficientSlides: true, allowTouchMove: false, preventClicks: false, breakpoints: { 1024: { slidesPerView: 6, } }, }); // Top var galleryTop1 = new Swiper('.gallery-top-1', { spaceBetween: 10, allowTouchMove: false, loop: true, preventClicks: false, breakpoints: { 1024: { allowTouchMove: true, } }, navigation: { nextEl: '.swiper-button-next', prevEl: '.swiper-button-prev', }, thumbs: { swiper: galleryThumbs1 } });
Have you been considering getting a 3D printer, but been putting it off either because of high prices or the assumption that they would be difficult to set up and learn? That’s been my case for the past few years.
Since prices began to fall below $1000, I grew increasingly interested in the possibility of owning one someday if I could finding enough practical uses to justify its purchase. Fast forward to 2021, and now we’re experiencing a boom in sub-$500 3D printers, including the Lotmaxx SC-10 V2. Today I’ll be reviewing and sharing my experience using it as my very first 3D printer and laser engraver.
With a big focus on modularity, simplicity, and offering lots of unique features out of the box, including bi-color printing and also being a laser engraver, does this sub $500 all-in-one 3D printer bite off more than it can chew?
youtube
The Lotmaxx SC-10 Shark V2, as its name implies, is the updated version to the original SC-10 which our team originally reviewed not too long ago in November 2020. While the Shark V2 is largely the same 3D printer and has many of the same quirks we discovered originally, it offers enough in terms of upgrades, improvements, and now standard features, that I would recommend going with this newer version if your budget allows.
In my time testing and reviewing the Shark V2, I have printed and etched a wide variety of projects. I will share the positive and not-so-great aspects from the perspective as a first-time 3D printer owner.
What to Expect
Whether you’re planning on getting this as your first 3D printer or are upgrading, I’ll go over the initial impressions and learning process that I went through to get this fully set up and printing, which should give you a good idea of what to expect with yours.
As I’ll detail throughout this review, my experience overall, once getting through some initial setup hurdles, was mostly very positive but not always stress-free. I generally do lots of research prior to purchasing and receiving new products, yet with this printer, I wanted to approach it from a novice perspective so as to see how easy (or not so easy) it truly was to set up and use.
I did have my share of issues and several times where I needed to troubleshoot or look up how to do something that wasn’t covered in the included manual. Especially if this is going to be your first printer, plan on spending a good amount of time, at least in the beginning, dedicated to figuring things out and lots of trial and error.
Once Optional, Now Standard
Even though our original review of the SC-10 suggests skipping on the optional upgrades, they've now been included as standard with the V2. Those consist of an auto-leveler, dual-extruder, and laser engraver. They too seem to have also improved in terms of reliability and performance compared to their previous versions.
That said, they’re still far from perfect. But coming from the perspective of a beginner who is interested in growing with this system and new creative outlet, I appreciate the additional features, printing options, and simplicity they can offer for more beginner or casual users like myself.
If you’re absolutely certain that you only want single color printing, don’t plan on using the 3D engraver, can get by without the auto-leveler, or are��on a tighter budget, then the original base SC-10 printer which retails for about $200 if you purchase straight from Lotmaxx’s site. For some, these potential savings between the two models might be better spent on some additional filament.
Speaking of savings, Lotmaxx seems to be frequently offering a variety of coupons and promotions on their official website. Oddly, though, they seem to have two official sites, Lotmaxx.com and Lotmaxx3D.com which both offer options to buy from, however, at the time of writing this article, the latter has the SC-10 Shark V2 priced lower at $429.99 vs $499 on the other. Whether or not these prices or coupons are exclusive to certain regions or limited-time offers is unclear, so it should be worth your time to see what the best current deals are when you choose to buy.
95% Pre-Assembled with a 5% Struggle
While you likely won’t be able to fully assemble and be ready to print in under 10 minutes as Lotmaxx claims, especially if you have never done so before, you will still appreciate the relatively straightforward and simple steps need to get the printer ready.
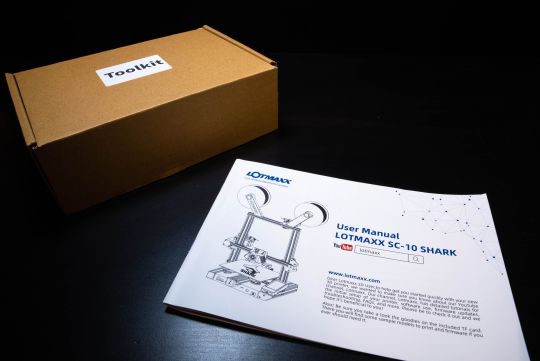
Everything you’ll need for assembly, from the tools, a few spare parts, and wire ties for optional cable management is included and easily identifiable in your package. You even get a small sample spool each of orange and green filament, as well as two sheets of plywood, to get you started with your first few projects.
For the easiest install experience, give yourself plenty of space to lay out all your parts. Once you get everything assembled, this printer measures in at 17x18.3x19.21 inches, so you’ll need a good amount of space to locate this in.
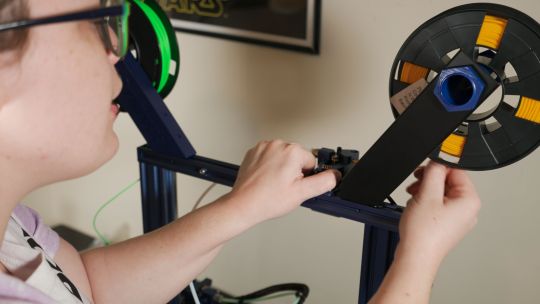
With the printer arriving 95% pre-built, there are only a few core pieces, all of which felt well built. Assembly involves attaching the Z-axis to the base with 4 screws at the bottom, connecting the handheld touch screen with a cable, mounting the two filament holders, installing the bi-color extruder with two screws, and then plugging in a variety of wires.
One of the main benefits compared to the original SC-10 model, is that once optional add-one like the auto-level sensor are pre-installed and don’t require any additional setup.
Confusing Instructions
The included instructions, even with their illustrations, were often confusing with unclear wording, choice of reference images, or complete omissions. As such, certain assembly steps took a bit of time figuring out how exactly it was meant to attach. I believe this would be a larger issue for others who lack experience setting up these more DIY devices, and could perhaps be a complete deal-breaker for those who just want everything to work straight out of the box.
Moreover, my first frustrating experience came as a direct result of the instructions completely skipping a very important step required to let the printer turn on. After completing the entire install, the instructions then show users how to begin the leveling and calibration. What they failed to mention beforehand, and not until 8 pages later, was that there is a small and hidden switch in the rear lower side of the printer that you to set to 220v or 110v before use.
I ended up trying to figure out why the printer wasn’t turning on for about 15 minutes. I rechecked every attachment, cable and tried other outlets to see if that was the problem. With no luck, I began to search for my problem online and found that a few other users experienced the same issue and left 1-star reviews on Amazon. They too made sure everything was properly installed but couldn’t get the SC-10 to turn on, and so assumed it arrived broken.
While it would be nice for the units to ship out with their localized voltage switch pre-configured, I would be more than happy to also have the instructions clearly indicate this crucial step in the right spot. A simple problem with a simple fix, but this would be just the first.
Setting it Up
Once you actually manage to assemble everything and power on the Lotmaxx SC-10 V2, you can continue with the setup process.
Firmware
I would recommend visiting Lotmaxx's support page first to download the latest available firmware, which you can then flash via the included 16GB micro-SD card. This is another example of where the manual doesn’t walk you through the process, but I did find their short YouTube video to be clear enough.
Auto and Manual Bed Leveling
Something that takes more time figuring out is leveling. Underneath the print bed, there are four large dials that can be turned to adjust each of the sides’ heights.
Through the on-screen settings menu, there are two leveling setups available, automatic and manual. If you’re doing manual leveling, which I recommend, the setup screen will have five points that the extruder will travel to; the 4 corners and the 1 center point. Using the dials underneath the bed, the goal is to tighten them each just enough that it creates slight friction at each point when you pull on a test piece of paper.
I found it to be a little tricky because it's hard to measure the same amount of friction between each point, and it especially never seems to be the same at the center point. Measuring friction with a piece of paper can only be so accurate. Tied in with this, both the bed and extruder have some wobble and give to their position, and so, it can be especially tricky to determine where the friction point really is.
While this updated SC-10 V2 now has the automatic leveler attachment pre-installed, it seems that it only helps the printer become a little more precise as opposed to completely eliminating the entire manual leveling process. What’s good, however, is that the auto-leveling process no longer requires firmware configuration to get it working. Still, you should only use the automatic leveling after completing a manual one first.
Loading Filament and The Run-Out Sensor
Each extruder has a dedicated filament sensor which you feed the filament through and into its Bowden tube which connects to the print head. This feeding process is rather tedious as it involves clicking a button while simultaneously pushing the filament down the tube until it has about 1cm of tube left before it enters the extruder module.
The filament sensor is useful with pausing a print if you run out of filament during it, but it has some limitations. First, I would have liked for the option, if it’s a single color print, to allow the printer to default to using the second filament if the first runs out. Second, and really frustrating, if your first filament on the left is ever out, even if you have the printer set to only print with the second, it will give you an error that your filament is out and it will not allow you to continue until at least a few cm of filament have been pushed through the first sensor so that it can detect it.
Because of this last limitation, with my later prints a few weeks into my review, I had to completely switch the filament out of the second extruder into the first to allow it to print anything. Seems like there should be a simple setting available to avoid this, or just smarter software.
Slicing and Loading Project Files
Now that the printer is fully set up and adjusted, there are two ways to print 3D files and etched images.
Pre-installed on the included 16GB micro-SD card, Lotmaxx has included a handful of interesting Gcode files (pre-sliced instructions for the machine to print directly from).
You can choose from their single color or bi-color models as well as a few laser-etched images. While there are other slicing programs that are capable of working with the Lotmaxx SC-10 V2, their own branded one is the only one that is also capable of preparing etching files too.
Lotmaxx has its own Cura-based slicing software to create printable files and laser etching files that you can then either copy over to the micro-SD card, or send over USB when connected directly to a computer.

If you’re not familiar with this kind of slicing software, it can be a bit overwhelming at first figuring out how to get 3D objects ready for pprinting. Essentially, through a variety of customizable settings, you can instruct the printer how precise, dense and fast to make the print. Take your time to familiarize yourself with the program to understand the importance of each setting as it can make a huge difference in terms of quality and print time. There are lots of good videos which go over how to get your models imported into the software, tweaking the parameters, and then saved and exported as a Gcode file ready for printing.
While printing directly from a PC is possible and might seem more convenient than copying over the files to the micro-SD card and then reattaching the card to the printer, it’s not as reliable as it requires the PC and the slicing program to stay awake during the entire print. It would have been great to have the ability to send the sliced files over USB to the printer to store and print locally.
Slow and Steady MEans Better Prints
It was here that I began to research and better understand the importance of those slicing settings. If you really want your prints to turn out well with minimum issues, longer printing times will be needed. It can be easy to get a little greedy and try to speed things up, but in my experience, it wasn’t worth it.
Frequently, this is where I encountered the majority of my issues with prints. I would rather wait longer for a print to come out right than to save a bit of time and have a completely unusable print. This is especially important for prints with moving or connecting parts that have lower tolerances for error.
For example, one of my more functional prints of a table clamp headphone holder, it had two separate pieces which needed to fit and work together. The screw needed to turn in the clamp in order for this whole print to work.
Even though I printed this at a normal speed with less detail, the two prints work perfectly. The screw turns extremely well. With the exception of the back of the clamp looking a little messy, which I am thinking might be due to a leveling issue, the overall finish of both the screw and clamp look and feel really nice. Even the corners and edges are smooth with minor imperfections.
That said, because of how long it takes to see your print progress and gauge how well it's going, it can be especially difficult to fine-tune and make necessary adjustments. Beyond just slow and steady prints, using this or any 3D printer is going to be a slow and steady learning experience as well.
Prints and Etches
Operation and Interface
Using the handheld touchscreen is quick and easy to understand after a few minutes with it. It controls all the leveling and preheating options as well as quickly lets you browse and load sliced models that you've copied onto the micro-SD card. Compared to some of the earlier Lotmaxx models which had a fixed screen to the printer itself, having this removable screen that can be brought up to eye level allows you to more easily make adjustments and load projects without the need to bend down to see what you’re doing.
Removable Flexible Build Plate and Scraper
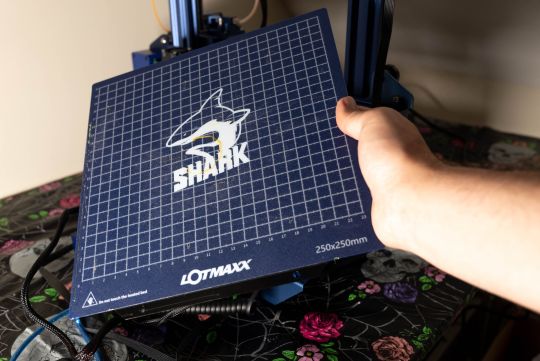
Before the Lotmaxx begins printing, it heats up its build plate to help the filament adhere. Do not touch the plate during the print as it gets very hot. When the print is complete, you can actually detach the entire build plate, then flex it slightly to snap your print off.
Single Color Prints
Similar to our review of original SC-10, I also chose the lucky cat as my first print. Keeping everything at its default settings and just letting the printer run for a few hours overnight gave great results. This was the first time I witness how detailed and precise the prints could be. Especially in the little corners, I was expecting it to get “blobby”, but it didn’t. There were a few areas I noticed it could have been a little more defined, but still incredible results for my first test.

When you get comfortable with their pre-installed prints, you’ll want to check out sites like Thingiverse which have a fantastic selection of user-submitted models to download and print. Bi-color objects are actually broken down into separate models, which are assigned different colors. With dual-extruders still not being very popular, reliable, or worth the additional setup time, you won’t find too many bi-color prints to download.
Bi-Color and Waste
Next, I tried their bi-color dragon and egg. To date, I think this is the best print I managed. Again, everything was kept at its default settings and I let it run for a few hours while I stepped away and did other work. I would pop my head in every now and again to check its process and make sure nothing had gone awry.

A couple of hours in, the dragon’s form started to take shape, as well as a separate object that very much looked like a top hat. It wasn’t until a bit later that I actually realized this was just a waste by-product caused by printing in two colors. Every time the extruder switched to the other color, it would add to its circle of waste and then resume printing the actual model. This is part of its cleaning process to minimize clogs and ensure good color separation, but it definitely comes at a price.
Colors can’t be mixed though, something that other printers can do. This might limit the versatility of having dual extruders for some. If you can look past its shortcomings, the results you get are still on-par with single-color prints in my opinion. They take longer and will use much more filament, but they do help give your prints more life. I like having the flexibility of having bi-color printing when I want it, but for the majority of my prints, I’m sticking with single colors.
Laser Etches
Switching to the laser etcher is the only mode that requires separate installation. It’s quick and simple, but somewhat inconvenient.

To install the laser etcher and have the most surface area to work with, you’ll first need to remove the dual extruder which is attached by two bolts. You can either attach the removed extruder to the top rail of the printer or keep it off to the side and out of the way of the laser etcher. There is one other module that attaches and screws into the base of the printer as well. It would have been nice if there was a way to have both the dual extruder and laser etcher installed simultaneously without drawbacks and needing to switch back and forth.
Using the same Lotmaxx slicing software, you can prepare your images for etching. Simple PNGs with transparent backgrounds and minimal shadows and details are suggested. Otherwise, you’ll likely run into the issue of the etch being a blurry, shadowy mess. I custom-made a few images in Photoshop and went through a few revisions before I was ready for it to be etched.
Unlike 3D printing, extra precautions are needed while etching. First, you have to wear safety goggles, which they include, in order to prevent hurting your eyes from the lasers. Likewise, as this is burning into the material, risk for fire is possible. You should not leave this unattended while it etches.
The only real drawback to the etcher is its speed. Just like the previous model, it still goes line by line, making it far slower. Aside from this, I was really happy with how my etches turned out. Even with smaller text, everything was sharp and clear.
Unlike with 3D printing, my first custom etch worked flawlessly. Just to try it, I wanted to see if I could go over the same etch a second time to get one half darker than the other. This did not work, and instead, caused a bit of the halo effect you see near the bottom because it wasn’t perfectly aligned.
Final Thoughts: Who is this Best for?
Learning Curve
My experience using the Lotmaxx SC-10 Shark V2 has had several ups and downs. Many of my earlier struggles and issues came from this being a completely new experience that required lots of trial, error, and troubleshooting to overcome. While this experience can be similar for many other new tools and hobbies, I think it was especially true here because of the number of moving parts involved which could potentially cause issues, and the somewhat steep initial learning curve.
Value
The SC-10 V2 stands out with its price and now standard attachments which help it be a more versatile tool that is not only easier to use and setup but can also laser etch too. Especially if you’re on the fence about getting your first printer, its relatively low price and overall beginner-friendly experience make it a great choice. However, to get the most value and use out of this printer, especially if you are completely new to 3D printing, you'll need to be patient and expect to invest lots of time learning your new tools and software. There will be times where something goes wrong or doesn’t print exactly as you expected. While it isn’t necessarily the most difficult to “fix” or get working, it can be overwhelming at times. As you become more familiar with the various settings as well as getting used to its various quirks, you can reliably make great 3D prints and etches.
Google, Reddit and YouTube will be your friends along this journey, but rest assured, it will be a fun, challenging and rewarding one.
The Lotmaxx SC-10 Shark V2 Review: Impressive and Affordable 2-in-1 3D Printer published first on http://droneseco.tumblr.com/
0 notes
Text
Culinary History (Part 9): The Perfect Pan
There are many important factors we require in a pan. The most important one is that it is highly conductive, so that it heats food quickly, and distributes heat evenly across the base, without any hot spots.
It should balance well in the hand. It should be light and easy to manouevre on the stove-top, with a handle that won't burn your hand. But it also needs to be dense & solid enough to not buckle, chip or crack under high heat.
Its surface should be non-reactive, non-stick, non-corrosive, long-lasting, and easy to clean. We want it to have a nice shape and sit well on the element. Price is important as well.
All materials have their pros and cons. Ceramic is good – until it cracks. Same with Pyrex, which will manage fine in the oven, but crack over a flame. Aluminium is good for cooking omelettes and is light, but you can't cook acidic foods in it. Silver is excellent, but the food will taste of tarnish unless the pan is kept perfectly clean. (Also, it's ridiculously expensive.)
Cast-iron vessels have been used for centuries, and many cooks prefer heavy, black, cast-iron pans. They are still the choice for dishes such as corn-bread in the US. If it's well-seasoned (explained later), then it will be non-stick; and it can withstand the high heat needed for searing because it is so heavy. However, if it isn't dried & oiled carefully after being used, it will rust badly. Also, it leaches small amounts of iron into the food (not enough to be toxic).
Enamelled cast iron fixes many of these problems (i.e. covering it with a vitreous enamel glaze). The Ancient Egyptians & Greeks made enamelled jewellery by fusing powdering glass onto pottery beads, firing it at temperatures of 750-800°C.
The most famous enamelled cast-iron cookware is made by the company Le Creuset. Enamelling had already been applied to iron & steel since around 1850. In 1925, two Belgian industrialists – Armand Desaegher (a cast-metal expert) and Octave Aubecq (who knew about enamelling) thought of using it for cookware. They began with a round cocotte (casserole dish), and over the years expanded into many other kitchen items.
Le Creuset was one of the definitive cookware ranges of the 1900's. They used different colours over the years – flame orange (1930's), Elysées yellow (1950's), blue (1960's, suggested by Elizabeth David, inspired by a packet of Gauloises cigarettes). Today, they are teal, cerise and granite.
They are excellent pots – the cast iron warms up evenly, and retains heat extremely well. The enamel prevents the food from tasting metallic. The big problem with them, though, is how easily things stick to the bottom at high temperatures.
Food sticks to the bottom of pans because it proteins react with metal ions on the pan's surface. So to stop it sticking, you either 1) stir it too fast for it to get a chance to, or 2) putting a protective layer on the pan.
This is traditionally done by “seasoning” the pan. Soak the pan in hot soapy water, then rinse & dry it. Rub oil/lard onto the surface, and heat it very slowly for several hours. This causes some of the fat molecules to “polymerize”, leaving a slick, shiny surface.
Every time you cook a meal in this pan, it will add another layer of polymerized fat. Eventually, the pan becomes extremely slick: in a nicely-blackened wok, the food will slide and jump. But the pan must never be scoured, and you shouldn't put acidic foods in it. If the seasoning wears away, then you have to season it from the start again.
In 1954, Marc Grégoire (a French engineer) invented non-stick pans that didn't have to be seasoned. Polytetrafluoroethylene (PFTE) had been used by chemists since 1938. It was used to coat industrial valves, and for fishing tackle. Apparently, his wife suggested that he try using the PTFE he'd been using on fishing tackle, to solve the problem of food sticking to her pans. He found a way to meld PTFE to an aluminium pot.
PTFE molecules don't bond with other molecules. This is because it is made up of 4 fluorine atoms and 2 carbon atoms, and once the fluorine has bonded with the carbon, it doesn't want to bond with anything else. When you pour a wee bit of oil into a PTFE-coated pan, the pan appears to be repelling the droplets.
In 1956, the French Tefal company began selling their non-stick pans, or “Teflon”. In 1961, DuPont launched the first American non-stick cooking vessel, called “The Happy Pan”. Within a year alone, American sales were a million units a month. In 2006, 70% of cookware sold in America was non-stick.
But non-stick is not the perfect answer. Stewing or sautéing in a non-stick pan doesn't give you the brown stick bits for deglazing. And the non-stick properties don't last, no matter how careful you are (no metal utensils, keeping it away from searing high temperatures). Eventually, it wears away – the reverse of a traditionally-seasoned pan.
PTFE isn't toxic, but if heated above 250°C, it gives off several fluorocarbon gases as byproducts, which can cause flu-like symptoms (“polymer fume fever”). The industry responded to this by saying that pans wouldn't be heated that high under regular use – but that isn't correct, as leaving a pan to preheat without oil in it can reach these temperatures.
In 2005, the Environmental Protection Agency (in America) investigated whether PFOA (a substance used in the manufacturing of PTFE) was carcinogenic. DuPont (the main American manufacturer) has stated that the amount of PFOA on a pan is too low to be of harm, but not everyone's fears were assuaged.
In 1988, Chuck Lemme (an American engineer) created an inventory of 9 categories for pan quality:
Temperature uniformity (evening out hot spots)
Reactivity & toxicity
Hardness
Simple strength (swill it survive being dropped?)
Low-stick rating
East of maintenance (easy to clean)
Efficiency (conducting heat well through the base)
Weight (can I lift it?)
Cost
Each pan was scored out of 10 for each category, and then added up to a total score out of 1000. But none of them got anywhere near it.
Pure aluminium was 8.9 for temperature uniformity (great for omelettes), but a 2 for hardness (many aluminium pans end up misshapen). Copper scored 10/10 for efficiency – but 1/10 for maintenance. None of the single-material pots scored over 500, and the highest-scoring pot was pure cast iron, with 544.4.
To bump a pan's rating higher than that, it had to be made of more than one metal, sandwiched together. At the time, cooking experts believed that only pure copper pans were worth having – but they were wrong. Lemme found that just a very thin layer of copper “electroplated to the bottom mainly for decoration” could increase a pan's conductivity greatly. A 1.4mm stainless steel pan with a 0.1mm layer of copper would increase its ability to even out hot spots by 160%.
To check for hot spots in a pan, sprinkle flour over its surface, and put it on a medium heat. A brown pattern will start to form as the flour burns, and if it spreads over the whole surface of the pan, then it has good temperature uniformity. If a small brown dot appears towards the centre of the pan (which is more likely), then this is a hot spot, and when cooking in the pan, the food at that point will cook better than the food at the edges (unless you stir it frequently).
Lemme said that the ideal pot would have a stainless steel-nickel alloy for the inside of the pan, coated with one of the more durable non-stick surfaces (such as flame-sprayed nickel). The outer bottom would be laminated with pure aluminium, 4mm thick on the bottom, and thinning out to 2mm on the sides. He never marketed this pan, going back instead to engineering things. Even his ideal pot, though, rated only 734 (hypothetically) on his scale.
The problem is that having all those qualities is impossible, because some of them are incompatible. A thin base makes the pan more energy-efficient (responding better to different heats from the burner), which can be useful for making sauces, or pancakes (they are cooked quickly & at a higher temperature). So of course this saves on energy bills. BUT a thick base is better for getting rid of hot spots, because the temperatures on the base are more even. It is also excellent for heat retention – thick cast iron takes ages to heat up, but once hot, it stays hot. This is good for searing meat, because when the cold meat lands in the pan, it still keeps most of its heat.
But technology has improved in the last few decades, and alloys are being used, like Lemme said. One of the top American cookware brands is All-Clad, and they have a patented formula which uses 5 layers of different metals in the same pan, alternating highly-conductive materials with low-conductive materials. This is to “promote the lateral flow of cooking energy and eliminate hot spots”, and the pans are designed to work with the “newest-technology induction cooker tops”. However, they are ridiculously expensive.
Dr. Nathan Myhrvold (co-author of Modernist Cuisine, 2011) worked with a team of researchers in a cooking laboratory to scientifically analyze cooking techniques. He discovered that berries & lettuce should be plunged into warm water before being refridgerated, so that they last longer in the fridge. Also, duck confit doesn't need to be cooked in its own fat, as is tradition: a sous-vide water bath is just as good.
He conducted many experiments on the “perfect pan” and found that it was impossible – “no pan can be heated to perfect evenness.” Even the most highly-conductive pan could not cook perfectly evenly. Because there was another factor – the heat source.
The usual small domestic gas burner is only 6cm in diameter, and this isn't wide enough to heat evenly to the far edges of the pan, no matter how highly it scores on Lemme's scale. Myhrvold's advice is to “Skimp on the pan, but choose your burner carefully.” He found that if you have a burner at least as wide as the pan, then a cheap aluminium-stainless steel-bonded pan is nearly the same as a copper pan.
#book: consider the fork#history#culinary history#classics#egypt#ancient egypt#ancient greece#belgium#france#usa#armand desaegher#octabe aubecq#elizabeth david#marc grégoire#chuck lemme#nathan myhrvold
3 notes
·
View notes
Text
It’s the last week of January, it’s very cold here in UK and I thought, this would be the perfect time to sit down and let ourselves to get inspired, try new things or dust off the old ones with a new coat! Every spread you will see here highly customizable and you can personalize it however you like — the choice is yours and it has to work for YOU!
SPREAD NUMBER 1
I could not kick this off with the creator of the bullet journal, Ryder Carroll. His monthly spread is very basic, yet very effective and it is the backbone to everything else that follows. It consists of a monthly calendar and a task list. The purpose of each spread is to help you organize your month and future project. You will achieve a lot more in your life when you are ready. Sometimes, it is very hard but if you want to live a better life, it has to be done. Don’t worry, it is very simple and you will love it!
SPREAD NUMBER 2
This is the spread that I am currently using and I have created it based on my own needs. Here, you will find a traditional monthly log on one page (weeks separated by dots) and a mini monthly calendar, 3 monthly goals and actions to make them happen, monthly tasks, and next month‘s tasks on the oppposite page. This spread is built to make you move forward, focus on your goals without getting overwhelmed.
SPREAD NUMBER 3
In this spread, I have divided the monthly log (weeks separated by dashes) into two sections:
am / work / all day / events
pm schedule / personal / meal plan / mood
On the opposite page, you can see that I kept the monthly tracker right by the monthly log — the reason for this is to keep it bound together. Next to these, there are 3 monthly goals, monthly projects, and next month‘s events/tasks.
SPREAD NUMBER 4
I love the fact that you can have everything here on this spread and it still looks very tidy! On the left page, we have the monthly log (weeks separated by lines) and the monthly tracker drawn side by side for easy reference. On the opposite page, there is a mini monthly calendar again, ‘My mission’ statements’ goals and things to make them happen, monthly tasks, plenty of space for notes, and next month‘s coming up.
SPREAD NUMBER 5
This monthly calendar is a smaller version of its big brother (the monthly calendar in the next picture). You can use this calendar as a part of your colour coding system. How it works is that you add different colours to your sections or areas, such as meetings, events, personal appointments, exams, gym sessions etc. You can keep your colour code key right below the monthly calendar for easy and quick reference. ‘This month’ is the place where you write what each coloured dot in your monthly calendar means. For example:
when you have a one off event scheduled (e.g. seminar at 5pm), you can pick the colour that you use for such event and write the date down with this colour, then you can write what it actually is, seminar 5pm, right next to it
on the other hand, if there is something you do on regular basis, let’s say that you go to a yoga class twice or once a week, you can use the colour for gym’s colour code and write yoga with this colour, and then write the dates next to it ticking them off as you complete
At the bottom of this spread, you can find a monthly tracker in horizontal position which I find very appealing. And on the right page, there are monthly goals, monthly projects, notes, and next month’s tasks.
SPREAD NUMBER 6
Monthly calendar made easy! It looks great and is useful too. You can use colour coding within this spread as well if you wish. Underneath, you can find next month‘s tasks. On the left side, there is a monthly/habit tracker where you can also track things like my pet’s activity, pregnancy weight, baby’s kicks, mood, dialy steps # etc. And, yes! You can absolutely use sticky notes or any kind of other paper cuts in your journal! I have always been using sticky notes within my planners/journals to keep a shopping list with me all the time so I can add things I need to buy, plus it’s handy when you go and do the actual shopping – you simple peel off the sticky note and if you are using a wallet time phone cover like I am, you can stick it inside to make sure you won’t lose it!
SPREAD NUMBER 7
This spread was inspired by Zoe @zf.sp . First, we can see that there is a mini monthly calendar right underneath the title, important events, focus on, notes, to-do, and next month‘s coming up. on the right page, there is a habit tracker which is divided by the dates and creates the illusion of monthly log – you can use one half for that! Zoe uses one half of this tracker for tracking her habits and the other half for tracking her skills. You can also use one of these sections for a 1-10 scale to record your daily mood, sleep, fitness etc. and see how they relate to each other by analyzing the line and its shape throughout the month!
SPREAD NUMBER 8
This is such a cool spread! Inspired by Jady @greenishplanning . The monthly calendar has been unified into one neat square and she is using the colour coding system here too. In the left down corner is the colour code key and you can you the space around it for writing down the dates and things you have scheduled. There is also a monthly tasks & goals list. On the opposite page, there is a brilliantly made monthly/habit tracker. Even though I am not a fan of using the entire page for tracking things, this one is really nice. I like it because it’s got different areas divided by lines that you can colour in. These reas could be your morning routine, school, work, social media, self-care etc.
#gallery-0-5 { margin: auto; } #gallery-0-5 .gallery-item { float: left; margin-top: 10px; text-align: center; width: 50%; } #gallery-0-5 img { border: 2px solid #cfcfcf; } #gallery-0-5 .gallery-caption { margin-left: 0; } /* see gallery_shortcode() in wp-includes/media.php */
SPREAD NUMBER 9
Isn’t it pretty? This spread is inspired by Megan @pageflutter and I love how she keeps the monthly log at top of the spread. It looks very organized and you have a lot of breathing space here. At the bottom portion, there is plenty of space for your notes, monthly tasks and upcoming evens. Also, a mini monthly calendar for the upcoming month where you can use colour coding to mark important dates.
SPREAD NUMBER 10
I wanted to have some sort of minimal planning spread and at first, I only created a monthly log on the left and a small monthly calendar. Then I wanted to give you some idea so I filled the empty space with monthly goals, monthly tasks, notes, and coming up. The calendar in the top right corner is something that I adore! It can be used as a colour code calendar OR a new thing!! ; a 3 new habits’ tracker!! Sometimes, it is quite overwhelming to start new things and make a habit out of them. I wanted to implement the same theory here as I did with my 3 monthly goals, which is – we will only try 3 new things (maximum) per month. It takes about 30 days to build a new habit and trying to re-build yourself with too many changes at once, well, the chances are that you won’t stick with it because it will be too much. So, take it easy and try just a few, build up your confidence. You can only start with one habit! As long as you stick to it and make yourself proud of you, that’s what counts.
You can also use this tracker as your social media tracker, daily weight tracker, child’s health etc.
And here is a mini version of spread number 10!! Don’t you love it?? It’s so cute! It is a pocket size (A6) Leuchtturm1917 and it looks adorable!
— my beloved SUPPLIES —
my beloved dotted Leuchtturm1917
Faber-Castell Pitt Artist Pens
Uni Pin Fine Line Marker 0.1mm
*The links above will take you to your local Amazon shop! Even if you won’t buy any of these supplies, accessing your Amazon via any affiliate link above (at no cost to you) and placing an order of any item you like to purchase, you are still supporting this blog and future giveaways!
Would you like to watch the video? Come this way 🙂 → Youtube | 10 monthly spread ideas
10 Monthly spread ideas for your bullet journal! #bulletjournal #betweenthesteps It's the last week of January, it's very cold here in UK and I thought, this would be the perfect time to sit down and let ourselves to get inspired, try new things or dust off the old ones with a new coat!
0 notes
Text
The Lotmaxx SC-10 Shark V2 Review: Impressive and Affordable 2-in-1 3D Printer
Lotmaxx SC-10 Shark V2
8.50 / 10
Read Reviews
Read More Reviews
Read More Reviews
Read More Reviews
Read More Reviews
Read More Reviews
Read More Reviews
Read More Reviews
Read More Reviews
Read More Reviews
Read More Reviews
Read More Reviews
Read More Reviews
Read More Reviews
Read More Reviews
Read More Reviews
Read More Reviews
Read More Reviews
Read More Reviews


Shop Now
Compared to its first version, the Lotmaxx SC-10 Shark V2 offers several upgrades and now standard features, including a dual-extruder and laser etcher, making it a great choice for both beginners and those looking to stay under $500.
Specifications
Brand: Lotmaxx
Build Volume: 235x235x265mm
Printing Accuracy: ± 0.1mm
Connectivity: Micro SD and USB
Heated Build Plate: Removable Magnetic Plate
Feed Type: Bowden Tube
Dimensions: 17x18.3x19.21in
Weight: 18.5lbs
Dual-Color Printing: Standard Dual Extruder
Pros
95% pre-assembled
Removable flexible build plate
Laser etcher is simple to install and use
3D prints are accurate
Cons
Initial installation and setup directions are limited and confusing
Manual and auto-leveling takes getting used to
Laser etching goes line-by-line, making it slow
Learning process involves lots of patience
Bi-color printing involves lots of waste
Buy This Product
Lotmaxx SC-10 Shark V2 other
Shop
// Bottom var galleryThumbs1 = new Swiper('.gallery-thumbs-1', { spaceBetween: 10, slidesPerView: 10, freeMode: true, watchSlidesVisibility: true, watchSlidesProgress: true, centerInsufficientSlides: true, allowTouchMove: false, preventClicks: false, breakpoints: { 1024: { slidesPerView: 6, } }, }); // Top var galleryTop1 = new Swiper('.gallery-top-1', { spaceBetween: 10, allowTouchMove: false, loop: true, preventClicks: false, breakpoints: { 1024: { allowTouchMove: true, } }, navigation: { nextEl: '.swiper-button-next', prevEl: '.swiper-button-prev', }, thumbs: { swiper: galleryThumbs1 } });
Have you been considering getting a 3D printer, but been putting it off either because of high prices or the assumption that they would be difficult to set up and learn? That’s been my case for the past few years.
Since prices began to fall below $1000, I grew increasingly interested in the possibility of owning one someday if I could finding enough practical uses to justify its purchase. Fast forward to 2021, and now we’re experiencing a boom in sub-$500 3D printers, including the Lotmaxx SC-10 V2. Today I’ll be reviewing and sharing my experience using it as my very first 3D printer and laser engraver.
With a big focus on modularity, simplicity, and offering lots of unique features out of the box, including bi-color printing and also being a laser engraver, does this sub $500 all-in-one 3D printer bite off more than it can chew?
youtube
The Lotmaxx SC-10 Shark V2, as its name implies, is the updated version to the original SC-10 which our team originally reviewed not too long ago in November 2020. While the Shark V2 is largely the same 3D printer and has many of the same quirks we discovered originally, it offers enough in terms of upgrades, improvements, and now standard features, that I would recommend going with this newer version if your budget allows.

In my time testing and reviewing the Shark V2, I have printed and etched a wide variety of projects. I will share the positive and not-so-great aspects from the perspective as a first-time 3D printer owner.
What to Expect
Whether you’re planning on getting this as your first 3D printer or are upgrading, I’ll go over the initial impressions and learning process that I went through to get this fully set up and printing, which should give you a good idea of what to expect with yours.
As I’ll detail throughout this review, my experience overall, once getting through some initial setup hurdles, was mostly very positive but not always stress-free. I generally do lots of research prior to purchasing and receiving new products, yet with this printer, I wanted to approach it from a novice perspective so as to see how easy (or not so easy) it truly was to set up and use.
I did have my share of issues and several times where I needed to troubleshoot or look up how to do something that wasn’t covered in the included manual. Especially if this is going to be your first printer, plan on spending a good amount of time, at least in the beginning, dedicated to figuring things out and lots of trial and error.
Once Optional, Now Standard
Even though our original review of the SC-10 suggests skipping on the optional upgrades, they've now been included as standard with the V2. Those consist of an auto-leveler, dual-extruder, and laser engraver. They too seem to have also improved in terms of reliability and performance compared to their previous versions.
That said, they’re still far from perfect. But coming from the perspective of a beginner who is interested in growing with this system and new creative outlet, I appreciate the additional features, printing options, and simplicity they can offer for more beginner or casual users like myself.
If you’re absolutely certain that you only want single color printing, don’t plan on using the 3D engraver, can get by without the auto-leveler, or are on a tighter budget, then the original base SC-10 printer which retails for about $200 if you purchase straight from Lotmaxx’s site. For some, these potential savings between the two models might be better spent on some additional filament.
Speaking of savings, Lotmaxx seems to be frequently offering a variety of coupons and promotions on their official website. Oddly, though, they seem to have two official sites, Lotmaxx.com and Lotmaxx3D.com which both offer options to buy from, however, at the time of writing this article, the latter has the SC-10 Shark V2 priced lower at $429.99 vs $499 on the other. Whether or not these prices or coupons are exclusive to certain regions or limited-time offers is unclear, so it should be worth your time to see what the best current deals are when you choose to buy.
95% Pre-Assembled with a 5% Struggle
While you likely won’t be able to fully assemble and be ready to print in under 10 minutes as Lotmaxx claims, especially if you have never done so before, you will still appreciate the relatively straightforward and simple steps need to get the printer ready.
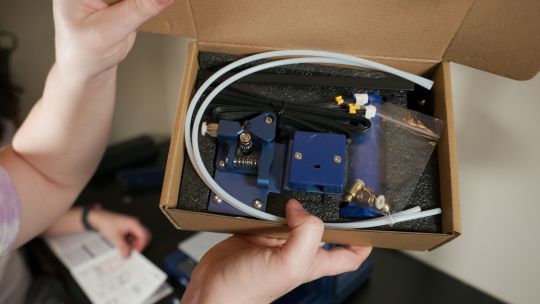
Everything you’ll need for assembly, from the tools, a few spare parts, and wire ties for optional cable management is included and easily identifiable in your package. You even get a small sample spool each of orange and green filament, as well as two sheets of plywood, to get you started with your first few projects.
For the easiest install experience, give yourself plenty of space to lay out all your parts. Once you get everything assembled, this printer measures in at 17x18.3x19.21 inches, so you’ll need a good amount of space to locate this in.
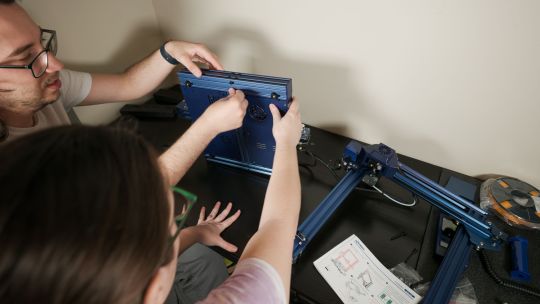
With the printer arriving 95% pre-built, there are only a few core pieces, all of which felt well built. Assembly involves attaching the Z-axis to the base with 4 screws at the bottom, connecting the handheld touch screen with a cable, mounting the two filament holders, installing the bi-color extruder with two screws, and then plugging in a variety of wires.
One of the main benefits compared to the original SC-10 model, is that once optional add-one like the auto-level sensor are pre-installed and don’t require any additional setup.
Confusing Instructions
The included instructions, even with their illustrations, were often confusing with unclear wording, choice of reference images, or complete omissions. As such, certain assembly steps took a bit of time figuring out how exactly it was meant to attach. I believe this would be a larger issue for others who lack experience setting up these more DIY devices, and could perhaps be a complete deal-breaker for those who just want everything to work straight out of the box.
Moreover, my first frustrating experience came as a direct result of the instructions completely skipping a very important step required to let the printer turn on. After completing the entire install, the instructions then show users how to begin the leveling and calibration. What they failed to mention beforehand, and not until 8 pages later, was that there is a small and hidden switch in the rear lower side of the printer that you to set to 220v or 110v before use.
I ended up trying to figure out why the printer wasn’t turning on for about 15 minutes. I rechecked every attachment, cable and tried other outlets to see if that was the problem. With no luck, I began to search for my problem online and found that a few other users experienced the same issue and left 1-star reviews on Amazon. They too made sure everything was properly installed but couldn’t get the SC-10 to turn on, and so assumed it arrived broken.
While it would be nice for the units to ship out with their localized voltage switch pre-configured, I would be more than happy to also have the instructions clearly indicate this crucial step in the right spot. A simple problem with a simple fix, but this would be just the first.
Setting it Up
Once you actually manage to assemble everything and power on the Lotmaxx SC-10 V2, you can continue with the setup process.
Firmware
I would recommend visiting Lotmaxx's support page first to download the latest available firmware, which you can then flash via the included 16GB micro-SD card. This is another example of where the manual doesn’t walk you through the process, but I did find their short YouTube video to be clear enough.
Auto and Manual Bed Leveling
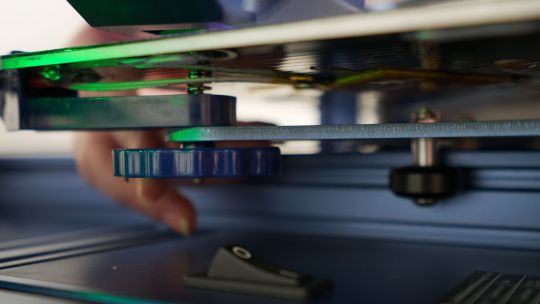
Something that takes more time figuring out is leveling. Underneath the print bed, there are four large dials that can be turned to adjust each of the sides’ heights.
Through the on-screen settings menu, there are two leveling setups available, automatic and manual. If you’re doing manual leveling, which I recommend, the setup screen will have five points that the extruder will travel to; the 4 corners and the 1 center point. Using the dials underneath the bed, the goal is to tighten them each just enough that it creates slight friction at each point when you pull on a test piece of paper.
I found it to be a little tricky because it's hard to measure the same amount of friction between each point, and it especially never seems to be the same at the center point. Measuring friction with a piece of paper can only be so accurate. Tied in with this, both the bed and extruder have some wobble and give to their position, and so, it can be especially tricky to determine where the friction point really is.
While this updated SC-10 V2 now has the automatic leveler attachment pre-installed, it seems that it only helps the printer become a little more precise as opposed to completely eliminating the entire manual leveling process. What’s good, however, is that the auto-leveling process no longer requires firmware configuration to get it working. Still, you should only use the automatic leveling after completing a manual one first.
Loading Filament and The Run-Out Sensor
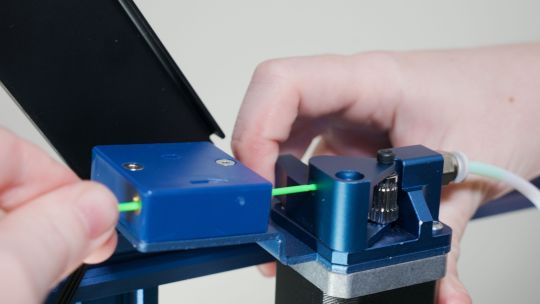
Each extruder has a dedicated filament sensor which you feed the filament through and into its Bowden tube which connects to the print head. This feeding process is rather tedious as it involves clicking a button while simultaneously pushing the filament down the tube until it has about 1cm of tube left before it enters the extruder module.
The filament sensor is useful with pausing a print if you run out of filament during it, but it has some limitations. First, I would have liked for the option, if it’s a single color print, to allow the printer to default to using the second filament if the first runs out. Second, and really frustrating, if your first filament on the left is ever out, even if you have the printer set to only print with the second, it will give you an error that your filament is out and it will not allow you to continue until at least a few cm of filament have been pushed through the first sensor so that it can detect it.
Because of this last limitation, with my later prints a few weeks into my review, I had to completely switch the filament out of the second extruder into the first to allow it to print anything. Seems like there should be a simple setting available to avoid this, or just smarter software.
Slicing and Loading Project Files
Now that the printer is fully set up and adjusted, there are two ways to print 3D files and etched images.
Pre-installed on the included 16GB micro-SD card, Lotmaxx has included a handful of interesting Gcode files (pre-sliced instructions for the machine to print directly from).
You can choose from their single color or bi-color models as well as a few laser-etched images. While there are other slicing programs that are capable of working with the Lotmaxx SC-10 V2, their own branded one is the only one that is also capable of preparing etching files too.
Lotmaxx has its own Cura-based slicing software to create printable files and laser etching files that you can then either copy over to the micro-SD card, or send over USB when connected directly to a computer.

If you’re not familiar with this kind of slicing software, it can be a bit overwhelming at first figuring out how to get 3D objects ready for pprinting. Essentially, through a variety of customizable settings, you can instruct the printer how precise, dense and fast to make the print. Take your time to familiarize yourself with the program to understand the importance of each setting as it can make a huge difference in terms of quality and print time. There are lots of good videos which go over how to get your models imported into the software, tweaking the parameters, and then saved and exported as a Gcode file ready for printing.
While printing directly from a PC is possible and might seem more convenient than copying over the files to the micro-SD card and then reattaching the card to the printer, it’s not as reliable as it requires the PC and the slicing program to stay awake during the entire print. It would have been great to have the ability to send the sliced files over USB to the printer to store and print locally.
Slow and Steady MEans Better Prints
It was here that I began to research and better understand the importance of those slicing settings. If you really want your prints to turn out well with minimum issues, longer printing times will be needed. It can be easy to get a little greedy and try to speed things up, but in my experience, it wasn’t worth it.
Frequently, this is where I encountered the majority of my issues with prints. I would rather wait longer for a print to come out right than to save a bit of time and have a completely unusable print. This is especially important for prints with moving or connecting parts that have lower tolerances for error.

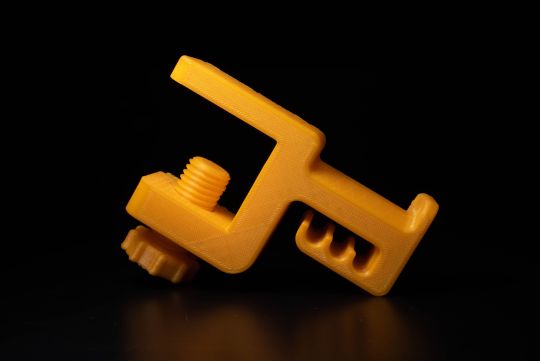
For example, one of my more functional prints of a table clamp headphone holder, it had two separate pieces which needed to fit and work together. The screw needed to turn in the clamp in order for this whole print to work.
Even though I printed this at a normal speed with less detail, the two prints work perfectly. The screw turns extremely well. With the exception of the back of the clamp looking a little messy, which I am thinking might be due to a leveling issue, the overall finish of both the screw and clamp look and feel really nice. Even the corners and edges are smooth with minor imperfections.
That said, because of how long it takes to see your print progress and gauge how well it's going, it can be especially difficult to fine-tune and make necessary adjustments. Beyond just slow and steady prints, using this or any 3D printer is going to be a slow and steady learning experience as well.
Prints and Etches
Operation and Interface
Using the handheld touchscreen is quick and easy to understand after a few minutes with it. It controls all the leveling and preheating options as well as quickly lets you browse and load sliced models that you've copied onto the micro-SD card. Compared to some of the earlier Lotmaxx models which had a fixed screen to the printer itself, having this removable screen that can be brought up to eye level allows you to more easily make adjustments and load projects without the need to bend down to see what you’re doing.
Removable Flexible Build Plate and Scraper
Before the Lotmaxx begins printing, it heats up its build plate to help the filament adhere. Do not touch the plate during the print as it gets very hot. When the print is complete, you can actually detach the entire build plate, then flex it slightly to snap your print off.
Single Color Prints
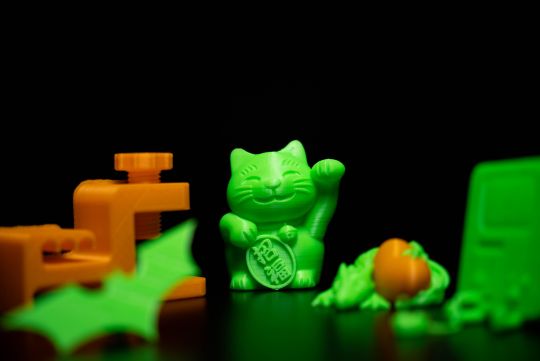
Similar to our review of original SC-10, I also chose the lucky cat as my first print. Keeping everything at its default settings and just letting the printer run for a few hours overnight gave great results. This was the first time I witness how detailed and precise the prints could be. Especially in the little corners, I was expecting it to get “blobby”, but it didn’t. There were a few areas I noticed it could have been a little more defined, but still incredible results for my first test.

When you get comfortable with their pre-installed prints, you’ll want to check out sites like Thingiverse which have a fantastic selection of user-submitted models to download and print. Bi-color objects are actually broken down into separate models, which are assigned different colors. With dual-extruders still not being very popular, reliable, or worth the additional setup time, you won’t find too many bi-color prints to download.
Bi-Color and Waste
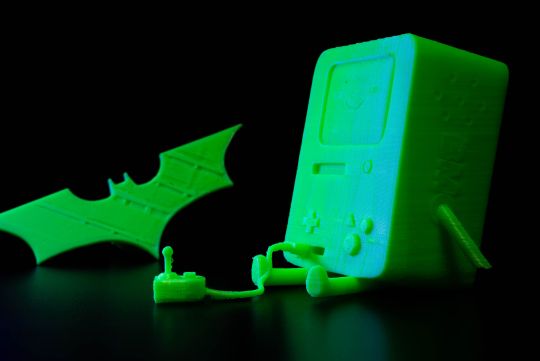
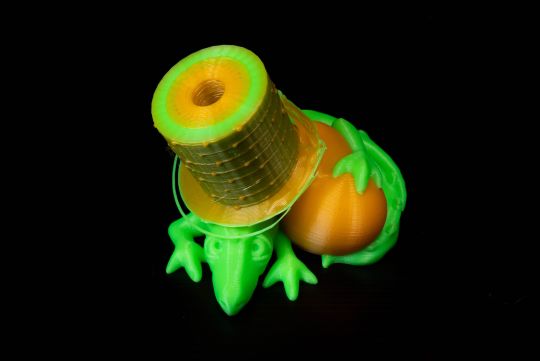
Next, I tried their bi-color dragon and egg. To date, I think this is the best print I managed. Again, everything was kept at its default settings and I let it run for a few hours while I stepped away and did other work. I would pop my head in every now and again to check its process and make sure nothing had gone awry.

A couple of hours in, the dragon’s form started to take shape, as well as a separate object that very much looked like a top hat. It wasn’t until a bit later that I actually realized this was just a waste by-product caused by printing in two colors. Every time the extruder switched to the other color, it would add to its circle of waste and then resume printing the actual model. This is part of its cleaning process to minimize clogs and ensure good color separation, but it definitely comes at a price.
Colors can’t be mixed though, something that other printers can do. This might limit the versatility of having dual extruders for some. If you can look past its shortcomings, the results you get are still on-par with single-color prints in my opinion. They take longer and will use much more filament, but they do help give your prints more life. I like having the flexibility of having bi-color printing when I want it, but for the majority of my prints, I’m sticking with single colors.

Laser Etches
Switching to the laser etcher is the only mode that requires separate installation. It’s quick and simple, but somewhat inconvenient.

To install the laser etcher and have the most surface area to work with, you’ll first need to remove the dual extruder which is attached by two bolts. You can either attach the removed extruder to the top rail of the printer or keep it off to the side and out of the way of the laser etcher. There is one other module that attaches and screws into the base of the printer as well. It would have been nice if there was a way to have both the dual extruder and laser etcher installed simultaneously without drawbacks and needing to switch back and forth.
Using the same Lotmaxx slicing software, you can prepare your images for etching. Simple PNGs with transparent backgrounds and minimal shadows and details are suggested. Otherwise, you’ll likely run into the issue of the etch being a blurry, shadowy mess. I custom-made a few images in Photoshop and went through a few revisions before I was ready for it to be etched.

Unlike 3D printing, extra precautions are needed while etching. First, you have to wear safety goggles, which they include, in order to prevent hurting your eyes from the lasers. Likewise, as this is burning into the material, risk for fire is possible. You should not leave this unattended while it etches.
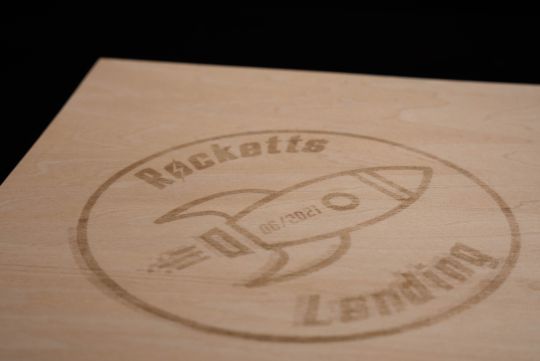
The only real drawback to the etcher is its speed. Just like the previous model, it still goes line by line, making it far slower. Aside from this, I was really happy with how my etches turned out. Even with smaller text, everything was sharp and clear.
Unlike with 3D printing, my first custom etch worked flawlessly. Just to try it, I wanted to see if I could go over the same etch a second time to get one half darker than the other. This did not work, and instead, caused a bit of the halo effect you see near the bottom because it wasn’t perfectly aligned.
Final Thoughts: Who is this Best for?
Learning Curve
My experience using the Lotmaxx SC-10 Shark V2 has had several ups and downs. Many of my earlier struggles and issues came from this being a completely new experience that required lots of trial, error, and troubleshooting to overcome. While this experience can be similar for many other new tools and hobbies, I think it was especially true here because of the number of moving parts involved which could potentially cause issues, and the somewhat steep initial learning curve.
Value
The SC-10 V2 stands out with its price and now standard attachments which help it be a more versatile tool that is not only easier to use and setup but can also laser etch too. Especially if you’re on the fence about getting your first printer, its relatively low price and overall beginner-friendly experience make it a great choice. However, to get the most value and use out of this printer, especially if you are completely new to 3D printing, you'll need to be patient and expect to invest lots of time learning your new tools and software. There will be times where something goes wrong or doesn’t print exactly as you expected. While it isn’t necessarily the most difficult to “fix” or get working, it can be overwhelming at times. As you become more familiar with the various settings as well as getting used to its various quirks, you can reliably make great 3D prints and etches.
Google, Reddit and YouTube will be your friends along this journey, but rest assured, it will be a fun, challenging and rewarding one.
The Lotmaxx SC-10 Shark V2 Review: Impressive and Affordable 2-in-1 3D Printer published first on http://droneseco.tumblr.com/
0 notes