#but i sure installed a bunch of modding tools and saved tutorials
Explore tagged Tumblr posts
Text
Current Activities in Gaming #226
Alternative title: My Christmas sale haul. I'll start with something that wasn't even on sale but still bought it at the same time as the others; Rogue Trader. Pretty much along the same lines as BG3, I don't expect to ever beat RT. There's also a lot of reports that Act 4 and beyond are a buggy breakable mess, which is similar to how BG3's act 3 becomes a lagfest for me because I'm still in the process of saving up for a new CPU/Motherboard so I can run newer games like Starfield. Quick aside about Starfield: The one saving grace of not being able to play it right away... I hear it's a fairly lackluster game. Perhaps by the time I am able to play it at all, the modding tools might be out and help liven it up. I certainly expect to get a ReShade because it LOOKS like dogshit from most screenshots I've seen. I don't want to play in a brown mess.
Back to RT; Much like BG3 I am finding myself doing some alt hopping to see how other class/archetype combinations behave. I also want one of everything; A heretic, a dogmatic, and the "iconoclast", a word I'm not familiar with but mostly means "helpful and supportive".
I have 20 hours played but have only gotten past Act 1 just last night on my "main" file. My main girl is a crime lord soldier, whose main job is being the team's backline sniper. She's very good at it, and when she CAN hit, she's the most likely to crit into very high damages. But she's the least capable of AoE. Her sniper can sometimes hit an enemy directly behind my target but that's it.
Next on the list is Evil Genius 2. Don't know much about it, screenshots and reviews remind me one of those "Dungeons" games I had where I had a bunch of minions build various functional rooms in order to do dastardly deeds. But if Zero Punctuation is anything to go by it sounds like EG2 spends too much time on the room building part and not enough on the dastardly deeds. Not sure if I'll like it but hey it was on sale.
We got Sipho next, which acts like Stage 1 of Spore but more robust. I played a few rounds of it and I'm still not sure I understand how to really build my own creature. Controlling them seems sluggish too, and I wonder if that will be more smooth as I get more parts.
Next up is Death Must Die, a survivor-like that follows the same Diablo-esque mood of Halls of Torment. If you liked Vampire Survivors I recommend both of these. Death Must Die is fun but it currently has a problem where one build is vastly superior to others, based around the "Mayhem" trait, if you can get it, it adds permanent damage for that run. I once got it up to 416% so I killed the map's boss in about seven seconds. That's gonna be nerfed.
We got Dome Keeper, which acts like that old digging game I can't recall the name of (but it was iconic for its era, I just didn't play it myself). You kinda play a bit of minecraft but your dome gets attacked every couple of minutes so you need to use the resources you get to upgrade it and fight them off. It's cute, finding it a bit difficult though.
Keeping the same theme here, Graveyard Keeper. Same developers as Stardew Valley which I really liked and most reviews state that if I enjoy Stardew than Graveyard follows a lot of the same beats. I just wish I could mod my bearded chud fellow into a girl but that doesn't seem to be available. Didn't play it for very long, I'll get around to it some day.
I -finally- got one of those Vampire Masquerade visual novels, a genre I don't usually care much for because there's not enough "game" in them. Sometimes one will add RPG elements and that catches my interest more. Right now I have "Shadows of New York", which I believe has a gal PC. I think the other ones you switch around like five different characters. I installed it but didn't play it.
I have Vectorio which I can't even get past the tutorial. I should probably refund that one. It's haunted my wishlist for so long but I have no idea what to actually do.
Got Hard West 2. Looks like another XCOM-like, as Rogue Trader is. Not installed yet. Low priority.
Startup Panic, another game dev simulator like. Not installed, low priority.
Crossroads: Anniversary edition has been on my wishlist for fucking ever but it's been locked to mixed reviews because apparently it's buggy to the point of unplayable for some people, and I'm just hoping I get lucky. The christmas sale finally put it on sale to an acceptable price so I nabbed it. Not even fully sure what kind of game it is, just an inn manager sort of thing.
Noun Town Language Learning. Installed but waiting for them to add Norwegian. I could get in there now and start a little bit of Japanese. One of my favorite things about learning other languages is watching movies and occasionally catching to see if the subtitles are accurate or not, which I can typically do with German even though I'm no longer remotely fluent in it (took German classes for a couple years in high school, those days are long behind me).
But I'm on a Norse lore kick lately and I want to be a little "closer" to it by learning Norwegian.
And that's a wrap!
1 note
·
View note
Photo


Tutorial - Decor crowds (and decor sims)
Hi everyone! Someone asked me if I could make a tutorial showing how I make decor crowds. Now my university stress is mostly gone so I finally have the time and energy to show the procress.
I am not going to show how to make poses, so if you don’t already know how to make poses, I recommend this tutorial.
This tutorial works for both one sim and for crowds. You just need to skip some parts if you only want to make one sim.
Now, let’s get started.
You will need:
TS4 SimRipper
Sims 4 Studio and Blender (preferably 2.70 if you want to follow along with my tutorial in the same version)
Image editing tool of your choosing, I use Paint Tool Sai, but you can use any that supports files with transparent backgrounds (PNG-files).
I recommend that you create one folder which you work within to keep track on all files, but that it up to your own preference!
Edit: 3/8-2020 Hello everyone! I can recommend checking out this tutorial if you experience any problems with shadows! It’s extremely useful and made by the talented @theroyalthornoliachronicles
Step 1 - Make one or a bunch of sims.
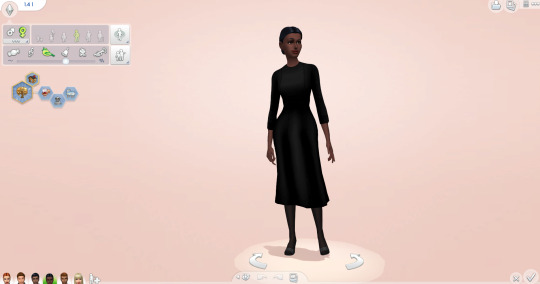
Make one or more sims that you want to have as your decor sims/crowd. Name them something easy like A A or 1 1. Each of these sims are names 1.1 1, 1.2 1, 1.3 1, etc. This makes them very easy to locate later.
When you’re finished, save your game and close/minimize it.
Step 2 - Launch TS4 SimRipper
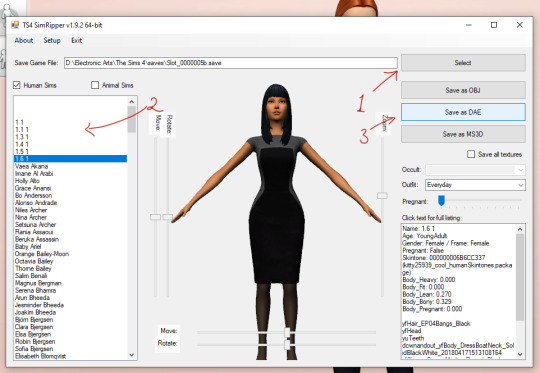
TS4 SimRipper is super easy to use. Place it in a folder so you have every file at the same place, unzip it, install it and then launch the program. If you cannot find the file, it should be a program file, look below for a guide.
When it launches, press Select (1) and choose the file at the top of the list. Let it load (don’t click anything).
When it’s finished, choose the sim you want to export (2). Again wait, it may take a while but that is normal.
When the sim is loaded, press Save as .dae (3). This is going to also take a while, so you can do other stuff in the meantime. For example, you may proceed to the next step in this tutorial. Remember to name them something easy to find, like 1, 2, 3, etc.
Remember to check if the program is finished every now and then to export the other sims you made.

If you cannot find the program, it should look like this. My system language is Swedish, but it should be named something along the line of program under the type-category.
Step 3 - Export files and rigs from Sims4Studio.
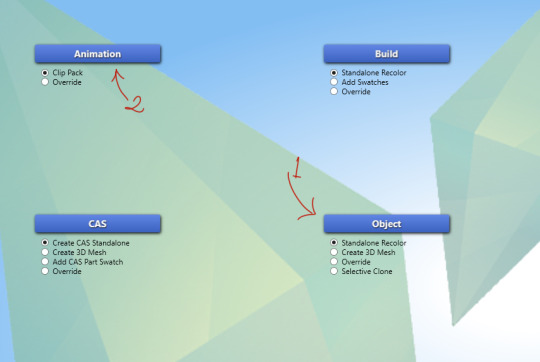
Now it’s time to start making the decor sims. Either start with Objects (1) or Poses (2). If you want a tutorial on how to make poses, please follow the tutorial I linked above.
When it comes to Object (2), choose create 3D Mesh and then the blue button.
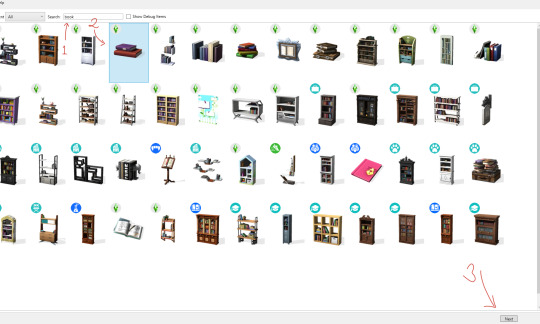
Like my last tutorial, we are going to use these books are our base. Start by searching for them (1), click on them (2) and then press Next (3). Name it whatever, but I recommend a name that will make sense a mod folder.
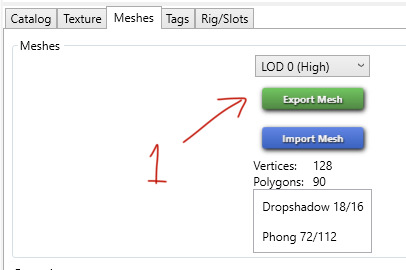
When it has loaded, click on Meshes and choose Export Mesh (1). Again, name the file whatever you want. I named my Grund - which means base in Swedish.
Step 4 - Working in Blender

Open the newly exported mesh in Blender by double-clicking on it. You should be met with something that looks like this.
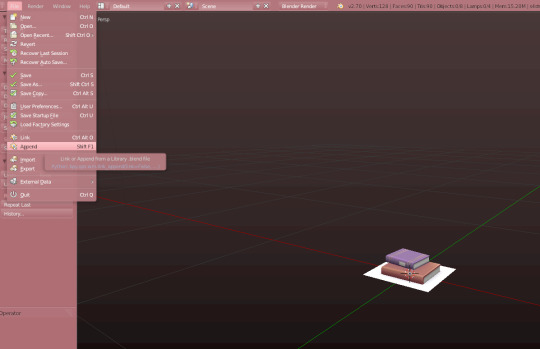
Open the File-folder and press Append, or just click Shift + F1.
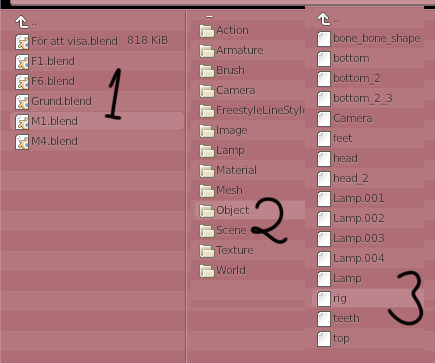
Choose one of the poses you made in advance or just import the rig you exported earlier. I am using a pose from my Mourning pose pack. Click on the pose (1), then Object (2) and finally rig (3). You do not need any of the other pieces in this tutorial.
If you are using another creator’s cc, like a pose, be sure to ask for permission before sharing the decor sim with the public.

When done correctly, it should look like this. This is the sim’s frame which we will base our decor sim on. This rig will be named rig.001, just leave it be.
Step 5 - Import the .dae file
Unlike my last tutorial, this step is super easy and takes almost no time.
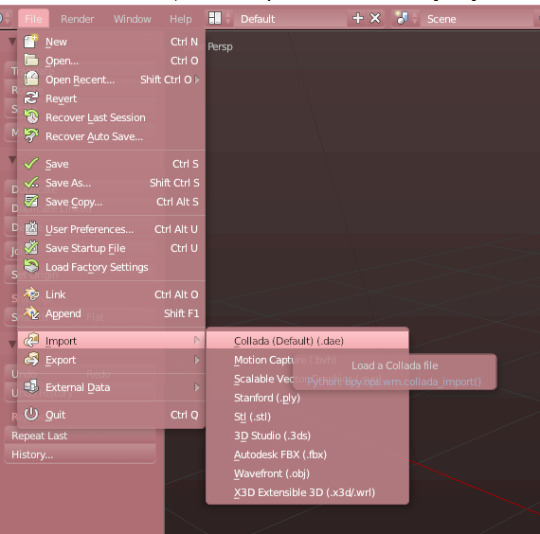
Go to file, then down to Import. Choose Collada (Default) (.dae). This is your sim with its rig and body exported from the game. This means that you can make decor sims of any body size, skin colour or other feature.
Click on any of the .dae files you exported eariler.
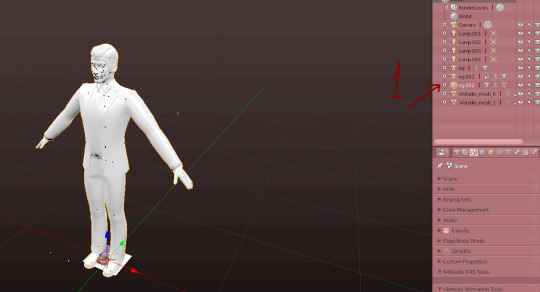
Now you will have a new rig named rig.002. Go right ahead and delete it.
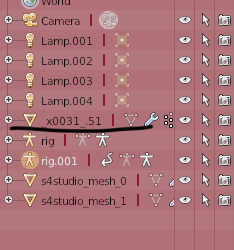
Now the body will be named something like this instead, just keep an eye what it turns into.

Now press the modifier-button (1). Then click on the Object bar on the rig modifier (2). Choose the second rig (3) and press Apply (4).
After pressing the Apply button, you cannot move the sim’s body, so if there is something that needs to be fixed, do that before.
When that is done, delete rig.001.
Step 6 - Preparing the meshes to be merged
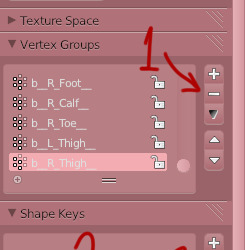
Now we’re gonna delete any trace that this sim used to be a moving object. Start by removing every vertex group from the sim. Delete them by clicking on the - button a whole bunch of times (1). Then rename the first UV-map to uv_0 (2) and delete the second one (3).
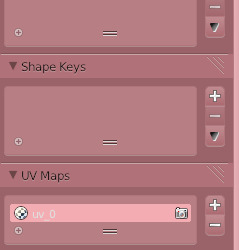
This is what it should look like when you’re done.
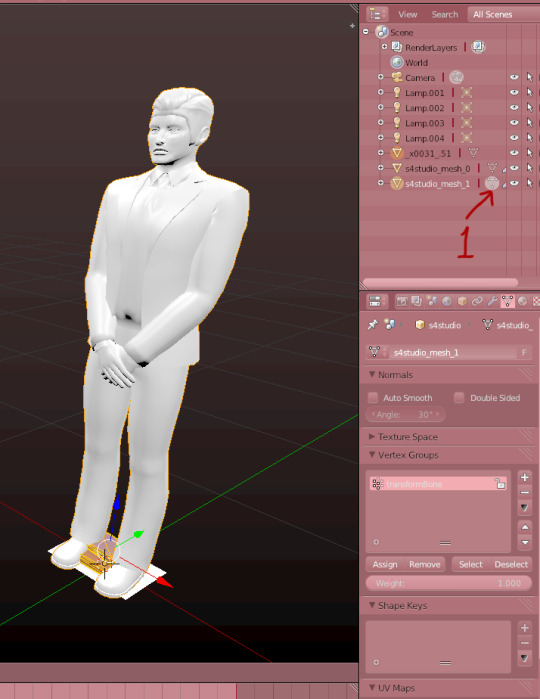
Now we’re gonna merge the two meshes. Start by clicking on the Sims4Studio-file’s thingy I marked (1). Then press A so it looks like it does on the image. When the mesh is orange, press X to delete it. You’ll need its values, so do not delete the whole thing, only it’s mesh.
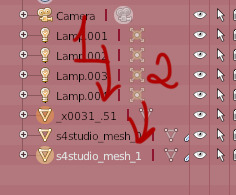
Now, click on the sim in the list of things (1). Then hold shift and click on the S4S-mesh (2).

When they’re both marked like in the picture, press Ctrl + J, or the join button to the left.
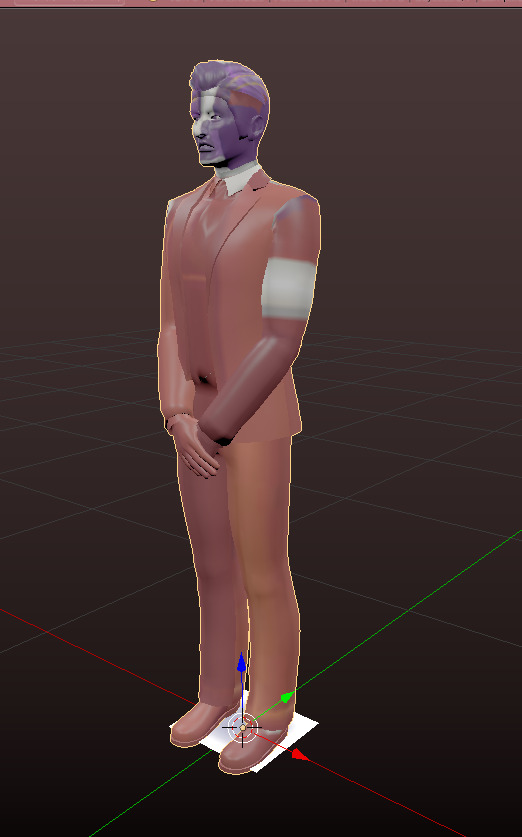
Now it should look like this, if it’s all black, you need to go back and rename the uv-maps to uv_0. You go back by pressing Ctrl + Alt + Z.
Step 7 - Save and finish up the project.
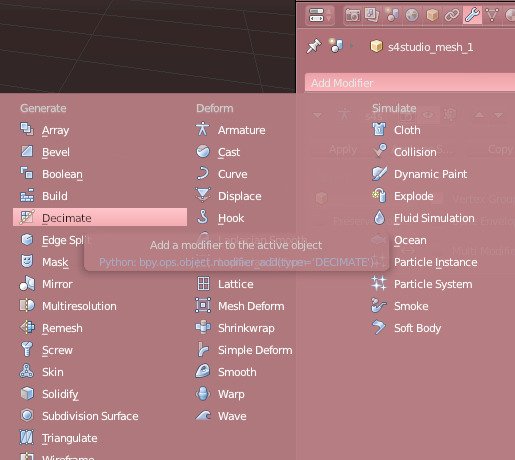
Now save your project before doing this step.
When it’s saved, go back to modifiers and add the Decimate-modifier.
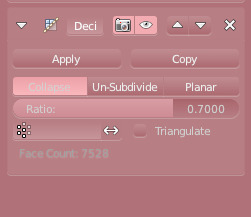
Chance the Ratio to anywhere between 0.6 to 0.8. I usually go with 0.7. Click apply when you’re satisfied.
Save your project again.
If you are only making one decor sim, you’re finished here for now!! You only need to add the other LODs, so you can skip the next step.
Step 8 - Fixing the uv-map (Not necessary for only one sim).
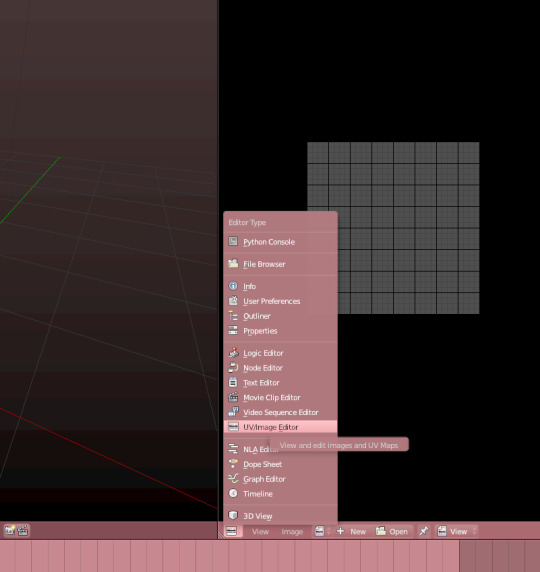
The uv-map is already finished if you are making only one sim, but if you are going to make a crowd, this is a very important step. Don’t worry, it’s really easy.
Open the uv-map by opening a new window and then choosing the UV/imagine Editor. Remember to enter the edit-mode on the mesh.
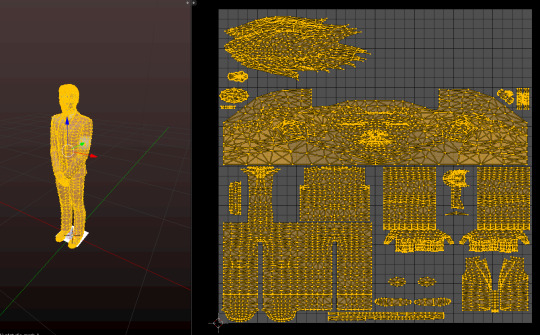
Press A on both windows to highlight everything.
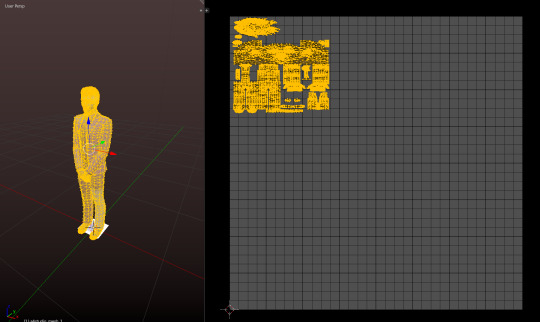
When it’s highlighted, scale it down so that it can fit more uv-maps on it. You make it smaller by pressing S on your keyboard and you can move it by pressing G.
Make sure that it’s big enough to still be able to show textures. but small enough to allow other sims’ uv-maps to be placed beside them.
Now you’re done. Now, redo all the steps you just did but place the uv-map on another spots. You do not want them to overlap or they’ll look ugly.
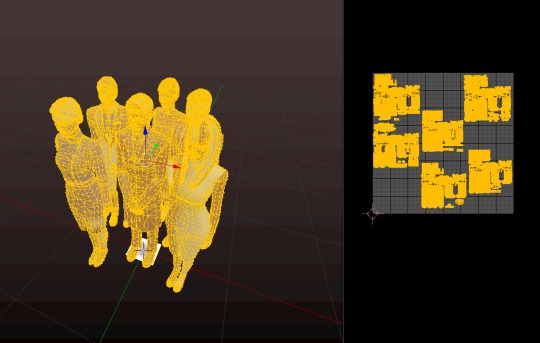
When you done all that, append the decor sims together so they form one mesh and uv-map. If done correctly, it should look like this.

After that, export the uv-map like this. Name it whatever you want.
Save your work again, and decimate the mesh. Try to make it to a 0.5 ratio. This make the crowd more manageable for the game.
Save it again and minimize Blender.
Step 9 - Making the object and fixing the texture.
Okay, here comes the annoying part. Now it’s time for a lot of waiting and to put a texture on your uv-map.
Unless you’re only making one sim, which means that you only need to import both files you just created!
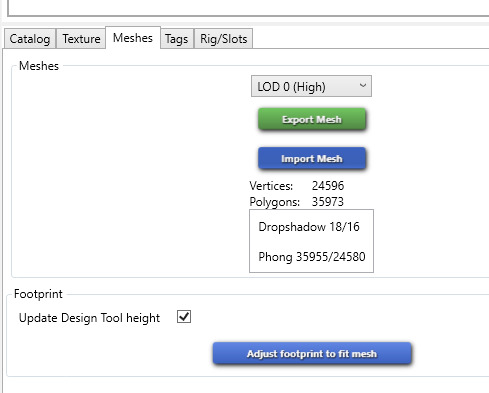
Start by importing your mesh into Sim4Studio. Now this is going to make a while, the more sims you added to your crowd, the longer the waiting. I made 6 sims, so that is a very big file.
When it’s loaded into S4S, save your file, so you don’t lose any progress.
While its loading, open your imagine editing tool and prepare yourself for a lot of fiddling.
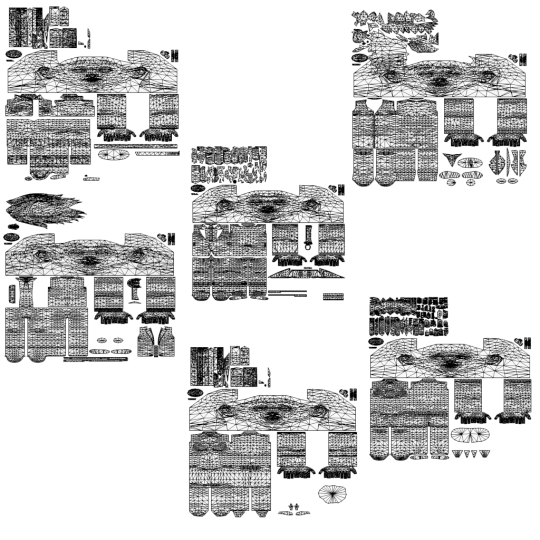
Your uv-map should look like this. So now it’s time to open every diffuse map you exported earlier in your editing tool and start matching them up.
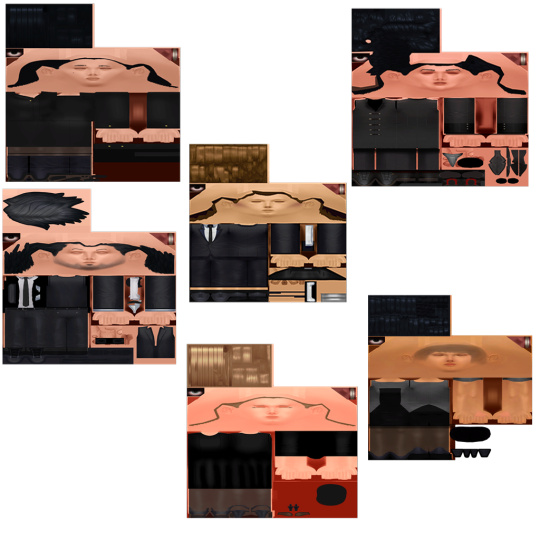
When you’ve managed to fix the uv-map, it looks like this. This took a lot of time, as one pixel makes a big difference. Have patience when you do this part.
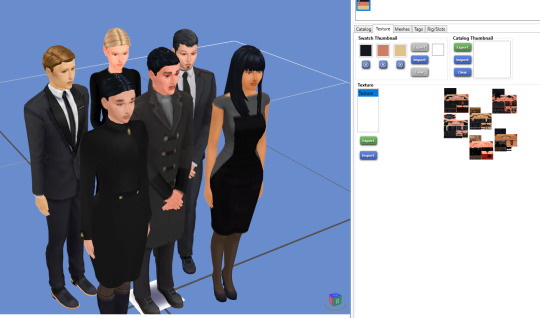
When you take the time, the crowd looks something like this, or hopefully a little more dapper, as mine is quite... depressed.
Step 10 - LODS and Shadow-LODS
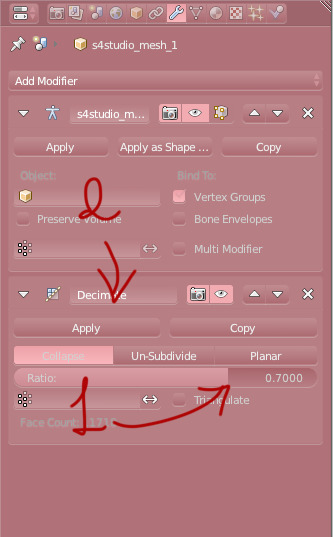
ANYWAY let’s fix the LODs. Go back to your blender-file and decimate it with a ratio between 0.6 - 0.8. Again, I use 0.7. Press save and import it into Sims4Studio. Repeat once more for the last LOD. Save between each LOD if you are worried about losing the progress.

Last step in Blender is to make a shadow LOD.
Start by deleting this mesh (1). This is the shadow when you have the “full” object, so now it is just in the way.
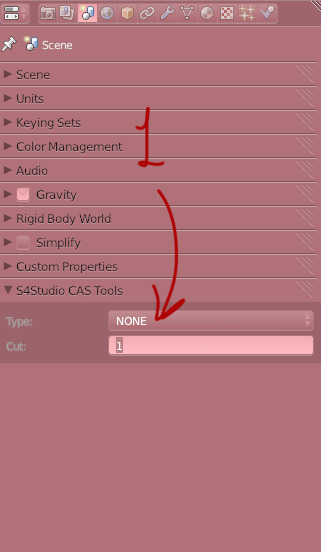
When its gone, change the Cut from 1 to 0. This makes it into a shadow mesh. Save and go back into Sims4Studio.
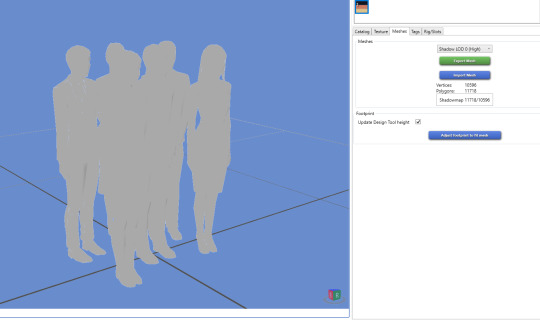
Now you can import that same shadow-mesh into every shadow LOD. Then it’s finished, you’re done!
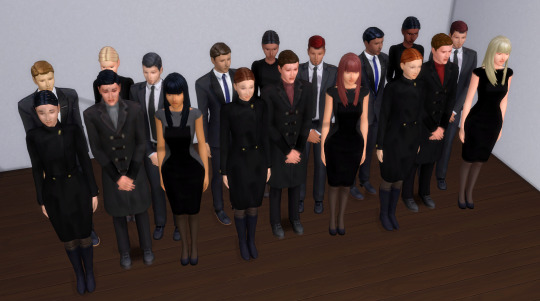
Now all that’s left is to fix the Catalog name, description and tags.
Thank you so much for following my tutorial! If you have any questions, feel free to ask me🌸
404 notes
·
View notes
Text
How to clayify alpha hair (TS4)
Hi y’all, today I’m showing how to retexture, (keyword TEXTURE, not model!), alpha hair to maxis match.
I’m sure there are countless tutorials on it, but I am neurodivergent and really struggled to understand most tutorials so I am attempting to write one out for fellow NDs and beginners alike too. (Tutorial continued below!)
Now! With that out of the way, here is what you will need to do this
~ Sims4Studio (Free! Works on both Windows and Mac.)
~ Any photo editing software, I’m using an online one called Photopea because it is simple enough for me to use.
~ And this PSD for the Maxis Match textures.
______
A plus for you all, this will *NOT* require blender! We are simply retexturing.
So, assuming you have S4S (Sims4Studio) installed and the pathways correct, and your software or browserware ready, we can get to texturing.
STEP ONE
Download a mesh. Download any mesh you want, I recommend to check the creators TOU so you know what you’re allowed to do. Some allow you to upload your retexture as long as you don’t include their mesh with it, and some let you do whatever you want as long as it is personal use only.
For this tutorial, I’m using Galactic by Anto on TSR.
After downloading the hair, put it in the mods folder inside the Sims 4 Studio mods folder.
Now, this part for S4S is crucial, make sure your pathways are done correctly, I’ll show you mind that you can use as a reference for your, keep in mind I’m on a MacBook so mine likely looks different than a Windows.

(ignore the censoring, it’s my deadname).
After that is configured, you’ll restart S4S.
STEP TWO
Under CAS, you’ll click the “Create CAS Standalone” option. Then hit the big CAS button above it.
You’ll see a bunch of heads and stuff, you’re gonna tick the option to show only custom content, and click the hair you’re wanting to use. It’ll prompt you to save it and then take you to this screen.
(Also! After saving a package, to reaccess it for future tinkering, you’ll hit the “My Projects” button on the main screen and get to your package from there!).
After that, this window should pop up.

Under texture, you’re gonna click diffuse (the default) and export.
That’s the texture we will editing in our preferred software!
STEP 3
We’re going to open the diffuse texture in our software, and then add the PSD I linked earlier.
Now me, I use the dirty blonde swatch for texturing because it is easier on my eyes and for recoloring (for me at least, do what is easiest for you!).
We’ll delete all the other colors so they don’t take up layer space and it’ll be easier for us to navigate through.
Now, the easiest way I can say this, we’re going to take the Maxis texture, and use a transform tool to fit it to the shapes of the alpha hair. I’ll include a gif so it makes more sense.

You’ll make one of those for every block of hair there is. (Ignore the hairline type thing when doing the blocks, that doesn’t matter too much).
After that, you will want to merge all the **MAXIS** layers together. Do NOT merge with the Alpha layer yet!!!
Then set the Maxis texture layer to about 50~70% opacity or whatever works for you so you an see the alpha texture under it.
Now we’ll carve out the shapes we need, it’ll go from something like this, to this. All depends on your original texture.

After you’re happy with it, export it as a PNG or whatever you feel fit to use.
(As seen here, I personally don’t always fully clean away the alpha strands because I’m lazy but you’re supposed to \/(ToT)\/)
Then you’ll go back to S4S and import the new texture you made.
(Image texture before shaping vs after shaping).
And voila! You’ll have results. You **must** check them in the actual Sims 4 game, as S4S doesn’t display it the way it looks in-game, at least in my experience.
To check how it looks, copy or move your package and the original hair to the Sims 4 mods folder.
To ever touch it up or recolor, you’ll simply move it back to the S4S mods folder.
It won’t always be perfect and that’s ok! Here is mine for example, the scalp looks a bit funky and I need to work on it later tonight.
(Top is alpha, bottom is my maxis retexture).

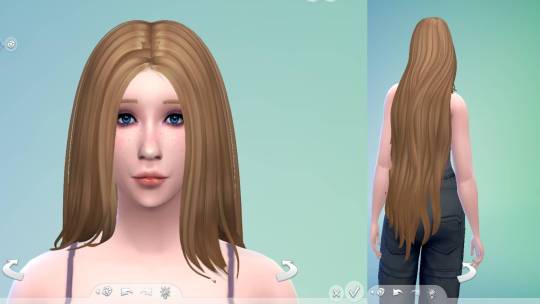
Just remember: the more you do this and mess around, the more you’ll learn! Don’t be afraid of messing up, every mistake is a step in the right direction. (And a step to Google xD).
Now! Very quickly before I end this post, to recolor a texture, you’ll take your finished texture and open a Hue/Saturation tool (in your photo software), and there are usually 3 sliders: Saturation, Hue, and Light.
Adjust those to your liking, and you have new colors!
You could also, for example, use the white/silver Maxis hair options, and use a COLOR image over and use multiply or some other setting, just make sure you have a clipping mask on so the transparency is intact!
I hope this helped, feel free to send an ask or DM if you have any questions, I don’t bite <3
love, serafufu
#ts4#ts4 retexture#thesims4#sims 4 decades challenge#alpha to maxis match#ts4 tutorial#retexture#sims4studio
2 notes
·
View notes
Note
Hi ! Just wanted to ask , how do you put your own slugcat skin in game? I know it's works with fancy slugcat mod,,, but i don't know how to use it ;-; , can you teach me

i can try! although i only learned most of this very recently, so i’m not the most knowledgeable. i also use BepInEx as the modloader.
im going to start with the assumption that you already have fancy slugcats installed and working, after this you’re going to need the custom assets and custom tails mod. both can be found on RainDB.
keep in mind, each of these mods contains a read me with more information, so reference those if you don’t understand something in my explanation. everything is under a read more as this post is very long.
ive also attempted to be as detailed with this tutorial as possible.
and lastly, please read through the entire tutorial before starting work as it’s very likely you’ll end up having to redo things otherwise, mostly because of the way custom tails functions.
part 1: custom tails
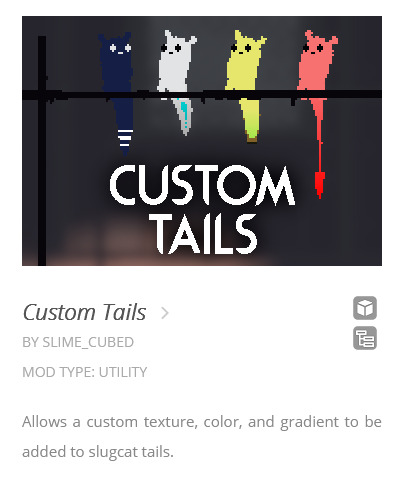
we’ll start with adding a custom tail, the custom tails mod requires ConfigMachine, fancy Slugcats and Custom Assets. (publicity stunt is only required if you still use Partiality, not if you use BepInEx) download and apply these mods first. (the .dll files)
once you’ve downloaded custom tails you’ll find an “examples” folder in the .zip file, this contains the files you’ll edit to make your own custom tail.
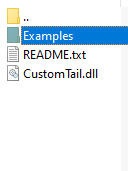
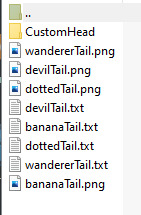
each of the example tails is shown on the thumbnail for the custom tails mod, so you can get an idea of how they look in action.
sidenote: the devil tail png is completely white, and thus it can be hard or impossible to see on a default photo viewer, open it on something like paint tool sai and add a colored background. once you’ve selected which base you want to use, extract (or just copy and paste) that tail png along with its txt file somewhere you can work on it, desktop works just fine. now you can make whatever modifications you want to the tail, i’ll use my firecracker tail as an example.
note: if you leave parts of the sprite purely white, it will get colored in with whatever color you choose in the fancy slugcats menu, its essentially transparency.

once you’re happy with how it looks, it’s time to apply it. firstly, change the tails name into something recognizable, like FRtail.png
now take your txt file and name it the same thing you named your tail, and make sure to be exact or things might break.
then open said txt file and change the default tail name into your tails name.
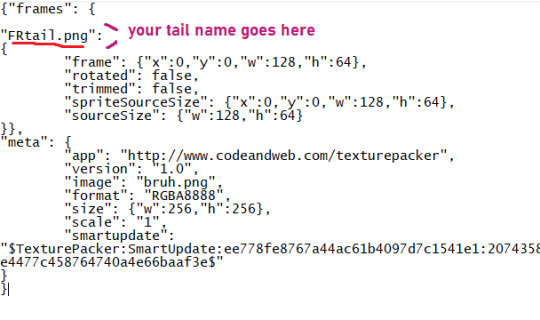
once all that is done, you have to navigate into the atlases folder in your rain world install. to get there open up steam, find RW and right click it in the menu to bring up this text box
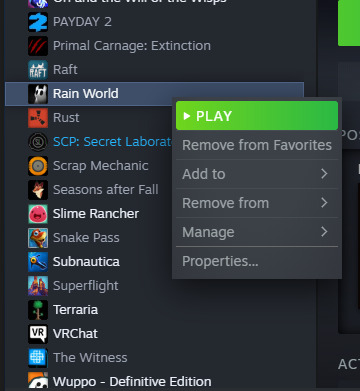
choose “properties” at the very bottom to open up this menu
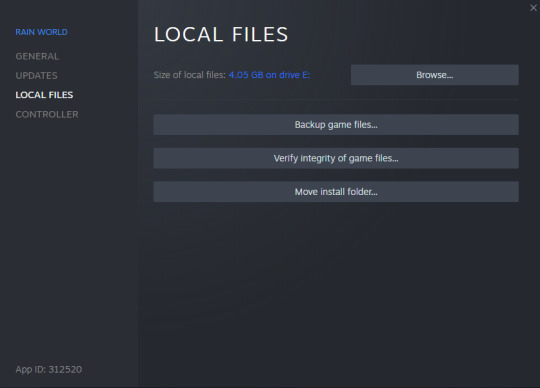
select “local files” on the side, and when you see this screen press “browse” and it will open up the root folder of RW.
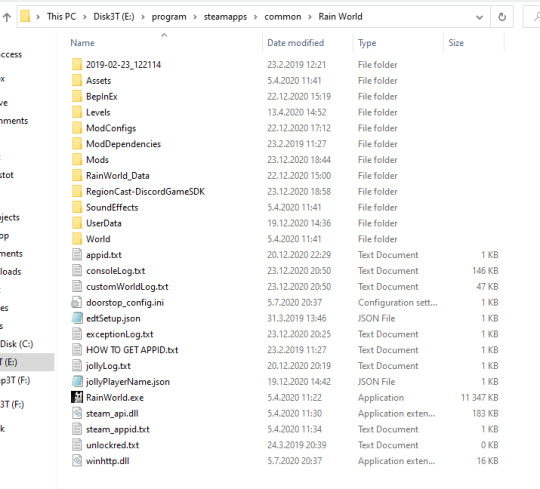
(i have quite a bit more stuff in my install folder due to mods, so don’t worry about not having all of it) from here you want to open the “Assets” folder near the top, from there you open Futile > Resources > Atlases.
now all you need to do is put both your tail png and txt files into Atlases like so:
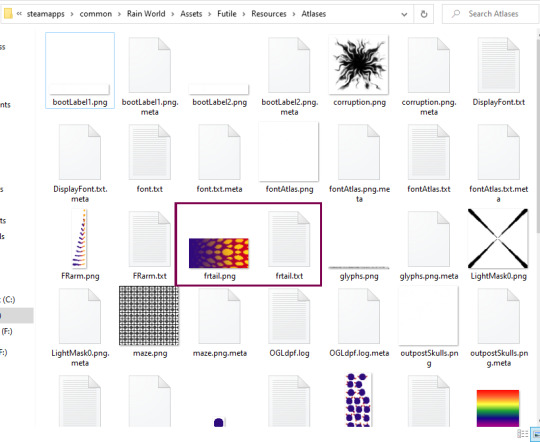
note: capital letters matter, if you used capital letters in your name you have to use those same capital letters in every name, for example if you use frtail.txt and FRtail.png it wont work. it all has to be the same in every case.
once that’s done, go back to your RW root folder (the one where RainWorld.exe is located) and open the “ModConfigs” folder, from there go to Fancy slugcats > custom heads. it will be empty if you haven’t made any modifications yet.
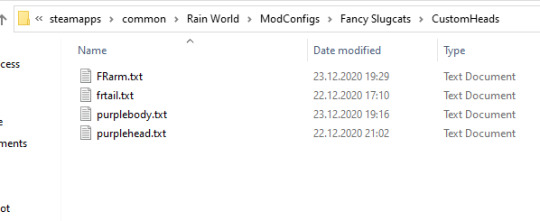
once youre here, make a new txt file and name it the same name you’ve used for your tail.png and txt files. then open it and type the same name inside it, don’t forget to save.
now you should be ready to open up RW, remember to enable the required mods: fancy slugcats, custom assets, custom tails, config machine and publicity stunt (partiality only)
note: if your game opens up to a black screen and wont start, it usually means something is wrong with the txt files, either you forgot to add a name inside one of them, you forgot to save when you added the name, or you���ve misspelled the name. double check all the names for your png and txt files.
now then, let’s get to adding your tail to your slugcat
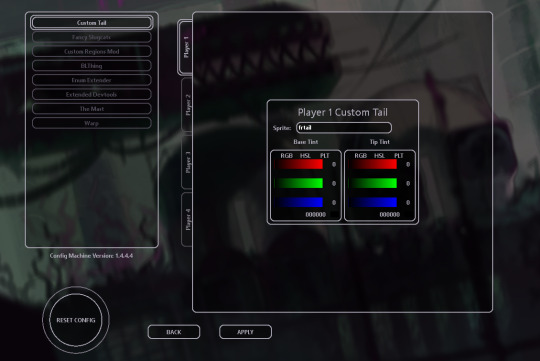
once the game is open, navigate to settings and open mod config, from there you should see custom tails in the menu. once here type your custom tails name into the “sprite” box, remember to be exact with the name.
if the name shows up red, you’ve made a mistake somewhere in the process, if it shows up as white, its been successfully added!
if you touch the sliders it will add a gradient to your tail and undo/cover up any sprite changes, so keep them as black. you can also change your tails size in the fancy slugcats menu as usual.

now you have a snazzy tail to show off to the world! “.......but wait” i might hear you say “my tail isn’t the same color as the image i made!”
that’s because whatever color you apply to your slugcat in the fancy slugcats menu gets applied on top of the image you made. meaning if your slugcat is a rather more dark color, it will make your tail darker as well. meaning not only will bright aspects of it not be bright anymore, the base of your tail will be darker than your base slugcat color, thus it wont match. this is a problem i ran into as my slugcat is purple with bright accents.
the transparency i mentioned earlier helps with this “if you leave parts of the sprite purely white, it will get colored in with whatever color you choose in the fancy slugcats menu, its essentially transparency.“
you can use this transparency to make the base of your tail match the rest of your slugcats body, now all the white will be filled in with whatever color you’ve chosen in the menu, however it still wont fix all other parts of it having the base color applied to them.
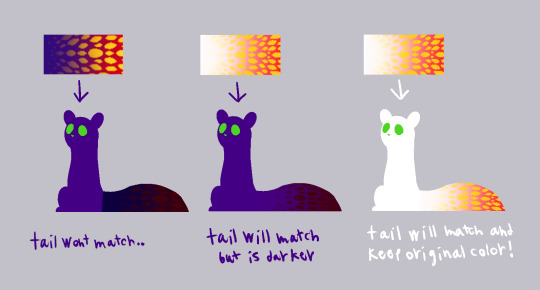
now if your base slugcat color is white, you don’t have to worry about any of this at all! the tail will stay how you made it!
if your slugcat will be lightly colored but not completely white, or your dark slugcat will have dark markings, this is all stuff you can reasonably account for while making the markings themselves (once you’ve made the txt and png files and put them in the right places, you can edit the png in the atlases folder directly) but if you want to do something more close to my slugcat, we’re going to have to do it by changing the color of slugcat using sprites.
part 2: sprite edits
so, to get around this problem and to get the freedom to edit the sprites however we like we’re going to be editing each sprite separately. this way you can virtually add anything you like to your slugcat, antlers, spikes, fur. although this might require you to change the position of the sprites to get them to line up properly in-game.
i’ll only touch on recoloring sprites as i haven’t edited the shape of any of them yet, i’ll update this tutorial with extra info once i’ve tried it out myself.
some of slugcats sprites have multiple versions that will get bundled in order to make the animations you see in game (head, arms, legs)
others are static sprites and only have one version (tail, body, hips)
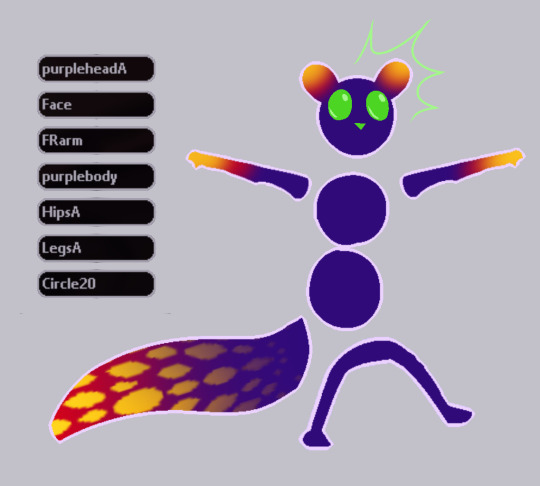
firstly, you’ll need to find the sprites you’re going to edit, all of these sprites are included in the custom assets zip file you downloaded from RainDB.
you’ll find slugcats sprites in Unpacked Atlases > RainWorld, extract this folder to make looking for the correct sprites easier.
note: all of the sprites are white by default, this makes them incredibly difficult to see in a folder without opening them in some external program, thus i’ve changed my windows settings to make the folder background dark (this can be found in Personalization)
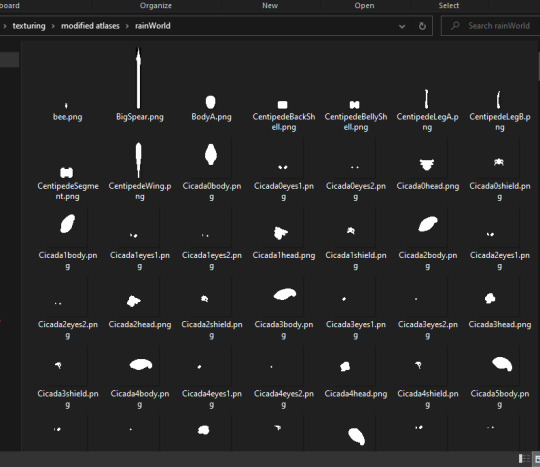
this folder includes the sprites of most of the creatures in RW, so picking out slugcats sprites can be a tad... difficult. thus i'll name every single sprite you’ll need to hopefully make it easier. BodyA, HipsA, PlayerArm0 to 12, FaceA0 to 8, FaceB0 to 8, FaceDead, FaceStunned, HeadA0 to 17
aaand all the leg sprites are in a png because they have so many names
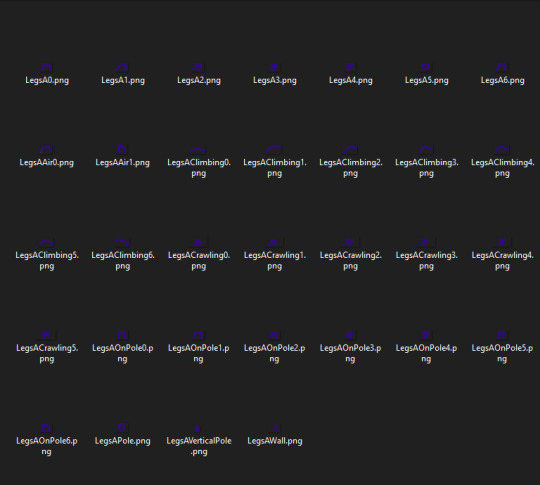
most of them can be found bunched up together in the RW folder, a tail texture isn’t included as that will still be handled through custom tails as detailed above.
now i suggest you make some way to store all of slugcats sprites neatly, as it will save you a lot of hassle in the long run. i separated all body part sprites into folders.

now you’re free to make any edits you like to the sprites. however, i’ll go about this tutorial with the expectation the only edits are color edits, not shape edits, as again i don’t have experience with those.
once your sprites are all colored and neatly organized its time to compile them, each body part gets compiled into their own bunch (arms in one, legs in another) for this you’ll need a program called texture packer, i can’t provide a direct link because my post might get thrown into the void by tumblr, there is however a direct link in the custom assets read me.
once you’ve downloaded texture packer, heres an easy to follow short video tutorial made by AndrewFM on how to use it.
once your sprites are bundled you’ll go through the same process as with adding your custom tail. i’ll use arm sprites as an example.

you’ll get a png file with all of your edited sprites in them, as well as a .json file that contains placement information, turn that json file into a txt by renaming it (yourarmname).txt
now open the txt file and rename every single part to whatever name you decided to give your arm sprites, but keep the numbers at the end of the sprite names, they are important.
note: do not rename the individual sprite png’s before they are packed
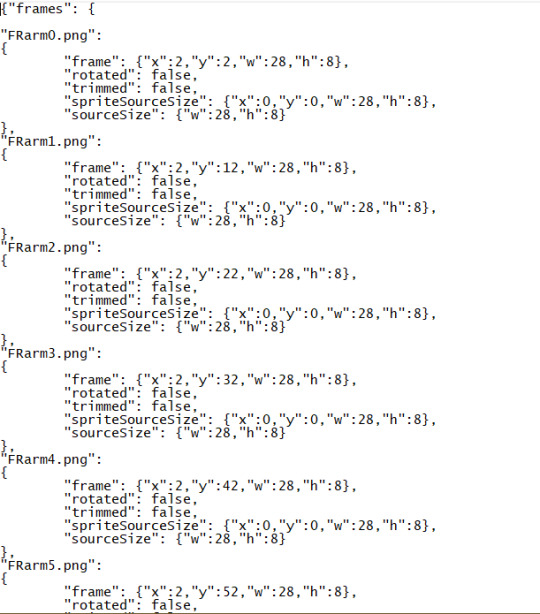
now that your txt and png files are ready, drop them into the same Atlases folder in your RW install as you did with your custom tail, and similarly add another new txt file into ModConfig > FancySlugcats > CustomHeads and rename it to the same name you named your sprite, and add that exact same name inside the txt file itself.
if the game yet again refuses to start, remember to double check the names in the txt files.
now we’re ready to apply the sprites in-game, open up RW and head to setting > mod config,
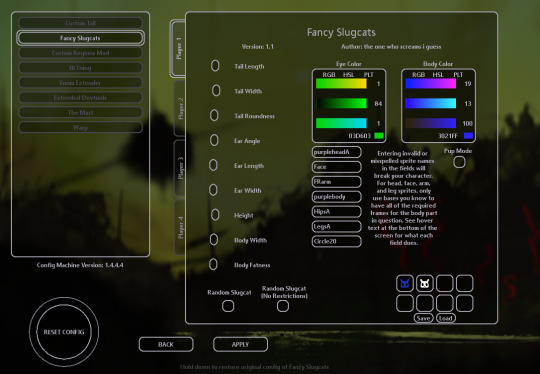
depending on which sprites you’ve edited, you’ll need to enter the sprite name into the specific field it belongs to, for me i’ll add the name to the arms section. you’ll get more details about what goes where when you hover over the text field.
for some of them, you’ll need to include A at the end of your sprite name, but only in the mod config menu
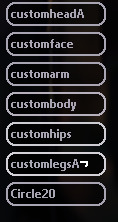
this shows where they are needed.
now you need to repeat this process for each bundle of slugcats body parts and apply them. note: body and hips despite both being part of slugcats main body gets applied separately, and even though they only have one sprite each you still need to pack them with texture packer and go through the same process as for the others.
this all might seem tiresome, and in certain ways it definitely is, but once you’ve gotten the hang of the packing, adding to folders and applying the process gets a lot faster.
once all of your sprites are applied, legs, hips, body, head, arms, tail. you want to make sure in fancy slugcats settings to make your slugcats color pure white so it wont affect your custom sprite coloration in any way. however you can apply color to slugcats face through the menu as usual.
there is a known issue where slugcats fists when climbing poles don’t get colored, this issue currently can’t be fixed easily.
the end result? quite a fancy slugcat indeed!


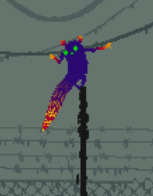
if i made any mistakes, or there’s extra info i should add, then message me and i’ll edit the post accordingly!
if there’s anything you can’t figure out no matter what you try, join the RW discord and ask people in the modding support channel, thats where i got most of my information from!
hopefully this is helpful to some of you! i spent quite a while making this tutorial so reblogs would be very much appreciated!
83 notes
·
View notes
Text
a somewhat comprehensive performance guide for the sims 3
what it says on the tin. i’m sticking everything under the cut to avoid clogging everyone’s dash because, hoo boy, this is a looong post
welcome to my kitchen, and hopefully i can help you get your game to run a bit better!
first, if you haven’t already, make sure to launch your game (i recommend just bg so it loads quickly) and check if you need to change your graphics settings. if you’re on windows and would like to play your game in windowed fullscreen:
download and install this program (it’s safe, i promise)
open the program and you should get a notification that it’s running in your tray
with ts3 open (in it’s windowed mode), click on your tray and right click on the program’s icon, then select Add window
go back to ts3′s window and press F3 on your keyboard. you should get a notification that ts3 has been added to the program’s list, and you’re done!
you’ll also need an fps limiter to prevent the game from frying your video card. i use this one, set at 60fps. alternatively, you can download MATY’s fps limiter and place it in your game’s bin. (The Sims 3/Game/Bin)
is your game crashing on startup? check your DEP settings or try using 3booter.
some tips to help your game run better
have as few programs as possible running while ts3 is open.
run a 4gb patch on your game. download this, run the .exe, select the game’s executable (The Sims 3/Game/Bin/TS3W.exe for patch 1.69 or TS3.exe for patch 1.67), and click open. you’ll get a pop up saying it’s patched. please note that your computer needs to have over 2gb of RAM for this! (most do, but do check how much RAM you have!)
if you’d rather increase how much RAM the game uses yourself, follow this tutorial.
download razer game booster. this frees up some memory on your computer to increase performance.
check how much virtual memory your pc is using. follow this tutorial.
delete cache files. the game will generate new ones every time you open the game, so make sure to delete the following files before running the game: CASPartCache, compositorCache, scriptCache, simCompositorCache, socialCache. these files are found in Documents/Electronic Arts/The Sims 3.
if you’re on pc, delete your WoldCaches folder. not everyone will have this folder, and the game may also regenerate the folder. (mine didn’t regenerate the folder, but it’s happened to others) DO NOT do this if you’re on mac!!!!
disable your FeaturedItems folder. this prevents the game from generating a fuckton of store thumbnails you’ll never look at. follow this tutorial or just set the folder to be read only.
turn off the following in your game settings: shop mode, interactive loading screens, and online features. i also recommend turning off story progression and memories and using mods to handle these instead.
edit your GraphicsRules.sgr. this will help your game load textures faster. (it also helps how fast your sims change their clothes!) do it yourself by following these tutorials ( 1 + 2 ) or download avian’s graphics fix (v1.69) (v1.67). i recommend doing the latter more than doing it yourself!
modding your game: a quick crash course
yeah, i know most people know how to download and install custom content + mods, but this is still good to give a read for managing your sims 3 cc!
first, you’ll need a mods folder because ts3 won’t generate one by itself. i recommend you download this framework and follow MTS’ guide to setting it up. it comes with a nifty little no intro video mod!
use the compressorizer redux. you can extract it wherever you’d like, just make sure to keep all its files in the same folder. this program is pretty self-explanatory, it compresses .package and .sims3pack files. to use it, click Add Files to List, select the folder with your files (you can do this multiple times), and click GO! now, just let it do its thing! it may take a while to process everything if you have big files, but you’ll get a pop up saying how many MBs you saved when it’s done. you can also use decrapify mode on .sims3packs (useful for store content!)
i recommend downloading Delphy’s Sims3Pack Extractor. i avoid using the game launcher to manage my cc at all costs, and this tool is useful for extracting .package files from .sims3pack files. follow this tutorial to use it!
Delphy’s Dashboard Tool is also useful for finding any broken, duplicate, or conflicting cc. i don’t recommend using the fix all problems option, do it yourself instead to make sure you don’t delete anything you want to keep.
renaming cc files can also help with lag. follow this tutorial!
you can also merge your package files to help with lag and load times using this tutorial. i don’t do this personally, but my mods folder is pretty small too.
note: the game launcher can only load 500 .sims3pack files at a time. only use the launcher to install absolutely necessary items!
to help reduce lag and load times, you can delete everything in your DCBackup folder (Documents/Electronic Arts/The Sims 3/DCBackup) EXCEPT for ccmerged.package. DO NOT delete ccmerged, it has all the cc installed through the launcher. (ps. you can safely use the compressorizer to compress your ccmerged file!)
final tip: try to control the amount of cc you have installed. i’ve noticed that the game takes a lot longer to load when my mods folder starts to reach a Gb. my mods folder is currently 368Mb, and it takes around 5 minutes to load any saves.
helpful mods for your game
the ETERNAL must have: nraas’ mastercontroller. you’ll need this to run all nraas mods! also be sure to grab overwatch and errortrap while you’re at it! these catch and clean any errors that happen in your game. i also recommend register and traffic.
no (or fewer) auto memories is SUPER useful for controlling memories in the game and helps with game performance. it’s super customizable!
ellacharmed’s world fixes. not really a traditional mod, but this helps with routing and camera control! note: don’t use these on preexisting saves! some lots have been moved and there will be little gaps in the world with preexisting saves.
routing fixes for schools + other lots. be sure to use nraas to reset your school lot after installing!
interaction on sloped terrain. this is mostly just a sanity saver, but very useful!
finally, i recommend grabbing awesome mod. it has a bunch of fixes and is very customizable!
reducing save game bloat
a.k.a. the steps i go through to make sure that my game loads relatively fast and runs with minimal lag.
if i’ve taken any screenshots the last time i played the game, i move those out of ts3′s screenshots folder and into a separate folder.
i delete all generated cache files. see the tips section above for more info
i run kuree’s save cleaner on the save i’m planning on playing. if the latest version (2.1) doesn’t open/work, try using v1.1 instead. you can also do this manually, though i don’t recommend it for the sake of your sanity.
every couple of in-game weeks in a save i run a total reset on the world i’m playing in. this is done through nraas mastercontroller. click on your city hall from map view>nraas>mastercontroller>total reset
tip: to help prevent your saves from corrupting, use save as and keep multiple versions of your save. for example, i have 3 versions of my lepacy save. this way, if a save does corrupt, you have a backup!
misc. ways to reduce lag
don’t run the game with all packs enabled. it’s going to murder your game. only run with packs you know you’ll use. you can also refer to this masterpost for bgc items if you only want certain items from a pack.
don’t keep tons of stuff in your sim’s inventory. use the fridge to keep fish and harvestables instead.
if your sim has the collection helper LTR in their inventory, make sure you have it set to none when you’re not using it.
i recommend downloading simborg’s CAS hiders, ILTS’ CAS Rehaul, and/or sweetdevil-sims’ CAS hiders to reduce CAS load times.
change CAS’ catalogs to show in compact form using nraas mastercontroller. select a sim>nraas>mastercontroller>settings>CAS and look for show in compact form options and set each to true
nona’s no limos mod can help nraas overwatch’s nightly clean up
make sure to turn off any build/buy cheats you activated when you go back into live mode. (even if it’s just to save)
if you’re using CAS a lot in a play session, it’s a good idea to quit to desktop and reload the game every once in a while
try to avoid saving presets and CASt swatches
disconnect from the internet. i don’t do this often because i usually have spotify or carl’s sims 3 guide open alongside ts3.
good resources to refer to
the sims wiki’s game guide to improving performace
nraas’ tips for better game performance
this thread @ MTS
optimization guide @ games4theworld
this post by darkfridaysims
that’s all folks!
if you’d like to know what cc and mods i’m using, here’s my resources page. thanks for reading all this, and if you need any clarification or have anything to add onto this, definitely hmu!
edits
*ps that i won’t be tagging people i credit so i don’t risk clogging their activity, i’ll still include a link to their blog!
the fps and 4Gb patch aren’t needed, it was fixed in a patch! (thank you, create-a-sim!)
#ofc feel free to rb this!#i took me 6 hrs to get this all together so i'd really appreciate it!#sdjkadh how do i tag this#the sims 3#sims 3#ts3#tutorial#tips#reference#sr
688 notes
·
View notes
Text
WMS Hair Recolor Tutorial!
I’ve gotten a couple of requests to do a tutorial on how i do my recolors, so here you go!!
Also, this is what i do when recoloring, you don’t have to do the exact same thing, everyone has their preferences!
And be prepared!! This is a VERY detailed tutorial!!
If you have any questions about the tutorial, or if there’s anything you don’t understand, pls send me a dm! :D
Press keep reading to see the tutorial! :D vv
You will need:
Photoshop of any kind (you can get CS2 for free here!)
Sims 4 Studio (S4S) (needs registration to download)
A DDS plugin for PS! (it’s called texture tools)
WMS recolring actions by @wildlyminiaturesandwich!
WMS swatches thumbs! (same link ^)
Before recoloring you should read WMS’s post on her recolors! There are a lot info there you’ll need to use in this tutorial!!!
1. Install S4S, PS and the DDS plugin!
2. Find whatever hair you want to recolor and download it!
Make sure to put the downloaded file into the mods folder in S4S!! Which can be found in documents>sims 4 studio>mods

3. Open S4S and create your recolor file!
Go to the cas section and choose “Add CAS part swatch” it’s very important you choose that or else the swatches will not be a part of the orignial mesh, and you’ll make a standalone file!
Then click ‘CAS’, and it’ll bring you to a page with all the stuff EA has created, including the cc files you’ve put into the mods folder!
In the top right corner you can filter the files into only showing the mods/cc you’ve put in!
Find the hair you want to recolor, and ‘shift+click’ the file and press next in the bottom right corner!
A new window will pop up and this is where you will save your file! To start with i create a folder with the mesh artists url, then the hair name and in that folder i create one folder for each of the palettes!
Then i create the file, and name it after the palette i start with!

4. Now we’re going to prepare the file for recoloring!
First find the ‘EA white’ swatch and export the texture (make sure the file is a .dds file!!!!)!
Now delete all of the other swatches, so that there’s only one swatch remaining! It doesn’t have to be a specific swatch, it’s just important that you export the white texture before deleting the swatches :D
Now go to ‘warehouse’ which is in the top left corner and click on ‘CAS PART’ (there should only be one)
Go to the search bar on the right and type ‘sec’ and “SecondaryDisplayIndex” will pop up!
Click on the number and write either 200 (unnaturals), 400 (naturals) or 600 (neutrals) depending on what palette you’re using! This will make sure your recolors will stay in order, and not interfere with eachother! I highly suggest you read @neverloore‘s post about it right here!!
Now that you’ve exported the texture, and done the SecondaryDisplayIndex we can move on to the recoloring!

5. Open Photoshop and start recoloring!
Open up PS and open your ‘EA white base texture!
Go to the actions tab on your right, click on the little arrow in the top right corner, then ‘Load Actions’! Find the WMS actions and load them!
Now go to the palette/folder (in the actions menu) you would like to recolor with and click the arrow! Now a bunch of actions will appear, and these are all the individual colors for the palette!
Click on the first action and then click the little arrow down at the bottom of the action window! Now your file has been recolored!
Save the texture by pressing ‘ctrl+shift+s’ i find that this is the quickest way to do it!! You can do it manually by going to ‘file>save-as’ in the topbar menu!
A new window will pop up! Find the folder we created at the beginning, and go to the folder with the palette you’ve chosen, and type 1 (or whatever number you’ve reached)! I give all the swatches numbers according to the palettes colors, it’s easier to have it this way when we start putting the swatches into S4S! Press save!!
The NVIDIA DDS plugin will now pop up, and you wanna have the top row set to “DXT5 ARGB 8 BPP / interpolated alpha”! Click save, and do this to all the other swatches you wanna make! (Remember to go back into history and start with the base before doing another recolor)

6. Put the recolored files into S4S!
Go back into S4S and import the new recolors! (one at the time)
When you’ve imported all the recolors go to swatch thumbnails and import the WMS swatch thumbnails!
Right+click on the existing swatch (the one with the cross under) and then click on the swatch thumbnail we just imported! It should now change to the same color as the one in the imported thumbnail! Do this to all your swatches!!
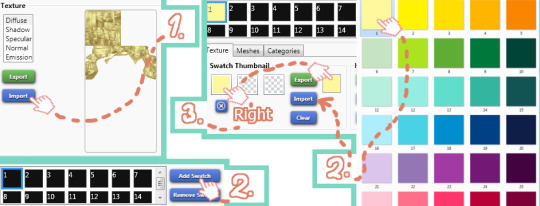
7. You’re now done! Just remember to save and rename your file!!
8. If you’re going to recolor with more than one of the palettes, i suggest you make individual files for every palette (so 1, 2 or 3 files), and when you’re done you can merge all the files/packages together into one!
Go to tools in the topbar, then merge packages!
Add your recolors and then merge them all together, to create a new package with all files included!
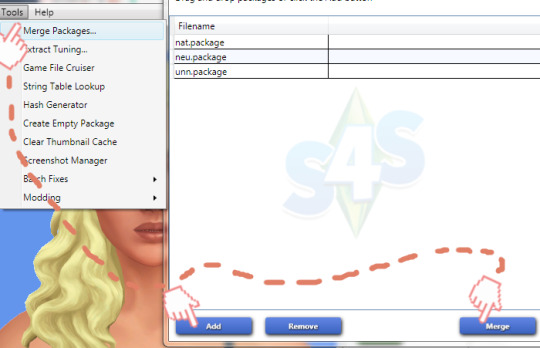
Hope you guys liked the tutorial!! It looks rather complicated when you first look at it, but it’s quite easy once you get the hang of it!! When you get into ‘the rythm’ of recoloring you can do it very fast - it takes me about 40 min. to recolor one hair with all three of the palettes! :D
#simblr#s4 tutorial#ts4 tutorial#recolor tutorial#s4 help#sims4studios#sssvitlans#lanaccfinds#tutorial
426 notes
·
View notes
Text
Divinity Engine 2 Tutorial

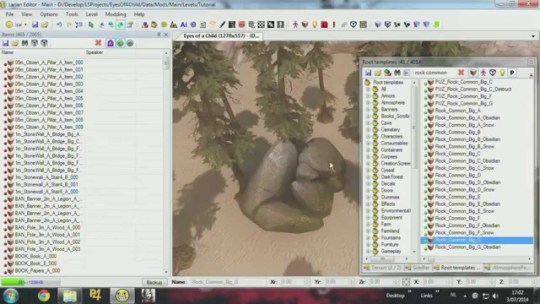
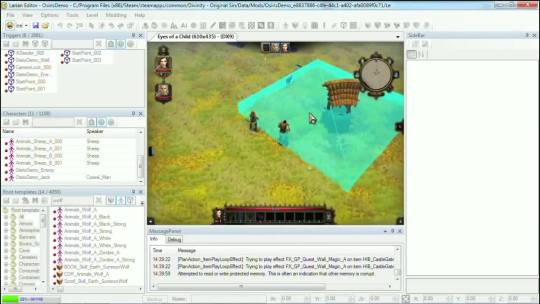
OK.. in this one we are going to drop in a chair and a NPC and then make him sit on the chair. 1: Lets grab a chair from the resources... I use FUR_Humans_Citz_Chair_Poor_A in this example. Drop it onto your level. 2: Grab your NPC and drop them next to the chair. I used GameMaster_PoorCivilian_Easy_Human_Female 3: Now select your chair and change its NAME (not display name) to S_FUR_Humans_Citz_Chair_Poor_A - Make sure you remember this. You must add the S_ as a prefix for it to show in the list later. 4: Now select your NPC, and edit the scripts attribute. 5: In the Edit Scripts.. search for and add the 'Sit' script. 6: Now select the 'Seat' attribute for that script and find the chair you renamed. 'S_FUR_Humans_Citz_Chair_Poor_A' from the drop down list. 7: Save and reload .. and when you hit play your NPC will wander over and take a pew. Hope thats useful, let me know if you want more of these.
Divinity Engine 2 Data

Hi, this small guide is here to help you to download and install the editor. I don't have GoG version around for now, so it will only work for Steam. Intallation -- Open Steam client -- Click on Library -- In drop down find Tools section and click on it -- You will see the tools list. Search for The Divinity Engine Enhanced Edition and double click on it. -- The install path can be the one that Steam proposes for you (something like C:Program Files (x86)Steam) or any you want, it does not really matter. -- Click Next, Agree and wait for tool to be downloaded and installed -- When engine is installed you can click on Library/Installed and the see tool inside Tools section of your library -- Make sure that you have Divinity: Original Sin Enhanced Editon game installed, editor bases on it and requires it to work -- You can hit Play to launch the engine. Setup -- When you first time started the editor, you will get this message -- This means you need to do a small configuration setup. Hit OK and the Setting window will appear -- There is bunch of params in this window, but we mostly are interested in EditorDataPath and GameDataPath. -- You need to click browse inside the EditorDataPath property and locate the Data/Editor folder inside your DOSEE game folder. -- In my case it will be: D:SteamLibrarysteamappscommonDivinity Original Sin Enhanced EditionDataEditor -- In your case it maybe a bit different. -- If you getting trouble to find where your game is installed, then: --- Find game in your Steam library --- Right click on it and select Properties --- In Properties select Local Files pane and click on Browse Local Files… button. This will bring you to the game folder inside the Windows Explorer --- You game folder will look like this --- Go to Data/Editor and copy the path from Explorer window header -- You need insert it in EditorDataPath property under the Global Setting section -- Now do the same for GameDataPath, except now you need to tager Data folder inside your game folder (you can simply copy editor path and remove Editor at the end of it) -- Eventually your settings will look similar to: -- Now hit OK. Editor will load now and you will see the welcome message with the list of mods -- If you see it, it means that your editor is installed and setup correctly. Happy modding!
Divinity Engine 2 Tutorial Python 3
Divinity Engine 2 Item Making Tutorial
The enemies are weak, dealing just 2-4 damage a hit. Test out your skills, kill them then move on. There isn't much on the deck of the boat, although you can drag a water barrel up the stairs near. Hi guys,Brand new to the forums but a huge fan of old school modding and the modding community. I haven't done much since NWN and a bit for NWN 2. Divinity Engine 2 looks incredibly promising - especially with the GM mode, and I thought I'd try to dive into it. I thought some people jus. Right-click it to open the Properties menu. In the DLC tab, check the box next to 'Divinity Engine 2 Data.' The game should begin updating. Download and set up the tools. Credits for tarot card fan art go to the lovely Drathe. Retrieved from 'https://docs.larian.game/index.php?title=TheDivinityEngine2&oldid=6064'.
Divinity Engine 2 Tutorial Android Studio
Divinity Engine 2 won't open. So I was trying to make an add-on to change a character's race earlier, and I went to open the divinity engine for the first time, directed it to my data folder for dos2, and then tabbed out waiting for it to open over the top of whatever I was doing. 'okay, maybe it has a button that I didn't.

0 notes
Text
Making a Credit Score Commodity
“How To Create Copy and Edit a Commodity
This is for my Credit Score project.
I need to ask more experienced modders to proofread this before I am confident that it is correct!
If you are a modder and you see something that I did wrong, something I missed, or something you would do differently, I would love feedback.
You need: A program (like Sims 4 Studio) to edit and package XML files. (You can even just use Notepad to edit an XML file, but my tutorial will use Sims 4 Studio) I highly recommend DocFetcher because searching through game files will give you tons of examples to work with.
This part of the tutorial copies a commodity that’s built into the game and relabels it with a new name. Super detailed for super-beginners. The next part of the tutorial will look at categorizing commodities. For help with set-up, I followed this intro video by Carl’s Sim Guides. If you want to read more about XML you could try this link but most of it is way over my head.
We want the game to track a new value that can go up and down. This is a “statistic” called a “commodity.”
Ideally we want to start with a Basegame (”BG”) commodity so that everyone can follow along, but we’ll be looking at examples from expansion/game/stuff-packs, as well.
I’ve opened DocFetcher and searched for files with *commodity* (using the asterisks* as a wildcard search, to find every mention of “commodity” even when it’s sandwiched between other characters)
I’ve noticed that there are mentions of “staticCommodity” (which doesn’t sound like what I need, since “static”=“unchanging”) and there are a lot of mentions of “commodity,” but the things that actually define a new type of commodity seem to start with “commodity_...”, like the “commodity_Motive_HygieneHands”
-------
Looking at several “commodity_...” items, everything starts with the same line: <?xml version="1.0" encoding="utf-8"?> That’s just the start-y bit. Someone else could probably tell you more but I can’t.
Next is a line something like this: <I c="Commodity" i="statistic" m="statistics.commodity" n="commodity_Motive_HygieneHands" s="16616">
This is an element that can be looked at as <I> with a bunch of extra details crammed in. We need to make sure that the very last line of code is </I> in order to close it out. Everything else will be sandwiched in between.
Now, looking at all those extra details- which are called “attributes”- we’re defining c (the class?) as a “Commodity”; i (which stands for something?) is a “statistic”; m (which stands for something?) is “statistics.commodity”; n (the name?) is “commodity_Motive_HygieneHands”; and s (which acts as and identification number and stands for something?) as “16616″.
----------
Time to follow along!
Make sure you’ve already installed Sims 4 Studio (or another program to edit XML files).
Make sure you’ve already extracted XML files with Scumbumbo’s XML File Extractor and you’ve set up an index in DocFetcher, if you want to easily search and cross-reference examples.
Follow this video tutorial for a basic introduction and for help with set up. You can stop watching at 6:45 if you just want to see set-up.
----------
Use a program like Sims 4 Studio to open and edit an XML file:
From the main menu of Sims 4 Studio you can go up to the toolbar, click “Tools,” click “Extract Tuning,” and search the window that pops up for a file that starts with “statistic/commodity_”.
Select one of the files that starts with “statistic/commodity_...” and click the “Add to Package” button. Type a file name. The “Save as type” drop-down menu should show “Sims 4 Package (*.package)”. Click “Save” and your project will be saved and automatically open. You will see two files: a “Statistic Tuning” file and a “Sim Data” file.
----------
Check the “Instance” number:
Click on the “Statistic Tuning” file first. You’ll see the XML code show up on the right-hand part of the screen. The first few lines match what we saw before: <?xml version="1.0" encoding="utf-8"?> followed by <I c="Commodity" i="statistic" m="statistics.commodity" n="commodity_Motive_HygieneHands" s="16616">
The “n” or name and “s” or ID# may be different, if you picked a different commodity to use, but the class, i, and m should match c="Commodity" i="statistic" m="statistics.commodity"
Click on the “Data” tab that’s located next to the active “XML” tab, above the XML code/textbox. Watch this video by BakieGaming if you need help. You can skip to about 1:30. Bakie is working with a different kind of file type, but the “XML” and “Data” tabs should be in the same place you see them in the video.
Before changing anything, take a look at the “Instance”. The "Instance” for the “Statistic Tuning” file for commodity_Motive_HygieneHands is 00000000000040E8.
Select the “Sim Data” file. The “Data” tab should be selected. Look at the “Instance” for that. The “Instance” for this “Sim Data” file is ALSO 00000000000040E8. The Instance number for both files should match.
----------
Rename your commodity:
Click back to the Statistic Tuning file. You need the Data tab selected.
Click on the “Name” text box and type in a new name, starting with “yourmoddername:” I like to stick to the format of the original game files, so mine starts with “mymoddername:commodity_”.
Since my modder name is “samines” and this commodity is going to track a sim’s credit score, I used the name “samines:commodity_CreditScore”
Watch the video by BakieGaming to see this in action.
The “TuningId” automatically/magically changes to a unique (and much longer) number. This number is created based on the name you choose, so including your username ensures that your mod won’t end up with the same TuningId# as anyone else’s mod.
If you go back to the XML tab, you can see that the second line has changed to use the new Name and TuningId. Mine looks like this now: <I c="Commodity" i="statistic" m="statistics.commodity" n="samines:commodity_CreditScore" s="15622537670801435380">
----------
Fix the Sim Data file so that the Instance numbers match:
When the TuningId magically changed, so did the Instance #. Instead of “00000000000040E8″, my number is now “D8CE673D66472AF4″.
Select and copy the new Instance # from your Statistic Tuning data.
Click back to the Sim Data File. Delete the old Instance # and replace it with the new Instance # that you copied. “00000000000040E8″ is replaced with “D8CE673D66472AF4″ so that the Statistic Tuning and Sim Date Instances match again.
----------
The key # automatically changes, but the “Display Name” does not, and it cannot be edited in the Data tab.
I’m not convinced that I’m not missing something else, but what I did is:
Click to the XML tab for the Sim Data file.
Skip the first 3 lines: <?xml version="1.0" encoding="utf-8"?> <SimData version="0x00000101" u="0x00000000"> <Instances>
The forth line should include the text for the display name: <I name="commodity_Motive_HygieneHands" schema="Commodity" type="Object">
Replace the original name with your the new name you used in the Statistic Tuning name="commodity_Motive_HygieneHands" is replaced with name=“samines:commodity_CreditScore”
Click back to the Data tab. The “display name” should be show the name you just typed. If you look at the list of files on the left half of the screen, the last column (the unlabeled column after the ones labeled “Type,” “Group,” “Instance,” and “Filesize”) should show the name that you created.
---
Good job! Next we’ll look at assigning a category.
#sims 4#sims 4 mods#sims 4 mod DIY#Credit Score Commodity#commodity#statistic#XML#attributes#extract tuning#starting a project#.package#Statistic Tuning#Sim Data#XML tab#Data tab#name#display name#TuningId#Instance
0 notes
Text
uh oh. i was only trying to check how to edit the starting equipment for cc and then started looking into the file system for too long and i think i accidentally unlocked the modding autism again
#i still haven't figured out the former#but i sure installed a bunch of modding tools and saved tutorials#nina plays bg3
5 notes
·
View notes