#bramaking
Explore tagged Tumblr posts
Text
Lotfus Bralette Sewalong: Construction 1
ok things I've learned: it'd be easier if I used a different fabric for main and lining, and it would be easy if that fabric had an obvious right and wrong side. Despite all my labeling and stickering and everything I *still* sewed a panel in wrong, and it was a nightmare making sure everything was mirror-imaged correctly.
All that said, I had to unpick a total of one seam (but unpicked two by accident, argh), and there's a sudden point where you have everything assembled and you're like..... none of this needs labels any more, and you have to peel them all off before you can continue. And it comes suddenly. So.
I'm not finished but I'm really near the end. It's a lot of fussy little sewing, but the seams are like ten inches long max, it really doesn't take very long.
This being my muslin, I have focused on getting everything put together and have not paid attention to seam finishing, trimming, grading, pressing etc. My next version, I will do those things, but I've omitted them from this version because I still don't know if the thing is going to fucking fit, I'm not topstitching something if I might have to tear it all back out, though let's be realistic I'm not going to disassemble this thing, if it turns out unwearable I'm just going to cut the notions off and start over. It's not that much fabric. I will make minor tweaks probably, but generally it is not going to be worth it to pull this apart. (Exception: if it's too large I would cut seams off and sew it smaller. But it will not be too large, I already know that from the approximate shove-my-boob-meat-into-a-half-of-it not-exactly-try-on-- it is certainly not too big, but I can't tell if it's too small because without the elastic and fasteners it's not pulled closely enough to me to be sure. It feels like there's not enough fabric to go around, but I know the wide band elastic covers a lot of territory, so I'm reserving judgement.)
So. How far did I get? Well.
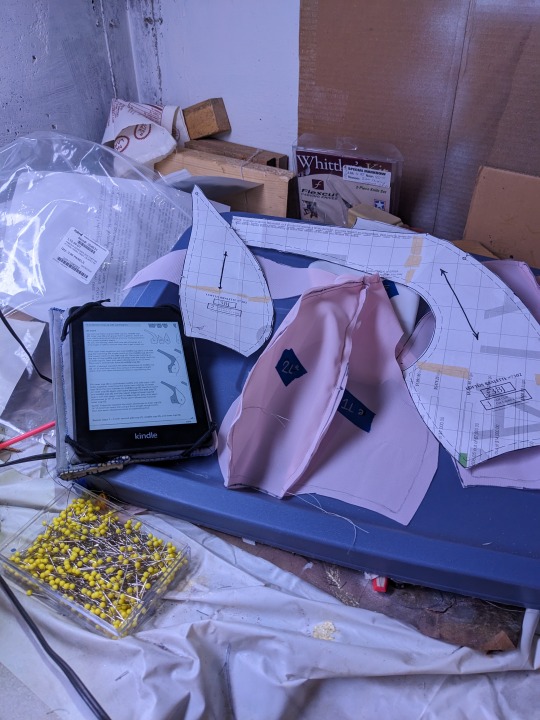
[img description: this is the cluttered basement setup. Image shows a blue rubbermaid tote lid with a tall rim leaning on a pile of stuff on a cluttered desk, and on the lid is a Kindle with the sewing instructions loaded up, one half of the bra cup assembled, several pattern pieces, and next to the rim is a large box of yellow-headed quilting pins.]
I sent this setup photo to my family groupchat when we were discussing what we're doing with our weekends. (One younger sister is camping in Vermont with husband and kid, the other was gardening and found a big shed snakeskin which was cool, Mom was visiting a brew pub in fort edward and sent a photo of what looked like a pole to me and said "there's edward" and i don't get the joke, and the oldest sister had just taken her daughter to get her ears pierced, which among our people is a sign of young adulthood. Not that it's relevant to the sewalong but this is my blog after all, LOL.)
I had to unpick a seam but progress was quick after that.
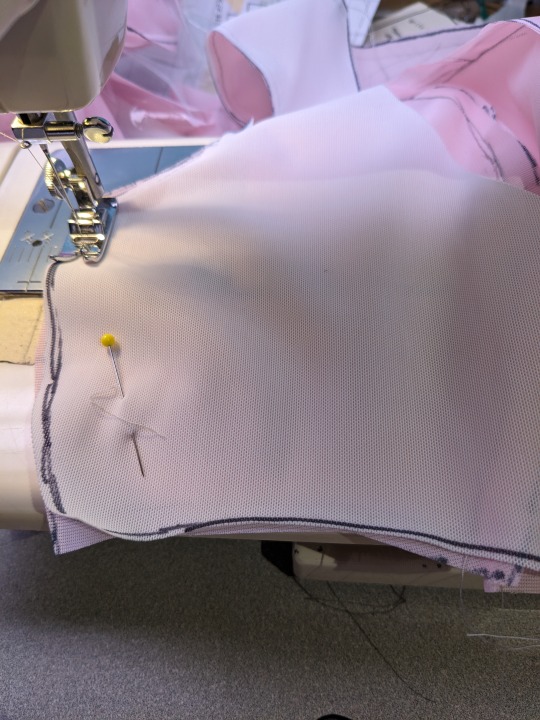
[image description: an assemblage of fabric, with a pin in it, going through the throat plate of a sewing machine. The lower fabric is pink, the top fabric white. Both are decorated with Sharpie marks around the edge. The pink is nonstretch nylon tricot, the white is heavy duty powermesh.]
When it came time to attach the powerbar to the cup lining, I felt that the video sewalong had said to have the powermesh side up. The issue here is that the bra cup and lining are non-stretch fabric, as the pattern is written, and the powerbar and back band are stretch fabric, specifically powermesh (which has superior recovery to other stretch fabrics and so is indispensible in bras and compression garments). And attaching stretch to nonstretch is always a little bit of a nightmare, and generally is inadvisable, but bras break the rules in many ways and that's why so many of us are intimidated about bras.
I discovered immediately that sewing with the nonstretch side against the feed dogs and the stretch side against the presser foot was a NO GO. The stretch fabric would get pulled by the presser foot wildly out of shape, and I kept having to raise the presser foot and shove at the fabric to keep it aligned, and I kept wobbling my seam all over the place and it was awful. So I flipped it over and put the stretch fabric against the feed dogs instead, and then had zero further issues. I have not re-checked the sewalong, and the pattern instructions do not specify, but for my own reference, always put the stretch fabric against the feed dogs, that is unambiguously what worked here.
I also broke my anti-topstitching-on-muslins stance here and did topstitch the seam after I attached the back band to the cups. I wasn't doing it anywhere else, but I think it's necessary there, to hold everything down. There's gonna be SO much strain on that seam.
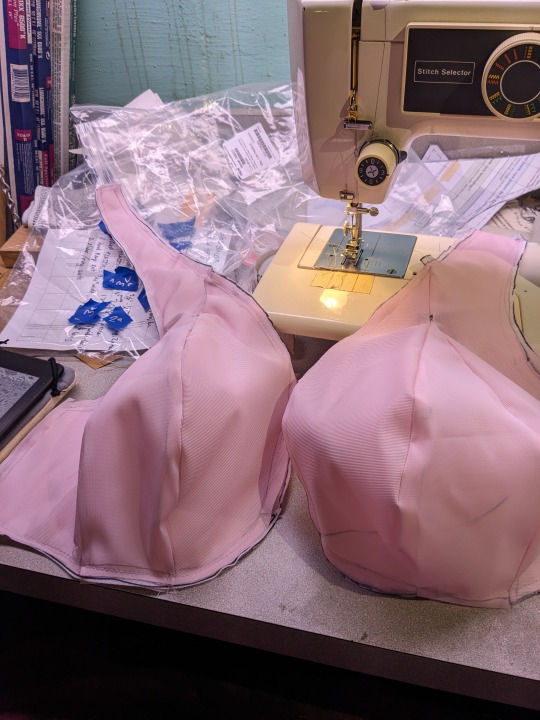
[image description: a pale pink, quite substantial bra, though it only looks fully assembled, lying on the talbe in front of a sewing machine. There's no center gore so it's only arranged as if assembled. But the cups are visibly partly self-supporting, because they're now three layers of fabric, so they're approximately boob-shaped, and hilariously fleshtoned in this light, I did not think this through.]
I got this far, both cups and linings assembled, with the powermesh in the middle. And then I had to make the center gore, which didn't go together the way I expected at all. You sew it in two halves, and then sew the halves together, which I had not expected and could not make myself understand. I did it, and then re-watched the sewalong afterward, and i'm still not sure I did it right, but mine did go on and looks right so I guess even if I did do something not the way the sewalong suggests I did it right enough that it works.
The frustrating thing is that you make the center gore and then set it aside, though, LOL. So I had to make it, then put the neck elastic on, and then check again.
I was SO confused by the elastic. You sew it on right sides together, and then flip it to the inside of the bra and topstitch it from the outside. So you want to sew it in such a way that just a little edge of it, which may or may not have decorative picots because it depends what you bought, will overhang when you flip it. So you want to sew it down along the MARKED SEW LINE on your strap, and if there's a bunch of extra wobbly edges and shit, sew to the inside of that, and you can trim them off after. This is where you compensate for wobbly cutting and wobbly sewing and wobbly putting-layers-together, and it's brilliant.
I didn't do it right but I will next time now that I understand that. And Jenn from Porcelynne *does* explain that, explicitly, in the sewalong, but I watched the sewalong ahead of time and couldn't remember in the moment. So this is me reinforcing it: your whole neckline edge, sew that elastic just so and once you flip it, it will look like you lined everything up perfectly. And you don't have to stretch as you sew for the whole strap bit, and there's only a tiny bit of stretching as you sew down around the cup, and it ends right where your powerbar came in, so it's a nice continuous band of stretch all the way around your boob.
And THEN you stick the center gore in, sandwiched, before you flip the elastic, and it looks weird as hell and no way could this be right. But then once you flip the thing, sure enough, there's just a cute decorative bit of elastic between the cup and center gore, and it looks good as hell.
(I mean, it doesn't on my muslin, but it will when I make a nice version. My muslin is hideous LOL, and I'm not worried in the slightest.)
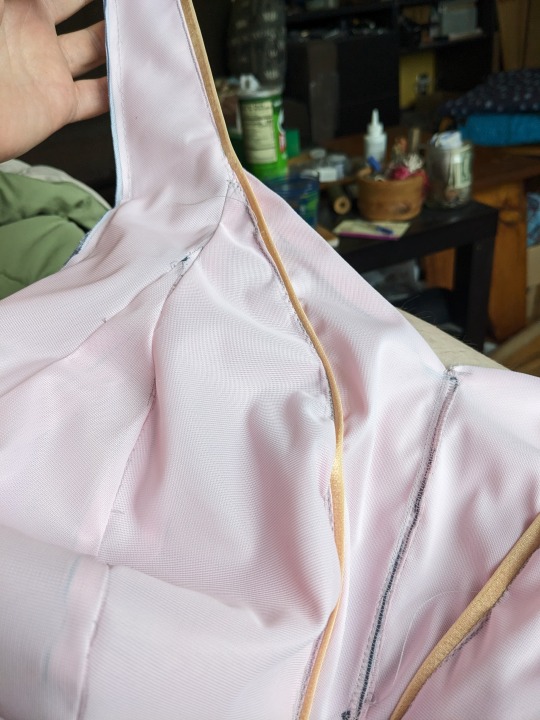
[image description: an expanse of pale pink fabric with disconcertingly peach-colored elastic running down the middle of it.]
That's what the elastic looks like topstitched down, and there's the center gore with a big sharpie mark down the middle because i meant to turn that bit to the inside but put it in backwards. Oh well.
and this is the back, where the elastic's sewn down: if I was doing a finished one, I could trim off all those odd little bits sticking out where the three layers of fabric didn't quiiiiite go together evenly, and it would look finished and polished and lovely.
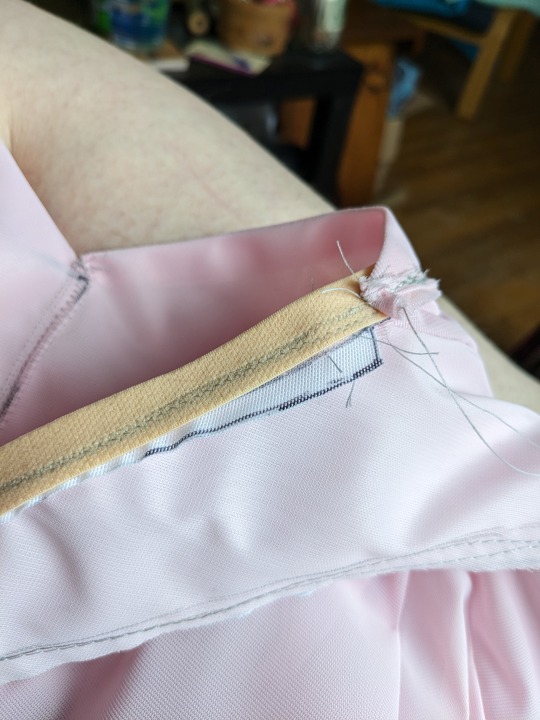
[image description: a bit of pale pink fabric flipped to the back. The peach elastic at the top has a couple wobbly lines of stitching on it, and some sharpie-bordered white fabric is sticking out and looks wobbly and terrible, and there are unclipped loose gray threads from construction everywhere.]
I'm not even saving that much time by making the muslin shitty, LOL. I'm just figuring, I need to see how it goes together before I get hung up on the cute details. I have enough of this exact fabric to use it again, but I also have a cute kit, a bunch of salvaged notions, and an intense desire to use a whole variety of other nontraditional bra fabrics, so I'm not that worried.
I should buy cuter elastic though. Elastic can't really be salvaged, not nicely. I'll have to pick up some cute stuff with decorative picots and whatnot. The supply list doesn't specify that you need picots, but then the instructions assume you have them, which confused me. The point is, you should sew the elastic at a point where some of it will protrude past the turned edge, because that's the correct look and function, and you should buy elastic that's not too scratchy.
I know a lot of people are concerned with bras being scratchy. I personally have never been irritated by the seams or fabric of a bra, but I HAVE been wildly irritated by the edge of the hook-and-eye band, the tips of side boning if there is any, and the STRAP elastic being shitty. So I will be focusing my energies on those.
I'm also thinking about making a bra in one layer, with binding over the seams and the powerbar made of stretch lace with a decorative edge, and put on the exterior of the single layer. That would be possible. The two-layer construction of this is kind of bulky and I get why it's like that, but my heavy-duty chestmeats aren't necessarily that heavy-duty.
I'm also going to make this in knit fabric, and am perusing all the Cashmerette Club discussion boards (where much of the pattern design team does lurk) for pointers on alternate materials and such, and I'll compile what I learn and post it here don't worry. (The number one thing is that if you make it in knits, size down one cup size. The number two thing is that if you make it with a fabric that stretches, match the stretch between the outer and lining fabric, it HAS to be the same. And example one is a fellow-commenter told me she made the whole thing in powermesh, sized down one cup size as per recommendation, and it worked perfectly. So we have that as a datapoint.)
(I don't love powermesh for its own merits but I cannot deny, it recovers perfectly, until it doesn't and you throw the bra out, so from a functional standpoint, it's The Thing to use. I'm taking apart old bras for notions and that's the thing I see-- when the powermesh went, I had to stop wearing that bra. But most of them, I busted the underwire channeling or the hooks first. Because they were DDs and I was a J, mostly, but. Hey. Yeah some other time I'll write a post about my horrible struggles with bras and how long I spent with everyone telling me it wasn't possible to be more than a DD and i must be having a body wrong somehow.)
ANYhoo.
I had to stop to make dinner after attaching the neckband elastic and center gore. So at some point today I will venture back down and keep working. The next step is the underarm elastic, and then the straps, and then the hook and eye closure, and then it's done. So I'm pretty close really, but my cat just got into my lap so I won't be headed down there imminently, LOL.
cat tax:
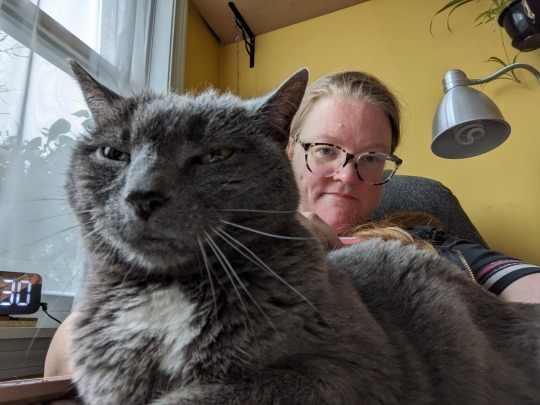
[image description: a white lady in a chair heavily overshadowed by a small gray cat with a white chest patch in the foreground looking extremely smug]
She's helping me post.
13 notes
·
View notes
Text
instagram
bramakerssupply
New Pattern coming soon! We know you've heard of the bullet bra, but have you heard of the mullet bra?
That's right ladies! It's business in the front, and a party in the back. To complete this bra, every pattern will include a full set of hair extensions in your preferred colour - what a deal! You can choose to wear your mullet down, for casual wear, or in an updo for those active days.
Keep an eye out for the pattern drop!
this is majestic
1 note
·
View note
Text
Have you SEEN the original moon landing feed, especially the scary bit near the end?
youtube
Now stay with me. I grew up hearing about these few minutes from my parents (in fact I took the TV they watched it on to grad school; DS9 and Babylon5 worked well in b&w).
This is even crazier than it looks like.
My parents were both scientists, my grandmother a planetarium director, and my dad was just about to land his job at a rocket company that built 95 small rockets that were part of the UpGoer Saturn V. (Yeah. Just the small ones. Saturn V was a BEAST.)
So my parents had a fair idea how dangerous this was, how Neil going manual was a bad sign, and just how close he was to running empty and crashing. They knew the problem that every ounce of fuel you carry requires even more fuel to lift off, so the Eagle was built light, carrying no excess weight even in fuel (it had to lift off the Moon with no rocket, after all).
But they didn't learn until years later just how jury-rigged and bespoke Apollo technology was. Every vehicle and part was designed like a Mythbusters build: extremely customized for the procedures it had to accomplish, using parts and even technology invented for specific mission tasks.

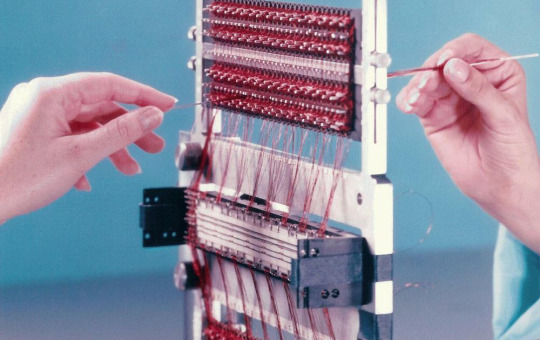
rope memory, predecessor to modern silicon chips: 1s and 0s woven by women (of course) at a Massachusetts textile plant
At the time, computers were the size of rooms and very touchy. Apollo's computer memory was core rope memory, never used before or since, to save space. The read/write guidance computer, too, was woven: physical media could better survive the rigors of space travel. (I suspect even my parents don't know it also used some of the very first integrated circuits, soldered by hand under a microscope by Navajo women).
Spacesuits were (and still are) designed and hand-stitched by Playtex bramakers. The lunar rovers' wheels were titanium meshes woven with piano wire to let dust through, and even had a clever navigation system despite no GPS or magnetic north.
They couldn't test these rigs with computer modeling. They didn't know for sure what the moon's surface would be like, apart from basic parameters like low gravity and near vacuum and a temperature ranging from 250°F in the sun to -250° in the shade. And it was nearly impossible to test for or practice in those conditions on Earth.
And then there were the unknowns. A massive solar flare between Apollo 16 and 17 might have killed or sickened them too much to operate their ship.
While the spacesuit and to some extent the rover design carried on, a lot of these hacks were so unusual that they might as well be alien tech. (I'm sorry woven technology fell out of vogue for several decades.) That goes some way towards explaining why humans haven't left Earth orbit since I was two.
The other problem, of course, is expense. Tech for human space exploration requires as much R&D and testing as fighter planes, which have developed through a century of multiple countries' military budgets. Human space programs are lucky to last two presidents; the next president usually doesn't think giving glory to his predecessor is a good use of money.
So for 40 years, NASA has mostly worked with other countries on human spaceflight or built robot explorers that can be launched in 3-4 years before Congress or the president can axe the program. They're less likely to shut down a mission when 99.99% of the money's been spent, and all that's left to do is download data and uplink occasional instructions.
TL:DR; Congress and the White House keep flashing the equivalent of that computer error message, every time NASA gets ready to send humans into space again. Overload. Abort mission.
Unless, you know, American citizens start saying Go. Go. Go. Go. We have some pretty important priorities down here on Earth (which Amazon and Disney and oil companies should be footing the bill for, though they try not to), but I bet the military can cough up the cost of a few fighter jets.
#happy moon landing day#apollo 11#space#Long post is long#I hope this is a good read despite fibromyalgia making my brain turn to fuzz#but this is so much cool stuff
77 notes
·
View notes
Text
Explora las posibilidades de nuestro diseño web Profesional
En Bramak, nuestra misión es transformar tus ideas en experiencias digitales únicas. Como una agencia de diseño web comprometida con la excelencia, ofrecemos una amplia variedad de servicios diseñados para satisfacer cualquier necesidad. Desde una página para tu negocio local hasta plataformas avanzadas, las posibilidades son infinitas. Conoce cómo podemos brindar soluciones personalizadas que llevan tu proyecto al siguiente nivel.

¿Qué tipo de página necesitas?
En Bramak entendemos que cada cliente es único, al igual que sus objetivos. Por eso, ofrecemos servicios que se adaptan a tus necesidades específicas. Aquí hay algunas de las opciones que puedes explorar con nosotros:
1. Página web para negocios
Si buscas llevar tu empresa al mundo digital, una página web profesional es esencial. Nuestro equipo combina diseño UX/UI con estrategias efectivas para crear una presencia sólida que refleje los valores y servicios de tu negocio. Una página web bien diseñada no solo genera confianza, sino que también ayuda a captar nuevos clientes.
2. Landing page: Diseñadas para la conversión
¿Quieres promocionar un producto, servicio o campaña específica? Diseñamos landing pages impactantes que convierten visitantes en clientes. Con un diseño atractivo, mensajes claros y llamadas a la acción estratégicas, nuestras landing pages son herramientas poderosas para el marketing digital.
3. Tiendas online: Tu negocio abierto 24/7
En el mundo actual, tener una tienda en línea es imprescindible para ampliar tus ventas. Diseñamos tiendas online funcionales, intuitivas y atractivas que hacen que la experiencia de compra sea un placer para tus clientes. Ya sea que vendas productos físicos o digitales, nosotros creamos una plataforma personalizada que se adapta perfectamente a tu negocio.
4. Plataformas de cursos y membresías
El aprendizaje en línea está en auge, y nosotros te ayudamos a aprovechar esta tendencia. Creamos plataformas robustas para cursos y membresías, con sistemas de pago integrados, accesos personalizados y diseños intuitivos que mejoran la experiencia de usuario.
5. Proyectos a medida
¿Tienes una idea única? Nos encanta aceptar retos. Nuestro equipo se especializa en desarrollar proyectos personalizados, combinando diseño gráfico y desarrollo web avanzado para dar vida a cualquier concepto. Si puedes imaginarlo, podemos hacerlo realidad.
Lo que hace diferente a Bramak
En Bramak, no solo creamos páginas web; diseñamos experiencias. Nuestro enfoque combina creatividad, tecnología y estrategias centradas en el usuario. Esto es lo que nos distingue:
Diseño UX/UI: Nos aseguramos de que tu página no solo sea hermosa, sino también fácil de navegar.
Atención Personalizada: Trabajamos contigo en cada etapa para garantizar que el resultado supere tus expectativas.
Soluciones Integrales: Desde el diseño hasta el desarrollo y el mantenimiento, brindamos soluciones completas para que no tengas que preocuparte por nada.
Adaptabilidad: Nos aseguramos de que tu sitio sea 100% responsive, optimizado para móviles, tablets y computadoras de escritorio.
Valor de una buena presencia digital
Invertir en un diseño web profesional no solo mejora la imagen de tu marca, sino que también aumenta tu alcance y genera más oportunidades de negocio. Ya sea que necesites una landing page efectiva, una tienda en línea funcional o cualquier otro tipo de página, nuestra agencia de diseño web está aquí para ayudarte a lograrlo.

¿Por qué escogernos?
Porque en Bramak no solo ofrecemos soluciones, sino que también nos comprometemos a impulsar tu éxito en el mundo digital. Nuestro equipo de expertos combina habilidades en diseño gráfico, desarrollo web y marketing digital para brindarte resultados sobresalientes.
¡Hablemos de Tu Proyecto!
¿Listo para dar el siguiente paso? Contáctanos y descubre cómo nuestro diseño web profesional puede transformar tu idea en una realidad impactante. Juntos, llevaremos tu presencia digital al siguiente nivel.
0 notes
Photo

I debated not even sharing this but as a Custom Fashion Designer every step of the process is an important communication tool. However not every step of the process ends up being a part of the final garment. For Anna K’s #SomethingBoldSomethingBlueBridal the original Prototype ended up being completely redesigned and the final pattern ended up not being anything like the first draft. Having a fitted bodice was very important to achieve the level of support Anna needed to feel as comfortable and elegant as possible on her wedding day. Seams, cups and gathers were how we initially tried to create that support, but as we fit the Prototype and began taking notes and feeling into the dress we recognized many opportunities for improvement. As an expert I know when - and how - to change course to best serve my VIPs. Upgrading a design from it’s original concept is always available to my Custom Fashion Clients and I’m honored to rise to the occasion. Custom Fashion has a base price that includes the full process short of upgrades like redesign, formal fabrics, couture elements, embellishing, dyeing, etc. If you’d like to bring a Custom Fashion idea to life with an experienced Fashion Designer and Seamster comment or DM now! Availability is extremely limited and I book out far in advance! Accepting new Custom Fashion Clients beginning in January for March deadlines and on into 2023! ✂️ 🪡 🧵 . . . #customfashion #custombridal #patterndrafting #fashiondesigner #fashiondesignprocess #prototyping #bramaker #seamster #seamedcups #cups #bracups #fashionexperience #flxfibers #brasupport #support #bramaking #custombra #oneofakindweddingdress #upgrademystyle #upgrade #dressupgrade #dressmaker (at Themis and Thread) https://www.instagram.com/p/CiIE_yVA5To/?igshid=NGJjMDIxMWI=
#somethingboldsomethingbluebridal#customfashion#custombridal#patterndrafting#fashiondesigner#fashiondesignprocess#prototyping#bramaker#seamster#seamedcups#cups#bracups#fashionexperience#flxfibers#brasupport#support#bramaking#custombra#oneofakindweddingdress#upgrademystyle#upgrade#dressupgrade#dressmaker
0 notes
Photo
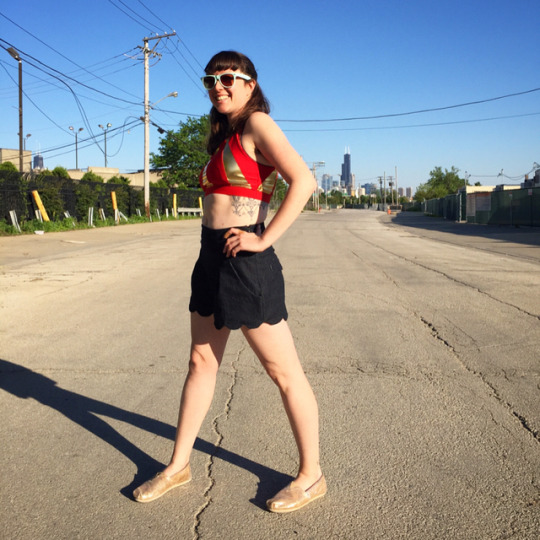
Happy Wonder Woman Day!!! Snuck some selfish sewing time this week and made these super cute scalloped, high waisted shorts and AND a Wonder Woman bra!!! Shorts were a @deer_and_doe_patterns tweak (I added back pockets because DUH) and the bra was a @mmadalynne free bralette pattern with GOLD SPANDEX aaahahahahaha. Bring on the movie!! #wonderwoman #bramaking #sewing #imakethings #itsgotpocket
10 notes
·
View notes
Photo
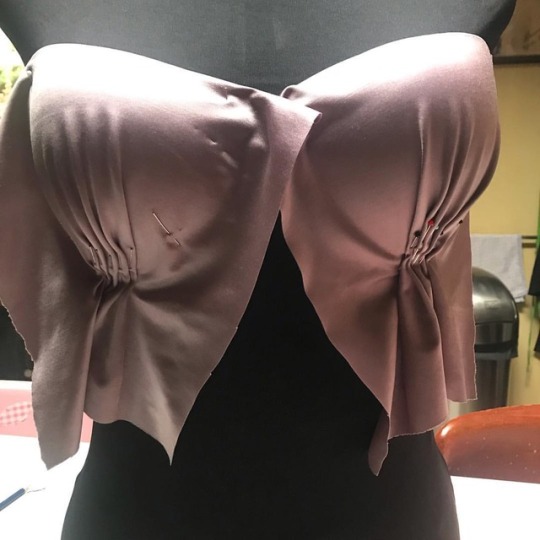
Ze lijken vrij gelijk. #pleasedwithit #bramaking #drapage #lingeriemaking #lingeriedesigner #lycra https://www.instagram.com/p/BttN4J6CbZa/?utm_source=ig_tumblr_share&igshid=1x9vwvgm68zl4
0 notes
Text
Impulsa tu negocio con nuestra agencia de diseño web profesional
Nos destacamos como una increíble agencia de diseño web en México, comprometidos en llevar cada proyecto al siguiente nivel.
Si estás buscando una solución efectiva para fortalecer la presencia en línea de tu negocio, nuestro equipo especializado en diseño de páginas web está listo para ayudarte a alcanzar tus objetivos.
En nuestra agencia de diseño web hacemos desde la creación de sitios web hasta el desarrollo de una tienda en línea completamente funcional, ofrecemos un servicio integral y personalizado, pensado para cubrir cada aspecto necesario.

¿Qué te ofrecemos?
Nuestro enfoque va más allá de solo diseño visual: trabajamos en profundidad cada proyecto, fusionando el diseño UX (experiencia de usuario) y el diseño UI (interfaz de usuario) para asegurar que cada sitio web no solo sea atractivo, sino que también brinde una experiencia optimizada para cada usuario.
Diseños que capturan y convierten
Nuestro compromiso como agencia de diseño web es entregarte un diseño web profesional que refleje los valores y objetivos de tu negocio. Sabemos que cada cliente y proyecto es único, y por eso creamos sitios a medida, alineados con tu visión y con el mercado actual.
Nuestro objetivo es diseñar experiencias web que logren captar y retener la atención de tus usuarios, transformando cada visita en una oportunidad.
Servicios personalizados para cada necesidad
En Bramak ofrecemos servicios que cubren todas las etapas del proceso creativo y técnico. Desde el diseño inicial hasta el desarrollo, nuestro equipo trabaja contigo para construir una presencia digital que represente lo mejor de tu marca.
¿Necesitas una tienda en línea? En Bramak como agencia de diseño web nos aseguraremos de que tu e-commerce tenga todas las funcionalidades que necesitas para vender con éxito.
¡Comienza hoy a transformar tu presencia en línea!
No dejes pasar la oportunidad de llevar tu negocio al mundo digital de la mano de expertos. Contacta a Bramak, la mejor opción de agencia de diseño web en México, y descubre cómo podemos ayudarte a crear el sitio web que tu negocio merece.
¡Hablemos sobre tu proyecto y hagamos realidad tu visión!
¿Qué es una agencia de diseño web?
Una agencia de diseño web es una empresa que se especializa en crear y mejorar la presencia digital de sus clientes a través de sitios web bien diseñados y funcionales. La misión de una agencia de diseño web es ayudar a sus clientes a construir una imagen en línea que atraiga a su audiencia, mejore la experiencia del usuario y, en última instancia, apoye el crecimiento del negocio.
¿Qué hace una empresa de diseño web?
Una empresa de diseño web se encarga de todo el proceso de creación de sitios web, desde la planificación inicial hasta la implementación y el mantenimiento. Sus actividades suelen incluir el diseño visual, desarrollo técnico y optimización de la experiencia de usuario (UX).
¿Cuál es el mejor desarrollador de páginas web?
El mejor desarrollador de páginas web depende de las necesidades del proyecto y del nivel de personalización requerido.

¿Cómo funciona una agencia de diseño?
El funcionamiento de una agencia de diseño web sigue un proceso estructurado que permite transformar las ideas de los clientes en un producto final que cumpla con sus expectativas.
0 notes
Text
Diseños de tiendas online que impulsan tu negocio
En Bramak sabemos que cada negocio es único, y por eso ofrecemos soluciones personalizadas para el diseño de tiendas virtuales. Nuestro objetivo es ayudarte a crear una plataforma que no solo sea visualmente atractiva, sino que también esté optimizada para vender productos y ofrecer una experiencia de usuario inolvidable.
Aquí te contamos más sobre las posibilidades que ofrecemos y por qué tu negocio se beneficiará al contar con una tienda online profesional.

¿Qué tipo de tiendas virtuales puedes crear con nosotros?
Con Bramak puedes diseñar tiendas virtuales que se adapten a las necesidades específicas de tu negocio y a las expectativas de tu público objetivo. Algunos de los tipos de tiendas online que podemos crear incluyen:
1. Tiendas de productos físicos
Perfectas para negocios que venden productos tangibles, como ropa, accesorios, alimentos, electrónicos, entre otros. Estas tiendas permiten organizar los productos por categorías, para que los clientes encuentren fácilmente lo que buscan.
2. Tiendas de productos digitales
Si tu negocio se centra en la venta de ebooks, cursos en línea, software o música, diseñamos plataformas con sistemas de descarga integrados y métodos de pago confiables.
3. Tiendas de suscripciones
Desde cajas de suscripción hasta membresías exclusivas, puedes gestionar pagos recurrentes de manera sencilla y segura para ofrecer a tus clientes contenido exclusivo o productos regulares.
4. Marketplace
Si tienes en mente un proyecto donde diversos vendedores puedan ofrecer sus productos, creamos marketplaces completamente funcionales, similares a los grandes del comercio electrónico.
¿Qué negocios se benefician de un diseño profesional de tienda virtual?
Cualquier negocio puede beneficiarse de contar con una tienda online profesional. Si tienes un negocio físico o buscas emprender en el mundo digital, aquí algunos ejemplos:
Tiendas minoristas: Ideal para pequeños negocios que desean vender productos más allá de su localidad.
Empresas de servicios: Profesionales que ofrecen servicios de consultoría, clases en línea o talleres pueden monetizar su conocimiento.
Artistas y creadores: Vende tus obras de arte, música, o fotografía directamente al cliente final.
Fabricantes: Presenta tu línea de productos directamente al consumidor, sin intermediarios.
Emprendedores: Si tienes una idea de negocio, iniciar con una tienda virtual te permite validar tu proyecto con una inversión controlada.
Al contar con un diseño de tienda virtual bien estructurado, te posicionas frente a un público objetivo más amplio, impulsando las ventas y el crecimiento de tu negocio en línea.
¿Por qué elegir un diseño web profesional para tu tienda online?
Un diseño web adecuado para tu tienda no solo se trata de estética, sino de funcionalidad y experiencia de usuario. ¿Cómo nos enfocamos en cada detalle?
Experiencia de usuario optimizada
Sabemos que el cliente digital busca rapidez y comodidad. Por eso, nuestras tiendas virtuales tienen una navegación intuitiva, que facilita el acceso a productos por categorías, filtros inteligentes y procesos de compra simplificados.
Diseño sencillo y atractivo
Tu tienda online debe reflejar la identidad de tu marca, con un diseño sencillo pero profesional que cautive a tus clientes desde el primer momento.
Integración de métodos de pago seguros
Incluimos múltiples métodos de pago, como tarjetas de crédito, transferencias y billeteras digitales, garantizando un proceso de pago seguro para tus clientes.

Adaptación a dispositivos móviles
La mayoría de las compras en línea se realizan desde smartphones. Nuestras tiendas son completamente responsivas, asegurando una experiencia impecable en cualquier dispositivo.
Más que un diseño, una estrategia para vender productos
En Bramak no solo diseñamos tiendas, creamos soluciones para que vendas más. Incorporamos herramientas como análisis de comportamiento, integración con redes sociales y sistemas de marketing automatizados.
Además, entendemos que cada público objetivo tiene necesidades diferentes. Por eso, trabajamos contigo para crear una tienda que destaque por su personalización y funcionalidad.
¿Listo para potenciar tu negocio online?
Invertir en el diseño de tu tienda virtual es más que tener presencia en línea; es abrir las puertas a un mundo de oportunidades en el comercio electrónico. En Bramak diseñamos tiendas online que no solo se ven bien, sino que están hechas para vender.
0 notes


