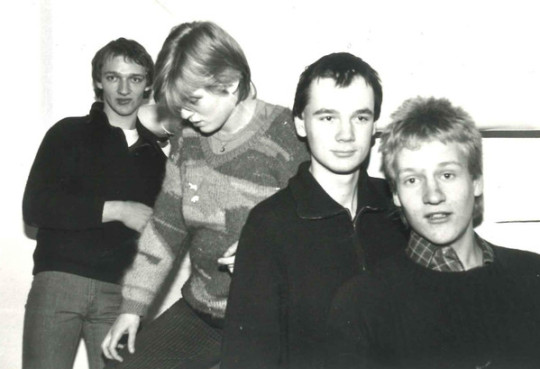
#black tape project diy
Explore tagged Tumblr posts
Visit Tumblr Blog
Explore Tumblr blogs with no restrictions, modern design and the best experience.
Last Seen Tumblr Blogs


Fun Fact
The most popular pages on Tumblr are about Minecraft, GIFs, and David J. Peterson.
Text
dailymotion
#blacktapeproject#balck tape project#black tape bikini#Made Of TAPE#Bikinis Made Of TAPE#black tape catwalk#black tape project#black tape#the black tape project#body art#black tape project fashion#black tape project start to finish#body arts guam#black tape project diy#joel alvarez
5 notes
·
View notes
Text
18+
Eddie Munson x AFAB reader, established relationship, lingerie, allusions to oral sex(F), PIV sex


a/n: I'm no seamstress by any means but I can do a decent enough job with a needle and thread and I love making my own lingerie from time to time so it got me thinking about dear sweet horny Eddie and what it might be like when you let him in on your little hobby.

You'd first told him about it a few months into your relationship, on a day when a press of his lips to the corner of your mouth had turned into open mouthed kisses, his tongue wrapped around yours. Eddie had pulled you closer to feel more of you then, settling you in his lap, pushing your skirt up to find the black, hand sewn lacy garters circling the thickness of your thighs, made dainty and pretty with ruching and bows.
He doesn't even know what they're called – all he knows is that he likes them, a lot and he tells you so between kisses, tracing the soft fabric with his fingers, pinching the delicate lace with a low whistle. He slips in a corny but sweet line about how it makes your thighs look like they've been giftwrapped just for him and that gets a giggle out of you, telling him you made them yourself.
"You serious?", he looks up at you, amazement shining bright in his deep mahogany eyes even when you try to downplay it, telling him it's not that hard. But your modesty does nothing to stop him from thinking you're the most talented person he's ever met and he reminds you of that mixed in with more praise when you change positions and he's down on his knees, slipping his fingers under each garter while he fits his head between your legs.
"Turning up in a pretty little outfit like this? that's begging to have my tongue on you, baby. You shoulda known that", he tuts against your clothed mound, licking a broad stripe up your panties, tasting the wetness that had gathered there on the black cotton.
He only pulled out the stitching on one garter that day – unintentional of course but unavoidable too given how tightly he had to hold you down in place as you writhed. It didn't trouble you though because it was nothing you couldn't mend with your needle and some thread back at home.
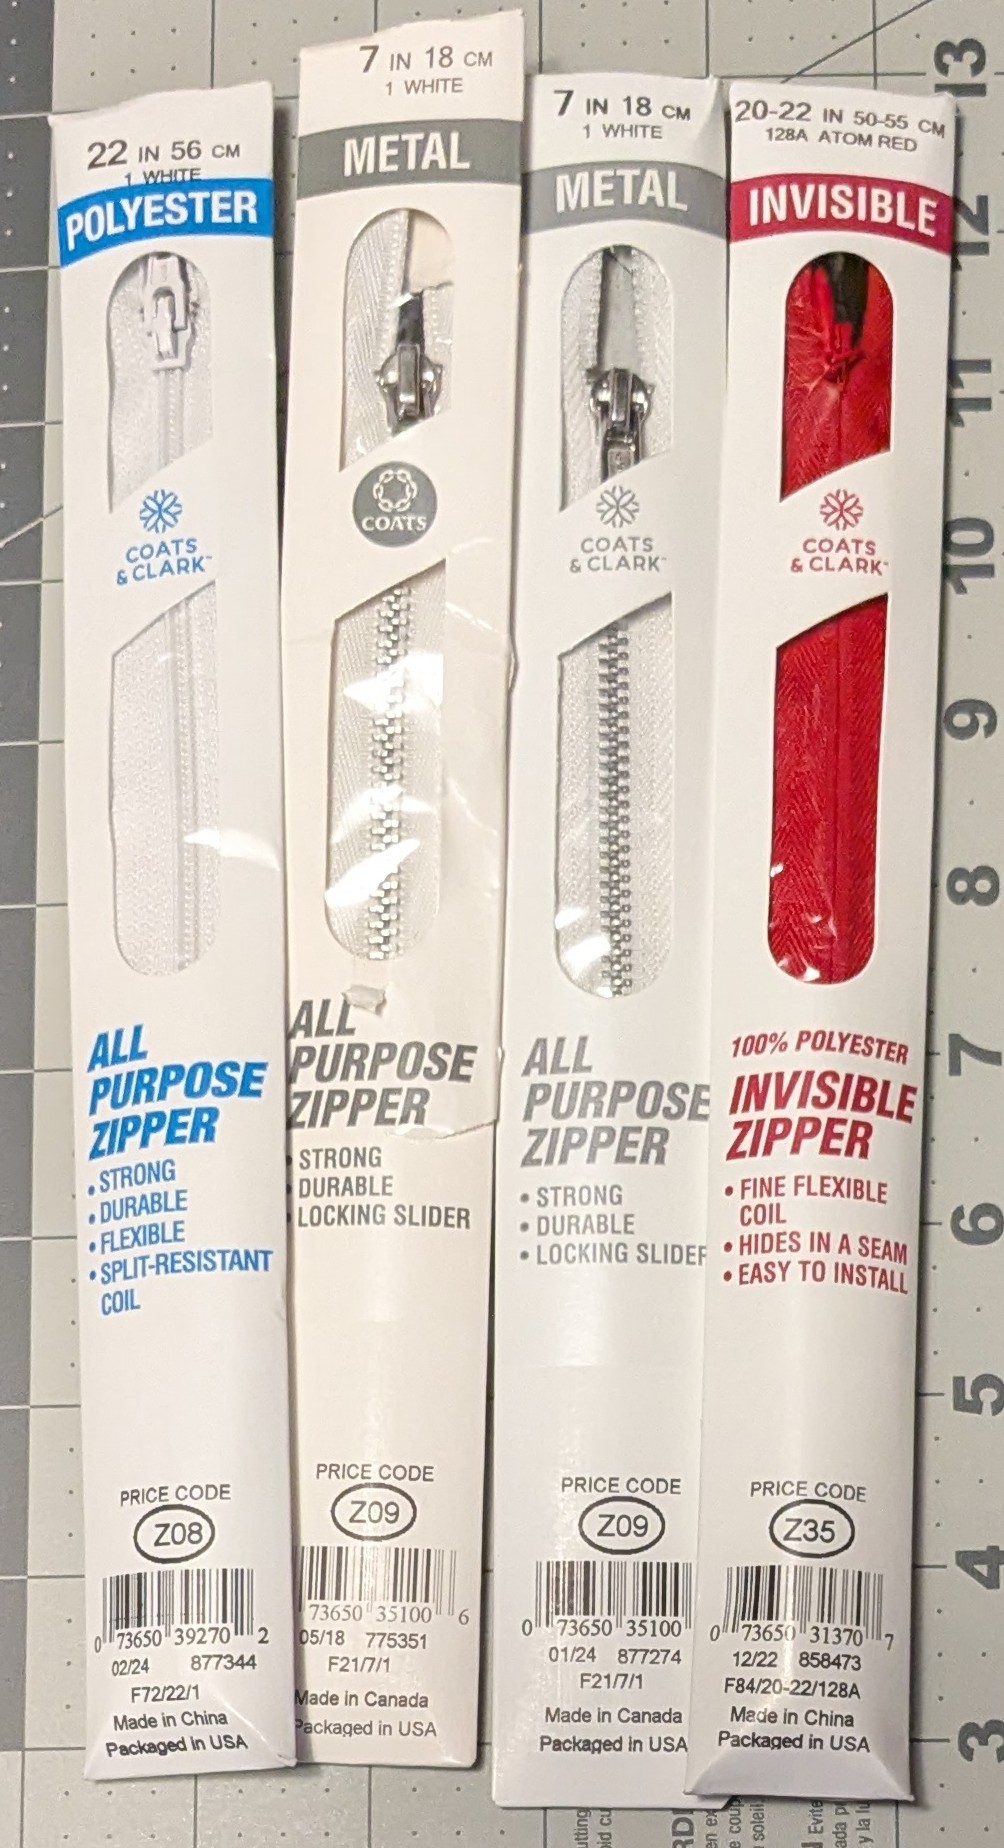
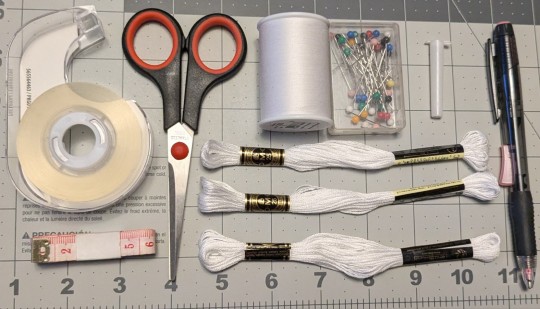
From then on, whenever you feel inspired to tackle a new design he's all sorts of encouraging, driving you and accompanying you to get all the things you need – all of the sewing supplies; fabric, thread, lace, ribbon, elastic and more. He helps you decide on which colors to get and he makes the gesture of paying for it all too, wanting to spoil you. Not to mention it's kind of like he's buying himself a present too, knowing you'll model the undergarments for him when you're done.
The most you let him help with after that is taking your measurements, letting him wrap the measuring tape around your hips and bust while you guide him on how to do it correctly but what that leads to is a lot of wandering touches and a few sneaky pinches on your ass, having to playfully swat his hands away if you hope to get anything done.
Eddie backs down with a little whine but all the faux pouting's just for show. He finds space on your bed while you look up DIY tutorials online at your desk before you get down to sewing, all of your supplies laid out neatly by your side, ready to be used.
While you're busy he spends his time strumming away on his guitar, pencil tucked behind his ear as he brainstorms lyrics for a new song. Both of you liked working on your own projects this way, in the same room because you appreciate having each other's company and presence to surround yourself with while you create.
Though Eddie had promised not to look too much he struggles to uphold that promise as he sneaks peaks at you cutting out patterns for a matching lace bra and panty set. He adores the cute way your brows scrunch together in concentration when you thread your needle and how you sometimes mirror him with your tongue pinched between your lips while you meticulously stitch all the individual cut outs together.
Somewhere between the time it takes you to get the panties finished and the bra started he approaches you, one hand clamped over his eyes so he can't see your progress – he knows how much you want to surprise him with the final result. Held out in the other is a mug of that tea you like, having made a quick trip to your kitchen and back, a bag of potato chips cradled in the crook of his elbow for you too.
You thank him and gladly take the offerings, cheeks growing warm when he plants a quick kiss on the top of your head. "Don't overwork yourself", he coos into your hair, giving your shoulder a gentle squeeze before he heads back to your bed and picks up his guitar again.
The tune Eddie's playing carries you through the rest of your stitching and close to an hour later you swivel your desk chair around in his direction. "I'm done", you announce with a sunny smile and he grins back at you, fingers abandoning his guitar. "You gonna get changed right now?" he asks hopefully, eyes twinkling.
"Yup", you answer him, popping the 'P' with a little wink. You gather the set in your arms, stepping into the bathroom. "Wait here, I wanna do a reveal", you tell him before closing the door, all giddy with girlish excitement, proud of how the it all came out.
The wait isn't long but every second that passes has Eddie feeling like his head's full of fireworks, finding it impossible to remain still, fingers drumming on his knees, legs hung over the side of your bed, socked feet tapping away on your carpeted floor.
You don't announce yourself once you've changed, unlocking the bathroom door and letting it swing open as you lean against the doorframe, letting your boyfriend take in your newest creation.
You know you've succeeded when his lips part, jaw going slack and his eyes going wide to rake over every inch of you, stunned.
He makes grabby hands at you and its somehow made cuter given his age so you step forward to let him get a closer look, occupying the space between his spread legs, letting him place his warm hands on the bare skin of your waist.
It's always a rare moment when Eddie goes silent, words escaping him as he quietly admires the way the material wraps around your proportions perfectly and the the cheeky cut of your panties as you do a little spin for him, the front a soft lilac satin, the back a matching shade of lace to reveal your ass through the floral embroidery.
The bra is simple – nothing too elaborate like some of the designs you'd scrolled through but it compliments the underwear well. The straps are thin and rest comfortably on your shoulders, the rest sewn in a longline style. It's sheer with the same floral lace as your panties so your nipples show through, your breasts supported well even without padding or underwire for extra softness, all with a tiny, pretty ribbon bow stitched right in the middle to match the one on the front of your panties too.
"You're so fucking beautiful", me utters, pulling you closer to kiss you right above your belly button, making your chest flutter with a thousand beating wings, a hurricane of butterflies taking flight just beneath your skin.
You let him lay you down on the bed and he's far more gentle than he needs to be when he slips your panties to the side, not wanting to stretch or snag the lace and ruin all your hard work. Your belly feels warm like sunlight spilling through your window in the morning because he's so careful with the pretty underwear while he runs a finger through your wet folds, making you feel like something as delicate as porcelain, something to touched with care and worshiped. It makes you hunger for more, pulling him closer by his shoulders.
"Wanna feel you inside", you place your lips on his, hands helping him to unbuckle his belt as he leans over you. You pull not so gently at his clothing, a big contrast to how he's handling you, tossing each article to the side impatiently while you remain in your cute little ensemble. You wouldn't be ridding yourself of your underwear tonight and he wouldn't have it any other way.
"Can't believe I've got the prettiest doll in town all to myself", Eddie huffs a breath against the column of your neck at the same moment you suck one in, pressing his cock inside you, so thick and hard it makes the stretch that much better.
"And she's all dressed up just for me"
527 notes
·
View notes
Text
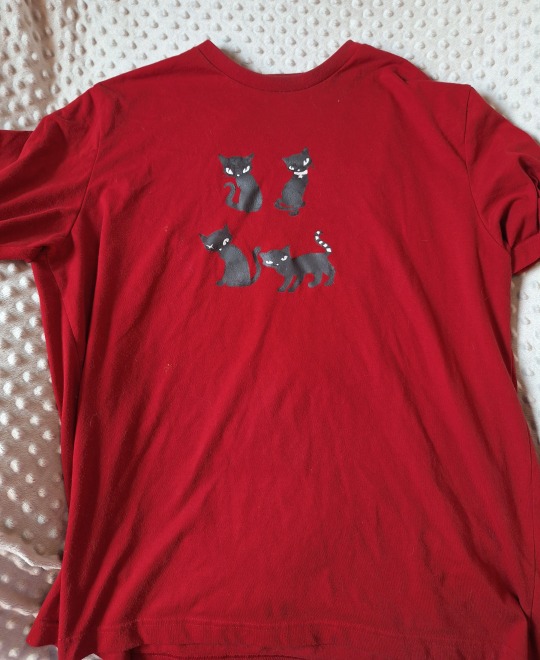
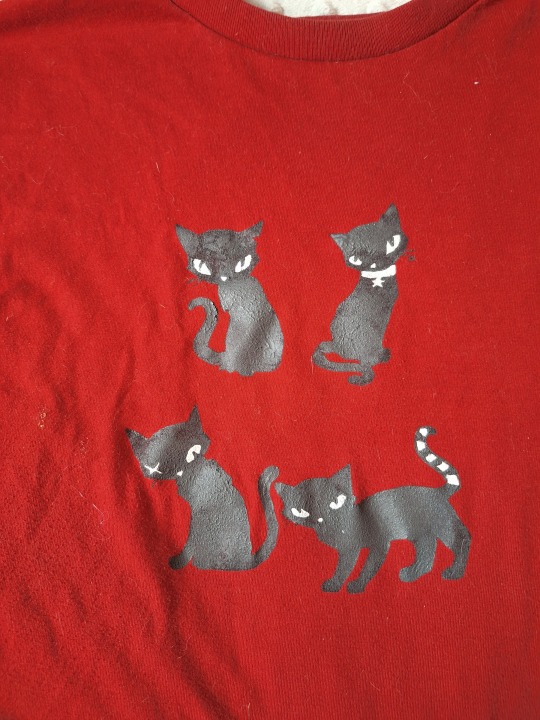
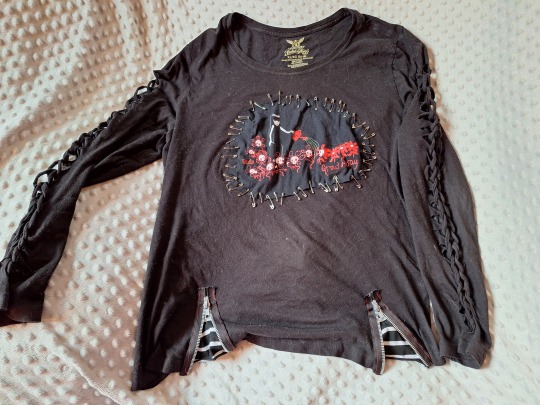
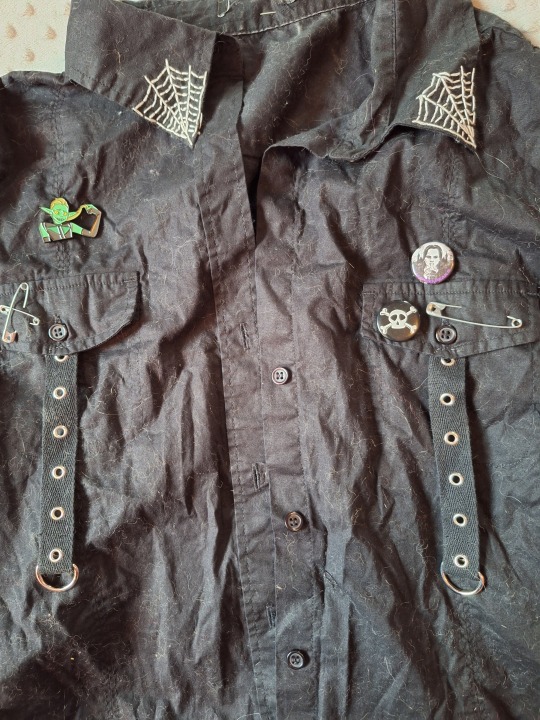
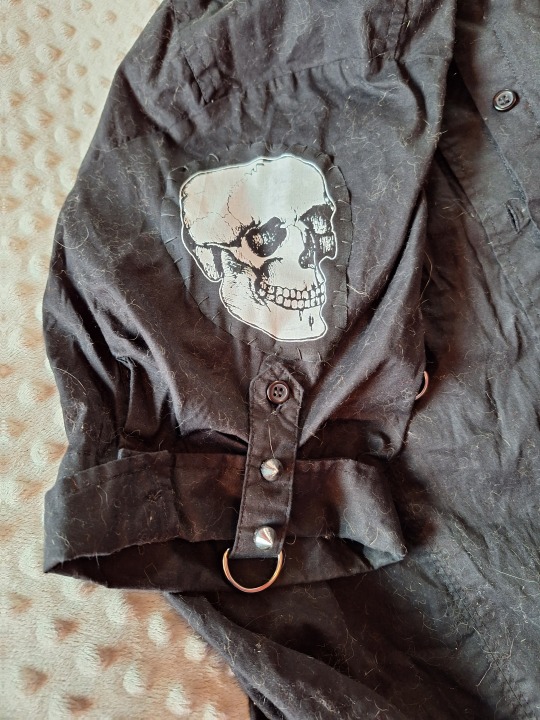
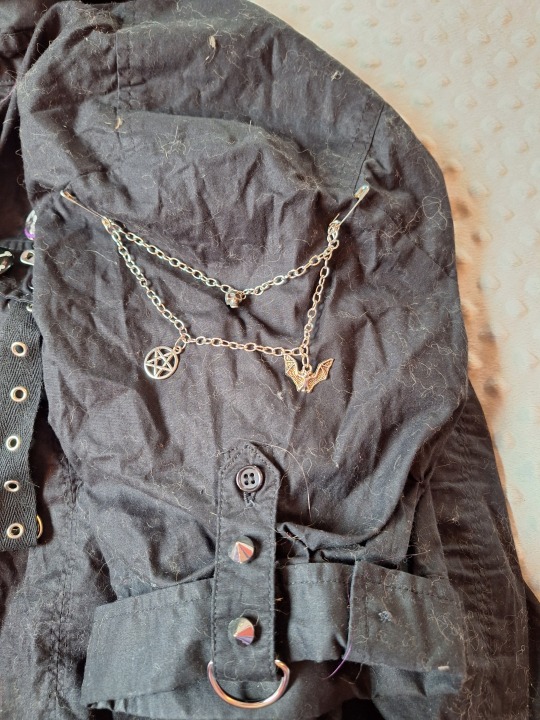
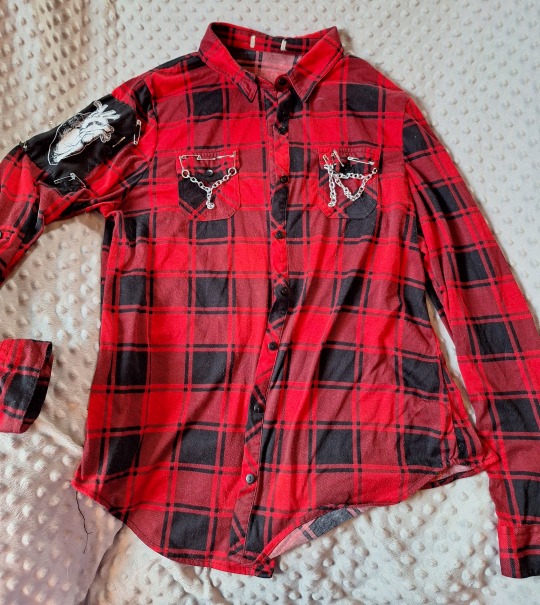
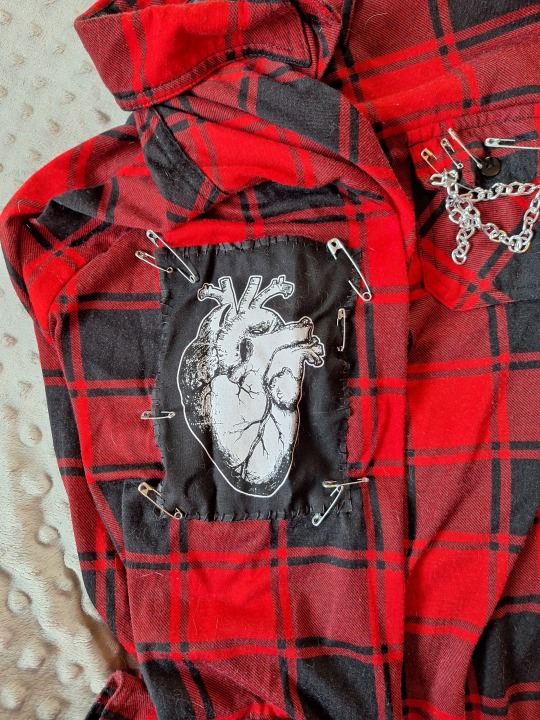
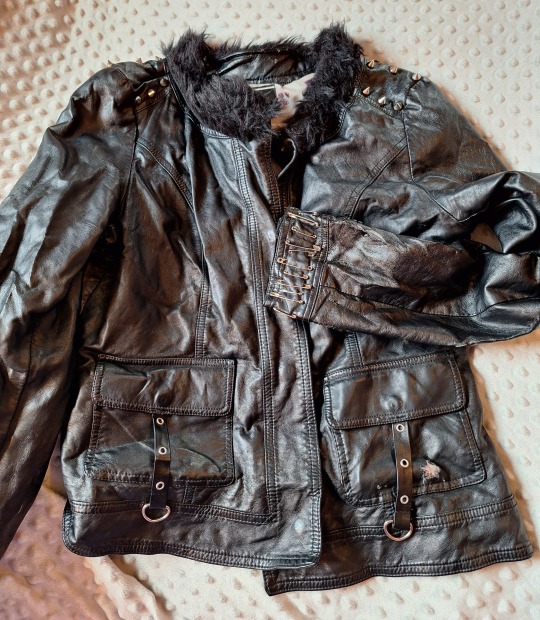
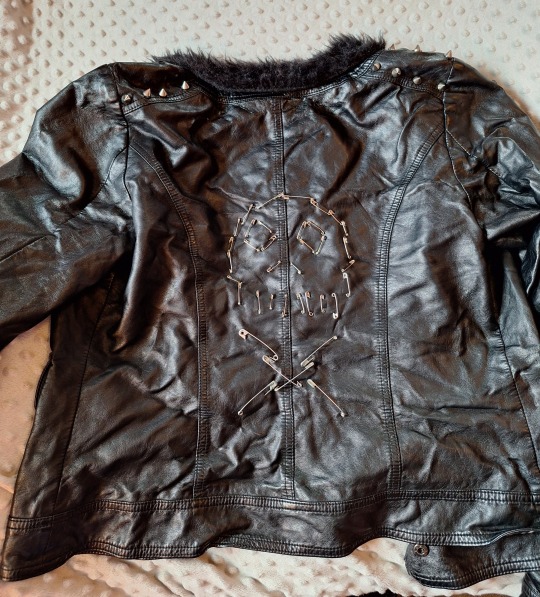
Goth DIY: Altered Clothing part 1
Since some of you crafty goths were interested in seeing the clothing I've altered, I decided to compile it all in one place! I hope I can inspire your creations,give you ideas, and teach you new techniques. This will be a long post, since I've been making alterations to my clothing since high school, which also means some of these projects aren't as polished as others, since they were made when I was newer to DIY and have mistakes I've since learned from, but that's okay! Goth doesn't have to be polished and perfect, and don't let the fear of mistakes stop you from creating!
I've already done posts about the shorts and pants I've gothified, so part 1 will focus on t-shirts, camisoles, and button-up shirts. Part 2 will have sweaters, skirts, and dresses. Some alterations are as easy as adding safety pins or lace trim, and others involve more sewing. Lots of these are very beginner-friendly projects and take less than an hour. All of these items were completely plain when I got them--anything metal, lace, embroidered, or painted that you see was added by me. I'll add more about each garment in the image descriptions. As always, feel free to message me if you want better or more thorough instructions or DIY advice. I'm here to be a resource to my fellow crafters! <3
(Also, please pardon the cat hair and my hair on the clothes--I don't take perfect pictures. A couple pics are also old since those shirts are in storage so I could make room for my winter wardrobe, so you'll notice a change in backdrop and a dirty mirror.)
Let's start with t-shirts and camisoles! Use an old shirt, a thrifted shirt, a shirt from Walmart, etc.! I like to get plain unisex t-shirts from Walmart and paint on them using freezer paper stencils, bleach them, shred them, and/or add safety pins to them. The camis also came from Walmart, and I changed the necklines and added lace trim to make them cuter.
To make a sweetheart neckline on a cami, you can cut it, or you can just pinch the middle and sew it into place (I did that for all of them except the black and white one--that one ended up a little lower-cut than I meant it to, so I decided to stick with the pinching method). The lace trim I used on the black camis isn't stretchy, but still works just fine, as long as you pin it into place while you're wearing the shirt and stretch the shirt a bit as you sew to maintain stretch in those areas. Stretchy lace, like I used on the pink and red camis, works a bit better, but is harder to find. I still like pinning the lace while I'm wearing the shirt to get the placement down, but if you wear a bra, make sure you're wearing the one you plan on wearing with the shirt while placing the lace. I found it doesn't sit right with bras that fit a little differently than the one I based the placement on.
The long-sleeved Emily the Strange shirt has a neat detail, albeit a wonky one because my placement is a bit off sometimes. You'll notice two little striped triangles at the bottom. I cut slits in the shirt and added triangles of striped stretchy fabric, then sewed zippers over top of them to hide the seams and add extra detail. I also sewed the zippers on with red thread for contrast.


My button-ups are a bit more involved. I treat them like how I treat shorts--patches, lace, embroidery, pins, grommet tape, D-rings, charms, chains, oh my! The pink one is my most recent, and I'm so proud of it. All of the patches came from ToothxNail on Etsy, except the Rat King patch, which came from Katiewhittleart on Etsy. The flowers on the collar were buttons that I glued onto flat-back pins from a craft store (I used E6000 glue). Made super quick collar pins that I can remove when washing the shirt or put on something else when I want.
The orange button-up was by far the simplest. I just added lace trim to the cuffs and cropped it (it had been high-low, but I wanted to wear it tucked into a skirt and the long back was annoying me). I also added collar clips with a chain that I got at a craft fair, but that's more like styling an accessory with it than altering it, since I can just un-clip them.
The leather jacket is old and doesn't fit well, so I don't wear it anymore, but I kept it because it was my first leather jacket. Adding the sew-on studs and faux-fur trim on the neck took the longest. You'll also notice that a mouse chewed a hole in the outer shell on the pocket.

Part 2
#diy advice from your local goth#goth diy#goth clothing#goth fashion#goth#gothgoth#goth subculture#diy fashion#diy#diy tutorial#goth tutorial#crafting#sewing#mine
104 notes
·
View notes
Text
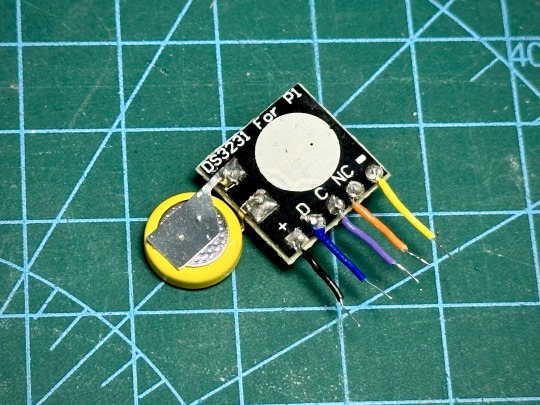
DIY: Making A Pwnagotchi
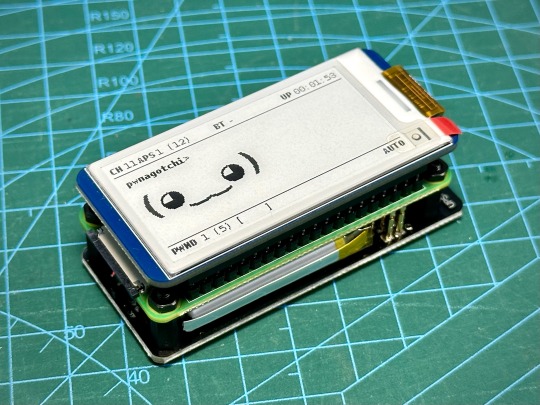

Yes, I know I am very late to the game ... LOL I was meddling with Flipper Zero and war driving, then I came across the Pwnagotchi project. Since I already had the parts to do this lying around in my workshop, I decided to put together my own Pwnagotchi just for fun. Started by hooking up the Waveshare 2.13" Black and White E-Ink Display to a Raspberry Pi running a fresh Raspbian image and downloaded the Waveshare demo code to test the display to make sure it's working properly, since I have not actually used it before. This is a v4 display.

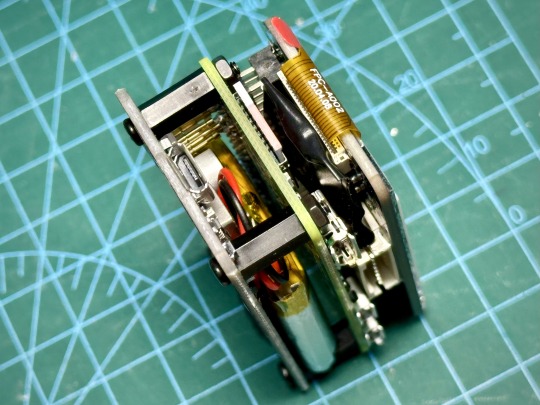
After that, I just followed all the instructions over here to put it all together, including adding a real time clock. I used the DS3231 RTC module designed for Pi, but in order to make it fit into the space between the display and the Pi board, I had to make some modifications. The female header pins on the RTC module was desoldered and short wires were soldered on. The battery also had to be desoldered and resoldered on in a new positionlike below to make the module thin enough. The module was then wrapped in wire tape for insulation. Now, we can just slot the wires into the female header pin holes of the display before we snap it onto the Pi board.
Below, you can see the RTC fits comfortably between the boards. I also attached a UPS Lite v1.2 board. Apparently, the UPS Lite board I had was a clone/knock off. It uses I2C address of 0x32 instead of 0x36 that was used in the original product, so the UPS Lite plugin in Pwnagotchi won't work. Oh well, I will just use it like a normal battery pack.

Now, for the software. The original Pwnagotchi project has not had any new updates for over 2 years, so it's kinda out of date and it doesn't support the newer Waveshare displays. Luckily for us, someone had taken the effort to fork the project and released new versions of Pwnagotchi over here. Note that this requires Raspberry Pi Zero 2 W.
The Waveshare 2.13" E-Ink display that I had was v4, but I found that I had to set the display type to "waveshare_3" in Pwnagotchi settings for it to work properly. Next is to 3D print a case for this, but in the mean time, I used some nano bricks to build a temporary case for it.
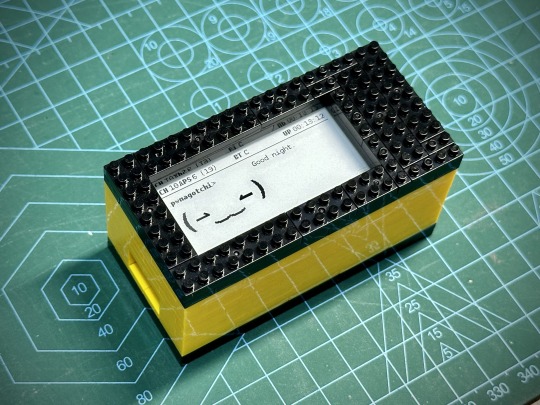
That's it for now. Happy hacking!
62 notes
·
View notes
Text
DIY Desmond Miles Jacket
Hey folks! I've been wanting to make this jacket as a gift for my boyfriend (🤫), and noticed there really aren't a lot of good resources online, so... I suppose I'll be the resource!
I'll try to make this as beginner-friendly as possible, since I know this might be some of y'all's first project :)
(Just the materials for now! Check under the cut :])
Materials:
A pattern! This is the first thing you'll need, since it might give you an idea of what fabrics to look for. A few features don't exactly matter, since we'll be editing them anyway. For instance, I'm using this free hoodie pattern, which includes a large front pocket and slim hood, but no zipper. I'll explain later how to edit the pattern toward what's needed, but as long as it's the right size and has a hood, you should be okay.

Fabrics. You'll need a white fabric for the outer shell (mine is knit), a ribbed knit fabric for the cuffs and hem (also white), and a red fabric for the lining (I'm using some ITY — also knit, but it's light and stretchy). Hoodies generally take 2-3 yards of fabric for adult sizes (each layer), and you may need a second layer of white fabric so the red doesn't show through. You'll probably only need about half a yard of your cuff fabric, but if you (like me) can only find it in multi-yard precut rolls, it's okay to use the rest as your middle layer. Just keep in mind that using a knit fabric will make the jacket warmer, as will using rib-knit. (Texture traps heat!) [If you're making the version from Revelations, use black for your shell and cuff fabrics, and anything (or nothing!) for the middle layer. Where this guide says "white", remember you'll need black instead.]
Zippers. You'll need a white zipper for the front, two short metal zippers for the pockets, and a zipper of your choice for the hood. (You can also forgo the zipper here if you wish.) As for lengths, it won't be one-size-fits-all, so make sure to measure your pattern in the zipper locations. (You may want to wait until your pattern is done to buy your zippers!)
General kit! You'll need scissors, clear tape, needles, white thread, white embroidery floss, and pins, as well as a measuring tape (the ribbon kind!), a straightedge, and a pencil. These sorts of things are good to keep around if you sew regularly, and experienced sewists may have most of these already. If you don't, most of these can be found in prepackaged sewing kits, and the rest are relatively cheap.
Go forth, my pupils! Gather your materials! I'll be back with another post soon :)
#desmond miles hoodie#desmond miles jacket#desmond miles#assassin's creed#assassin's creed brotherhood#assassin's creed revelations#assassin's creed iii#sewing#diy#cosplay#babe don't look :p
19 notes
·
View notes
Text
Liam Grant — Prodigal Son (VHF Records)
How does one go about making music not usually understood as “punk” sound like punk? How best to apply the DIY ethos, the construction by destruction, of punk art to other genres? How can the guide-fires that have been lit by past iconoclasts of the underground illuminate explorations in different styles? Maine-based fingerstyle guitarist Liam Grant provides his answers to these questions in the form of his sophomore LP, Prodigal Son (out 2/21/2025 on VHF Records), a collection of anti-tradition-traditional-style music — American Primitive with a capital A and P through a dirtied lens — kindly and perhaps counter-intuitively dedicated to his parents.
The opening track, “Palmyra,” starts with a gong-like bang on the open strings of a Weissenborn lap dobro prior to dipping into a sunny, up-tempo Fahey-style postmodern country blues jam. A typical start for a post-Jack-Rose guitar soli record, except that it sounds like it was run through the same amp and pedals Doyle Wolfgang Von Frankenstein used while recording “Where Eagles Dare”, with the gain on the tape machine dimed à la Bowie recording Raw Power. The disconnect between the refinement of the playing and the fidelity of the recording is striking. It isn’t circumstantially lo-fi, nor is it an attempt to sound vintage like a dusty 78 rpm disc, going back to the source — it’s an intentional push into distortion, taking something pretty and covering it in mud.
This distressed audio technique works well with the blues style music, you can situate the gritty sound of the slide in some kind of smoky Roadhouse scenario — trade out the casual violence for folks talking over each other about obscure records from Western Massachusetts while the guitar wails. It takes on another dimension of abstraction when Grant switches out the slide for the twelve-string and gets in raga mode. The lightning-like knots of fingerpicking on the moody, roughly thirteen-minute eastern-infected journey “Salmon Tails Up The River” dissolve into flattened fields of blown-out tape fuzz, blending with the textured booms of the low end strings to create a speaker-straining mass of sound. Another lengthy twelve-string piece, “Insult to Injury,” opens the B-side with a meditative counterpoint to the sturm und drang of “Salmon Tails”,twinkling riffs cutting through the sonic haze like a gentle ship passing through ocean fog.
The last two songs on Prodigal Son show different ways of approaching folk, in a broad sense, in a punk way, first by paying tribute to an originator, second by an invocation of the DIY lifestyle. “A Moment at the Door” is a take on a composition by a master of boundary-clearing, broke-down blues guitar playing, Loren Mazzacane Connors. The overdriven recording here finds a comfortable middle ground where Grant ably recreates Connor’s minimalist electric guitar style on his six-string acoustic, magnetic hiss filling the stretches between notes. The album closer “Old Country Rock” is a loose and joyous live cut from the Grant/McGuire/Flaherty old-time trio. This is where the DIY lifestyle aspect of Grant’s project comes in. Last year this trio embarked on an extensive Southeastern US tour, booking it and conducting business in a way that would’ve been familiar to Black Flag in 1981, if you substituted phone calls for Instagram DMs. Twenty years ago, the original incarnation of Old Crow Medicine Show were constantly touring road-dogs bringing Beale Street jug band songs from the twenties and thirties to places no one had ever played them before. The *music* wasn’t punk, but they were – not because of how they sounded but because of how they did things. Patti Smith, asked likely for the millionth time what punk was, said “To me, punk rock is the freedom to create, freedom to be successful, freedom to not be successful, freedom to be who you are.” Punk has never been an aesthetic genre. It’s a way of being, and Liam Grant literally slides into it on the first track of Prodigal Son.
Joshua Moss
3 notes
·
View notes
Text
Night Palace- Mount Eerie

Despite how long Phil Elverum has been recording music as The Microphones and Mount Eerie, he's taken so many stylistic detours over the years that it's hard know what exactly you're getting into with any specific project of his. Since cutting his teeth with self-recorded, lo-fi tapes as TM in the mid 90s, Elverum has mined a distinctly DIY lifer trajectory with music that spans indie rock, avant-folk, experimental rock, noise rock, ambient, and even some black metal with a deft touch that belies the ingenuity with which it's all constructed. Any one of his projects could be a maximalist, studio as instrument epic, a record with nothing more than vocals and acoustic guitar, or something in between. After any level of familiarity sets in, it's easy to project a vague notion of what you're in for with any subsequent Elverum effort after around 3 decades of consistent recording, but every once in a while a record like Night Palace comes around to rewire your expectations for what any given record of his is going to sound like under any of his monikers. While NP is hardly a dramatic departure from his tried and true touchstones, its bold and versatile presentation exemplifies all the qualities that have made his artistry so singular without coming off like a tired retread. It's without question the most compelling record that Elverum has released under the ME moniker to date.
The last Elverum release was the aptly titled 5th proper Microphones LP in 2020, Microphones in 2020, on which Elverum looked back on his past quarter century of making art while questioning what it all means and taking himself and other artists he admires to task over the course of a single 45 minute song that mostly stuck to a gentle folk sway with occasional distortion-laden drones punctuating moments of particular emotional urgency. While existential quandaries still loom large on NP, Elverum opts for the other end of the songwriting spectrum here. NP consists of a 26 song/80 minute suite of music that offers a rich sampling of everything that Elverum excels at sonically while still adhering to a cohesive arc that renders it just as naturally suited to cherry picking highlights as it does as a fully immersive, start to finish listening experience. NP has been billed as a long-coming follow-up of sorts to Elverum's highly-influential opus, The Glow. Pt. 2, and it's easy to cynically read into that framing as an easy, shallow angle, but the ambitious sprawl with which the music unfolds lends quite a bit of legitimacy to that claim. Although some of the hairpin turns are abrupt, and not everything is equally as distinctive, nothing ever feels forced or gimmicky, and the entire collection of music unfolds with a generosity that deepens upon subsequent listens.
Elverum's writing throughout NP is as rich and sprawling as the vast soundscapes that frame them. While the last several Elverum releases unfolded with a gutting intimacy, NP retains that while also zooming out towards macro concerns that span privatization (“Co-Owner of Trees”) forced displacement (“Non-Metaphorical Decolonization”) and the futile human desire to control nature (“November Rain”) among much else. On "I Heard Whales (I Think)" Elverum muses about the beautiful music found in nature throughout the first verse before the music swerves into what sounds like field recordings from a stream for almost 2 minutes before returning to the same subject for a 2nd verse to close things out. Does there need to be so much time dedicated to nothing but the sound of flowing water on an album that clocks in at 80 minutes? Probably not, but that's beside the point. It's these sort of touches that help reinforce the significance of the environment where Elverum writes and records his music. On "I Spoke With a Fish" he does just, lamenting the futility of trying to do justice to the beauty of the world around him through his art to a fish over stereotypically sparse folk stylings that unexpectedly tease a lo-fi trap beat with Elverum briefly singing in auto-tune before quickly returning to the original progression. The song ends with Elverum and the fish trading compliments to each other over light guitar strums and tape hiss. It reads like a terminally online update of a classic Lewis Carroll story made fresh with Elverum's personality, and it's indicative of his ability to distill emotionally urgent ideas into a myriad of engaging contexts.
Like with the best of Elverum's music, the greatest appeal of NP lies in how sonically distinctive and dynamically varied the music is. The aforementioned trap detour on "I Spoke With a Fish" is as unprecedented for Elverum as anything on NP gets, but everything from snappy, lo-fi indie rock immediacy ("I Saw Another Bird") black metal heaves ("Swallowed Alive"), and somber folk dirges ("Blurred World"), are as well-realized as anything that Elverum has ever written. Elverum remains a master at distilling his disparate influences into ambitious productions with a homespun affability. There are 2 separate Stereolab-esque kosmiche numbers in the form of "Non-Metaphorical Decolonization" and "Co-Owner of Trees", but despite the driving organ and pummeling percussion that propels them both forward, they're very different beasts, with the former skewing more atmospheric as it breaks apart into an ambient drift midway through while the latter rocks harder than anything Elverum has done in years and coasts on a scorching trail of feedback to close. Despite Elverum's deep familiarity with these forms, the execution sounds fresh, invigorated, and imbued with the sort of hunger typically reserved for artists with something to prove. There’s an abundance of sonic riches on NP, and it’s a testament to Elverum’s knack for curation that it all hangs together so well. Elverum's inquisitive nature and seemingly bottomless well of inspiration remain the gifts that keep on giving.
Essentials: "I Walk", "Co-Owner of Trees", "I Saw Another Bird"
5 notes
·
View notes
Text
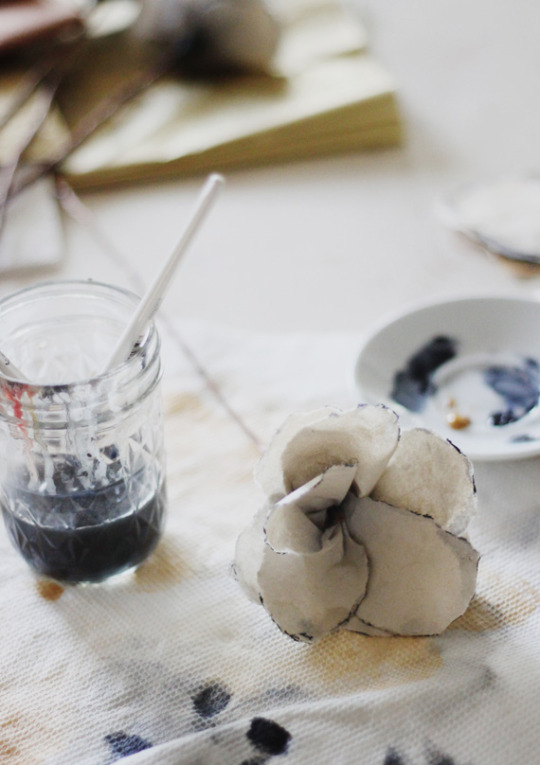
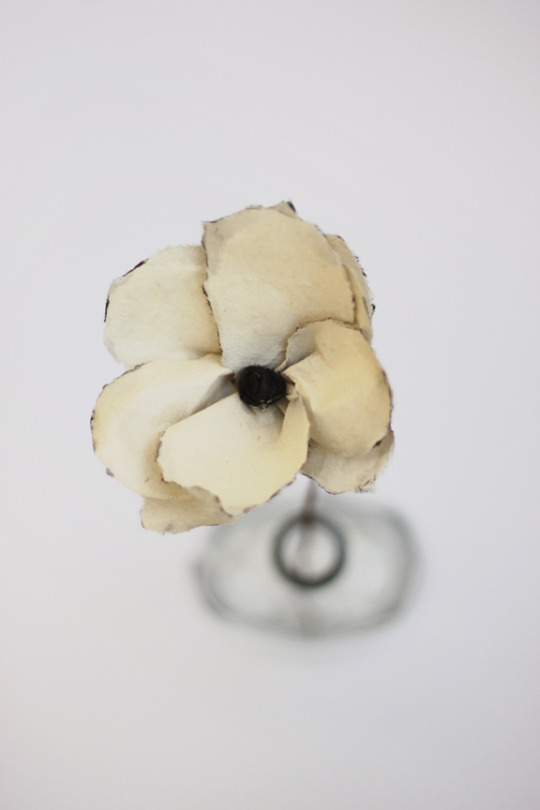
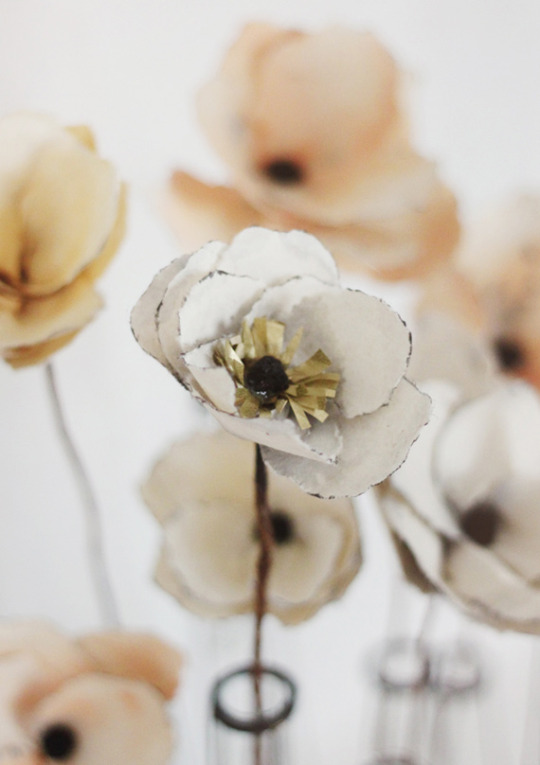
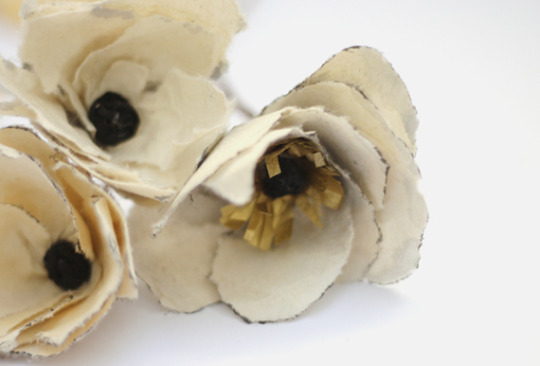
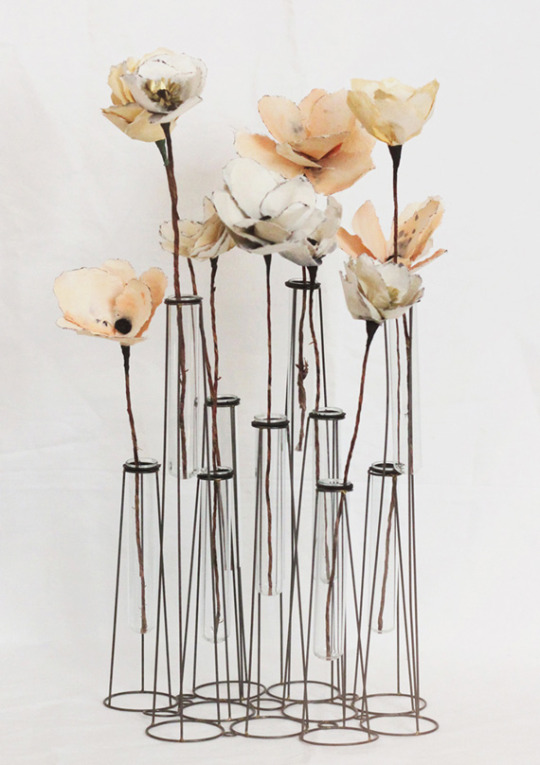
DIY Watercolor Paper Flowers
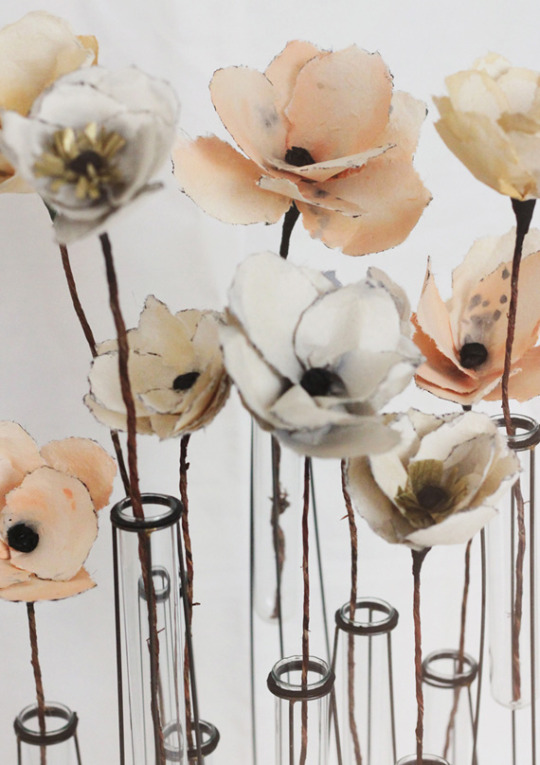
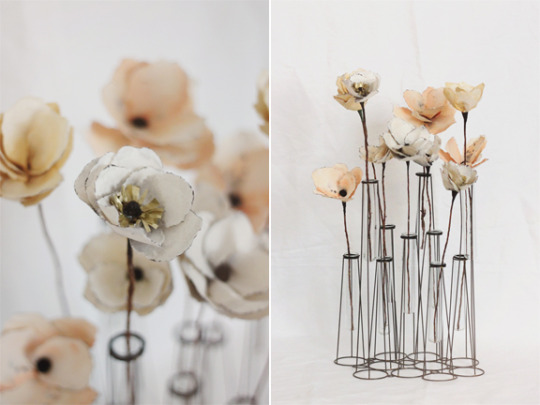
Project by Nicole and Kelli:
I’m so excited to share this DIY with you today! But first, I want to introduce to you my friend Nicole from Bloem Hill, part owner of an amazing floral and design company based in Southern California. Nicole and I have partnered up to bring you a fresh new DIY project once a month, and I can’t be more excited about it. If you are anything like me, you need someone to challenge you in your craft endeavor’s, and Nicole’s my girl! Be sure to stop by her blog to say hello. She is incredibly talented.
Naturally, we are kicking off our DIY series with florals! But even better, florals that will never die! (my kind of flowers!) We decided to put our own spin on a paper flower with an organic, natural and painterly feel. It took a bit of trial and error, but we love what we came up with!
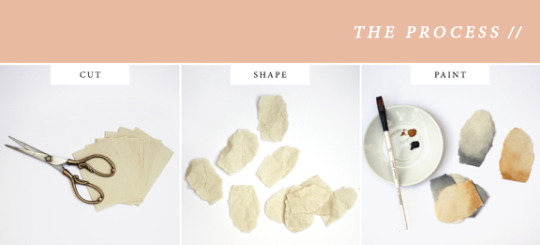
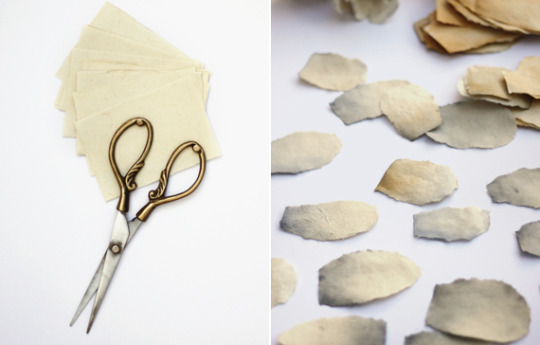
First, you will need a pair of scissors and some paper. We used this natural fine paper from Paper Source. Cut about 10-12 rectangular pieces roughly 4″ X 2.5″ in size (larger for a larger flower, smaller for a smaller flower). You could then use your scissors to cut them all into the shape of petals, but we preferred tearing the paper by hand so that the edges were left rough and slightly frayed. They all don’t have to be perfect. In fact, having them irregular looks even better in the end.
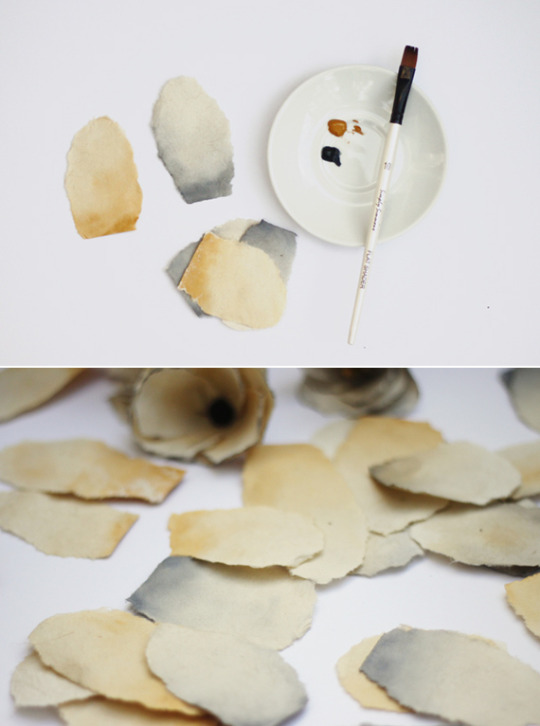
After you are done shaping your petals, you’ll want to paint them. We used Winsor & Newton watercolors in mustard, peach and grey. But use whatever color palette is inspiring to you! This is the part that allows you to get creative. Mix your paint with water and start painting your petals. I would suggest making the bottom portion of the petal darker, and then fading up to a lighter shade at the ends. Let the petals dry.
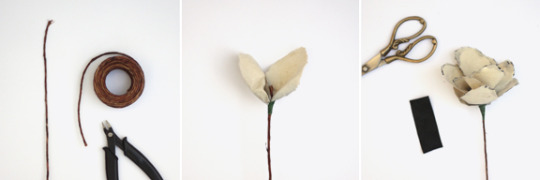
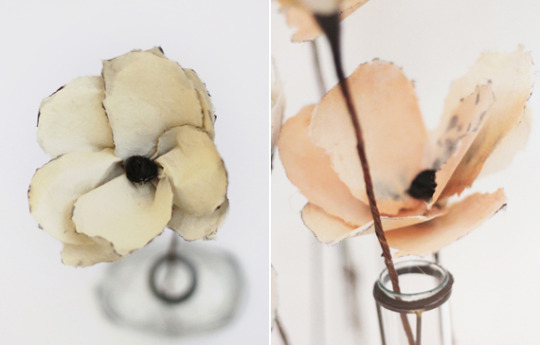
Next you will need some rustic floral wire and some pliers. The wire will serve as your stem, so cut it to the length you desire. To create your flower, take the petals (they should be fully dry at this point) and begin wrapping them around the top of your stem using floral tape (not pictured) to secure them. We did 2 petals at a time. After you have attached all of your petals and your flower is full, it will need a “center” to cover up the exposed wire in the middle. We just twisted solid black paper into a small ball and used a glue gun to attached it to the center. We also added touches of black paint along the edges of our petals to give them a little definition.
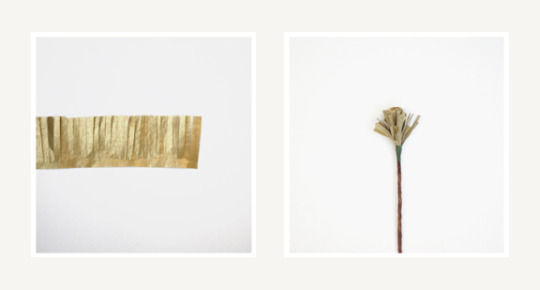
A fun trick for adding a little extra sparkle to the center of your flower :
Cut a strip of metallic tissue paper and using shredding scissors, cut along the edge leaving at least a centimeter uncut. Roll it, metallic side facing in, around the top of your wire before you start attaching your petals. This will leave you with a pretty little pom in the center when you are finished!

20 notes
·
View notes
Text
Oh shit! I just noticed Godspeed You! Black Emperor put the lost tape "all lights fucked on the hairy amp drooling" on Bandcamp (2 years ago). This was Efrim's solo project before GY!BE formed. It was lost for decades until piracy saved it in 2022.
"this was a retirement letter,
recorded spring/summer/fall summer of 1993.
all of it by efrim, and a little bass from mauro.
vocals on $13.13 by d.c., acoustic gtr. snippet and backwards hash by dan-o.
no relation to the band that followed.
be gentle.
xoxoxox efrim
This was a 2-tape set, handmade and sold at a few very underground shows in 1993. Only 33 were made. By the time it was a legend among GY!BE fans but no one could find one however hard they looked. It was assumed lost to time.
And now it's back on Godspeed's music store page (but not streaming which is why I didn't notice it) where the band can get paid for it again. Scary to put such early experimental DIY work out there, but it's so important to seeing who Efrim Menuck would become as a musician.
3 notes
·
View notes
Text
De Algemene Verwarring #108 - 4 March 2024
Episode one hundred and eight of De Algemene Verwarring was broadcast on Monday, March 4, 2024, and you can listen to it by clicking on the link below that will take you directly to the Mixcloud page:
Pictured below is Bärchen Und Die Milchbubis! They are a band from Hannover, Germany, they released one album and two singles between 1980 and 1982, and now, in 2024, they are touring again! But that's not why I played them in the show, I played them because they are one of the bands that are featured in the fantastic Inner World 033 podcast, by the World Of Echo label, and compiled by the Famous Mammals. It's a three hour long feast of great great music, and I wanted to direct my listeners to this podcast, go listen and enjoy. Also, this episode of De Algemene Verwarring is a digital one, so as always I'm playing some tracks that I don't own on a physical lp or cd. Some of them are just ripped off the youtubes because unavailable on other places, and some others are from the Bandcamp vaults. Links below in the playlist when available. I particularly enjoyed making this episode, I think there are some real bangers in there. Oh and by the way sorry for the delay with the update here. And beneath the photo you can find the playlist for this show. Enjoy!
Playlist:
The Gories: Nitroglycerine (7” “Nitroglycerine/Makin’ Love” on New Rose Records, 1990)
Snooper: Company Car (digital release on Bandcamp, 2023)
Personal & The Pizzas: (Don’t Trust No) Party Boy (7” “I Want You” on Trouble In Mind Records, 2010)
Cuir: Gast (cassette “Promo Tape” on Offside Records & Forty Tapes, 2024)
Big Black: Rema-Rema (one-sided 7” “Rema-Rema” on Forced Exposure, 1985)
Geo: Elasticate (cassette “Geo”, self-released by the band, 2021)
Onyon: Alien Alien (LP “Last Days On earth” on Trouble In Mind Records, 2023)
I.L.L.O.: Roses (cassette “10 Ill Songs” on Spared Flesh & U-Bac, 2024)
Dilemmas: Bomb The Clock (cd-r “Zero Work” on You Need To Practice More, 2017)
Bärchen Und Die Milchbubis: Muskeln (7” Muskeln” on Schalter Records, 1982, also on LP “Dann Macht Es Bum” on No Fun Records, 1981 and the compilation “Endlich Komplett Betrunken” on Tapete Records, 2021)
Would Be Goods: Cecil Beatons Scrapbook (7” “The Camera Loves Me” on Cherry Red Records, 1988) - UK indie pop rond zangeres Jessica Griffin, nu solo project
Pletyka: Aug. 31 (cassette & digital release on Szégyen Kazetták, 2023)
Desinteresse: Ver Weg Van Hier (Cassette “Voor Altijd” on Decadence, 2023)
Chalk: The Gate (12” “Conditions II” on Nice Swan Records, 2024)
番長 Taste: Fireflies In The Shrine (CD “Summer Nights” on Carbon Records, 2023)
LSD Fundraiser: Industrial Jazz Hands (Cassette “Fashionably Late For The Apocalypse” on Knotwilg Records, 2022)
Modelbau/Steffan De Turck: Kitchen Sink Realism (Bukhansan) (cd-r “Zweites Treffen (undefiniert)” on Kirigirisu Recordings, 2023)
#radioshow#de algemene verwarring#post punk#punk#experimental music#new wave#indie#drones#noise#folk#Bandcamp
2 notes
·
View notes
Text


NEW FOR BANDCAMP FRIDAY
It’s #bandcampfriday and we've got an amazing bunch of new tapes available to pre-order (along with loads of other good stuff).
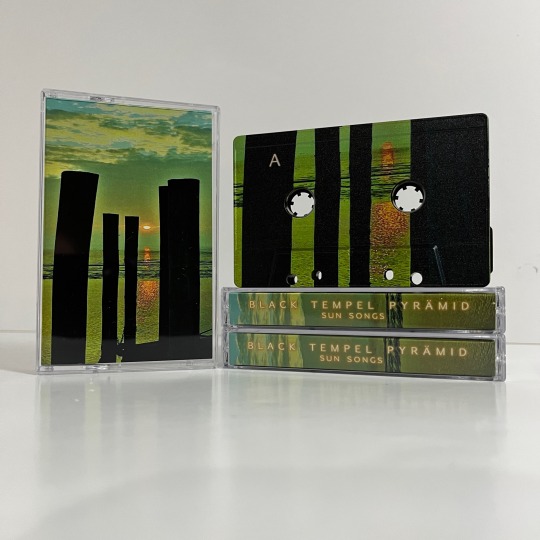
1) BLACK TEMPEL PYRÄMID "Meditations On Consequences" (only 3 copies left)
2) BLACK TEMPEL PYRÄMID “Sun Songs" (only 1 copy left)
Two albums recorded between June & November 2022, this is the experimental American primitive Krautrock project of Patrick R. Pärk. A collection of sonic heady works that will pull you in for a bizarre & dark American primitive nightmare journey.
3) MIKE NEAVES "You're Welcome"
A masterpiece of 160bpm spidery fractured techno. The sound of the jittery Monday AM interior of your skull, & the mutant sounds of the weekender you wish you were at instead.
4) SALISMAN & HIS UNWAVERING CIRCLE "Parched"
The soundtrack for troubled times: Rivers of synthesizers. Pedal steel drenched in warbling tape echo. Tense electronic rhythms and rustic percussion.
5) POUND LAND "Violence"
8 filthy tracks of vitriolic desperation set against a backdrop of nineties alt-metal industrial abstracted by psych doom and post-punk.
'Violence is an album that captures that sense of perpetual anger, frustration & ever-creeping hopelessness. Of course, it does all that while making a gloriously malevolent racket.' (4/5) - Andy Brown, Louder Than War
6) DRAGGED UP "Hex Domestic EP"
New EP from the off-kilter psych-garage Glasgow proto-punk band, featuring members from Trembling Bells, Vom, The Owsley Sunshine & Las Mitras.
'like classic CBGBs proto-punk transplanted to rain-drenched Scottish streets' - Nathan Whittle, Louder Than War
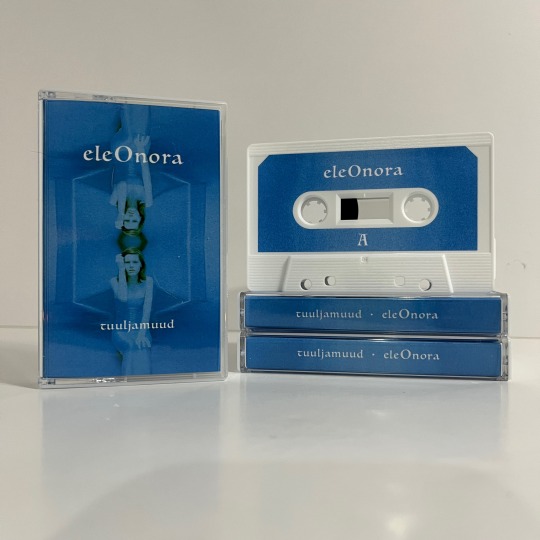
7) eleOnora "tuuljamuud"
Haunting meditative vocal improvisations made over a 13 year period. Primitive early raw folk. eleOnora is an Estonian-Latvian singer & avant-garde vocalist, who also works with Road To Saturn, Tencu/eleOnora & Ringhold
Tapes made by the Audio Tape People
Thank you to James Watts for the layout design on 1) 2) and 5)
Dig in deep.
#bandcampfriday#cassette#music#cruelnaturerecords#tape#limited edition#new music#bandcamp#preorder#download
3 notes
·
View notes
Text
Surprising Uses for Heavy Duty Black Refuse Sacks
Instant Garden Tarp for Weeding & Mulch
Spread a 70 litre Binbags heavy duty sack flat, slice the sides, and you have a durable groundsheet that keeps soil off patios while you weed or spread mulch. When you’re done, simply scoop it all up and bin it—no muddy mess.
2. Emergency Rain Poncho on Camping Trips
Forgot your jacket? Cut a head hole and two arm slits. The puncture resistant, leak proof film of our black refuse sacks shrugs off downpours better than flimsy shop ponchos and packs back down to pocket size.
3. DIY Car Seat Protector for Wet Pets & Sports Gear
Slit the sack, drape it over your car seat, and tuck in the edges. Muddy paws or post match kits won’t soak through, thanks to Binbags thick, tear resistant construction.
4. Quick Fix Storage for Seasonal Clothes and Bedding
Heavy duty sacks act as airtight storage when you twist, fold, and tape the opening. Their dark colour blocks light, slowing fabric fading during attic or garage storage.
5. Moisture Barrier for Home DIY Projects
Painting a ceiling? Tape opened up black sacks over furniture and floors. They’re tougher than drop cloths, so dripping paint or falling hardware won’t punch holes.
6. Makeshift Rucksack Liner on Hiking Adventures
Line your backpack with a Binbags sack before packing. If the heavens open, everything inside—sleeping bag, electronics—stays bone dry.
7. Weed Suppressing Sheet in Vegetable Beds
Lay flat sacks between rows, cover with bark or gravel, and pierce holes for plants. The opaque black film blocks sunlight, starving weeds without chemicals.
8. Solar Water Heater for Outdoor Showers
Fill a heavy duty sack with water, seal tight, and leave it in direct sun. Black plastic absorbs heat efficiently; by late afternoon, you have warm rinse off water for camping or beach trips.
9. Emergency Window Patch After Storm Damage
Cut the sack to size, stretch it across broken panes, and secure with duct tape. Its puncture resistance keeps wind and rain out until professional repairs arrive.
Conclusion
A heavy duty black refuse sack from Binbags is more than a waste solution—it’s a multipurpose hero for garden, garage, travel, and DIY tasks. Stock a roll of 70 litre bags, and you’ll always have an instant tarp, poncho, or protective liner on hand—proof that the strongest bin bag can punch well above its weight.
1 note
·
View note
Text
Goth Boys! This is the perfect Wrapping Paper for YOU...and it's CUSTOMIZABLE

Insanely Black (The Darkest Black) CUSTOMIZABLE Wrapping Paper

It's on Zazzle
----------------------------------------------------------------------------
20 Uses of The Insanely Black CUSTOM Wrapping Paper...other than Wrapping Gifts
Crafts & DIY Projects
Scrapbooking – Use the wrapping paper as backgrounds or embellishments.
Origami & Paper Crafts – Fold into decorative shapes or paper flowers.
Greeting Cards – Cut and paste pieces onto blank cards for unique designs.
Bookmarks – Laminate small strips for stylish bookmarks.
Decorative Envelopes – Make colorful envelopes for letters or invitations.
Home Decor
Drawer Liners – Line drawers or shelves for a pop of black.
Wall Art – Frame pretty wrapping paper as affordable wall decor.
Book Covers – Protect and customize books or notebooks.
Furniture Makeover – Use Mod Podge to apply to old furniture surfaces.
Lamp Shades – Cover lampshades for a new look.
Party & Event Uses
Table Runners or Placemats – Cut and use as disposable decorations.
Backdrop for Photos – Use large sheets as a photo booth backdrop.
Piñata Decoration – Cover a homemade piñata with Insanely Black.
Confetti – Shred into small pieces for Insanely Black confetti
Party Hats & Crowns – Make fun party accessories.
Practical Uses
Packing Material – Crumple it for cushioning fragile items in boxes.
Protect Surfaces for Painting – Use as a disposable drop cloth.
DIY Gift Bags – Fold and tape into small custom bags.
Seed Starters – Wrap seeds in damp paper and sprout them.
Fire Starter – Use as kindling for fireplaces or bonfires.
#GothicStyle#GothAesthetic#DarkAesthetic#GothVibes#AlternativeFashion#GothicGifts#GothicWrappingPaper#DarkGifts#AlternativeGiftWrap#GothGiftWrap#SpookyGifts#DarkAndElegant#AltBoys#GothBoys#GothMen#GothGuys#Gothic#GothFashion
0 notes
Text
How to Install a Bubble Pendant Light in 5 Easy Steps
Bubble pendant lights add elegance and modern style to any space. Whether you're upgrading your home decor or installing new lighting for the first time, this step-by-step guide will help you complete the process safely and efficiently.
Tools and Materials Needed
Before you begin, gather the following tools and materials:
Bubble pendant light fixture
Screwdriver (flathead and Phillips)
Electrical tape
Wire strippers
Voltage tester
Ladder
Wire connectors
Ceiling electrical box
Mounting bracket (if required)
Drill (if needed)
Ensuring you have all necessary tools beforehand will streamline the installation process.
Step 1: Turn Off the Power
Safety is a priority when working with electrical wiring. Follow these steps to turn off the power properly:
Locate your home’s electrical panel.
Switch off the circuit breaker that controls the existing light fixture.
Use a voltage tester to confirm that the power is off.
Never skip this step, as working with live wires can be dangerous.
Step 2: Remove the Existing Fixture
If replacing an old light fixture, carefully remove it:
Use a screwdriver to detach the fixture from the ceiling.
Disconnect the wiring by unscrewing wire connectors and separating the wires.
Inspect the ceiling electrical box to ensure it’s secure and in good condition.
If the box is loose or damaged, reinforce or replace it before proceeding.
Step 3: Install the Mounting Bracket
Most bubble pendant lights come with a mounting bracket for proper support. Install it by following these steps:
Align the bracket with the ceiling electrical box.
Secure it using the provided screws.
Ensure the bracket is level and tightly fastened to prevent instability.
The mounting bracket provides a secure base for your pendant light.
Step 4: Connect the Wiring
Properly connecting the electrical wiring ensures the functionality and safety of your bubble pendant light:
Identify the wires:
Black (live/hot)
White (neutral)
Green or bare copper (ground)
Match the wires from the fixture to the corresponding ceiling wires:
Black to black
White to white
Green or bare wire to ground
Secure the connections with wire connectors and wrap them with electrical tape for added security.
Carefully tuck the wires into the electrical box.
Step 5: Attach and Secure the Light Fixture
Now, it's time to install the bubble pendant light itself:
Lift the pendant light and align it with the mounting bracket.
Secure it in place using the screws provided with the fixture.
Adjust the height of the pendant by lengthening or shortening the cord if necessary.
Double-check that all components are tight and level.
Final Checks and Testing
Before finishing, perform these final steps:
Restore power by switching the circuit breaker back on.
Turn on the light switch to test functionality.
Inspect for flickering or loose connections and make adjustments if needed.
Ensure the pendant is level and aesthetically aligned with your space.
Tips for a Professional Finish
Choose the Right Bulb: Use an LED bulb with the appropriate wattage for energy efficiency.
Use a Dimmer Switch: If compatible, install a dimmer switch for customizable lighting.
Clean the Fixture: Wipe the pendant with a microfiber cloth to remove fingerprints or dust after installation.
Check the Ceiling Box Rating: Ensure it can support the weight of your new fixture.
Conclusion
Installing a bubble pendant light is a straightforward DIY project that enhances the ambiance of any room. By following these five easy steps, you can safely and efficiently install your fixture like a professional. Whether illuminating a kitchen, dining room, or living space, your new bubble pendant light will add elegance and functionality to your home.
1 note
·
View note
Photo

I’ve lived in my apartment for over 13 years so my living room configuration has changed a lot during that time. Former roommates (and their couches) have come and gone, a TV and console has been replaced by a projector, and a rug and a set of armchairs were added at some point. During the pandemic, I set up a hybrid music-and-exercise corner where a digital piano and vinyl records live next to dumbbells and yoga gear.I say all this to illustrate how much the usable floor space in my living room has shifted—sometimes, quite drastically. I’ve found that it’s always easier and more sensible to determine the couch and entertainment setup first, then find a suitable table to fill in the space in between. Eleven years ago, when I was acquiring my first coffee table, I knew I had to get something that would offer some flexibility—in terms of size, versatility, and affordability—for my never-ending and ever-evolving living situation.I settled on a choose-my-own-adventure route: I bought a set of hairpin table legs from Etsy for $68 with the intention of DIYing a wooden table top. That way, if I needed to reimagine my living room, I could simply swap out the table top to match whatever the next vibe happened to be. Plus, I felt as though these rustic table legs were minimalist enough that they wouldn’t feel so outdated to me over time.This project turned out to be one of my greatest under-$100 acts (and hacks). The process of DIYing a coffee table with hairpin table legs is so straightforward and simple—all it requires is a trip to your local Home Depot or any home-improvement store, a drill, a tape measure, and some materials and an outdoor space if you want to sand, stain/paint, or finish the piece of wood yourself. Here’s how you, too, can create your own table.Determine your dimensions Hairpin legs come in all lengths so you first need to figure out how high you want your table to be. The general rule of thumb is to have the coffee table two inches lower than, or up to the same height, as the seat of the couch. If a coffee table is taller than the couch seat, the proportion will feel off. Most standard coffee tables are 14 to 18 inches high, so the hairpin table legs should be shorter than that. If you plan on getting a super thick slab of wood for the table top, consider getting even shorter legs.A tape measure is key. Sit on your couch as you normally do, and determine how high a comfortable coffee table height would be for you. Imagine yourself setting a cup of tea down or kicking your feet up while watching a movie. Think about what table height would feel most natural to you. Then, knock off two or three inches from that height and try to find a set of table legs in that length.Secure the table legs Spend time getting lost in the hairpin leg search—click around, look at pics, and see what styles and colors speak to you. The price points can be all over the place depending on the finish and retailer but as long as the legs are metal, they ought to be sturdy enough for a table project—and a lot of listings will also let you know how much weight the legs can handle.16" Hairpin Furniture LegsSMARTSTANDARD hairpin legs are made of 3/8" cold rolled sturdy steel with a satin black powder coated finish, ensuring long-lasting durability and stability.Twisted Hairpin Legs A slight variation of the classic style hairpin leg. Set of 4 twisted hairpin legs, select height from options. Perfect for your DIY project. These legs are constructed using 3/8" solid steel round bar, bent by hand, and will ship with a raw finish.Crosby Hairpin Legs Solid Steel Legs with clear coat. Screws and feet included. Choose between 6" and 20" hairpin legs. This listing is for LEGS ONLY. Furniture they are attached to is not included. Comes in sets of 4. For a super low coffee table (or perhaps a DIY console, as pictured), opt for a set of six-inch legs. StudioVerne Hairpin Legs StudioVerne Hairpin LegsHeight: 71 centimeters Materials: steel, metal, passion, knowledge, fun, powder coat,
0 notes