#biky and orion cosplay
Explore tagged Tumblr posts
Text
Tutoriel Bendy Props (Part 1)
Hi ! Today there’s a lot to do, because we’re making props ! To appease the gods...
In this first part, I’ll show you how to make the following objects :
Bacon Soup
Vinyl
Film roll of “the End “
Gear
Wrench
Don’t worry, this the same technique for every props, I’ll just guide you through the measuring and painting you’ll have to do for these particular props !

The materials :
EVA Foam, Ultra High Density - 7 mm
Foam Clay
Contact Cement
Hot Glue
Ochre acrylic paint
Black acrylic paint
Cutter
Rotary Tool
Can
The stages of creation :
1. Make a pattern. So this time we don’t have “reel” measures in this game. To solve this problem I used the “Bendy Crack-up Comics Collection” for reference, because “The Illusion of Living” book ( that we’ll make too in one of the following tutorials ! ) is the same size as this cartoon book. For a perfect circle, I often use a bowl or a lid.
Oh, and about the vinyl… It’s a pretty small one you can find in-game, and given the comparaison with the book, it’s a small one so it’s a 45 rpm ( which makes sense since it’s a single ), and for that part it’s important to conserve the standard 17cm diameter. The gear is a 10 toothed one, and i know it’s annoying since it’s hardly symmetrical but hey, cosplay is an exact science !

2. Cut the foam around your pattern : Don’t forget that the props is in 3D so you have to cut 3 layers of foam. For the End Reel, you have to create a box-type pattern because it’s thick. For the bacon soup I just took a can of mushrooms and painted over it for the texture and the metallic feel, but you can cut it in foam too following the same technique as the reel.
3. After everything is cut nicely, you have to glue it with hot glue or contact cement. For perfect seams, I recommend you sand it gently before filling the holes with Foam Clay. For a cleaner texture, you can warm your foam in order to seal it. Sadly, I can’t do that because my heat gun is too… hot and melts away the foam, but a hairdryer could work.

4. Now, it’s time to paint ! So this part, is the longest of this creation. I don’t have real tips for you for this part, apart from looking closely at your reference pictures ( preferably from the game if you’re looking for replicas ).
You start with a coat or two of yellow ochre paint ( yes, like Bob Ross always says ), or the colour you feel is fitting, before adding in the black details ! About the tools you can use, Posca paint pens are the best, but they’re expensive. If you’re patient enough, you can use a thin paintbrush and go back and forth between coats of black and yellow if you do mistakes ( BUT ALWAYS LET THE PAINT DRY BEFORE ANOTHER COAT, ELSE THEY’LL MERGE AND YOU’LL BE LEFT WITH SAD, DARK BROWN ). It important to have a good painting ocre whit lot of pigments.
Don’t forget, you must have fun so you can add your own references even if they are not canon.

And that’s the look you can achieve in this part ! Congratulations ! Don’t forget to ask me if you need help for your own props, since I keep all my patterns and techniques.
I hope you enjoyed this post format, and I’ll tell you soon about Eclipse Studios !
#biky and orion cosplay#eclipse studios#cosplay#bendy and the ink machine#batim#batim cosplay#bendy#bendy props#cosplay tutorial#props#foarm cosplay#henry stein#sammy lawrence#henry stein cosplay#sammy cosplay
95 notes
·
View notes
Text
Tutoriel Bendy Props (Part 2 )
Hello and welcome ( back ) onto this ongoing series of BATIM props tutorial. Today, we’ll make the radio ! And a working one.
This time, Orion was a big helper. He deisgned the patterns, took all the measurements and worked out a way for that radio to swing !
This tutorial will only cover the radio because the process is kinda different from the other props ( that you can find here ), we took extra time and care because we DO wanna listen to Sammy Jam on loop. Best OST, can’t change my mind.
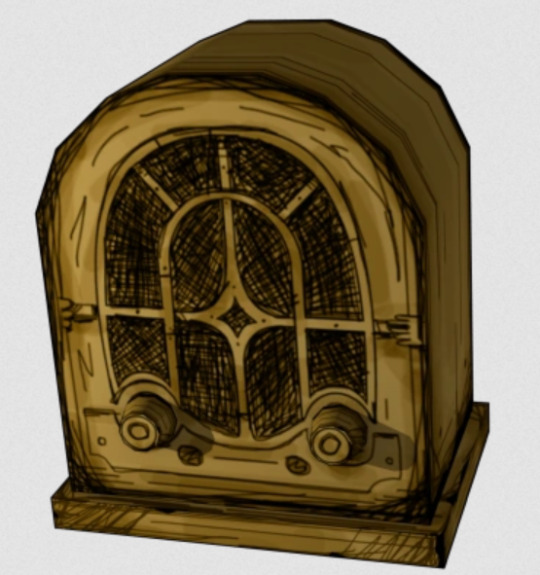
So, you’ll need :
EVA Foam, 5, 7 and 10mm ( or you can use cardboard. Like really, don’t feel pressured into buying those pricey materials if it’s JUST for the radio. Go ham on empty amazon packages and have fun. )
Foam Clay & Kwik Seal, those two are to buy only if you’re using EVA foam. They’re meant to seal the irregularities in foam.
Contact Cement & Hot Glue. Same here, Contact Cement is hardcore glue and isn’t that useful for cardboard, so use Hot Glue instead ! If you use extra-strong glue ( the ones in tiny packages ), be really careful not to put any on your skin ( it burns like hell ).
Yellow Ochre & Black acrylic paint
Cutter & Rotary Tool
little pieces of wood ( like lollipop sticks. )
Snap buttons
Strap ( anything from a rigid piece of cloth to leather is good for what we’re doing here. )
Hinge ( take it from a small box you don’t use anymore. oh, and maybe a screwdriver. )
a mini speaker ! the only thing you’re supposed to buy for the craft. Purchase the cheapest speaker you can find, since low quality speakers perfectly replicate the “no bass” feel of old radios. :)
If you’re looking for the cosplay materials we talked about, visit CosplayShop ( especially if you’re from Europe since they’re Belgian ), but don’t forget, you can use cardboard !
Step 1 : The pattern


The first thing to do is figuring out the pattern. If you already have your Bluetooth speaker, take it in account for the overall size of the radio.
You don’t need to understand all that complicated stuff, Orion figured it out for you.
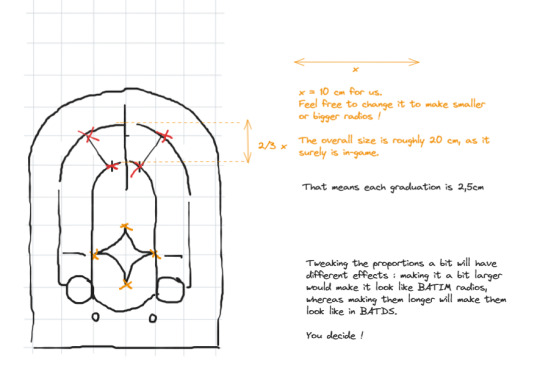
Sorry for the shaky hand, I did it with my PC’s trackpad.
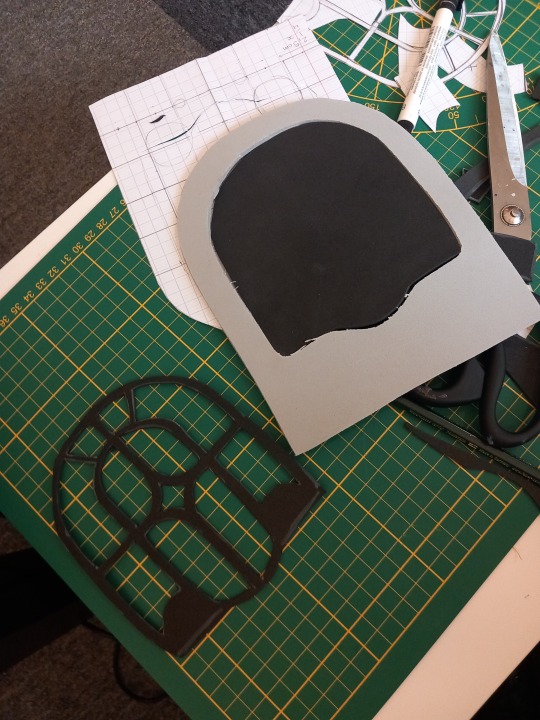
Step 2 : Cut the foam around your pattern.
The face and back sides will be cut in 0,7mm EVA Foam ( High Density ) ; then you cut the grill cloth in thinner foam, or using a real cloth. It’s important that part stays thin, for the sound to come out of it.
Above, you also have the pattern for the relief, that I also cut in 0,5mm Foam. Use a cutter for this !
The buttons are just two cylinders. Since they don’t need to be working, they’re pretty simple to make. Just make sure you don’t use a material that’s too thick, else it’ll be hard to bend.
The depth of the radio is just a 10cm wide piece of material, cut to the right size, that’ll vary with the perimeter of your own radio : don’t bother with the calculus, just test and cut a bit more each time until you got the right size.
After everything is cut nicely, you have to glue it with hot glue or contact cement. For perfect seams, I recommend you sand it gently before filling the holes with Foam Clay or Kwik Seal.
Now that your radio is in 3D, you have to make the base ! Use rigid, thicker foam / cardboard, or double it and stick it together. There should be around a centimetre between the edge of the base and the edge of the radio.
Now, don’t glue it if you wanna have access to the speaker inside. Screw and / or glue the hinge in order to open it. Place the hinge on the back side of the radio.

Now, the inside of the radio ! You gotta put a strap to stitch the speaker in place : we used a piece of leather but anything will do. To make it sit nicely, you can build a base to put it on. We built ours with both small pieces of wood and foam, because foam is easier to glue on foam than wood.
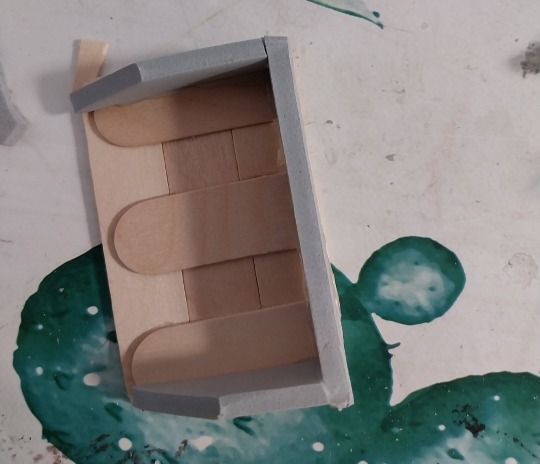

Now, it’s painting time ! This step is explained in the first part of these tutorials, but I’m sure you can figure it out with reference pictures !
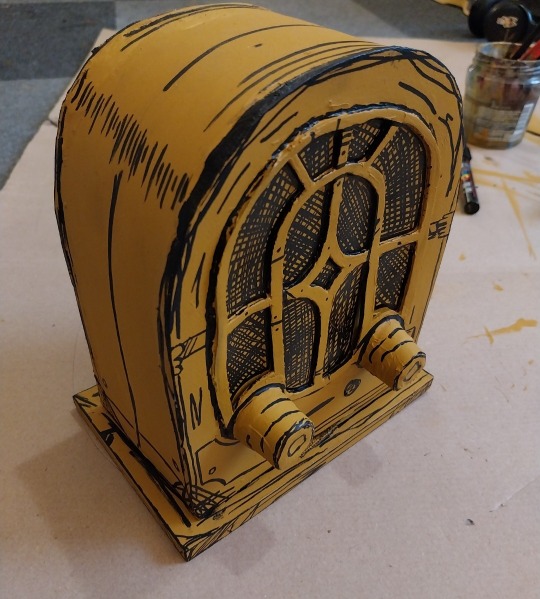
Ta-da !
We personally use this radio as a prop when roleplaying to develop our Alternate Universe, Eclipse Studios ! By the way, we’re working on a new comic I think people will love…
Don’t forget to ask me if you need help for your own props, since I keep all my patterns and techniques.
I hope you enjoyed this post and this technic radio, and I’ll tell you soon about Eclipse Studios !
#biky and orion cosplay#eclipse studios#batim#bendy#bendy and the ink machine#sammy lawrence#batim cosplay#bendy props#cosplay#bendy cosplay#Bendy radio#sammy lawrence cosplay#Henry stein#Henry stein cosplay
27 notes
·
View notes
Text
Tutorial Bendy Cutout
Hello everyone ! Do you want a beautiful cutout watching you in your little 30 m² apartment ? You are in the right place !

The materials :
EVA Foam, Ultra High Density - 7 mm
EVA Foam, Low Density - 5 mm
Fiberglass bar
Contact Cement
Hot Glue
Ochre acrylic paint
Black acrylic paint
Cutter
Rotary Tool
Of course there are cosplayer materials, you can use thin & thick cardboard. Our first cutout was made of cardboard and it looked good.
The stages of creation :
Make a pattern. Most important step ! Especially if you used expensive material, and if you want create many of them. I know a lot of people skip this step. I was the first to leave this part out, lazy cosplayer that I was. I give to you measurements and a little sketch.
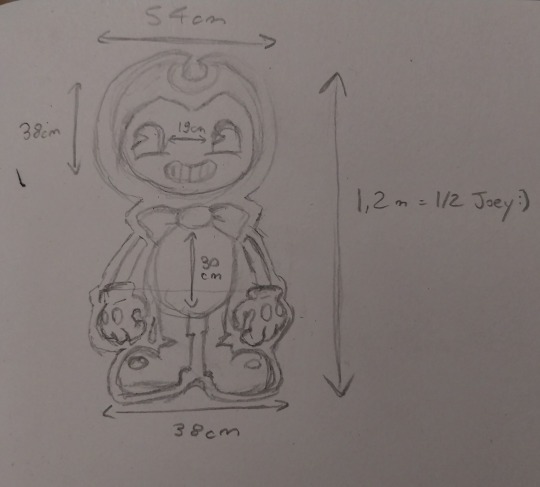
2. Trace your pattern on the foam, you have to got a good cutter for this part because the foam is hard to cut. Be precise in the cut. Don’t forget to cut the spaces between the hands and the legs.
3. You may notice that your sign is all flabby. To solve this problem you have to glue some high density foam ( or cardboard ) on the back. For more of solidity, carve a slot with the rotary tool to put a fiberglass stick inside the EVA foam. Finally you can glue the solid piece onto the back of the cutout.

4. With a Posca or a thick marker, you can trace the drawing of the magnificent little devil darling. Do not hesitate to ask me questions in the /ask if you are missing measurements. After that you can have fun with painting, and adding texture. Mine is not finished, for I have to make details of wood and inkstains.
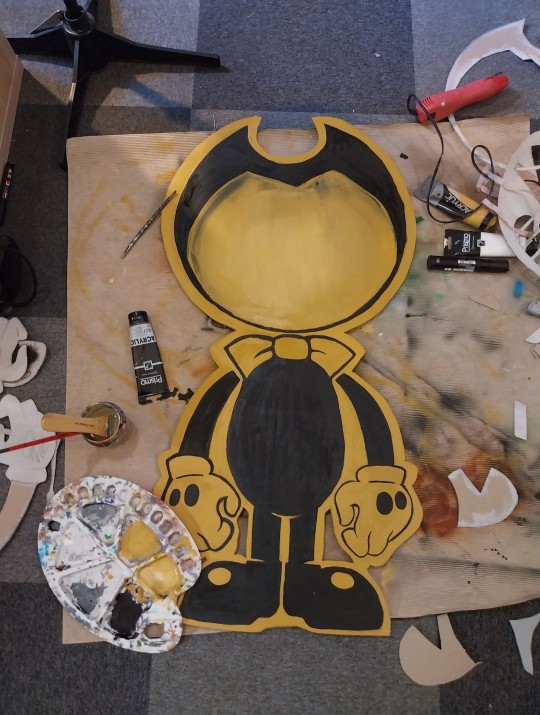
TA-DA ! Your Bendy Cutout is finished ! if you want to put it against a wall, you can. Otherwise I will explain in a future post how to make a handle to carry it with you like Sammy does. I will probably add directions on how to make it stand upright too in the near future.
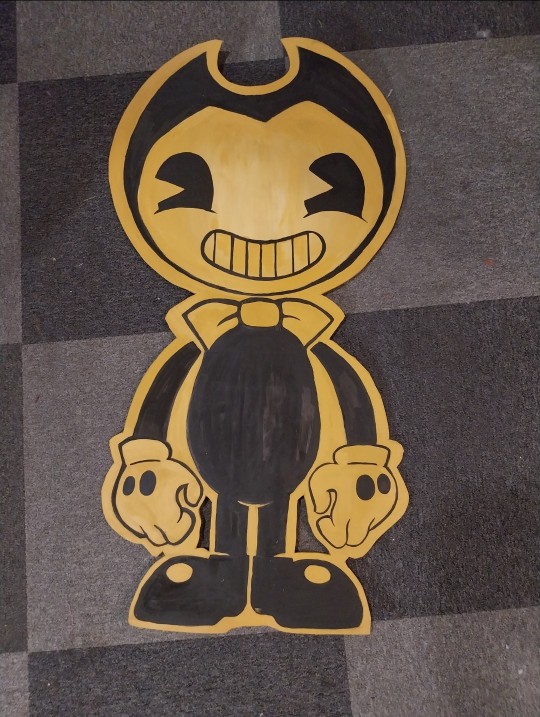
I hope you enjoyed this post format, and I’ll tell you soon about the Eclipse Studios !
#biky and orion cosplay#eclipse studios#bendy and the ink machine#cosplay#batim cosplay#Bendy#Bendy props#props#Batim Prop#batim#cosplay tutorial#Sign bendy#sammy lawrence#Sammy cosplay#Sammy lawrence Cosplay#sammy batim#bendy cosplay#bendy cutout
43 notes
·
View notes
Text
I made this tutorial for your cosplay batim ! A new post is coming soon for the process of my cosplay. Actually, I made propos in the first chapter. :>
Tutorial Bendy Cutout
Hello everyone ! Do you want a beautiful cutout watching you in your little 30 m² apartment ? You are in the right place !

The materials :
EVA Foam, Ultra High Density - 7 mm
EVA Foam, Low Density - 5 mm
Fiberglass bar
Contact Cement
Hot Glue
Ochre acrylic paint
Black acrylic paint
Cutter
Rotary Tool
Of course there are cosplayer materials, you can use thin & thick cardboard. Our first cutout was made of cardboard and it looked good.
The stages of creation :
Make a pattern. Most important step ! Especially if you used expensive material, and if you want create many of them. I know a lot of people skip this step. I was the first to leave this part out, lazy cosplayer that I was. I give to you measurements and a little sketch.

2. Trace your pattern on the foam, you have to got a good cutter for this part because the foam is hard to cut. Be precise in the cut. Don’t forget to cut the spaces between the hands and the legs.
3. You may notice that your sign is all flabby. To solve this problem you have to glue some high density foam ( or cardboard ) on the back. For more of solidity, carve a slot with the rotary tool to put a fiberglass stick inside the EVA foam. Finally you can glue the solid piece onto the back of the cutout.

4. With a Posca or a thick marker, you can trace the drawing of the magnificent little devil darling. Do not hesitate to ask me questions in the /ask if you are missing measurements. After that you can have fun with painting, and adding texture. Mine is not finished, for I have to make details of wood and inkstains.

TA-DA ! Your Bendy Cutout is finished ! if you want to put it against a wall, you can. Otherwise I will explain in a future post how to make a handle to carry it with you like Sammy does. I will probably add directions on how to make it stand upright too in the near future.

I hope you enjoyed this post format, and I’ll tell you soon about the Eclipse Studios !
#biky and orion cosplay#eclipse studios#bendy and the ink machine#cosplay#batim cosplay#Bendy#Bendy props#Batim Prop#props#cosplay tutorial#batim#sammy lawrence#Sammy cosplay#Sammy lawrence Cosplay#sammy batim#bendy cosplay#bendy cutout
43 notes
·
View notes