#best browser for streaming video mac
Explore tagged Tumblr posts
Visit Tumblr Blog
Explore Tumblr blogs with no restrictions, modern design and the best experience.
Last Seen Tumblr Blogs


Fun Fact
Mobile Tumblr US users spend an average of 4.04 minutes per session on the app.
Text
GIF Tutorial
This is going to be a long post, so I'm going to place the majority of it under the cut.
Disclaimer - There are many ways to make gifs, and this is just one way to make them - it's the process that I have figured out works best for me. I am in no way claiming that this is the "definitive" or "best" way to make gifs. There are probably other, better ways to do things, but because people have asked how I do it, I am sharing my process.
Introduction I use a Mac. I am assuming most of this will also be applicable to those of you using Windows as well. This tutorial is divided into three parts. Here is a video of the following process as well: https://www.youtube.com/watch?v=lBRbWC-iMOM
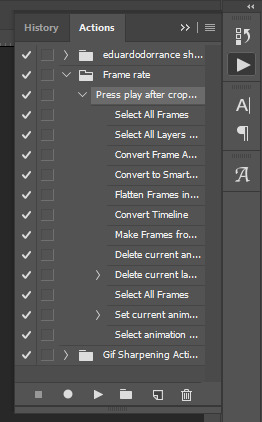
Actions I use three Actions, that you can download here through my Google drive, if you want. A tutorial for how to install Actions in Photoshop can be found here.
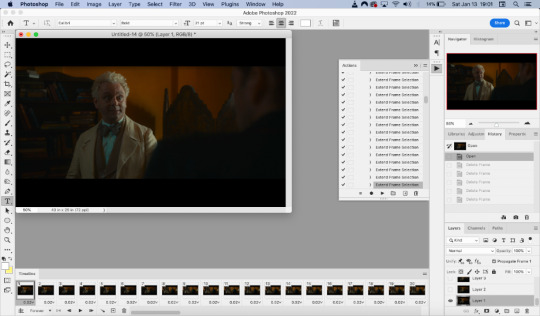
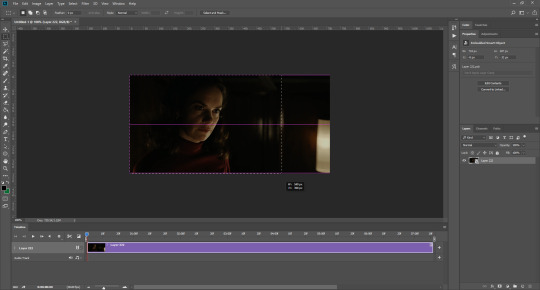
Photoshop Layout I use Photoshop CC, but I used Photoshop CS5 for years, got used to it, so when I upgraded to CC, I arranged it to resemble what I was used to.
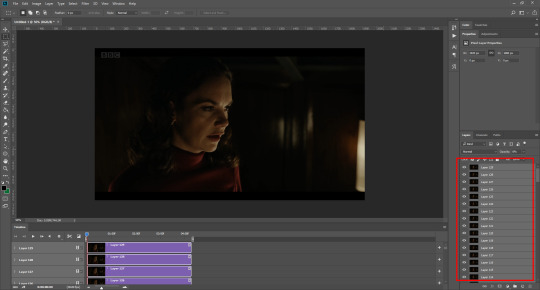
I have the following windows open:
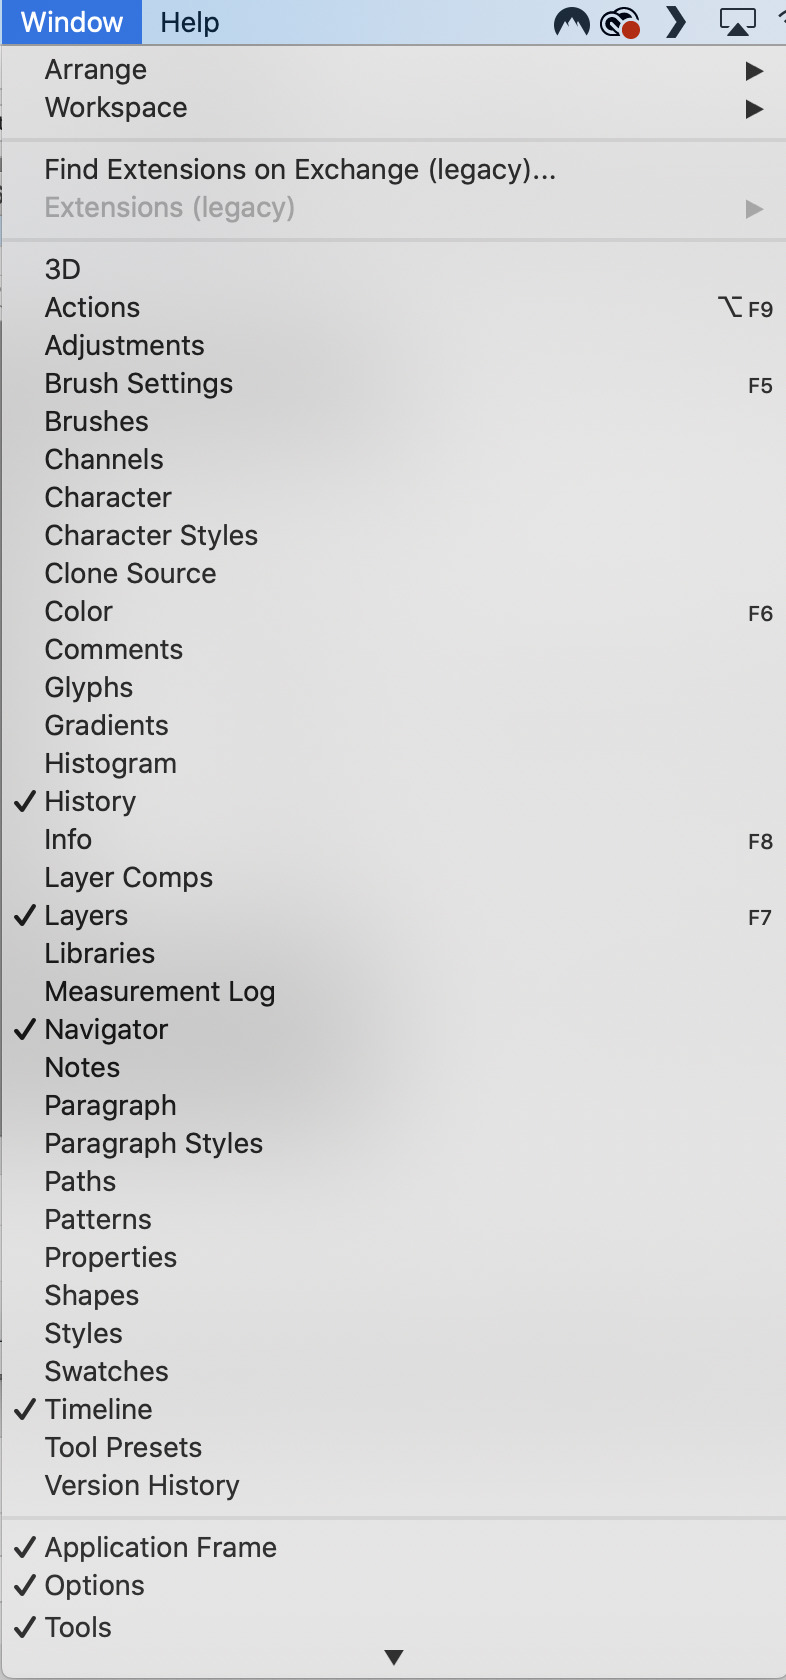
And they are arranged like this:
PART ONE - CLIPPING Part 1 consists of using a screen recorder (i.e., Quicktime) to make short clips of scenes or parts of a scene that you want to make gifs of. I have a Mac, so Quicktime is what I use. For Windows users, I’m sure there are equivalent alternatives that are just as good. Years ago, when I was first starting to make gifs, I frequently heard people refer to KMPlayer as what they used, so that might still be a good option for you if you are a Windows user. The most important part is that it takes high-quality recordings, with as little detail and quality loss as possible.
With this screen recording method, you can make screen recordings of video files that are stored locally on your computer (I use VLC to play videos), or streaming on sites like YouTube, Amazon Prime, Hulu, Disney+, HBO, etc. No downloading of the video is necessary. For some of those websites, if you have trouble with getting it to work, you may have to disable your browser’s hardware acceleration. This process is described here (https://www.theverge.com/23715928/netflix-amazon-prime-screenshot-mac-windows-how-to).
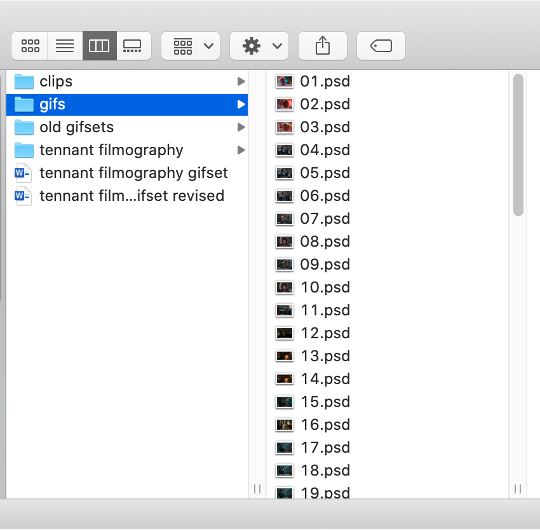
I record the clips with sound, to make it easier to transcribe/write out the dialogue in Photoshop later. When I have recorded all the clips I want, I put the clips into my folder where I store all my clips, and into another folder that is labelled with the episode number so I can remember where each clip came from in order to properly label them later when the time comes to upload them to Tumblr.
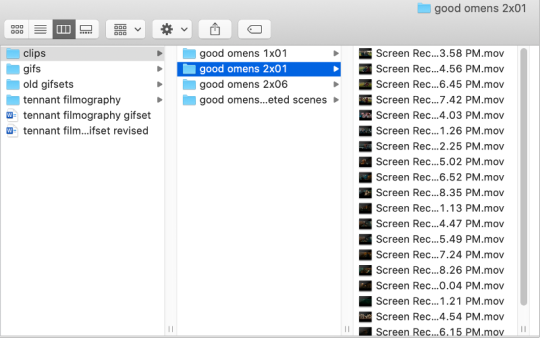
Example: A folder containing clips from Good Omens 2x01
PART TWO: EXTRACTING/MAKING GIFS FROM THE CLIPS
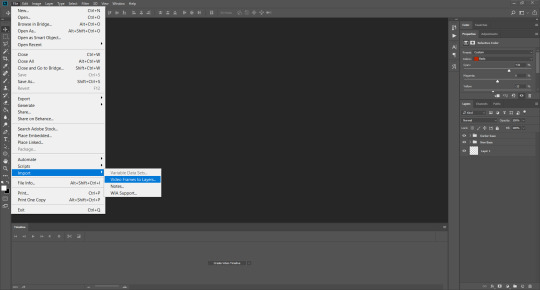
Open video file in Photoshop To do this, click on File > Import > Video Frames to Layers
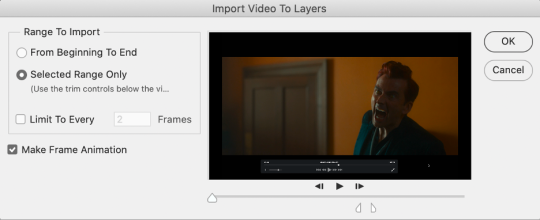
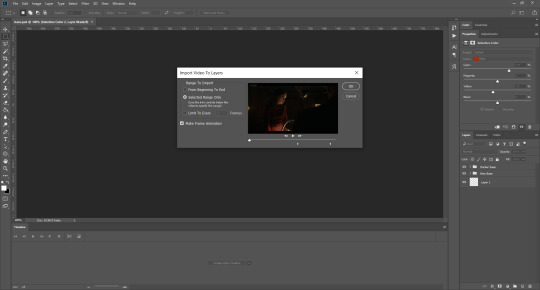
Use the markers to select roughly where you want the gif to begin and end.
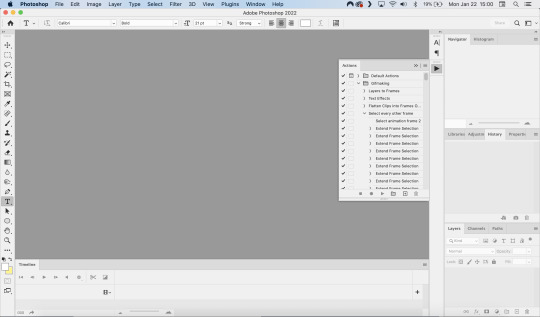
With videos that have been clipped with Quicktime (not sure about other programs), the vast majority of the time there are twice as many frames as needed – every other frame is a duplicate. For a smaller gif size and smoother playback, I delete every other frame in the timeline box at the bottom of the screen. I used to do this manually (very time consuming), but now do it with the use of an action that I created that will automatically select every other frame. Downloads and installation instructions for all the actions I use are available above.
To use an action, click on the title of the action, then click the play button at the bottom of the window.
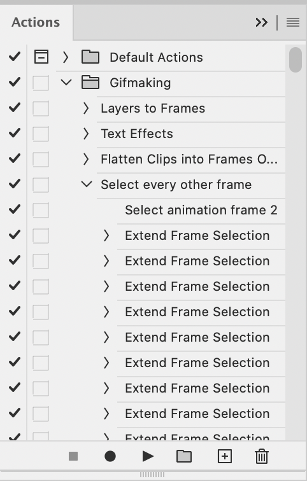
I often get an error message that says “The command ‘Extend Frame Selection’ is not currently available”, but it still works. Just click “stop” and every other frame will be selected.

Click the trash can icon in the timeline window to delete the selected frames.
At this point, you will have half as many frames in your timeline as you did before. You will also likely have extra frames at both the beginning and end of the timeline that you don’t want to be part of the gif – from the previous shot, for example. You can delete those now.
This next step is optional: There will still be some duplicate frames in the timeline that were not deleted earlier. It is not strictly necessary to delete these, and I see many gifmakers who don’t get rid of them. It’s usually not all that noticeable. However, because I’m a bit of a perfectionist, I always go through the timeline frame-by-frame and delete each duplicate. This ultimately will reduce the gif’s file size and make the movement in the gif appear much smoother. I usually find that every fourth or fifth frame is a duplicate. Unfortunately, it’s not always consistent, so using an automated action would not work to make this process go faster.
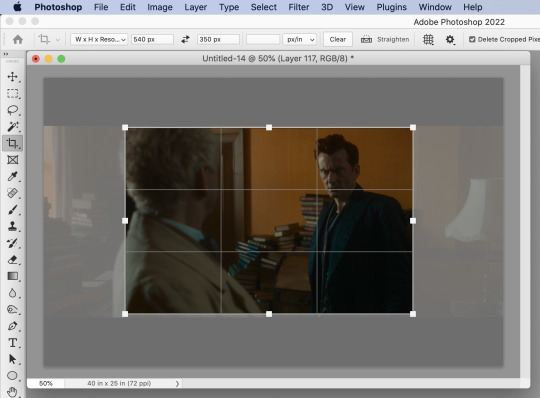
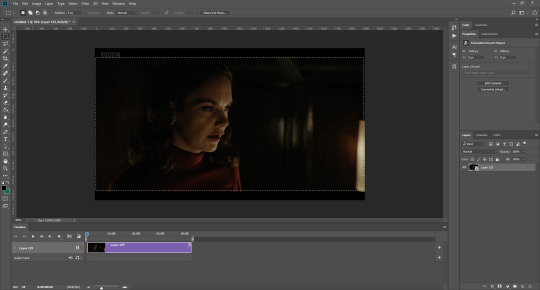
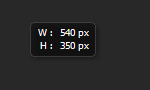
Cropping Once this part is complete, I select the crop tool. I usually make my gifs 540px wide by 350px high. You can change the height to whatever you want, but Tumblr’s max width is 540px. I find the aspect ratio of 540x350px usually allows gifs to feel large, while at the same time not cutting off too much of the sides. Depending on the type of gif I’m making I may adjust this, but generally, if I’m giffing a scene from a TV show or movie, I stick with my standard 540x350px dimensions.
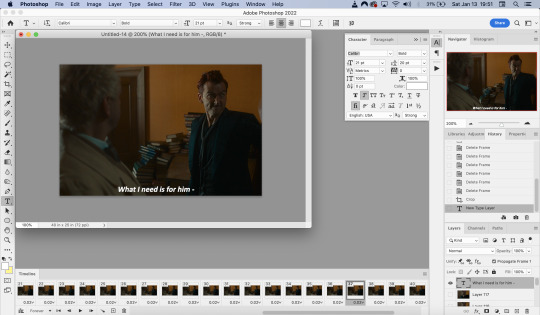
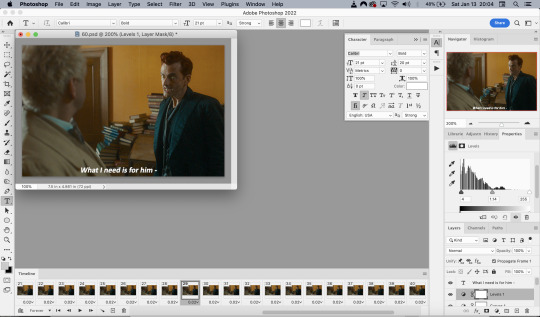
Adding Text Next, I add text. Select the text icon. In the layers window, make sure the top layer is selected, otherwise the text will not show up when you start typing.
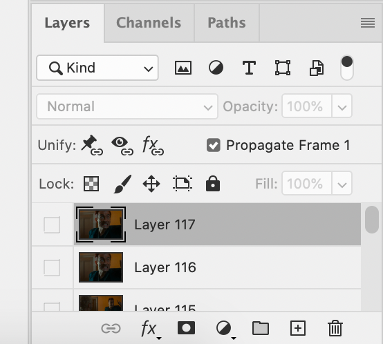
The top layer is selected
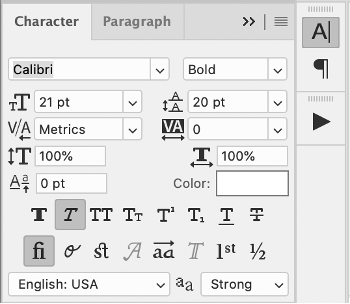
These are the font settings I currently use:
If I am just making one gifset, or one or two gifs, I’ll go straight on to the next steps. However, if I’m making a large amount of gifs, I save the gif right now, close out of it, and repeat the steps in this section for the next gifs, so I eventually have an entire folder of “raw” unedited photoshop files that have been cropped and captioned, and just need to be colored, have text effects added, and be sharpened. For me personally, I find I make gifs more efficiently by doing it in this “batch” style process.
All cropped and unedited gifs (psd files)
PART 3: COLORING, EFFECTS, & SHARPENING
Coloring I do plan on making a separate tutorial on this at some point, but will include a brief summary here. When it comes to coloring, I generally tend to go by a “less is more” attitude. I am not by any means great at coloring, but nonetheless I’ll explain the types of adjustment layers I typically use.
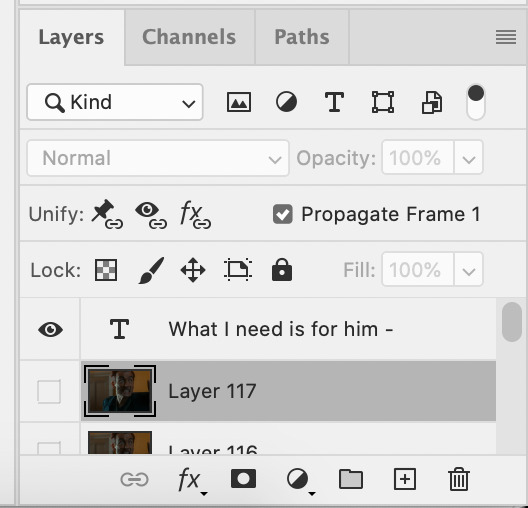
Note: Before making any adjustments, make sure you have the layer directly underneath the text layer selected, as shown in the screencap below, otherwise it will also apply those adjustments to the text, which makes it look weird.
I start with a Curves layer to change the overall brightness/contrast, then a Levels layer to adjust the shadows and highlights, and then a Brightness/Contrast layer to do some final minor tweaks. The only time I ever reuse gif coloring is when they are from the same scene with the same colors, lighting, backgrounds, etc. Every other time, I tailor the adjustment layers to the specific gif.
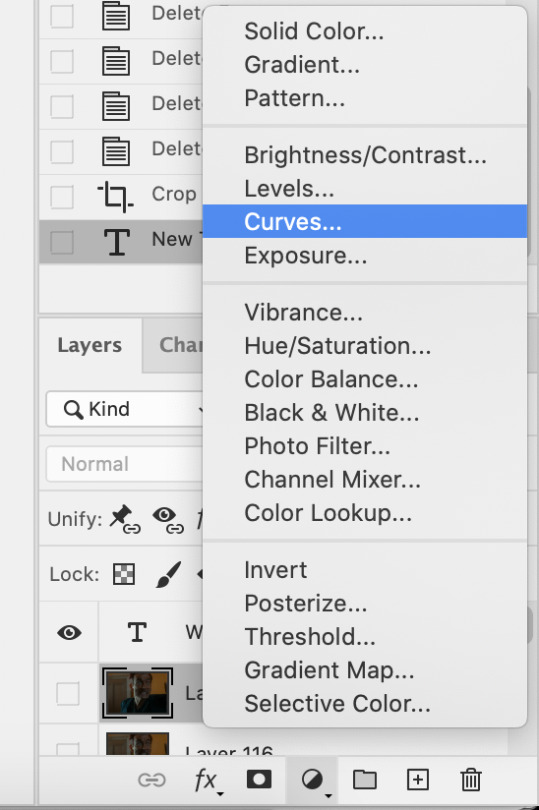
You can add adjustment layers by clicking the half light/dark circle on the bottom of the Layers window.
How the gif looks with both a Curves layer and Levels layer
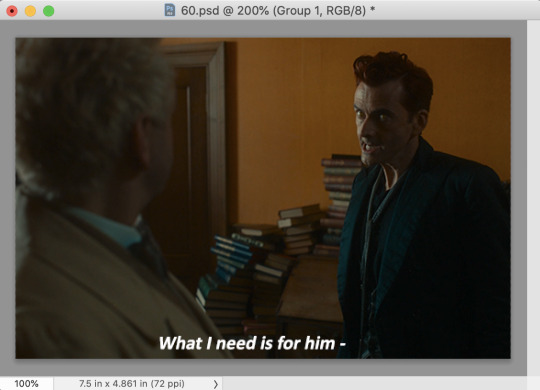
Before adding the adjustment layers
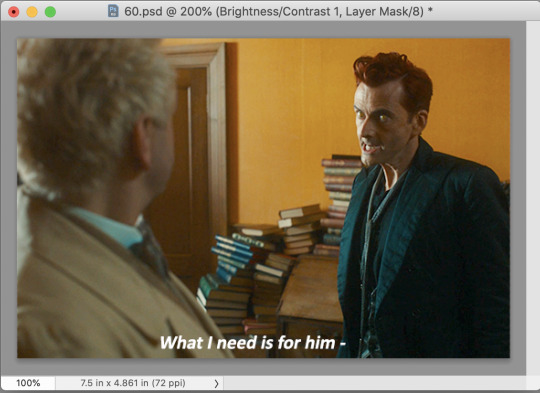
After adding the adjustment layers
A lot of the time, I'll just stick to adjusting the lighting. However, if the colors look gross, or if they are over/undersaturated, I’ll add a Color Balance layer and play around with the settings on that, or use a Hue/Saturation layer and increase/decrease the saturation of specific color channels. It really depends on what you’re going for, and what you think looks good. There is no one “right” way to color a gif.
Text Effects If you are using the Actions I included in the download, you can just run the "Text Effects" action with the text layer selected, and it will do the following automatically. If not, you can do it manually by doing the following.
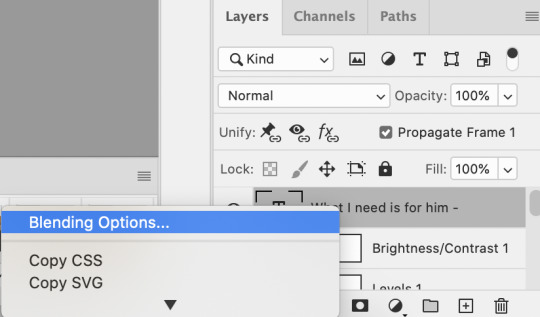
Right click on the text layer in the Layers window and click on Blending Options.
I use a stroke and drop-shadow on my gifs. Here are the settings I use.
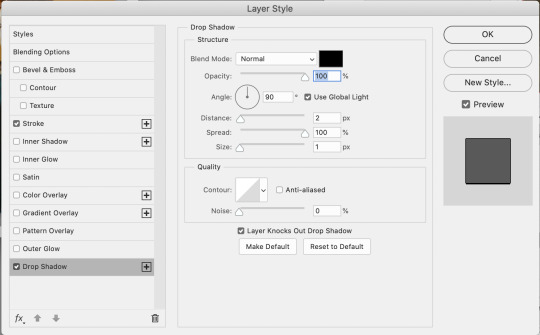
Drop Shadow settings
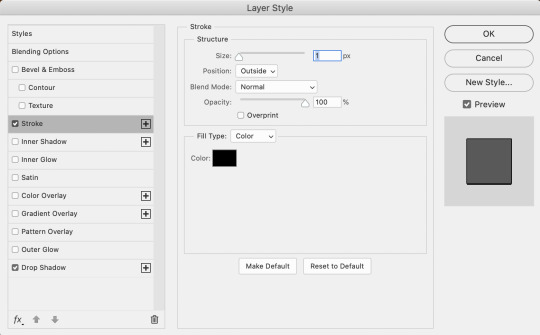
Stroke settings
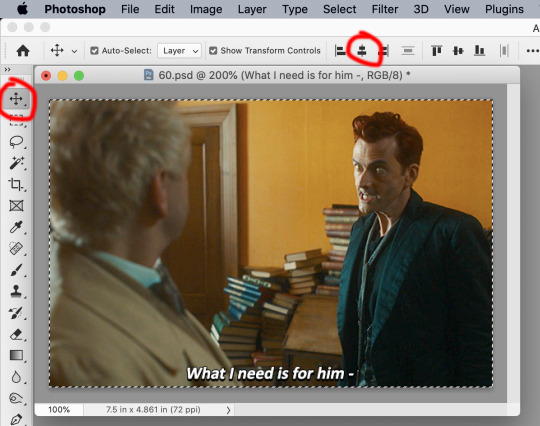
Next, to center the text, click on the text layer. With the text layer selected on the Layers window, Select All by clicking ctrl+a (Windows) or command+a (Mac). Then click on the "Align horizontal centers" icon in the “Move tool” option menu.
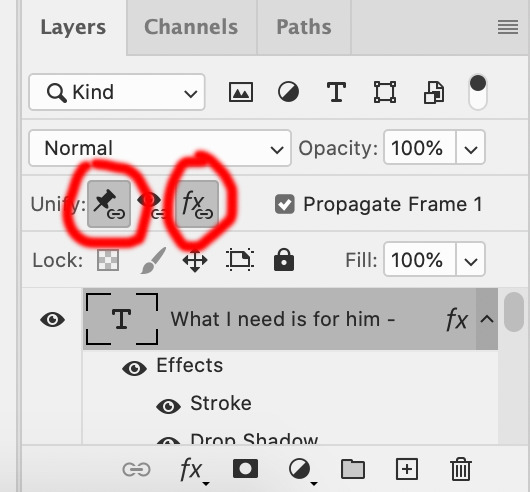
Important – in the Layers menu, make sure the buttons “Unify layer position” and “unify layer effects” are clicked an enabled for the text layer.
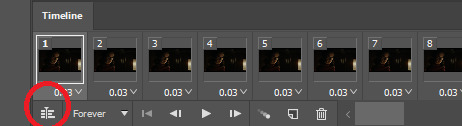
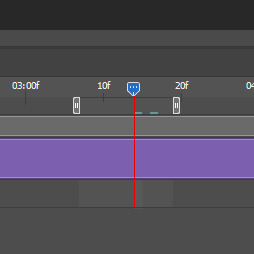
Sharpening Select all the frames in the Timeline window. Then in the lower left-hand corner click “convert to video timeline.”

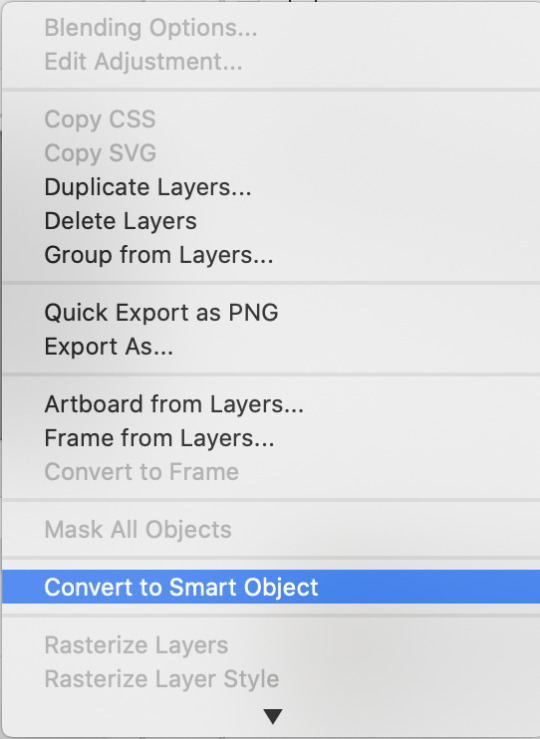
In the Layers window, select all of the frame layers (do not include the text layer or adjustment/coloring layers in the selection) and right click on it. Select “Convert to smart object.”
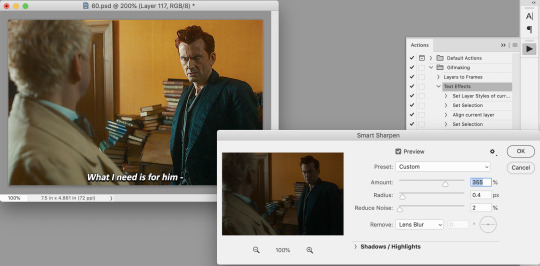
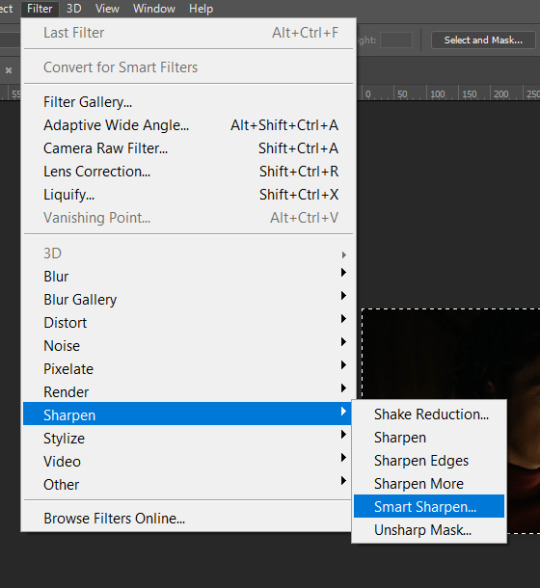
Select Filter > Sharpen > Smart Sharpen. In the same way that coloring can differ depending on the gif, the ideal settings for sharpening can also differ from gif-to-gif. It can really depend on the quality of the source of the gif, like whether it’s HD or not. These are the settings I’m using for the current gif:
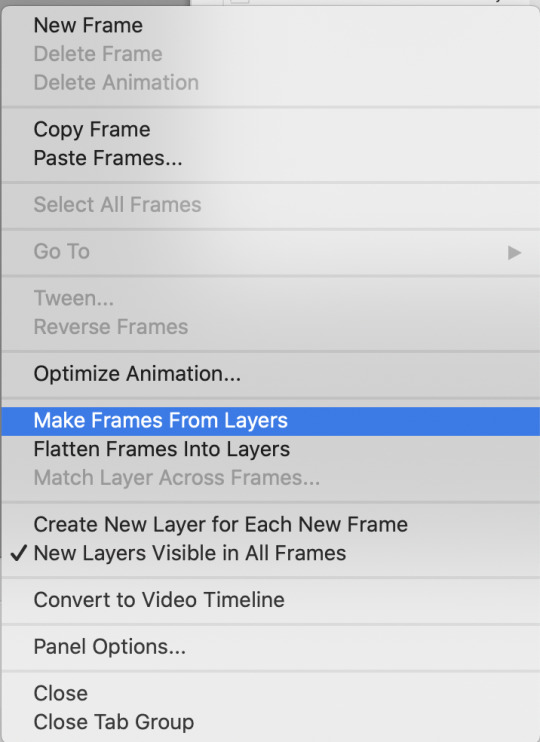
If you are using Actions, you can run the "Layers to Frames" Action. If not, do the following:
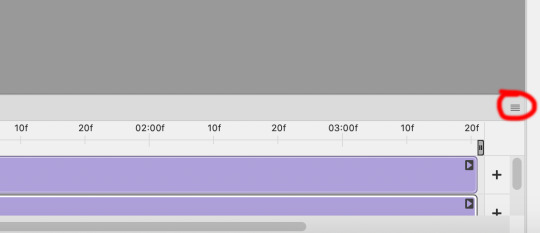
Click on the button circled in red
It will open up this menu. Click on "Flatten frames into clips"
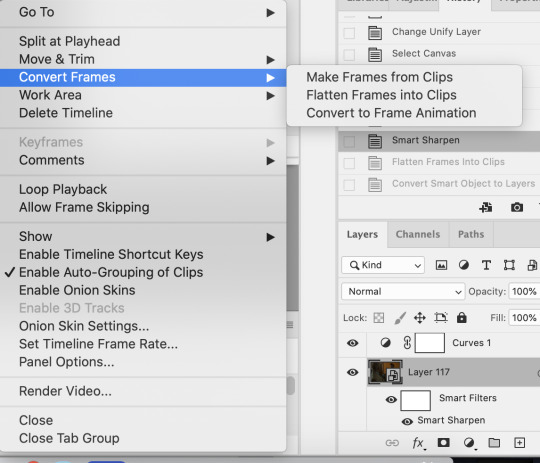
Click the button circled in red, then click "Make frames from layers"
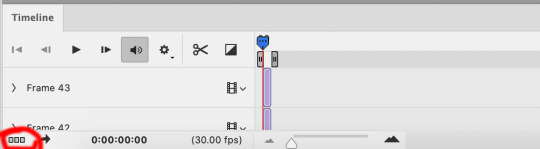
Delete the first couple of "junk" frames
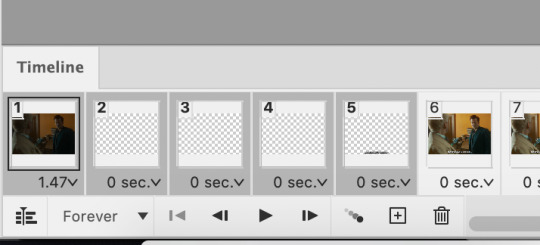
Select all of the frames. Right click on the "0 sec." to change the frame rate. I usually use 0.05, but it might depend on the gif itself.
Exporting Click on File > Export > Save for Web (Legacy)
I cannot add another screencap because I've reached Tumblr's max for this post, but here are the settings I use: Selective Diffusion 256 Colors Dither 100%
You may find that when you try to export your gif, the file size is too big. Tumblr’s gif file size limit is 10mb – try to make it under that – even anywhere in the 9.9mb range. As long as it’s under 10mb, it should work.
To get gifs that are too large to fit under the limit, I usually end up deleting frames from the beginning or end of the gif. If you’re using the 540x350px dimensions, I typically find that the average number of frames I can fit into one gif is between 80-90. Depending on the colors in the gif, it’s sometimes more, sometimes less.
69 notes
·
View notes
Text
Your search for best youtube downloader ends here. We have compiled a list of best video downloader for youtube. There are many youtube downloader software that you can install on your PC and use for downloading any youtube video. Some of these also come with resume capability for supporting large video downloads. YouTube is undoubtedly the biggest video portal over the internet. It offers a wide range of videos in different categories including entertainment, news, and learning lessons. People often find it comfortable to learn with video lessons. However, it is not possible to download videos form YouTube without specific video downloader programs. These programs allow users to download YouTube videos as per their wish. Popular YouTube Downloader iSkysoft Free Video Downloader This free video downloading software has many powerful features to easily download the videos. This is available on Mac and Windows. Premium features are available for a small price, however the free version is good enough if you wish to download only youtube videos. YTD Video Downloader YTD Video Downloader is an advanced version of YouTube Downloader and it offers video download and conversion at a better speed. It is packed with some new features including resume capability and video toolbar. The user might feel some unresponsiveness while downloading longer videos. Airy Airy - versatile YouTube downloader for Mac and Windows, which allows saving videos in MP4, FLV and 3GP formats and various resolutions. It also enables you to extract and save only soundtracks - all you have to do is to choose MP3 from the list of the formats displayed when downloading. Airy costs $19.95, but first several downloads are free. The app is available both for Windows and Macintosh. ATube Catcher aTube Catcher is a free tool that allows users to download videos from multiple websites. It is used for several other services including CD/DVD/Blu-Ray creator, audio and screen recorder, video/audio cropping, and similar services. It can further create GIFs, ringtones, MP3, and Audio CDs. Above all, it is a free too with minimal to no advertising, which makes it an overall smooth experience. All Video Downloader All Video Downloader is among one of the best freeware programs available for downloading streaming videos. Videos can be easily converted to different formats and the built-in search engine allows users to search videos from the software interface only. MacX YouTube Downloader MacX YouTube Downloader is a 100% free YouTube downloader for Mac users to download YouTube videos with fastest speed and high output quality. It supports to batch download 4K/HD/SD streaming videos and music from YouTube, Facebook, Vimeo, Dailymotion, Vevo and other 300+ video/audio sharing sites for playing back on Mac or adding the output MP4 videos to iTunes Library for transferring to iPhone, iPad. No adware, spyware, or malware. Browser Based Downloader KEEPVID Downloader For users looking for browser-based downloader, KEEPVID is an excellent option. Users can save streaming videos simply by adding the video link in the download box. It is possible to add bookmark and use the tool as per your requirements. YouTube Downloader For Android This is an excellent app for android users. This app allows users to download videos on different devices or the user can send these videos via SSH. The dashboard allows users to manage downloads and perform advanced functions like extracting MP3 from the video. It works comfortable with Android 4+. There are several services available for downloading videos from major video streaming channels including YouTube. Users can convert MP3 files according to their requirement and on top of it; most of these services are available free cost. It means that the user can use these services as freeware or choose the premium service with a small fee and several additional services. Get ready and start downloading YouTube services of your choice.
Legacy / Unsupported Tools This section has list of legacy tools that are not available anymore. YouTube To Mp3 Converter For downloading only audio of a Youtube video YouTube MP3 is an excellent service that allows customers to convert video files to MP3 format. The user simply requires YouTube URL and it is possible to download the MP3 file after conversion. The only thing user needs to do is to download the file and it works perfectly fine on Windows, Mac, Linux, and even on iPhone. Firefox Addon To Download YouTube Videos Download YouTube Videos as MP4 For users looking to download YouTube videos from the comfort of their browser, Download YouTube Videos as MP4 is the perfect tool. It allows users to download videos in the FLV and MP4 formats. The extension is built with a simple interface and allows users to download videos directly. Windows 8 Phone App YouTube Downloader Plus RT For Windows 8 Phone users, this app allows them to download YouTube videos as per their requirements. Further, it allows users to extract audio from the app and create MP3 files. It offers high-speed downloads and users can upload files directly to SkyDrive. On top of these things, it has a neat and easy-to-use interface. YouTuber It is among the best downloader programs available for scrapping YouTube videos and it can easily convert YouTube videos. The interface is quite basic but easy to use. Users can choose from the free or premium version as per their requirements. It is quicker and offers better services when compared with other freeware programs. YouTubeByClick YouTubeByClick is video downloader masterpiece. It is the most simple and easy software for downloading from YouTube and other 40+ sites. It has great special features like downloading a whole playlist and channel from YouTube, download private videos from YouTube and Facebook, Download and convert for any format, cut the downloaded MP3 for making ringtones and many more great options. The software integrates into your browser and lets you download in one click mode. You should try it. Free YouTube Download This tool is specially developed for downloading videos from YouTube and it can download single as well videos in a playlist. Users can download all videos of a channel or videos with the viewing history of a user. It is possible to download complete YouTube lists with this downloader. It is one of the best tools for downloading videos from YouTube. Article Updates Article Updated on September 2021. Some HTTP links are updated to HTTPS. Updated broken links with latest URLs. Some minor text updates done. Content validated and updated for relevance in 2021. Updated on Aug 2017 - Added MacX Youtube downloader to the list. Updated on November 2016 - Updated latest information about software and fixed minor issues.
0 notes
Text
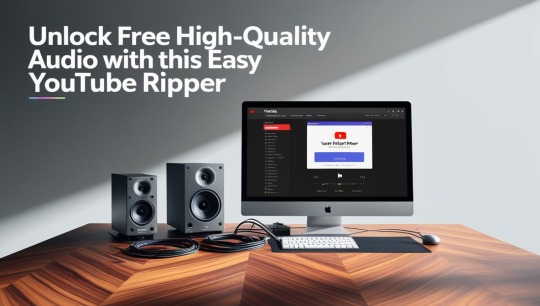
Unlock Free High-Quality Audio with This Easy YouTube Ripper
Everyone loves listening to music and sound clips from YouTube, but what if you could easily convert your favorite videos into high-quality audio files—free of charge? With the YouTube Ripper, you can do exactly that! Whether you want to create playlists, download sound bites, or simply save music for offline listening, this tool makes it fast, easy, and hassle-free.
Let’s dive into how you can use this simple tool to rip audio from YouTube without the need for any software or complicated processes.
Why Use a YouTube Ripper?
YouTube is home to millions of videos, but many of us are just interested in the audio—whether it’s music, podcasts, or sound effects. While streaming is great, there are times when you want to have those tracks on hand, even without an internet connection.
That’s where a YouTube Ripper comes in! This free tool allows you to quickly convert YouTube videos into high-quality audio files. The best part? You don’t need any technical skills or complicated software—just a browser and a few simple steps, and you’re good to go!
How to Use the YouTube Ripper
Using this tool is a breeze. Follow these simple steps to unlock your free, high-quality audio files from YouTube:
Open the Ripper Tool in Your BrowserOpen your web browser (Google Chrome, Safari, or any browser of your choice) and navigate to the YouTube Ripper website. No software downloads or installs needed—just an internet connection.
Paste the YouTube LinkFind the YouTube video you want to rip audio from and copy its URL. Then, paste the link into the input box on the Ripper website.
Select Your Audio FormatChoose the audio format you prefer. MP3 is the most common choice for its universal compatibility, but you can also opt for higher-quality formats like WAV if you want crystal-clear sound.
Click ‘Download’Once you’ve selected your desired format, click the Download button. Within seconds, the tool will begin converting the video into audio. The process is quick, efficient, and completely free.
Save and EnjoyYour new audio file will be ready for download. It will automatically save to your device’s download folder. From there, you can transfer it to your music player, create a playlist, or simply enjoy your new audio offline!
Why Choose This YouTube Ripper?
There are many reasons to choose this YouTube Ripper over others. Here’s why it stands out:
Completely Free: No subscriptions, no hidden fees. Enjoy unlimited downloads and audio ripping at no cost.
Fast and Simple: Convert videos into high-quality audio files in a matter of seconds. No lengthy waits or complicated steps involved.
Multiple Formats: Choose from a variety of formats, including MP3, WAV, and more, to ensure you get the best sound quality.
No Software Needed: Unlike other tools that require software downloads or installations, this YouTube Ripper works directly in your browser.
Universal Compatibility: Whether you're using a PC, Mac, or mobile device, this tool works seamlessly across platforms.
Final Thoughts
Whether you're a music lover, content creator, or simply someone who wants to save their favorite YouTube videos as audio, the YouTube Ripper makes it easy to unlock high-quality audio in just a few clicks. Enjoy the freedom of accessing your favorite tracks offline, creating playlists, or simply having your favorite YouTube sounds on hand whenever you want. With no software required and no hidden fees, it's the easiest way to rip audio from YouTube and enjoy it without any hassle.
0 notes
Text
Black Myth Wukong Now With Complete Ray Tracing & DLSS 3
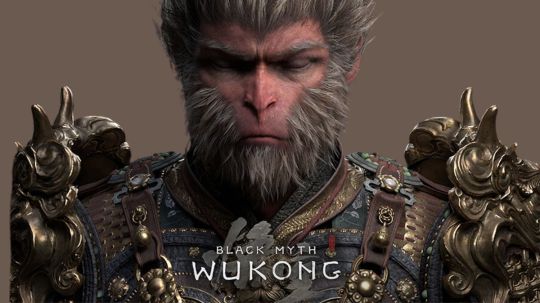
Black Myth: Wukong
Game Science’s much awaited action role-playing game Black Myth Wukong is now available. Take an exciting trip through Chinese mythology! Explore a huge and magical world full of obstacles and breathtaking wonders as the Destined One. Use NVIDIA DLSS 3 and full ray tracing to solve mysteries of a beautiful past and reveal old stories’ secrets. Use GeForce RTX 40 Series power for an unparalleled PC experience.
NVIDIA helped Black Myth: Wukong’s graphics and technology improve realistic complete ray tracing, also known as path tracing, provides the finest possible lighting, effects, and immersion. And the AI-powered DLSS 3 provides the performance to appreciate and experience Black Myth Wukong at the maximum detail levels.
PC players may defeat Black Myth: Wukong’s challenging opponents at fast, responsive frame rates and be amazed by the game’s vivid graphics when they combine the sheer power of GeForce RTX 40 Series GPUs with its AI Tensor Cores and Ray Tracing Cores. When played on GeForce RTX 40 Series GPUs, Black Myth Wukong provides a zero-compromise experience.
A difficult but incredibly accurate method of rendering light and its impact on a scene is full ray tracing. Visual effects artists use this sophisticated ray tracing technique to create graphics for movies and television shows that are indistinguishable from reality; however, full ray tracing in real-time video games was unattainable until the release of GeForce RTX GPUs with RT Cores and the AI-powered acceleration of NVIDIA DLSS.
Black Myth Wukong complete ray tracing improves the lighting, shadows, and reflections’ accuracy and quality. Water reflections capture every element of the surroundings. Water caustics realistically depict light refraction and reflection, adding even more realism. Because particles are reflected, combat becomes more thrilling and dynamic. A fully ray-traced lighting system guarantees pixel-perfect illumination both indoors and outdoors, bouncing light to realistically illuminate the scene and darken parts where light is blocked or does not reach. In addition, contact hardening and softening completely ray traced shadows work in tandem with the lighting system to cast shadows everywhere, including the tiniest ones from leaves and stones, geometry-rich buildings, the main character, and the enormous bosses that need to be defeated.
NVIDIA GeForce NOW
GeForce NOW: More than 2,000 titles, first-day new releases, and automated Xbox login
You can play the newest games on NVIDIA GeForce NOW if you’re not at home, your PC can’t render high-fidelity games at fast frame rates, or you don’t own a contemporary PC or laptop. You may stream your own games from compatible platforms with GeForce NOW Ultimate. This allows you to play Black Myth Wukong and other top RTX games on PCs and laptops with GeForce RTX 40 Series graphics cards, including DLSS 3 and full ray tracing.
Experience GeForce NOW via web browsers, iPhones, iPads, Android smartphones, Macs, Chromebooks, SHIELD TVs, and a plethora of other frequently owned devices, including controllers and PC accessories.
GeForce NOW improves cloud gaming every week by uploading fresh upgrades and high-caliber PC games to the cloud.
Members can now stream the FINAL FANTASY XVI demo, which is improved with DLSS 3 and Reflex, as well as Black Myth Wukong, which features complete ray tracing and DLSS 3. These new day-one releases expand upon previous achievements, including the addition of support for the cloud-based automated installation of over 25 of the best CurseForge World of Warcraft Addons, the opening of new data centers in Poland and Japan to enable even better gaming both domestically and abroad, and the availability of over 2,000 games.
Last year, GeForce NOW brought support for the Xbox platform thanks to its collaboration with Microsoft. More than 140 PC Games Pass titles and more than 250 games that may be bought through the Microsoft or Xbox shops are available to gamers.
Indiana Jones and the Great Circle
NVIDIA DLSS 3.5 and complete ray tracing will be available soon for Indiana Jones and the Great Circle
Discover the answer to one of the biggest mysteries in history with Bethesda Softworks and MachineGames’ Indiana Jones and the Great Circle, which will be released on December 9th in association with Lucasfilm Games. Put yourself in the footsteps of Indiana Jones and set off on a solo, story-driven expedition across the globe at the pinnacle of the fabled archaeologist’s achievements.
Enjoy even more dramatic and immersive adventures on PC with complete ray tracing, which can be further enhanced and accelerated with NVIDIA DLSS 3.5 with Ray Reconstruction. Your GeForce RTX 40 Series GPU will allow you to experience Indy’s adventure at its best, from the snow-capped peaks of the Himalayas to the pyramids of Egypt and the sacred halls of the Vatican!
Read more on Govindhtech.com
#BlackMythWukong#BlackMythgame#BlackMythRTX#blackmyth#dlss#dlss3#taytracing#NVIDIA#news#Technology#technews#technologytrends#govindhtech#technologynews
0 notes
Text
Mastering the Art of Sharing Video with Audio on Microsoft Teams
When it comes to remote collaboration, Microsoft Teams has become a cornerstone for many organizations. Professional Pa System Package Whether you're hosting a virtual meeting, conducting a training session, or sharing important updates, ensuring that your video content is accompanied by clear and synchronized audio is crucial.Challenges in It Infrastructure Management Here’s a comprehensive guide to help you master the art of sharing video with audio on Teams, ensuring a seamless and professional experience for all participants.
Understanding the Basics
Before diving into the steps, it’s important to understand why sharing video with audio can sometimes be challenging. Start a Meeting in Google Meet Unlike a simple video call, sharing a video file or streaming content with sound requires that both the video and audio are transmitted clearly and in sync.Learn Smart Classroom Teams provides a specific feature to help you achieve this, but it's essential to use it correctly.
Step-by-Step Guide to Sharing Video with Audio
Start or Join a Meeting: Begin by starting a new meeting or joining an existing one in Microsoft Teams. Ensure that your camera and microphone settings are configured correctly.
Prepare Your Video File: Have your video file ready for sharing. This could be a pre-recorded video saved on your device or a streaming video from a browser.
Share Your Screen or Window:
Click on the “Share content” button, typically represented by an upward arrow icon within the meeting controls.
Choose whether you want to share your entire screen or a specific window. If you are streaming a video from a browser or an application, select the appropriate window or application.
Enable Audio Sharing:
For Windows:
When you select the window or screen you want to share, make sure to check the “Include computer sound” option. This is crucial as it ensures that any audio from the video is transmitted to the meeting participants.
For Mac:
Unfortunately, Mac users might not see the same option as Windows users. For better audio sharing on macOS, consider using the built-in Teams desktop app instead of the browser version, or use third-party software to capture system audio.
Play Your Video: Start playing your video once you’ve shared your screen or window. Make sure the volume is appropriately adjusted on your end, and keep an eye on the audio levels to ensure it’s clear for everyone.
Monitor and Adjust: Keep an eye on participant feedback. If they report audio issues, try adjusting the volume or re-sharing the content. Sometimes, it might be necessary to pause and restart the video to get the best audio quality.
Tips for Optimal Sharing
Pre-Test Your Setup: Before the meeting, test your video and audio setup with a colleague or in a practice meeting to ensure everything works smoothly.
Use Headphones: Wearing headphones can help reduce audio feedback and improve sound quality for both you and the participants.
Close Unnecessary Applications: Close any applications that might consume bandwidth or interfere with audio quality.
Be Mindful of Network Bandwidth: High-quality video and audio sharing can be bandwidth-intensive. Ensure you have a stable internet connection to avoid disruptions.
Troubleshooting Common Issues
Audio Lag or Distortion: If participants experience lag or distortion, try lowering the video quality or closing other applications that might be using network resources.
No Audio from Video: Ensure that the “Include computer sound” option was selected. If problems persist, consider re-sharing the video or restarting the Teams application.
0 notes
Text
Best Remote Desktop Software for Mac 2024

In this internet-centric world, almost everything is connected to your devices in one way or another. In times like these, a reliable remote connection is a must. Because you never know when you need to connect your device when you are far away. And especially if you are a Mac user, high-performance software is required to handle large files & quality software. Today, many remote desktop software are available for Mac to control your device from anywhere in the world. With this, we aim to find the best remote desktop software for Mac in 2024.
Best Remote Desktop Software for Mac 2024
TeamViewer
TeamViewer has been a favorite among users for its ease of use and robust features. With TeamViewer, you can access your Mac remotely from anywhere with an internet connection. Its cross-platform compatibility allows you to connect to Windows, Linux, and mobile devices effortlessly. Moreover, TeamViewer offers secure remote access with end-to-end encryption to ensure your data remains safe during transmission. Provide remote support, collaborate on projects, or access files on the go - TeamViewer is really one of the best remote desktop software for Mac.
Chrome Remote Desktop
Are you looking for a simple remote desktop solution? Chrome Remote Desktop is worth considering. As an extension for Google Chrome, it smoothly integrates with your browser, making it easy to set up & use. With Chrome Remote Desktop, you can access your Mac from Chrome running on any device - Windows, Linux, and Chrome OS. Also, it offers secure remote access using Google's infrastructure, giving you peace of mind when working remotely.
Remote Desktop Manager
Remote Desktop Manager is a complete solution for managing all your remote connections in one place. Connect to Mac, Windows, Linux, or virtual machines - Remote Desktop Manager has all the desired tools & features. It supports numerous protocols such as RDP, SSH, VNC, and Telnet - making it suitable for IT professionals. With features like credential management, session recording, and multi-monitor support - Remote Desktop Manager offers unparalleled flexibility and control over your remote connections.
AnyDesk
Known for its high-speed performance & low latency, AnyDesk is another popular choice for remote desktop access. With AnyDesk, you can remotely control your Mac from anywhere with minimal lag due to its compression algorithms. Moreover, AnyDesk provides security with TLS 1.2 encryption and RSA 2048 asymmetric key exchange to protect your data from unauthorized access. Working from home or traveling, AnyDesk gives you a smooth remote desktop experience.
Splashtop
Splashtop offers a range of remote desktop solutions tailored to different use cases - personal use, enterprise-level deployments, and high-performance work. With Splashtop, you can access your Mac from any device, including Windows, Mac, iOS, Android, and Chromebook. Its high-performance engine delivers responsive remote access, even over low-bandwidth connections. Splashtop also provides advanced features like file transfer, remote printing, and session recording, making it a versatile choice for remote work.
Microsoft Remote Desktop
Microsoft Remote Desktop is an excellent choice for Mac users who need to connect to Windows-based systems. This software enables remote Windows desktop access from your Mac device. It has a robust interface for customizing your remote desktop experience according to your preferences. Microsoft Remote Desktop supports remote audio and video streaming for multimedia applications and virtual meetings.
RealVNC
RealVNC is one of the best remote desktop software for Mac. It offers both cloud-based and on-premises solutions. With RealVNC, you can securely access your Mac from anywhere using any device. The encryption & authentication mechanisms are unique features of RealVNC. It also supports multi-platform connectivity for connecting Mac, Windows, Linux, and Raspberry Pi devices. RealVNC can provide enterprise-grade features like centralized deployment, user authentication, and audit logging when needed.
Conclusion
Having the right remote desktop software for your Mac is essential if you work from a distance. Security, features, and ease of work - are the factors you should consider in a remote desktop software for Mac. You must ensure that these things align with your requirements. From the above list, you can choose any software. All are the best remote desktop software for Mac in 2024.
0 notes
Text
Understanding Video Formats and Codecs
In the realm of digital video editing, understanding video formats and codecs is paramount to achieving optimal results. Each format and codec comes with its own specifications and considerations, influencing factors such as file size, quality, and compatibility. In this comprehensive guide, we'll delve into the intricacies of video formats and codecs, shedding light on their importance in the video editing process.

Exploring Video Formats
Overview of Video Formats Video formats refer to the structure in which video data is encoded and stored. Common video formats include MP4, AVI, MOV, and WMV, each with its unique characteristics and applications.
Understanding Popular Video Formats MP4 (MPEG-4): Widely used for online streaming and sharing due to its efficient compression and high-quality output.
AVI (Audio Video Interleave): A legacy format known for its compatibility with various media players, although it tends to produce larger file sizes.
MOV (QuickTime Movie): Developed by Apple, MOV files are commonly used in Mac environments and offer excellent support for multimedia content.
WMV (Windows Media Video): Primarily associated with Windows platforms, WMV files provide efficient compression and are suitable for web streaming.
Deciphering Video Codecs
What Are Video Codecs? Algorithms called video codecs are used to both compress and decompress video data. They play a crucial role in balancing file size and video quality, allowing for efficient storage and transmission of digital video content.
Commonly Used Video Codecs H.264 (Advanced Video Coding): One of the most widely used codecs for online video streaming and playback, known for its high compression efficiency and widespread compatibility.
HEVC stands for High-Efficiency Video Coding, and it's also H.265, HEVC offers improved compression efficiency over H.264, making it ideal for 4K and high-definition video content.
VP9: Developed by Google, VP9 is an open-source codec designed to deliver high-quality video streaming with reduced bandwidth requirements, commonly used in web browsers and streaming platforms.
Choosing the Right Format and Codec
Considerations for Video Editing When selecting a video format and codec for your editing projects, consider factors such as the intended use of the video, platform compatibility, and storage limitations. opt for formats and codecs that strike a balance between quality and file size, ensuring optimal performance throughout the editing process.
Benefits of Enrolling in a Video Editing Course in Dehradun - DSOM At DSOM (Design School of Online Marketing) Video editing course in Dehradun, we offer specialized video editing courses designed to equip aspiring editors with the knowledge and skills needed to navigate the complexities of digital video editing. Our comprehensive curriculum covers topics such as video formats, codecs, editing techniques, and industry best practices, providing students with a solid foundation for success in the field of video editing.
Conclusion Understanding video formats and codecs is essential for achieving professional results in digital video editing. By familiarizing yourself with the characteristics and applications of different formats and codecs, you can make informed decisions throughout the editing process, ensuring the highest quality output for your projects.
0 notes
Text
The Ultimate Free YouTube Downloader for PC and Mac 2023
The Ultimate Free YouTube Downloader for PC and Mac is the best tool to download videos from YouTube. It supports downloading YouTube HD, standard and 4k videos in the MP4 format. With the built-in video player, you can play your downloaded videos without having to install any additional plug-ins or codecs. You can also convert downloaded videos to AVI, WMV, MKV, MOV and more with this free YouTube downloader.
Free YouTube Downloader is the best tool to download videos from YouTube. It supports downloading YouTube HD, standard and 4k videos in the MP4 format.
Free YouTube Downloader is the best tool to download videos from YouTube. It supports downloading YouTube HD, standard and 4k videos in the MP4 format. The Free YouTube Downloader has a built-in video player that lets you listen to your favorite songs while they are downloaded. You can also convert downloaded videos to AVI, WMV, MKV, MOV and more with just one click!
With the built-in video player, you can play your downloaded videos without having to install any additional plug-ins or codecs.
With the built-in video player, you can play your downloaded videos without having to install any additional plug-ins or codecs. The built-in video player is compatible with all browsers, including Google Chrome, Mozilla Firefox and Internet Explorer.
Is it legal to downloaded YouTube videos?
Before you utilize a free YouTube downloader, keep in mind that doing so violates YouTube's terms of service, which state that you can only stream videos straight from its servers. Unless you own the video, have permission from the copyright holder, or it is in the public domain, downloading videos is possibly a copyright violation.
You can also convert downloaded videos to AVI, WMV, MKV, MOV and more with this free YouTube downloader.
You can also convert downloaded videos to AVI, WMV, MKV, MOV and more with this free YouTube downloader. This is a great way to archive your favorite videos or watch them on other devices. Converting videos is easy with this free YouTube video converter! Just drag and drop the video file in the program window and click Convert button on top menu bar to start converting process immediately - it's that simple!
This is the best free YouTube Downloader for PC and Mac
This is the best free YouTube downloader for PC and Mac. It's simple, easy to use, and won't cost you a dime. Unlike other free YouTube downloaders that only allow you to download videos in low quality or with watermarks on them, this program lets you choose your own resolution and format (the latter being especially important if you want to convert videos). If you don't have any good reason why not to use this program right now--and believe us when we say there aren't many--then go ahead and get started! 1. 4K Video Downloader Fast, free and flexible – the most versatile YouTube downloader 2. Any Video Converter Free Download and convert videos, and add special effects 3. Free YouTube Download Grab videos without clicking a single button 4. aTube Catcher Download, convert and merge videos as they're playing
What's the difference between Online YouTube downloaders and desktop apps?
There are several websites where you may download YouTube videos, but we do not suggest them owing to the drawbacks they have over desktop applications. For starters, they are slower owing to the remote server's and your data connection's limits. Many of these sites also display NSFW adverts or thumbnails of recently downloaded videos, which may be inappropriate. Online video converters usually don't provide you much (if any) control over the video file in terms of quality or professional format. They only allow you to download one video at a time, and you can't save whole playlists. 3D and 360-degree films are also out of the question, and just a few devices can handle 4K resolution. Read the full article
1 note
·
View note
Text
Your search for best youtube downloader ends here. We have compiled a list of best video downloader for youtube. There are many youtube downloader software that you can install on your PC and use for downloading any youtube video. Some of these also come with resume capability for supporting large video downloads. YouTube is undoubtedly the biggest video portal over the internet. It offers a wide range of videos in different categories including entertainment, news, and learning lessons. People often find it comfortable to learn with video lessons. However, it is not possible to download videos form YouTube without specific video downloader programs. These programs allow users to download YouTube videos as per their wish. Popular YouTube Downloader iSkysoft Free Video Downloader This free video downloading software has many powerful features to easily download the videos. This is available on Mac and Windows. Premium features are available for a small price, however the free version is good enough if you wish to download only youtube videos. YTD Video Downloader YTD Video Downloader is an advanced version of YouTube Downloader and it offers video download and conversion at a better speed. It is packed with some new features including resume capability and video toolbar. The user might feel some unresponsiveness while downloading longer videos. Airy Airy - versatile YouTube downloader for Mac and Windows, which allows saving videos in MP4, FLV and 3GP formats and various resolutions. It also enables you to extract and save only soundtracks - all you have to do is to choose MP3 from the list of the formats displayed when downloading. Airy costs $19.95, but first several downloads are free. The app is available both for Windows and Macintosh. ATube Catcher aTube Catcher is a free tool that allows users to download videos from multiple websites. It is used for several other services including CD/DVD/Blu-Ray creator, audio and screen recorder, video/audio cropping, and similar services. It can further create GIFs, ringtones, MP3, and Audio CDs. Above all, it is a free too with minimal to no advertising, which makes it an overall smooth experience. All Video Downloader All Video Downloader is among one of the best freeware programs available for downloading streaming videos. Videos can be easily converted to different formats and the built-in search engine allows users to search videos from the software interface only. MacX YouTube Downloader MacX YouTube Downloader is a 100% free YouTube downloader for Mac users to download YouTube videos with fastest speed and high output quality. It supports to batch download 4K/HD/SD streaming videos and music from YouTube, Facebook, Vimeo, Dailymotion, Vevo and other 300+ video/audio sharing sites for playing back on Mac or adding the output MP4 videos to iTunes Library for transferring to iPhone, iPad. No adware, spyware, or malware. Browser Based Downloader KEEPVID Downloader For users looking for browser-based downloader, KEEPVID is an excellent option. Users can save streaming videos simply by adding the video link in the download box. It is possible to add bookmark and use the tool as per your requirements. YouTube Downloader For Android This is an excellent app for android users. This app allows users to download videos on different devices or the user can send these videos via SSH. The dashboard allows users to manage downloads and perform advanced functions like extracting MP3 from the video. It works comfortable with Android 4+. There are several services available for downloading videos from major video streaming channels including YouTube. Users can convert MP3 files according to their requirement and on top of it; most of these services are available free cost. It means that the user can use these services as freeware or choose the premium service with a small fee and several additional services. Get ready and start downloading YouTube services of your choice.
Legacy / Unsupported Tools This section has list of legacy tools that are not available anymore. YouTube To Mp3 Converter For downloading only audio of a Youtube video YouTube MP3 is an excellent service that allows customers to convert video files to MP3 format. The user simply requires YouTube URL and it is possible to download the MP3 file after conversion. The only thing user needs to do is to download the file and it works perfectly fine on Windows, Mac, Linux, and even on iPhone. Firefox Addon To Download YouTube Videos Download YouTube Videos as MP4 For users looking to download YouTube videos from the comfort of their browser, Download YouTube Videos as MP4 is the perfect tool. It allows users to download videos in the FLV and MP4 formats. The extension is built with a simple interface and allows users to download videos directly. Windows 8 Phone App YouTube Downloader Plus RT For Windows 8 Phone users, this app allows them to download YouTube videos as per their requirements. Further, it allows users to extract audio from the app and create MP3 files. It offers high-speed downloads and users can upload files directly to SkyDrive. On top of these things, it has a neat and easy-to-use interface. YouTuber It is among the best downloader programs available for scrapping YouTube videos and it can easily convert YouTube videos. The interface is quite basic but easy to use. Users can choose from the free or premium version as per their requirements. It is quicker and offers better services when compared with other freeware programs. YouTubeByClick YouTubeByClick is video downloader masterpiece. It is the most simple and easy software for downloading from YouTube and other 40+ sites. It has great special features like downloading a whole playlist and channel from YouTube, download private videos from YouTube and Facebook, Download and convert for any format, cut the downloaded MP3 for making ringtones and many more great options. The software integrates into your browser and lets you download in one click mode. You should try it. Free YouTube Download This tool is specially developed for downloading videos from YouTube and it can download single as well videos in a playlist. Users can download all videos of a channel or videos with the viewing history of a user. It is possible to download complete YouTube lists with this downloader. It is one of the best tools for downloading videos from YouTube. Article Updates Article Updated on September 2021. Some HTTP links are updated to HTTPS. Updated broken links with latest URLs. Some minor text updates done. Content validated and updated for relevance in 2021. Updated on Aug 2017 - Added MacX Youtube downloader to the list. Updated on November 2016 - Updated latest information about software and fixed minor issues.
0 notes
Text
249 - That Motel Has Color TV and Free HBO - With Guest Mike Potter, Jeff Gamet, and Ben Roethig
The latest In Touch With iOS with Dave he is joined by guest Mike Potter, Jeff Gamet, and Ben Roethig. Warner Discovery is merging services and now HBO Max will be called MAX. Are they crazy with the name change? Must update to iOS 16.4.1 important security fixes. iCloud Keychain do you use it? We discussed working with 1Password and others. We review iPad keyboard folio cases and which one is best. Is free VPN good for the iPhone? Opera browser now has it. Plus more announcements about Macstock 7 and more.
The show notes are at InTouchwithiOS.com
Direct Link to Audio
Links to our Show
Click this link Buy me a Coffee to support the show we would really appreciate it. intouchwithios.com/coffee
Another way to support the show is to become a Patreon member patreon.com/intouchwithios
Website: In Touch With iOS
YouTube Channel
In Touch with iOS Magazine on Flipboard
Facebook Page
Twitter
Instagram
News
You Can Now Order Pizza from CarPlay Because Apparently Everybody Wanted This
Future Chevrolets and Cadillacs will not get Apple CarPlay and Android Auto and then Ford commits to continued CarPlay support as GM, Tesla, and Rivian face backlash for holding out
Apple Releases New Firmware for AirPods, AirPods Max and AirPods Pro [Updated]
AirPods Users Without a Nearby Apple Device Can Visit an Apple Store to Update Firmware
YouTube Premium to Offer SharePlay and Enhanced 1080p Video on iPhone
Urgent security updates for decade-old Macs and 8-year-old iPhones? So much for so-called 'planned obsolescence
Warner Bros. to Replace HBO Max With New 'Max' Streaming Service
Apple Card Savings Account Likely Launching on April 17
Topics
Serious vulnerabilities must update to 16.4.1.
iOS 16.4.1, iPadOS 16.4.1, and macOS 13.3.1 Fix Actively Exploited Vulnerabilities - MacRumors
Apple Releases iOS 16.4.1 With Fixes For Siri Response Issues and Other Bugs - MacRumors
Apple Releases macOS 13.3.1 With Fix for Apple Watch Unlock - MacRumors
Apple Releases tvOS 16.4.1 and HomePod Software 16.4.1
If iOS 16.4.1 is causing CarPlay problems, here's how to fix it
Even older iOS is updated. No Device Left Behind? Apple Releases Swath of Security Patches for Older Operating Systems
Beta this week. iOS16.5 Beta 2 is released this week to both developers and public beta.
Apple Seeds Second Betas of iOS 16.5 and iPadOS 16.5
Apple Seeds Second Beta of watchOS 9.5 to Developers - MacRumors
Apple Seeds Second Beta of tvOS 16.5 to Developers - MacRumors
Simplified iOS 16.4 Beta Installation Method Expands to Latest macOS Ventura 13.4 and watchOS 9.5 Betas - MacRumors
Rumor: Apple Now Testing iOS 16.6 for iPhone Ahead of iOS 17 at WWDC
Using iCloud Keychain How to set up, use, or turn off iCloud Keychain on iPhone, iPad, and Mac
VPN for Free on iPhone? This free VPN is now available to all iPhone owners
iPad Keyboard Folio cases. Which ones are the best? Brydge, Logitech, Apple, Zugu, Zagg.
Here are our top choices.
Logitech Folio Touch - Keyboard Case with Trackpad for iPad Pro 11-inch (1st, 2nd & 3rd gen) and iPad Air (4th & 5th gen)
Combo Touch Keyboard Trackpad Case for iPad Pro 12.9-inch 6th Gen / 11-inch 4th Gen & iPad Air 5th Gen
Macstock 7 is here! Tickets are now available and the speaker list is filling up as Dave,again is speaking at the event. Jeff Gamer, Chuck Joiner, and many others. Please join in all the fun July 22-23, 2023! Speakers Link.
Our Host
Dave Ginsburg is an IT professional supporting Mac, iOS and Windows users and shares his wealth of knowledge of iPhone, iPad, Apple Watch, Apple TV and related technologies. Visit the YouTube channel https://youtube.com/intouchwithios follow him on Mastadon @daveg65,
Twitter @daveg65.and the show @intouchwithios
Our Regular Contributors
Jeff Gamet is a podcaster, technology blogger, artist, and author. Previously, he was The Mac Observer’s managing editor, and Smile’s TextExpander Evangelist. You can find him on Mastadon @jgamet as well as Twitter and Instagram as @jgamet His YouTube channel https://youtube.com/jgamet
Ben Roethig Former Associate Editor of GeekBeat.TV and host of the Tech Hangout and Deconstruct with Patrice Mac user since the mid 90s. Tech support specialist. Twitter @benroethig Website: https://roethigtech.blogspot.com
About our Guest
Mike Potter is the organizer of Macstock Conference: and the host of the For Mac Eyes Only Podcast. You can reach him on Mastodon: https://tooting.ninja/@formaceyesonly https://tooting.ninja/@macstockexpo
Here is our latest Episode!
0 notes
Text
Video Downloader App Review
Video downloader app is an application that allows users to download their favorite videos from the internet for offline viewing. This has become a very popular use for many people, as it is often necessary to watch videos in a place where there is not an internet connection available. This can be very useful for eLearning purposes, or even for simply storing videos that you want to view later on your device. Read more great facts on google pay, click here.
The best video downloader apps offer fast and easy downloads of your favourite videos, with no adverts or watermarks to worry about. Some also have more advanced features than others, which can be useful if you are looking for the best solution to your video downloading needs. For more useful reference regarding vidmate app, have a peek here.
One of the most popular video downloader apps on the market is VidMate, which provides users with a simple and effective way to save their favourite videos from YouTube. Its interface is user-friendly and features are well organized in categories like new releases, top rated and coming soon.
It supports almost all video formats, including MP4, AVI, MOV and WMV. It also has a built-in browser that lets you search and browse for the video you need to download.
This is a great video downloader app that offers a straightforward, easy-to-use interface with support for hundreds of websites. Its video-processing engine is very powerful and will quickly convert any video into a format compatible with your computer, mobile or tablet.
In addition to this, it will also provide you with a full range of editing functions, such as trimming video into clips, merging several videos into one, adding effects and more. It also supports DVD ripping and editing, and can be used on both Windows and Mac.
VDownloader is a free software that works with more than 1,000 video hosting sites, including Dailymotion, Break, Twitch, Vimeo, and more. It's easy to use and includes internal search for videos, as well as features to record live streams and save them with subtitles.
To start, select a video from the list and click the "Download" button. FVD will open a page that lets you enter a file name (optional), as well as choose a resolution and quality. Then, it will automatically pull the filename from the video's URL.
You can also add multiple files to the queue at once and it will automatically process them in batches. This makes it very fast to download a large number of videos at once, and it can help you manage your downloads more effectively.
The program is free to use, but it does have a premium version that allows you to remove advertisements and watermarks from your downloaded videos. It can also be a good choice if you need to download videos in high-resolutions, as it will allow you to do this with ease.
Another great option for free video downloader apps is YTD Video Downloader, which is a lightweight, simple to use, and free video downloader that is available on most devices. The app has a built-in web browser that lets you download videos from YouTube and other video sites, including Facebook and Twitter. Please view this site https://www.wiki-how.in/vidmate-apk-download-latest-verion/ for further details.
0 notes
Link
0 notes
Text
Boom Streams: The Best IPTV Subscription Service Provider
The next big thing in the live video streaming is IPTV. It has taken the live video streaming market by storm. An iptv service is provided by an IPTV service provider in the same way the cable operator works and delivers a live stream of TV program or videos that are streaming live and in demand through internet networks. The tradition TV networks or cable have taken a backseat and IPTV has occupied the front row. OTTs and some best iptv plans for live streaming of videos have changed the way consumers use the services. Anybody who has an internet connection can stream content online on the device of their choice. Thus, with the rising number of people with an internet connection, online content consumption is gaining pace.
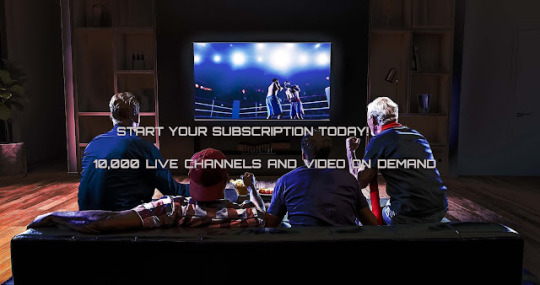
Boom Streams is an iptv subscription service provider that supports many different devices and consumers may watch on any devices and provides reliable service at best prices. They offer more than 3000 US channels, more than 2000 UK and Canada channels covering almost more than 10000 channels. Boom streams have premium channels, VOD Movies, VOD TV- Shows of worldwide channels. Boom streams offer many channels internationally in their subscription plans. Choose the best iptv subscription service and there will be no more expensive cable bills and you will enjoy an uninterrupted IPTV service always up to 99% of the time. There is no delay in buffering or freezing and a free 24/7 customer support for help. Boom streams support all devices including smart phones, STB Box’s/Amazon Firestick/iPhone, iPad, Mac, Smart TVs, Roku and live web browser streaming. According to binge Boom Streams is the best IPTV service provider.
To provide video contents over a private network system in an organization IPTV may be used, but similar ideas are uncommon than subscription options. The subscriber based models are not complex and the service providers avoid scaling issues and network latency. BOOM Streams is a best iptv subscription service provider gives free trial on IPTV subscription from their website.
If you still choose to be a traditional TV channel believer you are missing out on many things. Many subscribers demand live content which is available while streaming then opting for IPTV service provider is the best. In their website they have an iptv subscription free trial for those who want a trial first. Many traditional TV channels are switching to IPTV because of the growing mobile and smart phone users. As the number of smart phone increases it has created a huge demand for IPTV. There are numerous best iptv plans available in Boom Streams.
#best iptv subscription service#best iptv plans#iptv paid subscription#iptv subscription service provider#iptv subscription free trial
3 notes
·
View notes
Text
Free screen and webcam recorder windows 10

こたつパンチラしてる素人さんを盗撮したエ 画像21枚.
Best Free Screen Recorder with Audio for Windows 10, and Mac.
実家で妹を盗撮しまくった変態兄の秘蔵動画&画像集 | スクールガールレビュー.
Two Webcam Recorders for Windows 10 (Default and Suggested).
Free Screen Recorder - Screencast-O-Matic.
撮りためた姉ちゃんのこたつの中の黒タイツ①②パンスト見放題セット | 盗撮動画紹介所.
【坂口みほの】こたつの中でパンチラ・パンモロしてる無防備な下半身にこっそりイタズラ♡ニーハイ美少女jkは声出せずにピンクパンツに染みがつくほど.
シェアハウスで女子高生の着替えやオナニーを盗撮した激ヤバ動画 | 東京パンチラ通り.
盗撮動画ミッション - Part 2.
How to record screen and webcam on Windows 10 - AddictiveTips.
Screen Recorder - Webcam & Voice Recorder - VEED.
30ページパンチラav動画リスト。無料hdダウンロード | Avサンプル.
【熟女画像】人妻熟女のスカートの中を逆さ撮りしたパンチラ盗撮エロ画像 - 熟女画像ハメママ.
眠れるパンティ食い込み動画の美女 - 2nt.
こたつパンチラしてる素人さんを盗撮したエ 画像21枚.
Instructions for use: First, you can select the "Recorder" button in the startup interface to enter the recording interface. Second, Please adjust the area of the screen to be recorded, zoom in, zoom out, move by dragging the border. Third, click the "Record" button in the lower right corner of the interface. Recording begins..
Best Free Screen Recorder with Audio for Windows 10, and Mac.
All you need is a Microsoft Edge installed and you can record anything - tabs on Edge or other browsers, Desktop Screen, or your webcam. Just one click to open the gateway for narrating and sharing ideas, stories, and updates. → How to use StoryXpress to record screen video? - Download the Extension. - Choose from 3 recording modes - Screen. Filmora Screen Recorder. Our top pick to record video from webcam windows 10 is the. Apr 15, 2022 · Top 3. OBS (Windows & Mac & Linux) ⭐ Our Rating: 4.6/5. Open Broadcaster Software (OBS) is an open-source screen recording software that is free to use and can record screens without watermark and time limit. And it's compatible with multiple platforms including Windows 11/10/8.1/8/7, Mac, and Linux.
実家で妹を盗撮しまくった変態兄の秘蔵動画&画像集 | スクールガールレビュー.
パンチラ av動画リスト (30ページ) 02:18:00. mmus-010 - 美人性的妄想過剰セクシズム... 2017年4月27日. 04:00:00. okax-211 - 無防備パンチラ. 向かいの部屋の巨乳美女の生着替えを覗いていると… 平凡な日常、何気なく窓先を覗いて見るとそこには…卑猥でえげつない巨乳美女の生着替え姿が!. Bandicam is a free screen recorder for Windows that enables you to capture any area of your screen either as a screenshot or screencast video file. You can record lectures, webinars, games, and Skype calls with the option to add narration from your microphone and video from your webcam, as well as share on YouTube or Vimeo.
Two Webcam Recorders for Windows 10 (Default and Suggested).
.
Free Screen Recorder - Screencast-O-Matic.
【こたつ】暖かくなってきたけどまだこたつの中はパンチラ天国 20枚... エロ画像美術館... 無料エロ動画 LOVEPOP R18 PANTY-LOVE DUGA FC2動画見放題 6ms カリビアンコム 天然むすめ 一本道 HEYZO のぞきっくす のぞきザムライ アダルトランキング SOKMIL Girl's Blue Fetish. 女子校生(女子高生・JK)専門のエロ無料動画まとめサイト。制服・美少女・ギャル・パンチラ動画が無料で見放題!スマートフォンにも対応 パンチラ盗撮(女子校生・JK・美少女)専門のエロ無料動画まとめサイト。制服・美少女・ギャル・パンチラ動画が無料で見放題!スマートフォンにも対応.
撮りためた姉ちゃんのこたつの中の黒タイツ①②パンスト見放題セット | 盗撮動画紹介所.
Webcam and Screen Recorder Logitech Webcam Software for Windows 10 Free Capture photos and videos, upload to Facebook with one-click, adjust camera settings. Windows Logitech Webcam Software for.
【坂口みほの】こたつの中でパンチラ・パンモロしてる無防備な下半身にこっそりイタズラ♡ニーハイ美少女jkは声出せずにピンクパンツに染みがつくほど.
.
シェアハウスで女子高生の着替えやオナニーを盗撮した激ヤバ動画 | 東京パンチラ通り.
Jan 13, 2021 · 3. ShareX - Free Webcam Capture. Supported OS: Windows. ShareX is a lightweight, free and open source Webcam recorder to record computer screen, Webcam video and take screenshots. The built-in video editing tool of ShareX helps users edit videos, add video effects and add watermark to photo..
盗撮動画ミッション - Part 2.
Version: 4.2.8 Updated: May 27, 2022 Support external device capture. This webcam screen recorder also provides the video editing option Debut Video Capture is also a great free webcam recording software for Windows 10. Super Webcam Recorder is a tool enabling users to capture streaming video and snapshots. Internet. 覗き大好きなあなたへ…素人女性の動画&画像がてんこ盛りサイト!... 街でolをストーキングしてパンチラを盗撮した映像! 目をつけたolにスッポンのごとく食い下がり盗撮! 街を歩いていて好みのタイプの女性とすれ違った時、思わずムラっときて後を.
How to record screen and webcam on Windows 10 - AddictiveTips.
京 府某温泉宿で隠し撮り 修学旅行女子学生たちのこたつパンチラ盗撮3 60人300分... 【動画配信限定特典映像付】部活合宿で出会った たわわな天使たちとただ欲望のままに…~ロリ巨乳、風呂・着替え盗撮、夜 い、乱交、猥褻映像~. Instructions for use: First, you can select the "Recorder" button in the startup interface to enter the recording interface. Second, Please adjust the area of the screen to be recorded, zoom in, zoom out, move by dragging the border. Third, click the "Record" button in the lower right corner of the interface. Recording begins.
Screen Recorder - Webcam & Voice Recorder - VEED.
こたつの中だからと安心しきって無防備にお股全開パンチラ美少女にイタズラ三昧♡。特にフェラに興味のある方、是非ご視聴下さい - 動画ちゃんねるの無料エロ動画。.
30ページパンチラav動画リスト。無料hdダウンロード | Avサンプル.
ゲーセンで椅子に座っている女の子の対面パンチラ動画w... こたつパンチラ画像101枚。こたつ布団で見えないからと大胆に股を開いて座ってるjkやミニスカギャルのこたつパンチラや人妻のテーブル下パンチラをお楽しみください!.
【熟女画像】人妻熟女のスカートの中を逆さ撮りしたパンチラ盗撮エロ画像 - 熟女画像ハメママ.
. ホーム パンチラ・逆さ撮り 【パンチラ】お花見で盗撮された座りパンチラ動画... 【パンチラ】セーラー服の女子高生の汚れたパンティーのしゃがみパンチラを対面から盗撮. Jan 12, 2019 · Click or tap on Cortana's search box from the taskbar and type in the word camera. Then, click or tap on the Camera app. To record videos with the Camera app from Windows 10, you first have to switch to Video mode. Click or tap the Video button from the right side of the app's window. Then, to start recording a video with the Camera app, click.
眠れるパンティ食い込み動画の美女 - 2nt.
More Than Just Free Screen Recording. Upload an existing video or record your own with the Vidyard Screen and Webcam Recorder. Embed your video on your website, send it in emails, or share it on social media with just a few clicks. Get notified the moment your video has been watched (and see who watched it, and for how long). そうやって盗撮された妹の着替え、お風呂、トイレ、オナニーの写真や動画をかき集めてみました。. パンチラやブラチラは言うに及ばず、さらに過激な部分が映ってしまってる映像も!. ロリコンでシスコンのあなたならきっとわかる家庭内盗撮の魔力. Supported OS: Windows, Mac. Price: Free but $30 for the PRO version. #5. Litecam HD. This is a great tool for recording your webcam and screen since it is designed to capture everything that appears on the screen. You can add your overlay in the settings. Pros.
Other links:
Macbook Pro Install Windows 10 From Usb
Scanner Software For Windows 10 64 Bit
Fl Studio Registration Key Generator
Mario 3Ds
Free Audit Programs Download
10 notes
·
View notes
Photo

Hello! As requested, here is a tutorial on how I make my gifs. I would like to preface this by saying there are many ways to make gifs, and there’s no right or wrong answer imo. This is just how I personally go about doing so!
I will be using PS CC 2017, but as long as you have the video timeline option, it shouldn’t matter too much; on any version of PS, you should be able to adapt anything I mention here! You will also need some kind of screen recording software. I’ll talk a little more about that under the cut.
To start, you need the source material you will be making the gifs from! I get mine from snahp(.)it (avoiding links so tumblr hopefully doesn’t banish this from the tags lmao) and I always opt for either 1080p or 2160p. Not all laptops will support 2160p as it’s 4K, but either works great! You just want your gifs to be the best quality possible.
Next is where the screen recording comes in. I don’t use the screencapping method to make my gifs (where you use a program to cap a clip and then load those caps into a stack in PS). This isn’t for any particular reason… it’s just how my friends, (who very kindly taught me to gif), had always done it, so it’s now how I do it too. Personally, I find the quality to be just as good as the screencapping method, and have never noticed a difference between the two.
As I have a PC, I use the software built into it for screen-recording. If you go here: theverge(.)com/2020/4/21/21222533/record-screen-pc-windows-laptop-xbox-game-bar-how-to – you can see how to use the XBOX screenrecorder to record from files you have d*wnloaded. This also works on some streaming sites, but I think it depends on what browser you use. Personally, I recommend Firefox, as that seems to bypass a lot of the blocking and ads that occur when trying to do this sort of thing.
For MAC users, I have been told handbrake works well, as it converts MKV files to MP4, which can then be used to make gifs. You only need to convert part of the file to MP4 depending on how much you want to gif, and this also bypasses the screenrecording stage, as you can edit MP4 clips on Quicktime. I am told you can split them into smaller clips by going to edit > trim and it saves the new clip!
I have also used anyvideoconverter for small clips, but I can’t say what it does to the quality of your video, or how big of a file it lets you put in! With the XBOX screenrecorder, it doesn’t matter what type of video files you get, as the recording will save to MP4 anyway.
LOADING YOUR FRAMES
Now, go ahead and record whatever clips you want to gif. Make sure you have the video timeline open, by going to window > timeline. Then, go to file > import > video frames to layers.
Next, select and open your clip from where it has saved (with the XBOX recorder, it saves in video > captures). You should see a little window pop up, where you can move the sliders back and forth to clip your recording to whichever part(s) you specifically want to gif. I recommend trying not to load a lot of frames into photoshop at once, but I would be a hypocrite to say that, since I do it a lot lmao. Just be patient if you do!
Once you have chosen the length, click okay. Never, EVER, I repeat NEVER click the button that says “limit to every __ frames”. This really ruins the flow and quality of your gif—it’s better to have shorter, but smoother gifs, I promise. And with tumblr’s new 10 MB limit, it shouldn’t be a problem anyway!
Then, your frames should open up. What we want to do is make them into a smart object, so we can edit all the layers at the same time. To do this, click the small button in the left-hand corner. ALWAYS click this first. If you don’t, it will only convert the first frame to a smart object and the gif won’t work.
Give it a second to sort itself out, then, on the right-hand side, select all your frames at once using the shift key.
Then, go to filter > convert for smart filters. This might take a minute. Don’t click anything else in case PS gets angry lmao, just leave it for a second and it’ll do its thing. The more frames you have, the longer it takes! Now we have our gif, but it needs to be cropped, sharpened and coloured!
CROPPING
You want to start by selecting the rectangular marquee tool on the left-hand side, then drag it across by clicking and highlighting the area you would like to crop your gif to, like so:
What I tend to do is select everything inside the black lines you sometimes get around your gif (this depends on what file you d*wnload), and also the tiniest bit inside the sides. This is because I’ve found if you crop it right up to the edge, you get a tiny bit of transparency on the sides of your gifs, which I’d rather avoid.
Once you have your desired selection, go to image > crop. Now, the dimensions for tumblr are 540px width, so all your gifs have to be that width. However, the length is up to you. I really like big gifs, so sometimes I even make a full square, or even longer. It’s entirely up to you, and what kind of set you want to make.
For the purposes of this gif, I will stick to what I usually go for, 540px by 350 px. This will mean you’ll have to crop some width off, but that’s okay, since Marisa isn’t central anyway. The cropping is always trial and error for me, as sometimes people move out of the frame within in the gif. The best thing to do is just try it, and then move the slider in the timeline window at the bottom to see if the person stays inside the gif, and if not, adjust accordingly.
Next, go to image > image size:
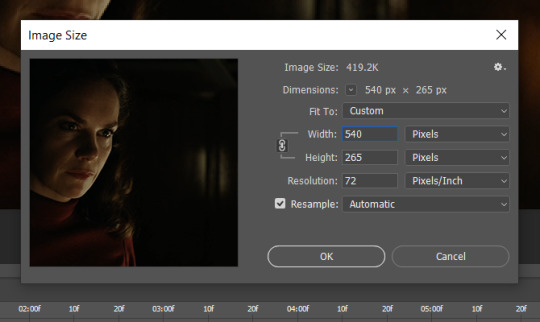
In this box, if I put the width as 540, the gif is a smaller height than I want, as it keeps to the dimensions of the gif when you load it into PS. That’s okay, just put the height you want instead, and we’ll crop off the excess.
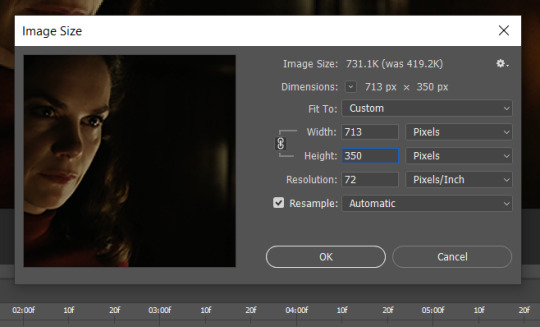
Then click OK. Using the rectangular marquee tool again, we need to remove the excess width. Part of the reason I like this version of PS is that it tells you the width of your selection as you do it, but you can always use the ruler as a guide, and check the size of your image by going to image > image size again.
Again, use image > crop, and your gif should now be the correct size!
You can also use the crop tool in the timeline window to crop the length of your gif:
However, I tend to wait until later on to do this (which will be explained further down!)
SHARPENING
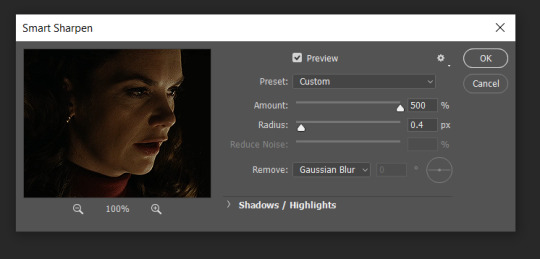
Next you want to go to filter > sharpen > smart sharpen.
These are my settings. However, 0.4px is very sharp, too much so, but that’s easily fixed.
Go to filter > blur > Gaussian blur and then set it to 1.0.
Now on the right-hand side, we need to reduce the blur, so double click the little adjustment button, and change the opacity of the blur. I usually go for 20-30%!
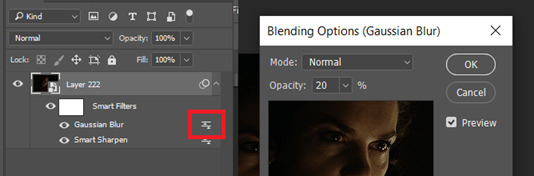
Then click OK, and that’s your sharpening done!
COLOURING
I picked this scene on purpose as it’s dark, so good for showing how to colour a gif. I have a base psd which consists of some very basic adjustments, but it mostly exists so I don’t forget what adjustment layers I like to use. I adjust them every time I make a gif, essentially colouring each gif from scratch.
In this case, the psd actually makes it darker. So, what I will do is turn each layer off, and adjust as I go. A lot of people say using lots of adjustment layers ruins the quality of your gif… I have never found this to be true, as long as you are gentle with them. If you whack the brightness right up to the top, it’s going to ruin your gif no matter if you use 1 adjustment layer or 100. I would just say use your common sense, and adjust a little at a time!
I start with a simple black to white gradient map set to soft light, because I think it helps you see depth once you add some brightness to it. I usually do this on about 10%, or more if needed. It’s probably unnecessary, I just like how it looks!

Then, I move onto using curves and levels. This is where things can diverge depending on who you’re colouring. If this person is white, it doesn’t matter too much. If they’re not white, you don’t want to white wash them. My best advice is to play around with it. By adding vibrance and other (usually the red) selective colour settings later, you can ensure you don’t change the person’s skin tone from what it originally was. You can also use layer masks at varying opacities (various shades of grey), on your curves and levels, to remove some brightening so that you’re not changing anyone’s skin colour. Just brighten slowly and check in with yourself honestly about how your gif looks.
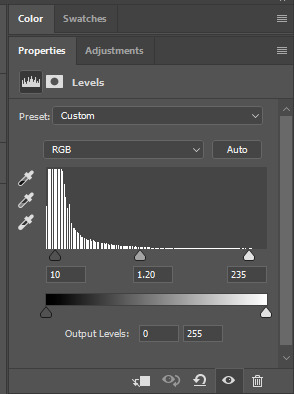
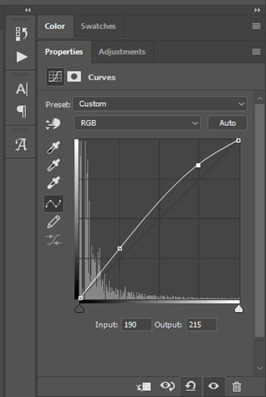
Some people don’t like using levels, or curves. It’s completely up to you. I tend to use both because levels are good for bringing depth, even if not brightening (though I like to use them for that as well).
One thing you can do is use the white point of the gif to make PS adjust the curves itself, however I like to drag the sliders myself and see what it looks like. Just make sure it’s not too bright, as we will be using further layers to brighten more, after.

Next is levels. The slider on the left controls the black point, the one in the middle controls the midtones, and the one on the right controls the white points. The black brings depth, the midtones adjust the overall brightness, and the white points produce stronger highlights. Again, you’ll get a feel for how this works as you practice. Just don’t use the white point excessively, especially if your characters are not white.
Then I add vibrance (+20!), because we’ve removed a lot of it when lightening the gif. Next is exposure, which I find brings out the highlight and shadow areas more effectively:

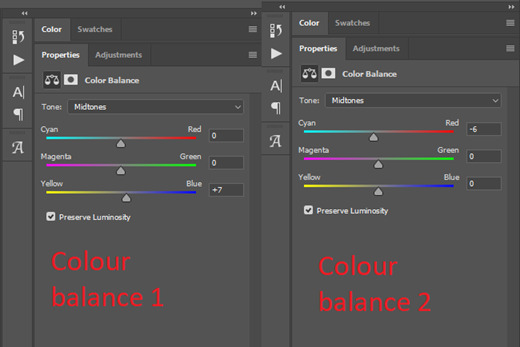
Then colour balance! This helps with scenes that might be a certain colour, i.e. too blue, too green, too red, etc. Moving the sliders in the opposite direction of the colour your gif is will counteract it. The best thing to do when accounting for different colours, is to make a new layer every time you change colour, so that you don’t get confused. I always add a new layer for colour balance and selective colour if I want to change more than one thing. So one for red, one for yellow, one for pink, etc.
A layer of brightness just to make the gif pop, and because the scene is extra dark, I added a very gentle extra curves layer:
SAVING YOUR GIF
Time to save the gif. You can go ahead and file > export > save for web (legacy) now, but then you’ll have to reopen the gif to reset the frame rate from 0.07, to 0.05. Instead of doing that, I use a modified action. The original was made by the very talented @elenafisher! So I do not take credit for that at all. You can find the original here: elenafisher(.)tumblr(.)com/post/190817437374/gif-sharpening-action-2-preview-download and in my resources tag. Please reblog it if you’re going to use this!
To use an action, first make sure you have actions turned on in window > actions. To load in your action, go to the little lines circled, and then load the action from your downloads:
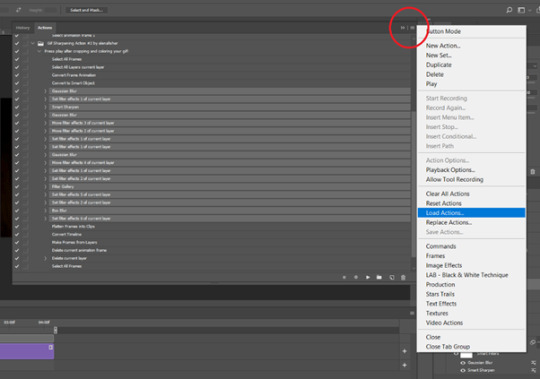
Obviously if you don’t want to sharpen your gifs yourself, you can use the action as it is, and it will give you a beautiful glowing effect. If you’d just like to use it to flatten your gif into frames like I do, make sure to take out all the items I have highlighted:
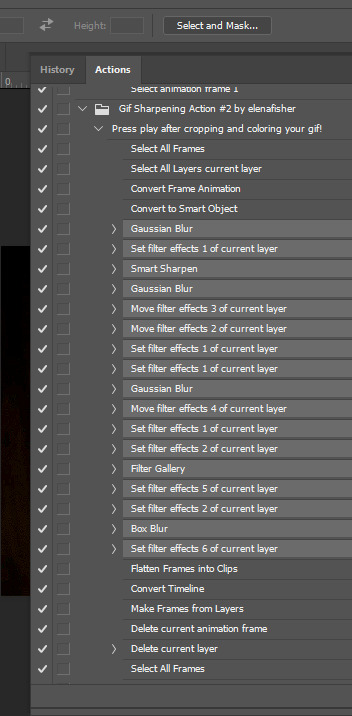
Until it looks like this!
Make sure you have the layer under the file name highlighted, and then click the play button at the bottom! (If you get a screen saying select all frames cannot be found, don’t worry, just click continue!) You can delete the layer that does that if you want, I just keep it in case I realise I’ve forgotten to do something, because you can click cancel and edit your gif before you flatten it. Of course you can undo the steps to get back to the smart object version of your gif, it just takes longer!
And now your gif is in frames and set to 0.05 already, so you don’t have to change the speed! All you need to do now before saving is change the gif cycle to “forever” in the bottom left-hand corner:
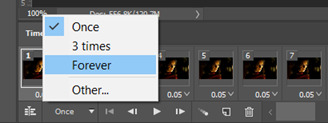
Then to save the gif go to file > export > save for web (legacy). Sometimes, the gif is bigger than the tumblr 10MB limit. You’ll be able to see this in the bottom left-hand corner of the gif save settings. If this is the case, I like to preview the gif, to see whether it would be best to cut frames off of the beginning or the end, or both. When you’ve decided, you can select the frames at the bottom, and in the right-hand side panel, and delete them both using the little bins/trash icons.
I keep checking and deleting frames until I get the gif under 10 MB! Just don’t delete frames from the middle, as then you’ll have the same issue as if you selected “every other frame” when making the gif: it won’t flow!
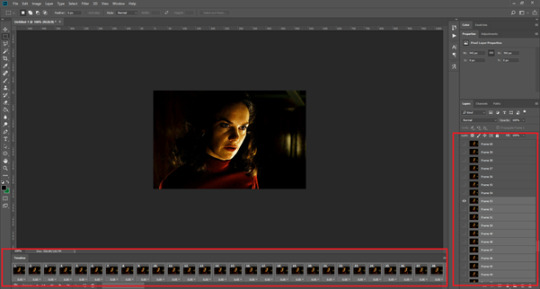
Lastly, these are my save settings:
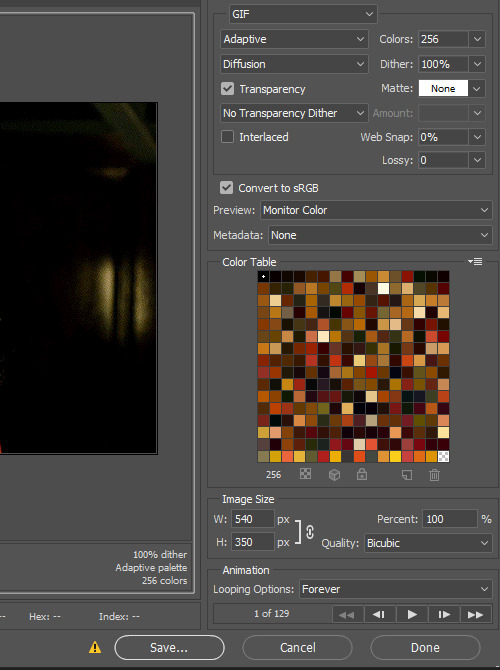

So that’s it! That’s how I make all my gifs. Blending I do when the gifs are in the grouped, smart filter stage, whereas text I add on during the framing section above! Really hope this is helpful, please feel free to ask any questions you may have! 💖
#gif tutorial#tutorial*#completeresources#yeahps#chaoticresources#allresources#mikesmom#usergeo#userava#usertix#usersmile#usertom#if you'd like me to cover anything more advanced just shout#i wanted to show how i add text too but tumblr wouldn't let me add any more pics#but people can let me know if that's something you'd want!
518 notes
·
View notes
Text
My GIF making process!

I’ve been asked many times for a tutorial, but because I get really detailed, I always get overwhelmed by the idea. But I finally decided to buckle down!
Just so you know: I don’t use PSDs in this, and I don’t import layers to frames or anything like that. I like the hard way—at least in gif making, I believe you get higher quality gifs. Join me as I show you how to make gifs by loading videos directly into the Photoshop timeline and my coloring and sharpening techniques.
Tools used:
Mac OS X (only necessary for the first step, and there are other ways around it with a PC)
Adobe Photoshop
YouTube Purchases (any streaming service will work)
Topics covered:
Obtaining the Source Material
Loading the video file into Photoshop
Prepping, Cropping, and Resizing the Media
Adjustment Layers
Sharpening
Exporting
Obtaining the Source Material
There are a few different methods for obtaining video to work with. Proper YouTube videos are nice, but finding any major motion picture in that format is difficult, if not illegal.
Once I realized I could get really great quality video by doing screen recordings from streaming services, I stopped worrying about finding (and pirating) high resolution video files. So now, I just go to whichever streaming service I need to, pick out the movie or show, find the spot, and record small snippets.
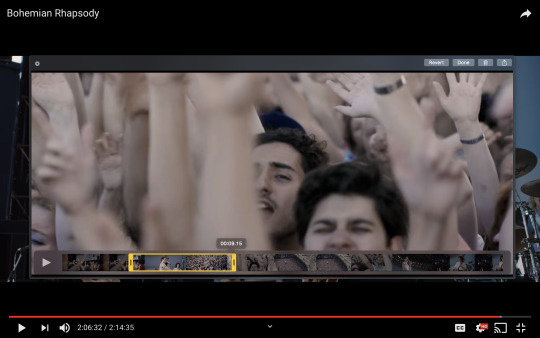
Mac screen recording instructions:
On a Mac, Command+Shift+5 will bring up the screen recording dialogue.
Resize the frame of what you want to record within the browser.
Go to a second or two before, press the “record” button, and then begin playing the video, remembering to keep your cursor out of the recording box.
Use the Space bar to pause your video when you’ve gotten the snippet you need. Stop the screen recording by clicking the ⏹ button that is in your menu bar at the top of the screen.
Important: when the recording appears in the bottom right of your screen, click on it, and then trim the video on either end. This will help your computer convert the video file to the type that can be opened by Photoshop.
Click “done” and it will appear on your desktop, ready to be used!
PC Users: ??? Here’s a Google search I did for you
Loading the video file into Photoshop
Lots of people use this process for making gifs (a great tutorial!). I didn’t even know it existed until last summer, when I’d already been giffing for years. I wish I could still do something like that with these screen recordings, but the files are absolutely HUGE, especially on Macs with double retina displays, which actually increase the dpi by a lot. Making screencaps of them fills up my hard drive, almost immediately—even when I’ve got 20 gigs of free space to work with. So what do we do? We just. Open the file. In Photoshop. Et voila!
You can do this with any type of video, not just screen recordings.
Prepping, Cropping, and Resizing the Media
When Photoshop loads your videos up, it makes the video hilariously fast (something about frame conversion). You must slow it down for it to look natural. THIS MUST BE DONE BEFORE YOU RESZE. Your Photoshop timeline window should be at the bottom of the screen. See that little triangle in the top right of the video?
Click on it, and a menu will appear to change speed and duration.
Change the speed first- usually between 80-85% will seem realistic. (I actually went a little faster than I usually would on this at almost 86%—I don’t recommend this)
Press the button next to duration and pull the toggle all the way to the far right (if you don’t do this, full length of the video will be cut off).
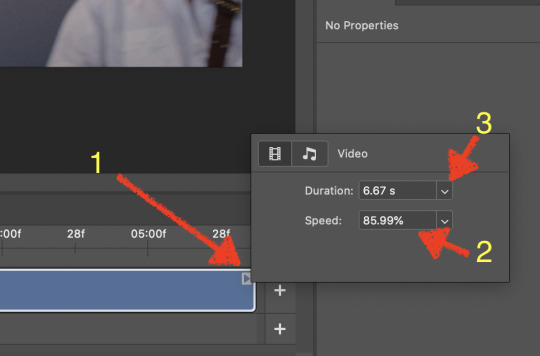
Now you’ll want to crop it. Ever since Tumblr upped its GIF size limit, I have been playing around with 7:5 ratios, but let’s go with 3:2 for now. Use the Crop tool, pick out 3:2 in the top left (it may say 2:3, but you can switch that) and then find the most suitable spot in your gif for that. Hit enter on your keyboard.
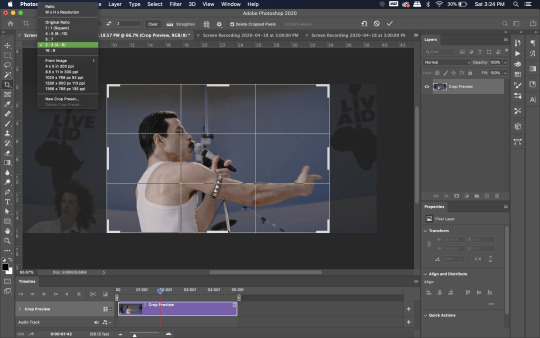
Some things to keep in mind when cropping:
Most videos come in 16:9 ratio (BoRhap is even wider). If it’s a wide shot, you’ll need to do the full 16:9 to not lose anything. Of course, experiment and find what’s right for you!
As you can see above, I moved forward in the timeline and made the crop to a point in the video when the broadest movement was happening.
Certain videos WILL have a black or red bar that may be imperceptible until you’ve already exported the gif. Just crop in a little tighter on top and bottom to avoid them.
Now you’ll need to resize your gif to be the correct size for Tumblr. If you don’t use Tumblr’s exact dimensions, your gifs (as uploaded) will appear blurry or pixellated. We’re doing a full-width gif here, which is 540px. On a Mac, I use Command+Option+I (for “Image Size) to open the resize dialogue. You can also find it under Image->Image size...
Make sure to also have “Resample” checked. Lately I’ve been playing around to see if different options are better. Most GIF makers use “Bicubic Sharper (Reduction)” and they are not wrong to do so. I’ve just been unhappy with it lately, so I have been trying this other setting out, “Bicubic (smooth gradients)”.
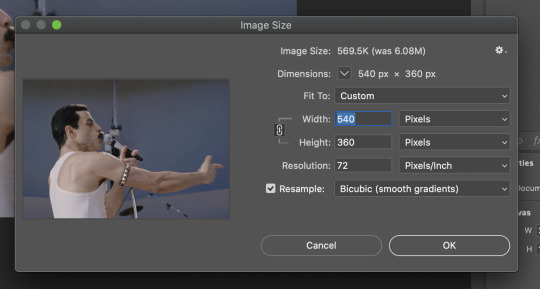
Click OK. A dialogue may come up that asks if you want to convert to a Smart Object. The answer is yes, okay, do it. The only major caveat is that you can’t go back and change the timeline speed. That’s why we did it first. But you can preview the speed now that it’s smaller, and if you don’t like it, use Command+Z (or “Undo”) and go back a couple steps to get the speed you like.
You may find, especially on a Mac screen (and possibly other displays), that at 100% your gif looks too small to be 540px. That is the curse and blessing of working with super-high resolution hardware. Zoom in to 200% and proceed about your business. This is what it will look like on Tumblr.
You may find it helpful at this point to begin by defining the beginning and end of your gif by moving around these bumpers. It’s safe to keep gifs under 02:00f in length. Under half of 01:00f will be way too short. (I tend to overshoot in length and then trim the beginning and the end once I see how big the gifs are upon exporting.)
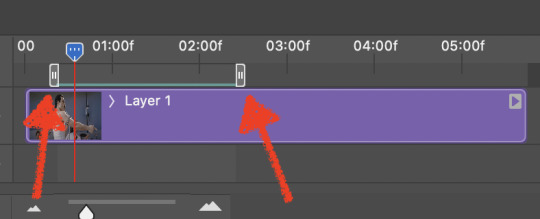
Adjustment Layers
Now the creativity and fun begin!
There are a LOT of ways to get creative here. I’m going to keep it simple, very simple, but I strongly recommend opening up a new adjustment layer of each type and trying to figure out what each does!
You’ll find the adjustment layer menu at the bottom of the Layers window.

Curves
There are a lot of ways to make Curves work for you! It can do the job of Brightness/Contrast, it can do Levels, it can do Color Balance! We’re going to use it mainly to help with brightness here, but also to level out some of the tones. One of the quick tricks you can do is use the droppers on the left side of the Properties window. There are three- one with a white tip, one gray, one black. These can help define what your white tones are (and whether they need to be more of one color or another), and so on with your blacks. Sometimes it works, sometimes it doesn’t; in this case, I think it doesn’t:
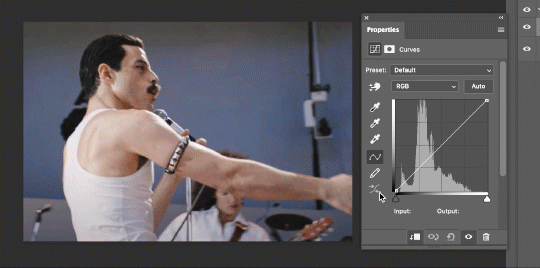
That looks totally blown out and somehow also too dark!
So instead, we’re going to use that little hand with the finger pointing out and some arrows pointing up and down. This lets you define which sections you want to get brighter or darker, and how much. It doesn’t do color correction. In the example below, you can see I dragged up on a white spot and down on a dark spot. Then, I moved points around on the curve itself to refine (which the gif here doesn’t show...).
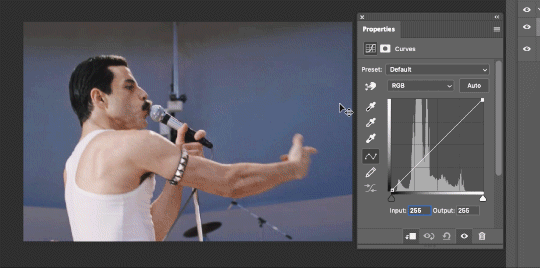
Vibrance/Saturation x2
Next, I’ve been using @gwil-lee‘s Vibrance/Saturation trick (I know you said you learned it from someone else, but I learned it from you!).
Create a Vibrance Adjustment layer, bump the values up a bunch, and then change its Fill to somewhere between 2-9%. Change the Blend Mode to Color Burn. Then make a copy of that layer keeping everything the same, but make it Color Dodge. I can’t quite define what these do, but it makes it punchier!

Color Balance
Most people are familiar with this. For this gif, I’m going to make the shadows more Cyan/Blue and the highlights more Red/Yellow. Just a few points each.
Exposure
I brought the Exposure up a bit, but not enough for you to need to read about, haha.
Selective Color
Here’s where you make fine adjustments to colors. This particular scene is extremely simple, color-wise, so keep it simple. I’m going to bump up the cyans/blues, take up the black by just a point or two, and maybe bump up the yellows and reds a tiny bit. (And as always, remember, the “opposite” of cyan is red, the opposite of magenta is green, and the opposite of yellow is blue. CMY/RGB!)

I think at this point I’m going to call it with the adjustment layers. You can go absolutely hogwild with more of them! But at this point, I’m ready to start sharpening!

Sharpening
I do three sharpening filters these days. These are all under Filter->Sharpen. Make sure your media layer (default called Layer 1) is selected as we go through this! (Also, this can really take a toll on your processor, so don’t say I didn’t warn you.)
Sharpen- This layer does the basic job
Smart Sharpen (Amount: 10%, Radius: 10, Reduce Noise: 4% Gaussian Blur)- This layer gives texture
Smart Sharpen (Amount: 500, Radius: 0.3, Reduce Noise: 12% Gaussian Blur)- This layer gives refined sharpening and smoothing
Fiddle with these as needed! Let your gif play all the way through- this may go slowly as your processor works on it. Make sure the beginning and end points make sense.
Exporting
After You’re going to have to use File->Export->Save For Web (Legacy)... or use the shortcut of Shift+Option+Command+S. This could take some time for the dialogue to pop up! Be patient.
In my opinion, these are the best gif export settings for crisp edges and no noise:
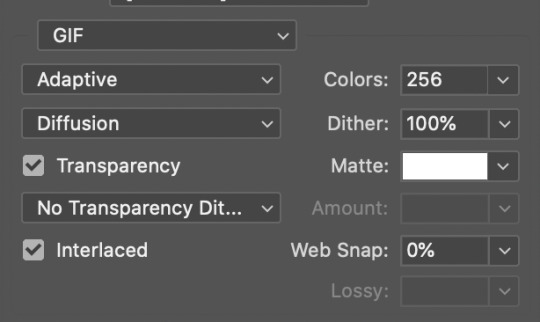
Now you see how big the file is in the bottom left. Tumblr won’t let you upload anything bigger than 10MB and it’s safer to stay under 9MB, in my experience. When your gif is too big, you have a couple options. You can close the dialogue and change the length of your gif.
OR, you can uncheck “Interlaced” and bump up the lossy to 1 or or more. This will create noise. Sometimes, that’s a good thing!
Here’s without lossy:
Here’s WITH lossy: (Honestly in a fast moving gif like this, it’s almost imperceptible, but I can see it!)

And now that I’ve exported, I can see what there’s a little black line on the bottom! So I’m going to trim that off and call it good! You can see the full gifset here.
Hope you enjoyed! Reblog if you try this out or learned anything. Feel free to reach out with questions any time!
378 notes
·
View notes