#because the photographer's photos are higher quality than the iPhone photos
Explore tagged Tumblr posts
Text
After many frustrations with my iPhone camera thinking it's smarter than it really is, I've decided I need to get a camera. Don't know what kind yet 'cause I'll have to research the best kind I can get for not-too-too-much-money, but I think it would be nice to be able to take nicer pictures and also not have to worry about my phone storage space filling up so fast.
#my sister's wedding kinda set me on the idea#because the photographer's photos are higher quality than the iPhone photos#but my gosh everything is So White and I don't know if it's because of her flash or because she added a filter#but anyways I thought it would be nice to be able to take really nice pictures of people without having to deal with photographer trends#so sometime after Christmas when my bank account has calmed down I'm gonna start looking into that#I am open to recommendations btw
5 notes
·
View notes
Text
The “eyes” have it
Did you know?
A study, conducted at the University of Glasgow in 2013, found that Eye Reflections in Photos Can Reliably Identify Who's Behind the Lens.
To test how effective a mirror the cornea was, researchers took passport-style photos of college students in a lab setting. Bystanders were placed a few feet away, facing the subjects, while the photos were being taken. When the researchers zoomed in on the subjects' eyes in the photos, they were able to see pixelated versions of the bystanders' faces.
“...the scientists found that study participants could correctly identify most of those tiny faces. When the bystanders were strangers, participants could correctly match a pixelated photo with a higher-quality headshot 71 percent of the time. When the reflected faces were people the participants knew, the rate of successful identification jumped to 84 percent. “
In this study, the researchers used a high resolution camera (39 megapixels). As a result, their reflections were clearer than what the average cellphone camera would produce under the same conditions (The 2016 IPhone 7, for example, has a resolution of 12 megapixels). The study concluded, though, that, if the viewer knew the person reflected, they could identify them even when the picture was blurry.
“Previous psychological research has established that humans can identify faces from extremely poor quality images, when they are familiar with the faces concerned. For example, [the researchers] found that viewers could identify blurred photographs of familiar faces with equivalent image resolutions as low as 7×10 pixels.”
Identifiable Images of Bystanders Extracted from Corneal Reflections
The researchers used a pixelated image of Barack Obama as their example.

For our fandom, the equivalent would be a pixelated image of this guy.
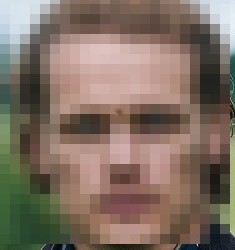
Subjects in the study were reflected in a human’s eye. If a human eye, with a cornea measuring approx 11.5 mm in diameter, can capture reflections, imagine what a cat’s cornea, measuring 16.5 mm in diameter, might reveal.
Maybe we don’t have to just imagine, though.....
Say a cat (we’ll call her Eddie) received a jaunty Christmas bell collar in December 2016 that she felt was beneath her dignity to wear.
She may have felt compelled to glare at the person (or people) responsible for said gift as they were taking her picture.
Let’s take a look and see if we can identify, with at least reasonable certainty, who she might have been plotting revenge against looking at.
Original picture posted by Cait on 12/25/2016

The picture has been cropped and enlarged below with the most prominent reflection (person #1) on Eddie’s left eye, circled.
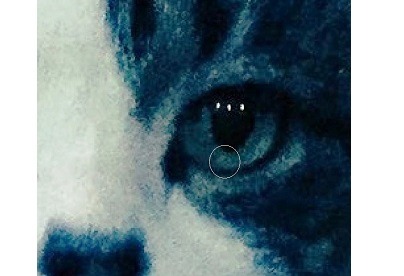
Below, the image has been further cropped and enlarged, again with the reflection circled. Tilt your head just a bit to the left. Do you see it yet?
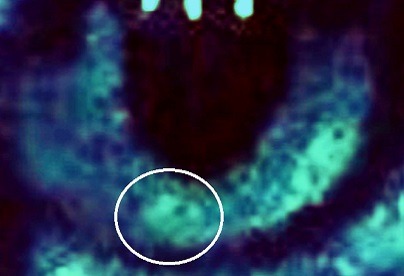
If not, no worries. In the following gif, I’ve tinted the reflection with sepia and enhanced the image using contrast and lighting tools (from a free, online site..nothing fancy). At the end of the gif, I’ve removed the background to show only the reflected face.

Now that we have an enhanced face of person #1, is there a reflection of person #2? Though it’s harder to see, I happen to think so.
Below I’ve gifed the progression of highlighting person #2. I used the same photo enhancement tools as with person #1 (sepia tint, contrast and lighting) but also added color tints for the phone (white) and sleeves (red). ( Note: I can’t say for sure that she’s wearing a shirt with long sleeves, but I wanted to break up the monotony of the sepia tones, in part to make it easier for you to distinguish the hand that’s covering part of her face from her face itself.)
As the image emerges below, you will first see her arms/hands and phone and then her face/hair.

Next, similar to what the University of Glasgow researchers did in their study, let’s compare the reflections to an actual picture of the likely subject.
Person #1 appears to have a beard, or at least several days worth of facial hair, and he’s wearing glasses. (Though appearing dark-tinted in the reflection, these would be regular glasses.) His hair is light in color and looks longish on top with some curl there and over his ear. His overall appearance seems casual/scruffy, like he’s a man on hiatus from work, hanging out at home “sort of personally” with his cat and...well...his Cait.
Here is the reflection side-by-side with a picture of scruffy Sam from a more recent hiatus.

And here, I overlay the two images.

Moving on to person #2, here’s a side-by-side of her reflection with a recent picture of Cait. (I flipped the 2019 picture so that her head was tilted in the same direction as the one in the 2016 reflection.) I didn’t overlay these images, but Cait being there is a pretty safe bet. After all, she took/posted the picture.
Like Sam, Cait appears to be wearing glasses in the reflected image with one lens visible and the other blending in with her dark hair color.
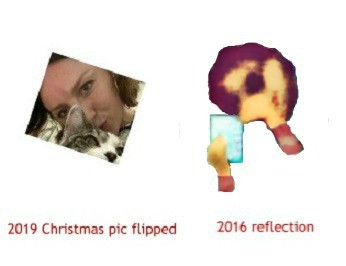
In summary:
The picture of Eddie was taken in a less ideal setting, in terms of lighting, and with a lower resolution camera (likely an Iphone with 12 megapixels) than those taken in the University study.
Despite this, images of two faces can be seen reflected in Eddie’s eye.
As in the study, the “bystanders” (Sam and Cait in this case) were close to the “subject” of the photo (Eddie). How can I deduce this? Because pictures of the “pancake kitchen”, where this picture was taken, were posted on a public realty site when the flat was for sale, so the layout of the kitchen is known. ( *See “re-enactment” photo ...term used loosely here...below.)
Because I am very familiar with their faces, I am able to recognize that the images reflected in Eddie’s eye bear a strong resemblance to Sam and Cait and, therefore, conclude with reasonable certainty that it is them.
Reflections aside, the cat collar always screamed “picked out by Sam” to me.
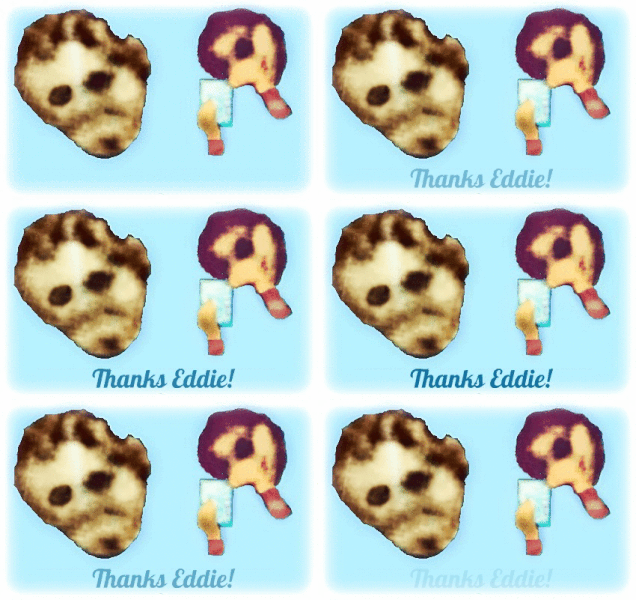
* “Re-enactment” picture

It probably won’t come as a surprise that the idea to do this “re-enactment” came to me in the early morning hours on a night I had insomnia. I combined both the reflected faces and Cait’s reflected hands/arms with stick figure art, found online, for their bodies. The result is...well...not art .. but a cute, if a bit silly, rendition of the scene showing you approximately where SC would have been in relation to Eddie.
It’s not perfectly accurate, of course. In reality...
SC were likely sitting at Eddie’s level or at least crouched down to it.
Eddie was sitting on that location of the table but turned toward SC.
Based on the size of his reflection vs Cait’s, Sam’s face was probably a bit closer to Eddie than Cait’s was when the picture was snapped.
Sam was probably not wearing a necktie and was (probably?) wearing pants. ☺ (Cait would so wear that dress, though.)
As an aside, even though there’s no proof of where Sam’s arms are from the reflection, I like that his stick figure arm just couldn’t help but go around Cait’s shoulder. Art imitating life.
So there you have it. Do you see what I see? Don’t see it? See it, but don’t want to believe it? I respect all opinions, but this is meant to be something fun to speculate about (Remember fun? I know it’s rare in our fandom these days.), so maybe give that a try or, if not, scroll on by.
320 notes
·
View notes
Text
Lighting The Dark Research
What Is Light Painting?
Sometimes called light drawing or light graffiti, light painting is the photographic technique of using a moving light source—such as a flashlight, glow stick, light brush, or even a smartphone—to alter an image while taking a long exposure photograph. Instead of just capturing an image as-is, light painters add another element by highlighting an object or creating streaks, colors, or flashes within the image.
What Camera Settings Are Best for Light Painting?
As with any specialized kind of photography, you’re going to want to play around with your camera settings in order to figure out the exact ones to use for the effect you desire. But there are some specifics that can help you get started with light painting.
The most essential thing that’s different from the majority of the photos you’ll probably take is the fact that you’re going to want a long exposure. We’re talking really long: at least 30 seconds, if not longer, depending on what you’re creating. A long exposure allows your camera to capture motion in a blur, while stationary objects stay crisp. In the case of light paintings, the motion will be a light source.
Here are the most basic settings you’re going to need to set on your camera in order to successfully get that long exposure and create a light painting:
Mode: Manual or bulb
Shutter speed: 30 seconds
F-stop or aperture: 8 or 10
ISO: 100
How to Set Up Your Camera for Light Painting: Step-by-Step Guide
Determine base exposures. You need to determine the base exposures of the ambient light, before you even add any new light painting elements. Because you’re working with long exposure times, it can help to set your ISO to six stops higher than the ISO you’ll be using. If you’re using ISO 100, that means you’ll set it to ISO 6400. At that ISO, figure out how many seconds you need to expose the ambient light. One second at ISO 6400 is equal to one minute at ISO 100. Once you’ve figured out the exposure in seconds, set the ISO back to 100 and check the exposure in minutes. If it matches up, you have your base exposure time.
Focus the image. It’s important to focus your image before you start light painting, but that can be difficult in the dark. This is where the manual focus setting is useful. If you have the option of turning on an overhead light, you can do that in order to focus the camera. But if you don’t have an overhead light—like if you’re shooting outside—you can simply point a light source at a part of your scene that you know needs to be in focus. Leave that light source on as long as you’re focusing and turn it off once you’ve found your focus.
Begin the exposure. This is the fun part! It’s time to begin your exposure and start painting. The majority of cameras will allow exposure times of up to 30 seconds, so if you want a longer exposure time than that, set your shutter speed to bulb mode. Bulb mode means the camera will keep taking the photo until your finger leaves the shutter button (or remote shutter release).
What Equipment Do You Need for Light Painting?
You’ll need some basic equipment to create light painting photography, as well as some slightly more complicated camera settings. We’ll go over both. First, let’s discuss equipment.
Camera. You’ll need a camera in order to create light painting. A DSLR digital camera with manual settings offers the customizability and accessories you’ll need to get the best light painting results. However, you can also use an iPhone to create light paintings. It’s a good lower cost entry to the art, as most people already have phones. But if you’re choosing to go that route, you’ll need an app that’s designed specifically for light painting—and many of the other tips listed here won’t be relevant.
Tripod. In a long exposure photograph, your shutter is open for a long time, which means that any movement, no matter how small, can lead to a blurred image. In light painting, some blurs—the ones you create with your light source—are actually desired. However, blurring as a result of camera shake will result in a muddled image. To combat camera shake, make sure you have a good, sturdy tripod. The only exception to this tripod requirement is if you’re doing kinetic light painting, which we’ll go over below.
Light sources. You can use nearly any tool as a light source for a light painting, but each one will have a different effect—and even a different color. Examples of popular light sources for light painting include light painting brushes, flashlights, lasers, glow sticks, strobe lights, candles, LED lights, even string lights. It’s worth experimenting with different light sources to see which ones work best for your desired effect.
Remote shutter release. When shooting with a long shutter speed, even the slightest motion can blur the image. This means that unless you’re doing kinetic light painting, you really don’t want to touch your camera or tripod. Instead, invest in a remote shutter release or a cable release for your camera. These tools allow you to snap the image without ever touching your camera! If you’re not ready to invest in a remote shutter release or cable release, the timer function on your camera will also do.
Stopwatch. A stopwatch can be helpful for light painting, particularly if you’re moving the light sources yourself. You’ll need to keep your shutter open long enough for you to complete your light painting, and counting the seconds in your head can be distracting and difficult. Instead, use a stopwatch to time your movements, then make any necessary adjustments to your shutter speed or movement speed.
Color gels. A color gel is a transparent colored material that goes over your lens and changes the color of the image you’re capturing. You can buy them online, at camera stores, or even make them yourself out of colored pieces of transparent plastic. Color gels are great for changing the tint of the light you’re working with. Use these if you’re going for certain effects, but they probably won’t be necessary every single time.
3 Main Types of Light Sources for Light PaintingThere are three main types of light sources for light painting:On-camera light source. An on-camera light source means the element creating the light is a visible subject. With this technique, you actually step within the frame of the image and use a light source to “paint.” It’s a good idea to wear dark clothing if you’re choosing this technique, so that you don’t show up in the image yourself. Off-camera light source. With an off-camera light source, you’re going to shine a light from outside the frame of the photo onto a section of the thing you’re photographing. Off camera light sources are great for highlighting specific objects or for changing the overall tone of the image. Kinetic light painting. With kinetic light painting, you’re actually going to move the camera, not the light source. So, for example, you could create a candle light painting with the light emitted from a candle.
5 Light Painting Tips and Techniques
There are a number of different light painting tips techniques worth keeping in mind. These include:Paint from different angles. Rather than shining a light from behind your camera (or directly at it), try painting surfaces from the side or above to bring out their textures. Shine a light source at ground level to add dimension and detail to the surface—this effect is especially great for grassy areas. Wear the right clothing. If you’re using an on-camera light source, make sure your light is the focus of your photo (rather than the person holding it) by having them wear dark, non-reflective clothing. Use a red filter for testing. When setting up your shots, it’s important to keep your eyes acclimated to the low-light setting. Instead of using traditional flashlights, which will ruin your night vision, try attaching a red filter to your testing lights. Experiment with different surfaces. Reflective surfaces like metal, glass, and mirrors can create surprising effects in light painting. For other applications, rougher surfaces like stucco and wood absorb more light, while transparent materials like cloth can filter your light source in interesting ways. Experiment with movement speed. How bright your light painting will be depends on how quickly you move your light source. For instance, the longer you hold a light source in a specific spot, the more time your camera sensor will have to absorb it, and the brighter it will appear in the finished photo. Experiment with fast and slow movements to create shading effects that add complexity to your photos.
Here are a few contemporary photographers known for their work with light painting:
LAPP-PRO. The person behind LAPP-PRO is JanLeonardo and he’s one of the best known light painting photographers right now. His work combines choreographed manipulation of light, performance art, time, and photography.
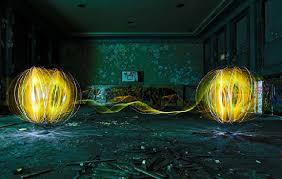
https://youtu.be/9kAO6w3ICRM
Hannu Huhtamo. Hannu Huhtamo is known for his flowers and structures that look as though they could be CGI creations.

Michael Bosanko. Michael Bosanko’s work has a playful, whimsical quality. He uses light to create otherworldly scenes that can include humans, animals, and well-known motifs.

1 note
·
View note
Text
You sent too many requests so Linguee locked your computer out.
You sent too many requests so Linguee locked your computer. The show for trivia and everything websites what you don't need to know otherwise. I have lost my ballpoint pen and am now writing with a pencil. The hardware is not so utopian, it is in every TFT monitor with VGA input. The drivers for the hardware would of course be a completely different topic. Instead of such a useless trash that only slows the OS even further, Apple SBSettings, LockInfo and a better notification system should donate to the iOS. There is plenty of time for such a senseless toy, but simply turning Bluetooth on and off (see JB) is not enough. So far, it was part of the Apple strategy for me to forego such gadgets and it was the app.
Freya 210x150cm Photographic Background 90s Hip-Hop Background Party Themed Decoration for Photography Studio 90s Party Decor ...
We provide daily updates and interesting information about the world around iPhone, iPad, Mac and other things that we like. It is so annoying to push through all settings for a BT connection. If you are already alienating your videos and don't want to wait for Apple, take a look at the AppStore download FaceMan presented here. Compatibility Requires iOS 8.0 or later. Compatible with iPhone, iPad and iPod touch. The geography expressed in pictures is also a writing with the body. A technical error occurred while trying to complete your entry. We are already working on it and will be back for you as soon as possible. is packed with information for the benefit of which moderators Markus and Gregor cannot guarantee in the next test. Here you don't learn for school, but for cats! The X-ray effect, for example, or the image manipulations described with "Glow" and "Nightvision" dramatically exaggerate the edges and colors. For users who allow the execution of Javascript in the browser, this number is significantly higher than for users who prohibit this. So it might help if you enable Javascript in your browser settings, wait a few hours, and then continue using Linguee normally.
Progressive or interlaced, ratio of keyframes to diiferential frames, data rate, compression.
These ratings and ratings come from aptoid users, so you can leave your own install aptoid. li>
It would be better to have a converter that converts VGA directly.
The purchase of this item is a transaction with Google Payments.
The show for trivia and everything else you don't need to know.
Please enter a valid zip code. Not to forget, VGA has 50 frames per second or more, PAL only 24 fields. But of course that depends on the quality requirements. When it comes to giving the expectant mother a video of the ultrasound examination - but hardly anyone has a video recorder - then such a grabber may be sufficient.
Neoback Back to 90s Background Graffiti Retro Radio Fashion Shoes Photography Background Hip Hop Themed Party Banner Backdrop ... h2> First, it is used as teaching material in the lecture hall by the university teachers because the teaching material is based on the principle of "writing with chalk on the board". But in addition to "funny" live videos (e.g. in the form of animated backgrounds or washed out colors for the next FaceTime chat), Apple is also considering simple manipulation options for pictures and photo recordings.

Please come back later. We apologize for this inconvenience and thank you for your understanding. These examples can contain colloquial words based on your search result. I have the Grabby here, it should be recognized at least as well as any part of Amazon. But I find it more important which codecs are used for digitizing. Progressive or interlaced, ratio of keyframes to diiferential frames, data rate, compression.
1 note
·
View note
Text
Photography Has Changed...
One hundred years ago, photography was obviously not nearly as common as it is today. Photography was on the rise in the early twentieth century, and although it was far cheaper in the 1920s than it was in the beginning of the invention of photography nearly eighty years earlier, it still was not cheap. The cost of the most popular camera in the roaring twenties, the Kodak Brownie, was $5.90. This sounds like a dream price for a camera, even by today’s standards where, adjusted for inflation, this would be about $75.68.
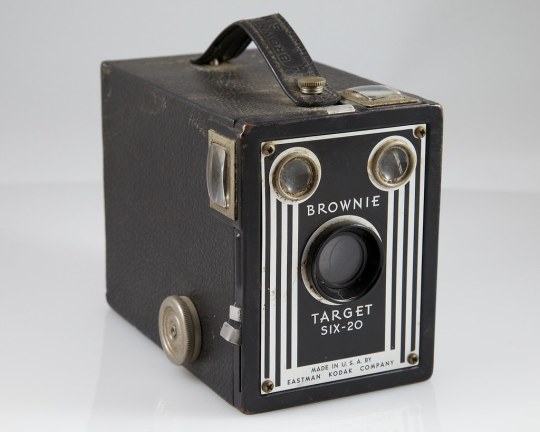
Kodak Brownie Target SIX-20 box camera by Kevin Stanchfield
However, just because photography wasn’t as expensive didn’t mean it was easy. Photographers had to spend time manually focusing their cameras to get the correct shot and developing film for hours on end to get the perfect print. Fast forward to today, a full century later, where we can pull a device from our pocket, aim it at whatever we’d like, and a tiny camera will automatically focus to the subject and the lighting. Then that photo is saved in a digital landscape, no developing and printing required. Frankly, we’re spoiled.
In the last decade or so, photography has taken on almost an entirely new meaning in the art and technology world. Never before did people have access to relatively high quality cameras the way that we do today. Because of this, photography itself has changed. Twenty years ago, if you wanted a photograph of yourself, your family, or anything else, you had to either own a physical camera, or get in touch with someone who did. Taking images of yourself by yourself (what is today known as a “selfie”) was not as simple as looking at a screen that fits in the palm of your hand, it required the set-up of a tripod and a shutter-release system or self timer. Not to mention the subject likely couldn’t see themselves or what the image looked like in the process of taking it. This idea was especially true of those using film, as they likely wouldn’t see the results for a few days, so there was no room to see what the image looked like immediately after taking it to go back and make adjustments.
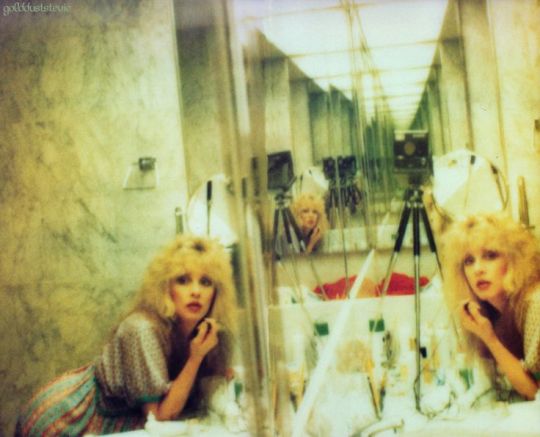
All Hail Queen Stevie -A photograph of Fleetwood Mac singer Stevie Nicks that she took herself using multiple mirrors- via Little Golden Age on Wordpress

Lovely, a Self Portrait - Image by Author
All of this begs the question: what is considered “art photography” in a time where anyone and everyone is essentially a photographer? Does a photograph that’s taken on an iPhone have any less artistic value than a photograph that’s taken on a high-powered Canon?
Let’s start with one of the main arguments for why the answer to that question might be yes: the quality. The iPhone X and Xs, the two newest iPhones released to the public each have a 12 megapixel camera. This has offered some of the best resolution in photographs that Apple users have ever seen. However, a Canon Rebel T3i, a common camera for amateur to professional photographers, offers 18 megapixels. For those that may not know as much about megapixels, this is a huge jump in overall resolution. A photograph taken with a high-resolution camera will produce an image with much more detail, and in cases of printing, will be a much higher quality print. This may not matter to someone that’s just posting an image on Facebook or Instagram, but that could play into what constitutes a piece of art from just a regular photograph. Sure, a photographer may post their images on Facebook or Instagram just like anyone else, but if an image taken with a cell phone and an image taken with a DSLR camera were hung up next to each other in a museum, for example, there would be a jump in quality between the two.
Color may also play into this equation. In a broad sense, an iPhone camera tends to “blur” colors together, ultimately assuming the colors it sees as it displays them. A DSLR camera is much more exact in the colors it “sees,” often times making the final image have much richer, more true-to-life colors.
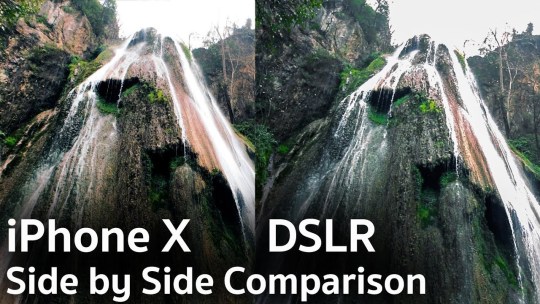
iPhone X vs DSLR – Side by Side Comparison! - DavidPlays on YouTube
As you can see in the image above, the colors taken by the DSLR camera are much richer. Although we, the viewer, are not actually there and cannot see what this waterfall looked like in person, it’s safe to say that the image on the right is likely much more true to life than the image on the left. The greens and the red in the rocks specifically point to how a higher-powered camera can produce a much more quality image.
However, there is always a counterargument to every argument. In this case, one could bring up the fact that color, quality, and whatever other qualities a DSLR camera has to offer may not matter at all.
Take, for example, the photographer Francesca Woodman. She was a famous photographer known for her self-portraits during the 1970s and 1980s. This was during a time when film photography was the greatest form of photography that man had ever known, and although color photography was available, Woodman chose to shoot in black and white. A handful of Woodman’s images are grainy due to film quality, out of focus, or contain blurred objects. Yet, she is still considered one of the greatest fine-art photographers of the twentieth century.

The Long Exposure of Francesca Woodman via Elizabeth Gumport
Why? Because of the content of her images. Not just the subjects in them, but the meaning behind them. Deep down, fine art photography is really more about the meaning behind the image rather than the image itself. If an artist can defend their work and give it true meaning and depth, there is no reason why a blurry film photo has more or less fine art quality to it than an extremely sharp and colorful photograph of the same subject. This may plague the fine-art photographer that spent thousands of dollars on a camera set-up that’s destined to get the perfect shot, but their image can be worth just as much, or even less, than a photograph taken on a disposable camera bought at Wal Mart for less than ten dollars. It’s all about the meaning behind the image and the artist who takes it.
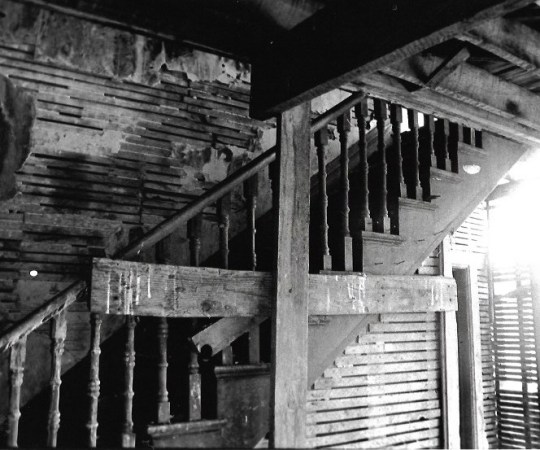
The Worst Image with the Best Meaning - Image by Author
In the end, what constitutes “fine art photography” is in the eye of the beholder. Photography is now a medium that’s available to almost everyone across the globe, for better or worse. What we, the viewer, are responsible for is determining if the meaning behind the photograph is worthy of the image itself.
1 note
·
View note
Text
Using iNaturalist Tutorial 1: Making Observations (Mobile App)
Welcome to the first part in a series of tutorials on using the world-wide citizen science website/app/paradise that is iNaturalist [link]. They have their own tutorials on using the website [link], but *coughs* they haven’t been updated in a while and the interface changed a little.
I’m trying to encourage tumblr peeps to try out iNaturalist, so I created an “iNatters of tumblr” group [link] for us all to see what everybody else encounters, help each other ID things, and otherwise just have a fun time while contributing to science! Want to join us? Just create an account on iNaturalist, and either send me your username (on tumblr or on iNat!) and/or follow the group (click the button in the top right corner of the group page). I will add you to the list of identifiers, and all of your observations, past and present, will be added to the group! Check out my tagged posts about this project! [link]
Figuring out any new website or app can be confusing and frustrating, and I hope these tutorials will make it easier to start using iNaturalist. If anything I say is unclear, confusing, or doesn’t match what you see, just let me know and I will update this tutorial with a better explanation.
These tutorials are image-heavy and kinda long, so they will be under a cut. Note: I have the iPhone version of the app, so you may see a slightly different interface on another device.
Observation Tutorial Part 1: Making Observations with the Mobile App
First Thing’s First! Let’s check out your settings!

Most of these settings are self-explanatory. Automatic Upload The app defaults to automatic upload, which means it will start uploading your observations as soon as you save them. If you are doing a bioblitz, or are in an area with limited cell reception, this option can slow down the app and drain your battery. If you turn off this option, you will need to push the “upload” button to post your observations so others can see them.
Suggest Species This option is MAGICAL. It was first rolled out about a year ago, and HOLY CARP it’s pretty good! But, it does have limitations. First, it requires a good signal and can slow you down and eat up your battery. Also, it works based off a machine-learning system from observations previously uploaded and verified on iNaturalist. What this means: The identify tool can only successfully identify things that have been observed and identified by other real humans. Also, it only uses your main photo (the first one), and it can get thrown off if it was taken at a weird angle, or if there is lots of other stuff in the background (like plants, rocks, other bugs). And, very important to note: it does not take your location into consideration. There is a very heavy user-base in New Zealand, so it is fairly common for species that only occur in New Zealand to be suggested. So, use your best judgement. If you think something is a Booger Beetle, but the app suggests Snot Weevil, ignore the app. OR, you can stick to a higher classification (Beetles) and come back to it later. You can always change your mind!
iNaturalist Network You don’t really need to worry about this too much. There are a bunch of “flavors” of iNaturalist, and which network you select is the one your data will stick to in the event that the iNaturalist Network breaks up. They are more or less regional. More information about the networks here [link]
Okay, let’s take some photos!

Wow, nice! You have two options for making observations with the mobile app. Option 1: Take the photo now, worry about iNat later Option 2: Take the photo using the iNat app
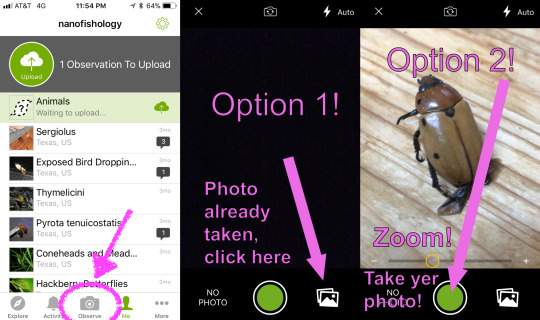
I recommend choosing Option 1 if you are taking photos of things that may move, because the app has a bit of a delay, and the quality tends to not be as good. I use Option 1 almost exclusively, because it’s easier to take my photos and do bulk uploads when I’m inside and not being chased by mosquitos. Option 2 is better if your subject isn’t moving too fast, and if you are just observing a couple things (and also if you don’t want to build up a several-month-long backlog of photos on your phone...).
You can take and select multiple photos! Try to get different angles, and photograph different parts of your subject to help with IDs later.
Advanced iNatter Option If you take photos with your phone to upload later, you have the option of annotating your photos! This is helpful if you have more than one specimen in the photo, or if your specimen is well camouflaged. You can also point out important features, like I did below. Any edits you do to your photos before you upload them can really help out people who do IDs!

Regardless of which option you choose, you will end up at your observation page!
Adding identifications to your observations
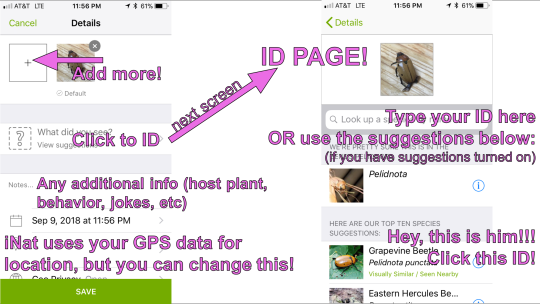
From your observation page (on the left above), you can add more photos, add an ID, write notes, and edit time and location information. More on those options later! First, let’s click “What did you see?” to get to the ID page.
If you have “Suggest species” turned on, the app guesses what you saw. Clicking the information symbol to the right will show you more information on each species to help you decide if that ID is a good fit. Feel free to pick whatever you think is closest, and other people will agree with you OR suggest other identifications later.
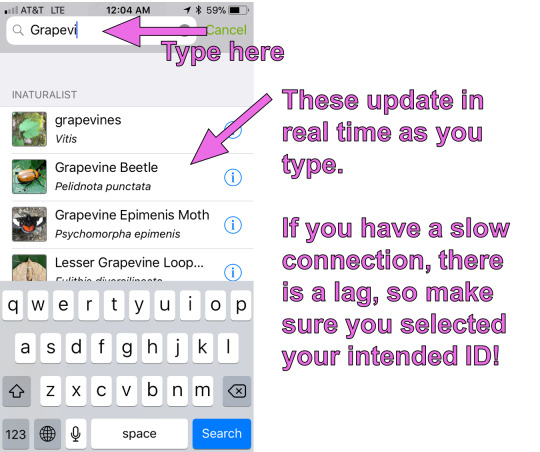
If you know what you saw, or if you have a guess, go ahead and type it into the search bar. If you have autocomplete on, it will (guess what!) autocomplete what you are typing. If you have a slow connection, LOOK OUT because you might accidentally select the wrong ID due to lag.
Editing Location and Privacy
Depending on your phone’s privacy settings, your photos will automatically have a GPS stamp on them, so if you are adding photos to iNat later, you usually don’t need to worry about remembering where you took them. If you have this feature turned off for your phone, that’s fine! Or, if you have that option turned on, and your photos are GPS tagged, you can still protect your privacy while keeping the location data useful for scientists and researchers.
If you are wondering, “Why is location even important? Why should I bother?” There are a couple answers! First, there are very few species present worldwide. For the most part, in order to identify something, it is essentially to know where it was. Sometimes, you can be vague, and just stating the country is good enough detail to identify something (common for larger animals, like birds and mammals, and larger plants like trees). But other times, you need to be extremely specific. Some insects look nearly identical to each other, but there will be different species living on one side of a mountain range vs the other side, even if they are only 20 miles apart. And also, researchers who are tracking the movement of species in response to climate change can benefit from having access to accurate data--showing that a species of plant is appearing even several miles north each year is crucial to understanding how to manage environmental stewardship.
If you are out and about, and have GPS phototagging on, you don’t really need to edit your location (unless you want to!). If you have GPS tagging off, or the location data was a little off, OR you want to protect your privacy (observations at your house, for example), here’s what ya do:

Click the area on your observation page with location (I blanked those details out of my screencap). You will be taken to a map. Clicking the green arrow takes you to your current location. You can zoom in or out of the map (unfortunately, you can’t just type in an address on the mobile app, but you CAN on the website, and you CAN edit posts you made from the mobile app on the website later!). When the location you want is centered on the map, zoom in or out to set your accuracy (if you can’t remember where you were, but you KNOW you were somewhere in Austin, you would basically do what I have above in my map).
If you don’t want to edit the location, but you don’t want the entire world to know where your photos were taken, you can change the GeoPrivacy setting (kinda cut off in the screencap, but it’s directly underneath location). You can select three options: Open: Everybody can see where your observations were made Obscured: iNaturalist will create large square that contains your true location at some random point within the square. All observations with obscured coordinates will be randomly assigned to one point in that square. Only you can see those coordinates (one exception is if you join a very specific type of project, and you have opted-in to let project curators see obscured coordinates). Private: No location information is shared. You may select this option if you want, BUT keep in mind it will be very difficult for people to help identify your observations! For more information on GeoPrivacy, iNaturalist provides more information here [link]
Adding Observations to Projects
iNaturalist has many different kinds of projects [link]. The “iNatters of tumblr” project is a “collection” project type, which automatically adds observations meeting specific criteria (in our case, all observations made by users I have added to the project). Another type of of project, the “traditional” project type, was originally the only type of project available. It’s great for collecting some very specific observations that you can’t really search for. Two of my favorites are “Mating Behaviour” and “Animated Observations” [both are links]. The downside of these kinds of projects is somebody has to manually add each observation to the project. If you have joined one of these kinds of projects, you can link them to your observation before you save it. You can also add observations to projects any time later.

To link your observation with a project, you must have joined a project first. Afterwards, just click the button and you’re done!
Saving and Uploading
You’re almost done! Just ONE final step. Save!!! Click the big green SAVE button at the bottom, and you see your beautiful observation:

If you have Auto Uploads turned off, you need to click the upload button to start uploading. That’s it! Congratulations!
If you take your photos with a camera, or if you want to upload a BUNCH of observations at one time, you will want to make your observations on the website, rather than the mobile app. Making observations on the iNaturalist website will be the subject of Tutorial 2!
September 18, 2018
#this post took me three hours you're welcome#tumblr inat project#inaturalist#inat#citizen science#inat tutorial#how to#informational#time to go home#insects#beetles
42 notes
·
View notes
Text
PhoneX Can Respond to A Tap
PhoneX Can Reply to A Faucet

3. At The Modern Educator of the telephone,while you take away the battery,you will see that one thing like this,in my case its : "RM-356". Please edit Promote Your Previous Mobile phone For Some Additional Money! and discover writer credits at the unique wikiHow article on Methods to Determine a Refurbished Iphone. If you need to save lots of much more, the iPhone 7 continues to be on sale within the refurbished retailer. After all, it goes without saying that the largest purpose to get a refurbished phone is to save some pennies (yes!). Sadly, the one product we will get our fingers on today is the new 10.5” iPad Professional. Why can't I get email on my Iphone or Ipad? There isn't any further information about why the hackers settled for a lot much less. I'm not sure why the cell phone price differs a lot between these two t cell phone price plans. There are millions of customers the world over and to cater the ever-rising number of customers, cellular manufacturing firms produce new cell phones ceaselessly. The physical gateways (the satellite ground stations) for these satellite tv for pc links are within the UK and in Iraq, with the UK station offering logical gateways to the rest-of-the-World (ROW), mainly Turkey, Syria, Saudi Arabia, UAE and Egypt.
It lets you print any Microsoft word document, Excel sheet, PDF document, Image file, xps file, PowerPoint presentation, the SMS and contacts, electronic mail etc. An individual can proceed printing once the mobile and the printer are related. This might include another cell phone, for example. A number one provider of GSM wholesale phones and cell devices, GSM Supplier persistently presents purchasers high quality products from the world’s top manufacturers at the lowest costs obtainable. But with the environment friendly assist of GPS jamming system such sorts of cell phone ringing would not be occurred. It is most advisable that you simply choose a refurbished phone that has a brand new display or a screen whose visibility and overall efficiency you can depend on. To make the numbers of profitable attacks towards Windows Cellphone Operating System even lesser, you can use Folder Lock for Windows Cellphone. In a nod in the direction of person profiles, parents can create Apple IDs for kids with an Ask to purchase characteristic.
Phone 7 user guideyou have download in pdf now the iPhone user information iOS11 pdf obtainable so subsequent in iOS 12. Now the iPhone X manual pdf obtainable to obtain. Up to eighty per cent of a phone is recyclable, so do not send it to landfill or go away it within the drawer - recycle it! These phone have, most frequently, not been heavily used or abused; refurbishing them is usually as simple and fast as cleaning them up and reinstalling their software. Nunutz is simply another respectable platform for buying used iPhones that allows you to view pictures of this phone. Take your cellphone outside the establishment and speak to your hearts content. Remember Portable Pico Projector For IPhone that these cell telephones are refurbished to look like new cell phones so a thorough and detailed examination has to be made always. Are they preventing the improper warfare? So, even in case you are holding an iPhone 4, it still appears the identical as iPhone 4S thus the value for iPhone 4 still remained higher than other models.
With such a critical change to how you drive your customers to make use of their digital units did even one person at apple cease to contemplate this problem and the way it Woud impact people? This offers to different people the prospect to benefit from this. This is a have a look at each single profit included with Prime -- along with just a few Amazon providers you might think were included, but really value further. That forces them to look on the screen when they sort. As such, it is crucial to contemplate how much storage you suppose you would require earlier than purchase. An efficient technique to set Timmer, all it's a must to do is to hold down the Timmer icon, it would develop. When done, the selection will change out of your iPhone to the "Final Import" section, together with your pictures displayed. This toy digicam and photo sharing app helps customers express their photographic talent and to be inspired by the wonderful images from others. Another way to determine whether a gadget has been refurbished is to open the Cellular section of the Settings app and test the lifetime cellular utilization.
Now, with all the good option to see things on the net, I don't feel the need to go to Vegas anymore, a visit I actually do not miss at all. Then on Saturday, I drove as much as Phoenix International Raceway to see the Indy Car race there (the first time Indy cars have raced here in eleven years). For instance, House Procuring Network reportedly pays cable Tv companies to be included in your service package deal, because they know they'll make more money if they're seen in additional properties. If you are after big financial savings, or if you'd like to look with out hopping from one store to another, there isn't any better method than to go to online stores. A really interesting matter and I really appreciated the way you offered it. That transfer has pushed the U.S. The Sandisk Ulta 128GB Twin USB/Micro USB thumb drive makes it extremely easy to move files from your Android smartphone to a computer.
1 note
·
View note
Text
Week 11 - Sound Production
Written by Josh Tonkin (C3399145)
Week 11 Blog - 15/05/2022
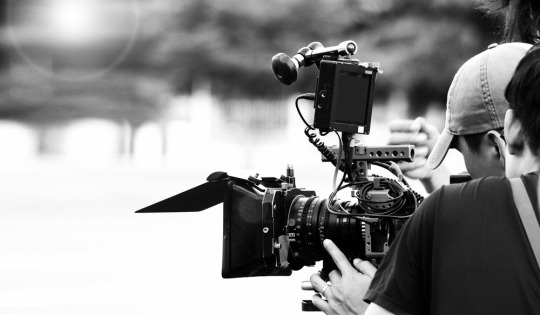
Overview of the process and development of our group’s short film:
This week, our group members joined forces at my house to film, record audio assets and take photographs for our movie poster.
Our group had fun filming, and in particular, we enjoyed experimenting with the different lighting in and around my dining room (overhead lights, candles and lamps) to find the lighting /colour tone that we all felt accurately reflected the eery tone of our story:

We also recorded audio/dialogue for the monologues of the protagonist and his deceased partner with Brynn’s recording equipment in order to get higher quality/clearer dialogue that we can edit/mix in post-production.
Finally, our group took numerous photos (for our movie poster) that are inspired by the dark tone and disturbing eeriness of the horror film ‘Hereditary’:

A self-evaluation and reflective account of my individual role:
My individual tasks:
My role this week required me step out of my comfort zone significantly (having never acted before), as I had to act as the psychotic protagonist.
I also took it upon myself to set up numerous light sources (including candles and lamps) in and around our set (my dining room table) before my group members arrived so that the filming process would run quickly and smoothly.
Did you find these challenging or fun?
I was not only surprised by my enjoyment of acting, but also by the fact that I only felt like I was struggling during the final scene, which required me to act as a psychotic protagonist who explodes in rage.
I found this one scene particularly challenging because – whilst I wasn’t embarrassed or scared to act in front of my friends – I literally didn’t know what to do (physically and verbally) during this scene.
Did you make good progress, or were there obstacles?
I overcame this obstacle by consulting my group members – in particular Brynn and Blake (our director), who both gave me tips on how I could act during this challenging scene – and “poorly” channelling (in my opinion) the acting performance of Claire Danes in the drama tv series ‘Homeland’, where she acts as a character with bipolar disorder:

Whilst I cringe when watching our footage, I have been reassured by my group members (in particular Brynn) that I did well, which gives me some reassurance.
Critique of our group’s collaborative experience:
Our group experienced two difficulties whilst filming:
Whilst filming particular scenes, some of our group members (a.k.a. Brynn) couldn’t stop laughing, which only made everyone else laugh. Our group overcame this through the light-hearted decision to send these people out of the room so that we could film our scenes.
The exposure on my iPhone camera kept changing, which resulted in some shots being brighter than others. We resolved this by shooting our film on the Filmic Pro app, which allowed us to manually set and lock the exposure.
Word count: 437
0 notes
Photo

Passive Income: How I make $40,000/year doing nothing (software engineer edition) Passive Income: How I make $40,000/year doing nothing (software engineer edition) Video Transcript ▼ okay all right okay how's it going I think I'm getting all settled in here welcome back to another episode of the tech lead I am the tech lead and today I'll be the tech lead not to start off we actually have a sponsor today so let's go to that right now right now my name is the tech lead and I am the tech lead I hope you're enjoying the show but don't forget if you like the content we also have available for you tech weed season one complete HD for the low price of 1995 with this you get 28 additional episodes and nearly three hours of additional content check it out in the description link below everyone who has bother have left rave reviews saying that it has been well worth it for them they'll do it for me give it a like and subscribe and back to you tech lead thanks tech lead today I wanted to talk about passive income and about how I'm generating about $40,000 per year just on site income and this is income where I'm basically just not doing anything I'm just sitting around and each day I'm getting about low over $100 just for doing nothing now I wanted to talk about this video not actually because I think it's important for software engineers to build additional site income streams I would say that even $40,000 per year isn't really going to be that meaningful necessarily but but I would say it's a very fun happy to have it can help you get deeper into software engineering as you're building these side projects it can help build up your resume and what I hope to do is tell you about the ways that I generate aside the income and I'm not really sure if all of these are going to be completely useful for you because it may be difficult to replicate what I've done but it can help inspire you maybe give you some ideas so for me most of my side income comes from for projects that I'm doing now the first one is this photography software that I created it's called pan elapsed 360 comm check it out it is for time-lapse photographers and this project is a very niche project that I began when there was a big time-lapse boom like there were time lapses all over YouTube and I was into time lapses as well and people needed a way to add special effects to these time lapses to process the time lapses and there weren't many good time lapse software's so I looked into it there was one software that was retailing for over $200 and I thought you know that's really expensive and that I could build something better not the software I built did two things the first thing it would do was it would allow you to add motion to your time lapses using actually perspective correct math and this involved really understanding the math behind lenses like a 24 millimeter camera what does that actually mean in terms of field of view and what's like a hundred millimeter camera and this was very fun for me to learn and figure out and find the exact math behind it and I also applied some of my computer graphics skills to get this going I built the software using Adobe ActionScript which is like Flash technology now it's pretty funny because ActionScript is not a very popular language these days but the great thing about it was it was cross-platform across Windows and Apple and I wanted to make sure that the software I wrote could target both platforms and they needed to be desktop software because I didn't want users to have to upload their photos just together processed on like some web software so I've looked around for the appropriate technology for this and I could have chosen either Java or Adobe AIR ActionScript and I really wasn't keen on getting back into Java and it seemed to me that ActionScript and Flash technology could be something interesting it's something that I had already been doing a bit of and I was able to just build out the software pretty quickly it took like two weeks or so to build out I noticed at the time that a lot of time-lapse photographers were try to add motion to their time lapses using very expensive hardware rigs that would be based on timers and it was slowly like rotate the head and I realized that you didn't really need these Hardware timers and rotational motorized heads to do other stuff like you could do with or in software using perspective correction and just a bit of math and image distortion there was a very small niche messageboard community of time-lapse photographers I was part of it and I knew that if I built a software I could just go there announce it and everybody would see that message so that's exactly what I did and we then the first day or two of me launching the software I was already getting like five hundred dollars every day in sales over the years I continued to build up features into the software another big feature was allowing you to capture time lapses across sunset or sunrise when the scene exposure would change quickly and and for this I would use math to calculate the exposure of a scene based on the exposure triangle which is based on aperture ISO and shutter speed and using these three pieces you're able to calculate how bright a scene is and then interpret what Brenton is each frame should be as the cameras changing exposure quickly to try to capture the scene I also added some other interesting features like I had the support to do fish eye time lapses which is a very unique and strange effect and it literally took me like a month to work out the calculations for how to do a fisheye projection and then build like fisheye geometry into the program so I'm not sure if this was that well-received so I'm I don't know if it was a really good use of my time to spend the whole month building out this feature but it was really fun for me to do at least and I had to get into like GPU shaders to actually do it so I had to teach myself that stuff anyway the software something that I'm still maintaining these days I sell it for a pretty high price about $80 a piece and I think that's actually a very worthwhile price and also I just think that the economics is that for desktop software you can just charge more and I was pretty happy that I did not make this like an iPhone app where the standard is every app needs to be like $1 or $5 like like here's an app time selling for $80 but I still managed to make about one sell every day and it also helped when our managers to translate the whole web site into Japanese and the software became quite popular in Japan as well so that's one side project there's another side project that I've been running for the past 10 years or so it's called human pets comm it's kind of a social network and this was very popular back in the day like there were 2 million users and it was generating like $2,000 everyday or something for a while these days the website has lost a lot of popularity from its heyday it's still pushing out about say $100 per month and the way it generates money is generally through memberships take off these shoes so I feel like I probably should be charging more for membership I charge like 6 dollars for a monthly membership which is probably too low when you become a member you gain a bunch of additional features and another great thing about this that added was that you could buy or give to memberships to other people so a lot of people will be doing that because often people seem to treat others better than they may treat themselves I also run some Adsense on the site the ads don't really make much money it's like $60 a month but this site has been operational for the past ten years or so and it's just been spilling additional income for me the whole time so that's great the third project was a set of iPhone games web RPG apps really where people could just progress a character through a game and there would be levels a storyline to push the player through many items to collect monsters to fight and you just click buttons and kind of move your character through I think the key to this was there was a storyline that was just very engrossing for it to player and the other thing was I had high limits for purchases like you could buy items that were like $20 in the game there's a statistic that 90% of your income will come from the top 10% of players for in the game and those players are concerned with their whales they're basically people who have either a lot of money or don't mind spending a lot of money on gaming and so I think that was one mistake I made with my first website which was unlimited so that you can only pay a maximum of about 6 dollars per month for membership and after that it didn't matter how much you loved the app or game it was kept at that amount and what I wish I did was add higher thresholds for spending now the fourth project I did was very interesting and this was actually photography and you can sell stock photography or stock videos now stuff photography doesn't pay very well because it's so cheap like one photo the most you could get is like 25 cents or something like my best selling photo was a photo of the Brooklyn Bridge a New York just happens to sell very well because it's so iconic and this photo so about 1,500 copies and each copy was a dollar so me just standing there taking one shot with that was like a fifteen hundred dollar shot right there with video it's even better because each video you can sell for about $50 a piece or so and these days I think people are looking really for 4k video like they need to be extremely high quality my videos that I sold really well were videos of Japan there was actually the shrine called fushimi inari in kyoto with a bunch of red gates this was actually relatively unknown when I visited and there were very few people but it's funny that now if you go there's tons of people and I think it's because I helped popularize it you know I had this video and sold over a thousand copies of this video and usually it's travel agencies that buy these videos and then they use these to try to sell that that's a nation tours packages and they take tours there so it's kind of shame now that this place is now completely overrun with tours and I probably helped contribute to that mess and then I also did videos of Iceland the ice caves and Northern Lights and each of these videos generally brought in like $1,000 so in the end my photography work brought in about twenty thousand dollars over four or five years or so the other great thing about the photography work was I actually got sponsorships so I was able to work with a selling company and they offered us $10,000 catamarans and sailboats in exotic locations like the Bahamas or Phuket and we were able to just take these sailboats around and this was kind of unique because I knew how to sell and I'm a photographer so as I was able to take week-long sailing vacations in the exotic areas worthy lodging and that boat would be free so it was pretty great when you add it all together we're looking at about thirty six hundred dollars a month or forty K a year and the great thing about citing income like this business income is that you can actually deduct expenses on this so if you buy a laptop you can deduct against that anything i buy that may have some business purpose would be like about thirty percent off or something like that now one funny consequence of this is i don't actually do much github open source contributions because a lot of what I work on I sell like I wanted to be commercial software so I don't actually want to open source things so one time I had to recruit her asked me like hey what's your github and I was like I don't do open source you know I actually make money from her projects and they're just like that yeah that's I would say though that another way I generate a lot of site income so to say is I just live with my parents that's saving me like at least $3,000 per month on rent and the funny thing about this is you calculate that as post-tax income so it's equivalent to about 4 K per month in income you might earn at a job that's like 48 K savings right there's so I don't know what I'm gonna do with all this money I'm saving but maybe I'll give it to my kid or something like that so the last thing one says when I look for a project there's a few things I'm looking for so the first thing to look for is timing like why now and everything I've done that has succeeded I think there was a reason that timing made sense like like there were certain trends in user behavior or technology that signified that it was at that moment that it would be ripe for some project to succeed the other thing is I look for things that are scalable so running a restaurant I think is not very scalable it's I think what you're really looking for our scenarios were you can affect far more many people and that's usually done through the internet and that gets the last thing is using coding to automate these systems such that you don't have to do anything and then the system just automatically takes care itself that's when it becomes really passive but yeah that's pretty much how I've been looking at generally the inside income I think in the whole scheme of things it's not much compared to say the salary that a software engineer is able to generate but I think it's really fun sometimes you're actually able to strike gold in certain areas and make a lot but there than that I think it just makes the Hobby that much more interesting and overall just push your craft to a higher level no matter what you're doing so there you have it that'll do it for me if you liked the video please give it a like and subscribe it really helps grow the channel and that we'll see you next time bye
8 notes
·
View notes
Text
SEO Techniques to Improve Your SERP Results
Increasing your SERP rankings is an extremely effective technique to increase the number of visitors to your site. This rise in traffic is directly related to the improved visibility that comes with ranking higher on search engine results pages (SERPs) (search engine results pages).
To be sure, there are numerous strategies to improve your search engine rankings and increase the number of visits to your website, but the most demand some effort and research.
However, any London-based SEO business will tell you that a few easy SEO tools may significantly assist you with all the time-consuming activities while also raising your overall SERPs.
Also read: Best digital marketing Company in Ahmedabad
The following four tips will assist you in increasing your visibility on search engine results pages:
1. Utilize Original Photographs
When it comes to SEO, unique photos are usually a plus. This is for two reasons:
To begin, the photos you employ must be relevant to your content in order to maximise their effectiveness. If they are not, search engines will give your site less weight, and there will be no benefit to employing original photographs.
Second, make an effort to include keywords in the file names of your images. Search engines will take these into account, and you'll benefit from a higher ranking if they correspond to common SERP inquiries.
Source tags must be included on any photos that are linked to your site. The best approach to accomplish this is to use alt tags and include a keyword in them so that Google can quickly determine what is on the image.
For instance, an Instagram post with an image of my new outfit would include the alt: "New Dresses for Spring!
Also read :digital marketing companies in Ahmedabad
2. Make Use of Long-Tailed Keywords
Long-tail keywords are an excellent approach to boost your search engine rankings. They are extremely targeted and pertinent terms that express precisely what you're attempting to accomplish. Here is an illustration:
Assume we are a retailer of the new iPhone 7 and wish to increase our presence on Google. This term appears straightforward, but we know that this long-tail keyword is failing to deliver the results we require. Our competition for this term receives more traffic than we do, which makes no sense given how straightforward it is to target phrases like this.
Rather with "iPhone 7 Price," we substitute "Cheapest iPhone 7 Deals Online." While our competition continues to receive traffic for this term, Google Trends indicates that "Cheapest iPhone 7 Deals Online" has a higher search volume than the first.
This suggests that we have a better chance of obtaining results for this new long-tail keyword. We're ranking better in the SERPs since our competition is receiving less traffic for this term, and we're able to catch 100% of it!
3. Exceptional Content
While quality content has always been critical for SEO, its importance has increased in recent years. It is becoming an increasingly larger need if you wish to be found in Google's EDU SERPs. There are numerous ways to enhance your material - for example, by giving original information backed up by strong references.
This is critical because if Google cannot decipher what your content is saying, you will not rank well! As a result, when producing blog posts or articles, always attempt to use both long-tail and primary keywords throughout the material. This manner, Google will recognise that your post is relevant to the keyword for which you are attempting to rank.
Also read: Top rated digital marketing companies in Ahmedabad
For instance, if you're writing an article about creating a social media calendar, keywords such as "social media content calendar" and phrases such as "how to create a social media calendar" are excellent.
4. Develop a social media presence
Finally, share your articles on social media! This manner, a broader audience will understand what you're all about, and others who are unfamiliar with you will get knowledge as well. Begin by creating a Twitter account for your business and scheduling social media postings in advance with a platform like Hootsuite, so you don't have to spend your entire day tweeting.
Social media is all about sharing, so take advantage of this. Share your blog entries via Twitter and your own content via Facebook.
Here are a few additional tips:
5. Create Backlinks
This is a quick and easy way for bloggers to improve their search engine results, but it does need some study. Numerous websites, such as Moz and Open Site Explorer, make it easy to examine who is linking to your competitors and how they are linking.
If you discover that a competitor has a link from another website, visit the site and see if you can convince them to link back to you as well. If you are unable to do so, identify numerous websites from which your competition does not receive links and contact them. This is an excellent method for generating backlinks without having to do a tonne of work.
Also read: Top digital marketing Company in Surat
6. Optimize Your Internal Linking Structure
A well-optimized website is an extremely effective approach to improve your SERP rankings. You must ensure that your site is thoroughly optimised for the primary keywords for which you wish to rank, as well as secondary keywords. Each page of your site should be optimised for at least two keywords, and the anchor text for internal links should be relevant.
Screaming Frog is an excellent tool for determining whether or not your website is properly optimised. This will show you how many pages connect to each URL on your site, which links are most effective at sending traffic to them, and how many of your internal links have been clicked on.
Also read: Best digital marketing Company
0 notes
Text
VFX artist 'unwraps' classic Apollo pic to show us what Buzz Aldrin saw on the Moon
https://sciencespies.com/space/vfx-artist-unwraps-classic-apollo-pic-to-show-us-what-buzz-aldrin-saw-on-the-moon/
VFX artist 'unwraps' classic Apollo pic to show us what Buzz Aldrin saw on the Moon
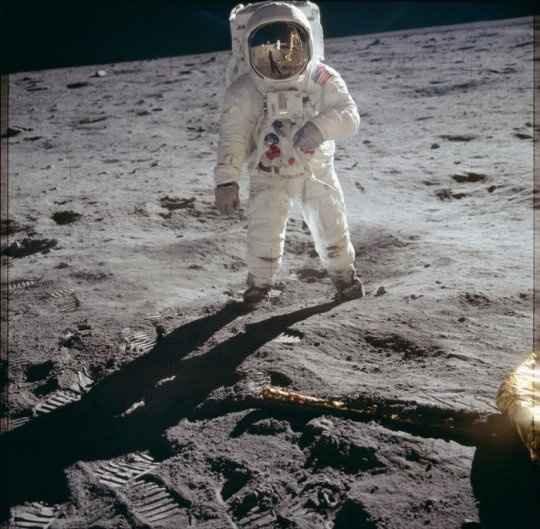
Fifty-two years after the first historical Moon landing, we’ve been given a brand new perspective of a classic Apollo-era photo.
Reddit user and visual effects artist Michael Ranger, AKA rg1213, chose the iconic photo of Buzz Aldrin taken by Neil Armstrong during the Apollo 11 mission, and ‘unwrapped’ the lunar vista reflected in the astronaut’s helmet.
The result is a never-before-seen, 360-degree astronaut’s-eye panoramic view of the Moon.
“What makes this process exciting for me is the fact that this is real,” Ranger wrote on Reddit. “If I get any inkling whatsoever that something like this is fake or false, my interest in it completely evaporates. This is great because it’s real!”

Astronaut Buzz Aldrin walks on the Moon. (NASA)
The photo in question is an iconic one, taken in July of 1969. Aldrin stands near the leg of the Eagle lunar module, his left arm cocked. In the reflection on his visor, his shadow stretches out in front of him, the module shines in the harsh light of the unfiltered Sun, and Armstrong stands with the Hasselblad camera held at chest height.
If you look carefully, you can see Earth, right at the top of the visor.
Ranger’s reconstruction follows a previous attempt in February of 2019, and an earlier version from a few days ago using a lower resolution photo.
“I took this famous image of Buzz Aldrin on the Moon, zoomed in to his visor, and because it’s essentially a mirror ball I was able to ‘unwrap’ it to this 2D image. Then I opened that in the Google Street View app and can see what [Aldrin] saw,” he explained.
The latest version uses the highest resolution image available, taken from the comprehensive Project Apollo Archive on Flickr.
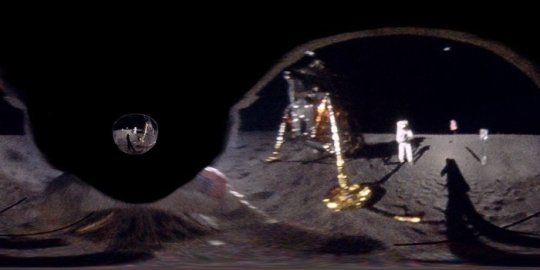
(NASA/Michael Ranger AKA u/rg1213)
“Using that higher quality photo, I created this unwrapped panoramic 360-degree image, which I opened in a free 360-degree viewer and recorded this video with it,” Ranger wrote. “In addition to the higher resolution of the film scan and the uncompressed file format, I sharpened and color corrected it in Photoshop rather than on my iPhone like the first one, which led to better results.”
He also color-corrected the gold tint of the visor – a protection measure against solar radiation – and added more space around the edges of the visor for a more realistic representation of the inside of Aldrin’s helmet, he said.
The Apollo 11 mission, which launched on 16 July 1969 to land Armstrong and Aldrin on the Moon on 20 July, was the first time humanity had set foot on a world that wasn’t Earth. Many photographic and video assets have been retained, and are available on the public domain.
Last year, a film restoration specialist used artificial intelligence to enhance some Apollo 11 mission footage, bringing it to 24 frames per second for an incredible crisp and clear experience of iconic mission moments.
We don’t think Ranger will be the last to attempt this, either. Based on the comment thread, other Reddit users seem inspired to try their hand at finding hidden views in Apollo photographs.
#Space
0 notes
Text
Why Did We ‘Degauss’ Our Old Monitors?
A version of this post originally appeared on Tedium, a twice-weekly newsletter that hunts for the end of the long tail.
As you read this, you are likely in a room surrounded by screens. We all are.
They are everywhere, in giant, slab-like form; in moderate, tablet-like form; and in handheld sizes that fit in your pocket. But one nice thing about these screens is that they have continually improved in many ways, and as a result, you no longer need to do something that people with screens had to do back in the day: degaussing.
This was a fact-of-life thing with CRT monitors, and now, we don’t even have to think about it anymore. If you haven’t used a CRT monitor in, oh, 20 years, you probably forgot about it entirely.
So let’s discuss why we needed to do it … and why, in its own way, degaussing is friggin’ awesome.
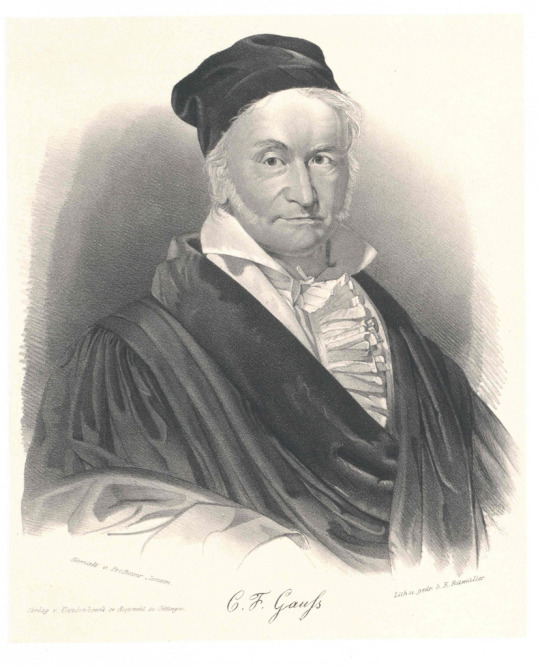
Mathematical and magnetic icon Carl Friedrich Gauss. Image: Austrian National Library/Europeana/Public Domain
Before we talk about degaussing, let’s talk about the guy the concept is named for
Born in 1777 in the Principality of Brunswick-Wolfenbüttel (now part of modern-day Germany), Carl Friedrich Gauss showed a prodigal interest in mathematics (and learning in general—he knew a number of languages) that only intensified after the duke of Brunswick offered him financial assistance that allowed him to study at University of Göttingen.
Throughout his youth, he became interested in mathematical discoveries, and independently discovered a number of major mathematical constructs including the binomial theorem and the prime number theorem. His doctoral dissertation, on the fundamental theorem of algebra, was one of many attempts to prove the theorem during the period—and while it had gaps, it didn’t stop him from trying at least three other times in his lifetime.
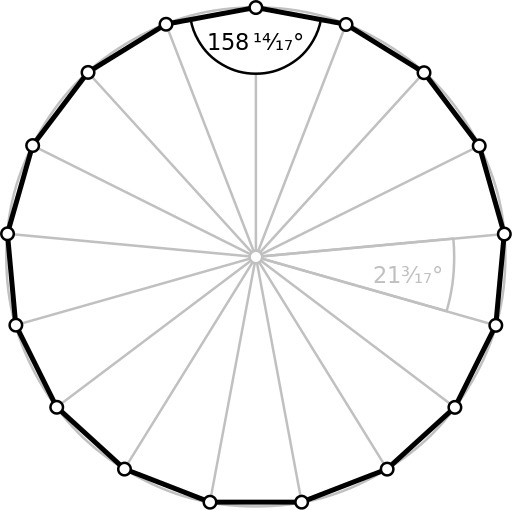
A heptadecagon. Image: Wikimedia Commons
Eventually, he pioneered new discoveries in the field of mathematics, with his first major one being the heptadecagon, a 17-sided polygon that can be produced geometrically, with a compass and straightedge. This polygon, a circle with many gaps along the edges, was a huge deal in part because of the fact that little, if any progress had been made in the creation of new polygons in more than 2,000 years.
From there, Gauss created a variety of mathematical theories, some of which proved the basis for technologies used in the modern day. A good example of this is the Gaussian function, a type of peak function that produces a bell-curve style effect. That function serves as the basis of something you likely use frequently if you’re a photo editor, Gaussian blur, which blurs an image by averaging out a group of nearby pixels along something called the Gaussian kernel. You don’t need to know how it works to use it, thanks to computers, but it essentially uses math to dull out the details of photographs.
Fitting for the life of someone so passionate about math, his life was full of discoveries that largely outlived him, and he ultimately became the most prominent mathematician of his era.
One of these discoveries, made during the later years of his life, ended up inspiring the concept of degaussing. Collaborating with William Weber while serving as director of the observatory at Göttingen University, the two worked closely on concepts of magnetism, leading at one point to an attempt to use bursts of magnetic field to speed up how quickly telegraphs were delivered. The project ultimately wasn’t seen through, but it did produce a working model that remains in active use as a memorial.
Gauss developed ways to measure magnetism and spent years focused on analyzing the power of magnetic force. It was one of the many acts of his life in which he did things that would prove important decades later.
In 1936, 81 years after his passing, he received the ultimate honor for a physicist—he had a unit of measure named after him: The gauss, or a measurement of the level of magnetic induction, or magnetic flux density. (Not to be forgotten is Weber, who has a unit of magnetic flux named after him.)
While officially deprecated from the metric system in favor of the tesla (named for the guy, not the motors), the gauss was the force that brought the term degaussing to the world.
So Carl Friedrich Gauss didn’t create degaussing, but in many ways, his work inspired its creation.
1897
The year Karl Ferdinand Braun, a German physicist, helped develop the first cathode ray tube, which was first used in an oscilloscope before it found its later, more prominent use as the basis of the television screen. Braun’s work, which won an early Nobel Prize in physics, first found use as the basis of a screen a decade later thanks to Russian professor Boris Rosing, who adapted a cathode ray to receive shapes transmitted over a mechanical scanner.
Image: Zach Vessels/Unsplash
So what’s the deal with degaussing anyway?
You might be wondering, what does all this talk about degaussing have to do with TV sets?
In many ways, this comes down to the way the CRT works. At its most basic level, a cathode ray tube is a gigantic electron gun with the primary target being the screen that aims to show the images.
The YouTube channel Technology Connections, a Tedium favorite, has a great video describing how the CRT works in analog television sets, which you can watch here.
The thing with electrons, though, is that they are magnetically charged, and when magnets interact with one another, they cause problems. Think about that recent news story about how Apple’s MagSafe connectors in recent iPhones cause problems with pacemakers.
In many ways, magnets have a similar effect on CRTs—they screw the sets up. This is particularly the case with color, whose intensity can be negatively affected by magnets, basically confusing the set’s makeup of color in the process.
This clip of a guy going buck-wild with a neodymium magnet on a CRT is a great example of this in action. A strong magnet can force the electron gun to misfire, but on top of that, it shakes up the colors and makes them particularly trippy in a psychedelic sense. The black and white signal will generally return to position. The color won’t.
Now, this is where the need for degaussing comes in. Degaussing is the process of removing unwanted magnetic fields from an object, and they became particularly important in the era of the color TV.
In early color televisions produced before the mid-1960s or so, there was a need to periodically tune the screens that required the assistance of a TV repairman to help periodically tune the television to ensure the highest quality.
An unbylined syndicated 1966 article that ran in a number of newspapers described TV sets as “touchy” (and has some old-school gender politics in its lede, sadly) and said that older color television sets could take as long as an hour and a half to retune. The good news, however, is that technology was improving during this time and degaussers were often built into newer TV sets. (The whooshing effect that you might remember when an old TV set turned on? That was the degaussing coil.)
Still though, the piece noted that periodic technician work was necessary to keep the set working:
Although automatic or manual degaussers are part of better quality color television sets to demagnetize or counteract the earth’s magnetic field and cut down on impurities that louse up a picture, it may be necessary for the technician to degauss the set in a few months s after it is installed. He also 1 must be equipped to realign the picture so it will hold for at least another year.
The technology required to degauss a TV set was often promoted using terms like “color purifier” to help sell the idea that the sets looked significantly better than the old ones. The marketing messages around these sets became a bit over the top, to the point that Congressional hearings were held in the early 1970s to consider whether the FTC was doing enough to rein in misleading advertising claims. The long story short of all that: The technology used to purify the sets did work, but it was not unique by that point. Literally every color TV set under the sun had it.
And by the 1980s, computer monitors, which often dealt in far higher resolutions than television sets did, also had to rely on degaussing technology. The problem is, those old built-in degaussing coils don’t always work forever, which requires the use of external devices. (If you move a CRT around, it’s recommended that you degauss it.)
A bunch of them are on YouTube, and man, are they fun to watch:
As you can see in this first clip, a strong magnet totally ruined the effect of those color bars. And the degaussing coil built into the device, complete with its own button, wasn’t enough to fix it. But by carefully using an external degaussing coil—a round device that looks not unlike an old antenna—the user was able to slowly wave the coil around the screen and repair it. (These are on sale online, but not always in the large, round form.) The effect is dizzying to watch.
As the YouTube channel Arcade Repair Tips explains, this was also the case for old arcade machines, such as the 1942 machine used as a test subject.
But one does not necessarily need a special coil to pull off this trick. In this 2015 clip involving YouTube’s favorite game, the original Super Mario Bros., a neodymium magnet is used both to screw up the colors, and, by slowly waving back over a few minutes, to fix them.
But because this is Tedium and we must save the best for last, I share with you this video of a guy taking an electric drill to a computer screen. (Warning: it gets loud.) Not quite as effective as simply using a degaussing coil, but incredibly fun to watch.
If you were to show these videos to the Insane Clown Posse, they would call it a miracle.
“I’m happy to report that the remaining two servers on the AAR were delivered to ITIM and the hard drives were degaussed three times. Additionally, I followed up with Jonathan on replacing the old UPSs with the new ones.”
— Christopher Dehner, an information security employee for the Georgia Center for Elections Systems at Kennesaw State University, revealing that he had degaussed a number of hard drives with election-related data on them days after a lawsuit was filed regarding allegations of voter fraud around a 2016 special election. (A similar tactic was used by the attackers in a mass shooting in San Bernardino, California in 2015.) In the case of hard drives, degaussing is a tactic use to wipe the devices so the data can’t be read. One problem: It also destroys the hard drive in the process.
Of course, while degaussing was most prominently used in television sets, it is not the only place where the term came up.
During World War II, Germany started attacking warships at sea using large magnetic mines, which could detect the magnetic signatures of large warships and go off at that moment.
“It’s an inventive way to sink ships. Steel warships create an invisible magnetic signature as they sail,” writer James Simpson of the blog War is Boring wrote. “Magnetic mines detonate when they detect this signature, even when they’re moored tens of meters underwater.”
The Engineering and Technology History Wiki notes that one of the mines ended up being dropped near the British shore, where it was then taken apart and analyzed. This eventually led to the creation of a degaussing process that could be used to remove that magnetic signature from ships, “wiping” them in much the same way as a TV set would be “wiped” of unwanted magnetic interference only decades later.
Of course, ship degaussing was still a problem well past World War II: ”As late as the 1970s, merchant ships sailing in the English Channel, the Baltic Sea, and into German and Dutch ports, were ‘wiped’ to protect them from magnetic mines left over from World War II,” the wiki noted.
The magnetic pull of Carl Friedrich Gauss’ influence is strangely strong.
Why Did We ‘Degauss’ Our Old Monitors? syndicated from https://triviaqaweb.wordpress.com/feed/
0 notes
Text
Responsible for a zdjęcia ślubne warszawa Budget? 12 Top Notch Ways to Spend Your Money
Candid moments materialize speedily, so ensure you are All set for every minute because it will never transpire missing for prolonged. You'll want to be alert for decisive second to capture the candid shots all the time mainly because if any candid moment you will overlook that working day it will not be captured once more. Fantastic candid images provides goose bumps for that person and in addition he/she will be able to really feel link even should they weren't a part of it.
Probably a severe light-weight powering your matter can destroy your pics if you do not know how to handle it. To tackle this, I'll recommend you to have all the main points about gentle sources where You should get the candid photographs. You should regulate your camera environment Based on wedding ceremony venues. A few days prior to the wedding day, make sure you double Look at your all devices's and things that you'll consider on the wedding ceremony ceremony. Also, do not forget to get backup stuff as part of your digital camera bag, like further memory card and backup batteries are so vital.
It truly is an extremely appealing subject mainly because numerous photographers oppose the idea of employing flash or not or light-weight modifiers. In accordance with my opinion, Within the Sunlight mild firing the flash at a similar angle from the lens result could be boring, so you might want to take the flash from the digital camera and shoot from the aspect. During the night activities, it permits you to customise a blank canvas upon which you'll fill up your own personal hues and creative imagination combined with the flash.

For the ideal candid marriage pictures You need to consider extra pictures approximately you could since it will enhance the possibilities to capture the most beneficial moments of your marriage ceremony day. It's actually not pretty much capturing a instant of marriage working day; It is an emotion and appreciate of that moment which will not be take place yet again. Choose your digicam along with you of that day everywhere you go since you under no circumstances know when an awesome photo opportunity will present. I normally acquire additional pics because it will Strengthen to obtain an amazing candid photographs possibility. Candid pics tilt client memories towards The great ordeals they have got had. It truly is an easy solution to infuse your daily program which has a Imaginative spirit.
A picture states a thousand phrases. It truly is a standard knowledge that every of us has heard no less than once in a lifetime. There is a particular truth of the matter in this article but allow me to acquire the liberty to modify it a little bit in order that it remains related in today's context. A perfectly-taken and crystal obvious picture suggests a million text. Does it seem exaggerating? I undoubtedly Will not Feel so. While using the developing influence of social websites which include Fb, Twitter and Instagram, a picture uploaded to those social websites sphere can go viral and remaining discussed by millions of persons and nicely, likely over 1,000,000 periods.
In case you are a photography enthusiast and you have a digital digital camera, then lifestyle won't be total and not using a good photo printer. Nevertheless, as electronic images is swiftly shifting towards cellular units including smartphones and tablets, discovering the very best photo printer is not a trivial http://www.wesele.com.pl/porady-na_co_zwrocic_uwage_poszukujac_fotografa_slubnego,p,1302.html process. That is certainly why dealing with excellent Photograph printer testimonials is essential If you need to make certain that the printer that you purchase is appropriate Together with the gadget wherever your photos are taken and stored. The issue that you've to request is dependent upon what product you happen to be acquiring. When you've got an iPhone, iPod or iPad, the issue will probably be if the printer supports Apple's AirPrint. Should you have an Android phone or tablet, the query might be whether or not the printer supports Google's Cloud Print. But this concern is appropriate only in order to print your illustrations or photos directly from your cellular units.
As with every new technological innovation, reception to digital images was not all lukewarm throughout its early a long time of introduction. It's a much distinctive photograph now as the volume of people deciding on analog camera is shrinking to in the vicinity of extinction. Depending on the current state-of-the-art, it truly is argueable that analog digicam nevertheless retains several edges but These are promptly diminishing. The largest edge that digital digital camera has over its analog counterpart is the greater cost successful and more handy storage. Rather then capturing photographs on film that needs to be developed thereafter, visuals captured using a electronic camera are generally stored in SD or Flash memory cards which minimizes the price of Each individual graphic seize to zero. When the maximum storage capacity is arrived at, the photographs may be transferred out to the PC as well as the cupboard space can be resetted to its initial potential. Image preview aspect is the other usefulness that is usually touted out of digital cameras. Instantly immediately after Each individual impression capture, one is able to carry out a high quality Test on the graphic which includes just been taken and if desired, the image can basically be deleted and retaken.
youtube
In deciding for the top Picture printer, there is one essential factor that is frequently neglected by most potential buyers. The first thing that many consumers will likely be weighing is actually the price tag that is certainly hooked up into the printer. On closer glance, this upfront Expense will not be the biggest component that could attract dollars from customers' pocket. It is actually a standard understanding that primary makers including Canon, isn't going to make the majority in their profit from promoting the printer alone, but with the ink somewhat. It is actually amusing to realize that despite these kinds of awareness becoming available in the general public domain, it really is one factor that may be most often disregarded by most buyers. So, a person must think about the price of the ink the printer is making use of and the quantity of output that can be churned out of each and every cartridge in lieu of basically investigating the purchase price tag. Eventually, the higher measurement metric to decide which Photograph printer is the greatest can be the fee per printout.
You most likely have switched to electronic digital camera by now. With profits of smartphones last but not least surpassing that of 'dumbphones', I guess you might be holding on to at least one at the moment. Along with the know-how continue to evolving constantly, never suppose top brand names to become the leader. Even when you're purchasing a Canon printers, you should definitely study Canon Picture printer reviews and open up you to the whole world of options. There are actually new models launched Once in a while. And on earth of technological innovation, disruptive innovation normally emanates from challenger instead of the incumbent. Will not which the listing of best Photograph printers for 2013 will definitely be unique from that of preceding yr.
0 notes
Text
8 Tips To Help You Master Adobe Photoshop Camera
Photoshop camera is a new addition to the photography world by Adobe. This app is like having a photoshop app inside your camera. It is an intelligent camera that understands your lenses and chooses the correct filter for your photo before you begin clicking your pictures. You can edit the filters after clicking your picture as well. Share your pictures and edits created by the photoshop lenses on your social media handle directly from the app. This app is back with AI-powered features that allow you to create beautiful scenery & food shots, and more.
However, due to the pre-set filters, you may not be able to edit your pictures as per your preference manually but it is still an amazing app to create beautiful Insta worthy pictures. Before you get excited about all the features you’ll get on your device, make sure that your device is compatible with this app. This app is currently available on Android 9.0 pie or Android 10, and it also works on Google Pixel, OnePlus 6/6T or higher, and Samsung Galaxy phones. iOS users will get better compatibility with this app, but their phones must be running on either iOS12 or iOS13. And the app only supports multiple camera lenses like the one on the iPhone 11 series.

You can use some of these hacks and tips to get the best out of Photoshop camera app:
Image Quality Settings
This app automatically compresses your photo into a file that consumes less than 1 MB space. The in-built camera of the apps doesn’t allow you to control the level of compression, but you can still make a copy of your original photo from the settings of the app. On the top of the screen, you will find a three-dot menu. Click on it to go open Settings and then go to Preferences. Switch on the toggle for Save Data to Camera Roll. This will ensure that when you download an image from the photoshop camera, you will find the original and less compressed version of the picture.
Lens Library
you will find a variety of lenses for filters on the photoshop camera app, but you can still download more from the Lens Library by tapping on the circular icon on the top left corner of the screen. From the library, download your favorite filters and organize them like a playlist in the Manage Lenses section. Tap, hold, and drag the downloaded filters to organize them. Due to the automatic scene recognition, these filters will not prove much beneficial because the Photoshop camera app leaves minimal room for manual editing. Yet, again you will somehow find filters similar to any other app’s editing filters, and they will enhance the beauty of your pictures.
Composition Edit
You can edit the composition of your pictures using the pre-existing lenses created by the best photographers around the world. This will minimize your time consumption while editing an image. You can choose from the most vibrant lenses or to the minimalistic lenses based on your preferences.
Edit background
You can change or edit the background using different filters and backdrops. You can altogether remove the existing background of a picture and exchange it with any other interesting background from the app. You can play with the background easily using the multiple background editing tools this app offers.
Minimalistic Strategy
Using the minimalistic filters will help you play with pictures and editing. It will help you create realistic images. In the case of night photography, if you want to bring out a starry night effect, you can use the celestial lens to bring out the colors, ambiance, etc. A lot of users highly recommend the celestial lens for night photography.
Manuals edits
Although, there is little room for edits and manual tweaks, you can still use that little amount of features to give a personalized touch to your pictures. You can use the Photoshop Express app for editing. The editing option on the photos of the camera lets you add text or captions to your photographs. From the PsX tool, you can apply effects, themes, texts, and more.
Edit imported pictures
The in-built camera in the app lets you create the best pictures, but you can also import photos from your camera roll or gallery. Importing photographs from your lightroom library is also an available option, but only if you are a Creative Cloud subscriber. To import photos, click on the photo preview icon available on the right side of the shutter button. It will take you to the PsC studio where all your in-app snaps are saved. Besides that option, you will find the Camera Roll from where you can import pictures from your device. The magic wand will automatically edit and add a filter to your picture.
Create personalized lenses
Just how you use the creator’s lenses, you can create your own lenses only by applying to become a Featured Lens Creator.
Go to the All Lenses section by tapping on the icon given in the top left corner.
Then click on the Create a Lens option.
You will be directed to the Creator’s Program page from where you can begin the journey of creating and uploading your lens.
SOURCE:- 8 Tips To Help You Master Adobe Photoshop Camera
0 notes
Text
How to Edit Photos in the iPhone
Also, there is nothing worse than accidentally deleting a perfect shot by mistakenly touching the trash can icon instead of the delete button.
You should never delete a photo if you have selected the photo you want to retain or if you have selected another photo as an alternate in the photo album. You may use the camera button to edit another photo while viewing the first photo. You can then select the second photo and save it in a different location.
When you edit your photos, you may choose to use the live preview feature to preview what will be the final effect. There are many different lightroom mobile features available to preview different types of effects.

Lightroom mobile is also a great editing application that lets you change colors and blend photographs, head to gradientfilter.com. The best part about using this application is that you can preview how your final product will look before you actually send it to print.
It is important to make sure you download a copy of your photo before editing it. One way to do this is to take a digital photo, store it on your computer and then transfer it to your iPhone. If you edit the digital photo directly after it is taken, the digital photo will no longer be in the format you want Lightroom to open it in.
Another way to avoid problems with your final product is to convert the photo into a different photo formats. This allows you to preview how the final photo will look.
When you view a different format photo on your iPhone, there is a larger risk of losing information. In addition, there is a higher risk of your iPhone not reading the file correctly. Editing the photo before you convert it to the format you want your final product to be read on your iPhone can help you avoid these problems.
You should never upload your own pictures onto any service. Many sites use their own technology to create the most attractive files, and if you upload your photo to a site that doesn't support that format, it will be useless.
You should only click the copy button in the Edit Photo window when you are prompted to. If you click the copy button, you may lose important information such as flash or camera settings, custom white balance settings, and other options.
Sometimes, the preview on the preview of the last image in the gallery changes because it is being re-sized from the previous snapshot. If you do not change the size of the preview, the image may appear blurry.
Remember that the preview is usually not a direct representation of the final product. A good quality photo editor can help you edit your photo and give you a final look. If you need the ability to edit the file and do the final editing, you should turn to a professional photo editing application for your final product.
For best results, I recommend using photo editing software. I personally use Adobe Photoshop, but many other photo editing applications are available that will work well with your iPhone.
0 notes