#balena etcher
Explore tagged Tumblr posts
Visit Tumblr Blog
Explore Tumblr blogs with no restrictions, modern design and the best experience.
Last Seen Tumblr Blogs


Fun Fact
There were a total of 171.5 billion posts on Tumblr in 2019.
Text
KDE iso image writer my beloved
#linux#kde#i used to use balena etcher#which is good#but the simplicity of kde's writer is really nice
11 notes
·
View notes
Note
Please, please explain how to install and use linux like I'm 5 years old. I'm so sick of windows adding AI and other bullshit to my already struggling elderly laptop but I'm really not good with computers at all so I have no idea where to start with Linux.
Okay, so, I'm going to break this down into steps I would give the average tumblr user first, and then if any of them are confusing or use words you don't understand, ask me and I'll explain that step in greater detail.
Step 0) BACK. UP. YOUR. SHIT.
NEVER EVER EVER CHANGE YOUR OPERATING SYSTEM WITHOUT A COMPLETE BACKUP OF ALL YOUR FILES.
Step 1) Learn your machine. You need to know:
How much RAM you have
If your processor is 32 or 64 bit
How big your hard drive is
On windows, you can find out all of this by going to the start menu, typing "about" and opening the first result on your system instead of the internet.
For additional instructions, visit this page.
Step 2) Pick your Linux.
There's like 10,000 kinds of Linux, each tailored to particular functions that the end-user (that is you!) might want to have. The sheer amount is very daunting, so first I'm going to give my suggestions, then I'll explain how to pick for yourself.
For Mac users, I suggest Kubuntu. For windows users, I suggest Mint Cinnamon. If your laptop is really REALLY old, I recommend Sparky Stable, which is the lightest weight Linux I would ever suggest for a new user. In every case, download the version suited to your processor (32 bit can be labelled "x86" or "32 bit"; 64 bit is always labelled "64 bit").
If you want to try a different type of linux, you'll need to make sure your laptop meets the "minimum specs" or "system requirements." These numbers tell you how much RAM, processor and hard drive space the linux will use. (That's why you needed those numbers at the beginning.)
Step 3) Collect your supplies. You're going to need:
An ISO burning program compatible with your current system, like Balena Etcher.
A copy of the ISO file for the Linux you want to use.
Your laptop.
An 8gb or larger USB flash drive.
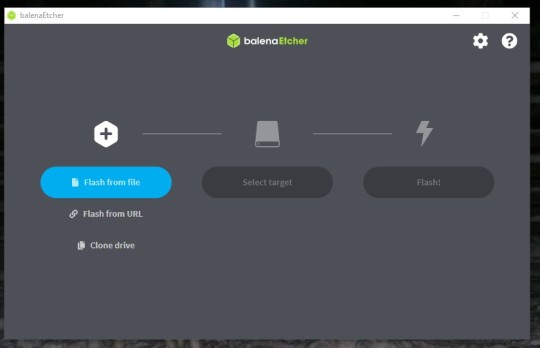
Step 3) Make a bootable USB drive
Install Balena Etcher, hitting "okay" and "next" when prompted. Last I checked, Etcher doesn't have adware attached, so you can just hit next every time.
Plug your USB drive into the laptop.
Open Etcher.
Click "flash from file" and open the ISO file with your Linux on it.
Click "Select target" and open the USB drive location. Hit the "flash" button. This will start writing all the linux installer data to your flash drive. Depending on the speed of your machine, this could take as long as 10 minutes, but shouldn't be much longer.
Step 4) Boot to the USB drive
This is, in my opinion, the trickiest step for a lot of people who don't do "computer stuff." Fortunately, in a rare act of good will, Windows 10 made this process a lot easier.
All you'll need to do is go to settings, then recovery, then advanced startup and pick the button labelled "use a device."
This tutorial has images showing where each of those is located. It's considered an "advanced setting" so you may get a spooky popup warning you that you could "harm your system by making changes" but we're not doing anything potentially harmful so you can ignore that if you get it.
Step 5) Try out linux on the flash drive first.
Linux installs using a cool little test version of itself that you can play around in. You won't be able to make changes or save settings, but you can explore a bit and see if the interface is to your liking. If it's hideous or hard to navigate, simply pick a new linux version to download, and repeat the "make a bootable USB" step for it.
Step 6) Actually install that sucker
This step varies from version to version, but the first part should be the same across the board: on the desktop, there should be a shortcut that says something like "install now." Double click it.
Follow the instructions your specific linux version gives you. When in doubt, pick the default, with one exception:
If it asks you to encrypt your drive say no. That's a more advanced feature that can really fuck your shit up down the road if you don't know how to handle it.
At some point you're going to get a scary looking warning that says 1 of 2 things. Either:
Install Linux alongside Windows, or
Format harddrive to delete all data
That first option will let you do what is called "dual booting." From then on, your computer will ask every time you turn it on whether you want Windows or Linux.
The second option will nuke Windows from orbit, leaving only linux behind.
The install process is slower the larger your chosen version is, but I've never seen it take more than half an hour. During that time, most linux versions will have a little slideshow of the features and layout of common settings that you can read or ignore as you prefer.
Step 7) Boot to your sexy new Linux device.
If you're dual booting, use the arrow keys and enter key to select your linux version from the new boot menu, called GRUB.
If you've only got linux, turn the computer on as normal and linux will boot up immediately.
Bonus Step: Copy Pasting some code
In your new start menu, look for an application called "terminal" or "terminal emulator." Open that up, and you will be presented with an intense looking (but actually very harmless) text command area.
Now, open up your web browser (firefox comes pre-installed on most!), and search the phrase "what to do after installing [linux version you picked]"
You're looking for a website called "It's FOSS." Here's a link to their page on Mint. This site has lots and lots of snippets of little text commands you can experiment with to learn how that functionality works!
Or, if you don't want to fuck with the terminal at all (fair enough!) then instead of "terminal" look for something called "software manager."
This is sort of like an app store for linux; you can install all kinds of programs directly from there without needing to go to the website of the program itself!
294 notes
·
View notes
Text
Switching my little sister's laptop from Ubuntu to fedora because it was just sooooo fucking janky and never worked properly.
My dumbass was too lazy to install balena etcher, so I just did "cp fedora.iso /dev/sda"
Big problem I didn't realise was that sda was actually the harddrive. On my laptop that's /dev/nvme0 and /dev/sda is always whatever usb I got.
Interestingly it now refuses to detect the harddrive as an install location, and I'm not sure it's because I fucked up big time or that it is detected as a fedora install medium and thus ignored
25 notes
·
View notes
Text
If you don’t like Windows 10, Windows 11, or other mainstream desktop operating systems for whatever reason, consider using linux. It isn’t as hard as you think.
I switched from Windows 10 to Linux Mint a few months ago, and it went pretty smoothly for me.
Linux has a reputation for being difficult to use, and while it is somewhat deserved, it is quite overblown.
For myself, I think the hardest part of switching was installing Linux on my device. It required me to learn some new software and took about 3 hours on my first try. After setting up my laptop, it was pretty easy. The user interface took a few days to adjust to, and I fiddled around with some settings to my preference, but it was not difficult to adjust from Windows 10 to Linux Mint.
And if you can get someone else to install linux for you, all you need to do it get used to some user interface changes!
INSTALLING LINUX ON YOUR COMPUTER
Here’s an installation guide for Linux Mint if you want more detail than what I give. Link: https://linuxmint-installation-guide.readthedocs.io/en/latest/
You will need: a laptop or desktop, a USB stick, and USB writing software.
Download a linux ISO file. An ISO file is all the data used to install an operating system onto a computer.
Then you will need to download a USB writing program. Then you can use USB writing software to put the ISO file onto a USB drive. This will create the “bootable media” which will be used to install linux onto your computer. For installing Linux Mint on my device, I used Balena Etcher to write the ISO file.

64 notes
·
View notes
Text
HOW TO BACK UP YOUR SHIT ON A FUBAR PC
So, I have a lil linux know how. Someone I know's Windows Boot SSD died on em. I helped unfuck it, but it still got me thinkin. "Do people know how to back up stuff after their PC commits seppuku?"
So What you'll need is:
-A friend's PC to create the usb tool -A USB drive (preferably USB 3.0) with 16 GB or more of storage -An external hard drive to store the backup image -An internet connection.
FIRST
Borrow your friend's pc or laptop.
Download balena-etcher or Rufus
Download a copy of ubuntu linux. Get a coffee, eat a sandwich. This'll take a while.
Once it's done, use Etcher or Rufus to install Ubuntu on the flash drive. Eject the usb, thank your friend, and go back to your malfunctioning compy and plug the usb in.
NOTE: THIS PRESUMES THAT THERE IS A SOFTWARE ERROR PREVENTING YOUR MACHINE FROM BOOTING. IF THE HARDWARE ITSELF IS BROKEN, THIS WONT WORK.
Ok, you're going to boot your PC into BIOS. How? Depends on who made the computer. Google "How to open bios on a [Blank] pc", and you should be able to find the answer pretty quick. Its usually by either spamming the delete key or f10 while your computer turns on.
Once you're in the BIOS, there should be a menu with boot options. Select the usb. It will boot your computer into ubuntu linux, running off that lil usb stick. Neat, huh? You'll get the option to try or install ubuntu as an operating system. You want to click "try".
Plug in the external drive you're putting the backup image of your drive on.
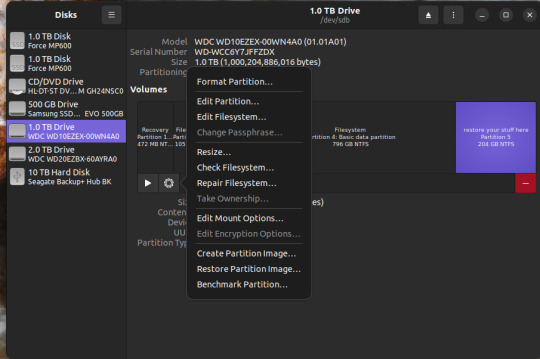
Hit the windows key and it should pull up a search bar. type "Disks" or "Gparted". it's the same program either way so, open it.
You should see something like this.
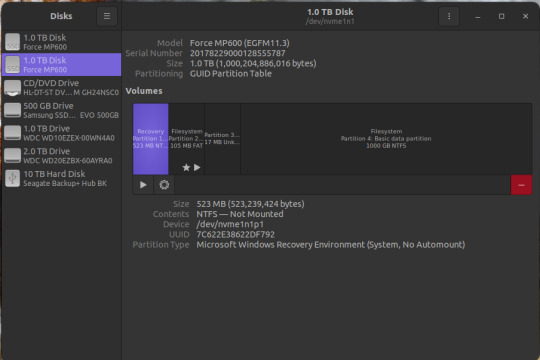
Depending on the size of your Boot SSD in windows, you may need to shrink the partition a bit. like If you have a 500gb drive handy, but the drive you need to back up is 1TB. So click on the bit that says "basic data partition"
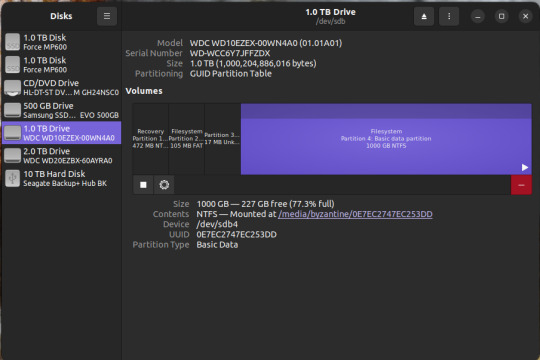
click the gear icon
Click "Resize..."
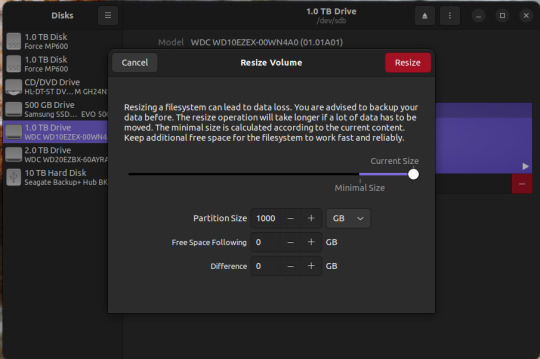
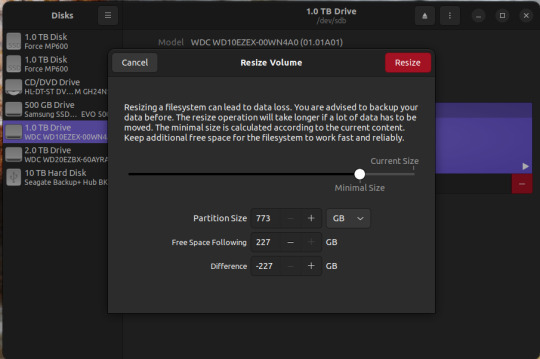
Resize. if the external drive you're backing up to is BIGGER than the boot drive you're trying to back up, you can skip this.
Now there's two things you can do. The first is to simply create an image of the basic data partition where all your files are. The second is to back up the whole disk.
To back up the partition,
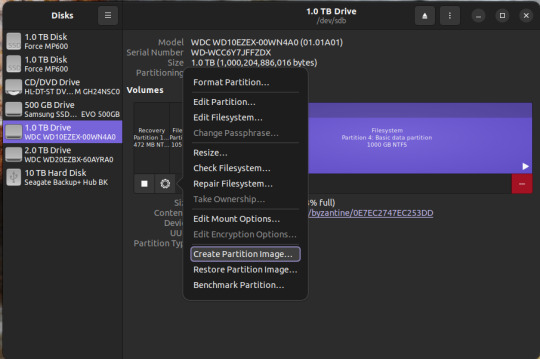
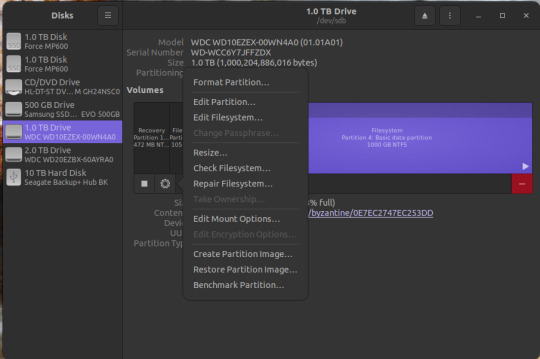
Select the basic data partition, click the gear icon, and select "create partition image"
Name it whatever you want, save it on the external drive. Go get another coffee and a sandwich, this may take awhile as well.
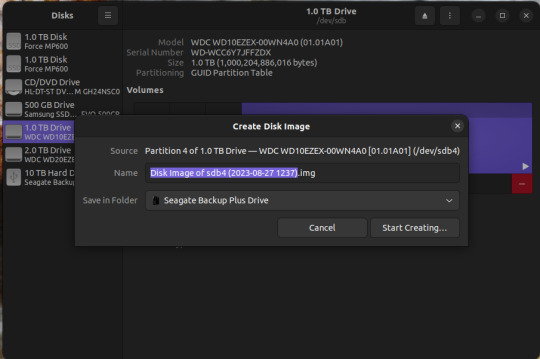
To make a backup of the whole disk, click on the three vertical dots in the upper right corner, and select "create disk image"
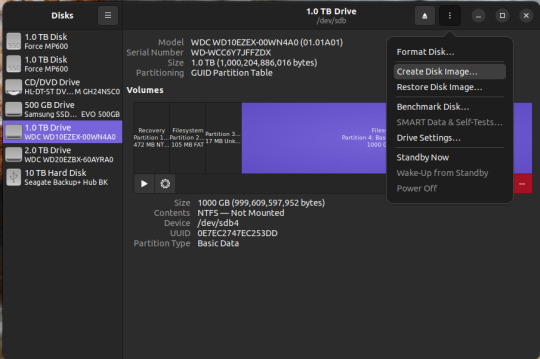
Same as before. name it what you want, save it to the external drive.
There you go.
To access the data, you need to restore that image to a new SSD or hard drive. You can do this using the same program. I recommend doing this AFTER you've done whatever was needed to fix windows.
if you're just restoring a partition image, not the whole disk, here's what you do.
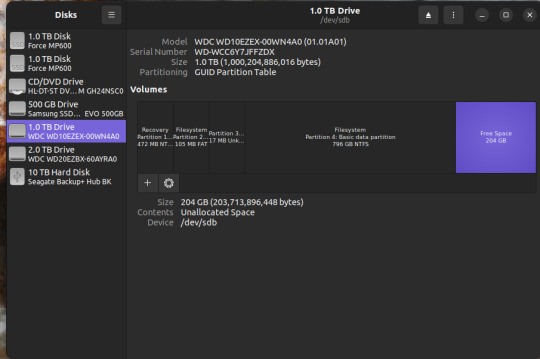
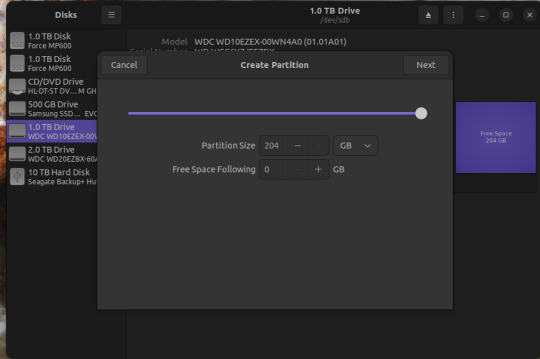
If you have FREE SPACE on a drive, or new drive, you can click on the "+" button, create a new empty partition
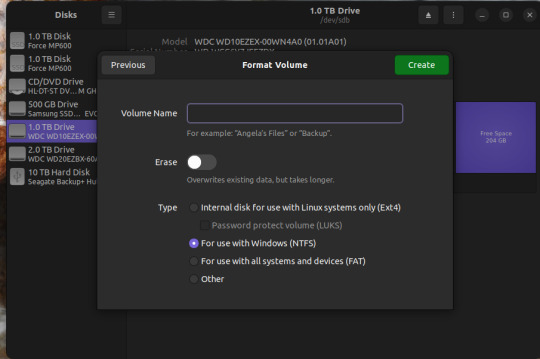
and click "restore partition image" to make it readable. Then you can mount it as a new drive in windows and copy your stuff over. WARNING: THE PARTITION YOU'RE RESTORING TO MUST BE AS BIG OR BIGGER THAN THE PARTITION IMAGE
For a disk image, similar steps.

Three vertical dots on the upper right, select "restore disk image".
Select the full disk image from wherever you saved it and restore.
WARNING: Restoring a disk image will nuke anything already on the drive you're restoring it TO. So don't restore the disk image to your fixed boot drive, or to the drive you saved the disk image on.
Anywhomst. I hope this helps someone save their stuff or avoid being charged out the nose by a computer repair shop.
15 notes
·
View notes
Text
Computers
Before everything else: I know this isn't the type of stuff I usually post, but here we go:
I recently switched my computer from Windows to Linux.
And must say, I much prefer Linux. It runs much better on slower computers. If you have a machine that's not running so well on Windows, you might consider trying Linux. For example, my computer kept freezing the whole time I was using it with Windows, but as soon as I switched to Linux that stopped happening.
In case you're curious as to how to do this, I'll try my best to explain.
WARNING: This process will delete EVERYTHING on your computer! Make sure to save any important files on a separate USB stick (not the one you'll use in this process)
So the first thing you will want to do is to download your preferred version of Linux. I took Ubuntu, it's probably one of the best-known ones. I just googled "Ubuntu OS download" and went from there.
Then you need to flash the OS onto a USB stick. There are several programs you can use to do this, Balena Etcher is very user-friendly but I was having some problems with it. Rufus would be another option but it's less user-friendly. You can google around and see what program you want to use. (There's also online guides on how to flash Linux onto a USB stick if you need help.)
Next comes the (sorta?) tricky part. (Make sure all your files are saved to a separate USB stick before you continue!!!) Plug the USB stick with Linux into your computer. Restart your computer, and while it's restarting, spam the function keys on your keyboard (the F1-F12) to get into the BIOS. Unfortunately I don't know exactly which one does the trick, if it doesn't work, try again until you get it.
Now you should see a list of options to boot your computer, and your USB stick should be one of them. Select it in the list. (At lest with Ubuntu) It prompted me to select an operating system or something like that, you don't have to worry about that, just select the first one in the list ("*Ubuntu" in my case).
Now your computer is running on Linux! You can now go ahead and download Linux onto our hard drive, the computer will immediately present this option to you.
Once it's done downloading, you now have a Linux computer!
All you need to do now is grab your USB stick with your files on it, plug it into your computer and you're good to go!
I'm sure there are more detailed guides on the internet, I guess I just wanted to put this out there in case anyone is curious.
11 notes
·
View notes
Text
Just learned that my (now formerly) favorite disk imager, balenaEtcher, contains intentional Spyware that reports user activity to various analytics groups (including google analytics) without the user’s knowledge or consent.
Thank Torvalds for the Arch Wiki and the contributors there who included a warning about it, but goddammit now I have to find a new disk imager.
2 notes
·
View notes
Text
Perfect time to switch to linux!
If you've thought about it but don't know which one to try, i would suggest linux Mint (i recommend the latest LTS version). You can download the ISO for free and use an image writer like Balena Etcher to write it to a blank flash drive. Then you can simply boot to the flash drive and try it out without even installing it. If you don't like it, you don't have to commit!
Literal definition of spyware:
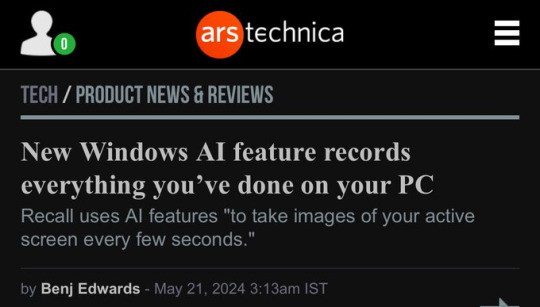
Also From Microsoft’s own FAQ: "Note that Recall does not perform content moderation. It will not hide information such as passwords or financial account numbers. 🤡

226K notes
·
View notes
Note
You are the mutual I know who uses linux, and I have a half-broken dinosaur of a laptop I want to see if linux would make usable again.
Its 8+ years old, cannot connect to the internet for a reason that may be software related or might not(its a mystery), and has other various issues.
My use of it would Primarily be as a on-the-go text & html editor and if I can get the internet running on it then also firefox as well. Maybe some offline emulation of some older games or a simple linux supported drawing program but that isnt essential.
The question is Thus: If I download a linux mint installer and copy to a flashdrive(presuming you can download the file without it starting to set up the OS instantly), is that all thats necessary to upload linux mint onto a laptop that has no internet capabilities?
Also which version of linux mint should I use? I see there are several. This laptop 3 years ago ran windows 10 ok enough to boot up chrome and use the internet, but now it takes like 15 mins to finish loading enough that you can open programs, as a metric.
Thanks and hope you have a nice day!
Yes, most linux distros will run on a machine that age, and with a surprising degree of vitality. Game emulation should work just fine, unless the computer was very low power even for 2015.
On a mech that old, I'd suggest just checking if the tiny wire for the wifi card has popped loose over time. They are snap-on wire heads that don't lock, so especially with laptops, disconnections like that happen.
Your wifi card should look a lot like this:

I've circled the two tiny ports, and drawn arrows to identify which cables. The whole wifi card will be about an inch across, and is the ONLY thing that uses those kind of wires, so it's very identifiable.
Linux mint is designed to install offline, and includes a wide variety of open source and generic drivers for just.... so much hardware. When you begin installation, it will ask you if you want to use, "third party, private and proprietary drivers." If you say yes, it will want an internet connection to download those drivers. If you say no, it will install entirely offline without issue.
As for which version: the only difference is the visuals. I, personally, like XFCE because it has very minimal visual noise. Everything is simple rectangles with sharp corners and clear boundaries. This lack of visual flair also means it uses the least resources to run the OS, leaving more hardware power available for actual tasks. However, it's a very intimidating desktop. If you liked Windows XP but haven't enjoyed much since, grab XFCE.
If you are a Mac/apple user, I actually recommend Kubuntu instead of Mint, because it has the most similar interface visually and will cause the least transition pains. Kubuntu has equally if not even more robust hardware support to Mint, as both of them are built on top of the Ubuntu framework.
For everyone else, I suggest starting with Mint Cinnamon. I have actually, with no reservations, had way better results teaching confused retirees to run Cinnamon than Windows or Mac. It's a very user friendly interface.
The start bar search, for example, literally just shows results for files/programs installed to your computer, none of this bs about integrated web searching.
As for installation tools:
You must burn the ISO file to the flashdrive as a bootable disk, rather than simply copying the file to it. I'm sure you know that; it's the same for installing windows. But! People often forget that detail and wonder why their computer keeps booting to windows instead of the installation media.
I personally use LiLiUSB because I'm stuck mentally in the year 2014 which is when it stopped updating. For a more sane approach, try Balena Etcher. Or whatever bootable drive software you like; it doesn't really matter. You just need to make the drive bootable before installation.
47 notes
·
View notes
Text
Tech - FAQ 2
I'm scared of PCs; I'm just an end-user! I want to learn, though!
If you're curious and want a safe and zero-consequence environment to poke around with, consider turning to tools like VirtualBox. This is what we call a VM Manager or a Virtual Machine manager that enables you to emulate computer hardware on, well, actual hardware. It's a great way to create a Windows install you can poke around without damaging your own system, or of trying out other operating systems to familiarize yourself with them.
In fact, I'll always recommend that anyone who's sitting on the fence in regards to Linux try out a distro in a VM, first. There's no pressure involved, you get the same feel as a bare-metal install, and can rest easy in knowing that if none of this works out for you, you can just mash Delete on your VM folder, delete VirtualBox and forget this ever happened.
What tools do you recommend?
I can point you to several. First comes not so much a software tool as a piece of hardware most of us have, which is a USB drive. If you want to store diagnostics tools on it as well as a few OS image files, I'd advise investing in a nice and chonky one, going above 16 GBs in size. See Amazon for help, or any computer or hardware store you can think of. If you go Amazon's route, avoid no-name vendors and buy directly from reputed hardware manufacturers, like Lexar, Seagate or others. They'll be more expensive, yes, but you won't get scammed.
Then comes Balena Etcher and Rufus. Both do the same thing, which is burn an ISO image file to a USB stick, so said stick becomes a bootable drive containing everything you need to install an OS to your main drive. Etcher is more straightforward, while Rufus offers a few customization options, especially if you're trying to burn or flash a Windows image file.
What about Ventoy?
Ventoy is the Big Kahuna in bootable ISO file management, but it's a bit too involved for first-timers. Effectively, it turns your USB thumb drive into its own multiboot system, complete with a GRUB file that allows your PC to boot off it, while letting you choose which operating system you actually want to start. So instead of having one stick for your tools, one for a Windows install and one for a Linux distro, you'd have everything in one place. I'd recommend familiarizing yourself with simpler tools, first.
I don't want to switch to Linux, but I want more ownership of my Windows install. What can I do?
You can refer to tools like NTLite but again, that one is a lot for first-timers. In the interim, I'd recommend starting with a vanilla Windows 11 install and then referring to Chris Titus' Ultimate Windows Tool, to tweak and debloat your OS to your heart's content. Of particular note is the included MicroWin tool, which can strip down a normal Windows 11 ISO and create an unattended, offline install that boots directly into your User account. No giving Microsoft further credentials, no connection required - nothing. Several of the tweaks involved result in a Windows install that phones home a lot less often and that only concerns itself with proved, tested and necessary Windows Update cycles.
What's an Unattended install?
That refers to a software install that requires no input from the user. You start it, off it goes - and the reins of the PC are handed over to you only once the whole process is completed. No more screwing-about with Microsoft Game Pass offers or trying to say no to Microsoft's thirty thousand instances of telemetry. One click, and you're off to the races.
I tried it, and noticed it didn't remove everything from the base install. I still want to remove more stuff.
Then check out Bulk Crap Uninstaller, which allows you to force the removal of components Windows considers as vital, but that aren't, necessarily. If BCI's interface underlines something in green, it's safe to remove. If it's listed in red, you can still remove it. At your own risk. Some things are provably safe to remove, like the Xbox Game Bar if you've never used the Windows Store to buy a game before. Others shouldn't be touched if you know what's good for you, like Windows Explorer...
I've heard bad things about VirtualBox. What else can you recommend?
Microsoft supplies its own Hyper-V virtualization platform as part of Windows' basic tools, although it's not installed by default and is typically a bit more finicky to handle. Please note, Hyper-V isn't included in Windows Home Edition. You may have to upgrade, or go with a software-based solution like VirtualBox. Check your BIOS; your motherboard needs to support virtualization tech, too.
To get it, search for Turn Windows features on or off in the Start Menu's Search bar and tick the box next to Hyper-V. It'll tell you to prep for a reboot, let it do its thing. Once you've rebooted, you'll be able to search for Hyper-V in the Start menu. Follow the first-time tutorial that pops up to get a sense of the process - which requires you to have an ISO on hand.
What's a BIOS?
The Basic Input-Output System, or BIOS, is what initially controls your PC, before handing off most important aspects of it to your actual operating system. The BIOS performs hardware checks, allows you to define boot priority and can allow you to enable more advanced aspects of your motherboard of choice.
So, I figured out this Virtualization thing. What OS do I try out now?
The obvious first answer is Windows. Running Windows within another instance of Windows has the merit of giving you the most compact and secure home lab you could possibly want. You can try out the stupid shit I mentioned in the previous post - such as deleting System32 - in full confidence that you won't torch your actual rig. You can also test out debloaters, aesthetic patches, anything you'd want - with no fear of leaving scars on your actual system.
What about Linux?
Start with Linux Mint. It'll get you everything you need - just don't forget to install its hardware codecs, when it asks you. Get used to the Terminal - and do that in the knowledge that you're just barely touching the surface of the tech that runs most of the Web. Even Microsoft itself runs its business partly on Mint's parent distro, Ubuntu.
When you're ready, check out Arco Linux as a transition point between Mint and Arch Linux. Get used to its own package manager and syntax, while keeping the benefits of an out-of-box GUI experience.
At the end of your journey, hopefully a few years down the line, try out Arch Linux proper. Stick to VM installs, and get used to the command line-based install process. It isn't that complicated, but the absence of anything graphical and the need to grasp certain commands from the get-go can be daunting for some. Be aware that even if your Arch install boots and reaches a desktop, you'll have to provide literally everything else - or at least point it to the right resources. Expect some Terminal editing, a good long while spent poring through config files - and the fact that Arch pays for its modularity with stability. One errant package update can break anything and everything - and that's a small price to pay in the face of total user control - at least, according to some diehards.
So, when do I get to Mister Robot shit?
That's after years of work and several certifications. You can check your local Community College for courses, or just learn as you go online, provided you do sit down to take the CompTIA certifications, eventually. Fair warning - they're gruelling. Comparatively, Microsoft's own database of certs is easier to work through, but are more specific to Windows itself, as you'd expect. Outright hackers, however, tend not to make gains strictly using legitimate training platforms. Hacker or not, your best tool for learning is going to be a home lab.
What's a home lab?
Just your eternally willing victim, to be simplistic. It's a PC you set up as an attack target, or a PC you use as a test bench for new hardware, new tools or distros. Before any stress test I submit to the business' infrastructure, I always test my scripts and practice myself on hardware set aside specifically for that. You don't need anything expensive; mine is still just a refurbished Dell OptiPlex mid-tower PC bought used on eBay. It's currently connected to the office's netwok via VPN so I can attack it realistically. It's packed with dummy files and is designed to sort of feel like the workstation of a modestly-careful member of our Accounting team, and my colleagues in the IT department are instructed to treat any non-standard access to it as seriously as any other potential breach.
It's actually fairly simple: if I can hack into it and copy or steal something, then someone else can. If someone else can, then our entire infrastructure is at risk. This is why even though I work from home, there's days where audits need to happen, and I need to ensure that everyone who's onboard with us has decent security practices. That means going to our small office, going over logs manually and making sure nobody's been using workarounds or unsecure software.
Which tools can I expect to use?
Mostly Kali Linux' set of tools, just packaged into something a little less meme-worthy - like Parrot Security. Metasploit is eventually going to be your bread-and-butter, as once properly configured, it's a one-stop shop for pen-testing everything from computers to smartphones of both the Apple and Android persuasions.
I've done research and people keep telling me not to do bare-metal installs of Kali or Parrot. Why is that?
Because a hacker, ethical or otherwise, leaves no trace. You haven't finished pen-testing something until you've managed to exfil without being fingered as an unexpected connection. You're not there to leave calling cards; that's distinctly unprofessional. If you do choose to leave one, then it means you're after something - usually money, or the approval of some sponsor body or State. And that, well, defeats the purpose of being a hacker. Curiosity should be its own reward. Considering, working off of a dedicated "hacking rig" is the stupidest and easiest way for your pen-testing efforts to lose all relevancy - or for your sponsored hacks to be easily traceable.
Keep a mainline OS that handles Normie stuff - word-processing, normal Sysadmin tasks, writing emails, gaming after hours - and then use a USB stick to create a bootable drive image that contains everything you need for the rest.
Have you hacked anything before?
Only approved company resources - including keypads, IR receivers on TVs mounted in the Old Place's conference room - everything I could conceivably reach within the limits of my mandate. Now, with Walt and Sarah, I maintain the same ethical constraints. If I'm not asked to test something, I don't touch it.
But have you ever... hacked anything?
Illegally? No. I'm a staunch White Hat - with a few tinges of gray here and there. I've trolled particularly noxious Sales Reps using script-based UI barks in Windows, but I wouldn't go further.
1 note
·
View note
Text
Hi, you summoned me, the big gorgeous linux fairy, and this is the Jack Joy's Guide to Linux. This is going to be a long read, so be prepared.
Chapter 0: What do we want? The first thing I would recommend is asking what you want from linux. Linux is open source, has 30 years of dedicated nerds working on it, and is driven by giving people choice and control over their computer. You got options, but with that decisions to make. Is it simplicity? Is it Stability? Do we wanna game, or is this basically just a fancy browser machine with some word processors attached? It all depends on knowin what you want, because there is going to be something that will cater to your needs. Chapter 0.5: Making the tough call The second thing to know about linux is that you are going to be giving up some stuff to gain a LOT of control over your computer. Linux has done a wonderful job getting easier about what it offers, but ultimately you are going to run into some jank. You are going to have to be prepared to touch the scary obelisk that is the terminal. And you are going to have to say goodbye to some programs that just don't work on linux. If you use Adobe Products you are SOOL for example. There are replacements, but you will inevitably end up having to learn something new. Personally, I found the task to be refreshing to get myself acquainted with stuff, but that isn't what everyone wants. Hopefully this is not a dealbreaker.
Chapter 1: Go Oynon, I need to collect my tools.
To Install Linux, you are going to need a few things, and before you begin to just follow this guide as you are doing it, read this entire chapter as there are going to be some things that are gonna be important to know before you get into things.
A flash drive (preferably just a big USB stick, messing around with USB to SD card readers got me a fucked install of mint once)
Balena Etcher
Your preferred Flavor of linux
Some knowledge on the bios of your machine
And preferably a secondary boot device in your machine (IE a second SSD)
First grab the ISO file of the OS you want to install on your PC, which maybe you have already had a potential distro of linux in mind. If not, let me recommend some potential good candidates for someone first messing around with linux.
Side Tangent 1.1: Jack Joy's Pixie Picks for easy Linux Distros
Linux Mint is the gold standard for stupid simple linux distro. It just works*, it comes with a DE(desktop Enviroment) that is reminiscent of windows 7 so adjustment should be minimal and overall, is very uncomplicated. Is a bit bland tho. *(things still break sometimes)
Ubuntu meanwhile you probably already heard of. Think of it as the MacOS of Linux. It has the most company support, it's DE called GNOME is very MacOS like in it's design language, incredibly stable, but also very poor in customization. If something says tested on linux, a lot of the time, it means tested on Ubuntu.
EndeavourOS is my linux distribution of choice. It's based off of Arch Linux, which is what powers the Steamdeck with SteamOS, and as such has a lot of nifty Arch linux niceties, like the Arch User Repository, and KDE Plasma as it's DE. It tries to combine being user friendly while letting you tinker with everything, it is on the cutting edge of linux, but that also means that stuff CAN break more often.
With this side tangent over, install balena etcher and flash your ISO on your USB stick.
Reboot your PC, and as it boots enter into your BIOS. Most systems use the F12 function key, but it might also be any of the other F keys because no one can agree on anything in the fucking tech space. From the BIOS your going to want to look into your boot order and if your USB stick is available, pull it up in the order. If it isn't there, your gonna have to wrestle with your BIOS as there might be some secure boot shenanigans going on. BIOS' vary so much that you'll have to look into your system in particular (which could be a good time to learn more about your PC in general).
Once done, exit out of the BIOS and things should hopefully be happening. Depending on the Linux Distro you used this might look more or less scary, but if it looks like it is doing some WEIRD SHIT instead of booting windows, it's going good. At some point you'll enter a "live enviroment" of your OS (a version of the OS that exists entirely from the USB that will be gone once you reboot) and an installer will be on the desktop or have popped up automatically (at least, for all three of the beginner friendly Distro's I recommended. Please don't try to install raw Arch Linux on your first Linux Install.)
Once the installer gets to formatting drives is where we have to do a hard pause, because formatting drives is SCARY and DANGEROUS if you aren't doing it to an extra drive that has nothing in it. In general it is always scary and dangerous. The installer is going to give you a bunch of options on where it wants to be put, and what it is going to do to the drive where it makes itself at home. If you are putting this on an extra SSD, tell it to do what it wants with that extra SSD and bob is your uncle. If you are putting this on the same drive as your windows install, you are going to have to be real careful and tell it to make a partition, give it however much space you can give it, and voila. Or, if you just want to ensure you never go to windows ever again, nuke the entire drive, in which case you might want to invest in another USB drive to keep a clean copy of a non shit windows OS. Think of that USB drive as an "In case of emergency, Break glass" type safety precaution.
The Installer will finish, either asking you to reboot the PC or doing so by itself, and once it is done it will now do the standard linux boot sequence. Congratulations. You have transitioned your PC from widows to whatever flavor of Linux picked your fancy. From here on out, what you do with your PC is up to you and you alone. Fuck around. Look at all the software that came with your linux install, especially the actual software store where you can get even more stuff.
Hope this guide helped.
im sure someone already made a post about it but i came across a ublock origin add-on that blacklists around 950 AI websites and disables AI overview ☝️ so u can be free from seeing AI in your search
#linux#linuxposting#I am sorry this is such a long guide#i wanted to make it shorter but it always felt like i forgot something that might be messed up by someone#i wanted to be as thourough as possible
58K notes
·
View notes
Video
youtube
Installing AlmaLinux on the Raspberry Pi 5 #raspberrypi5 #AlmaLinux
#RaspberryPi5 #AlmaLinux #LinuxTutorial #RaspberryPiProjects #TechGuide #ITSamuraiTeacher #StepByStepGuide #LinuxOnRaspberryPi #DIYTech #opensource Welcome to IT Samurai Teacher! In this video, we're diving into an exciting tutorial on Installing AlmaLinux on the Raspberry Pi 5. Follow our detailed, step-by-step guide to set up AlmaLinux, a robust and reliable operating system, on your Raspberry Pi 5. 🔹 What You'll Learn: How to prepare your Raspberry Pi 5 for installation. Step-by-step instructions to download and install AlmaLinux. Tips and tricks for configuring AlmaLinux on your Raspberry Pi 5. Troubleshooting common issues during the installation process. 🔹 Why AlmaLinux? AlmaLinux offers a stable and secure platform, perfect for developers, tech enthusiasts, and anyone looking to explore Linux on the Raspberry Pi 5. Whether you're new to Linux or an experienced user, this tutorial will guide you through the process with ease. 🔹 Tools & Resources: Raspberry Pi 5 MicroSD Card AlmaLinux ISO Balena Etcher (for creating a bootable SD card) Useful Links: Download AlmaLinux : https://almalinux.org/ Balena Etcher : https://etcher.balena.io/ Don't forget to like, comment, and subscribe for more tutorials on Raspberry Pi projects, Linux installations, and tech guides. Hit the bell icon to stay updated with our latest videos! / itsamuraiteacher
0 notes
Photo

How to Fix Balena Etcher Not Working on Ubuntu 22.04 👉 Read the article: https://bonguides.com/how-to-fix-balena-etcher-not-working-on-ubuntu-22-04/?feed_id=235&_unique_id=66475ca0e17bd
0 notes
Text
Balena Etcher being made with electron is TRULY fucking inane.
1 note
·
View note
Text
Apologies for necro-posting, but I looked through the notes and while people have given you some pros and cons, no one actually walked you through getting it up and running, and I might as well give my best shot at helping someone evacuate from windows 11, so here is the Jack Joy's Explanation and Guide to Linux. Chapter 0: The Pitch for the Penguin.
Linux is all about freedom. While Windows and MacOS are Walled Gardens that are slowly stripping away control from their users and extracting more and more from you, the person who is using a non-linux OS, Linux does not do that shit. Free and Open Source Software is the name of the game in Linux, as that is what is mostly being developed in that space by an army of volunteers passionate about keeping the PC personal. That comes with some caveats though. A lot of the software you use is proprietary, and while some of that is still available on Linux, most of it is not. Some you'll expect. Some you wouldn't think is even proprietary and will surprise you when you lose access to it. The Linux community has done it's best to provide solutions for a lot of these, and you will find that a lot of what you want to use has some alternative in linux, but some things will just be fucked. You trade convenience for control.
Chapter 0.5: When you are a King very few choices are simple
If the Pitch convinced you, then congrats, you now have one of the hardest decisions to make as a Linux User. What Distribution of Linux are we using? Distributions (or Distro's for short) are all different OS' who run on the Linux Kernel, the thing that gives your machine thought and makes it possible to run the hit video game Team Fortress 2 (2007). There are a lot of distributions of linux, all of which do weird things with it, but my personal Picks are as follows.
Linux Mint
Linux Mint is the gold standard for stupid simple linux distro. It just works*, it comes with a DE(desktop Enviroment) that is reminiscent of windows 7 so adjustment should be minimal and overall, is very uncomplicated. Is a bit bland tho. *(things still break sometimes).
Ubuntu
Ubuntu meanwhile you probably already heard of. Think of it as the MacOS of Linux. It has the most company support, it's DE called GNOME is very MacOS like in it's design language, incredibly stable, but also very poor in customization. If something says tested on linux, a lot of the time, it means tested on Ubuntu.
EndeavourOS
EndeavourOS is my linux distribution of choice. It's based off of Arch Linux, which is what powers the Steamdeck with SteamOS, and as such has a lot of nifty Arch linux niceties, like the Arch User Repository, and KDE Plasma as it's DE. It tries to combine being user friendly while letting you tinker with everything, it is on the cutting edge of linux, but that also means that stuff CAN break more often.
These are just my picks. Some other notable beginner friendly Linux Distros that might pique your interest could be Pop_Os, Manjaro, Elementary OS and probably a bunch of others that I forgot or don't even know exist until someone will complain at me for forgetting after writing this guide. Choice my friend. You have a lot of it, and so think about what you want from your PC and go with the distro that seems to be best suited for your usecase, whether it be as a game machine or to just use firefox and libreoffice.
Chapter 1: Performing OS Replacement Therapy on your PC
So, you know what Linux Distro you are gonna use, you know you are ready to do this, so how are we doing this? Pretty simple in all honesty. We only need:
A Flash drive (USB preferred, SD or micro SD card readers can get FUNKY)
Balena Etcher
The ISO of the flavor of Linux you want to use
Some knowledge of how to navigate your computers BIOS
And preferably a secondary boot device (IE, a second SSD in your PC)
Plug your USB into your PC, and with Balena Etcher flash your ISO onto it. If you got another USB to spare, it is a good idea to flash an image of Windows 7 onto it. Think of that second USB stick as a "In Case of Emergency, Break Glass" type of safety precaution. We don't wanna have to use it, but it's good to have just in case. Reboot your PC with your Linux flashed USB stick in, and get into your BIOS. There you are going to pull that USB stick up the boot loader until it goes before windows. If that is somehow not an option, you might have to fuck around with your PC as there might be some secure boot shennanigans going on. Consult DuckDuckGo about your specific Computer, someone already figured it out if there is a hiccup. If you were able to pull up your USB up the boot order, exit the BIOS and hopefully things should be happening. To confirm look at the screen and if it does something new (and potentially scary looking) instead of the normal windows boot sequence, it is probably doing good. After a while you should be spat back out into a "Live Enviroment" version of your OS. This version of the OS exists only for this boot, and is pulled from your USB stick. There should be an installer inside of that live enviroment version of your OS, after which it is mostly smooth sailing. Follow the Installer, but pay REAL GOOD ATTENTION to what it is sayin when it asks you where it wants to be installed, as it will create a partition somewhere on your PC. If you have a PC with an SSD that isn't being used by windows, I recommend giving it that as you'll just be able to give that entire drive to Linux without problem. If you don't have an extra SSD, you will have to cleave a chunk from the one drive you have from windows. You can just give it 50% of the drive if you want to be conservative and still retain the ability to go back to windows. But should you feel particularly pissed/want to make sure you have no escape back to windows without having to reinstall it via that second USB stick, then torch the damn thing. Once the Installer is done it will either ask you to reboot your PC or just do it itself. After which point if everything went right, you will complete your first boot of Linux and end up in the actual version of the OS you installed. If you made it there, congratulations, and welcome to Linux. You might want to update the first time you boot, but after that, feel free to poke around to see what you have installed. Get Acquainted with your new Desktop, use some of the artisanal software that is FOS, if you are feeling spicey, run some commands in the terminal (as long as you know what they do. please do not run sudo rm -rf / because you saw it on a funny linux meme, that will uninstall your entire OS.) I hope this Guide has been helpful ^w^.
Hey. Gonna gamble here. Can someone explain to me the pros and cons of Linux as a whole and tell me maybe -possibly- how one might go about getting something set up
463 notes
·
View notes